This stock has comfortable dual-raised cheekpieces on both the left and right sides of the gun.
Raised cheek pieces are designed to provide you with firm control during the shot cycle.
Moreover, this pellet gun has a rubber buttpad that helps reduce recoil.
Also, it has a textured grip and forearm that adds friction to your hands when shooting, prevents slippage from the shooter’s sweat, and increases stability in aiming.
Ammo
The Benjamin Varmint .22 Powerpack uses .22 pellets as its only source of ammunition.
This gun doesn’t have a traditional iron sight: no front sight, no rear sight.
But this gun does come with 3-9×32 scop.
As if the variable scope is not enough for a successful shooting day, Crosman has installed a lot of optics including a Red Class III fast acquisition laser
With a push on/off or remote tape switch, 90-lumen flashlight, and mounts (the flashlight has a red flip-up filter).
This optic combo lets you hunt anytime, anywhere, from day to night with great visibility.
You have more mounting options and you can swap the scope from one gun to another and use the different scope in one air rifle as well.
And yes, no more worrying about tube length, eye relief, etc since you can place the scope ring at any point you want.
Shooting Ability
The effective shooting range of this gun is up to 70 yards.
You can use it for plinking, target shooting, small game hunting, and pest control.
Specifications
Caliber: 0.22”
Velocity: 950 FPS with alloy
Loudness: 3- Medium
Overall Length: 44.5”
Shot Capacity: 1
Barrel: Rifled
Front Sight: None
Rear Sight: None
Scopeable: Weaver mounts
Trigger: Two-stage adjustable
Buttplate: Rubber
Suggested for : target shooting/small game hunting/ pest control
Action: Break barrel
Safety: Manual
Powerplant: Gas-piston
Function: Single-shot
Body Type: Rifle
Weight: 7.38 lbs
Optics: Scope, Class III laser, 90-lumen flashlight and mounts.
Price
The Crosman Varmint .22 Powerpack is 180 dollars.
It’s a reasonable price in my opinion when you consider the great build, quality craftsmanship, modern technology, fantastic power and pinpoint accuracy .
Learn to identify the differences between a prairie chicken and a sharp-tailed grouse.
A trio of hunters spaced out over forty yards from each other with two pointing dogs covering the large expansive prairie walked towards the horizon. The dogs were quartering back and forth as they crested an upland slope searching for scent. Suddenly the dogs began to act “birdy.” As if someone hit the pause button on the TV remote, the dogs froze in mid-stride. The hunters approached with anticipation. Shotguns were transitioned into the ready position. Grips tightened.
Suddenly, a covey of football sized and shaped birds exploded from the swaying grass. The half-dozen birds rose into the air with a series of rapid wingbeats. Underbellies appeared to be lighter in color along with unique tail appearances. These were not hen pheasants, though similar in coloration. These were prairie grouse. A volley of shots rang out from each of the three hunters. A pair of birds dropped from the blue sky.
As birds were being retrieved, a late flush thirty yards away startled the hunters. More shots rang out, breaking the silence again across the landscape. One more bird returned to the ground from where it flushed. Birds were brought to their masters. With birds in hand, it was quickly discovered that two different types of prairie fowl had been taken on the wing-a duo of prairie chickens and a sharp-tailed grouse. The two species shared several similar characteristics, from the habitat the birds were being hunted in, to the way they flushed, and even their shared physical appearances. Both birds were indeed upland cousins.
On the left a prairie chicken on the right a sharp-tailed grouse. Photo by @uplandflush AKA Frank Loncarich and Kyle Hedges.
Greater prairie chickens (chickens) and sharp-tailed grouse (sharptails or sharpies), collectively referred to as prairie grouse, are closely related birds native to the prairie landscapes of Colorado, Idaho, Kansas, Minnesota, Montana, Nebraska, North Dakota (no prairie chicken season) and South Dakota, Wyoming, and Canada. Prairie grouse hunting typically occurs on large expanses of grassland, but can occur in cropland or field edges in grassland dominated landscapes. As the name implies, prairie grouse are birds of the great, wide-open spaces found in North America’s Great Plains.
These birds are usually found in coveys which tend to increase in size as the season progresses. It’s not uncommon to find prairie grouse in mixed flocks of both prairie chickens and sharptails where these species’ range overlaps. While historically there are some range overlaps between sharp-tailed grouse and greater prairie chickens, range itself is a good way to identify the species, as sharp-tailed grouse are found in a much wider geographic area than are prairie chickens.
On the left the tail of a prairie chicken on the right the tail of a sharp-tailed grouse. Photo by @uplandflush AKA Frank Loncarich and Kyle Hedges.
Understanding Prairie Grouse Habitat
Habitat is critical to finding grouse out on the vast expansive prairie. Hunters should concentrate by looking for native grass with nearby croplands. This will be a paradigm shift for pheasant hunters who may lean toward thicker cover in low-lying areas. What looks like prime pheasant cover is NOT where prairie grouse will be found. The best habitat is pristine grass that looks like it did when Native Americans hunted there. Grass that is shorter than knee high is best. Any higher and the birds cannot see over it to defend themselves and observe approaching predators. These are all things to consider when finding sharp-tailed grouse habitat or prairie chicken habitat.
Prairie grouse are not likely to be found in areas where cattle have overgrazed the grass; however, it has been my experience and observation that prairie grouse will indeed remain in the area, especially if there is an established lek.
When it is hot prairie and the sun is beating down as is common during September and even into October, grouse will seek out relief and move to areas with shade, such as in taller grass, plum thickets, clumps of sumac, bushes, and tree rows. If there is dew or rain on the grass, birds will move to shorter grass or areas where they can stay dry.
Prairie chicken in flight, their dark band tail color a distinguish factor between the sharp-tailed grouse. Photo by Steve Oehlenschlager
Difference in Prairie Grouse Ranges
For prairie chickens, range is the easiest way to tell them apart. Greater prairie chickens can be found from Kansas, eastern Colorado, Nebraska, and on northward through the Dakotas. Sharp-tailed grouse are found in a much wider geographic area than are prairie chickens. They are found in lot more states as well as north of the border.
Identification of Prairie Grouse
Telling them apart in flight is an acquired skill. The question one must ask is, are you as a hunter able to identify which type of prairie grouse from the way it flies or its appearance in flight? What about from the type of habitat or physical attributes once birds are delivered to leather-gloved hands? In actuality there’s little practical difference visually between greater prairie chickens and sharp-tailed grouse.
The first step in any bird identification is learning to observe. Watch and listen. It will also help to think about what types of habitat are most likely to hold specific types of upland gamebirds. The availability of specific habitat types may limit where a species can be encountered.
A sharp-tailed grouse in flight, their light white color tail a distinguish factor between the prairie chicken. Photo by Steve Oehlenschlager
Prairie Grouse Quirks.
Flocks of chickens and sharptails often flush in small groups, or even one-by-one when pointed or flushed by dogs. Hunters should follow up on every flush, including wild ones. With each covey rise, there’s a chance that a straggler may be holding tight. Many hunters make the mistake and assume that all the birds have flushed, thus missing an opportunity for a late riser. Even if the birds are out of shotgun range, hunters need not stand there but hustle over to the area where the birds flushed. There’s a good chance of finding a tight-sitting bird or two.
Hunters who empty their guns on the initial flush should reload quickly and be ready for straggling singles. One thing in common for both prairie chickens and sharptails is that they both chuckle like they are laughing at you when flushed!
Guide to Hunting Prairie Chickens in Kansas
Finding Sharp-Tailed Grouse Habitat
Hunting Prairie Chickens in September – The Kansas “Grouse” Opener
Hunters and shooters across North America love their 30-caliber cartridges. With the popularization of the 30-06 Springfield, the .308” diameter bullet became synonymous with stopping power and long range precision.
However, hunters and shooters wanted more power, muzzle velocity, and a flatter trajectory – and so, the magnum craze began.
Two extremely popular 30-caliber magnum cartridges are the 300 Win Mag and the 300 PRC (Precision Rifle Cartridge). The 300 PRC is a relatively new cartridge as it was released in 2018 while the 300 Win Mag was released in 1962. Both are capable of sub-MOA level accuracy at extreme long range and can take down elk and moose at well over 500 yards.
Although the 300 PRC has been optimized for use with heavier bullets with a high ballistic coefficient, the 300 Win Mag will be more than sufficient for most shooters.
Is it worth it to get a new rifle in 300 PRC? What advantages does it bring to the table?
In this article, we will examine both rifle cartridges to help you determine which will best fit your shooting needs.
What’s the Difference Between 300 PRC vs 300 Win Mag?
The 300 Winchester Magnum was developed in 1962 using a 375 H&H Magnum belted case necked down to accept a 30-caliber bullet. It was designed to fit inside a long action rifle and maintain supersonic flight well past 1,000 yards. At the time, the use of long, aerodynamic, heavier 30-caliber bullets was not something shooters were looking for, as most hunters didn’t really care about ballistic coefficient and were more concerned with penetration and stopping power.
In 2018, the ballistics team at Hornady looked to create a highly optimized 30-caliber magnum cartridge that could utilize longer bullets that were ideal for extreme long range (ELR) shooting. Hornady built the 300 PRC from the ground up, creating the ideal precision rifle cartridge to compete with the 338 Lapua Magnum with considerably lower recoil.
Both the 300 Win Mag and the 300 PRC can shoot past 1,000 yards and maintain accuracy. However, the 300 PRC will be better suited for shooting out past 1,500 yards and out to 2,000. This caught the eye of the Department of Defense (DoD) in 2019 and they ordered an undisclosed number of Barret MRAD rifles chambered in 300 PRC for their Advanced Sniper Rifle course.
The ELR accuracy that the 300 PRC offers are only matched by the 300 Norma Magnum, 30 Nosler, and 338 Lapua at this point. Does that mean you need to run out and get a new rifle or rebarrel your 300 Win Mag for 300 PRC?
Probably not.
For most target shooters or hunters, the 300 Win Mag will be more than sufficient to fell any game or punch out the 10-ring that dare enter their crosshairs.
However, if you shoot F-Class and/or T-Class competitions, the 300 PRC might give you an edge over some of your competition using a 338 Lapua or a different 30-caliber magnum cartridge.
In the following sections, we will break down the advantages and disadvantages of the 300 PRC and the 300 Winchester Magnum so you can understand the benefits and limits of each precision rifle cartridge.
Cartridge Specs
When evaluating a precision rifle cartridge, it’s a good idea to analyze the cartridge specs to gain more knowledge of each.
The first thing to notice is that both rifle cartridges have the same base diameter, 0.532”. This means that they both utilize a magnum bolt face. So, if you ever wanted to do a conversion, a simple barrel swap is all that would be required.
The next similarity to notice is the case length and the cartridge capacity, as both the 300 PRC and 300 Win Mag are virtually identical in these two categories.
However, the main difference that you’ll note is the massive difference in overall length. The 3.34” overall length for the 300 Win Mag allows it to be loaded in a long action rifle, whereas the 3.7” overall length of the 300 PRC requires a magnum action rifle.
Hornady specifically designed the 300 PRC for the magnum action as they wanted their cartridge to have as long a “head height” as possible. Head height is simply the overall length minus the case length. A longer head height allows for longer, more aerodynamic projectiles with a higher ballistic coefficient (BC) to be used. A high BC is preferred when shooting long range and the 1.12” head height of the 300 PRC allows for this. In contrast, the 300 Win Mag has a head height of 0.72”.
The additional head height for the 300 PRC translates to more room outside the case for longer bullets than the 300 Win Mag can accommodate. Furthermore, the 300 PRC can fire these longer, slender, higher BC bullets without disrupting the powder column inside the cartridge case. In contrast, similar bullets fired in a 300 Win Mag would intrude on the powder column or contact the rifling upon chambering the round.
But does having an unobstructed powder column inside the case really matter? For long range precision shooting, yes it does.
An unobstructed powder column will have an extremely consistent burn, whereas a compressed powder charge or having a bullet seated in the middle of it will change the dynamics of the powder burn. For precision shooters, consistency is the key to accuracy.
With so many variables going into shots over 1,000 yards, shooters need to eliminate as many variables as possible. A consistent powder burn will mean a smooth pressure curve and low standard deviation in muzzle velocity. A compressed powder column or one that is obstructed by a bullet adds new variables into the equation, and inconsistencies can be seen in the point of impact downrange for these loads.
This difference showcases the disparity in design concept between the 300 PRC and 300 Win Mag. The 300 PRC was designed form the ground up to be a highly precise and consistent long range shooting cartridge. On the other hand, the 300 Win Mag was designed first as a big game hunting cartridge and was adopted as a long range competitor later in its life.
Although the 300 PRC has clearly been optimized for long range efficiency, those benefits come at the cost of added recoil.
Recoil
Recoil is the energy directed towards the shooter when a cartridge is fired from a firearm. It is dependent on several factors, but firearm weight, powder charge, and bullet weight are three of the primary factors that affect felt recoil.
Many competitive shooters and big game hunters will not be concerned with recoil as any shooter can adapt to it with proper training and a concrete focus on the fundamentals of marksmanship.
However, for most shooters recoil will be a serious issue that they need to consider, as developing recoil anticipation is extremely detrimental to downrange accuracy.
For the purpose of this example, we will consider the Weatherby Vanguard hunting rifle weighting in at 7.5 lbs.
The chosen bullets and loadings will be the 300 Win Mag 200 gr Hornady ELD-X bullet being fired at 2850 FPS and the Hornady Precision Hunter 212-grain ELD-X traveling at 2875 FPS for the 300 PRC. This is about as close to an apples-to-apples comparison for both rifle cartridges. With these parameters, the felt recoil for 300 PRC will be 42 ft-lbs compared to 37 ft-lbs for 300 Win Mag. This translates to about a 13% difference.
The 300 Win Mag is already considered to have rather stout recoil, so this increase is something to consider when looking to add a 300 PRC to your collection. Although we are not in shoulder bruising 338 Lapua territory, neither cartridge is a slouch when it comes to recoil.
Barrel Life
For precision shooters who demand the pinnacle of accuracy and consistency from their rifles, barrel life is something these marksmen will track meticulously. The largest factor that affects barrel life is the powder charge of the ammo being fired.
A higher powder charge will typically reduce barrel life.
Cartridges like the 300 Norma Magnum or the 300 Remington Ultra Magnum are often referred to as “barrel burners” as their 95+ grain powder charges are notorious for being hard on barrels. These heavy powder charges will quickly erode the rifling at the throat of the barrel, reducing downrange accuracy.
Hornady had this in mind when the developed the 300 PRC, as they did not want the cartridge burning out barrels quickly.
The general rule for the 300 Win Mag is that a barrel will maintain peak accuracy for somewhere between 2500 to 2000 rounds.
Barrel life data on the 300 PRC is a more difficult to come by as it is a newer cartridge, however 2000 rounds seem to be the current consensus in the long range shooting community.
Trajectory
Trajectory is how we quantify a bullet’s flight path as it travels downrange measured in inches of bullet drop.
Both the 300 Win Mag and 300 PRC have very flat trajectories, which makes them ideal for long range shooting.
For this example, we will consider shots taken at 1,500 yards with a 195 gr Hornady ELD-M 300 Win Mag and a 225 gr ELD-M for the 300 PRC.
At 1,500 yards, the 300 Win Mag will have experienced -885” of bullet drop while the 300 PRC will have dropped -776”. Clearly the 300 PRC has the flatter trajectory at longer distances.
However, I also wanted to compare the mid-range trajectory as this is more important for hunters. At 600 yards, the 300 Win Mag has dropped -74” while the 300 PRC has dropped -73”. Essentially, they are identical at intermediate ranges.
Accuracy
Usually for caliber comparisons, there is little difference in accuracy between two cartridges. However, the 300 PRC has several advantages over the 300 Win Mag that will help the PRC perform better at long range.
The first benefit is that the 300 PRC is a beltless design whereas the 300 Win Mag has a belted case.
At the time of development, the group think was that a magnum cartridge needed the belt to aid in case rigidity. This has been proven to be a false presumption, however upon chambering in the rifle, headspacing occurs off the belt. This can cause for as much as 0.009” of room for error when pushing the bullet into the chamber.
This might not sound like much, but all that added slop can have the bullet entering the chamber off center. That fraction of a degree may cause the bullet to enter the rifling off axis, and at 1,500 yards can have a massive effect on point of impact.
By comparison, headspacing for the 300 PRC occurs off the 30-degree shoulders Hornady designed for the cartridge. This aids in chamber alignment when the cartridge is loaded into the chamber, meaning that the bullet will be more consistently aligned on axis with the barrel rifling. The 300 PRC also has a longer case neck, which helps hold longer projectiles securely and concentrically, which also aids in consistency and accuracy.
Finally, the 300 PRC was designed with a shorter freebore diameter than the 300 Win Mag. Freebore is the smooth portion of the chamber closes to the cartridge. A tighter freebore space means there is less opportunity for a bullet to yaw when entering the rifling, also increasing consistency and accuracy.
Although the accuracy of a cartridge is most often a reflection of the ability of the shooter and their shooting platform, most long range precision shooters will find that the 300 PRC is more accurate and consistent with ELR shots than the 300 Win Mag.
Ballistic Coefficient
Ballistic coefficient (BC) is a measure of how well a bullet resists wind and air resistance. Put another way, it’s a numeric representation of how aerodynamic a bullet is. A high BC is preferred as this means the bullet will buck the wind easier.
Generally, a heavier bullet will have a higher BC as it takes more force to disrupt the flight of a heavier bullet than a lighter one.
The 300 PRC was specifically designed to fire heavier bullets, so it should come as no surprised that the 300 Win Mag falls behind the 300 PRC in terms BC.
The two primary factory loads for 300 PRC are the 212-grain ELD-X and the 225 gr ELD match, which have a BC of 0.663 and 0.777, respectively.
The 300 Win Mag just cannot compete with the heavier bullets fired by the 300 PRC. The heaviest projectiles the 300 Win Mag can reliably fire would be 200 gr bullets, as the slower twist rate of the barrel cannot stabilize heavier bullets reliably. For example, a 200 gr Berger Hybrid Target will have a BC of 0.64.
The ballistic coefficient for both cartridges is extremely good, but the 300 PRC is just better as it can fire heavier bullets.
Sectional Density
Sectional Density (SD) is the measure of how well a bullet penetrates a target. This is extremely important when hunting big game, as you need a bullet that can punch through thick hide, bone, and sinew.
Sectional density is calculated by comparing the bullet weight and the bullet diameter. The higher the SD the deeper the bullet will penetrate into the target.
As both rifle cartridges fire the same diameter bullet, they will have very similar sectional densities with a very slight advantage towards the 300 PRC as it fires heavier bullets.
Hunting
When hunting, shot placement is always the most important factor between an ethical kill and wounding the animal. Therefore, you might assume that you want the most accurate cartridge possible when hunting.
However, I contest that the 300 Win Mag is the superior option for hunting.
Don’t get me wrong, those 212-grain ELD-X 300 PRC cartridges will do a number on an elk or whitetail. However, at ethical hunting distances (500 yards for most hunters), there is little difference between the 300 Win Mag and the 300 PRC.
However, the one major difference between the two is recoil. Lower recoil will often translate into greater precision and accuracy downrange. Therefore, the 300 Win Mag will be easier to handle at shorter ranges and result in better shot placement.
Furthermore, 300 Win Mag factory ammo is easy to find, cheaper, and comes in more varieties than 300 PRC.
As it is unlikely that a moose or elk will be able to detect any fractional differences in internal ballistics between the two rounds, it’s clear that the 300 Win Mag is the better choice for hunting.
Rifle and Ammo Cost/Availability
This is another category where the 300 Win Mag reigns supreme as it has been on the market for over 50 years.
The 300 Win Mag is considered the gold standard when it comes to hunting big game. Therefore, virtually every firearm manufacturer has a rifle chambered in the cartridge. Entry models are also available such as the Savage Axis or the Ruger American for under $700.
As the 300 PRC is the new kid on the block, there are fewer rifle options available. Rifles from Savage, Bergara, Ruger, Barrett, and other custom manufacturers will start at nothing short of a grand and go up from there. In terms of ammo for 300 PRC, there are fewer varieties available…And they are not cheap! The least expensive PRC ammo I could find ran around $3/round while match ammo ran around $6-7/round.
To complicate matters, there are not many bullet weights available for 300 PRC at this time. The 212 gr ELD-X line from Hornady are the most popular factory loads for hunting while the 225 grain ELD Match is their match-grade round. And that’s about all that’s available at the time of writing!
On the other hand, 300 Win Mag ammo can run as low as $2/round for cheap FMJ practice ammo and about $5/round for the high-quality hunting varieties.
The 300 Win Mag is easier to find in your local firearms shop or hunting outlet store, whereas 300 PRC is a lot less common to see in these stores.
Reloading
Reloading or handloading is the process of recycling fired brass and to be fired again. This not only offers a wide range of ammo customization, but it also reduces your overall cost per round. Reloading is one way to bring the cost per round of 300 PRC back into the realm of practicality. However, the heavier bullets that it fires are not often compatible with other 30-caliber cartridges except for the likes of the 300 Norma Magnum.
In contrast, the lighter bullets fired by the 300 Win Mag can be loaded into 30-06 Springfield, 308 Winchester, and 300 WSM and allows you to purchase in bulk if you reload for these cartridges as well.
Powder selection you’ll want to prioritize slower burning, temperature stable powders such as Retumbo, Reloader 26, Reloader 23, H4831, and H1000.
All major bullet manufacturers like Berger, Barnes, Nosler, and Hornady make 30-caliber bullets that will mate beautiful with both cartridges.
300 Win Mag Ballistics
A Brief History of 300 PRC
The Hornady 300 Precision Rifle Cartridge (PRC) was specifically designed with long range precision shooting in mind. Hornady developed the cartridge to fire long, aerodynamic, and high BC 30-caliber bullets to be everything long range shooters want but haven’t heard about yet.
The 300 PRC began when the ballisticians at Hornady wanted to bridge the gap between the 300 Winchester Magnum and 338 Lapua Magnum for extreme long range (ELR) shooters who wanted to air it out past 1,500 yards but not have to endure the shoulder punishing recoil of the 338.
Other cartridges had attempted this but fell slightly short of the mark, namely the 30 Nosler and 300 Norma Magnum. Barrel life for these cartridges is painfully short, and Hornady wanted to provide shooters with a cartridge that could fire 200+ grain 0.308” diameter bullet while maintaining an acceptable lifespan of the barrel.
Using the 375 Ruger as a parent case, Hornady necked down the cartridge to accept a 30-caliber bullet and set the shoulder angle at 30 degrees, and thusly the 300 PRC was born.
Hornady specifically built the 300 PRC to be a magnum cartridge and did not constrain themselves by using a long action like what happened with the 300 Winchester Magnum.
Instead, they build the rifle around the cartridge, and what they got was an extremely accurate long range cartridge that can easily compete with the 338 Lapua in terms of trajectory.
The 300 PRC embodies everything amazing about the 6.5 Creedmoor and adapts it to 30 caliber. Hornady rolled out their new cartridge at 2019 SHOT Show and received SAAMI approval in August of 2018.
The initial design for the 300 PRC fires a 212 gr bullet at 2860 fps and 3850 ft-lbs of energy at the muzzle. Hornady also offers factory loads with 220, 225, and 250 grain bullets.
Although the 300 PRC is still somewhat of an obscure chambering, it is quickly becoming more popular in the long range competition circuit and is also garnering some attention from US SOCOM for military application.
A Brief History of 300 Win Mag
In 1963, Winchester introduced the 300 Win Mag in its long-action Winchester Model 70 bolt action rifle.
Remington quickly followed suit, introducing a 300 Win Mag offering in its popular Rem 700 bolt action rife. Since then, the 300 Winchester Magnum has quickly become one of the most successful magnum rifle cartridges on the market today.
The 300 Winchester Magnum was developed from the belted 375 H&H Magnum cartridge and sports a whopping case capacity of 91.5 gr of water and a max pressure of 64,000 psi based on SAAMI specifications.
This voluminous case capacity allows the 300 Win Mag to pack in the powder and push the .308” diameter bullet to its limits.
At the muzzle, a 150-grain bullet is screaming down range at about 3300 fps with a back-breaking 3600 ft-lbs of energy. That is some serious power! Standard loadings for the 300 Win Mag range between bullet weights of 150 and 220 gr.
Many shooters believe that the belted case is required to contain the “case-splitting” pressure that the 300 Win Mag must exude. However, this is a common misconception.
Based on the case design, the belted cartridge is superfluous. However, Winchester retained the designed as a marketing strategy to link the cartridge to its heavy hitting predecessor, the 375 H&H Magnum.
The strategy was wildly successful as the 300 Winchester Magnum has become one of the most popular magnum cartridges on the market, surpassing the 300 WSM, 7mm Rem Mag, and 270 Weatherby Magnum.
Final Shots: 300 Win Mag vs 300 PRC
The ballisticians at Hornady did an exceptional job designing the 300 PRC, focusing on optimizing the cartridge design and then building the rifle around it. Although many have criticized the 300 PRC for being another boutique cartridge that offers only marginal improvements over current designs, US SOCOM seems to disagree with their purchase of an unknown quantity of Barrett MRAD rifles in 300 PRC.
It’s hard to say if the 300 PRC will gain mainstream acceptance and adoption by other ammo and rifle manufacturers, however Hornady has changed many perspectives in the past like they did with the 6.5 Creedmoor.
The benefits that the 300 PRC offers cannot be ignored, as it is truly a precision rifle cartridge in every sense of the word.
The 300 Winchester Magnum is big game hunting mainstay and has taken every animal on North America. It is powerful, accurate, and has a trajectory that military snipers, sportsmen, and target shooters have grown to love.
However, the 300 Win Mag cannot accommodate heaver .308” bullets with higher ballistic coefficients like the 300 PRC was designed for. The 300 Win Mag also has less recoil than the 300 PRC, which can make a difference if follow-up shots are needed.
For most shooters, the 300 Win Mag will be more than enough to handle all their shooting needs. However, for long range F-Class and T-Class competitions, the 300 PRC is clearly the ideal choice.
As the 300 PRC and 300 Win Mag have almost identical ballistic properties at hunting ranges, there is not a compelling argument for using the more expensive 300 PRC at these ranges when the 300 Win Mag can do the same thing at lower cost and recoil.
But if you just love the idea of having the most accurized 30-caliber magnum cartridge out there, then go get yourself a 300 PRC and enjoy that sub-MOA accuracy that the cartridge offers!
If you learned to fish as a child, your earliest memories, much like ours, were watching a bobber with great anticipation waiting for it to abruptly disappear under the slick calm waters on an early morning fishing trip with a loved one. I’m 51 years old now, and watching a fishing bobber go under still gives me a childlike thrill. Nostalgia not withstanding, a fishing float is a great way to present not only live baits but also small artificials to fish in a natural way.
Fly anglers use small floats and indicators to let them know when a trout has sucked in a nymph in current runs that you won’t see or feel. Crappie anglers will slip float a jig in timber to catch fish that are reluctant to move much. Whatever your preferred method of fishing, knowing the best fishing bobbers and where to use each one will help you present your baits better and catch more fish.
OUR LIST OF BEST FISHING BOBBERS
Best Weighted Spring Bobber: Thill Premium Weighted Float
Best Slip Floats: Thill Pro Series Slip Float
Best Rattling Float: Bett’s Mr. Crappie Rattlin Pear
Best Weighted Clip Bobber: Bett’s Mr. Crappie Weighted Bobber
Best Crappie Bobber: Thill Crappie Cork
Best Catfish Float: CJ’s Catfish Float
Best Panfish Quick Floats: Leland’s Lures Trout Magnet E-Z Floats
Best Weighted Spring Bobber: Thill Premium Weighted Float
The Thill name and premium fishing floats are synonymous. Regardless of the species you chase, you’ve likely found yourself looking at one of the many versions of Thill floats to float your offering. Arguably their most popular model because it’s simple, effective and well designed, the Thill Premium Weighted Float features the spring or slip versions but we think the spring bobber is the best no-nonsense float for a variety of species of fish.
Pull the spring down, run the line into the notch and let the spring loose and you’re good to go. We often use this bobber in the spring when casting to crappie in shallow water with jigs we want to work ultra slow around shallow cover that might be spooky (like when they are moving up to spawn). These high quality bobbers come 2 to a pack for $3.99.
Buy at Amazon
Buy at Bass Pro
Best Rattling Float: Bett’s Mr. Crappie Rattlin Pear
We got into using a rattling bobber with tungsten bluegill bugs this spring to chase some of our personal best bluegills and shellcrackers. The Mr. Crappie Rattlin Pear is a small bobber that attaches quickly to help make casting very light jigs a little easier and letting you slow down your retrieve and add pauses you can’t do otherwise.
I took some of my biggest bluegills and panfish on this bobber this year because I felt the rattle called fish in that were curious and then they found the bug. This was especially productive for me in laydown trees in the spring and early summer.
The Rattlin Pear comes in a three sizes from 7/8 inch to 1 1/4 inch for bluegills and crappie alike and would probably work for trout and wallyes as well.
Buy at Bass Pro
Buy at Amazon
Best Slip Floats: Thill Pro Series Slip Float
Another staple in the slip float arena, the Thill Pro Series Slip Float comes in many different sizes and diameters as well as weighted and unweighted. These floats work really well when you want to cast to fish that are in deeper water and you need the rig to be compact on the cast but then sink down to the fish and sit in one place over deeper water. From 1/2 inch diameter up to 1 inch in diameter. These floats work for a ton of species and applications where you want to float fish a little deeper. They are made of premium balsa to ensure a long last bobber that always floats well and is easily pulled under by the right size prey.
Buy at FishUSA
Buy at Amazon
Buy at Tackle Warehouse
Buy at Bass Pro
Best Weighted Clip Bobber: Bett’s Mr. Crappie Snappers Float
There is something to be said for having a bobber that works quick and easy when you suddenly need to change your presentation or need to improve your casting distance because of the wind without having to upsize your lure and speed up your retrieves. A clip on bobber is very handy to have. I keep several in my travel bags and boat because I’ve had lots of times panfishing where I wished I could add a float to a jig to slow my presentation, get a little more distance or make a bait present more naturally in current and wind.
The Bett’s Mr. Crappie Weighted Bobber casts like a rock, attaches quickly and easily and won’t crack or fill up with water. It’s a foam style bobber that comes in a few different sizes for bluegill and crappies alike. I’ve even used the larger ones on other species like catfish. They come two to a pack for $2.29.
Buy at Bass Pro
Buy at Amazon
Best Crappie Bobber: Thill Crappie Cork
The Thill Crappie Cork is the do-it-all bobber for crappie fishermen. It’s made to be the only float you need for crappie. It comes in multiple sizes, offers both spring clip and slip cork design with a bobber stop already built into the stem. It’s the ultimate float for versatility and convenience for serious anglers. Always good to have a couple in your bag. Weight is printed on the float for convenience. These floats start at $2.49.
Buy at FishUSA
Buy at Bass Pro
Buy at Amazon
Best Catfish Float: CJ’s Catfish Float
We’ve talked about these floats before in our Kayak Catfishing feature as these are a dynamite way to present bait to channel catfish and blue catfish alike. Check out our feature to see how these are employed. But these unique floats feature a long 14-inch stem and a rigging mechanism that makes them a slip float but your line runs on the outside. This float is designed to let you know a cat is biting without them feeling any resistance so you have the drop on them everytime. These floats excel for drift fishing and that’s why they have become the staple among serious catfishermen. They come 2 to a pack for $8.99.
Buy at BassPro
Best Quick Float Indicators: Leland’s Lures Trout Magnet E-Z Floats
Sometimes you just want to throw quick small float on an ultralight setup to float your jig or slow your presentation and without having to completely rerig, it’s nice when you can use something like the Trout Magnet E-Z Floats, that use a slit style bobber with a peg to pinch your line in place on the bobber. You can add them quickly to your ultralight offerings to keep your bait up and out of cover and off the bottom as you fish through shallow areas with tiny lures. They are made of a high-float foam, come 4 to a pack in high viz colors for $1.87.
Buy at FishUSA
Buy at Amazon
Buy at BassPro.com
TYPES OF FISHING BOBBERS AND FLOATS
Fishing bobbers and floats vary in size, materials and how you connect them to your line. There are basically three ways to connect a bobber to your line that include the following:
Clip on
Pinch/peg
Slip on with a stopper
As you’ve seen going through this list, bobbers can ether be clipped on with spring loaded clips or external springs or rubber sleeves. Floats can also be pinched on with a peg where you either run the line through the bobber or put it through a slit in the side of the bobber and then use a peg to pinch the bobber onto your line. Or you can use a slip style bobber where your line runs through the bobber after your slide or tie a bobber stop onto your line above it. Each of the three ways to connect have a time and place and often convenience and depth are the determining factors.
BEST BOBBER BRANDS
With bobbers, you can get by with a cheaper bobber in a pinch but their are a few brands that are the best at making specific application floats. Brands like Thill, Betts and Eagle Claw have some of the widest selections of bobbers to fit all types of fish and fishing applications. There are a lot of other good brands that don’t have as diverse a selection but also offer great bobbers like Rod-N-Bob, Raven, Sheffield, Northland, and Lunkerhunt. You can find a very good selection of floats at FishUSA.com
BOBBER FISHING SETUPS
When fishing with bobbers, anglers often like to use lighter lines and either spinning or spin casting setups. I spent a lot of time fishing small bobbers on tungsten jigs for panfish this year on spinning rod and reels with 4-pound line as well as BFS baitcasting gear with the same light lines like 4-pound mono and 8-pound braid. With the bigger bobbers you can go up in size and weighted bobbers also allow you to use larger line sizes without sacrificing castability.
BEST BOBBER AND FLOAT MATERIALS
Balsa and foam are probably the two most common types of fishing bobbers along with plastic. The first two will hold up a lot better than the latter. Plastic tends to eventually crack or wear out and let water in which makes it stop floating. Balsa will still float if it breaks, splinters or loses pieces.
Few things in fishing are more exciting than watching a muskie suddenly appear like a great white shark stalking your surface lure. It’s even more heart-stopping when the monster opens its mouth and engulfs it. Unfortunately, many muskie anglers are of the mistaken belief that, while thrilling to use, topwater lures are low-percentage options and highly situational.
Not so, says renowned Ottawa River muskie guide John Anderson, legendary muskie guru Dick Pearson, and Lake of the Woods muskie stalker Darcy Cox. There’s almost never a time, nor a situation, when the trio won’t throw a surface bait. It’s why they’re topwater trendsetters.
“If an angler only threw surface baits, they would catch fewer fish, but they would be much bigger,” says Anderson, who owns the Ottawa River Muskie Factory. Pearson, on the other hand, has seen it all during his time on the water, pioneering muskie tactics through the heydays of the 1970s, 80s, and 90s. He attributes much of today’s topwater skepticism to times past, when lure selection was limited and hooking percentage poor.
“Many in my era tried it, but quit,” Pearson says. “I can remember having multiple blow-ups and losing fish after fish on early versions of the Mud Puppy and Arbogast Muskie Jitterbug. Today, however, I haven’t found a surface bait I don’t like. The variety is amazing.”
Cox, ironically, fell head over heels for surface lures, taking the fast lane to the top of the water column after reading an article penned by Pearson in In-Fisherman magazine. “It opened my eyes as to how versatile topwater lures can be for muskies,” says Cox, whose Tank Industry Guide Service has a waiting list of guests. “I was throwing Globes in 2-foot waves and using prop baits and walk-the-dog-style surface lures in sunny conditions, which is counter to what we’re taught. I think the word is getting out now, as more muskie anglers are discovering how deadly surface baits can be.”
THE ULTIMATE EDGE
“My transition to taking muskies on topwater was gradual,” recalls Pearson, who’s also an avid hunter. “I began looking at muskies the same way I look at whitetail deer — as creatures of edges. That’s when the importance of the surface became more apparent. I regard it now as the ultimate edge. The place where two worlds collide. The place where oxygen, temperature, wind, sound, and visibility have their greatest variations and consequences.
“There were eureka moments, as well,” he says. “The first evening I ever threw a Top Raider, for instance, I boated four nice fish. Another time, in the 1980s, I threw the first Jackpots in rollers on Lac Seul and boated five big muskies in one day.” While Anderson, Pearson, and Cox won’t hesitate to present a surface bait around any piece of structure or cover, or in any weather or water conditions, they concede that they’ve isolated a range of locations and conditions where the lures excel.
“Project Noble Beast is my bible,” Anderson says, referring to Sean Landsman’s groundbreaking telemetry research on the Ottawa River. “It showed how devoted muskies are throughout the season to specific shallow structures like rocky shoals and dense weedbeds. When you understand how dedicated the fish are to specific locations, you realize why you need to enter waypoints on every spot you raise a big fish.
“You can make a living casting topwaters at sunset. I use them in the morning, as well, but the evening is universally more productive, especially in July and August. Throwing topwaters at sunset in mid-summer is a great big-fish strategy,” he says.
Spotting shallow cover, especially associated with vegetation, also persuades Cox to drop whatever rod he’s holding and quickly grab one rigged with a topwater lure. “I’ve found that surface baits work well on sunny, warm days immediately following a cold front,” he says. “I often find muskies in as little as 6 inches of water during the warm-up. They don’t want to go out deep to chase food.
“The first couple of weeks after the muskie season opens is a great time to use topwaters. Fish are shallow, soaking up the heat, so a topwater is the perfect lure to use where the fish feel most comfortable.” Pearson agrees. “In summer, calm, warm mornings and evenings are best around shallow structures with submergent vegetation and reeds,” he says.
“But topwaters are often my bait of choice on Opening Day, as well. Warming water is much better, in my opinion, than cooling water.”
GOOD VIBRATIONS
Listen to Anderson, Pearson, and Cox talk about topwaters and you frequently hear about noise, vibration, and water displacement. “Part of the collision factor I mentioned earlier,” Pearson says, “are noise and visual disturbance. It’s like an escaping mouse triggering a cat. Sound is very important. You’re tickling their lateral lines with good vibrations.
“The deep pop produced by a Fat Bastard in the wind may be key one time, while a light pop, or as I like to say, the pitter-patter of little feet, works better another time. In a walk-the-dog-style bait, a Jackpot may work, but then the whoosh of a Weagle outfishes it. Similarly, I’ve seen times when tinkling a flaptail is unbeatable and then, for no reason, the waddling plop-plop of a Creeper shines. You have to think about the different sound options and vary them regularly.”
While Cox also pays attention to the different sounds surface baits make, he’s even more fixated on their vibrations, likening the pulse patterns to the big double-bladed bucktails that have taken the muskie world by storm. “The bigger the vibration radius, the more muskies you can call in with a surface bait,” Cox says. “That’s why #10 bucktails changed the game. Nothing matches their ‘call radius.’ It’s the same with topwater baits.
“Sometimes, however, a call radius isn’t required. If you’re casting to a spot where you know a muskie is positioned, the silent treatment may entice a fish that’s wary of the unnatural clatter from rattles. That’s why I tend to throw noisy topwaters when I’m searching for muskies, switching to quieter surface baits when I return to a fish I raised earlier, or when working high-percentage water.”
Anderson, on the other hand, believes that fish in general, and muskies in particular, pattern sound more easily than they do sight. And he’s convinced it extends beyond the timbre or tone of your lure, to include things like your electric trolling motor and sonar.
“I was involved in a sturgeon tagging study on the St. Lawrence River, and we couldn’t approach a tagged fish when the water pump was running,” Anderson says. “It wasn’t noisy, but it had a distinct resonance that the biologist in charge of the study said the fish had learned to identify. As soon as we turned off the pump, we could drive right up to them.”
After being involved in that project and studying how muskies react to various surface sounds, Anderson is convinced that they’ve become conditioned to avoid many popular lures. “I’m throwing much bigger surface lures these days,” he says. “Lures like the Big Mama, Dirdy B, and Twisted Sis’tr offer a larger visual profile, but beyond that, they make a different noise and throw more water. The Top Raider is a great lure, but most muskies have seen and heard it so many times I’m certain they’ve learned to avoid it.”
FAST & ERRATIC OR SLOW & STRAIGHT?
This also applies to walker-style lures. Anderson says you typically raise more fish with lures that sashay back and forth erratically, but you put more in the boat with baits that run straight ahead. “Muskies don’t miss topwater lures by mistake,” he says. “It’s never an accident. So, if you’re seeing fish, or having them boil on your bait, it’s because you’re doing something they don’t want you to do. Usually it’s the speed of your retrieve.
“Most muskie anglers have two retrieve speeds: fast and really fast. I have so many people in the boat with me each season that I get to study them carefully. It has taught me that retrieving surface baits slowly is essential most of the time. I typically crawl them along, retrieving them ever slower, certainly slower than other lure types.”
While Cox differs slightly from Anderson in his fondness for walk-the-dog style topwaters, he agrees that a lingering retrieve is almost always better than a rapid one. “Walk-the-dog-style topwaters are slow-moving lures,” Cox says. “You want to make them act wounded. They’re in the right position above the fishes’ heads so they can see them from different depths and directions. A lazy muskie can cruise up, slowly make the decision to eat, then attack with minimal effort and a high chance of success.”
GO FIGURE
No lure is perfect, and while surface baits come with little baggage, they’re not without warts. The biggest is when you spot a muskie trailing your lure. Surface lures are the most difficult to work at the side of the boat when you’re trying to entice a reluctant fish to bite.
“If I spot a muskie following my surface bait, I try to duck down and hide,” Pearson says. “I change the retrieve speed if time permits. I also move my rod tip and try to change the lure’s direction. But usually you’re faced with two choices: Either stop the lure in its tracks, or take it under and go into a figure-eight or circle.
“Stopping works, although most muskie anglers are hesitant to try it. I have film of me catching a 50-inch fish after stopping a walk-the-dog style topwater. You can see the fish rise up slowly and take it down like a bobber. If I go into a figure-eight, however, I almost always pull the topwater under, hoping that I can continue its action and in doing so, create a trail of bubbles.”
TOPWATER ACES UP THEIR SLEEVES
Being smitten with surface baits means Anderson, Pearson, and Cox have their fair share of aces up their sleeves. Pearson, for example, likes walker-style lures over deep water whenever he spots suspended balls of bait, especially ciscoes, in the upper part of the water column. And he won’t hesitate to fish these lures in rollers when a storm is approaching.
Anderson, however, rarely leads with a surface bait, typically starting each day with muskie-size jerkbait, glidebait, softbait, or bladebait. “But if I can’t seal the deal, I use a surface lure,” he says. “They’re the best clean-up bait you can tie on.”
Cox likes to fish the most unlikely spots, a foot or less of clear water, at the most dubious time, mid-day, under bright sun. “On opening day last year, I was sight-fishing on a sandflat in one foot of water when I spotted a gorgeous muskie,” he says. “My guest made a cast and the wake was Godzilla-like. The strike on the figure-eight was classic, and the ensuing fight a masterpiece. The fish measured 51.5 inches and we watched the whole show, from start to finish, on a flat-calm, blue-sky, sunny day. You have to love throwing surface baits for muskies.”
*In-Fisherman Field Editor Gord Pyzer is a former Ontario natural resource manager and National Fresh Water Fishing Hall of Fame inductee. He lives in Kenora, Ontario.
Our Favorite Thermal Monoculars of 2024 for Hunting Coyotes, Hogs & More
You probably thought seeing in the dark was a superpower when you were a kid. Now that you’re all grown up and have a little coin in your pocket, you can actually buy that ability with one of 2024’s best thermal monoculars.
If you’ve got pesky coyotes, hogs, and boars that insist on showing up where they’re not welcome, you can peel back the darkness and find out exactly where they are with the push of a button.
But it’s not just about nighttime. Infrared imaging scanners can expose camouflaged deer and elk who’ve bedded down during the day or blended into the woods too well to see. If something gives off heat, a thermal monocular can help you see it — night or day.
We’ve picked out various products from some of the best names in thermal imaging, like FLIR, Pulsar, ATN, and AGN. These trusted brands have products that satisfy all portions of the price scale, including budget options, under $1000 picks, and $4000 state-of-the-art monsters.
Deciding which thermal monocular you need depends on many essential variables — like how you plan to use it, the range you need it to detect, and your budget. The best thermal imaging device for one hunter could be a poor choice for another.
But enough of all this talk about superpowers and price scales. Our reviews of 2024’s best imaging monoculars for hunters and homeowners will heat up your imagination and maybe even help take down a coyote or two.
Budget or “Cheap” Thermal Devices
When it comes to entry-level thermal monoculars, each unit comes with a 160×120 thermal sensor. That’s nowhere near the pixel density of 640×480 sensors available on the higher end, but that doesn’t make these units worthless by any means.
A decent thermal monocular can help you detect prey animals at short distances that would otherwise be undetectable. Or, if you’re following a blood trail that’s gone cold, they’ll peer through the darkness and illuminate what you might otherwise miss.
To be blunt, we prefer mid-range imaging devices of 384×288 pixels or better, but if you want to dip your feet into the thermal monocular game, you can still reap some benefits from the following budget-friendly devices.
Best Inexpensive Solution AGM Global Vision Asp-Micro TM160
As you might’ve guessed from the name, the AGM Asp-Micro TM160 is a small handheld thermal imager that fits easily inside your pocket.
Equipped with a 160×120 thermal detector, you’re not getting the most impressive thermal imaging monocular on the market, not by a longshot. But, if you need to spot heat signatures quickly, the TM160 could make the difference between detecting hogs and coyotes or letting them run wild and ravage your property.
Some additional features you’ll get with the Asp-Micro TM160 include:
10-hour battery life
8 GB internal storage
Video and photo camera
Up to 4x digital zoom
In short, this cheap option for sale delivers solid performance without breaking the bank.
Pocket-Sized Heat Imager FLIR Systems Scout TK Mini
Thermal Sensor: 160×120 Display: 640×480 LCD Detection Range: 91 meters Weight: .4 lb NETD: Unlisted Best for: Home security Not for: Identifying creatures
The next affordable infrared spotter on our list comes from a well-known name in the thermal monocular space: FLIR Systems.
Even more compact and lightweight than the TM160, the Scout TK Mini weighs only .4 pounds. That makes it a portable companion for home security and animal detection, as well.
Like the TM160, you won’t be able to identify animals at far distances with this device, but it can give you the edge you need.
Just be careful: you’ll have to get close to identify animals with a sub-$1,000 monocular like the FLIR Scout TK Mini.
Additional features include:
Still image and video recording
5-hour battery life
IP67 dust and waterproof rating
Eight color palettes
If you’re looking for the most lightweight budget thermal monocular, consider the Micro TK Mini. And if weight isn’t your biggest concern, the next infrared imager is a significant upgrade thanks to its zoom capabilities.
Good Quality without Breaking the Bank ATN OTS-XLT 2.5-10x
The ATN OTS-XLT 2.5-10x uses the same size microbolometer sensor as our first two recommendations but offers a bit higher detection and identification range with a 2.5x base magnification and up to 10x zoom.
This additional zoom will come in handy if you want to center your thermogram and give yourself more confidence when identifying, though you shouldn’t expect to identify hogs or coyotes at long range.
I’d like to clarify my use of the word “identification” here. If you’re an experienced hog and coyote hunter, the ATN OTS-XLT can help you identify those creatures day or night. But telling the difference between a dog and a coyote with a smaller sensor isn’t for novices, so keep that in mind.
That said, if you’re new to thermal imaging or want a monocular that offers more detail, upgrading to a larger thermal detector resolution will do wonders for your identification game.
Features of this scanner include:
Four color palettes
10-hour battery life
Base magnification of 2.5x
Zoom up to 10x
Camera for video and pictures
If you’re confident in your identification capabilities, you might get the job done with this entry-level ATN thermal unit.
Rugged Thermal Smartphone AGM G2 Guardian
Base Magnification: 5.6x Thermal Sensor: 256 x 192 Refresh Rate: 25 Hz Pixel Pitch: 12 micron Display: 6.58’’ FHD+ 120Hz Detection Range: 500 meters Weight: .9 lb Best for: Anyone who wants or needs the convenience of a thermal monocular on their cell phone Not for: Extreme distances, fast-moving objects
New for 2024, and the first product of its kind, the AGM G2 Guardian is a rugged cell phone and long-range thermal monocular in one.
We were fortunate enough to receive one of these bad boys to test drive, and to say that we’re impressed with the functionality of this gadget would be an understatement.
After some first-hand experience, we can definitively say that this device from AGM is a valuable tool for a variety of users; whether you’re a hunter, outdoorsmen, first responder, or construction worker (think HVAC, electrical, or plumbing).
The G2 Guardian boasts a 25 Hz refresh rate. While that’s paltry compared to others on this list, it’s important to note that for the price, it’s one of the best values for any entry-level thermal device. Its MSRP rings in at an approachable $899.
The G2 Guardian is feature-rich; here are some of our favorite attributes:
It’s unlocked and can be used with any carrier
Built-in 109 dB speaker
108 MP camera
Beefy 7,000 milliamp battery
Impact resistant and waterproof
You get more than just a long-range thermal monocular with the Guardian G2 from AGM, you get a trailblazing and one-of-a-kind gadget that’ll stand up to anything you can throw its way.
VIEW ON AGM MOBILE
Mid-Range Infrared Scanners
Now that we’ve considered some solid budget options, let’s move into the best mid-range thermal monoculars for hunting. The truth is, many thermal imaging experts consider this price range the actual entry level.
If you’re willing to drop a little more coin on one of these devices, you’ll be rewarded with a much better thermal sensor that offers 500% more microbolometer pixels. That means a sharper image, more heat detection, and a greater chance of identifying your prey.
Strap in because this is where the products start to get very interesting.
The Now-We’re-Talkin’ Choice AGM Global Vision Taipan TM15-384
Base Magnification: 1.5x Thermal Sensor: 384×288 Refresh Rate: 50 Hz Pixel Pitch: 12 micron Display: 1280×960 LCOS Detection Range: 708 meters Weight: .6 lb NETD: <35mK Best for: Mid-range detection, short-range ID Not for: Long ranges
For hunters who want a device that can identify prey up to 200 meters in the dark, fog, or haze, this is the best thermal imaging for hunting monocular of 2024 for the money.
For starters, this unit is a breeze to use. There’s no focus ring to adjust; it fits your pocket easily and delivers a wide field of view. In short, beginners can turn on this compact handheld device, start scanning, and expect high performance with minimal adjustments.
Efficiency like this is possible because AGM engineered the monocular well and gave it a solid foundation. With a 384×288-pixel microbolometer, 12-micron pixel pitch, a generous 1280×960 LCOS display, and 1.5x magnification, users of all stripes can detect even small rodents at relatively long distances.
If you’re looking for camouflaged deer or elk at dusk or dawn, it should be no surprise when you find great success with this AGM unit.
Some other useful features you’ll find include:
7.5 hour run time
Hot-spot mark
Distance measurement
Up to 8x zoom
App integration
Camera for video and picture
IP67 dust and waterproofing
For hunters who don’t need long detection ranges or those who hunt in tight spaces, the Taipan TM15-384 is the unit for you.
Great Value Long-Range Detection AGM Global Vision Taipan TM25-384
Base Magnification: 2.5x Thermal Sensor: 384×288 Refresh Rate: 50 Hz Pixel Pitch: 12 micron Display: 1280×960 LCOS Detection Range: 1,180 meters Weight: .7 lb NETD: <35mK Best for: Mid to long-range detection Not for: Short ranges
The previous AGM thermal monocular provides such great value that we had to include the upgraded 2.5x magnification model. If you value the ability to detect heat signatures up to 1,180 meters, you’ll love the Taipan TM25-384.
It uses the same infrared-detecting sensor as the TM15 but offers a longer focal length and higher magnification level. The benefit of 2.5x magnification is the ability to see animals as if they’re 2.5 times closer than what you’d typically see.
So, if you’re a long-range hunter who puts in extensive miles tracking and monitoring the behavior of big game like elk, this tool can allow you to see in the dark, gaze through the fog, and get the leg up on your prey.
Just know that you’ll have to scan the area a bit more thoroughly to cover the same ground as the TM15, as it has a smaller field of view (FOV). This is normal with higher magnification devices; they make it more challenging to spot up close-and-personal prey.
With those facts understood, we believe this is 2024’s best long-range thermal monocular for the money. We can’t recommend it enough for day and night hunting. Just keep in mind that you can’t replace the battery yourself.
Reference the TM15-384’s listing above for this specific unit’s additional features. And, if you don’t require this much magnification, a unit like the AGM Global Vision TM19 will hit the sweet spot perfectly.
Base Magnification: 3.3x Thermal Sensor: 400×300 Refresh Rate: 50 Hz Pixel Pitch: 17 micron Display: 1280×960 LCOS Detection Range: 708 meters NETD: 50 mK Weight: 1.2 lb Best for: Long-range detect, short to mid-range ID Not for: Very long ranges
While AGM thermal monoculars provide some of the best value in the space, Burris isn’t too far behind. Based on their included bevy of features, we think they offer greater value to hunters than the AGM solutions.
The main difference between the AGM TM15-25 line and the Burris BTH is the size of the thermal sensors. Burris put a slightly bigger unit on this device, which clocks in at 400×300. This handheld can collect more infrared energy than its AGM counterparts, and perhaps that’s part of why it weighs nearly twice as much.
Another reason for the added weight is this unit’s rangefinder, which can help you determine the exact distance between you and that raccoon, coyote, deer, or whatever else.
If ranging capabilities weren’t enough, hunters can set up the BTH and use it as a remote camera in the blind. Doing so will allow them to see what’s happening from a distance. The app integration on this beast truly sets it apart from the first two mid-range devices in this section.
High-tech equipment can mean the difference between filling your tag and spooking the game you’re after. We think the former is a better option, so check out the following features if you want to know what else this puppy can do.
Picture-in-picture mode
Five unique color palettes
Hot tracking
Remote control via smartphone
Multiple reticles, unlike AGM products
IP66 rated for dust and waterproofing
For a feature-packed thermal device at a great price, check out the Burris BTH50.
High-End Thermal Monoculars
This section is for you hunters and homeowners who want a device with a 384-pixel sensor that offers all the bells and whistles.
And, if you want to start dipping your toes into the 640-pixel waters, we’ve got an excellent choice immediately at the end of this section.
Rangefinding-Capable High End Buy Pulsar 2-8x Axion 2 LRF XQ35
Base Magnification: 2x Thermal Sensor: 384x 288 Refresh Rate: 50 Hz Pixel Pitch: 17 micron Display: 640×400 AMOLED Detection Range: 1,400 meters NETD: <40 mK Weight: .7 lb Best for: Long-range infrared detection, short to mid-range ID Not for: Extreme distances
Pulsar is a well-known and respected name in the thermal imaging arena. Their excellent customer service sure helps, but their spread of world-class heat-tracking products is why they’re one of the best, if not the best, in the business.
Housed in a magnesium-armored body and easy to slide into a pocket, the handheld Axion 2 LRF (laser range finder) can help you spot and range prey animals over 1,100 meters away. And, unlike all the other previous devices on this list, it utilizes a sharp, high-contrast AMOLED display.
The benefit of an AMOLED display is that it works in lower temperatures than an LCOS display. So, if you’re hunting or scanning in a frozen Minnesota winter, an AMOLED display could be the ticket.
It’s worth noting that this device comes in a non-rangefinding version as well.
You can save a good chunk of change by going without the LRF, and if you do, you’re still getting one of the best thermal imagers for hunting at any price point, let alone in the sub-$2,000 range. We love the rangefinder version, however, since it serves double duty in our packs.
Check out the Axion 2 XQ38 LRF if you want a unit with less base magnification. With both models, you’ll get:
Eight color palettes
Picture-in-picture mode
11-hour battery life and user-swappable batteries
2.4/5GHz WiFi wavebands
European-made Lynred sensor
16 GB internal storage (and 16 GB free cloud)
Fast start-up (fully booted in 5 seconds)
IPX6 waterproof rating
The feature-rich Pulsar Axion line isn’t cheap, but it’s well worth the money for all types of hunting — including hog, coyote, deer, elk, and more.
Base Magnification: 4.5x Thermal Sensor: 384x 288 Refresh Rate: 50 Hz Pixel Pitch: 17 micron Display: 1024×768 AMOLED Detection Range: 1,800 meters NETD: <40 mK Weight: 1.10 lb Best for: Long-range detection, short to mid-range ID Not for: Very long range ID
Compared to the Axion 2 I just mentioned, the Helion 2 XQ50 has a few significant advantages. The first leg up that springs to mind is this unit’s detection range. Because this imager starts with a 4.5x magnification, you’ll get an impressive 1,800 meters of range compared to the 1,400 meters of the Axion 2.
Of course, a device’s detection range isn’t all that matters. For example, you might prefer less magnification if you hunt in more confined quarters. If that’s the case, a unit like the Helion 2 XQ38 might be the best choice for you.
The Helion XQ series utilized excellent displays. Thanks to a standard 1024×768 AMOLED screen, these top-end devices provide razor-sharp optical detail for hunters in less-than-perfect conditions — day or night, in the summer, or during cold winters.
Pulsar built these units to last. They’re constructed of magnesium, which serves multiple purposes, including increased structural strength, heat dissipation, and high-quality image maintenance.
You can also expect:
Up to 8x digital zoom
Built-in photo and video camera
WiFi integration with Android and iOS
10-hour battery life and multiple battery options
Stadiametric rangefinding and reticle (non-laser)
16 GB onboard storage
If you want a 384-pixel sensor with the most bells and whistles available in a thermal monocular, the Helion 2 series is your best bet.
Our First 640-Pixel Unit AGM Global Vision Asp TM35-640
Base Magnification: 1.4x Thermal Sensor: 640×512 Refresh Rate: 50 Hz Pixel Pitch: 17 micron Display: 1024×768 OLED Detection Range: 1,600+ meters Weight: 1.1 lb Best for: Identification at mid-range Not for: Users who want quick-swap batteries
Once again, AGM shows up to the thermal imaging party with one of 2024’s very best models you can buy for your hard-earned money — the Asp TM35-640.
Equipped with the largest sensor featured in this article so far, it’ll deliver high-end thermal imaging capability, which means more crips and detailed images. Simply put, 640×512 sensors capture nearly 300% more thermal energy than their 384×288 counterparts.
With more detail, you’ll be able to identify animals at longer distances, which could mean a world of difference if you’re trying to differentiate between a buck or a doe, for example.
But that’s not the only advantage. The Asp TM35-640 comes with an OLED display, which provides more contrast than its AMOLED counterparts. Blacks are blacker with OLEDs, so you’ll be able to differentiate thermal signatures easier and more precisely.
There is one downside, though. Unlike the Pulsar units above, the battery is not user-replaceable.
Other than that minor gripe, we love this device, which also comes with:
5-hours of battery life
16 GB built-in memory
Photo and video camera
Four color palettes
Hot spot tracking
Up to 4x digital zoom
The TM35-640 is our top pick in the high-end range due to its technological advantages (640 sensor, OLED) over the two Pulsars above.
VIEW ON AMAZON
Higher-than-High End Units
For the discerning hunter and homeowners who spare no expense, we’re happy to showcase the best of the best thermal monoculars of 2024.
While we’re aware that several thermal monoculars exceed this price point (~$4,000), we think these units are the best because they’re made for you — hunters. Here you’ll find cutting-edge sensors, bells, whistles, advanced capabilities, and incredible performance.
Best All-Around High End Pulsar Helion XP50 PRO
Base Magnification: 2.5x Thermal Sensor: 640×480 Refresh Rate: 50 Hz Pixel Pitch: 17 micron Display: 1024×756 AMOLED Detection Range: 1,800 meters Weight: 1.1 lb NETD: <25 mK Best for: Detailed observation in harsh conditions Not for: One issue here is price, but if you can afford it, get it
Suppose you want the best possible compact thermal imaging monocular for hunting in the world. In that case, regardless of price, you’d be hard-pressed to top the genius-level capabilities that Pulsar stuffed into their Helion XP50 Pro.
It all starts with the thermal sensor Pulsar used in their flagship handheld. With a <25 mK NETD rating, this unit has no problem discerning even the smallest differences in heat. Those tiny differences, delivered to its HD-quality screen, give you a vivid and complete view of the field.
No matter the weather you’re battling, even extreme cold coupled with rain and fog, you’ll cut through it all to spot what you’re after — creatures that would be hidden entirely otherwise. And even if it takes you a while to spot what you’re after, this device uses hot-swappable batteries to keep you going as long as you want.
With 1,800 meters of detection range, you’ll be able to scan extreme distances. This impressive range, coupled with the high-end visual abilities packed into the unit, will allow you to identify precisely what the thermogram is displaying long before inferior units.
Additional game-breaking features of the Helion XP50 PRO include:
Picture-in-picture
Stadiametric rangefinding
IPX7 waterproof rating
Easy-to-update software
8+ hours of battery life
8x zoom
If you’re ready to step up to the highest level, check out Pulsar’s Helion XP50 Pro. But if you don’t battle temperature swings often, our next option might be even better for you.
VIEW ON OPTICS PLANET
Biggest Thermal Sensor Leica Calonox
Base Magnification: 2.5x Thermal Sensor: 640×512 Refresh Rate: 50 Hz Pixel Pitch: 12 micron Display: 1280×960 LCOS Detection Range: 3,000 meters Weight: 1.5 lb NETD: Not listed Best for: Long-range detection and ID Not for: Extreme temperature variance locations, but it’ll do just fine if you find yourself in one
In our opinion, the thermal device with the best image isn’t from Pulsar; it’s the Leica Calonox. To help decide between the two units, ask yourself one question:
Do you prefer to notice greater temperature changes, or do you seek out more detailed images?
Versus the Pulsar Helion XP50, Leica uses a 640×512 microbolometer while the Pulsar uses a 640×480 counterpart. For that reason, the Leica can collect more thermal energy via its sensor.
Then, because the Leica uses a more advanced 12-micron pixel pitch, the images are crisper and easier to see since there’s less distance between the center of each pixel and its neighbor.
The result is arguably the sharpest image on the market when it comes to compact handhelds explicitly made for hunters. But because the Leica uses an LCOS display, it won’t fare as well as the Helion in downright cold temperatures.
Your choice ultimately comes down to the environment you’ll do most of your thermal imaging. At 3,000 meters, the Calonox has nearly double the detection range of the Helion XP50 Pro. Do you need that much range, or would you rather have better performance in harsh conditions?
Here are some additional features to help guide your decision making:
Leica Image Optimization (LIO) for extreme sharpness
Up to 5 hours of run time
IPX4 Rating
10x magnification
Four color palettes
Excellent app integration and remote control
Can be used while charging
It’s pretty apparent that the Leica Calonox is an exciting challenger to the Pulsar Helion XP50 Pro.
Longest Range on the List ATN OTS 4T 640 4-40x Smart HD
Base Magnification: 4x Thermal Sensor: 640×480 Refresh Rate: 60 Hz Pixel Pitch: Not listed Display: 1280×720 LCOS Detection Range: 3,300 meters Weight: 2.0 lb NETD: <25 mK Best for: Long-range scanning, marathon hunting sessions Not for: Swampy environments — not rated for submerging in water
Not to be outdone, ATN presents its challenger to the thermal imaging throne. If you need extreme range, the ATN OTS 4T 640 4-40x tops all others on this list.
With 3,300 meters of detection, the ATN delivers excellent image quality via its 640×480 sensor. One exciting way that ATN stands apart from its competition is that it utilizes a superior 60 Hz refresh rate, enabling hunters to scan the field quicker and miss fewer details.
Capabilities like these are beneficial when considering this model’s base magnification. Starting at 4x, you’ll be able to eyeball the field without fear of being spotted. And, if you need different magnification levels, ATN offers several other powers in this series.
If you don’t need the extreme magnification and zoom this particular unit provides, chances are there’s something more your speed on this list.
Each device in this series includes:
Spin-to-zoom wheel
16+ hours of battery life
Dual-core processing
Video recording
HD video streaming
Ballistic calculator
If you’re seeking excellent battery life and ultra-long-range detection, you can’t do better than the OTS 640 series from ATN.
And if you don’t need long-range capabilities and desire less magnification, going with the ATN OTS 4T 640 1.5-15x will save you some dough over our previous top-end recommendations.
Technical Considerations of Thermal Monoculars
Thermal monoculars are complicated gadgets; let us help simplify them for you
Thermal monoculars are complex devices that give you the ability to see heat. Since animals are warmer than their surroundings, these devices pick up their infrared energy and turn it into visible light that a hunter can see.
With the suitable unit for the hunting and imaging you do, you’ll be able to inspect the darkness or defeat natural camouflage to spot hogs, coyotes, deer, elk, and other game that typically go undetected.
But, that ability isn’t possible without advanced electronics and materials. Let’s dive into the most critical aspects of thermal monoculars and what they mean for your buying decision.
Lens Material and Size
Unlike binoculars or spotting scopes that use glass for their objective lens, the lens at the end of the cylinder, many infrared scanners use the germanium. That’s because infrared light doesn’t pass through glass.
Germanium, on the other hand, is invisible to infrared light, enabling it to pass through and relay infrared information to the electronics. That info is then processed and delivered to your eyepiece.
The larger the objective lens, the more infrared light the sensor can capture. If you know you’ll be hunting a lot at night or in adverse conditions, a larger lens will help you see more infrared energy.
Sensor and Resolution
Also called the microbolometer, this component reacts to infrared wavelengths or heat given off by your prey. It’s composed of pixels that send electrical impulses to the electronics for processing, creating an image your eyes can see.
The more pixels your senor has, the better image quality you’ll receive. At the lower end of the price spectrum, you’ll commonly see 160×120 microbolometers, which equates to 19,200 total pixels overall.
If you were to move up into the next level of thermal monocular class we discuss, the 384×288 units, you get 110,592 pixels, or over a 500% increase. With more pixels, you’ll see more detailed images, meaning you’ll be able to spot and identify animals with far more certainty.
For that reason, we strongly recommend going with a 384-pixel unit or better. Check out the AGM Global Vision Thermal Monocular Taipan TM15-384 for the best 384-pixel unit you can buy for the money.
Pixel Pitch
Now that you’ve got an idea of what microbolometers do and how they work, it’s vital to discuss pixel pitch. This number measures the distance, in microns or µm, between pixels directly next to one another. You’ll typically see 17 µm or 12 µm measurements.
A lower number denotes a higher-quality sensor. That’s because there’s less space between the pixels themselves. With less distance between the pixels, the sensor can create more detail to give you a sharper image.
Noise Equivalent Temperature Difference (NETD)
NETD is the sensor’s ability to discern even the most minute differences in temperature. Like the pixel pitch measurement, this is another measurement that’s better if its value is lower.
Anything below the 60 milli-Kelvin (mK) is considered an above-average sensor. The higher quality instruments, such as the Pulsar Helion XP50 PRO, feature sensors capable of discerning minute differences in temperature, which helps give hunters the clearest, most precise image available.
In the case of the Helion XP50 Pro, its NETD value is <25 mK, making it one of the best values you’ll find on the market today.
Display Resolution and Type
After the microbolometer takes infrared information and passes it to its electronics for processing, that info will arrive on the display to show you what you’re looking at.
There are a few critical bits of information to know regarding displays. The first is resolution.
High-end devices use HD resolutions like 1280×960. On lower-end devices, you’ll typically see lower resolutions, including 720×540. Just like the microbolometer, more pixels lead to more detail. You can make out more of the animal or scene you’re investigating with more visible pixels.
The next information to keep an eye on is the display type.
On low-end devices, you’ll typically see LCOS displays. These are solid since they use very little energy and are relatively cheap, but they won’t work in temperatures below 14° F. You’ll want an AMOLED or OLED display if you regularly hunt or use your monocular in colder temps.
AMOLED displays work down to -25° Fahrenheit. They also provide greater contrast than what you’d get in an LCOS display, which can help you make out minute differences in a scene.
OLED displays work in similar temperatures as AMOLED displays, but they have an advantage considering contrast ratios. Because an OLED pixel powers itself, you’ll get deeper blacks on your display.
When using palettes like white-hot or black-hot, higher contrast levels can mean you’ll see more detail on your display. However, AMOLED displays have higher color saturation, meaning you’ll get more color when using palettes like fusion.
Ultimately, the image should look fantastic if you’re buying a high-end device, whether it uses an AMOLED or OLED display.
Magnification
Typically, thermal monoculars have some sort of base magnification. Shorter-range devices start at 1.4x or 1.5x, meaning objects appear 1.4x or 1.5x closer to your eye than you’d see naturally. Some have no magnification at all.
You can expect base magnifications of 2.5x to 4x and higher for long-range thermal monoculars.
If you hunt animals at great distances, say you’re in an enormous flat expanse somewhere in the plains of eastern Wyoming, detecting animals at long range can make the difference between missing a potential trophy buck or filling your tag.
Field of View
If you’re not aware, field of view is the width of the area you can see on your thermal imaging monocular display.
It relates to magnification in a pretty specific way. If you’re looking through a lens with higher magnification, you’ll have a smaller FOV. If you need to scan wide-open spaces, a larger FOV may be for you.
But, if you value the ability to see far, a monocular with a higher base magnification might make the most sense. It just depends on what and where you’re hunting.
Zoom
With zoom, you’re taking that base magnification and enlarging it. In the case of thermal monoculars, you’ll be doing so with a digital zoom feature. The electronics in your device are simply digitizing a larger version of what you’d see with no zoom applied to the image.
Zoom can help you determine whether or not the thermal image you’re seeing is prey worth further investigating or if you’re just looking at the neighbor’s dog.
Detection Range
When you combine the lens, microbolometer, display, and magnification, the hope is to create a marriage of components that will help you detect coyotes, hogs, deer, elk, or whatever else.
Different thermal monoculars have different detection ranges, which are measured in meters. Monoculars with large microbolometers and higher zoom numbers give you more extensive detection ranges.
Detection essentially just lets you know a creature is out there. Depending on how close you are to it and what color palette you’re using, it could show up as a splotch of light or a highly detailed image.
How easy it is to identify animals at a given range depends on the quality of your monocular.
Let’s talk about that next.
Identification Range
Identification range of the Leica Calonox: on point
All animals, humans included, give off heat, so deciphering what you’re looking at can be tricky. High-quality thermal monoculars allow you to identify the creature on your display at further distances than lower-quality devices.
Just like detection range, identification range is measured in meters. Naturally, all products always have a smaller identification range than they do detection range. That said, you can get away with a shorter identification range if you’re well accustomed to animal behavior and movement.
But, if you want to be sure about what you’re viewing, you’ll need to find a thermal monocular with a more extended identification range, for example:
If you’re a coyote hunter, knowing whether you’re looking at a coyote or a dog can make the difference between having some serious explaining to do or eliminating a harmful nuisance from your property.
A device like the Leica Calonox makes for an excellent identification tool.
Refresh Rate (Hertz)
Your refresh rate relates to both your microbolometer and display. This value, or the amount of Hertz, states the number of times per second your microbolometer or display will refresh.
Typically, you’ll see values of 50 Hz, meaning the image can refresh itself 50 times per second. If you scan large areas, you’ll want a higher value to keep up with how quickly you move the device.
Palettes
Thermal monoculars have a variety of ways to display the thermal information they pick up, and they’re called color pallets. Using different colors allows hunters to better decipher the scenery around them. We’ll discuss the four most widely used here.
Black Hot: Warmer objects appear black. This palate is used extensively by hunters and law enforcement because it doesn’t deviate much from how humans typically view the world.
White Hot: Warmer objects look white. This palate is one of the most commonly used for surveillance in urban environments.
Red Hot: Warmer objects look red. This palate is probably what you think of when you hear the words “thermal imaging.”
Rainbow: Warmer objects appear lighter and cool objects appear darker. This palate is excellent for observing objects and environments where heat differentials are minor.
Durability and Waterproofing
Because the items listed here are made mainly for hunting, they require a certain level of durability.
Spending lots of time in the great outdoors will beat the heck out of stuff, so finding durable equipment that can last several seasons will inevitably save you some dough.
One of the ways you can tell if something is durable is to identify what it’s made of. The Pulsar 2-8x Axion 2 LRF XQ35 is an excellent example of a product made of solid materials; in this case, Pulsar constructed it of incredibly durable magnesium.
Another way to determine how a product will fare against the elements is via its IP (ingress protection) rating. An IP rating tells you how well an enclosure can keep dust, water, and other stuff out. For example, in the case of an IP67, the first number (6) is the solids protection. Six and up indicates that the product is dust-proof.
The second number, 7, tells the consumer how water-tight a product is. In this case, seven means the product can withstand being submerged in water for up to 30 minutes.
In short, IP ratings give hunters a quick way of telling how much interior protection a product will have out in the wild.
Click here for a full breakdown of the IP rating system.
Battery Life and Type
If you plan on hunting for extended periods, you’ll want a device with long battery life. Better yet, find a device that enables you to swap batteries and extend your day in the field.
One great example of a device with long battery life is the ATN OTS 4T 640 4-40x Thermal Smart HD. Batteries can weigh a lot, so be sure to find your sweet spot between battery life and weight when choosing your next thermal imager.
WiFi Connectivity
Some devices are equipped with WiFi capabilities, which connect the thermal imager to a cell phone to transfer data between the two. Most devices use the older 2.4 GHz spectrum, but newer ones use 5 GHz for faster data transfer speeds.
Size and Weight
At the risk of sounding like Captain Obvious, the size and weight of your thermal monocular could mean the difference between making it a joy to carry or a bulky hindrance.
Get your hands on a device that offers you the portability you require. One example of a lightweight unit with exceptional capabilities is the AGM TM19-384.
Safety
Thermal monoculars make up just one portion of the thermal imaging market. Manufacturers sell thermal binoculars and thermal scopes as well. Compared to thermal scopes, I think monoculars are safer.
When using a rifle scope, you have to point your weapon at what you want to scan. Doing so can present some safety concerns if you’re hunting with a large group or in a well-trafficked area. Plus, looking through the scope all the time can be a literal pain in the neck.
I think the safest way to use thermal technology is via a monocular, though a solid thermal rifle scope is a nice piece of kit too.
Warranty
A product’s warranty is something to consider when dropping over a grand on a thermal monocular. Make sure you feel comfortable with the company you’re dealing with and the warranty they offer. Read the fine print.
Most of the monoculars on this list come from companies that offer three-year limited warranties for their products. As always, ensure you’re getting a solid warranty from a trusted company when you decide to purchase this significant.
Thermal Technology vs. Night Vision
Thermal technology vs. night vision: which is best for you?
Many of you might wonder whether night vision or thermal monoculars are best for hunting, and there’s some confusion surrounding the debate.
The differences between the two come down to what each device can “see” and how it sees it.
Night vision devices rely on a light source — the moon immediately comes to mind. You can also use an infrared illumination device to provide your scope or monocular with a light source.
On the other hand, thermal imaging doesn’t require any light whatsoever. These devices pick up heat signatures and can work flawlessly in the pitch dark of a moonless night. You can also use a thermal imaging unit in the daytime to help you detect and identify bedded or naturally camouflaged animals.
Both thermal and night vision devices have their advantages and drawbacks, so using them in conjunction is good. For example, a thermal monocular and a night vision scope combo tacked onto your rifle could be a winning combo for quick scanning to detect prey and accurate shot placement.
Which of 2024’s Best Thermal Monoculars Will See the Heat?
Time to step up your game and see what all the fuss is about
As you can see, 2024’s best thermal monoculars come in all shapes and sizes. The high-tech products we recommend are lightweight, handheld, and extremely helpful for spotting and identifying coyotes, hogs, and other pesky creatures.
Not only can one of these infrared scanners help you see in the dark, but they can help you spot creatures when conditions are foggy, rainy, and frigid. The coyotes, hogs, and raccoons out there will stand no chance if you’ve got a quality thermal monocular in your kit.
Heck, you also get an advantage in the daytime if you’re looking to find bedded and naturally camouflaged wild game like deer and elk.
So hopefully, no matter which device you pick, whether it’s a Pulsar, ATN, or AGM Global Vision, it’ll give you the ability to see what your eyes alone can’t.
Whether you’re looking for a budget option, a solid setup under $1,000, the best mid-range choice for the money, or an ultra-high-end hoss, we hope our thermal imaging for hunting reviews and write-ups give you all the advantages you seek.
Thanks for checking out 2024’s best thermal monoculars, and be sure to check back soon for more hot gear reviews.
“Backyard Air Rifle Shooting: Know the Rules and Regulations. Discover whether shooting an air rifle in your backyard is legal and safe. Get essential guidelines to ensure responsible and enjoyable shooting experiences within the comfort of your own property.”
can i shoot air rifle in my backyard?
Air rifles are a popular choice for recreational shooting and target practice. However, whether or not you can shoot an air rifle in your backyard depends on various factors such as your location, local laws, and safety considerations. Before engaging in any shooting activities in your backyard, it is crucial to research and understand the regulations specific to your area.
In many residential areas, shooting an air rifle in your backyard may be prohibited due to safety concerns. Backyards are typically confined spaces with close proximity to neighboring properties, which can pose risks if projectiles travel beyond the intended target. It is essential to ensure that you have a safe and suitable backstop or bullet trap to prevent any stray pellets from causing harm.
Additionally, familiarize yourself with local laws and regulations regarding firearms and shooting activities. Some areas may have restrictions on discharging any type of weapon within city limits or within a certain distance from dwellings. It is always advisable to contact your local law enforcement agency or relevant authorities to obtain accurate information about the legality of shooting an air rifle in your specific location.
In conclusion, shooting an air rifle in your backyard is subject to local laws and regulations. It is important to check with your local authorities to ensure compliance with any restrictions or permissions required. Safety precautions should always be taken, such as using a suitable backdrop and ensuring that the area is clear of people or pets.
When you see someone participating in an air rifle shooting competition, you may notice that they are wearing a particular type of clothing. This clothing is not just for show – it serves a specific purpose that helps the shooter to be successful. In this blog post, we’ll take a closer look at why air rifle shooters wear suits and how it helps them to improve their performance.
What’s with the funny outfits in the Olympic shooting?
The first reason why air rifle shooters wear suits is for support. The jacket and pants are usually made from a stiff material, such as canvas, which helps to support the shooter’s body and minimize movement.
This is important because small body movements can have a significant impact on the accuracy of the shot. The shooting jacket and pants also have rough material on contact points, such as the elbows and shoulders. This helps keep the muscles from getting tense while holding the gun.
Another reason why air rifle shooters wear suits is for consistency and accuracy. The shoes that shooters wear have very stiff, flat, oversized soles, which keep the feet from moving.
Lastly, the gloves that shooters wear help to protect their hands from getting blisters or calluses from holding the gun tightly for an extended period of time.
Requiring only a few parts, this simple and effective setup provides stable images for detailed views of the night sky.
“This is the best binocular mount I’ve ever used!” Those were the first words out of my mouth as I came indoors from testing my just-completed binocular rig.
It’s rare that I build something that actually works better than expected, but finally I’d come up with a binocular mount that provides steady views, is easy to use, very portable, and simple to build. It was a good night.
I’ve written many times about the virtues of mounted binoculars. Indeed, a good number of the objects I’ve observed over the years need steady views to be to be seen at all. I’ve used (and built) many binocular mounts, but most of them have been either expensive, bulky, or, to some extent, awkward to use. The mount shown here has none of those shortcomings and is ideally suited to observers like me who prefers to view the sky while seated or reclining in a deck chair.
The main components of my bino mount can be obtained at your local camera store, but if you’re a photographer, it’s likely you already own many of them. You’ll need a standard camera tripod with a pan/tilt head (the sturdier, the better), a ball head, and a monopod. I used an inexpensive monopod made by Slik and similar ones can be had for around $20. The ball head doesn’t need to be an expensive, heavy duty model unless your binoculars are particularly weighty. Mine is a Stroboframe FLM compact ball head, which typically retails in the $25 range. A nice feature of this unit is that a single knob locks all motions. You’ll also need a right-angle binocular-to-tripod adapter. Avoid the flimsy plastic ones that often come with budget binoculars.
The final component of my bino-mount assembly is the part you make: the bracket that mates the monopod to the tripod head. As ATM projects go, it doesn’t get much easier than this. Only a handful of hardware store parts are needed and none of the dimensions are especially critical.
Shown here are the various pieces of the tripod mounting bracket before assembly.
You’ll need to round up a 2½-inch by 5-inch length of ¾-inch plywood, a ¼-20 threaded insert (a T-nut will also work with a minor modification), a short length of flexible plastic tubing (automotive vacuum hose works well), and a U-bolt. The size of the U-bolt will depend on the diameter of the monopod section you’re going to clamp in the bracket. I recommend using the first segment that telescopes out of the monopod’s body, which measures ¾ inches with my Slik.
Begin construction by cutting a your length of plywood in half so that you have two 2½-inch square pieces — one will be used for the mounting block, the other will form a cradle for the monopod. In the center of one piece, drill a hole that corresponds to the diameter of the monopod section to be cradled. Next, cut that piece in half and set aside.
Turning to the second plywood part, mark the center and drill the hole to accommodate the threaded insert. Screw in the insert until it’s flush with the underside of the block. Next, drill two holes for the U-bolt. Make these a bit bigger than needed to avoid having the bolt’s threads bind on the wood block. You’ll also have to enlarge these holes on the underside so that the U-bolt nuts are recessed. You’ll also probably find that the threaded sections of the U-bolt will have to be shortened with a hacksaw so that they didn’t protrude beyond the surface of the plywood. Paul Oppenheim wrote in with a helpful tip, suggesting, “thread the nuts on first! After you’ve cut the legs, gently back the nuts off the legs, and you will have repaired any thread damage the hacksawing might have caused.”
Finally, slip a short length of tubing onto the U-bolt to prevent it from marring the finish of your monopod.
This view shows the underside of the bracket after assembly, but before painting. Note the recessed holes that accommodate the nuts for the U-bolt.
The remaining work basically consists of affixing (with wood screws and glue) the cradle halves to the mounting block, as shown in the photo above. Give the wood a waterproof finish to protect it from the elements, and let it dry. Now it’s time to assemble the mount. Begin by laying the monopod in the cradle so that the bottom of the thickest section abuts the top of the bracket. Next, slip on the U-bolt and tighten the nuts just enough that the monopod won’t rotate. Attach this to your tripod via the threaded insert, mount your binoculars, and you’re done . . . almost.
Here the mount is fully assembled before painting, just to make sure everything fits properly.
It’s likely the assembled mount will be considerably out of balance and that you’ll need to counter the weight of the binoculars. I made a counterweight from of a plastic peanut-butter jar filled with coins. I simply slide the foot of the monopod through a hole in the lid into a wooden disk in the bottom of the jar. The rubber foot of the monopod seats in a hole drilled part way through the wooden disk. A hose clamp attached to the monopod prevents the lid from sliding down. I filled the jar with all the loose change I had lying around (look under your sofa cushions if you’re a few ounces short), then screwed the jar onto the lid. The nifty thing about this counterweight is that you can adjust it by simply extending the monopod until the balance feels right.
The mount’s penny-ante counterweight (left) and (right) two important purchased items: a tripod ball head and right-angle binocular adapter.
After my original article describing this mount appeared in Sky&Telescope, Richard Frederick wrote to say that he’d found a way to make the mount without having to actually build anything. Instead of making a tripod-mounting bracket, he bought a Interfit tripod clamp. (Bogen also makes a similar unit.) So, if you’d rather spend $25 than the time it takes to make the part described above, you actually can put together my mount with off-the-shelf-parts.
To use the bino mount, leave the tripod head lightly clamped — once you’ve adjusted the counterweight, the binoculars won’t move on their own. Loosen the ball head and aim the binoculars freehand — as if they weren’t mounted at all. Once you’ve swept up your target, lock the ball head, and enjoy the view — the binoculars will seem to float in front of your eyes. And because the motions of the mount have so many degrees of freedom, you’ll find that you can comfortably view a huge swath of sky from one position. Indeed, on most nights, I never move my lounge chair at all. By adjusting my recliner, I can scan from the horizon to the zenith and a generous amount east and west. This really is the best mount I’ve used.
Soon after completing this project, I built a second mount that dispenses with the monopod and allows me to mount two binoculars simultaneously, one at either end of a length of aluminum tubing This way I can readily compare views in my 10×50s and 15×70s, for example. With this configuration, one binocular serves as the counterweight for the other. This two-headed contraption consists of a 48-inch-long piece of 1¼-diameter aluminum tubing in place of a monopod. Into either end of the tubing, I glued a short length of 1¹̷₈ -inch-diameter hardwood doweling with a ¼-20 anchor bolt screwed into it to serve as mounting stud for the ball head. In use this bino mount works the same way as the original monopod version.
With either binocular mount you’ll have the means to get steady views of the night sky, without the expense of a commercial unit or resorting to image-stabilized binoculars. Once you’ve tried using your binos this way, you may never use them unmounted again.
Did you find this article interesting or helpful? If so, consider using this link the next time you shop at Amazon.com. Better yet, bookmark it for future use. Thanks to Amazon’s associates program, doing so costs you nothing yet helps keep this site up and running. Thanks!
(This article is an updated and expanded version of one that appeared in the August 2010 issue of Sky&Telescope)
In this article, we will take a look at the 22 largest hunting companies in the US. You can skip this part and go to 5 Largest Hunting Companies in the US.
The hunting industry in the US remains an attractive niche market for investors. The market has several segments which are expected to grow in the months and years to come. According to a report by Association of Fish and Wildlife Agencies, hunter spending in the US generates about $185 million per day for the economy. The report said that despite an increasing urbanization, there has been a dramatic rise in the number of Americans who indulge in hunting sports for recreation. The report said that about 11.5 million people took part in hunting activities in 2016, and a whopping 7.6 million of them were deer hunters.
According to a report by Research and Markets, the global fishing, hunting and trapping market value stood at about $936.4 billion in 2021. This value was expected to cross $1,031.78 billion in 2022, growing at a compound annual growth rate (CAGR) of 10.2%. By 2026, the same market, according to the report, is estimated to touch $1,507.13 billion in 2026.
Our Methodology
For this article we scoured the hunting industry and its related segments to pick the top 22 players that are directly or indirectly involved in selling hunting related equipment, hunting firearms, apparel and accessories. Some of these companies are public, while others are private but with sizable impact and revenue in the industry. For public companies we have mentioned their market caps, while latest available annual revenue is mentioned for private companies. The list is ranked in ascending order of market cap. For private companies, we used annual revenue for ranking.
Photo by Molnár Bálint on Unsplash
Largest Hunting Companies in the US
22. Browning Arms Company
Annual Revenue: $100M
Number of Hedge fund holders: N/A
Browning Arms Company is a Utah-based hunting firearms and outdoor gear company. Browning Arms Company was founded in Utah in 1878. It is one of the oldest hunting companies in America.
21. American Outdoor Brands, Inc. (NASDAQ:AOUT)
Market Cap: $144M
Number of Hedge fund holders: 8
American Outdoor Brands, Inc. (NASDAQ:AOUT) owns several brands that are involved in hunting and related equipment. American Outdoor Brands, Inc. (NASDAQ:AOUT)’s hunting-related brands include Grilla Grills (sells grills), Bog Hunt (sells hunting equipment), Lockdown (firearms), Caldwell Shooting and more.
20. O.F. Mossberg & Sons
Annual Revenue: $160M
Number of Hedge fund holders: N/A
O.F. Mossberg & Sons is one of the largest hunting firearm companies in the US. O.F. Mossberg & Sons has a special section on big game and field hunting firearms on its website. O.F. Mossberg & Sons has another subsidiary, Maverick Arms, that sells hunting and security firearms, barrels, choke tubes, and conversions. O.F. Mossberg & Sons ranks 20th in our list of the biggest hunting companies in the US.
19. Big 5 Sporting Goods Corporation (NASDAQ:BGFV)
Annual Revenue: $261.45M
Number of Hedge fund holders: 10
California-based Big 5 Sporting Goods Corporation (NASDAQ:BGFV) sells hunting rifles and accessories, among other sporting goods. In November, Big 5 Sporting Goods Corporation (NASDAQ:BGFV) posted Q3 GAAP EPS of $0.29. Revenue in the quarter fell 9.7% to total $261.45 million, beating estimates by $3.05 million. Adjusted EBITDA in the period was $13.0 million, compared to$37.3 million posted in the same period last year. For the fourth quarter of 2022, Big 5 Sporting Goods Corporation (NASDAQ:BGFV) said that it expects same store sales to decrease in the high single-digit to low double-digit range compared to the fiscal 2021 fourth quarter,
18. Clarus Corporation (NASDAQ:CLAR)
Market Cap: $352.96M
Number of Hedge fund holders: 20
Clarus Corporation (NASDAQ:CLAR) sells outdoor equipment. Clarus Corporation (NASDAQ:CLAR) is added in our list of the largest hunting companies in the US because some of its brands are directly involved in hunting-related products. For example, it owns Sierra Bullets, which makes bullets used in hunting, target shooting and for defense purposes. Clarus Corporation (NASDAQ:CLAR) is also behind Barnes Bullets, which is a key player in the bullet industry.
17. Sportsman’s Warehouse Holdings, Inc. (NASDAQ:SPWH)
Market Cap: $380M
Number of Hedge fund holders: 22
Utah-based Sportsman’s Warehouse Holdings, Inc. (NASDAQ:SPWH) is a Utah-based company that sells guns and hunting-related equipment. Sportsman’s Warehouse Holdings, Inc. (NASDAQ:SPWH) operates across 30 states in the US.
16. Smith & Wesson Brands, Inc. (NASDAQ:SWBI)
Market Cap: $470M
Number of Hedge fund holders: 12
Smith & Wesson Brands, Inc. (NASDAQ:SWBI) is a Massachusetts-based firearm company that makes several pistols and firearms for recreation and hunting. In December, Smith & Wesson Brands, Inc. (NASDAQ:SWBI) fell after the company posted a 48% drop in its sales. Smith & Wesson Brands, Inc. (NASDAQ:SWBI) said that the demand for its products was down when compared to last year amid rising inflation, among other factors. Smith & Wesson Brands, Inc. (NASDAQ:SWBI)’s gross margin in the period also fell to 32.4% of sales vs. 44.3% a year ago. However, Smith & Wesson Brands, Inc. (NASDAQ:SWBI)’s management said that it expects to remain “highly profitable” despite the challenges.
15. Remington Outdoor Company (Owned by Cerberus Capital Management)
Annual Revenue (2021): $700M
Number of Hedge fund holders: N/A
Remington Outdoor Company was one of the biggest firearm companies in the US. It announced bankruptcy back in 2018 but later made a comeback. Remington Outdoor Company had to file bankruptcy again in 2020. Remington Outdoor Company is now owned by Cerberus Capital Management. Remington Outdoor Company still sells hunting equipment, hunting rifles and related accessories on its website.
14. Sturm, Ruger & Company, Inc. (NYSE:RGR)
Market Cap: $975M
Number of Hedge fund holders: 11
Sturm, Ruger & Company, Inc. (NYSE:RGR) is one of the notable publicly-traded firearm manufacturers in the US. Sturm, Ruger & Company, Inc. (NYSE:RGR) lists several rifles and firearms on its website especially designed for different kinds of hunting expeditions. In December, Sturm, Ruger & Company, Inc. (NYSE:RGR) soared after the company surprised investors with a $5.00 per share special dividend. Sturm, Ruger & Company, Inc. (NYSE:RGR) said that it was giving dividend because of its strong operational and financial performance, including consistently positive cash flow and a current cash balance of $220 million. Sturm, Ruger & Company, Inc. (NYSE:RGR) has returned about $590 million in cash to shareholders through its quarterly dividend and share buybacks.
13. Wolverine World Wide, Inc. (NYSE:WWW)
Market Cap: $1.07B
Number of Hedge fund holders: 18
Wolverine World Wide, Inc. (NYSE:WWW) is a Michigan-based company that specializes in footwear. Wolverine World Wide, Inc. (NYSE:WWW) has a complete section for hunting boots. It sells waterproof boots designed for difficult terrains and hunting environments. Earlier this month, Wolverine World Wide, Inc. (NYSE:WWW) gained after the company posted positive outlook for 2024 at the ICR conference. Wolverine World Wide, Inc. (NYSE:WWW)’s management has revealed plans to cut down its inventories and increase profits moving forward.
12. Patagonia
Annual Revenue: $1.5B
Number of Hedge fund holders: N/A
California-based Patagonia is one of the biggest hunting apparel companies in the US. Patagonia products are highly famous among hunters in the US. Patagonia has operations in over 10 countries and manufacturing facilities spread across the globe.
11. Compass Diversified (NYSE:CODI)
Market Cap: $1.52B
Number of Hedge fund holders: 7
Compass Diversified (NYSE:CODI) is a major holding company that owns several brands. Some of Compass Diversified (NYSE:CODI)’s brands are related to hunting. Last year, Compass Diversified (NYSE:CODI) completed its buyout of PrimaLoft, Inc., which makes high-performance material solutions, specializing in insulations and fabrics. Compass Diversified (NYSE:CODI)’s products are used in hunting, for military purposes and in other outdoor activities. In 2018, Compass Diversified (NYSE:CODI) also bought Ravin Crossbows for $94 million.
10. Vista Outdoor Inc. (NYSE:VSTO)
Market Cap: $1.55B
Number of Hedge fund holders: 22
Vista Outdoor Inc. (NYSE:VSTO) is behind several major hunting-related brands, including Bushnell, Black Hawk, Remington, among others. Vista Outdoor Inc. (NYSE:VSTO) acquired some parts of the gunmaker Remington Outdoor Co Inc’s ammunition and accessories businesses for about $81 million. In November, Vista Outdoor Inc. (NYSE:VSTO) stock fell after the company cut its full-year estimates. Vista Outdoor Inc. (NYSE:VSTO) said that it is operating in a challenging environment. It now expects full-year revenue to come in between $3.05 billion to $3.15 billion, down from a prior outlook of $3.20 billion to $3.325 billion.
9. Camping World Holdings, Inc. (NYSE:CWH)
Market Cap: $2.15B
Number of Hedge fund holders: 22
Camping World Holdings, Inc. (NYSE:CWH) is an Illinois-based company that sells recreational vehicles. But being an outdoor company, Camping World Holdings, Inc. (NYSE:CWH) also sells hunting equipment, fishing gear and related products. Some of the notable hunting items Camping World Holdings, Inc. (NYSE:CWH) sells on its platform outdoor generators, tents, outdoor vaults, grills and fishing rods.
8. Cabela’s (Parent Co: Bass Pro Shops, Great Outdoors Group, LLC.)
Annual Revenue: $3.6B
Number of Hedge fund holders: N/A
Cabela’s is an American retailer that specializes in products related to hunting, fishing, camping and hiking. Cabela’s sells hunting apparel, accessories, trail cameras, decoys, hunting watches and much more. Cabela’s parent organizations are Bass Pro Shops, Great Outdoors Group, LLC.
7. YETI Holdings, Inc. (NYSE:YETI)
Market Cap: $3.88B
Number of Hedge fund holders: 23
Texas-based YETI Holdings, Inc. (NYSE:YETI) ranks 7th in our list of the largest hunting companies in the US. YETI Holdings, Inc. (NYSE:YETI) makes outdoor products such as water coolers, ice chests, thermoses and related accessories. YETI Holdings, Inc. (NYSE:YETI) also sells big game hunting and water fowl hunting gear on its website.
In November, investment firm Canaccord Genuity started covering Yeti Holdings (NYSE:YETI) with a Buy rating. The firm thinks the brand has a “staying power”.
6. Columbia Sportswear Company (NASDAQ:COLM)
Market Cap: $5.78B
Number of Hedge fund holders: 20
With a market cap of $5.7 billion, Columbia Sportswear Company (NASDAQ:COLM) is one of the biggest outdoor companies in the US. Columbia Sportswear Company (NASDAQ:COLM) also makes caps, puffer jackets, trousers, hoodies and related equipment for hunting. In October, Columbia Sportswear Company (NASDAQ:COLM) declared a quarterly dividend of $0.30/share, inline with the previous dividend. The forward dividend yield at the time came in at 1.63%.
Click to continue reading and see 5 Largest Hunting Companies in the US.
Suggested articles:
15 Biggest Window Manufacturing Companies
12 Biggest Ocean Cleaning Companies in the World
13 Cash Rich Penny Stocks That Hedge Funds Are Buying
Disclosure: None. 22 Largest Hunting Companies in the US is originally published on Insider Monkey.
"Air Rifle Scope vs Rifle Scope: Unveiling the Ultimate Precision Optics. Discover the essential differences and benefits of these two optical devices, empowering shooters...





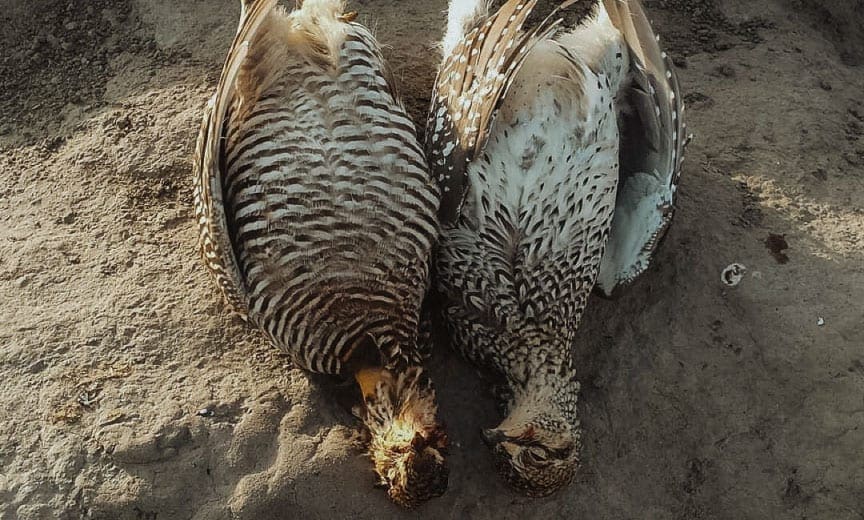
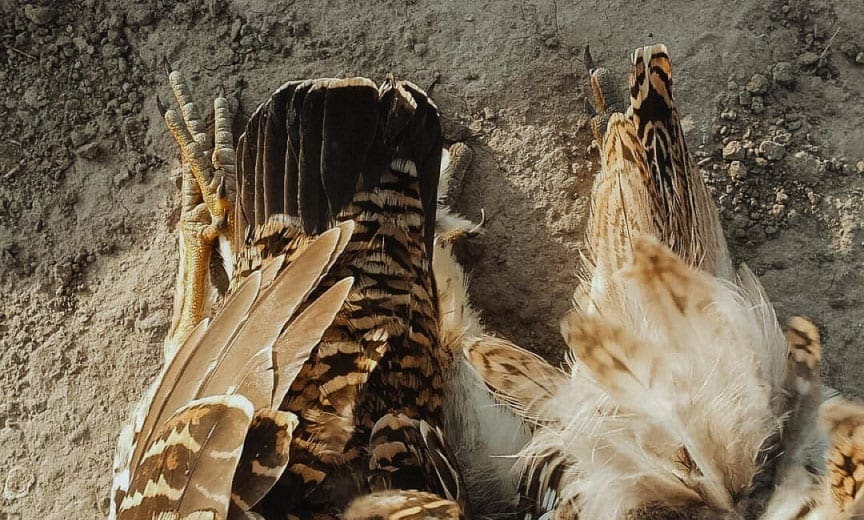
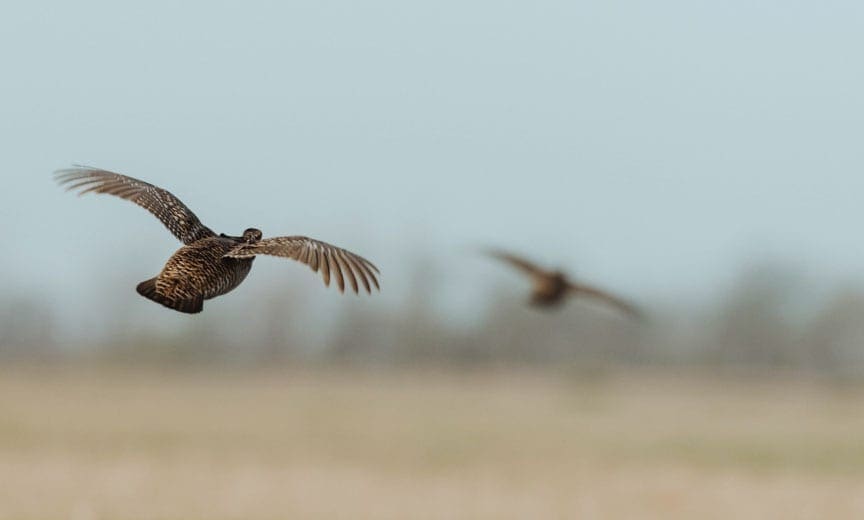
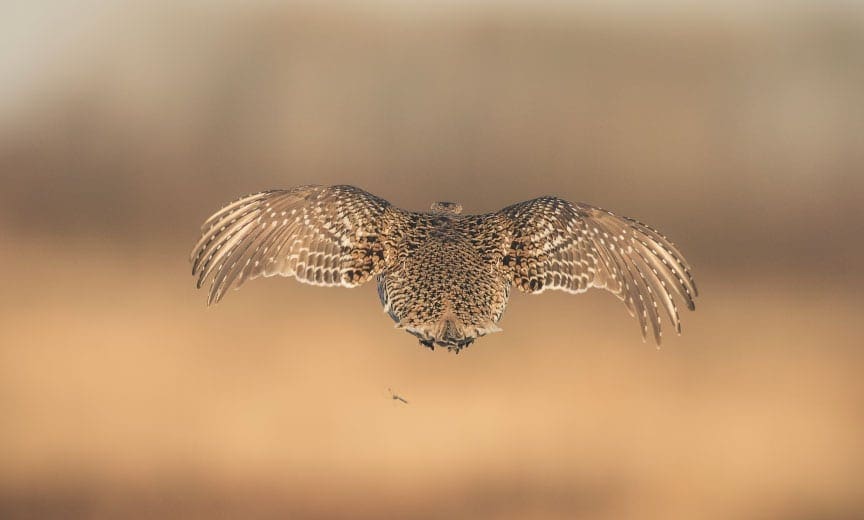
 Hunters and shooters across North America love their 30-caliber cartridges. With the popularization of the 30-06 Springfield, the .308” diameter bullet became synonymous with stopping power and long range precision.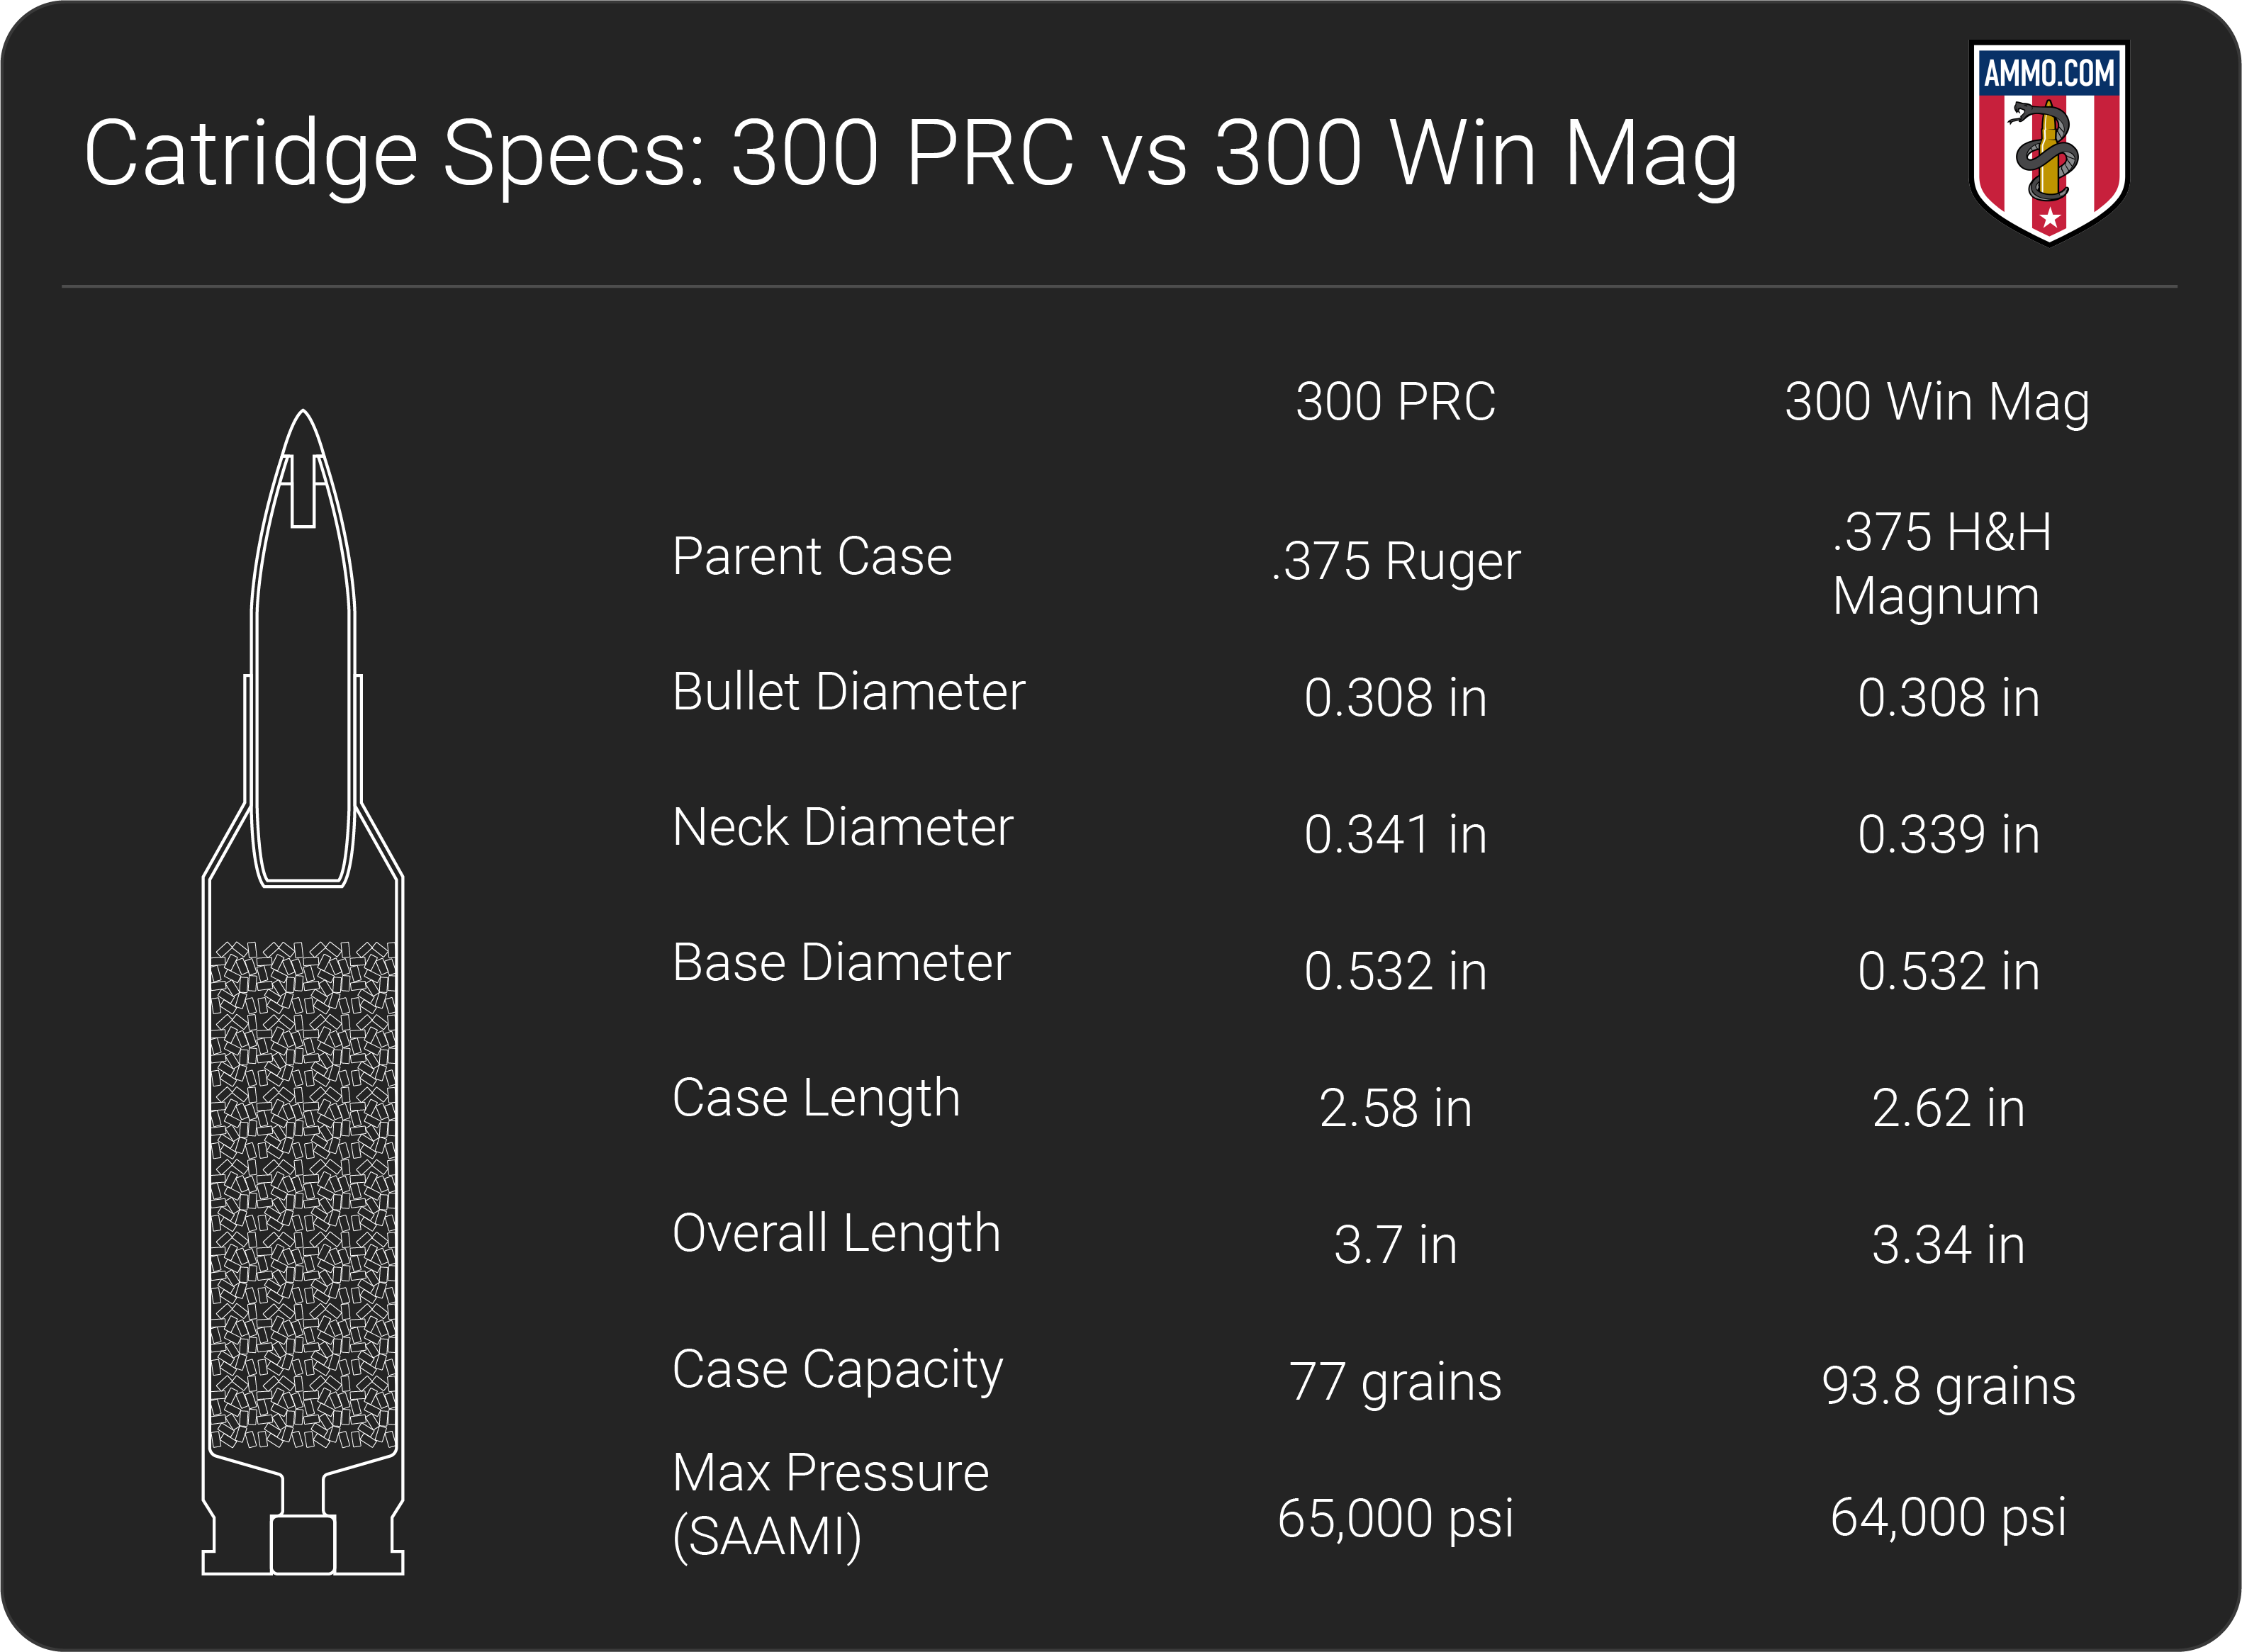


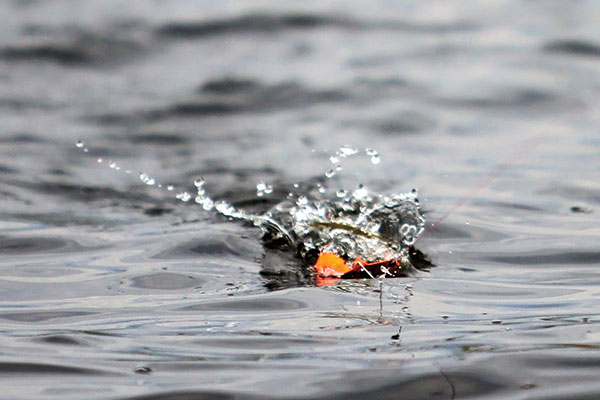
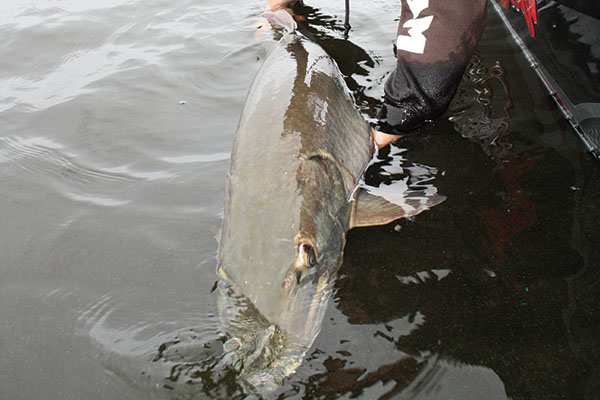 Few things in fishing are more exciting than watching a muskie suddenly appear like a great white shark stalking your surface lure. It’s even more heart-stopping when the monster opens its mouth and engulfs it. Unfortunately, many muskie anglers are of the mistaken belief that, while thrilling to use, topwater lures are low-percentage options and highly situational.
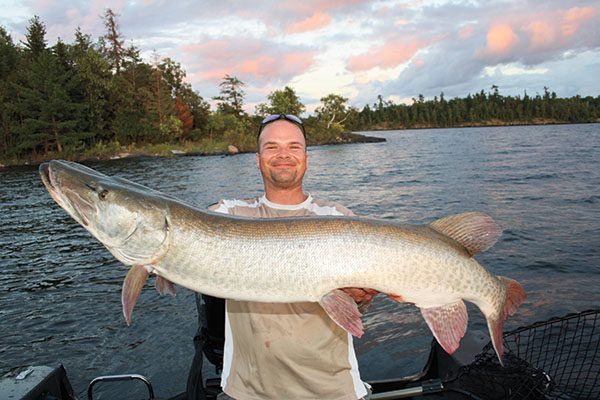 THE ULTIMATE EDGE
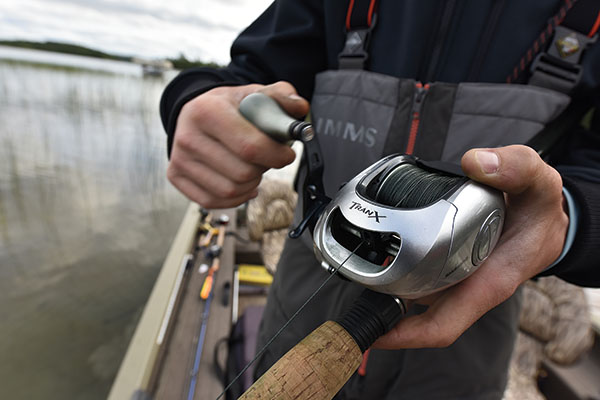 GOOD VIBRATIONS
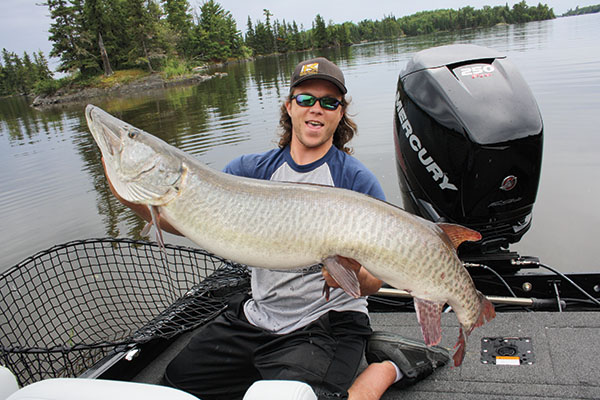 FAST & ERRATIC OR SLOW & STRAIGHT?




 compact ball head, which typically retails in the $25 range. A nice feature of this unit is that a single knob locks all motions. You’ll also need a right-angle binocular-to-tripod adapter. Avoid the flimsy plastic ones that often come with budget binoculars.
 . (Bogen also makes a similar unit
 .) So, if you’d rather spend $25 than the time it takes to make the part described above, you actually can put together my mount with off-the-shelf-parts.
 the next time you shop at Amazon.com. Better yet, bookmark it for future use. Thanks to Amazon’s associates program, doing so costs you nothing yet helps keep this site up and running. Thanks!


