“Unlocking the Power: Exploring Air Rifle Velocity for Unparalleled Precision and Performance. Discover the game-changing potential of air rifle velocity as we delve into the science behind its impact on accuracy, range, and overall shooting experience. Get ready to elevate your shooting prowess to new heights with our comprehensive guide!”
air rifle velocity
When it comes to air rifles, one of the key factors that enthusiasts and hunters look for is velocity. Air rifle velocity refers to the speed at which a pellet or BB is propelled out of the barrel. It plays a crucial role in determining the accuracy, power, and range of a shot. The higher the velocity, the faster the projectile travels towards its target.
In general, air rifle velocities can vary widely depending on factors such as the type of gun, caliber, pellet weight, and power source. Different models offer different velocities, ranging from around 300 to over 1,500 feet per second (fps). Some air rifles are designed for high-velocity shooting for long-range targets or hunting larger game animals, while others prioritize lower velocities for backyard plinking or target practice.
It’s important to note that while higher velocities may seem desirable for their potential impact on accuracy and knockdown power, they also come with trade-offs. Extremely high-velocity shots can be louder, less accurate due to increased recoil or instability, and may have limited pellet selection options. Therefore, finding the right balance between velocity and other factors is crucial when selecting an air rifle that suits your specific needs and preferences.
In conclusion, air rifle velocity plays a crucial role in determining accuracy and effectiveness. Higher velocities result in greater power and longer range, making them ideal for certain activities like hunting or target shooting. However, it is important to consider safety measures and local regulations when using high-velocity air rifles. It is recommended to choose a velocity that aligns with your specific needs and skill level for optimal performance.
Known as the Land of 10,000 Lakes, Minnesota is a freshwater paradise. But more importantly, it’s a dream come true for every avid angler. If you’re wondering why that’s the case, the answer is simple – the entire state is brimming with record-breaking specimens! And no, we aren’t exaggerating. We’re probably selling it short. But we’ll let the Minnesota state record fish speak for themselves.
We could endlessly gush about Minnesota being the ultimate freshwater angling destination, but only facts testify to this. So, in this article, we’ll list the most sought-after fish species in Minnesota and give you an account of how they made the headlines. So without further ado, let’s see what all the hype is about.
As a freshwater fishing magnate, Minnesota boasts world-famous fish species such as Bass, Catfish, Crappie, Sunfish, and Perch. The list goes on and includes local VIPs like Walleye, Pike, Musky, and Sturgeon, too. But be it a local or global favorite (or both), one thing is certain – there isn’t a shortage of brag-worthy catches.
To see what Minnesota’s record for each headliner is, click on the species below. Bear in mind that the fish are listed in alphabetical order and not according to the latest record.
Bass (Largemouth)
Bass (Smallmouth)
Catfish (Flathead)
Crappie
Musky
Perch (Yellow)
Pike (Northern)
Sturgeon
Sunfish
Walleye
Bass (Largemouth)
Minnesota state record: 8 lbs 15 oz on Auburn Lake in 2005.
Largemouth Bass are, without a doubt, among the most popular freshwater game fish in the world. Minnesota is no exception. One reason they’re so much in demand is because they’re excellent opponents. They’ll strike your bait with explosive force. The other reason is their abundance. You’ll find them in over 2,000 lakes and almost all major rivers in Minnesota.
The weedy shorelines and underwater structures of Leech Lake, Lake Minnetonka, and Vermillion Lake make an ideal habitat for Largemouth Bass. Besides lakes, you can count on the Mississippi, St. Croix, Zumbro, and Cloquet Rivers to always provide you with a bragging story. From the regular 2-pounders to enviable 5-pounders, these hotspots won’t disappoint with their Largemouth Bass offer.
Curiously enough, the Minnesota state record Largemouth Bass didn’t come from any of these fisheries. The biggest Minnesota Bass was taken from Auburn Lake in 2005. The fish weighed 8 pounds 15 ounces and was 23.5 incheslong. And more impressively, its girth was 17.5 inches! This monster dethroned its predecessor, which had held the record for 11 years.
To make the entire story even more interesting, this beast was the first fish of the morning for Mark Raveling, a 54-year-old tournament angler. How about that?
Bass (Smallmouth)
Minnesota state record: 8 lbs on West Battle Lake in 1948.
If you thought that Largemouth Bass were all the rage, wait to see what Minnesota Smallmouth Bass have in store for you. Smallies are anything but small. While they weigh between 2 and 4 pounds on average, they can easily outgrow Largemouth and reach 8 pounds. What’s more, the Minnesota state record Smallmouth Bass caught on West Battle Lake in 1948 was an 8 lb brute!
West Battle Lake isn’t the only body of water stocked with Smallmouth Bass. Their population is vibrant in the upper Mississippi and St. Croix Rivers, as well as in all major drainages across the state. They also thrive in Rainy Lake, Mille Lacs Lake, and Basswood Lake. In fact, two of the biggest Minnesota Smallies were caught in these lakes – a Lake Mille Lacs 5-pounder landed in 2001 and a Basswood Lake 6-pounder hooked in 1997.
Long story short, it seems that it’s high time a new Minnesota state record for Smallmouth Bass was made! So, gear up with hard lures, soft tube baits, plastic worms, spinners, or jigs, and hit one of these lakes and rivers in late spring and score the next state record.
The rocky eddies of rivers and crystal-clear shallows of lakes will be your allies when outsmarting Smallies. Once hooked, however, they won’t go down without a fight. More aggressive than Largemouth, Smallies will make you break a sweat – and hopefully a record, too.
Catfish (Flathead)
Minnesota state record: 52.25 inches on the St. Croix River in 2017.
Speaking of hefty fellas that will spice up your angling endeavors, have you ever fished for Flathead Catfish? These massive creatures are the second largest fish in Minnesota, preceded only by Sturgeon. Their size and weight often surpass the Smallmouth and Largemouth Bass records combined!
If you haven’t battled these monsters before, it’s high time you added them to your bucket list. Not only are they size-inspiring, but they’re also fun and easy to catch. You just have to know where to look for them and how to lure them your way.
A usual stink bait, for example, doesn’t work for Flatheads as they prefer live bait. Also, stick to rootwad patches with moderate current, and a Catifsh will almost immediately grace the end of your line. To ensure they stay on the line, use a sturdy 7′ rod with at least a 30 lb test line.
When it comes to the exact spot, look no further than the St. Croix River and its Stillwater region. The St. Croix River has been the most reliable fishery for pulling out giants over the years. This is also the place where the first Minnesota Flathead Catfish record was made in 1970. It was none other than a 70-pounder! But that wasn’t the only jaw-dropping Flathead caught here. Mark Mosby hit the jackpot with a behemoth measuring 4.38 feet in 2017 after only 15 minutes of reeling!
Crappie
Minnesota state record: A 5 lb, 21″ Black Crappie on the Vermilion River in 1940.
Unlike Catfish, Crappie aren’t impressive in size. Yet, they rank pretty high on Minnesota’s list of favorite fish to pursue. What’s more, they come immediately after Walleye. So, what’s the catch (pun intended)?
The reasons to love Crappie are numerous. Apart from being delicious and available throughout the entire year, they’ll motivate you to experiment with your angling approaches. A minnow beneath a bobber and a beetle-spin casting lure is effective. But you’ll have to mix and match baits, lures, and techniques until you find the right combo.
Even though Crappie can be elusive, the good news is that they’re widespread. Minnesota’s lakes and rivers are stocked with Crappie. You can wet your line anywhere from Mille Lacs Lake, Minnetonka Lake, and Lake Winnibigoshish to Red Lake, Sand Lake, Lake Andrew, and Bowstring Lake. Wherever you, there, the chances are you’ll end up with a decent 12″, 1 lb specimen.
A record-breaking bruiser, however, was found in the Vermillion River in 1940. The fish in question was Black Crappie which measured 21 inches long and weighed 5 pounds! So now that you know where to look for Crappie and how to outwit them, you’re ready break the old Minnesota state Crappie record.
Musky
Minnesota state record: 58.25 inches on Mille Lacs Lake in 2022.
Muskellunge, better known as Muskies, are naturally large fish. They typically grow to be between 28 and 48 inches. Quite a catch, right? Now imagine how rewarding a 4.9-footer is. Well, that’s precisely what the latest Minnesota Musky record is!
The lucky angler who broke the previous record (a 4.8′ Musky caught in 2021) for the longest Musky in Minnesota is Eric Bakke of Princeton. He was trolling on Mille Lacs Lake with his fishing buddy Jon Blood when the trophy fish bit. They measured it, snapped a photo, and returned the fish to the water. Having in mind how Muskies can live 18 years on average, he released it hoping there would be still a chance for someone to clash with this titan.
If this sparked your interest in Musky fishing, then you know where to find the next Minnesota record. But Mille Lacs Lake isn’t the only place with a hot bite. The previous two Musky records were made on Lake Vermillion. With these two powerful bodies of water at your disposal, a superb Musky hunt is guaranteed!
One final tip for landing a prize catch is to align your pursuit with Muskies’ peak season. While the prime time to go after Muskies is in late summer, you’ll usually spot the largest specimens in October.
Perch (Yellow)
Minnesota state record: 3 lbs 4 oz on Lake Plantagenet in 1945.
Often overshadowed by their more popular neighbors such as Crappie and Walleye, Yellow Perch aren’t to be missed out on. Perky and tasty, Yellow Perch aren’t the biggest fish around and they most certainly aren’t the best fighters. They are, however, excellent ice-fishing targets. Sure, you can hunt them year-round, but wintertime is when they shine the brightest.
If you want the Perch to bite, you’ll first have to intrigue them. Start with a basic hook and slowly introduce spinner rigs and small jigs. And then boost your odds by adding live bait like worms or crayfish. If you’re ice fishing, use ice flies tipped with grubs as well. Of course, this is just a suggestion and the possibilities are endless.
All in all, you get the point – Yellow Perch are exciting to fish for. They’ll always keep you on your toes. And that’s another reason anglers find a thrill in going after Yellow Perch. Should you need any further motivation to pursue them, we can tell you that Minnesota’s waters are overflowing with Perch.
Lake Winnibigoshish, Leech Lake, Cass Lake, Lake of the Woods, Big Stone Lake, and Mille Lacs Lake are famous Perch fisheries. They’ll treat you to plenty of 10-ouncers. However, if you’re after the new Minnesota state record Perch, you might want to check out Lake Plantagenet. This is where the last record was caught, weighing an incredible 3 pounds and 4 ounces!
Pike (Northern)
Minnesota state record: 46.25 inches on Basswood Lake in 2021 and Mille Lacs Lake in 2024.
Next up, we present you Northern Pike. Formidable fighters and aggressive predators, Pike are a beloved sport fish in Minnesota. On top of being worthy rivals, Pike are available in almost all lakes across the state making them must-fish targets when angling in Minnesota. They’re on every angler’s list! With them being everywhere and everyone going after them, it’s no surprise then that the Minnesota state record Northern Pike is a tie!
Yes, you read that correctly – Minnesota has not one but two Pike records! The latest prize fish was caught by Brad Lila on Mille Lacs Lake in 2024 and it shares first place with the 2021 Pike reeled in by Brecken Kobylecky on Basswood Lake. Both creatures were 3.85 feet long! When compared to a common 26-inch keeper, these trophies sound amazing. Apart from quantity, Minnesota boasts quality Pike fishing as well.
To glorify Minnesota’s Pike fishing opportunities even further, we have to tell you that one state record was an ice fishing product, while the other was a summer angling outcome. So, be it summer or winter, a record-breaking Pike is waiting for you in Minnesota!
Mille Lacs Lake and Basswood Lake are the ultimate spots for you to chase that gigantic Pike, but so are the Rainy River, Leech Lake, Lake Winnibigoshish, and Lake Vermillion. Beware that it took 30 minutes and a helping hand for Brad Lila to pull his monster out of hiding. You’ll need serious muscle power and assistance if you want to break the current record.
Sturgeon
Minnesota state record: 78 inches on the St. Croix River in 2019.
Speaking of back-breaking action, you’ll most certainly need all the help you can get for these colossal beings. Sturgeon are “living dinosaurs of the fish world” for a reason. They can live over 150 years and weigh an unbelievable three digits! But what about Minnesota’s Sturgeon?
Lake Sturgeon are Minnesota’s largest fish and they can weigh more than 100 pounds. As for length, let’s say that a 3′ fish in the Rainy River is a common occurrence. Darren Troseth, however, was fortunate enough to stumble on what may be the biggest-ever fish in Minnesota! It was none other than a 6.5′ ice fishing catch! This makes the Minnesota state record Sturgeon quite the catch.
Darren, a seasoned angler and an experienced captain, said he had caught many beasts during his lifetime but he had never seen a fish that big! Since one regular hole wasn’t enough, he had to drill four more before he could brag about his trophy! He even immortalized his epic ice fishing moment on the St. Croix River in a video.
Although neither endangered nor threatened, Sturgeon are considered a species of special concern in order to be protected from overfishing and extinction. So, please have this in mind when chasing the Minnesota Sturgeon record.
Sunfish
Minnesota state record: 1 lb 12 oz on the Zumbro River in 1994 and Green Lake in 2022.
Slowly but surely, we’re wrapping up Minnesota’s line-up of the state record fish. Maybe they aren’t as mind-blowing as Sturgeon, but Sunfish deserve praise, too. Bluegill, Pumpkinseed, Green, and Hybrid, Sunfish are popular species to fish for in Minnesota. And each has its own record. But the latest Sunfish record was a 2022 Hybrid – and it was the same as the 1994 record. Yes, another tie!
Aaron Ardoff, the holder of the current Minnesota state record Sunfish, always hoped he’d get his hand on trophy Sunny. However, he was targeting Pike and Bass with spinnerbaits on Green Lake when he suddenly realized his dream was about to come true. And, as fate would have it, he landed a record-breaking Sunny that September in 2022.
Aaron’s Hybrid weighed in at 1 pound and 12 ounces! And this chubby fella tied the one reeled in from the Zumbro River back in 1994. For a Panfish that doesn’t always exceed half a pound, this was quite an accomplishment.
Mostly pursued due to their exquisite reputation as table fare, Sunfish are surprisingly good fighters, too. Whether you’re after a plump Sunny like Aaron’s or if you’re into a delicious dinner, Gull Lake, Green Lake, and the backwaters of the Mississippi River will always greet you with a healthy Sunfish population.
Walleye
Minnesota state record: 17 lbs 8 oz on the Sea Gull River in 1979.
We saved the best for last – Walleye. Big, mean, fast, furious, elusive, and unpredictable, Walleye are everything a game fish should be. It’s no wonder that Walleye are Minnesota’s state fish and that two counties, Garrison and Baudette, compete for the title of “Walleye Capital of the World!”
To pump things up further, it was Cook County and the Sea Gull River at Saganaga Lake that took the Walleye crown – not Garrison or Baudette. This is where the Minnesota Walleye state record of 17 pounds and 8 ounces was found by LeRoy Chiovitte in 1979. The specimen was almost 3 feet in length with a girth of 21.25 inches.
Don Mickel was on the verge of beating this record in 2012 but he had to release his catch and was unable to confirm its potential. But this is great news for you as it means there’s still room for snatching a true gem in one of Minnesota’s Walleye fisheries.
The average Minnesota Walleye ranges between 1 and 4 pounds, but 8-pounders regularly patrol the waters of Mille Lacs Lake and Lake of the Woods. And then, from time to time, a giant appears.
Minnesota State Record Fish: An Overview
Here’s a quick breakdown of the above-mentioned species, their measurements, and the angling hotspots that made history:
Species Pounds Ounces Length (in) Girth (in) Place Year Bass (Largemouth) 8 15 23.25 17.25 Auburn Lake 2005 Bass (Smallmouth) 8 0 N/A N/A West Battle Lake 1948 Catfish (Flathead) N/A N/A 52.25 32 St. Croix River 2017 Crappie (Black) 5 0 21 N/A Vermillion River 1940 Musky N/A N/A 58.25 N/A Mille Lacs Lake 2022 Perch (Yellow) 3 4 N/A N/A Lake Plantagenet 1945 Pike (Northern) N/A N/A 46.25 N/A Basswood Lake 2021 Pike (Northern) N/A N/A 46.25 23.5 Mille Lacs Lake 2024 Sturgeon N/A N/A 78 29.25 St. Croix River 2019 Sunfish (Hybrid) 1 12 11.25 12 Zumbro River 1994 Sunfish (Hybrid) 1 12 12 13 Green Lake 2022 Walleye 17 8 35.75 21.25 Sea Gull River 1979
Minnesota State Record Fish: A Neverending Story
You’ve reached the end of this article but the list of Minnesota’s state record fish is a neverending story. The records aren’t set in stone and each day brings us closer to a new jaw-dropping trophy that might dethrone its predecessor. After all, this is the Land of 10,000 Lakes and the possibilities are endless.
We’ll keep a close eye on Minnesota’s angling scene and update you as new brag-worthy fish emerge. Who knows, maybe someday we’ll write about you and your fish.
How did you like our Minnesota state record fish blog? What record surprised you? Do you have any Minnesota bragging stories of your own? Hit the button below and share your thoughts with us.
Superstitions (noun):: A belief or practice resulting from ignorance, fear of the unknown, trust in magic or chance, or a false conception of causation – Merriam Webster
I just returned home from a fishing trip and heard about the banana superstition for the first time. Apparently bringing a banana along is bad luck and some captains won’t even allow you on their boat if they are aware of you possessing the fruit. This was interesting to me and got me thinking about other fishing superstitions.
Here are 10 common fishing superstitions or “old wives’ tales:”
No bananas on the boat.
They bring bad luck, but pineapples bring you good luck. This is one of the most common and oldest superstitions in the sailing and fishing world. This tale is believed to have derived from sailors who experienced diseased pests from rotten fruits – particularly bananas. Another belief is that banana peeling acts as a natural fish repellent. Whatever the case may be, most captains are serious about not allowing bananas on their boats.
Bribing the water.
Fishermen throw quarters of half dollars over their shoulders to “buy up” some wind when crews are overworked. It is also believed that tossing a coin into the water will bring good luck and bountiful fishing. While I do not personally recommend anyone throwing anything into our waters – it is said bribing the ocean with a coin will bring good luck and a safe return home.
Cows laying down.
This fishing superstition means the fishing will be difficult but if they are standing, prepare for a good day of fishing. Many believe that cattle react to barometric pressure changes the same way that fish do.
The first cast omen.
If you catch a fish on the first cast, you will jinx yourself for the rest of the day. Some professional fishermen will purposely cast off to the side of their boat where they do not believe fish are in hopes of not catching a fish on the first cast.
Never tell an angler “good luck” before they head out.
This fishing superstition will bring them bad luck. “Tight lines” is a safer way to wish the angler well.
Never whistle while on a boat.
Whistling was believed to challenge the wind bringing in a storm therefore, whistling is frowned upon during fishing.
Avoid saying “rabbit.”
If you must talk about these cute floppy-eared animals, superstitious anglers refer to them as “the name of the beast” or “the animal with big ears.” A rabbit’s foot is considered lucky on land but not so much while on the water.
Don’t step over rods or bring them into the house before going fishing.
This is said to bring a bad day of fishing. A common belief is that either of these things will ruin a fisherman’s day.
Kissing the fish will bring you luck.
Some say this started as a sign of respect for the fish. Some say the fish will share and attract others. Whatever the reason, kissing fish especially the first catch is still done by many anglers.
My personal favorite…women onboard will bring bad luck.
Sailors believed that women onboard would anger the sea causing rough and stormy conditions. Coincidentally, a naked woman or one exposing bare chest would bring good luck which is why you may have observed the figure of a woman on the bow of ships. Sounds like a man made this one up. Kidding, kind of… 😊
Commonly Asked Questions About Fishing Superstitions:
What is the superstition about fish?
The superstition about fish revolves around the belief that speaking the word “fish” while on a fishing trip will jinx the chance of catching any. Anglers avoid mentioning the word to avoid bad luck.
What are good luck rituals for fishing?
Anglers have various good luck rituals, like spitting on the bait, wearing lucky fishing hats, or performing a “first catch” ritual. These practices are believed to bring luck and abundance.
Why is a pineapple good luck on a boat?
A pineapple is considered good luck on a boat because of its historical association with hospitality and prosperity. Carrying a pineapple on board is thought to attract good vibes and successful fishing trips.
What brings good luck on a boat?
Various items are believed to bring good luck on a boat, such as horseshoes, acorns, or certain coins. Additionally, the presence of dolphins or albatrosses is seen as auspicious signs for fishermen.
While these fishing superstitions may sound silly, I was amazed at how widely known these are and how so many still believe and practice these tales. I have to say, on this ladies’ fishing trip, we did adhere to each of these rules except for the women on the boat (obviously) and we had two days of very successful bass fishing on the well-known Guntersville Lake in Alabama.
This event organized by Wildlife Women who are some of the coolest and most encouraging outdoor women.
*If looking for a fishing guide on Lake Guntersville, I highly recommend Captain John Maner.
Have you been practicing your shooting form at home, only to grow weary of chasing stray arrows around? Try putting a backstop behind your target and save yourself the hassle.
A backstop is material placed behind archery targets to catch arrows. Backstops are normally made of a thick, spongey material that absorbs the arrow’s shock. If you released an arrow into a wall, fence or anything else solid, the arrow would break upon impact. Backstops give the arrow something to sink into if it sails past the target. Keep in mind that while backstops will help provide a larger base for the arrows to land, you should always make sure you have a wall behind the target and backstop or plenty of open space.
Hay bales are a great, inexpensive way to create a backstop for your arrows. Photo Credit: Clearwater Cottage Blog
The most common and inexpensive backstop is a hay bale. The hay is very forgiving, although it won’t last as long as a foam material. The hay bales will still serve their purpose, but you might need to rearrange it regularly and fill in any gaps that come about with use.
You can also use foam play mats – the kind that young children use in classrooms. Or other floor mats work too. No matter the material, always use an arrow puller to remove the arrows from the stop. If an arrow gets stuck, you could break it by trying to yank it out. An arrow puller gives you a good grip so you can pull cleanly without breaks.
Make sure your backstop is wider and higher than your target so you don’t have to run around to collect stray shots that miss their mark. If you need to work on your precision, or you’re practicing with a novice, a backstop will help you avoid losing arrows in the woods or backyard.
Choose a material that is long-lasting and can hold up through many rounds. Photo Credit: Tradgang
Your backstop should also be sturdy – how much so partially depends on the intensity of your draw weight. The higher the draw weight on the bow, the more force behind the arrow. For a lower draw weight, you can probably afford a thinner backstop. As you practice with your backstop, you’ll see how the material absorbs the velocity of the arrows and adjust accordingly. The fix may be as simple as moving the target and backstop further away.
The supply list is fairly minimal. All you need is:
A horse stall mat, foam play mat or hay bales
2x4s or cables
If you’re feeling crafty, you can build the backstop yourself. Photo Credit: amzn.to
You can build your backstop against your fence, create a frame for your target and backstop, or leave it free-standing. If you build your own stand, hang the backdrop from the same pipes or boards you used for the stands. Hay bales can remain free standing and can be stacked as high or wide as necessary.
Backstops are an often-overlooked part of the archery arsenal, but it’s never too late to start using one. Save yourself broken arrows and broken fences by building your own backstop in just a few hours. Backstops are a time-saver and safety precaution that can benefit every archer.
If you learned to fish as a child, your earliest memories, much like ours, were watching a bobber with great anticipation waiting for it to abruptly disappear under the slick calm waters on an early morning fishing trip with a loved one. I’m 51 years old now, and watching a fishing bobber go under still gives me a childlike thrill. Nostalgia not withstanding, a fishing float is a great way to present not only live baits but also small artificials to fish in a natural way.
Fly anglers use small floats and indicators to let them know when a trout has sucked in a nymph in current runs that you won’t see or feel. Crappie anglers will slip float a jig in timber to catch fish that are reluctant to move much. Whatever your preferred method of fishing, knowing the best fishing bobbers and where to use each one will help you present your baits better and catch more fish.
Best Weighted Spring Bobber: Thill Premium Weighted Float
Best Slip Floats: Thill Pro Series Slip Float
Best Rattling Float: Bett’s Mr. Crappie Rattlin Pear
Best Weighted Clip Bobber: Bett’s Mr. Crappie Weighted Bobber
Best Crappie Bobber: Thill Crappie Cork
Best Catfish Float: CJ’s Catfish Float
Best Panfish Quick Floats: Leland’s Lures Trout Magnet E-Z Floats
Best Weighted Spring Bobber: Thill Premium Weighted Float
The Thill name and premium fishing floats are synonymous. Regardless of the species you chase, you’ve likely found yourself looking at one of the many versions of Thill floats to float your offering. Arguably their most popular model because it’s simple, effective and well designed, the Thill Premium Weighted Float features the spring or slip versions but we think the spring bobber is the best no-nonsense float for a variety of species of fish.
Pull the spring down, run the line into the notch and let the spring loose and you’re good to go. We often use this bobber in the spring when casting to crappie in shallow water with jigs we want to work ultra slow around shallow cover that might be spooky (like when they are moving up to spawn). These high quality bobbers come 2 to a pack for $3.99.
Buy at Amazon
Buy at Bass Pro
Best Rattling Float: Bett’s Mr. Crappie Rattlin Pear
We got into using a rattling bobber with tungsten bluegill bugs this spring to chase some of our personal best bluegills and shellcrackers. The Mr. Crappie Rattlin Pear is a small bobber that attaches quickly to help make casting very light jigs a little easier and letting you slow down your retrieve and add pauses you can’t do otherwise.
I took some of my biggest bluegills and panfish on this bobber this year because I felt the rattle called fish in that were curious and then they found the bug. This was especially productive for me in laydown trees in the spring and early summer.
The Rattlin Pear comes in a three sizes from 7/8 inch to 1 1/4 inch for bluegills and crappie alike and would probably work for trout and wallyes as well.
Buy at Bass Pro
Buy at Amazon
Best Slip Floats: Thill Pro Series Slip Float
Another staple in the slip float arena, the Thill Pro Series Slip Float comes in many different sizes and diameters as well as weighted and unweighted. These floats work really well when you want to cast to fish that are in deeper water and you need the rig to be compact on the cast but then sink down to the fish and sit in one place over deeper water. From 1/2 inch diameter up to 1 inch in diameter. These floats work for a ton of species and applications where you want to float fish a little deeper. They are made of premium balsa to ensure a long last bobber that always floats well and is easily pulled under by the right size prey.
Buy at FishUSA
Buy at Amazon
Buy at Tackle Warehouse
Buy at Bass Pro
Best Weighted Clip Bobber: Bett’s Mr. Crappie Snappers Float
There is something to be said for having a bobber that works quick and easy when you suddenly need to change your presentation or need to improve your casting distance because of the wind without having to upsize your lure and speed up your retrieves. A clip on bobber is very handy to have. I keep several in my travel bags and boat because I’ve had lots of times panfishing where I wished I could add a float to a jig to slow my presentation, get a little more distance or make a bait present more naturally in current and wind.
The Bett’s Mr. Crappie Weighted Bobber casts like a rock, attaches quickly and easily and won’t crack or fill up with water. It’s a foam style bobber that comes in a few different sizes for bluegill and crappies alike. I’ve even used the larger ones on other species like catfish. They come two to a pack for $2.29.
Buy at Bass Pro
Buy at Amazon
Best Crappie Bobber: Thill Crappie Cork
The Thill Crappie Cork is the do-it-all bobber for crappie fishermen. It’s made to be the only float you need for crappie. It comes in multiple sizes, offers both spring clip and slip cork design with a bobber stop already built into the stem. It’s the ultimate float for versatility and convenience for serious anglers. Always good to have a couple in your bag. Weight is printed on the float for convenience. These floats start at $2.49.
Buy at FishUSA
Buy at Bass Pro
Buy at Amazon
Best Catfish Float: CJ’s Catfish Float
We’ve talked about these floats before in our Kayak Catfishing feature as these are a dynamite way to present bait to channel catfish and blue catfish alike. Check out our feature to see how these are employed. But these unique floats feature a long 14-inch stem and a rigging mechanism that makes them a slip float but your line runs on the outside. This float is designed to let you know a cat is biting without them feeling any resistance so you have the drop on them everytime. These floats excel for drift fishing and that’s why they have become the staple among serious catfishermen. They come 2 to a pack for $8.99.
Buy at BassPro
Best Quick Float Indicators: Leland’s Lures Trout Magnet E-Z Floats
Sometimes you just want to throw quick small float on an ultralight setup to float your jig or slow your presentation and without having to completely rerig, it’s nice when you can use something like the Trout Magnet E-Z Floats, that use a slit style bobber with a peg to pinch your line in place on the bobber. You can add them quickly to your ultralight offerings to keep your bait up and out of cover and off the bottom as you fish through shallow areas with tiny lures. They are made of a high-float foam, come 4 to a pack in high viz colors for $1.87.
Buy at FishUSA
Buy at Amazon
Buy at BassPro.com
TYPES OF FISHING BOBBERS AND FLOATS
Fishing bobbers and floats vary in size, materials and how you connect them to your line. There are basically three ways to connect a bobber to your line that include the following:
Clip on
Pinch/peg
Slip on with a stopper
As you’ve seen going through this list, bobbers can ether be clipped on with spring loaded clips or external springs or rubber sleeves. Floats can also be pinched on with a peg where you either run the line through the bobber or put it through a slit in the side of the bobber and then use a peg to pinch the bobber onto your line. Or you can use a slip style bobber where your line runs through the bobber after your slide or tie a bobber stop onto your line above it. Each of the three ways to connect have a time and place and often convenience and depth are the determining factors.
BEST BOBBER BRANDS
With bobbers, you can get by with a cheaper bobber in a pinch but their are a few brands that are the best at making specific application floats. Brands like Thill, Betts and Eagle Claw have some of the widest selections of bobbers to fit all types of fish and fishing applications. There are a lot of other good brands that don’t have as diverse a selection but also offer great bobbers like Rod-N-Bob, Raven, Sheffield, Northland, and Lunkerhunt. You can find a very good selection of floats at FishUSA.com
BOBBER FISHING SETUPS
When fishing with bobbers, anglers often like to use lighter lines and either spinning or spin casting setups. I spent a lot of time fishing small bobbers on tungsten jigs for panfish this year on spinning rod and reels with 4-pound line as well as BFS baitcasting gear with the same light lines like 4-pound mono and 8-pound braid. With the bigger bobbers you can go up in size and weighted bobbers also allow you to use larger line sizes without sacrificing castability.
BEST BOBBER AND FLOAT MATERIALS
Balsa and foam are probably the two most common types of fishing bobbers along with plastic. The first two will hold up a lot better than the latter. Plastic tends to eventually crack or wear out and let water in which makes it stop floating. Balsa will still float if it breaks, splinters or loses pieces.
Overall, catfish are some of the most abundant species of fish in the world. According to Practical Fishkeeping, there are now over 3,000 species of catfish around the world. Depending on the species, catfish can range in size from 1.5 to 2 inches (4 to 5 cm) to hundreds of pounds, like the behemoths on this list. All of the catfish on this list are over 100 pounds (45.36 kilograms). Nearly all of these catfish are listed as the world record for their species in the International Game Fish Association’s (IGFA) World Records Database. As of the time of this writing the records are accurate.
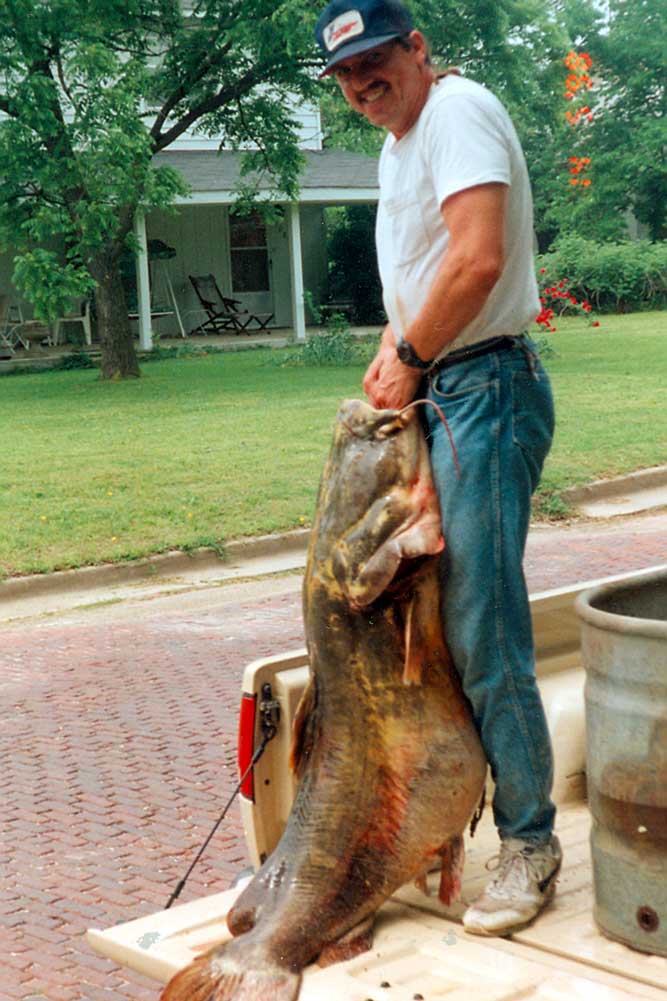
The record for the largest flathead catfish belongs to Ken Paulie, who landed his big flathead over 20 years ago. Paulie’s flathead catfish weighed 123 pounds (55.79 kilograms) and was over 5 feet (1.55 meters) in length.
While Paulie’s record was verified by the the Kansas Department of Wildlife and Parks and has been standing for over 20 years, many people have questioned the legitimacy of Paulie’s catch. Paulie was using a light tackle while he was crappie fishing and the flathead was a lucky catch.
Did You Know?
Paulie’s flathead catfish was frozen for many years before it was presented to the Kansas Department of Wildlife, Parks, and Tourism in 2016 for further examination. Researchers determined that the record flathead catfish was at least 22 years old, grew very rapidly, and was most likely a male.
Record Redtail Catfish (Pirarara)
Source: IGFA World Records Database
The world’s largest redtail catfish was captured in 2010 by Gilberto Fernandes in Brazil’s Amazon River. Fernandes’ redtail catfish was 123 pounds 7 ounces (56 kilograms) and 4.62 feet (1.408 meters) long. There really isn’t any more details about Fernandes’ catch, but he did use a fiberglass Sportex rod to land the redtail catfish.
According to a news report, Fernandes has over 100 IGFA world fishing records. Just a month before he made his record redtail catfish catch, Fernandes caught another redtail that was 113 pounds 8 ounces (51.5 kilograms).
Did You Know?
Redtail catfish are not picky eaters and in the wild tend to eat fish and crustaceans. In captivity, redtail catfish eat assorted worms, frozen foods, sinking catfish pellets, and dry foods.
Record Blue Catfish
Source: The Roanoake Times
The record blue catfish was caught in 2011 in Kerr Lake, Virginia by a man named Richard Nicholas Anderson. This large blue catfish weighed in at 143 pounds (64.86 kilograms) and was 4.75 feet (1.45 meters) long. It took Anderson about 45 minutes to land the giant blue catfish, whose size surprised Virginia Department of Game and Inland Fisheries chief Gary Martel.
Anderson wanted to keep his blue catfish alive so that it could be put in a tank at a local Bass Pro Shops retail store. However, despite his best efforts, his record blue catfish died.
Did You Know?
Blue catfish were intentionally introduced into rivers in Virginia in the 1970s, but have now become an invasive species that grows and breeds rapidly.
Record Goonch
Source: fiskefuralle.se
The record for the largest Goonch ever caught belongs to Jakub Vágner, the host of National Geographic’s “Fish Warrior.” Vágner’s Goonch was 165 pounds 5 ounces (75 kilograms) and over 5 feet (1.57 meters) long. The Goonch was caught in the River Ramganga in India.
In addition to the large Goonch, Vágner has caught several other large freshwater fish, including and 286.6 pound (130 kilogram) Arapaima and an 242.5 pound (110 kilogram) Wels catfish. In an interview, Vágner said that he is sill after the world record Goliath Tiger Fish of the Kongo river.
Did You Know?
Goonch catfish have reportedly been known to eat corpses from funeral pyres on the Kali River, which runs between Nepal and India. It is speculated that this has allowed the Goonch to grow so large and develop a taste for human flesh.
Dino Ferrari’s Wels Catfish
Source: Adventure Sports Network
In 2015, an Italian fisherman named Dino Ferrari was featured in international news for capturing a monster Wels catfish in the Po Delta. Ferrari’s Wels catfish weighed 280 pounds (127 kilograms) and was 8.75 feet (2.67 meters) long. Although Ferrari’s catch is impressive, unfortunately he was just shy of the world record for a Wels catfish catch, which weighed 297 pounds 9 ounces (134.97 kilograms).
However, other than the official record listing on the International Game Fish Association’s website, there wasn’t enough information to feature the story of the record Wels catfish. Ferrari’s sponsor did say that his catch may hold the world record for a fish caught with a Torpedo spinning rod made by an Italian manufacturer.
Did You Know?
It took Ferrari 40 minutes to catch the Wels catfish and he decided to release the fish back into the water so he could be caught again in the future.
Record Lau-Lau (Piraiba)
Source: bigfishesoftheworld.blogspot.com
Jorge Masullo de Aguiar currently holds the world record for the largest Lau-Lau (Piraiba), which is a species of catfish that is native to South America. Masullo de Aguiar’s Piraiba was caught in 2009 and weighed 341 pounds 11 ounces (155 kilograms). This giant South American catfish was also over 6.5 feet (2 meters) long.
While Masullo de Aguiar’s Piraiba is the largest officially on record, in general, Piraiba can weigh over 450 pounds (204 kilograms). In fact, the Piraiba is the largest of the catfish species found in the Amazon.
Did You Know?
Piraiba are so large that monkeys, cats, dogs, birds, and other catfish have been found in their stomachs.
Mekong Giant Catfish
Source: NBC News
In 2005, a behemoth Mekong giant catfish, weighing in at a scale-tipping 646 pounds (293 kilograms) was caught in a remote village in Thailand near the Mekong River. Experts believe that this monster Mekong giant catfish is not only the largest catfish ever caught in the world, but the largest freshwater fish ever recorded.
In addition to weighing nearly 650 pounds, this Mekong giant catfish was 9 feet (2.7 meters) long. It took over an hour for the Thai fishermen to reel in the heavy catfish. Officials from Thailand’s Inland Fishery Department wanted to use the female Mekong giant catfish for a breeding program, but she ended up dying. The people from the nearby villagers didn’t let the fish go to waste and ended up eating it.
Did You Know?
The Mekong giant catfish is rare and endangered and the one caught in 2005 was the largest ever caught since Thailand began keeping records in 1981.
Earth’s oceans are full of big surprises – something Kori Garza knows better than most.
The marine biologist has been on thousands of shark dives around the globe through the years and gets a “serene feeling” when she’s in the water with the “big beautiful predators.” But nothing could prepare her for the massive shadow that approached from the murky depths of the Pacific Ocean in November 2018.
“We all just paused, jaws dropped and were like, ‘Now that’s a shark,'” Garza said. “It was so much bigger than what you would expect anything in the water to naturally be coming towards you.”
Tiger sharks are the second deadliest in the ocean and normally reach about 12 feet long. The longest on record used to be 15 feet. This gigantic creature, who Garza and her team named Kamakai, measured in at 18 feet based on their estimations – larger than the boat used for the voyage.
“Her mouth couldn’t even close she was so big and she couldn’t really move her fins,” Garza explained. “They were kind of stuck in this position and she was slowly swimming around. Much rounder than normal, but very calm and comfortable – wasn’t aggressive or territorial.”
Garza’s crew only had an hour with the apex marine predator before it moved on. The team was diving at a shark sanctuary in French Polynesia, which meant no tagging as they would have been forced to capture the animal – a practice banned in the region since 2006.
In Garza’s new documentary, “World’s Biggest Tiger Shark?” – part of National Geographic Wild’s “Sharkfest” season – she’s joined by cinematographer Andy Casagrande for a mission to find and film Kamakai once more, while searching for any clues that might explain why sharks in the South Pacific seem to be growing bigger each year.
“When I came here I was so shocked there was this amazing hot spot for tiger sharks and nobody was talking about it,” Garza said. “It made me think of how many tiger shark hot spots are out there waiting to be found, especially in this region.”
As the team searches for Kamakai, they look for unique features that distinguish the animal from other giant tiger sharks they may happen upon, including stripe pattern, dorsal fin and white lines around the mouth.
Garza, who grew up in St. Louis, said she became intrigued with sharks after watching “Jaws” as a child, and took a particular affinity for Richard Dreyfuss’ character, Hooper, in the classic film.
“It was the coolest thing I’ve ever seen,” Garza said. “When I saw the marine biologist, I thought, ‘Wow, I want that job. How do I get that job?'”
A few years later she found herself at Hawaii Pacific University studying for her dream job. She’s been diving with sharks for a decade.
Garza said she hopes to show people tuning in to “World’s Biggest Tiger Shark?” new information on the predators, including never-before-seen hunting tactics and uncommon filming locations.
“Almost everything you see from tiger shark documentaries is from the same spot – Tiger Beach, Bahamas. I’m excited to share the French Polynesian, Tahitian sharks because it highlights our shark sanctuary, one of the biggest in the world,” she said. “It’s important to see how these sanctuaries support ecosystems with these big predators on top.”
“World’s Biggest Tiger Shark?” premieres July 19 at 8/7c on National Geographic. An encore presentation will follow on Aug. 11 at 9/8c on Nat Geo Wild.
Coyotes are great at digging holes, and there are many reasons that coyotes dig. The most common reason that coyotes use their digging talents is to create underground burrows where they raise their pups and hide from predators.
They also use their digging abilities to tear apart and hide food. Coyotes dig for food like rodents, worms, and foxes. Coyotes may also dig for carrion if given the opportunity. Digging is one of the most common ways that the coyote supports and protects itself.
You can prevent coyotes from invading your property by using galvanized wire. Install an underground barrier, which prevents coyotes from digging under your fencing. You should bury the galvanized wire at least five-and-a-half inches deep around the fence perimeter.
Coyotes dig holes so they may sleep in dens and burrows. These wild canines are a common predator to many small animals and insects. However, they are also, themselves, prey to many larger animals like wolves and mountain lions.
Do Coyotes Dig Holes?
Coyotes dig holes for many purposes, such as safety, comfort, and finding food.
Digging is one of the many talents coyotes have that help them remain at the top of the food chain despite their small size. Coyotes use digging to steal burrows, dig up rodents, and hide from larger predators underground.
Do They Dig Their Own Dens And Burrows?
Coyotes dig their own dens and burrows. The average coyote den is only a few feet in size. But may range up to fifty feet, with several openings and rooms.
Although coyotes can dig their own burrows, they may also steal them from other animals too.
Will Coyotes Sometimes Take Over Dens From Other Animals?
It is common for coyotes to take over dens from other small animals like foxes, rabbits, and other animals. If the den they find is not big enough for them, the coyote will dig the burrow so they can fit easier.
Coyotes typically take dens from other medium-sized carnivores like skunks and raccoons. In the process, they either consume the animal or run them out of the territory.
How Do Coyotes Build Their Dens?
The most common way that coyotes build dens is by digging an underground burrow that goes at least one foot underground. They will also build dens by stealing dens from other animals and then digging them wider.
Coyotes also build dens by digging into fallen or rotted tree trunks. Rotted trunks are great temporary dens because they are easy to build, provide protection, and are great for escaping harsh weather.
How Deep Can Coyotes Dig?
Coyotes can dig very deep. There is no exact measurement available because they are always adapting to new behaviors. Since the coyote is a great digger, that means without preventative measures, the coyote can dig underneath unprotected fences very easily.
Do Coyotes Dig Tunnels?
Coyotes do not dig tunnels, but they will dig large burrows that may have several entrances. These dens with numerous entrances can easily be mistaken as tunnels because of how large they eventually become.
Do Coyotes Bury Their Food?
Coyotes sometimes bury their food. Burying their food allows the coyotes to hide their meal from larger predators like mountain lions and wolves while they are away. Then, they may return and eat the rest of their meal later.
Will a Coyote Dig Up Dead Animals?
A coyote will dig up dead animals if they smell them. One of the main parts of the coyote’s diet is carrion. Even if the coyote does not eat the dead animal, they take joy in rolling its body in the dead animal so it may enjoy the rotting smell.
Do Coyotes Dig For Grubs, Moles, Mice, or Other Things To Eat?
Coyotes are opportunistic hunters. Being an opportunistic hunter means that the coyote might dig in the ground for worms and grubs, if necessary.
Will A Coyote Dig Up Your Lawn or Flower Beds?
Coyotes do not typically dig up flower beds unless they are interested in what you have planted inside of the flower bed. In some cases, the opportunistic coyote might become interested in the smell of certain vegetables and become enticed to try the various plants in your homemade garden.
A coyote may also dig up your garden because of insects, small mammals, and rodents that live in your garden.
Did A Coyote Dig That Hole? What To Look For
Coyote holes are large, typically a foot wide. Pay attention to the exterior if you suspect a coyote dug the hole. Several visual indicators may signal that a coyote has dug the hole.
Visual indicators that a coyote dug the hole include:
The presence of medium-sized canine footprints
Dirt is flung in several directions and piles (like a dog)
Feces resembling a domestic dog nearby the hole
Skeletal remains of small animals, rodents, birds, etc.
Large claw marks
Coyotes are visually similar to domestic dogs. If you notice feces, hair, or footprints that look similar to a canine, that could indicate you are in the territory of a coyote. The coyote has a similar digging technique as the domestic dog.
They are slightly sloppy and dig with their dirt in piles. If you notice dirt clumped in messy piles, this is an indication of a canine hole.
You may also choose to listen to your surroundings. If you hear howling at night near the hole, that is a common sign that a coyote owns that burrow.
Other Animals That Might Dig Up Your Lawn
Many animals might be digging up your lawn without you knowing. In fact, the presence of these animals on your lawn might attract coyotes. No matter what you try, unless you rid yourself of these small pests, coyotes will continue returning for this food source even after it begins to rot.
Common animals that dig up backyards include:
Domestic dogs
Badgers
Skunks
Rats or mice
Groundhogs
Opossum
Moles
Raccoons
Gophers
If dirt is pushed from underground toward the surface, that indicates that a small animal is burrowing underground. Unlike coyotes, pushing dirt from under the ground is an indication that the animal lives underground.
Removing smaller animals from your yard can prevent coyotes from entering your yard. Most of these animals attract coyotes and may lead to a coyote infestation if you are not careful.
Can Coyotes Dig Under Fences? Or Get Into Chicken Coops?
Coyotes are known for sneaking into chicken coops to eat chickens and eggs. They have an easy time digging underneath fences as well as jumping over fences. To ensure that coyotes will not get into your chicken coop, you must make your chicken coop and your fence coyote safe.
How To Make A Barrier Coyote Proof
To make a barrier coyote-proof, you must extend your fence at least five-and-a-half feet underground. An underground fence prevents the coyote from digging under your fence. In most cases, coyotes will give up when their attempts are obstructed.
Good barriers to place underground are barbed wire, chicken wire, and galvanized wire. When a coyote feels this, it will no longer dig in that area. Farmers may also recommend surrounding fences with tripwires, if possible.
Poaching in Michigan is a serious offense in Michigan with serious penalties if convicted.
Did you know Michigan has elk? Most people think of these animals as belonging in the Western states or Canada. However, Michigan is home to a population of these beautiful, wild creatures. Michigan is also home to many avid hunters.
Unlike deer, who run rampant throughout the state and suffer from overpopulation, elk are more protected by the law. You could get in big trouble for hunting them without a special license.
Elk hunting licenses are only available by drawing, and there are a limited number available each year. If you don’t get a special permit, that’s it. You will have to try again next year.
Illegal hunting is called poaching, and poaching could cost you your ability to hunt in this state – potentially for the rest of your life.
Two Michigan men were charged for poaching a cow elk in Wolverine, Michigan in 1998. It was through the DNR poaching hotline that DNR officers investigated Jakob Gagnon and Logan Turbin.
An anonymous tip about the pair led to a search warrant, which led to investigators finding elk meat and cocaine in Gagnon’s residence.
Turbin was charged with assisting Gagnon in processing the elk and illegal possession of elk meat.
Gagnon initially fled the state after authorities searched his home, but turned himself in to law enforcement. He was arraigned August 28, 2020 for taking an elk without a license, possession of stolen property, and cocaine possession.
Penalties for Poaching in Michigan
While Gagnon’s poaching crime was a misdemeanor, his actions attracted law enforcement who went on to find evidence to charge him with a felony crime.
That’s just one way in which breaking hunting laws can backfire on you.
New Deer Hunting Regulations in Michigan
It’s also good to be aware of some of the new bag limits on deer hunting as we get closer to deer hunting season. A mistake or a crime of opportunity could result in a massive fine.
In 2014, Public Act 175 of 2013 went into effect, making it more expensive to break the hunting laws. Rather than a flat $1,000 restitution fee, the fine increases with the number of points on the deer’s antlers, to discourage hunters from taking more trophy bucks than they are legally allowed to bag.
According to Natural Resources and Environmental Protection Act (Excerpt) Act of 1994:
A Michigan hunter was fined $15,000 for bagging an 18-point buck in 2015. It was his third of the season. Apparently, it was a “crime of opportunity.” He had the right to hunt, and the buck just walked in front of him.
Michigan Poaching Defense Attorney
Poaching may not be one of the top crimes leading to jail time or felonies on your record. However, if it doesn’t lead to those things, it can undoubtedly bleed your wallet dry.
For a hunter, losing your license potentially for 15 years isn’t worth the bagging that one animal. Don’t assume no one will tip-off investigators either.
If you’re facing jail time or hefty fines related to poaching in Michigan, call my office and get us working for you.
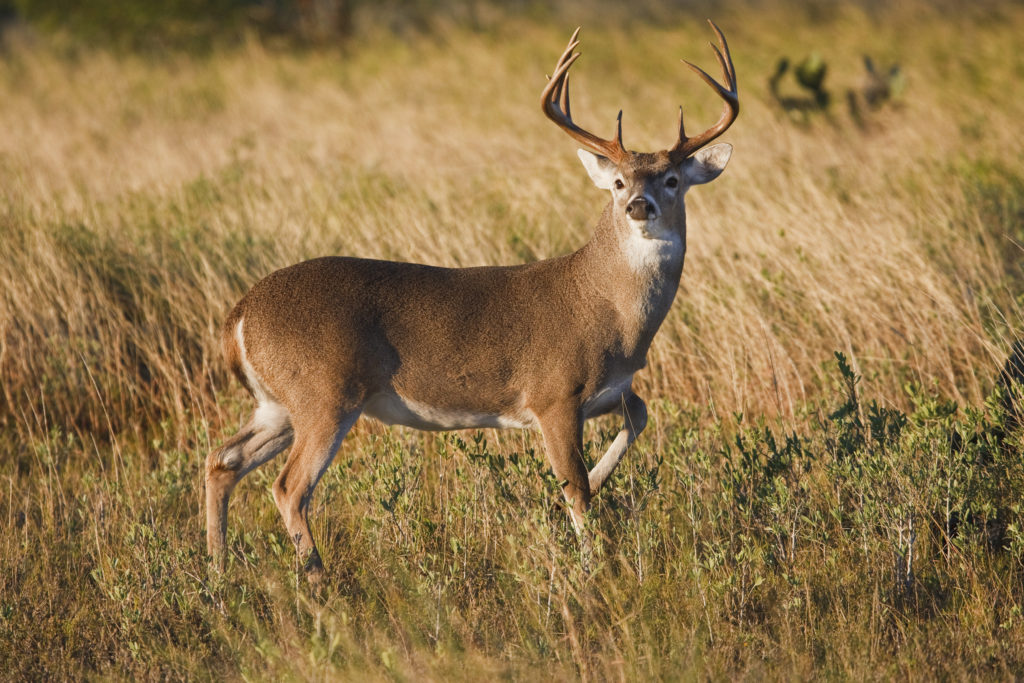
All whitetails react differently to pressure from humans, especially during hunting season, but research shows some clues into what they do and where they go during these months of intrusion into their areas. (Photo: Getty Images)
Recent biological studies demonstrate very clearly that white-tailed deer not only perceive their environment in fine detail, but are able to respond immediately to risks and pressure.
Legal light ends in just a few minutes, but you dare not move. You’ve heard a few deer staging around you for the past half hour, and not long ago you heard the bark of your brother’s rifle from a stand not a quarter mile away.
By Dr. Stephen Ditchkoffand Jeff Sullivan
Yet, like many nights before, you’ve been left with nothing but an aching back and a dream of what might have been, while the deer that so patiently waited for darkness to fall feast upon the food plot you leave behind. This spot used to be packed with deer, but as the season comes to a close it seems that what was once your secret honey hole has lost its magic. Now you can do nothing but wonder what gave you away, and what to change for next season.
Not surprisingly, though deer hunters across the country come from a myriad of backgrounds they all seem able to relate to one issue — sometimes it feels like the deer know where you will be before you get there. While this is an often perplexing and frustrating phenomenon for hunters, biologists have been studying the reactions of wildlife to predators for decades and have developed a theory that appears to explain the activities of whitetails during the hunting season.
LANDSCAPE OF FEAR THEORY The landscape of fear theory suggests that animals are consistently at risk from predators, which in this case would be human hunters, and that the level of risk changes based upon two main factors. First is the animal’s location: While wild predators such as wolves might be more dangerous along grassy meadows, human hunters often concentrate near roadways and open areas, and often hunt repeatedly from the same location.
The second major factor influencing risk is the time of day. For instance, human hunters are limited by legal hunting times, and most often sit only during the periods around sunrise and sunset, abandoning their stands during the midday hours. This theory can be visualized as a mountain range where mountain peaks are areas of greatest risk and valleys are areas of greatest safety. Throughout the course of a day, each area’s height changes as the risk levels associated with that area change. The objective for prey species is to stay at the lowest possible elevation while still accessing all of the resources they need to survive and reproduce.
Previous studies have long confirmed what hunters already know; deer can recognize changes in risk and react as one would expect under the landscape of fear theory. Studies ranging as far back as the 1960s have demonstrated that when hunting pressure is sufficiently high, deer increase their use of dense cover areas such as thickets or hardwood drains and then use risky areas such as bait piles only during safe periods, such as nocturnal hours. Similarly, studies have found that activity patterns of deer are such that they are more active when hunters are not in the woods and less active when they are.
A fellow researcher, Kevyn Wiskirchen, with Auburn University, recently wrote an article (in the September 2016 issue of Deer & Deer Hunting) documenting just such a pattern. He detailed how white-tailed deer suppress movement during the weekend to minimize exposure to humans. But when hunters are absent from the woods during the week, the deer become much more active.
While these studies have provided great insight into larger behavioral trends, they have all examined hunt- ing pressure in relation to an entire property or large landscape, leaving the question of how deer respond to risk at specific locations unanswered. Essentially, until now scientists have not been able to account for the potential that deer could recognize risk at a spatial scale as fine as individual hunting locations and respond accordingly. It is quite possible that the responses seen at the landscape scale are completely different from what is seen in relation to actual locations of risk, especially when hunting pressure is kept very low across a property. Fortunately, advances in technology now enable scientists to investigate such detailed behaviors.
With each additional hunting event at a given stand, deer became increasingly less likely to use the vulnerability zone around that stand during mornings and evenings (Figure 1).
RESPONSE TO LOCALIZED RISK Due to the general lack of data, and thus, understanding of how white- tailed deer respond to localized risk, we, with financial support from the South Carolina Department of Natural Resources, set out to examine this aspect of deer biology and determine the movement patterns of adult does during the hunting season with respect to hunting stands.
To accomplish our goal we darted adult female white-tailed deer and fit each with a GPS collar programmed to collect locational data every 30 minutes, allowing us to gather highly detailed information on deer movement relative to hunting pressure. Hunting on the property was strictly managed, with hunters taken to and picked up from permanent stands by guides.
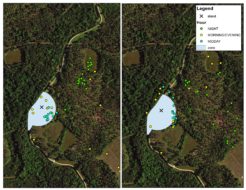
We determined the GPS coordinates of every hunting stand, food plot and automatic feeder on the property, and determined the area around each stand in which a deer would be visible to a hunter (which we called the vulnerability zone). We then combined all of this information with the movement data collected by the GPS collars, and imported it into a data visualization tool known as ArcMap. This software enabled us to actually see how deer moved each day, and where they were located on the property.
We were interested in understanding how deer moved during three specific periods: Morning/Evening (from legal light to 8 a.m. and 3 p.m. to legal light), Midday (from 8 a.m. until 3 p.m.), and Night (from end of legal light to beginning of legal light the next morning). These periods were based upon changes in risk, as hunters were present only during the Morning/Evening period, a scenario likely to be true for most regions of the country where hunters choose not to sit throughout the midday hours.
Traditional knowledge, and the landscape of fear theory, would suggest that repeated hunting events at the same location would force deer to recognize that area as being of greater risk, and subsequently deer would reduce their usage of that area during times when hunters would be present, namely surrounding sunrise and sunset. This is precisely what we observed. With each additional hunting event at a given stand, deer became increasingly less likely to use the vulnerability zone around that stand during mornings and evenings (Figure 1).
Similarly, following the day that a stand was hunted, deer use of the vulnerability zone around that stand during the Morning/Evening period was at its least. But deer use of that area progressively increased with each passing day. This result was also expected, because the fear response of an animal should decrease over time, especially in hunting environments where most stands are associated with a food source such as a food plot or corn feeder. When the areas of risk are associated with a food reward, the animal must balance the trade-off of avoiding risk with miss- ing out on the nutritional benefits of visiting that location.
Next, we looked at movements during the Midday period. Interestingly, previous studies at the landscape scale had reported conflicting results. Some studies suggested that deer increase activity during midday hours as a way to make up for lost opportunities when they avoid moving during crepuscular periods, while others have claimed that deer remain cryptic during all daylight hours, thus reducing usage of risky areas.
We found that deer followed the same trends during the Midday period as they did during the Morning/Evening period. That is to say that they decreased usage of vulnerability zones around hunting stands following each additional hunting event, but increased usage as time passed. Surprisingly, we observed that deer were far less likely to utilize the vulnerability zone around a stand during the Midday period than during the Morning/Evening period.
After a fourth hunting event at a given location, deer became less likely to use the vulnerability zone immediately following a hunting event and slowly increased usage with each passing day (Figure 2).
This might seem surprising at first, because deer could safely use these areas during the midday without the risk of being exposed to hunters. We believe that this response is due to the natural feeding behavior of deer being focused on crepuscular periods and the fact that vehicle traffic through the property might have been sufficient during the Midday period to make the vulnerability zones appear risky even if they were not.
While the responses we observed during the Morning/Evening and Midday periods were much as one would expect, a very interesting trend emerged during the Night period. We have all heard a hunter complain that “all of the deer have gone nocturnal” and you might very well be that hunter yourself. If so, it probably wouldn’t surprise you to hear that deer initially increased their usage of a vulnerability zone around a stand following the first few hunting events at that location and decreased usage with each passing night since hunting had occurred. Yet this trend changed with additional continued hunting pressure at that stand. After a fourth hunting event at a given location, deer became less likely to use the vulnerability zone immediately following a hunting event and slowly increased usage with each passing day (Figure 2).
Essentially, after continued hunting pressure at a particular stand, deer changed their behavioral response at night to the same avoidance we observed during the Morning/ Evening period. This suggests that deer respond to initial hunting events by simply accessing the area during a safe time and their fear decreases as time passes. But as hunters use the area more, deer respond by avoiding the area altogether. Perhaps the deer decide, in essence, to move on to safer pastures where they may be able to feed during Morning/Evening hours instead of confining themselves to nocturnal hours only.
BEHAVIOR MODIFICATION Our findings provide us with unique insight into the behavior of white-tailed deer in response to pressure from human hunters. While hunters have long known that white- tails have the ability to modify their behavior and space use in response to hunting pressure, this study has allowed us to document exactly how deer respond to spatially explicit risk and how that response differs from responses visible at the landscape level.
While one could look at the landscape level response of this population and assume that hunting pressure was not sufficiently strong enough to force deer to alter their behavior, a more thorough investigation reveals that deer are in fact recognizing and responding to the risks posed by hunters: They are merely doing so at a small enough spatial scale to reduce the impacts on their regular activities.
It’s this minor variation in their movement and activity patterns that make it seem as though there aren’t any deer in the woods. Some might view deer as creatures randomly moving through the woods from one field to the next, but this study demonstrates that white-tailed deer not only perceive their environment in fine detail, but are able to respond to risks immediately and use infor- mation about past risk at a location to make informed future decisions about using or avoiding that location.
No matter how little you are hunting an area you are influencing the likelihood of a deer using that area again, at least for a few days. Even if you never fire the gun, there is a strong likelihood that you were still detected by at least a few deer.
TAKEAWAYS FROM THE STUDY So what does this mean for you as a hunter? Well, there are a few clear takeaways from this study that you can use to aid your quest this fall. First, no matter how little you are hunting an area you are influencing the likelihood of a deer using that area again, at least for a few days. Even if you never fire the gun, there is a strong likelihood that you were still detected by at least a few deer.
While you might have still had plenty of deer come and go blissfully unaware of your presence, others might have been spooked off as they approached from downwind, or smelled the disturbance along the path you used to reach your stand. Therefore, after hunting a location try and give that stand a few days off so that the fear response can decrease before your next hunt.
Secondly, understand how the length of your season might impact deer behavior. If you live in a New England state with shorter seasons you can expect deer to have a much stronger reaction across the landscape to hunting pressure than in Southern states with more prolonged seasons. When the season is shorter, deer can afford to avoid high value areas (food plots and feeders) for the brief season and return when it’s safer, but such avoidance might be nutritionally prohibitive in states with longer hunting seasons.
Finally, consider moving your hunting stands between seasons, while this study did not investigate if the number of hunting events at a stand the year prior caused deer to avoid an area more quickly the next season, it is a good idea to reduce your predict- ability as much as possible.
We as hunters attempt to pattern deer almost every way imaginable, from extensive scouting and note taking from years on a property to a network of game cameras trying to locate that trophy buck. Yet, with all of the effort we direct toward patterning them, it can become all too easy to forget that deer are also capable of patterning us. So this coming season, as the days grow shorter and your heart gets restless, yearning for an all too brief escape into the peaceful hunting grounds, do your best to be aware of your own patterns and embrace the opportunity to outwit your prey — not by attempting to understand their predictability, but by limiting your own.
— Jeff Sullivan completed his M.S. degree in 2016 at Auburn University studying white-tailed deer under the supervision of Dr. Steve Ditchkoff. He is currently employed by USGS at the Patuxent Wildlife Research Center.
— Dr. Steve Ditchkoff is a professor in the School of Forestry and Wild- life Sciences at Auburn University. He manages the deer research program at Auburn and has been conducting research on white-tailed deer for 25 years.
An air rifle's effective shooting range depends on various factors, including the type of rifle, the caliber, and the power source. Generally speaking, most...
")
")
")
")
")


 Source: IGFA World Records Database
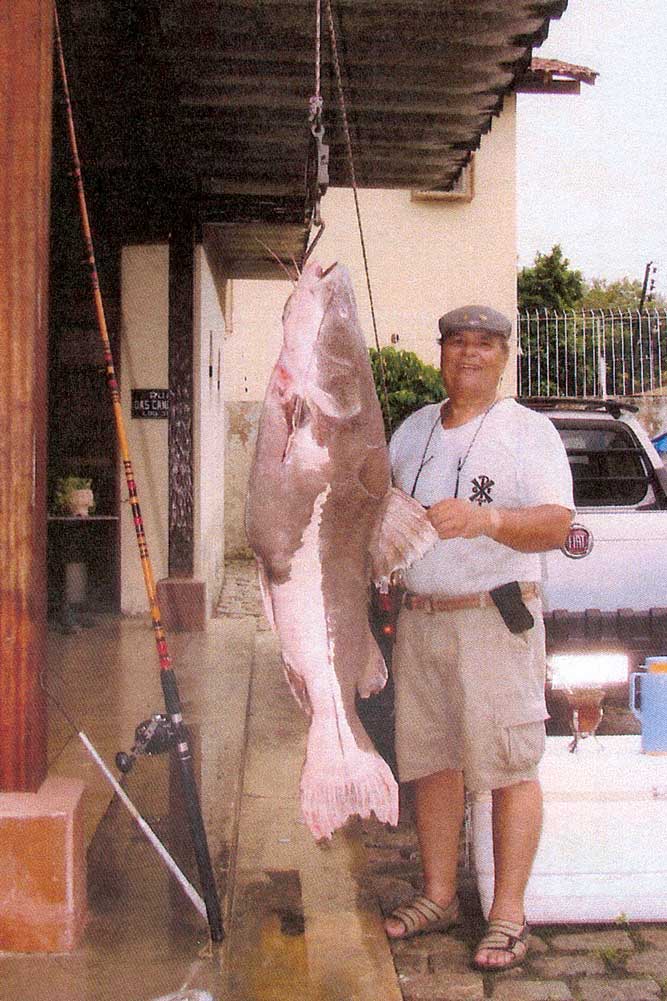 Source: IGFA World Records Database
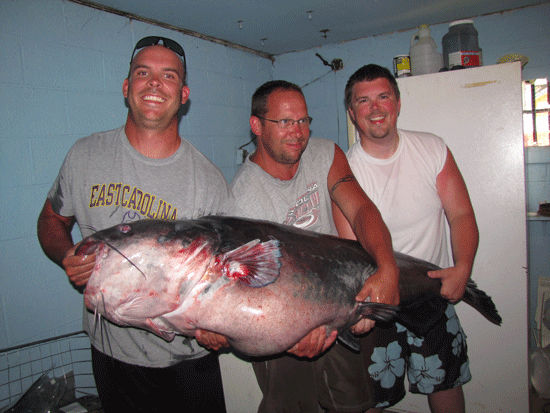 Source: The Roanoake Times
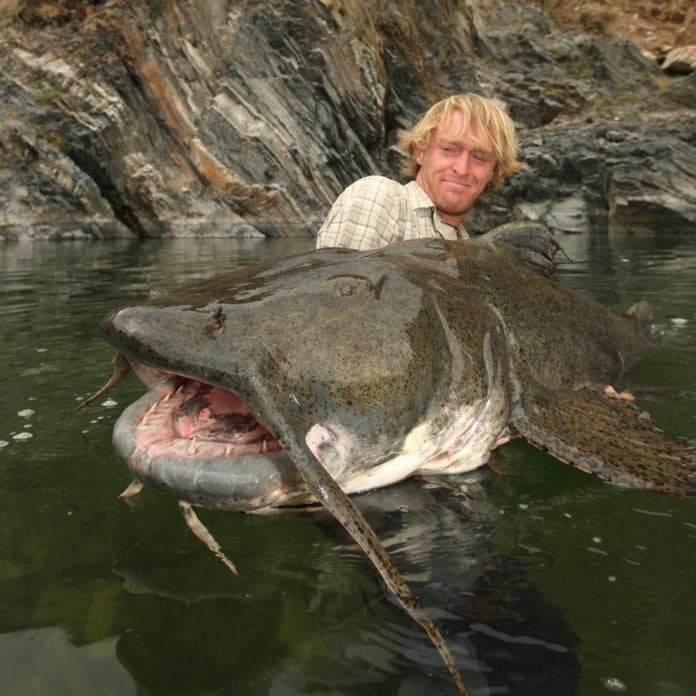 Source: fiskefuralle.se
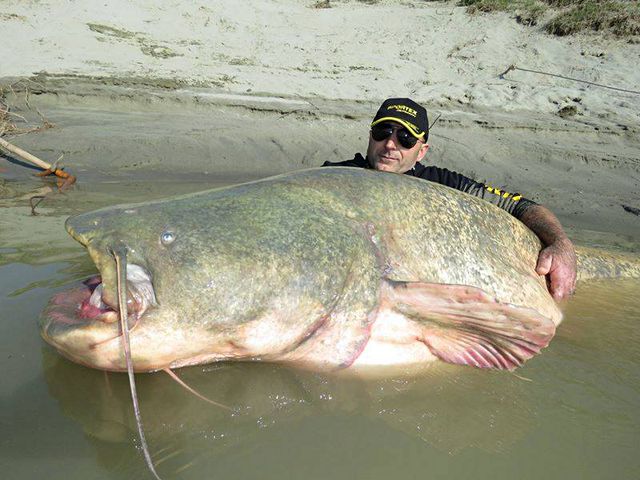 Source: Adventure Sports Network
 Source: bigfishesoftheworld.blogspot.com
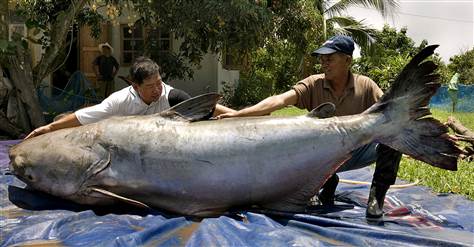 Source: NBC News