Whether you’re looking for faster target acquisition on your pistol or more range on your turkey gun, red dot sights can increase your efficacy and range.
While red dots vary in size, they seem to largely inhabit three categories: micro, small to mid-size, and large, closed emitters. Each category serves a function, depending on a shooter’s needs, but quality can also determine this as well (a lot of early, cheap red dots were unnecessarily bulky).
The Vortex Venom delicately walks the line between micro and mid-size red dots. While it’s not a micro dot by recent standards (such as the Vortex Defender or Holosun’s line of microdots), the Vortex Venom is an unobtrusive optic for your turkey gun, but it also won’t feel like a brick if you decide to mount it on your pistol.
In short: The Vortex Venom is an affordable and streamlined red dot with a large sight window that makes it ideal for a variety of shooting situations.
This turkey season, I mounted the Vortex Venom on one of my Remington 870s. It comes with a Weaver/Picatinny mount and mounting screws. Sighting in the Venom required a learning curve. I spent several shells before noticing that the red dot wasn’t moving when I adjusted the elevation.
With the shotgun in a rest, I observed the red dot and made a full rotation and back before it finally moved, and I had it dialed in a few shells later. I’ve had zero issues out of it since, but it’s worth noting.
Dot Brightness and Clarity
Vortex offers the Venom in 6 MOA and 3 MOA configurations. With shots inside 40 yards, I’m running the 6 MOA on my turkey gun. Within that distance, you won’t have to worry about it covering up a turkey head, and the dot is plenty bright for low light conditions or extremely sunny days.
The Venom includes two brightness modes, Auto and Manual. Dot brightness in Auto mode adjusts to the ambient lighting conditions and power down after 14 hours of inactivity. You can engage Auto mode by holding the up arrow until the dot flashes three times, while Manual mode engages after the dot flashes twice.
The dot exhibits a small bloom and a significant starburst effect on higher settings, but I didn’t notice any parallax within 100 yards. On lower settings, the Venom produces a bright, crisp dot.
Durability
(Photo/Adam Moore)
I haven’t had any issues with the Venom holding its zero. After running through various target loads and a box of Winchester Longbeard XRs, and burying the Venom in mud to brace a fall, the dot hasn’t moved. Considering that my gun takes a beating throughout turkey season, I’ve been pleased with the lack of adjustments I’ve had to make since the initial sight in.
Where the Vortex Venom Shines
The streamlined design makes the Vortex Venom ideal when you need to shave weight or space. Recessed windage and elevation adjustments mean you don’t have to worry about large dials getting bumped or snagged on brush. The large sight window, which has a blue tint, makes target acquisition (like picking out a turkey head through the timber) a breeze.
For less than $250, this red dot is hard to beat, especially since it’s covered by Vortex’s VIP warranty.
Where the Vortex Venom Can Improve
You can’t feel any clicks when you make adjustments to the windage and elevation, so a clear, tactile response would be nice.
The adjustment mishap I had while sighting in the red dot was a bit unsettling, but I haven’t had any issues with it since. It’s possible an obstruction, like an epoxy, was blocking the housing and eventually broke free once I cranked down on the turret. For what it’s worth, I’ve been running this setup since it happened, and I’ve even checked the zero a couple of times just to be safe.
Vortex Venom Red Dot: Final Thoughts
(Photo/Adam Moore)
The Vortex Venom inhabits that class of red dots that offers intuitive and rugged features at a budget price. Whether you’re chasing turkeys or adding an optic to your bear gun, you should consider the Venom as an affordable and capable option.
One of the biggest benefits of a multi-pump air rifle is that it gives you more control over the power of your shot.
The more you pump, the higher the velocity and power.
The less you pump, the lower the power and feet per second (FPS).
Therefore, the M4-177 can adapt to short and long-range shooting and indoor and outdoor shooting.
In general, a multi-pump air gun will be lightweight, compact, and recoilless, and this model is no exception.
Additionally, they are self-contained so there is no need for expensive CO2 cartridges
Or scuba tanks that some of the other pneumatic require.
The only downside of a pump air gun is the considerable amount of time and effort required for cocking before each shot.
When hunting, this timing can be detrimental and your target might scurry off while you are still trying to cock the rifle.
This gun has an internal diameter of 0.177 (or 4.5 millimeters).
As the name suggests, it uses 0.177 pellets which are known for having a very high velocity, good knockdown power, and flat trajectory (higher accuracy).
The 0.177 pellet is also very cheap so it’s awesome for shooters who shoot a lot for practice or in hunting.
Unlike some automatic air rifles, the Crosman M4-177 is a single-shot air rifle, which means that the gun must be cocked before each firing .
In this way, a single-shot air gun forces shooters to slow down and be better marksmen.
With a single shot, there is a greater chance that your shooting skill and precision will increase.
What makes the Crosman M4-177 stand apart from other airguns is its feel: this gun looks and feels like a real M4- assault rifle.
To start, the barrel is rifled, which means that it has spiral grooves inside to make the bullet spin around its long axis.
Spinning the bullet stabilizes it in its trajectory, improves accuracy, and enhances the shooting range.
Not only is the gun styled to look like an M4, but Crosman also incorporated non-functional features
That reflects features on a real carbine, such as a flat suppressor, hammer pin, trigger pin, magazine release button, takedown pin, and charging handle.
Since it looks just like an M4, you may want to apply some high-visibility tape on the end of the barrel
So that it can be distinguished from a real firearm.
Stock
The Crosman M4-177 features a black synthetic and elongated textured polymer forearm.
The synthetic stock of Crosman M4-177 is made of ABS plastic,
Which stands for acrylonitrile butadiene styrene, and the chemical formula is (C8H8)x(C4H6)y(C3H3N)z.
It is a common material used to make air rifles and is lightweight, rigid, temperature-resistant, and impact resistant.
The black synthetic stock is lighter than wood and is more resilient to atmospheric changes.
For example, if you live in a hot, humid place, a wood stock might expand and contract due to the changes in weather conditions.
These types of minor fluctuations might affect your shot accuracy, which can be crucial when hunting small games.
The M4-177 would therefore be ideal for those who shoot in various weather conditions such as extreme heat, humidity, snow, and rain.
The stock length can be adjusted to five different positions so as to fit your arm’s length.
For ease of carrying, there are two loop slots to hold the sling.
The stock is also ambidextrous so you can train both shooting arms or switch off with an opposite-arm shooter in practice.
A thin plastic pad at the bottom end can allow the gun to be stood up for added convenience.
There is also a fake magazine included in this rifle, which can be easily removed or used to store BBs, pellet clips, and sight adjustment tools.
Ammo
The Crosman M4-177 uses both BBs and 0.177 pellets as its ammo so you can shoot whatever ammo you’ve got lying around.
It also includes a five-shot pellet clip, and the BB reservoir can hold up to 350 BBs at a time.
Therefore, you can practice target shooting for long hours without worrying about running out of ammo.
Cocking and Loading
Before cocking, be sure to first push the cross-bolt safety in the trigger guard to the “ON SAFE” mode.
Then you will hold the stock with one arm, fully grasping the foregrip with your other arm, and extend the stock all the way until it stops.
After that, swing it back into its original position.
This gun will require at least three pumps to prevent pellet jamming, but don’t pump more than 10 pumps since that can damage the gun.
You can easily load both pellets and BBs, so you have a lot of options when shooting.
Remember that you cannot shoot both BBs and pellets at the same time.
To avoid loading ammo into the wrong port, BBs are loaded on one side and pellets on the other.
The loading action of BBs and pellets may seem complicated at first but when you get used to it, it will become second nature.
To load BBs, locate the BB loading port by moving the loading port cover toward the rear of the gun.
You can pour up to 350 BBs into it.
Close the port cover, push the BB retainer button forward, tilt the rifle down, shake the gun, and then let gravity feed BBs into the magazine.
After that, you pull the retainer button back to lock them in.
Now, you position the pellet clip so the BBs can be fed through one of the pellet’s chambers.
With the barrel tilted downward, the magnetic bolt will pick up the BBs when you cock the bolt (pull it back and push it all the way forward).
And voila, you are ready to shoot with BB ammo.
If you’d like to load pellets, first load pellets into the pellet clip with the pellet’s nose lying forward.
Next, pull the bolt back, put the pellet clip into the gun, and make sure that the pellet’s chamber is aligned with the barrel.
Push the bolt all the way forward and you are ready to fire with pellets.
Velocity and accuracy
We can see that the velocity is consistent between different pellets. Each provides a medium shooting speed.
The Crosman M4-177 has a maximum velocity of 660 FPS with steel BB and 625 FPS with a pellet.
With 5.23 grains Crosman Copperhead BBs, Daisy zinc-plated BBs, and steel BBs, its velocity is 576 FPS, 579 FPS, and 650 FPS, respectively.
With Crosman premier super match pellets, 8.18 grains pellets, and 7.9 grains Crosman Premier pellet,
Its velocity is 529 FPS, 559 FPS, and 625 FPS, respectively.
Ammo
Velocity (FPS)
Steel BB (manufacturer)
660
Pellett
625
5.23 grain Crosman Copperhead BB
576
Daisy zinc-plated BBs
579
Steel BB (tested)
650
Different shooters have performed accuracy tests.
The shot distance is good, with some shooters being able to shoot a metal drum at 100 yards.
However, this gun is very accurate for 40 yards or less.
The common shooting groups are:
0.25 inches at 25 yards,
5/8 inches at 12.5 yards,
1 inches at 15 yards,
2 inches at 40 yards,
0.25 inches at 25 feet,
quarter size at 40 yards,
2 inches at 35 feet,
4 inches at 100 feet,
0.25 inches at 30 yards,
1.4 inches at 20 yards.
Distance in yards:
< 12.5
15
20
25
30
40
100
¼
?
?
?
⅝
?
1
?
2
?
?
1 ½
?
4
?
Metal Drum
?
Most accurate
?
?
?
?
?
?
Rick Eutsler from AirgunWeb tested intensively the M4-177 in the video below
Sight
The Crosman M4-177 comes with an open sight, which consists of a post front sight and dual aperture rear sight.
If you’re not familiar with these types of sights, then you might be in for a treat!
The use of these two sight types allows for better clarity in focusing as well as more adjustments based on terrain.
Additionally, both the front sight and rear sight are removable and can be replaced with a scope if you like.
Aperture sights, also known as peep sights, are similar to standard open sights except it has a cut in the middle of the rear sight for target alignment.
With aperture sights, the “ghost ring” of the aperture blurs the surrounding areas,
So your eyes are only drawn to two points (the front sight and the target) as opposed to the three points in traditional open sights (the target, the front sight, and the rear sight).
This type of sight can easily improve accuracy and is far superior to traditional open sight.
The aperture rear sight of the Crosman M4-177 is also a dual sight, which means that it has two rings with different purposes.
The ring with the bigger aperture permits you to zero in on the target more quickly
While the ring with the smaller hole provides you with more precision for aiming.
Moreover, the rear sight can be adjusted from left to right to account for windage,
While the front sight can be adjusted up and down for elevation.
The accessory rail is a Picatinny style rail, which is almost identical to the weaver rail, except it has a series of ridges located at precise intervals along the rail.
The Picatinny rail provides more mounting options so you can easily swap scopes and mount the scope rings at any distance along the shaft.
This gun comes with four optic rails (two in the barrel, one in the upper receiver, and one in the handguard),
But I recommend that you only use the rail on top of the receiver and on top of the muzzle to mount your accessories.
If you install accessories along the other two rails, then they may get in the way of the pumping.
This video below will explain in detail how to install and adjust the sight for this air rifle:
Noise
This gun is very quiet. None of the customer reviews on Amazon, Walmart, Pyramid Air, and Cabelas complain about the noise.
Shooting range and intended use
The effective shooting range of this air fun is less than 40 yards.
The maximum shooting range can be up to 100 yards.
This gun can be used for both indoor and outdoor shooting.
The manufacturer recommends it for plinking and target shooting
Accessories
This gun only has the front sight and rear sight as included accessories.
If you want to utilize the built-in features, you can buy other gear such as a sling, scope, red dot, laser, flashlight, and more.
Maintenance
This air gun requires little to no maintenance.
It only requires a few drops of Crosman 0241 Pellgunoil in the barrel and the pivot pin after 250 shots.
With this simple maintenance, this gun will last for a long time.
Specification
Caliber: 0.177
Power plant: multi-pump pneumatic
Cocking effort: 3-10 pumps
Maximum Velocity: 660 FPS with steel BB, 625 FPS with pellet
Ammo: BBs and pellets
Weight: 3.75 pounds
Barrel Length: 17.25 inches
Overall Length: 33.75 inches
Capacity: single shot
Barrel: steel rifled
Front sight: removable, adjustable for elevation
Rear sight: removable, dual aperture, adjustable for windage
Trigger safety: manual
Accessory rail: Picatinny Style
Buttpad: plastic
Material: metal / ABS plastic
Warranty
At the moment, Crosman offers a one-year limited warranty from the date of purchase.
Customer Reviews
The many customer reviews online are very positive.
Most people love its cool style and find it very fun to shoot with.
They also like its quietness, easy-to-use open sight, adequate velocity, sufficient power and modern design.
Nothing arises as a serious issue.
Pros
Look and feel like real M4-AR
Lightweight
Medium velocity and decent power
Quiet
Very accurate
Useful synthetic and adjustable stock
Control over power of the gun with pumping action
Can shoot both BBs and pellets
Picatinny optic rail
Effective dual aperture sight
Cons
Pumping action takes time to learn and can be tedious
Not great for hunting
Doesn’t have a scope
Price
The Crosman M4-177 is only about $60 USD, which is very affordable for a gun of this caliber.
The Crosman M4-177 is an impressive multi-pump pneumatic air gun that comes with a lot of great features.
While you may have to get used to the pump-action, I would still highly recommend this gun for more playful settings and to shoot with your kids, family, and friends.
As I mentioned in my previous articles on patterning my shotgun, the basics of turkey hunting, and camouflaging my shotgun, I’m in the process of preparing for an upcoming turkey hunt during Memorial Day weekend. For my next article in my series on turkey hunting, I’m writing about the differences between some of the various types of turkey calls commonly used by turkey hunters. Since spring turkey season overlaps with mating season for turkeys in most of the United States, imitating turkey vocalizations is the most popular and most effective technique used by turkey hunters to call in a big gobbler. There are a wide variety of turkey calls available on the market today, and I hope to provide some useful information on the advantages and disadvantages of each in this article.
Before we begin, please note that I’m not necessarily endorsing any particular type or brand of turkey call in this article. Indeed, I haven’t actually used any of them on a turkey hunt yet, so I’m not really in a position to say which type or brand works “best.” Instead, I’m merely presenting some of the pros and cons of each type of call as well as some things to consider when getting ready to purchase one.
The push button call is probably the easiest turkey call to use. Made from wood (primarily walnut) and/or plastic, push button calls can produce realistic sounds imitating turkey hen clucks, purrs, and yelps. Since they are so easy to use, push button calls are very popular among new turkey hunters. Another advantage of the push button call is that a hunter can also easily operate one with only one hand, or even mount it on the stock of a shotgun for quick and easy access.
Unfortunately, push button turkey calls are very sensitive to moisture. While turkeys will still move during a spring rain shower, a little rain can silence a push button call and ruin a hunt for a hunter who relies solely upon push button calls. Additionally, push button calls can present problems for a hunter going after turkeys subject to heavy hunting pressure. Since they are so popular, and since push button calls do not produce quite as wide of a variety of sounds as other turkey calls (particularly diaphragm or pot and striker calls), mature gobblers may quickly wise up and become less responsive to a hunter using a push button call midway through the season.
Like the push button call, the box call is also extremely popular and very easy to use. Box calls are most often made of wood such as walnut, cedar, or mahogany, among others. However, some box calls are now made out of metal. In the hands of a skilled caller, a box call can produce a very wide variety of turkey vocalizations. Additionally, box calls are great for calling over long distances, as they can mimic turkey vocalizations at loud, as well as soft volumes.
Like push button calls, box calls are also sensitive to moisture and don’t work nearly as well when wet. However, this is not as big of a problem as it used to be because some companies now manufacture waterproof box calls (like the call pictured above). Another problem with box calls is that most of them require two hands to operate. This makes it more difficult for a hunter to transition from operating the call to aiming his or her shotgun without being spotted by a sharp eyed gobbler.
Finally, box calls have the same disadvantage as box calls when hunting heavily pressured turkeys. Since they are so popular, turkeys sometimes learn what a box call sounds like and become less responsive to them. Since the goal of a hunter is to sound like a turkey, not a turkey hunter, this can be a problem.
Pot and striker calls consist of a round disc, usually made from glass, slate, or ceramic materials, and a striker usually made of wood, aluminum, or carbon. To use, apply pressure to the pot with the striker at varying pressures, angles, and patterns to create different sounds. Using these calls, a skilled caller can produce a dizzying array of turkey calls. Additionally, most pot and striker calls are much more tolerant of wet conditions than box or push button calls are.
While pot and striker calls are great options for a turkey hunter, they are not without disadvantages. Like a box call, pot and striker calls have the disadvantage that they require two hands to operate. Additionally, they are more difficult to learn to use effectively when compared to push button calls or box calls.
Also known as mouth calls, diaphragm calls are small, horseshoe shaped calls with rubber or latex reeds that vibrate when air is forced across them. Many different manufacturers produce diaphragm calls in a wide variety of variations that can imitate virtually any turkey vocalization. Diaphragm calls are inexpensive, small, lightweight, and weatherproof. They also do not require the hunter to use his or her hands for operation. This significantly cuts down on movement and allows the hunter to use the call right up until the point that they take the shot without spooking the bird.
The biggest disadvantage to the diaphragm call is that they are the most difficult turkey calls for a hunter to learn how to use properly. Indeed, many experienced and successful turkey hunters do not know how to use a diaphragm call to its fullest potential. The other disadvantage to a diaphragm call is that they are not as loud as other turkey calls, especially box calls.
As you can see, each of the different types of turkey calls I described here fits into a particular niche. None is perfect, but they can complement each other very well if used appropriately. As a result, instead of looking for the “best” call, it’s probably a better idea for a turkey hunter to purchase and master the use of 2-3 different turkey calls. This will give the hunter several options if he or she out in turkey hunting and gets caught in a rain shower or the turkeys stop responding to a particular call. By having a different, but complementary, call on hand that he or she can use well, that hunter may be able to change things up and end the hunt with a big gobbler on the ground.
Make sure you follow The Big Game Hunting Blog on Facebook, Instagram, Twitter, and YouTube.
NEXT: BEST 6.5 CREEDMOOR AMMO FOR HUNTING ELK, DEER, AND OTHER BIG GAME
Welcome! Please view, share, and enjoy the copyrighted, complete solution to the Fenn quest. Visual independent proof (“VIP”) exists in three different forms, while the site determined by the poem is here.
The readiest proof is found here or in the image shown on this page, which is the quest solution. The image combines an overlay of the illustration by Polt found in the epilogue of The Thrill of the Chase: A Memoir by Fenn, published in January 2010, onto an outdoor photo of the site I took in August 2018. That match proves that Fenn, who commissioned the illustration, was at the site of the photo while creating the quest.
In that book, where “EPILOGUE” heads the last chapter title page, the letters “LOG” are centered above the illustration. The Greek root of “epilogue” is “ἐπί” or “epi” meaning “above.” In often referencing “under a log” or “turning over a log” while searching, Fenn refers to this image, not to the natural remains of a tree. The key image under, or labeled by, the letters “LOG,” when overlaid onto the correct photo and faded, proves the correct site, again underneath.
More independent proof is found here in the clear connections between the site and the Colorado state seal. The three VIPs often interconnect. For example, the fasces in the state seal matches the “ax in the wood” portion of the overlay image, while the Fenn directive to “turn over a log” matches the key 1794 Battle of Fallen Timbers, fought near Toledo.
Details are found in the full solution.
Only the correct site and its surroundings were visited in the context of the quest. Identifying the area was straightforward. The difficulty lay first in narrowing down the site, which took about one year, then in perceiving that the quest is not a scavenger hunt for treasure but rather a test of grit: of character, disentitlement, productivity, and resilience in adversity, culminating in independent proof. Creating at least one form of independent proof took over two years, and creating others took almost three.
The rugged site, dominated by willows, is of limited extent, about 1 acre (0.4 ha), yet multiple, thorough searches yielded nothing. Anyone is welcome to explore and search the site. Outdoor safety precautions in all particulars must be taken as the site is at 9,000 feet (2,743 m) of altitude and is accessed only by wading a river.
The solution is publicly revealed. To be clear, the quest is solved, the answer to the puzzle is independently proved, and treasure is absent at the site.
Three forms of VIP would not be needed if treasure, proof enough, were present. The status of treasure is unknown. In my opinion, a real treasure exists, and Fenn securely retains it to award as he sees fit — which is also common sense: the poem ends, “I give you title to the gold.” Many “treasure searchers” might misunderstand the quest, setting the wrong success standard and guaranteeing failure by insisting on finding and retrieving a literal treasure, when the “treasure in the woods” is figurative or metaphorical. A metaphorical test of grit solved by creativity and reference to history, literature, and images is consistent with the personal profile of a combat pilot turned artist and best-selling author. Literally abandoning treasure in the woods, a foolish act inconsistent with a brilliant man, also would deprive Fenn of control over the quest.
Many thanks to Fenn, Polt, family, friends, and public safety authorities. Fenn is a man of service, creativity, and intellect, whom I respect and admire. I am humbled to have solved his amazing quest and would be privileged to meet him in person. We have never mutually corresponded. My name and contact are found atop this page and at the bottom of the cover page of the solution document.
“If I cannot move heaven, I will raise hell.” – Virgil, The Aeneid of Virgil, Book Seven, Line 312
Massachusetts hunters are preparing for the approaching spring turkey season. Subject to limitations, the season will last for several weeks and include the Youth Turkey Hunt Day. This article will go through the specifics of the Massachusetts turkey season, including crucial dates, rules, and advice on a productive hunt. So gather your supplies, and let’s begin!
During this season, a hunting or sports license, a turkey permit, and three turkey tags are needed to hunt wild turkeys in Massachusetts. For the eleventh season, beginning in April, turkey hunting will also be permitted on Cape Cod National Seashore.
MA Youth Turkey Season
MA Youth Turkey SeasonSeason Start DateSeason End DateBig Game Zones 1-13 (Youth Hunt:)22-Apr22-Apr
MA Spring Turkey Season
MA Sping Turkey SeasonSeason Start DateSeason End DateBig Game (Zones 1-13)24-Apr20-May
MA Fall Turkey Season
MA Fall Turkey SeasonHunting Season Start DateHunting Season End DateBig Game (Zones 10-13***)2-Oct25-Nov Big Game (Zones 1-9***)16-Oct25-Nov
From October 16 through October 28, 2024, hunters may use shotguns, muzzleloading shotguns, and archery tools during the autumn turkey hunting season in wildlife management zones 1 through 13. However, only archery gear is permitted during specific times of the fall season. The tables that are presented offer further information on these times.
Note: For the entire Hunting license list, view it on the mass.gov website
Hunting Regulations
Massachusetts turkey hunters need licenses and permits. Massachusetts requires a Hunting or Sporting License, a Turkey permit, and a Safety sticker. Non-residents require a Big game license, Turkey permission, and a Safety sticker. Turkey hunting with a shotgun or muzzleloader requires a safety sticker. Sighting down the barrel requires this sticker. Visit any MassWildlife office or contact mass.wildlife@mass.gov to get a new sticker.
Turkey hunting equipment rules vary in spring. Shotgun hunting is limited to gauge 10 and shot size #4. Smoothbore shotguns may only be.775 calibers and #4 shot size for muzzleloader hunting. Archery equipment must have a draw weight of at least 40 lbs at 28 inches or peak draw and well-sharpened steel broadhead blades of at least 7/8 inches. Expanding broadheads and portable releases are permitted, but airbows are not. Permitted disabled hunters may use crossbows.
During the autumn turkey season in Massachusetts, hunters must wear blaze orange caps in Wildlife Management Areas stocked with pheasants or quail.
Massachusetts, licensed turkey hunters may call turkeys for other hunters but cannot carry firearms or archery equipment if they have surpassed the season limit. Even without tags, the caller needs a license and Turkey permission. Massachusetts turkey hunters cannot utilize electronic calls, dogs, bait, drive or herd birds, or live decoys.
Hunters must rescue and utilize dead or injured game animals. The animal must be maintained or sent to someone else for processing. Damaged, decaying, ill, or contaminated animals are exempt from this regulation.
Massachusetts residents must report turkey harvests within 48 hours at a check station or online via MassFishHunt. After harvesting the turkey, you must affix the paper tag from your permit to the carcass and keep it intact until it is reported and processed for food or taxidermy. Online harvesters must put their confirmation number on the carcass tag.
Massachusetts has spring and fall turkey seasons. Spring runs from the final Monday of April to the fourth Saturday. Wildlife management zones (WMZs) affect fall. WMZ 1-9’s season runs from the 6th Monday before Thanksgiving to the Saturday after. WMZ 10-13’s season runs from the 8th Monday before Thanksgiving to the Saturday after. Sunday hunting is prohibited. There is a special kids’ turkey hunt on the Saturday before spring. This hunt requires the young turkey program and Basic hunter education.
Note: For Complete Massachusetts Turkey hunting regulation, you review the Commonwealth of Massachusetts website
“Understanding Felon Firearm Possession in Oklahoma: Unraveling the Legality of Owning Air Rifles for Convicted Individuals”
can a felon own an air rifle in oklahoma
In the state of Oklahoma, the ownership and possession of firearms by felons is heavily regulated. However, when it comes to air rifles, the laws are slightly different. According to Oklahoma law, felons are allowed to own and possess air rifles as long as they have completed their sentence and have had their firearm rights restored. This means that if a convicted felon has gone through the necessary legal process to regain their firearm rights, they can legally own an air rifle in Oklahoma.
It is important to note that while felons may be able to own an air rifle in Oklahoma, there are still restrictions and regulations that apply. For example, they must comply with all federal laws regarding firearms, including restrictions on possessing firearms near schools or committing certain crimes while in possession of a firearm. Additionally, any individual who is subject to domestic violence restraining orders or has been convicted of domestic violence offenses may be prohibited from owning any type of firearm, including air rifles.
In conclusion, felons in Oklahoma can legally own an air rifle if they have completed their sentence and had their firearm rights restored. However, it is essential for them to understand and comply with all relevant federal and state laws regarding firearms ownership and possession. It is advisable for individuals with felony convictions to consult with legal professionals to ensure they are fully aware of their rights and responsibilities when it comes to owning an air rifle in Oklahoma.
In Oklahoma, felons are prohibited from owning firearms, including air rifles. State law does not differentiate between different types of firearms. Therefore, it is illegal for a felon to possess an air rifle in this state.
So you have your rifle but need a way to stabilize your rifle to make clean, accurate shots? Well, look no further than a rifle bipod! In this guide, we dive into the best rifle bipod for your setup and needs.
I’ll start with some of the market’s top bipod options and then see the best options for different applications.
The Caldwell XLA pivot bipod is a compact, lightweight aluminum bipod made for bolt action rifles and AR-15 style rifles.
The XLA pivot is a budget bipod but not a low-quality bipod.
The legs of the bipod are made of aluminum and the other parts are steel.
This bipod has two external springs that allow the legs to flip down and be resecured in the up position to make moving with the bipod easier.
Javelin Spartan Lite
The Javelin Spartan Lite is an extremely simple bipod made by Spartan Precision Equipment.
The Javelin Spartan Lite is a three-piece system that allows you to remove the legs of the bipod via a screw-on and off-based system to achieve your preferred length.
The Javelin Spartan Lite is very accurately named: it’s lite. The short-leg version is only 4.6 ounces.
The disadvantage to the Javelin system is the legs are fixed height.
The attachment system for the Javelin is supplied with a classic rifle adapter kit, which uses the sling stud that is included on most rifles.
The Javelin provides a great deal of stability since the legs are fixed height and stationery.
Harris Series Bipod
The Harris Bipod is probably one of the most well-known rifle bipods on the market. In fact, when you ask someone what bipod you should buy they are likely to recommend to you a Harris Series bipod.
The Harris bipods have earned their stripes and are extremely well known. The Harris excels at what it is for its price point. Sitting right around the $100 range, it is affordable and feature-packed.
The Harris bipod has several ways to attach it to a rifle, including a QD mount system.
One thing to note about the Harris series is the two external springs that function the same way the Caldwell bipods do. The springs all for retraction and deployment of the bipods.
This made for the perfect pairing with my Thompson Center Compass.
Magpul Rifle Bipod
The Magpul rifle bipod is my go-to bipod on my Ruger American Hunter rifle. I love this bipod, but it does have some drawbacks.
The price of the Magpul bipod is in line with other mid-tier rifle bipods. At around the $100 mark, it is incredibly competitive.
Magpul is known for its polymer products, so it’s not a huge shock that the Magpul bipod has a substantial amount of polymer in the design.
They even have a MOE version that is entirely polymer. I’ll talk about that next.
The Magpul bipod is highly compact and uses a button deployment system to allow you to adjust the height of the bipod legs.
While the Magpul bipod isn’t the lightest of the list it is the lightest with its features.
Magpul MOE Bipod
The Magpul MOE bipod is the all-polymer version of the Magpul Rifle Bipod. You may ask, why would I want a polymer bipod?
Two main things: weight and price.
The price of the polymer bipod is $74.95, which is $30-40 cheaper than its metal counterpart.
While it still provides many of the same features, the polymer is not as strong (some say sturdy) as metal.
What it loses in strength, it gains in weight reduction. The MOE bipod is only 8 ounces.
Warne Precision Bipod
Warne Precision is at the higher end of this list but is feature-packed and high-quality.
This bipod is nice because it can be adjusted from the shooting position and has rapid leg deployment and no external springs.
The Warne bipod is excellent for nearing any application from hunting to competition, and everything in between brings excellent stability.
With that stability comes a pretty sizeable cost. At $335, it isn’t a cheap option but very likely the best option for features.
Accu Shot Atlas Bipod
B&T Industries makes the Accu Shot one of the most popular high-end bipods, with everyone from recreational hunters to tier 1 military units using it.
It would be considered the current gold standard of weapon bipods.
ACCU-TAC BR-4
The ACCU-TAC BR-4 is one of the best-looking and feature-packed bi-pods on the market today.
Don’t get this confused with the Accu-Shot; they are entirely different companies.
The Accu-Tac will run on the high end of the price points for rifle bi-pods, but you get many features and an extremely high-quality design.
Adjusting the Accu-Tac Bi-Pod
The Accu-Tac B4 is easily adjusted for height and uneven surfaces. The legs are extremely easy to deploy you simply pull out and set them to the angle that works best.
You can then adjust the up-and-down height of the bi-pod by pulling down on the bottom of the Accu-Tac legs. To retract the legs, press the adjustment button on the side of the bipod.
This design is incredibly simple and one of my favorite bipod designs. It’s sturdy and easy to use.
Attaching the Accu-Tac Bi-Pod
The Accu-Tac BR-4 Bi-Pod attaches via a Picatinny rail attachment that can be adjusted easily and is on a QD mount system.
The QD mount makes it easy to attach and detach your bi-pod if you need it removed. This bi-pod does store well, but if you want to cut down the overall weight of your gun, you may want to remove it for certain applications.
In my opinion, the Accu-Tac BR-4 is one of the best rifle bipods on the mark!
MDT GRND-POD
The MDT GRND-POD bipod is a cutting-edge accessory designed to enhance the stability and accuracy of rifles, making it a favored choice among avid marksmen and professional shooters.
Crafted with precision engineering and high-quality materials, this bipod offers exceptional performance in a variety of shooting conditions.
Its versatility is a standout feature, as it provides both fixed and pivoting modes, allowing shooters to adapt to different shooting scenarios quickly.
Whether you’re in a prone position or shooting from a bench, the MDT GRND-POD delivers unmatched stability, ensuring consistent shot placement.
One of the standout features of the MDT GRND-POD is its robust construction.
It is built to withstand the rigors of the field and can endure harsh environmental conditions.
The bipod’s legs are adjustable, allowing for precise height customization to accommodate various shooting situations and terrains.
Quick and effortless deployment is possible thanks to its user-friendly design, ensuring shooters spend less time setting up and more time focusing on their targets.
With the MDT GRND-POD bipod, shooters can significantly improve their shooting accuracy, making it an indispensable tool for those who demand peak performance from their rifles.
How to Choose a Rifle Bipod
Choosing the best rifle bipod for your rifle is a crucial decision that can significantly impact your shooting experience and accuracy.
With numerous options available on the market, it’s essential to consider several key factors to make an informed choice.
Bipod Type: There are primarily two types of bipods: fixed and pivoting. Fixed bipods offer stability but limited flexibility in target tracking. Pivoting bipods provide the ability to pan and tilt, allowing for smoother tracking of moving targets. Consider your shooting style and the types of situations you’ll encounter when choosing between these two types.
Height Adjustment: Look for a bipod with adjustable leg height. This feature allows you to adapt to various terrains and shooting positions, such as prone, sitting, or bench shooting. Telescoping legs or quick-release mechanisms are beneficial for easy and quick height adjustments.
Build Quality: Invest in a bipod made from durable materials like aluminum or steel. Quality construction ensures longevity and reliability, even in rugged conditions. Weather-resistant coatings can also protect your bipod from the elements.
Attachment Method: Consider how the bipod attaches to your rifle. Picatinny rail or swivel stud mounts are common options. Ensure compatibility with your rifle’s attachment points.
Leg Design: The shape and design of the bipod legs can affect stability. Some bipods feature wider, non-slip rubber feet or spiked feet for better grip on various surfaces.
Weight: The weight of your bipod can impact portability. For hunting or long-distance shooting, a lightweight option might be preferable. However, for benchrest shooting or precision shooting, a heavier, more stable bipod may be ideal.
Price: Quality bipods come in a range of prices. While it’s tempting to opt for the most budget-friendly option, investing in a reputable brand and model often pays off in terms of durability and performance.
User-Friendliness: Look for features that enhance ease of use, such as quick-deploy legs or one-handed adjustments. These can be especially handy in fast-paced shooting situations.
Reviews and Recommendations: Seek out reviews from experienced shooters and consider their recommendations. Online forums and user reviews can provide valuable insights into the performance and reliability of specific bipods.
Brand Reputation: Well-known brands in the shooting industry often have a track record of producing quality accessories. Research the reputation of the brand you’re considering to ensure you’re getting a reliable product.
Ultimately, the choice of a bipod for your rifle should align with your shooting needs and preferences.
Taking the time to evaluate these factors will help you select a bipod that enhances your shooting experience and improves your accuracy in the field or at the range.
Hunting Rifle Bipods
Nearly any bipod can be a hunting bipod but to drill down and find the best hunting rifle bipod you need to know what type of hunting you’ll be doing.
For example, if you are hunting from a tree stand or climbing stand,rr a bipod either doesn’t make much sense or will need to be very specific to your needs since there typically isn’t much to rest your bipod legs on in a climbing stand.
In short, determining what will work as the best rifle bipod for hunting will largely depend on how you plan to hunt.
Best Budget Bipod Rifle
My best budget bipod recommendation will likely come as no surprise as this company has a long-standing reputation.
The Magpul MOE bipod takes the budget best rifle bipod category handily. With its $75 price tag and solid performance, it takes the gold on budget and quality.
Best Rifle Bipod for Long Range Shooting
The Harris series of bipods are the most popular among professional shooters; having over 45% of the professional shooting market, they are #1 for long-range shooting.
While they may not be the best or the most expensive, they are certainly the most popular when it comes to the best rifle bipod.
At this time of the year in Alaska, a drive of more than a couple hundred miles will involve some time during darkness. While heading north to visit friends during the holidays, I spotted a small, bright spot in the roadway ahead.
As my lights got closer, a huge, brown ungulate appeared surrounding that tiny light spot. I slowed appropriately. A few miles farther down the road, a pair of bright spots appeared on one side of the road. A second later I was able to see the faintly lit image of a lynx crossing the road. I had first seen both of these animals because of their tapetum lucidum reflecting my headlight illumination.
While many are familiar with the phrase, “A deer-in-the-headlights look,” not as many may realize there is an interesting anatomical basis for this situation. Most nocturnal animals, like dogs, cats, deer, etc., will demonstrate “eye shine” when a bright light is shown on them at night. What happens is the light entering the animal’s eyeball is being reflected right back at us as if there were a mirror in there. The mirror analogy is actually pretty close to what is happening.
In order to understand how the tapetum lucidum works, we have to know a little about the layers inside the eyeball itself. First, the retina is the thin, innermost layer of the eye and it contains the light-sensitive cells called rods and cones, and lots of blood vessels. In very close proximity to the rods and cones is a black layer called the choroid.
The important choroid layer absorbs light that has just passed by the light-sensitive
rods and cones. In humans that do not have a heavily pigmented choroids, like albinos, to absorb the passing rays, light gets reflected and scattered inside the eyeball. These individuals suffer with visual difficulties and even small amounts of light are blindingly bright.
In nocturnal animals with a tapetum lucidum, the choroid, or a special portion of the retina, will act as a slight reflector. The actual tapetum lucidum can vary in its composition depending on the specific animal. Since there are so many different animals that exhibit “eye shine,” it is easy to understand that there are many different kinds of reflective layers.
In some, it is composed of a special layer of iridescent crystals like guanine, or in others it might be a layer of cells with reflective fibers.
No matter how the reflection by the tapetum is accomplished, the incoming light is reflected right back past the very rods and cones that it originally passed. This essentially gives the rods and cones a second chance to detect the same light rays. That simple reflection greatly enhances night vision.
Also, by reflecting the light exactly back from where it came, the animal is able to create a crisp visual image rather than getting a blurry image that would occur if the light scattered randomly within the eyeball. It is believed that cats can see about nine times better at night than we can, since they have a tapetum and we do not.
The color of the reflective “eye shine” will vary according to the animal. Many reptiles
show bright red eye shine, while mammals vary from yellow, white, blue and green. There are variations even within the same species and there are lots of examples of one eye reflecting back one color while the other eye reflects back a different color. Along with birds, some fish, like walleye, have a tapetum.
Most primates — like humans — pigs, kangaroos and other day-active animals do not have a tapetum lucidum. Accordingly, our night vision is mediocre compared to those animals that are active at night.
Humans can produce a confusing situation known in the photography arena as “red eye.” This occurs when a flash of light illuminates the blood vessel-rich retina in the back of the eye and the eyes appear to be red. There is no tapetum involved here, just illumination of blood vessels. If the source of the flash were somewhere other than on the camera, there would be no “red eye.”
Imagine how our flash pictures might look if we had chartreuse-colored blood?
Another unusual situation in humans and some animals is the white glow that can appear in the eyes. This “eye glow” occurs when there are cataracts. The glow is caused by illumination of the crystals embedded within the lens of the eye and, again, is not caused by a tapetum.
Moose certainly have a tapetum lucidum, but I have wondered why we don’t often see the same bright headlight reflection from moose eyes that can be seen from smaller animals like dogs or cats. The answer probably comes from several different reasons.
First, moose are large animals and their eyes are often held above the level where our headlights are aimed. Because a moose’s eyes are on extreme sides of its head, it is difficult to see both of their eyes at the same time. So we most commonly get a reflection from only one eye at a time.
I have not been able to find much documentation on the size of a moose tapetum compared with other animals. However, after shining a bright flashlight beam at a moose from various angles, I have discovered that the tapetum in a moose’s eye is mostly in the very back of the eyeball.
When the moose is at right angles to you, your lights are not striking the tapetum, and you only get a slight “red-eye” reflection.
Only when the moose is looking directly at you, and they don’t do this all that often, will you see the bright, two-eyed reflection.
So, as a moose crosses the road, you and I get a single, slight reddish glow from an eye that is not reflecting back much light from our headlights. No wonder we don’t easily see that moose crossing up ahead.
The next time your lights fall on an animal and you see the distinctive “deer-in-the-headlights” reflection, you will know that particular animal is normally active at night. You’ll also know they have a microscopically thin tapetum lucidum in the back of their eyeball that aids in their night vision.
David Wartinbee, Ph.D, J.D., is a biology professor at Kenai Peninsula College’s Kenai River Campus. He is writing a series of columns on the ecology of the Cook Inlet watershed.
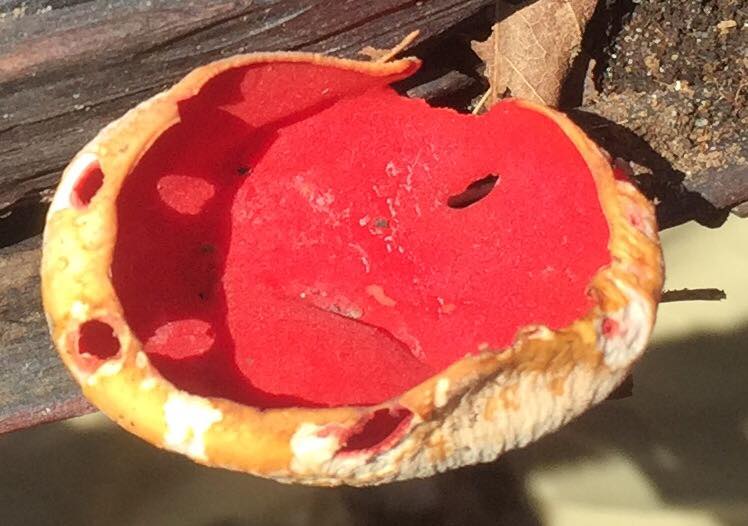
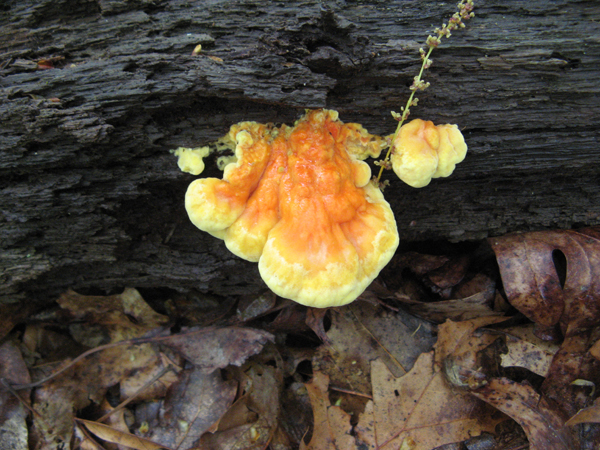
There are over 100 fairly common spring mushrooms in our area (NYC metro area) – that is, occurring between March 21 and June 21. Some of these occur in great numbers. Some are choice edibles. A few are poisonous. One is deadly. Most are just not edible or palatable 0r chewable. Learn them one at a time and you’ll see how quickly you can become familiar with much of our spring mushroom flora…………..
——————————————————-
CENTRAL PARK MUSHROOM HUNT – JUNE 14th
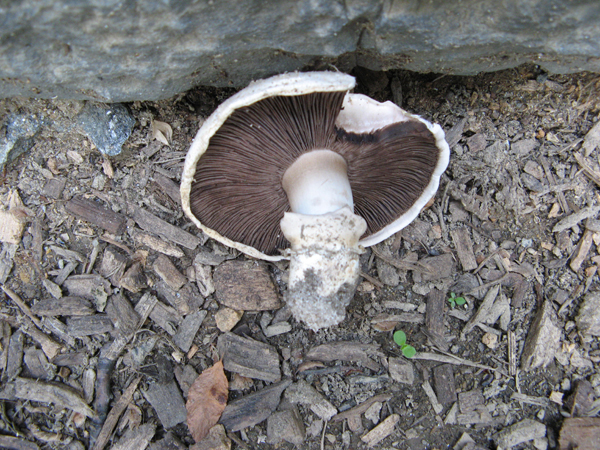
GILLED MUSHROOMS included AMANITA flavorubescens PLUTEUS cervinus, PSATHYRELLA candolleana, RUSSULA sp., SCHIZOPHYLLUM commune, STROPHARIA rugosoannulata, and a few still to be identified
DUNCE CAP – Conocybe lactea – not edible – common in grass in late May/early June
———————————————————-
LAWN MOWER’S MUSHROOM – Panaeolina foenisecii – not edible – common in grass in late May/early June
———————————————-
Baby INKY CAPS – Coprinus macaques complex – Edible, good in soup, as duxelles, etc. – on wood, base of stumps, wood chips
————————————————————-
DEADLY GALERINA – Galerina (autumnalis) marginata – a very common Little Brown Mushroom – on decayed logs – DEADLY POISONOUS
—————————————————————
FAWN MUSHROOM – Pluteus cervinus complex – edible when young – on wood or buried wood
————————————————————-
WINE CAP – Stropharia rugosoannulata – Good edible when young – always in wood chips
————————————————————
BOLETES
CRACKED CAP BOLETE – Xerocomellus chrysenteron – first bolete to appear (late May-early June) – edible – on the ground under oaks (mycorrhizal)
—————————————————————
JELLY FUNGI
WOOD-EAR – Auricularia auricula complex – edible, best in soup – one wood – common in late winter and spring
—————————————————————-
WITCHES’ BUTTER – Tremella mesenteric complex – edible but not incredible – on wood
———————————————————————-
SPRING MUSHROOMS 2017………………SPRING MUSHROOMS 2017…………………SPRING MUSHROOMS 2017
A MULTIPLE CHOICE TEST –
1, Name 3 gilled mushrooms that grow on wood: a) Agaricus bitorquis, b) Pleurotus ostreatus, c) Coprinus micaceus, d) Morchella esculenta, e) Flammulina velutipes, f) Ganoderma applanatum
2. Name 3 gilled mushrooms that grow on the ground: a) Agaricus bitorquis, b) Pleurotus ostreatus, c) Conocybe lactea, d) Panaeolina foenisecii, e) Pluteus cervinus, f) Stropharia rugoso-annulata
3. What color is the spore print of Pluteus cervinus: a) white, b) yellowish, c) pinkish brown or brownish pink, d) ochre brown, e) purple brown, f) black
4. Name one deadly Little Brown Mushroom: a) Agaricus bitorquis, b) Pleurotus ostreatus, c) Gallerina autumnalis (marginata) , d) Morchella esculenta, e) Pluteus cervinus, f) Flammulina velutipes
5. Name one spring lawn mushroom: a) Pluteus cervinus, b) Flammulina velutipes, c) Stropharia rugoso-annulata, d) Marasmius oreades, e) Morchella esculenta, f) Pleurotus ostreatus
6. Name one inky cap mushroom that is not safe to eat: a) Coprinus comatus, b) Coprinus micaceus, c) Coprinus atramentarius, d) Coprinus plicatilis, e) Coprinus disseminatus
7. What’s the name of the common cultivated mushrooms?: a) Agaricus campestris, b) Agaricus bitorquis, c) Agaricus bisporus, d) Agaricus arvensis, e) Agaricus placomyces
8. Name one spring species of Agaricus: a) Agaricus arvensis, b) Agaricus bitorquis, c) Agaricus crocodilians, d), Agaricus placomyces, e) Agaricus bernaradii
9. Where would I look to find Wine Cap mushrooms?: a) in lawns, b) on trees, c) in wood chip mulch, d) in manure, e) in deep conifer woods
10. Where would I look to find oyster mushrooms: a) in a lawn, b) in swampy ground, c) on trees and logs, d) in manure, e) on other mushrooms
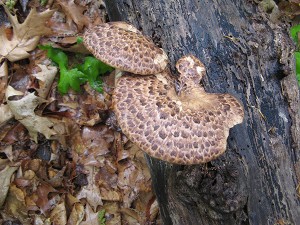
11. Name one common spring polypore: a) Polyporus squamnosus, b) Grifola frondosa, c) Meripilus sumstinei
12. Where should I look to find morels? a) on elm trees, b) under elm trees, c) in manure piles, d) in swamps, e) only at Whole Foods
13. How can I tell a morel from a false morel?: a) only one is brown, b) only one comes up in the spring, c) only one has a hollow stem, d) only one smells like cherry vanilla, e) only one is an Ascomycete
14. Have you ever eaten wood-ear mushrooms? a) yes or b) no ????
15. What kind of mushroom is a Turkey-tail?: a) a jelly fungus, b) a gilled mushroom, c) a polypore, d) an Ascomycete, e) a puffball
16. What kind of mushroom is a Reishi mushroom?: a) a gilled mushroom, b) a polypore, c) a jelly fungus, d) an Ascomycete, e) a puffball
17. Where would I look to find Chaga?: a) on an elm, b) on an oak, c) on a birch, d) on a pine, e) on a tulip-poplar
18. What is a Caterpillar Fungus, and is it edible?: Cordyceps is the traditional genus for these mushrooms that parasitize overwintering caterpillars, and it is edible but primarily used as a medicine
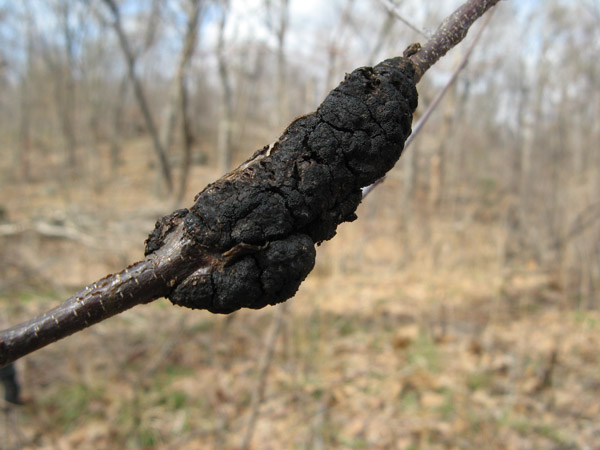
19. Where would I look to find Black Knot fungus?: a) on an elm tree, b) on an oak tree, c) on a cherry tree, d) on a poplar tree, e) on a ginkgo tree
20. Are mushrooms edible raw, and if not, why not?: NO (if very few exceptions, mushrooms are highly indigestible raw)
21. Give one example of one ectomycorrhizal mushroom?: a) Coprinus commatus, b) Agaricus bitorquis, c) Pleurotus osteratus, d) Pluteus cervinus, e) Boletus chrysenteron
If you hunt whitetails, it should be no secret to you that whitetails communicate through scent they leave behind. Whether detecting danger, bucks seeking a breeding doe or a doe locating a hiding fawn, whitetail deer use scent for much of their survival and social interaction. Scraping behavior of whitetails, is one of the CHIEF ways whitetail bucks leave scent behind throughout the year.
Bucks work scrape’s overhanging branches, called a licking branch, throughout the year, often times more than they work the scrape itself. But their most aggressive scraping of these areas occur from October to December when testosterone levels are highest. When a whitetail buck makes a scrape he does so where there is an attractive branch hanging along a roadway, at the edge of a field, on a well-worn trail, or in a random area he’s walking through. In most cases a buck begins the scraping process by rubbing his forehead, preorbital, and nasal glands on the branch and in some cases will actually lick and chew on the overhanging branch. Once done, most bucks will paw the leaves and other debris from the ground under the branch, then urinate into the pawed-out earth.
Photo Courtesy of americanhunter.org
The process usually takes less than two minutes. During this time, however, a buck will leave liberal amounts of scent behind. Scraping, like rubbing, allows a buck to make his presence known. It’s a calling card of sorts; a post on a whitetail bulletin board. Research suggests that scraping is primarily a buck activity. Does have been known to work a scrape from time to time but they most frequently work the licking branch above the scrape. Bucks almost always work both.
Scrapes can be broken down into 3 different categories, though the names or classification of these are often debated. The are Boundary, Secondary and Primary Scrapes.
Boundary scrapes: Boundary scrapes are made by traveling bucks moving through his territory. These scrapes will show up along field edges, fence rows and roads that aren’t too busy.
Secondary scrapes: Secondary scrapes are made my bucks as more of an impulse. These are far more random and a result of the buck “feeling the need” to make a scrape. Call it impulse, hormones or whatever you’d like but these scrapes are less frequent, spiritic and typically not a good target for hunting over.
Primary scrapes: These are the scrapes that hunters need to target. These scrapes are the epitome of whitetail scrapes, with some having the potential of becoming very attractive to whitetail bucks. These scrapes can be found in strategic locations—inside corners of agriculture fields, ridge lines, pinch points and especially along well-worn trails between bedding and feeding areas during the rut. Find these primary scrapes and hang a stand!
Bucks work licking branches 365 days to leave their scent, scraping behavior peaks during the 30 day window leading up to peak rut, especially during the last 10 days. Once breeding kicks in scraping behavior drops off drastically. Scraping will continue during the post rut but at a significantly lower rate than occurs leading up to that point.
Exploring the Pros and Cons: Pump Air Rifle vs Break Barrel - Unveiling the key differences and advantages between two popular air rifle mechanisms....
"Unlock the Perfect Shot: Discover the Best Scope for Break Barrel Air Rifles. Enhance your shooting experience with precision and accuracy, as we delve...
Wyatt Earp has said:
Fast is fine, but accuracy is everything
And I just thought how many airgunners are obsessed with muzzle velocity and muzzle energy,...
")
")
")
")
")


 Review – The Best Name In The Air Rifle Game")