So, which to choose? Although a regged PCP may seem the ideal, unregged PCPs have been around for many years and are still popular. Indeed, much R&D has been undertaken in the PCP world, so the simple ‘knock-open’ valve of old is a far cry from what we see on today’s airgun hardware. The Slingshot hammer/valve set-up used in some unregulated Brocock and Daystate PCPs is one such example of how far unregged PCP design has evolved. Nevertheless, characteristics of unregged and regged systems are an important consideration when choosing a PCP for your specific shooting needs.
UNREGGED PCP Between the first and last shots of an unregged PCP’s charge of air – its ‘usable’ range – the output will follow a power curve, peaking somewhere around the mid-point of the curve. While the duration of the peak depends solely on the rifle’s inherent design, this part of the curve is referred to as the ‘sweet spot’. It’s where the shot-to-shot consistency – and so the rifle’s accuracy – will be at its best. The longer the sweet spot, the better. Ideally, that is where you want to be doing most of your shooting (and where you should zero your scope). Of course, you can shoot either side of the sweet spot, but you may well see a slight change in the pellets’ POI. At relatively close ranges this probably isn’t a problem, but it may shift your pellets outside acceptable limits for hunting or competitive target shooting at longer distances. Therefore, with any unregulated PCP, it pays to familiarise yourself with the characteristics of its power curve so that you can compensate for POI shift if required.
Although an unregged PCP lets you shoot throughout its usable pressure range (200 down to 100 BAR in this example), the best consistency, power and accuracy will be obtained by shooting in its ‘sweet spot’ (165 down to 120 BAR in this example) For example, your rifle may fill to 200 BAR and then, 150 shots later, need a refill at 100 BAR. Let’s assume its sweet spot spans 65 of those 150 shots. Then it would be worth noting on the rifle’s manometer what pressure range relates to that 65-shot section – perhaps between 165 and 120 BAR. If the number of shots you get per charge of air doesn’t bother you, you could choose to fill the rifle only to 165 BAR each time, and always refill it at 120 BAR. Yes, the trade-off is that you’d be reducing the rifle’s shot count, but in return, you’d be getting an output performance on a par with a regged PCP. Plus, by starting at lower pressures, charging the rifle from a manual pump will be less effort, and you’ll get longer periods between scuba tank fill-ups.
REGGED PCP Where an air regulator is fitted to a PCP, air release is far more controlled for the entirety of the rifle’s charge and there is, therefore, no power curve. Effectively, a regged PCP offers a sweet spot that extends from the first to the last shots of the usable shot range. In some cases, because a regulator deals with air delivery more efficiently, the rifle also returns more shots between fill-ups. Generally, a regulator system incorporates a secondary air chamber (the plenum chamber) which is designed to operate at a constant pressure. This means that as the rifle’s air pressure drops, the main firing valve always delivers an exactly-metered volume/pressure of air. The benefit of this is that the rifle’s power output is the same, no matter where it is within its charge cycle. That said, it is important not to let the pressure in the rifle’s main air reservoir drop below that of the regulator’s operating pressure, else the regulator effectively becomes redundant in the airflow chain. Many gunmakers now incorporate an additional gauge on their regged PCPs to specifically indicate the regulator status, like on the Brocock Commander PCP. The regulated Brocock Commander has two manometers – one for its HuMa regulator’s fixed pressure (top) and one to show the pressure status of the rifle’s main air reservoir The regulated Brocock Commander has two manometers – one for its HuMa regulator’s fixed pressure (top) and one to show the pressure status of the rifle’s main air reservoir While ‘managing’ the power curve of an unregged PCP isn’t exactly a headache for most shooters, there’s no denying that the fill-and-forget operation of a regged PCP is more straightforward. However, regulated PCPs cost more than their unregged counterparts, so you have to weigh up their worth in your particular scenario. FT, HFT and benchrest competition shooters, who seek ultimate precision in every aspect of their sport, may be able to justify the outlay for a regged PCP, but for everyday shooting/hunting assignments, a good quality, unregged PCP is equally as good if you have a full understanding of its power curve. Yet never dismiss the addition of a PCP regulator as ‘just another thing to go wrong. That may have been the case when air gunsmiths were experimenting with them many decades ago. But just like knock-open systems have evolved, the PCP regulator has also graduated. Specialist regulator manufacturers have risen to the forefront of the airgun industry, with many gunmakers incorporating their proven designs in their regged PCPs. Daystate, for instance, has partnered with the world-renowned HuMa-Air to develop a metering system in their regulated HR Huntsman Regal, Renegade HR and Wolverine R air rifles.
The Crosman 1077 air gun has a plastic buttpad to absorb recoil and help you enjoy more shooting without worrying about hurting your arms.
Besides, it features non-slip checkering in the grip and forearm.
The checkerings increase friction between the shooter’s palm and the gun’s stock, add more stability to your arm when shooting, and prevent slippage from the shooter’s sweat.
Ammo
Crosman 1077 has the .177 caliber (the internal diameter of the barrel, measured in inches) so it uses .177 pellets as ammo.
.177 pellet is cheap and lightweight.
It also has various types such as wadcutter, round nose, pointed, hollow point, etc.
Paul Capello, from Airgun Reporter, examined the Crosman 1077 air rifle here:
Loading Crosman 1077 CO2 air gun
Loading the pellet:
First, put the gun on “SAFE”.
Press the release buttons on both sides of the magazine and pull it downward.
Slide the pellet clip pin forward and take out the clip.
With the clip in one hand, use your other hand to insert a pellet at one of twelve pellet chambers (with the pellet’s nose lying forward and the pellet’s skirt flying backward).
Keep inserting the pellet until the clip is full.
Put the clip into the magazine, pull the clip pin rearward, and return the magazine to the stock.
Installing CO2 cartridge:
Put the gun “SAFE”.
Unscrew the piercing tube cap below the barrel and remove it.
Insert the new CO2 cylinder into the gun with the small head pointing rearward.
Screw the cap firmly into place.
Put the gun off safe and fire.
If the gun doesn’t shoot, put it on safe and tighten the screw more (you can use a screwdriver or a coin placing in a slot of the knob to produce more force)
In summary, you can see that it takes very little effort to load the Crosman 1077 gun.
And the best part is you don’t have to break a single sweat to pump or to break down the barrel like other pneumatic rifles and springers.
The sight uses optical fiber for the dots so you could align the target faster and more accurately, even in the low-light shooting condition.
Besides, the rear sight has windage adjustment (allows you to adjust the sight left and right), and elevation adjustment (allows you to adjust the sight up and down).
It has hundreds of customer reviews without a single complaint about noise.
You don’t have to buy hearing equipment even if you have sensitive ears.
Moreover, you can be confident to shoot this gun in the backyard without disturbing your neighbors.
Shooting range and intended use
The Crosman 1077 CO2 air rifle is great for target shooting and plinking up to 30 yards.
It’s not recommended to use this gun for pest control or small game hunting unless in the close range (less than 20 yards)
Crosman 1077 Accessories
The Crosman 1077 has CO2 cartridges as the only accessory.
You can buy a speed loader and an additional pellet clip for a faster reload.
For even greater accuracy, you can buy a scope to mount in an 11mm dovetail scope rail.
Maintenance
The Crosman 1077 semi-automatic air gun requires very little maintenance.
You only need to put a drop of Pellgun Oil on the tip of every CO2 cartridge, another drop on the thread of piercing tube cap, and a light coat of oil on the barrel to prevent rust.
Specification
Caliber: .177
Power source: CO2 cylinder
Velocity: Up to 625 FPS
Barrel length: 20.38”
Overall length: 36.88”
Capacity: 12 shots
Front sight: Fiber Optic
Rear sight: Fully adjustable for windage and elevation
Scope rail: 11 mm dovetail
Safety: Cross-bolt
Weight: 3lbs 11 oz
Buttplate: plastic
Function: Repeater
Checkering: Grip and forearm
As you can see above, the barrel is not very long and the gun only weighs a little more than 3lbs
So it’s very lightweight and easy to carry around for even a 10 years-old child.
Pros and Cons
Pros
Cons
Cheap price
Lightweight
Medium velocity
Highly accurate
Great fiber optic sight
Easy to load and cock, no pumping or breaking barrel effort required
High follow-up shot speed
Impressive semi-automatic feature
Durable stock
Useful checkering in grip and forearm
Provide more shooting and more fun
Not enough power for pest control and small game hunting
Cost of CO2 cartridge can add up if you shoot a lot
Crosman 1077 Price
The Crosman 1077 price is only $70.
You can’t get a better semi-automatic CO2 air rifle at this price level.
Also remember that if you shoot a lot, you should buy numerous pellets (500-count packs at least) and a bunch of CO2 cartridges.
The cost of CO2 capsules and pellets can add up over time, though.
As of this date, the Crosman 1077 semi-automatic CO2 air rifle has a one-year limited warranty from the date of purchase.
Customer Reviews
While researching this product, I always look at the trench in customer reviews.
Although the Crosman 1077 has lots of 4 stars and 5 stars, it also got a bunch of 1-star ratings.
There are 2 issues that arose with the negative reviews:
The first is the problem of leaking CO2 so the gun cannot shoot at all.
But defective products are a risk we always have to face in online buying and air rifle shopping is no exception.
The second is the pellet jamming.
The manual is very clear about how to insert the pellet into the clip properly so make sure you follow the instruction carefully to avoid this problem.
Besides, it is advised that you use only the Crosman pellet to work with the gun to get the best result and avoid any potential damage to your gun.
Perhaps it’s because I’m an admitted deer geek, but I find whitetail anatomy absolutely fascinating. It’s come to the point where — when I’m hunting and decide I’m going to shoot a deer — I can’t focus on the deer itself.
I start focusing on bits and pieces of the deer. The whitetail’s arteries are among these “bits and pieces.”
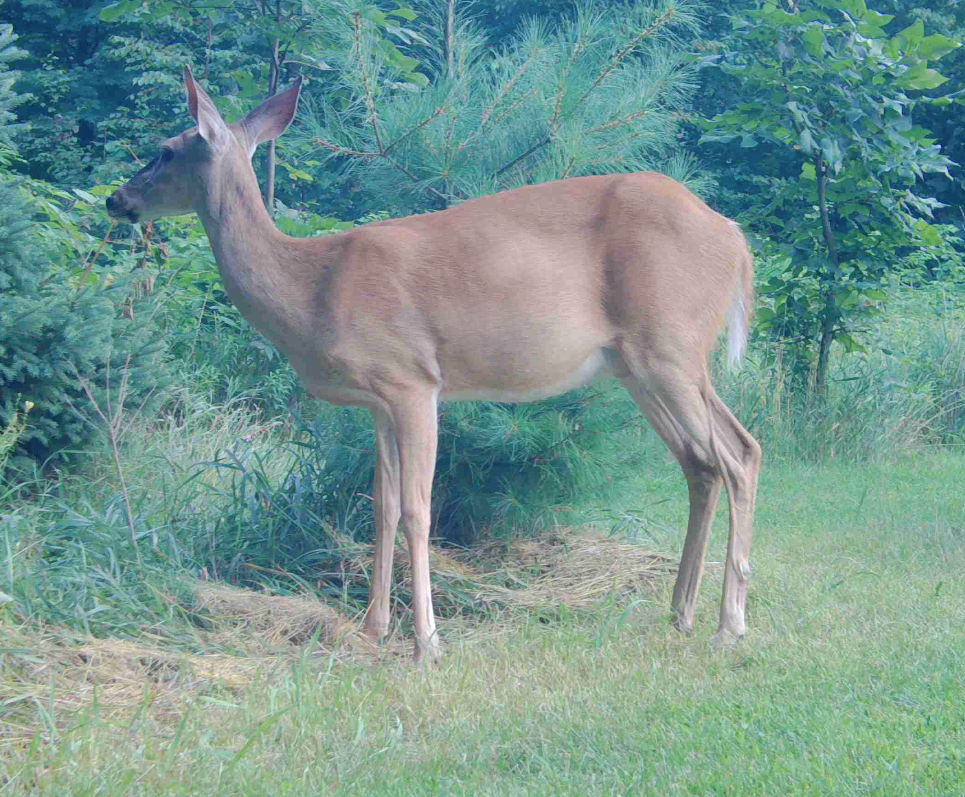
Take the femoral artery, for example. That’s the one thing the absolutely jumped out at me the first time I looked at this Browning Trail Camera image of an adult doe. Yes, the doe is awfully pretty — standing there almost broadside (technically slightly quartering to), and she seems to be heading into fall in optimum health.
But just look at that bulging artery in her leg! Quite dramatic, isn’t it?
More About Deer Anatomy
Wisconsin’s Norman Johnson and Alabama’s Dr. Phillip Bishop are two experts in this subject matter, and I’ve had the pleasure of working closely with both of them to help educate millions of whitetail bowhunters on the nuances and associated science connected with femoral artery wounds in deer.
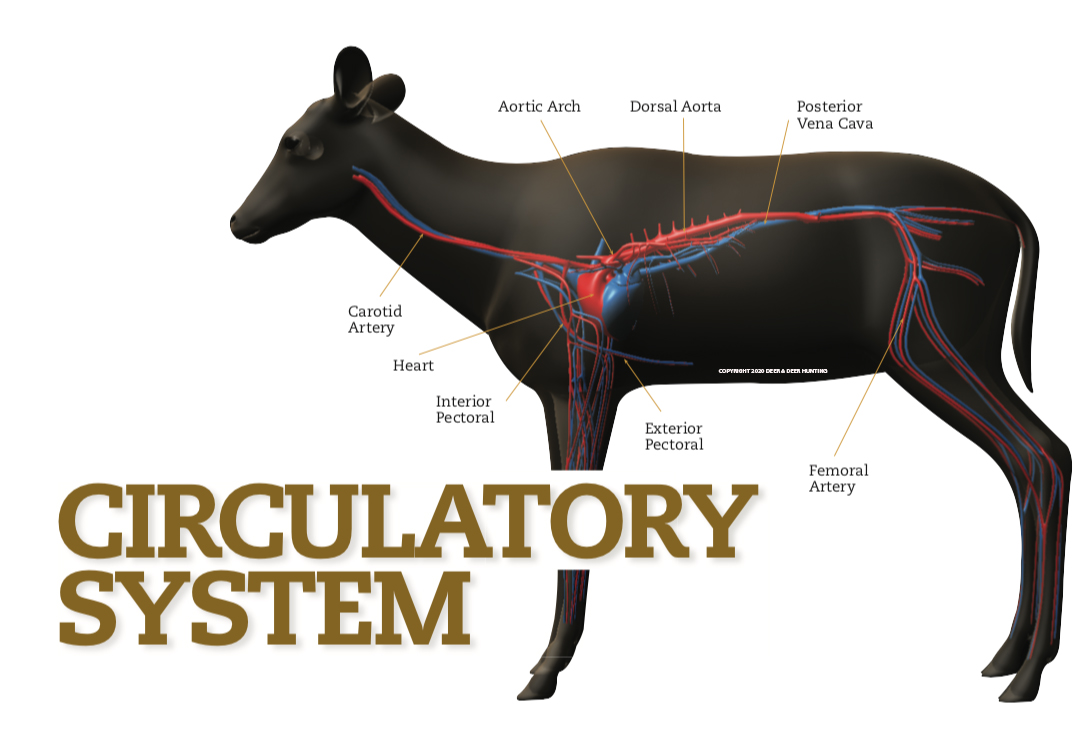
In his work with D&DH, Johnson reminds us of how the upper hindquarters of a deer are a highly blood-rich region, just below where the aorta bifurcates (branches) to a network of other arteries, deep femoral and common femoral arteries, terminating in the lower legs. The vascularity (blood supply) to the entire rear end, including the hams, presents a very effective killing shot for a sharp, well-placed broadhead.
“While working 25 years in the field of radiology directly performing angiography on all parts of the human body, we clearly demonstrated the highly vascular blood supply to this entire region,” he continued. “Man and animal share a direct resemblance in anatomical and physiological makeup, as blood is pumped to all regions of the body. Main arteries resemble the roots of a tree comprised of divisions that branch and re-branch, finally forming smaller vessels. A large enough, razor-sharp broadhead is imperative as an anti-prothrombin (coagulation) measure.”
Study all parts of a deer when you’re hunting, and note how the arteries, joints and bones all come together. (photo by Dan Schmidt)
Both the late John Trout Jr. and Chuck Adams coined the phrase, “The deer (should be) (is) in a big heap of trouble” referring to the rear-end shot. Adams wrote this in his book, “The Complete Book of Bowhunting” (1978): “I’ve personally shot over a dozen deer in the rear-end and none went over 100 yards before keeling over.”
Trout, widely considered one of the foremost experts on blood-trailing whitetails, was more reserved. He said he had recovered many whitetails shot through the hips, even when the femoral artery was missed. He concluded: “Nonetheless, a hip shot is not a shot that any hunter should take intentionally.”
The Whitetail’s Femoral Artery
Dr. Phillip Bishop of the University of Alabama has taught us a lot about deer physiology over the years. The femoral artery topic is one instance where he shed light on what used to be a rather taboo subject, especially among bowhunters.
“Because high blood flow requires high blood pressure, the femoral arteries carry blood under very high pressure when the muscles are working hard,” Bishop writes. “Once the arteries branch several times, they are lined with smooth muscle that can tighten and reduce the diameter of the blood vessels. Every time the vessel diameter is reduced by half, the blood fl ow is reduced by a factor of 16.”
Conversely, he continued, the muscles lining the arteries can also expand, and when the diameter doubles, blood flow increases by a factor of 16. The blood flow increase from smallest to largest is like comparing a garden hose to a fireman’s hose.
“When a large artery, like the femoral artery, is cut, the high arterial pressure causes very rapid blood loss. With every contraction of the heart, the pressure rises and blood is pushed out. In the case of a shotgun slug through the hams, the blood pressure causes the bright red, oxygen-rich arterial blood to spray out impressively, leaving the biggest blood trail we’re likely ever to see from a whitetail.”
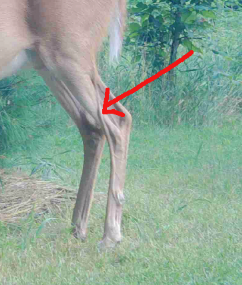
The lower branch of the femoral artery runs all the way down to the bottom of a deer’s leg. (photo by Dan Schmidt)
When the deer runs or jumps, the pressure rises and the spray is even more widely dispersed.
“The rapid loss of blood from the femoral artery, or any other major artery, causes a rapid and merciful death. Plus, a deer with a major arterial wound that has an exit outside the body will leave an easy blood trail. I have read accounts of deer expiring very quickly when one or both femoral arteries are severed.,” Bishop concludes.
The bottom line: All of these insights should be used to add depth and breadth to your knowledge of white-tailed deer anatomy. Contrary to the opinions of some of my bloodbrothers (and sisters), I would never, ever purposefully shoot a deer “in the ass” on the hopes my broadhead would severe the femoral artery. It is true: A razor-sharp broadhead to the femoral artery will put a deer down quickly, but the odds of this happening on purpose are extremely small. Granted, accidents happen. A twig deflect and arrow. You flinch badly at the shot. Etc. It happens, and if you shoot at enough deer, odds are it will happen to you.
In that event, knowing precisely where the artery is located and how it works are critical pieces of information that can help you decide which next moves to make.
The Mathematics of Deer Blood
The average white-tailed deer of about 150 pounds in live weight carries at least eight pints of blood in its arterial system. For a bowhunter to easily recover a wounded deer, the blood loss must be extensive. A deer will have to lose at least 35 percent of its total blood volume for the hunter to recover it rapidly. That means a loss of at least 2. pints of blood in the case of a 150-pound buck. The quicker the blood loss, the sooner you will recover the animal.
According to Professor Aaron Moen, a deer biologist at Cornell University, a running white-tailed deer has three times the heart rate of a bedded deer.
Major arteries in a whitetail literally run from top to bottom (head to toe) if you consider all of the various blood runways. (Illustration copyright Media 360 LLC. All rights reserved)
Why would we want to wait and allow the deer to bed down after being wounded? Any shock the bow-hunter hopes to inflict on a whitetail will only result through great and rapid loss of blood. Applying basic mathematics to his findings on wounded deer behavior, blood loss and shock, University of Pennsylvania researchers once presented us with this interesting and speculative scenario of a hard-hit 150-pound deer leaving a blood trail of l00 yards. They cited an example of a deer wounded to the extent of leaving a very well-defined blood trail indicative of arterial or other heavy bleeding caused by the arrow passing completely through the deer:
“This deer would have to lose 52 ounces, or about 3. pints of blood before collapse,” they reported. “Internal blood loss would have to extend to 41 ounces, or about 2ó pints to stop the deer within the trail distance of 100 yards. In other words, the internal loss rate would have to be almost four times that of the external rate in order to down the deer. Average internal blood loss needed would be .41 ounces per yard; the external rate, .11 ounces per yard.”
Final Thoughts
How far can a deer run before collapsing after a major artery has been severed? How many yards can it run before going down? In his book The Deer of North America, Leonard Lee Rue III estimates that a deer with a major rupture of its arterial system can probably run for approximately 85 to 120 seconds on the oxygen in its bloodstream and brain: “Running at a speed of 35 mph, the deer could potentially run 3,850 feet in 85 seconds, or 5,390 feet in 120 seconds. Although it is not likely that a deer will run this far, the potential exists.”
“Sharp Senses: Unveiling the Wonders of Its Eyesight or Hearing! Exploring the extraordinary capabilities of its visual perception or auditory prowess, this captivating headline delves into the fascinating world of our incredible sensory organs. Discover how these senses shape our understanding of the world and unlock remarkable insights into nature’s marvels.”
Deer have a unique and remarkable eyesight that allows them to navigate their surroundings and detect potential threats. Their eyes are positioned on the sides of their head, giving them a wide field of view of approximately 310 degrees. This wide view enables deer to be aware of their surroundings and detect predators from various angles. However, this wide view comes at the cost of reduced depth perception and difficulty in focusing on a single point.
In addition to their wide field of view, deer also possess excellent night vision. This is particularly useful during the early morning and near dusk when visibility is low. Their ability to see in low light conditions allows them to remain vigilant against predators even during periods of reduced visibility.
Deer also have a keen sense of hearing, which complements their visual capabilities. They have numerous muscles attached to their ears, enabling them to rotate their ears in any direction without moving their heads. This flexibility allows them to pinpoint the source of sounds and detect potential danger from afar. Furthermore, deer can hear higher frequencies of sound than humans, making them more attuned to certain auditory cues in their environment.
Overall, the combination of exceptional eyesight, night vision, and acute hearing makes deer highly adept at detecting potential threats and navigating their surroundings effectively. These sensory adaptations contribute to their survival in various habitats around the world.
Some key points about the remarkable eyesight of deer include:
– Deer have a wide field of view of approximately 310 degrees due to the positioning of their eyes on the sides of their head.
– Their wide field of view provides them with an advantage in detecting predators from different angles but compromises depth perception.
– Deer possess excellent night vision, allowing them to see clearly during low light conditions.
– They have a keen sense of hearing and can detect higher frequencies than humans.
– The combination of these sensory adaptations contributes to their ability to detect potential threats and navigate their environment effectively.
Unveiling the Extraordinary Hearing Abilities of Deer
Deer, as members of the order Artiodactyle, possess remarkable hearing abilities. They have a multitude of muscles attached to their ears, allowing them to rotate their ears in any direction without moving their heads. This unique adaptation enables them to detect sounds at higher frequencies than humans can perceive. With their acute sense of hearing, deer are able to detect potential predators from a considerable distance away, enhancing their chances of survival in the wild.
Moreover, deer’s exceptional hearing is not only crucial for detecting threats but also plays a role in communication. These animals produce scents through glands located on their head, legs, and hooves, which convey important information to other deer about gender, social status, physical condition, and the safety of an area. By utilizing both olfactory and auditory cues, deer establish complex social dynamics within their population.
In addition to their extraordinary hearing abilities, deer possess other fascinating adaptations that contribute to their survival in various habitats around the world. Their brown coat provides excellent camouflage in woodland environments, allowing them to remain undetected by passing predators when they stand still. Fawns are born with a reddish-brown color and white spots that aid in camouflaging them until they reach 3-4 months old when these spots disappear.
Furthermore, deer have eyes positioned on the sides of their head, providing them with a wide field of view spanning approximately 310 degrees. While this panoramic vision allows them to monitor their surroundings effectively, it makes it challenging for deer to focus on specific points or objects. However, they compensate for this limitation with an excellent night vision that proves particularly useful during dawn and dusk periods.
To sustain themselves nutritionally, deer are herbivores and consume a diverse range of plant matter such as grasses, leaves, stems, shoots, berries, herbs, acorns mushrooms as well as agricultural crops like corn and soybeans. As ruminants, deer possess a four-chambered stomach, similar to cattle, goats, and antelope. This specialized digestive system allows them to efficiently extract nutrients from their plant-based diet.
Overall, the extraordinary hearing abilities of deer contribute to their survival in the wild by alerting them to potential dangers and facilitating communication within their social groups. These adaptations, combined with their camouflage capabilities and specialized feeding habits, make deer highly adaptable and successful inhabitants of diverse habitats worldwide.
Exploring the Acute Eyesight of Deer in the Wild
Deer have a remarkable ability to see clearly and detect movement in their surroundings. Their eyes are positioned on the sides of their head, giving them a wide field of view of approximately 310 degrees. This panoramic vision allows them to monitor their surroundings for potential threats or predators. However, this wide view comes at a cost – deer have limited binocular vision and struggle to focus on a single point. This is why they often tilt their heads to better align their eyes and improve depth perception.
Characteristics of Deer’s Vision:
– Deer have excellent night vision, which aids them during low-light conditions such as dawn and dusk when they are most active.
– They can perceive higher frequencies of sound than humans, allowing them to detect subtle noises that may indicate danger.
– The brown coat of deer provides effective camouflage in woodland environments, allowing them to blend seamlessly with their surroundings.
– Fawns possess a reddish-brown color with white spots, which helps them camouflage and hide from predators until they are around 3-4 months old.
– During the fall season, deer shed their summer coat and grow a thicker winter coat to protect themselves from colder temperatures.
Deer rely heavily on their acute sense of hearing and smell in combination with their keen eyesight to stay alert and evade potential threats. By utilizing these senses effectively, deer can navigate various habitats and ensure their survival in the wild.
The Adaptive Hearing Skills of Deer: Nature’s Alert System
Deer have a remarkable sense of hearing that allows them to detect predators from a long distance away. Their ears are equipped with numerous muscles, enabling them to turn their ears in any direction without having to move their heads. This flexibility gives them a 310-degree view of their surroundings, making it easier for them to detect potential threats. Additionally, deer can hear higher frequencies of sound than humans, further enhancing their ability to pick up on subtle noises in their environment.
One of the key advantages of deer’s acute hearing is their ability to stay alert and avoid danger while grazing or resting. By constantly monitoring their surroundings through sound, they can quickly respond to the presence of predators or other disturbances. This heightened awareness helps them survive in various habitats and contributes to their status as prey animals.
In addition to their impressive hearing abilities, deer also possess an excellent sense of smell. They lick their noses to keep them moist, which helps odor particles stick and enhances their sense of smell. The nose plays a crucial role in communication among deer as well. Glands located on the head, legs, and hooves produce scents that convey important information about an individual’s gender, social status, physical condition, and the safety of an area.
Overall, the adaptive hearing skills of deer serve as nature’s alert system for these graceful creatures. Their ability to detect predators and other potential threats through sound allows them to remain vigilant and ensure their survival in diverse environments.
Sources:
– Wanda Embar (2002-2022). “The Adaptive Hearing Skills of Deer: Nature’s Alert System.” Retrieved from [link]
Insights into How Deer’s Eyesight Helps Them Survive
Deer have a unique visual system that plays a crucial role in their survival. Their eyes are positioned on the sides of their head, giving them a wide field of view of approximately 310 degrees. This wide-angle vision allows them to detect potential threats or predators from various directions, enhancing their ability to evade danger. However, this wide view comes at the cost of reduced depth perception and difficulty focusing on a single point.
Furthermore, deer possess excellent night vision, which is particularly advantageous during the early morning and near dusk when they are most active. This heightened nocturnal vision enables them to navigate through dimly lit environments and detect movement in low-light conditions.
In addition to their visual capabilities, deer also rely on other senses such as hearing and smell to stay alert and avoid danger. They have a remarkable sense of hearing due to the presence of numerous muscles attached to their ears. These muscles allow them to rotate their ears independently without moving their heads, enabling them to pinpoint the direction of sounds more accurately. Deer can hear higher frequencies than humans, making them more attuned to subtle auditory cues in their environment.
Their sense of smell is equally impressive. Deer possess an acute olfactory system that helps them detect predators from afar and gather information about their surroundings. They lick their nose to keep it moist, aiding in the adherence of odor particles that enhance their sense of smell. Glands located on various parts of their body produce scents that convey important messages about gender, social status, physical condition, and safety within an area.
Overall, deer’s eyesight is just one component of their multi-faceted sensory system that contributes significantly to their survival in diverse habitats. Their wide field of view, night vision capabilities, acute hearing, and keen sense of smell collectively enable them to navigate through different environments while remaining vigilant against potential threats.
The Sensational Senses of Deer: Vision and Hearing Explored
Deer possess remarkable senses that allow them to navigate their environment and detect potential threats. Their vision is unique, with eyes positioned on the sides of their head, providing them with a wide field of view of approximately 310 degrees. However, this wide view makes it difficult for deer to focus on a single point. Despite this limitation, they have excellent night vision, which proves advantageous during the early morning and near dusk.
In addition to their visual capabilities, deer have an extraordinary sense of hearing. They possess numerous muscles attached to their ears, enabling them to rotate their ears in any direction without moving their heads. This ability allows them to detect sounds at higher frequencies than humans can perceive. Their acute hearing serves as an important tool for detecting predators from afar.
Furthermore, deer rely on their sense of smell as another vital sensory mechanism. They possess an excellent sense of smell that enables them to detect predators from long distances away. To enhance their olfactory abilities, deer lick their noses to keep them moist, aiding in the adherence of odor particles. The nose also plays a role in communication among deer through the production of scents from glands located on their head, legs, and hooves. These scents convey information about gender, social status, physical condition, and safety within an area.
Overall, the sensational senses possessed by deer contribute greatly to their survival and ability to thrive in various habitats around the world.
– Deer have a wide field of view due to the positioning of their eyes on the sides of their head.
– Their night vision is exceptional and aids them during low-light conditions.
– Deer can rotate their ears in any direction without moving their heads.
– They possess a keen sense of hearing that allows them to detect high-frequency sounds.
– Deer have an excellent sense of smell that helps them detect predators from afar.
– Licking their noses keeps them moist and improves their ability to pick up scent particles.
– Deer use scent glands on their head, legs, and hooves to communicate important information to other deer.
In conclusion, whether discussing eyesight or hearing, both senses play crucial roles in an individual’s perception and overall well-being. While each sense has its unique functions, they contribute to our ability to navigate the world around us and connect with others. Understanding the importance of maintaining good eye health and hearing capabilities is imperative for a fulfilling and enriching life.
From my experience, here’s what makes the best scope for 6.5 Creedmoor:
First, great reticle. You can either do all the calculations by hand. Or the reticle can lend you a hand by doing it for you — this is helpful for long holdover shots.
Next, the body needs to be durable and the turrets need to track true. This makes adjustments easy. And most importantly, clear glass. The last thing you want is murky glass at high magnifications.
After years of extensively using dozens of 6.5 Creedmoor scopes, the Vortex Viper PST II 5-25×50 checks all of these boxes and is one of the best long range optics on the market.
The PST Gen II is my go-to long range scope.
The turrets are glove-adjustable, the EBR-2C reticle is fine and illuminated, and the glass is crystal clear. Plus, the magnification range is more than adequate for extreme long-range shooting and hunting.
That’s why it’s my go-to scope for long-range events.
If you want an ‘upgraded’ version of the PST Gen II, I’d recommend investing in Nightforce’s NXS line.
Just like the PST, it has clear glass, the turrets are adjustable and accurate, and the glass is second to none. What makes this optic superior is the MOAR reticle. It’s super easy to use and read — an indispensable feature on the field.
However, it does come at an indispensable price tag.
When I first started out in long range shooting, I didn’t have the money to buy the fanciest gadgets.
I needed an optic that performed well without the heavy price tag. That’s when my friend introduced me to the Athlon Argos BTR — an affordable long-range scope that has clear glass and the APMR reticle.
This would be my go-to if I needed something affordable and were getting started with long distance shooting.
If you can’t afford the PST Gen II or Nightforce NXS but want something a bit better than the Argos BTR, I’d highly recommend the Strike Eagle 4-24×50.
Sure, it doesn’t have Nightforce’s glass, but the glass on it is really good. In fact, I’ve used it for precision shooting, long-range shooting (above 1000 yards), and even hunting — and it has never let me down. Plus, it comes with Vortex’s lifetime warranty.
Nor am I some optic guru with 30 years of experience.
I’m just a guy who likes to go shooting with good quality firearms with good quality equipment. Over the years, I’ve hand-tested hundreds of scopes — including the best AR-15 scopes and optics.
I’ve tried all the brands. Bushnell, Nikon, Nightforce, Vortex, Zeiss — you name it.
As a result, I know what makes a good scope. So when it came time to find the top scope for 6.5 Creedmoor, I did what most people don’t:
Hand-test scopes.
In fact, I researched over 30 6.5 Creedmoor scopes, paid for them out of my own pocket, and tested everything from glass quality to tracking.
The result?
My personal list of the top scopes for the 6.5 Creedmoor cartridge on the market right now.
Also, no reviewer scope or outside contributions were accepted for this review. Nor did any optic company pay me to write this review. I don’t accept sponsored reviews.
In doing so, it allows me to write the most honest guide possible. That way, I can focus on thoroughly testing the scopes rather than appeasing manufacturers.
With that out of the way, let’s get started.
Read Before You Buy
Most people spend WAY too much on the wrong scope (and the best red dots for pistols).
Why?
Because they don’t know what to look for in a 6.5 Creedmoor scope.
So to save you money and time, here’s everything you need to know about finding the right 6.5 Creedmoor scope.
By the end of this small guide, you’ll know what type of scope to buy.
How To Choose A 6.5 Creedmoor Scope
Put simply:
The 6.5 creedmoor is arguably one of the best long-distance rounds.
It easily hits 250 yards without a sight. And when you add the best 6.5 Creedmoor optic, it easily goes past 1000+ yards and up.
The best part?
The 6.5 fits in .308 sized guns with the power of a 300 win mag…all in one round.
(6.5 went through 4+ bottles of soda)
That’s why competitive shooters have easily stretched past 3000 yards — even in windy conditions!
But let’s be real for a second:
You probably won’t shoot that far out. Instead, you might choose one of these…
6.5 Creedmoor Shooting Distances
These are the 3 ranges you’ll probably be shooting from:
Close Range: <300 yards
Medium Range: Between 300 to 700 yards
Long Range: 700+ yards
Simply pick a range and move on.
But what if you use more than one range? That’s totally fine — I’ll cover that down below. For now, choose a range and move onto…
What Magnification To Choose For 6.5 Creedmoor Scopes?
Here’s the #1 newbie mistake for scopes:
People buying the WRONG amount of magnification. They either buy too much or too little, resulting in missed shots.
So how do you solve this? By reading up on magnification.
The good news?
I’ll cover the different magnification ranges you need for your 6.5 Creedmoor rifle scope right now. Keep on reading…
Close Range (<300 yards)
The 6.5 Creedmoor isn’t a close-range weapon.
However, if you want to kill a whitetail dead then here’s the magnification you’ll need:
Magnification:5 – 9X power
You’ll find that even the best holographic sights can’t go much higher than this effectively.
Medium Range (300 – 700 yards)
This is the most common 6.5 hunting range. Whether you’re hunting elk, deer or mulies, you’ll need:
Magnification: Between 9 – 15X power
This will allow you to virtually see (and hit) most big game targets effortlessly.
Long Range (700+ yards)
This is where the 6.5 Creedmoor’s beauty shines.
In fact, people routinely hit 1000+ yards with very little effort. How? By selecting the right magnification.
Here’s the 6.5’s recommended long-range mag:
Magnification: 15X and up
The Bottom Line On Magnification
Want to choose the right scope? Do two things:
Determine your shooting range (short, medium, long)
Choose a magnification range
When done correctly, you have no choice but to choose the best 6.5 Creedmoor scope for your needs.
That said, if you use more than one magnification (medium and long range), then get a variable powered scope.
This type of scope has a range of magnifications (like the ones down below) and can outperform even the best AR-15 red dot scopes at most ranges.
With all that said, I believe you’re ready to choose the best 6.5 Creedmoor scope. Let’s dive in!
Best Scope for 6.5 Creedmoor
If you’re pressed on time, here’s a quick list of the best scopes for 6.5 Creedmoor:
Vortex Viper PST II 5-25×50: Best Long Range Scope
Nightforce Optics NXS 5.5-22×56: Best Extreme Long Range Scope
Athlon Argos BTR 6-24×50: Best Budget Long Range Scope
Vortex Strike Eagle 4-24×50: Best Short-to-Long Range Scope
1. Vortex Viper PST II 5-25×50: Best Long Range Scope
The Vortex Viper PST II 5-25×50 is the best long range scope for 6.5 Creedmoor.
In fact:
I’d call it a “Budget-Friendly Night Force Scope”.
Why? Keep reading and all will be revealed…
Glass Clarity & Reticle
The glass is clear as day.
Matter of fact, I barely noticed a difference in glass quality between the PST and Razor HD:
(And keep in mind: The Razor HD costs TWICE as much as the PST).
So, how is the Viper’s glass that clear?
Well, Vortex used the same coatings — extra-low dispersion (XD) glass and fully multi-coated lens — on both rifle scopes.
This results in crispy views like this:
Looking through the scope, you may have noticed the fine reticle:
The EBR-2C MRAD.
(Also available in MOA)
What’s so special about it?
Two things:
It’s specifically engineered for long-range shots. And…
It can estimate holdover, windage, and even bullet drop.
That’s pretty cool.
But the part that sells it is how the scope’s set in the first focal plane.
Which means:
The reticle’s size adjusts with your magnification.
Here it is at 5X magnification:
And at 25X:
This is perfect for long-range shooting as it’ll make distance adjustments MUCH easier and more accurate, making this one of the best scopes for AR-10.
The reticle also works in low-light conditions. This is due to the illuminated reticle.
Take a look:
It’s visible both day and night. It even comes with a 10-setting illumination knob (which is smooth to turn).
Battery life is great too. However, I recommend keeping a spare of CR2032 batteries in your range bag just in case the batteries die.
Eye Relief & Eye Box
The 3.4” eye relief is pretty good. The eye box is also very forgiving.
The best part?
The eye relief remains consistent at all magnification settings.
Durability
The PST Gen II is extremely durable.
In fact:
It’s completely shockproof, fogproof, waterproof, snowproof, and even…
…fireproof.
It’s survived being thrown out of a car:
Being buried alive in dirt:
And pure abused. Despite all that, the scope still functioned perfectly and held zero. The glass is also oil-proof, dirt-proof, and scratch-proof due to the ArmorTek coating.
In short:
It has a rugged exterior and can be used in ANY condition. However, the durability and glass quality comes at a minor cost:
Heavier weight (2 pounds).
But so are all the 5-25x alternatives — some even heavier. That said, to keep your build as light as possible, I recommend using a lightweight mount (covered below).
Elevation & Windage Knobs
The capped windage and elevation turrets are very reliable.
They produce crisp, audible clicks. It turns smoothly. It’s very precise. And the textured grips around each knob makes adjustments super easy:
Zeroing was even easier. Within 3 shots of getting on paper, I was zeroed. It also held zero.
Matter of fact, I’ve fired over 300 6.5 Creedmoor rounds to date with the PST and the scope still hasn’t lost zero.
That’s great and all, but the one feature that makes this scope worth its weight in gold is the…
RZR Zero Stop.
With it, you can’t adjust past your sight-in zero. This is invaluable for long-distance shots (which require frequent adjustments).
Here’s how to set it up:
Magnification & Parallax
The 5-25x magnification is great for medium to long-range shooting — making it one of the best scope for 6.5 Creedmoor AR 10.
The magnification ring is smooth, yet stiff:
The best part?
The scope remains clear and parallax-free throughout ALL magnification settings (5x-25x). I’ve shot past 1,000 yards with ease.
But one thing to keep in mind:
Weather affects clarity.
For example, if it rains or snows, you’ll notice the clarity at inclining magnifications (20x-25x) become a bit worse.
Why?
Because of the scope’s clarity. You see, Vortex engineered the glass to pick up every single detail. So if you’re out shooting in rain, the PST will likely pick up individual rain drops.
That said, it’s not really a problem. It’s just something to keep in mind when shooting in bad weather.
Mounting & Rings
I went with the Midwest Industries 30mm Quick Disconnect Mount. It’s lightweight, easy-to-use, and durable.
But let’s be honest:
It’s not worth the extra money. Instead, I’d recommend getting the Aero Precision Ultralight Extended Mount for your 6.5 Creedmoor rifle. It’s well-built, feather light, and relatively cheap.
If you intend on shooting in sunny conditions, don’t buy a sunshade — the scope already comes with one 🙂
And one last thing:
If you want to keep your lens in tip-top shape for years to come, invest in Vortex Defender Flip Caps (Eye Piece Size: E-10, 41.5-46mm) (Objective Size: O-50, 55-59mm).
Vortex’s included bikini caps just don’t cut it.
Summary
If you’re a long-range shooter or tactical precision shooter, I HIGHLY recommend the Vortex Viper PST Gen II 5-25×50.
Here’s why. It’s got:
Zero stop
Clear glass
First focal plane
EBR-2C illuminated reticle
Tactical, glove-adjustable turrets
Lifetime, no-questions-ask warranty
Long magnification (can easily see past 1,000 yards)
In other words:
It’s got all the premium Nightforce features…without the arms and legs price tag. That’s why it’s my go-to scope for long-range events.
Of course, it costs a pretty penny. And it’s not for everyone.
But if you’re looking for the best long range scope for the money, I wouldn’t think twice about getting the PST Gen II as it easily stands among the best rifle scopes.
2. Nightforce Optics NXS 5.5-22×56: Best Extreme Long Range Scope
The Nightforce NXS 5.5-22×50 is the best extreme long-range scope.
In fact:
It was originally developed for the U.S. military’s extreme long-range shooting. And to date:
It’s the number one choice for military and law enforcement agencies.
Why? Keep reading to find out…
Glass Clarity & Reticle
The glass is exceptional.
Matter of fact, it’s the best glass I’ve ever seen. Take a look for yourself:
It looks MUCH clearer in person
It’s second to none. And for a good reason:
Nightforce uses high-quality precision glass. Then, they fully multi-coated the lens to maximize clarity and light transmission.
The results? Insanely clear glass.
And that’s not all. Nightforce knew that a good reticle was key to long-range shooting. So, they made one of the best long-range reticles to date:
The MOAR reticle.
It’s very advanced. It can be used for ranging objects. Estimating windage, holdover, winddrift. And it has the option to illuminate, which makes low light shooting a breeze.
Also:
The reticle is plenty fine for load development at 150 yards, prairie dogs at 500, or shawking steel at 1,000+. And it’s thick enough that I don’t lose it in timber — making it one of the best hunting scope for 6.5 Creedmoor rifle.
The best part?
The reticle remains clear and thick at ALL magnifications. This is due to the NXS’ second focal plane.
Eye Relief & Eye Box
The Nightforce NXS has 4 whopping inches of eye relief!
Which means, you don’t have to crawl up on the scope to get a full picture. Nor do you have to worry about scope bite.
In fact:
The NXS could handle higher recoiling rifles such as the .50 BMG and .338 Lapua Magnum.
Just be sure to get solid mount/rings (which I’ll cover down below).
Also, the field-of-view is large and the eye box is very forgiving.
Durability
This 6.5 Creedmoor rifle scope is built like a tank.
It’s 2-pounds of solid 6061-T6 Aircraft Grade Aluminum.
It has survived rigorous torture testing, 1,250 G’s of force, and multiple beatings:
Despite all that, the scope still works perfectly. It’s no surprise why. Nightforce optics were designed for the U.S. military. Which means, durability was a must. And the NXS is one hell of a rugged scope.
Not to mention, it’s completely waterproof, fogproof, and snowproof.
Elevation & Windage Knobs
The target turrets are very reliable.
They produce audible, tactile clicks. It turns smoothly. Tracking is dead-on. And the textured grip knobs make adjustments 100x easier:
Zeroing was straight-forward. Within 4 rounds, I was set. But does it hold zero? To date, I’ve fired over 125 rounds of heavy-hitting .50 BMG rounds and it still hasn’t lost zero.
That says a lot. But what really speaks is my favorite long-range feature…
The ZeroStop.
With this feature, you never have to worry about losing your zero ever again.
For example, let’s say you zeroed at 50 yards. If you want to take a shot at 400 yards, simply adjust the elevation up. But what if you want to shoot back down to 50 yards and don’t remember how many rotations you took?
Good news:
You don’t have to. Because Zero Stop saves your zero. This allows you to make frequent adjustments without worrying about losing your zero. Here’s a video demonstrating how it works:
It’s quick. Easy. And makes going back to zero a no brainer.
Magnification & Parallax
The 5.5-22X is effective for short-to-extreme long distances.
In fact:
I was able to hit the bullseye at 2,150 yards.
That’s because the scope remains parallax-free and clear throughout all magnifications — including the highest (22X). This places it equal with the best rimfire scopes for 22LR and other similar guns.
The best part?
Unlike the Vortex PST, the scope’s clarity remains sharp in bad weather. So if you’re hunting and it starts pouring rain, your scope won’t be effected.
The only minor drawback is the side parallax knob markings. Let me explain…
Other scopes that have parallax adjustment knobs usually have numbers associated with the mark. This scope doesn’t. It just has notches.
Of course, this was new to me and it was a bit difficult for me to get used to. But after a while, it became second nature.
Mounting & Rings
I went with the Nightforce 1.125 High Ring Set.
They are excellent rings. Very solid — especially for big bore or larger caliber rifles.
Sunshade is included with the scope. However, you need to get yourself some lens caps if you want to keep the glass protected.
I recommend getting Nightforce Lens Caps. Eyepiece:
Objective:
Summary
If you got the money and are looking for the most premium extreme long-range scope out there, the Nightforce NXS 5.5-22×56 is for you.
Here’s why:
Durable
Zero stop
MOAR reticle
Exceptional glass
Second focal plane
Generous field of view
Short-to-Long distances
Low-light shooting capabilities
It’s no wonder Chris Kyle — the most lethal sniper in U.S. history — used Nightforce. They produce the best optics on the market.
But they also produce the biggest tear in your pocket. The old saying is “buy once, cry once.”
I don’t know about you, but I’m still crying. Because the truth is:
It really stung buying this scope. But at the end of the day, I can easily nail targets above 2000 yard ranges.
In short:
If you’re a precision marksman, law enforcement/military personnel, or do PRS competitions, the Nightforce NXS 5.5-22×56 gives you everything you need and more.
3. Athlon Argos BTR 6-24×50: Best Budget Long Range Scope
You don’t need to spend $800+ on a quality long-range 6.5 Creedmoor scope.
You can get similar quality for a fraction of the price.
Enter: Athlon Argos BTR 6-24×50.
It’s got:
Great glass
True tracking
Tough durability
First focal plane
APMR illuminated reticle
Long-range capabilities (1,200+ yards)
In short:
If you’re on a tight budget or just getting started with long distance shooting, I highly recommend the Athlon Argos BTR 6-24×50.
It’s got all of the premium long-range shooting features at ⅓ of the price.
In fact, these features make it one of the best scopes for 308 long range shooting and the best 10/22 scopes available.
If you’re interested, read my full Athlon Argos BTR review. Or you could purchase it now:
4. Vortex Strike Eagle 4-24×50: Best Short-to-Long Range Scope
The Vortex Strike Eagle 4-24×50 is designed for short-to-long distance shots.
In fact:
I’ve used it for precision shooting, long-range shooting (above 1000 yards), and even hunting.
What makes it so versatile? Everything, starting with…
Glass Clarity & Reticle
The glass is sharp and bright.
Clarity is good enough to watch the bullet trace from a 6.5 Creedmoor round hit paper at 150 yards at 24X.
However, the edges become a bit blurry at higher magnification powers (20X+).
The EBR-4 MOA reticle is solid for long distance shooting.
It’s a second focal plane 20 MOA that estimates holdover, range, and windage corrections — making it a solid 6.5 Creedmoor BDC scope. The reticle’s also illuminated:
This allows you to shoot in low-light conditions.
It has an 11-setting brightness knob that is smooth to turn. Although battery life is good, I recommend having a spare of CR2032 batteries in your range bag.
Eye Relief & Eye Box
It has a generous 3.5” of eye relief.
This is a bit more than the Athlon Argos BTR.
The eyebox is forgiving as well. However, it gets a bit tight at the highest magnification (24X).
Durability
It’s O-ring sealed, nitrogen purged, and built from aircraft-grade aluminum.
In other words, it’s completely waterproof, fogproof, and shockproof. It won’t break no matter the conditions.
But all this durability comes at a cost:
Heavy weight (1.6 pounds).
This is lighter than the Vortex PST II. But it’s still a bit heavy. To compensate, use a lightweight mount (covered below).
Elevation & Windage Knobs
The tactical turrets are zero resettable.
Which means, you can adjust the windage and elevation dials, and return to zero quickly. A great feature if you’re into hunting or long-range shooting where frequent adjustments are required.
The turrets are also audible and crisp.
Although they’re stiff to turn at first, it loosens up with usage.
Magnification & Parallax
The 4x – 24x zoom range offers a wide array of shooting scenarios, making it perfect for various shooting applications. Tactical, feral hog hunting, competition, operations, etc.
The best part?
The sight remains clear and parallax-free throughout all ranges. Here’s how it looks at 4x:
And at 24x:
If parallax ever becomes an issue, Vortex installed a side parallax knob to tackle it 🙂
But keep in mind: the knob is stiff to turn at first. But just like the turrets, it’ll loosen up with usage.
Mounting & Rings
I used a Vortex Sport Cantilever 30mm Mount 2-inch offset on my 6.5 Creedmoor rifle. It’s durable, easy to install (tools included in the box), and holds your scope in place.
It’ll keep your glass protected for years to come.
Summary
Looking for the best Vortex scope for 6.5 Creedmoor rifle? Get the Vortex Strike Eagle 4-24×50.
Besides the stiff knobs and slight distortion at inclining magnifications, it’s got:
Clear glass
EBR-4 reticle
Zero resettable
Illuminated reticle
Edge-to-edge clarity
Fast focus eyepiece
Short-to-long distance magnification (4x – 24x)
In short:
It’s a solid, budget-friendly Creedmoor scope that could be used on any gun — including the AR-15. Not to mention, it’s covered by Vortex’s lifetime warranty. So if it ever breaks, they’ll repair it for free.
Disclosure
Every review you read — be it print or online — should have a disclosure informing you about any potential biases that may influence the review.
I want you to know about any biases that may have affected this review.
How I Get My Scopes
Every 6.5 Creedmoor rifle scope I recommended above were bought from my own pocket money. I paid the same price as any other customer.
External Contributions
I received no special discounts. Nor did I receive any free or ‘reviewer’ products.
By doing this, it allows me to share with you my own personal experience with each optic. The good, the bad, and the ugly without appeasing scope manufacturers.
I have no financial interest to any optic company. This includes stocks and mutual funds. This isn’t a sponsored post.
Affiliate Links
ScopesField.com is a for-profit business that literally feeds and clothes my family.
I earn money through affiliate sales. Which means, if you make a purchase through my affiliate link, I get a small commission: typically 2-4%.
I don’t see what you purchase, nor does it affect the price you pay.
With the money I make, I use it to feed my family, keep the reviews unbiased (not reaching out to optic companies), and keep annoying ads off my site.
Conclusion
You can’t go wrong with any of these scopes.
In fact:
I’ve reviewed tens of scopes and these turned out to be the best scope for 6.5 Creedmoor.
They’re all capable of shooting above 1,000 yards with fine adjustments.
Just pick one based on your budget and try it out at the range.
If you don’t like it for whatever reason, you could always return it back to Amazon thanks to their 30-day Money Back Guarantee.
Now I’d like to hear from you:
Which riflescope do you use for your 6.5 Creedmoor rifle?
Maybe a Nightforce? Or a Vortex PST Gen II? Either way, let me know by leaving a comment down below.
If you have any other scope recommendations I should look into, please let me know. Also, if you’re a CQB hunter or someone that shoots close-range, check out my best 1-4x scope or best red dot magnifier buyer’s guide.
Lastly, to all those who have served, and those who continue to serve…Thank you for your service! Come home safely and soon.
If you’re looking to master the art of cutting a tomahawk steak, you’ve come to the right place. With its impressive bone-in presentation and succulent marbling, the tomahawk steak is a true showstopper on any grill or plate.
In this guide, we’ll walk you through the step-by-step process of properly cutting a tomahawk steak, ensuring that you achieve perfect slices that do justice to this flavorful cut of beef.
First, make sure you have a sharp knife that can easily glide through the meat. Begin by identifying the bone that extends from the center of the steak’s thickness, resembling a tomahawk axe handle.
This bone adds flavor and moisture to the meat during the cooking process, making it essential for the overall taste.
Next, position the tomahawk steak on a cutting board with the bone facing upwards. Start by slicing horizontally through the outer fat, creating a clean incision that exposes the meat underneath. Use gentle, controlled motions to avoid cutting into the bone.
Once you’ve created this initial incision, it’s time to reveal the beautifully cooked meat. Hold the bone firmly and carefully make vertical cuts, perpendicular to the bone, to create individual slices of your desired thickness. Take your time and adjust the pressure as needed to ensure clean cuts and presentable portions.
Remember, presentation is key when serving a tomahawk steak. Arrange the sliced portions
When it comes to indulging in a delicious and mouthwatering steak, the tomahawk steak is hard to beat. This impressive cut of beef is known for its large size, frenched bone, and exceptional marbling, making it a show-stopping centerpiece for any special occasion or backyard barbecue.
However, with so many options available, choosing the perfect tomahawk steak can be a daunting task. In this section, we will guide you through the factors to consider to ensure that you select the best tomahawk steak for an unforgettable dining experience.
1. Quality and Grade
The first and most important factor to consider when choosing a tomahawk steak is its quality and grade. The quality of the steak is determined by the amount and distribution of marbling throughout the meat.
Marbling refers to the white streaks of fat that are dispersed within the muscle, enhancing the tenderness, juiciness, and flavor of the steak.
When it comes to grades, the U.S. Department of Agriculture (USDA) assigns three main categories: Select, Choice, and Prime. Select is the lowest grade, with minimal marbling, while Choice has a moderate amount of marbling, and Prime is the highest grade, with abundant marbling.
For a truly exceptional tomahawk steak, opt for Prime grade if available. However, Choice grade can also provide a delicious and flavorful steak.
2. Size and Thickness
Another crucial factor to consider when choosing a tomahawk steak is its size and thickness. The tomahawk steak is renowned for its impressive size, often weighing around 2 to 3 pounds. However, you can also find smaller tomahawk steaks that are perfect for individual servings.
The thickness of the steak is equally important, as it affects the cooking time and doneness.
A thicker tomahawk steak will take longer to cook and may result in a more medium-rare or medium doneness, while a thinner steak will cook faster and may lean towards a medium or medium-well doneness. Choose the size and thickness that best suits your preferences and cooking method.
3. Source and Origin
Knowing the source and origin of your tomahawk steak is essential for several reasons. Firstly, it ensures that you are purchasing a steak from a reputable and trusted supplier.
Secondly, it allows you to support local farmers and businesses. Finally, it provides insight into the rearing and feeding practices of the cattle, which can impact the flavor and quality of the meat.
Look for tomahawk steaks that are sourced from sustainable and ethical farms, known for their commitment to animal welfare and environmentally friendly practices.
Additionally, consider opting for locally sourced tomahawk steaks to support your local community and reduce the carbon footprint associated with long-distance transportation.
4. Price and Budget
While tomahawk steaks are undoubtedly a luxurious and decadent choice, they can also come with a hefty price tag. Consider your budget and the occasion when choosing a tomahawk steak.
If you’re looking to impress guests or celebrate a special occasion, investing in a high-quality tomahawk steak may be worth it. However, if you’re on a tighter budget or planning a more casual gathering, there are still delicious options available at a more affordable price point.
Remember that the price of the tomahawk steak will vary depending on factors such as the quality, grade, size, and source. Take these into account when selecting a steak that aligns with your budget.
5. Personal Preferences
Ultimately, your personal preferences should play a significant role in choosing the perfect tomahawk steak. Consider how you like your steak cooked, whether you prefer a leaner or well-marbled cut, and any specific dietary restrictions or preferences.
If you enjoy a tender and melt-in-your-mouth steak, opt for a tomahawk steak with ample marbling. On the other hand, if you prefer a leaner cut with a bolder beef flavor, consider choosing a tomahawk steak with less marbling.
Additionally, take into account any special dietary requirements, such as grass-fed or organic options. Many suppliers offer a variety of tomahawk steaks to cater to different preferences and dietary needs.
Preparing the Tomahawk Steak for Cutting
Once you have obtained a high-quality Tomahawk steak, it is important to prepare it properly before cutting into it. This will ensure that you maximize the flavor and tenderness of the meat. Here are the steps to follow:
Remove the steak from the refrigerator: Take the Tomahawk steak out of the refrigerator and allow it to come to room temperature. This will help the meat cook more evenly.
Season the steak: Generously season the steak with kosher salt and freshly ground black pepper on all sides. You can also add any additional spices or herbs of your choice to enhance the flavor.
Let it rest: After seasoning, let the steak rest for about 30 minutes. This allows the seasonings to penetrate the meat and enhances the overall flavor.
Preheat the grill: While the steak is resting, preheat your grill to high heat. Tomahawk steaks are best cooked over direct heat.
Oil the grates: To prevent the steak from sticking to the grill, lightly oil the grates. Use tongs and a folded paper towel dipped in oil to rub the grates.
Sear the steak: Place the seasoned Tomahawk steak directly on the hot grill grates. Sear it for about 2-3 minutes per side to create a flavorful crust.
Move to indirect heat: Once the steak is seared, move it to a cooler part of the grill or reduce the heat to medium. This will allow the steak to cook more gently and evenly.
Use a meat thermometer: To ensure that your Tomahawk steak is cooked to your desired level of doneness, use a meat thermometer. The internal temperature should reach 130°F (medium-rare), 140°F (medium), or 150°F (medium-well).
Rest the steak: Once the steak reaches the desired temperature, remove it from the grill and let it rest for at least 10 minutes. This allows the juices to redistribute and ensures a more tender and flavorful steak.
By following these steps, you will be able to prepare your Tomahawk steak for cutting and enjoy a delicious and perfectly cooked piece of meat.
Remember, cooking times may vary depending on the thickness of the steak and the heat of your grill, so it’s important to use a meat thermometer for accurate results. Enjoy your meal!
Essential Tools for Cutting a Tomahawk Steak
When it comes to cutting a tomahawk steak, having the right tools can make all the difference. This thick, bone-in ribeye steak requires some specialized equipment to ensure that you can slice through it effortlessly and present a perfectly cooked piece of meat. Here are the essential tools you’ll need:
1. Tomahawk Steak
Before you even think about cutting a tomahawk steak, you’ll need to have one on hand. This beautifully marbled, bone-in ribeye is known for its unique Frenched bone that resembles a tomahawk axe handle, hence its name.
Make sure you source a high-quality tomahawk steak from a trusted butcher or specialty meat shop.
2. Cutting Board
A sturdy and spacious cutting board is a must-have for cutting a tomahawk steak. Look for a board that is large enough to accommodate the size of your steak and has enough space for you to maneuver your knife comfortably.
A cutting board made of wood or plastic is recommended to prevent bacterial contamination and ensure easy cleanup.
3. Boning Knife
A boning knife is an essential tool for cutting a tomahawk steak, especially when it comes to removing the meat from the bone. Look for a sharp, narrow-bladed boning knife that allows for precise and controlled cuts.
The flexibility of the blade will help you navigate around the bone and separate the meat easily.
4. Carving Knife
Once you have separated the meat from the bone, a carving knife will come in handy for slicing the tomahawk steak into individual portions. A long, thin-bladed carving knife with a sharp edge will ensure clean cuts and help you achieve the desired thickness for each slice.
5. Meat Thermometer
When cooking a tomahawk steak, it’s crucial to monitor the internal temperature to achieve the desired level of doneness. A reliable meat thermometer will help you determine when the steak is cooked to perfection.
Insert the thermometer into the thickest part of the meat, away from the bone, and refer to a temperature guide for your preferred level of doneness.
6. Tongs
Tongs are essential for handling the tomahawk steak while it’s on the grill or in the oven. Opt for long, sturdy tongs that provide a good grip and allow you to flip the steak with ease. Avoid using a fork, as it can pierce the meat and cause the juices to escape, resulting in a drier steak.
7. Grill or Oven
Depending on your preference, you can cook a tomahawk steak on a grill or in the oven. A grill will give you those beautiful grill marks and a smoky flavor, while the oven will provide more controlled heat. Whichever method you choose, make sure it is properly preheated to the recommended temperature.
8. Resting Rack
After you have cooked the tomahawk steak, it’s crucial to let it rest for a few minutes before slicing. A resting rack allows the juices to redistribute within the meat, resulting in a more flavorful and tender steak. Place the steak on the rack and cover it loosely with foil to retain heat.
With these essential tools at your disposal, you’ll be well-equipped to tackle the task of cutting a tomahawk steak. Remember to handle the steak with care and always prioritize safety when using sharp knives. Enjoy the process and savor the delicious results!
Step-by-Step Guide to Cutting a Tomahawk Steak
Are you a steak lover looking to impress your guests with a perfectly cooked and beautifully presented tomahawk steak? Look no further! In this step-by-step guide, we will walk you through the process of cutting a tomahawk steak from a prime rib roast.
With a few simple techniques and the right tools, you’ll be able to create a restaurant-worthy tomahawk steak in the comfort of your own kitchen.
Step 1: Choose the Right Cut
The first step in cutting a tomahawk steak is selecting the right cut of meat. Look for a well-marbled prime rib roast that has been dry-aged for at least 21 days. Dry-aged beef develops a more concentrated and intense flavor, making it ideal for a tomahawk steak.
Step 2: Gather Your Tools
Before you begin the cutting process, make sure you have the necessary tools on hand. You will need a sharp boning knife, a sturdy cutting board, and a pair of kitchen shears. It’s important to have sharp tools to ensure clean and precise cuts.
Step 3: Locate the Bone
Place the prime rib roast on your cutting board with the bones facing upwards. Locate the bone that runs along the edge of the roast. This bone will serve as the handle of your tomahawk steak, giving it its distinctive appearance.
Step 4: Remove the Rib Cap
Using your boning knife, carefully separate the rib cap from the meat. The rib cap is a layer of fat and connective tissue that sits on top of the meat.
Start at one end of the roast and slowly work your way along the bone, gently separating the rib cap from the meat. Set the rib cap aside for later use, as it can be cooked separately for additional flavor.
Step 5: French the Bone
Next, you’ll want to “French” the bone to enhance the presentation of your tomahawk steak. Using your kitchen shears, remove the excess meat and fat from the bone, exposing it for a clean and elegant look. This process will give your tomahawk steak that iconic “handle” appearance.
Step 6: Trim the Meat
After removing the rib cap and Frenching the bone, it’s time to trim any excess fat or connective tissue from the meat. This will help ensure even cooking and a more tender steak. Use your boning knife to carefully trim away any unwanted parts, leaving behind a well-marbled piece of meat.
Step 7: Cut Individual Steaks
Finally, it’s time to cut individual tomahawk steaks from the prime rib roast. Start by cutting perpendicular to the bone, creating thick, bone-in steaks.
Aim for a steak thickness of around 2 inches for that perfect balance of tenderness and juiciness. Once you have cut the steaks, you can season them with your favorite spices and herbs before cooking.
Step 8: Cook and Serve
Now that you have successfully cut your tomahawk steaks, it’s time to cook them to perfection. Whether you prefer grilling, pan-searing, or using a sous vide method, make sure to cook the steaks to your desired level of doneness.
Let the steaks rest for a few minutes before serving to allow the juices to redistribute. Serve your tomahawk steaks with a side of roasted vegetables or a loaded baked potato for a complete and satisfying meal.
5. Tips and Tricks for a Perfectly Cut Tomahawk Steak
If you’re a meat lover, then you’ve probably heard of the mighty Tomahawk steak. Known for its impressive presentation and succulent flavor, this cut of meat is a true showstopper.
However, cooking and cutting a Tomahawk steak can be a bit intimidating if you’re not familiar with the process. Fear not, as we’ve compiled some useful tips and tricks to help you master the art of preparing a perfectly cut Tomahawk steak.
1. Choosing the Right Tomahawk Steak
The first step to achieving a fantastic Tomahawk steak is choosing the right cut of meat. Look for a steak with a thick bone and well-marbled meat.
The bone not only adds an impressive visual appeal but also helps in maintaining the steak’s tenderness and juiciness. Additionally, the marbling is crucial for flavor and ensures the steak remains moist and flavorful during cooking.
2. Preparing the Steak
Before you start cooking your Tomahawk steak, it’s essential to let it come to room temperature. Allowing the steak to sit at room temperature for about 30 minutes helps ensure even cooking throughout the meat. Season the steak generously with salt and pepper, or your favorite steak seasoning, for a burst of flavor.
3. Cooking Techniques
There are several cooking techniques you can use to cook the perfect Tomahawk steak. Here are a couple of popular options:
Reverse Sear: This method involves slow cooking the steak at a low temperature before searing it on high heat to achieve a beautifully charred exterior. Start by placing the steak in a preheated oven at around 275°F (135°C) until it reaches your desired internal temperature. Finish by searing the steak on a hot grill or cast-iron skillet for a few minutes on each side.
Grilling: Grilling a Tomahawk steak is a classic and straightforward method. Preheat your grill to high heat and place the steak over direct heat. Sear for a few minutes on each side to achieve the desired doneness. For added flavor, you can also use wood chips or chunks to create a smoky aroma.
4. Resting and Carving
Once your Tomahawk steak is cooked to perfection, it’s crucial to let it rest before slicing. Resting allows the juices to redistribute throughout the meat, resulting in a juicier and more tender steak. Wrap the steak loosely in aluminum foil and let it rest for about 10 minutes.
When it comes to carving a Tomahawk steak, you’ll want to make thick, impressive slices. Start by removing the bone, which can be easily done by cutting along the bone and using a gentle sawing motion.
Once the bone is removed, slice the steak against the grain into thick pieces, around 1 inch (2.5 cm) thick. Serve the slices on a platter and enjoy!
5. Serving Suggestions
A perfectly cut Tomahawk steak deserves the perfect accompaniments. Here are a few serving suggestions to elevate your dining experience:
Classic sides: Pair your steak with classic sides like mashed potatoes, roasted vegetables, or a fresh green salad.
Sauces: Consider serving the steak with flavorful sauces such as peppercorn sauce, chimichurri, or a rich mushroom sauce.
Wine pairing: Enhance the flavors of your Tomahawk steak with a bold red wine, such as Cabernet Sauvignon or Malbec.
Now that you’re armed with these tips and tricks, you’re ready to tackle a perfectly cut Tomahawk steak.
Whether you’re grilling for a special occasion or simply indulging in a delicious meal, mastering the art of preparing this impressive cut of meat will surely impress your guests or satisfy your own meat cravings. Enjoy!
Frequently Asked Questions (FAQs)
1. How to cut a tomahawk steak?
To cut a tomahawk steak, start by placing the steak with the bone-side down on a cutting board. Use a sharp knife to make a horizontal cut along the bone, separating the meat from the bone. Then, make vertical cuts to portion the steak into individual servings. Serve and enjoy!
2. How long should I cook a tomahawk steak?
The cooking time for a tomahawk steak will vary depending on the thickness of the steak and the desired level of doneness.
As a general guide, grill the steak for 4-5 minutes per side for medium-rare, or adjust the cooking time according to personal preference. Use a meat thermometer to ensure the steak reaches the desired internal temperature.
3. How should I season a tomahawk steak?
For a delicious tomahawk steak, season it generously with salt and pepper on all sides. You can also add additional spices or a dry rub for extra flavor. Allow the seasoning to penetrate the steak by letting it sit at room temperature for about 30 minutes before cooking. This will enhance the taste and tenderness of the steak.
Conclusion
In conclusion, learning how to cut a tomahawk steak is a valuable skill for any home cook or aspiring chef. By following the proper technique, you can ensure beautiful, evenly cooked steaks that are sure to impress your guests. Remember to start with a high-quality tomahawk steak and use a sharp knife to create clean cuts.
Take your time and follow the bone’s natural curve to achieve those iconic long, exposed bones. Whether you’re grilling, broiling, or pan-searing, the tomahawk steak is guaranteed to provide a flavorful and visually stunning dining experience.
Cutting a tomahawk steak is not only about technique but also about appreciating the art of cooking. The bone-in presentation adds elegance to the dish, making it a standout choice for special occasions or celebrations.
From its marbling to its tenderness, the tomahawk steak is a prime cut that commands attention. With practice and patience, you can master the art of cutting and enjoy this indulgent and satisfying piece of meat.
Fish also make a viable bait source, which is great for those of us who love to spend time angling as well as hunting. They can be used in many of the same ways as the above methods: just save the heads and guts in the freezer and make a pile.
One of the main ways they’re used as bait by experienced coyote trappers and hunters, however, is by salting them. When salted, the fish can be kept almost indefinitely without making your house reek or taking up room in your freezer that could probably be better used by stocking with more edible game.
It’s not a bait of last resort, it’s actually quite effective, but it is a bit specialized when it comes to making sure you have some on hand.
Related: “When Is The Best Time To Hunt Coyotes?” Searching For The Perfect Shot
This is one of the most popular baits for coyote, and it’s not hard to see why. It’s a strong scent that will often bring them in from long distances, and they love to eat it.The main downside of using chicken liver as bait is that it can be expensive if you go through alot of it, and it doesn’t store well. You can’t just keep a bunch in your freezer like you can with some of the other types of baits on this list.You’ll have to either use it fresh or find a way to preserve it, which means figuring out how to keep it from going bad too quickly or learning how to salt it properly so that it lasts a bit longer.
8.) Coyote urine
If you want to guarantee that a coyote is going to show up, using coyote urine as bait is about as close as you can get. You can purchase it online or at many sporting goods stores, and all you have to do is let it drip onto the ground near where you’ll be waiting with your gun.The downside to using this method is that it can be quite expensive if you go through alot of it, and it also doesn’t store well. Once opened, a bottle of coyote urine will only last for a few months before it starts to lose its potency.You’ll also want to be sure that you don’t use too much, as the coyote will be able to smell it from quite a distance and if there’s too much they may just avoid the area altogether. A little goes a long way with this method.
9.) Fruits and vegetables
You might not think of fruits and vegetables as being good bait for coyote, but in reality they can be quite effective. This is especially true if you happen to live near an area where farmers are growing crops. Apples, watermelons, and other fruits make excellent bait, as do corn and other vegetables. The key is to find a way to keep them from going bad too quickly. One method is to soak them in salt water overnight, which will help to preserve them.You can also add some sugar to the mix, which will make the bait even more irresistible to coyotes. Just be sure not to use too much or you’ll end up attracting bears and other large animals that you don’t want to deal with.
10.) Bacon
Bacon is another bait that can be quite effective, but it shares many of the same drawbacks as chicken liver. It’s a strong scent that will often bring coyotes in from long distances, but it doesn’t store well and can be quite expensive if you go through alot of it.You can keep bacon fresh for a few days by wrapping it in plastic and stored in a cool, dry place, but after that it will start to go bad. You can also salt it or smoke it to help preserve it, but this will change the taste and smell somewhat.
11.) Coyote food
One of the best baits you can use is something that the coyote would normally eat. This could be anything from a small animal to a piece of meat that you’ve been able to trap.The key is to make sure the bait is fresh, and that you’re using something that the coyote is likely to be attracted to. You can also use a scent attractant to help bring them in, but this isn’t always necessary.
12.) Sausage
Sausage is another type of meat that can be quite effective as bait for coyote, but it has the same drawbacks as bacon. It’s a strong scent that will often bring them in from long distances, but it doesn’t store well and can be quite expensive if you go through alot of it.You can keep sausage fresh for a few days by wrapping it in plastic and stored in a cool, dry place, but after that it will start to go bad. You can also salt it or smoke it to help preserve it, but this will change the taste and smell somewhat.
13.Kitten food
Kitten food can be an effective bait for coyote. The key is to use something that is fresh and that the coyote is likely to be attracted to. You can also use a scent attractant to help bring them in, but this isn’t always necessary.
14.Cheese
Cheese is a common bait that can be used to catch many different types of animals, and it also works well for coyote. The key is to use something that is fresh and that the coyote is likely to be attracted to. You can also use a scent attractant to help bring them in, but this isn’t always necessary.
There are an incredible number of broadheads on the market today, so choosing the best mechanical broadhead for your particular setup can be a daunting task.
My hope is that this article will help you narrow down your choices to a manageable number so that you can make a final decision based on your needs and the information at hand.
For hunting whitetail deer, our favorite is the G5 Deadmeat. If you prefer a more streamline 2-blade setup, then the Rage Hypodermic is going to be hard to beat.
If you’re looking specifically for a crossbow broadhead, we have a whole other article for that.
The G5 Deadmeat is our choice for the overall best mechanical broadhead. I am a big fan of G5 Outdoors and their American-made products.
The G5 checks all the boxes that make up a great expandable broadhead: it’s solid steel, features three blades with a 1 1/2-inch cutting diameter for maximum damage, and the Snap lock system keeps the blades in place to prevent pre-deployment.
The blades are rear-deploying, which we feel is a better design because they lose less energy during deployment, and the risk of deflection is less than with forward deploying blades.
In addition to its solid design, we like that the Deadmeat is offered in both 100 and 125 grains for those who may want a heavier setup. The three-pack of broadheads includes a Ballistic Match Point practice tip that matches the flight of the Deadmeat for easy practice without damaging your hunting broadheads.
If you want a solid expandable broadhead that hits hard and creates great blood trails, we highly recommend the G5 Deadmeat!
No one sells more broadheads annually than Rage, and I doubt any on the market kills more deer. That doesn’t necessarily mean they’re the best, but they have done a great job of marketing over the years.
Rage aren’t my favorite, but if I was going to shoot one it would be the standard two-blade Hypodermic.
The chisel tip, combined with the 2-inch cutting diameter should result in decent penetration, plenty of damage, and a short blood trail.
The rear deploying blades should minimize energy loss, and the improved shock collar technology ensures the blades stay in place until impact. We also like that this model Rage has a steel ferrule for maximum strength and durability.
The icing on the cake with these Rage broadheads is that you can often find them at a great price on Amazon. And despite what you may have heard, Rage broadheads are American-made.
I have personally used and killed deer with NAP Killzones. I really can’t say anything negative about them, other than I wished the long, tapered ferrule was steel rather than aluminum.
The Killzones are similar to the Rage discussed above in that they are rear deploying and feature a 2-inch cutting diameter.
What I like about the Killzone is that is features a spring clip design for blade deployment that eliminates the need for any rubber bands, clips or retainers. I also like the hardened trophy tip designed to split bone and get maximum penetration.
If you’re looking for a 2-blade mechanical broadhead with a decent cutting diameter, then the NAP Killzone may be the perfect option.
If it weren’t for the aluminum ferrule, we probably would have designated them as the Best Two Blade Mechanical Broadhead, but for now, the Rage Hypodermic gets that nod. You won’t go wrong with either, though.
While the G5 Deadmeat is our overall pick for best mechanical broadhead, their Megameat is a great option as well.
The Megameat features the same three-blade design, all steel construction, and Snap lock construction to keep the blades in place. The main difference is the larger 2-inch cutting diameter.
The reason we chose the Deadmeat over the Megameat is our belief that a 1.5-inch cutting diameter is ideal for a three-blade broadhead.
If you prefer a larger cutting diameter and have a bow setup that will give you a pass-thru every time, then the Megameat may be the perfect option for you. One thing is for sure, you can’t go wrong with a G5 product.
The Rage 2-Blade Chisel Tip is the second Rage expandable broadhead on our list, and the most popular option in the Rage’s extensive lineup of broadheads.
Like the Hypodermic, the Chisel Tip SC is 100 grain and features a 2-inch cutting diameter. The main difference is in the tip.
The Hypodermic has a longer, tapered tip that is part of the overall one-piece steel ferrule. The Chisel Tip has a unique, twisted chisel tip that is made for breaking through bone.
The reason we ranked this one below the Hypodermic is due to the weaker aluminum ferrule. Overall, though, this is still a great option.
Swhacker mechanical broadheads have a unique blade design with two separate cutting edges.
The smaller wing blades are designed to cut the hide and first set of ribs, with the idea that the main blades will still be razor-sharp once they deploy in the body cavity for maximum damage to internal organs.
In my mind, two weak points on the Swhacker are the aluminum ferrule and the rubber bands used to hold the blades closed in flight. However, I do like the fact that there is little chance of the blades not deploying due to the wing blade design.
And while they may not be my favorite broadhead, it’s hard to argue with a 4.7 out of 5 rating on Amazon. I also have mad respect for Levi Morgan as an archer and a bowhunter, and he is a big believer in Swhacker broadheads.
All the broadheads discussed above are well known, highly rated, and should fly like your field points if your bow is properly tuned. You can’t go wrong with any of them.
I’ve shot all of them myself with good results, although I now prefer fixed blade broadheads for deer.
If you’re having a hard time narrowing down your choice among these options, here are the most important features to consider:
Broadhead Weight
Most mechanical broadheads are going to come in either 85, 100, 125 or 150 grains, with 100 grains being the most common. Any of these will work effectively. It’s really a matter of your overall arrow or bolt setup as to which weight you choose.
If you’re just going with a standard mid-weight arrow setup, then I’d recommend sticking with a 100 grain broadhead because they are readily available and will get the job done. However, if you’re like me and prefer a heavier arrow setup with a little higher FOC, then a 125 or even a 150 grain may be your best bet.
Even if you like a heavier setup, you can always use a 100 grain mechanical and add weight with a heavier brass insert or insert weight.
Two Blade vs Three Blade Broadheads
In your quest to find the perfect option, you may wonder if you should you shoot a two or three blade broadhead.
First off, let me say that either of those options will get the job done. Like most things in life, there’s tradeoffs to each option.
A two-blade broadhead is going to have less resistance, so it will be more likely to pass thru an animal. The tradeoff to that reduced resistance and increased penetration is less overall tissue damage and a smaller blood trail.
Three blade broadheads, on the other hand, should produce a larger wound channel and better blood trail. And while they will have more resistance than a two-blade, as long as you’re shooting a heavy enough arrow setup, and/or enough poundage on your bow, penetration shouldn’t be an issue.
Cutting Diameter
Cutting diameter is another important factor when choosing a broadhead. Similar to the blade number discussion above, cutting diameter will impact penetration and the subsequent blood trail.
A smaller cutting diameter will have less resistance and will be more likely to pass through, but it will also create a smaller wound channel. That smaller hole will me less overall tissue damage and a smaller blood trail.
That leaves you having to strike a balance between getting a solid pass-thru shot and still inflicting as much damage as possible for a good, short blood trail.
Other factors in that decision will be your bow setup and overall arrow setup. If you shoot a lower poundage, short draw length, or a light arrow setup, then you will want to err on the side of smaller cutting diameter to ensure a pass-thru shot.
My preference is a 1 1/2-inch to 2-inch maximum cutting diameter from a mechanical broadhead.
Final Thoughts
Choosing the best mechanical broadhead can be challenging. There are tons of options on the market today, and all of them will kill a deer with proper shot placement.
That’s not to say, however, that some options aren’t much better than others. To narrow down your choice, use the factors outlined above, and you should find one or more great options from our list above.
Ultimately, you won’t go wrong with any of the options listed above, but hopefully this article will help you find the best mechanical broadhead for your specific needs.
The Rage Hypodermic Crossbow Broadhead is one of the greatest innovations in modern archery hunting in several areas. That said, it may not be perfect for everyone, but I’ve found it to be my favorite tool in my broadhead toolbox thus far. I just finished my fourth deer hunting season exclusively using these broadheads, and I have alot of insights to share.
I’ve seen plenty of reviews where people talk hypothetically and scientifically about these broadheads, quoting all the marketing materials or synthesizing other online reviews and it’s obvious they have never touched let alone shot one of these broadheads.
That isn’t going to be this review. I have four sets of antlers that these broadheads have brought home for me, not to mention some does the Rage’s have put in my freezer as well. And I have bought every single broadhead with my own money. This review is packed with information and insight that the cookie cutter reviews can’t provide.
The rage hypodermics are a mechanical broadhead, which means they fold up neatly for storage and shooting. But upon impact, the cutting blades expand outward to drastically increase the cutting diameter. One some models the blades are held in place by a collar, other models have no collar, more on that later.
These broadheads are simple to work with, safe to handle, and thus far in my experience, 100% reliable. The goal of mechanical broadheads is to provide a larger cutting diameter than is feasible with fixed blade broadheads while being more aerodynamic and accurate. Do they achieve this goal? In short, yes.
Specs
2-Blade Crossbow Broadhead
100 Grain or 125 Grain
Hybrid Hypodermic Tip
Stainless Steel Hypodermic Ferrule
.035″ Blade Thickness
2 ” Cutting Diameter
High Energy SHOCK COLLAR™ or No Collar Blade Lock
3 per Package
Replacement Blades Available
If you are new to crossbow hunting, here is a podcast episode I did on How To Pick Your First Crossbow For Deer Hunting.
Massive Effectiveness – Hype or Truth?
Rage boasts a lot of big colorful words to describe how impressively effective these crossbow broadheads are, along with the non-crossbow versions. Do they live up to that hype though? Are they really that devastating on deer? My experience with archery hunting is that if you hit a deer in an ideal location, that deer is going to die. And if you hit it in a bad location, it may or may not die, and you may or may not recover it. Shot placement is everything to achieve a quick humane kill.
These hypodermic crossbow broadheads are no exception to that simple truth. I have botched a shot and lost a deer. But if the hunter can do their part and place the shot in a good spot, these things are amazing. The stories below illustrate that quite well.
Cast Studies Of How They Really Work
The first shot I took with a Rage Hypodermic Crossbow Broadhead dropped the deer to the ground, in place, at 30 yards. The deer couldn’t go five feet. The wound was so impressive, and deer bled out so much and so quickly that it was a little bit nauseating to me. I kid you not. The deer was unconscious within seconds, it dropped right to the ground and couldn’t get back up. I was immediately sold on these broadheads. They were unbelievably effective.
The second deer I shot was a nice buck walking at 23 yards. I watched it run less than 50 yards and pile up right in front of me. This shot was not as gruesome as the first, but it was impressively effective. The deer was not conscious for more than a few seconds.
The next buck I shot ran 75 yards or so but left such a large blood trail that I could not believe there was any blood left in the deer by the time I found it. Far more blood than with any rifle kill I’ve had on a deer. Again, a very fast and humane kill.
I could go on and on, but the bottom line is this. Every deer where I was even close to a vital area was on the ground within seconds and didn’t go more than that one at 75 yards. The blood trails were always easy to follow when I didn’t watch the deer go down. Sometimes the blood trails were excessive and other times they were average. But each time the deer went down fast, humanely, with minimal suffering and was easily recovered.
How Well Do They Penetrate?
When it comes to arrows, everyone wants a pass-through shot, myself included. A pass-through double lung shot will quickly kill a deer 100% of the time and provide the most trackable blood with the largest margin of error. Plus, a pass through arrow is most easily recovered and reused. These Rage broadheads have not always given me a clean passthrough shot though.
I would say 60% of the time the arrow has gone through the deer and cleanly come out the other side. The other 40% of the time the arrow has poked through the other side of the deer to some degree but remained lodged in the deer. I hate this, because almost every single time the arrow has been broken, usually sheared off when the deer runs next to a tree.
However, the effectiveness of the broadhead has not diminished at all in these situations. The deer do not run any further or bleed any less. The broadhead does its damage, its game over every single time. What keeps the arrow from cleanly leaving the deer? I cannot tell. These things tend to go right through rib bone like nothing. I am wondering if the bow I’ve been using needs the string replaced and is losing some velocity. But the bottom line is a 100% fast kill rate on all deer shot anywhere close to a vital area.
Do They Always Work?
Yes, so far. I have not had one fail to deploy, deploy improperly, or malfunction in any way. I shoot, the broadhead opens, and the deer quickly expires. I have full confidence that these are going to work every time. I’ve shot deer as far as 40 yards and have never had an issue with the broadheads. They just work. As they should.
Can They Pass Through Bone?
I hate this question, because it is not often asked responsibly. No archery hunter should ever fire into the shoulder or at any bone other than a rib. It is irresponsible and unethical. No broadhead, no matter what it’s made of, fixed, mechanical, titanium, or weighing 600 grains can reliability pass through the thickest part of the shoulder of a gull grown deer, let alone with enough power to humanely kill the deer. Often the arrow will deflect, sometimes it will bounce off, if it goes through its trajectory can be greatly altered. It is a not a shot hunters should take or try to find special equipment for. Stop it.
Stop chasing this foolhardy idea, it is wounding too many deer. Never aim for hard bone and don’t try to build a heavy arrow setup that gives you a better change of taking the deer if you do. You will focus on the wrong things and botch more shots because of it. These broadheads and all broadheads will do what they are designed to do, go through both lungs and kill a deer quickly. If you want to shoot through the shoulder, then use a rifle. For more, check out my podcast episode Heavy Arrows Vs. Fast Arrows For Deer Hunting.
Can You Shoot Through Mesh In Ground Blinds?
This is a hotly contested subject! Shooting through the mesh of a ground blind with any broadhead, let alone a mechanical broadhead like the Rage Hypodermic is greatly debated. Rather than quoting arguments and articles, I’ll just tell you the truth. It works, its fine, and it works great. 80% of the deer I’ve shot with these have been from ground blinds and through the mesh. I have not noticed any difference whatsoever of shots going through the mesh vs. those not through the message. It’s a non-issue.
I believe the benefits of the mesh to conceal the hunter outweigh any theoretical cons about shooting through mesh. It does not seem to impact the velocity, range, accuracy, or penetration of the broadheads. And no, they do not deploy when shooting through the mesh. This debate is waged largely by people who have no experience. I can tell you first-hand, the mesh hasn’t hurt me one bit.
Collar vs. No Collar
Rage makes a version of the Hypodermic crossbow broadheads with a collar and without a collar. If you are unfamiliar, the collar is just a little plastic ring that holds the blades in place. When the broadheads hit the deer, the collar snaps off and the blades open. The no collar version uses a newer mechanical mechanism to replace the collar.
There is alot of debate about broadheads that use a collar being inferior because the collar requires “alot of energy” to break and that energy is not able to go into the deer. I talked to Rage about this very point at length, and according to them, the people who make the broadheads, this is completely untrue. The amount of energy required to break a collar is inconsequential.
People accidently snap collars when brush touches the broadhead in a quiver, which is one of the main reasons they created the no collar version. The collar and the no collar broadheads perform almost identically.
Keep in mind, it is in their best interest to push the no collar models because they cost more. So, to say the cheaper and older collared models have the same performance is just plain honesty. I personally prefer the collar version because it is cheaper than the no-collar.
The Best Part – They Fly Like Field Tips
Hands down, the best feature of the Rage Hypodermic Crossbow Broadhead is that they fly just like a field tip. I can practice with field tips as much as I want, and then put on a broadhead and will have the same accuracy at every range that the field tip has. This means I only need to practice with one set of ranges. I am able to hit what and where I am aiming much more easily.
Because shot placement matters more than anything else and everything else when it comes to deer hunting. And these broadheads help me place my shots better. That is the number one reason I like them. The better the hit, the cleaner the kill, the faster you can recover the deer and the better quality the meat. Here is a short video I did about how long to wait to recover a wounded deer from two different perspectives.
Can You Re-Use Them?
People sometimes also say the no collar version of the broadheads is better than the collar version because you won’t run out of collars. Well, neither of these broadheads are very re-usable. They are essentially a one-shot tool. The arrows you can easily re-use, the broadheads rarely are. Rage does make replacement blades you can swap out, so if you do that and sharpen the point of the arrow and nothing is bent, you could re-use them.
But for the trouble and cost, I just throw on a new broadhead every time so I can have peace of mind than I am at 100% for the next deer. I do save my used broadheads that are still in good shape for small game or even turkey hunting. I asked Rage directly if the broadheads were typically single use items and they agreed that they are.
Mechanical vs. Fixed Blade Broadheads
I will not go into the same level of detail describing any specific fixed blade broadheads, but I want to mention the general pros and cons of them. The biggest three benefits that fixed blade broadheads have are less complexity, better able to break through bone, and are more easily re-usable. The cons are that they often drop faster or fly different than field tips, may have less range, and do less damage to the deer.
For me, and only me, I value the mechanical broadheads much higher than fixed blade versions. I prize the ability to accurately hit the deer above everything else, and the Rage’s excel in this area. I have not seen any reliability issue with the Rage’s despite their greater complexity, and I would not likely take the time to straighten and re-sharpen fixed blade broadheads after use anyway, so they would still be single use items for me. In terms of ability to “smash through bone”, you shouldn’t be doing anyway, as I noted previously.
So, for me, it is no contest. Accuracy trumps everything and being able to more speedily dispatch a well hit deer trumps any theoretical potential to break through bones I shouldn’t be aiming at. You may have different priorities and ways to rate the value of these tools for your use. Always use what fits YOU best.
The Cheapest Way To Get Them
I have found the most cost effective way to buy the Rage Hypodermic Crossbow Broadheads with a collar and without a collar is from Amazon. The prices fluctuate throughout the year but when they are low, especially for the version with a collar they can be very inexpensive. Always be on the lookout for good deals though. You never know where you might find a great price. I will buy them anytime during the year to keep my stock up to an acceptable level.
Conclusion & Recommendations
Are the Rage Hypodermic Crossbow Broadheads the best option on the market? I can’t say that. There are lots of other options I have yet to test. But of everything I have put my hands on, these are thus far the best tool I’ve come across. Why? I can hit what I’m aiming at better than anything else, they work every time, and they do all that a broadhead can do to bring down a deer fast and humanely. So I give them top marks.
Be sure to listen to The New Hunters Guide Podcast and check us out on YouTube.
Till next time. God bless you, and go get em in the woods!
George Konetes Ph.D. – Founder and Host of the New Hunters Guide.
The New Hunters Guide is simply what George wishes he would have had when learning how to hunt; a single place to get practical hands on knowledge about different kinds of hunting, gear, strategy, and tips that can improve your comfort and fun factor in the woods.
I haven’t taken all of Canada’s upland game bird species with my bow—yet—but I’ve arrowed plenty of willow ptarmigan and grouse, and most recently Hungarian partridge.
In the process, I’ve learned that success depends on how well you understand the birds you’re targeting, what equipment you use and, most importantly, being ready to seize the opportunities. Here’s what you need to know to start bowhunting for upland birds.
BIRD BEHAVIOUR
Whenever you’re big-game hunting, stay alert for ruffed, spruce and even blue grouse. In areas where they’re unpressured, they’ll often hold, allowing you to move in close for a shot. Similarly, on the tundra and in the mountains, willow and rock ptarmigan will typically exhibit little fear of humans, again allowing you to move into range. Ten- to 20-metre shots are typical with these sporting birds. By comparison, quail, chukar, Hungarian partridge, sharp-tailed grouse and pheasant are more flighty, making them all the more challenging.
SPECIALIZED GEAR
If you’re bowhunting birds on the ground, just about any standard fletched hunting arrow will suffice. If you plan to shoot birds in flight, however, you’ll want to specialize your equipment.
Being able to slow down your arrows so they travel a shorter distance will make the recovery of your arrow and downed quarry that much easier. For this, you need to shoot Flu Flus, arrows fletched with larger diameter feathers (typically four inches wide). Basically, Flu Flus come out of your bow at full force, but the tall feathers create drag to quickly slow them down. They are available for carbon and aluminum shafts suitable for shooting out of compound and traditional bows, as well as for wooden shafts made for longbows and recurves.
Hungarian partridge offer a challenge
From a compound bow, a Flu Flu may fly as far as 75 metres before slowing down. Out of a traditional bow, on the other hand, it may slow down after 25 metres. My favourite all-around Flu Flu arrow is a 5/16-inch diameter Easton Traditional Only 600-spine carbon shaft with four fletches. You can also build your own Flu Flu arrows using TrueFlight’s Spiral Wrap Flu-Flu Cut Feathers, which are easy to wrap.
Both compound and traditional bows work fine for upland birds, but the tips you choose should be specific to the type of hunting you plan to do. My favourite tip for birds on the ground is a 100-grain G5 Small Game Head. A Zwickey Judo Point also works very well. Go with either 100-grain screw-in tips for carbon arrows or 135-grain glue-on tips for traditional wooden shafts. Judo tips have small-diameter, spring-loaded arms to inflict damage, but the arms also serve to snag grass and dirt to quickly stop the arrow. Other options include variations of rubber tips, such as Bludgeon Screw-In Blunts for carbon arrows.
Some bowhunters who target pheasants and other upland species on the wing will opt to use a larger diameter tip, such as a Snaro Screw-In Bird Point. Its flat nose delivers a killing shock, while the four-hoop design increases the odds of success by tangling up in the bird’s wings. Made for all carbon and aluminum arrows, it comes with either a three- or six-inch wingspan.
TECHNIQUE
Sneaking up on some upland birds on the ground isn’t too difficult. You just need to be able to gauge when you’re close enough to take the shot, but not so close that you flush the bird. Shooting birds in the air is a different story, however.
If you’re using a compound bow, you’ll want to draw and ready yourself for the flush. With a traditional bow, it really depends on your shooting style; instinctive shooters tend to find it easier to shoot moving targets. As with shotgunning, it’s about learning how much to lead the bird, and determining how long to delay in aiming and releasing. You also need to accommodate for arrow speed. All this can be frustrating to master, but it becomes easier the more you do it.
With that in mind, it pays to practise a lot before you hunt. From a safe spot off to the side, have a friend stand 20 metres away and toss a foam target up in the air to simulate a flushing bird. Eventually, you’ll sort out the timing, aiming and lead to make the shot—and be ready for the real thing.
"Unlock the Perfect Shot: Discover the Best Scope for Break Barrel Air Rifles. Enhance your shooting experience with precision and accuracy, as we delve...
")
")
")
")
")