Sighting-in is one of the most important parts of preparing for hunting season. The first step in sighting-in your rifle is to give it a thorough cleaning. A rifle’s accuracy will often improve with a good, complete cleanup. Next, check the screws on the action, sights, scope mounts, and scope rings. A loose screw can result in poor accuracy in the field.
Test the Bore Sight
The scope must be bore-sighted. Bore-sighting your scope and rifle will ensure that the first shots fired will be on the paper at 25 or 50 yards, and you will not waste ammunition. Most rifle ranges have a bore-sighting device, called a collimator, which you can use by following simple instructions. A gun shop or gunsmith may bore-sight your rifle for you.
If you cannot find a bore-sighter, set up a bullseye target at 25 yards. Remove the bolt from the rifle and place the rifle on a solid rest. Look through the barrel and place the bullseye in the center of the barrel. Your eye will automatically center the smaller circle (the bullseye) inside the larger circle (inside of the barrel).
Now ease your face up until you can see through the scope. If the scope cross-hairs are centered in the bullseye, you will be able to hit the target. If they are not centered, you should adjust the scope until the cross-hairs are centered in the bullseye. When you are bore-sighting by this method you must move the scope adjustments opposite the direction you want the cross-hairs to move. For example, if your cross-hairs are low, you will move the vertical scope adjustment screw in the direction that says down. If the cross-hairs are to the right of the bullseye you must move the horizontal adjustment in the direction that says right.
Select the Correct Ammunition
The next step is to select your ammunition. Most modern rifles will shoot bullets of “medium” weight with good hunting accuracy. In a .30-06 or .308 this means 165- to 180-grain bullets. In a 7mm, look for 140- to 175-grain bullets. Many rifles will perform more favorably with one brand of ammunition over another. If you can afford to, buy at least two different brands of ammunition and two bullet weights for sighting-in. Once you’ve found the brand that your rifle responds best to, use the other ammunition for practice.
Be sure to use hearing and eye protection. If you don’t have an established shooting range where you live, make sure you shoot against a backstop with no houses, roads, or other buildings within three miles down range.
Use Front and Rear Rests
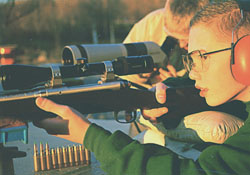
Now your rifle is ready for sighting-in with live ammunition. Shooting ranges will have benches to sit at for sighting-in. If you will not be using one of these facilities, use a small table. You must be comfortably seated for sighting-in. Place the forestock of the rifle on a solid rest. Sand bags work well or a block of wood covered with an old towel will do. Never rest the barrel itself on this front rest. You will also need a rear rest for the buttstock. Again, sand bags or a smaller block of wood with a rolled up towel on top will work well.
 The secret to accurately sighting-in is to build up a front and back rest that will support your rifle without you having to hold it in place. Make adjustments in your rests until the cross-hairs of the scope are centered on the target. Place your front hand on the stock behind the front rest.
Now carefully load a single cartridge. Move your body and the padding under the buttstock until the cross-hairs are centered on the target. Breathe slowly and naturally. Relax and squeeze the trigger. Do not get up from your seat or move around. Try to stay as still as possible and fire two more shots.
Now you should have a “group” of three shots on the target that are fairly close together. This group may not be in the center of the target. Determine the center of the group. If the center of your group is one inch low and two inches right of your point of aim, you must use the scope adjustment screws to move the center of the group one inch up and two inches left. In this case, you move the scope adjustment knobs in the direction indicated on the knobs i.e., up to move the group center up, and left to move the group center left.
Place Shots in a Grouping
Fire another three-shot group. Do not rush your shots. Allow time for your rifle barrel to cool. A hot barrel will not shoot to the same place as a cold barrel. You will be hunting with a cool or cold barrel. After this second group, you may need to make further adjustments with the scope. Continue to fire three-shot groups and make adjustments until your three-shot group is centered at 25 yards on your point of aim.
Move the target to 100 yards and repeat the process. Cartridges such as the .270 and .30-06 will place your shots about 2½ to 3 inches higher than you aimed the cross-hairs. If your rifle is sighted-in 2½ to 3 inches high at 100 yards, you will be sighted-in to about 250 yards. By sighted-in, we mean that your bullet will never rise or fall more than 4 inches from the intersection of the scope cross-hairs.
If you use this method of calibrating your sights, you should be able to correctly place a shot on any game animal out to 200 yards by simply holding the cross-hairs in the middle of the vital zone and squeezing the trigger.
Regular Practice
It is obvious, but this point bears repeating: practice, practice, practice! Your Alaska hunt may provide one shot, in a once-in-a-lifetime experience. Make sure that your marksmanship is up to the challenge.


