Home Blog Page 63

Guide to Trapping for Beginners

0

This site contains affiliate links. As an Amazon Associate, I earn a commission from qualifying purchases at no extra cost to you. Full Disclosure Here.

If you’re bugging out to the wilderness, or if you’re bugging in near the wilderness, trapping can be a great source of food. The major benefits are that once you’re set up, trapping doesn’t take up much time. If you intend to patrol your property anyway, checking the traps takes even less time. And if you lack the skills (or the ammunition) to hunt, bringing in protein through trapping can be very important.

Trapping might be successful for a short period of time in an urban area, assuming most humans have died of the disaster and therefore competition for this meat is low, but you’ll soon find you have to move to a more plentiful area.

Mostly, learning to trap benefits preppers in the wilderness. Even while you’re on the move, trapping in a wild enough area can bring in breakfast.

The Knowledge You Need to Start Trapping

To be a successful trapper, you need to have knowledge about the animal you are trying to trap. For this article, we’ll use rabbit or hare as our example.

rabbit in wild

It’s a plentiful animal that you’re likely to have wherever you’re trapping, and you can bait it with greens and veggies, a good trade for the potential of meat. Plus, skinning a rabbit is fairly easy for the beginner.

  1. Diet: You need to know your animal’s diet in order to place and bait your trap effectively. A rabbit eats grasses and plants at ground level, so you should place your traps there. You can use many garden veggies to bait rabbits. If you find nuisance rabbits are eating in your garden, bait your trap with whatever they are favoring.
  2. Tracks and terrain: You need to know where your target animal hangs out and what its tracks look like. Rabbit tracks are distinctive, with larger back feet and tiny front feet, moving together in a hop-pattern. It’ll be much easier to see these tracks in winter snow. In other seasons you’re more likely to see a game trail, a small path of beaten down grass which the animal frequently travels on.

As for terrain, rabbits like partly open fields full of clover, grasses and their other favorite foods. They tend to eat where shelter, in the form of bushes or logs, is nearby.

Rabbits are very habitual, which makes them a great target animal for the beginner. In fact, if you bug-in on your own property you’ll have a big advantage, because you’ll probably know where the rabbits like to hang out.

  1. Scat, burrows and nests: You also need to know what the scat (poop) looks like and, to a lesser degree, what the burrows, dens, and resting places of your animal look like. Rabbits make pellets, like all herbivores, and they are tiny. Sometimes you’ll find them in a little pile on a rabbit path, and other times the rabbit will have hopped a little bit while doing its business.

A rabbit burrow is often a small hole (10-15 cm in diameter) dug into a slope. While it can be useful to identify a rabbit burrow, trapping right outside of it is often not a great idea.

Rabbits can take the time to really survey their environment from the burrow, and can easily retreat when they sense something is wrong. Plus, there will often be multiple exits, so a rabbit can avoid your trap.

rabbit in jungle forest

Rabbits do not keep their babies in their burrows. Instead, they make separate shallow nests covered with their own hair and grasses. Mom will return once or twice a day to feed them. Don’t trap babies, or nursing moms, you won’t get much meat and you’re cutting into your own supply.

  1. Other behavior: Some animals have more complex behavior and leave more complex signs, like scratch marks, that you will want to learn all about. The only extra detail I can think about for rabbits is their hours of activity: they are most active during dawn and dusk.
  2. Legal information: There are legal restrictions on trapping. If this is a SHTF situation, you may not have to worry about that. But if it isn’t you need to read up on the laws specific to your state. Most areas require you affix your personal information to your traps, and only use certain types of traps, in certain areas, at certain times, with certain target species. Urban settings will have more requirements, which may limit you to using only live-traps and dog-proof traps.
  3. Trap selection and placement: Trapping rabbits in a survival situation doesn’t require anything fancy, a simple snare will do., as long as you place it well, which takes practice. If you’d rather purchase, or are just trying to get some practice, body grip traps are the easiest for beginners, they also offer quick death. Start with just one kind of trap, master it, and move on. Eventually, you may also dabble in other accessories, like specialized bait, calls, smells, heavy-duty gloves, game bags, guns, clubs, and more.
  4. Patience: So much of trapping is waiting. Don’t be discouraged when you initially don’t get anything. And, don’t move your traps for some time, as the more animals get used to a trap the more they will let their guard down around it. An empty but triggered trap, while frustrating, means the location is good.
  5. Dispatch and harvesting: Dispatching is the kind word for killing. You want to do this as quickly and humanely as possible. Few trappers use guns, as most are trapping for furs and guns may cause considerable damage. Rabbits can be bludgeoned to death, or you can learn a technique that breaks their neck. Then, you’ll also have to learn how to harvest the rabbit, which is the kind way of saying skin it and process the meat.

Types of Survival Traps

For legal reasons, you are likely going to want to start out using purchased traps. Primitive, hand-made traps can be illegal, in part because they are usually less humane, and, could be a danger to humans if made large enough. But, you likely won’t have access to purchased traps while you’re bugging out. Knowing how to make a trap can get you a meal anywhere.

To make a survival trap you need a knife, cord, wood, and, optionally, bait. I suggest you start with the simplest traps, aiming for plentiful small or medium-sized animals.

Try to disturb the environment as minimally as possible so there’s nothing to indicate to the animal that you were there. Remember that animals will be using smell too, so make the trap off-sites, try to match materials to the trap location, and use gloves.

1. Simple Snare

A snare is simply a noose. As an animal moves through it, it pulls the noose tight. The more the animal struggles, the more firmly it is trapped.

simple snare
Image Credits
  • To make a snare, grab your cord and use one end to tie a simple overhand knot around the other.
  • Play with the cord until the loop is about the size of your fist (this is for rabbit, bigger animals need bigger loops).
  • Tie the other end of the string tightly onto something sturdy, a nearby tree branch, buried deep into the ground, will do.
  • You can now prop up the noose with small, firmly planted sticks. Ideally, these will keep the noose open for the animal to walk into.

You can make a snare out of any string, wire, paracord, or natural cordage. However, remember that snare material needs to be strong. Even small animals will put up a fight, especially if they get caught a while before you show up.

My suggestions are to make simple snares ahead of time and place them in your bug-out-bag.
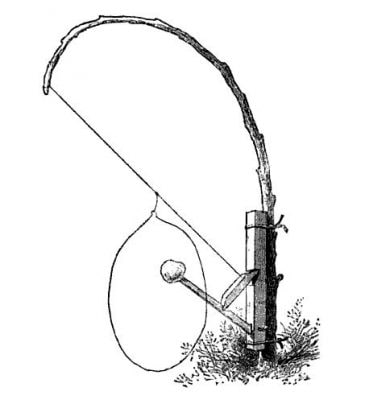
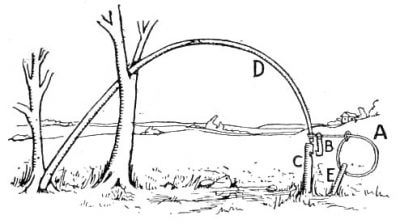
2. Spring Snare

To make a more successful trap, you can add a spring element to the snare. Young, small saplings can be harnessed to pull the small game up into the air after it is caught. This increases the chances the animal will die a quick death, and can help keep other animals from stealing your prey.

Image Credits
  • To make a spring snare, first, find a young, green, bendable sapling. Then make a noose.
  • Next, carve a trigger out of two pieces of wood. These pieces should lock into one another, but not too well. You want it to be barely holding on, that way, it triggers easily to catch your prey. The tension from the sapling will keep a properly flimsy trigger secure.
  • Bury the bottom portion of the trigger in the ground. Or, carve it into something already in the ground.
  • Tie the noose to the top portion of the trigger. Tie the top portion of the trigger to the top of the sapling.
  • Bend the sapling back so it’s under a lot of pressure, and attach the two trigger pieces together.
  • Now, prop up the snare.

The idea behind this trap is that the animal is first caught in the snare. When it struggles, it dislodges the top trigger piece from the bottom. This releases the sapling, pulling the snare and the animal up into the air. If you caught its throat, it should be strangled to death.

There are many other modifications to snare traps, but this is easiest to start with. Also, be warned, you may find that your snare traps catch the leg of larger animals, especially if you’ve made them strong, so always be prepared to deal with them.

3. Deadfall

Deadfall traps drop heavy objects on the animals in order to kill them. You have to be smart about setting these, so that you don’t hurt yourself and don’t endanger other humans. For starters, don’t stand under the weight.

deadfall trap
Image Credits

We’ll start with a smaller deadfall trap, the balance log. This trap requires bait.

  • Find a “Y” shaped piece of wood. Whittle the bottom and one end into points.
  • Find another branch, a straight one, and set it on top of a log on one side, and on top of your “Y” wood on the other. You want the branch to sit level and secure. This might require whittling down the “Y” wood a bit more.
  • Apply bait to the non-whittled end of the “Y” wood.
  • Carefully lay heavy logs on the crossbar.

The idea behind this trap is that the animal moves under the logs to get to the bait. As it nibbles on the bait it pushes the “Y” bar, which moves easily because it’s only resting on a point. When the “Y” wood falls down, so does the crossbar and the heavy logs. These should knock out the animal.

There are plenty of other kinds of traps you can make by hand, including net traps and spear traps (which can easily maim you and aren’t for the beginner so we won’t cover them here).

Keep in mind that none of these traps are likely to be humane and give you a quick kill. Instead, you need to check your traps regularly and be ready to dispatch a struggling animal when you find it.

Final Thoughts

While you might be subject to a limit by your game laws, in a SHTF situation, it’s always better to have more traps to up your chances of success. Even if the game you’re bringing in is small, a few small animals can make a meal. With a little practice, trapping can be an even more viable method of getting calories.

Author Bio: Ellysa Chenery can be found writing all over the web. She loves adapting traditional skills for new situations, whether in the wilderness, garden, or homestead. Her favorite smell is carrots fresh from the dirt.

If you enjoyed this article, consider following our Facebook page.

Moose: How Often Do Bears Hunt These Large Prey?

0

“Majestic and elusive, the moose is an iconic symbol of the wilderness. Explore the world of these magnificent creatures, known for their impressive antlers and massive size. Discover fascinating facts, habitat, behaviors, and conservation efforts surrounding this captivating creature in our immersive moose guide.”

The Role of Moose in the Diet of Bears: An In-Depth Look

While bears are capable of hunting large prey like deer and moose, it is not their primary source of food. They are more likely to scavenge for carcasses or hunt smaller animals. The frequency of bear hunting large prey can vary based on factors such as the availability of other food sources and the bear’s individual behavior.

Bears, including Eurasian brown bears, Gobi Bears, Grizzly bears, Kodiak bears, and black bear species, have a diet that mainly consists of plant matter. They consume foliage such as berries, seeds, grasses, and nuts. The protein they do consume mostly comes from carrion (dead animals), salmon, eggs, and insects.

In terms of hunting large prey like moose, bears tend to target young, sick or disabled individuals rather than healthy and fleet prey. They are opportunistic hunters who are unwilling to expend more calories than they would gain from a kill. Their hunting patterns are well attuned to their own limitations and energy efficiency.

List:

– Bears primarily rely on plants, berries, insects, and small mammals in their diet.
– Hunting large prey like moose is not their main source of food.
– Factors such as availability of other food sources and individual bear behavior influence the frequency of bear hunting large prey.
– Bears mainly consume plant matter such as foliage (berries, seeds, grasses, nuts) and small prey like mice, insects, and fish.
– Protein in their diet comes from carrion (dead animals), salmon, eggs, and insects.
– Bears avoid healthy and fleet prey but may take their chances with young or disabled large prey.
– Bears are highly opportunistic hunters and prioritize energy efficiency in their hunting patterns.

Understanding the Relationship Between Bears and Moose as Prey

Understanding the Relationship Between Bears and Moose as Prey

Bears’ Diet and Hunting Patterns

Bears are primarily omnivores, with their diet consisting mainly of plants, berries, insects, and small mammals. While they are capable of hunting large prey like deer and moose, it is not their primary source of food. Bears are highly opportunistic in their hunting patterns and prefer to scavenge for carcasses or hunt smaller animals. They are well attuned to their own limitations and are unwilling to expend more calories than they would gain from a kill. Millennia of evolution have taught bears the most energy-efficient way of surviving, which involves avoiding healthy and fleet prey like deer or moose.

Moose as Prey for Bears

Although bears by and large avoid healthy and fleet prey such as deer or moose, they will take their chances with young, sick, or disabled large prey. In fact, studies have shown that bears do occasionally hunt moose calves or caribou calves when the opportunity presents itself. A study conducted in Alaska equipped a small group of brown bears with cameras, revealing that more than half of their meals came from moose or caribou calves. Adult moose made up just over 12% of their diet during the study period.

Frequency of Bear Hunting Large Prey

The frequency of bear hunting large prey like moose can vary based on factors such as the availability of other food sources and the bear’s individual behavior. While some bears may rely more heavily on hunting large prey when other food sources are scarce, others may predominantly feed on plant matter, carrion, salmon, eggs, and insects. It is important to note that different bear species may exhibit different hunting patterns as well.

In conclusion, while bears have the capability to hunt large prey like moose, it is not their primary source of food. Their diet mainly consists of plant matter and small prey like mice, insects, and fish. Bears are opportunistic hunters and will take advantage of young, sick, or disabled large prey when the opportunity presents itself. The frequency of bear hunting large prey can vary based on various factors such as food availability and individual behavior.

Exploring Bear Hunting Patterns: How Often Do They Target Moose?

Exploring Bear Hunting Patterns: How Often Do They Target Moose?

The Frequency of Bear Hunting Large Prey

Bears, although capable of hunting large prey like deer and moose, do not primarily rely on them as a food source. Their diet mainly consists of plants, berries, insects, and small mammals. The frequency of bear hunting large prey can vary depending on factors such as the availability of other food sources and the individual behavior of the bear. Bears are highly opportunistic predators and are well attuned to their own limitations. They are unwilling to expend more calories than they would gain from a kill, drawing on millennia of evolution that have taught them the most energy-efficient way of surviving.

Bear Diet Composition

Bears by and large avoid healthy and fleet prey such as deer or moose. Their diet is primarily composed of foliage such as berries, seeds, grasses, nuts, and small prey like mice, insects, and fish where they don’t face a physical challenge. Such foods make up the bulk of a bear’s diet. However, bears will take their chances with young, sick or disabled large prey if available. They also scavenge for carrion when the opportunity presents itself.

Research Findings

A study conducted in Alaska using cameras equipped on brown bears revealed interesting insights into their hunting patterns. More than half of their meals came from moose or caribou calves, while adult moose accounted for just over 12% of their diet. Over a period of 45 days, the bears killed an average of 34.4 moose and caribou calves per bear. In some cases, one bear even killed 44 calves in just 25 days.

In conclusion, while bears have the ability to hunt large prey like moose, it is not their primary source of food. They are highly adaptable and opportunistic predators, preferring a diet consisting mainly of plants, berries, insects, and small mammals. The frequency of bear hunting large prey can vary based on factors such as the availability of other food sources and the individual behavior of the bear.

Moose as a Food Source for Bears: Frequency and Factors

Moose as a Food Source for Bears: Frequency and Factors

Factors Affecting Bear Hunting of Moose

The frequency of bears hunting large prey like moose can vary based on several factors. One important factor is the availability of other food sources. Bears are highly opportunistic and will choose the most energy-efficient way of obtaining food. Therefore, if there is an abundance of plant matter, berries, insects, or small mammals in their environment, they are more likely to rely on these food sources rather than hunting moose.

Another factor that influences bear hunting behavior is the individual bear’s behavior and preferences. Some bears may have a higher inclination towards hunting large prey, while others may prefer to scavenge for carcasses or hunt smaller animals. This individual behavior can also be influenced by factors such as experience, age, and physical condition.

The Role of Carrion in Bear Diet

Carrion plays a significant role in the diet of bears, including their consumption of moose. When given the opportunity, bears will readily feed on carrion, which includes dead animals such as moose. This allows them to obtain valuable nutrients without expending excessive energy in hunting.

However, it is important to note that bears primarily target young, sick, or disabled moose when hunting for prey. They are less likely to take on the challenge of hunting healthy adult moose due to the physical challenges involved. Therefore, while moose may be part of a bear’s diet when available as carrion or vulnerable individuals, it is not their primary source of food.

Observations from Studies

Studies conducted on brown bears in Alaska have provided insights into their hunting patterns and reliance on moose as a food source. These studies equipped a small group of brown bears with cameras to monitor their feeding habits. The results showed that more than half of their meals came from moose or caribou calves, while adult moose made up just over 12% of their diet.

The study also revealed that bears killed an average of 34.4 moose and caribou calves over a span of 45 days. In some cases, individual bears were observed to have killed as many as 44 calves in just 25 days. These observations highlight the opportunistic nature of bear hunting and their ability to target vulnerable prey when available.

In conclusion, while bears are capable of hunting large prey like moose, it is not their primary source of food. They primarily rely on plant matter, berries, insects, and small prey for sustenance. The frequency of bear hunting moose can vary depending on factors such as the availability of other food sources and the individual behavior of the bear. Carrion plays a significant role in their diet, allowing them to obtain nutrients without expending excessive energy in hunting healthy adult moose.

Unveiling the Truth: How Much Do Bears Really Hunt Moose?

The Predatory Behavior of Bears

Bears are often perceived as fierce predators capable of taking down large prey like moose and deer. However, the truth is that bears are primarily omnivores with a diet consisting mainly of plants, berries, insects, and small mammals. While they do have the ability to hunt larger prey, such instances are relatively rare. Bears are highly opportunistic in their hunting patterns and prefer to scavenge for carcasses or hunt smaller animals. This behavior is driven by their evolutionary instincts to conserve energy and maximize their chances of survival.

The Factors Influencing Bear Hunting Patterns

The frequency of bears hunting large prey like moose can vary depending on several factors. One significant factor is the availability of alternative food sources. Bears will prioritize consuming plant matter, berries, and smaller prey if these resources are abundant and easily accessible. Additionally, individual bear behavior plays a role in determining hunting patterns. Some bears may exhibit more predatory tendencies than others, leading them to actively pursue larger prey when opportunities arise.

Understanding Bear Diets

Contrary to popular belief, the bulk of a bear’s diet consists of foliage such as berries, seeds, grasses, and nuts. They also rely on small prey like mice, insects, and fish for sustenance. These food sources provide the necessary nutrients without posing a significant physical challenge to the bear. However, bears are not averse to taking advantage of young, sick, or disabled large prey when presented with the opportunity. They may also consume carrion if it becomes available.

Overall, while bears are capable hunters that can take down large prey like moose or caribou calves when circumstances align, these instances are not common occurrences in their diet. Their primary focus remains on plant matter and smaller prey that offer a more energy-efficient way of survival.

The Surprising Role of Moose in Bear Diets: Debunking Common Misconceptions

The Surprising Role of Moose in Bear Diets: Debunking Common Misconceptions

1. Moose as a Secondary Food Source

Contrary to popular belief, moose are not a primary food source for bears. While bears are capable of hunting and consuming large prey like moose, it is not their main source of sustenance. Bears primarily rely on a diet consisting of plants, berries, insects, and small mammals. Moose only make up a small percentage of their overall diet.

2. Opportunistic Behavior

Bears are highly opportunistic hunters and are well attuned to their own limitations. They have evolved to be energy-efficient and will not expend more calories than they would gain from a kill. As such, they tend to avoid healthy and fleet prey like adult moose or deer. Instead, they prefer to scavenge for carcasses or hunt smaller animals that do not pose a physical challenge.

3. Dietary Composition

The bulk of a bear’s diet consists of plant matter such as foliage, berries, seeds, grasses, and nuts. They also consume small prey like mice, insects, and fish where they face less resistance. Carrion is another food source that bears take advantage of when the opportunity presents itself. While they may occasionally target young, sick, or disabled large prey like moose calves or bison calves if available, it is not their typical hunting pattern.

In conclusion, while bears have the ability to hunt large prey like moose, it is not their primary source of food. Their diet mainly consists of plant matter and smaller prey items that require less effort to capture. The misconception that bears frequently hunt adult moose or other large species stems from their opportunistic behavior and occasional consumption of easy targets when available.

In conclusion, moose are fascinating creatures known for their impressive size and unique features. They play a crucial role in the ecosystem, contributing to the balance of nature. However, they also face threats such as habitat loss and climate change. It is important to protect and conserve moose populations to ensure the long-term survival of these magnificent animals.

Jug Fishing Tips to Catch More Catfish

0

Tony Adams, of Eufaula, Alabama, is one of the best catfish catchers I know. In four hours, using what he considers the best jug line setup, Tony can produce 200-400 pounds by jug line fishing for catfish in Alabama and most of them individually will range from 8-20 pounds or better.

Tony jug fishes water that most catfishermen don’t fish, including the edges of underwater river channels, 20-60 feet deep, with jugs on Lake Eufaula. One of the most-important components of catching catfish while jugging southeast Alabama on the Chattahoochee River is the bait.

Great Days Outdoors asked Adams to test Fishbites Yeh Monn! Freshwater Catfish Baits that are biodegradable and made from all-natural ingredients to compare their catchability to his best jug fishing setup.

“I’ve discovered that the most-productive bait for deep-water catfish is hickory shad, often called skipjacks,” Adams explained. “We can catch them with a cast net here on Lake Eufaula, but they’re hard to find. Not only that, but after we get them, they must be frozen quickly and placed in the freezer, which requires a lot of time and effort that I don’t have. So, instead of trying to catch these hickory shad, I buy them from a guy who catches them on the Tennessee River, vacuum seals them and freezes them, while they’re still fresh. But, I have to pay $3 per shad.”

When Adams is jug line fishing for small catfish, he can get 20 baits out of one shad. However, if he’s fishing for big catfish, he only may get 12 baits out of one shad. To test Fishbites, Adams used the same number of jugs that he did while fishing with skipjacks on his best jug fishing setup.

“There was no difference between the amount and the size of catfish I caught with the Fishbites compared to those I caught with skipjacks,” Adams said. “I also liked how the Fishbites were more accessible, cost less and didn’t have to be kept frozen. I actually found more reasons to use the 5/8-inch-wide and 12-inch-long ribbons of Fishbites’ Yeh Monn! Freshwater Catfish Baits that are available in crawfish, liver, shad and worm scents than to go through all the trouble required to get, keep and fish with frozen skipjacks.”

Tony Adams moved to Eufaula, Alabama, in 1989, and when he arrived, he decided he would learn where and how to catch catfish there.

Today, during the hot summer months, Adams runs the lines coming from his jugs down to 40-60 feet deep, and in the fall, 18-60 feet deep, because he says, “The bigger catfish at Lake Eufaula and other lakes will hold in that deeper water. I’ve caught cats weighing from 20-60 pounds each on 60-foot deep lines.”

How to Rig and Bait Jugs for Catfish

Generally when Adams goes jug line fishing for catfish in Alabama, he puts out about 72, 20-ounce plastic jugs that he often rescues from ballpark garbage cans.

“During the summer months, we’ll catch about 300 pounds of cats by putting out those 72 jugs and fishing for 4 hours,” Adams said. “Then during the fall, I’ll usually catch 150-200 pounds of catfish in a 4-hour period to have a fine fish fry.”

Adams can produce that many fish in that short time, partly because he uses a Humminbird Helix 12 depth finder that features down imagining as well as side imaging.

Adams Puts his Best Jug Fishing Setup out on the Edge of the Main River Channel

Adams paints all his 20-ounce Gatorade and Pepsi plastic bottles orange. The jugs then fit neatly into the racks that drink salesmen use to carry Gatorade and Pepsi into the stores, and they’re stackable. So, Adams’ jugs don’t take up very much room in his boat.

“My jugs are easier to see on the water when they’re painted orange than any other color,”

Adams explained. “I use 50-60 pound test line coming off my jugs and either No. 5/0 or No. 6/0 stainless-steel circle hooks.”

Adams fills the insides of some of the jugs with foam, especially when he’s jug line fishing for very-big catfish in Alabama.

“A big catfish can pull a jug down so deep that the sides of the jug will collapse. So, by spraying foam in the jugs when I’m fishing for big cats, I solve that problem. The foam creates more flotation, and even if the jugs are pulled down deep in the water, the sides of the jugs won’t collapse.”

Why Place Your Best Jug Fishing Setup in a Straight Line

On some of his jugs, Adams uses an egg sinker above a swivel with about 18 inches of leader line below the swivel going to the hook.

According to Adams, “The weight helps the bait reach the bottom faster, and the swivel prevents the cat from rolling up in the line. On some of my jugs, I won’t use any lead, and I’ll only have a swivel to keep the cat from twisting the line. So, when the catfish picks-up my bait, the fish won’t feel any resistance on the line, until it gets the bait well into its mouth.

“I like to use No. 5/0 or No. 6/0 stainless-steel circle hooks when I’m trying to catch big cats – generally larger than what most anglers use. When I want to catch eating-size cats, I use a No. 7/0 or a No. 8/0 hook. I’ll also put about three turns of electrical tape around my jugs to have a place to put the points of my hooks when I take in my lines. Putting the points of the hooks under the electrical tape keeps the line on the jugs from unrolling, and it gives me a good place to store my hooks after I’ve finished fishing. I have reflective tape on some of the jugs to spot them easily when I fish at night.”

I also noticed that Adams tended to put his jugs out in a straight line, and he told me, “The easiest way to determine if you’ve got a cat on a jug or not is to put your jugs out in a straight line. Then when you start running your jugs, if you see a jug off to the left or to the right of that line, you know you’ve either caught a cat, or a cat has taken your bait. However, most of the time, if a jug isn’t in that straight line where you’ve put it, it will have a catfish on it.”

Adams uses a fiberglass Bream Buster pole with a large bass hook on the end of the pole tied to the last eyelet on the pole to pick-up his jugs quickly and play a catfish down. Then he can get the catfish to the surface quicker and up to the side of the boat.

Where to Put Out Your Best Jug Fishing Setup to Catch Catfish

When I fished with Adams, we started putting our 72 jugs for catfish out in the mouth of Barbour Creek. Then we headed north toward the railroad trestle. Adams uses his depth finder to pinpoint the water depth where the shad are concentrating on a river channel.

“When you put your jugs on the edge of a river channel, the wind either will blow the jugs on top of the river channel or out over the river channel,” Adams explained. “The catfish will relate to that river channel, especially in the hot summertime, as well as in the fall of the year when they’ll often suspend over the river channel.”

Adams cuts his baits into two sizes, big baits for big catfish and smaller baits for catfish 1-1/2 to 8 pounds.

“I put my bigger baits out in the deeper water, and my smaller baits in the shallow water,” Adams said.

As we put out the jugs, I saw that the main river channel had a bend on it. Instead of placing the jugs in a straight line there, Adams motored his boat around the bend and placed a few extra jugs in that bend of the old river channel.

“I’ll place a few more jugs in this spot than I do when I’m putting them out in a straight line,” Adams mentioned. “For the last 2 years, I’ve hooked a ‘gorilla-size’ catfish that stays in this bend. Once this catfish gets hooked, it goes to some underwater structure and breaks my line. I’ve watched for my jug to come up for 30 minutes before, but that ole catfish will keep it down underwater, and I’ll lose my jug. But I’ve never seen this large catfish.”

Why Use Large Baits to Catch Big Catfish

I asked Adams, “How often do you lose a jug when you put jugs out to catch catfish?

“If there’s little or no wind, I may not lose any jugs,” Adams said. “But on a windy day, I may lose three or four jugs, even if I’m working them, taking fish off the jugs and rebaiting, for the full 4 hours. There have been days when I’ve jug fished just ahead of a storm, and the big catfish have been biting actively. When that happens, I easily can lose as many as 12 jugs out of the 72. When those big catfish feel the pressure of the jug, they will run to structure and hang my jug up underwater.”

When I asked, “Tony, how often do you change out your hooks when you are jug fishing for catfish in Alabama?” he answered, “I usually change my hooks about once per year. But when I break a line off from a jug that’s gotten into structure, I’ll change out the line, the weight and the swivel and put a new hook on that jug. I fish with stainless-steel circle hooks, because they don’t rust, and they’re really strong.

“The lines on my jugs will get my hook and bait down to 18 – 60 feet deep. Most jug fishermen don’t fish with lines that long. I use lines that long from the springtime until the weather starts to cool down in early winter. Once winter arrives, the cats will move into the creeks. Then, I’ll put my jugs out in the creeks and shorten my lines to 8-16 feet deep. I can catch catfish all winter long jug line fishing for catfish in Alabama on Lake Eufaula.”

Adams likes the skipjack’s head for a big bait. He doesn’t catch a big catfish on every skipjack head he baits with, but if a big catfish does find that bait, it really will enjoy the head of a skipjack for breakfast or lunch. And, the same is true of the Fishbites Yeh Monn! Freshwater Catfish Baits Adams tried for “GDO.”

What Tips Will Help You Jug Fish for Catfish Better

* A 20-ounce Gatorade or a soft drink bottle with the cap screwed on is an ideal size of jug for the best jug fishing setup. It’s not too big and doesn’t take up much space in the boat.

* Those 20-ounce jugs rigged and ready to fish can be put in a drink case they’ve been designed to fit in and take up far less room and are much easier to handle than gallon jugs or bigger.

* The line will free-spool off the end of the jug just as fast as line free-spools off a spinning reel, by throwing the bait in the water and keeping your big engine running. (No lead necessary).

* Deep-water fishing produces more and bigger catfish than fishing in shallow water, or at least, when fishing Lake Eufaula.

* Stainless-steel circle hooks require much less maintenance and can help you land bigger cats than wire hooks will.

* A Bream Buster pole with a large bass hook tied to the end of it makes picking up jugs, as well as fighting and landing big cats, easier and quicker than trying to pull the cats in hand-over-hand with the line.

* A strong, oversized rubber-coated dip net is a must for success when jug fishing for catfish in Alabama.

* You must spend about 4 hours of the day baiting and landing the catfish you catch on your jugs to take the most catfish. However, using Fishbites’ Yeh Monn! Catfish Baits saves time.

* Jug line fishing Adams’ style is one of the quickest ways I’ve ever seen to catch the most catfish in the shortest time for both the table and the freezer.

Important Contact Info

FishBites

www.fishbites.com

amazon.com/fishbites

877-840-2248

How Deer Sleep: 11 Highly Interesting Sleeping Habits

0

The sleeping habits of a deer are probably some of the most interesting out of all the large land mammals. How deer sleep is so different from what we are used to as humans, that it makes them a very interesting topic to look into.

This overview covers a wide range of facts about how deer sleep, why they do it that way, and how it helps them survive in the wild. Let’s get right into it!

1. Some Deer Sleep Standing Up

Although it is not very common, some deer have been observed sleeping while standing up. The upright position is rare, because most adult deer sleep on their side with their heads up. Young fawns will lie down curled up, with their nose tucked under their legs.

Most individuals will not stand up because they lose muscle control while sleeping, just like humans do.

However, just like humans have the ability to sleep-walk, so can some deer! The main reason the animals might do this is to be extra alert about potential dangers in their immediate surroundings.

2. Deer Can Sleep With Their Eyes Open

Because a prey species like deer need to be on high alert at all times, it is not uncommon for deer to sleep with their eyes open. The animals fall into a daydream-like state for several seconds to minutes, lowering brain activity. The state is similar to what would be considered a sleep state.

Much like sleeping while standing up, sleeping with eyes open is an incidental occurrence for most deer. You might have even seen it while encountering them in the wild, without realizing it!

While bedding down, the animals are more likely to close their eyes for brief periods of time. Keeping their heads up and their other senses sharp, they never lose their ability to sense a potential predator nearby.

3. They Sleep In Super Short Intervals

Humans need about 8 hours of sleep every night to feel well-rested. Deer do it in a completely different way: the animals take incredibly short power naps and stay on high alert at all times.

How long deer sleep depends on how safe they feel bedding down. Most deer sleep 4.5 hours during the day, but will do so in extremely short intervals of about 30 seconds to 3 minutes at a time. During their sleep hours, deer will reach deeper REM sleep for about 30 minutes in total.

It is not uncommon for the animals to switch locations many times in a single sleep session. The short intervals wake them up often, but this is needed to keep them safe. Their resting brain is hard-wired for taking power naps, so to speak.

4. If Deer Sleep In Your Yard, They Feel Safe

Have you ever been blessed with the presence of some deer in your backyard? Then you have been chosen. If a deer shows up to take a nap on your property, it feels safe enough to be around you. They don’t see you as a threat and know they will not be harmed by you.

However cute Bambi might seem from a distance, be mindful of the fact that you’re still dealing with a wild animal. You should never feed wild deer for any reason, their survival should not depend on human feeding.

Especially in summer, fawns might end up in your yard to hide from potential predators. They are curled up and usually stay quiet in a hiding position, which makes a fawn relatively difficult to spot.

Fawn Sleeping Tall Grass
Be aware of any sleeping fawns before mowing tall grass

5. Returning To Sleep In The Same Spot

When deer have found a relatively safe bedding area, they are inclined to return to sleep in the same spot repeatedly. While the animals are known to change locations often (even during a single sleeping session), they will come back to a few good bedding locations to sleep in.

In order for a bedding area to feel safe enough to return to multiple times, the animals will have a few requirements for the perfect ‘sleeping spot’:

  • Sufficient cover so potential predators cannot easily spot them
  • Open view of a large area in order to spot any potential dangers
  • The ability to hide from the rain or other weather elements
  • Soft natural bedding like tall grass or a pile of leaves

6. Fawns Sleep With An Extreme Heartrate

Much like human babies, a newborn fawn is a natural-born sleeper. Compared to adult deer, a young fawn will sleep a lot more, about 95% of the time they are bedded. But don’t think the young animals are relaxed while doing this.

During their extensive bedding time, a fawn has an incredibly high heart rate of around 175 beats per minute. The senses of a baby deer are on high alert and shift immediately when potential danger is detected, dropping their heart rate to an average of only 60 beats per minute.

When the extremely high heart rate drops, the body of a hiding fawn is much more difficult to detect by potential predators. The animals breathe less, tuck their head into their legs, and pull their ears back to become as small and undetectable as possible.

7. Deer Don’t Usually Sleep At Night

People commonly think that deer are most active at night, but that’s not true. Deer are not considered nocturnal, but are instead crepuscular species, meaning they are most active during the twilight hours of the day (dawn and dusk).

While it is true that deer don’t often sleep at night, they are most active during the hours around sunrise and sunset.

The main benefit of being a crepuscular animal is decreasing the odds of getting preyed upon. During twilight hours (dawn and dusk), it is much harder for nocturnal and diurnal predators to track prey. This gives deer and other crepuscular wildlife the edge needed to survive as a species.

8. Winter Hibernation Is Not For Deer

While most deer species do lower their activity in the coldest months, the animals never go into hibernation. It is true that deer will hunker down for multiple days or weeks on end to avoid the cold, but they don’t fatten up enough before winter to survive going into full hibernation mode.

Mule deer, moose, elk, and reindeer are more inclined to be active during the winter months than other species, such as white-tailed deer. These species have adapted to colder climates and will remain active for the majority of autumn, winter, and spring.

It is safe to conclude that hibernation is not for deer, but that doesn’t mean they enjoy being in the cold. Hunkering down and bedding longer is their preferred solution to the cold!

Winter Hibernate Buck
No hibernation, but they do hunker down on cold days

9. Bucks In Rut Rarely Ever Sleep

During the rutting season, bucks change everything about their normal behavioral patterns. A buck will generally not sleep or eat during the height of rutting season. Mals will be too focused on finding a mating partner and driving out competitors.

Only after the buck found a suitable female and has successfully mated, he will take some to snooze and find food.

However, he will spend most of his time defending his territory and female from other interested males that are roaming the area. There will be very little time for a quick nap if you want to have children as a buck!

10. Sleeping Beside The Road Is Common

There is a reason why deer-vehicle collisions are such a common occurrence, especially when the colder months are approaching. An elevated road gives a sense of protection and will be a source of warmth for the animals.

The false feeling of safety the road might provide (the asphalt retaining the heat after the sun has set is the main culprit) motivates deer to stick around and take some rest longer than necessary.

If you find a doe or buck near the side of the road, you might want to consider shooing the animal away when it is safe to do so. Alert oncoming traffic before you do so, because you want to avoid the animals panicking and running into cars.

11. Like All Mammals, Deer Are Able To Dream

Even though a deer won’t stay in the dream state very long due to their short-interval sleeping patterns, a deer is able to dream. Deer get about 30 minutes of REM sleep per day, which is the deeper sleep phase in which dreams are produced.

What deer dreams are made of, we can only guess. Probably about food, other members of their herd, or maybe even about running away from that predator.

Maybe it’s true that when deer dream, they visit us when we are in that dream state ourselves. After all, humans assign a lot of value to deer appearing in their dreams…

Bow Arm Shoulder Pain: A Common Issue Among Archers and Bowhunters

0

Causes of Bow Arm Shoulder Pain

Shoulder pain is almost inevitable for archers and bowhunters due to the repetitive motion of shooting a bow. This motion puts significant stress on the shoulder joint. According to a research study by van Doorn et al, shoulder pain is the third most common musculoskeletal complaint treated in physical therapy. From my experience as a physical therapist, I have found that shoulder pain is often caused by repetitive activities.

Common shoulder issues among archers and bowhunters include shoulder instability, scapular dyskinesis, rotator cuff disorders, biceps tendinopathy, bursitis, and shoulder impingement.

Shoulder instability

Occurs when the shoulder joint (glenohumeral joint) is unable to maintain its proper position due to excessive movement in the ligaments, joint capsule, or from insufficient dynamic stability of the rotator cuff musculature. This instability can result in frequent dislocations, subluxations, or allow excessive movement of the shoulder which causes undue stress and eventual pain, swelling, weakness, or limited range of motion.

Scapular dyskinesis

Refers to abnormal movement or positioning of the shoulder blades (scapula) during shoulder movements and limits the efficiency of the complex shoulder joint.

Rotator cuff disorders

Refers to a group of conditions that affect the muscles and tendons that attach the shoulder blade to the upper arm bone. The rotator cuff muscles include: supraspinatus, infraspinatus, teres minor, and subscapularis. These four muscles work to stabilize the shoulder joint and keep the ball and socket joint centered in optimal position. Rotator cuff disorders can include inflammation, tears, or degeneration resulting in pain and weakness.

Biceps tendinopathy

Refers to pain and inflammation of the biceps tendon, which attaches the biceps muscle to the shoulder and elbow. This pain is usually located on the front of the shoulder and can cause a popping sensation in the shoulder. Biceps tendinopathy can be caused by overuse, degeneration, postural abnormalities, or poor shooting form and technique, and can result in pain, weakness, and limited mobility.

Bursitis

Refers to inflammation of the small fluid-filled sacs that provide cushion between the tendons and bony structures. Bursitis can be caused by overuse or injury, and can result in pain and limited range of motion.

Shoulder Impingement

Occurs when the tendons or bursa in the shoulder become compressed or pinched during shoulder movements, resulting in pain and limited mobility. It can be caused by a variety of factors, including overuse, poor posture, or structural abnormalities in the shoulder joint.

It’s important to understand that the shoulder is a complex joint that involves many muscles, tendons, ligaments, and bones. If the riser and cam, or scapula and humerus, are not in the optimal position, then this may lead to bow failure or shoulder dysfunctions and pain. The aforementioned shoulder dysfunctions can occur separately, but oftentimes, they are interrelated and occur at the same time.

For example, shoulder instability can lead to scapular dyskinesis because the shoulder blade has to compensate for the unstable joint. Scapular dyskinesis can then cause rotator cuff disorders because it changes the mechanics of how the rotator cuff muscles work. Rotator cuff disorders can also lead to biceps tendinopathy because the biceps tendon works closely with the rotator cuff muscles and, in my opinion, should be considered part of the rotator cuff for all practical purposes. Bursitis can develop as a result of any of these conditions because any abnormal movement or positioning of the shoulder can compress or pinch the tendons or bursae in the shoulder joint.

This is a brief explanation of how complex the shoulder joint is and highlights the importance of addressing any shoulder pain as early as possible to prevent further dysfunction and pain while shooting a bow and arrow.

By addressing the underlying dysfunction, archers and bowhunters can prevent the development or progression of other shoulder dysfunctions and minimize the risk of further damage or injury.

Prevention and Management of Bow Arm Shoulder Pain

Archers and bowhunters can prevent and treat bow arm shoulder pain with archery-specific exercises. Archery-specific exercises should include both compound and accessory exercises that target the rotator cuff, scapula, and arm musculature to help stabilize the shoulder and meet the demands of shooting a bow.

Core strengthening, balance training, and mobility exercises are also vital in maximizing success and reducing risk of injury.

Self-filming while shooting a bow and arrow will help identify shooting flaws and provide feedback on what may be contributing to your bow arm shoulder pain.

Shooting a bow and arrow with poor archery form can compound shoulder problems and increase the risk of injury.

To manage existing bow arm shoulder pain, modify shooting frequency, reduce draw weight, ice, modify shooting form and technique, or take a 1-2 week break from shooting.

Step-by-Step Return to Shooting After a Shoulder Injury

1. Start with shorter distances: It’s important to start at a shorter distance, such as 10 yards, and gradually work your way up to longer distances. This will help you ease back into shooting and prevent re-injury.

2. Decrease the draw weight: Using a lighter draw weight can help reduce the strain on your shoulder as you work your way back up to shooting your normal draw weight. Increase the draw weight by no more than 5-10% in one week.

3. Focus on form: When returning to shooting, it’s important to focus on your form and technique. This can help you prevent future injuries and improve your accuracy. I am a strong believer in self-filming to identify poor shooting form.

4. Incorporate stretching and warm-up exercises: Incorporating stretching and warm-up exercises into your routine can help improve your flexibility and reduce the risk of injury.

5. Perform supplemental exercises: Progressive archery-specific exercises targeting the rotator cuff, scapula, and core musculature will help restore and build the strength necessary for performing archery and bowhunting at a high level.

6. Listen to your body: It’s important to listen to your body and take breaks as needed. If you experience pain or discomfort when shooting, it may be a sign that you need to take a break or reduce the volume of your shooting.

7. Seek professional guidance: If you’re unsure about how to safely return to shooting after a shoulder injury, it’s always a good idea to seek guidance from a healthcare professional or qualified archery coach. They can help you develop a safe and effective plan for returning to shooting.

Return to Archery Guide

Use this table as a guide to your recovery and return to shooting a bow and arrow. It’s important to note that these guidelines are just a starting point and may need to be adjusted based on individual recovery, physical ability, and experience with archery. Additionally, it’s important to always listen to your body and adjust accordingly. It may be a good idea to discuss your return to shooting with a healthcare professional.

Preparing and Using Sinew

0

To make many of the more advanced tools and weapons associated with wilderness survival you will need two animal products, sinew and rawhide. What sinew is, how to obtain it, and how to process it is the subject of this post.

What is Sinew?Sinew can be obtained from the tendons of any mammal. Tendons are the tough stringy things that attach muscles to bones. When these tendons are processed into sinew they provide a wonderful material that can be used to make super strong cordage, good sewing thread, and they can be used as a binding twine to attach arrowheads, arrow fletchings, knife blades, spear points, drill points and etc. Sinew is as tough as nylon, and it is impregnated with its own natural glue that can be activated with a little moisture. Sinew shrinks a little when it dries so that is binds things together tightly. Sinew will last for hundreds of years if it is protected from moisture. In short, sinew is a super material that has no modern equivalent. The only down-side to sinew is that it must be kept dry. If you get it wet it will soften and stretch, and whatever you have bound together with it will come apart. If you think that any sinew that you have used may be exposed to moisture, you must coat it with pine sap or some other agent that will waterproof it.

How do You Obtain Sinew?One of the most widely available sources of sinew is from the deer, although elk or buffalo will work just as well. The most useful sinews are located in the lower legs and along the upper back lying over the back straps. If you hunt deer you can remove both the leg and back sinews when you are butchering. If you have friends that hunt you can ask them to bring you the lower legs when they butcher. The lower legs have no usable meat on them and most people just cut them off and throw them away. Hunters will usually be glad to give you this part of their kill even if they do think you’re a little strange for wanting it. You can even go to most packing houses during deer season and they are often glad to get rid of any legs that they have. All of my friends know that I want deer legs and I usually get anywhere from twenty to fifty a year just for the asking. Pictured below: deer legPreparing and Using SinewHow do You Process Sinew?To remove the sinews, you need a sharp knife or a good sharp flake of flint. Slice down the back of the leg from knee joint to just above the dew claws and peel the skin back. Lying just below the skin is a white membrane. This membrane encases the tendon which lies in a shallow groove down the back of the leg bone. Preparing and Using SinewPreparing and Using Sinew

Split open the membrane and you will see a milky white cord looking thing. This is the tendon. Preparing and Using Sinew
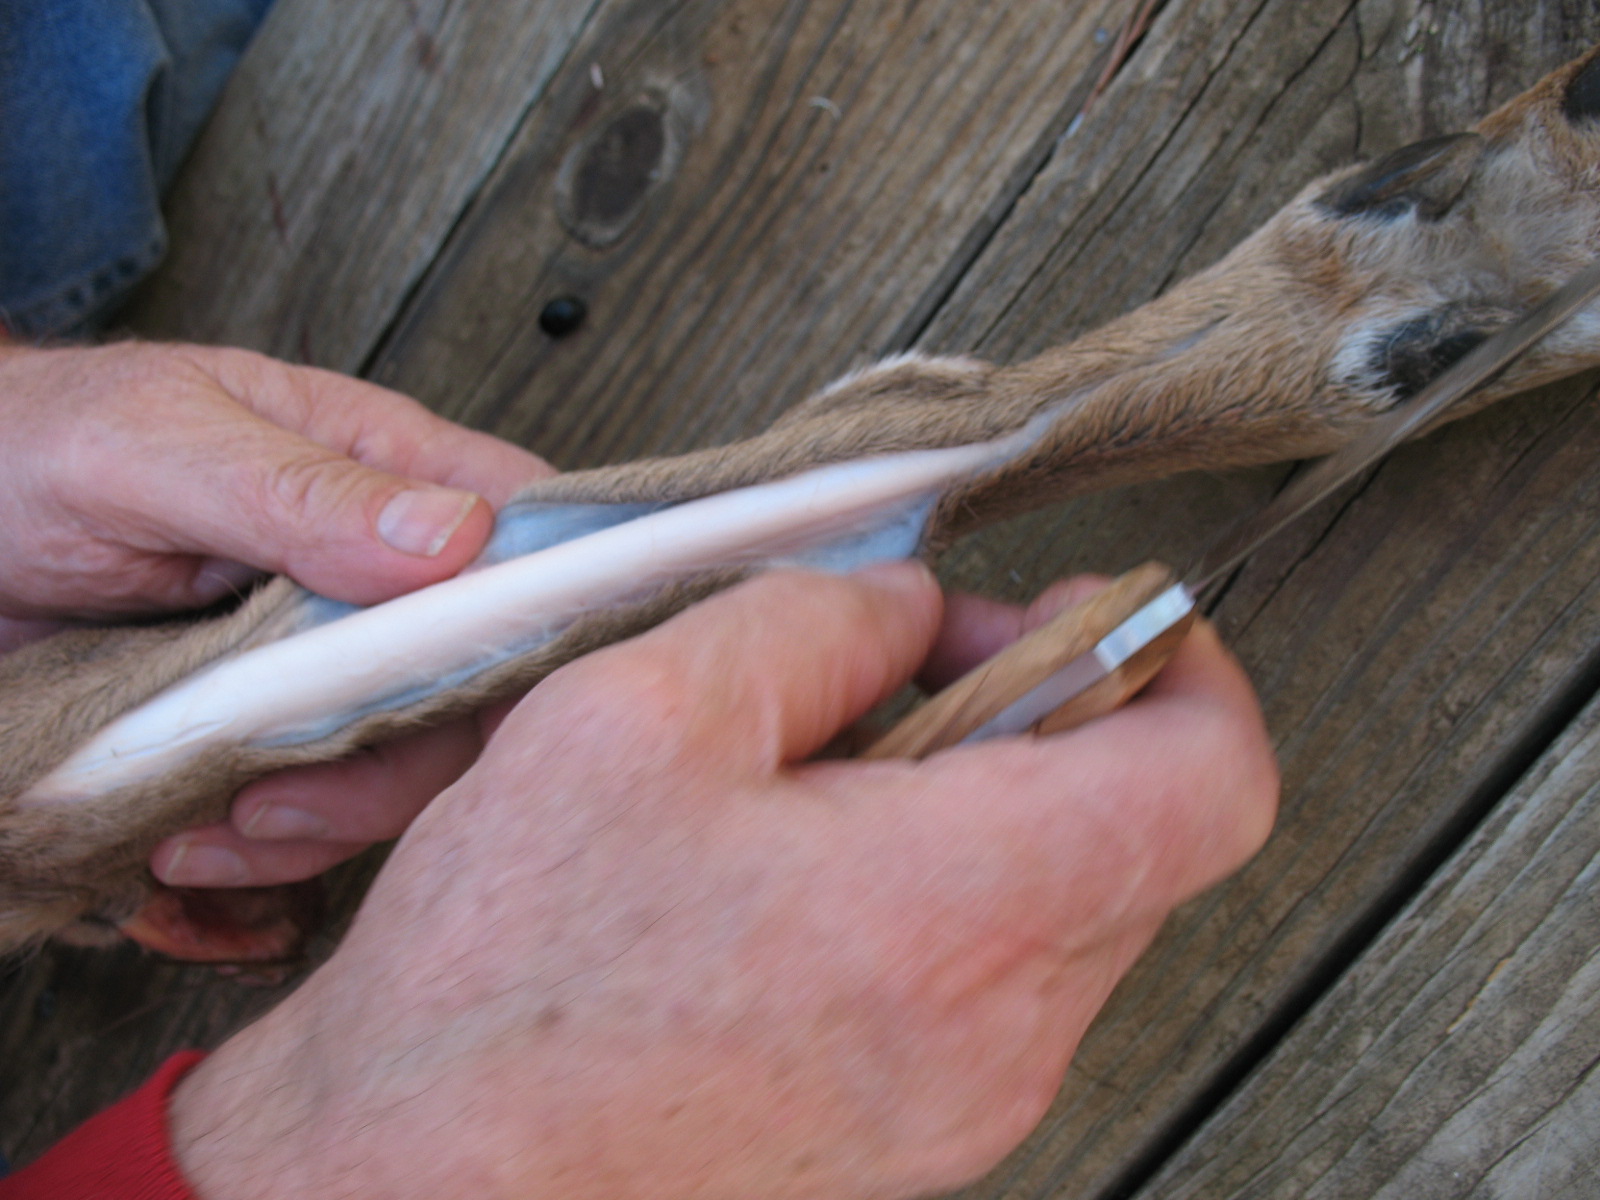
You can usually slip your finger under the edge of the tendon and lift it up out of the bone a little. When you get the tendon up out of the groove, run your knife up and down to loosen the tendon even more. Preparing and Using SinewI usually run my knife down toward the hoof, and when I can’t go any farther, I turn the blade up and slice through the tendon freeing that end. You can then grab the tendon with you hand and peel it out down toward the knee joint. When you pull up as much of the tendon as you can get, cut that end off with your knife. Preparing and Using SinewPreparing and Using SinewThere may be some membrane left sticking to the tendon (kind of a slimy case) and if you can remove this it will be helpful although it’s not vitally necessary.When you have a white floppy tendon in your hand, the hard part is done. Preparing and Using SinewJust set the tendon out in the sun or on the kitchen drain board if your spouse is out of town. In less than twenty-four hours the soft wet tendon will be hard, dry, and kind of a translucent yellow color. It looks a lot like plastic. Preparing and Using SinewNow take the dried tendon and use a smooth round rock or the round end of a ball peen hammer and start pounding. What ever you pound with, it needs to be rounded. Flat edges, like the flat of a hammer or axe, will cut the fibers in the sinew. Preparing and Using SinewAs you pound, the sinew will start to turn white, and it will begin to separate into fluffy white fibers. You can now take you fingers and pull apart the fibers is small bundles about the thickness of a pencil lead or smaller. Preparing and Using SinewThese little fiber bundles are what you’re looking for. You can use them to back a bow, make a bow string, sew leather together, tie on arrowheads etc.Preparing and Using Sinew
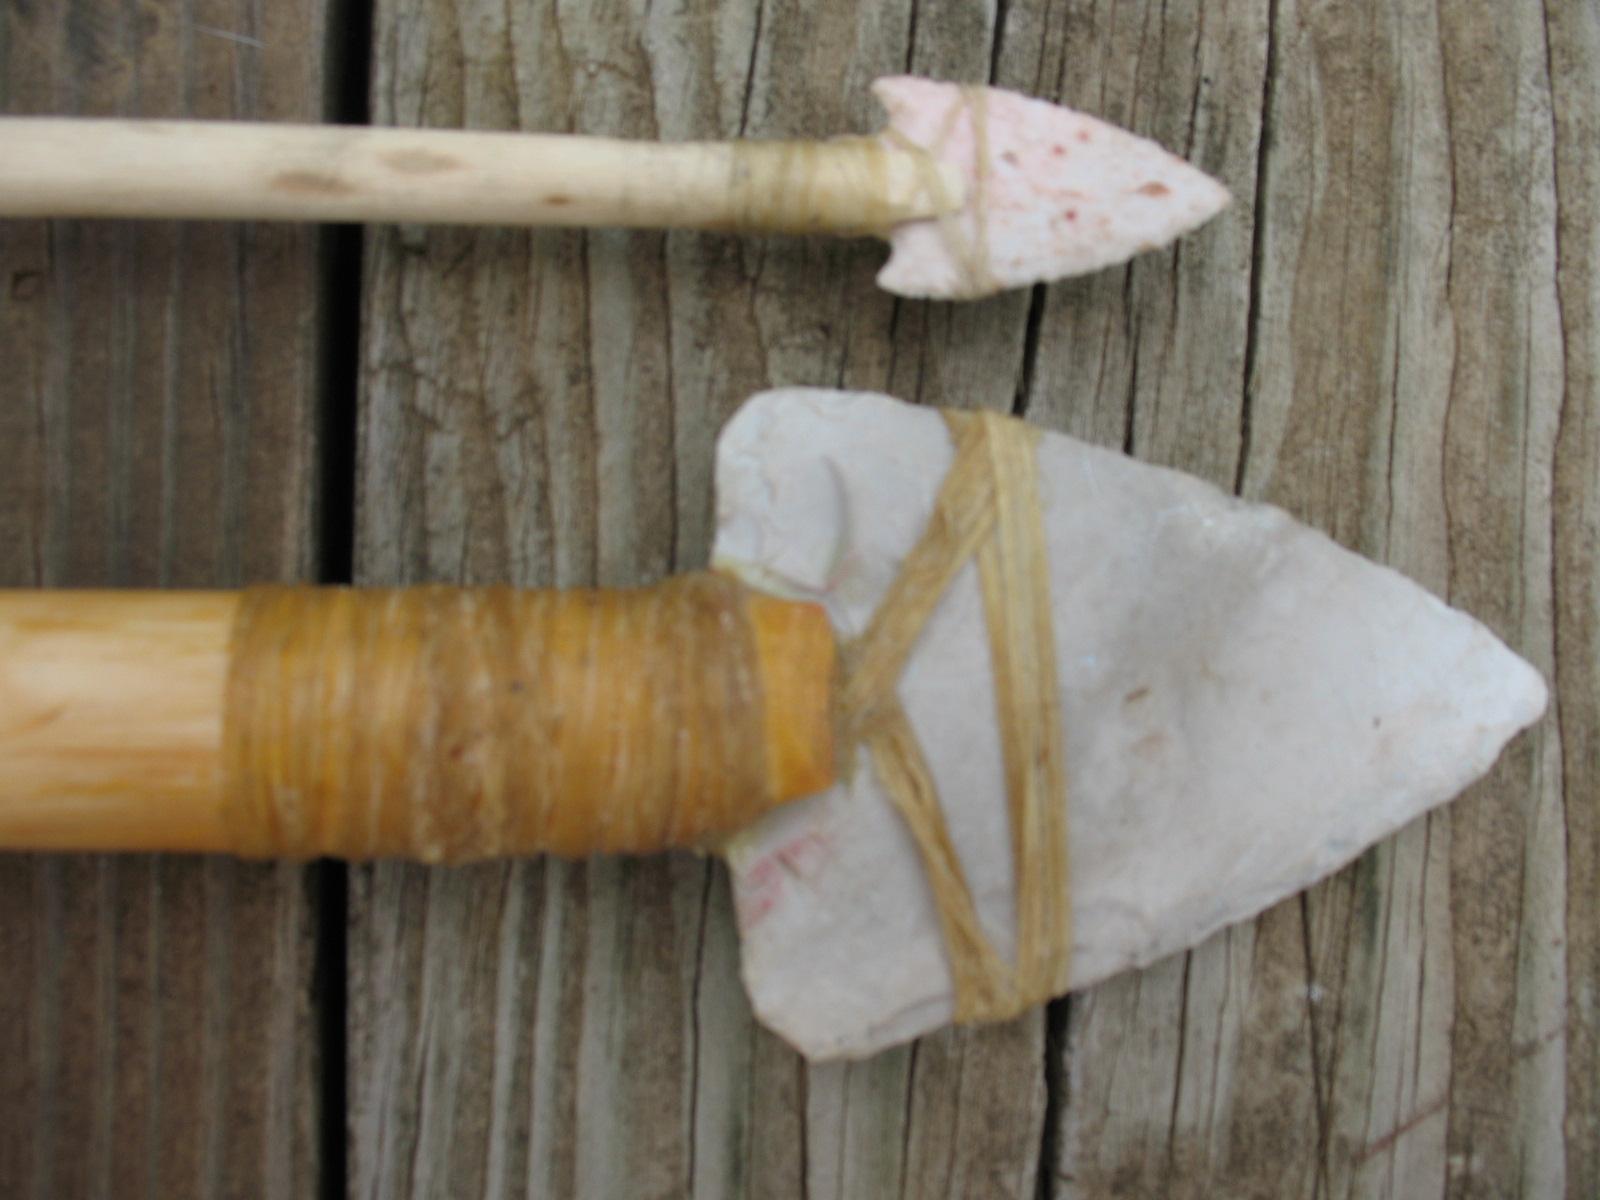
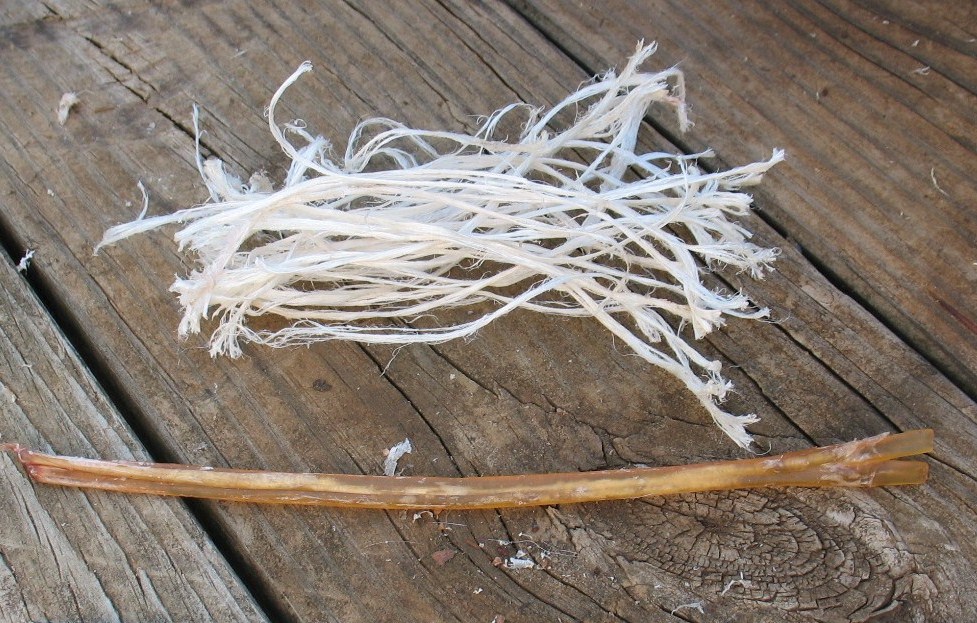
To use the sinew to, for example, tie on an arrow head; all you have to do is pop a piece in your mouth and chew on it a little. Don’t be squeamish. It’s no different than chewing on a piece of deer jerky. The saliva in your mouth and the gentle chewing will soften the sinew in seconds. Don’t chew too long or you will wash all of the glue out of the sinew.

When the sinew is soft remove it from your mouth and wrap it around your arrowhead. You don’t have to tie it off because the sinew will stick to itself. Set it in the sun for twenty or thirty minutes and it will dry hard and tight. Coat the sinew with melted pine sap or carpenter’s glue and let it dry. Pictured below: sinew bow string, arrowhead, spearhead, and knife blade all attached with sinew; and sinew backing on an elm wood bow.Preparing and Using SinewPreparing and Using SinewPreparing and Using SinewPreparing and Using Sinew
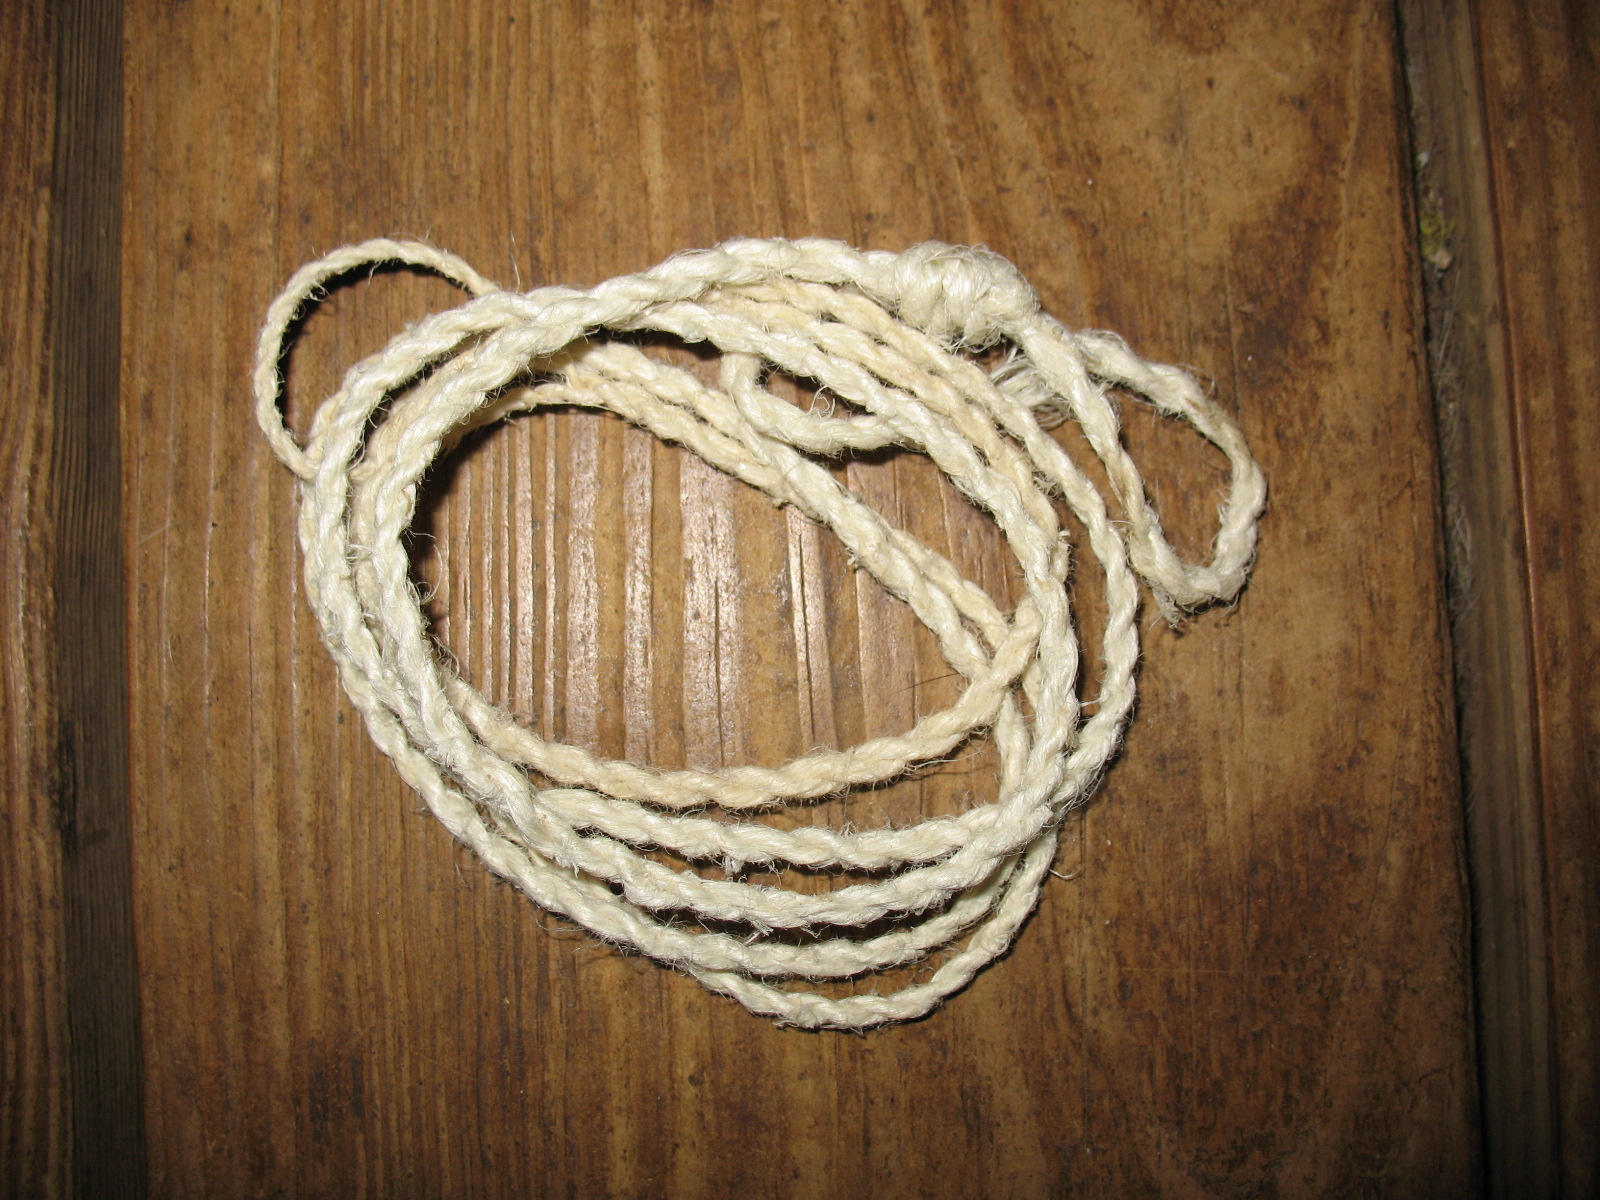
That’s all there is to it. Amazing isn’t it!

Colorado Elk Shed Hunting Tips

0

By Adam Parr

For the past few years, I’ve struggled to find elk antlers in the mountains of Colorado and quickly became frustrated with the lack of my success. One consistency I’ve come to realize over the past two seasons is that elk shed hunting is simply a different ball game. Comparatively to both whitetails and mule deer, elk antlers always seemed to elude me while deer antlers were relatively easy to find.

The entire purpose of my blog is to document my findings as I embrace a new lifestyle in a much more extreme terrain and environment. With that being said, I believe any midwestern whitetail hunter can have success in their first season shed hunting for mule deer because a lot of the same principles apply. Mule deer are found at lower elevations during the winter months, making them easier to pattern and are easily accessible. They seem to hold more of a consistent pattern for longer periods of time, while an elk herd has a much larger range and can be found in a completely different area from one day to the next.

Below are a few tips to help shorten your elk shed hunting learning curve and to get you on the fast track to finding brown gold!

Get Higher

No, I’m not making a 420 reference here; I’m talking elevation. As a general rule of thumb, the majority of mature bulls are going to be found at higher elevations than the smaller bulls and cows. Although mule deer and elk wintering areas will have some cross-over, most of the lower elevation elk sign will be cows and young bulls.

In areas of extreme snowfall and harsh winter conditions, even the herd bulls will get pushed down to lower elevations out of necessity to survive. The key thing to remember is that elk typically shed their antlers much later in the Spring than deer, so it is important to pay attention to snow accumulation. This past Winter, snowfall was heavy in December, January, and February but March and April were mild with very little accumulation. A mild Spring caused the elk to move back up to higher areas of the mountains during the time that the majority of shedding occurs.

Locate Secluded Basins

The key word here is seclusion. Bigger bulls and elk in general, prefer seclusion and will not tolerate human interaction, which is why you also find them at higher elevations. A great way to locate these areas is through the use of Google Earth, which shows the terrain features from a birds-eye view before ever stepping foot on the ground. Looking at maps prior to entering an area lets you visualize the terrain without wasting time and energy scouring areas that are unproductive.

Mule deer and cow elk will be found closer to roads and human traffic, but don’t be fooled by these visuals. Bull elk are seeking solidarity out of eyesight over the next mountain top.

Go Where The Grass Is

Much like livestock and cattle, elk require an average of 20 pounds of grass and browse vegetation to sustain themselves through a harsh Winter so it’s imperative to locate food. These large grassy meadows, which are predominately found on South facing slopes can be easily identified, once again from Google Earth. By keeping this information in mind, it will help you locate potential feeding areas that elk will utilize on a regular basis.

No matter how good a secluded basin looks at a high elevation, if it doesn’t have a plentiful amount of food, the elk will be nowhere in sight. This seems like common sense to many people but this is something I struggled with early on and I wasted a lot of hours searching areas that did not hold bulls or any elk, for that matter.

The Trifecta

If you want to start having serious success with elk sheds, locate the ultimate elk wintering area; A secluded basin, with an abundance of food at high-elevation. Once you find an area like this, the probability of it being a great spot year after year will be high. For some added advice, be sure to check out this quick video from Mark Kayser, Tips For Finding Elk Shed Antlers.

It is also important to be in very good physical shape if you want to attempt getting into secluded areas of elk country. The terrain is tough, the air is thin and the distance is far, but If you are willing to put in the work, shed antler success will follow.

For additional shed hunting tips and helpful information, be sure to check out 4 New School Tips For The Beginner Colorado Shed Hunter. Happy shed hunting!

Strategies for Montana Fishing in October

0

One of the most frequent questions I am asked when visiting anglers are planning their fishing trip to Montana is “when is the best time to come out”. That question is impossible to answer so I generally try to feel out what is most important to someone: nice weather, lots of action, dry fly fishing, big trout, etc. If your top priority is catching big brown trout the answer is easier: October. There is no better time to fish Montana for large trout than October (and even November). Brown trout which tend to make up the majority of the trophy size trout that we see each year spawn in November and early December. Browns are notorious for becoming more aggressive prior to the spawn.

The aggressive nature of browns in the fall combined with the fact that they are on the move running up river and sometimes into tributaries can produce some heart stopping action for lucky and persistent anglers. Late fall fishing isn’t just about targeting huge trout, there can also be some great dry fly fishing over the baetis hatch. For most of our guides, however, we get caught up in chasing really big fish in the autumn months. Hunting huge browns in the fall isn’t for everyone and if you are going to play the game there are a few important guidelines worth considering.

Dress for Success October and November in the Northern Rockies can be notoriously unpredictable. Days can be warm and sunny or the snow can be blowing sideways. Make sure you prepare for any kind of weather from hot and sunny to cold and wet. If you are travelling all the way to Montana to chase big October browns you don’t want to be shut out just because some bad weather blows in. Although October and November are dry months, there will always be some early winter storms that move through and these often produce great conditions for browns that love low light conditions. I still wear gore tex waders but I also have long underwear and fleece pants to layer underneath as well as plenty of layers on top. Don’t forget the gloves and winter hat either.

Arrive at Peak Times Although big browns begin moving in late September, the best fall run fishing isn’t until after the middle of October and sometimes as late as mid November. The peak fishing on the Madison run above Hebgen in Yellowstone is usually the third week of October while monster browns on the Missouri usually don’t start showing up until November.

Throw Giant Streamers Most anglers know that big browns are predators and that fishing streamers is a great way to target them. If you are going to throw streamers in the fall don’t underestimate how big of a fly a huge brown will eat. I have seen big browns regularly eat relatively big trout in the 15” range – they often can’t swallow them all at once and spend a day with a big tail sticking out of their mouth. If you want to move fish over 24” make sure you are stripping the biggest streamers that you can find. I usually have to tie my own tandem hook streamers that are around 10” long. These massive flies are best fished on a seven or eight weight. They won’t put you into many small trout but if you throw them long enough you are sure to see some huge fish at some point.

Try Egg Patterns Whitefish, brown trout and brook trout are all fall spawners which means there are a lot of eggs bouncing around the rivers in October and November. Although huge browns tend to prefer a big meal, eggs are so packed with nutrients that even the largest browns will still eat them. There are days when fishing egg patterns under an indicator will outfish every other method for big browns.

Target Spawning Runs Although any large river that holds big browns can produce a monster in the fall, targeting fisheries that receive a spawning run of browns from a lake or larger river downstream is a good option in late October and November. Most of these fall run fisheries are no secret. Expect to see some other anglers if you are chasing browns on these fisheries that include the Madison in Yellowstone Park, The Lewis Channel in Yellowstone and the Missouri between the lakes. There are other locations that aren’t as well known that also produce a great run of fall browns if you do some legwork and experimenting. Even on the famous fall run fisheries like the Madison in the park there is always plenty of room and on a weekday with a bit of fall weather you will often see very few other anglers. November fishing is also extremely productive and the fishing pressure dramatically drops off with very few visiting anglers in the state and most of the locals out hunting.

Tree Spile: Find Water From Trees In Survival Situations

0

Three days without water is the general rule of thumb for how long we can live without it. Given its importance, we should be well versed in the many methods for finding water in the wild.

The most obvious source is a body of water such as a river or lake. But what about another resource that is all around us? I am talking about trees.

Trees can contain a huge amount of water in the form of sap. This sap contains vitamins, minerals, sugar but is primarily made up of water. Since the tree is like one big filter, this sap is perfectly fine to drink. But the question then becomes how to get at it. For that, you will need a tree spile. To be fair, you do not have to carry a modern spile to tap a tree but it sure makes it easier.

What is a Tree Spile?

Chances are you may have seen one of these without even knowing it. Either in person or through TV I bet you have seen maple syrup collected from a tree.

To do this a hole is drilled in the tree, a spile is tapped in and a bucket is hung from the spile. A spile is simply a hollow metal tube that directs the sap into a bucket, rather than letting it run down the bark.

Choosing A Spile

There are a few different options when it comes to choosing this tool. There are different styles that can make the tapping process a bit easier. Some have an end that comes more to a point while others are more rounded. But I am more concerned about the materials they are made from.

Generally, they are made from aluminum, stainless steel, and plastic. Aluminum and plastics options are certainly going to be lighter in weight and cheaper to buy. I believe I even have seen some of the plastic spiles for under a dollar.

This is my personal opinion but I lean towards the stainless steel spiles. They are more expensive but they are less prone to breaking or bending like aluminum or plastic options. I am also not concerned with weight as even a stainless steel spile is quite light and I will only be carrying one. Again that is just my preference and I’m sure the other people have had just as much success with the other types.

Before Using a Spile

First, not all trees can or should be tapped. I am only familiar with tapping maples and birches but I do know there are other trees that can be tapped. If you are interested in trying this process I would recommend that you learn what trees can be tapped and if they are in your area.

Secondly, this method is somewhat seasonal as it works best in late winter to spring. This is when the tree is experiencing very cold nights, below freezing, and then above freezing daytime temperatures.

This temperature difference causes a higher sap flow or pressure within the tree. When a hole is created in the tree, the sap has a place to escape. When this is timed correctly, a gallon or more of sap can be collected in just a few hours.

How To Use A Tree Spile

Once a tree is selected, using a spile is quite easy. It is my recommendation that all of the tools and collection container be ready to go beforehand so as not to waste any sap. Here is a list of the tools you will need.

  • Drill bit, knife, or some sort of spike for creating the hole in the side of the tree.
  • Spile
  • Collection container: This could be a cup, water bottle or anything that will catch and hold the sap
  • Cordage: While cordage is not required it may be helpful to hold the collection container in place.
  • Impact tool: This can be the butt of a knife, a hammer, or a sturdy branch but you will need something to tap the spile into the tree.

When all of these tools are collected and laid out in front of you, go ahead and follow the steps below.

Step One

Remove a small section of the bark being careful to remove just enough for the spile. Considering that the tree is giving you something it is always good to keep conservation in mind. Only take what you need in order to keep the tree as healthy as possible

Step Two

A hole needs to be drilled for the spile to be tapped into. Ideally, this would be done with a drill which most people do not carry in a pack, some do, but most do not. The tip of a knife will work or a spiked tomahawk.

Step Three

Clean out some of the loose debris from the hole and insert the spile angling the front end slightly downward. The spile does not need to be at an extreme angle, and in fact, it shouldn’t be. It only needs to provide enough of a slope that the sap will run down it. Now, use the butt of a knife handle or a piece of wood and tap the spile firmly into the hole.

The spile does not need to be hammered in but it should rest firmly enough in the hole that it can support the weight of a collection container.

Step Four

Hang a collection container from the spile or place it on the ground beneath it. If it is on the ground just make sure it will not tip over.

Step Five

After you are done tapping a tree it is best to pack the hole with clay or dirt. This will help prevent that area from becoming infected.

Video

Check out this great video demonstrating how to use a tree spile:

Final Words

Unless the sap is being stored in very cold conditions it should be consumed right away, within the first day or two at most, otherwise it can go “bad.”

But with one little tool and five easy steps, you now know how to collect water from a tree. Thanks for reading.

Moose vs Human A Fascinating Compared

0

In this article, we study Moose compared to humans. Moose are a large, placid mammal found in North America. They share many similarities with humans, such as walking on two legs and possessing a strong immune system. However, there are also some key differences between Moose and humans. For example, Moose has larger heart than humans and can weigh up to 1,600 pounds! In addition, they have a longer gestation period than humans (around nine months) and give birth to one calf at a time.

Moose and humans have been living side by side for a long time, and these two species are so similar that one might wonder how they distinguish themselves. This article will answer the question, “What is the difference between moose and humans?”

In this article, we will see the difference between a moose and a human and examine the anatomy of both creatures to learn more about them.

Moose Compared To Human

Moose Size Comparison The Types of Moose

Moose are one of the largest species within the deer family. Several subspecies are found across the northern hemisphere, the largest being the Alaskan Moose, also known as the Yukon moose. They can stand up to 7.5 feet tall at the shoulder and weigh over 1,500 pounds.

The Eurasian elk or Moose is slightly smaller, with females averaging around 800-900 pounds while males weigh around 1,100-1,300 pounds. The Shiras moose, found in North America, is the smallest of the subspecies, with females weighing around 500-700 pounds and males weighing around 800-1,000 pounds.

Moose have long legs, a broad faces, and a distinctive “bell” or hanging dewlap under their chin. Despite their size, they are surprisingly good swimmers and can run up to 35 miles per hour over short distances. Moose are a fascinating and impressive species, with subtle differences in size and appearance across their range.

  • Alaska Yukon Moose:

The Alaska Yukon moose is considered the largest subspecies of Moose worldwide. These massive animals can weigh 1,200 to 1,600 pounds and stand up to six feet tall at the shoulder. The largest recorded Alaska Yukon moose was a bull found in the Yukon Territory in Canada, which weighed in at a whopping 1,800 pounds and had antlers that spanned almost six feet across.

With their long legs and impressive antlers, these Moose are built for intimidating displays of strength during mating season. Hunters also prize them for their impressive size and meat, which is lean and high in protein. While the largest Alaska Yukon moose ever recorded may be an anomaly, these impressive animals are still a sight in their natural habitat.

  • Yellowstone Moose:

The Yellowstone Moose, known for their enormous size, are found in the forests of North America and are one of the largest breeds of Moose in the world. The largest recorded Moose was a Bull Alaskan Moose, which weighed over 2,000 lbs and had antlers spanning over 6 feet in width. Despite its enormous size, the Moose is a gentle giant and has never been known to attack humans unprovoked.

Moose prefer to live in isolation and be more active in the early morning and late afternoon. They are herbivores and enjoy a diet of grasses, aquatic plants, and leaves. The Yellowstone Moose’s population has steadily decreased, primarily due to habitat loss and hunting. However, conservation efforts have been implemented to protect and preserve the species. Overall, the size of the largest Moose in the world is a breathtaking sight to see and can only be appreciated through firsthand experience.

Five Cool Facts About the Moose

The Moose, also known as the elk, is a majestic creature in North America. Here are five cool facts about the Moose that you may not know.

  • Male Moose, or bulls as they are called, can weigh up to 1,500 pounds and stand up to 7 feet tall, making them one of the largest land animals in North America.
  • Contrary to popular belief, the Moose is not entirely mute and can vocalize through various sounds, including grunts and bellows.
  • Moose have specially designed nose that allows them to breathe through the snow, making it easier to survive in their natural habitat during the winter months.
  • The Moose is an excellent swimmer and can move through the water at up to 6 miles per hour. This unique skill allows them to cross large bodies of water, which other animals would find impossible.
  • Moose can run up to 35 miles per hour, which, despite their large size, is surprisingly fast. This speed has allowed them to outrun predators and escape danger in the wild. While there are many fascinating animals in North America, the Moose certainly stands out as one of the most interesting and unique creatures nature offers.

Moose vs. Human Size Comparison

When it comes to size comparison between Moose and humans, there is simply no contest. Moose are large and imposing animals, often standing up to 6 feet at the shoulders and weighing up to 1,500 pounds. The average human male is roughly 5 feet 9 inches tall and weighs around 200 pounds. As such, a moose can make a human feel very small indeed.

One of the most striking things about a moose’s size is its antlers. These appendages can grow to be as wide as 6 feet and weigh up to 70 pounds, making them the largest antlers of any mammal in the world. And while they may not use them to attack humans, Moose are known to be extremely territorial and can become aggressive if they feel threatened or cornered.

Overall, while humans may be able to outsmart or outmaneuver Moose in certain situations, there is no denying these majestic animals’ sheer size and power. When encountering a moose in the wild, it is essential to show respect and caution, as they are capable of causing serious harm if provoked. Additionally, it is important to remain vigilant when driving in areas with moose populations, as collisions with these animals can be deadly for both parties involved. Despite their intimidating size, Moose are fascinating creatures that deserve our admiration and protection.

Moose Size Comparison to a Horse

Moose are one of the largest animals in the deer family and are known for their enormous size. They are much larger than horses in terms of height and weight. On average, a moose can stand up to six feet tall at the shoulder and weigh anywhere between 800 to 1400 pounds, almost twice the weight of the average horse.

Their massive antlers can measure up to six feet in width, adding to their impressive size. In comparison, horses are much smaller, with an average height of 15-16 hands and a weight between 800 to 1200 pounds. Standing next to a fully grown moose, you can easily see the significant physical differences between the two animals. Overall, Moose are one of the largest land animals in North America, and their impressive size is just one of the many fascinating things about them.

Moose Size Comparison to an Elk

Moose are the largest deer species in the world, with adult males weighing between 1,000 to 1,500 pounds, while females are smaller, weighing around 800 to 1,000 pounds. In comparison, adult male elk weigh around 700 pounds, while females weigh around 500 pounds. Moose also stand taller than elk, with males reaching up to 6 feet and females around 5 feet at the shoulder. Elk, on the other hand, stand around 4 to 5 feet at the shoulder.

Moose also have larger antlers than elk, with a span of up to 6 feet, whereas elk antlers generally span about 5 feet. The size difference between Moose and elk is due to their different habitats and behaviors. Moose live in colder, more forested areas, while elk typically inhabit more open areas such as grasslands. As such, Moose needs to be bigger and more agile to navigate through dense vegetation.

Moose Size Comparison to a Bison

Moose and bison are both majestic animals often found in the wild. However, when it comes to size, Moose are generally larger than bison. A fully-grown bull moose can weigh up to 1,500 pounds and reach six and a half feet tall at the shoulder. A typical male bison weighs between 800 to 2,000 pounds and stands around six feet tall at the shoulder.

The main physical difference between the two is their antlers and horns. Moose have broad, flat antlers which can span up to six feet across, while bison have shorter, curved horns. Regarding their overall appearance, both animals have distinctive humped shoulder and large head, which is used for grazing on vegetation. Despite their differences, these majestic creatures are both vital to the ecosystem and remain an important symbol of the wild west.

Moose Size Comparison to an Elephant

The Moose and the elephant are two very different but majestic animals. Regarding size comparison, the elephant is the larger of the two. An average adult elephant can weigh anywhere from 5,000 to 14,000 pounds, while a bull moose weighs in at around 1,200 pounds. Elephants can also stand anywhere from 8 to 13 feet tall, while Moose are typically only around 6.5 to 7 feet tall at the shoulder.

Moose does have one advantage over elephants, though, in terms of antlers. A male moose’s antlers can span up to 6 feet across, while elephants do not have any antlers or tusks that can compare. Overall, while both animals are impressive in their ways, elephants take the cake regarding their sheer size.

How Big Is a Full-Grown Moose?

The full-grown Moose is one of the largest land mammals found in North America and Europe. Standing on all four legs, a male moose can reach up to 7 feet at the shoulder, while a female can measure up to 5 feet. Their weight can vary depending on the season, but on average, a bull can weigh anywhere between 800-1500 pounds, while a female can weigh between 600-800 pounds.

Their antlers are also a distinguishing feature, with males having broad, curved antlers measuring up to 6 feet wide. However, females also have antlers, usually smaller and less noticeable. Moose are known for their intimidating size, and despite their large size, they are also agile swimmers and runners. Seeing a moose in the wild is often a highlight for tourists, as they are unique and fascinating creatures.

How Big Is the Largest Moose in the World?

The largest Moose in the world, commonly known as the Alaskan Moose, can grow over 7 feet tall and weigh upwards of 1,600 pounds. These majestic creatures are found primarily in Alaska, Canada, and parts of Scandinavia and are known for their massive antlers that can reach up to 6 feet in width. The largest recorded Alaskan Moose had antlers that spanned 79 inches, making it nearly impossible to imagine how impressive and intimidating these animals can be.

Despite their imposing size, these Moose are generally docile and avoid confrontation with humans. However, they are still considered one of the most challenging big-game animals to hunt due to their elusive nature and the harsh terrain in which they are typically found. The Alaskan Moose is undoubtedly a remarkable animal that commands respect and awe for its sheer size and power.

How Big Are Moose Compared to Humans?

Moose are much larger than humans. An average moose can grow up to 6.5 feet tall at the shoulder and weigh up to 1,800 pounds, while the average human is around 5.6 feet tall and weighs around 160 pounds. Moose has a towering presence and can be intimidating, especially when encountered up close.

How Big Is a Moose Compared to a Bison?

A moose is typically larger than a bison. While the average adult bison stands around 6 feet tall and weighs between 900 and 2,000 pounds, a male moose can reach up to 7 feet tall and weigh between 800 and 1,800 pounds. The antlers of a male moose can also add 4 to 5 feet in height.

How Strong Is a Moose?

Moose are incredibly strong and powerful animals. Adult males, or bulls, can weigh up to 1500 pounds and stand over seven feet tall. Their thick muscles and strong bones allow them to charge through deep snow and rough terrain, easily breaking through tree branches. Moose are formidable competitors in the animal kingdom and should not be underestimated.

What Is the Size of a Baby Moose?

A baby moose is typically born weighing between 25 and 35 pounds and standing about 3 feet tall. As they grow, they can reach a height of up to 6 feet at the shoulder and weigh around 1,200 pounds as adults. The actual size of a baby moose may vary depending on the sub-species and location where they are born.

What is a Moose, and what are they like?

Moose are large, brown mammals living in cold climates worldwide. Moose are the largest land animals in North America and can weigh up to 2,000 pounds. They have two big antlers on their heads that they use to fight for mates and food. The Moose is a shy animal that survives by grazing on grasses and shrubs.

Moose are large mammals weighing up to 1,500 pounds and standing as tall as 6 feet at the shoulder. There are two main types of Moose: the North American Black and the Brown. These moose varieties have unique physical features that set them apart from other mammalian species. For example, Brown moose have large heads with short ears, while North American Black Moose have smaller heads with long ears.

Another distinguishing feature of Moose is their antlers. Antlers give these animals their name – they are similar to horns in shape and size, but they grow on all four legs instead of just on the head. Moose use their antlers to dig for food or to defend themselves against predators. Antler growth is limited by testosterone – when males reach sexual maturity, their antlers start to grow rapidly to attract mates.

While North American Black and Brown moose share many of the same characteristics, they have some differences! For example, Brown moose are more likely than North American Black Moose to inhabit thickly forested environments. At the same time, North American Black Moose are more likely to live in open areas near water sources. Overall, though, Moose are fascinating creatures that deserve our attention – not only for their impressive physical features but also for their unique behavior and ecology.

What is a Human, and how do they differ from Moose?

A human is a warm-blooded mammalian species that stands upright on two legs and has a head with a large brain. They differ in many ways from Moose, the largest land animal in North America. For one, humans are much smaller than Moose. A male moose can weigh up to 1,500 pounds and measure 10 feet tall at the shoulder. Meanwhile, a human female typically weighs about 150 pounds and stands only 4 feet tall at the shoulder. Additionally, humans have shorter noses and ears than Moose. Their fur varies in color from black, brown, gray, or white.

Humans have adaptations that allow them to thrive in colder climates than other mammals. For example, humans have a layer of insulation around their body called a fatty layer which helps keep them warm in cold weather conditions. Humans also have larger lungs that allow them to take in more oxygen when they are running or skiing, allowing them to stay warm for longer periods. Finally, humans have thicker skin than most other mammals which helps protect them from injuries in cold weather conditions.

How does Moose live, and what is their diet?

Compared to humans: Moose are large, hairy, and surprisingly agile animals that can travel up to 30 miles daily. They live in the northern hemisphere and eat mostly plants, though they will also eat small mammals, birds, and fish. Moose have a long gestation period (up to 12 months) and give birth to one or two calves. Cows and calves are scrawny initially but quickly gain weight as they forage for food.

Moose are massive animals and can weigh up to two thousand pounds, and they live in the coldest parts of North America, including Alaska and Canada. Moose are herbivores whose diet consists mainly of grass, leaves, and other plants.

How do humans live, and what is their diet?

In Moose compared to humans: Humans are currently the dominant species on Earth and have developed civilizations and cultures that span the globe. Humans rely on plants and animals for food, but what is the difference between a Moose and a human? Moose compared to humans, so a Moose has a longer life expectancy than a human. They can live up to 25 years in the wild, while humans can only live around 70. A Moose’s diet consists mainly of vegetation (grass, leaves, etc.), while humans have evolved to be omnivorous. This means that they eat both plants and animals.

Why are Moose different from humans: Moose compared to a human?

Moose are different from humans in many ways. For one, they are much larger and have a thicker fur coat than humans. Moose also have longer noses than humans, and their ears are smaller. They also have a differently shaped brain than humans, which may explain why they are better at some tasks than humans, such as navigating in the wild.

When Moose is compared to humans, then Moose is one of the most iconic and recognizable animals in North America. They are large, bulky creatures that stand on two legs and have a long necks. Moose are different from humans in many ways. For example, Moose has four teats instead of two, which helps them to nurse their young.

Moose also have longer tails than humans, and they move more slowly than people do – making them slower runners on average. Additionally, Moose have different adaptations for survival in their environment: they have long noses that help them find food underwater and big antlers that help them defend themselves against predators.

Conclusion

Moose are huge animals that can weigh up to two thousand pounds and have several distinguishing features compared to humans. For one, Moose, compared to humans, Moose have shorter necks than humans and larger heads. Additionally, their ears are relatively small, and they lack a chin. Moose also typically have longer legs than humans, which gives them an advantage when running away from danger or chasing down food.

Finally, Moose tend to possess darker fur than humans, making it more difficult for predators to see in the forested areas where they live.

The biggest difference between Moose and humans is that Moose have a higher level of omega-3 fatty acids in their diet. This means they have a lower risk of heart disease and other chronic diseases, so they are hunted for their meat in some parts of the world. Additionally, their hair contains more moisture than human hair, so it can be used to make clothing and other products.

FAQs

How big is a moose compared to a human?

Moose are much larger than humans, with adult males reaching a height of around 6-7 feet at the shoulder and weighing up to 1500 pounds. Females are slightly smaller but still much larger than the average human. Moose are impressive animals with their massive size and unique antlers, making them a sight in the wild.

How big is the biggest Moose?

The biggest Moose ever recorded was a male Alaskan moose that weighed over 1,800 pounds and stood over 7 feet tall at the shoulders. These massive creatures can have antlers that span over 6 feet and can weigh up to 40 pounds each. Moose are the largest members of the deer family and are found in North America, Scandinavia, and Russia.

What animal is the same size as a moose?

The elk, also known as a wapiti, is the same size as a moose, and they are both members of the deer family and can weigh up to 1000 pounds. However, the Moose tends to be taller due to its longer legs, while the elk has a more slender build.

Why is Moose so strong?

Moose are incredibly strong animals due to a combination of factors, including their large size, muscular build, and dense bones. They can carry and lift objects that weigh up to 1,000 pounds, making them some of the strongest animals in the world. Moose also has a unique way of walking that helps distribute their weight evenly, making them more stable and capable of navigating rough terrain.

Why is Moose so strong?

Moose are incredibly strong due to several factors. Their large size and muscular build allow them to carry their massive antlers and navigate difficult terrain. Moose also has an extremely efficient digestive system, allowing them to extract maximum nutrients from their food, giving them the energy to maintain their strength. Finally, Moose have a keen spatial awareness and an innate ability to adapt to their environment, making them powerful and successful animals in the wild.

Best Air Rifle Deals

Popular Posts

Guide to find Best Scope for Break Barrel Air Rifles

0
"Unlock the Perfect Shot: Discover the Best Scope for Break Barrel Air Rifles. Enhance your shooting experience with precision and accuracy, as we delve...

How Does an Air Rifle Work?

0
Discover the inner workings of an air rifle with our comprehensive guide! From the mechanics behind its powerful shots to the intricate process of...

5 Types of Air Guns You Need to Know Before Buying

0
Have you ever wondered how many types of air rifles are out there? Is your head spinning around with various powerplants and you don’t know...

Air gun 101: How Nitro Piston technology can make your shooting sport more exciting?

0
In the air gun market today, there are many air rifles made with nitro-piston technology Even the best-selling lists on gun retailer's sites have a...

Gas vs Spring Piston: Which One is Better?

0
Today, you can find 5 different types of air rifles available in the industry. They are: spring pistons, gas pistons, PCP air rifles, variable...