If you’re thinking about live trapping a raccoon, choosing the right raccoon bait is important.
For starters, trapping a raccoon in a live trap is not very difficult, and it’s one of the best ways to get rid of a raccoon that’s getting into your garbage or pet food.
Raccoons are curious animals that will venture into a trap without much hesitation.
However, the real problem arrises when you want to catch just a raccoon and not a lot of other non targeted animals like your neighbors cat, opossums or worse, a skunk.
Raccoons are not picky eaters.
Cat food, sardines, canned dog food and various table scraps will all work to lure just about any raccoon into a trap.
The problem is other animals like them too!
So, to trap a raccoon and only a raccoon, it’s important to choose a bait that’s not as appealing to other animals.
This doesn’t guarantee you won’t catch an opossum since you never know what a wild animal will do, but choosing the correct bait will make a big difference.
Choosing A Raccoon Bait
When live trapping a raccoon, trap placement and setup is important, but it’s the bait that actually lures the animal into the trap.
I’ve trapped a lot of raccoons in a live trap over the years and I’ve found a couple of baits that work really well for raccoons, but limit the amount of non targeted animals caught in the trap.
Here are some of the best raccoon bait choices for a live trap:
Marshmallows
Raccoons love marshmallows and they’re one of the best baits you can use in a live trap because they don’t attract a lot of unwanted species.
You can use large or small marshmallows, but I like to use the large ones because it’s harder for the raccoon to pull them through the side of the trap.
Clean Tin Foil
Hang a crumbled piece of clean tin foil in the back of the trap behind the trigger pan.
Suspend the piece of tin foil by tying it with a string to the top of the trap.
Since raccoons are curious animals, the shinny dangling tin foil alone is enough to lure them into the trap.
By using clean tin foil it eliminates the rotten smell that could attract unwanted animals.
I know, it sounds unbelievable but it actually works!
The tin foil attractant is the best way to trap a raccoon if you don’t want to catch your neighbors cat or any other unwanted animal.
A Single Whole Egg
A whole, un-cracked fresh egg is also a good bait for a raccoon but decreases the chances of catching an unwanted animal.
Place the egg in the back of the trap behind the trigger pan and you’re done.
Since raccoons commonly raid nests and steal eggs from animals in the wild, a whole chicken egg is a great raccoon bait to use.
Overall
There’s a lot of different baits you can use to trap a raccoon.
So, if you want to trap a raccoon and drastically reduce the chance of catching anything else, try using one of the baits we described above.
There’s always a chance of catching a different animal especially if they’re really hungry, but that’s the great thing about using a live trap instead of a snare or foothold trap to catch a raccoon.
The non-targeted animal won’t be injured if it gets caught inside the trap, and you can easily release them unharmed back into the wild.
So you just bought a new AR-15 and took it to the range.
You ripped through a few boxes of ammo and now you’re home and you need to know….how do I clean this thing?
Maybe you’ve pulled the pins and separated the upper and the lower and you have no idea what to do from there.
It looks intimidating, right?
Feeling a bit overwhelmed?
No need for that, cleaning the AR-15 is pretty easy!
I’m going to show you just how easy it is to tear your rifle apart, clean it in depth, and put it all back together without fear of damaging anything or leaving any parts out.
Now…with a quick video too!
If that helped, please subscribe to our YouTube channel since we’re adding new videos every week!
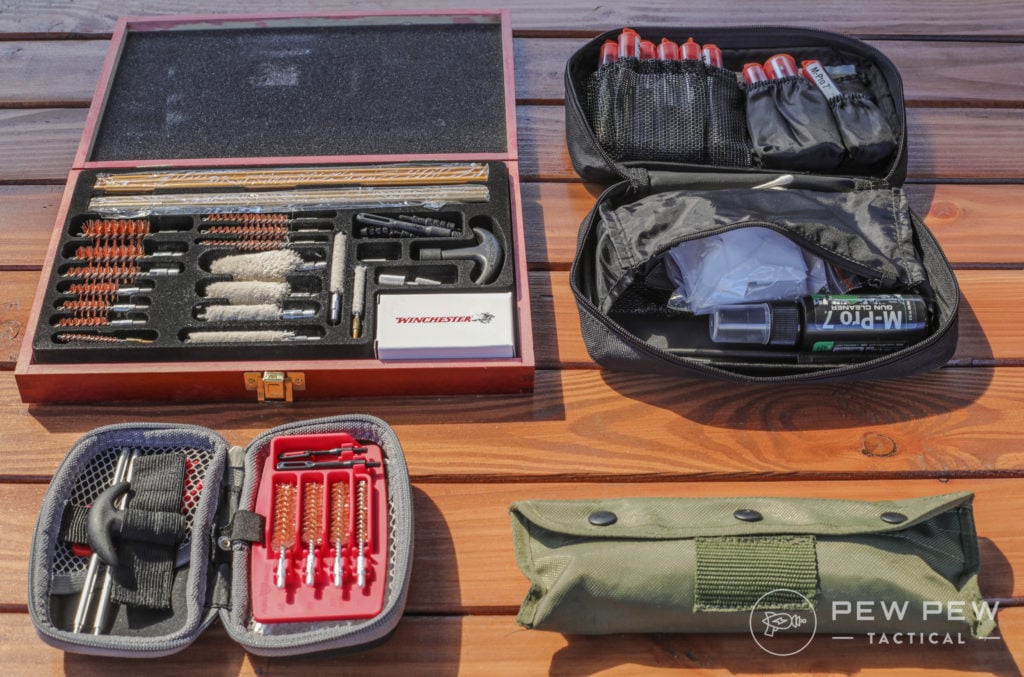
If you already have other guns, and you’re cleaning them like you should be (you are cleaning your guns regularly right?) then you most likely already have just about everything you need to clean an AR-15, except for some AR-specific things like a bore brush for your particular caliber.
If you don’t already have cleaning supplies, or if you want to build a complete AR-15 cleaning kit that you can carry to the range or competitions, you have two options: build a kit, or buy one.
Which one is better?
That’s going to be a decision you have to make for yourself.
If you just want a kit that works, or maybe you don’t shoot your AR a lot and aren’t worried about maximizing your cleaning efficiency, then just buying a pre-made kit is perfectly fine.
But, if you are a high volume shooter and you need to clean your rifle frequently, or you’re like me and just enjoy the Zen-like process of cleaning your guns, you’ll probably want to build the perfect kit to meet your needs.
Let’s look at the pros and cons of these two approaches.
Buying a Pre-Made Gun Cleaning Kit
First, if you want to order a kit that will have just about everything you need, there’s no shame in that. Not everyone has the time or energy to build a kit from scratch, and there are several good options out there. The downsides of buying a totally pre-made kit are you can only reliably find universal cleaning kits that are going to include a bunch of extra brushes and bore snakes that you won’t necessarily need.
All Gun Cleaning Kits
Think of the pre-made kit like an off-the-rack suit. Sure it’ll work, but its never going to be as nice, or as personalized as a bespoke option.
Basically, off-the-rack is fine, but you wouldn’t want to wear it to your wedding or wear it every day.
The same goes for these pre-made kits…you wouldn’t want to rely on them for something important, say, if you’re a competition shooter, and you’ll want a more personalized option if you’re going to be using it a lot.
That being said, these kits are perfectly fine for most folks, and they’ll be good if you have other guns or other AR-15 calibers, or are looking at acquiring some in the future. Our favorite is the GuardTech.
With these kits or any kit, you buy/build, you’ll want to make sure that they include the correct size bore snakes and brushes, as well as the other tools that work with your AR-15. Make sure you match the caliber to your gun, or you’re going to have to buy another…and you’ll feel a bit silly in the process.
Check out all our favorites in Best Gun Cleaning Kits.
Building Your Own AR-15 Cleaning Kit
Because cleaning a gun is a process that can vary so much from person to person, it’s best that you build a kit that meets your own needs. You can always pick up several different pre-made kits and combine them into one giant “frankenkit”.
If you’re going to build your own kit, I recommend buying a nice case such as this Plano 3-Tray Tackle Box with Dual Top Access, but anything from a cardboard box on up will do.
Next, you’ll want a cleaning mat to keep your parts visible and to keep everything organized. A white sheet or tablecloth will do, but I like this Gun Cleaning Mat because it also includes a handy parts list, making it perfect for a beginner.
From there, you’ll want to buy the brushes and bore snakes/rods for your particular AR caliber. I’ve included some links to .223/5.56 caliber ones below since these are the most common flavors of AR on the market, but you’ll need ones that match your particular caliber.
Here are some kits that include more or less everything you need:
Gunmaster 223/5.56 AR Rifle Cleaning Kit ($12) – This is the one in my case up top.
Real Avid Gun Boss – AR/.223/5.56 Compact Rod-Type Cleaning System Kit ($30)
Otis Modern Sporting Rifle & AR Cleaning System ($43)
With these kits, you should have the brushes, bore snakes/rods, punches, and other various and sundry things you will need, other than your consumable cleaning supplies such as solvent, lubes, and cleaning patches.
The only other things you may find useful (especially if you want to get into some light gunsmithing) is a better punch set like this Ultimate Arms Roll Pin Punch Set ($29.99) and an AR-15 Vise Block ($49.99) that fits into the mag well of the rifle so you can secure it in a bench vise without scratching the finish on your gun.
Best AR-15 Cleaning Solvents and Lubricant
Hoppe’s No. 9 Gun Bore Cleaner ($7.46)
Hoppe’s No. 9 Lubricating Oil ($6.99)
CLP Oil, Solvent, and Lube Combination ($33)
Ballistol Multi-Purpose Aerosol Can Lubricant Cleaner Protectant ($10) (We love this one so much, we wrote a Ballistol Review)
Step 2: Prep the Area and Clear the Firearm
First, lay out your cleaning mat and throw on some gloves. Some of these chemicals are toxic and you want them in the gun, not on your skin or in your body.
Next, round up all the ammo for your gun, and move it off the table. Seriously. Get it out of the room, if possible. This eliminates the possibility of a round finding its way into the chamber at any point.
Next, clear and render safe your firearm. (That’s fancy talk for making sure the gun can’t go pew, pew pew, or pew pew pew for any reason.)
Here’s the full procedure
Point the rifle in a SAFE direction.
Remove the magazine.
Place the weapon on safe (don’t worry if you can’t because the hammer isn’t pulled back).
Lock the bolt to the rear.
Visually inspect the chamber and remove any ammunition that may not have been ejected.
Release the bolt.
Place the weapon on safe.
Step 2: Separate the Upper Receiver from the Lower Receiver.
Push the take-down pins out and pull the two halves apart. Some pins can be pushed out with your finger, others may require the use of a punch. Be careful whatever you use so you don’t scratch your finish. I recommend a nylon punch from one of the kits above for general use.
Step 3: Remove the Charging Handle and Bolt Carrier Group
Step 4: Disassemble the Bolt Carrier Group
First, push the bolt to the rear (pictured above) and remove the firing pin retaining pin using your pick. Remove the firing pin and set it aside. Rotate the cam pin ninety degrees and remove it. Now the bolt should slide right out!
Step 5: Disassemble the Bolt
Once you have the bolt out of the bolt carrier group, use a punch and your mallet to remove the extractor pin, and then remove the extractor and set it aside.
Step 6: Remove the Buffer and Buffer Spring from the Buffer Tube
Using a calloused finger, or a punch, press down on the buffer retainer. Remove the buffer and spring from the tube. Remember the retainer is under pressure, so try not to push down on it too far and slip once the pieces are out.
Otherwise, you’ll spend the next few hours looking for it after it springs off to the other end of the room.
Step 7: Clean the Chamber and Barrel
Everyone has their method for this, but there are a few things you need to remember.
The most important thing is that you clean the chamber and barrel from rear to front. You want to make sure the debris comes out the front of the barrel, and that any brush you use on a rod is inserted from the rear – go with the bullet.
This helps keep the rifling intact. The movies are wrong; you don’t clean from the muzzle to the chamber!
This area takes some creativity to clean up, but with time you’ll find what works for you. This is a good place to drop a little bit of that Bore Cleaner you picked up.
Step 8: Clean the Bolt Carrier Group
This is easier than the chamber and barrel.
Give everything a good scrub. Look for carbon buildup, especially at the rear of the firing pin.
Clean the extractor well, attention to detail is key. I make sure my rags are all plain white and cleaned after every use with bleach.
Set one aside as an “inspection” rag so you can easily find missed carbon.
When you’re finished, reassemble the bolt carrier group in the exact opposite order of disassembly. Make sure your bolt is fully to the front so it can be reinserted in the upper. A flick of the wrist helps this along.
Step 9: Clean the Buffer Assembly
This part is easy. Get a rag with a little lube on it and wipe it all down.
Unless you took your rifle to a really cool obstacle course, you probably won’t need to get back in the tube itself. Wipe down the spring and buffer and you’re all set.
During this step, if you have a collapsible stock it’s not a bad idea to remove it and wipe down the outside of the buffer. It’s an option if you have been in a messy environment, but not needed for range trips.
Step 10: Clean the Charging Handle and Upper Receiver
Just like the buffer assembly, a lightly oiled rag is all you should really need here.
You’ll find what works best for you, but once reassembled the charging handle should move effortlessly within the upper receiver.
Step 11: Clean the Fire Control Group (FCG) and Lower Receiver
This takes a brush, oil, and patience.
It generally doesn’t get too fouled up. Pay attention to your FCG and make sure there are no cracks on the hammer or anywhere on the lower receiver.
Step 12: Reassemble your Rifle
Work backward from the takedown, just like the bolt carrier group. After the fifth time, you do this it will become second nature! It should look something like this when you’re done.
Step 13: Lubricate your Rifle
There are more details to this, but I’m going to keep it simple for right now. All the pieces of your bolt carrier group and your charging handle should receive a light coat of lubricant. It should have a nice sheen to it.
Your FCG, mag release button, bolt catch button, safety selector should all get a drop or two of lubricant. Fiddle with them a touch to work it in there. Bottom line, anything that moves needs to have a bit of lubricant on it.
Step 14: Perform a Function Check
You put all your ammo away at the beginning of this whole deal (right?) so there should be no way a round is anywhere near the chamber but do a safety check just in case.
Then:
Point the weapon in a safe direction.
Pull the bolt to the rear and release it forward.
Place the rifle on safe. Squeeze the trigger. If the hammer doesn’t drop, you passed that step.
Place the rifle on fire and pull the trigger. The hammer should fall. If it does, then you’re all finished with the hard part.
Step 16: Clean Your Magazine
This is an often overlooked step. It doesn’t need to be cleaned after every trip to the range. Just pay attention to it during loading.
Does it bind up? Can you hear dirt rattling around in there? Is it hard to load?
Cleaning the magazine is just like cleaning the buffer assembly. Use a pick or whatever you have handy to remove the base plate.
Remove the spring and follower. Wipe it all down and clean it up. Reassemble in the reverse of disassembly.
These are pretty straightforward. If you’ve invested in anti-tilt followers for your GI magazines, this is a great time to install them.
Step 17: Maintenance
Just like the break-in procedure, every rifle has its own maintenance schedule. Consult the manufacturer for more. A general rule of thumb is to give your rifle a thorough inspection every thousand rounds. Once you hit the five thousand round mark, it is a good idea to move to inspections every five hundred rounds.
The most common failures occur in the various springs (specifically the extractor spring), and in the O-Rings on the bolt carrier group. If failures begin, start there!
Keeping a clean and properly lubricated rifle will naturally reduce the risk of failure and extend the life of your rifle. During each cleaning, inspect all parts of cracks, burrs and general wear and tear that may bring your rifle out of spec.
Some Final Thing to Consider When Cleaning an AR-15
Do you shoot corrosive ammo? Check out our handy guide for more information and proper cleaning instructions.
Take your time. You want to be as thorough as possible. Really get inside the bolt carrier with every rag and cleaner you possibly can.
When inserting the firing pin retaining pin, remember the big hole is where it goes in. If you put it in the small hole on the other side, you’re going to have a bad day.
Anything that moves on your rifle should get at least one drop of lubricant whenever you clean. Just like an engine, that oil is important! I cannot stress this enough.
That about does it for this one folks, if you have any questions or want to tell us about your own cleaning procedures, drop us a line in the comments below!Want to see what can happen when you DON’T clean your AR…check out 8 Most Common AR-15 Failures.
Hey there my fellow fishing enthusiasts and welcome to my post discussing an important question when it comes to fishing… can you eat Walleye? Now, the short answer is absolutely, if fact, it is one of the most popular and sought after fresh water species to consume…
So let’s check out the ins and outs of eating Walleye below…
So, before we start, let’s just quickly recap what we are talking about here. Walleye are a freshwater gamefish native to the United States and Canada. Also known as also called the yellow pike or yellow pickerel, they live predominately at the bottom of lakes and rivers and are known as one of the most prized freshwater table fish you can catch.
Walleye have a long, thin body that is primarily gold and olive in color with a white belly. They posses two dorsal fins on the top of their bodies with a large mouth and sharp teeth. Their name comes from their eyes which are cloudy-looking which is caused by a reflective layer of pigment.
They generally live for around 15 – 20 years depending on their habitat and can reach sizes of up to 80 cm (31 in) in length.
Note: Due to their popularity as a sport fish and for consumption, many States and jurisdictions have seasonal restrictions or slot limits in place. To avoid fines, always check local regulations before hitting the water.
In short, absolutely they are. In fact they are one of the most popular and sought after freshwater table fish in the U.S. Their flesh is clean, sweet and extremely versatile. However, as with most freshwater species (such as Largemouth Bass etc.), the following should be considered:
They will take on the flavour of their surroundings – so avoid eating if they are caught in murky, stagnant or dirty water.
The older varieties tend to taste a lot stronger or ‘fishier’ so if you are planning to keep one for dinner, it doesn’t necessarily have to be the biggest one you catch.
Larger varieties are also more susceptible to worms, parasites and increased absorbsion of waterway contaminants.
In most cases, as long as the water is clean and you are within your slot limit, then you are generally good to go.
As with most white meated fish, Walleye do not need to be bled upon capture however if you plan to consume it, then it is always a good idea to place them on ice as soon as possible after it is landed. Many use an ice slurry in a cooler which is generally a ratio of 2 parts ice to 1 part water for this purpose.
Due to their eating habits, freshwater fish must be thoroughly cleaned and rinsed prior to consumption. From here, preparation will be determined by how you plan to eat it. If they are to be eaten whole then you will need to clean and scale them beforehand. If you plan to pan fry, then you can either scale and fillet or fillet and skin. Keep the meat refrigerated or on ice at all times before and after preparation.
Yes – Raw Walleye fillets can be frozen for 6 – 12 months. It must at the very least be gutted and cleaned and placed in an airtight bag (ziplock bags are good here – try to remove as much air as possible) prior to being placed in the freezer. They will last longer (up to the full 12 months) if vacuum sealed instead.
Can they be eaten raw?
Technically yes, if it is caught in clean water and prepared with the utmost care until eaten then it can be ok – although the taste does not match that of saltwater species such as Tuna, Salmon and Kingfish. The issue here however is that freshwater fish tends to contain more bacteria and parasites which are killed off by cooking.
To be honest, if sashimi is your meal of choice then I would look for a species such as Striped Bass or those listed above and leave the freshwater catches for the frypan.
At the end of the day, due to its white flesh and versatility, Walleye can be prepared in the same manner as most other fresh or saltwater species in that they can be:
Grilled
Walleye fillets can be cooked over charcoal or gas grills with any and all spices and seasonings as you see fit. Below is a common recipe:
Heat a grill hot but not smoking.
Pat fillets dry then spread butter or oil over the non-skinned side (or both if fillet is skinned) along with salt and pepper.
Grill fillets until just cooked (fillets start to flake) – Do not overcook as the meat will go dry.
Consume with salad or grilled vegetables.
You can of course use any other herbs or spices on the flesh to taste.
Pan Fried
As above, but in a pan – I like to add garlic to the butter when I pan fry white fish fillets with the salt and pepper as well. I have seen many Walleye recipes with Asian spices or Italian herbs used too so that is also worth a try. Of course, they can also be crumbed as well which entails:
Gather three bowls and in the first, place some flour, eggs (beaten) in the second and breadcrumbs in the third.
Pat dry each fillet (skin on or off to preference) and then cover in flour.
Sink the flour covered fillets into the egg mixture and then cover in breadcrumbs
Shallow fry in the oil of your choice in a pan large enough to hold the full size of the fillet.
Spritz with lemon juice and consume with fries (chips), salad or whatever else takes your fancy.
Note: For extra flavour, add salt and pepper to the flour or even some grated Parmesan cheese to the breadcrumbs. I have even seen some good recipes using BBQ rubs on the fillets as well.
Baked
For this last option, the fish is cooked whole in the oven. A cooking example is as below:
Make sure the fish is cleaned and scaled.
Score the skin with a sharp knife (This will stop it shrinking too much from the heat).
Cover the outside with a lubricant such as butter or oil.
Fill the cavity with whatever takes your fancy (common options are garlic, herbs, spices, lemon, tomatoes or mustard).
Bake in the oven until just cooked – again, it will dry out if left too long.
Note: Based on my research over a number of recipes, a 1.5lb Walleye will take around 15 – 30 minutes in a 375F oven.
And there you go – my response to the question of whether you can eat Walleye. I hope it has been helpful and as usual, please let me know of your experiences – or recipes – would love to see your recipes below too.
Also, please do not hesitate to comment below if you have any questions, concerns, corrections, or would like me to check anything else out for you.
We asked a firearms expert with over thirty years of experience to pick the top five semiautomatic pistols. Yes, here we go again with another Top 5 gun list. Having previously done one on the Top 5 9mm Pistols, 5 Best Sig Sauer Guns, 5 Best CCW Guns, and plenty more.
Now it’s time to get to one of the most popular gun debates out there. We’re going to talk about what I consider to be the five best Semiautomatic Pistols regardless of size, brand, or specific caliber.
M1911/M1911-A1 .45 ACP
Okay, y’all know this one had to make the list. Besides belonging on this Top 5 List, it’s also one of the three most enduring inventions of the legendary gunmaker John Moses Browning. After passing a 6,000 round torture test, it became the first semiautomatic pistol to be adopted by the U.S. Armed Forces as well as the most powerful sidearm to ever become standard issue to a nation’s military.
It served faithfully in that role for nearly 75 years, and even though the M1911 was officially replaced in that role by the next gun on the list, it remains wildly popular with gun enthusiasts to this day, more than 100 years since its invention. And it’s one of my sentimental favorites as well; my very first firearms purchase was a Springfield Armory M1911-A1, and I’m quite fond of both my Springfield Mil-Spec and my genuine WWI-vintage Colt.
Beretta 92FS/M9 9mm
As previously indicated, this was the gun that had the daunting task that of succeeding the M1911 as the official sidearm of the U.S. military, and in 1984 the Beretta 92F/M9 did precisely that, in turn fulfilling the role for 33 years — saw combat in Panama, Iraq, and Afghanistan along the way — before giving way to the SIG M17. This pistol gained further credibility after being adopted by LAPD and the L.A. Sheriff’s Department as well as numerous other domestic law enforcement agencies. In retrospect, that’s not surprising in light of the fact that Beretta is the world’s oldest industrial firm of any kind, dating back to 1526, so you gotta figure they know what they’re doing.
What’s more, two renowned firearms industry experts who are both known as hardcore M1911 aficionados, Ken Hackathorn and gunsmith Bill Wilson, have gone on record lavishing praise on the Beretta, with the former deeming it “the most reliable handgun I ever used” and the latter stating that “I shoot it just as well as the 1911.”
From a personal standpoint, as I’ve written several times before, the Beretta 92 was the very first pistol I fell in love with – strictly platonically speaking of course – back at the tender age of 14.
Browning Hi-Power P-35 9mm
Another one of John Browning’s top three most enduring inventions (the third being the M2 “Ma Deuce” .50 caliber machine gun). Though alas, Mr. Browning passed away in 1926 before this particular project was perfected, so the proverbial torch was passed on to Belgian gun designer Monsieur Dieudonné Saive, who saw the pistol through to completion in 1935, hence the P-35 designation. With its 13 + 1 standard ammo capacity, the BHP was the first of the “Wondernines,” i.e. high-capacity double-stack 9mm autoloaders; indeed, the “Hi-Power” designation refers to the ammunition capacity and not the ballistic power of the caliber in which the pistol was chambered.
The “Grande Puissance” spent several decades as the most widely used military, police, and counterterrorist pistol in the world, with its list of users including the elite British Special Air Service (SAS) and the FBI Hostage Rescue Team (HRT). That’s credentials!
I purchased my own 1967 vintage BHP as a birthday present to myself back in 2007. With roughly 4,000 rounds through it, it’s been a fine shooter.
Glock 17 9mm
Here we go again. The most reliable and durable handgun ever made: a service life in excess of 250,000 rounds; going 10,000 jam-free rounds without a cleaning; Tenifer finish that’s more rust-resistant than stainless steel; continuing to function after being dropped out of a helicopter at an altitude of 400 feet; working after being frozen in a solid block of ice, etc. The pistol that, upon its debut in 1982, established the credibility of polymer-framed and striker-fired pistols and paved the way for their eventual dominance of the U.S. private citizen and law enforcement market.
My own Glock 17 has given me superb performance over the course of 19 years and 20,000 rounds. ‘Nuff said.
Ruger Standard .22 LR
Hey, I had to include at least one rimfire pistol on the list for the sake of “equal time,” right?
The Ruger Standard is to .22 Long Rifle (LR) rimfire semiauto pistols what the M1911 and Browning Hi-Power 9mm are to centerfire semiautomatic combat handguns, i.e. the gold standard against which all competing makes & models must be judged. Back in 1949, this pistol launched the careers of the late great Bill Ruger (1916-2002) and Alex Sturm (1923-1951) and their eponymous Sturm, Ruger & Co, which is now one of the giants of the American firearms industry.
Like the 1911 and BHP, M1911 and the BHP, the Ruger .22 autopistol has proven itself highly adaptable through the decades, spawning many variants and lending itself to a myriad of customizations.
And this gun hasn’t served as a mere plinker and paper-puncher either: suppressed (“silenced”) editions of the pistol were actually used by U.S. Army Special Forces AKA “Green Berets” for stealthy kills against Viet Cong and North Vietnamese Army (NVA) sentries during the Vietnam War.
Shockingly, this is the only pistol on the list which I don’t own! That said, I recently did a live-fire range review of the current and most refined variant, the Ruger Mk IV, and found it to be a very pleasant experience.
Hit Or Miss?
Okay, agree or disagree? For any fans of SIG Sauer pistols, Smith & Wesson auto pistols, the CZ-75 (that one just barely missed the cut, to be honest), Heckler & Koch (HK), Walther, etc. go ahead and unleash your rage at us in the Comments section.
Bonus: Glock Gun Photo Essay
MORE: The F-35 Now Comes in Beast Mode
MORE: Why the U.S. Navy Tried to Sink Their Own Aircraft Carrier
Expert Author Biography: Christian D. Orr has 33 years of shooting experience, starting at the tender age of 14. His marksmanship accomplishments include: the Air Force Small Arms Ribbon w/one device (for M16A2 rifle and M9 pistol); Pistol Expert Ratings from U.S. Customs & Border Protection (CBP), Immigration & Customs Enforcement (ICE), and the Federal Law Enforcement Training Center (FLETC) Criminal Investigator Training Program (CITP); multiple medals and trophies via the Glock Sport Shooting Foundation (GSSF) and the Nevada Police & Fires Games (NPAF). Chris has been an NRA Certified Basic Pistol Instructor since 2011. In his spare time, he enjoys (besides shooting, obviously) dining out, cigars, Irish and British pubs, travel, USC Trojans college football, and Washington DC professional sports.
We’ve all been there. You get ready for a perfect day of fishing, pick your best lures and your favorite rod, only to sit out on the boat watching your line idle without a single bite. “What did I do wrong?” you ask yourself. A painful question pretty much every single angler has asked at some point. Well, we’ve got some good news and bad news for you: It wasn’t really your fault. But in a way, it was. Why did you strike out? The answer, more often than not, lies in how the weather affects fishing. And today, you’re going to learn all there is to know about it.
To understand exactly how the weather affects fish, we’ll first take a look at the individual weather factors that influence the way fish behave. We’ll then explore how these factors make fish tick (or tock). Last but not least, we’ll talk about the best weather conditions for fishing, as well as what you can do to make the most out of your outing.
By the time you’ve read this article, you’ll not only have a few geeky facts to tell your friends, you’ll also know some tricks to help you round the day off with a full cooler.
The weather can affect fishing in a number of ways. A few naturally-occurring elements are key influencers on the way fish behave. These are:
Most fish species are cold-blooded, and can’t regulate their body temperature. This means that they’re forced to adjust their metabolisms to the temperature of the water around them. In colder waters, fish tend to slow down, and generally need less food to support themselves. In warmer waters, they are much more active, and as a result, need significantly more food to survive.
But that’s not the only way water temperatures affect fish. In order to breathe, fish rely on their gills to extract dissolved oxygen from the water. It so happens that the amount of dissolved oxygen in the water depends almost exclusively on the surrounding temperature. As a rule of thumb, colder waters have more dissolved oxygen, and warmer waters have less.
So, what’s the big deal? Simply put, each fish species has a minimum water temperature under which it won’t feed, and a maximum water temperature over which it can’t breathe. As a fisherman, you obviously don’t need to know the exact numbers. However, knowing why and when water temperatures change can make all the difference when trying to catch fish.
How does the weather influence water temperatures?
Water temperature can change in a number of ways. There are slow, seasonal changes, which are mainly influenced by the amount of sunlight a body of water receives over an extended period of time. These changes don’t have a tremendous impact on water temperature in the short term.
Even if you’re fishing a small pond, a passing cloud won’t realistically change the temperature by a significant amount. What can drastically change the water temperature, however, is rainfall.
When it rains, fresh water pours into a body of water, changing its temperature. This change can happen quickly, especially if we’re talking about a small body of water. In addition, rainfall changes the turbidity (clarity) of the water, as well as the salinity of saltwater. Lastly, rain can often shoot large quantities of nutrients into the water. When all these changes occur at the same time, they can significantly change the way resident fish behave.
Wind
In North America, winds generally blow in a northeast direction. This happens for two reasons: first, the Earth’s rotation, and second, the jet stream. During the summer, the jet stream shifts to the north, pulling warm gusts of low-pressure air from the southwest with it. This is why we have those warm summer winds. During fall and winter, the jet stream shifts to the south, bringing cold fronts and high-pressure air masses from the north.
When masses of cold and warm air mix, storms start to brew. But more on this in a bit.
Winds can influence water bodies and their residents in several ways. The most obvious one, of course, is by making waves. As winds blows along the surface of the water, it creates friction. The stronger the wind blows, the greater the friction, and the greater the waves.
Waves can increase the turbidity of the water, pulling currents and nutrients along with them. All of these factors influence the way fish will behave. Last but not least, winds cause changes in barometric pressure.
Barometric Pressure
If there’s one thing that can bring about a feeding frenzy in fish, it’s a change in barometric pressure. Sudden weather changes produce rapid shifts in barometric pressure, and this is precisely why these are the best moments to wet your line.
What is barometric pressure?
Barometric pressure, or atmospheric pressure, is the force exerted by the Earth’s atmosphere on a given area. Think of it as “the weight of the air.” Barometric pressure is measured in several ways: inches of mercury (in-Hg), millibars (mb), or pounds per square inch (psi). In the US, we mostly use inches Hg. At sea level, barometric pressure of 29.92 inches is “normal.” Anything above that is considered high, and anything below that, low.
Again, you don’t need to focus on absolute numbers, because fish aren’t paying much attention either. What you should make note of is that just as the atmosphere pushes down on Earth’s surface, it does the same to its many bodies of water. These waters, in turn, push on the fish that live there.
Why does barometric pressure affect fish?
To survive in water, fish had to develop a series of physical adaptations. When it comes barometric pressure and fish behavior, two of these adaptations are key. These are the lateral line and the swim bladder.
The lateral line is an organ fish use to navigate and sense the presence of predators or food. It senses the tiniest of reverberations in the water, and as such, it is very sensitive to pressure changes.
The swim bladder, on the other hand, is an organ similar to the stomach, which can inflate with air and allows the fish to achieve buoyancy. As the air pressure changes, so does the pressure on a fish’s swim bladder. It’s something like a natural barometer.
Fish species like Trout, Grouper, Snapper, and Tarpon have larger swim bladders, and are more sensitive to changes in air pressure. On the other hand, species with smaller bladders like Mahi Mahi, Barracuda, Wahoo, and Kingfish are much less affected. And then there are species like Sharks and various types of Tuna that don’t have this organ at all.
Barometric Pressure and Fishing
Alright, air pressure affects fish, we understand. But exactly when and how does this happen? It’s a well-known fact that rising barometric pressure means improving weather and clear skies. Conversely, dropping barometric pressure means that a storm or a cold front is on its way.
Fishing before and after a Storm
As a storm approaches, a mass of warm, low-pressure air gathers above a mass of cold, high-pressure air. When the two air masses meet, they start creating condensation in the form of clouds. During this time, a noticeable, steady drop in air pressure occurs. The pressure continues to drop until the very end of the storm.
Depending on the scale of the storm, this can happen very quickly, or over an extended period of time. For you, the latter is a much better option, as it gives you more time to fish while the pressure is dropping.
What follows the storm is typically a cold front, bringing winds, and a mass of cold, high-pressure air. The cold front often clears the skies, and more importantly, brings about a rapid rise in air pressure. In most cases, this means that fishing is a no-go.
Once the air pressure reaches a high point, it finally stabilizes. There’s no set rule on how long this can take, as it usually depends on the storm that just passed. Fish are mostly inactive after the atmospheric pressure levels out. However, around 72 hours into this period of steady barometric pressure, the fish start coming out again.
Interestingly, fish seem to be much keener on biting than before the weather change started. Some anglers speculate that this is because there was no fishing for several days, and fish have “forgotten” about the hooks and lures they normally avoid. A more realistic cause for the increased bite, however, seems to be that the fish haven’t fed in a while.
Fishing Tactics for Changing Weather
All of the weather factors we mentioned are very closely connected, meaning that one doesn’t change without the other. To make the perfect fishing tactic, you’re going to need to be mindful of them all.
Timing
Summarizing what we talked about above, fish react to changes in barometric pressure in the following way:
Rapid drops in pressure: changes of more than 0.18 inches Hg in 3 hours, the bite is great
Rapid rise in pressure: the fish retreat, the bite is non-existent
Stable pressure: after 3 days of pressure not changing by more than 0.3 inches Hg, the bite is good again
Nowadays, there are plenty of barometer-equipped fishing apps which you can use to track and plan your outings.
Temperature and Turbidity
In colder weather, fish are sluggish, so your lure/bait presentation should be slow-moving as well. Of course, the contrary is true for warmer conditions.
As we mentioned, wind and rainfall can make waters more turbid than normal. Turbidity can drastically limit visibility underwater, and in turn, change the way fish behave. For the most part, fish are sight hunters. When they can’t see, they’ll rely more on their lateral line to find prey. This is where fast action lures can come in handy. The flutter these lures make is the perfect attention-grabber in such situations.
Still, if you’re fishing cold waters, the fish might not be as easily lured to move (no pun intended). In these situations, you’ll need to rely on brightly colored lures to get them to bite. Reds, yellows, and greens can all produce results. In muddy waters, however, red-colored lures tend to lose their visibility. If this is the case, your best bet is to stick to bright yellow and green presentations.
If the seas are rough, chances are that fish have retreated to deeper waters. If you’re determined to fish in these conditions, make sure you’ve chosen the right kind of boat.
Enjoy Responsibly
Fishing ahead of an upcoming storm can produce incredible results. There are countless stories of fishermen cashing in on the feeding frenzy while other anglers are stuck on the highway trying to get home.
Still, as much as it would be cool to be the star of “Twister 2.0,” no fish is worth losing your head over. Read the weather and fishing reports carefully, and give yourself a time cushion to leave the area in case you get held up.
Get things right, however, and you could be looking at catching the fish of a lifetime! So there you have it. That covers everything you need to know about how weather affects fishing.
If you need more information on how to go about fishing for the first time, visit our Fishing Tips for Beginners blog.
What are your tactics for fishing in bad weather? Did you ever fish ahead of a coming storm? Are there some weather-related fishing tips we forgot to mention? Let us know in the comments below.
Limb lines are an extremely effective and simple method of catfishing. Typical limb lines for catfish setups involve nothing more than stout twine, a heavy sinker, a strong swivel, a sharp hook, and a tasty piece of bait. Instead of attaching this to a fishing pole, you tie it to a supple green limb overhanging the water and motor away to go do other things. In your absence, the limb fights the fish. Clever anglers may set a dozen or more of these lines, and let them “soak” for a couple of hours while they fish with a rod and reel nearby. If they’re lucky, they’ll soon be blessed with a “tree shaker,” a catfish so big it makes the whole tree sway as it struggles to return to deeper water!
In most cases, yes! Most states allow limb lining in one form or another. In places where catfish are plentiful (throughout most of the southern and midwestern United States) regulations generally permit limb lines, trotlines, and other forms of setlining. Some states may have restrictions on the number of lines or hooks you can have out at once, and most require that the lines be tagged with the owner’s information. It’s important that you read up on your state’s regulations and clarify any questions with local authorities before you begin setting limb lines for catfish.
Limb Line Fishing
Some catfishermen look down upon limb lines, claiming that they don’t require any skill. It’s true that limb lines do set the hook and play the fish for you. But limb lines are to rod and reel fishing what trapping is to hunting. It’s a different way to accomplish the same goal, and you put in all of the hard work and planning on the front end of the project. There is definitely an art to setting limb lines.
Look for banks with a lot of overhanging brush on them when you are setting your limb lines.
For this article, we were lucky enough to be able to interview Art Preller. Art is a longtime limb line fisherman on the White River and the inventor of the Port Arthur Limb Line.
How Deep To Set Limb Lines For Catfish
While many fishermen conceptualize catfish as deep water bottom dwellers, Art knows different. “Catfish are edge dwellers,” he says. “They’ll run the bank edge at night, and you don’t need a whole lot of water to catch them in. I’ve got a three foot paddle on my boat, and if I see a limb that looks good I’ll go over and stick that paddle in the water. If it’s got three feet then I’ll go ahead and set a line. I don’t usually fish all the way on the bottom. I’ll drop the bait down to the bottom and then come up about six inches.”
Setting Catfish Lines – Where To Put Them
We asked Art if he had any advice on what stretches of the bank were good candidates for limb line fishing.
“It depends on what you’re fishing for,” Art replied. “If you’re fishing for flatheads, bluff banks are best. If you’re fishing for channel cats or blue cats, you can really catch them almost anywhere. I like to look for banks with a lot of overhanging brush on them. And the more structure you have around on the edge of the bank, the better.”
Catfish Bank Poles/Diddy Poles – An Option When You Don’t Have A Limb
Sometimes, there just isn’t a limb handy where you want to set a hook. Art keeps a few pvc poles in his boat that can be driven into eroded bluff banks. Referred to as “bank poles” “ditty poles” or “diddy poles,” these simple devices can make you a more versatile fisherman.
Diddy poles can be made from pvc, bamboo, cane, or green willow shoots. Anglers can also purchase premade diddy poles made from fiberglass. These poles are small enough in diameter that they can be set on sunken timber with the aid of the appropriately sized drill bit. If you’re looking to purchase some premade diddy poles, Catfish Getters offers them in several sizes and configurations.
Limb Lines On The River
When setting limb lines on the river, look for breaks in the current. If there’s a seam line in the current, catfish will lurk in the low-flow areas and wait to ambush food swept downstream. The mouth of creeks and sloughs off of the main channel can be productive areas.
If you can’t find any limbs overhanging the bank, you can attach your limb line to a diddy pole on the bank.
Structure can also provide an easy place for catfish to rest and wait for prey. Old docks, fallen down trees, and sunken houseboats or derelict vessels on the bank can be productive places.
How To Set Limb Lines For Flatheads
Flathead catfish are highly regarded by serious catfishermen. “Flatheads are kinda like the crappie of the catfish family,” Art explains. “They have a very white, clean meat because they hunt live bait; they’re not scavengers like the other species.”
So how can a catfisherman target flatheads with his limb lines?
“You’ll definitely catch more flatheads with live bait,” he said. “Down here, we like to use goldfish or rice slicks.” (Editor’s note: “rice slicks” is a colloquial term for Green Sunfish (Lepomis cyanellus). “June is usually the most productive month because they’re spawning. Right now, if we set hooks with live bait, we’re running around a 25% hookup rate for flatheads.”
Best Bait For Limb Lines
What about other species? What’s the best bait for channel catfish and blue catfish?
“Nightcrawlers are always a good go-getter,” says Art. “You’ll mainly catch channel cats on them, but you can catch blues and even flatheads occasionally. You just have to be careful how you run your lines. If you’re using nightcrawlers, wait until sunset to bait your hooks. Otherwise bait-stealers like bream and gar will clean your hooks before catfish can find them.”
“As far as blues go, if you can catch a few skipjack or freshwater drum, you can cut those up and that’s a really good bait for blue cats,” Art explains. “We were out just last week and caught a 22lb blue on a piece of cut drum.”
Best Hooks For Limb Lines
Hook selection is a very important part of your limb line strategy. Catfish run the gamut from 2lb “eatin’-sized” channel cats all the way to trophy-class blue cats that can break the hundred pound mark. You’ll want to match your hook to your target fish’s size.
“I’m not really a trophy catfisherman,” says Art. “I’m just out to fill my freezer. My general rule is if a fish is too big for my filet knife, I’ll let him go. You need big fish in your water to replenish what you catch. So with that in mind, I consider a size two to size four j-hook to be about right for what I’m targeting.”
Choose your hook size based on the size of catfish you are looking to catch.
What about trophy catifsh?
“If you’re going for the big fish, those 50-80lb trophy fish, then you’ll want something bigger. I’d say a 7/0 circle hook would be about right for big fish. You’ll also want to get some bigger swivels. Big catfish are tough on your tackle.”
Best Knot For Limb Lines
For your connections to the swivel and hook, a good, no-slip knot with high break strength such as a Palomar knot is ideal. For your attachment to the limb, a good slip-knot will hold even the largest catfish, but come loose quickly and easily with a tug of the tag end when it’s time to gather your lines back up.
Best Time To Set Limb Lines
Limb lines are usually set at night during the spring and summer months. During this time, catfish feed more heavily at night as the water temperatures cool off. They’ll transition from deep, cool holes to the shallows along the shoreline in search of prey such as shad, bluegill, skipjack, crawfish, and insects.
Fishing at night also ensures that you are avoiding the “bait stealers” Art mentions. If you try to run lines during the day, you’ll have to fight with bream, gar, choupique, and even hungry turtles!
Limb Line String
Catfish are not line-shy. Heavy-duty, tarred trotline cord is strong and holds knots well, two features crucial in limb line string. Art’s premade limb lines come standard with tarred cord rated to 170lbs, plenty strong enough for even the biggest trophy catfish.
Limb Line Weights
When selecting weights for limb lines used in catfishing, it is essential to consider the size and behavior of the catfish species you are targeting. Generally, heavier weights are preferred to keep the line securely anchored to the limb or structure. The weight should be sufficient to counteract the fish’s strength and prevent it from easily breaking free. Depending on the water current and depth, weights ranging from 2 to 8 ounces or more may be suitable. It’s important to experiment and adjust the weight based on the specific fishing conditions to ensure the limb line remains stable and effective in attracting and catching catfish.
How To Make A Limb Line
Limb Line Setup
If you’d like to make your own limbline, start by gathering your materials. You’ll need heavy cord, strong swivels, sharp hooks, and some ½-4oz egg weights.
Start by cutting 2 lengths of cord; a 6-10ft main line and an approximately 2ft leader. Tie a heavy-duty swivel on one end of the main line using an improved clinch knot or palomar knot and thread an egg weight on. In heavy current, you’ll need a heavy sinker to keep your bait submerged. In slack water, use a lighter sinker.
Once the sinker is threaded, prevent it from coming off by tying a simple overhand knot on the opposite end of the line from the sinker. Then, tie a hook to your leader line. Straight-shank hooks can be attached with an improved clinch knot or similar. Circle hooks perform better when snelled. Be sure to use a hook size appropriate for the size fish you are after.
Once this is done, tie the hook and leader to the swivel on your main line. Add a tag in compliance with local regs to your main line, and your line is ready for the water!
Limb Line Rigs
It may not occur to most fishermen, but there is more than one way to rig a limb line. Most anglers will stick with the tried-and-tested Carolina and split shot rigs for limb lines. But there’s nothing stopping you from experimenting! Any live or cut bait rig that you would tie on the end of a rod-n-reel can be duplicated on a limb line. A dropshot rig is a good way to suspend bait off of the bottom, and you can experiment with multiple hooks by mimicking a high-low rig.
Catfish Limb Lines For Sale
While limb lines are simple to make, they do take up a lot of time. And if you don’t already have the hardware on-hand, it can be surprisingly expensive by the time you add up all of the materials plus time and gas to acquire them. Pre-made limb lines are an excellent option for fishermen who are short on time, or who just want to try a couple out on their next fishing trip.
Art Preller’s Port Arthur Limb Lines are an innovative take on limb lines. They incorporate a hi-vis, reflective flagging device that serves as a fish indicator, tag, and storage device. According to Art, “You can put fifty of them in a five gallon bucket and they’re all organized. And when you’re done fishing, they’re easy to pull off of the river so that you aren’t losing equipment or littering the environment.”
Trophy sized catfish can definitely be caught on the proper limb line setup.
Limb Line Safety
Unfortunately, some fishermen give limb-lining a bad name and abandon their lines or leave them unattended for too long. This can be dangerous to wildlife and even people, especially when water levels fall and leave the hooks exposed. Animals and boaters can become hooked or entangled in an abandoned limb line, so always be sure to remove your lines when you are done with them!
Limb Line Lights
Some anglers go so far as to mark their limb lines to make them more visible. A chemical glow stick or inexpensive clip-on light can make it easier for you or unwary boaters to locate your lines in the dark. Reflective tape and hi-vis yellow, orange, or pink lines can also make it easier for you and others to see your lines.
Limb Line Tags
In most states, regulations call for tagging your limb lines. These tags generally require you to provide ID and contact information. In Alabama, for example, lines must be tagged with the owner’s name and either a phone number or fishing license number. This information helps conservation officers to identify the owners of abandoned lines.
Limb Line Storage
Perhaps the most difficult part of fishing with limb lines is keeping them organized! The more lines you run, the harder this becomes. A boat full of lines with sharp hooks and flopping catfish isn’t just frustrating, it can be downright dangerous!
Some anglers keep their lines wrapped around a section of foam pool noodle. Bury the hook point in the foam, wrap the line around the noodle, and tuck the tag end under the last wrap for a clean package that can be easily unwound when needed.
Another storage tactic is to wrap the lines around your fingers in a figure-8 pattern and secure it with a small alligator clip. The wrapped line can then be set into a compartment in a flat, stowaway-style tackle box.
Final Thoughts On Limb Lines For Catfish
In conclusion, limb lines are a highly effective and popular method for catching catfish. This traditional fishing technique combines simplicity and efficiency, making it accessible to anglers of all skill levels. By utilizing strong lines, appropriate bait, and strategic placement, limb lines offer a reliable means of catching plenty of catfish. However, it is crucial for anglers to prioritize responsible fishing practices, ensuring the safety and well-being of both the targeted species and the surrounding ecosystem. By adhering to local regulations and employing responsible fishing methods, anglers can continue to enjoy the thrill of limb lining while preserving natural resources and being considerate of other outdoorsmen.
Full Disclosure: This post may include affiliate links. There’s no extra charge to our readers for using these.
Trapping muskrats has long been a traditional outdoor activity for many enthusiasts and an effective method for controlling the population of this small semi-aquatic rodent.
As a beginner, it’s important to understand the basics of muskrat behavior and their natural habitats to increase chances of success and ensure an ethical and humane trapping experience. With the right knowledge and equipment, even newcomers can quickly become skilled in trapping muskrats.
Body grip traps are effective for muskrat trapping due to their design, which quickly and humanely dispatches the animal.
These traps have a large square frame and powerful springs, allowing muskrats to be easily targeted. When setting these traps, pay attention to the muskrat’s pathways and place the trap accordingly.
Coil Spring Traps
Coil spring traps are also a popular choice for trapping muskrats. These traps consist of two powerful springs attached to a jaw-like mechanism.
When the muskrat triggers the trap, the jaws close with great force, ensuring a quick capture. Coil spring traps should be placed in shallow water near muskrat dens or other frequented locations.
Foothold Traps
Foothold traps are a traditional choice for many trappers. These traps have two jaws that close when a muskrat steps on the trigger, securing the animal’s foot.
Foothold traps can be placed near muskrat dens, on floating debris, or on trails. These traps are known for their versatility, and can be used in different situations.
Conibear Traps
Conibear traps are a type of body grip trap with a rectangular frame. They are designed to capture and kill the muskrat with the strong force of the springs.
Conibear traps are best used in narrow channels where muskrats frequently swim or travel through.
Live Cage Traps
Live cage traps are a humane option for those who want to capture muskrats without causing harm. These traps consist of a metal cage with a door that closes when the muskrat enters to eat the bait inside.
This method allows the trapper to safely relocate the muskrat to another area. When using live cage traps, be sure to check them frequently to avoid causing unnecessary stress to the captured animal.
Float Traps
Float traps are a unique method of trapping muskrats that involve a floating platform, which is placed in water where muskrats are known to forage.
These platforms typically have traps, such as foothold or body grip traps, attached to them. When the muskrat climbs onto the floating platform, it triggers the trap, ensuring a successful capture.
Trap Setting Techniques
Den and Burrow Sets
Den and burrow sets are ideal for targeting muskrats within their natural habitats. To set up a den set, locate an active muskrat burrow entrance, either underwater or above water within the bank. Place a trap at the entrance, ensuring it is stable and secure.
For burrow sets, position the trap inside the burrow, making sure it is properly concealed. Successfully trapping muskrats with den and burrow sets requires patience, observation, and proper trap placement.
Runway Sets
Muskrats frequently use established trails to move through their territory. A runway set aims to take advantage of these well-traveled paths. Locate a muskrat run, typically characterized by a narrow underwater channel with a clearly visible entrance.
Place a trap within the run approximately six to twelve inches below the water surface. Keep the trap secured with a stake or weight so that it remains in position. The muskrat will swim into the trap as it moves along its usual route.
Slide Sets
A slide set capitalizes on muskrats’ tendency to slide into the water from the bank. Identify an active slide by looking for a narrow, worn path leading from the bank into the water.
Place a trap on the slide, submerging it slightly under the water. Make sure the trap is stable, preferably anchored to nearby vegetation or a stake. As the muskrat uses the slide, it will encounter the trap and be captured.
Float Sets
Float sets are an effective technique for trapping muskrats in deep water. To construct a float set, create or purchase a floating platform made of wood or foam. Attach the trap to the float and anchor it in a location where muskrats are known to be active.
Bait the trap with vegetables or muskrat attractant, making it an enticing target for the muskrats. When the muskrat visits the float set, it will be caught in the trap. Remember to regularly check and reset these traps as needed.
Muskrat Bait and Lure
Natural Food Sources
Muskrats have a diverse diet consisting of various plants and small aquatic animals. You can use some of these natural food sources to attract them to your trap. These include vegetation such as cattails, root vegetables like carrots and parsnip, apples, and other parts of plants that muskrats may eat.
Additionally, muskrats are known to consume small aquatic animals like crayfish, mussels, frogs, and insects. Using these natural food sources as bait can enhance the effectiveness of your trap.
Commercial Lures
There are commercially available muskrat lures that you can use to attract them more effectively. These lures often contain scents or ingredients that are highly attractive to muskrats, including oil of anise.
When using commercial lures, carefully read and follow the manufacturer’s instructions to ensure successful trapping. Keep in mind that some lures may also attract other animals such as beavers, raccoons, or coons, so be prepared to secure your trap accordingly.
Homemade Lures
If you prefer to make your own muskrat lure, you can use some of the natural food sources mentioned earlier, combined with additional scents or ingredients to enhance their attractiveness.
One common homemade lure is a mixture of peanut butter and apple bits. This combination produces a strong scent that can lure muskrats toward your trap.
However, homemade lures may not be as potent as commercial options, and you may need to test different formulations to find the most effective combination for your specific trapping location. Remember to be cautious when using homemade lures, as they might also attract unintended animals to your trap.
Trapping Safety and Equipment
Protective Clothing
When trapping muskrats, wear protective clothing to ensure safety and reduce the risk of injury. Wearing gloves helps protect your hands from sharp objects and animal bites.
Additionally, waders are crucial for navigating the wet environments where muskrats are commonly found. This water-resistant gear enables trappers to move comfortably and safely in shallow water while setting and checking the traps.
Trap Preparation and Maintenance
Proper preparation and maintenance of muskrat traps are crucial for optimal performance and to ensure the wellbeing of the animal. Follow the guidelines below:
Clean and deodorize traps between each use to eliminate any human scent or remnants of previous catches.
Check trap mechanisms for functionality by testing the trigger and springs before each use.
Remove any rust or debris that could hinder the trap’s performance or impede its ability to close properly.
Using well-maintained equipment will make your trapping experience more efficient, effective, and humane.
Trap Anchoring and Staking
An essential aspect of muskrat trapping is the correct anchoring and staking of traps. This aids in:
Swiftly submerging the trapped animal, ensuring a quick and humane end.
Preventing the loss or theft of traps.
Reducing the risk of non-target species coming into contact with the trap.
Use sturdy stakes or tangle stakes to anchor traps securely in position. Some options include:
Slide sets: These are an effective method for trapping muskrats. Ensure that the trap is appropriately weighted, such as using a #1½ trap or using a tangle stake, to quickly pull the trapped animal underwater.
Bank den sets: Place a bodygrip trap at the entrance of a muskrat den and anchor it with a stake or sliding wire system to secure it in place.
Properly anchoring and staking traps will make your trapping experience more successful and ethical.
Catching Multiple Muskrats
Use of Multiple Traps
Catching multiple muskrats can be made more efficient by strategically placing a variety of traps around muskrat habitats. Given that muskrats are abundant in many areas and relatively easy to trap, employing multiple traps can help increase the chances of capturing them successfully.
Using different types of traps, such as wire mesh traps, box traps, or body-gripping traps, allows trappers to target various muskrat behaviors and movement patterns.
When placing multiple traps, it is important to look for muskrat signs, such as burrows, tunnels, and trails. Observe their feeding areas and place traps near their most active locations. This strategy will increase the chances of catching multiple muskrats, as they will likely be attracted to their preferred feeding and resting spots.
Colony Trapping
Colony trapping is another effective method for catching multiple muskrats. A muskrat colony trap is designed to catch several muskrats at once without the need for bait.
These traps are made of wire mesh and are typically longer (e.g., 36-inch) to accommodate more muskrats. The trap doors are gravity-operated, allowing muskrats to enter but not exit.
To effectively use a colony trap, place the trap in shallow water near muskrat activity signs. The trap should be positioned at an angle, with one end resting against the bank or vegetation and the other end submerged in the water.
This setup encourages muskrats to enter the trap while they are swimming or searching for food.
Frequently Asked Questions
What is the most effective trapping method for muskrats?
Muskrats can be effectively captured using foothold traps, live traps, or colony traps. For example, the Tomahawk Rigid Muskrat Colony Trap is 36 inches long and can catch up to 10 muskrats at once. The most suitable method depends on the trapper’s goals and preferences, as well as local regulations.
How can I safely remove muskrats from my pond?
To safely remove muskrats from a pond, use live traps, such as Havahart live muskrat traps. Position the trap near a muskrat’s entry or exit point to increase the chances of successful trapping. After capturing the muskrat, relocate it to another area, complying with local wildlife regulations.
Which bait works best for catching muskrats?
Muskrats are primarily herbivorous and prefer plant-based baits. However, when using slide sets—a technique that places foothold traps along trails where muskrats enter and exit the water—no bait or lure is typically required.
What is the proper way to set up a muskrat live trap?
To set up a muskrat live trap, choose a trap at least 30-40 inches in length. Place the trap near a muskrat slide or at a known entry/exit point. Monitor the trap regularly and always follow the trap’s instructions and applicable regulations.
Are there specific regulations for muskrat trapping?
Yes. Regulations for muskrat trapping vary by state, province, or country. Trappers need to follow local laws, including licensing requirements, trapping methods, and the relocation or disposal of captured animals.
What are the common uses for captured muskrats?
Captured muskrats can be harvested for their fur, meat, or simply removed for pond or land management purposes. If trapping for meat or fur, trappers must ensure they adhere to local wildlife regulations and sustainable trapping practices.
Wrapping up the Guide to Trapping Muskrats Successfully
Muskrats are among the easiest furbearers to trap, making it an accessible venture for those interested in learning about trapping.
Choosing the appropriate trap, understanding helpful techniques for setting traps, and selecting the best bait and lure can drastically improve the chances of successful capture. Next, check out our Complete Guide to Woodchuck Trapping!
New chicken owners are often quick to purchase heat lamps to keep their flock warm in the winter and to maintain warmth within the chick brooder. However, this heating method is not safe and there are MUCH better options available. Today we are going to discuss the best alternatives to heat lamps for chickens and other barnyard animals.
Heat lamps have been used for years to warm livestock during freezing temperatures. They are also used in brooders for young chicks. These lamps have contributed to hundreds upon hundreds of barn and house fires so I have sworn them off, but my animals still need to stay warm… so… what are my options?
What is the Purpose of a Heat Lamp
Before we discuss heat lamp alternatives, let’s talk about why livestock owners use heat lamps to begin with.
Heat Lamps in a Brooder
When baby chicks are purchased from a hatchery or if you hatch your own chicks, they don’t have a mother hen to sit under for warmth. Since they don’t have mama hen’s body heat and they can’t regulate their body temperature, there has to be an artificial heat source.
Day-old chicks need a temperature of 95 degrees F in the brooder. 2-week-old chicks need 90 degrees F and the temperature requirement continues to drop 5 degrees per week until they move out of the brooder.
Heat lamps are used to provide this heat for the chicks until they are ready to move outside.
Heat Lamps in the Coop
A heat lamp is also often used to warm a chicken coop during cold weather. This really isn’t necessary, but in some areas where the temperatures drop below freezing, the extra heat can be helpful.
Why You Shouldn’t Use Heat Lamps
Providing your animals with heat isn’t a bad thing, but using unsafe heating equipment is. There are a few reasons why you should avoid using heat lamps for your livestock so let’s jump into those.
1. They are a fire hazard
The number one reason to stay away from heat lamps is the high risk of fire. Heat lamp bulbs get very hot and the heat cannot be regulated. This heat is concentrated in one area and, if placed too close, can catch nearby materials on fire.
Traditional heat lamps are hung up with a metal clamp. These clamps are known to shift and release causing the lamp to fall. When a heat lamp falls, the heat is transferred directly to the surface that it falls on. If this surface is coop bedding, wood, or another combustible material then you almost certainly have a barn fire.
2. They shatter easily
Heat lamp bulbs are not shatterproof. This means that if a lamp falls, the bulb may shatter and spread glass shards all around the floor of the coop, barn, or brooder.
A hot bulb can also shatter if practically anything touches it while it is hot. Imagine your animals splashing a bit of water or a loose feather flying around… once that water or the feather hits the bulb, bam! You have glass everywhere and potentially a fire.
Even if the fallen heat lamp doesn’t catch anything on fire, the broken glass would still be a huge safety concern.
3. They don’t distribute heat evenly
The heat from a heat lamp does not distribute evenly… it concentrates in the center. This poses a fire risk and it can make it difficult for the chicks or other animals to find a spot with a comfortable temperature. Since heat lamps warm up the entire space, chicks (and other animals) have a difficult time if they get overheated.
4. They produce disruptive light
Heat lamps emit a bright light that animals can’t get away from. This light can disrupt their natural sleep patterns as well as their hormone production. If you are using a heat lamp for laying age birds, this additional light can cause them to continue to lay eggs even when their bodies want to rest.
5. Chickens can keep themselves warm
Adult birds don’t really need supplemental heat in the winter. As long as you provide a healthy environment with proper ventilation and a wind break, their feathers keep them warm. This is the same for most farm animals.
If you do need artificial heat for your animals, check out the safe heat lamp alternatives listed below.
6 Safe Alternatives to Heat Lamps for Chickens
Heat lamps are one of many options for keeping your animals warm. Let’s dig into safe alternative heat sources for your homestead.
1. Heat Plates
This is my go-to choice for a heat lamp alternative. Heating Plates serve the same purpose as heat lamps without the high risk of fire. There are horizontal heat plates that are made to be used with young chicks and there are vertical (stand-up) heat plates that can be used with older birds.
Horizontal heat plates provide heat to chicks using much less electricity than a heat lamp. The chicks gather under the plate just as they would gather under a mother hen. You can adjust the height of the plate easily as the birds grow.
A vertical heat plate can be used for ducklings and older birds as well as some other livestock. This is a plate that heats up to warm animals that are standing or laying down near it. Some plates switch from horizontal to vertical so you can use them throughout the lifetime of your chickens.
Heat plates allow the birds to choose if they want to be in the heated area or if they want to move to a cooler spot. In fact, these plates don’t even warm the air. They will only warm a solid object (like a chick) that passes through the radiant heat emitted from the plate. This is important because different chicks may be comfortable at different temperatures.
The surface of a heat plate doesn’t get hot, either. When you touch it, it should feel warm, but it won’t burn you or your animals.
Heat lamps put out continual light that can disrupt the animal’s natural sleep cycles, but heat plates produce no light so sleep patterns are undisturbed.
I use an Ecoglow brooder for young chicks and this heating plate for ducklings and older birds.
Advantages:
Less Electricity
Very Low Fire Risk
No Shatter Risk
Mimics Mother Hen
Radiant Heat
Low Surface Heat
No Artificial Light
Height Adjustable
2. Heat Pads
Electric heating pads are used as a heat lamp alternative for small animals (chicks, piglets, etc.), but they have to be protected from water. They can be placed under bedding, on the wall, or under a towel.
You can also make a faux heat plate by turning a small metal basket upside down and placing a heating pad on top. If you choose to use a heating pad, try to find one with a built-in thermostat.
Advantages:
Lower Electricity Usage
No Artificial Light
Low Burn Risk
No Shatter Risk
3. Hot Water Bottles
Bottles with hot water can be placed in with the animals that you are trying to warm. These bottles will need to be replaced frequently, but they can offer warmth temporarily. This is a safer alternative to a heat lamp that works well in an off-grid situation with no electricity, but it does require more labor on your part.
If you choose this method of heating, be sure to insulate the bottles with a rag or dish towel to keep the animals from burning themselves.
This won’t work for very young chicks that need high ambient temperatures (80-95 degrees F).
Advantages:
No Electricity Usage
No Fire Risk
No Shatter Risk
4. Ceramic Heat Emitter
Ceramic heat emitters are used in a similar fashion as heat lamps, but they provide heat without emitting light. No artificial light means that the animals’ natural sleep patterns are undisturbed. Since there is no glass bulb, they do not pose a shatter risk and the fire risk is much lower (but still present).
The surface temperature of the emitter can get very hot which can burn your animals if they touch it.
Advantages:
Less Electricity
Low Fire Risk
Low Shatter Risk
Radiant Heat Source
No Artificial Light
5. Deep Litter Method
During the winter, you can increase the heat inside your coop or shelter by layering new bedding down on top of old bedding. Piling the bedding up like this is called the deep litter method. This method will increase the temperature inside the shelter for your animals without a safety risk.
Advantages:
No Electricity Usage
Increase Ambient Heat Naturally
No Fire Risk
No Shatter Risk
No Artificial Light
6. Natural Warming
The best heat lamp alternative is no supplemental heat at all (except when it comes to baby chicks). Most animals are just fine in the winter without any artificial heat. Just be sure to provide your livestock with a shelter that has a windbreak and proper ventilation. This will keep them dry and out of the wind.
Every deer season, Louisiana hunters take some trophy bucks. Here are the stories behind three from last season.
This time of year, my social media feeds begin filling with photos of huge, once-a-lifetime trophy bucks. Of course, few hunters ever have a chance at a record buck, but hunters should take solace knowing their odds of tagging a big buck are better in Louisiana than in most states.
Remember, Louisiana has everything it takes to build a trophy buck, including highly productive habitat, a diverse and well-developed gene pool and a culture of management-minded stewardship. By mid summer 2018, Johnathan Bordelon, the biologist over the Louisiana Deer Study, added 29 deer to the Louisiana Big Game Recognition Program.
“Bucks meeting the Louisiana Big Game Recognition minimum criteria are harvested across most of the state,” said Bordelon. “Of course, the productive habitat within the Mississippi Alluvial Valley produces more big bucks than other habitats in the state. Older age management is the driving force behind most of it. Louisiana continues to produce its fair share of 3.5 year and older bucks each season. In fact, when compared to the rest of the nation, Louisiana typically ranks in the top three each year in the percentage of 3.5-year and older.”
It is important to understand the framework of Louisiana’s Big Game Recognition Program and what constitutes a quality buck. The program documents white-tailed deer harvested within the state that meet or exceed minimum antler size. Yearly lists are published in early to mid-summer and the all-time list is updated and published every three years. However, since the recognition program is voluntary, there are likely a number of other deer in the state that have not been added to the roll.
MADISON PARISH — MICHAEL MAY
Michael May started bowhunting with a Ben Pearson Hunter recurve when he was 12 years old, which was over five decades ago. Of course, he has upgraded his bow since then, so the evening of Oct. 4 found him climbing into a stand with his Matthews compound.
The old growth timber he was hunting was located along the banks of one of Madison Parish’s larger lakes. Made up of bottomland hardwoods, his spot had little to no underbrush making it easy to see deer for a distance. Nearby, a regrown thicket provided lots of browse plants for the area deer.
With an easterly wind, May settled in to enjoy an evening hunt. Soon after the woods calmed down, several does approached his stand. Approximately 4:30 in the evening, motion in the distance caught his eye. Unbelievably, a large-antlered buck rose from his apparent bedding spot approximately 100 yards away. The deer began a long creep toward the does. For nearly an hour, the buck crept forward. Soon, the buck was at 40 yards, and still coming. Eventually, the buck paused 20 yards out, turned broadside and offered a shot. Jumping on the opportunity, May drew his bow, found the deer in his sight, and released an arrow. The deer dropped on the spot.
Weighing in at 190 pounds, the deer did not size up with his normally heavier cousins from the Parish, but the 6.5-year-old buck could still hold his own. With an inside spread of 15.5 inches, this dimension only adds a small part of the deer’s 186 5/8 inches.
“I was actually hunting a larger deer that frequented the area,” said May. “I put cameras out about a month before during the first week of September. I saw this deer on camera twice, the first time on Sept. 28, and again on Oct. 3 during daylight hours.”
CONCORDIA PARISH — LEE TIFFEE
The best part of the hunting tradition is the hunting stories that accompany it. Each hunt, whether it is successful or not, produces a story. According to Lee Tiffee, a 10-year-old deer hunter from Concordia Parish, the circumstances leading to his encounter with a buck serve to prove that when deer hunting, a hunter needs to be on the lookout at all times.
On December 26, Lee and his father, Tom, climbed their stand on a cold, rainy, afternoon hunt. A family friend accompanied the pair but peeled off about a hundred yards or so. Their stand is found behind their house and overlooks a food plot. The woods surrounding the food plot are enrolled in Wetland Reserve Program, providing thick cover and plenty of browse and bedding areas. If the rain would let up, both hunters thought it likely deer would be moving that evening. Watching the woodline for hours seems like a job reserved for older, more mature individuals, but Lee was ready to hunt this day. A few hours into the hunt, the younger Tiffee recalled seeing a deer appear out of nowhere.
“I looked out on the food plot and saw deer,” said Lee. “It was a cull buck that had a spike antler on one side and four scraggly points on the other side. Dad said I could shoot him.”
Unfortunately, nerves got the best of him and as Lee pulled his rifle up to fire, he was shaking. Just as he was able to calm down, their hunting partner shot and the cull buck busted out of the food plot.
“We figured the woods were all awake after the shot and deer busting through the woods, so we decided we would go help our friend track and drag his deer before it got dark.”
The Tiffees started to depart their stand, but were still in hunt mode. Tom looked up and saw a deer standing on the back side of the food plot. Then, Lee saw him, but couldn’t see his antlers. The rest Tom remembers in slow motion. Lee’s gun was resting on the side of the stand, and before Tom knew what was happening, Lee was shooting at the deer. A round from the Remington 700 found its target and the buck heaved, and broke for the thicket. Now the hunting party had two deer on the ground, but the rain wasn’t letting up. They finally found some blood and tracked the deer down through a gully and up the other side. Upon seeing the buck, the pair was shocked at its size, with Lee calling the grandfather to say that he had killed a monster.
Lee and his dad dragged the deer back to the vehicle, and the rest of the story has been written down in the family history book. Lee’s buck scored 168 5/8 inches, which was enough to win the youth division at a local big buck contest. The buck now hangs proudly on his wall at home and Lee offers his hunting story to any who will listen.
AVOYELLES PARISH — AMANDA SMITH
The second week of January blew into Avoyelles Parish on the backside of rain and saw a cold air mass settle into the region. This weather is normal in northern regions, but can be hard to handle for Deep South hunters. Those brave enough to venture to the woods included Amanda Smith.
“I tried to get my son to sit in the stands that evening, but he didn’t want to,” recalled Amanda. The family hunts a small tract of bottomland behind their home in Avoyelles Parish. Though small, land anywhere in Avoyelles Parish may be holding big deer. This is true for the family’s hunting land.
For seven seasons, the Smiths have watched one deer in particular. The buck always produced non-typical antlers and his crown has grown every year. This week, Scotty had taken over home duty for Amanda and she took a week to hunt. They had meat in the freezer and were buck hunting, having seen the buck on a camera about a month before. He had grown and they were figuring this would be the season they took him. Interestingly, the deer the Smith’s had been watching grow over the years was unknown to their neighbors.
“On January 13th, the wind was in my favor, and I walked to the stand for the evening hunt carrying an extra piece of gear — my portable heater,” Amanda said.
Heater in hand and an H&R .444 slung over her shoulder, Smith took to the woods, using the same trail to their only stand on the property. They don’t move around a lot on the property, which is why they believe they are so successful. The hunt was uneventful and cold, at least until a deer appeared.
“When I saw the deer coming, I reached down, turned the heater off and picked up my rifle,” said Amanda. “Putting it up, I realized that the lens had fogged up. I wiped down the scope, slowly, and made a small circle just enough to see through. I put the deer in the crosshairs.
She was calm, as she believed it was a cull buck — a bent up 6 point with lame legs — they had identified for removal. With the deer standing broadside, she squeezed the trigger and he went down. Smith didn’t realize she had killed a 200-inch monster buck.
“I climbed down, walked up to the deer, realized who it was, and I went crazy,” said Amanda.
Scotty arrived on scene as did the couple’s children, making it a family affair; they kids were very excited. They dragged the deer home where it officially scored 226 2/8 inches, making it the fifth largest non-typical in the state and the biggest ever in Avoyelles Parish.
“Rain or Shine: Unveiling the Habits of Whitetail Deer During Rainfall” – Discover whether these majestic creatures retreat or persist in their movements when faced with precipitation, as we delve into the intriguing behavior of whitetail deer amidst rainy conditions.
Hunting Whitetail in the Rain: Strategies for Success
Hunting whitetail in the rain can be a challenging but rewarding experience if you employ the right strategies. One key strategy is to remember that rain does not significantly affect deer behavior. While their activity patterns may change slightly, deer still need to feed and will resume their normal routine once the rain subsides. Therefore, if you are willing to endure a little rain, you have a good chance of catching a big buck on your trail camera as soon as the rain stops.
Another important strategy is to take advantage of the increased daytime movement of mature bucks after the rain quits. Rainfall is one of the few factors that can increase deer activity during daylight hours, giving hunters a prime opportunity to spot and target these elusive creatures. Additionally, fewer hunters are likely to be out in rainy conditions, further reducing competition and increasing your chances of success.
The wet leaves caused by rain can also work in your favor when hunting whitetail. The noise dampening effect of wetness and suppressed scent conditions due to wind give hunters an advantage over deer. Bucks may move more freely and less methodically due to the slippery terrain, making them more vulnerable to being spotted by alert hunters.
To hunt successfully in the rain, it is crucial to come prepared with proper rain gear and a waterproof blind or shelter. Staying dry while waiting for that monster buck is essential for comfort and focus. Additionally, anticipate a longer sit than usual since deer can move at any given time during rainfall. Be patient, bring snacks, and mentally prepare yourself for an all-day hunt.
Tracking a wounded deer in rainy conditions requires extra attention and care. Rain can wash away blood trails, making it harder to follow the wounded animal’s path. It is crucial to ensure clean shots and pay close attention to every movement after pulling the trigger. Depending on the shot placement and circumstances, you may choose between waiting for the buck to fall or immediately tracking it.
In conclusion, hunting whitetail in the rain can be a promising and rewarding experience if you approach it with the right strategies. Don’t be discouraged by rainy forecasts; instead, prepare ahead of time, utilize hunting apps like HuntWise to plan your stands, and take advantage of this less popular time for hunting. With the right gear, patience, and tracking techniques, you can increase your chances of landing that big buck even in wet weather conditions.
Do Whitetail Deer Move During Rainy Weather? The Truth Revealed
When it comes to hunting whitetail deer, many hunters wonder if rain affects their movement. The truth is that rain does have an impact on hunters, but not so much on the deer themselves. While rain may alter the times when deer are normally active, they still need to feed and will resume their regular activities as soon as the rain stops.
Whitetail deer are always on the move, except in severe weather conditions such as heavy downpours and strong winds. They prefer to move when they can hear what is happening around them, which is why they tend to avoid heavy rain and wind. This means that if you can endure a little rain, you have a good chance of catching a big buck on your trail camera right after the rain subsides.
One important thing to note is that mature bucks tend to be more active during daylight hours right after the rain stops. Rainfall increases daytime movement for deer, which gives hunters an advantage. Additionally, fewer hunters take advantage of hunting in rainy conditions, giving bucks another reason to move more freely.
The wet leaves caused by rain also affect how bucks move. They tend to veer away from stopping frequently or reacting to noises due to the slippery ground. This allows them to move more freely and unpredictably. As a hunter, this combination of reduced noise and suppressed scent conditions due to wind gives you an advantage over the deer.
To hunt successfully in rainy weather, it’s crucial to be prepared with appropriate gear such as good rain gear and a waterproof blind. Staying dry while waiting for that monster buck is essential for your comfort and focus. Make sure you have everything you need to stay warm and dry during your hunt.
Anticipate a longer sit than usual when hunting in the rain because deer can move at any given time during rainfall. Sometimes there might be short breaks in the rain, and then it starts again unexpectedly. Challenge yourself to sit all day long, bring snacks, and be ready for action. Patience is key because deer will move whenever there’s a brief break in the rain.
When it comes to tracking a deer after a successful shot in rainy weather, it’s important to ensure a clean shot and pay attention to every little movement after pulling the trigger. Rain can wash away blood, so you need to be extra careful during tracking. You have two options: either wait for the buck to fall or start tracking immediately. Choose the best strategy based on your situation.
With these tips in mind, hunting in rainy weather can be just as promising as a crisp fall morning. Don’t let rain discourage you or make you give up on your hunt. Prepare ahead of time, take advantage of this less popular hunting time, and use tools like the HuntWise app to plan your stands and find the most ideal conditions. Rainy weather can offer unique opportunities for landing that big buck you’ve been dreaming of.
Rainy Day Hunting: How to Take Advantage of Whitetail Movement
When it comes to hunting whitetail deer in the rain, many hunters may feel discouraged or opt to stay home. However, with the right strategies and preparation, hunting in the rain can actually be quite advantageous. Here are some tips to help you make the most of rainy day hunting:
1. Understand Deer Behavior in Rainy Conditions
While rain may affect hunters’ spirits, it doesn’t really impact deer behavior significantly. Deer still need to feed and carry on with their daily activities even during light rain. They may alter their activity patterns slightly, but they will continue moving as long as the weather is not severe. Keep in mind that heavy wind or downpouring rain might deter deer from being active.
2. Take Advantage of Post-Rain Activity
Mature bucks tend to start moving right after the rain stops, often during daylight hours. Rain increases daytime movement for deer, making it an opportune time for hunters to be in the field. Since many hunters avoid hunting in the rain, there will be fewer people out competing for deer sightings.
3. Utilize Stealth and Scent Suppression
Wet conditions provide an advantage for hunters due to reduced noise caused by wet leaves and suppressed scent carried away by wind and rain. Move quietly and take advantage of these conditions by using scent control methods such as scent eliminators or playing the wind effectively.
4. Be Prepared with Proper Gear
Before heading out for a rainy hunt, make sure you have appropriate rain gear that will keep you dry while waiting for your target buck. Being prepared with waterproof clothing and a waterproof blind will ensure you can withstand the elements without getting soaked.
5. Be Patient and Plan for Longer Sits
Rain can be unpredictable, with periods of heavy rain followed by brief pauses. To increase your chances of success, be prepared for longer sits in the field and bring snacks and necessities to make yourself comfortable throughout the day. Remember that deer will move whenever there is a break in the rain, so patience is key.
6. Track Effectively After a Shot
When hunting in the rain, it’s crucial to pay close attention to your shot placement and track the deer effectively. Rain can wash away blood trails, making tracking more challenging. Make sure you have a clean shot and choose either to let the buck fall before tracking or immediately start tracking while paying attention to every movement.
By following these strategies and being well-prepared for rainy day hunting, you can take advantage of whitetail movement during less popular hunting conditions. Don’t let rain deter you from pursuing your hunting goals – embrace the challenge and use it to your advantage.
Maximizing Your Chances: Hunting Whitetail in Wet Conditions
Hunting whitetail deer in wet conditions can be a challenging but rewarding experience. With the right strategies and preparation, you can increase your chances of success even when it’s raining. Here are some tips to help you make the most of hunting in wet conditions:
1. Be Prepared with the Right Gear
Before heading out for a rainy hunt, make sure you have the appropriate gear to keep yourself dry and comfortable. Invest in good quality rain gear that is waterproof and will protect you from getting soaked. Additionally, consider using a waterproof blind or shelter to wait for that monster buck without getting wet.
2. Anticipate a Longer Sit
During rainy weather, deer can move at any given time as the rain may hold off for short periods before picking back up again. To maximize your chances of encountering deer, challenge yourself to sit all day long. Bring snacks, use the bathroom before heading to your stand or blind, and be prepared for unpredictable weather patterns.
3. Pay Attention to Tracking Techniques
When hunting in wet conditions, it’s important to pay extra attention to tracking techniques after making a shot. Rain can wash away blood trails, making it more challenging to track wounded deer. Ensure that your shot is clean and take note of every movement after pulling the trigger.
4. Choose the Best Tracking Strategy
After making a successful shot, you have two options for tracking in the rain: either give the buck some time to fall or immediately begin tracking. Assess the situation based on your shot placement and make an informed decision on which strategy is best for you.
5. Take Advantage of Less Popular Hunting Times
Many hunters may choose not to hunt during rainy weather, giving you an advantage. Whitetail deer will still be active and on the move, especially when the rain starts to subside. By being willing to endure a little rain, you increase your chances of encountering that big buck while others stay home due to the weather.
6. Utilize Technology for Planning
Make use of hunting apps like HuntWise to plan your hunting strategy in wet conditions. Plot your stands, compare which stand has the most ideal conditions for hunting in the rain, and make informed decisions based on weather patterns and deer movement predictions.
Remember, hunting in wet conditions can be just as promising as a clear fall morning if you are prepared and adaptable. Don’t let rain discourage you or cause you to call it quits. Instead, embrace the challenge and take advantage of this less popular time for hunting whitetail deer.
Whitetail Deer and Rain: Understanding Their Behavior and Patterns
When it comes to hunting whitetail deer in the rain, understanding their behavior and patterns can greatly increase your chances of success. While rain may put a damper on your spirits as a hunter, it doesn’t necessarily affect the deer in the same way. Deer still need to feed and go about their business even when it’s raining, with the exception of severe weather conditions like heavy downpours or strong winds. Therefore, if you’re willing to endure a little rain, you may have the opportunity to catch that big buck on your trail cam just as the rain begins to subside.
One important factor to consider is that mature bucks tend to move right after the rain stops, increasing daytime activity. This is a great advantage for hunters as rain is one of the few things that can boost deer movement during daylight hours. Additionally, fewer hunters are likely to take advantage of hunting in the rain, giving bucks another reason to move more freely. The wet leaves also cause bucks to move less methodically, veering away from stopping frequently or reacting to every noise they hear. This combination of reduced noise due to wetness and suppressed scent conditions due to wind gives hunters an advantage over the deer.
To successfully hunt whitetail deer in the rain, preparation is key. Make sure you have good rain gear and a waterproof blind that will keep you dry while waiting for your target buck. Being prepared before heading out for a rainy hunt ensures you stay warm and somewhat dry throughout your hunting expedition.
Another important aspect is being mentally prepared for an extended sit. During rainfall, deer can move at any given time as showers might come and go unpredictably. To maximize your chances of success, challenge yourself to sit all day long. Bring snacks with you, use bathroom facilities before heading out to your stand or blind, and get ready for potential action. Remember, rain is unpredictable, and deer will move whenever there’s a break in the weather. Patience is key, and sitting all day can greatly increase your chances of encountering a buck.
Once you’ve successfully landed a deer, tracking becomes crucial. Rain can wash away blood trails, making it challenging to track the animal. Ensure that your shot is clean and pay close attention to any movement after pulling the trigger. Depending on the situation, you may choose to let the buck fall before tracking or immediately begin tracking. These are two of the best options for tracking in rainy conditions.
In conclusion, hunting whitetail deer in the rain can be just as promising as hunting on a crisp fall morning. Don’t be discouraged or give up when you see rain in the forecast. Instead, prepare ahead of time with proper gear and take advantage of this less popular hunting time. Utilize tools like the HuntWise app to plot your stands and compare which one has the most ideal conditions for hunting in the rain. With these strategies in mind and a good understanding of deer behavior during rainfall, you’ll increase your chances of landing that big buck even when it’s wet outside.
Rain or Shine: Hunting Tips for Tracking Whitetail in Wet Weather
Tracking whitetail deer in wet weather can present unique challenges for hunters. However, with the right strategies and preparation, rain can actually provide an advantage for those willing to brave the elements. Here are some tips to help you track whitetail in wet weather:
1. Be Prepared with Proper Gear
Before heading out into the rain, make sure you have the appropriate gear to keep yourself dry and comfortable. Invest in good quality rain gear that is waterproof and breathable. Additionally, consider using a waterproof blind or tree stand cover to provide extra protection from the elements.
2. Anticipate Longer Sits
During rainy conditions, deer may move at any given time as the rain comes and goes. Be prepared for longer sits in your hunting spot, as deer may become active during periods of lighter rain or when it temporarily stops. Bring snacks and necessities to ensure you can stay in your hunting location without having to leave due to discomfort.
3. Pay Attention to Deer Behavior
Deer behavior may be altered during rainy weather, but they will still need to feed and go about their daily activities once the rain subsides. Keep in mind that mature bucks tend to move right after the rain quits, increasing daytime movement opportunities. Take advantage of this by positioning yourself strategically during these times.
4. Utilize Reduced Noise and Scent Conditions
Wet leaves dampen noise, making it harder for deer to detect your presence. Take advantage of this by moving more freely without worrying too much about noise disturbances scaring away deer. Additionally, rainy conditions often suppress scent, giving you an advantage when it comes to staying undetected by wary bucks.
5. Ensure Clean Shots
In wet weather, blood trails can be easily washed away, making tracking more challenging. To increase your chances of a successful track, focus on making clean shots and paying close attention to the deer’s movements after the shot. Take note of landmarks or other identifiable features to help you locate the downed deer.
6. Choose the Best Tracking Strategy
After making a shot, you have two main options for tracking in the rain: either wait for the deer to fall before beginning your track or immediately start tracking. Evaluate the circumstances and make a decision based on factors such as shot placement, distance traveled by the deer, and visibility in the rain.
By following these strategies and being prepared for wet weather conditions, hunting in the rain can prove to be just as successful as hunting on clear days. Don’t let rain deter you from pursuing your trophy buck – embrace the challenge and increase your chances of a successful hunt.
In conclusion, whitetail deer are known to move less during heavy rain due to reduced visibility and decreased hearing abilities. However, they may still be active in light rain or seek shelter until the weather improves. Their movement patterns may vary depending on local conditions and the individual deer’s behavior.
")
")
")
")
")