The number one question people ask us at outdoor shows and in the field is “how do you set up your decoys” or “why did you set your goose decoys up this way”. In fact I’d say it’s the number one reason people who book a guided goose or duck hunt with Maxxed Out Guides want to learn about while they’re in the field.
Unfortunately there isn’t one easy answer. Some hunters may say they set up there spread one particular way every time. You’ll hear hunters talk about and X, C, J spread which means their decoys are set to loosely resemble one of those letters. I strongly recommend not following that line of thinking. There are many times driving around that I’ll see decoy spreads that make a definitive, C, J or X in the field.
This causes two problems for you. First birds don’t naturally sit in fields in formations that resemble letters. Second birds see these unnatural looking spreads up and down the flyway. So not only are they unnatural geese get trained and accustomed to seeing them. This is typically not a combination for success.
However from my experience there is no one decoy spread that each and every day in the field. Some days you need more decoys. Some days you need fewer. There are days where your blinds will need to be at the front of your decoy spread and there are some days where they will need to be at the back.
There are many variables to this equation but the main variable, as it is with any hunt, is the weather. Birds simply look for different things in different weather conditions. The only thing that can tell you how to react to weather is experience and time in the field.
Are there days that a ‘letter shaped” spread will kill geese? Absolutely! However what you typically find on those types of days is most any style spread will kill birds.
So while there isn’t one “go to” spread there are a few things that can help you as you learn how to set your decoys.
First is the kill hole. You always want to try and manipulate the birds to attempt land or finish where you want them. Usually the kill hole is a spot in front of everyone that will create safe shooting lanes and opportunity for everyone to shoot. Typically we like to set up with the wind at our backs so the birds are finishing straight at us. However things like where the roost is in relation to the field, sun, wind and avaialble cover to hide your layout blinds doesn’t always make that possible. Hunting a strong cross wind is one of the more challenging scenarios you’ll run into when establishing the kill hole and is something that comes with experience. Either way though we typically like to give the birds lot of space so they have plenty of area to finish as they come into the spread. Sometimes you have to adjust things as the birds are finishing differently than you anticipated they would.
The second is never have your hide (where you put your layouts) dictated by your decoys. Your decoys should always be dictated by your hide. It does not matter how many decoys you have or realistic they are, if birds see your hide as they approach you are in for a long day in the field, because remember, these birds did not wake up this morning and head out to feed with the intention of giving you a good hunt. They want to live and if they see things out of the ordinary…they’re gone! So once you find your field and see what type of wind and sun your going to be dealing with the next day, your first priority should be to determine where the best place for your hide is, based on the information you have.
Once you have an idea of where your hide is, then you can start to strategize on how to set our decoys and where to position the kill hole.
Lastly, while I can’t give one shape that always works, look at your decoys when you’ve set them all. Remember these are wild animals your hunting. Does your spread look natural? Does it have a definitive edge (it shouldn’t)? Don’t be afraid to put smaller groups just outside of the main mass of decoys. You’ll frequently see a main mass of birds in a field and then smaller groups sprinkled around it. Create some randomness to your spread and don’t be afraid to try something new.
Red frankfurters in a grocery case in Lewiston, Maine. Local and regional traditions are important in many ways, and can be informational, historical, or even humorous in nature. For example, some of the oddest hot dogs I’ve seen are the red frankfurters of Maine. I was curious when I saw these in the grocery store so I asked a manager if they were hot or somehow spicy. “No, they’re not.” How are they different from other natural casing frankfurters from the same meatpackers? “They taste the same” was the answer. Then why are they red? “I really don’t know, that’s always confused me, too.”
Red frankfurters are served in what are called Frankfurter or Frankfort Rolls.
Curious, I flipped over one of the packages of red frankfurters:
Ingredients: Beef and pork, water, corn syrup, contains 2% or less of salt, potassium lactate, flavorings (including extractives of paprika), dextrose, sodium diacetate, ascorbic acid (vitamin C), sodium nitrate, FD&C red #40 and red #3, in a natural lamb casing.
Searching the case I found some meatpackers also throw in FD&C Yellow #6.
I then located the Natural Casing Frankfurters from the same meatpacker:
Ingredients: Beef and pork, water, corn syrup, contains 2% or less of salt, potassium lactate, flavorings (including extractives of paprika), dextrose, sodium diacetate, ascorbic acid (vitamin C), sodium nitrate, in a natural lamb casing.
The only obvious difference is the red coloring. The amounts of the other ingredients may have differed, but it wasn’t likely. From a food manufacturing standpoint, I imagined the process would put the completed natural casing frankfurters through a vat of dye prior to packaging.
None of it made any sense at all.
Prepping the red hot dogs and buns in an electric skillet. The buns are buttered before grilling.
Local media in Maine reports on this from time-to-time, noting not only the popularity but also versions of the reason behind the red coloring:
“W.A. Bean & Sons … has been making the natural casing treats since 1918 … ‘We are the only makers of the red hot dogs left in the state of Maine,’ [Sean Smith, director of marketing and sales development] said … W.A. Bean produces an estimated 400,000 pounds of snappers each year, both under its own name and the Rice’s label that the family began producing nearly a decade ago, after negotiating a deal with its former owner and former competitor.
Smith said the company used to have a large U.S. map on display, with push pins marking everywhere their snappers were shipped, sometimes in orders as large as 10 pounds at a time. Over time, the map became so crowded that maintaining it was no longer feasible … Maine exiles also snatch them up while visiting ‘home’ to bring back to share with their families and friends, Smith said, noting that one W.A. Bean fan from North Carolina drives north every three or four weeks to get a fix of his favorite dog.
It isn’t entirely clear why the red coloring was introduced. One legend has it that the coloring historically was added by the original European makers of frankfurters to mask less-than-premium ingredients … Smith, however, speculated that W.A. Bean added its signature coloring as a way of making its frankfurters stand out amid a sea of competitors. ‘And it took off.’” [Gagnon, 2012]
It’s the perception of the red vs. natural colorings that is odd, that not only do people prefer it but that they’ll go to great lengths to make sure that’s what they eat, even though there are no flavor differences.
I also know of one sixth grader in 2018 who will only eat the red ones because, as his mom laughingly told me on social media, “My son won’t eat the brown. Says they taste weird.” Another acquaintance had this to say:
“Red hot dogs are popular in Hawaii too. When I was signing the papers to close on the house, the mortgage guy was telling us all about a trip he just took to NY, but he ended up staying in the room because he got sick and he thought it was the ‘brown hot dogs’, his colleague said, disgustedly, ‘YOU eat BROWN hotdogs?!’ The rest of us died laughing.”
The cuisinologist in me had to discover the true origin, and as it turns out, it does exist. The London-based Newcomen Society “exists to encourage study of the history of engineering and technology from ancient times to the present day.” The former American arm of the Society, founded in 1939 and disbanded in 2007, held their “1992 Maine Meeting” in Portland. Joseph “Chet” Jordan, grandson of the local meatpacker Jordan’s Meats founder and Chairman of the company at the time, was the Guest Of Honor. He gave the address “Jordan’s Meats: A Thriving Business in Its Third Generation-built Primarily on ‘hot Dogs’” on October 9th. The Society subsequently published the text of his address in 1993 as a 24-page pamphlet with historical photos from Jordan’s Meats. Mr. Jordan’s address specifically addressed the history of Maine’s red frankfurters.
“… Charles and Richard Schonland … were sons of German immigrants, and their father ran the leading sausage business in Lawrence [Massachusetts]. In 1891, the brothers had decided to found their own company and ‘investigated several cities’ before deciding on Portland. Schonlands began operations in a leased building … but later built their own building … Schonlands introduced the so called ‘red franks’ to Maine, and their distribution was Portland, Lewiston, Auburn, Biddeford, Saco and Sanford. This is why the ‘red franks’ today are still popular in those areas. They colored their hot dogs red to differentiate their product from the competition … Pa worked at Schonland Brothers, where he learned much and planned for the day when he could start his own company … [I]n 1927, the year I was born, my parents founded Jordan’s Ready-To-Eat-Meats … In 1935 a major benchmark was reached when Pa purchased Schonland Brothers, his former employers … [T]he red hot dogs that so many people associate with Jordan’s are only one of our many products. As I mentioned before this was a kind of trademark for Schonland Brothers which was continued by Jordan’s after the purchase. In fact, it was Jordan’s who introduced the red franks to Aroostook County in the mid-1930s. The ingredients of the red frank are identical to those in our uncolored franks, but demand for the red frank is still traditional in many parts of the state.” [Jordan, 1993: 8, 10, 12, 13, 14]
The tradition of Maine’s red hot dogs has relocated since Chet Jordan’s address. Jordan’s Meats had bought C.H. Rice Co. in Bangor back in 1962. [Jordan 1993: 19] The Iowa Beef Co. subsequently purchased Jordan’s in 2001, which Tyson Foods then bought in 2003. Tyson then closed Jordan’s Augusta plant, where Rice’s red frankforts were made, in 2004. Later that year, the Rice family bought its name back from Tyson Foods and formed a partnership with Bangor sausagemaker W.A. Bean to begin making the Rice version of the red hot dog again. [Associated Press, 2004] In 2008 Kayem Foods of Chelsea, Massachusetts, announced they had purchased the Jordan’s Meats brand from Tyson Foods, along with six other local brands. [Kayem Foods, 2008] Tyson Foods had closed the Jordan’s Meats plant in Portland in 2005, which then burned on May 6, 2010. [Hoey, 2010] As of the time of this writing, W.A. Bean is still producing both their own and the C.H. Rice versions of Maine’s red hot dog in Bangor and is the only in-state manufacturer of the product. [Gagnon, 2012]
Frankfurt or New England Rolls
Hot dog buns next to Frankfurt Rolls at a Hannaford store in Maine. A “Frankfurt Roll” or “Frankfurter Roll” in New England and New York state is a top-split bun with flat sides that’s either buttered and grilled for use with New England hot dogs or seafood rolls, or steamed for use with coney dogs or frankfurters.
The traditional story of the Frankfurt or Frankfurter Roll used with Maine’s red hot dogs, as well as other preparations such as the Lobster Roll, is that sometime in the 1940s the Howard Johnson’s chain commissioned the J.J. Nissen baking company in Maine to create the roll for their fried clam sandwich. USA Pan® is also credited with developing the pan to create the roll. [Tucker, 2020]
The same style of bun is marketed in other parts of the country as a “coney” or “New England” roll. These are two brands available at a grocery store in Ohio. Wonder also offers a New England roll, available in various parts of the U.S.
Images provided by Food Historian Dr. Eleanor Bartlett of the University of Cambridge (@historyeats) indicated that evidence from Europe strongly suggests this really wasn’t a new development in any manner. The soft French roll, a light bread dough rolled out thinly then rolled into a tight cylinder before baking closely to one another, had been included in paintings as far back as the early 17th century. Visually almost identical to the roll developed by J.J. Nissen, it appears the only real differences are the addition of the top slice for insertion of the meat or seafood components, and the buttering and grilling of the sides of the rolls.
Left: Kitchen interior with a maid preparing meat and gentlemen drinking at a table beyond, by Jeremias van Winghe, 1613; Right: The Baker, Job Adriaenszoon Berckheyde, 1681.
A Frankfurt Roll as made by Country Kitchen, a commercial bakery in Lewiston, Maine.
Another issue with the traditional story of the New England roll pan is that, according to their web site, USA Pan® wasn’t founded until 2009. It’s a subsidiary of Bundy Baking Solutions, makers of factory baking pans and equipment. According to the USA Pan site Bundy Baking was founded in 1959, while the Bundy Baking Solutions site indicates 1964. Both of these facts discredit the supposed J.J. Nissen/USA Pan® connection in the 1940s described in [Tucker, 2020].
Other sources provide a seemingly more accurate history. In the Boston Globe Holly Jennings wrote “J. J. Nissen knew it would need a special pan for an automated production line. Industrial baking-pan manufacturer Ekco Products designed the first commercial pan for the bakery.” [Jennings, 2013] As Ekco had been founded as a manufacturer of non-electric houseware in 1888, this origin makes more sense. Ekco became a subsidiary of American Home Products in 1965. Bundy Baking Solutions founder Russell T. Bundy had begun his career at Ekco. Chicago Metallic had acquired Ekco in 1996, and Bundy Baking Solutions then acquired Chicago Metallic in 2005.
Some of the verbal history in [Jennings, 2013] appears to be a bit of marketing though. One of the interviewees stated “The hinged and side-sliced hamburger and hot dog buns used in most regions of the country today … did not come until later, sometime in the mid-’50s, with the invention of the mechanical side slicer.” This is disproven in U.S. Patent 2,059,108, “Frankfurter Roll Slitting Machine”,assigned to Laurence G. Hobbs and Knut J. Cederholm of Fitchburg, Massachussetts, on October 27, 1936.
Download (PDF, 499KB)
To bake the buns properly, USA Pan® offers a retail ten-bun New England Hot Dog Bun pan for use with any recipe for the buns, which is the pan I’ll use here. Why 10, and not 8? I’m guessing that’s because the end buns only have one side that’s flat and grillable. This pan shows up in the catalog for Bundy subsidiary Chicago Metallic.
For retail New England bun production, Bundy Solutions’ industrial New England pan, with capacities such as six 12-bun loaves, is considered a custom baking pan having various available options and configurations for industrial bakery use. It’s from the Hot Dog, Sub & Hoagie Bun Pan collection from their American Pan subsidiary.
One issue with this pan is that it’s not very tall, at 1-5/16″, so buns made with it are really too short to fill very well. The technique described in many recipes for it mention inverting a baking sheet over the pan, weighted by a piece of cast iron. As the buns cook upside down, this ensures the bottoms of the buns are flat. Photos then show the bottoms of the buns even with the top of the pan.
The real trick is to find a recipe that rises enough to become taller than the New England Hot Dog Bun pan. I needed to find one that gives the buns an extra 3/4″ to grow, to just over 2″ tall.
Many commercial Frankfurt or New England rolls are made of a simple bread dough. The recipe USA® Pan offers for use with their pan includes milk, butter, and potato flakes. It also describes the dough as being stretched and placed in the pan as a whole before the second proofing instead of the rolls being individually formed. This is clearly how the commercial buns are made that are available in New England groceries, and would be the most authentic. Unlike many other recipes it calls for instant yeast vs. active yeast.
To get the buttery sweetness of a good New England classic, you could use one of the better recipes for a Parker House Roll, such as this recipe from the James Beard Foundation. Originally developed at Boston’s venerable Parker House Hotel, the roll is not only still served there, its recipe has been printed in countless cookbooks since Fannie Farmer’s first Boston Cooking School Cook Book in 1896.
Other available recipes available include butter, and either milk or milk flakes, minus the potato flakes, making for a fluffier roll with less density. A version from The Flavor Blender illustrates forming the buns individually. King Arthur Flour has posted this recipe for a version which also includes potato flour or flakes. In the King Arthur version the buns are formed in the pan as a flat layer, which is then cut into the individual rolls after baking.
The following recipe is a modification of the recipe for the pan itself from USA Pan®. Modifications include using more water to get a fluffier bun that can grow more, and not using a sheet pan and weight to flatten the dough as it bakes as suggested in other recipes for the pan. This allows the buns to grow past the hight of the pan, giving them more room for fillings.
Notes On This Recipe
The New England Hot Dog Bun Pan is available from USA Pan® at: https://www.usapan.com/new-england-hot-dog-bun-pan-1190ne
The New England Hot Dog Bun Pan from USA Pan® has a silicone coating that doesn’t respond well to non-stick sprays or metal utensils. It’s best not to use either with it. However, it it makes you feel better, greasing and flouring the pan is alright, although it’s not necessary.
In some ovens, particularly smaller convection ovens, the tops of the buns won’t be quite browned. About 9 minutes into the bake time, remove the buns from the oven and flip them out to check the tops. If they haven’t started browning, set the baked bun mass right-side-up on a baking sheet and bake the remaining 9 minutes until the tops are golden brown.
Bibliography
Associated Press, October 27, 2004. A dog-meet-dog world – Longtime Bangor competitors combine their frankfurter forces. seacoastonline.com.
Gagnon, Dawn, August 17, 2012. Bangor company’s “red snapper” hot dogs are a beloved taste of Maine. Bangor, Maine: Bangor Daily News.
Hoey, Dennis, May 7, 2010. Fire tears through Jordan’s Meats site. Portland, Maine: Portland Press Herald.
Jennings, Holly, July 2, 2013. New England-style bun, from HoJo’s to homemade: Boston Globe.
Jordan, Joseph, 1993. Jordan’s Meats: A Thriving Business in its Third Generation-Built Primarily on ‘Hot Dogs’. Portland, Maine: The Newcomen Society Of The United States.
Kayem Foods, May 20, 2008. Kayem Foods Acquires Jordan’s, Deutschmacher, Kirschner and Essem Brands From Tyson Foods. Chelsea, Massachusetts: Kayem Foods Press Release.
Tucker, Aimee, May 6, 2015. The New England Hot Dog Bun. Dublin, New Hampshire: New England Today
“Exploring the world of deer hunting in Wisconsin? Discover the affordable gateway to this thrilling experience on public land! Uncover the costs associated with entering this popular sport, as we delve into an insightful guide, ensuring you have all the essential information to embark on your exciting deer hunting journey.”
Exploring the Costs of Deer Hunting on Public Land in Wisconsin
Deer hunting on public land in Wisconsin can be a cost-effective option for hunters. Unlike hunting on private land, which often requires permission or leasing fees, hunting on public land is accessible to all hunters with a valid license. The cost of a resident gun deer hunting license in Wisconsin is $24, making it an affordable option for many hunters. For those aged 12-17, the cost is even lower at $20, and children under 12 can hunt for just $7.
One of the advantages of hunting on public land is that there are no additional fees or lease costs associated with accessing the property. Public lands in Wisconsin include state parks, forests, wildlife areas, and other designated areas where hunting is permitted. These lands are managed by the Department of Natural Resources and provide ample opportunities for deer hunting.
In addition to the affordability of hunting on public land, there are also safety benefits. Public lands are often well-marked and have designated hunting zones to ensure the safety of hunters and other outdoor enthusiasts. The DNR also provides hunter safety education programs to promote responsible and safe hunting practices.
However, it’s important to note that while hunting on public land may be more affordable, it does come with its own set of challenges. Public lands can be heavily hunted and may require more effort to find a suitable location and avoid crowded areas. Additionally, access to certain areas may be limited during specific seasons or times of the year.
Overall, deer hunting on public land in Wisconsin offers an affordable and accessible option for hunters. With proper planning and research, hunters can enjoy a successful and cost-effective deer hunt while taking advantage of the state’s abundant natural resources.
Benefits of Deer Hunting on Public Land:
– Affordable: A resident gun deer hunting license costs $24.
– Accessible: Public lands in Wisconsin are open to all hunters with a valid license.
– Safety: Public lands often have designated hunting zones and safety education programs.
Challenges of Deer Hunting on Public Land:
– Competition: Public lands can be heavily hunted, requiring more effort to find suitable locations.
– Limited Access: Some areas may have restrictions or limited access during certain seasons or times of the year.
Budgeting for a Deer Hunting Adventure on Wisconsin’s Public Land
1. Planning Your Expenses
When budgeting for a deer hunting adventure on Wisconsin’s public land, it’s important to consider all the necessary expenses. Start by determining the cost of your hunting license, which is $24 for residents and $200 for non-residents. If you are bringing along any minors or teenagers aged 12-17, their licenses will cost $20 each. Children under 12 can hunt without a license.
2. Accommodation and Transportation
Next, consider the costs of accommodation and transportation. If you plan to stay in a hotel or cabin near your hunting area, research the prices and make reservations in advance. Alternatively, you can opt for camping at one of the many public campgrounds available in Wisconsin. Remember to factor in fuel costs if you’ll be driving to your hunting location.
3. Gear and Equipment
Deer hunting requires specific gear and equipment, such as firearms or bows, ammunition or arrows, tree stands or blinds, clothing, boots, binoculars, and field dressing tools. Make a list of all the necessary items and research their prices to estimate your expenses accurately. Consider purchasing quality gear that will last multiple seasons.
4. Food and Supplies
Don’t forget about food and supplies during your hunting trip. Plan your meals ahead of time and create a grocery list with essential items like snacks, water bottles, cooking ingredients, and disposable utensils if needed. It’s also wise to bring a first aid kit in case of any minor injuries.
5. Miscellaneous Expenses
Lastly, account for any miscellaneous expenses that may arise during your deer hunting adventure. This could include additional permits or tags if you plan on harvesting more than one deer, taxidermy fees if you choose to mount your trophy, or any unexpected costs that may arise.
By carefully budgeting for your deer hunting adventure on Wisconsin’s public land, you can ensure that you have a memorable and enjoyable experience without breaking the bank. Remember to plan ahead, research prices, and prioritize essential expenses to make the most of your hunting trip.
Understanding the Financial Investment of Deer Hunting in Wisconsin’s Public Areas
Deer hunting in Wisconsin’s public areas is not only a popular recreational activity but also a significant financial investment for hunters. The annual November gun deer season, which draws the most participants and has the biggest economic impact, contributes greatly to the state’s economy. With an expected sale of about 550,000 firearm deer licenses this year, the Department of Natural Resources (DNR) generates substantial revenue from license sales alone.
In addition to license fees, hunters also contribute to the local economy through their spending on equipment, lodging, food, and other related expenses. The influx of out-of-state hunters from all 50 states and more than a dozen foreign countries further boosts tourism and brings in additional revenue to Wisconsin.
The financial investment in deer hunting extends beyond just the purchase of licenses and expenses during the hunting season. Many hunters invest in specialized gear such as firearms, ammunition, camouflage clothing, tree stands, binoculars, and other accessories. These purchases not only support local businesses but also contribute to the broader outdoor industry.
Furthermore, public land management and conservation efforts play a crucial role in maintaining robust deer populations and ensuring sustainable hunting opportunities. The DNR allocates resources for habitat improvement projects, wildlife research, population management strategies, and law enforcement activities related to deer hunting. This investment helps maintain healthy ecosystems while providing recreational opportunities for hunters.
Overall, deer hunting in Wisconsin’s public areas represents a significant financial investment that supports local economies, outdoor industry businesses, and conservation efforts. It is an important contributor to the state’s economy while also providing valuable recreational opportunities for both residents and visitors alike.
Benefits of Deer Hunting Investment:
– Boosts tourism and brings revenue from out-of-state hunters
– Supports local businesses through spending on equipment and supplies
– Contributes to the broader outdoor industry
– Funds habitat improvement projects and wildlife research
– Maintains healthy ecosystems and sustainable hunting opportunities
Financial Aspects of Deer Hunting:
– Sale of firearm deer licenses generates substantial revenue for the DNR
– Hunters spend on equipment, lodging, food, and other related expenses
– Investment in specialized gear such as firearms, ammunition, and accessories
– Public land management and conservation efforts require financial resources
– Overall economic impact extends beyond the hunting season.
Breaking Down the Expenses of Deer Hunting on Public Land in Wisconsin
Deer hunting on public land in Wisconsin can be an exciting and rewarding experience, but it’s important to understand the expenses involved. Here is a breakdown of the costs you can expect when hunting deer on public land in Wisconsin.
Licenses and Tags
To hunt deer in Wisconsin, you will need to purchase a hunting license. For residents, a gun deer hunting license costs $24. Non-residents, on the other hand, will need to pay $200 for a gun deer hunting license. Additionally, there may be additional fees for certain tags, such as antlerless deer tags. It’s important to check the specific regulations and fees for the county or area where you plan to hunt.
Equipment
Proper equipment is essential for a successful and safe hunt. This includes firearms or bows, ammunition or arrows, camouflage clothing, boots, binoculars, and other necessary gear. The cost of equipment can vary depending on your preferences and budget. It’s important to invest in high-quality gear that will last and perform well in various weather conditions.
Travel and Accommodation
If you are traveling from out of state or a considerable distance within Wisconsin to hunt on public land, you will need to consider travel expenses. This may include fuel costs, lodging accommodations if staying overnight, and meals during your trip. Planning ahead can help you find affordable options that fit within your budget.
Additional Costs
There may be additional costs associated with deer hunting on public land in Wisconsin. For example, if you choose to use bait as part of your hunting strategy and are in one of the 14 counties where baiting is legal, you’ll need to purchase corn or other bait. It’s also important to consider any potential costs for processing or butchering your harvested deer, as well as any taxidermy services if you choose to have a trophy mounted.
While hunting on public land in Wisconsin can be an affordable option compared to private land hunting, it’s important to budget and plan accordingly. Understanding the expenses involved will help ensure that you have an enjoyable and successful hunting experience.
The Price Tag of Pursuing Deer on Wisconsin’s Public Hunting Grounds
Pursuing deer on public hunting grounds in Wisconsin comes with a price tag. While the cost of a resident gun deer hunting license is $24, non-residents will have to pay $200 for the same license. However, it is worth noting that there are discounted rates available for younger hunters aged 12-17 ($20) and children under 12 ($7). These licenses can be purchased online at gowild.wi.gov or from sporting goods stores and other license sales outlets listed on the interactive map provided by the Department of Natural Resources (DNR).
Once a hunter successfully shoots a deer, it must be registered by 5 p.m. the day after it is recovered. This registration process can be done online at GameReg.WI.Gov or through a phone call to (844) 426-3734. It is important to note that all harvested deer must be registered to comply with regulations.
When it comes to baiting deer, there are certain restrictions in place. Baiting is legal in 14 counties but prohibited in 58 for the 2024 gun deer season due to state laws aimed at preventing chronic wasting disease. In counties where baiting is allowed, hunters are limited to using two gallons of corn or other bait at a site. For specific details on baiting regulations, individuals can visit dnr.gov.wi.
In terms of safety, there has been a positive trend towards fewer shooting incidents during Wisconsin’s gun deer hunting seasons. This improvement can be attributed to mandatory hunter safety education and the use of blaze orange clothing. The shooting incident rate in recent years has been approximately 1 per 100,000 participants. Additionally, the increased use of tree stands and reduced reliance on deer drives has contributed to safer hunting practices.
Overall, pursuing deer on Wisconsin’s public hunting grounds requires obtaining the necessary licenses, following registration procedures, adhering to baiting regulations, and prioritizing safety. By doing so, hunters can enjoy a successful and fulfilling hunting experience in the state.
Calculating the Cost to Engage in Deer Hunting on Public Land in Wisconsin
Calculating the cost to engage in deer hunting on public land in Wisconsin can involve several factors. Here are some considerations and expenses to keep in mind:
1. Hunting License: In order to hunt deer in Wisconsin, you will need to purchase a hunting license. The cost of a resident gun deer hunting license is $24, while non-residents will pay $200 for a license. There are also reduced rates for youth hunters aged 12-17 ($20) and those under 12 ($7).
2. Tags: Each hunter is typically authorized to harvest one buck and at least one doe with their license. The number of antlerless deer tags available in each county is determined through a process involving recommendations from the County Deer Advisory Council, review by the Department of Natural Resources (DNR), and the Natural Resources Board.
3. Equipment: Deer hunting requires certain equipment such as firearms or archery equipment, ammunition or arrows, tree stands or blinds, camouflage clothing, boots, knives, and other accessories. The cost of these items can vary depending on personal preference and quality.
4. Transportation: Traveling to public hunting lands may require fuel costs for vehicles or transportation fees if using public transportation.
5. Lodging: If you plan on staying overnight during your hunting trip, lodging expenses should be considered. This could include hotel stays, camping fees if applicable, or renting cabins or other accommodations.
6. Food and Supplies: Bringing food and supplies for your hunting trip is essential. This includes meals for the duration of your stay, snacks, water or beverages, cooking utensils if necessary, coolers for storing harvested game meat safely, and any other necessary supplies.
7. Miscellaneous Expenses: Additional expenses may include hunting permits or stamps required for specific areas or activities (e.g., state park permits), processing fees if you choose to have your harvested deer processed by a professional butcher, taxidermy fees if you decide to mount a trophy, and any other personal expenses or incidentals.
It is important to note that these costs can vary depending on individual choices, preferences, and circumstances. It is recommended to plan and budget accordingly to ensure an enjoyable and successful hunting experience in Wisconsin’s public lands.
In conclusion, the cost of getting into deer hunting in Wisconsin on public land varies depending on several factors. While there are expenses such as licenses, permits, and equipment, it is possible to start with a modest budget. By researching affordable options and considering second-hand gear, individuals can pursue this popular outdoor activity without breaking the bank.
You’ve put in unsuccessfully for years, trying to draw a tag for your dream hunt. When you finally get that coveted tag in hand, make sure your hunt gets off to a smooth start. You’ve got to get there first. Learn all you need to know about flying with archery equipment well in advance of your flight.
If you do your homework and you’re proactive about complying with regulations, you shouldn’t have any trouble flying with archery gear. Most airlines permit you to fly with a bow and arrows, but it’s a good idea to call your airline for specific information and to learn if there are any size restrictions on your bow case.
According to Transportation Security Administration guidelines, your bow, arrows and hunting knives must be checked; they can’t be part of your carry-on baggage. There are no specific regulations requiring releases to be checked, but be aware that most airport security officials are unfamiliar with archery equipment and may mistake your release for a firearm part, given that it has a trigger, or even brass knuckles, depending on the release style. It’s best to keep it in checked baggage.
Because they don’t encounter archery equipment every day, some security agents may not know the rules as well as you do. Expect delays and have your facts in order to help the process go smoothly. Print out a copy of TSA regulations on archery equipment and carry it with you for added insurance.
Packing your bow properly not only helps things go smoothly at the airport, but it also protects your equipment. TSA regulations don’t require your bow to be in a hard-sided case, but using one is an excellent idea because baggage is often handled roughly. The only reason you might consider using a soft case is if your final destination involves flying in a bush plane where weight is a factor.
Your case must be locked. Most bowhunters buy a TSA-approved lock. TSA agents have universal keys that can open these locks. Your case will almost certainly be opened and inspected, and if you don’t have a TSA lock and aren’t there to open the case yourself, the lock could be cut. If you don’t want agents to access your case in your absence, ask if an agent can examine the case right at the ticket counter while you supervise, or wait to go through security until you’re sure your case has been inspected. Keep your key on your person at all times. Once inspected, your case should move through baggage without a hitch.
Pack your bow case to protect your gear. Use tie-down straps to secure your bow within the case. Stuff hunting clothes or other soft material around your bow, particularly around delicate sights. You may even consider wrapping your sights with foam or bubble wrap. Arrows should be stored securely in the case’s foam slits or in a separate arrow tube stored within the case. Broadheads should be removed from arrows and stored in a hard container inside the bow case. Also, package your hunting knife in a sheath or hard container and store it inside the case.
On the day of your flight, arrive at the airport well before your departure time in case you run into hassles. Most airlines charge fees for checked bags (and even more for oversized bags, which may apply to your bow case). One alternative is to ship your bow prior to your flight. You won’t have to deal with airport hassles, but you probably won’t save much money, either, and you still run the risk that your bow doesn’t make it to your destination. Plus, you’ll have to forgo a few days of shooting practice.
When you reach your final destination, with any luck, your bow case will pop up into the baggage claim area as expected, but don’t be alarmed if you don’t see it right away. Sometimes large bags, or those that may be considered weapons, have to be picked up at the baggage claim office with a photo ID.
Flying internationally with a bow usually isn’t a problem, but some countries may restrict it, so check in advance. It’s a good idea to fill out Form 4457, Certificate of Registration for Personal Effects Taken Abroad, ahead of time. That proves you owned the bow while in the United States, shielding you from paying tariffs upon your return. Carry your hunting license or archery organization membership card as well. Agents in other countries may not understand hunting and could think you are using your bow as a weapon. Having this paperwork on you makes you look more legitimate.
Glock makes some of the best pistols in the world that are used by militaries, law enforcement, and civilians all over the world. Though all their pistols are very popular, the Glock 17 and the Glock 19 probably take the top spots.
Both of these pistols are very capable and effective. They are both chambered in 9mm and use similar designs, materials, and testing standards. However, they also have distinct differences, which set them apart.
So, today we will put the two of the best and most popular pistols, the Glock 17 and 19, against each other and try to answer which one you should get.
*G17 and G19 have many generation models. In this article, we will be comparing the factory GEN5 models.
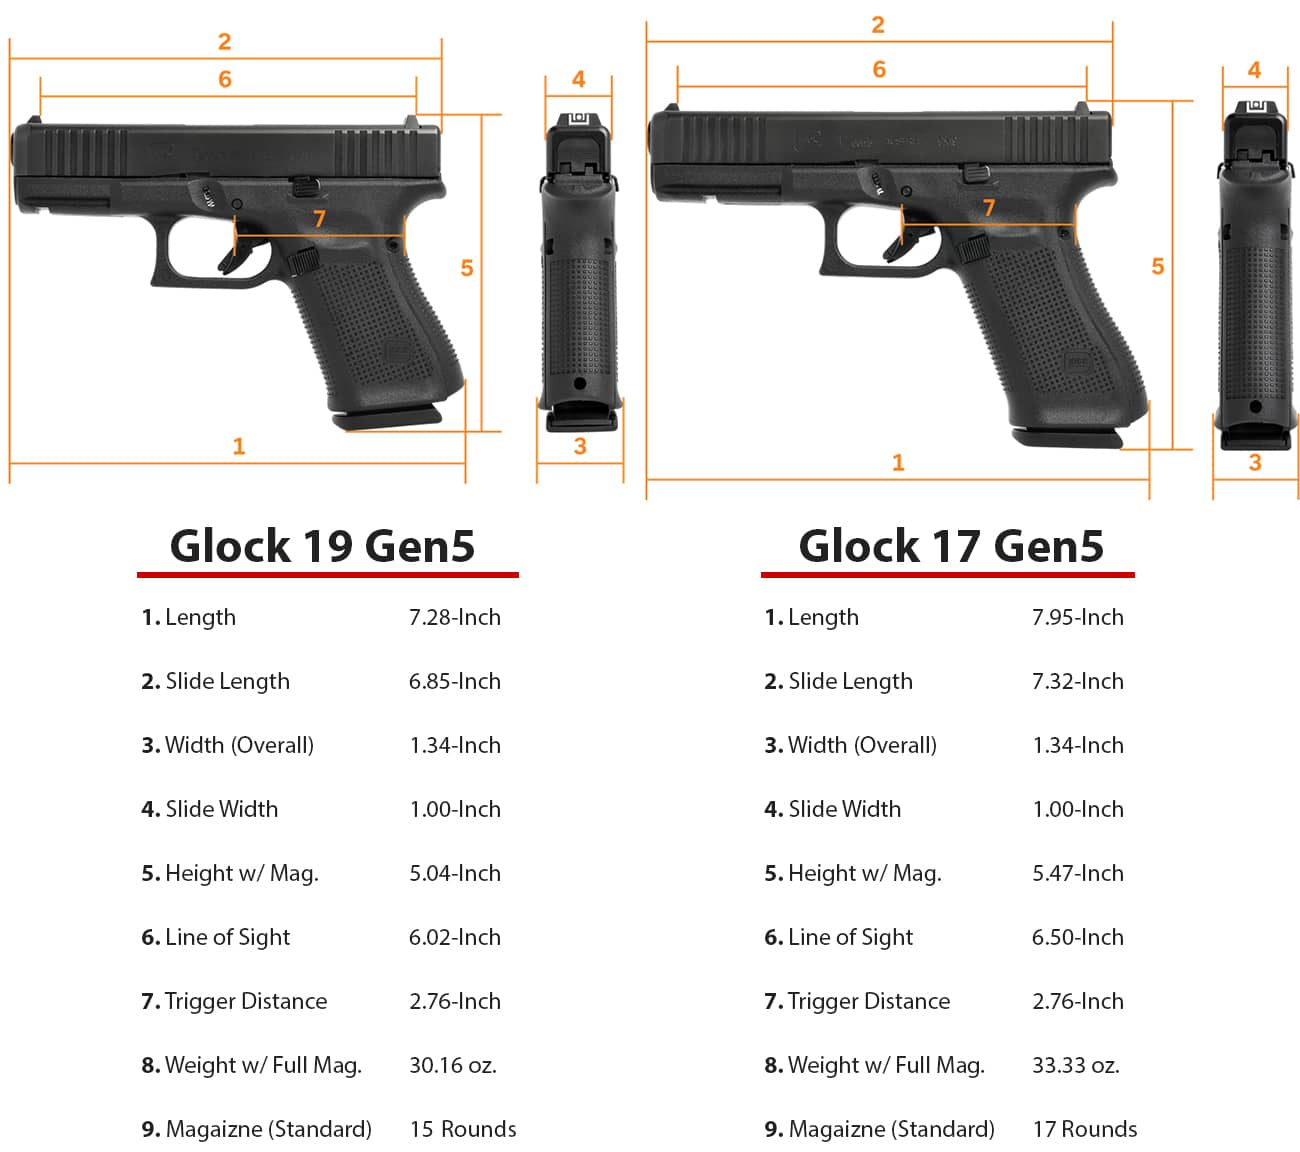
In many ways, the Glock 17 and 19 are the same. However, the Glock 17 is a full-sized pistol, and the Glock 19 is more of a compact or midsize pistol. They fire the same caliber, have identical triggers, and have the same barrel rifling; however, the Glock 19, being a more compact pistol, has a shorter barrel, grip, and slide.
The Glock 17 has a 4.48-inch barrel (114 mm), whereas a Glock 19 has a 4-inch barrel (102 mm). With the shorter barrel, the overall length of the Glock 19 is also shorter. It is 7.28 inches (185 mm) compared to the 8.03 inches (204 mm) on the Glock 17.
When it comes to concealment, which is what most compact pistols are designed for, the height of the grip is a more critical factor than the length of the slide. This is why the difference between the size of the grips is more significant than the difference in the barrel length. The Glock 19 has a 5.04 inches (128 mm) tall grip, with the magazine included, whereas the Glock 17 has a grip height of 6.50 inches (165 mm). In terms of slide width and overall width, the Glock 17 and 19 have the same size.
Glock 17 Vs. 19: Recoil and Accuracy
Both felt recoil and accuracy usually depend upon the shooter. However, as far as the capability of the pistols is concerned, both the Glock 17 and 19 are very accurate in the hands of even an average shooter. Technically, since the barrel on the Glock 17 is longer, it should theoretically give the bullet more stabilization at longer distances and hence be more accurate. Still, realistically, it is tough to tell any difference between the accuracy of these pistols. They are both very accurate pistols, which is owed to many factors. However, the unique Polygonal rifling used in Glock pistols is one of the main reasons for their exceptional accuracy. Glock has modified the rifling and the crown on the Gen5 models to increase its precision further.
In terms of recoil, both pistols are again quite similar. Despite the slightly shorter grip, the Glock 19 is very easy to grip, even for people with large hands. Weight also impacts the recoil impulse of a firearm, and though the Glock 19 is lighter, there is no noticeable difference in recoil. The shorter pistol should kick harder, but the difference is so insignificant that it would take a real expert to notice it.
Glock 19 vs. 17: Magazine Capacity
In terms of magazine capacity, the Glock 17 can hold 17 rounds of 9mm in the magazine, with one in the chamber. Keep in mind that this is not why it is called the Glock 17. The “17” refers to the patent number rather than the magazine’s capacity. The Glock 19 has a capacity of 15 rounds, plus one in the chamber. The shorter slide means that it carries a shorter magazine. However, if you want, you can use Glock 17 magazines in a Glock 19 or even opt for higher capacity magazines, but that would obviously decrease the concealability of the Glock 19, and it won’t technically be a “compact” pistol anymore. So, in terms of magazine capacity, both models can achieve the same capacity since G19 can also use G17 magazines.
Which One Should You Get?
Both the Glock 17 and 19 are excellent and versatile pistols that can fit almost any use case. However, with their different sizes, they do perform better in some applications than others. For instance, if you are looking for a full-sized pistol, perhaps for competition shooting, or you want a home defense pistol that has a higher capacity from the box, then the Glock 17 is the better option. On the other hand, if you are looking for a concealed carry pistol, the Glock 19 is the better option. Both pistols are great for defense and are widely used by law enforcement and militaries worldwide.
Glock 17 Pros and Cons
Pros:
Larger frame for easier control
Higher magazine capacity (factory)
The longer barrel can increase accuracy slightly
The heavier weight can reduce recoil slightly
Cons:
Not very concealable
Glock 19 Pros and Cons
Pros:
More concealable
Faster cycling rate
Cons:
Lower capacity (factory)
Conclusion:
So, where both the Glock 17 and 19 are among some of the best semi-automatic 9mm pistols in the world and can be used in almost any application, their slight differences do set them apart. The Glock 19 is the better option for concealed carry, with its smaller frame and overall profile. On the other hand, the Glock 17 is better for home defense, or completion shooting, since it has a higher capacity and bigger size. Still, many people use the 17 as their everyday carry pistol, and many use the 19 come home defense and competition shooting, both of these pistols are just so versatile that they could be used for any application.
Glock makes some of the best pistols in the world that are used by militaries, law enforcement, and civilians all over the world. Though all their pistols are very popular, the Glock 17 and the Glock 19 probably take the top spots.
Both of these pistols are very capable and effective. They are both chambered in 9mm and use similar designs, materials, and testing standards. However, they also have distinct differences, which set them apart.
So, today we will put the two of the best and most popular pistols, the Glock 17 and 19, against each other and try to answer which one you should get.
*G17 and G19 have many generation models. In this article, we will be comparing the factory GEN5 models.
"Air Rifle Scope vs Rifle Scope: Unveiling the Ultimate Precision Optics. Discover the essential differences and benefits of these two optical devices, empowering shooters...
")
")
")
")
")


 Red frankfurters in a grocery case in Lewiston, Maine. Local and regional traditions are important in many ways, and can be informational, historical, or even humorous in nature. For example, some of the oddest hot dogs I’ve seen are the red frankfurters of Maine. I was curious when I saw these in the grocery store so I asked a manager if they were hot or somehow spicy. “No, they’re not.” How are they different from other natural casing frankfurters from the same meatpackers? “They taste the same” was the answer. Then why are they red? “I really don’t know, that’s always confused me, too.”
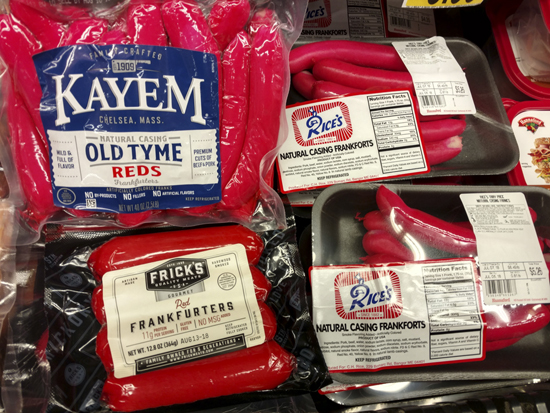 Red frankfurters are served in what are called Frankfurter or Frankfort Rolls.
 Prepping the red hot dogs and buns in an electric skillet. The buns are buttered before grilling.
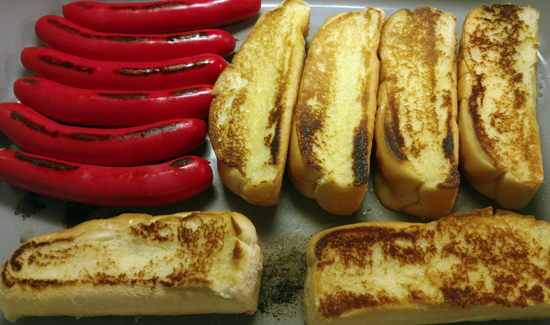 Hot dog buns next to Frankfurt Rolls at a Hannaford store in Maine. A “Frankfurt Roll” or “Frankfurter Roll” in New England and New York state is a top-split bun with flat sides that’s either buttered and grilled for use with New England hot dogs or seafood rolls, or steamed for use with coney dogs or frankfurters.
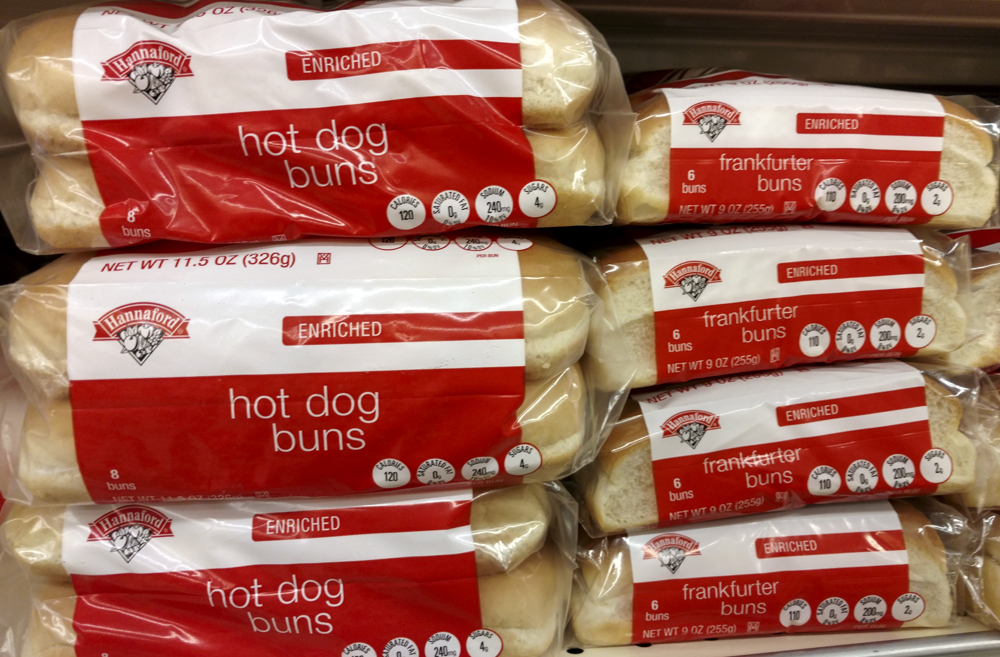 The same style of bun is marketed in other parts of the country as a “coney” or “New England” roll. These are two brands available at a grocery store in Ohio. Wonder also offers a New England roll, available in various parts of the U.S.
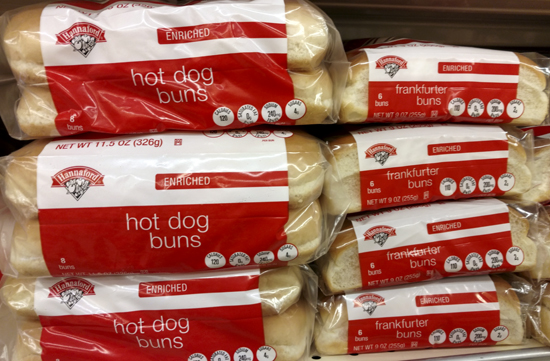 Left: Kitchen interior with a maid preparing meat and gentlemen drinking at a table beyond, by Jeremias van Winghe, 1613; Right: The Baker, Job Adriaenszoon Berckheyde, 1681.
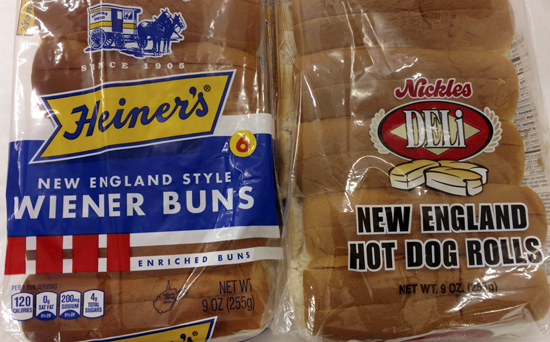 To bake the buns properly, USA Pan® offers a retail ten-bun New England Hot Dog Bun pan for use with any recipe for the buns, which is the pan I’ll use here. Why 10, and not 8? I’m guessing that’s because the end buns only have one side that’s flat and grillable. This pan shows up in the catalog for Bundy subsidiary Chicago Metallic.