Scoring an impressive 247 4/8’s this monster was not brought down by a hunter
“Michigan’s Biggest Buck” is a very powerful statement. The current Michigan record is a buck shot with a firearm in 1976 by Paul M. Mickey that scores 238 2/8 Non-Typical, Boone & Crockett points. The buck in the pictures accompanying this article has an amazing gross green score of 257 2/8 and a green net score of 247 4/8! If this score holds up, it will blow way past this long standing record by nearly 10 inches.
This new buck cannot officially be recognized as the state record until April 6, at which time it will be eligible for an official panel-score. The current tallies came about when Commemorative Bucks of Michigan scorer, Dennis Sheets measured the massive headgear accompanying this buck. These scores are considered “green” because the current record keeping systems require a 60 day period of “drying” after the antlers are acquired.
This impressive buck was not brought down by a hunter but rather it was found dead by Sharon Weidmayer while she was taking her dog “Camy” for a walk through some overgrown pasture land. Ms. Weidmayer found the buck on February 7, 2010 and informed her hunting friend Ron Waldron of her find and asked him to come and get the deer.
Two days later, Sharon took Ron to the dead animal. When Ron saw the monstrous buck he exclaimed in jest, “That’s not a deer, that’s an elk.”
Ron could not wait to show the antlers to his son-in-law/hunting partner, Mike Guenther. As soon as Mike saw the trophy he knew they had something really special and contacted the authorities to acquire a permit to own the deer.
This buck has 26 scoreable points and carries an incredible 29 inch inside-spread, and main beams that measure 31 inches. The deer was found dead in Clinton, Michigan which is in Lenawee County. This is the same county that produced the 200 class buck taken by Jeremy Collingsworth during the 2009 archery season and was featured on the cover of the January 2010 issue of Woods-N-Water News.
Mr. Guenther reports that the big buck that his father-in-law brought home hadn’t been dead for very long. The deer had been eaten by coyotes but the eyes were intact and the meat remained red. The cause of death is unknown but there were no visible holes or broken bones. The jaw and teeth wear indicate maybe a 4 ½ year old deer.
Ironically, another 4 ½ year old deer that was also found dead is the world record non-typical buck. This deer is known as the “Missouri Monarch” and scores 333 7/8. The highest scoring buck killed by a hunter was shot with a muzzleloader by 15 year-old Tony Lovstuen in Iowa and scores 319 4/8.
The highest scoring Michigan non-typical taken by hunters include the aforementioned Mickey buck which also holds the firearm record at 238 2/8. Aaron M. Davis has the archery record with a Hillsdale County buck that scores 225 7/8. Calhoun County is the home of the state record muzzleloader buck shot by Tim Tackett and it scores 215 1/8. The handgun record is held by Carl Mattson with a score of 218 1/8.
Mike Guenther states that Sharon also found the previous year’s shed from the buck’s right side and that the brow tine curls the same and it even has matching “sticker” points. Guenther goes on to say that the buck put on a lot of mass since the previous year.
When word spread of their great discovery over 200 people toured their pole barn to view the spectacular trophy. Ron and Mike are passionate hunters themselves and are “quite glad to be able to share such a wonderful buck with the public.”
Adult white-tailed deer are about three feet tall at the front shoulders. Maryland yearling bucks (males) weigh an average of 105 pounds; yearling does (females) average 90 pounds. During the warm months, deer possess reddish-brown hair. A grayish-brown coat with a thick undercoat replaces the reddish hair during the cold time period. The white-tailed deer’s distinctive white tail and white rump patch is readily visible when they bound away from real or perceived danger. White-tailed deer sprint up to 35 miles per hour and are able to leap over 8 foot tall barriers.
Only white-tailed bucks possess antlers. In extremely rare cases, does may grow antlers. Bucks use their hard antlers to establish dominance over other bucks during breeding season. Antlers are grown and shed each year. Antlers, which are composed of true bone, begin to grow in late March and early April. The growing antlers are covered with skin and blood vessels called velvet.
White-tailed deer can be found in every county in Maryland. White-tailed deer are also common throughout much of the United States, southern Canada and even parts of central America.
Doe (left) by John White and a buck withvelvet antlers (right), by Kerry Wixted
Habitat:
Maryland white-tailed deer habitat includes most of the state except for open water and intensely developed urban areas (e.g. downtown Baltimore). Deer thrive in landscapes with wooded/brush sections and open areas such as cropland, pasture or landscaped yards. Deer use the wooded areas for food and cover, and open areas provide food. Landscapes with an abundance of edge habitat (areas where forested and open habitat meet) support prime deer habitats. Because of this, suburban sprawl creates ideal habitat conditions for white-tailed deer. When forested areas are converted into housing developments, portions are cleared for roads and home sites, while other sections remain forested. When open farmland is transformed into residential areas, new homeowners plant trees, shrubs and perennials. Both of these types of residential conversions provide excellent deer habitat. To learn more about managing deer damage, then click here.
The typical, annual average home range for white-tailed deer is considered about one square mile (640 acres). However, the sex and age of the deer and habitat types will influence varying size home ranges. Yearling males will move many miles while adult females usually have smaller stable, annual home ranges. Deer in good quality habitat will need to travel less than deer in poor quality habitat.
Diet:
Deer feed on nuts and berries, leaves, woody shoots and stems, grasses and cultivated crops. Some of their favorite natural foods include acorns, honeysuckle, poison ivy, green briar, young tree seedlings and mushrooms. Soybeans, corn and ornamental shrubs are several of their favorite foods planted by humans.
Deer have a four-chambered stomach that is required to digest the vegetation. Food first travels to the rumen that contains the bacteria and protozoans, which begin the digestive process. The reticulum circulates food back to the mouth so that the deer can chew the food again. The omasum functions as a pump and directs the partially digested food from the reticulum to the abomasum. This final chamber functions as a true stomach and completes the digestive process. Because of this special digestion process, it is generally not recommended to feed deer during the winter. Click here to view White-tailed Deer Facts.
Reproduction:
Maryland white-tailed deer begin breeding in October and continue to breed through mid December. The shortening of day length (photo period) triggers the breeding season. Most does become pregnant during the first half of November. Because white-tailed deer are polygamous, one dominant buck can breed numerous does. Any receptive doe that does not become pregnant will cycle back into estrous (heat) in about 28 days and will mate again.
Fawns (baby deer) are born during May and June after a gestation period of about 200 days. Yearling does usually give birth to single fawns. Mature does in good physical condition frequently produce twins.
Newborn spotted fawns remain hidden and solitary for about three weeks. The doe visits her young only two to three times per day in order to nurse and groom the offspring. When the fawn is strong enough to run with the doe, it will follow its mother and begin to sample foods eaten by the doe. Fawns can live independently of their mother at about two months old.
Sounds:
Deer typically make three different types of sounds: alarm, maternal, reproductive.
Alarm calls help to warn other deer of real or perceived danger. When a deer is surprised, it will snort by forcing out air rapidly from the nostrils. When fawns or young adults are captured by a predator or trapped, they will make a bleating or groaning sound.
Does also use low grunts to communicate with her young and to maintain contact. Fawns respond with a mew like sound. Fawns will also use bleats to get attention from the maternal doe. Communication between does and young help to maintain a close pair bond.
During the breeding season, bucks make grunt sounds while searching for receptive does and while tending does. Bucks also advertise their presence to prospective does and potential competitive bucks with grunts of varying pitch and volume.
Behavior:
Bucks are often solitary creatures aside from the breeding season and occasionally during the summer when they form bachelor bands. In the breeding season, bucks will actively seek out females to mate with as well as spar with other males to fight for the rights to breed.
Does, on the other hand, can often be seen traveling together particularly in the winter when food tends to be scarce. Often, fawns will remain with their mothers through the winter and into early spring. Typically, young bucks leave their mothers earlier than young does.
Management:
White-tailed deer are primarily managed by hunting in Maryland. Click here to learn more about hunting as an effective tool for white-tailed deer management. Click here to learn more about white-tailed deer management, in general.
For an information sheet on common deer sign, please click here.
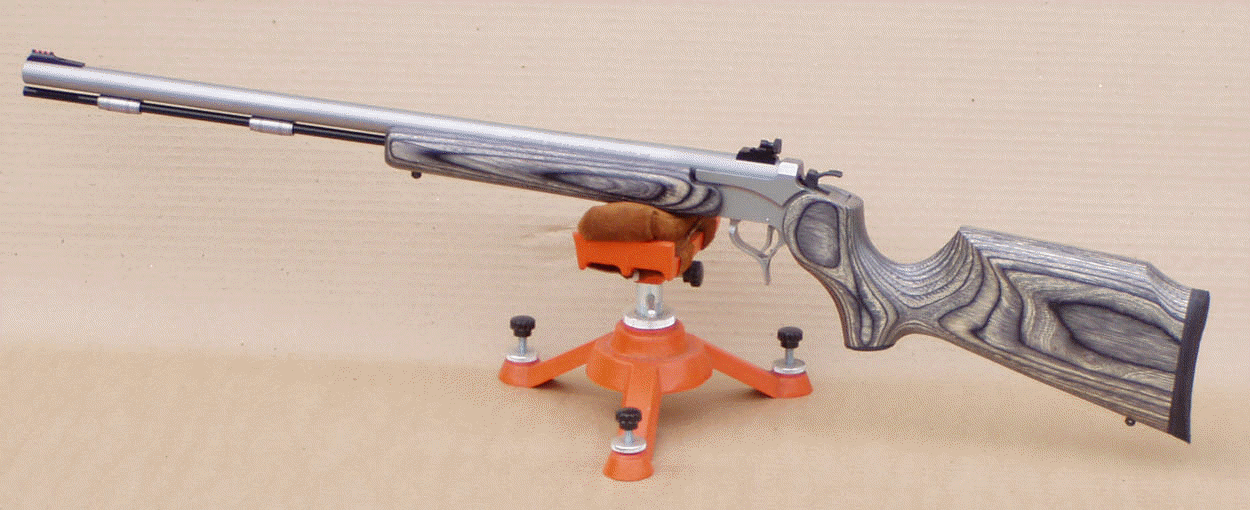
One of the most important parts of a rifle is something that is often overlooked – the stock. Rifle stocks are one step you can take to customize your firearm to exactly fit the shooter and the uses of the gun. Let’s take a look at some different parts and types of rifle stocks. Read on!
A Rifle Stock is also known as a shoulder stock, buttstock or just the “butt” of the firearm. The receiver and firing mechanism as well as the barrel are attached to the stock which is held against the shooter’s shoulder when fired. The stock of the rifle allows you to firmly support and aim your gun.
It is important to know the parts of the rifle stock to help understand what type of stock will work best for our rifle and chosen application of said rifle. As shown in the diagram above, the parts of the rifle stock’s anatomy are mainly the butt and forend with the butt having a comb, heel, toe and grip.
Butt
The butt of the rifle stock is the part that is held into the shooter’s shoulder. Oftentimes with larger caliber rifles you will notice padding added to it to reduce felt recoil.
Comb
The comb of the rifle stock is the top of the stock where the shooter will rest our cheek to sight down the barrel or optic. Comb is very important as it puts the shooter’s eye into the perfect spot for aiming and eye relief for the optic.
Grip
Grips on a rifle stock are fairly self-explanatory. This is the part the stock the shooter’s hand holds keeping the butt tight into the shoulder.
Forend
A forend of the gun stock is where the shooter’s supporting arm holds the rifle up and maneuvers with the gun to aim it towards the target. It will be important to have a forend with excellent grip that fits the shooter’s body well.
Rifle Stock Construction
Rifle stocks can be made of many different materials and in many different styles. Ask yourself what type of climate you will be shooting in and the purpose of the gun. For instance, extreme temperatures often experienced in big-game hunting could potentially cause wood to warp, so a composite of some nature might be a better choice. Let’s take a look at a few of the material options.
Hardwood
Hardwood rifle stocks can vary greatly in accuracy and are susceptible to changes in temperatures, warping etc. When selecting a hardwood gun stock try to find one in a type of wood that is extra dense and hard. The softer the wood, the more prone to warping, shrinking/expanding and cracks the rifle stock will be.
A Curly Maple Hardwood Rifle Stock. Photo Credit – Accurate Shooter Bulletin
If we want a fancy, beautiful rifle stock we’ll be able to find a hardwood stock in nearly every exotic wood you can think of, making this a great choice for a displayed weapon as well as a great choice for a hunting rifle. Prices can vary from $50 into the thousands.
Laminated
Laminated wood has a very high accuracy potential and is more resistant to changes in temperature and humidity because it is multiple layers of wood glued together and then sealed. This glue binding agent repels moisture and because we aren’t dealing with the natural grain of the wood we don’t have to worry about weak points that can eventually crack usually.
Laminated Rifle Stock. Photo Credit: Eabco
One thing to keep in mind with a laminated stock is that they can be heavier than the other options – one reason you see these stocks on benchrest long-range rifles. Laminated rifle stocks can usually be found under $500.
Injection Molded Synthetic
Injection Molded Synthetic rifle stocks are usually amongst the cheapest we can buy. These gun stocks are produced by injecting molten plastic in a mold. While these stocks might seem appealing due to price there are several drawbacks.
Injection Molded Synthetic rifle stocks are not stronger or lighter than most wood gun stocks and their strength and stiffness can diminish as the thermoplastics used heat up in the summer sun or from the heat of shooting. Less rigid rifle stocks can have effects on accuracy.
Composite rifle stocks are what you will usually see on high-end and military weapons. These are made from resin-soaked fabrics and powders put into a mold, compressed and allowed to cure. Composite Synthetic gun stocks can be made from various materials such as fiberglass, engineered fabrics or carbon fiber.
Rifle Stocks made in this manner and from these materials will often have reinforced stress points with something such as Aluminum. Lightweight, rigidity and chemically inert are the pros of these stocks but be prepared to shell out big money for them.
Bolt Action Stock vs AR Stock
Bolt-action rifles have an endless amount of options it seems but the AR-15 does as well. In general AR-15 stocks are Composite Synthetic or Injection Molded stocks. Typically AR-15 stocks are much more adjustable than your average bolt-action rifle stock. Remember that the AR platform of rifles are incredibly customizable to the shooter and their needs so the stock is going to be no different!
Retractable AR15 Stocks
Quite possibly the most common gun stock you will see on an AR is a retractable stock. This stock can be extended and retracted to fit the shooter’s size, length of pull, etc. With the flip of a lever or push of a button, the stock on your AR15 can be extended. Makes for a handy storage solution too! We like this one from Magpul here.
Fixed AR15 Stocks
Fixed AR15 stocks are what you might see on a vintage pre-ban Colt, similar to the M16 from the Vietnam-era in many cases. Obviously, if this works for a particular shooter more power to them. Modularity is the point of the AR-15 however, so it seems a bit silly not to have a more versatile gunstock. Nonetheless, many people like them. Check one out here.
AR15 Pistol Braces
AR-15 Pistols. Be careful with this one, as our beloved and revered ATF would like nothing more than to wreck your day at the range because you put a stock on your AR pistol, thus creating a Short-barreled Rifle. Thankfully, a pistol brace exists. A pistol brace is meant to be strapped to your arm to stabilize the pistol. Yes, you can shoulder a brace still. Sound stupid? Yeah, that’s because it is.
Left: A stock. Right: A pistol brace. Photo Credit – Shwat.com
Featureless AR15 Stocks
Continuing our trip down Stupidity Lane, we reach peak absurdity. In the United Soviet Socialist Republic of Cali… Errr. Sorry, we meant, in California, some lawmakers got a hair up their booties to make rifles “Featureless.” Not even going to speak about this anymore, we’ll just let the pic speak for itself. Sorry California.
A “Featureless” AR-15. Photo Credit – Caligunner.com
Shop Modulus Arms’ Butt Stocks
The gun world can be a huge rabbit hole when looking for compatible parts. We hope this helped give you some ideas for your next build or upgrading your current rifle! Don’t forget to check back often for helpful articles, tips and tricks etc! Looking for an AR-style stock? We’re slowly but surely expanding our inventory. Check out some of our favorites under parts & accessories! Until next time!
It has a single-shot action so you can shoot only once at a time.
The barrel is rifled which means that it has helical grooves inside the bore to make the bullet spin.
Moreover, the barrel is made of brass (an alloy made of copper and zinc).
Brass barrels give you lots of advantages:
First, it is pretty much non–corrosive and doesn’t rust easily.
Second, it is self-healing; as small scratches from inside the barrel, subsequent firing will smooth out these imperfections and give you much better accuracy.
In summary, having a brass barrel is a huge advantage that can make your gun last for years .
The Benjamin 397 doesn’t have a scope rail to mount the scope, so if you insist on using one, you will need either a Crosman 3/8 Intermount or the Air Venturi Weaver/Picatinny Intermount.
One thing to remember here is that you have to mount the ring in the center of the base to keep it solid,
And if the scope were any further back, it would interfere with the bolt handle
So you should get a forward-mounted scope to be able to pump the rifle in the normal way.
Even when you do mount the scope this way, the long eye relief will make the scope too hard to see through
So do yourself a favor and get theWilliam peep sight (shown below) instead
Air Venturi Williams 64 Peep Sight – 1
Air Venturi Williams 64 Peep Sight – 2
Because “pumper and peep are a match made in air gun heaven”, ya know.
Velocity, accuracy and power
The maximum velocity of this gun is 800 FPS.
This is a medium velocity compared to other .177 pellet guns on the market
And how about accuracy?
Chrony tests give us the results as follows:
.177 Pellets
Number of pumps
FPS
FPE
7.4 grains pellet
3
570
5.34
7.9 gr pellet
3
540
5.12
10.5 gr pellets
3
475
5.26
7.9 gr pellet
4
600
6.32
10.5 gr pellet
4
535
6.68
7.4 gr pellet
6
725
8.64
7.9 gr pellet
6
680
8.11
10.5 gr pellets
6
610
8.68
7.4 gr pellet
8
775
9.87
7.9 gr pellet
8
740
9.61
10.5 gr pellet
8
635
9.4
Crosman Premier Hollowpoint 7.9 gr
8
699
8.57
Dynamit Nobel Gecko 7 gr pellet
8
740.4
8.52
Crosman SSP 4.0 gr
8
894.8
7.11
Gamo PBA Raptor 5.4 gr
8
789.8
7.48
10.5 gr CP Ultra Magnum
8
643.4
9.65
Crosman Premier Hollow Point
10
752
9.92
Crosman Premiere 7.9 gr
10
741
9.63
RWS Superdome
10
780
11.22
As you can see, the actual velocities are so close to the advertised numbers. That’s a good sign for buyers.
See the video below for more numbers:
Next, let’s take a look at the performance of this rifle – The common shooting groups achieved with Benjamin 397 are:
0.5” at 33 yardst,
3/4″ at 30 yards,
1” at 25 yards,
2” at 20 yards,
1 1/2” at 35 yards out of the box,
2” at 30 yards,
1/4″ at 40 yards,
1/4″ at 25 yards,
1/4″ at 15 meters with Crosman Premiere Hollow Point,
1/4″ and dime size at 30 – 40 yards.
Moreover, it can:
headshot a squirrel at 50 yards,
kill moles, squirrels,
hit a milk cap at 12-13 yards,
shoot a dove at 20-30 yards,
kill 2 birds with Crosman pointed 7.9 gr at 41 yards,
penetrate 3/8” in a phone book 2” thick with RWS target at 10 feet for 5 pumps,
penetrate 1/2″ phone book 2” thick at 10 feet for 5 pumps,
penetrate 1/2” in a 2” phone book with RWS target at 10 feet for 8 pumps,
penetrate 5/8” in a 2” phone book with Gamo gold pellet at 10 feet for 8 pumps.
This gun packsone hell of a punch and if you have a problem with backyard varmint then this is a quiet, fast way to get rid of them and have some fun in the process .
Shooting Ability
The effective shooting range of the 397 is up to 50 yards.
It is ideal for spinning paper targets, casual plinking, or pest control
Loudness
Many owners report that the Benjamin 397 is relatively loud.
You can try using a heavier pellet, more of the energy will be absorbed launching the pellet and it should be a little quieter
Maintenance
To maintain the seal for a long time, always remember to put 1 pump of air into the gun when you are done shooting whether you plan to shoot again the next day or not again for another 2 years.
Specifications
Caliber: .177
Velocity: 800 FPS
Loudness: 4 – Medium – High
Barrel Length: 19.25”
Overall Length: 36.25”
Shot Capacity: Single shot
Cocking Effort: 3-8 pumps
Barrel: Rifled
Front Sight: Blade and Ramp
Rear Sight: Adjustable for windage and elevation
Scopeable: No
Trigger : Two-stage non-adjustable
Buttplate: plastic
Suggested for: Small game hunting/plinking
Trigger pull: 5.5 lbs
Action: Bolt-Action
Safety: Manual
Powerplant: Multi-pump pneumatic
Function: single-shot
Weight: 5.5 lbs
Customer review
Customers are generally satisfied with the quality of this gun.
In positive reviews, they love this gun because of its classic design, ease of handling, superb accuracy, and exciting knockdown power.
Nothing arises as a serious issue.
There are a few complaints here and there about mounting the scope on this gun
But as I said earlier in this review, you’re better off getting the William peep sight for maximum performance.
Pros and Cons
Pros
Cons
Handsome woodstock
Solid construction
Ergonomic Monte Carlo design
Long-lasting brass barrel
Actual velocity close to advertised numbers
Impressive accuracy
Fantastic power
Quiet
Decent open sight
No scope or accessory rail but you can fix this problem as I said earlier in this review
Price
The price for this rifle is about 150 dollars.
It’s a good price if you consider all the pros and cons of this gun.
Oh, and remember to save some bucks to get the Intermount if you insist on using the scope on this gun.
It’s built to last for years with the simple but effective operation, classic design, great power, and amazing accuracy.
For those interested in firearms and ammunition, you might want to explore more on 357 magnum brass to enhance your knowledge of ammunition components and reloading options. Additionally, if you’re looking to optimize your shooting experience, it’s essential to stay informed about the various ammunition choices available.
Our Favorite Thermal Monoculars of 2024 for Hunting Coyotes, Hogs & More
You probably thought seeing in the dark was a superpower when you were a kid. Now that you’re all grown up and have a little coin in your pocket, you can actually buy that ability with one of 2024’s best thermal monoculars.
If you’ve got pesky coyotes, hogs, and boars that insist on showing up where they’re not welcome, you can peel back the darkness and find out exactly where they are with the push of a button.
But it’s not just about nighttime. Infrared imaging scanners can expose camouflaged deer and elk who’ve bedded down during the day or blended into the woods too well to see. If something gives off heat, a thermal monocular can help you see it — night or day.
We’ve picked out various products from some of the best names in thermal imaging, like FLIR, Pulsar, ATN, and AGN. These trusted brands have products that satisfy all portions of the price scale, including budget options, under $1000 picks, and $4000 state-of-the-art monsters.
Deciding which thermal monocular you need depends on many essential variables — like how you plan to use it, the range you need it to detect, and your budget. The best thermal imaging device for one hunter could be a poor choice for another.
But enough of all this talk about superpowers and price scales. Our reviews of 2024’s best imaging monoculars for hunters and homeowners will heat up your imagination and maybe even help take down a coyote or two.
When it comes to entry-level thermal monoculars, each unit comes with a 160×120 thermal sensor. That’s nowhere near the pixel density of 640×480 sensors available on the higher end, but that doesn’t make these units worthless by any means.
A decent thermal monocular can help you detect prey animals at short distances that would otherwise be undetectable. Or, if you’re following a blood trail that’s gone cold, they’ll peer through the darkness and illuminate what you might otherwise miss.
To be blunt, we prefer mid-range imaging devices of 384×288 pixels or better, but if you want to dip your feet into the thermal monocular game, you can still reap some benefits from the following budget-friendly devices.
Best Inexpensive Solution AGM Global Vision Asp-Micro TM160
As you might’ve guessed from the name, the AGM Asp-Micro TM160 is a small handheld thermal imager that fits easily inside your pocket.
Equipped with a 160×120 thermal detector, you’re not getting the most impressive thermal imaging monocular on the market, not by a longshot. But, if you need to spot heat signatures quickly, the TM160 could make the difference between detecting hogs and coyotes or letting them run wild and ravage your property.
Some additional features you’ll get with the Asp-Micro TM160 include:
10-hour battery life
8 GB internal storage
Video and photo camera
Up to 4x digital zoom
In short, this cheap option for sale delivers solid performance without breaking the bank.
Pocket-Sized Heat Imager FLIR Systems Scout TK Mini
Thermal Sensor: 160×120 Display: 640×480 LCD Detection Range: 91 meters Weight: .4 lb NETD: Unlisted Best for: Home security Not for: Identifying creatures
The next affordable infrared spotter on our list comes from a well-known name in the thermal monocular space: FLIR Systems.
Even more compact and lightweight than the TM160, the Scout TK Mini weighs only .4 pounds. That makes it a portable companion for home security and animal detection, as well.
Like the TM160, you won’t be able to identify animals at far distances with this device, but it can give you the edge you need.
Just be careful: you’ll have to get close to identify animals with a sub-$1,000 monocular like the FLIR Scout TK Mini.
Additional features include:
Still image and video recording
5-hour battery life
IP67 dust and waterproof rating
Eight color palettes
If you’re looking for the most lightweight budget thermal monocular, consider the Micro TK Mini. And if weight isn’t your biggest concern, the next infrared imager is a significant upgrade thanks to its zoom capabilities.
Good Quality without Breaking the Bank ATN OTS-XLT 2.5-10x
The ATN OTS-XLT 2.5-10x uses the same size microbolometer sensor as our first two recommendations but offers a bit higher detection and identification range with a 2.5x base magnification and up to 10x zoom.
This additional zoom will come in handy if you want to center your thermogram and give yourself more confidence when identifying, though you shouldn’t expect to identify hogs or coyotes at long range.
I’d like to clarify my use of the word “identification” here. If you’re an experienced hog and coyote hunter, the ATN OTS-XLT can help you identify those creatures day or night. But telling the difference between a dog and a coyote with a smaller sensor isn’t for novices, so keep that in mind.
That said, if you’re new to thermal imaging or want a monocular that offers more detail, upgrading to a larger thermal detector resolution will do wonders for your identification game.
Features of this scanner include:
Four color palettes
10-hour battery life
Base magnification of 2.5x
Zoom up to 10x
Camera for video and pictures
If you’re confident in your identification capabilities, you might get the job done with this entry-level ATN thermal unit.
Rugged Thermal Smartphone AGM G2 Guardian
Base Magnification: 5.6x Thermal Sensor: 256 x 192 Refresh Rate: 25 Hz Pixel Pitch: 12 micron Display: 6.58’’ FHD+ 120Hz Detection Range: 500 meters Weight: .9 lb Best for: Anyone who wants or needs the convenience of a thermal monocular on their cell phone Not for: Extreme distances, fast-moving objects
New for 2024, and the first product of its kind, the AGM G2 Guardian is a rugged cell phone and long-range thermal monocular in one.
We were fortunate enough to receive one of these bad boys to test drive, and to say that we’re impressed with the functionality of this gadget would be an understatement.
After some first-hand experience, we can definitively say that this device from AGM is a valuable tool for a variety of users; whether you’re a hunter, outdoorsmen, first responder, or construction worker (think HVAC, electrical, or plumbing).
The G2 Guardian boasts a 25 Hz refresh rate. While that’s paltry compared to others on this list, it’s important to note that for the price, it’s one of the best values for any entry-level thermal device. Its MSRP rings in at an approachable $899.
The G2 Guardian is feature-rich; here are some of our favorite attributes:
It’s unlocked and can be used with any carrier
Built-in 109 dB speaker
108 MP camera
Beefy 7,000 milliamp battery
Impact resistant and waterproof
You get more than just a long-range thermal monocular with the Guardian G2 from AGM, you get a trailblazing and one-of-a-kind gadget that’ll stand up to anything you can throw its way.
VIEW ON AGM MOBILE
Mid-Range Infrared Scanners
Now that we’ve considered some solid budget options, let’s move into the best mid-range thermal monoculars for hunting. The truth is, many thermal imaging experts consider this price range the actual entry level.
If you’re willing to drop a little more coin on one of these devices, you’ll be rewarded with a much better thermal sensor that offers 500% more microbolometer pixels. That means a sharper image, more heat detection, and a greater chance of identifying your prey.
Strap in because this is where the products start to get very interesting.
The Now-We’re-Talkin’ Choice AGM Global Vision Taipan TM15-384
Base Magnification: 1.5x Thermal Sensor: 384×288 Refresh Rate: 50 Hz Pixel Pitch: 12 micron Display: 1280×960 LCOS Detection Range: 708 meters Weight: .6 lb NETD: <35mK Best for: Mid-range detection, short-range ID Not for: Long ranges
For hunters who want a device that can identify prey up to 200 meters in the dark, fog, or haze, this is the best thermal imaging for hunting monocular of 2024 for the money.
For starters, this unit is a breeze to use. There’s no focus ring to adjust; it fits your pocket easily and delivers a wide field of view. In short, beginners can turn on this compact handheld device, start scanning, and expect high performance with minimal adjustments.
Efficiency like this is possible because AGM engineered the monocular well and gave it a solid foundation. With a 384×288-pixel microbolometer, 12-micron pixel pitch, a generous 1280×960 LCOS display, and 1.5x magnification, users of all stripes can detect even small rodents at relatively long distances.
If you’re looking for camouflaged deer or elk at dusk or dawn, it should be no surprise when you find great success with this AGM unit.
Some other useful features you’ll find include:
7.5 hour run time
Hot-spot mark
Distance measurement
Up to 8x zoom
App integration
Camera for video and picture
IP67 dust and waterproofing
For hunters who don’t need long detection ranges or those who hunt in tight spaces, the Taipan TM15-384 is the unit for you.
Great Value Long-Range Detection AGM Global Vision Taipan TM25-384
Base Magnification: 2.5x Thermal Sensor: 384×288 Refresh Rate: 50 Hz Pixel Pitch: 12 micron Display: 1280×960 LCOS Detection Range: 1,180 meters Weight: .7 lb NETD: <35mK Best for: Mid to long-range detection Not for: Short ranges
The previous AGM thermal monocular provides such great value that we had to include the upgraded 2.5x magnification model. If you value the ability to detect heat signatures up to 1,180 meters, you’ll love the Taipan TM25-384.
It uses the same infrared-detecting sensor as the TM15 but offers a longer focal length and higher magnification level. The benefit of 2.5x magnification is the ability to see animals as if they’re 2.5 times closer than what you’d typically see.
So, if you’re a long-range hunter who puts in extensive miles tracking and monitoring the behavior of big game like elk, this tool can allow you to see in the dark, gaze through the fog, and get the leg up on your prey.
Just know that you’ll have to scan the area a bit more thoroughly to cover the same ground as the TM15, as it has a smaller field of view (FOV). This is normal with higher magnification devices; they make it more challenging to spot up close-and-personal prey.
With those facts understood, we believe this is 2024’s best long-range thermal monocular for the money. We can’t recommend it enough for day and night hunting. Just keep in mind that you can’t replace the battery yourself.
Reference the TM15-384’s listing above for this specific unit’s additional features. And, if you don’t require this much magnification, a unit like the AGM Global Vision TM19 will hit the sweet spot perfectly.
Base Magnification: 3.3x Thermal Sensor: 400×300 Refresh Rate: 50 Hz Pixel Pitch: 17 micron Display: 1280×960 LCOS Detection Range: 708 meters NETD: 50 mK Weight: 1.2 lb Best for: Long-range detect, short to mid-range ID Not for: Very long ranges
While AGM thermal monoculars provide some of the best value in the space, Burris isn’t too far behind. Based on their included bevy of features, we think they offer greater value to hunters than the AGM solutions.
The main difference between the AGM TM15-25 line and the Burris BTH is the size of the thermal sensors. Burris put a slightly bigger unit on this device, which clocks in at 400×300. This handheld can collect more infrared energy than its AGM counterparts, and perhaps that’s part of why it weighs nearly twice as much.
Another reason for the added weight is this unit’s rangefinder, which can help you determine the exact distance between you and that raccoon, coyote, deer, or whatever else.
If ranging capabilities weren’t enough, hunters can set up the BTH and use it as a remote camera in the blind. Doing so will allow them to see what’s happening from a distance. The app integration on this beast truly sets it apart from the first two mid-range devices in this section.
High-tech equipment can mean the difference between filling your tag and spooking the game you’re after. We think the former is a better option, so check out the following features if you want to know what else this puppy can do.
Picture-in-picture mode
Five unique color palettes
Hot tracking
Remote control via smartphone
Multiple reticles, unlike AGM products
IP66 rated for dust and waterproofing
For a feature-packed thermal device at a great price, check out the Burris BTH50.
High-End Thermal Monoculars
This section is for you hunters and homeowners who want a device with a 384-pixel sensor that offers all the bells and whistles.
And, if you want to start dipping your toes into the 640-pixel waters, we’ve got an excellent choice immediately at the end of this section.
Rangefinding-Capable High End Buy Pulsar 2-8x Axion 2 LRF XQ35
Base Magnification: 2x Thermal Sensor: 384x 288 Refresh Rate: 50 Hz Pixel Pitch: 17 micron Display: 640×400 AMOLED Detection Range: 1,400 meters NETD: <40 mK Weight: .7 lb Best for: Long-range infrared detection, short to mid-range ID Not for: Extreme distances
Pulsar is a well-known and respected name in the thermal imaging arena. Their excellent customer service sure helps, but their spread of world-class heat-tracking products is why they’re one of the best, if not the best, in the business.
Housed in a magnesium-armored body and easy to slide into a pocket, the handheld Axion 2 LRF (laser range finder) can help you spot and range prey animals over 1,100 meters away. And, unlike all the other previous devices on this list, it utilizes a sharp, high-contrast AMOLED display.
The benefit of an AMOLED display is that it works in lower temperatures than an LCOS display. So, if you’re hunting or scanning in a frozen Minnesota winter, an AMOLED display could be the ticket.
It’s worth noting that this device comes in a non-rangefinding version as well.
You can save a good chunk of change by going without the LRF, and if you do, you’re still getting one of the best thermal imagers for hunting at any price point, let alone in the sub-$2,000 range. We love the rangefinder version, however, since it serves double duty in our packs.
Check out the Axion 2 XQ38 LRF if you want a unit with less base magnification. With both models, you’ll get:
Eight color palettes
Picture-in-picture mode
11-hour battery life and user-swappable batteries
2.4/5GHz WiFi wavebands
European-made Lynred sensor
16 GB internal storage (and 16 GB free cloud)
Fast start-up (fully booted in 5 seconds)
IPX6 waterproof rating
The feature-rich Pulsar Axion line isn’t cheap, but it’s well worth the money for all types of hunting — including hog, coyote, deer, elk, and more.
Base Magnification: 4.5x Thermal Sensor: 384x 288 Refresh Rate: 50 Hz Pixel Pitch: 17 micron Display: 1024×768 AMOLED Detection Range: 1,800 meters NETD: <40 mK Weight: 1.10 lb Best for: Long-range detection, short to mid-range ID Not for: Very long range ID
Compared to the Axion 2 I just mentioned, the Helion 2 XQ50 has a few significant advantages. The first leg up that springs to mind is this unit’s detection range. Because this imager starts with a 4.5x magnification, you’ll get an impressive 1,800 meters of range compared to the 1,400 meters of the Axion 2.
Of course, a device’s detection range isn’t all that matters. For example, you might prefer less magnification if you hunt in more confined quarters. If that’s the case, a unit like the Helion 2 XQ38 might be the best choice for you.
The Helion XQ series utilized excellent displays. Thanks to a standard 1024×768 AMOLED screen, these top-end devices provide razor-sharp optical detail for hunters in less-than-perfect conditions — day or night, in the summer, or during cold winters.
Pulsar built these units to last. They’re constructed of magnesium, which serves multiple purposes, including increased structural strength, heat dissipation, and high-quality image maintenance.
You can also expect:
Up to 8x digital zoom
Built-in photo and video camera
WiFi integration with Android and iOS
10-hour battery life and multiple battery options
Stadiametric rangefinding and reticle (non-laser)
16 GB onboard storage
If you want a 384-pixel sensor with the most bells and whistles available in a thermal monocular, the Helion 2 series is your best bet.
Our First 640-Pixel Unit AGM Global Vision Asp TM35-640
Base Magnification: 1.4x Thermal Sensor: 640×512 Refresh Rate: 50 Hz Pixel Pitch: 17 micron Display: 1024×768 OLED Detection Range: 1,600+ meters Weight: 1.1 lb Best for: Identification at mid-range Not for: Users who want quick-swap batteries
Once again, AGM shows up to the thermal imaging party with one of 2024’s very best models you can buy for your hard-earned money — the Asp TM35-640.
Equipped with the largest sensor featured in this article so far, it’ll deliver high-end thermal imaging capability, which means more crips and detailed images. Simply put, 640×512 sensors capture nearly 300% more thermal energy than their 384×288 counterparts.
With more detail, you’ll be able to identify animals at longer distances, which could mean a world of difference if you’re trying to differentiate between a buck or a doe, for example.
But that’s not the only advantage. The Asp TM35-640 comes with an OLED display, which provides more contrast than its AMOLED counterparts. Blacks are blacker with OLEDs, so you’ll be able to differentiate thermal signatures easier and more precisely.
There is one downside, though. Unlike the Pulsar units above, the battery is not user-replaceable.
Other than that minor gripe, we love this device, which also comes with:
5-hours of battery life
16 GB built-in memory
Photo and video camera
Four color palettes
Hot spot tracking
Up to 4x digital zoom
The TM35-640 is our top pick in the high-end range due to its technological advantages (640 sensor, OLED) over the two Pulsars above.
VIEW ON AMAZON
Higher-than-High End Units
For the discerning hunter and homeowners who spare no expense, we’re happy to showcase the best of the best thermal monoculars of 2024.
While we’re aware that several thermal monoculars exceed this price point (~$4,000), we think these units are the best because they’re made for you — hunters. Here you’ll find cutting-edge sensors, bells, whistles, advanced capabilities, and incredible performance.
Best All-Around High End Pulsar Helion XP50 PRO
Base Magnification: 2.5x Thermal Sensor: 640×480 Refresh Rate: 50 Hz Pixel Pitch: 17 micron Display: 1024×756 AMOLED Detection Range: 1,800 meters Weight: 1.1 lb NETD: <25 mK Best for: Detailed observation in harsh conditions Not for: One issue here is price, but if you can afford it, get it
Suppose you want the best possible compact thermal imaging monocular for hunting in the world. In that case, regardless of price, you’d be hard-pressed to top the genius-level capabilities that Pulsar stuffed into their Helion XP50 Pro.
It all starts with the thermal sensor Pulsar used in their flagship handheld. With a <25 mK NETD rating, this unit has no problem discerning even the smallest differences in heat. Those tiny differences, delivered to its HD-quality screen, give you a vivid and complete view of the field.
No matter the weather you’re battling, even extreme cold coupled with rain and fog, you’ll cut through it all to spot what you’re after — creatures that would be hidden entirely otherwise. And even if it takes you a while to spot what you’re after, this device uses hot-swappable batteries to keep you going as long as you want.
With 1,800 meters of detection range, you’ll be able to scan extreme distances. This impressive range, coupled with the high-end visual abilities packed into the unit, will allow you to identify precisely what the thermogram is displaying long before inferior units.
Additional game-breaking features of the Helion XP50 PRO include:
Picture-in-picture
Stadiametric rangefinding
IPX7 waterproof rating
Easy-to-update software
8+ hours of battery life
8x zoom
If you’re ready to step up to the highest level, check out Pulsar’s Helion XP50 Pro. But if you don’t battle temperature swings often, our next option might be even better for you.
VIEW ON OPTICS PLANET
Biggest Thermal Sensor Leica Calonox
Base Magnification: 2.5x Thermal Sensor: 640×512 Refresh Rate: 50 Hz Pixel Pitch: 12 micron Display: 1280×960 LCOS Detection Range: 3,000 meters Weight: 1.5 lb NETD: Not listed Best for: Long-range detection and ID Not for: Extreme temperature variance locations, but it’ll do just fine if you find yourself in one
In our opinion, the thermal device with the best image isn’t from Pulsar; it’s the Leica Calonox. To help decide between the two units, ask yourself one question:
Do you prefer to notice greater temperature changes, or do you seek out more detailed images?
Versus the Pulsar Helion XP50, Leica uses a 640×512 microbolometer while the Pulsar uses a 640×480 counterpart. For that reason, the Leica can collect more thermal energy via its sensor.
Then, because the Leica uses a more advanced 12-micron pixel pitch, the images are crisper and easier to see since there’s less distance between the center of each pixel and its neighbor.
The result is arguably the sharpest image on the market when it comes to compact handhelds explicitly made for hunters. But because the Leica uses an LCOS display, it won’t fare as well as the Helion in downright cold temperatures.
Your choice ultimately comes down to the environment you’ll do most of your thermal imaging. At 3,000 meters, the Calonox has nearly double the detection range of the Helion XP50 Pro. Do you need that much range, or would you rather have better performance in harsh conditions?
Here are some additional features to help guide your decision making:
Leica Image Optimization (LIO) for extreme sharpness
Up to 5 hours of run time
IPX4 Rating
10x magnification
Four color palettes
Excellent app integration and remote control
Can be used while charging
It’s pretty apparent that the Leica Calonox is an exciting challenger to the Pulsar Helion XP50 Pro.
Longest Range on the List ATN OTS 4T 640 4-40x Smart HD
Base Magnification: 4x Thermal Sensor: 640×480 Refresh Rate: 60 Hz Pixel Pitch: Not listed Display: 1280×720 LCOS Detection Range: 3,300 meters Weight: 2.0 lb NETD: <25 mK Best for: Long-range scanning, marathon hunting sessions Not for: Swampy environments — not rated for submerging in water
Not to be outdone, ATN presents its challenger to the thermal imaging throne. If you need extreme range, the ATN OTS 4T 640 4-40x tops all others on this list.
With 3,300 meters of detection, the ATN delivers excellent image quality via its 640×480 sensor. One exciting way that ATN stands apart from its competition is that it utilizes a superior 60 Hz refresh rate, enabling hunters to scan the field quicker and miss fewer details.
Capabilities like these are beneficial when considering this model’s base magnification. Starting at 4x, you’ll be able to eyeball the field without fear of being spotted. And, if you need different magnification levels, ATN offers several other powers in this series.
If you don’t need the extreme magnification and zoom this particular unit provides, chances are there’s something more your speed on this list.
Each device in this series includes:
Spin-to-zoom wheel
16+ hours of battery life
Dual-core processing
Video recording
HD video streaming
Ballistic calculator
If you’re seeking excellent battery life and ultra-long-range detection, you can’t do better than the OTS 640 series from ATN.
And if you don’t need long-range capabilities and desire less magnification, going with the ATN OTS 4T 640 1.5-15x will save you some dough over our previous top-end recommendations.
Technical Considerations of Thermal Monoculars
Thermal monoculars are complicated gadgets; let us help simplify them for you
Thermal monoculars are complex devices that give you the ability to see heat. Since animals are warmer than their surroundings, these devices pick up their infrared energy and turn it into visible light that a hunter can see.
With the suitable unit for the hunting and imaging you do, you’ll be able to inspect the darkness or defeat natural camouflage to spot hogs, coyotes, deer, elk, and other game that typically go undetected.
But, that ability isn’t possible without advanced electronics and materials. Let’s dive into the most critical aspects of thermal monoculars and what they mean for your buying decision.
Lens Material and Size
Unlike binoculars or spotting scopes that use glass for their objective lens, the lens at the end of the cylinder, many infrared scanners use the germanium. That’s because infrared light doesn’t pass through glass.
Germanium, on the other hand, is invisible to infrared light, enabling it to pass through and relay infrared information to the electronics. That info is then processed and delivered to your eyepiece.
The larger the objective lens, the more infrared light the sensor can capture. If you know you’ll be hunting a lot at night or in adverse conditions, a larger lens will help you see more infrared energy.
Sensor and Resolution
Also called the microbolometer, this component reacts to infrared wavelengths or heat given off by your prey. It’s composed of pixels that send electrical impulses to the electronics for processing, creating an image your eyes can see.
The more pixels your senor has, the better image quality you’ll receive. At the lower end of the price spectrum, you’ll commonly see 160×120 microbolometers, which equates to 19,200 total pixels overall.
If you were to move up into the next level of thermal monocular class we discuss, the 384×288 units, you get 110,592 pixels, or over a 500% increase. With more pixels, you’ll see more detailed images, meaning you’ll be able to spot and identify animals with far more certainty.
For that reason, we strongly recommend going with a 384-pixel unit or better. Check out the AGM Global Vision Thermal Monocular Taipan TM15-384 for the best 384-pixel unit you can buy for the money.
Pixel Pitch
Now that you’ve got an idea of what microbolometers do and how they work, it’s vital to discuss pixel pitch. This number measures the distance, in microns or µm, between pixels directly next to one another. You’ll typically see 17 µm or 12 µm measurements.
A lower number denotes a higher-quality sensor. That’s because there’s less space between the pixels themselves. With less distance between the pixels, the sensor can create more detail to give you a sharper image.
Noise Equivalent Temperature Difference (NETD)
NETD is the sensor’s ability to discern even the most minute differences in temperature. Like the pixel pitch measurement, this is another measurement that’s better if its value is lower.
Anything below the 60 milli-Kelvin (mK) is considered an above-average sensor. The higher quality instruments, such as the Pulsar Helion XP50 PRO, feature sensors capable of discerning minute differences in temperature, which helps give hunters the clearest, most precise image available.
In the case of the Helion XP50 Pro, its NETD value is <25 mK, making it one of the best values you’ll find on the market today.
Display Resolution and Type
After the microbolometer takes infrared information and passes it to its electronics for processing, that info will arrive on the display to show you what you’re looking at.
There are a few critical bits of information to know regarding displays. The first is resolution.
High-end devices use HD resolutions like 1280×960. On lower-end devices, you’ll typically see lower resolutions, including 720×540. Just like the microbolometer, more pixels lead to more detail. You can make out more of the animal or scene you’re investigating with more visible pixels.
The next information to keep an eye on is the display type.
On low-end devices, you’ll typically see LCOS displays. These are solid since they use very little energy and are relatively cheap, but they won’t work in temperatures below 14° F. You’ll want an AMOLED or OLED display if you regularly hunt or use your monocular in colder temps.
AMOLED displays work down to -25° Fahrenheit. They also provide greater contrast than what you’d get in an LCOS display, which can help you make out minute differences in a scene.
OLED displays work in similar temperatures as AMOLED displays, but they have an advantage considering contrast ratios. Because an OLED pixel powers itself, you’ll get deeper blacks on your display.
When using palettes like white-hot or black-hot, higher contrast levels can mean you’ll see more detail on your display. However, AMOLED displays have higher color saturation, meaning you’ll get more color when using palettes like fusion.
Ultimately, the image should look fantastic if you’re buying a high-end device, whether it uses an AMOLED or OLED display.
Magnification
Typically, thermal monoculars have some sort of base magnification. Shorter-range devices start at 1.4x or 1.5x, meaning objects appear 1.4x or 1.5x closer to your eye than you’d see naturally. Some have no magnification at all.
You can expect base magnifications of 2.5x to 4x and higher for long-range thermal monoculars.
If you hunt animals at great distances, say you’re in an enormous flat expanse somewhere in the plains of eastern Wyoming, detecting animals at long range can make the difference between missing a potential trophy buck or filling your tag.
Field of View
If you’re not aware, field of view is the width of the area you can see on your thermal imaging monocular display.
It relates to magnification in a pretty specific way. If you’re looking through a lens with higher magnification, you’ll have a smaller FOV. If you need to scan wide-open spaces, a larger FOV may be for you.
But, if you value the ability to see far, a monocular with a higher base magnification might make the most sense. It just depends on what and where you’re hunting.
Zoom
With zoom, you’re taking that base magnification and enlarging it. In the case of thermal monoculars, you’ll be doing so with a digital zoom feature. The electronics in your device are simply digitizing a larger version of what you’d see with no zoom applied to the image.
Zoom can help you determine whether or not the thermal image you’re seeing is prey worth further investigating or if you’re just looking at the neighbor’s dog.
Detection Range
When you combine the lens, microbolometer, display, and magnification, the hope is to create a marriage of components that will help you detect coyotes, hogs, deer, elk, or whatever else.
Different thermal monoculars have different detection ranges, which are measured in meters. Monoculars with large microbolometers and higher zoom numbers give you more extensive detection ranges.
Detection essentially just lets you know a creature is out there. Depending on how close you are to it and what color palette you’re using, it could show up as a splotch of light or a highly detailed image.
How easy it is to identify animals at a given range depends on the quality of your monocular.
Let’s talk about that next.
Identification Range
Identification range of the Leica Calonox: on point
All animals, humans included, give off heat, so deciphering what you’re looking at can be tricky. High-quality thermal monoculars allow you to identify the creature on your display at further distances than lower-quality devices.
Just like detection range, identification range is measured in meters. Naturally, all products always have a smaller identification range than they do detection range. That said, you can get away with a shorter identification range if you’re well accustomed to animal behavior and movement.
But, if you want to be sure about what you’re viewing, you’ll need to find a thermal monocular with a more extended identification range, for example:
If you’re a coyote hunter, knowing whether you’re looking at a coyote or a dog can make the difference between having some serious explaining to do or eliminating a harmful nuisance from your property.
A device like the Leica Calonox makes for an excellent identification tool.
Refresh Rate (Hertz)
Your refresh rate relates to both your microbolometer and display. This value, or the amount of Hertz, states the number of times per second your microbolometer or display will refresh.
Typically, you’ll see values of 50 Hz, meaning the image can refresh itself 50 times per second. If you scan large areas, you’ll want a higher value to keep up with how quickly you move the device.
Palettes
Thermal monoculars have a variety of ways to display the thermal information they pick up, and they’re called color pallets. Using different colors allows hunters to better decipher the scenery around them. We’ll discuss the four most widely used here.
Black Hot: Warmer objects appear black. This palate is used extensively by hunters and law enforcement because it doesn’t deviate much from how humans typically view the world.
White Hot: Warmer objects look white. This palate is one of the most commonly used for surveillance in urban environments.
Red Hot: Warmer objects look red. This palate is probably what you think of when you hear the words “thermal imaging.”
Rainbow: Warmer objects appear lighter and cool objects appear darker. This palate is excellent for observing objects and environments where heat differentials are minor.
Durability and Waterproofing
Because the items listed here are made mainly for hunting, they require a certain level of durability.
Spending lots of time in the great outdoors will beat the heck out of stuff, so finding durable equipment that can last several seasons will inevitably save you some dough.
One of the ways you can tell if something is durable is to identify what it’s made of. The Pulsar 2-8x Axion 2 LRF XQ35 is an excellent example of a product made of solid materials; in this case, Pulsar constructed it of incredibly durable magnesium.
Another way to determine how a product will fare against the elements is via its IP (ingress protection) rating. An IP rating tells you how well an enclosure can keep dust, water, and other stuff out. For example, in the case of an IP67, the first number (6) is the solids protection. Six and up indicates that the product is dust-proof.
The second number, 7, tells the consumer how water-tight a product is. In this case, seven means the product can withstand being submerged in water for up to 30 minutes.
In short, IP ratings give hunters a quick way of telling how much interior protection a product will have out in the wild.
Click here for a full breakdown of the IP rating system.
Battery Life and Type
If you plan on hunting for extended periods, you’ll want a device with long battery life. Better yet, find a device that enables you to swap batteries and extend your day in the field.
One great example of a device with long battery life is the ATN OTS 4T 640 4-40x Thermal Smart HD. Batteries can weigh a lot, so be sure to find your sweet spot between battery life and weight when choosing your next thermal imager.
WiFi Connectivity
Some devices are equipped with WiFi capabilities, which connect the thermal imager to a cell phone to transfer data between the two. Most devices use the older 2.4 GHz spectrum, but newer ones use 5 GHz for faster data transfer speeds.
Size and Weight
At the risk of sounding like Captain Obvious, the size and weight of your thermal monocular could mean the difference between making it a joy to carry or a bulky hindrance.
Get your hands on a device that offers you the portability you require. One example of a lightweight unit with exceptional capabilities is the AGM TM19-384.
Safety
Thermal monoculars make up just one portion of the thermal imaging market. Manufacturers sell thermal binoculars and thermal scopes as well. Compared to thermal scopes, I think monoculars are safer.
When using a rifle scope, you have to point your weapon at what you want to scan. Doing so can present some safety concerns if you’re hunting with a large group or in a well-trafficked area. Plus, looking through the scope all the time can be a literal pain in the neck.
I think the safest way to use thermal technology is via a monocular, though a solid thermal rifle scope is a nice piece of kit too.
Warranty
A product’s warranty is something to consider when dropping over a grand on a thermal monocular. Make sure you feel comfortable with the company you’re dealing with and the warranty they offer. Read the fine print.
Most of the monoculars on this list come from companies that offer three-year limited warranties for their products. As always, ensure you’re getting a solid warranty from a trusted company when you decide to purchase this significant.
Thermal Technology vs. Night Vision
Thermal technology vs. night vision: which is best for you?
Many of you might wonder whether night vision or thermal monoculars are best for hunting, and there’s some confusion surrounding the debate.
The differences between the two come down to what each device can “see” and how it sees it.
Night vision devices rely on a light source — the moon immediately comes to mind. You can also use an infrared illumination device to provide your scope or monocular with a light source.
On the other hand, thermal imaging doesn’t require any light whatsoever. These devices pick up heat signatures and can work flawlessly in the pitch dark of a moonless night. You can also use a thermal imaging unit in the daytime to help you detect and identify bedded or naturally camouflaged animals.
Both thermal and night vision devices have their advantages and drawbacks, so using them in conjunction is good. For example, a thermal monocular and a night vision scope combo tacked onto your rifle could be a winning combo for quick scanning to detect prey and accurate shot placement.
Which of 2024’s Best Thermal Monoculars Will See the Heat?
Time to step up your game and see what all the fuss is about
As you can see, 2024’s best thermal monoculars come in all shapes and sizes. The high-tech products we recommend are lightweight, handheld, and extremely helpful for spotting and identifying coyotes, hogs, and other pesky creatures.
Not only can one of these infrared scanners help you see in the dark, but they can help you spot creatures when conditions are foggy, rainy, and frigid. The coyotes, hogs, and raccoons out there will stand no chance if you’ve got a quality thermal monocular in your kit.
Heck, you also get an advantage in the daytime if you’re looking to find bedded and naturally camouflaged wild game like deer and elk.
So hopefully, no matter which device you pick, whether it’s a Pulsar, ATN, or AGM Global Vision, it’ll give you the ability to see what your eyes alone can’t.
Whether you’re looking for a budget option, a solid setup under $1,000, the best mid-range choice for the money, or an ultra-high-end hoss, we hope our thermal imaging for hunting reviews and write-ups give you all the advantages you seek.
Thanks for checking out 2024’s best thermal monoculars, and be sure to check back soon for more hot gear reviews.
Twig growth for the season should be from 3 to 24 or more inches in length. Bark growth cracks usually indicate that the tree is healthy. Tissue in the cracks should be bright green or pink when scratched. However, loose and discolored bark or unusually flattened areas on the trunk is indicative of a diseased condition.
Root Zone Management
Maintain an undisturbed soil area above the root zone if possible. (For management purposes the root zone extends out 1/3 the distance beyond the drip line of the tree. The drip line is the outermost edge of a tree’s foliage). Minimize grading, digging, trenching, covering the ground with asphalt or concrete or landscape plants, excessive foot traffic, or vehicle parking. Proper management maintains free passage of water and air within the root zone. The area extending 6 feet from the trunk is the most vulnerable and should always be left undisturbed and uncovered.
Pruning
Mature oaks do not require pruning except to remove dead, weakened, diseased, or dangerous branches. If pruning is necessary, trees should be pruned in the dry season. June and July is best.
Irrigation
Native California oaks have evolved in a Mediterranean-type climate where there is little rainfall between late spring and early autumn. As such, they generally do not require irrigation during this dry period and, in fact, trees may be adversely effected by supplemental watering during this period since warm-moist conditions can favor harmful diseases. It is particularly critical that the trunks of oak trees remain dry. However, if the winter season is unusually dry, then a supplemental irrigation in the early spring can complement natural rainfall. Water deeply, to one to two feet, in the outer two-thirds of the root zone. Alternatively, placing organic mulch under the tree can conserve moisture in the root zone by reducing surface evaporation. Mulch also inhibits the growth of weeds, which can compete with oak roots for moisture and nutrients. As mulch breaks down, it also increases organic material in the soil which improves water percolation, aeration in the root zone, and long-term nutrient availability.
Newly planted trees may require supplemental watering while they are establishing in the landscape. These plants may require irrigation up to one every month in the dry period.
Fertilization
A healthy, mature oak under natural conditions does not require supplemental feeding. The leaf litter and other organic debris on the soil supply nutrients as they decompose and release nutrients to the soil and roots. Supplemental fertilization may be needed when the organic debris is removed or when the oak exhibits disease or when growth is poor. Generally, young trees can be fertilized to establish them quickly.
Nitrogen is the primary nutrient of value to oaks. Prior to rain or irrigation, fertilizer can be spread on the ground to cover the outer two-thirds of the root zone. An alternate application method is sometimes useful. Fertilizer can be injected with water or placed in holes dug into the ground, 18 inches apart, along the tree’s drip line. Fertilizers should be applied at a rate of two to four pounds of actual nitrogen per thousand square feet of area. (For example, if a nitrogen fertilizer contains 20% elemental nitrogen, then 10 to 20 pounds of fertilizer would be applied per thousand square feet of area). Organic nitrogen or slow release nitrogen sources are preferable. Organic sources should be applied in late winter to allow the nitrogen to move into the root zone. Inorganic sources should be applied in late spring after the first flush of growth.
Compatible Gardens
Drought tolerant plantings can be incorporated into the landscape around oaks. Many California native plants, once established, may require little or no watering. Again, plantings within the root zone area are not recommended.
NOTE: The information on this page was excerpted from from Living among the Oaks, a publication of the Integrated Hardwood Range Management Program, University of California Cooperative Extension. For more information, click here.
Of all the species out there, the Pacific halibut is the largest halibut of them all.
Catching one of these big fish is something that many anglers hope to do and some have actually managed to catch some truly giant halibut over the years.
In this article, we look into the story behind the current IGFA world record halibut as well as some other monster halibut that feature in the record books too.
The largest halibut ever caught on record is a Pacific halibut caught by Jack Tragis off Dutch Harbor, Alaska, in June 1996. The fish weighed in at a staggering 459 pounds, making it the IGFA all-tackle world record holder for this species.
The fish fought Jack for two hours before he was able to bring the giant fish aboard the small boat he and his friends had been using for the day on June 11.
At the time of his record-breaking catch, Jack was using a Shakespeare Sturdy Stick rod, a Penn Senator 4/0 reel, Aimer line, and a Big ugly jig.
Before landing the world record halibut, Jack and his fishing buddies had already landed several halibut (although these were much smaller) and were getting ready to head back to shore after spending the day fishing in waters that were around 200 feet deep. It was on his last cast of the day that Jack successfully caught his 459-pound record-breaker.
It took Jack two hours of fighting before the fish was able to be bought on board the small boat he and his friends had been using for the day. This big halibut was over eight feet long and five feet wide.
Jack’s catch didn’t just set a new record, it actually beat the former record by almost 20 pounds. Prior to Jack landing his giant pacific halibut, the biggest ever caught was a 440-pound fish that had been caught back in 1978.
This is one world record that will likely take a long time for anyone to even get close to, let alone try to break.
See also: Alaska fishing licenses: How much do they cost and how and where to buy?
Atlantic Halibut All Tackle Record
Thomas was able to submit all the details needed to the IGFA confirming his catch as the new record for the largest Atlantic halibut ever caught.
On the 28th of July 2004, angler Thomas Nielsen set a new world record for Atlantic halibut when he landed a big halibut that weighed in at an impressive 418 pounds 13 ounces. Thomas caught his record-breaking fish while bait fishing in Vannaya Troms, Norway. He was using a Shimano rod, a Shimano reel, and a Dyneema line baited with cole fish.
It took more than an hour of fighting for Thomas to successfully land the fish but once he did, he was able to submit all the details needed to the International Game Fish Association (IGFA) who ultimately confirmed his catch as being the new record for the largest Atlantic halibut ever caught.
California Halibut All Tackle Record
Angler Francisco J. Rivera was fishing in Santa Rosa Island, California, USA on the 1st of July 2011 when he landed his 67-pound 5-ounce California halibut that set the new record for the largest fish of this species ever caught.
He was using a Calstar rod, a Penn reel, and an Ande line.
In addition to his fishing gear, Francisco was bottom fishing using live squid as bait.
See also: California fishing license info: Costs, Where to buy and Different Types
About The Key Halibut Species
One key thing to remember when fishing for halibut is to be patient and wait for a bit of time after any halibut strikes your line.
Distribution
Pacific halibut can be found on the continental shelf of the northern Pacific Ocean and the Bering Sea.
Atlantic halibut can be found in Northerly places from Canada all the way to Iceland. If you are looking for Atlantic halibut in the US, then they are most common in the Gulf of Maine.
California halibut are most commonly found south of San Francisco.
Size Range
Pacific halibut males are usually smaller than the females of the species. Although not all will grow to extremely large sizes, this species is sometimes referred to as a barn door fish as some can grow up to around 500 pounds in weight and more than eight feet in length.
Atlantic halibut have a pretty slow growth rate so their true size is not always commonly seen. Although usually under eight feet in length, it is thought that these fish could grow up to 15 feet.
California halibut can live for up to 30 years and can grow up to around five feet in length and up to 72 pounds in weight.
Favored Fishing Techniques
One key thing to remember when fishing for halibut is to be patient and wait for a bit of time after any halibut strikes your line. Ideally, you might want to let the fish eat your bait before setting your hook.
A circle hook tends to work well for halibut fishing so these can be a useful addition to your fishing gear.
Another thing to keep in mind is that big bait can lead to some big halibut being caught.
Eating Qualities
Halibut is a delicious white-fleshed fish with a firm, meaty texture.
Halibut contains nutrients that are very good for your heart. These include nutrients such as omega-3 fatty acids, niacin, selenium and magnesium.
In regards to taste, halibut has a mild and sweet taste and has very lean, white flesh.
Halibut is considered a high-quality food source and makes for a great addition to your diet.
If you are like most people, you have probably heard the term “ten-point buck” but may not know exactly what it refers to.
In this post, we’ll explore the origins and definition of the term “ten-point buck.” We’ll also provide some tips on how to identify one if you happen to come across one while hunting. Stay tuned!
When discussing “points” in hunting, they are referring to the tips of each piece that is over an inch long.
You may hear everything from spikes (one point), two points, or six-point – ten points being even bigger than those smaller ones! But what does it all mean? It means using the points as a benchmark to describe the quality of the deer.
The anatomy of a Whitetail’s antlers is made up of the following:
Burr or pedicle
Brow tine
Main beam
Non-typicals
The classification and scoring of a Whitetail’s antlers are done by using the more common Boone and Crockett method. This method uses a combination of letters and numbers, more specifically the letters “H” and “G” and numbers 1 to 8.
Gs – These are used to name the normal antler points on a buck. G1 refers to the brow tine on a Whitetail as that is the first point, then G2 for the next point, and so on. It is important to note that the point on the main beam of a buck is not assigned the letter G although it is considered a point.
Hs – The H is used to measure the circumference of the antlers on a Whitetail. There are only four H measuring areas on a Whitetail’s antlers and regardless of the number of points it has, there will only be four Hs.
WHAT IS A 10-POINT BUCK?
As we stated above, in the Boone and Crockett method of scoring, a 10-point buck is simply a deer with 5 points on each side of its rack. These points can be any size, as long as they are over an inch long.
HOW OLD IS A 10-POINT BUCK?
The age of a 10-point buck can vary. If the deer is a yearling, it will likely have 8 or 9 points. A 2.5-year-old deer will typically have 10 points, and a 3.5-year-old deer will have 11 or 12 points. bucks typically reach their full antler potential at 4.5 years old, at which point they will have the potential to grow up to 15 points.
The answer to this question is subjective. Some hunters prefer to hunt bucks with large antlers, while others are more interested in the meat. Ultimately, it’s up to the individual hunter to decide what they consider to be a “good” deer.
How Big Is a 10-Point Buck?
The size of a 10-point buck can vary depending on the age and health of the deer. A yearling buck is typically around 3 feet tall at the shoulder, while an adult buck can be up to 4.5 feet tall. An adult buck will also weigh more than a yearling, with males averaging between 150 and 250 pounds.
HOW TO SEE A TEN-POINT BUCK?
Although ten-point bucks can be found in many parts of the United States, they are most commonly seen in the Midwest and southeastern states. If you’re hoping to catch a glimpse of one of these deer, your best bet is to head to a state like Illinois, Indiana, Iowa, Ohio, or Pennsylvania during the fall hunting season.
Now that you know what a 10-point buck is, you’re probably wondering how you can identify one if you come across one while hunting. Here are a few tips:
Look for a deer with ten points on its antlers. This is the most obvious way to identify a ten-point buck.
Measure the length of the deer’s antlers. If the antlers are at least ten inches long, you may be looking at a ten-point buck.
Check the size of the points. If the points are large and evenly spaced, you may be looking at a ten-point buck.
Look for other signs of a ten-point buck. These include large body sizes, thick necks, and heavy antlers.
Conclusion
To sum up, if you do come across a 10-point buck, be sure to take the time to identify it properly before taking a shot. Happy hunting!
Quickly filled with the hand pump or high-pressure tank, the Maximus can contain 2000 psi
And allows 30 shots per fill in .177 or 20 shots at .22 Caliber.
The rifle features an onboard 200-bar manometer to check pressure filling.
It’s charged for action by a two-piece 11mm optic mount and compatible accessories.
If you are thinking of starting target shooting practice in your backyard
And are trying to find the best reasonably priced air rifle, the Benjamin Maximus has to be in the mix given its $200 price tag.
Although the Benjamin Maximus air rifle weighs a bit more than average, the feel of the rifle is smooth and it is still lighter than it looks.
This is the reason that the air rifle is a good fit for people of all ages.
However, there is a warning from the manufacturing company to only use it if you are 18+.
Even if you are looking for an air rifle as a gift, Benjamin Maximus, with its tremendous out-of-the-box accuracy, would be the best option for you.
However, the Benjamin Maximus is a pretty loud rifle, with no silencer and no way to lower the volume.
If you’re looking for something for backyard use, you’d better hope to have pretty understanding neighbors!
In this review, we will be discussing the features of Benjamin Maximus and comparing its performance to Benjamin Discovery, so that you can decide which to add to your collection.
There is a molded stippling to help with handgrip if the weather turns wet, making it pretty user-friendly.
The finish of the stock is outstanding, with minimal molding marks, and the added provision of a sling swivel stud is well finished.
The Benjamin Maximus valve is red, unlike the Discovery.
If you look at the cheek weld, the 3 – 9 X scope meets the shooter’s eye quite naturally.
The metal finish is pretty fetching too.
However, since the air rifle is nowhere close to the $1000 mark, it’s unrealistic to expect far too much here.
After the HAM test, it is evident that Benjamin Maximus does, unfortunately, have a poorly finished breech.
The surface of the Benjamin Maximus is a bit dull in its matt black style, however, this doesn’t cover the whole metal area.
In summary, the Benjamin Maximus air rifle is pretty good in terms of appearance, but it’s still far from amazing.
Shooting Ability
The Benjamin Maximus is long, light, and easy to handle.
It weighs only 6 pounds, 5 ounces, which is pretty light for an air rifle with this power.
The magazine has the most comfortable PCP, with 2000 PSI fill pressure which can be done easily with a hand pump.
Without any doubt, this would be the best option for shooters who struggle to make a more usual fill of 3000 PSI, which is required by most other PCP rifles.
Here is the good news for shooters who are in search of perfection and accuracy.
The HAM test revealed that the RATEAGUN score of just 4.5, confirmed the Benjamin Maximus air rifle is very easy to shoot accurately.
Minimal space is afforded when loading pellets into the breach due to its restrictive, compact design.
Therefore, reloading can be a little bit tricky.
Likewise, the small bolt handle also makes the air rifle cocking effort feel rather heavy.
Power, Accuracy And Velocity
The Benjamin Maximus air rifle can fire both .177 and .22 Caliber rounds.
The former is more suitable for target shooting, while the latter is best for small game hunting or pest control.
If you’re having a hard time choosing between the Maximus and the Discovery, please know that there are some important differences.
Physically, the Maximus valve is red, and the Discovery valve is silver.
The Discovery is made with wood stock. Internally, there is a difference in the diameter of the sleeves.
Crossman claims that the Benjamin Maximus has a maximum muzzle velocity with lead pellets of 85 FPS in .22 Calibers.
However, in the HAM test, it actually shot much faster with alloy pellets.
While testing, for every 30 shots taken with the Maximus, the muzzle velocity dropped by approximately 100FPS.
The test was taken with 14.35-grain JSB Exact Jumbo Express Diabolo pellets.
The muzzle velocity drop is not as radical as the Discovery, and it is more accurate.
So, can you say that Maximus gives up to 30 effective shots per fill?
The answer is yes, so long as you accept that a 100FPS drop from first to last shot is effective (That’s a 23% reduction).
Market Availability
The Benjamin Maximus air rifle is available online and is trouble-free to buy, while Crosman is aiming to bring it to most sport shooting stores.
The Benjamin Maximus offers a distinctive twelve-month warranty, as the manufacturer is well known for its customer care for having replacement parts available.
In case of any problems, their team is highly qualified and knowledgeable to support the customer with any query or confusion.
Most owners will be shooting their Maximus air rifle with hollow-point pellets from Crosman Premier,
Which are available everywhere, and give the best performance.
A trouble-free pump that loads to 2000 psi, the standard foster Q/D pack nozzle, and a great look,
It’s these characteristics that make the Maximus a top PCP air rifle.
Benjamin Maximus is famous for its reasonable price, of course.
However, the high accuracy of the air rifle is also deeply appreciated.
As the Benjamin Maximus kit comes with its pump, target, and a can of ammo, it has saved buyers a lot of money.
In the Benjamin Maximus air rifle review, shooters have found the air rifle to be lighter than they expected, so it is an appropriate choice for less physically strong shooters.
It does not feel that heavy on shoulders and allows you to have an excellent shooting experience without any significant barricade.
The stock of the air rifle feels natural and not too bulky.
Though the manufacturers allow warranty claims to be made in case of dropping, most customers haven’t needed it.
It shots H&N 10.65gr, pellets into a9/16’ group at a measure of 25 yards, and there is no complaint about the air leakage of the air rifle.
Reviewers have also lauded the power of the air rifle, which is way above expectations given the low price.
The appearance of the air rifle is also discussed and concurs that it has a lovely shape and color, but with time, the air rifle loses its attraction and becomes a bit faded in color.
For those who are in search of an attractive-looking air rifle that will keep its luster over time, perhaps a second thought is required.
Customers have even recommended many extras of the Benjamin Maximus air rifle;
First is the air pump that must not be disconnected without the drainage of the tank.
Secondly, the air must not stay in the air gun.
One customer complained in their review that the cocking mechanism broke off after only a few uses.
Though the air rifle is loud, there is no such complaint about the noise of Benjamin Maximus among the customer reviews.
Lastly, one widely made criticism of Benjamin Maximus is that the trigger is a bit heavy but still crisp and predictable.
Some customers regret that the air rifle is unavailable in .25 Caliber.
The design of the air rifle is a cause for consternation among customers, for the durability we mentioned above.
There have also been some claims that the bolt actions broke while loading, tying into the above point.
Conclusion
In summary, customers are mostly satisfied with the Benjamin Maximus air rifle for being so powerful at such a reasonable price.
If you are comfortable with the loud sound, then the Benjamin Maximusair rifle is the best choice to have in your hands!
If you are looking for tools for medium-sized hunting games, a 270 rifle is a version worth owning. It has a compact size with a long enough range to flexibly hunt large animals such as wild deer or bears. How far can a 270 shoot? How is its performance? In this article, we will give a complete answer on the maximum distance that this version performs. Scroll down for details!
A .270 rifle is a type of firearm that is designed to fire ammunition chambered for the .270 Winchester cartridge. The .270 Winchester, often simply referred to as the .270, is a popular and versatile rifle cartridge known for its long-range accuracy and relatively flat trajectory. It is commonly used for hunting a wide range of game, including deer, elk, and various other large and medium-sized game animals.
The .270 Winchester cartridge typically uses bullets with a caliber of .277 inches (7mm), and it can deliver high muzzle velocities and energy, making it effective for shooting at extended ranges. This cartridge was introduced in 1925 and has remained a popular choice among hunters and sports shooters for many decades.
Rifles chambered in .270 Winchester are available in various configurations, including bolt-action, semi-automatic, and lever-action designs, allowing shooters to choose a rifle that suits their preferences and needs. These rifles are known for their accuracy, making them suitable for target shooting and hunting applications where precision is important.
What Seed .270 Bullet Is The Best?
You can choose from different types of ammunition for the 270 rifles. People will use 130-grain, even 150-grain, or 165-grain bullets. This number will depend on the characteristics of the hunt, such as terrain, climate, temperature, and target.
130 grain
If you need to take down deer, 130-grain ammo is the best product. For large-scale games and larger opponents like elk, a larger caliber bullet will be the best solution. The best thing I usually do is to search for information on the internet and consult experts to make the best choice.
The 130-grain ammunition is perfect with the balance between the power it produces and the weight that makes it a choice for many hunters. The extra energy of this bullet makes it work better and fly farther than other ammunition for the 270 guns.
150-165 grains
When you need to hunt large animals, you should choose larger ammunition such as 150 – 165 grain bullets. They will have better attack power when penetrating the animal’s skin.
90-110 grains
At distances of more than 5000 feet, the lighter 90-110 bullets would be ideal as they will measure longer distances for hunting deer or antelope. This projectile is subject to wind resistance at lower altitudes.
How Much Does .270 Winchester Drop?
The 270 rifle is a worthwhile investment because it increases your experience with high accuracy when hunting. According to many experimental studies, a 270 Winchester will drop about 3 inches if you aim 200 yards from the target.
If you are 300 yards away, the 270 Winchester will drop about 11 inches. Based on the above theory, you need to aim higher to accommodate the distance between you and the target to get the right shot.
Moreover, the 270 rifles can shoot up to 500 yards with accurate accuracy, but it will be less effective than close range. If you are not a professional and seasoned hunter, experimenting with longer than 500m may not work. A closer range will help you take out the target better. At the same time, you need to practice patiently to master the 270 rifles.
Factors Affecting Shooting Distance
The shooting distance of a firearm, such as a .270 rifle, is influenced by several key factors. Understanding these factors can help shooters make accurate shots and assess the effective range of their rifles. Here are the primary factors affecting shooting distance:
Bullet Ballistics
Muzzle Velocity: The speed at which the bullet exits the barrel greatly affects its range. Higher muzzle velocities generally result in longer effective distances.
Bullet Weight: Heavier bullets tend to retain energy and velocity better over longer distances, making them suitable for extended ranges.
Bullet Design: Different bullet shapes and designs, such as boat-tail or spitzer, can impact the bullet’s aerodynamics and trajectory.
Rifle Configuration
Barrel Length: Longer barrels can provide higher muzzle velocities, which can extend the shooting distance. Shorter barrels may limit effective range.
Accuracy: The precision and consistency of the rifle’s construction and components, including the chamber, barrel, and trigger, play a critical role in achieving accuracy at long distances.
Scope Quality: A high-quality optic with appropriate magnification and clarity is essential for accurately assessing and engaging targets at extended ranges.
Shooter Skill
Marksmanship: A shooter’s skill, including their ability to control breathing, trigger squeeze, and follow-through, greatly affects accuracy at longer distances.
Training: Regular practice and training in long-range shooting techniques are crucial for improving skills and maximizing effective range.
Environmental Conditions: The shooter’s ability to read and adjust for factors like wind speed and direction, temperature, humidity, and elevation can significantly impact accuracy.
Environmental Factors
Wind: Wind has a substantial effect on bullet trajectory. Understanding wind patterns and using wind-reading techniques can help compensate for its influence.
Altitude and Atmospheric Conditions: Higher altitudes typically result in lower air density, which can affect bullet flight. Additionally, variations in temperature and humidity can influence air density and, consequently, bullet performance.
Terrain and Obstacles: The type of terrain and the presence of obstacles between the shooter and the target can limit or enhance the effective shooting distance.
Ammunition Quality
Consistency: High-quality, consistent ammunition is essential for achieving predictable and repeatable ballistics. Variations in ammunition can affect accuracy at long ranges.
Handloading: Handloading or reloading ammunition allows shooters to fine-tune loads for specific rifles and shooting conditions, potentially extending effective range.
Target Size and Type
The size and type of the target play a significant role in determining the effective range. Larger targets are easier to hit accurately at longer distances.
Understanding and accounting for these factors is crucial for shooters looking to maximize the effective shooting distance of a .270 rifle or any other firearm. It requires a combination of the right equipment, skill development, and environmental awareness to consistently achieve accurate shots at extended ranges.
How Far Can A 270 Shoot?
You can use the 270 rifles up to 500 yards to defeat the big beast on your hunt. This is a product that receives a lot of attention and is an excellent choice if you want to take down large prey. The maximum distance a gun can shoot will depend on the barrel length and caliber.
If you own a long barrel, you will shoot accurately even when aiming long distances to the target The 24-inch barrel length is ideal for big hunting games. Besides the barrel length, the caliber is also a feature to consider.
Is the .270 Acceptable for Long-Range Shooting?
Long-range shootThe 270 rifles are ideally suited for long-range shooting Furthermore, expert tests have proven it to be one of the best in the range, with the best long-range performance available today. As with any rifle, gun construction and payload determine how far you can hit your target.
Most users expect to shoot at an ideal distance of 500 yards This range could undoubtedly be more extensive if you have the skill and seasoned experience for similar games. The 270 is the perfect product of a sizable long-range rifle.
It is an indispensable accessory for many professional hunters because of its stable and flexible operation in different terrain and situations. The device also works accurately and powerfully to hit multiple targets quickly. The 270 rifles have overcome many limitations of a conventional long-range gun version.
What’s The Max Effective Range For 270?
The maximum range you can shoot with a 270 rifle will depend on your target size. For animals weighing 1,200 pounds, you should stay within 450 yards. For a 1,000-pound beast, you can increase the distance up to 500 yards and use 130 or 140-grain ammo. In case you need to hunt coyotes, a distance of 300 yards will be optimal for the 270 Winchester.
Might The .270 Beat A Deer?
When participating in hunting, you always need to choose a good rifle and have the ability to shoot flexibly on many terrains. Of course, the 270 is the perfect version for hunting large-sized deer within 200 yards of any terrain.
This distance can be longer if you are a professional hunter. In dense jungles, you’ll need to reframe this to a shorter range for the best accuracy. Most skilled hunters prefer a 270 to take down animals with the most suitable ammunition.
In this regard, the 270 Winchester cartridge is on the most popular list even though it has been around since 1925. Its performance is excellent, with speeds up to 2700 ft/s at close range. But when you need to shoot at a distance of more than 500 yards, accuracy may decrease because of a wind speed or orbital fall rate.
Tips for Maximizing Shooting Distance
Maximizing shooting distance with a .270 rifle, or any other firearm, requires a combination of equipment, skills, and knowledge. Here are some tips to help you achieve longer and more accurate shots:
Select the Right Ammunition
Choose high-quality, consistent ammunition suitable for long-range shooting.
Experiment with different bullet weights and designs to find the one that performs best in your rifle for extended distances.
Optimize Your Rifle Setup
Ensure your rifle is in excellent condition and well-maintained.
Use a high-quality scope with appropriate magnification and clarity for long-range shooting.
Consider a bipod or shooting rest for stability.
Learn Ballistics
Understand the ballistics of your chosen ammunition, including muzzle velocity, bullet drop, and wind drift.
Use ballistics software or smartphone apps to calculate and adjust for bullet trajectory.
Practice Regularly
Develop and maintain your marksmanship skills through consistent practice.
Focus on breathing control, trigger squeeze, and follow-through.
Practice at various distances to gain experience and confidence.
Study Wind Patterns
Learn to read wind speed and direction accurately at different distances.
Use wind flags or vegetation as visual cues to gauge wind conditions.
Adjust your aim and hold-off for wind drift as needed.
Understand Environmental Factors
Be aware of how altitude, temperature, and humidity affect air density and, consequently, bullet performance.
Make necessary adjustments for these factors using ballistics data or calculations.
Keep Records
Maintain a shooting log or journal to record data on your rifle’s performance, ammunition, and environmental conditions for each session.
Use this data to refine your shooting techniques and equipment settings.
Use Stable Shooting Positions
Practice shooting from various positions, including prone, supported, and offhand, to determine which is most stable for long-range shots.
Employ sandbags, shooting sticks, or bipods to enhance stability.
Learn from Experienced Shooters
Seek advice and tips from experienced long-range shooters.
Attend shooting courses or events to gain valuable knowledge and insights.
Safety First
Always prioritize safety when handling firearms.
Ensure you have a safe backstop and a clear line of sight to your target.
Know Your Limits
Understand your own shooting capabilities and the limitations of your equipment.
Avoid taking shots beyond your skill level or the effective range of your rifle.
Stay Calm and Patient
Maintain composure and patience when taking long-range shots.
Avoid rushing shots, especially in high-pressure situations.
Remember that maximizing shooting distance is a skill that takes time to develop. Consistent practice and a commitment to improving your marksmanship, knowledge of ballistics, and understanding of environmental factors will help you achieve longer and more accurate shots with your .270 rifle or any other firearm.
Conclusion
This article has answered your question: How far can a 270 shoot? The maximum distance that a 270 rifle can shoot is 500 yards. This number can vary depending on your ammo and the surrounding physical conditions. If you want to hunt big animals quickly, the closer the distance will help you win them. We hope you can choose and use the best 270 rifles and ammunition for your effective hunting trip. Thank you for reading!
")
")
")
")
")


 Review – The Best Name In The Air Rifle Game")