The Swiss K31 has surged in popularity in recent years, and with good reason. They’re unique, fun to shoot, and stupid accurate.
Folks love these rifles and I think you are going to see why.
Amazing condition K31!
I’m going to give you an easy overview, get three K31s out to the range, and at the end, I’ll have a quick buyer’s guide for you.
Different
Adding some lumber to your firearm collection is a nice reprieve from black plastic guns. And the K31 is different even from other milsurp rifles.
Known for the straight-pull bolt, the beer keg charging handle, and that gorgeous Swiss shield, the Karabiner 31 or K31 is desirable for both shooters and collectors.
Beer keg charging handles, the classic sign of a Swiss rifle
Plus they are not for collecting dust, they’re for taking to the range.
Shortest History Lesson Ever
Before the K31, there were multiple variations of the Swiss straight-pull bolt rifle. But these were too long and too heavy.
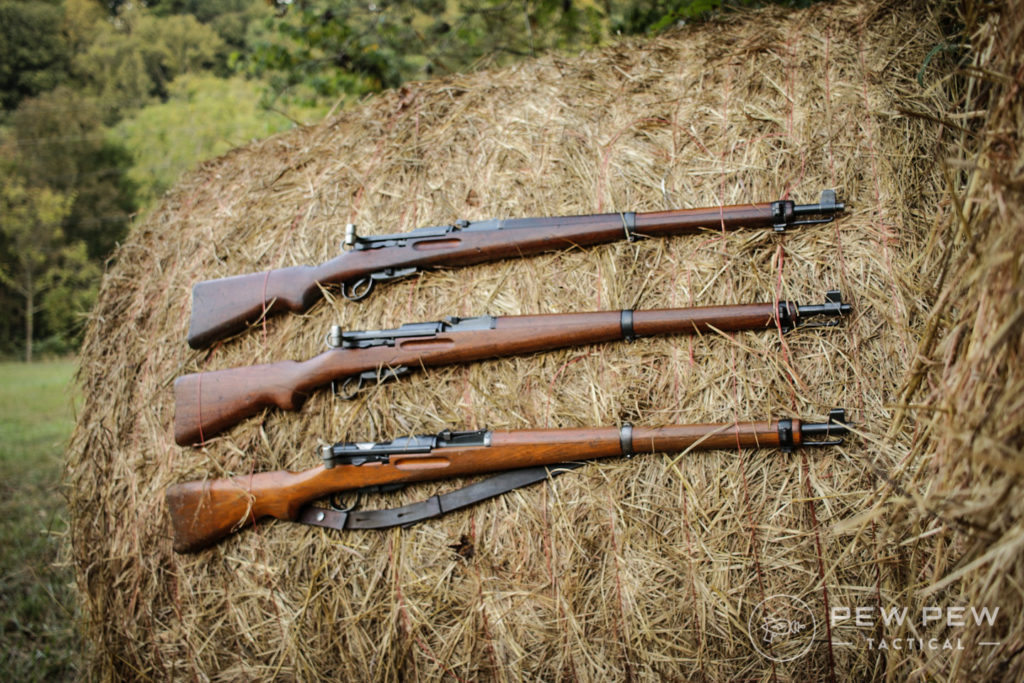
Swiss 1911 Rifle (top) was replaced by the Swiss K31 rifles (bottom two), Rock Island Auction Company
The Swiss military did a rifle redesign in 1931, and the Karabiner Model 1931 was born. It was issued from 1933 to 1958 with total production of about half a million.
Cool thing is that after Swiss soldiers finished their mandatory service, they could purchase their issued rifles. So there are loads of these guns which have been kept and maintained for a lifetime.
K31 through the ages
And often these guns reach the US surplus market in fantastic shape.
Accurate
The K31 has a reputation for excellent machining and craftsmanship which yields legendary accuracy.
Keep in mind that the technology in this gun is a century old, but the gun even today feels like a precision machine.
And working that straight-pull bolt is a fantastic experience at the range.
The Stocks
The stocks in the earlier models are all walnut, and from 1945 forward the stocks are all beechwood.
Swiss K31 with beechwood (top) and walnut (bottom) stocks
So an easy eye test is light stocks are newer, and dark stocks are older.
Ammo
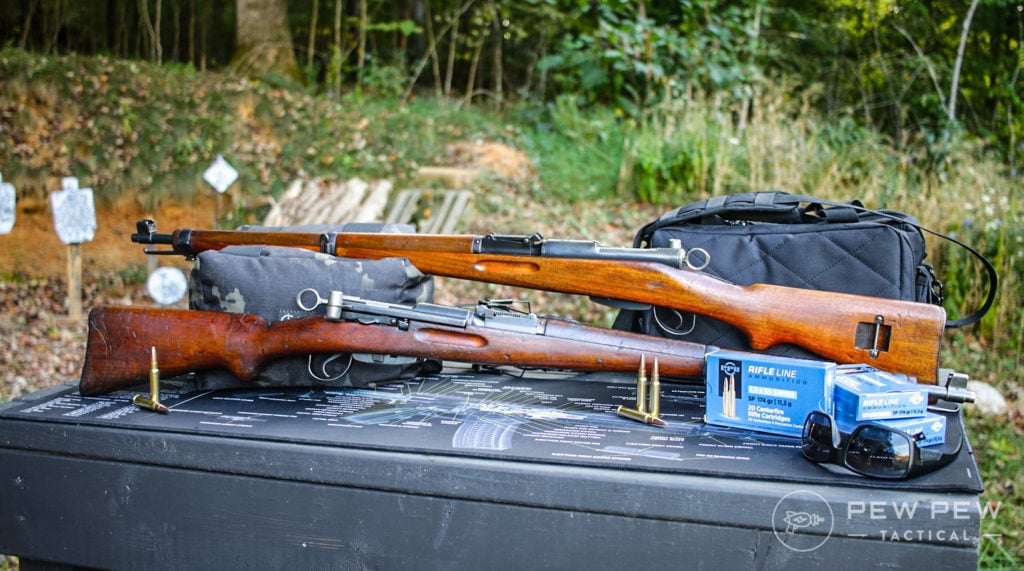
The K31 fires the 7.5 x 55mm Swiss round, also referred to as G11, but most just call it “7.5 Swiss”. Ammo is readily available, and the rifle can fire modern production ammunition.
K31 and Swiss ammo
The box magazine is self-locking and holds six rounds. Waxed cardboard clips are available for faster loading, but I usually eject the mag and load by hand.
At the Range
After 75 years of field testing, the accuracy of this rifle is not up for debate. Rounds will go where you send them, and you’ll see guys on YouTube take the K31 out to 1,000 yards with iron sights.
So for this test, I didn’t do a test at all. I just took a ton of ammo and enjoyed getting shots on target with something that’s not black and plastic. I shot from my shoulder at 75 yards with iron sights.
I fired PPU 174-grain ammo and was able to ping torso steel no sweat.
All three rifles I tested ran perfectly. Absolutely zero problems. These guns run.
The Pain
Lot of military rifles are murder on your shoulder, but the felt recoil on the K31 ain’t bad. I’ll call it medium. It’s certainly manageable.
The Sights
The rear sights have a leaf spring that is adjustable at 100 yard intervals. And the front sight is adjustable for windage with a nifty sliding design.
Other sight options are available, including the desirable diopter sights, but for anything other than standard iron sights, you’re gonna pay a hefty price.
The Trigger
The two-stage trigger is super easy to get used to. The first stage is ultra-light, and when you hit the second stage there is a clear wall.
Pull comes in between 3 and 4 pounds and the break is clean and overall I like the trigger.
The Downside
Not many negatives with this rifle. You’ll hear guys say that there is no positive extraction in the design, or that at 9 pounds it’s heavy, but for me I take those things in stride.
Worst I can say is that the ammo is expensive.
Troop Tags
This is where Swiss guns just get doggone cool.
On the day that these rifles were issued, the soldier’s name, birth year, and location of issue were written down on a small white tag and placed under the buttstock cap.
K31 Troop Card
These troop tags are the Holy Grail of Swiss rifle collection.
Maintenance
Because most rifles of this age have worn bluing and exposed steel, I am a little more mindful of how I maintain my K31s compared to a modern black rifle.
I clean and oil after every range trip, and I don’t handle the rifle without a quick wipe down.
A complete teardown and deep clean can be done in half an hour.
K31 Buyer’s Guide
Shopping for a K31 is easy peasy. 7 quick steps!
1. Identification
There are lots of different Swiss military rifles, but to identify the K31, look for the Swiss shield on the receiver, and the aluminum beer keg charging handle.
Perfect Swiss Shield
Lots of other Swiss rifles have beer keg handles, but they are all reddish bakelite. Again, look for the aluminum.
Mmmm, beerrr
2. Overall Condition
Look for the condition of the bluing and how much steel is exposed on the barrel and receiver. Look for rust. Look for cracks in the stock. Put a light in the barrel and look at the lands and grooves.
If you are shopping online, all good dealers will give you solid descriptions with photos.
3. Serial Numbers
The most desirable rifles have matching serial numbers on all the major parts including barrel, receiver, bolt, stock, handguard, and magazine.
K31 magazines with serial numbers!
4. Production Year
Because the Swiss did not participate in WWII, there is no pressure to get War-era rifles. K31s from the 1950s are just as desirable as earlier models.
Basically, the production year doesn’t matter.
5. Extras
I tested three standard run-of-the-mill K31s. But like all military collectibles, you can get lost in the weeds. There are rifles with diopter sights, sniper models with scopes, and guns with decades of provenance.
K31 and numbers matching bayonet
And you’ll pay more for extra features. But the good news is, if you are new to K31s, you can get a standard rifle in good shape without paying extra for rarer models.
Any K31 in good shape is going to be a winner!
6. Troop Tags
If you find a numbers-matching rifle in good shape with a troop tag, buy it. Just do it, period!
No joke, troop cards are one of the coolest things in milsurp!
7. Price
For the K31 goes up and down, but right now a numbers-matching K31 in solid condition is $500-800. Double that price for rifles with diopter sights.
By The Numbers
Reliability: 5/5
Keep it clean and this gun will run for another 100 years.
Ergonomics: 4/5
To be fair you’re holding a giant piece of lumber. But the pistol grip feels good and grabbing that beer keg handle is addicting.
Accuracy: 5/5
The free float barrel, precision engineering, and Swiss clockwork trigger combine for legendary accuracy. If you miss, it’s on you.
K31 rear sight
Customization: 0/5
If you even think about drilling the receiver for a scope mount, you need to sit in the corner and think about your decisions. Don’t change anything, Bubba.
Value: 4/5
True you can get other milsurp rifles for half the price of a K31, but you won’t get the precision or shootability. A lot of value for the price.
These are almost always available on GunBroker and sometimes on Guns.com!
If you’re unfamiliar with either, take a look at our reviews for both GunBroker and Guns.com.
Overall: 4/5
There’s not much to dislike about the K31. It’s easy to use and maintain, fun to show friends, and performance on the range is stellar.
Conclusion
The K31 is a fun to shoot, fun to show off, and even fun to disassemble milsurp gun that is accurate and a good bang-for-the-buck, but it’s heavy and ammo can get expensive.
I had a blast with this project. Even if you are not a milsurp guy, it’s great to get at least one gun into your collection that isn’t black and plastic.
And the artwork on the receiver is a big plus.
One more time…our video review!!
Love some more milsurp? Check out our Best Milsurp Rifles You Can Still Buy.
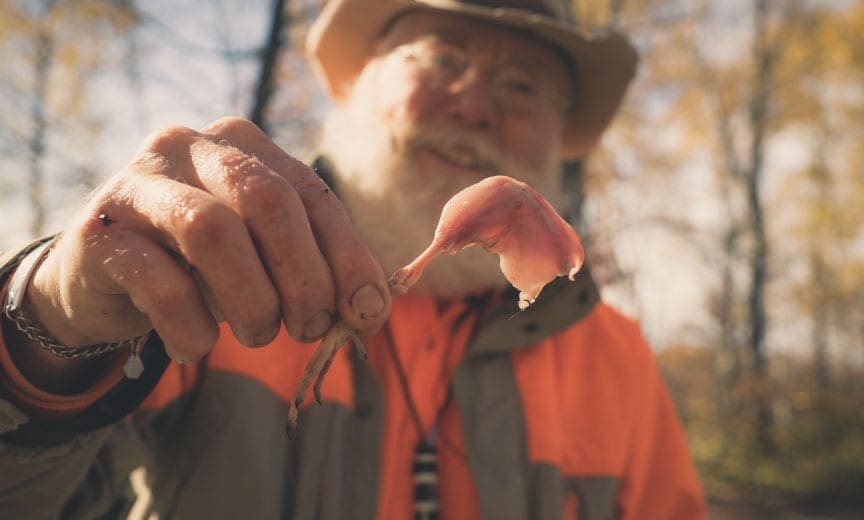
To spot and stalk or ambush hunt — that is the question
I have always been plagued with that dilemma ever since I started down this venture we call hunting. Growing up, we always still hunted or ambush hunted. I really wasn’t exposed to spot and stalk hunting until a few years ago. When I did go down the spot and stalk path, I couldn’t help but just want to find somewhere where I could sit and wait for that bear or buck to walk by though. In turn, when I was ambush hunting, I couldn’t stop thinking about what I could be seeing if I was glassing at that time. It was definitely a “grass is greener on the other side” scenario for me and, sometimes, it still is.
So which is better?
I feel like there really isn’t a concrete answer for this question. Everybody is different and different situations call for different types of hunting strategies. For instance, it wouldn’t be the best idea to spot and stalk hunt in country where you couldn’t see 10’ in front of you. This would call for more of a still hunting/ambush hunting approach. The whole idea behind spot and stalk is to spot the animal from a good distance away and plan a stalk in order to get close enough for a shot. Could that be done in dense country? Yes, it could. Is it the most productive way of hunting there? In my opinion, no. Let’s take a look at both applications.
Spot and stalk
This is by far my favorite way to hunt. Sitting on a high vantage point and overlooking vast open country with my binoculars brings a calming feeling to me. It’s like a never ending puzzle that is begging to be solved. Where will you see the animals? What animals will you see? Will you even see anything? If you do, how are you going to make your approach? I have learned more about deer hunting this way than any other animal. It is such an added benefit, in my opinion, to be able to sit there and watch animals from a long ways away act like themselves and do their thing. What part of the hill do they tend to walk on? What facing slope are they choosing over the others? Where are they bedding? That one is the most important, especially for a spot and stalk bowhunter. If you can glass a deer up and actually watch where it beds, now the game has really begun. Being able to do this is going to give you a lot more time to get over to where that animal is because you really don’t need to worry too much about that animal moving its position. Also, if you have never experienced the rush of sneaking up on a bedded deer or herd of elk, you are missing out. This is where our natural predatory instincts kick in and they are put to the ultimate test. Try it out sometime.
Ambush hunting
This type of hunting brings its own set of adrenaline rush. I can remember being a kid and sitting up against a tree with my dad. It was the first archery hunt that I had ever gone on. The day before we saw two or three amazing mule deer bucks and found a prominent trail leading up a fence line right towards where we were positioned for the morning. Just as the sun was peaking over the hillside in front of me, I saw antlers along with it. A beautiful old buck with a gray patch on his back slowly worked his way down towards me. I was so shaken up, I literally couldn’t pick up my bow. The old warrior walked right past me at 10 yards without an arrow to his name. That deer still haunts me.
Continued below.
Ambush hunting can be the most boring experience known to mankind, especially if you are a little kid. I have had the thought of bringing an audio book with me into the blind or perhaps a podcast. The hard nose in me says that this will take away from my experience and that those things don’t belong in the mountains and maybe they don’t. The plus with it, though, is that if you do see something, chances are you are going to be presented with a shot. I will admit that it is a very exciting experience hearing something walking towards you and not being able to see it until it comes into view. There is no better way to get close to game than letting the game get close to you.
Which method is the best way to go?
I am afraid that only you can answer that question. How do you prefer to hunt? If you don’t care, then take a look at the country you will be hunting. What application do you think is going to lend success? I myself prefer to spot and stalk as I have stated above. Because of this, I try to find country that allows me to do so. The past few months, I have been fighting with myself on how to approach my next spring bear hunt. In the past it has been a constant battle of spot and stalk or ambush hunting. In the end, I decided to do what makes me happy and plays to my strengths, successful or not. If you like sitting in a blind or treestand, then do it! If you’re like me and enjoy looking through your optics and playing “Where’s Waldo?” with the quarry you seek, then do it! You write your own story.
If you’re looking for a live bait that will attract fish, mealworms are a great option. These small worms are high in protein and fat, making them irresistible to many fish species. In addition, they’re easy to find and relatively inexpensive. Here’s everything you need to know about using mealworms for fishing.
Benefits of Using Mealworms as Bait
There are several benefits to using mealworms as bait. First, they’re a natural food source for many fish species. This means that fish are more likely to bite on a mealworm than something they don’t typically eat.
Second, mealworms are high in nutrition, making them an ideal food source for fish, as it gives them the energy they need to grow and thrive.
Third, mealworms are relatively easy to find and purchase. You can find them at most bait shops or online. They’re also relatively inexpensive, making them a great option for budget-minded anglers.
How to Use Mealworms as Bait
Using mealworms is simple – thread them onto your hook and cast your line into the water. The mealworms will wiggle and squirm, attracting fish to your line. In addition, their soft bodies make them easy for fish to eat. The size of the hook depends on the size of the fish you are hoping to catch.
Ways to use mealworms for fishing also depend on the fish you’re targeting. For example, if you’re fishing for trout, you can thread the mealworm onto a hook and cast your line into a pool or stream.
The movement of the mealworm will attract the trout, and when they bite, you can reel them in. If you’re fishing for catfish, you can drop a handful of mealworms into the water and wait for the catfish to bite.
What Type of Fish Can You Catch with Mealworms as a Bait? Mealworms are effective for many different fish species, including trout, bass, panfish, and catfish. When fishing for trout, try using a small mealworm. For bass, use a larger worm. And for catfish, use a handful of worms.
How to Buy Mealworms
You can find mealworms at most bait shops or online. If you’re buying them online, make sure to purchase them from a reputable source. Look for a supplier that offers guaranteed live delivery and ships their worms in a breathable container. Also, be sure to choose the correct size worm for the fish you’re hoping to catch.
How to Keep the Mealworms Fresh for Fishing
Mealworms are live bait, so it’s essential to keep them alive and fresh. The best way to do this is to purchase a breathable container, such as a mesh bag, and store them in a cool, dark place. Change the bedding regularly and mist the worms with water to keep them hydrated. You can also purchase a live bait aerator to keep the mealworms alive and fresh for longer periods.
Buy Mealworms for Fishing from Sunshine State Worms
If you’re looking for high-quality mealworms as bait for fishing, look no further than Sunshine State Worms. We offer live delivery and guaranteed live arrival on all our worms.
We also ship our worms in a breathable container to ensure they arrive alive and fresh. Plus, we have a wide variety of sizes to choose from, so you can find the perfect worm for your fishing needs. Visit our website today to learn more and place your order.
Like many unknowing dog owners, I used to allow my dogs to ride in the back seat or hitch of the car without worrying about their safety. They lay down and were calm, so I never saw a need to use a dog crate for car travel.
When I got Sitka, however, there was no sitting calmly in the car while I drove.
Sitka is anxious in the car, and after the first ride involved him lunging at trucks and motorcycles, pacing back and forth, and whining the entire time, I knew I needed a solution to keep us safe and sane.
Initially, I secured him using a harness system from Kurgo that is crash-tested and kept him from pacing, but he’d spin and tangle himself in the straps resulting in needing to pull over to untangle his legs periodically.
From there, I decided to look into a kennel and began intense research to find the best dog crates for car travel. I asked friends, polled my Instagram audience, read reviews, and emailed brands to create a list of potential candidates.
In this post, I feature the dog crates that I considered purchasing, which means they met the criteria I will explain below. I explain why I chose the one that I did and provide suggestions for why other brands might work best for your car situation and dog.
Don’t feel like reading all the research and just want to know my top pick?This is the crate I went with for myself.It’s one of the more expensive dog crates on the market, but it is worth every penny because I fully believe that in the event of an accident, Sitka will survive.
Even if your dog was like my first dogs and settled calmly in the car, it’s a good idea to secure them in a dog kennel in the event of a car accident.
Here are the three main reasons:
Safety
Think about it, we buckle up every time we get into the car, but many dog owners don’t often consider securing their dog. In a crash, unsecured dogs will become projectiles and can result in serious injuries and death.
Security
If you are injured in a car accident, your dog will be in a safe and secure spot where they cannot run away or bite anyone.
Restraint
When I drove with Sitka the first time, I was certain we would get into an accident. His movement and whining was so distracting that I couldn’t concentrate on driving.
In 2019, Volvo conducted a safety study that determined that unrestrained dogs led to significantly more unsafe driving behaviors, distracted driving, and increased stress for both the human and the dog.
Image from Volvo Study: Unrestrained Pets Increase Stress and Distraction on the Road
In the Event of a Car Accident
In the unfortunate case that you are in a car accident, there are a few preparation steps to take to ensure the utmost safety for your pet.
This is especially important if you are injured and unable to tend to your dog after a crash.
Secure a laminated form on top of or inside of the kennel with the following information:
Your first and last name
Address
Phone number
Emergency contact for your dog who is authorized to make choices on your behalf
Veterinarian
Any allergies your dog may have
Other pertinent information about your dog
Keep a spare leash and a muzzle in the car and include instructions about how to remove your dog from the kennel and where to take them until you are able to pick them up (i.e. with a friend or e nearest veterinarian).
When working with emergency personnel, if you are able to, communicate to them that you will be the one to remove your dog from the kennel.
I once saw a video posted on Instagram where a dog jumped out and started to run away when the firefighters removed him from his crate. Thankfully, he had his e-collar on and was able to be recalled back.
In stressful situations, dogs can bite or run away. Do as much as possible to prevent that from happening by communicating as best you can with emergency crews and in writing.
What to Look for In a Dog Crate for Car Travel
When deciding on the right dog crate for your needs, there are several factors to take into consideration that will ensure the best fit for your dog and car, and still meet safety requirements.
Size and Fit
When you measure your dog for the crate, you want a snug fit. Too much excess space means that they can become injured due to increased impact from a crash.
You also don’t want it too snug because then your dog won’t be able to move around to get comfortable.
Since most of the kennels in this article are not available to purchase in stores, testing fit is not an option. The best plan is to provide your dog and car’s measurements and dog’s weight to the manufacturer and work with them to determine best fit.
Material
To best protect your dog in the car, look for a dog crate that is made from a single piece of molded polyethylene. A single piece means that there are no weak points in the kennel that can fail in an impact.
Materials to avoid include:
Wire
Fabric
Folding crates
Traditional plastic “clamshell” dog crates.
Crash-testing
The Center for Pet Safety (CPS) conducted a series of crash tests for dog crates in partnership with Subaru of America in 2015. CPS evaluated crates that cost between $150 and $1000 and put them to a series of tests, including:
The use of dummy dogs weighing 75 lbs
Conducted two different crash test with rear seat folded in one and up in the second
Simulated crashes at speeds of 30 mph
You can see the test results from the report here.
There are many dog crates out there that claim to be crash-tested, but because there is not the same requirement for testing the safety of dog crates as there is for cars or child seats, purchasers need to do their homework.
Since the most recent CPS test was performed in 2015, there are likely suitable kennels that didn’t make the list or new additions to the market that weren’t tested.
Email the manufacturer to ask about their crash testing protocols and read reviews from people whose dogs were in car crashes to validate the claims.
Strap Loops
Some dog crates come with strap loops that allow you to secure the kennel into your car. This is especially important for those whose dogs will ride in open bed trucks.
Different manufacturers may recommend different types of straps to tie down the kennel. Check in with them before purchasing if you plan to secure the kennel in your car.
Ventilation
It can get hot and stuffy inside of a plastic box, so when you’re looking for a crate for your dog for the car, make sure that it has good ventilation.
This means there are plenty of air holes on the sides that provide cross breezes.
Sizing Your Dog Crate for the Car
Depending on the kind of car you have and your dog’s size, different crates will fit differently. Further, placement depends on where your car’s crumple zones are located.
For example, the front and rear of many cars feature a crumple zone, designed to protect passengers, but that’s not where you want the kennel to sit.
You’ll want to check with your car’s manufacturer to determine where the crumple zones in your specific car are located. Next, measure to ensure the kennel will fit in the designated safe location.
The Best Dog Crates for Car Travel
I conducted deep research on several dog crates for car travel before making a decision. I visited several different websites and combed through reviews and talked to my community on Instagram to get their take on different kennels.
Some key features to look for include:
carrying handles
air vents
warranties
stackability for multiple dogs
tie down options
weight
A quality dog kennel that will protect your dog in the event of an accent is not cheap and you get what you pay for in most cases.
The typical wire cages or clamshell airline kennels are not suitable for safety in the event of a car crash. They will not protect your dog.
After all of my research, these are the brands that I considered, including the one I ultimately chose.
Top Pick for Dog Crate for Car Travel – Gunner Kennels
Gunner is an industry leader when it comes to dog crates the car. They are the only crate that passed in the 2015 CPS study and have a 5-Star Crash Test Rated designation from the organization.
Practically indestructible, Gunner tested the kennels by tossing the crate off a 200-foot cliff, dropping a 630-lb sled on it, shot it with a shotgun, and applying 4,000 lbs of pressure to it. All tests resulted in very little damage.
This is the kennel I use for Sitka currently. You can see my Gunner Dog Crate review here.
If you can’t afford a Gunner – Dakota 283
When I was fist looking into purchasing a dog crate for the car, I initially went with the Dakota G3 Medium. Although it’s not crash test rated, by CPS, the company has don extensive testing on the kennel.
Here’s what they said when I reached out to ask:
“We have done internal testing of our kennels through a variety of impact tests including 25 ft drop testing for impact and durability. Our testing drives us to test to failure on most tests so that we know limitations and strengths.
Additionally, and most important (sic) is that our kennels have been involved in several rollover accidents with the dog surviving uninjured. This is the ultimate test and testimonial to our design and performance.”
It’s important to consider that Dakota Kennels came out after CPS conducted the safety studies.
I chose the the Dakota G3 medium because it seemed like a good mix of the Ruffland and the Gunner Kennel, with a mid-range price tag. The military strength crate is made from a single piece of rotomolded Polyethylene that resists extreme impact.
I did like this kennel and felt very confident that it would protect my dog in the event of an accident. It was roomier than the Gunner, which isn’t ideal for car travel. It’s also taller, so blocked my rear vision more than the Gunner.
Dakota 283 generously provided a discount code for Long Haul Trekkers followers. Get 10% off your order with code SITKA10 at checkout.
Best Budget Pick – RuffLand
RuffLand Kennels (formerly known as Ruff Tuff Kennels) are the one of the most popular kennels for car travel. They’re very affordable and made from a durable one-piece roto-molded construction that can withstand heavy impact.
They were tested in the CPS crash test and performed well when placed in the rear cargo area against the rear seatback, however in the test without the seatback for reinforcement, the door completely separated from the crate and the dummy dog was not retained.
You can read more about the testing here.
RuffLand kennels are tapered to ensure full breathability, even with gear stacked right up against the crate. The brand also makes tie downs specifically for their kennels to ensure further security in the car.
Best Customizable Dog Crate for Car Travel – MIM Variocage
Regarded among the safest crash-tested dog kennels for car travel, Sweden-based MIM Variocages are the only dog cage in the world certified crash-tested for front, rear, and rollover impacts.
The brand will provide a free replacement in the event of an accident.
Variocages can be tailored to various vehicles and come in 4 models with over 14 adjustable sizes. The cages are designed with a crumple zone, similar to that of cars and feature a locking mechanism.
Do you use a dog crate for car travel?
Have you been in a car accident with your dog and have any tips to share?
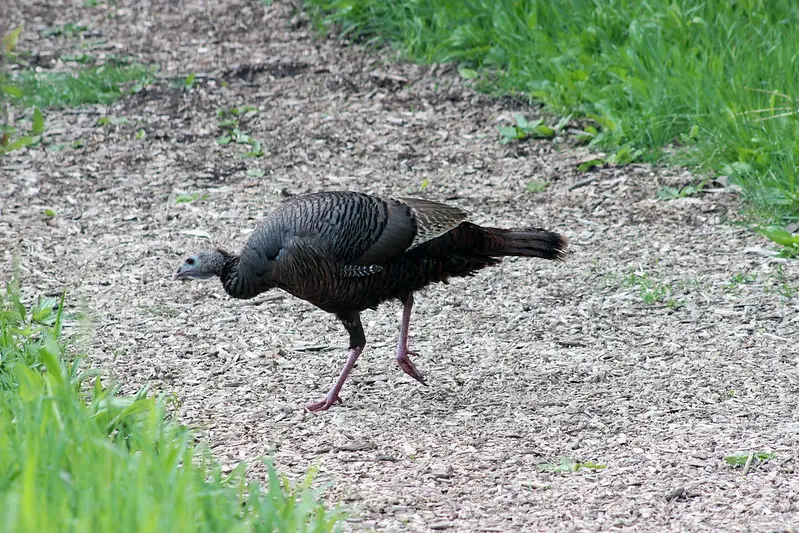
Always know your target before you pull the trigger. This is one of the golden rules of hunting. It’s not enough to just know that you’re shooting at a turkey. Just as in duck hunting you must know the species (and sometimes the sex). In deer hunting, you must be able to tell a buck from a doe. Well in turkey hunting, you must know the difference between a turkey hen vs a tom turkey.
A hen is a female turkey. They lay eggs and commonly make sounds known as clucks, yelps, cuts, kee-kees, and purrs.
A male turkey is known as a tom. Toms will make sounds known as gobbling, spitting, drumming, and yelping.
A juvenile tom is called a jake. For more information on jakes including whether you should shoot them or not, read our full article on the subject.
In most states, the law requires a harvest of only tom turkeys during the spring season. Some states allow you to shoot bearded hens. During fall seasons, there are states that allow both sexes to be harvested while others still only allow toms to be harvested.
As you can see, it is very important to be able to tell a tom from a hen. So let’s get into the differences.
Toms generally have a beard protruding from their chest. In a mature tom, these beards are usually seven inches or longer in length. Jakes will have shorter beards. Some toms have multiple beards.
Beards are black and are made of feather-like bristles.
The beard is usually easy to pick up when hunting so it is a key identifier. However, you can’t totally rely on the beard when identifying a turkey hen vs. a tom.
You see, some hens have beards. According to Julie Craven at BirdWatching, 5-10 percent of all hen turkeys have beards. And if that’s not confusing enough, some toms suffer from “beard rot” leaving them with a thin beard or even no beard at all. Beard rot results from vitamin deficiency in a turkey.
So a beard is a good guideline, but not a hard rule. What else can we use to tell a hen from a tom?
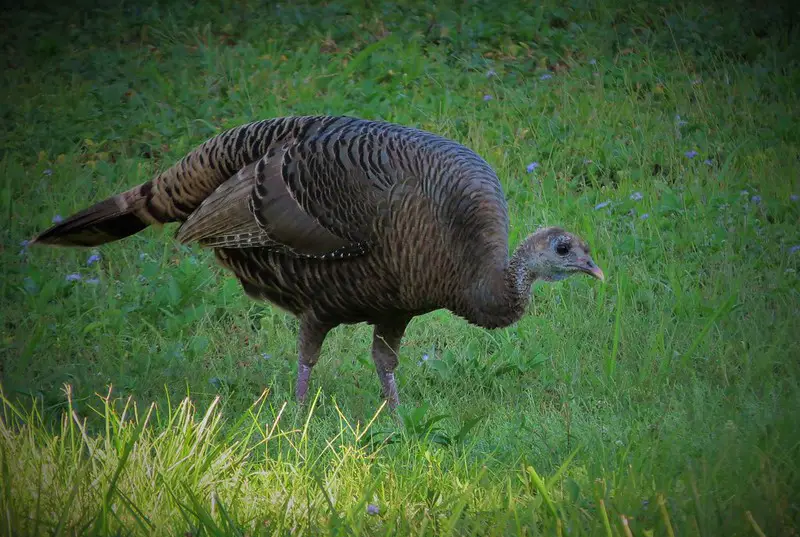
A hen, as shown above, does not have spurs like a tom. However, there are many other ways to tell a hen from a tom.
Spurs
For the most part, only toms and jakes grow spurs or “hooks”. In fact, spurs provide a rough estimate of the age of the tom. The theory is that the longer the spur, the older the turkey. The jake has a short, rounded spur while a three-year-old bird can have spurs longer than one inch in length.
A spur is a claw-like feather on the backside of the leg. They can be very sharp. Toms use the spurs to fight other gobblers and establish dominance. Spurs can vary in color from black to pink.
Unfortunately, spurs wear down, break, and even fall off. It can also be difficult to see the spurs of a tom in the field. So let’s move on to another factor we can use to differentiate a hen from a tom.
Size
Toms are bigger than hens. They typically run 11 to 24 pounds. A hen weighs from 5 to 12 pounds. The heaviest tom on record is 37.6 pounds.
Toms are also usually a bit longer than hens. The largest toms can be over four feet in length while the longest hens are usually just over three feet in length.
Size differences can be useful for determining sex if you have a mature tom and a hen. If you are seeing them separately in the field, it can be tough to determine gender based on size. Keep in mind that jakes and larger hens can be similar in size as well.
Size is another tool in our toolbox, but what other clues can we use?
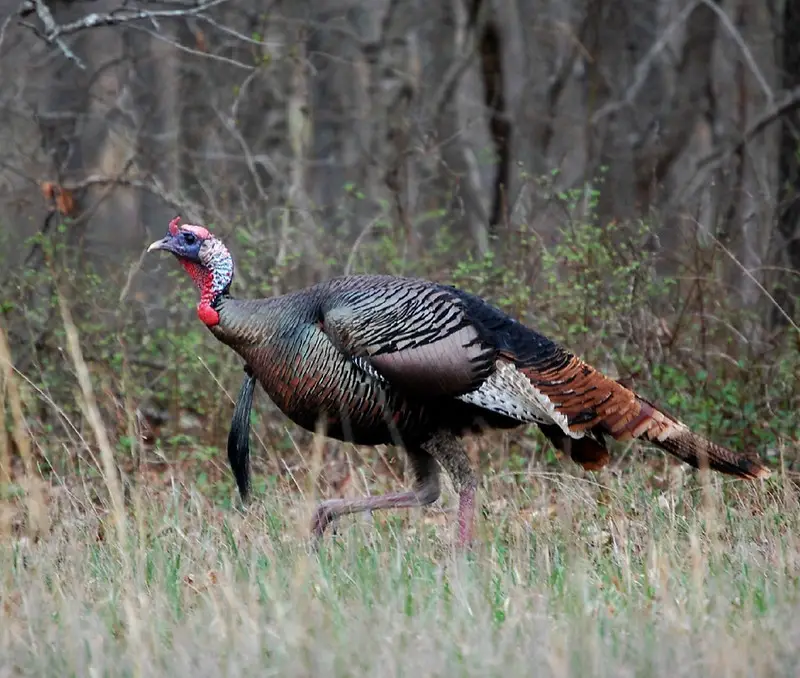
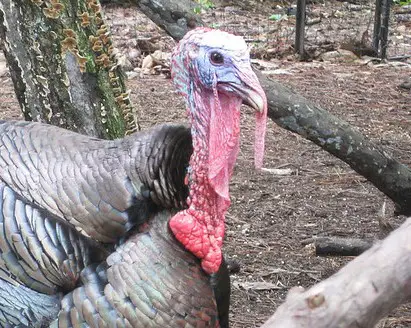
A good way to distinguish a hen from a tom is the head. Notice the mostly blue hue of the hen’s head on the left vs the red, white, and blue head of the tom on the right. The tom also has a much larger snood.
Head
The head is a great way to differentiate a tom from a hen as you will likely be focused on the head.
A tom’s head will be a combination of red, white, and blue. It is generally featherless. Toms also have a longer snood than a hen. The snood is the fleshy protuberance above the bill. It can contract, expand, and change colors based on the turkey’s mood.
The hen’s head is much less flashy than the tom’s. It is a blue-ish gray color. As mentioned above, the snood will be much shorter than a tom’s. Hen’s have small feathers on their heads.
The head is not the only coloring difference between a hen vs a tom turkey. Let’s look at the rest of their feathers.
Plumage
As you might have guessed, tom turkeys have flashier feathering than the hen like most other avian species.
The hen’s overall feathering is a browner tint than the darker, blacker tom’s. The tips of the feathers on a hen are more of a buff color. The tom turkey has dark, black color tips.
Let’s talk about how to identify the gender of a bird when tracking turkeys.
You can sometimes identify whether the track was left by a tom or hen by the length of the track.Photo courtesy of Virginia State Parks on Flickr
Tracks
As you might assume, the bigger tom has a bigger track than the smaller hen. If you find a track that is longer than four inches, it is probably a tom. Hen turkey tracks will usually be about three and a half inches in length.
Finally, there is another sign a turkey leaves behind.
Droppings
Yep, you can tell the sex of a turkey by its excrement. Toms leave a long, sometimes j-shaped dropping. These droppings are generally about two inches in length.
Tom droppings are easily distinguished from the more clumped together hen excrement.
Turkey Hen vs Tom: Final Thoughts
Determining the sex of a turkey is not easy when you are first getting started. As you become more experienced, you will learn to recognize toms and hens faster.
A good rule of thumb is to only shoot a bird after you have identified two distinguishing traits. For instance, if you see red on the head and a beard on the breast, you can feel confident that you are shooting a legal tom.
The exception to this rule would be if you are hunting in a state that allows you to shoot any bearded turkey, and you are fine taking a hen.
Hopefully, this article has made you feel a bit more comfortable in recognizing your game this hunting season. Bookmark this page and look at the pictures periodically to refresh yourself on the signs of a turkey hen vs a tom.
If you enjoyed this article, you may also like to read about the sounds a hen turkey makes.
Most backyards in North America have only one type of squirrel that you see regularly.
In northern and eastern regions, the two most common types are red and gray squirrels.
But if you’ve ever seen these two squirrels side-by-side then you know they’re really quite different animals! Not just in terms of size & appearance, but also in their behavior, habitat & even their diet.
So today let’s explore 8 key differences between red and gray squirrels in order to gain deeper insight about our backyard tree dwelling friends.
What’s the difference between red & gray squirrels?
Gray squirrels are much larger than red squirrels. Their tails are bushier and they have a longer skull shape. Gray squirrels also have much more color variation, including black, gray, cinnamon & blond.
To start off, take a look at this side-by-side comparison of a red squirrel on the left, and a gray squirrel on the right.
Let’s break down some things to notice about these two squirrels pictured above:
On the surface, perhaps the most obvious difference between red and gray squirrels is their color.
A red squirrel looking very dashing in the sunlight
Generally, red squirrels will all have this same reddish brown color shown above with very little variation. Red squirrels are a species of arboreal (tree dwelling) rodent that all have fur looking more or less identical to the photo above.
However it’s important to realize that gray squirrels are NOT always gray.
One of the big differences in gray squirrels from red squirrels is that they come in many different colors including gray, black & even shades of blond.
Black is one of the most common color variations in gray squirrels, but these are actually the same species!
It’s important to realize these color variations are all part of the same species of squirrel, and can even be brothers and sisters in the same family.
This means color can be a good way to identify squirrels, but only if you remember that gray squirrel communities are multi-colored.
The basic idea is:
Red squirrels are always red.
Any other color is a gray squirrel (or possibly fox squirrel in overlapping ranges).
In most cases these rules will work, however, New York city is known to have a population of cinnamon colored gray squirrels, which could be confused with red squirrels if you don’t know the other differences.
So while color can be useful, it’s actually not the best way to identify red and gray squirrels in all cases.
So what’s the best way to identify them?
2. Size
In general, the best way to identify gray squirrels from red squirrels is by their size difference.
Gray squirrels are significantly larger than red squirrels. According to most sources, gray squirrels weigh in at a range of 400-600 grams, which is almost twice the size of the 250-330 gram red squirrels.
This size difference is very obvious just by looking at them, and is typically the fastest & most accurate way to identify squirrels in actual practice.
If you’re used to watching gray squirrels and then you suddenly see a red squirrel, their small size will really stand out to you.
Side note: If you live further south, it’s also important to know whether your area has fox squirrels which are even bigger than gray squirrels, and sometimes even interbreed with their populations.
3. Ear Tufts
Another interesting clue to help with squirrel identification is that red squirrels grow little tufts of hair on their ears during winter.
Ear tufts are a more subtle characteristic than the overall size & color, but it still gives us a bit more insight into their character.
In actual practice, you really don’t need to look at squirrels this closely to tell them apart but it’s a funny quirk and something to look for during the cold season.
4. Social Behavior: Communal vs Solitary Squirrels
A much deeper level of knowledge about squirrels comes when you go beyond identification and begin to study their behavior.
Here the differences become even more obvious because red and gray squirrels have vastly different approaches to how they interact socially with other squirrels.
So how do red & gray squirrels differ in terms of their behavior?
Gray Squirrels Are Communal Squirrels
Gray squirrels are generally considered to be much more community oriented than red squirrels.
It’s extremely common to see groups of gray squirrels all hanging out peacefully together in the same area. They share territories, food and sometimes even sleep together.
In many ways, this is really the biggest of all the differences between red and gray squirrels because red squirrels are not communally oriented at all.
Red Squirrels Are Territorial/Solitary Squirrels
Red squirrels in sharp contrast to gray squirrels are some of the most aggressively territorial animals on the planet.
They actively defend their territories, food caches & nest sites with a wide variety of loud vocalizations and visual displays of aggression.
This aggression begins quite early after the baby squirrels are born, and continues for the rest of their life. In this sense, red and gray squirrels really are polar opposites.
5. Habitat
Aside from some occasional overlap at the edges of different habitat types, gray squirrels and red squirrels also tend to occupy very different niches in their habitat.
Gray squirrels thrive in urban & suburban environments and typically prefer forests dominated by deciduous trees (like the oak & beech forests we discussed in a different article on mast trees).
Red squirrels tend to become dominant in more remote forested habitats that include a lot of coniferous trees such as spruce and fir.
For this reason, many people who live in cities have never actually seen a red squirrel, and might not even realize they exist in your area.
The quintessential “squirrel on a power line” is a gray squirrel in almost every case. In all my years living close to red squirrels I’ve only ever seen one use the power lines to move around.
6. Diet
The result (or perhaps the cause of their habitat differences) is that despite being very closely related species in the squirrel family, red and gray squirrels eat almost completely different diets.
Gray squirrels eat a lot of large fleshy deciduous nuts like acorns & walnuts, while red squirrels tend to horde the cones of coniferous trees like spruce and feast on the tiny seeds.
Both squirrels also take advantage opportunistically of hunting insects (and even eating bird eggs!) however the exact species they hunt will vary depend on the ecology of their chosen forest type.
I covered what squirrels eat in much more detail in another article.
7. Calls & Vocalizations
Red and gray squirrels each make their own distinct set of calls & vocalizations which can be used for identification and behavior interpretation.
Grey squirrels who are upset will make a raspy bark when predators are nearby. In some cases it sounds a lot like a small dog barking.
In the following video clip you’ll hear some gray squirrel barking and related alarm calls from nearby robins and other smaller birds.
The red squirrel sound is a combination of high pitched “TIP” sounds mixed with lower range “CHUCK” calls that are used in varying combinations for different situations ranging from predator alarms to territorial situations:
Because red squirrels are so territorial, overall they tend to make a lot more noise than gray squirrels.
Red squirrels also make a loud trilling scream and are generally make a lot more noise than gray squirrels who are less easily offended. You can hear this rattling “scream” call at the 20 second mark in the following clip:
I’ve written a lot more on this topic, so if you want to explore the nuances of squirrel language, go read up about why squirrels chatter and scream so much.
8. Interactions Between Red & Gray Squirrels
Another way to gain insight about these two common messengers of the forest is to look at how they interact where territories overlap.
If you ever find yourself lucky enough to live in a place that has both red squirrels and gray squirrels living in close proximity, this is an amazing opportunity to learn and study their differences.
This is where a lot of interesting questions come up to truly define the boundaries of what it means to be a red squirrel or gray squirrel including their breeding, cooperation and competition.
Can Red Squirrels And Gray Squirrels Interbreed?
Because these are two different species, red squirrels cannot interbreed with gray squirrels.
Even gray squirrels who have a reddish color to their fur are born from two gray squirrel parents. When you see these color variations, remember that size is still the key identification characteristic as explained above in point #2.
Why Are Some Squirrels Red/Black/Gray/Blond?
So if they can’t interbreed, then why are all these different color squirrels living together?
Why can a single family of squirrels include both gray, black and possibly even other colors of squirrels?
Well, this is very similar to genetic variation in red foxes which sometimes makes them black.
It’s the same as how human children can have different colored eyes or hair than their parents. It has to do with the genetic combinations and recessive genes.
As a ridiculous example, it’s a bit similar to why red hair in humans cannot be caused by having an orangutan for a parent… because humans cannot mate with orangutans.
Do Gray Squirrels And Red Squirrels Get Along?
In most cases, red and gray squirrels have such distinct niches in the forest that their territories and trails almost never overlap.
For this reason, even if you do see red and gray squirrels nearby in the same area, they typically co-exist quite peacefully.
It’s not so much that they get along, as much as they don’t have any good reason to get in each other’s way.
Do Red And Gray Squirrels Compete?
In general – red and gray squirrels do not directly compete because they occupy different habitat niches.
Red squirrels are more dominant in coniferous forests, while gray squirrels are more dominant in deciduous forests and cities.
In mixed forests, their territories can occasionally overlap, however, even in these situations they tend to use different trails and different food sources so it’s rare for this to cause problems.
Why Do Red Squirrels Chase Gray Squirrels?
In cases where their activity does overlap, typically red squirrels will be the more aggressive and likely to chase the gray squirrels.
Considering that they’re so much smaller, this can be a funny surprise to see the red squirrels acting aggressively towards gray squirrels. But it really just comes down to the fact that red squirrels are so much more territorial.
If you spend a lot of time in mixed or coniferous forests with high red squirrel populations then you know what I’m talking about. You’ve probably been yelled at by a squirrel or two in your days!
When it comes down to it, gray squirrels and red squirrels really aren’t competing over food, nesting sites or mates, so there’s no reason for them to be territorial other than the fact that red squirrels are very aggressive towards pretty much everything.
Go Look For These Differences Yourself!
So now all you have to do is go watch your local squirrels for yourself.
Making your own observations is really what brings the magic of nature to life.
How many of these squirrel differences can you observe in your own backyard?
Are you seeing signs of territorial or communal squirrel behavior?
What else do you notice about your local gray and red squirrels?
Let me know what you discover out there, and happy squirrel watching!
Editor’s Note: Bob Judkins, an experienced crappie fisherman and member of the Oregon Bass & Panfish Club, offers his favorite equipment and tackle choices as well as some tips about where to catch local crappie, especially in the spring.
This rod is really light, so you can fish all day without much arm fatigue. That’s a great plus for older anglers like me.
My other rod is a Wally Marshall Signature Series WM80CP-2, 8′ light-action, 1/16 – 1/4 ounce lure weight, 2 – 6 pound line. That rod is good for fishing brush piles because it has a longer reach and a good backbone for lifting big slab crappie out of the nastiest brush pile.
Ultra-lights and micro-lights are fun rods for crappie fishing. I don’t use them anymore. I’ve lost too many big fish such as bass and channel cats while fishing for crappie with those rods, and you will probably hook one of these monsters while crappie fishing.
If you are a first-time crappie angler, you don’t have to go out and buy a dedicated crappie rod. The rod that you may have been using for trout fishing will work just fine.
Recommended Crappie Reel: Wally Marshall Pro WP30 Spinning Reel
This reel has a larger spool than most small reels. The larger spool helps reduce line twist, a common occurrence when using monofilament line and light jigs. The drag of this reel is really smooth and it will handle the largest of fish.
Recommended Crappie Line: Bass Pro Shop Premium Excel Monofilament Line
6-pound test, clear blue fluorescent (for high visibility)This is the fishing line I always end up using. It’s easy to see and “line watching” is important when you fish for crappie. Also, the memory of this line is not bad at all.
As far as super lines are concerned, I have used the Fireline Crystal in 6-pound test. It handles great and casts a long distance with no line twist, but I recommend that you tie on a clear monofilament leader.
The reason is as follows: A few years ago, I was fishing for crappie at Brownlee Reservoir with a friend. We were fishing the same depth, using identical jigs and bobbers, but we had on different fishing lines – mine was monofilament and his was a “superline.”
I was catching fish on every cast, but my friend was not. We then switched rods to see if that would make a difference. It did – no fish for me, but a fish on every cast for my friend. The conclusion was very clear to us: If you use a “superline,” tie on a clear leader.
Recommended Crappie Bobber: Weighted Torpedo Foam
Length: 1 ½” or 2”
There are so many types of floats to choose from – balsa, plastic, foam – and they all work well. I prefer the weighted torpedo foam for a longer cast.
This Northland jig is my favorite “go to” jig in color and size. I like its slow fall and small profile. It is a good jig for all panfish. My second “go to” jig is a Northland Gypsi Jig with crystal-flash in chartreuse and in 1/16 to 1/32-ounce sizes.
I use this jig in late summer and fall. It has a bigger profile with lots of flash. Soft plastic crappie jigs of different shapes and colors work well, too. If that’s what you have, use them.
COLOR?I’ve asked lots of crappie anglers, “What color is your favorite?” Their answers covered so many different colors. It may be that when crappie are on the bite, color may not be that important. But, when the fishing is tough, I “go to” the small Fire-Fly and white Crappie Nibble.
Recommended Crappie Bait: Berkley Crappie Nibbles
Color: White.
Crappie Nibbles come in other colors – pink, chartreuse, glow-in-the-dark. I’ve used them all. But WHITE nibbles are the ones to use and “I don’t leave home without them!”
Crappie Nibbles are really soft. If you take them out of the jar, spread them out and let them air-dry for 24 hours, they will firm up a bit and stay on your jig longer when used. But, if you dry them too long, they will become rock hard and you would not want that to happen. I keep two jars of “cured” nibbles ready to go.
When and Where to Catch Crappie in Oregon
For the beginner, the best time to fish for crappie is during spawning time in the spring. This is one of the easiest times to catch crappie. Spawning takes place when the water temperature is 62 – 65 degrees. Around Portland, this may be in May and June (give or take a couple of weeks). Small shallow ponds and lakes warm first.
My favorite small body of water is Vernonia Lake, located just south of the town of Vernonia, Oregon. To get there, take Highway 26 west to Highway 47; turn right; follow Highway 47 to Vernonia. Continue driving through town and you will find the lake to your right.
The travel distance from downtown Portland is about 50 miles. This lake is very people friendly. It has wheelchair accessibility, a small gravel boat ramp (boats with electric motors are allowed). Special Regulation: The limit is 10 crappie per day; no minimum length.
When I fish Vernonia, I go to the left of the parking lot and down to the wheelchair dock.
Most anglers will be fishing for trout in the main lake. I turn around and fish back toward the bank. I also fish the shade under the dock.
Use a 1/64 ounce Fire-Fly with Crappie Nibbles, a bobber, and jig it 2-3 feet down. This is a good place to start. If you don’t catch fish here, just move around the lake and try different spots.
In the Portland area, Swan Island Lagoon (on the lower Willamette River) can be a good spot. It’s a popular place and if your timing is right, you will have lots of company! It has good bank access.
Fish the west side of the Lagoon. Look for logs, pilings, docks and shade. They are all good spots to fish.
The Oregon Bass & Panfish Club is involved in a variety of angler education and fisheries enhancement activities. See their club page on this website.
Woodcock may be one of the greatest game birds to pursue for those interested in becoming a bird hunter or in areas otherwise devoid of wild birds
It comes as no surprise that the popularity of American woodcock hunting has risen with the decline of other upland game species in its flyway. In many areas, the bobwhite quail has become a distant whistle and the ruffed grouse merely a ghost. Woodcock are a migratory bird with flyways that stretch from Canada to Louisiana, east Texas, and even Florida. As a result of their geographic diversity, they have earned a variety of nicknames and cultural nods such as “mud bat” and woodcock gumbo. The entire eastern half of the United States hosts woodcock seasons which are regulated by federal migratory game laws. With a crash course in habitat knowledge, the leap to becoming a woodcock hunter is often easier than with other upland game species. Before you know it, that distinct whistle of rising wings will be a calling card for one of your favorite game species.
Are woodcock the gateway bird of the East?
If you ask me, woodcock represent one of the greatest opportunities for becoming an upland hunter. I may even take it a step further and say that they represent one of the best entry-level pursuits for new hunters all around. They offer exciting wingshooting challenges that can sometimes feel more like video-gaming than hard work. For those of us that drift further into the uplands and find ourselves with a bird dog coming along, we soon discover that woodcock may be a new dog’s (and hunter’s) best friend.
The biggest challenge when making the leap to woodcock hunting is learning about habitat, but this is easily achieved even without advanced degrees in ecology. A few basic concepts will eventually blossom into more elaborate ideas and theories with more time spent in the woods.
Woodcock hunting gear
Woodcock hunting gear can be as complex or as simple as you want, which is one of the beauties of upland hunting. Jeans can suffice if you can stand some thorns, or you could go invest in expensive upland-specific pants—the choice is yours. When it comes to topics like chokes and shot size, there are some specifics that make the most sense for the quarry. When it comes to choosing a hunting dog, should you go down that route, that’s a novel but we can at least get you started.
Woodcock shotguns, chokes, and shot size
Woodcock are not large birds. On the upper end, a female can weigh as much as a half-pound and on the low end, males can weigh as little as five ounces, so they do not require heavy firepower to bring down effectively and ethically.
The nature of the cover that woodcock inhabit and their behavior towards hunters will make for a lot of close shooting opportunities. This scenario calls for open shogun chokes like cylinder, skeet, and improved cylinder.
The most popular lead shot sizes for hunting woodcock are #7.5, #8 and #9. More obscure specialty loads can take you to #10 shot and to spreader loads, which have a wad designed to allow shot to spread out faster. In the realm of steel, #6 and #7 shot are among the most popular if only because smaller steel loads are very uncommon or non-existent. It does not take a lot to kill a woodcock, so it’s worth considering how many pellets you’re willing to pick out of one before eating. My personal choice is #7 steel.
When it comes to choosing a shotgun for woodcock hunting, it is the answer we all know is always true, but never want to hear: use a shotgun that works for you. The most popular of all the shotgun gauges for woodcock is 20 gauge, but the 12 gauge continues as a cultural staple. More obscure gauges like 16 and 28 find good representation in woodcock hunting, while the more experienced may try the challenge of a .410. The action type does not matter as long as it’s a gun that you can shoot straight with confidence. Note that federal migratory game laws require a shotgun plug when hunting woodcock to reduce the gun’s capacity to three shells. Shotguns with shorter barrels are traditionally valued for woodcock hunting due to the stem density and tight swinging area of their preferred habitat, though there’s plenty of debate over a few extra inches and their added value to overall gun balance… but that’s a discussion for another day.
Woodcock hunting clothing
As mentioned, jeans can work just fine in the pursuit of woodcock. There is no need for camouflage, but woodcock hunting certainly calls for blaze orange in the interest of safety. You will need a means to carry shotgun shells (probably 25 depending on your success and shooting consistency), your empty shells, water, birds (hopefully!), and outdoor basics like a compass and even matches and poncho if you wander into remote country. The addition of a dog can increase the list of items to carry quite a bit. Many upland vests and strap vests have been designed over the years by upland junkies, iconic brands, and even some homemade lots. If you get really into it, it’s worth checking out the countless vest options along with a good jacket and upland pants. A pair of leather shooting gloves is nice, but I have survived a solid 25 years in the woods without them.
Boots are the one thing I would not leave open to interpretation. Woodcock tend to live in wet lowland environments as they probe soft soils for earthworms. Some hunters may pitch a solid pair of leather boots, but I will debate it to my grave that rubber boots will always be the best option. Leather boots are great, right up until you step into a wet hole that sends water over the top and into the boot. You can put a fair number of miles in when searching for woodcock, so it’s important to think about comfort and avoiding blisters, too.
Woodcock dogs
Choosing a dog breed (even without a game species involved) is like going to an ice cream stand with an endless number of flavors, not to mention having to choose between cone and cup. You can effectively use a flusher, a pointer, or a dog you rescued at the pound who likes to walk in thick cover. There are some breeds that have even been named because of their particular woodcock hunting ability, like the American and English Cocker Spaniels. But there are also pointing breeds that are just as specialized and well-suited for this type of hunting. I am a pointing dog guy at the end of the day and, just like anything, we all have personal preferences.
If you are considering a dog, think first about what you want out of it. Perhaps join a local hunting dog club like NAVHDA to see some different dogs in action. You should be looking for a dog that has been bred to hunt the region or terrain that encompasses your primary hunting area. Most importantly, once you decide on a breed, carefully vet your breeder. Ask to see their dogs hunt, ask other people for recommendations, and do your homework. It’s an investment of hopefully 12 years or more that will be your shadow each and every day, so it should be taken more seriously than buying a car.
The good thing about hunting the American woodcock with dogs is that the birds generally like to hold tight and not walk. The recent influx of woodcock hunters throughout the flyway certainly seems to be accelerating some walking and running behavior, but still nothing compared to the iconic ruffed grouse, notorious scaled quail, or the classic ring-necked pheasant. Ultimately, for the novice dog handler, woodcock can and will become addicting for both the hunter and the dog.
Getting to know the American woodcock
Woodcock are a migratory bird, so the kinds of places in which they live, nest, and stop over can vary by geographic location. They have two primary flyways: the central, which is essentially from Ontario to northern Louisiana, and the eastern, which is from Quebec to northern Florida. However, we must remember these are man-made lines and recent studies by the United States Fish and Wildlife Service and the American Woodcock Society have shown birds crossing over these flyway systems. The northern reaches of the woodcock flyway are what is considered their “resident” location, which typically includes Canada, upper Midwest states, and parts of New England. The southern areas like Louisiana and east Texas are considered their wintering grounds and are generally dictated by whether the soil freezes, which affects their ability to probe for worms. Any place in between the resident and wintering grounds is often referred to as stop-over states.
Getting to know woodcock cover
Woodcock like young vegetation with a high stem density, or places considered early succession growth in forests. Add in upland shrubbery or alders and if you have trouble walking through it, you can be sure a woodcock would love it. They also need a place to land to get into the cover. I have found that thick areas adjacent to fields, log landings, trails, and meadows tend to hold birds because they have ample openings to set down. Their food source is primarily earthworms, which has more to do with soil type than anything else. If you are ready for advanced theories on that, you can read “Targeting Worms with GIS Soil Data to find Woodcock Habitat.”
To simplify all this, noting that this is not fine science, this is where I would begin:
There needs to be soft and moist soil
The brush density needs to be such that it’s hard to walk through and swinging a shotgun seems challenging
Check for a nearby opening for landing and access
When all else fails, try hunting along rivers and waterways with dense shrubbery immediately nearby
In recent years I have found woodcock in soft wood (conifer) covers, which is something that trends more commonly as they head south in stop-over states. While I do not know the exact science, my guess is that it’s pretty easy for those short legs to walk on those open floors while still providing cover from predators above.
For the best understanding of woodcock cover, I recommend learning from a biologist and not a novice woodcock hunter like myself. Read: How to Identify American Woodcock Habitat
The nature of migrating birds
The fall woodcock migration is an exciting and sometimes frustrating part of woodcock hunting. If you catch the bug like I did, you may find yourself following the migration south, hunting multiple states and trying to extend your season. When the cold weather comes in, so do the “flights” of woodcocks arriving from north of your location to stop over during the migration to wintering grounds. It’s a tricky thing and many argue the science behind what makes the birds pick up and move, but you will certainly notice that one day a cover can have birds everywhere and the next it will only be a faint memory with remnants of their signs like woodcock splash.
READ: The Unrealized Opportunity of Woodcock Hunting in the Central Midwest
This fleeting presence is something to love, but it is also a warning sign that the birds will eventually be gone. States with no resident populations will find it more inconsistent, so you should not easily give up on a particular spot because things can change from day to day.
OUTDOOR LIFE: How to Hunt the Mysterious Woodcock Migration
Shooting woodcock
There are a couple schools of thought when it comes to wingshooting woodcock. First, it’s important to understand how woodcock tend to flush. The nickname “mud bat” refers to their characteristic rise like that of a bat. Their flight is often like a fluttering, unpredictable dance or zig-zag to the top of the canopy. Once past that, they tend to take off like rocket ships or, as the folks from Modern Wild would say, like “timber rockets.” There are plenty of exceptions to those rules, of course. Sometimes they will liftoff in a deliberate and direct pattern, which some would argue is a tell-tale sign of a resident bird knowing how to escape. Weak flyers are often considered tired flight birds, but neither assumption has been scientifically proven.
One of the greatest things about woodcock—especially if you are hunting with a dog—is that they tend to hold tight, meaning you must come close to stepping on them in order to get them to fly. This is what makes them great for young dogs in training, but can make them a little more challenging to find if hunting without a dog (more on that later).
The most reputable school of thought on shooting technique is to let the bird get away from you a bit before shooting. This allows for their trajectory to stabilize and for your shot to open up to a larger pattern. I usually have an issue containing myself, so as soon as that whistle comes up and the bird is a safe height off the ground, I let the shots fly. You can really approach this however you like, just get some shot safely in the sky when the bird gets up. To be most effective at this, you have to understand one of the more difficult mental barriers in shooting woodcock: ignoring the trees.
I grew up shooting woodcock from as early as I can remember and never once thought about a tree as my barrel swung through thick cover. But for those that did not get programmed at a young age, this can be a hurdle. If the trees and branches get into your head, you will not swing properly and you will always be at a disadvantage when shooting woodcock.
READ: Ignore the Trees when Grouse and Woodcock Shooting for Better Results
Beyond that, understanding the basic theories of effective shotgun shooting, such as the Churchill method, can greatly increase your odds in any wingshooting situation. Practice your gun mount repeatedly, consider the fit of your shotgun, and try patterning your gun to understand the shot pattern before hitting the woods.
Hunting woodcock without a dog
There are undoubtedly people reading this right now and yelling, “Blasphemy!” at their screen. But yes, woodcock can be hunted without a bird dog. Although I started off in my early years hunting over my father’s Brittany, I continued hunting later in life without a dog. Because woodcock hold tight, you will have to carefully grid an area when walking to make sure you have applied ample pressure to get them to flush. They are highly camouflaged, so without a dog’s nose giving you an indication of where they sit, you are unlikely to see them until they take off.
Recovery of shot woodcock without the aid of a dog can be particularly challenging because their camouflaged coloring blends in perfectly with the forest floor. Since they are small and live in dense cover, they can often get hung up on things off the ground, which only adds to the complexity of locating them after the shot. As a conservationist, you owe it to the bird to make a serious effort with or without a dog to recover game in any circumstances.
READ: How to Recover More Birds without a Dog
The controversy and ethics of pass shooting woodcock
Pass shooting woodcock is a technique rarely spoken of and highly controversial. Many consider it to be “unsporting.” I bring it up because you will inevitably discover it and should carefully consider the ethics of such a method. Although legal in some areas, it’s important to remember that legality does not always equate to sustainable practice. As hunters, we should think carefully about the long-term implications of pass shooting woodcock and the impact on future woodcock populations.
Pass shooting woodcock is a method that takes advantage of the final, legal shooting time to shoot woodcock as they move through open areas like fields to move to feeding areas. I often hear stories of early morning waterfowl hunters shooting woodcock at first light, as well. By setting up in a field adjacent to woodcock habitat and waiting for these final or first moments, a hunter will encounter fast-flying birds. These birds are a challenge to hit because they are often at top speeds. At a minimum, I would recommend steering clear of this method and finding a downed woodcock that sailed a long distance is not easy and could certainly start to enter the realm of the unethical. As a responsible culture, we need to make the hard choices even when laws permit it. We should not rely on legislation to dictate our morals and our commitment to sustainable practices.
Eating American woodcock
Although woodcock can be a culinary challenge at first attempt, with a bit of knowledge they can make amazing table fare. A few basic rules can accelerate that process. As renowned upland game chef Hank Shaw would point out, they pluck easily. Aging woodcock is a common practice, accomplished by tossing them in a fridge for a few days with the guts still in and the feathers still on. After a few days, they are better tasting and easier to pluck.
Woodcock cook faster than chicken and must either be cooked to medium rare or for a very long time to allow the meat to fall off the bones. Anything in between will cause you to think that woodcock aren’t worth eating, which is simply untrue. They are “earthy” in flavor and respond well when paired with mushrooms or sweeter things from where they live, such as apples and cranberries. Sure, you can slap bacon on them and of course it will taste great (and like bacon), but they are very good when prepared in other manners as well.
The legs are often thrown away, but it’s worth pointing out that this light, tender meat is arguably the best part of the bird. They can either be cooked as part of a whole bird or saved for a day of woodcock poppers or buffalo legs. Woodcock have become the most common bird prepared in my kitchen.
Woodcock conservation
In speaking of hunting woodcock, we must take note of their current state and their future. Since the populations were first recorded in the 1970s, woodcock have suffered a 1% decline every year. Habitat loss is the largest culprit in this decline, because woodcock often migrate through areas that are heavily developed without consideration for their needs. Recent studies with the Eastern Woodcock Migration Research Cooperative (EWMRC), in partnership with the American Woodcock Society, are hoping to identify areas that are in greatest need of habitat for stop-over cover.
While the populations are considered stable and safe to hunt, and given the migratory nature of the bird, you can feel safe and confident in hunting them in any state that has a legal season. They are currently sustainable and will hopefully begin to rebound if we all do our part to follow the science and support efforts to create more habitat.
Recent mumbling in the scientific community has theorized, but not yet proven, that climate change may be shifting the woodcock range and affecting some breeding behavior. This is worth following as we learn more and consider how this will affect the future of hunting this bird.
Woodcock hunting media content
Woodcock has been written about since medieval times when the Eurasian woodcock would be cooked in court. Eventually hunting practices evolved with dogs to bring them to market. In the Americas, they are known for the poetic culture that surrounds them, which has been explored by many of the upland literature greats. If you are an audio lover, I would suggest heading over to Audible and downloading Woodcock Shooting by Edmund Davis. This 1908 classic is unusual, poetic, and informative. Furthermore, you can check out frequent episodes of the Project Upland Podcast where host Nick Larson’s love for the woodcock and culture is hard to hide.
American woodcock hold the distinct position as the most-covered bird in Project Upland Original Films. Much of that simply reflects the opportunity that surrounded me when my passion brought me along this path. From our first year of films with the Ruffed Grouse Society to the viral film “First Season,” digging through our film library will give many options to get inspired in the poetic vibes of woodcock culture. If seeing drone footage of woodcock points and shooting situations sounds intriguing, check out the film “Legacy.” And for those as nerdy as it comes, you can find our latest film on the topic, “Woodcock Banding,” which explores the unusual ritual of using dogs in the spring to band woodcock with biologist Bailey Petersen.
Project Upland has a long list of woodcock hunting articles that can be found here.
We will continue to evolve this article as we create more content around woodcock hunting in North America, so be sure to check back in. And in the true crowdsource mentality of the Project Upland community, we always like to hear about what questions and ideas you have around the topic. Comment below, email us, or hop onto the Facebook community page to share your thoughts. We hope this article helps with woodcock hunting this season.
In fish and fishing, it’s essential to get updated on the current news and learn a bit about the history and the people. So, why don’t you check your list and find out if yours hit the top list of the world’s most famous and best anglers!
Placing in the eleventh of the most famous anglers that you should know is Andy Mill. He took a variety of careers-broadcasting, writing and is a renowned world-class downhill ski racer. But not only that, but Mill is also a known Tarpon lover. He even has an endearment for it, which he calls “poon.”
Checking up his fishing stats, he’s best and killed fly rod tournaments with more wins than anyone. He is the only angler to have won a Tarpon, Bonefish, and Permit tournament on the fly. Andy Mill has so much love for his first love that he wrote an award-winning book, A Passion for Tarpon.
It’s incredible to fall in love with fishing just because of a string. Yes, you heard it right, a string but no ordinary string because it was by Ernie Schwiebert. Goodman Ernie helped him with his first attempt at casting. The first sight of the string was his love, but the first trout dropped the bomb to make Mill fall for fishing more.
This master and lover of Tarpon grew up in Aspen, Colorado. Mill described it as the place with the greatest mountains in the world. It’s full of ice suitable for skiing, and when summer’s in, it’s the best for fishing that he would even spend his entire summers on the Roaring Fork River chasing fish till dusk.
During his childhood, Andy Mill dreamed of winning at night. He dreamed big, and for that, he spent decades of learning fishing with the best mentors and guides he could find. He spends a lot of time fishing and fishing 40 days a year chasing Tarpons.
Colorado was his playground! So, what do you know, maybe you should play too! Don’t take fishing too hard. You should enjoy it and have fun. That’s what Andy Mill did, and look where it got him now—a five-time Gold Cup winner, which is the biggest fly rod tarpon tournament so that you know.
And just like any other anglers out there, he also failed and lost, but he found the courage and was restless, determined to win. Andy Mill was full of hope. He finds a lot of hope in fishing, and that’s why he loves doing it. He’s like a child hoping for a sunny day, for plenty of fish to be around, and for them to take the bait and take a bite! Andy Mill has that child in him but also has that determination and commitment of a man, and that’s what you should be.
Top #10 Joe Brooks
Next, that landed the tenth spot is Joe Brooks. If you’re a fly fishing fanatic, then you must have known this guy. Well, he’s just the guy who coined the term sportsman, and not only that; he’s just the father of modern fly fishing! He practically pioneered everything in fly fishing, popularized and expanded fly fishing than any other individual.
This man is a star! He appeared and hosted the first outdoor TV series ‘The American Sportsman‘ in the 1960s. Joe brooks also wrote different articles and books about how to start fly fishing and the techniques in fly fishing. He was born into a family of businessmen. He worked and tried, but he was not happy about it.
So Joe brooks pursued his two passions- writing and fishing! Hmm. There’s something fishy going on in here. Andy Mill and Joe Brooks, they’re pretty alike. They’re both known writers and loves fishing so much. Joe Brooks knows what he wants. He listens to what his heart says— he loves fly fishing!
Joe Brooks loved it so much that he shared it with the world by teaching and mentoring, traveling to different places like Argentina and the Everglades, exploring new ways or techniques using a fly in catching new and different fish species that weren’t tried or caught before. And that’s what makes Joe Brooks legendary!
Top #9 Michael Lerner
At number nine, coming in at number nine, is the International Game Fish Association (IGFA) founder Michael Lerner, a researcher and one of the greatest anglers of the early times. Lerner and his wife set out various fishing expeditions to explore and study different types of fish species, even those who haven’t seen the light of day. His works provided knowledge and understanding about the saltwater gamefish and proved to be an essential source for anglers, scholars, biologists, and conservationists. Lerner was also honored in the IGFA’s Hall of Fame and received numerous awards from different international bodies to contribute to the scientific and angler community.
Top #8 Ray Scott
What’s your world’s favorite game fish? It’s the Bass! Bass became famous because of Ray Scott. He influenced many anglers and even people who are not yet inclined to fishing to indulge in bass fishing through his television shows. He is known as the man who changed recreational fishing into a multi-billion dollar industry. He inspired many people at home to fish by letting them feel the joy of fishing while these people were watching TV! Scott was inducted into the Hall of Fame of the IGFA for his works, expanding the modern-day bass angling.
Top #7 David Moore
Now, down to number seven of the most famous is David Moore, a native Oklahoman angler whose name was included in the top 20 best anglers on the planet of the outdoor life. Moore, who was a former Bass angler, found Carp fishing more interesting. He participated at the World Carp Championship in 1999 and 2012 and at the 2009 World Carp Classic held in France. Moore and his fishing partner landed a total weight of 377lbs. 12 oz. at Nature’s Trophies Carp Challenge in 2010!
In 2004 he received a lifetime achievement award from the Carp Anglers Group for his dedication to promoting American Carp angling. He is the co-founder of the American Carp Society who has a mission to change the Carp’s image, and serves as a tournament director for Carp Tournament events.
Top #6 Curt Gowdy
Curtis Edward Gowdy, the only man behind the voice of every major sports event! Gowdy has both passions for announcing and fishing. He’s the famous American sportscaster of NBC Sports and has covered many nationally televised sporting events. He spearheaded the creation of “The American Sportsman,” the first fishing show on television. Curt Gowdy has 22 Halls of Fame from different award-giving bodies in different fields, one of which is the International Fishing Hall of Fame in 1981, IGFA Hall of Fame in 2003 National Freshwater Fishing Hall of Fame in 2005.
Top #5 John Wilson
The best-known angler throughout Europe, John Wilson, takes the number five spot. He’s been an angler for over sixty years, honored and inducted into the Hall of Fame in 2010 by the IGFA. In 1986, he started his show “Go Fishing,” which ran for 18 years. Wilson inspired many of his viewers and readers to start and to rekindle their long-lost love for fishing. He was recognized as the sole force behind the revival of sports fishing in the UK and was given a title as the “Greatest Angler of All Time” by Britain’s weekly Angling Times.
Top #4 Mike Iaconelli
You’re almost at the top, and the list is almost over. Mike Iaconelli was born in Philadelphia, is a professional Bass fisherman who won the 2003 Bassmaster Classic. He began fishing at a young age in the Pocono Mountains. He founded the “Top Rod Bassmasters,” a bass fishing club where he started participating in tournaments. In one of his tournaments, the Federation tournament, he broke a record of 19.58 pounds! And it was at the 1999 Bassmaster Classic, he finished in sixth place, Iaconelli received his first major sponsors.
He continued to bag his success, hauled in more than 4,000 pounds of bass, snagged five tournament wins, and finished in the top ten about 44 times! He is still on the top of his career, mastering the art and continuing his pursuit for the win. In 2014, Mike won the Bassmaster Elites at Delaware River and currently hosting “IKE LIVE!” a fishing talk show that features professional anglers in bass fishing and other fishing fanatics.
Top #3 Zane Grey
A one-time holder of over a dozen saltwater records, who is he? He was born on January 31, 1872, author and known for his popular adventure novels The Last of the Plainsmen and Riders of the Purple Sage. Got it? Do you need more clues? How about the first fisherman to drag around 471kg Pacific Blue Marlin? It’s Pearl Zane Grey!
Zane Grey contributed and popularized big-game fishing. He was a writer at the Outdoor Life magazine. He was inducted and received the IGFA’s Hall of Fame for his pursuits and contributions to the recreational fishing world. He mastered the methods to catch the elusive broadbill swordfish. He’s a devoted saltwater angler who spent most of his fishing, earning him to triumph and become a champion in-game fishing!
Top #2 Roland Martin
With over six decades of fishing experience in the water, Roland Martin is one of the most decorated and celebrated fishermen in bass fishing history. He is considered one of the founding fathers of modern bass fishing. Martin was one of the first anglers to introduce and popularize the idea of patterning fish. Like many famous anglers, Martin’s light shines brightly. He has TV shows on NBC, sharing his tricks and tips to young, less experienced anglers and avid viewers. He also has his fair share of fishing success, winning in tournaments, 19 pro tournament wins, almost 100 top 10 finishes, and 20-second place B.A.S.S. finishes. He was also entitled nine times as the B.A.S.S. Angler of the Year!
Top #1 Ernest Hemingway
Guess who’s on the number one list of the world’s most famous and best anglers that you should know. It’s (keep the drum roll going) Ernest Hemingway! So, what’s Hemingway’s secret that put him at the top spot? Maybe it’s Northern Michigan!
Northern Michigan was his Eden. He adopted his father’s outdoor hobbies like hunting, fishing, and camping in the wood and lakes, but it’s his personality and the constant pursuit of adventure that shaped him into the man that he was. He found solace and serenity in the forest or in wading a stream. He was three when he started fishing and ventured into deep-sea fishing in his early 30s. He won every organized fishing tournament. Incredibly, he caught one of the largest Marlins of all times, weighing almost 533kg!
Other than that, he is a Nobel Prize winner. He also received a Pulitzer award and is considered one of the great American 20th century novelists, but did you know that he almost missed his wedding so that he could enjoy fishing in Sturgeon River? Well, it’s a good thing he got his wife hooked up, or else it would be another case of a runaway bride or, in this case, a busy fishing groom!
Farewell to Arms, The Sun Also Rises, and the famous Old Man and the Seaarejust a few of his great works. You can check out these stories and try to read them. They’re full of adventure and fishing from the real-life experiences of the writer himself—his childhood memories, experiences, and his love for the place where he grew up and his passion for fishing. These stories did not only change literature forever, but they also instilled enthusiasm and stirred up curiosity and appreciation for the art of fishing.
You like fishing because you feel solace and connection with nature. You have the right quality of an angler but not yet the quality of the best angler. You know you have it in you. So, if you want to be like these guys, loved by fans, and you want to inspire people, teach them how to fish, entice them to fish, the answer is just simple, learn from the lives of those who were before you.
Like Andy Mill, give in to the child that’s in you- DREAM and HOPE. Like Joe Brooks, you must find your happiness—LISTEN to your heart. Like Michael Lerner, Don’t be afraid to EXPLORE; ENCOURAGE like Ray Scott; EMBRACE CHANGE like David Moore did. BELIEVE in yourself and NEVER QUIT like Iaconelli and the rest of these best anglers. Drive that passion and have FUN!
An air rifle's effective shooting range depends on various factors, including the type of rifle, the caliber, and the power source. Generally speaking, most...
")
")
")
")
")