")
")
")
")
")


 Review – The Best Name In The Air Rifle Game")


According to Yamaha, the 1000cc class is, by far, the largest in the sport/utility segment among trail riders and explorers. Since its public release on Sept. 3, Yamaha’s brand new sport/utility Wolverine RMAX2 and RMAX4 have created a firestorm of positivity and excitement among SXS enthusiasts not seen for a Japanese machine since the time when the Yamaha Rhino 660 was the sportiest machine on the market.
If a manufacturer wants to create excitement that turns into sales instead of criticism, they have to build SXSs with class leading specifications that deliver on the promise of quality and performance without major compromises. That’s exactly what Yamaha has done with their new Wolverine RMAX 1000, and enthusiasts have responded accordingly with many of our viewers split between elation over putting money down on a new RMAX and those suffering with buyer’s regret over last year’s purchase.
Many of the RMAX’ specifications are not only leading in the sport/utility class, they’re competitive or more impressive than some sport models we’ve tested. Infected with enthusiasm shared with our viewers, we met up with Factory Yamaha at Mild to Wild Off-Road in Sparta, Kentucky for a private one-on-one test day with the RMAX2. Open twice a year for public riding, Mild to Wild is the private testing grounds for our pro level test driver, Justin Frasure, owner of RAZR Sharp Customs and a former pro rock bouncer. His company builds SXS chassis, suspension parts, roll cages, bumpers, as well as complete turnkey trail and rock bouncer builds. Justin was joined by UTV on Demand editor, Chad Westcott. Chad is an avid off-roader who teaches SXS driving courses to first responders. With two drivers and 7 plus hours of seat time under our belts, we’re ready to share our impression of Yamaha’s exciting new RMAX2.
Trim Packages
The RMAX is currently available in 3 trim packages: the $19,799 base model; our test unit, the $21,999 XT-R edition; and the $23,299 Limited Edition. The standard model comes with GBC’s new Dirt Commander 2.0 radial tires with Maxxis Carnivores used on the XT-R and LE models. The XT-R and LE models also benefit from various digital throttle modes, backlit switches, blue LED interior lights, removable Adventure Pro GPS/tablet integration, Pre-installed VRX 4,500 Warn winch controlled by a switch on the dash, and upgraded front bumpers with four light pod mounts vs 2 on the standard bumper. Limited editions also benefit from a factory installed SSV Works stereo and Yamaha’s removable key controlled Speed Management system, which limits top-speed to 25MPH while still allowing full power for work or hills. Base models can be easily upgraded with any or all of the before mentioned features found on the XT-R and LE models. One item not easily upgraded are the Fox IQS shocks, which are tunable from inside the cabin. More on that later.
Engine Performance
At the heart of the new RMAX is a brand new 999cc, liquid-cooled, parallel twin-cylinder engine featuring 4 valves and double overhead cams per cylinder. Its 270° firing order helps increase torque and traction. Premium pump gas is recommended with the engine’s sport class worthy 11.2:1 compression ratio. It’s said to produce class leading horsepower and torque peaking out at 108hp at 8,500rpms with a 9,250 RPM redline. That’s 8 more HP than the General XP 1000, the 60” sport class, 4HP more than the Talon 1000, and within 2hp of the RZR XP 1000.
Yamaha is claiming a 4% reduction in rotating mass compared to the 850cc class Wolverine X2/X4 models for improved rev-ability. A counter balancer and 4-point rubber engine mounts were employed to keep vibration to a minimum.
Oil is circulated via dry-sump lubrication with an oil cooler for added cooling. A shallow sump profile on the bottom and inclined engine layout allow for a more compact design with a lower center of gravity.
Air intakes for the engine and CVT are mounted high under the hood making ingesting dirt and water less likely. There’s tool-free access to the primary foam filter with a secondary paper filter Yamaha claims will not pass dirt. Fuel is delivered via Yamaha Fuel Injection with dual, 48mm throttle bodies.
A fully automatic Yamaha’s Ultramatic CVT transmission relies on a primary wet clutch to handle engagement eliminating the need to slip the drive belt on take-offs or getting back on the gas, greatly reducing wear allowing Yamaha to cover the RMAX with their 10 year belt warranty. This type of transmission is a bit harder to tune with aftermarket clutch kits, though. Exhaust from the CVT is utilized to cool the exhaust pipe and spark plug coils. Spiral
beveled and helical cut gears with rigid gears nestled in a detached transmission along with single inline front and rear driveshafts help keep the drivetrain running smooth and quiet. Yamaha’s On-Command drive system delivers the capability of 2wd, 4wd, and 4wd with front differential lock. Available on XT-R and LE models, for the first time, Yamaha is offering multiple drive modes on a SXS with their Yamaha Chip Controlled Throttle offering sport, trail, and crawl modes. Each mode delivers full power with sport mode tuned for quick acceleration and responsiveness to throttle input. Trail mode is tuned for a more linear response and acceleration similar to a cable actuated throttle. Crawl mode offers slower response for greater traction in rocks or mud. Drive modes also affect engine braking. Trail and crawl modes offer full engine braking with sport mode tuned for smoother engine braking, preferable when coming down from speed in whooped out or choppy terrain.
The engine fires right up emitting a mild sporty rumble from the exhaust with db levels we find acceptable inside the cabin for a work capable SXS with sporty intentions. The transmission shifts smoothly and effortlessly between high, low, neutral and reverse regardless of situation. Rolling on the gas from a dead stop or getting in and out of the throttle at speed, clutch engagement is magically smooth and gearbox like with no feel of belt lash like some other CVT equipped machines. It’s one of the smoothest, most natural, feeling CVT transmission he’s experienced.
The butter smooth clutching feeds in the engine’s seamless power delivery. It’s linear, yet fun; controllable, but fast enough to provide a thrill level missing from the X2 and X4. Low-end power is respectable, easily getting the car moving on flat or slow technical terrain. Seamlessly building power into the midrange, the RMAX can generate decent trail speed without having to rev the engine hard. A strong torque curve entering the midrange allows the RMAX to tackle impressively long steep climbs instilling confidence that you’re not going to run out of power.
Pushing the limits of the engine’s performance racing from corner to corner on the roomy trails, you quickly forget that there’s a dump bed behind you. It delivers the type of engine performance we’ve come to expect from the naturally aspirated sport class, all-be-it very refined. When you ask for it, the RMAX has enough thrust to push you back in your seat. We got the tires spinning cresting mild rollers in the trail and it’s possible to break loose and steer a bit with the back end in corners, even in limited slip 4WD. We had our machine close to 60mph on one of the longer straightaways we encountered with the RMAX apparently topping out at 73MPH, so cruising at 50mph on smooth, fast trails shouldn’t be an issue.
Exploring the drive modes, crawl mode allowed us to easily crawl our way through big creek rocks with plenty of power to keep crawling and no sign of wheel spin. On the other hand, with full power on tap, Justin tackled one of the longest, steepest climbs we came across in crawl mode. Even if full power wasn’t necessary, it was there, if needed, which is brilliant.
Trail mode provides a very natural feeling acceleration that seems proportional to the demand placed on the gas pedal. It works well for any type of driving from technical to sporty; good thing as this is the only mode available on the stock base model. The gas pedal, while improved over the one on the older Wolverine X models, still drew mixed reviews with Justin wishing for a heel pocket. Fortunately, low-speed pedal bob is no longer an issue in trail or crawl modes with the digital throttle filtering out most unwanted input without feeling laggy.
Sport mode is sort of similar to slapping a ¼ turn twist throttle on your dirt bike. It doesn’t change the power capabilities of the engine; it simply delivers more gas with less movement of the throttle. Sport mode’s snappy delivery right off idle can reintroduce some unwanted pedal bob that translates to forward momentum at crawling speeds if you’re not precise with your foot. Sport mode is not about babysitting the gas, though; it’s about getting immediately into the heart of the power and it does it well. Sport mode is our mode of choice for motoring or humbling sport SXS owners on the trail.
Variable engine braking seemed perfectly matched with the different drive modes. The normal, higher level of engine braking provided in crawl and trail modes do notably better at keeping speed in check on downhills. Sport mode’s reduced engine braking does well at allowing you to coast a bit more through bumps and reduces the feeling of throwing out the Anker when letting off the gas to set up for turns.
The increased traction of Crawl mode increases the capability of what’s possible, even in limited slip 4WD. However, when negotiating slick, muddy, steep, rutted climb where all four tires are spinning, it’s nice knowing that the front differential is locked with all four tires clawing for traction regardless of what we did with the throttle or if available grip changed from one side to the other.
Overall, the engine is well mannered for all day work with performance that feels worthy of a sport SXS. The General could be out gunned.
Chassis and Suspension
The RMAX is built on a brand new steel frame. Its 64” width is ideal for adapting well to nearly all types of terrain. Most of the underside of the frame is covered by a welded on steel skid plate with a front plastic skid plate and rear CV guards. Kickouts on the lower frame rails help pretend snagging rear wheels on trees of other obstacles. Our unit came outfitted with a set of 3/8” thick, UHMWPE skid plates, protecting the underside of the frame’s armor, which we’d rather not scratch up. Plus, they help slide over rocks more easily. They’d be our number one accessory pic.
Winch-ready steel bumpers feature very overbuilt looking tie down hooks for easy trailering. A channel in the grill allows an observer to keep an eye on the winch cable helping prevent tangling and binding.
The RMAX2 utilizes dual A-Arms front with wide-arc lower arms for improved ground clearance. Dual control arms out back utilize single stamped designed lower arms for improved strength. We were impressed with the thick shock mounts and stout appearance of the exposed frame and suspension parts. Justin felt construction appeared beyond what the competition is delivering at this time.
Fox Podium 2.0 QS3 shocks are used on the standard and XT-R models with Fox IQS shocks used on the LE model. Both shocks feature nitrogen reservoirs, dual rate springs with preload adjustment, and three-way compression damping adjustability with comfort, medium, and firm settings for different speeds, terrains, and uses.. The QS3 shocks have three position dials on the shocks’ reservoirs, while the IQS system allows you to select between the different compressions’ damping settings via a switch inside the cockpit.
According to Yamaha, the shocks were optimized for maximum low-speed comfort and maximum articulation while still offering a high-level of bottoming resistance.
The RMAX2 features class-leading suspension travel at both ends with 14.2” front and 16.9” rear. That’s nearly 3” more rear suspension travel than General XP 1000, within 1/10” of an inch of Yamaha’s YXZ1000R sport SXS, and more overall travel than the 64” wide Honda Talon X sport model. Equipped with a sway bar up front, it foregoes a rear sway bar for maximum articulation.
The RMAX2’s 86.7” wheelbase is claimed to improve the contact to ground feeling on steep climbs and descents compared to the 83” wheelbase of the General XP 1000. Rolling on 30X10-14” radial tires on 14” aluminum wheels, the RMAX2 delivers the square wheel tire setup we prefer. Ground clearance is class leading at 13.8”.
Optimized for use with 29-30” tires, Yamaha’s electric power steering is now offering a 2nd mode that automatically engages to make steering easier when the front differential is locked.
Yamaha is claiming a wet weight for the RMAX2 XT-R edition of 1876.1 lbs, around 172 pounds more than the slightly more compact, but similarly appointed, 850 class Wolverine X2 XT-R, which produces 69hp in comparison to the RMAX2 108hp. The RMAX certainly enjoys a substantial power to weight advantage.
Suspension performance was outstanding on the trails we tested on. The factory suspension settings are designed for two occupants with 150lbs in the bed with room to stiffen or soften the ride. That’s where we left it for our first day of testing, although Justin said he would soften the settings a bit for driving alone. We managed to bottom the suspension on a major G-out, which Justin said pushed most sport SXS’s shocks to their limits. Even then, the RMAX never bottomed harshly and quickly regained its composure.
Even with good bottoming resistance, during rock crawling, the shocks do an excellent job of absorbing square edge impacts and allowing the suspension to respond to the demands of the terrain aided greatly by the lack of a rear sway bar. It rolls over rocks and fills in holes with the rest of the RMAX and its occupants flying along comfortably above turbulence. Come to think of it, that’s kind of how the RMAX rides when you’re flying down the trail at speed. Small bumps aren’t harsh; the suspension never seems to bottom harshly; and everything in between is well dampened while still leaving you feeling very connected to the trail. Rebound damping was quick enough that the suspension is always ready for the next bump in the rocks, emitting a fun, responsive, and lively feeling over mildly rolling trail. The RMAX2 had a lot of suspension travel and it felt like it no matter how we drove it.
Driving in limited slip 4wd a majority of the time to maximize handling, entering corners at speed dive and body roll were well controlled with just enough front-end squat and weight transfer to the outside tire to get the front end hooked up and steering precisely. Justin proclaimed that the RMAX2 is the most accurate steering SXS he’s driven! In bumpy corners where the car might start to bobble, the suspension quickly settles things down. Stability in turns is very good with the feeling of a pretty low center of gravity. When you hammer down exiting corners, you feel the back end squat and transfer its weight to the outside tire, settling into the turn like a trophy truck. Even then, the rear suspension remains very responsive to bumps keeping the ride comfortable and the driver in control.
Power steering is near perfection as we’ve come to expect on all Yamaha models. It’s light with the perfect amount of feedback keeping you feeling connected to the trail while eliminating unwanted bump feedback. The only time any real effort is required to turn the front wheels is at a dead stop with the front differential lock engaged.
Stable with precise handling, and forgiving suspension. What more can you ask for from a sport SXS, we mean sport/utility?
Brakes
The RMAX are slowed by four-wheel hydraulic disc brakes. 255mm rotors with 32mm calipers are used up front with 244.5mm rotors and 27mm calipers out back. Dual piston calipers are found at both ends. Steel-braided brake lines are used for enhanced power and feel.
The brakes deliver good feel and power, but both Chad and Justin felt the pedal required more pressure than they would like. Braking improved a bit throughout the day, but still required a good amount of pedal pressure to get the most out of the brakes.
Work Capability
While we didn’t get a chance to do any hauling or towing, with all this performance comes the capability to get work done or haul more gear out for the weekend. The RMAX2 features a cosmetically well disguised, hydraulically assisted, composite dump bed with multiple steel tie-down points and 600lb of cargo capacity. A 2” hitch receiver is rated to tow an additional ton even with the bed loaded.
Interior and Other Details
Interior comfort and attention to detail are first rate on the RMAX. Entering and exiting has been made much easier compared to older X2 models. New 3-piece doors feature interior door handles located farther from flying mud. Integrated door speaker pods are designed to make installing speakers easier with improved acoustics.
A blue backlit LED display is mounted just behind the steering wheel and is easy to read at a glance. Compared to the previous Wolverine X2 and X4, the automotive style cockpit is roomier for all occupants with nearly ½” more rearward movement for the driver’s seat. Soft touch points are located throughout. The seats feature increased bolstering with new cut and sewn seat covers. The seat belts feature tool free, 6-point adjustability in 20mm increments.
Gas and brake pedals are newly designed. A 17° tilt adjustable steering wheel is constructed of a softer durometer rubber. The passenger benefits from a new quick adjust, T-shaped grab handle with 95mm of adjustment that can be adjusted in 4mm increments.
Getting comfortable in the machine is pretty easy for most body types. At 6’2”, Chad felt that he had plenty of legroom on either side. As wide as an NFL player, his shoulder rubbed the shoulder bolster a bit when he was driving although it wasn’t serious. The steering wheel is rigid, yet soft to the touch, offering plenty of adjustment. The seats are comfortable with a design that’s well balanced for easy exiting from the car while still offering a decent amount of bolstering for aggressive driving. They seem well placed in the chassis, in relationship to the front and rear wheels, minimizing rider movement traversing bumps. While the passenger grab bar is comfortable, we hardly felt the need for it unless we were on monster descents. The three-point belts are among the most comfortable we’ve used with no uncomfortable pressure points, and we genuinely appreciated the added comfort of the soft touch points, which seemed perfectly placed . All of the switches and handles feel high quality.
Riding in the RMAX is a joy with no rattles squeaks or irritating vibrations from anywhere on the machine. There’s just the pleasant sound of the engine and a slight turbo sounding hiss from the CVT.
Interior storage includes a 5.8L passenger glove box and 2.7L center console. There are cubbies in the center console as well as driver and passenger side storage shelves. There are also 2 cup holders.
XT-R and Limited edition RMAX models benefit from Yamaha Adventure Pro GPS tablet integration along with a USB charge port. The Adventure Pro can be locked in place for security and removed for use in your car or truck. The center console is rubber sealed with pass throughs to charge your smartphone while safely inside.
All RMAX2 models come with sun tops standard featuring integration with Yamaha’s accessory windshield, cab enclosure system and mirrors.
Its modern sporty styling is accented with new LED marker lights. 7.6W LED low beams with 15.2W reflector high beam headlights are found out front with LED tail and reverse lights found out back.
Accessory Integration
If you like to accessorize your rig like us, it’s worth noting that Yamaha already has over 100 accessories ready to go for the new Wolverines. Besides the skid plates, our RMAX also benefited from Yamaha’s polycarbonate half windshield, which is far less obtrusive to your sight line than some of the curved half windshields. You might as well pick up a Yamaha accessory windshield before you leave the dealer as well. They’re a great addition to any SXS.
Conclusion
While we are typically excited about new machines, we’re blown away with the new Yamaha Wolverine RMAX2 1000. It’s certainly a contender or best in class in the sport/utility segment, but it’s more than that. Although we didn’t get the chance to test it in whooped out terrain, the RMAX 1000 seems good enough to serve the needs of many enthusiasts who’ve been wishing for a 64” wide, CVT equipped sport SXS from a Japanese manufacturer. It’s both quicker and faster than a Teryx 1000, might give the Talon 1000X a good run, and will work better for many drivers than Yamaha’s YXZ1000R on tighter trails. Plus, it will let you haul more gear, work, or tow more than any Sport SXS. Its combination of performance, versatility, and refinement is unique and why we expect the 2021 Yamaha Wolverine RMAX 1000 to become one of the top selling SXSs on the market. That’s saying a lot, but the new Wolverine RMAX2 1000 is really that good.
Tags: 2021 Yamaha Wolverine RMAX 1000 Test Review, 2021 Yamaha Wolverine RMAX2 1000 Test Review, can-am commander 1000, comparison, honda pioneer 5, Honda Talon 1000X, off road, polaris general 1000, polaris general xp 1000, Polaris RZR S 1000, Rmax, RMAX 1000 Review, RMAX 1000 Test, rmax review, Rmax test, side by side, sxs, sxs review, utv, vs, wolverine 2021, wolverine rmax, yamaha rmax 1000 vs polaris general, yamaha rmax upgrades, yamaha rmax2 review, Yamaha wolverine rmax 1000
 raw venison
  venison packed in salt
  the same dish a day later
  steaks after one day in salt
  fourteen days later
  salted venison steaks
  steak cut in half
  the inside is lighter in color
  Africa Overland Truck
 Luxury Overland Truck
 Luxury safari truck for small group overland tours
 Luxury Safari Truck for Overlanding Africa
 Sprinter Safari Minibus
 Pop-top 4×4 safari vehicle by William Warby
 Open African safari vehicle on game drive
 Open African safari vehicle
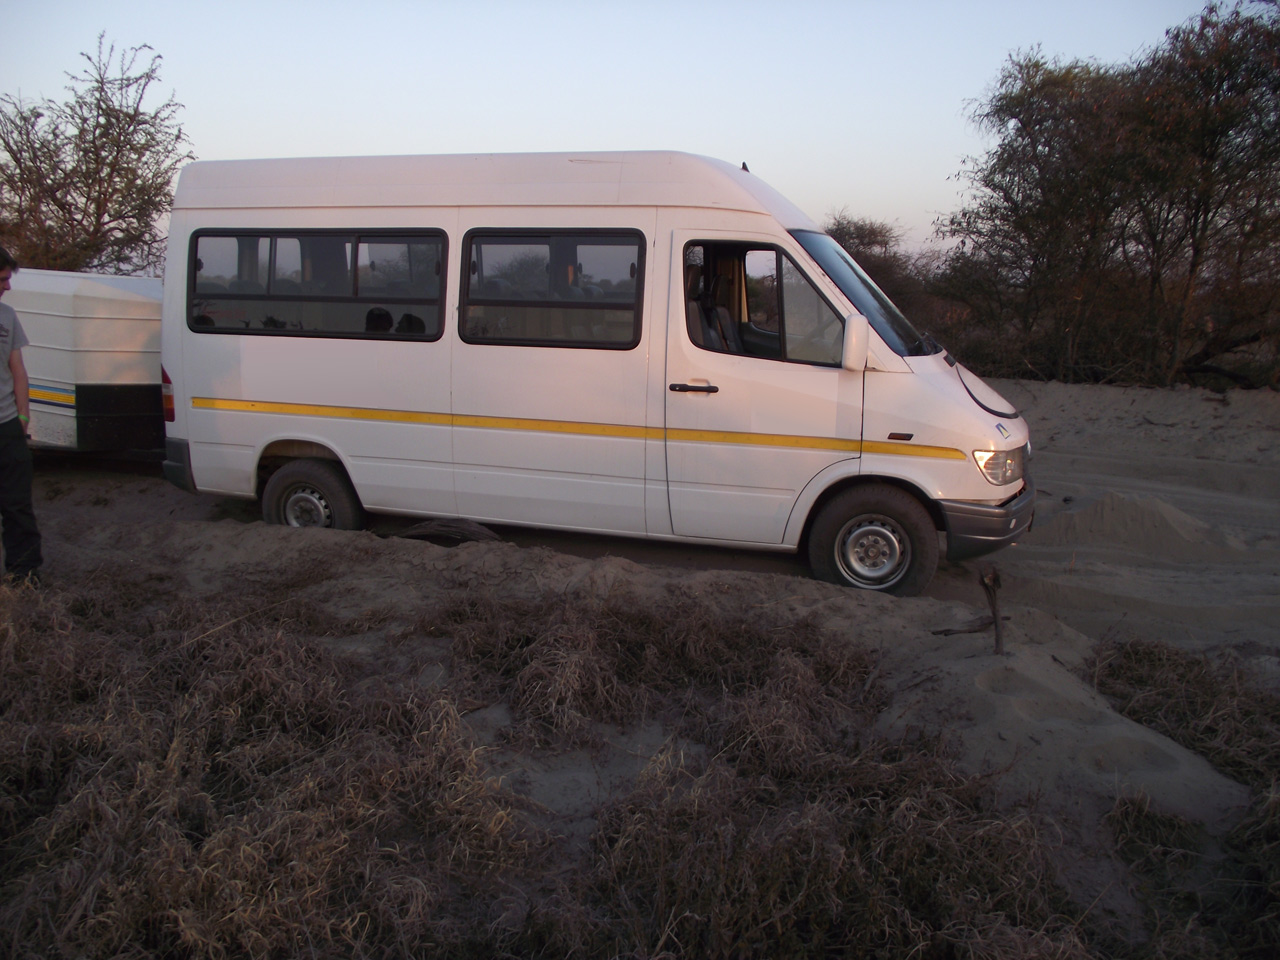 Plane view of the Okavango Delta by Justin Hall
 Small plane flights on safari
 Hot air ballooning over Serengeti Park by Wajahat Mahmood
 Shark diving safari by Kim Nowacki
 Great white shark cage diving boat
 Rafting the Zambezi on safari by Martijn Munneke
 East African Dhow sailing boat by Cesar Gonzalez Palomo
 Chobe boat cruise in Botswana
 Mokoro in Okavango Delta, Botswana
 Zambezi canoeing in Zambia
 Horseback safaris Cape Town
 Walking safaris in Africa
 Walking safari guide in Kenya
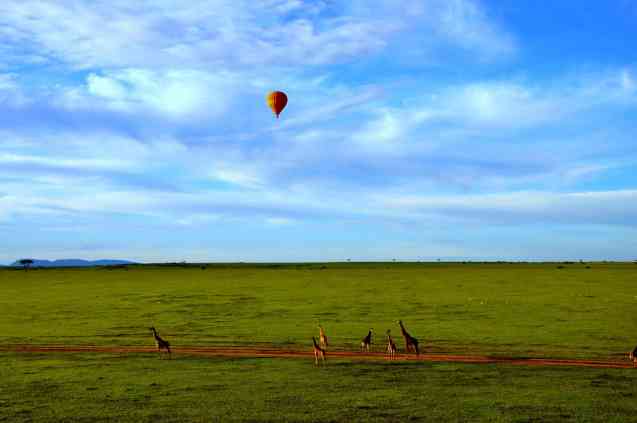 African safari vehicle in Kruger


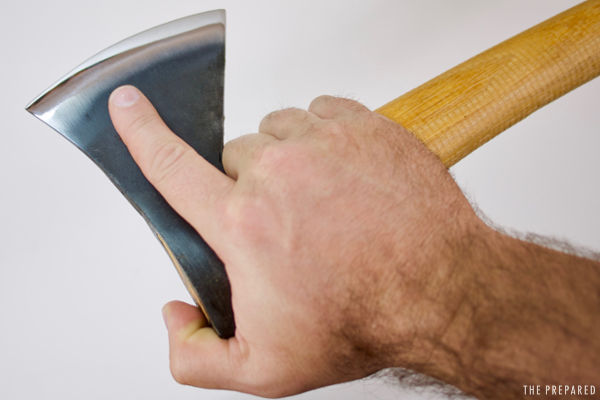
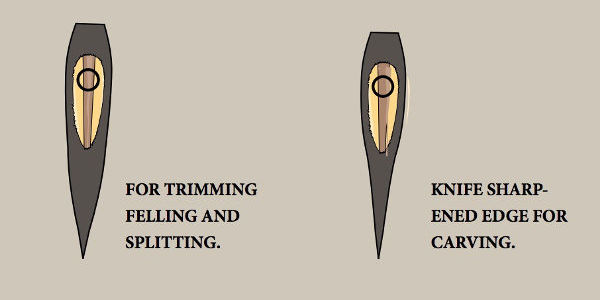
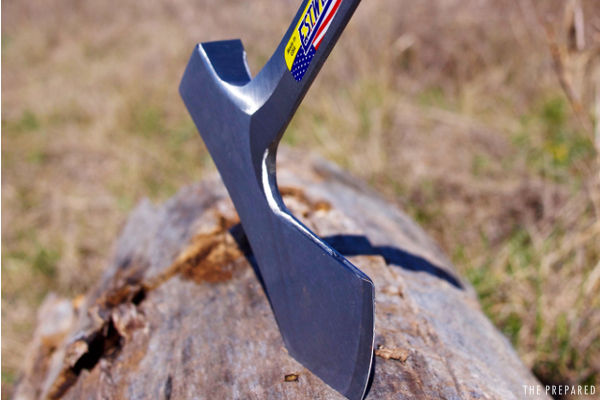
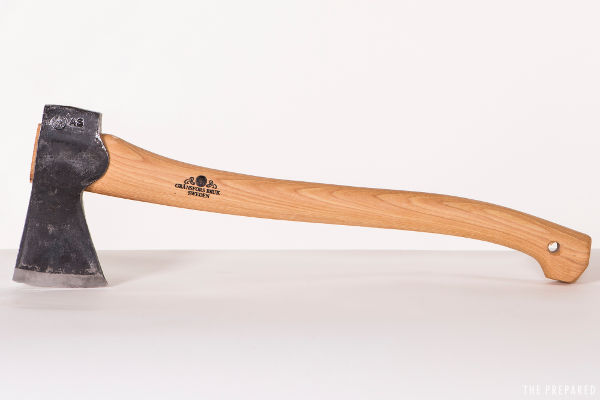
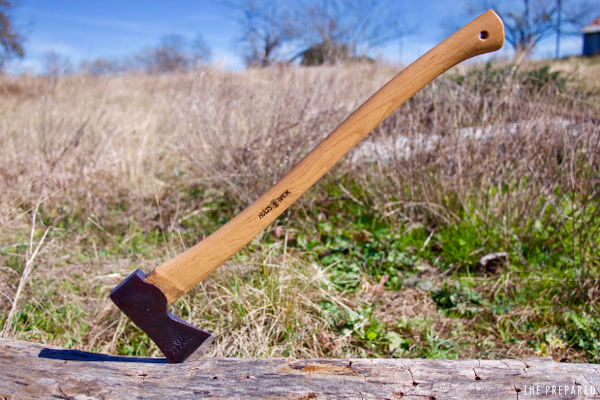
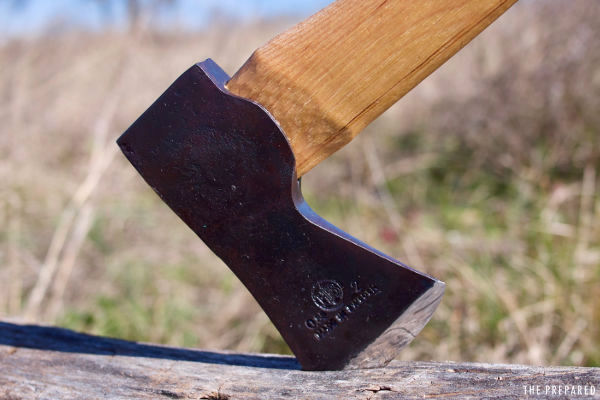
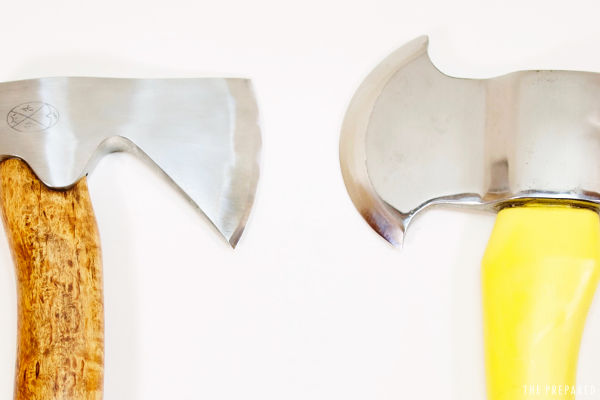 The edge shape and thickness determines how well an axe handles different materials.