Fishing for a trout has always seemed complicated, especially for those who are only planning to engage in this fun-filled recreational activity. However, it is not just all about fun. It is also a combination of knowledge, skills, determination, and mostly patience.Setting up fishing rigs and lines is the number one problem that can test an angler’s patience. There are a lot of variations of fishing lines and rigs that only a few can probably name.Regardless, we can always choose to make fishing a simple activity and not so complicated. That is why the internet can indeed be your ultimate best friend.This article will introduce to you the different steps to set up your trout rig and line.
Our Fishing Gears on Sale
Trout, What Is It?
A trout is a generic term used for several freshwater species. The trout is closely related to the Salmon family. Each trout can survive differently from one another. In line with that, variations of the trout can be found anywhere.
Some live in freshwater lakes and rivers, such as the lake trout. Others, notably the Rainbow Trout, can switch from living in the sea to inhabiting freshwaters. Due to the difference in habitat and environment, trouts also differ in their colors and patterns.
These colors are often acknowledged as camouflaging, in which a trout changes in color depending on the environment it is living in. What is impressive about the trout is that it changes colors if they migrate to a different place or environment.
It can be hard to determine the specific breed of trout based on their colors and look. Also, it can be challenging how to catch these trouts. Some trouts are rare to find, while some, on the other hand, can just be caught around the corners.
Before you can cast your line in the water and hang tight for a trout bite, there are many things that you ought to have as a primary concern as far as prior information. One of the prime things to know is the habitat and tendencies of the trout fish itself.
Keep in mind, your odds of winning a catch rely basically upon your capacity to pass judgment on trout behavior and afterward setting up a fishing rig and line in like manner.
Main Species Of Trout
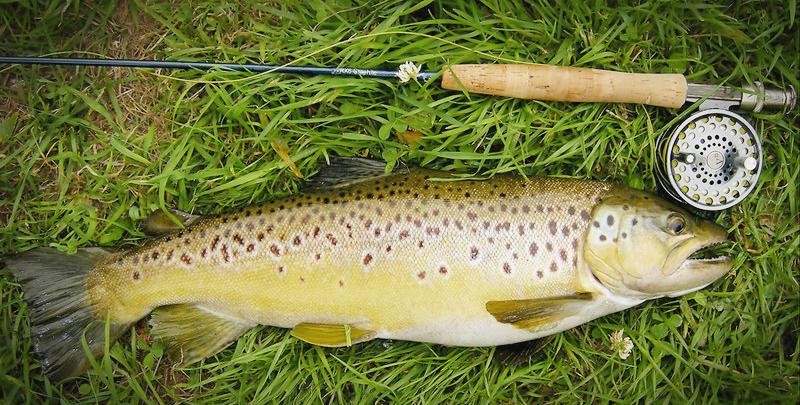
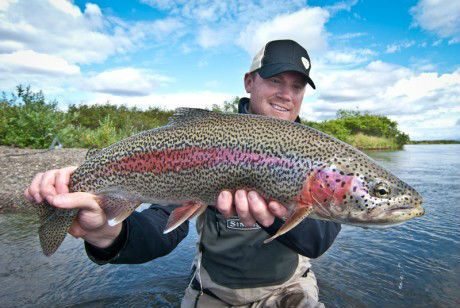
There are three major species of trout that fishers catch, and each has its unique characteristics. These are the Brown, Brook, and Rainbow Trout.
Apart from these three, the wildcard steelhead is also known to be the same as the rainbow trout. It lives in the ocean or lakes before it spawns in the freshwater or smaller tributaries.
Meanwhile, the rainbows produce a silvery color on them. This habit, also seen in salmon, makes them a must-have catch, especially among anglers.
Know Your Trout
Because of the trouts’ ability to survive across various water and current conditions vary in their shading and skin patterns. It is intriguing to realize that a wide range of trout types exist, depending upon the external conditions that they are opened to.
Below are some quick facts to help you with acquainting yourself with this exciting fish:
-
-
-
- What do they look like? The appearance of the trout fish differs over the various species. Since these fish take after the salmon family, trout itself develops to huge sizes, ensuring an extraordinary attraction for fishers and anglers in the area.
- Trout typically have moles like imprints and their bodies, whose size and color differ from species to species. Rainbow trout are generally touched with silver, while brown-colored trout are actually what their name proposes, but with reddish spots along their length.
- Trout fish habitat: trout are normally found in freshwater bodies, for example, lakes, and rivers, with certain species having the option to withstand the high salt content of the ocean. Trout prefer moving waterways that are colder and choose to live in calmer, less frequented zones.
- Eating patterns: trout are known to eat various bugs (mainly aquatic insects), crustaceans, worms, and leeches. Bigger-sized trout are likewise known to feed upon smaller fish!
Where Can You Find The Trout?
You can find the trout in moving and cold water. Trout can be found in the rivers and creeks, and they love to run up and down in these locations.Trout is one of the commonly stocked game species, and it can also be found in lakes (like another species, the Lake Trout). Indeed, trout can be dropped in ponds, streams, and anywhere.Trout can grow up to massive size and swim into the ocean. They sometimes feed smaller fish in the lake. Sometimes, they eat salmon spawn and raid their beds.Amazingly, trout is also one of the accessible food for wild animals. As such, you can see it in the woods, for they are considered the Bobcats, bears, and other animals’ food.The more remote the lake or river is, the more likely you can find a trout in the water. With this, trout fishing is considered one of the best activities for anglers and outdoor enthusiasts.
The Beauty Of Trout Fishing
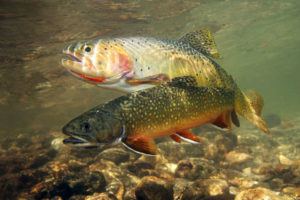
Without a doubt, trouts are among the most magnificent freshwater creatures that have ever prevailed in bodies of water. There are four major species of trout that are often sought after by anglers.
The Brook trout, commonly referred to as the speckled trout, is considered the easiest to catch. Meanwhile, the Cutthroat Trout (“Cutthroat” because of red-orange slash marks on their throats) dominantly occupies the country’s western part. Finally, the Rainbow and Brown Trout are both found in rivers or streams.
Setting Up The Rig
Well, all you need to figure out is your trout rig and how to set up your line. If you are wondering what the term “Rig” stands for, it is relatively simple. A rig is a term used to define the combination or arrangement of equipment or things used for fishing. A rig may be attached to a rod, carried by hand, or mounted on a boat.
How To Set Up A Trout Rig And Line?
When you get an overall idea of what the trout fish resembles, your goal of getting a fine example effectively turns out to be a lot simpler. Your best course of action is to exhibit your knowledge and set up your fishing rig and fishing line.
There are many and numerous ways on how to set up a trout rig. But, the steps and ways following this are by far the best ones out there. It has been tested and proven to catch a satisfying number of trouts.
The Things Needed For Trout Rig Setup
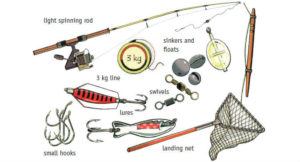
A rig is a group of fishing gear needed for making a decent catch. Here is a quick rundown of things that you would need to set up your fishing things and permit the fishing to progress.
-
-
- Fishing Rod and Reel – If you do not have one yet, you can start by purchasing an affordable pick at any fishing shop near you.
- Fishing Line – Usually, if you buy yourself a pair of fishing rods and fishing reel, the fishing line already comes with. If there are none, provide yourself with some fishing line at about 5-10 lb test fishing line. Next, spool it in the fishing reel. Ensure that your fishing line is neat and all set for trout hunting for those who already have. Ensure that there are no tangles or flaws inside the reel, or else it would significantly affect your trout adventure.
- A Set of Hooks – For trout fishing, the best hooks to use are sizes 4-12.
- Bobbers – A basic bobber will do. Just make sure that the bobber is big enough to prevent the split shot and hook and bait from sinking into the water.
- Sinkers – This is the exact opposite of the bobbers. The sinkers’ weight should be light enough. So, that if it is attached to the bobber, it will not drag the bobber down.
- Bait -Freshly picked worms can already work well for what we are about to do. But, other options also include using crickets or Berkely trout worms.
The Steps In Setting Up The Trout Rig
-
-
- Start with tying the fishing hook to the end of the fishing line. To this, you can use a basic knot to attach it to the line. It is best to use an Improved Clinch knot or Palomar Knot for better performance.
- Next, insert a line from one end of the split shot going out to the other end. Make sure that it is at a distance of 10-15 cm above the hook.
- The next thing to do is attach the bobber or float at the tip of the fishing line. This is quickly done by inserting the line through both the top and bottom metal hooks. Always remember that it is essential that the fishing line runs around the bobber or float. Moreover, both hooks should keep the bobber or float anchored or stationary.
There you have it. In only three easy steps, you have now set up an effective way for successful trout fishing.
Best Trout Fishing Rigs You Can Get To Know
1. Sinking Bait Trout Fishing Rig
A sinking bait rig is a ticket when trout plunges to the lake’s bottoms to look for the colder waters during warm days. All you require for a sinking bait rig is a slip sinker, swivel, hook, and bait.
What You Need:
-
-
- slip sinker
- swivel
- hook
- bait
How To Setup A Sinking Bait Trout Rig
First, rig a slip sinker and slide the eye of a slip sinker on the end of your fishing line. Next, tie a swivel to the end of the line to prevent losing the sinker. On the opposite end of the swivel, attach a 12-18″ piece of fishing line and attach your hook. Preferably a fishing line that is a somewhat lesser pound test than your mainline, that way, if your line breaks, it is just at the end of your rig.
With this arrangement, a trout will have the option to take the bait without feeling the sinker’s resistance. Likewise, you do not have a visual marker on the surface with this arrangement. Subsequently, it is ideal for saving a finger on the line to feel for any bites. You can likewise intently watch the fishing line to distinguish any movement.
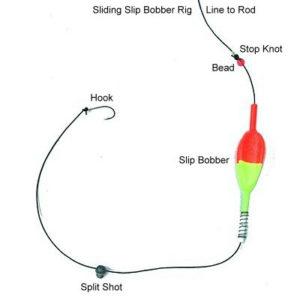
2. Float Fishing Rig For Trout (Bobber Fishing Rig)
In case you have not tested it or might want a substantially more visual style of trout fishing, try the thrill of fishing for trout with a bobber. Nothing beats the excitement of watching your bobber start to move a lot over the water, then rapidly dive under the water’s surface by a trout.
While a slip bobber trout rig takes somewhat more work than a basic clip on a bobber, the slip bobber is a substantially more flexible and powerful rig for trout fishing. This is particularly obvious in deeper lakes. But, a clip-on bobber could be similarly useful in catching trout in a shallow stream or waterway.
What You Need:
-
-
- slip bobber or clip-on bobber
- bobber stop (for slip bobber)
- swivel
- Hook
How To Set Up A Bobber Rig For Trout
A slip-bobber rig works like the previously mentioned slip-sinker rig. To start, take a bobber stop that is incorporated with most slip bobbers available and string it onto the end of your fishing line. This will fill in as a movable point to stop your bobber.
By sliding this up and down the line, you can fish your lure suspended in the water, basically as deep as you need.
After the bobber stop, slide on your bobber and tie on a swivel to prevent it from sliding off your line. Much the same as the sinker arrangement, tie on a 12-18″ segment of fishing line and attach your hook.
At the point when you cast, you’ll just be managing your bobber and this short segment of the line, regardless of really fishing your lure a lot further to the point of your bobber stopping.
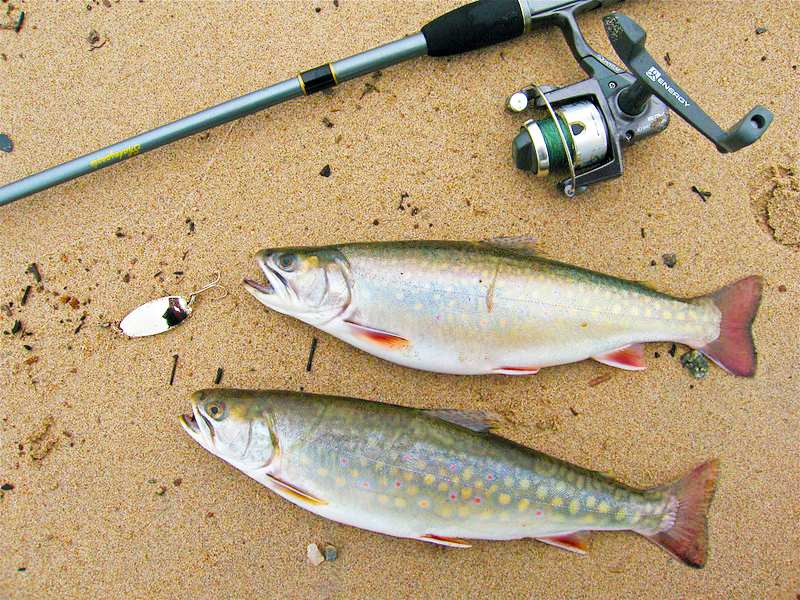
3. Lure Rig For Trout Fishing
This might be the easiest, and now and again, the best trout rig of all! It’s easy to set up as there are not close to the same number of segments to stress over compared with the bait fishing rig and bobber rig.
When using a lure to look for trout, you can keep it as easy as tying the lure right onto the end of your line if that is all you have. In any case, because of the lures spinning movement, this may place turns in your line that might decrease the breaking quality of the line or even cause a significant tangled wreck.
What You Need:
-
-
- Variety of trout lures
- Swivel (optional)
- Leader line
How To Setup A Lure Fishing Trout Rig
The preferable strategy for connecting a trout fishing lure is to tie a clip swivel to your line’s furthest limit and attach your lure to that. Not exclusively, it will lessen line twists. Likewise, it will consider a more reasonable presentation and make it simpler to change out between lures. By rapidly rotating through lures, you can rapidly figure out what the trout will like to eat at that given time.
For Trolling, these jet divers are a Great Replacement for outriggers and heavy lead ball sinkers.
How To Setup A Fishing Line?
Since you now have an idea of setting up a trout fishing rig, your next job includes the crucial need to have a strong grasp on the most proficient method to set up a fishing line.
Same as with the trout rig, there are many selections to choose from when it comes to setting up your fishing line. Particularly for trout fishing. But, this article will show you one of the basic fishing line setups there is. Yet, even though it is basic, it is still the most effective and reliable way to set up a fishing line for trout fishing.
The Things Needed For Fishing Line Setup
-
-
- Your fishing hooks and fishing line
The Steps In Setting Up The Fishing Line
-
- Attach the hook to the fishing line. Tie the Hook onto the Fishing Line. To do so, grab the tip of your fishing line and loop it in the tiny hole on your hook. Upon grabbing the end of the fishing line, you have already entered the hook. Twist that end to the mainline about nine times.
- Loopback. After you have twisted it about nine times, loop it in the tiny hole of the hook again. But, this time, on the opposite side of the hook’s hole from the first time, you have looped it in.
- Tighten. Once you have looped the fishing line in, pull the mainline (the longer part) to snug the twists tightly.
- Remove the excess line. Then, cut the extra hanging line on the other end of the fishing line closer to the hook.
- Prepare the line. The next steps would be the same as the ones when you are setting up your trout rig. Insert the weight, followed by the bobber, and so and so forth.
There you have it! A simple yet effective way to ensure a fishing line for a good trout adventure. Before heading out to look for some trout, read some of the tips, we have for trout fishing.
Common Things Used When Trout Fishing
Rainbow trout grow up to 12 inches long, and you can use an ultralight tackle for this type of fish. You can use a spinning reel, light/ ultralight action rod, and a 4-8 lb test fluorocarbon line for standard trout fishing.
Always remember these two important rules when trout fishing:
- Stocked trout needs power bait.
- Trout that measures over one-foot long cut insects and flies from their diet. These will not break or make the bite, but they can affect the type of trout you hook unto it.
Powerbait such as trout marshmallows or any dough bait substitute to imitate fish pellets is not a good choice for the native type of trout. Stocked trouts that grew in hatcheries and farms are being fed with fish pellets. Dough baits and power baits are created to imitate the fish pellets’ scent, texture, and size. However, if you wish to catch native trouts, they will be clueless about the glob of dough that floats in front of them.
Sometimes, you may get a bite because the trouts can be curious. However, native trouts are not conditioned to eat the pellets.
If you wish to catch bigger trouts like the brooks, browns, and steelhead, make sure to avoid the mayfly and fly. Trouts may sometimes occasionally eat small insects like flies, but they eat worms, smaller fishes, and shrimps most of the time.
Now, if you wish to imitate those trout meals when fishing, follow these tips:
Tips To Remember When Trout Fishing
- Learn the Rules. Before heading out to fish for some trouts, the first important tip is to be aware of your location’s rules and regulations. There are certain rules and regulations when it comes to fishing. Some rules from one state or place may be different from the other. So, to be sure, always remember to check the rules.
- Have Your Equipment Ready. If you have no fishing equipment yet available, you can look for some affordable fishing gear at fishing shops. However, fishing equipment’s logic is that the pricier the gear is, the durable, reliable, and high-quality. Of course, you also need to weigh if the price is reasonable or not.
- Know the Perfect Location. It is important to determine the location you are going to fish to. You cannot just choose some random lake and expect to catch your desired number of fish. To save your time and effort, it is best always to double-check the best places to fish.
- Check for Weather Updates. This goes hand in hand when choosing the perfect location. Checking the weather forecast can save you time, money, and energy.
- Baiting Your Hook Properly. One of the most common mistakes of anglers is the way they hook their baits. Some think that everything is set once the bait is hooked. As a matter of fact, the right way to hook your bait is to let the bait follow the hook’s shape. So, you have to fill in the bait body with the shape of the hook. This is to make sure that the fish never gets away.
Those who have a messy strategy of baiting their hook will unavoidably confront the more getting away from trout, alongside lost bait.
The ideal approach to hook is to ensure that the hook goes the entire body of the bait so the trout cannot swim away after detaching the untethered, floating bits of bait.
You can consider these little things that would permit you to meet with more prominent success as you set up a trout fishing rig and fishing line.
Common Lures For Trout Fishing
To lure the trouts into your baits, you must put a type of food they use to eat. If you are going trout fishing, be sure to have at least one of these lures:
Cranks
Crankbaits may not be every angler’s first choice when trout fishing. However, big trouts will hit crankbaits, especially those who are 1/3 or ½ of their size.
Trout has sharp teeth, and they don’t have any problem eating whole portions of big baits. They can tear it into pieces and swallow it.
Critters
Critters like beetles, grasshoppers, bugs, and crickets fall into the streams and rivers with trouts all the time. As such, trouts used to see these critters and eat them. If you try drowning grasshoppers or imitators in the current, surely the trouts will go after it.
Powerbait
Dough bait can be called power bait by any trout angler. If there are trouts anywhere in the area, you can have a few power bait colors to ball up, put into a hook, and give a go.
Salmon Eggs
Trouts are known as notorious scavengers—the raid on spawning beds of fishes to feed their eggs.
You can cut one belly open, put it into a size six hook, and trouts will feed on it.
Spinners
Rooster tails and spinners are some of the best lures for trouts all over the world. You can change it easily in and out on a swivel and get bit by trouts anywhere in the lake. Their flapping blades can be added to a river current.
Spoons
Flashy spoons and those tipped with feathers and wax worms are an effective lure for trouts throughout the year.
They live in colder weather when the bite slows down. Their flashiness entices into a bite and annoys the trouts.
Swimbaits
Bigger trouts love to eat smaller baitfish. One of the best techniques you can try is eating baitfish, paddle tail, a swimbait to disrupt the column.
Tubes
The tubes imitate zooplankton that fishes eat under the sea. They can be instrumental when trout fishing, so always keep them at your tackle box.
Worm Imitators
One of the most basic trout-catching lures is the worms. Live worms can get bit by every fish under the sea.
Some downsized and soft plastic worms can be a great option, too, for the trout. Make sure to choose bright color worms so trout can detect it underwater, even in rivers and lakes.
Important Notes
Always remember to enjoy your trout adventure. Some days will be bad, and other days will be amazingly worth it. Also, trout fishing is a matter of discovering your inner happiness. You are challenged in different ways that, sometimes, most of these tips will not save you from that scenario.Nonetheless, continue to learn and develop your skills when it comes to fishing. It is only a matter of dedication and passion to which one can truly bask in the glory of catching these aquatic species. I hope that these tips may work for you well, as it has worked for me.Keep in mind that knowledge and strategy go inseparably, and to appreciate more achievement, you should practice perfecting both!
Our Fishing Gears on Sale
")
")
")
")
")


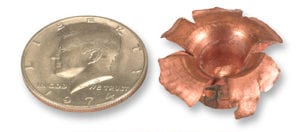 For comparison purposes this photo shows a 1974 Kennedy .50 cent piece; next to a NeoTec Copper 365gr expanded slug that was fire into a ballistic gelatin block from between 45 and 50 yards away. That range duplicates about 70% of most deer taken with a slug gun. This NeoTec Copper 365gr expanded slug weights 302gr (an 83% weight retention) and it expanded to just over the size of a half a dollar! An expanded slug like the one shown, @1800 fps, and spinning at 54,000 rpm’s (when fired thru a 1-24 twist rate barrel), and weighting over 30 grains, acts just like a hole saw!
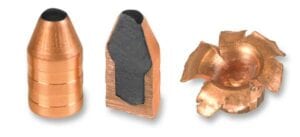 The “hollow bullet” design shown here uses an full cavity elastomer truss. This design helps generate real expansion of a 99.9% pure copper bullet that will expand and not just shoot thru or implode on impact projectile! [Sometime, in the near future, we will be hunting with “HOLLOW Bullets” supported entirely by internal metal alloy truss. These projectiles will be made on a 3-D metal printer] at even faster velocities.
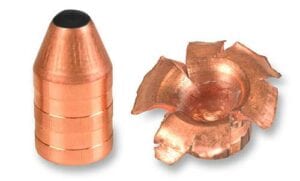 The “NeoTec Copper 365gr” Premier Slug