Home Blog Page 183

What Happens When You Shoot a Deer in the Neck: Implications and Outcomes

0

“Exploring the Consequences: Unveiling What Happens When a Deer is Shot in the Neck. Discover the potential outcomes, ranging from immediate incapacitation to survival strategies employed by these resilient creatures. Join us on an enlightening journey to understand the implications of such an encounter.”

The Effects of Shooting a Deer in the Neck: Caliber, Bullet Type, and Direction Matter

The Effects of Shooting a Deer in the Neck: Caliber, Bullet Type, and Direction Matter

Shooting a deer in the neck can have varying effects depending on several factors such as the caliber of the gun, bullet type, and direction of the shot. It is important to consider these factors as they can determine whether it will be an effective kill shot or result in wasted meat.

When using a.308 caliber rifle and shooting a deer in the spine just behind the neck, it can result in an instant kill by targeting vital organs such as the heart and lungs. However, there is still a risk involved as shooting slightly low may cause damage to other parts of the body without ensuring a quick death.

Neck shots are generally considered risky because if one fails to hit an artery or the spine, it may not be a lethal shot. This can lead to unnecessary suffering for the animal. Some hunters prefer shooting deer in the head with a Winchester model 70.308, resulting in a dead deer with intact antlers. However, this method does not provide any edible meat from the head.

The effectiveness of shooting in the neck also depends on where exactly in the neck and what caliber of gun is used. Hunting with a 30-06 and aiming high in the neck has been found to be successful for achieving instant death without wasting meat. However, this approach carries high risks due to small targets like the spine and blood vessels.

If a hunter’s shot is off by even an inch or two, it could cause significant muscle damage rather than hitting vital areas. This can lead to situations where wounded deer run off without bleeding enough to bleed out. In such cases, they may suffer from massive infections or bacterial illnesses that eventually prove fatal.

Bow hunters should exercise caution when considering neck shots as they pose additional challenges. There have been instances where broadheads snapped off in deer vertebrae were found, indicating unsuccessful neck shots. This can result in the deer experiencing immense pain and potentially dying from thirst or choking.

In conclusion, shooting a deer in the neck can have both positive and negative outcomes depending on factors such as caliber, bullet type, and shot direction. It is crucial to aim for vital areas like the spine or main blood vessels to ensure an instant and humane kill. However, there are inherent risks involved, including potential damage to muscles or missed arteries/veins that can lead to suffering and prolonged death for the animal. Bow hunters should be particularly cautious when attempting neck shots due to the challenges they present.

Exploring the Risks and Rewards of Shooting a Deer in the Neck

Exploring the Risks and Rewards of Shooting a Deer in the Neck

Shooting a deer in the neck can be both risky and rewarding, depending on various factors such as the caliber of the gun used, the specific target area, and the type of bullet employed. While some hunters prefer neck shots for their potential for instant kills, others caution against it due to the small target area and potential for non-fatal wounds.

One hunter shares his experience of using a.308 caliber rifle to shoot deer in the spine just behind the neck. This technique ensures that even if the shot is slightly low, it still takes out vital organs like the heart and lungs, resulting in a kill shot. However, he advises against aiming directly at the neck as it may not hit an artery or spine, potentially leading to a non-lethal wound.

Another hunter mentions using a Winchester model 70.308 to shoot deer in the head. While this results in an immediate kill, it leaves behind an ugly-looking carcass that is not suitable for consumption. However, if preserving the rack is important to you, this method may be preferred.

The effectiveness of shooting a deer in the neck largely depends on accuracy and precision. If one manages to hit either the spine or main blood vessels, death can be nearly instantaneous. However, these targets are quite small and missing them by even an inch or two can cause significant muscle damage without causing fatal bleeding. This can lead to prolonged suffering for the animal and eventual death due to infection or other complications.

It’s important to note that bow hunters should exercise caution when considering neck shots. The risk of missing vital targets increases with bows due to their shorter effective range and lower velocity compared to firearms. There have been instances where broadheads have snapped off in deer vertebrae after unsuccessful neck shots.

In conclusion, shooting a deer in the neck presents both risks and rewards. While it can result in an instant kill if the shot is accurate, there is a significant chance of non-fatal wounds or prolonged suffering for the animal. It’s crucial for hunters to assess their skill level, equipment capabilities, and ethical considerations before attempting neck shots.

Instant Death or Potential Suffering? The Consequences of Neck Shots on Deer

Neck shots on deer can have varying outcomes depending on several factors. These include the caliber of the gun used, the specific location within the neck that is hit, the type of bullet employed, and the direction in which the bullet is traveling. It is important to note that neck shots can result in a significant amount of meat being damaged, so many hunters prefer to avoid targeting this area. Personally, I opt for shooting deer in the spine just behind the neck using a.308 caliber rifle. This allows for a kill shot even if my aim is slightly low as it takes out the heart and lungs. However, neck shots are considered risky because if an artery or the spine is not hit, it may not result in an instant kill.

I have had experience shooting deer in the head with a Winchester model 70.308 rifle, and while it does result in a dead deer, it often leaves behind an unsightly appearance. Since I do not consume the head and prefer to keep its rack intact, this method suits my needs. However, it should be noted that the effectiveness of neck shots largely depends on their placement within the neck and the caliber of gun used.

For those who choose to target the neck area, especially when hunting with a 30-06 rifle like myself, aiming high in the neck has proven successful for achieving instant death without wasting any meat. Nevertheless, taking such shots comes with high risks and potential rewards. Hitting critical targets like the spine or main blood vessels results in near-instantaneous death. However, these targets are relatively small and missing them by just an inch or two can cause significant muscle damage without sufficient bleeding for a quick demise.

In cases where a shot veers off course and blows out the throat without hitting arteries or veins, a deer may choke to death if lucky, or die of thirst after a few days if unlucky. It is important to exercise caution when considering neck shots, especially for bow hunters. I have personally encountered two deer skeletons deep in the woods with snapped-off broadheads buried in their vertebrae, indicating that they ran away injured rather than succumbing to an immediate death.

In conclusion, neck shots on deer can result in instant death if critical targets such as the spine or main blood vessels are hit. However, due to the small size of these targets and the potential for missing them by a slight margin, there is also a risk of causing severe muscle damage and leaving the deer to suffer before eventually dying from infection or other complications. Bow hunters should be particularly cautious when attempting neck shots to ensure a quick and humane kill.

Understanding the Outcome of Shooting a Deer in the Neck: Factors to Consider

Shooting a deer in the neck can have varying outcomes depending on several factors. One important factor is the caliber of the gun used and the type of bullet. For example, using a.308 caliber rifle with a specific bullet may result in different effects compared to using a different caliber or bullet type.

Another crucial factor is where exactly in the neck the deer is shot. If the shot hits an artery or the spine, it can be a near-instantaneous kill. However, these vital targets are relatively small, and even a slight deviation in aim can lead to unintended consequences.

The direction and trajectory of the bullet also play a role in determining the outcome. If the bullet travels through major blood vessels or damages critical structures like the spine, it can result in immediate death. On the other hand, if the shot misses these targets but causes extensive muscle damage, it may not be fatal and could lead to significant suffering for the deer.

It’s worth noting that shooting a deer in the neck can result in significant meat loss due to potential damage caused by high-powered rounds. Therefore, some hunters prefer alternative shots that target vital organs like the heart and lungs while minimizing meat wastage.

In conclusion, shooting a deer in the neck carries both high risks and potential rewards. While hitting crucial arteries or structures can lead to an instant kill, missing these targets may cause severe injuries and prolonged suffering for the animal. It is essential for hunters to carefully consider their aim, choice of firearm, and potential outcomes before opting for this particular shot placement.

Is Shooting a Deer in the Neck a Reliable Kill Shot? Examining Different Perspectives

Is Shooting a Deer in the Neck a Reliable Kill Shot? Examining Different Perspectives

1. The Effectiveness of Shooting in the Neck

Shooting a deer in the neck can be an effective kill shot, but its reliability depends on various factors. One hunter shares their experience using a.308 caliber rifle and aiming for the spine just behind the neck. This approach ensures that even if the shot is slightly low, it still takes out vital organs like the heart and lungs, resulting in a quick kill. However, they caution against shooting directly at the neck due to the risk of missing important arteries or the spine, which may not result in an immediate kill.

2. Considerations for Successful Neck Shots

Another perspective highlights that shooting a deer in the neck can yield high rewards if executed accurately. Using a 30-06 rifle and aiming high in the neck has proven to be successful for this hunter, resulting in instant death and no wasted meat. However, they acknowledge that hitting small targets like the spine or main blood vessels can be challenging, emphasizing the need for precise aim.

3. Potential Risks and Consequences

While shooting a deer in the neck can offer quick kills when done properly, there are potential risks involved. If a shot is off by even an inch or two, it could cause significant muscle damage without ensuring enough bleeding for the deer to bleed out. This can lead to prolonged suffering and eventual death from bacterial infection or thirst if it cannot drink due to throat damage. Bow hunters are especially cautioned against taking neck shots due to instances of snapped-off broadheads found buried in vertebrae.

In conclusion, shooting a deer in the neck can be reliable if certain factors are considered: using an appropriate caliber firearm, aiming precisely at vital areas like the spine or main blood vessels, and being aware of the potential risks involved. However, it is crucial to prioritize ethical hunting practices and ensure a quick and humane kill for the animal.

The High Stakes of Shooting a Deer in the Neck: A Critical Analysis

Neck Shots: Risky but Potentially Rewarding

Shooting a deer in the neck can be a high-risk, high-reward scenario. The outcome largely depends on various factors such as the caliber of the gun, bullet type, shot placement, and direction of the bullet. While some hunters prefer neck shots for their potential instant kill, others find it too risky due to the small targets involved. If executed perfectly, hitting the spine or main blood vessels in the neck can result in near-instant death. However, even a slight deviation in aim can lead to severe muscle damage or missed arteries and veins, causing prolonged suffering for the deer.

The Importance of Shot Placement and Caliber Selection

To increase the chances of success when aiming for a neck shot, careful shot placement and appropriate caliber selection are crucial. Experienced hunters often recommend targeting just behind the neck in line with the spine. This position allows for a potential heart and lung hit if slightly low, ensuring a lethal outcome while minimizing meat wastage. However, using larger calibers like.308 or 30-06 is advisable to ensure sufficient stopping power and penetration to reach vital organs or blood vessels.

The Risks Faced by Bow Hunters

Bow hunters should exercise caution when considering neck shots on deer. The use of broadheads can pose additional risks due to their potential for snapping off within the vertebrae. This not only results in an unsuccessful kill but also leaves the deer to suffer from injuries and potentially die from infections or thirst over time. Therefore, bow hunters are advised to opt for alternative shot placements that offer higher chances of immediate incapacitation without compromising animal welfare.

In summary, shooting a deer in the neck presents both risks and rewards. While it can lead to a quick and humane kill if executed perfectly, the small targets involved and potential for muscle damage or missed vital structures make it a high-stakes endeavor. Careful shot placement, appropriate caliber selection, and consideration of the specific risks faced by bow hunters are essential factors to ensure ethical hunting practices and minimize unnecessary suffering for the animal.

In conclusion, shooting a deer in the neck can result in immediate death or severe injury. It is critical to consider ethical hunting practices and aim for vital organs to ensure a quick and humane kill. Additionally, seeking proper training and adhering to local hunting regulations are essential for responsible hunting.

Are Fish Mounts Made from Real Fish

0

If you have ever spent time in a big sporting goods store, like Bass Pro Shops, then you surely have noticed all the incredible fish mounted on the walls. Most anglers gaze up with envy at everything from huge marlin to jumbo bass, but have you ever wondered if those shiny mounts are real fish?

So, are fish mounts made from real fish? Taxidermy mounts made from real fish usually only contain the skin, teeth, head and fins. The body portion consists of a light weight foam mold on which the skin and other fish parts are mounted. Most fish mounts are actually painted fiberglass replicas.

There are some important things to know when the opportunity to catch a trophy fish comes knocking. Read on to learn more about taxidermy options, costs, fish preparations, and other important information to keep your fish looking as beautiful as the day you caught it.

How is a fish mounted

One of these days, you could very well catch the fish of a lifetime. Pictures are great, but sometimes they just don’t do the size of a fish justice. If you want to really show off your fishing prowess to your buddies, consider making your trophy a permanent mount on the wall.

Skin mounts

Using actual fish parts for mounting is slowly becoming a thing of the past. As anglers become more aware of the importance of fishery conservation, catch and release practices make real fish mounts impractical. Even so, taxidermists still get clients insisting on live mounts.

Live fish are mounted using the skin, fins, parts of the head and sometimes the teeth. Fish are far more delicate than most animals when it comes to mounting. Proper preparation is essential to ensure a high quality result. The taxidermist will skin the fish and use a preservative on the fish parts to be saved. Once the skin and other portions of the fish are dry, they are added to a foam mold that makes up the main body of the fish.

The next steps are where the taxidermist’s artistic ability really shines. Life like poses and painting a fish to mimic true-to-life colors is no small feat. Usually only one side of the fish is painted for wall mounts. Pedestal mounts will have both sides painted. Once painted, a clear coat layer is applied to protect it for years to come.

Replica mounts

If releasing the fish back to the water is your aim, then consider a fiberglass replica instead. It may not be the real thing, but it just might look better anyway. Here are a few things to consider when deciding between taking a fish to the taxidermist or releasing it to fight another day.

The modern day fiber glass reproductions are truly life-like. They are molded from real fish so all the details are present. If the paint job is done by a skilled taxidermist, you will never be able to tell the difference between a skin mount and a replica.

Many taxidermists have access to a large number of custom sizes from fish mold suppliers. This makes matching the exact size of your fish easier than ever.

It may not be the real fish you caught but it sure is a great way to commemorate the catch. It is also a much faster time to completion. A picture of the fish at the time you caught it is key to getting an accurate recreation of the fish. A good taxidermist will work with you and your picture to recreate the memory of your fish.

Regardless of the type of mount you get, it is important to do your homework when selecting a taxidermy shop. All taxidermy requires skill and artistic abilities. Don’t trust your dollar or trophy to someone without hearing feedback from actual customers.

5 easy steps to prepare a fish for taxidermy

Okay, you decided to keep the fish and take it to a taxidermist. Now what? To make sure your mount is as pretty as can be, follow these five simple steps.

Step 1

Take a good picture as soon as possible. Fish begin losing their best colors within two minutes. Snap a picture as soon as you pull it from the water to give the taxidermist the best chance at painting the exact colors. Limit how much you handle the fish to prevent damage to the scales and do not gut the fish.

Step 2

You never know when something could go wrong. If for some reason the fish is lost or damaged before getting it to a taxidermist, taking a few measurements if possible is a good idea. First, measure the length from nose to tail. Then, take a girth measurement around the fattest portion of the body. If you have a scale, weigh it too. Now you can get an accurate replica made if need be.

Step 3

Freeze your fish as soon as possible. Choose which side is best and remember to always keep that side up. This will be the visible side of the mount. Place it good side up on a flat surface in the freezer and leave it until it is solid throughout. This takes about three days. Do not put the fish in a bag or wrap it in newspaper.

Step 4

Even though the fish is now frozen, it can still be damaged by rough handling. Some taxidermists recommend misting the fish with water to form an ice coat. Several applications of water will provide a protective jacket when transporting it to the taxidermy shop.

Step 5

Now you are ready to take it in to a taxidermist. Once the fish is frozen, it is okay to put it in a bag for easy carrying. Take it in a cooler to prevent it from thawing out. After you select a local taxidermist, I recommend contacting them to see if they have any additional instructions.

How much does it cost to mount a fish

Getting any animal or fish mounted is not going to be cheap. You are paying for the skill and artistic talent of the taxidermist. The old saying, “you get what you pay for” rings true. Even so, if it is truly a trophy of a lifetime, it will be worth every penny.

After a little research, I found that the going rate for both replica and live fish mounts is about $16 per inch of fish for one side. To give you some perspective, the average sailfish is over 9 feet long and will cost roughly $1500. A trophy bass, on the other hand, may be only 24 inches long and cost around $400. Some taxidermists offer discounted prices for longer fish species.

Obviously, if you want both sides of the fish mounted and painted for pedestal mounts, you must double the price. Also, these costs do not include plaques or other mount décor.

How do you clean a wall mounted fish

Over time dust, sunlight and smoke can impact the life of a mount. Skin mounts generally do not last as long as replica mounts because of the fragile nature of the thin skin. Either way, regular maintenance can keep your mount in tip top shape for years to come.

Dust regularly with a slightly damp, lint free cloth. Air dusters work well for loose dust and will reduce the risk of damage. Be careful around the delicate fins. Sometimes it is easier to remove the fish from the wall and lay it on a flat surface.

To make the mount last even longer, avoid hanging it where it receives direct sunlight. The damaging UV rays will fade the colors overtime, especially on skin mounts.

Fire place smoke or cigarette smoke will slowly discolor fish mounts as well. Smoke build up cannot be removed by wiping or cleaning the mount. Take it into a professional taxidermist to be stripped and refinished.

Final thoughts

Fish mount are a great way to share your adventure of a lifetime with friends and family. A fish on the wall means proof of a catch and bragging rights to go with it. Getting a skin mount from a real fish or a replica mount is a personal choice. The replica mounts available now days offer the ability to exactly match your fish’s size and look. They also last longer and in most cases look better too.

How to Build an Electrolysis Tank for Cast Iron Restoration

0

One of the great things about cast-iron cookware is that it is nearly indestructible. Short of dropping one on the floor and cracking it or breaking off a handle, a cast-iron pan in just about any condition can be restored to better-than-new condition with some work.

The same skillet, before and after a soak in the E-tank and reseasoning.

How much work? Quite a bit if you try to scrub away the rust, and a little less if you use oven cleaner and let the pan set in a garbage bag for a few days. But who has time to scrub a layer of rust away, and who wants to mess with caustic chemicals if you don’t have to?

Don't pass up a good deal on vintage cast iron just because it might be rusty.

Making and using an electrolysis tank (E-tank for short) is much easier. An E-tank will clean even the rustiest and most neglected pan in a matter of days without any work on your end. An E-tank works by using electrical current to transfer the rust from the pan to a sacrificial piece of metal submerged in water. The electrical current comes from a battery charger. The positive clamp gets clamped to the sacrificial piece of metal, while the negative clamp gets clamped to the piece of cast iron you are trying to restore. The current flows through water, pulling the rust particles from the negatively charged cast iron to the positively charged sacrificial metal.

You probably have just about everything you need for this project in your garage.

The list of materials needed to build the tank is simple. You probably have most of them laying around the garage already.

You’ll need:

  • A plastic 20- to 25-gallon tote
  • A 12-volt battery charger
  • Water
  • A sacrificial piece of metal. Stainless steel works best, but any scrap steel or iron will work. It could be piece of angle iron, an old brake hub, a piece of sheet metal, or an old lawnmower blade, as long as it’s metal. The larger the surface area of the sacrificial metal, the faster the tank will work.
  • Sodium Carbonate: The easiest source for this is Arm and Hammer Washing Soda (not baking soda) found in the laundry detergent section of your local grocery.
  • String
  • A clamp
  • A stick or section of pvc pipe to extend over the tote to suspend the cast iron with string

Get Started

First some safety notes. It goes without saying that you need to take care when working with electricity around water. Don’t place the charger above the tote so that it might accidently get knocked into the water. Never touch the water without unplugging the charger first.

The gas that escapes from the tank is flammable. Do this outdoors or in a garage with great ventilation. Don’t set your tank up next to a pilot light or any other possible ignition sources.

  1. Fill the tote 2/3 or so with water, making sure the water level is deep enough to submerge your cast iron.
  2. Add 1/2 cup of the washing soda per 5 gallons of water. This isn’t a crucial measurement. Just get close. Mix well to dissolve.
  3. Place the sacrificial metal into the tank. I like to leave a corner up out of the water to clamp the charger to, but it can be submerged if you like. I use the clamp to hold the metal in position to one side of the tank.
  4. Extend the stick or pvc pipe across the tote, and tie a section of string to the center of it. Attach your rusty pot to the string and let it sink into the water with only a small amount of metal exposed above the water level.
  5. Clamp the negative clamp from your battery charger to the piece of cast iron you are cleaning just above the water’s surface. Clamp the positive clamp to the sacrificial metal.
  6. Set your charger to a manual, 12-volt setting. (Don’t use the quick-start setting if your charger has one; just the standard 12-volt setting.)
  7. Plug in the charger and go about your daily business. In a day or two, depending on the rust level, your pan will be cleaned and ready to season. You should see tiny foam bubbles start to form around your cast iron after a bit. Foamy rust will rise to the surface after several hours.

Attach the negative clamp from the battery charger to the cast iron, the positive to the sacrificial metal.

If you are like me, you are probably going to be curious about the progress and want to check on your pot from time to time. Always remember to unplug the charger before touching the water. The 12-volt current won’t hurt you, but you don’t want to take a chance on the charger falling into the tank while you are contacting the water.

Once the pan has soaked for 24 to 48 hours, remove it from the tank and and check to see if the rust has loosened to the point that you can wipe it away with your finger. If so, wash well with soapy water. If the pan still looks and feels rusty, return it to the tank for another 24 hours or so.After a 24- to 48-hour soak in the tank, the rust should wipe away with just a bit of pressure.
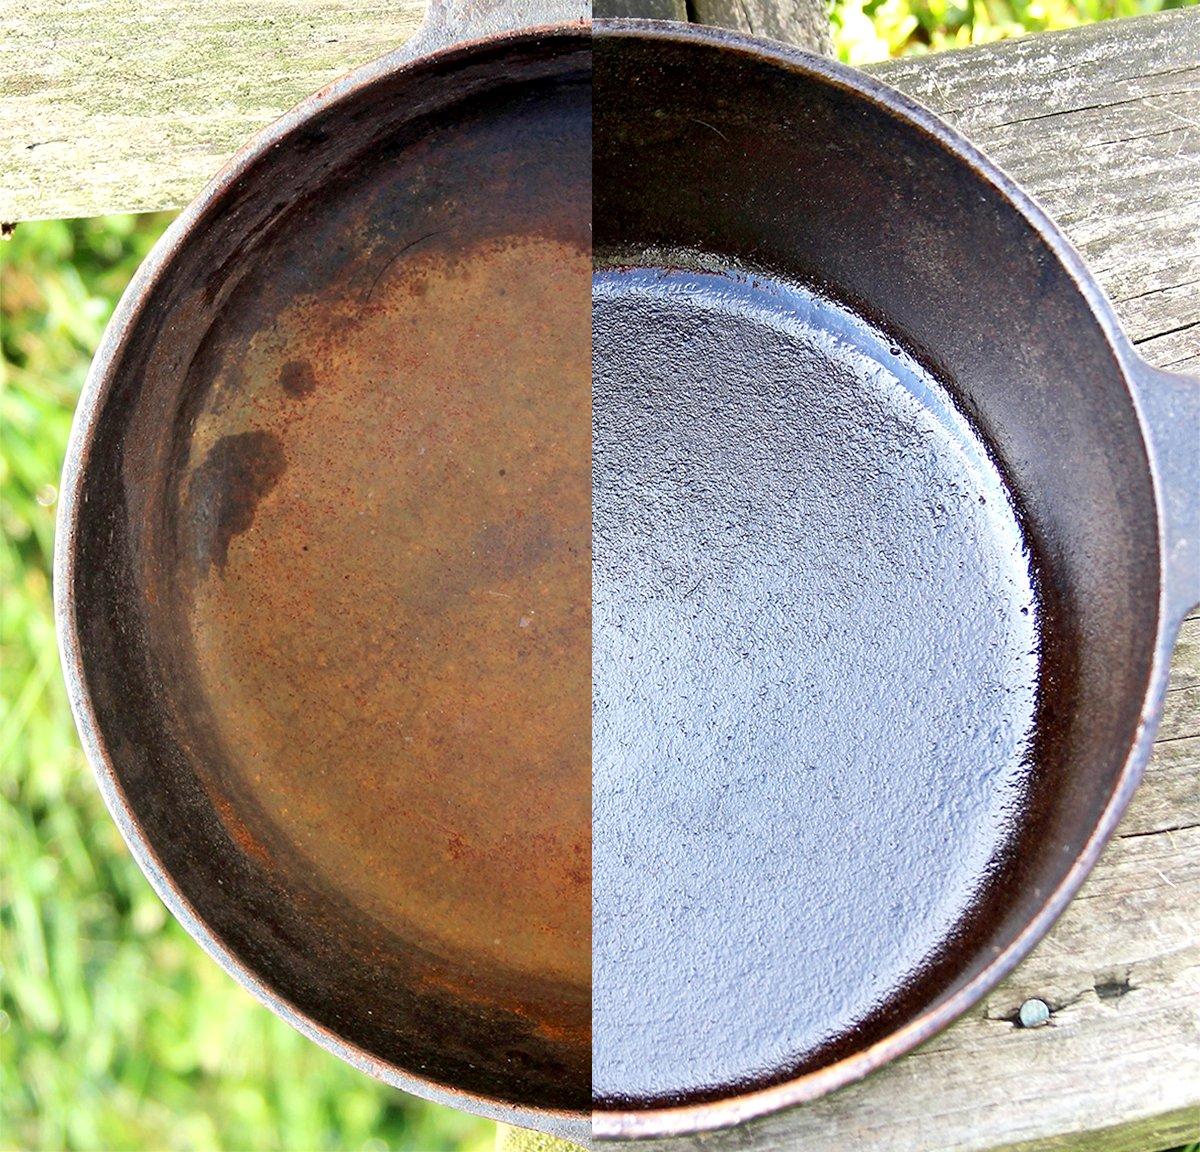
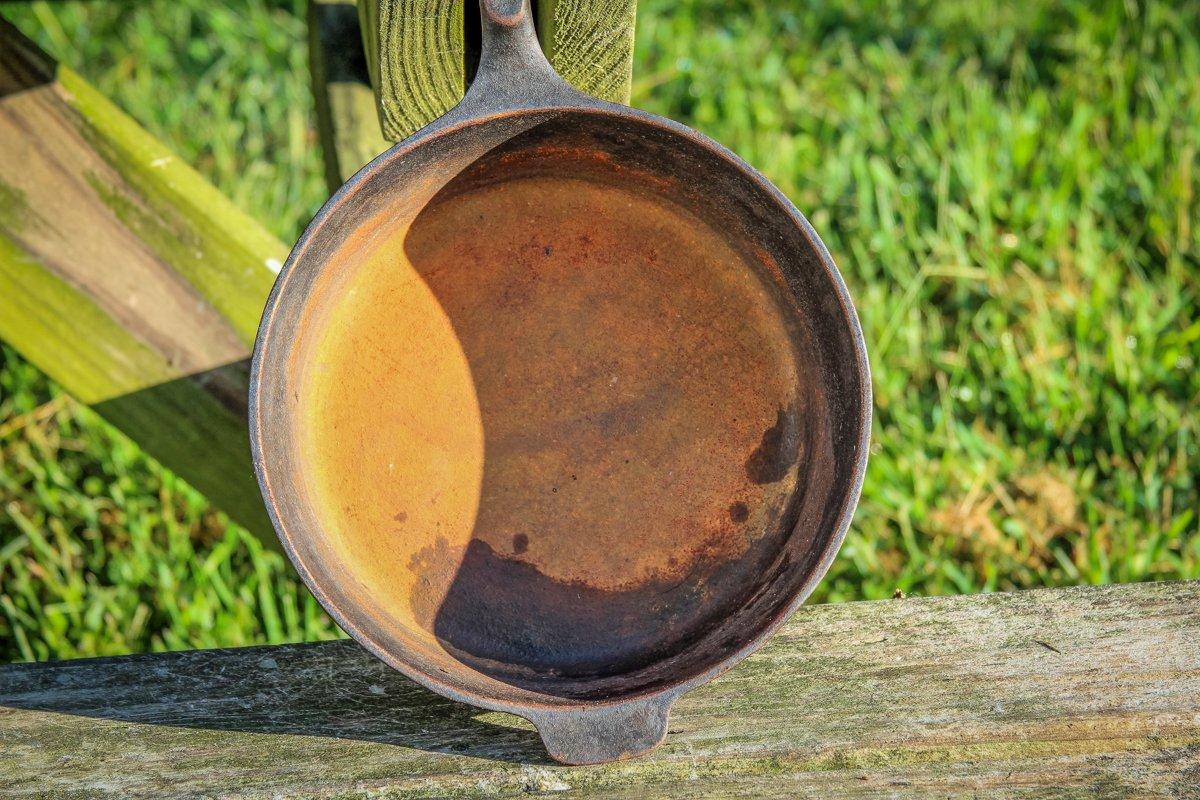
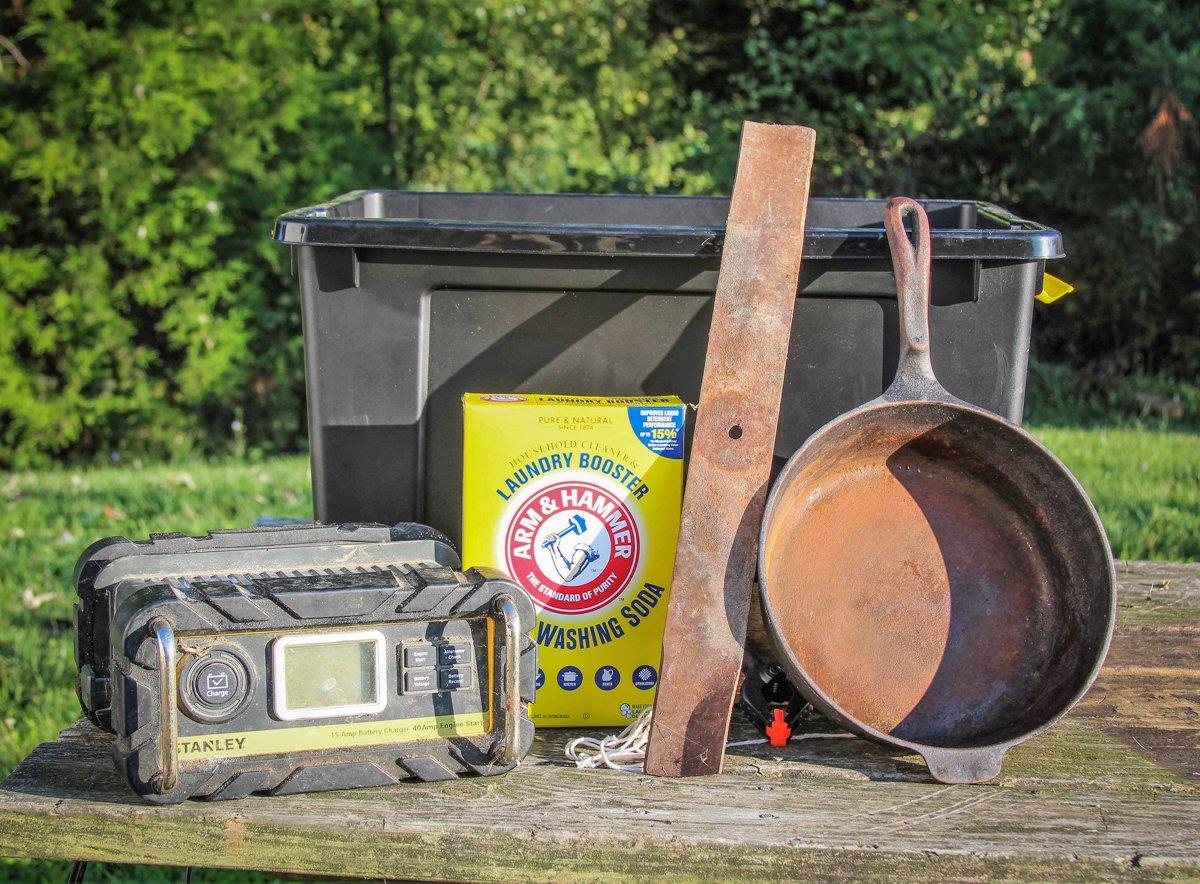
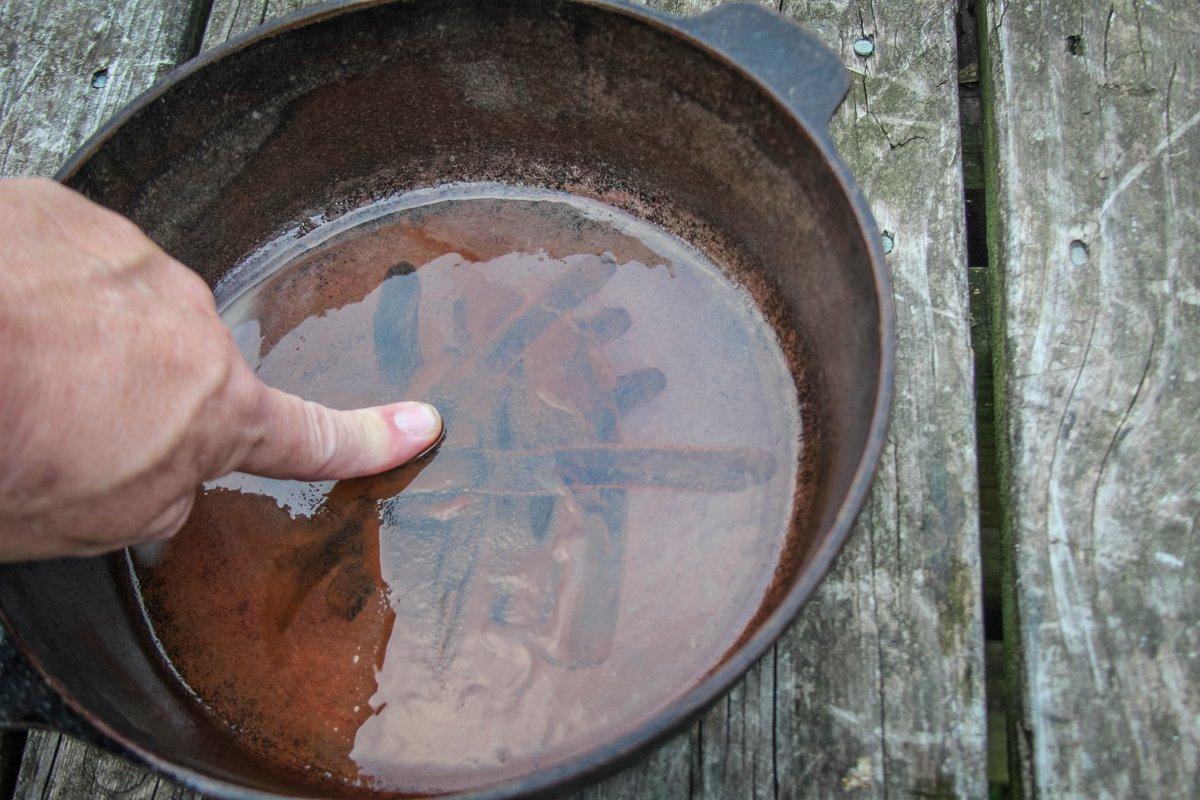
Once washed, immediately dry the pan (a bare iron pan will rust if you look at it wrong) and begin the seasoning process using this method or one of the newer cast-iron seasoning products on the market like Crisbeepuck, Buzzywax or Lodge Seasoning Spray.

Once your skillet has been scrubbed clean, season it and put it into regular use in your kitchen.

The water in the tank may look nasty after a use or two, but it never goes bad. Simply refill your water level when you need to due to evaporation loss. If the water gets to the point that it looks too funky to use, just dump it and start fresh.

A Hunter Scores A Perfect 10: The North American Slam

0

The following appears in the May issue of Alaska Sporting Journal:

Being based in Alaska has allowed Brian Watkins to harvest many of the big game animals making up a “Super 10” slam. But while he was able to stay in the Last Frontier to check Dall sheep, barren-ground caribou, moose and musk ox off his list, Watkins also went to the Lower 48 to help finish it. (BRIAN WATKINS)

BY BRIAN WATKINS

The Grand Slam Ovis Club started recording what is known as the North American Slam back in the 1970s. To record the slam, one must harvest all 29 recognized North American big game species.

The 29 animals can be divided into 10 categories, known as the “Super 10.” The categories include moose, caribou, deer, bear, bison/musk ox, elk, sheep, mountain goat, pronghorn and mountain lion. This is often considered the “mini- slam,” as a hunter must actively hunt all categories of animals in North America.

It just so happens that Alaska is home to species representing eight of the 10 categories – black, brown, grizzly and polar bear; musk ox and bison; Yukon-Alaskan moose; Roosevelt and Rocky Mountain elk; Sitka blacktail deer; mountain goat; Dall sheep; and barren- ground and woodland caribou.

Alaska affords the opportunity to tag out on eight game categories, most of which can be taken with an over-the- counter tag, with a few variables involved. The bison is a draw-only hunt, and there is limited opportunity for registration tags for musk ox and elk. There are draw tags available for all species. The woodland caribou is currently unable to be hunted due to declining numbers.

CONVENIENT AND AFFORDABLE

With the opportunities Alaska has to offer, being a resident helps hunters get extremely close to the Super 10 without breaking the bank. My personal chase for the Super 10 didn’t come to fruition until 2014 when I harvested my first moose. Up to that point, I had harvested whitetail deer (Pennsylvania), Sitka blacktail, caribou, mountain goat, black bear and brown bear. I was suddenly halfway to the Super 10 without realizing it.

A diehard bowhunter, Watkins has “added a new goal to harvest the Super 10 with a bow. Currently, I am sitting at nine of the 10 – with only an elk left on my to-do list.” (BRIAN WATKINS)

I set the goal to harvest the Super 10 by age 35. At the time I was 26. This would allow me to take a new species every other year.

My past stories in these pages have gone over all my hunting within Alaska, from road-based hunts to fly-outs and boat trips. Flying out is my favorite, but for cost-base hunters road hunts can be just as successful. I have harvested deer, sheep, goats, moose and caribou while boot hunting after driving to an area.

GOING SOUTH FOR SPEED GOATS

This past fall, with two animals to go, I headed south to the Lower 48 to complete the Super 10. My good friend Trevor Embry and I drew Montana pronghorn tags. I figured it would be an easy hunt. Boy, was I wrong. We were hunting public-land bucks, and they are skittish. Their eyesight is better than any other animal I’ve pursued. One of the guys hunting down there said their eyesight is like always having eight- power binoculars.

Our plan was to drive with onX maps and pick out public land, then glass and spot and stalk any animals on that land. But soon we figured out that if we saw a group of antelope, we had to maintain speed and pass them. Then, when out of sight, we could park and hike back to see if there were any bucks in the group. If you so much as let off the gas, the entire group would take off out of sight.

I snuck into 60 yards of herds multiple times, but as soon as I kneeled up for a shot, the group was off and running before I could even get my pins in sight.

Frustrations grew throughout the week as stalk after stalk was blown. Patience was the name of the game. After nearly 15 futile stalks, it came together with a buck chasing a doe right in front of me. I didn’t even need to stalk. We saw the group and were

getting into position as a buck ran directly past us and stopped broadside at 35 yards.

Watkins scored this Sitka blacktail on Kodiak Island. (BRIAN WATKINS)

THE LION SLEEPS TONIGHT

With number 9 successful, it was time to plan number 10: mountain lion! I knew the most efficient way to hunt mountain lions was with dogs. I booked a trip to Nevada for this past spring and went with Canyons West Guide Service (canyonswest.com).

The hunting style was a blast. The guide had four-wheelers with tracks on them, and we would drive mountain roads looking to cut a set of lion tracks. It was blowing 40 to 50 mph gusts while we were there, so cutting tracks proved to be a bit of a challenge. On day one, we cut a set from the evening prior, but they were pretty blown out. We let the dogs loose and climbed up a mountain in pursuit. It seemed as though the dogs treed the cat, but by the time we got there the cat must have busted out and climbed up into the cliffs, where neither the dogs or us could get to.

The next day, we set out for a new area. We cut a fresh set of tracks and drove the machines into the valley where they went. As we sat there deciding if the tracks were from a cat big enough to chase, we saw four deer on the hillside.

We figured the cat was actively stalking the deer. As we sat and discussed things, I saw the cat creeping along about 600 yards away! It was awesome. We let the dogs out after the cat and they treed it back across from where we’d just driven through.

We skinned and quartered that lion. That afternoon we went further into the mountains. My dad was along with me and had a tag as well. We didn’t cut anything fresh, so we planned to head back for the day. As we did, we cut a set of tracks we had missed along the way out. We set the dogs out and after a half hour they had the cat treed about 20 yards away from where we had just ridden past. These cats are elusive. That hunt completed my Super 10!

Watkins thought bagging a Lower 48 pronghorn would be easy, but nearly 15 unsuccessful stalks taught him otherwise. Eventually, he was in the right place at the right time, taking this buck near Missoula, Montana, last fall. (BRIAN WATKINS)

NEXT UP: SUPER 10 BY BOW

In 2017, I joined the Alaskan Bowhunters Association and befriended a group of people who are predominately bowhunters. I added a new goal to harvest the Super 10 with a bow. Currently, I am sitting at nine of the 10 – with only an elk left on my to-do list. I have since joined the board for ABA and hunt predominately with a bow myself.

I’ll get that elk eventually. ASJ

A great father-son hunt with his dad Tom in Nevada helped Brian check mountain lion off North America’s Super 10 list. (BRIAN WATKINS)

5 Timeless Bowhunting Quotes From Fred Bear The Father Of Modern Bowhunting

0

Fred Bear is the father of modern bow hunting. Born in Waynesboro, Pennsylvania, Bear didn’t even hunt until late into his 20’s. But his passion for the outdoors, conservation, and hunting grew quickly.

In 1933 Bear found himself unemployed during the Depression. He and a friend saved a small amount of money (huge for that time) and created Bear Archery that year.

Bear struggled for many years. But as more states allowed bowhunting and its popularity grew, Bear was at the forefront of the race. Bear spent his entire life dedicated to improving the hunting experience. Archery hunting today is still marked with Bear’s wisdom. Here is a small part of his legacy and why he is still relevant to bowhunting today.

Knowledge

“You can learn more about hunting deer with a bow and arrow in a week than a gun hunter will learn in his entire life.”

Bear hunted everything with a bow, from small game to Kodiak brown bears. He knew those animals well. One could argue that there are skilled rifle hunters that have animal smarts. But it’s a hard sell to say that a rifle brings you as close to learning all the quirks, body language, and sign of any animal the way bowhunting does. Archery, in its nature, forces a hunter to study the habits of animals and improve the skills needed to get closer to them.

A rifleman may know of a scrape or deer trails along travel routes. But a bowhunter needs to know precisely what will occur in those spots. He needs to be concerned with the smallest details of his entry and exit access. There is less room for error with wind and thermal currents. The close shooting range needed to make an ethical shot is only a fraction of what most gun hunters need.

When a bowhunter finds a place to hunt, he has to imagine the deer standing right where he is. He has to know why a deer wants to be in that spot. A hunt that fails to be a student of the woods is hunting almost purely on luck.

Investment

“If you consider an unsuccessful hunt to be a waste of time, then the true meaning of the chase eludes you.”

Remember when you were a brand new hunter? Your whole pre-hunt was spent hoping to come home with something you shot. But think back to the first time you saw a deer in the woods. Most of us weren’t even close to that animal.

My dad and uncle always said, “Well, we didn’t get anything, but we sure had fun!” After I saw my first deer when hunting, I finally understood that statement. My knees and hands shook so hard that there would have been no way I would have been able to draw my bow even if that deer had been close enough.

Bringing meat home to the table is an awesome bonus. But the fun is built into the hunt itself! Start thinking this way, and every one of your hunts will be a good one.

Self-Improvement

“Immerse yourself in the outdoor experience. It will cleanse your soul and make you a better person.”

Today, managing stress and self-care is a popular topic. Therapists, medicine, classes, special exercises, the list goes on. There are more and more medical diagnoses emerging. Suicide rates increase every day. Face it; the real truth is that people are hurting.

I’m not claiming that being outdoors and hunting is the way to fix it all. In fact, many of those options I listed are needed methods of help. But plenty of research proves that unplugging from the world and being outside in nature significantly decreases stress. With a targeted goal in mind and the surroundings of a hunter, hunting is one of the best stress relievers, and it can’t be bought.

Expertise

“The flight of the arrow is as true as the skill and the nerve of the man with the bow.”

Nothing in the world will test your nerves more than a giant whitetail buck. They can make the biggest baddest dude shake like a leaf when up close and personal.

Having a goal of shooting a big buck seems simple. But it’s far more complex than you’d imagine. It’s a good idea to aim for the clouds before you aim for the stars. If you haven’t killed any deer with your bow, start with whatever you get. If that’s a doe or any legal buck, so be it. Your skill will improve, and you’ll be better because of it. As a result, more success will be at the end of the blood trails you follow.

Passing Thoughts

Of all the things hunters do, the one thing they don’t often do is think about why they love to hunt. I’m sure most could rattle off a superficial list of good reasons, but they’d likely miss the big picture.

There isn’t anything quite like bowhunting, and Fred Bear said it best.

” When a hunter is in a tree stand with high moral values and with the proper hunting ethics and richer to the experience, that hunter is 20 feet closer to God.”

Author: Aaron Hepler

223 EFFECTIVE RANGE: HOW TO HIT YOUR TARGET EVERY TIME

0

Are you looking to improve your shooting accuracy? If so, you need to learn about the 223 effective range. This is the distance at which a rifle can be accurately fired. In this blog post, we will discuss what the 223 effective range is and how you can use it to your advantage when shooting targets. We will also provide some tips on how to improve your shooting accuracy!

223 Effective Range

The 223 effective range is the distance at which a rifle can be accurately fired.

The effective range for 223 is 400 to 600 yards.

This means that if you are shooting at a target that is within this range, you should be able to hit it with little to no problem. However, if you are shooting at a target that is outside of this range, your accuracy will start to decrease.

What is the effective range of a 223 round?

223 rounds are most effective when fired from a distance of 100 yards or less. Beyond that distance, the round begins to lose its accuracy and effectiveness.

So, if you’re looking to hit your target every time with a 223 round, make sure you’re firing from 100 yards or less. With practice and proper aim, you’ll be hitting your target every time in no time!

couple hundred rounds through it before finding its true potential. At first glance, the rifle may seem like any other hunting rifle. But upon closer inspection, one would notice the many unique features that make this weapon truly special.

The first thing that sets the 223 aside from other rifles is its range. The 223 has an incredibly long range, making it ideal for hunting big game. With a properly sighted in rifle, the 223 can take down an animal from over 500 yards away!

Not only does the 223 have an impressive range, but it is also incredibly accurate. When fired from a distance of 100 yards or less, the 223 round is almost guaranteed to hit its target. Beyond that distance, the round begins to lose its accuracy and effectiveness.

How far does a 223 drop at 300 yards?

At 300 yards, a 223 will drop about 23 inches. This is why it is important to know the effective range of your firearm. The further away your target is, the more important it becomes to account for bullet drop.

There are a few things you can do to improve your accuracy at long range:

  • – Use a scope or red dot sight. This will help you see your target better and make more accurate shots.
  • – Use higher quality ammunition. Match grade ammunition is designed to be more accurate than standard ammo.
  • – Practice, practice, practice! The more you shoot, the better you’ll become at hitting your targets.

How far does a 223 drop at 500 yards?

223 drop at 500 yards is relatively minimal. You can expect to see a drop of around two inches at that range. That being said, the bullet will still be highly effective at that range. If you are looking to hit your target every time, make sure to practice your shots and know your gun inside and out.

There are several factors that affect the 223 effective range. These include the type of rifle you are using, the ammunition you are using, and the distance between you and your target. If you want to improve your shooting accuracy, it is important to understand these factors and how they can impact your shots.

One of the best ways to improve your shooting accuracy is to practice regularly. The more you practice, the better you will become at hitting your target. You can also try different types of rifles and ammunition to see what works best for you. Experimenting with different firearms and ammo is a great way to find the perfect combination for your needs.

What is the range of a 223 AR-15?

223 AR-15 rifles have a range of around 500 yards. However, the effective range will depend on the shooter’s skill level and the type of ammunition being used. For most shooters, the effective range will be much shorter than 500 yards.

There are a few things that you can do to improve your chances of hitting your target at long range. First, make sure that you are using quality ammunition. Second, practice shooting at long range so that you can get a feel for how your rifle behaves at different ranges. Finally, use a scope or other sighting device to help you aim more accurately.

Whats better 308 or 223?

There are a lot of factors that go into determining which is better, 308 or 223. It really depends on what you’re looking for and what you’re trying to accomplish. If you’re just starting out, then the 223 is probably the better choice. It’s less expensive and has a shorter learning curve. However, if you’re looking for more power and accuracy, then the 308 is the way to go.

How far will a 223 bullet travel?

A223 bullet can travel quite far depending on conditions such as windspeed and direction, elevation, humidity, etc. In general though, most 223 bullets can travel over 1000 yards with relatively good accuracy. This makes the 223 an excellent choice for long range shooting.

How far can a 223 rifle shoot?

Most 223 rifles are designed to be accurate up to around 500 yards. However, with the right ammunition and optics, it is possible to extend that range significantly. There have been reports of people hitting targets at over 1000 yards with a223 rifle.

What is the most accurate 223 caliber rifle?

There are a lot of different factors that go into making a rifle accurate. It really depends on the individual gun and how it’s set up. Some people believe that the AR-15 platform is one of the most accurate options out there. Others swear by bolt action rifles like the Remington 700 series. Ultimately, it’s up to you to decide what is the most accurate 223 caliber rifle for your needs.

St. Lawrence River Fishing: 2024 Thousand Islands Angler’s Guide

0

Sharing is caring!

Offering some of the best fishing in New York for bass, muskellunge, walleye and several other species, the St. Lawrence River provides world-class angling on a grand scale. Few places in the Empire State have such a broad array of fishing options.

The river originates at the eastern end of Lake Ontario and drains the entire Great Lakes system into the Atlantic Ocean. Much of the river also forms the border between the United States and Canada.

The initial stretch of the river from Cape Vincent to around Morristown—about 60 miles, though measurements vary—is referred to as the Thousand Islands region. It is here that anglers will find much of the best fishing in the St. Lawrence River.

The Thousand Islands (a.k.a. 1000 Islands) region actually includes over 1,500 islands, ranging in size from a few square feet to several square miles.

A vast complex of rocky shoals, deep ledges and weedy embayments, the Thousand Islands supply virtually endless fishing opportunities.

Smallmouth Bass

The bass fishing in the St. Lawrence River is nothing short of spectacular, with smallmouth bass dominating most anglers’ catches.

Smallmouths ranging up to 4 pounds are abundant, and a 5-pounder barely raises an eyebrow.

The river is a frequent setting for bass tournaments, and it almost always takes a five-fish limit weighing over 20 pounds to win here. The St. Lawrence ranked number one on Bassmaster’s annual list of America’s best bass lakes in 2022.

Smallmouth bass abound on the river’s many rocky ledges and shoals. The St. Lawrence offers an endless supply of precisely the type of rocky structure that smallmouths love.

A good depth map is a very useful tool for identifying likely spots in this vast region, but you don’t usually have to go far to find great smallmouth habitat. Spring and fall are the best seasons to catch them in relatively shallow water.

Fishing in bays and around the rocky island shorelines is productive in May and June. In accordance with New York’s bass season, the fishing is catch-and-release-only until the third Saturday in June, by which time bass will be in post-spawn mode.

Summer bass fishing can be extraordinary, but be prepared to fish a little deeper than you’re accustomed to.

Ever since invasive zebra mussels arrived in the early ’90s, the water has become much clearer, and smallmouths are commonly found over 25 feet deep.

At times, they may be as deep as 50 feet, but they’re also known to feed in shallower spots or even suspend over deeper areas early in the morning and on overcast days. On days with a stiff breeze, bass will likely follow it toward windward shorelines.

River currents also drive bass movements and behavior. Although the current may seem imperceptible in many areas, bass still position themselves below current breaks, including islands and rock piles.

Jigs and finesse soft plastics on drop-shot rigs are the baits of choice for fishing deep structure.

A 5″ wacky worm is a great option for shallower areas, with darker, natural colors faring best.

The introduction of round gobies in the last 20 years has been a major change. Bass have increased in size, and studies suggest that gobies now make up 80% of smallmouths’ diet.

Any bait that resembles a goby is a good bet, with dark-colored tube jigs continuing to excel.

Largemouth Bass

With such an excellent smallmouth fishery at their fingertips, it’s unsurprising that many anglers overlook largemouth bass in the St. Lawrence River. But largemouths are also abundant, even if their populations are more localized.

Largemouths thrive in weedy shallows, bays and backwater areas all along the river. Bays like Goose Bay and Chippewa Bay are among the best spots, along with Lake of the Isles, a not-quite-closed-off embayment on Wellesley Island.

There can be great sight-fishing for bedding largemouths in early June—again, it’s catch and release only until the third Saturday. Largemouths continue to bite throughout the summer months, generally in shallower water than smallmouths.

Mouths of bays and channels between islands are good areas to find summer largemouths. Some of the best spots are where rocky structure and weed beds meet.

A very common feature throughout the Thousand Islands is rocky shorelines that drop off toward a weed bed at a depth of 6 to 10 feet. The margin between the rocky drop-off and the weed edge is a prime spot to find largemouths, especially first thing in the morning.

Casting around docks and boathouses is also productive in areas where the shoreline is more developed.

Wacky worms and soft plastic jerkbaits are great largemouth lures, along with spinnerbaits and crankbaits.

Walleye

Walleye in the St. Lawrence River are both large and abundant. The population is maintained through natural reproduction as well as generous stocking by the DEC, which has given walleye fishing a significant boost in the last 20 years or so.

The walleye season in New York begins the first Saturday in May and runs until March 15 the following year. The current state record, weighing 18 pounds 2 ounces, was caught on the St. Lawrence River on opening day of walleye season in 2018.

Various parts of the river offer different walleye fishing opportunities in different seasons. A few hardy anglers do very well fishing rocky shoals during the final, chilly weeks of walleye season in early March.

But the season opener in May is the date that most walleye fanatics look forward to.

By this time, walleye have usually finished spawning, and some of the best spots are mouths of rivers that empty into the St. Lawrence, including the Oswegatchie and Grass rivers.

The best walleye fishing in spring is generally in the section of the St. Lawrence downriver from the region considered to be the Thousand Islands. The Ogdensburg area and below the Moses-Saunders Power Dam in Massena are prime spots in May and June.

Jigging and dragging crawler harness spinner rigs are good tactics in spring, and depths around 20 to 25 feet are often productive. Walleye may be even shallower at night, and some of the best fishing takes place after dark.

Springtime anglers catch a lot of healthy, eating-size walleye in the 18- to 24-inch range, along with the occasional trophy (as the opening-day state record catch will attest to). But the summer months produce some of the biggest walleye of the year.

By summer, the bite shifts up into the Thousand Islands, though the areas below the dams farther downriver can still be productive.

Trolling deep shoals, island points and drop-offs in the Thousand Islands produces some of the biggest walleye from late summer into fall.

This is a great time to catch big ‘eyes, but the action can be slow. Depths in the 30- to 40-foot range are often best.

The Carleton Island area, not far from the mouth of the river in Cape Vincent, is a prime spot.

Try black-colored jigs or live minnows.

Muskellunge

The St. Lawrence River has a longstanding reputation as one of the best places to fish for muskellunge in the world. New York’s state record muskie, a 67-inch fish weighing 69 pounds, 15 ounces, was caught here in 1957.

Along with Lake Erie and the Niagara River, the St. Lawrence remains one of New York’s best places to catch a coveted muskellunge over 50 pounds. That being said, there’s reason to be extremely cautious about the future of the St. Lawrence River muskie fishery.

Muskellunge numbers have dropped precipitously since around 2005, with blame usually directed at round gobies.

These invaders eat muskellunge eggs and can potentially spread a deadly virus. A prominent muskellunge fish kill in 2022 was especially worrying.

But it’s not all doom and gloom. Anglers still catch muskies in the river and have an honest shot at a trophy. Going out with a guide is highly recommended for anyone unfamiliar with the river.

Muskellunge are widespread throughout the Thousand Islands region, and many are also caught farther downriver to the Ogdensburg area and beyond. Trolling is the best way to cover water and maximize potential strikes.

Edges of shoals are the top areas to troll for muskies, with August and September being peak months. Anglers also land some big ones later in the fall as these big predators feed heavily in anticipation of winter.

Ledges and drop-offs provide muskies with easy access to both deep and shallow water, allowing them to follow schools of baitfish in either direction. Depths between 20 and 40 feet are ideal.

Plugs and cranks like Radtke Pike Minnows, Cisco Kids, Jakes and Depth Raiders are favored by many, with 10″ models being standard. Oversized spinners like Mepps Muskie Killers are also excellent options.

Check out all of the best muskellunge fishing lakes and rivers in New York.

Northern Pike

Northern pike are exceptionally common in the St. Lawrence River. Although musky anglers sometimes view them as a nuisance, plenty of folks go out of their way to target pike. And with good reason.

Known for their fierce battles and line-slicing teeth, northern pike are capable of topping 25 pounds. Fish measuring 30 to 36 inches are common in the St. Lawrence.

Pike season opens in May, and the first month is the best time of year to find them in shallow water.

Having just spawned in April, pike will still be in weedy bays all along the river. Button Bay and Chippewa Bay are a couple of the best-known spots, but there are many, many others.

Large pike gradually transition to deeper haunts by summer, particularly favoring weed lines, shoals and points. However, anglers will still catch many at larger bays’ deep mouths, while smaller pike mostly populate the shallows..

The best pike lures for the St. Lawrence River are those that produce some metallic flash, including spinners and spoons. Gold-colored Doctor Spoons are a local favorite, along with Mepps #5 Aglia Bucktails.

Yellow perch are a major forage species for pike, and spoons with some yellow on them tend to draw a lot of strikes.

Spinner crawler rigs, more commonly used for walleye, also catch a lot of pike. Most anglers bait the rigs with either a live nightcrawler or minnow.

Ice fishing for pike is also very popular. Baiting tip-ups with live minnows around submerged islands and weed beds in the river’s bays is the perfect approach in January and February.

Eel Bay and Lake of the Isles on Wellesley Island, the bays around the village of Alexandria Bay, Goose Bay and Chippewa Bay are all excellent ice fishing areas for pike. Wheathouse Bay, a bit farther downriver near Ogdensburg, is also excellent.

Find more northern pike fishing hot spots in New York.

Other Game Fish

The St. Lawrence offers outstanding fishing for many additional species, including some that aren’t traditionally considered to be game fish.

For example, bullhead catfish invade shallow bays in extraordinary numbers every spring, and freshwater drum weighing over 10 pounds are common.

Bluegill and sunfish abound in shallow weed beds as well.

Long story short, don’t forget about these other fish species that also provide excellent fishing in the Thousand Islands.

Here are a few of those additional species we’d like to spotlight:

Yellow Perch

Yellow perch are some of the most abundant fish in the St. Lawrence River, inhabiting reefs and weed beds in prolific numbers. The ice fishing season is an especially popular time to fish for them.

As soon as safe ice forms on bays, anglers start catching great numbers of perch using jigging spoons, grub-tipped teardrop jigs and Jigging Raps.

Big “jack” perch in the 10- to 13-inch range are not hard to come by, though you may have to catch 100 dinks for every 10 jumbos.

Another great time to fish for perch is during the weeks immediately after ice-out, usually from late March to early April. Perch spawn this time of year in protected shallows, and anglers catch a bunch using live minnows.

Emerald shiners are the ideal bait if you can get your hands on some, but fathead minnows will also do the trick, along with bits of nightcrawler and small jigs.

Perch will be found in the backs of practically every bay and protected harbor areas and marinas.

Lots of quality perch will continue to be caught from docks and shorelines in Cape Vincent, Clayton, Alexandria Bay and Ogdensburg from late spring into summer. However, the best fishing for larger perch shifts to shoals on the main river in somewhat deeper water.

Crappie

Bays and backwaters along the St. Lawrence River offer excellent fishing for black crappies.

Even though fun to catch and delicious to eat, anglers often overlook this species to target other fish that are easier to find and catch reliably.

Crappies are notorious for vanishing like ghosts after the spring spawn.

Ice anglers catch their fair share of crappies in the Thousand Islands, with Lake of the Isles arguably the region’s premier crappie haunt. Goose Bay and other bays also have ample crappie populations.

Spring crappie fishing starts to pick up in April after the ice has receded from the bays and the shallowest backwaters begin to warm up. A good string of warm days can bring crappies flocking to the warmest available water.

Lots of scrappy 9- to 12-inch crappies are caught throughout the spawn, which is usually wrapping up by late May. After that, schools of crappies are nomadic and hard to pin down.

There can still be a good bite on summer evenings, as crappies emerge from weed beds just as the sun goes down.

Boat docks and marina areas can also continue to produce in summer, with crappies often seeking shade under structures that reach into deep water.

Common Carp

The St. Lawrence River has been called America’s carp capital, and few places in the country offer more or bigger carp. Anglers commonly catch carp weighing 20 pounds here, and 40-pound fish are available.

Carp are amazing fighters, and battling a carp that big is something you won’t soon forget.

Methods used to catch them vary widely. The presentation is often as simple as a few kernels of sweet corn threaded onto a hook and fished on the bottom. But serious carp anglers often go to greater lengths to target big carp.

Specialized European-style carp fishing gear and techniques have started catching on in the region, including 12-foot carp rods.

Boilies—hard-boiled baits made using grains and a variety of scents and flavors—are the top carp baits for serious anglers.

The months of June, July and August are the peak of the carp fishing season.

These fish inhabit areas throughout the river and are easily targeted from shore.

Planning Your Trip

The Thousand Islands region has been a major tourism hub in New York going back to the 19th century, and a wide range of amenities are available.

More than a dozen state parks line the shoreline of the river, and several towns offer shopping, dining and lodging.

Alexandria Bay, roughly in the center of the Thousand Islands, is widely considered to be the gateway to the region. Cape Vincent is another major hub at the mouth of the St. Lawrence River as it drains Lake Ontario.

Farther downriver, small cities and towns like Ogdensburg and Waddington also provide access. The river gets quite busy with anglers, campers and recreational boat traffic in summer, but the region’s vast size generally allows elbow room for all.

Getting to the Thousand Islands

The Thousand Islands region is easily accessible from most directions.

Interstate 81 takes drivers on a straight course from Syracuse to Alexandria Bay in about 90 minutes. State Routes 12, 12E and 37 run alongside the river, connecting many towns along its shoreline.

Bank & Boat Access

Anglers have countless options for enjoying the St. Lawrence River.

In addition to the 14 state parks along the river, there are 12 state and municipal public boat launch sites, to say nothing of dozens of privately owned marinas and campgrounds.

Some of the best public access sites, starting at the mouth of the river at Lake Ontario’s eastern end, are located in the following communities:

Cape Vincent

Located at the mouth of the St. Lawrence River, the town of Cape Vincent offers excellent bank fishing and free public boat launch facilities at East End Park, which is also a popular scuba diving site.

Burnham Point State Park offers additional fishing, boating and camping opportunities nearby. This park is the closest access to the excellent fishing areas around Carleton Island.

Clayton

Cedar Point State Park includes a fishing pier, campground and boat launch facilities just west of Clayton. The Clayton Municipal Docks has an additional public launch site and 200-foot floating dock complex.

Alexandria Bay

Alexandria Bay, often referred to as Alex Bay, offers the widest range of access options on the American side of the river.

Bank and boat access is available at the Village Docks and Scenic View Park.

Several excellent state parks are just a few minutes away, including Keewaydin State Park and Kring Point State Park, The latter sits on a peninsula between the main river and Goose Bay. Both offer camping, boat launch facilities, docking and bank fishing.

Another great option is Wellesley Island State Park, just across the Thousand Island Bridge from the mainland. The largest camping complex in the region, this park offers boat launch facilities and excellent fishing access on both the river and Lake of the Isles.

Chippewa Bay

Overlooking the bay of the same name, the hamlet of Chippewa Bay provides a free public boat launch at the end of Denner Road, next to the Chippewa Bay General Store. Cedar Island State Park, accessible only from the water, is a short boat ride away.

Morristown

In addition to a public boat ramp and bank fishing access at Bayside Park, Morristown is a short drive from Jacques Cartier State Park. The latter offers excellent launch and docking facilities, as well as bank fishing, campgrounds, and a swimming beach.

Ogdensburg

The city of Ogdensburg, located at the mouth of the Oswegatchie River, offers ample public river frontage for bank fishing at Morrisette Park and public boat ramps at the neighboring Patterson Street Boat Launch. Additional bank access is available on the Oswegatchie River.

Waddington

The town of Waddington has several excellent options for bank fishing, including ample open shoreline near Waddington Beach. Additional bank fishing and a public boat launch are available at Whittaker Park.

Massena

Several public parks in Massena offer fishing and boating access. The town operates the Fish Massena website, providing a handy guide to getting on the water.

Nearby Robert Moses State Park also offers camping, fishing access and boating facilities. The park is located on Barnhart Island, the northernmost point in New York State, and is accessible by car across Barnhart Island Bridge.

Know Before You Go

The Canadian border bisects the St. Lawrence River, and officials on both sides take the boundary seriously. A Province of Ontario fishing license is required to fish on the Canadian side.

Polar Bear VS Grizzly Size: A Comprehensive Comparison

0

Polar bears and grizzly bears are two of the most iconic bear species, each displaying unique characteristics and behaviors. When discussing their size, one question often arises: which bear is larger? In this article, we will explore the differences in size between polar bears and grizzly bears, touching on key factors that contribute to these variations.

Polar bears, native to the Arctic region, are considered the largest land carnivores. Males typically weigh between 770 and 1,500 pounds and have a massive build. On the other hand, grizzly bears, found in North America, display a more varied size range. Mainland grizzlies tend to be smaller, with their weight reaching up to 860 pounds in some cases.

These size differences can be attributed to several factors such as habitat, diet, and genetics. By comparing these majestic animals, we will gain a deeper understanding of their incredible adaptations and how they have evolved to thrive in their respective environments.

Comparison of Physical Characteristics

Polar bears and grizzly bears exhibit distinct differences in size and physical characteristics. As the largest bear species, polar bears generally are bigger than grizzlies, with adult males reaching lengths of up to 10 feet. Grizzly bears, on the other hand, are smaller, typically growing up to 8 feet long.

Size and Weight:

  • Polar Bears: Adult male polar bears can weigh up to 1,700 pounds, with females weighing around 50% less.
  • Grizzly Bears: Capable of reaching 800 pounds, male grizzlies usually weigh less than their polar counterparts, while females have a similar weight difference as polar bears.

When standing on their hind legs, the heights of these bears differ as well:

  • Polar Bears: Males measure 5.9 to 9.8 feet tall and can reach more than 11 feet (3.3 meters) when standing on their hind legs, while females range from 5.9 to 7.8 feet.
  • Grizzly Bears: Around 3.5-4.5 feet tall when walking on all four paws and can reach more than 8 feet (2.4 meters) when standing on their hind legs.

In terms of fur color, polar bears have a thick white coat, aiding in camouflage and insulation. Grizzly bears, on the other hand, display different shades of brown fur, often with lighter or darker tips, giving them a “grizzled” appearance.

Enhancing their hunting and swimming abilities, polar bears have larger and more paddle-like paws compared to grizzlies. Moreover, polar bears boast longer necks and narrower heads, adapted for catching seals in the water. Conversely, grizzly bears have a wider and more robust head, along with a noticeable shoulder hump, designed for digging and catching prey on land.

Polar Bear Size and Weight

Overall Size

Polar bears are among the largest members of the bear family. They typically stand around 5 feet at the shoulders, making them taller than their grizzly bear counterparts, which stand a little over 3 feet at the shoulders. The largest recorded polar bear measured 12 feet tall and weighed around 2,209 lbs (1,002 kg).

Weight Distribution

Male polar bears tend to weigh between 770 and 1,500 pounds, while female polar bears usually weigh between 330 and 650 pounds. It is important to note that polar bears’ weight can fluctuate depending on factors such as age, food availability, and their specific habitats.

Grizzly bears, on the other hand, are lighter and have a more varied weight range depending on their subspecies. The largest subspecies of brown bear, the Kodiak bear, has an average weight of 660 to 1,320 pounds for males and 330 to 715 pounds for females.

Grizzly Bear Size and Weight

Overall Size

Grizzly bears have a height of approximately 3.5-4.5 feet at the shoulder, with a total length of around 6.5 feet for both males and females. Although they may not be as tall as their polar bear counterparts, grizzlies are still considered as one of the largest terrestrial predators.

Weight Distribution

The weight of grizzly bears can vary greatly, reaching up to 860 pounds. It is important to note that male grizzly bears typically outweigh females by a significant margin. This sexual dimorphism is evident in their size, with males being around 20% larger than females.

Comparative Analysis

Polar bears and grizzly bears are both impressive animals with unique characteristics. In terms of size, polar bears tend to be larger than grizzly bears on average.

An adult male polar bear can grow up to 10 feet tall (3 meters) when standing on its hind legs, and typically weighs between 900 to 1,600 pounds (400-725 kilograms). Grizzly bears, on the other hand, can reach heights of 8 feet and weigh up to 860 pounds.

In terms of their habitats, polar bears primarily live in the Arctic regions where they can blend into the snow with their white fur. On the contrary, grizzly bears are typically found in North America, particularly in the western parts of the United States, Canada, and parts of Alaska. Their habitats differ significantly, which attributes to some of the differences in their sizes.

Given their size and weight, polar bears have a stronger advantage when competing for resources and hunting prey. However, grizzly bears are also considered powerful hunters, making them formidable competitors in their respective environments.

It’s important to note that the sizes of individual bears can vary, and both species have plenty of individual variance. Factors such as age, sex, and access to food resources can impact a bear’s size throughout its life.

Implications of Size Difference

Hunting Tactics

Polar bears and grizzly bears have different hunting tactics due to their size differences. Polar bears, being larger, rely mainly on their immense strength to catch seals and other marine mammals. They are excellent swimmers and can travel enormous distances in search of food. Grizzly bears, on the other hand, are more opportunistic and adaptable hunters. Their smaller size allows them to be more agile and chase various prey, including smaller animals, fish, and even scavenging on carcasses.

Survival Rate

The size difference between these bear species has a direct impact on their survival rates. Polar bears, with their larger size and massive body weight, can store more fat reserves, enabling them to survive harsh Arctic winters and periods of food scarcity. Grizzlies, being slightly smaller, have lower fat storage capacity, which can affect their survival in difficult conditions. However, their adaptability and diverse diet may compensate for this disadvantage.

Habitat Influence

The distinct size of polar bears and grizzly bears is influenced by their respective habitats. Polar bears have evolved to become the largest bear species, with adaptations especially suited for the extreme Arctic environment. Their large size combined with their thick coat of fur allows them to retain heat more efficiently, crucial for survival in the frigid Arctic temperatures. Grizzlies, predominantly living in North American forests and mountain ranges, have evolved to be somewhat smaller, enabling them to navigate their terrain for food and shelter more efficiently.

Frequently Asked Questions

Is a polar bear larger than a grizzly bear?

Yes, polar bears are generally larger than grizzly bears. Polar bears usually measure between 2.4 and 3 meters in length and can weigh up to 1,700 pounds, while grizzly bears measure around 2 meters in length and weigh about 860 pounds on average.

Would a grizzly bear beat a polar bear?

It is difficult to predict the exact outcome of a hypothetical battle between a polar bear and a grizzly bear. However, polar bears are larger and have a stronger bite force of around 1200 psi compared to grizzly bears, which have a bite force of about 975 psi. These factors give polar bears an advantage, but the outcome would depend on the individual circumstances.

How do Kodiak bear sizes relate to polar and grizzly bears?

Kodiak bears, a subspecies of brown bears, are similar in size to polar bears. Some Kodiak bears can reach up to 1,500 pounds in weight, which is close to the size of the largest polar bears. However, grizzly bears, which can also be considered a subspecies of brown bears, tend to be smaller than both polar bears and Kodiak bears.

What is the largest bear ever recorded and what species was it?

The largest polar bear ever recorded was in 1960 and measured 3.65 meters (12 feet) tall, weighing around 2,209 pounds (1,002 kg). This polar bear holds the record for the largest bear ever documented.

Which is considered more dangerous: polar or grizzly bears?

Both polar bears and grizzly bears can pose a threat to humans. However, polar bears are more likely to be considered more dangerous due to their greater size, increased aggression, and capacity to travel large distances in search of food. It is essential to exercise caution and maintain a safe distance from both species in their natural habitats.

Conclusion

Polar bears and grizzly bears are both remarkable and powerful animals, but they differ significantly in size. Polar bears are generally larger than grizzly bears, making them a force to be reckoned with in the wild. This size difference plays a crucial role in their hunting abilities and overall strength, with polar bears being more capable of taking down larger prey and fending off other predators.

Size differences between polar bears and grizzly bears can be attributed to various factors such as their habitat, diet, and genetics. Polar bears, primarily living in the harsh Arctic environment, rely on a diet of seals and other marine mammals that provide a high-fat intake for survival. Grizzly bears, on the other hand, consume a more diverse diet, including vegetation, berries, and smaller animals, contributing to their varying sizes depending on location and food availability.

In conclusion, the larger size of polar bears compared to grizzly bears has adapted them to their Arctic habitat, contributing to their status as one of the world’s most powerful land predators. Both species, however, play vital roles within their ecosystems, and their unique differences make each bear species fascinating in its own right.

Five of the Best Boa Snowmobile Boots

0

Freezing cold toes are no fun when you are out for a ride. These boa snowmobile boots will protect your little piggies when the mercury drops.

No one likes to get cold feet, especially when snowmobiling, and maybe when getting married. Picking the right pair of snowmobile boots is vital to the enjoyment of the ride. Not only do you need warm boots, but also supportive boots that function just as well off the sled as they do on.

While not absolutely essential, the boa closure system is ideally suited to snowmobilers. Lacing up your boots, or simply tightening or loosening them a little, can be done with the turn of a dial. You can even do it with a gloved hand – perfect for those cold winter morning rides. Boa snowmobile boots make it faster and easier to take them off or put them on. Plus, they are laced with stainless steel wire that is built to last, so you won’t have to worry about breaking a lace before you get out and ride. The boa closure system adds some cost to your snowmobiling boots, but when you consider you may own a pair for many years, the added convenience makes up for it – at least in our opinion.

Here are some staff favorite boa snowmobile boots that pass the test of being warm, functional, comfortable and ready to take on the adventure that you have in mind.

Lead Photo Courtesy Shuttestock/Wlad Go

1. Editor’s Choice: KLIM Adrenaline Pro GTX BOA

Klim Adrenaline Pro GTX Boa

Of course, you know Klim is going to bring it when it comes to technical riding gear. The all-new Adrenaline Pro GTX boot is Klim’s latest advancement in comfortable boots made for extremely technical conditions. The plan going into the these boa snowmobile boots was to tweak their previous design to add more support for your foot and for you as you tackle the terrain. The GTX boots have an advanced Boa closure and 600g Thinsulate insulation. They are guaranteed to keep you dry with complete GORE-TEX outers. They recommend a technical sock be worn to get the most out of the boot, which isn’t a bad idea anyway. These boots also have a forward design with stiff support against movement that aren’t going forward. This helps keep you planted and protected, while at the same time, being comfortable – Just as you’d expect from Klim.

Check Price

2. Runner Up: FXR Black Ops X-Cross Pro

black fxr black ops x-cross pro boa snowmobile boot

Boa technology is something you’ll see with many of the top boots. It is a simple system that has replaced standard tie-laces and lets you really get a snug and secure fit. FXR Racing created the Black Ops X-Cross Pro for those wanting the ultimate in extreme terrain riding and warmth. They are rated to -40° C with 600-gram insulation, but there’s so much more to these boots. The 2-piece tongue provides a positive fit for maximum comfort so you get the best flexibility, stability and protection while on your sled. Additionally, this boot has a fixed liner with fur lining for further comfort and warmth, while minimal seams in the sled-contact areas minimize possible damage from high contact points. When you’re off the sled, the 20mm thick EVA midsole gives you plenty of traction in the snow, and the 2mm rubber reinforced toe cap provides protection from cold and whatever you might stumble across under the snow.

Check Price

3. CastleX Charge Atop

Castle X Charge Atop Boa

As one of the leaders in performance snowmobile gear, CastleX has a boot that comes in at a close second on our list of best BOA snowmobile boots. This rugged snowmobile boot features a 3-layer Merino Wool blend that provides plenty of insulation to keep you warm, while providing plenty of moisture wicking air mesh to keep your feet dry. Furthermore, the CastleX Charge Atop has a fully integrated Castle DRY-X waterproof membrane to keep your feet dry even in deep snow, and the ColdShield Technology from CastleX helps to keep your feet comfortable with the removable insole that is manufactured from wool with a metallic heat reflecting layer.

Check Price

4. 509 Raid Single Boa

Black 509 Raid Single Boa snowmobile boot

Probably best known for its lineup of snowmobile goggles, 509 has some other gear worth looking into. The 509 Raid Boa snowmobile boot comes with 600g of Thinsulate insulation, 5TECH waterproof and breathable liner, Raid rubber reinforcements engineered to stand up to sharp running boards, and a dual boa lacing system with quick release M3 Lace reels and aircraft stainless wire. That dual boa lacing system lets you fine tune the upper and lower zone fit with the turn of a dial. All of this combines to make the 509 Raid Boa one of the best snowmobiling boots available.

Check Price

5. Korker Polar Vortex 1200

black and white korker polar vortex 1200 winter boots

While not a traditional snowmobile boot, these boots from Korker are something you should look at for a warm, dry boot that has tremendous support for activities on the sled and off. These boots feature 1200g of 3M Thinsulate insulation for maximum warmth of your feet while out on your sled, and the 100% waterproof construction ensures that your tootsies stay dry. If you venture out and feel a little chill in your feet, don’t fret because for additional warmth, Korker has integrated Farenheight Heat Warmer compatibility into their premium aerogel frost barrier footbed. One of the best selling points of these comfy winter boots is that they’re available with their OmniTrax 3.0 Interchangeable soles. You’ll get one set of Winter Rubber Lug soles and for those icy days, you can swap the soles out for the IceTrac Studded Rubber Lug soles that feature a total of 332 carbide studs to give you solid traction on the slippery stuff.

Check Price

Why is the Boa lace system better than traditional laces?

In one word, simplicity. The Boa lace system allows for tightening of your boots with simple turn of a knob, quickly and evenly. No more fiddling around with two laces, trying to pull them together with frostbitten fingers. Even with gloves on, you can secure and even tighten the boots if they settle after a little bit. They’re just easy and convenient.

What are the most important factors to look for in boots?

First and foremost for us, you want your boots to be warm. Why bother spending the money on them if you end up with frostbitten toes at the end of your riding day. Your boots should have plenty of insulation in addition to being 100% waterproof that helps to keep your feet warm, and of course with all of this you want your boots to be comfortable. Think that you’ll be in these for hours and how much can you really enjoy your riding if your feet are killing you. Finally we like our boots to have a good sturdy sole with plenty of traction. Remember that you’re not on your sled the entire time of your riding adventures. You want to have good traction while you’re taking your breaks as well.

Additional Resources

  • Best Snowmobile Gloves To Keep Your Fingers Warm
  • Best Snowmobile Jackets

Recent Updates

10/18/2022: Removed obsolete product, added new product (Korkers Polar Vortex 1200, FXR Black Ops X-Cross Pro, and CastleX Charge Atop), Added FAQ

We are committed to finding, researching, and recommending the best products. We earn commissions from purchases you make using the retail links in our product reviews. Learn more about how this works.

Best Time of Year, and Time of Day to Hunt Coyotes

0
Coyote looks at the camera as photographed by Jim Harmer.

Coyote hunting is my second favorite hunting sport, next to deer hunting. It’s fairly simple and doesn’t take a lot of gear to be successful.

The best time to hunt Coyotes is a winter morning or evening. Coyotes are desperate to eat in winter and respond well to food calls both day and night. It’s also easier to spot coyotes in winter after the cover brush has died back. Winter is the most forgiving time to hunt coyotes and a great time for beginners to start.

So, how do you find success consistently and how do you maximize your chances? I’ll go over nighttime vs daytime hunting, and what you can do to find good coyotes all year long.

The 3 Most Likely Seasons For a Succesfull Coyote Hunt

The most productive coyote hunts are usually in Winter, early Spring, and late Summer. Winter is when Coyotes are most hungry. Early Spring is mating season and mature males are easier to lure in. Late summer is when pups have matured and ventured out on their own, lacking experience.

The vast majority of coyote hunters agree that the easiest time to call in a mature coyote is during the height of winter. In winter, food is scarce and it takes more food to keep up their body temperature, so they get desperate.

Coyotes are usually far more willing to respond to a basic distress call in winter than any other time of year. And, they tend to respond much quicker. Hunger is the main driving force of nature and coyotes are no exception. When they get hungry, they will start taking big chances.

Early spring, February -March, males are looking for a mate. All you have to do is sound convincing. This is the one thing that takes precedence over finding a meal. A male coyote may forgo eating for days when on the trail of a female.

If you’re after a large, thick fur, this is probably the best chance of that. Furs are still in their prime from winter, and the wariest old coyotes lose all inhibition when looking for a mate.

The Fall hunt is when the woods and fields are filled with young male coyotes that just left their mother’s side. Their lack of experience makes them pretty vulnerable to calling in. But, they do learn quickly.

How to Hunt Coyotes in Winter.

Winter is the easiest time to spot a coyote. It’s also the easiest time to lure them in with a food call. by that, I mean something like the rabbit distress or woodpecker distress call. Replicate the sound of a free meal and it’s hard for a coyote to resist.

Besides the increase of food motivation, winter is an easy time to spot a coyote. Particularly if there is a light snow cover. Coyotes may seem light-colored most of the year, but they look like a large dark spot against a white, snowy field.

Plus, after the grasses have died back and the brush has lost its leaves, it’s only easier to spot a sneaking coyote. You’d be shocked to know how many coyotes are called in but never seen in the summer months.

You may think that since coyotes are easy to spot in winter, you would be too. I find it easier to hide in winter, particularly if it’s snowy. Snow camouflage hides extremely well against a snowy background. I have hunted with as little as a white sheet covering me. It’s pretty basic really.

My favorite method is to dig a hole in the snow and cover it up with my white snow poncho. I’m 90 percent below the snow and covered well. Nothing can see me then.

If you Live in a sane climate and don’t have snow, You’ll need to use something else to break up your outline like a tree or bush, unless you are hunting during a dark night.

My biggest tip to hunting coyotes in winter is to bring hand warmers. Hand warmers will keep your fingers able to operate your call and your trigger. I always carry two or three. Generally, they don’t get used, but sometimes they’re a lifesaver.

I actually know a guy who saved his life with hand warmers. During a negative 20-degree day in the Montanna mountains, he went through the ice on a lake. After crawling out, his fingers were unable to work his lighter to light a fire. He used about 15 hand warmers to bring up his body temperature from freezing.

Hunting Coyotes in Early Spring

Hunting coyotes in early Spring means learning to use howl calls. You can use The Lone Howl effectively. The Lone Howl is just a male announcing his presence in the area. That’s a good way to bring in a territorial, seasoned male.

Another great call is the Female howl, which is a higher pitch, just letting other dogs know who’s around. Finally, there are the Female Whimpers. The Whimpers is an estrus call, letting males know it’s now or never.

I personally don’t like the early Spring hunt because I often end up soaking wet. If the weather is right, cold and dry, I’ll be out hunting. If the snow is all melting and it may rain, no thank you.

In early spring, you may need to wear winter camouflage. If there isn’t any snow you’ll probably want a really good brown or tan, since you will be trying to blend in with whatever is on the ground. Of all the times to bring a hunting seat, Spring is it. Otherwise, you may end up with a really cold, wet caboose.

Hunting Late Sumner Coyotes

The Late Summer hunt is When you can find more coyotes, but they tend to be smaller. It is probably the second easiest time to call coyotes, and it’s easier to hunt in fall than in a cold winter. Most of the coyotes shot in late Summer are males, as they travel out and claim their own territory.

Late summer is certainly not for everyone. I enjoy a hot August day hunting coyotes. But my brother in Texas, not so much. If you don’t mind the heat, it’s a great time to find some mid-season success.

Another point here is that young coyotes don’t follow all the “rules”. Things like approach from downwind and approach cautiously from a position of cover; yeah they don’t always apply here. Be sure to keep your eyes moving and stay alert. They may be young and stupid but are still sneaky and quick.

If done right, territorial calls work well in this season. But, most hunters stick to the standard distress calls, for the most part, changing up only when things aren’t working as planned.

Although the late Summer season is filled with foolish young males, do your best not to tip them off. Try to keep still, quiet, and keep your scent down.

Coyotes are More Active Just Before Dawn

Coyotes are fairly nocturnal creatures and do most of their hunting under the cover of darkness when it’s easier to sneak. The most active time in my experience has been within a few hours of sunrise. But, coyotes are fairly active all night long.

Nighttime is generally when coyotes are hunting and making social calls. That behavior starts just after sundown, and it ends just before the sun comes up. Most of the activity is often at the beginning, or the end of an all-night hunt.

Camo isn’t that big of an issue when hunting at night. I’ve seen hunters go out in a black hoodie and come back with several dogs. you just need to be quiet. There is less ambient noise at night, and sound travels further in cooler air so coyotes will hear you easier.

Nighttime hunting requires either good lights or a basic night vision setup. Nightvision is more effective and much simpler than hassling around with lights. I don’t really recommend hunting with lights for coyotes, but some people do it regularly.

Lights can get the job done but are hard to work with and don’t tend to be productive in more hunted areas. A basic night vision like the SightMark Wraith costs around $450 and it’s a good scope for daytime use too.

Really, all you need is a gun and a night vision scope. A tripod or bipod helps a lot. It keeps the rifle steady and gets it above the level of grass and brush so you can make a clear shot.

If you aren’t into nighttime hunting, it may sound daunting and too complicated. Truth is, it’s kinda easier than hunting in the day, just because it’s easier for you to stay hidden.

I wrote a full-length article on Backfire about nighttime coyote hunting. Here’s a link to it.

A sightmark wraith night vision infrared scope on an AR-10 rifle
This is Jim Harmer’s Sightmark Wraith on an AR-10 set up for nighttime hunting

Coyotes are Mostly Nocturnal, But not Completely

Coyotes are somewhat active during the day, and many are shot in daylight hours. They are much easier to spot in daylight, and shots are easier to make. a coyote can come in at any time, day or night.

It’s only been recent that nighttime hunting has become popular. It always used to be that coyotes were hunted nearly exclusively in the day. That changed as the tactical crowd started making night vision scopes more common.

Today, there are possibly more nighttime hunters than daylight hunters. And, because the price of quality night vision keeps going down, it’s something most people can do.

I still hunt mostly in the day, because hunting all night on the weekend messes me up come Monday. It works, and you have to do what works for you. Tons of coyotes are shot during the day.

Is it Better to Hunt Coyotes in the Morning or the Evening?

Early morning is often the best time of day to hunt coyotes. Depending on your area, it could be better in the evening, but most hunters prefer the morning hunt. Coyotes can be active all day, and you need to be vigilant at all times during a hunt.

There really isn’t a magic time to hunt coyotes. Like the old adage says, the best time to hunt is when you can go. It really falls down to personal preference, and whether or not you want to buy night vision. If staying out late isn’t going t work for you, that’s fine. Just hunt in the day. It works.

Jim Harmer glassing for animals in the mountains while hunting.

Coyote Hunting in Warm vs Cold Weather.

When hunting in the winter, it’s acceptable to call aggressively. In warm weather, you can call too much and scare away coyotes. Expect coyotes to be more forgiving and less wary in cold-weather, and more cautious in summer.

Being in Michigan, I know about cold. Cold isn’t usually the issue. The winter problems are moisture and wind. Consider carrying a neoprene ski mask in your pocket in case the wind comes up.

The biggest difference is how you dress. In winter, you need to stay warm and dry. You have to be fairly concerned with water repellent outerwear, and moisture-wicking or breathable underwear. Being cold and wet will kill any hunt.

If you start to sweat on your way to your hunting spot, unzip your jacket and/or take your hat off to cool down. Perspiration can make you cold when you sit down and stop moving.

If you can handle hunting in cold weather, go for it. It’s usually more productive. Just maybe bring an extra pair of socks in case your feet get wet.

The other concern is your calls. Mouth calls can freeze up, and electronic calls can have issues with freezing batteries. Prevent your mouth calls from freezing up by putting it in an inside pocket, or tucking it inside your sleeve. If it’s incredibly frigid, warm up your caller’s battery every hour in your car.

The most important accessory for coyote hunting in warm weather is bug spray. Mosquitoes or blackflies can eat you alive and make it impossible to sit still. I like the 99 or 98 percent DEET stuff. Don’t overdress, and bring water because you’ll sweat a lot.

If you avoid wearing dark colors and sit in the shade, you should be fine anywhere outside of Death Valley. I’ll also note that rifles shoot higher in the heat. Hot air creates less resistance on the bullet and increases the chamber pressure. That makes the bullet a bit flatter shooting.

The opposite is also true. Bullets lose energy quicker and start out with a tad less pressure in cold weather. Be sure to check your rifle’s zero at least in the season of your hunt.

Also, do you know why desert coyotes howl at night? It’s because they can’t see the cactuses ahead after sundown.

And now, I take my leave.

Best Air Rifle Deals

Popular Posts

Air gun 101: Everything you need to know about air rifle accuracy

0
Wyatt Earp has said: Fast is fine, but accuracy is everything And I just thought how many airgunners are obsessed with muzzle velocity and muzzle energy,...

5 Types of Air Guns You Need to Know Before Buying

0
Have you ever wondered how many types of air rifles are out there? Is your head spinning around with various powerplants and you don’t know...

How to choose the right Air Gun Caliber for your game?

0
A story is told of three Native American hunters. Two are smart, the other somewhat ignorant. On the first day of the hunting season, one of...

Best Distance for Sighting In an Air Rifle

0
Shooting with an air rifle always seems like a thrilling experience, but if you are a newbie then you have lots to learn. One...

Can a 22 air rifle kill a deer?

0
"Debate over whether a 22 air rifle can effectively take down a deer has sparked curiosity among hunting enthusiasts. With its lower muzzle velocity...