Home Blog Page 184

Trail Camera Placement Strategies for Different Times of the Year

0

If you’ve made the mistake of leaving your trail cameras hanging on the same tree from opening day until post-rut then it’s time to start looking at the calendar and designing a better trail camera strategy for different seasons.

Please note this trail camera placement strategy guide does not give exact dates due to our global customer base and that every region is a little different. Shoot, even Northern and Southern deer hunters in the States will have different time schedules when they move trail cams, but you get the point!

Early Spring Trail Camera Strategies

Even if you like to track spring gobblers during this time of year (and who doesn’t), you can still kick off your trail camera tour. The only thing needed is a little attractant to get the ball rolling. For the most part, this includes one ingredient – salt.

Not only are minerals a good attractant, but introducing an intruder into the area is a great way to arouse a buck’s interest. This can be accomplished with a licking branch and some natural, pre-orbital gland secretions.

As soon as the leaves start to gobble up, the landscape buck antlers will start growing, and they will naturally seek out salt and other minerals. Whitetail does and fawns will also be attracted to these sites, and capturing them on camera is a great way to determine how many new deer have been added to the herd as well as how many does are in the area. This info will be precious in a few short months when the rut kicks in.

Doe bedding areas or suspected big buck hideouts are great locations to start mineral sites in early spring. Look for pinch points and funnels that will drive deer to your salt block and, ultimately, your trail camera. If you live in agricultural areas, then field edges are a great place to start. Once travel routes have been revealed, you can always choose to delve deeper into cover and start a new mineral site to get closer to bedding or staging areas.

Summer Trail Camera Strategies

By now, your food plot should be in full swing. If so, a trail camera set up along the fringes would be a great way to capture that nocturnal buck who only hits the fields at night. In areas where baiting is legal, trail cameras could be set up over bait to get the same results.

Either way, food will be the primary driving force for deer movement, so it only makes sense to hang your trail camera in areas where deer will be feeding. Summer is also a good time to consider staking out a water source with your trail camera to help deer movement. Don’t dismiss the value of a central hub of H2O in your hunting area. Hang that trail camera.

On a side note, this is also a great time to conduct a trail camera survey if you have a private tract of land you will be hunting on. It’s hands-down the best way to monitor your deer herd population. You’ll be able to estimate your deer density, fawn recruitment, sex ratio, the age structure of your bucks, and more.

Early Fall Trail Camera Strategies

As I eluded to earlier, things change. Those locations that proved so good in early and late summer are now proving to be different. This is simply due to changes in food and cover. Leaves are turning and falling, and deer are ready to find alternate food sources – like acorns!

In addition, testosterone is gradually starting to build in male deer. This causes a variety of behavioral changes, which will ultimately change deer movement and sightings. To keep up with these changes, you must move your trail cameras.

Food sources can change throughout the course of a season, so become familiar with all types, especially those that appear naturally in your hunting area.

Food can still be a hot ticket, but bedding areas, travel routes, and staging areas are usually where you will find a lot of buck movement. Some of the images you capture will be in daylight but expect many of them to occur under cover of darkness. That’s just the nature of the beast when you’re dealing with mature bucks.

Nevertheless, you can’t formulate a plan of attack until you get confirmation a big buck is in the area – day or night. So start by capturing the image first, then move on.

Pre Rut/Rut Trail Camera Strategies

Things get hectic during this time frame as bucks move with reckless abandonment, looking for a hot doe. In the weeks leading up to the actual breeding phase, bucks will leave a bevy of signs announcing their aggression and intentions. Look for that sign and consider hanging your favorite trail camera somewhere nearby.

Once the actual breeding begins, you can expect a drop in mature buck movement as they are pushing does into more secluded areas to not only avoid the pressure from other bucks but the onslaught of hunting pressure as well. Your trail cameras and treestands should be moved as well.

I like pinch points, oak flats, logging roads, secluded ridge top saddles, field edges, and the fringes of doe bedding areas or anywhere else the females congregate. A camera hung somewhere along my entry, and the exit route means I can check it on days that I hunt without disturbing the bucks I am chasing before the hunt. This also allows me to decide if the area I am hunting is worth returning to or if I should pull up the stakes and move on.

Post Rut/Winter Trail Camera Strategies

Everything old is new again as the urge to breed is over, and the focus once again shifts to food. And while you may want to keep a few cameras hanging over remaining food sources, it wouldn’t hurt to keep one in the areas you used during the rut. There is always the chance that the buck you’re after hasn’t given up hope and is still searching for love. Only your trail camera will tell you if that is the case or not.

In addition, this is a great time to conduct an end-of-the-season or winter trail camera survey. With deer searching for food, you’ll be able to get a tally of the bucks that made it through the year, as well as an understanding of your property’s deer density, buck to doe ratio, age structure, and more. Just like the trail camera survey you should run in late summer, this information is critical to understanding how you should approach the upcoming season.

Conclusion

Deer movement is one of the most important keys to getting the most out of your trail camera. Adjust your trail camera strategies to match each phase of the whitetail season, and you will gain a plethora of knowledge that will ultimately lead to more filled tags. The trick is finding a way to manage all of that trail camera knowledge and data. Once that happens, all of the puzzle pieces will start to fall into place—best of luck.

PS – If you’re using trail cameras and haven’t tried DeerLab’s trail camera photo management service, we invite you to sign-up for our free 30-day trial. We think it will completely change the way you view trail camera photos.
Hands-On Mountain Man History Lesson: DIY Tanning Beaver Tails

0

A few weeks ago, my landlord came knocking at my door on a Tuesday morning. When I answered, he said, “I’ve got a dead beaver out here. You want it?”

What are you supposed to say to that?

“Sure, I’ll take it!”

The words fell out of my mouth well before I realized I didn’t have any idea what the hell to do with a dead 37-pound beaver or how to process it even if I did. But I knew I wanted to make like a guy from the 18th century and take a shot at tanning the animal’s tail with nothing but a throwback attitude and the breadth of collective internet knowledge.

It soon became apparent that I did not have the skills to tan an entire beaver pelt, but the tail — I thought I could manage to tan the tail. Maybe. Sort of. And while figuring it out, I would get a glimpse into the rich history of trapping and part of how they processed the beavers they took, first hand.

Smell the Butt, Eat the Beaver Tails

The beaver-trapping business is an old one; its zenith came in the 18th and 19th centuries, mainly due to the fashion industry in the US and especially overseas. Beaver fur was all the rage, and the fur’s excellent ability to repel water made it an especially sought-after material for hats and other garments.

But what about the tail? After processing, beaver tails were extremely useful for making a number of high-quality leather goods. Plenty of folks have also been known to eat beaver tail — no not the Canadian treat made of deep-fried dough topped with cinnamon sugar and whipped cream with the same name — folks do eat actual beaver tails, especially trappers.

There are a number of ways to prepare what was once thought of as a mountain man’s delicacy. There’s no real amount of meat to be had from the tail, but it’s where a beaver stores most of its body fat.

When you skin a beaver, you’re not going to find a lot of subcutaneous fat like you would on a raccoon, because it’s all in the tail. If you were living in the backcountry for months on end, trapping and purely living off the land, that readily available source of good, pure fat would have been most welcome and perhaps necessary for survival and maintaining reasonable health. In a modern context, you can cook the tail, remove the fat, render it, and have a supply of high-quality cooking fat that can be used for all sorts of things.

In the old days, you’d encase the tail in clay and cook it on some hot coals, and then cut through the charred leather and the inner membrane to get to that pure fat. If your landlord ever drops a fresh beaver on your stoop and you’re brave enough, you can do the same by wrapping it in tin foil and throwing it on the grill.

Surprisingly, folks who have eaten that fat report that it’s basically tasteless. It can also be rendered and used like lard to cook other things.

The tails are pretty damn useful when still attached to the beaver, too. Beavers can slap that large, flat tail on the water surface to issue a danger warning, and it works extremely well as a rudder when they swim. On land, the sturdy tail, which is typically a foot long and 2 inches wide, is useful as another leg to help beavers reach branches and to stabilize their bodies when going to work on a tree trunk.

The animals also use their tail as a lever when dragging bulky and heavy branches into position for dam building. Some people think beavers also use their tails to pack mud into their dams, but they actually use their front feet.

Now, about the smell. You may have heard somewhere that beaver tails smell like vanilla. That’s sort of true. Beavers have castor sacs, a scent gland that creates a chemical compound in the form of a thick yellowish goop, called castoreum, which they use to mark their territory. The glands are actually located under the tail, so it’s the beaver’s ass that smells like vanilla, not the tail itself.

Castoreum smells and tastes so much like vanilla that it’s been used as a food flavoring and in perfumes — but these days, most vanilla scents are synthetic and castoreum is rarely used in vanilla extract (but it’s still on the FDA’s list of approved food ingredients, so you never know).

Because of their fur, skin, tails, and sweet, sweet ass-stink sacs, beavers were hunted and trapped nearly to extinction on two continents. There were only 1,300 Eurasian beavers in the wild at the beginning of the 1900s.

The North American beaver was also nearly hunted out of existence for their pelts and vanilla ass juice. There were an estimated 100 to 200 million beavers on the continent. By the early 1800s, there were hardly any.

But time marched on, and so did the fashions that required an abundance of beaver pelts. Demand declined and trappers moved on to other quarries and professions as the American Frontier dwindled.

Since then, reintroduction efforts in the US, Mexico, and Canada have been successful and their populations are once again abundant.

The Eurasian beaver population has also made a comeback, though not as dramatic, thanks to reintroduction efforts in France, Germany, Poland, and in parts of Scandinavia and Russia.

RELATED – Wildlife Scientists Lead the Charge in Montana’s Cwd ‘Zombie Deer’ Fight

Beaver Trapping in the 21st Century

Today, very few people make a living by trapping beavers. Instead, most are hobbyists and amateurs.

Beavers are amazing creatures, but they can wreak havoc on the local landscape, which is exactly what was happening on my landlord’s property. They were felling trees with tremendous speed and building dams that were causing flooding and cutting off the water supply to a large pond in a state-managed wildlife refuge that butts up against the property. That pond eventually empties into a nearly 700-mile-long river. So, with the blessing of the government officials in charge of the refuge, my landlord began setting traps and dispatching beavers. And that’s how I wound up playing 21st-century mountain man.

Tanning Beaver Tails

Before I got to tanning, I hit GoWild, a social media community geared toward the outdoors, and a bunch of users chimed in with their own experiences, best practices, and words of encouragement. I used what seemed like a couple of solid YouTube tutorials as guides, a few meager cutting implements, and just jumped into it. Fair warning: If you aren’t a patient person, you might want to tap out about now.

Lesson 1: Don’t Cut to the Tip on Beaver Tails

The first task, obviously, was to remove the tail, which was accomplished with a pocket knife and little difficulty.

Then, I cut the tail in half along the edges and began removing the outer skin. Most of this process was really easy, but as you get closer to the tip, the tail gets really thin. I made a couple of wrong moves that an experienced hand would not have made, and put some small holes in the tail leather.

I also discovered that any injury the beaver sustained to its tail that had healed over created really tough scar tissue was all but impossible to separate from the thin outer layer of the tail, resulting in a few more small tears.

Actually pulling the tail apart was more difficult. The interior fat is incredibly slimy and slippery, so I clamped the tailbone in a small bench vise and then got a good solid grip and started pulling the two halves away from the bone. The tactic worked, and they came apart relatively easily.

beaver tails
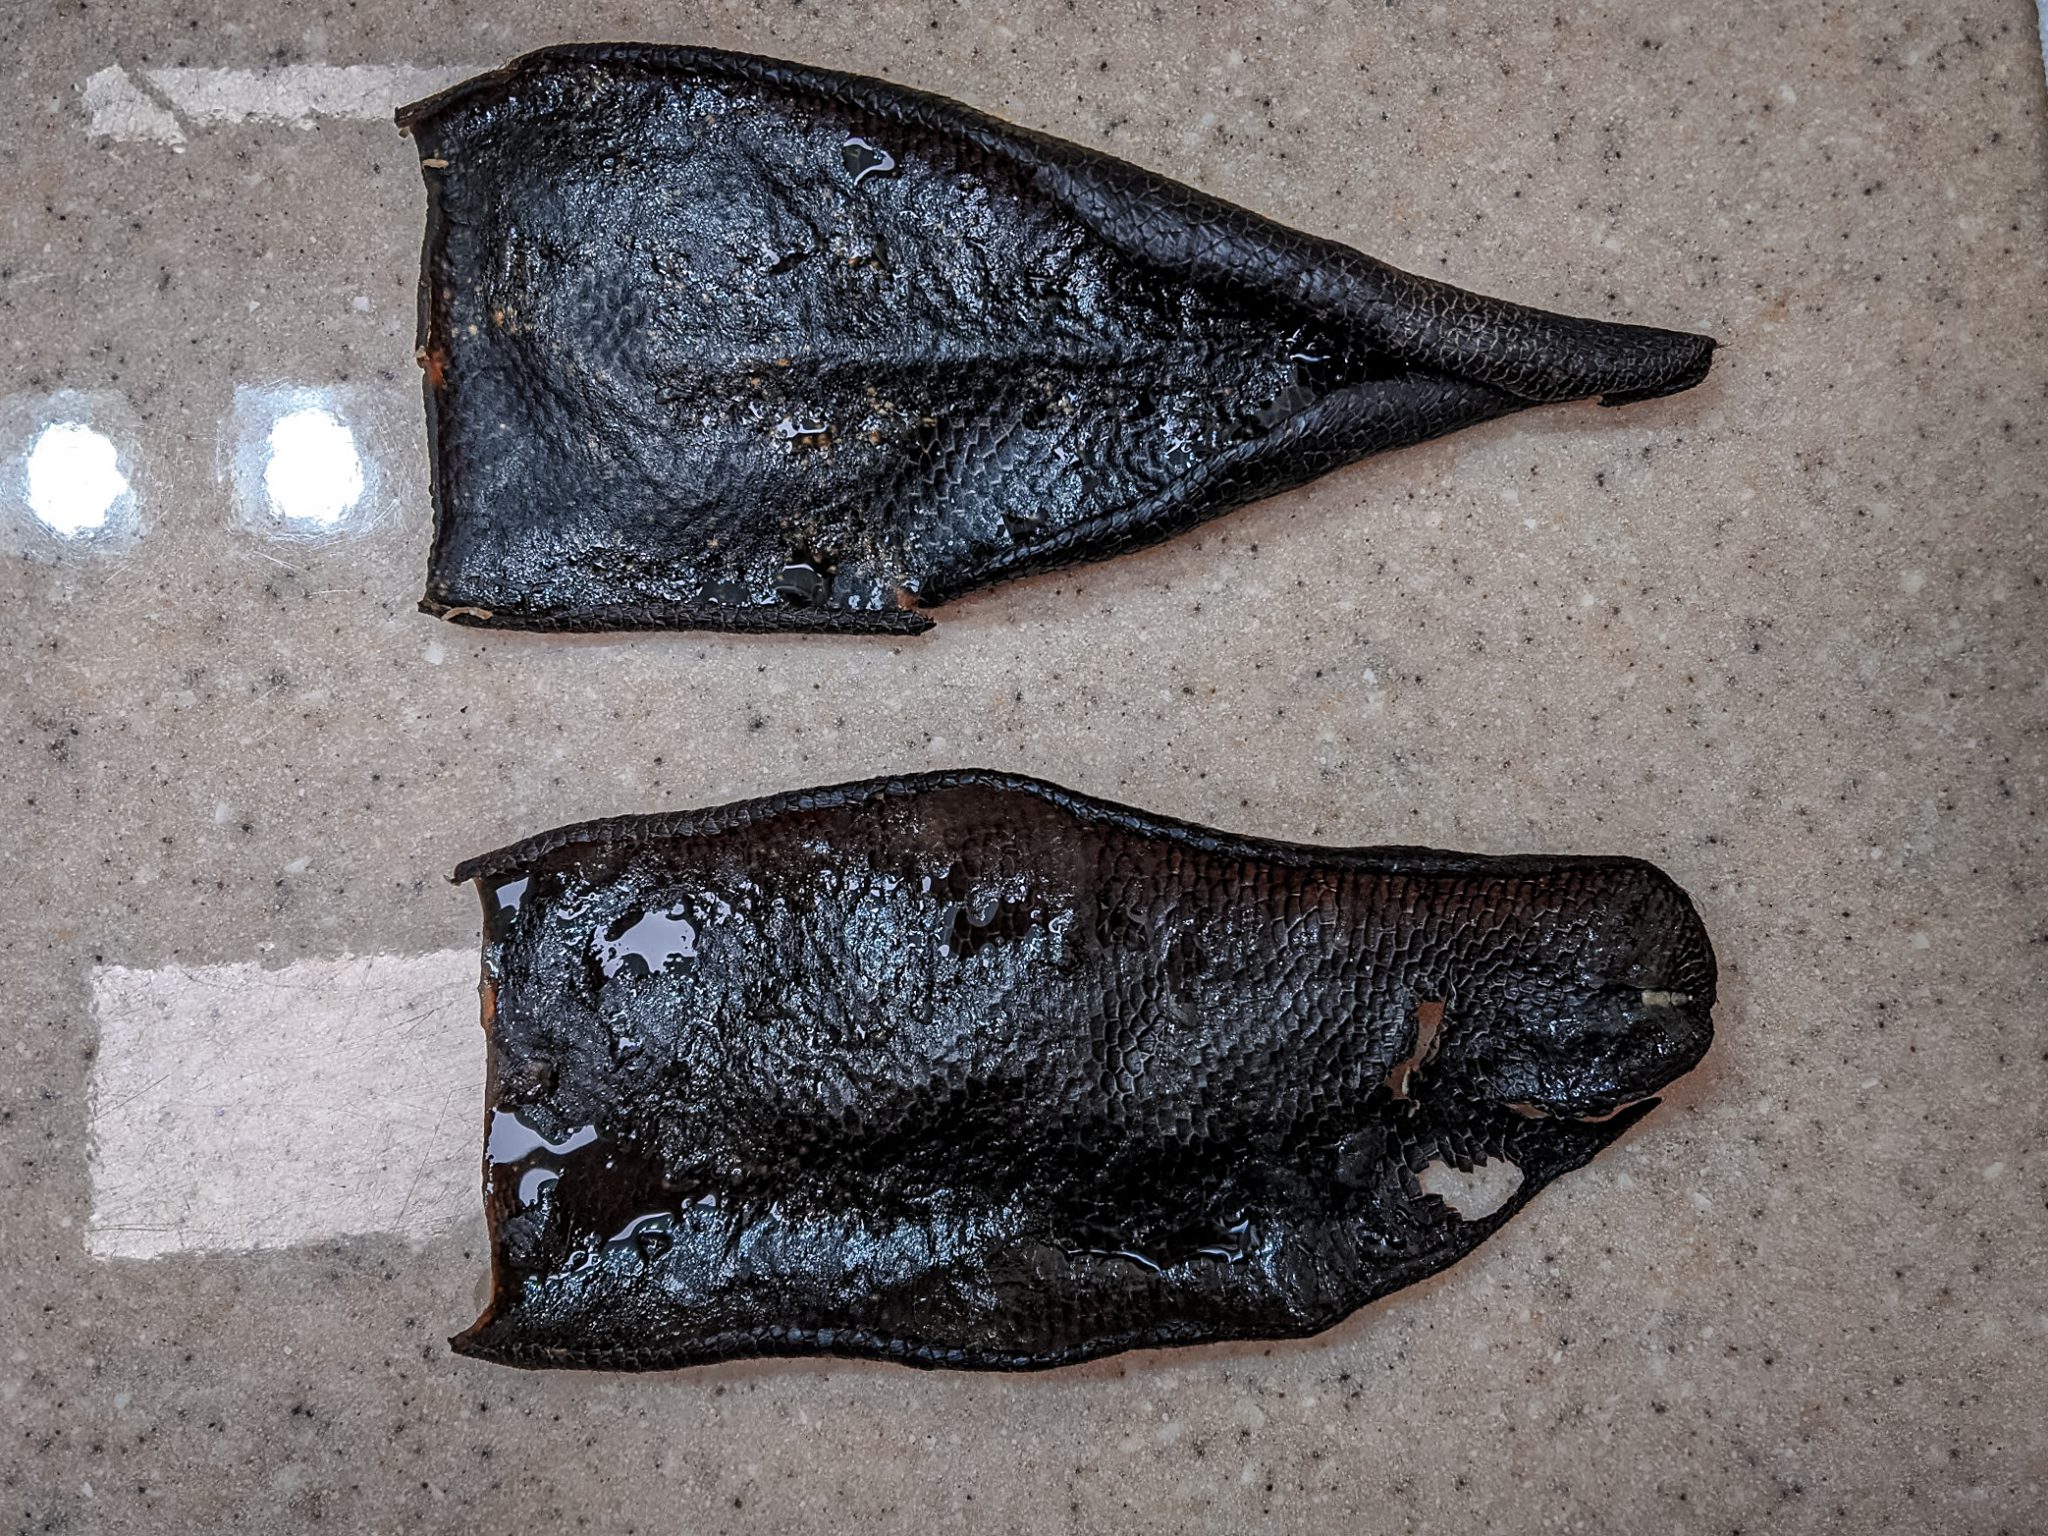
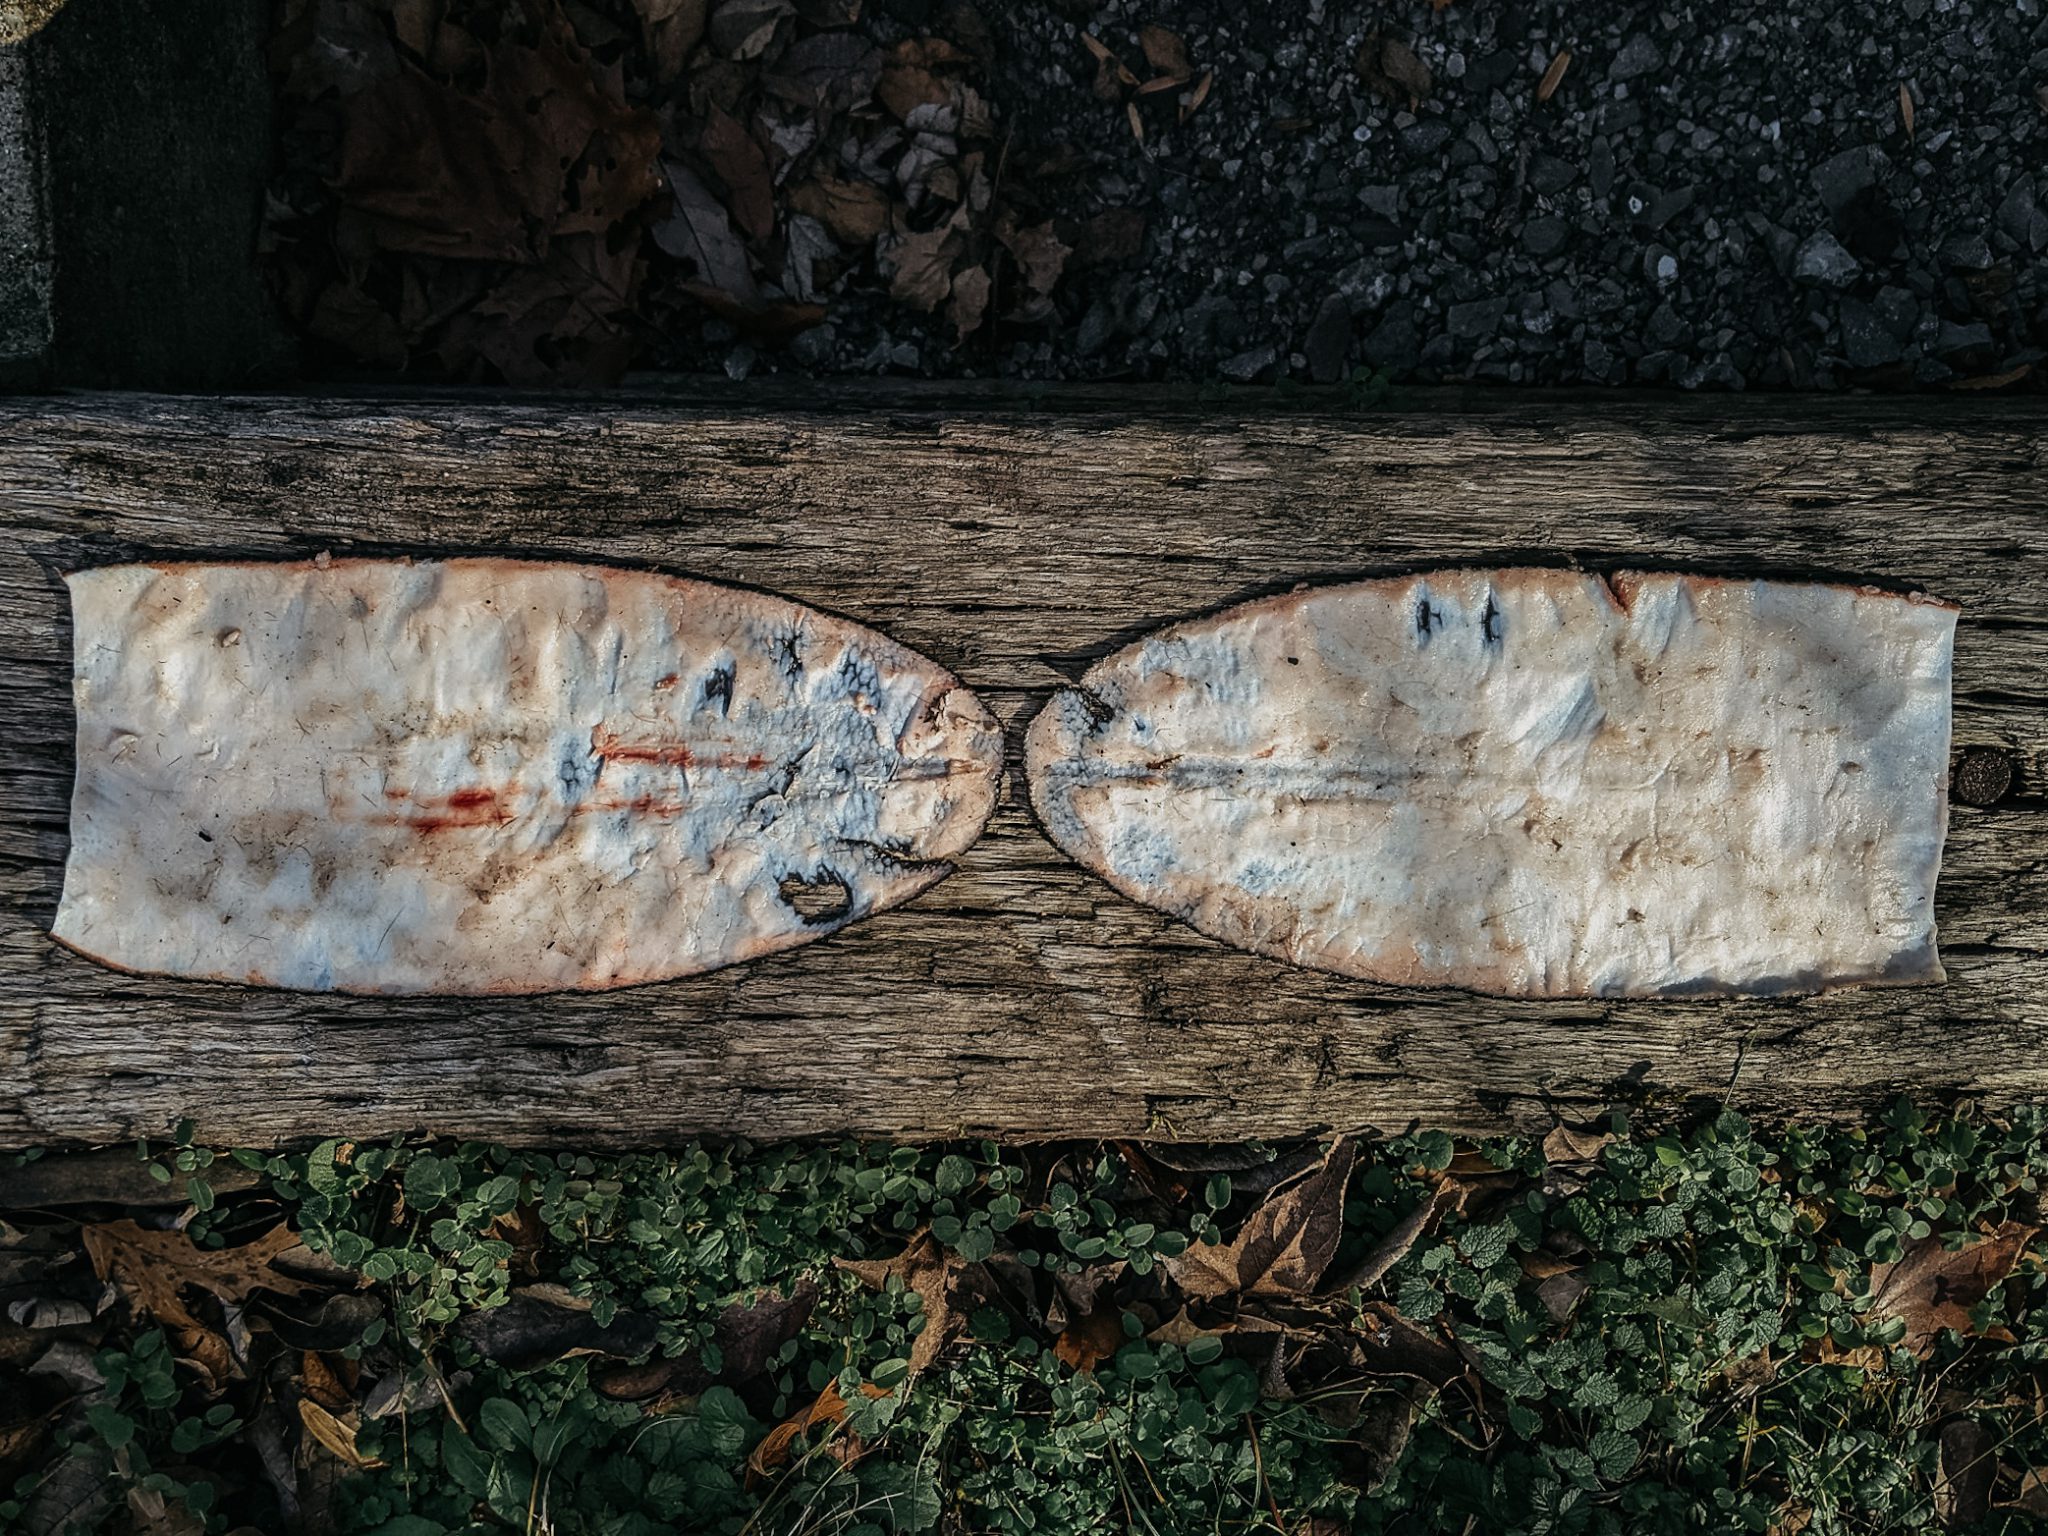
After cutting up both sides of the tail, the author clamped the tail bone in a vise, pulled the tail apart. While fleshing the tail with a skinning knife, he removed a bit too much in some places and not enough in others. A proper fleshing knife would have helped. T. Logan Metesh/Free Range American

Later on, I learned that you don’t have to try to split the tail all the way to the tip. Just get as close as you can without feeling like you’re going to risk poking through. If you get to this point, then the tail is usually thin enough to separate itself cleanly into two pieces just by pulling it apart.

RELATED – Sporting Dog Restrictions Fail in NH, Falter in MD, Progress Elsewhere

Lesson 2: Use the Right Knife

Next, all the fat and other tissue must be removed from the soon-to-be leather. I learned quickly that having a proper fleshing knife for the task, which I did not, would have made this step a lot easier. I made due with my sharp skinning knife, but the blade’s contours weren’t right for the task and it took a lot longer than it should have, and the results weren’t as clean or thorough as they should have been.

Lesson 3: Tendons Are Tough

I also learned that all of the tendons in the tail closest to the spine are incredibly tough. Given the power that a beaver’s tail has, this makes complete sense, but those sinewy little fibers were abnormally strong and definitely gave even my sharpest knife a run for its money.

With as much of the flesh removed as possible, I was set to start the actual tanning process. It wasn’t difficult, but it was time-consuming.

RELATED – Shed Hunting Tips From Connor Clark: How to Rule the West

Salt and Wait, Acid and Wait, Base and Wait, Wash

First, I thoroughly salted the flesh side of the tail halves with regular table salt and let them sit for 24 hours to dry out. After that, the tail was pretty dry and stiff.

Then, the halves went into a bucket of warm water for another 24 hours to rehydrate.

With the tail thoroughly salted and rehydrated, it then needs to be washed with dish soap to remove any remaining salt and beaver grease.

With the prep work finally done, I decided to go with the alum tanning process (aluminum sulfate and salt) because it seemed easiest and I could get the granulated alum at the grocery store.

I added the tails, granulated alum, and salt into a bucket of clean water with a 1-to-2 ratio of alum to salt. Then it soaked for 72 hours. Told you — lots of waiting.

At this point, I was three days in and the tail pieces were beginning to firm up and feel like leather, but I noticed the edges were starting to develop a slight curl.

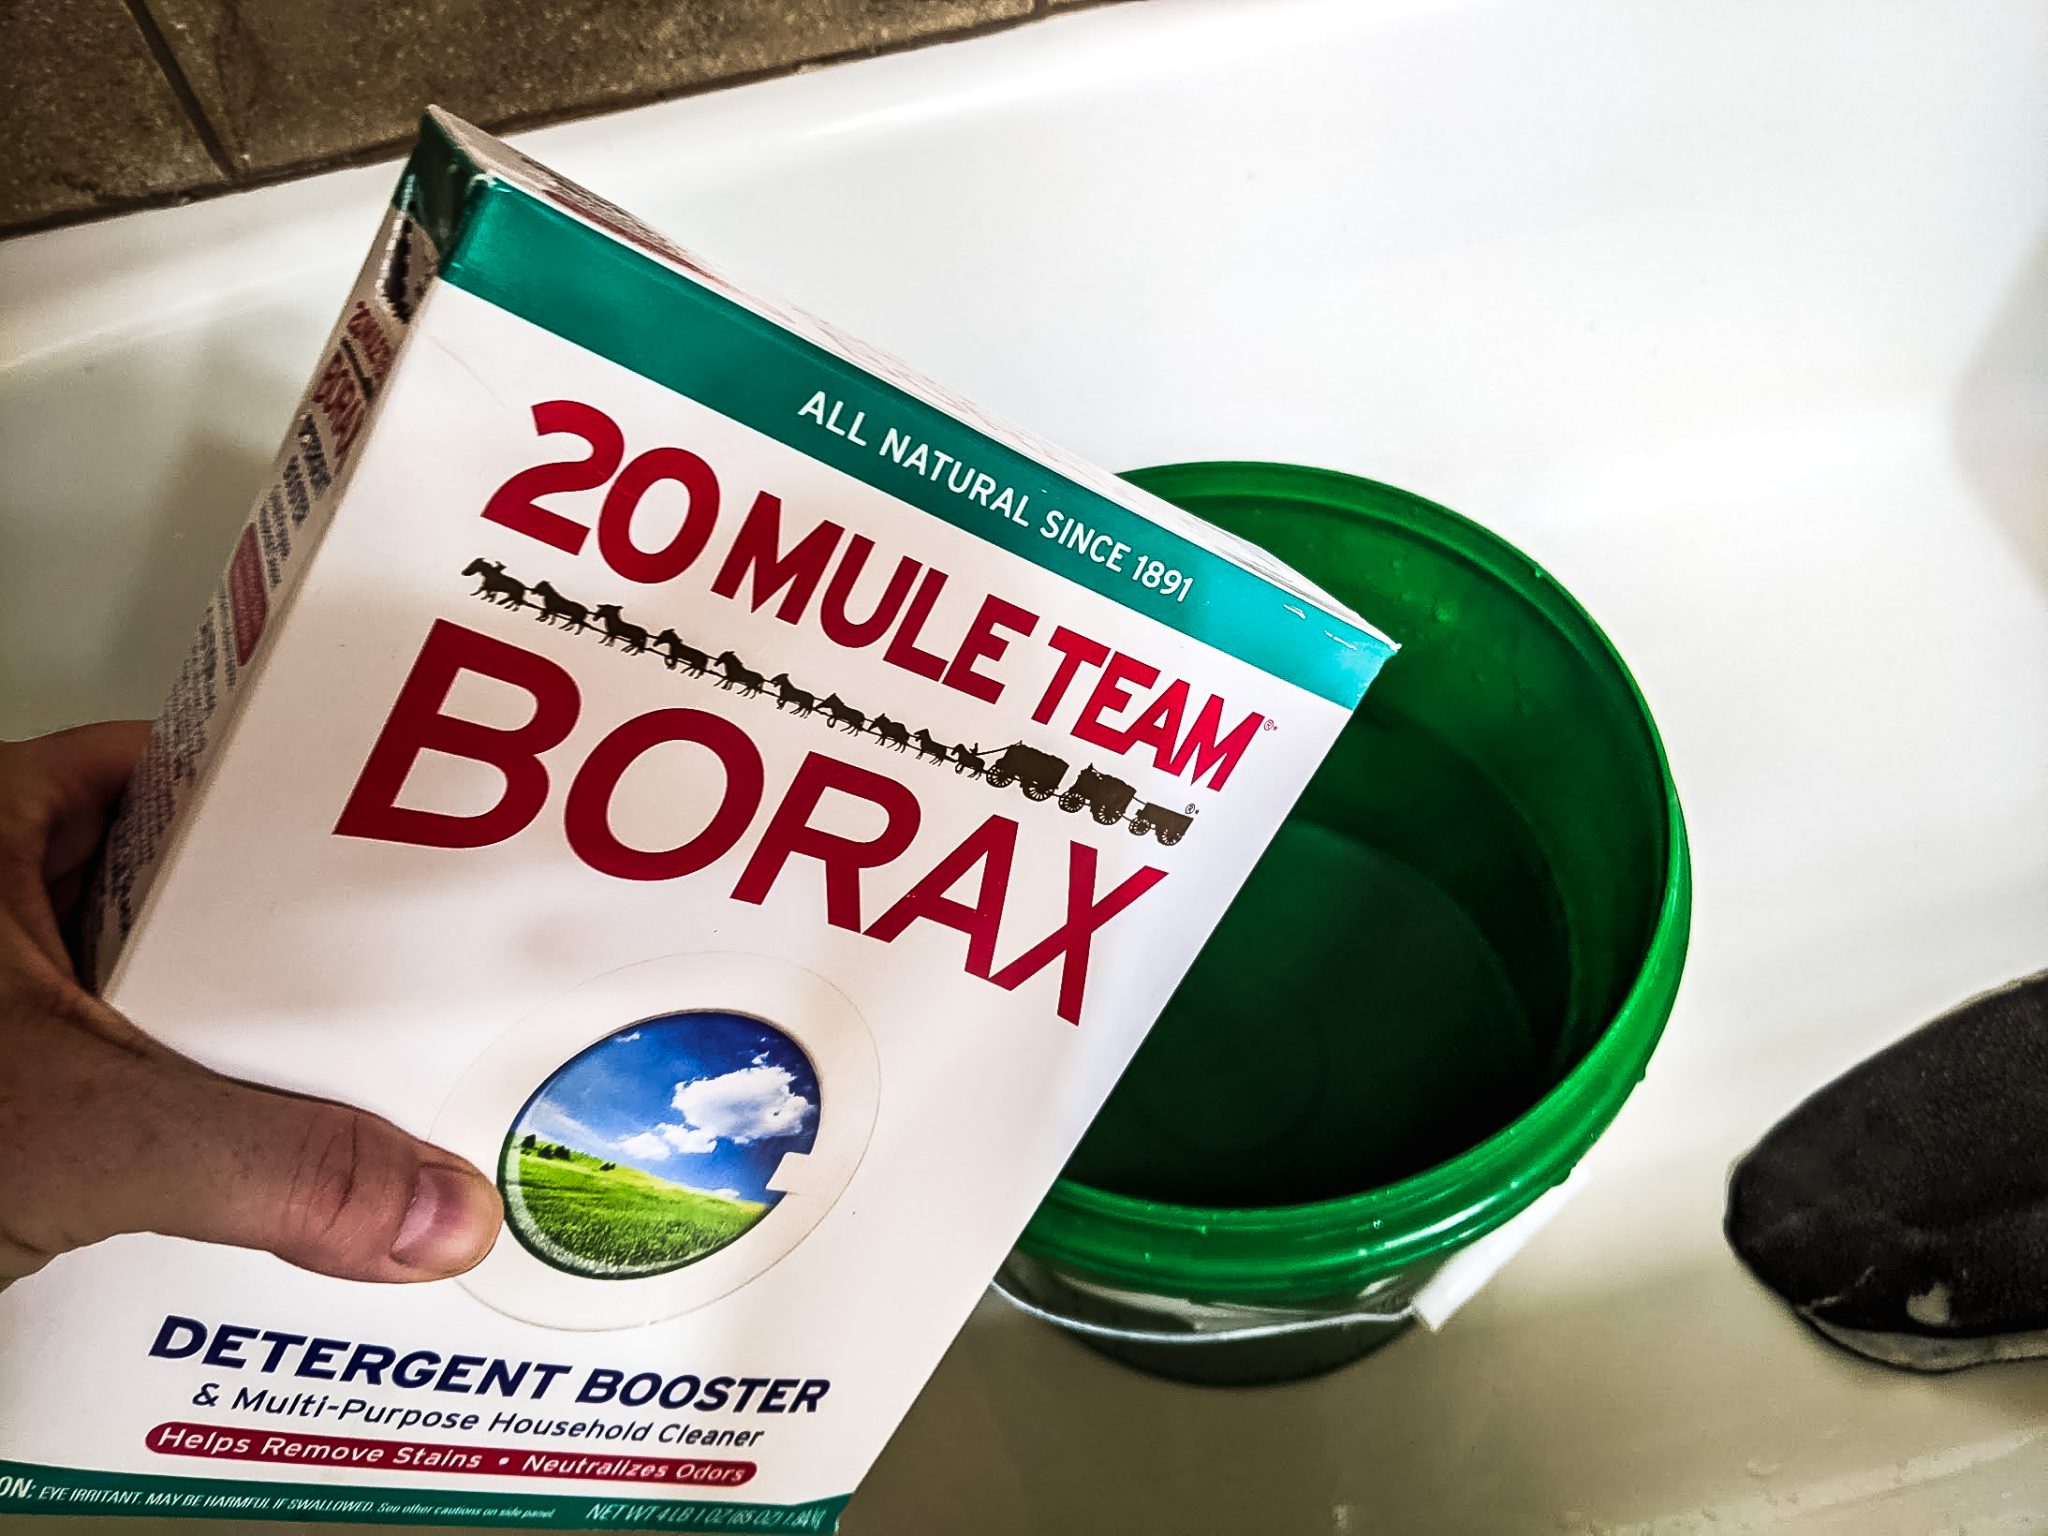
Next, the acidic alum has to be neutralized with a base. Borax works well. I dumped the bucket, filled it with some more water, added the tail and the Borax, and stepped away to wait for another 24 hours.

That was it for the tanning process and the pieces were ready for their final drying stage.

adding borax
The tanning alum is an acid, so it had to be neutralized with a strong base once the process was complete. T. Logan Metesh/Free Range American

RELATED – Wild Hunting Tactics: How 7 Apex Predators Do What They Do Best

The Final Results

I set them on some paper towels and then left for a week to visit family out of state, which wasn’t the best idea. When I got back, the pieces were definitely dry, but the result wasn’t what I was expecting — they were rock hard and severely curled at the edges. Plus, little puddles of beaver grease had accumulated in places.

too dry
The author let the tail pieces dry for a week unattended, and they took on some severe curls and had grease pools in the thicker spots. It was a rookie mistake, but a good lesson learned. T. Logan Metesh/Free Range American

I wiped up the grease and worked the pieces back and forth in my hands and over the edge of a counter to try and loosen them up into something close to pliable. The edges were rock hard and there was no way to remove the curl they’d acquired. I tried some leather conditioner to add some moisture back in.

The endeavor, I’d say, was a partial success — but I learned a hell of a lot going through the process.

Next time, I will certainly do a few things differently. I’ll be sure to use more appropriate knives and clean the inside of the tail more evenly. Leaving it to dry unattended for a week was also a bad idea. I also want to consider taking this guy’s advice, do some better knife work, and leave the skin as one piece when filleting the tail, so it can lay flat. His method for removing the tail bone by cutting it out looks easier than the vise method, so I’ll try that, too.

I might also sandwich the leather between some iron mesh during the last step and see if that can prevent any curling that might occur.

For now, the pieces of beaver leather are sitting on top of my gun safe, occasionally driving one of my dogs crazy when she catches the scent. Hopefully, the results of my next attempt will be more than just a learning experience and can be made into something useful.

If you come into the possession of a few beaver tails and, like me, have no tanning knowledge and don’t want to risk ruining the leather, you can trim it up according to the directions on the Specialty Leather Productions site, freeze it, and mail it to them. They’ll tan it and send you back perfect beaver leather for $6.50 per half.

READ NEXT – Wolves in Northern Minnesota Helping Moose, Eating Beavers

The 5 Best Tent Stakes

0

Best for the Beach and Soft Sediment

Orange Screw Ultimate Ground Anchor

Weight Per Stake: 1.82 oz | Material: 100% recycled polycarbonate plastic

If you often set up camp with a canopy tent on the beach or other areas with soft sediment, the Orange Screw Ultimate Ground Anchor is the stake for you. Its screw design, flexible plastic material, and length are the perfect recipe for a lightweight, durable, robust holding power machine in loose sediment where other stake designs struggle. Another bonus is that these screws do not require a hammer or an awkward balancing act to install by foot. Rather they use a plastic tube that threads through the top of the anchor for extra leverage to screw in by hand. Even if the anchor can only be installed 50% into the ground, the natural flexibility of the plastic and effective traction of the screw in the ground still provides an awesome hold.

Where the Orange Screw doesn’t shine is in hard, rocky ground. The main challenge in tough rocky earth is gaining initial traction with the anchor. As rocks shift and get dislodged as the anchor tries to dig in, it loosens up the ground reducing any traction the anchor might have had initially. This limitation to soft sediment already largely disqualifies these stakes from backcountry use, while the bulky size of these screws makes them an unrealistic option for backpacking as well. Overall, the Orange Screw is a durable option for staking applications requiring a strong hold in both horizontal and vertical directions of pull in soft to firm conditions. While you likely won’t see these miles away from the trailhead, there are plenty of uses like backyard canopies, camping, and festivals where these stakes can shine, plus the fact that it is made of recycled materials is an added bonus.

Compare Products

Compare select up to 5 products to compare

Why You Should Trust Us

We extensively researched the various types of tent stakes available on the market today, ranging from tri-beam, shepherd’s hook, nail peg, screws, and v-shape designs, and compiled a list of dozens of the most popular models today. Keeping overall performance and cost in mind, we narrowed our focus further to the top contenders for meeting a wide array of end-user needs. We hammered, pushed, and pulled each stake in and out of an array of different ground densities repeatedly to gauge durability, holding power, overall versatility, and ease of use to suss out the best of the best. With 80 uses applied per stake, we installed and pulled on stakes over 800 times. We carefully weighed and measured each stake to gauge overall packability while considering the inclusion of a stuff sack or not. We kept detailed notes along the way capturing surprise or unexpected performances and logged ideal uses in order to provide you with all of the information you need in choosing your next set of tent stakes.

As an avid outdoor recreationalist and industry professional, Hayley Walker has been adventuring and working in the outdoors since graduating from college in 2011. Whether it is backpacking, canyoneering, climbing, mountain biking, trail running, pack rafting, or all of the above wrapped up into a multi-sport adventure, she has spent countless nights out under the stars pitching tents and shelters. Her several years of experience as a rental gear manager for an outdoor guide and outfitting service has given her a depth of knowledge and experience when it comes to assessing camping equipment. She is no stranger to the ins and outs of tent stakes and their unending ability to bend or break at the most inopportune times. With a keen eye for the details and vast experience testing equipment for quality, Hayley put her knowledge to the test with this tent stakes review sussing out the top performers to help others rest easy on their camping adventures.

Analysis and Test Results

The criteria for comparison considers the important role tent stakes play in securing a protective and reliable shelter while out in the elements. Keep in mind your own staking needs and preferences as you consider the metrics and comparisons made between tent stakes below.

Value

Not all low-priced options are created equally. Some products present a better value than others, and though we don’t score the products we test on their price, we like to make note of products that provide a great price-to-performance ratio. We love the All One Tech Stakes, which come in a set of 12 and are lightweight, packable, and easy to use. This set is great for backpackers looking to shave weight and save money on gear. For campers who are less focused on weight but just need a solid, affordable stake to hold their tent down, check out the Coleman 10-Inch Steel stakes, a 4-pack of heavy-duty steel stakes. If you need a few more than 4, we recommend the Eurmax Galvanized, which are very similar but come in a 10-pack for a few bucks more.

Durability

Durability is one of the most important metrics we used to rank each model. While material and design play an important role in predicting potential overall durability, we wanted to know how well each tent stake could weather being repeatedly used in a variety of ground types including sand, soft soil, firm ground, and hard, rocky conditions in order to arrive at a real durability score. We installed 1 of each stake into all 4 ground types 20 times per ground type for an overall total of 80 installations per stake. Of those 20 installations per ground type, we used a hammer for 10 of them and our hands and feet for the other 10. Stakes were then scored across 3 metrics associated with durability; bend factor, guyline attachment points, and stake tip.

The recycled polycarbonate plastic Orange Screw Ultimate Ground Anchor surprised us with the highest durability score, showing very little wear and tear even after repeated uses. As expected, the steel Coleman 10-inch and Eurmax Galvanized stakes scored the next highest, especially under their ideal circumstances for use, with a hammer in soft to hard ground.

The Vargo Ti Shepherd’s Hook received a high score considering its minuscule weight, displaying promising integrity with its titanium material and natural flexing capabilities. The aluminum models struggled to keep up with the sturdiest models in regards to durability, but with careful use, they can enjoy a long life, too.

Packability

Packability is another key area of performance, especially when considering a backpacking or backcountry setting. Campers can largely ignore this metric, while backpackers are advised to tune in more carefully. We carefully measured and weighed each tent stake using a kitchen scale and measuring tape. Each stake within its set was measured and the average weight was scored relative to the other contenders. We measured one stake from each set to log and score the length and width. The smaller and lighter the stake, the higher the score. We also considered whether or not a set of stakes came with a stuff sack or not.

The most packable stakes were the Vargo Ti Shepherd’s Hook, the MSR Mini Groundhog, and the TOAKS Titanium V-Shaped, all of which were indeed lightweight and quite small in size. The Vargo Ti and the MSR Mini scored well for being the lightest of the bunch, while the TOAKS Titanium scored well for its ability to pack down into a neat, compact size by nesting into itself and for coming with a high-visibility, ultralight stuff sack.

Holding Power

This test metric measures how strong of a hold each stake provides across soft soil, firm ground, and hard rocky conditions. Upon installing each tent stake into the ground during our durability testing, we then attached a guyline to each stake and pulled at a near-horizontal angle to the ground. Across 20 pulls, we judged how easy or difficult it was to pull out of the ground. Scores were tallied either as an easy single-hand pull, a difficult single-hand pull, or a hard two-hand pull. Difficult two-hand pulls were then tallied for each stake across the soft soil, firm ground, and hard rocky ground types to give an average holding power score. We intentionally left out sandy conditions to give a more accurate representation of holding power under the most common circumstances. If a stake held strongly in one ground type but performed poorly in another, its overall holding power score was lower despite excelling under some circumstances.

Our strongest performers included the longer steel nail peg designs like the Coleman 10-inch Steel and the Eurmax Galvanized, which were able to dig down deep, maximizing their surface area and traction. The other top contender, especially in softer to firm ground types, was the Orange Screw Ultimate Ground Anchor with its wide screw design and length reaching and gripping effectively into the ground.

The other above-average performers included the TOAKS Titanium V-Shaped utilizing maximum surface area with its v-shape design and the aluminum tri-beam models like the MSR Mini Groundhog and the All One Tech stakes. Some of the shepherd hooks impressed us with more holding power than expected but still landed lower than the models mentioned above in this metric.

Versatility

Versatility determines overall stake performance and is based on scoring answers to a few basic questions. First, we consider how many guyline attachment points the stake presented. The more available options for attaching guylines increased the overall usability of a single stake. Second, we consider whether or not a stake requires a directional placement in the ground or if it can be placed in multiple directions. A directional placement requirement can be limiting, reducing its overall usability. Third, we consider the stakes’ utility across varying sediment densities, from loose sand to packed and dry dirt. Lastly, we consider whether or not it is still feasible to use a stake after it was bent or damaged through prior testing.

Our top performers for versatility included the All One Tech and MSR Mini Groundhog stakes for their overall solid performance in holding power, non-directional placement capabilities as tri-beam designs, and their ability to be used over and over again with minimal bending or damage. They are also lightweight enough for backpacking trips yet also work fine for camping.

The Coleman 10-Inch Steel and Eurmax Galvanized received higher scores for their ability to hold in sand where most others failed. Only the Orange Screw also performed well on the beach, although this screw is mostly limited to the beach or quite soft or moist sediment. The FANBX F Tent Pegs, while not the most versatile overall, did have a noteworthy performance in their continued usability despite getting bent out of shape early on in testing.

Ease of Use

Ease of Use is how user-friendly or not the tent stakes are. We used four criteria: ease of installation by hand and foot, ease of installation by hammer, the inclusion of a pull cord or equivalent, and the ease of removal from the ground. It should be noted that we did not use a hammer or foot to install the Orange Screw Ultimate Ground Anchor but rather, due to its design that utilizes its own mechanism for installation, based its ease of installation scores off of its intended installation method.

The top performers had pull cords and a tri-beam design in common, two factors contributing to easy removal and easier installation by foot. The winner here was the MSR Mini Groundhog, which was easier to install by foot than most others, hammered in quickly, and was a breeze to remove with the help of its pull cord. The notches are also very useful for keeping guylines in place.

The All One Tech came in as a close second. This model was equally easy to remove. However, its length made it a touch harder to install by foot. The Vargo Ti Shepherd’s Hook was another close contender. The slim profile made it easier to install in and around rocks. It was also easy to remove by hand with its hook design.

Conclusion

We used our professional experience working with rental equipment, our depth of personal experience pitching tents, and our extensive research and hands-on testing to bring you our comprehensive review and recommendations. After relentless usage in all types of environments, from sandy and soft conditions to our backyard lawn to rocky and unforgiving terrain, we documented stake performance through it all to identify the top models and their best uses, all with the hope of shedding light on what tent stakes make the most sense for your tent staking objectives and needs.

8 Tips for a Successful Deer Drive

0

Thank you for returning to read my latest article. In this article I would like to talk about the lost art of the “deer drive”.

There are many people out there that discount this age old practice due to belief that it is unethical and unsportsmanlike to hunt deer or any big game in such a matter.

I think I have only seen it shown on TV hunting shows maybe once or twice ever, and I watch a lot of hunting shows.

Now to a person that did not grow up learning this style of hunting, I can see how this is true. Some people may not know how to accurately shoot at a running deer or lack the confidence to do so.

If a deer drive is not properly planned out with your hunting party, it can be very dangerous as well. But, if done safely, and properly, it is a very effective way to harvest deer.

I grew up and have lived my entire life in the state of Wisconsin. In the Midwest, the deer drive is a long standing deer camp tradition. It is however, in my opinion, being phased out by most people, preferring to emulate what they learn from watching TV and reading magazines, where such a thing is generally frowned upon. In the Midwest region of the country, until the past couple decades; deer hunting was a way to put food on the table. Hunters were not going out to specifically to harvest a trophy whitetail, although they all dreamed of doing so. Normally people would sit their stands the first day or so, but if no luck was to be had, well we made our own luck. We needed food in our freezer, and if that meant bumping that giant out of the area in hopes to put a tag on a doe for meat, well then so be it.

In my opinion, things have definitely changed.

Tip #1 Safety, Safety, Safety

Did I forget to mention safety? It is true that this can be a very dangerous tactic to use while trying to harvest deer. Always make sure everyone knows where they can and cannot safely shoot. Many hunters have paid with their lives shooting into areas where they are not supposed to during a deer drive. If there is no safe direction for walkers to shoot due to position of the standers, then the walkers should not carry their guns on the drive, to avoid temptation to shoot at a deer that may jump out of its hiding spot.

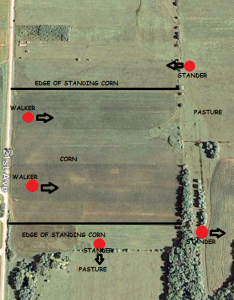
This was made clear to me on my first deer drive. I still remember like it was yesterday, my first ever deer drive. It was Thanksgiving Day in 1986. I had sat opening weekend seeing only a few deer. From what I can remember, no one had put a tag on a deer as of yet. After the Thanksgiving morning hunt we met at the trucks for lunch and started planning a drive. I was nervous, hoping I did would not screw up. Since I was using a 20 gauge shotgun, younger, and full of youthful energy, I was chosen to be one of the walkers. My father and older brothers, who had longer shooting rifles, were to be the standers. My other brother Tony was also chosen as a walker, because he also carried a shotgun. We chose to drive out a corn field that sat on the east end of the property. I was told sternly to follow the rules to ensure the utmost safety of everyone participating. My father and two other brothers would set up in the corners of the corn to catch deer that broke out of hiding. They were not allowed to shoot into the corn at all, for obvious reasons; my brother and I were in it! Tony and I were not allowed to shoot anywhere but straight down the rows of corn, this way we would not run the risk of shooting the standers stationed in the corners of the field.

We gave our predetermined signals to the standers that we were starting to walk into the field. Everyone was in place and ready for what was to come. As I took my first step into the rows, I grew ever more nervous. I was 12 years old and all of about 4 feet 8 inches tall. The corn we were walking into was over 7 feet tall! I could not see anything farther than 5 feet in front of me. All I knew was I had to walk straight through the corn and follow the rows so everyone knew where to expect me to be. I did not make it through the field 30 yards when I heard my brother Tony bellow “DEER!” and I heard shots start ringing out from his shotgun, or at least I thought it was him as I really could not see anything. I could hear corn stalks crashing all around me, and shots began to ring out from every perceivable direction. I pulled my gun up and knelt down in the middle of the corn, half expecting to get run over by a deer at any point in time. To say I was freaking out would be an understatement! For what seemed like 10 minutes, but was in reality probably only 30 seconds, the commotion subsided. My brother Tony started to yell my name to check to make sure I was safe. I did not immediately answer his calls because I was still in defense mode ready for a deer to plow through and run me over. After a few calls I finally answered him, “Ya!” They all started asking where I was. I could not answer them, as I was slightly disoriented, and my heart and brain was going at a million miles per hour. The only thing I could think of to do was put my blaze orange hat on the end of my barrel and raise it above the stalks of corn so they had a chance to see just where I was. They told me to make my way out. I gladly followed that piece of advice and walked until I reached the outskirts of the corn, leaving my hat on my gun barrel pointed above the corn the entire way, almost like a flag of surrender. As I reached the end of the corn I noticed my family standing around a doe that lay on the ground in front of them. They had taken, to the best of my childhood recollection, 3 does during that short drive. In a matter of a minute or so, my family had the much needed venison to sustain us through until the following deer season.

Tip #2 The Set-up

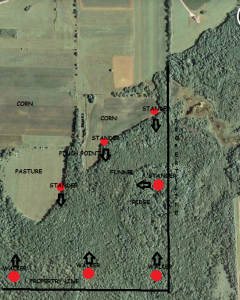
8 Tips for a Successful Deer Drive 1The position of the standers is paramount to the success of your drive. Standers should be set up to block all escape routes of the deer you are trying to move. I will use my hunting property to give you an example of this. The lay out of this land is simple. On the East side of the property is a large ridge with open mature hardwoods. The ridge only rises up about 10-15 feet in elevation. The West side of the land is a cow pasture that covers about 10 acres or so and runs adjacent to the road. The North end is a corn field, and the south end is a swampy area that the deer use as bedding and butts up to public land. The swampy area extends through the middle of the property essentially cutting it in half. This finger of swamp running between the hardwoods to the east and the pasture to the west makes for a perfect travel and escape route for the deer. Our walkers start by coming in on the public land to the south and push through the swamp towards the corn in the north. The deer normally follow the swamp on their way to the corn, essentially making it a pinch point. They do not like escaping through open territory, preferring to stay in cover as long as possible. We put one stander on the ridge to the east to catch any deer that shoot out the side, one in the pasture for the same reason, and then 1 or 2 along the corn to block off any way of escape. If there are any deer bedded down in the swamp, they are sure to bust out in the direction of one of the standers. The walkers in this scenario do not have much opportunity for shots due to the thickness of the cover, which is also why the deer love to hide here. If your standers have all escape routes blocked, success is assured. If there are any gaps or escape routes not covered, it is guaranteed the deer will find the weakness and exploit it.
Tip #3 Play the Wind

8 Tips for a Successful Deer Drive 2The wind is always a primary concern when it comes to hunting whitetails. The whitetail’s best defense is its sense of smell. While playing the wind during a deer drive, there are different factors to consider than just sitting in your stand. You should line up your walkers to walk with the wind, and your standers should be upwind of the drive. This allows the deer to smell the walkers. Letting the deer smell you may be something that goes against all you have been taught about hunting deer. The main purpose of letting the deer smell the walkers is to make them move before being jumped. If the deer sense your presence before you jump it they will move off towards the standers much sooner. If the deer do not know the walkers are coming towards them, you run the risk of jumping them at close range. If you startle the deer they are more likely to run full speed away. A deer at full speed is far harder to hit for the standers than one that is try to creep away. When they are moving away slower they are more likely to stop to look back at the danger, giving the shooter a chance to get a clean shot. A startled deer will not stop running until it knows it is safe. There are so many variables in taking a shot on a whitetail that is running for its life. You have to be able to hit something the size of a paper plate that is running at 30+ mph, and is bounding up and down, and zigzagging left and right. It almost seems impossible when you think about it. I have taken several deer while running, but have missed more. It is difficult to make an accurate shot at that target, and there is no way to practice for such a scenario. I have yet to see a rifle range that has moving targets that move as randomly as a running deer. There are some ranges that have a running deer moving target, but it is mainly a target that moves at a slower more predictable speed, and they move in straight lines. To make this shot requires either great skill or great luck, most of the time luck. With this in mind, I agree with most that say it is unethical for the majority of people to attempt this shot. The practice I have with this shot is the fact that I have made many of them. With deer drives firmly infused into my blood, I know what to expect when attempting a running shot. Opening day 6 years ago, I was sitting in my traditional rifle stand overlooking a corn field. Late in the morning a 7 point buck came out of the woods at full run across the cow pasture I was hunting over, headed for the corn. I knew if it hit the corn field it was going to be impossible to take it. I settled my rifle on a tree branch in front of me and started to track the deer through the iron sights of my Marlin 336 .35 Remington. This model gun is usually only good for shots under 200 yards; and that is in ideal shot conditions, but I knew my gun well. 8 Tips for a Successful Deer Drive 4I knew the closest that deer was going to get was about 175 yards away and with it at a full run, most people would not even think of attempting it. As it got closer and closer to the corn I knew it was now or never. I concentrated on my aim, let out a deep breath, and touched off a round. The deer folded up where it was at. I would be foolish to think that a shot like that was all skill. I know for a fact that there was a lot of luck involved. If the deer would have varied any on its path to the corn, I would have missed badly, or worse, wounded the deer so it would suffer. I am confident in taking a running shot, but it is not for everyone. 99% of all shot opportunities on deer during a drive will be moving deer, anything you can do to make the deer take a slower retreat; will greatly improve your odds of success.
Tip #4 Make Noise

Make noise you say? Well that is another tip that goes against the grain of traditional thinking when it comes to whitetail hunting. There are multiple reasons for walkers to make noise while on a drive. First is for safety reasons. If the walkers are making noise, then the standers can more easily pinpoint the location of the walkers, insuring that the standers know not to fire at your location. It also gives them an educated guess as to how much farther the walkers have to go before the drive is complete. It also aids in letting the deer know the walkers are coming, giving them ample opportunity to move before being startled and jumped from their bed. Once again, a deer creeping away slowly in an attempt to be undetected is easier to shoot than a running deer. This tactic is especially effective when driving through corn fields. Deer tend to hang tight in corn and will not jump until the last second and can hide rather well between the rows. I have developed a fun and entertaining cadence when making noise through the corn. I like to talk a lot and loudly and I also try to smack corn stalks on my way through. I want them to move before I get to them.

Tip #5 Be Prepared

As a stander, never in any circumstances, relax while you are waiting for the walkers. Always have your weapon in hand and pay close attention to your surroundings. The action can happen at any time and from any direction. It can be all over in a matter of seconds. I have seen deer pushed from drives while the walkers are still hundreds of yards away, and I also have had deer come out after the drivers have passed by. As discussed before, the deer will more than likely be on the run when you see it. If you get nice and comfy and lean your weapon up against a tree next to you, it will take longer for you to set up a shot. If you have your gun already in your hand when the deer comes through, you can quickly pull up and take your shot. If you have to pick your gun up first, your opportunity might pass you by before you have a chance. Never get caught unprepared on a drive.

Even walkers on the drive need to pay close attention. If you are a walker that is allowed to shoot on the drive, your window of opportunity will be even shorter. Instead of moving towards you like the standers, the deer is moving away from you, and quickly! You may only have a second or two to try and pull off an ethical shot. If you do not have a shot, or are not carrying a weapon, you can try to signal the standers that you have a deer on its feet if you see a deer jump and start moving away.

8 Tips for a Successful Deer Drive 3A few years ago, I was a walker on a short drive at our hunting property. I was equipped with a two-way radio to communicate with the standers, and I was the only walker. I made it about a quarter of the way through my drive when I jumped 2 does and a mature 9 point buck out of a thicket. Because I paid attention to my surroundings and never relaxed during my walk I was able to see the deer and tell the standers what was coming at them. My dad was ready with his gun up and into position already by the time that buck crested the ridge line in front of him. It was the biggest buck of his life, and undoubtedly noticing what was going on in front of me greatly helped in the success of that drive.

Tip #6 Lower Your Standards

While everyone would like to sit back and wait on that mature buck, it is very hard to age a deer while it is moving quickly through the woods. You may only have a couple of brief seconds to react and shoot at any given deer. You will never have the opportunity to study the deer and determine age. If you only want to shoot a buck that is 4 ½ years old or older, then deer drives may not be for you. While a small buck is fairly easy to judge while running quickly through the woods, you probably will not be able to tell the difference between 2 ½ year old and a 4 ½ year old. A running deer will appear more stretched out than a deer just standing there in a relaxed state, so you will not see if that deer has a large chest and pot belly as compared to a younger sleeker deer. And forget about trying to count points or judging score. If you try to judge the age and score of a deer before shooting, the deer will more than likely pass you by before you can figure it out.

Button bucks are another reason you may want to lower your expectations. If you are on a drive that permits you to take a doe, you run the risk of shooting buck fawns. While it is fairly easy to tell a fawn doe from a mature deer, it is not that easy with button bucks, especially in the north. By the time deer season rolls around in November, button bucks are normally the size of the adult does. Their body frame is larger than doe fawns, and can really fool you when on a full run. Even if the button buck is running next to a couple mature does, it does not look much smaller and can easily be thought to be a doe. If you do happen to shoot a buck fawn, do not get down on yourself about it. Take it from me, a professional chef, those fawns taste delicious! As I have always said, “Nothing tastes better than a baby vegetarian”.

Tip #7 Choose Your Weapons

The choice of weapons for your individual position in a deer drive is a critical factor. If you are a walker that is permitted to shoot, never carry a weapon with a scope. There are a couple reasons for this. As I mentioned before in this article, your window of opportunity will normally be shorter than that of a stander. To get a proper sight picture through your scope, it will take longer, running the possibility of missing your window. If you have a bead sight or iron sights on your gun you can more quickly acquire your target, improving your odds. I like to choose a shotgun for my weapon when I am a walker. My shots are usually close range and in dense cover. A high powered rifle bullet does not move through brush as easily as a shotgun slug. If I use a rifle, I use one without a scope and usually choose a slower moving bullet that will bust through brush without being deflected as much as a fast moving bullet. My rifle of choice is usually a lever action such as a 30-30 or my favorite, a .35 rem. Round nose bullets bust brush more easily than a pointed bullet, without as much deflection.

Walking through heavy brush where deer like to hide when pressured, can easily knock your scope off of zero, causing other headaches while deer hunting. If you knock off your zero, you will never know it, and this may cause you to miss your target or worse, wound the deer and cause it suffering.

Standers should be positioned in such a way that their gun matches the shot opportunities. If a stander has a short range rifle, then that shooter should be set up for short range shots. You do not want to set up a person with a short range rifle in a spot where his shot opportunities may be further than his guns effective range. If you have a spot in the drive where the stander has the chance to shoot out a couple hundred yards or so, you will want a long, flat shooting gun. On that same note, if the shot scenario will be something within 50 yards, you may want a shooter with a short range gun such as a shotgun or 30-30, rather than a 30-06 or 7mm-08. The cartridge you fire should always be considered when planning out your drive.

Tip #8 Driving Public Land

This is perhaps the most dangerous of situations. Public land is just that; public! Anyone, at any point in time, may wander onto the property. If you pull up to an empty parcel of land and decide you want to do a drive on it, make sure all safety rules are in place. You could all split up to your respective positions, and then another hunter could pull up, unaware of what is taking place. This puts both drivers and the other hunter in serious danger. If you believe the land is empty, but it suddenly is not, you may be shooting at a person you do not know is there. Alternatively, he might not know that there is a person walking towards him and take a shot at a deer you pushed, and put you or your standers in danger. If you choose to drive public lands, set up either a stander or walker where they can see if anyone else has entered the property, such as close to a road. This way if someone does enter the property, he can communicate to others and adjust your plan accordingly. A two-way radio helps in this so you can easily and instantly tell others, and everyone in your party is aware of what is going on.

I hope you find this article helpful when planning your next outing. While some may think this is an unethical or unsporting way of hunting, it is without doubt, an effective way to harvest deer. My party does several drives per year and has it down to a science, but the only thing we can predict, is the unpredictability of the whitetail deer.

If you follow some of these basic tactics; it will greatly increase your chances to put backstraps on the dinner table.

I would like to thank you all for taking the time to read this article. Good luck to all those venturing into the woods this fall and happy hunting!

My five favorite skinning knives for big game hunting

0

What are some of the characteristics of a good big game skinning knife? I have used these knives extensively and they work really well.

by Leon Pantenburg

Disclaimer: Nobody had any input in this post, and I was not paid to write it. This post features photos of some bloody blades, that got that way by being used in legal, lawful big game hunting. Don’t read or view any further if this offends you.

Even if you don’t hunt, and have no plans to start, a prepper/survivalist needs a set of butchering tools. When the shinola hits the fan, you may need to butcher and process a large animal such as a cow, pig, horse, bison, goat etc. With the correct tools and some basic knife skills, this is not a big deal. Without the right knives, that task may become odious and near-impossible drudgery.

Our ancestors skinned mammoths and other very large animals with small, sharp rocks. In an emergency, you could probably skin a large animal with a tiny Swiss Army Knife Classic or a pocket knife. For that matter, a standard box cutter would probably work OK. My Cold Steel SRK survival knife helped skin several deer and elk, and it worked fine. But who wants to just get by?

Among your butchering tools should be a skinning knife. Skinning a large animal merely requires separating the hide from the meat by cutting the membrane that connects them. Generally, the faster you can remove the hide, the quicker the meat cools and the better it will taste.

Every successful hunter has an opinion and here’s what I look for in a skinning knife:

  • Thin blade: The knife is not going to be used for bushcraft, and woodworking is not in the plan. A thin blade is more effective for virtually everything.
  • Pronounced belly: The belly of a blade is that part from the tip to where the edge straightens out. The belly does most of the work, and a skinning knife will have a large belly with a curve.
  • Comfortable handle: A skinner will be used a lot, for extended periods of time. The handle that fits your hand allows you to work comfortably. (Here is how to measure your hand to fit a handle.)
  • Quality steel: This goes without saying. A knife that must frequently be re-sharpened will take more time to use. Also, it will dull quicker, making it an unsafe tool. Best steel
  • Point: A piercing or drop point will work OK for skinning, but the best is an upswept or trailing point. These help extend the belly of the blade.
  • Size: This is a personal choice. I usually take two different-sized skinners in my daypack, because I can. I want a five-to-six inch blade on the larger knife, and a smaller knife with a two-to-three inch blade. These will be used in different parts of carcass.
  • No replaceable blades: Your best chance for getting in a survival situation is when you’re big game hunting. The replaceable blade knives are not sturdy enough to be survival knives – and are you going to pack out the dull blades? I hope so. Invest in a quality knife with good steel, and you won’t need to be resharpening or switching blades while processing a carcass.

Here are three types of knives I carry for big game hunting in the backcountry.

Obviously, I can’t test every skinner, and there isn’t even enough room to review all the skinning knives I have used over the years. The following skinners have proven themselves at many camp skinning racks. They are listed in a random, disorganized fashion, with no ranking of quality or usefulness.

Grandpa’s butcher knife: My grandfather, Leo Wirth, was a farmer and part-time butcher. One of my earliest childhood memories was watching Leo skin a pig at a butchering. During the Great Depression in the 1930s Leo would travel to other farms and butcher and process cattle, hogs, goats or whatever. He had a full compliment of butchering tools, hand made by his brother, John Wirth, who was a blacksmith in Boone, Iowa. John used the steel from a Model T Ford to craft the implements to Leo’s specifications.

Today, Leo’s knives are distributed among his descendants, and most of the blades are still in use. (Leo’s butchering steel is in my kitchen, and it gets used all the time. The steel ends up at the skinning rack during deer season.) My mom used Leo’s butcher knife for everything, and she maintained the edge with the steel and by honing it on the rim of a crock. At some 90+ years-old, the old butcher knife still has a lot of years of service left.

Russell Green River: A standard of the western fur trade was a do-all utility knife manufactured by J. Russell & Co. and sometimes referred to as a “Green River”. The knives were not called Green Rivers until some time after the heyday of the fur trade.

The J. Russell & Co factory was started in 1832-34 to make butcher and kitchen knives. During the era of the fur trade, close to 60,000 Russell knives per year were shipped to the West. Among the most popular patterns were the scalper, butcher and skinner. These are available today, and are a great low-cost, no-frills working tool. Fur Trade knives

Bark River Mountain Man: This basic utility knife is a recreation of the old Fur Trade standby. It combines modern steels and materials and a proven design. Mine gets a lot of use. The latest incarnation of this features the latest super steel, Magna-Cut, and an attractive handle made of the material of your choice. Bark River Mountain Man

Bark River Skinner: “Finally!” was my reaction when I saw Bark River had produced a designated skinning knife. Somebody finally produced an upscale, classic design knife for butchering and meat preparation. Bark River Skinner review

Bark River Fingerling: This design is familiar to anyone who has ever used an Old Timer™ Sharp Finger. The shape of the blade is excellent for processing the carcass, but is just as capable as an EDC knife. Read the Fingerling review.

Casstrom Safari: This small knife works very well as a small game knife. It is also valuable as a detail skinner for caping. While it could be used to skin an entire large game carcass, it wouldn’t be my first choice. On the other hand, the Safari is so small and lightweight, it makes a great backup blade in your daypack. Casstrom Safari Review

L.T. Wright Large Northern Hunter

The Northern Hunter is not really classified as a skinner, I guess, but it sure works well. The belly on the blade works efficiently to separate the hide and the handle design makes using the knife easy. Large Northern Hunter review

L.T. Wright Large Pouter

Not a skinner per se, the Large Pouter works well as an over-all hunting knife. The belly on the blade is about right for a skinner, and the knife can do it all on a carcass. Large Pouter review

Bark River JX6

The Grohmann Knives of Nova Scotia, Canada, had definite influence on this JX6 knife design. That design, according to my research, apparently goes back to the original Nessmuk knives. I used the knife on a couple of whitetails and it worked well. I would like a longer handle, but I have to periodically complain about something so people know I’m not writing ad copy!

This is another smaller skinner that is lightweight and handy. It fits well in a hunting daypack.

Honorable mention: These knives are not skinners per se, but they work well as hunting knives that can also be efficient skinners.

Lon Humphrey Minuteman: I loaned this knife to my brother, Michael Pantenburg, with the instructions to “Wring it out.”

He did that a couple of years ago on a Mississippi deer hunt. My cousin, Marion Fitzgerald, shot a whitetail buck. Mike helped him track the blood trail, and they recovered the animal, naturally, in a deep, weedy ravine. Marion went back to get me and the sled.

When we got back to the downed animal about 15 minutes later Mike had it gutted and ready to haul. We went back to the skinning shed, and Mike continued using the Minuteman to take the hide off. He raved about the Minuteman, and gave it a six-star rating out of a possible five stars.

Good friends, especially hunting friends, need good knives, in case you ever have to borrow one. Mike got the Minuteman for his birthday.

Jesse Hemphill Gator Breaker Bowie knife

Skinning an alligator is like skinning a motorcycle tire. When my neighbor brought home an eight-foot long alligator, I jumped at the chance to wring out some knives. The Hemphill Bowie knife proved to be the best knife for the job. My small knife on this project proved to be my Ambush Tundra.

Ambush Tundra: For several years the Tundra was no go-to hunting/skinning/everything knife, and it was used extensively on deer and elk. I have absolutely no complaints about its performance and could happily use a Tundra for the rest of my hunting days. Tundra review

But. Cutlery nerds are never quite satisfied.

Bark River UP Bravo: I thought the Tundra could be improved for me with that same leaf-style blade and the Bark River Bravo handle. I lobbied for that combination for a couple years, and apparently my suggestions, whining, complaining and begging were a small part of creating the UP Bravo and the UP series.

I’ve got to stop somewhere, so I’ll let it go with this. My personal skinning knife choices are not necessarily going to be yours. What works for me may not be the best choices for you. If you are currently using a favorite skinning knife and are happy with how it performs, there is no reason to go shopping for another knife.

But knife people are always looking for an excuse to acquire another cutlery tool – so here you go!

Please click here to check out and subscribe to the SurvivalCommonSense.com YouTube channel.

17 HMR vs 17 WSM

0
17 WSM vs 17 HMR vs 22LR
17 WSM vs 17 HMR

17 WSM: Is the Rimfire Speed King Worth It?

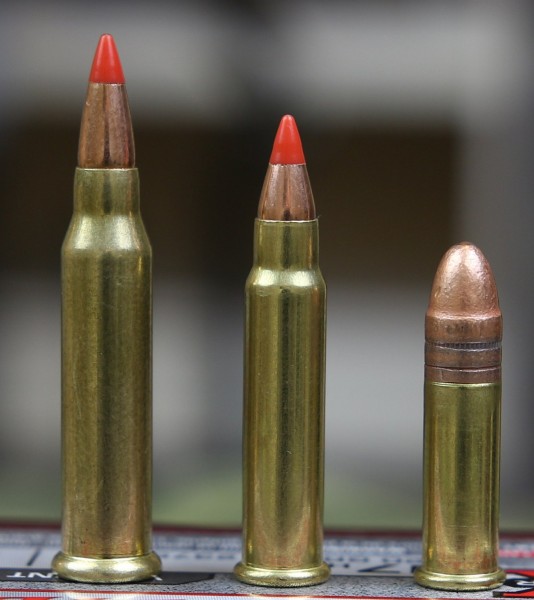
Designed and produced in 2002, the 17 Hornady Magnum Rimfire is pretty new in terms of cartridges, but there is an even newer kid on the block. The 17 Winchester Super Mag (WSM), has been in production since 2013 and is attempting to cut out a piece of the marketplace for a faster 17, and since the cases are made from nail blanks, they’re pretty inexpensive (very similar in cost to 17 HMR.) But is it fast enough?

Price update Sept 2022: 17 HMR is going for about $25 per box of 50 while 17 WSM is pretty close at about $30 per box.

Performance Comparison: Trajectory and Drift

The 17 WSM sends a 20 grain bullet out at 3000 fps, whereas the HMR is sending a 17 grain bullet at 2550 fps. That makes for some difference in the field, with the HMR granting an MPBR of 165 yards, whereas the WSM can do it with 205 yards (I’m running calculations for gopher-sized targets). That’s an extra 40 yards of non-adjusted range. More impressive is the wind drift difference. With a 10 mph crosswind, at 100 yards the WSM will drift 1.6 inches vs the HMR at 3.1 inches over. That could be the difference between a hit and a miss.

Quick numbers: (MPBR is for gophers: vertical target size of 3″)

  • 17 WSM 20 grain: 3000 FPS: .185BC: MPBR: 205 yards Energy: 400 ft-lbs
  • 17 WSM 25 grain: 2600 FPS: .23BC: MPBR: 186 yards Energy: 375 ft-lbs
  • 17 HMR 17 grain: 2550 FPS: .128BC: MPBR: 165 yards Energy: 245 ft-lbs

Performance Comparison: Energy

This is the big difference here. The 17 WSM makes for a decent coyote gun, carrying more energy much further, and the 25 grain bullet gives an option for more weight/penetration of larger varmints. I think the 204 Ruger and 223 Rem are better pure coyote rounds, but the 17 WSM offers a very inexpensive option for coyote control.

Downsides of 17 WSM

I’m going to bullet these out (ha!):

  • Availability. It doesn’t have mass support, and you won’t find boxes of it at your local hardware store. In fact, depending where you live, you might not be able to find any at all.
  • Ammo selection: Only Winchester makes the ammo so far. If your rifle doesn’t like either the 20 or 25 grain Winchester rounds, tough luck. Accuracy gremlins may be tied to the quality of ammo as well. “Accuracy at 100 yards with the 25-grain bullets was a bit over an inch; the results of the groups with the 20-grain load were too awful to print in a family magazine.” – John B. Snow article on the Winchester 1885 in Outdoor life. ***Oct 21, 2014 edit: Hornady has announced they are coming out with a 20 grain V-Max load for the 17 WSM.***
  • The ammo boxes are big and bulky compared with 17 HMR boxes.
  • Very few rifles are available in 17 WSM.
    • The Savage B.Mag
    • Volquartsen has a semi-auto 17 WSM
    • Franklin Armoury’s semi-auto F17-L
    • Winchester 1885 Low Wall Hunter
  • Slightly louder
  • May die out as soon as other rimfire ammo becomes readily available again. 17 WSM has yet to be firmly established and if none of the other ammo manufacturers end up making it, you might end up with a rifle or ammo that is discontinued or only supported by Winchester.

So, is 17 WSM Worth it?

At this point, 17 WSM is where a lot of new rounds and rifles find themselves: encountering teething problems and in that “will it become a thing or not” area. If you love staying at the leading edge of technology, this is it but be prepared to pay for being at the bleeding edge. Just because your new rifle and cartridge is better on paper than your buddy’s, doesn’t mean that you’ll outperform them in the field and you might end up dealing with growing pains.

Still not sure about these magnum rimfire rounds? Check out my article on the 17HMR vs 22LR.

Want to do your own MPBR calculations? Check out this calculator.

Black Ops Tactical Sniper Gas Piston Review

0

“All you need for happiness is a good gun, a good horse and a good wife” – Daniel Boone

While a good horse takes days to get,

A good wife takes years to find,

A good gun, on the contrary, only takes minutes to find

When you know exactly what you are looking for.

And if you love an air gun with a realistic tactical design,

the Black Ops tactical sniper has lots of promise to become your favorite gun for a lifetime.

Don’t take my word as gospel, see its pros and cons for yourself in this deep review.

Black Ops Tactical Sniper – Gun Type

This gun gets power from a gas-piston power plant.

For more on the 5 types of air rifles you need to know before buying, see this post.

This baby has a caliber (the internal diameter of the bore) of .177 (4.5 millimeters).

(For more on how to choose the right air gun caliber for your game, see this post.)

It is a single-shot break barrel gun which means that you can only shoot 1 shot at a time. 

Single-shot rifles make you a disciplined shooter: you have to think carefully about aiming and shooting because you only have 1 chance to shoot the target before reloading.

Moreover, a single-shot air gun gives you control over the type of pellet you want to shoot

And you can find out which pellet works best with the gun in the shortest amount of time.

The barrel is a rifled steel barrel. (For more on things you should know about air rifle barrels before buying, see this post.)

Furthermore, this gun has a muzzle brake at the tip of the barrel to reduce recoil.

A muzzle brake is made to take some of the gun’s kickback when shooting.

As the projectile leaves the muzzle of the gun, the gas propels the pellet in one direction

And also moves the barrel in the opposite direction.

So if you don’t want to get intense recoil, you have to change the direction of the released gas. 

The muzzle brake takes the form of a 2-inch tube screwed onto the muzzle and diverts gas around the barrel.

This is accomplished by the series of small parallel holes drilled in the tube.

The advantages? Muzzle brake cuts the recoil up to 50 percent which is a no-brainer for most shooters.

click for the lowest price

Stock

The Black Ops Tactical Sniper has a black synthetic stock.

Unlike wood stock, synthetic is lightweight and easy to carry around.

(For more on the in-depth comparison between synthetic and wood stock, see this post.)

The stock is ambidextrous: you can shoot the gun with ease regardless of whether you’re a left-handed shooter or right-handed shooter.

In addition, it has an adjustable comb that allows you to adjust the line of sight between your eyes and the barrel according to your own need.

This type of comb also gives you the ability to adjust the sight in the future when you grow or change the shooting styles.

An adjustable comb is best for picky shooters looking for a high degree of comfort and extreme efficiency while shooting.

This air rifle has a bipod that can be folded up out of the way when you don’t need it.

Also, the bipod is attached to the forearm so there’s nothing to clamp on the barrel

And you don’t have to struggle with annoying adapters to make it function properly.

Additionally, the bipod legs can extend up and down, from 8” to 10”, so you can design it in your own preference.

Ammo

Black Ops Tactical uses .177 pellets as its only source of ammunition.

.177 is a lightweight, popular, and undoubtedly cost-effective pellet when it comes to target shooting and plinking.

(For more on the differences between .177 & .22 and which jobs they do best, see this post.)

Cocking and Loading

Cocking the gun:

Grasp the airgun by the pistol grip or middle of the forearm, hold the gun close to your thigh or hip, 

With the unloaded airgun pointed upwards, firmly tap the muzzle end as as as possible,

Then pull the barrel down fully and you are just completed cocking action

Loading the gun:

With the breech opened after you cock the gun, put a pellet into the chamber (with the pellet’s nose lying forward) until the skirt is even with the face of the breech. 

After that close the gun by moving the barrel up to its original position and you are ready to shoot.

Black Ops Tactical Sniper Gas Piston Sight

This Tactical Sniper rifle doesn’t have an iron sight.

Instead of open sight, Black Ops puts a 4×32 scope on it for pinpoint accuracy.

If you observe snipers shooting on the range you would see those true snipers never use open sight since they demand surgical precision for all their shots.

And you won’t be shooting the same as the military snipers do, so a 4×32 scope meets all your need for hunting and plinking.

In fact, hunters generally like to choose low-magnification scope because it gives them a wider field of view and fast target acquisition

(For more on how many types of air gun sights are out there and which one is suitable for you, see this post.)

Besides the main optic rail for mounting the scope on top of the stock, the Black Ops Tactical Sniper has two more accessory rails in Picatinny style on both sides of the gun

So you can mount a laser and flashlight or other creative combination on this gun.

Velocity, Accuracy, and Power

Accuracy

CalibersPelletsDistancesGroups
.177Crosman Premier Hollow Point 7.9 gr20 yards0.5"
.22Crosman Premier Hollow Point Pellets 14.3 Gr10 yardsnickle size
.22Crosman Premier Hollow Point Pellets 14.3 Gr20 yardsdime size
.22H&N Crow Magnum 18.21 Gr35 yardsquarter size

Chrony tests

CalibersPelletsFPSFPE
.177Crosman Premier Hollow Point 7.9 gr94715.74
.22RWS Hyper Velocity 11 gr83316.95
.177Crosman Destroyer 7.90 gr1081 20.5
.177H&N Baracuda Match 10.65 gr92520.24
.177RWS HyperMAX 5.2 Gr123217.53
.177RWS Hobby 7gr105717.37
.177RWS Superdome 8.3 gr93716.19
.177JSB Match Diabolo Exact 8.44 Gr98618.22
.177H&N Field Target Trophy 8.64 Gr93816.88
.177H&N Crow Magnum 8.80 Gr91816.47
.177Gamo Rocket 9.6 Gr90217.35
.177Crosman Premier Heavy 10.5 Gr85517.05
.177Beeman Silver Arrow 11.57 gr80816.78

Recommended uses

  • Target shooting/plinking
  • Pest control/small game hunting: rats, raccoons, quails, doves, rabbits.

Noise

This gun produces supersonic velocity if you use a lightweight pellet so you can hear a loud crack sound due to the pellet breaking the sound barrier.

If you live in a sparsely populated area, this is not a problem but if you live in the urban area

And have over-sensitive neighbors, you should go with heavier pellets to make the velocity go subsonic

Shooting range and intended use

The effective shooting range for this gun is up to 100 yards.

Besides, it will come in handy for dispatching small rodents and other garden pests.

If you are not into pest control, this rifle makes a great paper popper and tin can destroyer.

Accessories

You don’t need to buy anything to use with this gun.

Maintenance

This Black Ops Gas Piston sniper rifle requires very little maintenance:

Just lubricate it properly every few hundred of shots and you are good to go.

Black Ops Tactical Sniper Specifications

  • Caliber: .177”
  • Velocity: 1250 FPS
  • Loudness: 3- Medium
  • Barrel Length: 18”
  • Overall Length: 44.0”
  • Shot Capacity: 1
  • Cocking Effort: 44lbs
  • Barrel: Rifled
  • Front Sight: None
  • Rear Sight: None
  • Scopeable: Weaver/Picatinny
  • Trigger: Single-stage
  • Buttplate: Adjustable
  • Suggested for: Target shooting/Plinking/Small game hunting/Pest control
  • Action: Break Barrel
  • Safety Automatic
  • Powerplant: Gas-piston
  • Function: Single-shot
  • Body Type: Rifle
  • Weight: 9.6 lbs

Black Ops Tactical Sniper Price

The price for a Black Ops Tactical Sniper rifle is only about 200 dollars.

It is a great price if you consider its innovative technology, high power, and dead-on accuracy.

Pros and Cons

ProsCons
  • Impressive tactical design
  • The safety switch location in front of the trigger makes it easy to use “blind”
  • The durability of the bi-pod, and the spring-assisted leg extension design is up to par.
  • Adjustable cheek rest
  • Accurate and fun to shoot
  • You need to attach the scope and bipod yourself.

Customer Reviews

The Black Ops Tactical Sniper receives lots of mixed reviews from customers. 

Positive reviews show that people love its magnum power, supersonic velocity, cool design, ergonomic bipod, and advanced technology.

Negative reviews provide a few issues with this gun:

The first problem is that shooters find it heavy to operate so this is not a gun for small-build guys,

The second issue is that some people complain about it being so loud.

As I said earlier, this is a supersonic air gun so if you don’t want to hear the loud crack noise,

You should use heavy pellets to slow it down to a subsonic level like 1000 FPS which is still plenty for rats, rabbits, and doves.

(For more on the best air rifle for rabbits, see this post)

Conclusion

Black Ops Tactical Sniper Gas Piston is hard-hitting and extremely accurate with a shooting range of up to 100 yards. It’s a fantastic, affordable air gun on the market today!

#WhitetailWednesday: 7 World-Class Bucks Known Only From Shed Antlers

0

These bucks are only known by the sheds they left behind.

In whitetail hunting history, there are plenty of successful hunt stories that ended with a legendary whitetail deer. But for every huge deer that falls to a hunter, there are probably just as many that get away. Some of these bucks are total ghosts that are only known by the shed antlers they left behind.

For today’s #WhitetailWednesday, here are seven bucks that left behind their antlers and vanished into thin air.

The Kansas King

These gorgeous 12-point deer sheds were found in the early 1990s. This buck may have rewritten whitetail hunting history had a hunter ever spotted it. There are actually two sets of sheds from this buck. The first scores 201 7/8, but it’s the second set that garners everyone’s attention. We can only speculate on the inside spread, but it is believed this buck would have netted a whopping 217 inches!

Had the buck met his demise by a hunter, Milo Hanson’s typical world record would likely actually be number two in the record books. Unfortunately, the world will never know.

The General

Yet another would-be typical world record, this gargantuan buck wandered Nebraska sometime in the late 1950s. For years, the sheds remained in relative obscurity in a farmer’s home. That is, until he showed them to an Oklahoma hunting outfitter. The outfitter recognized the significance of the awesome antlers subsequently scored them.

It’s estimated this monster buck would have grossed over 230 inches typical and would have likely netted somewhere in the 220s! That’s mostly thanks to main beams of over 30 inches. What’s crazy is the farmer who found them said there wasn’t one, but THREE bucks of this caliber running around the area that year!

It’s felt like Milo Hanson’s world record has been untouchable the last 25 years, but one can only wonder how much more out of reach the record would feel had the General fallen to a hunter.

The Excelsior Urban Giant

This buck was actually pretty well-known to many of the locals who tracked his movements and antler growth with trail cameras near Excelsior, Minnesota, in 2011. Many shed hunters searched for the large antlers and eventually his sheds were tracked down on two separate days by the same hunter in February 2011. The two sides scored around 175 inches without factoring in an inside spread, which would probably put the buck in the 190-inch range.

But in 2012, it the buck seemingly vanished without a trace and no one seems to know for sure what happened to it. There are internet rumors, but no proof he was hit by a car in late winter. This giant, like many mature bucks, will probably remain one of the great mysteries of whitetail history.

The Knife-Handle Buck

This giant wandered Iowa sometime in the 1970s. Unfortunately, the sheds were picked up by a farmer who didn’t really care about them and not someone who loves antler hunting. The farmer gave one side to a visiting trapper and the other side to a friend who had a hobby of making knife handles.

Yes, one of the largest sets of typical antlers ever was partially cut up for a knife! Fortunately, only part of it was destroyed and the leftover piece was later recovered in 2012 still in fairly good condition. A taxidermist was able to recreate the long-missing side from the piece.

Of course, this means no accurate numbers can be ascertained for this deer, but we can make a good guess. Estimates on this buck’s score over 230 inches, meaning this buck would could potentially have shattered all current typical records if only the buck had met up with a lucky hunter during hunting season.

The Wensel Shed

Photos of this single massive shed have circulated the internet for years now. You wouldn’t have to be a shed hunting master to spot something like this.

This buck had some good genes. This seven-point side scores over 100 inches all on its own! An Illinois giant grew this antler back in 1980, and as far as we know, the other side was never found, although it was rumored to be just as big.

Looking at this side, it’s easy to imagine it probably would’ve been a world record had the deer been harvested. But, like many of the bucks on this list, it just seems to have vanished into the wild, never to be seen again. But, it’still igniting the imaginations of hunters all these years later.

Mystery Wisconsin World-Record 5-Pointer

Another buck shrouded in relative mystery and known by only one shed deer antler, this 5-point side is the stuff of shed hunting dreams. The antler was found by a Wisconsin farmer (Are you also noticing a pattern here with farmers picking up world-class antlers?) and then tacked to a barn, where it stayed for years before it was sold and brought out of obscurity.

The thing that grabs everyone’s attention with this antler is the jaw-dropping 13-7/8-inch browtine. As far as we know, the other side was never found and the buck was never shot. This one side scores an eye-popping 98 6/8 inches. If the other side was anything like this one, we may have been talking about a 10-pointer that rivals the Jordan buck for king of the 10-pointers.

The Minnesota Monarch

This buck puzzled hunters for years in Minnesota, mainly because no one could find the deer before late winter. One landowner found several sets of sheds, as he noticed the deer only showed up on his property in February.

In 1990, the buck’s antlers scored 310 inches non-typical. Keep in mind, that was before calculating in the inside spread which can only be guessed. It’s very likely this buck would have been a world record for a hunter-killed whitetail at the very least.

But the following year, the Monarch didn’t return. Instead, he vanished into Minnesota hunting legend, and hunters in the area were likely left wondering what could’ve been.

NEXT: #WHITETAILWEDNESDAY: 5 WORLD-RECORD BUCKS THAT SUCCESSFULLY AVOIDED ALL HUNTERS

The Turkey Calling Calendar

0

Bob Humphrey

Varying your calling through the season could earn you a successful date with a big gobbler this spring.

Turkey behavior, including how they call and how they respond to calls has a certain chronology to it. While there are no hard and fast rules when it comes to turkeys, there are some generalities that seem to hold true more often than not.

How to Call to Early-Season Turkeys

Early-Season Turkey Calling
Some turkey seasons, like those in the deep south or some midwestern states, bow seasons open when winter flocks are still breaking up, which can be a tumultuous time for turkey and hunter alike.

The earliest hunting seasons begin sometime between when winter flocks break-up and toms start gathering their harems. It’s a confusing time for turkeys and turkey hunters, but one thing that usually holds true is the birds are very vocal; and you should be too. One good tactic, which may come in handy later as well, is to aggravate the boss hen. If you get her mouthing off, it will fire up all the males within hearing, especially those naive two-year-olds that can be downright suicidal. Match her note for note, especially if you notice her call getting louder and more aggressive. And enjoy this while it lasts because once the toms have a hen or two in their hand, they’ll quickly lose interest in the other birds in the bush. Fighting purrs work well at this, too, as there’s still a lot of jousting for dominance.

How to Call to Mid-Season Turkeys

Unless they travel, most folks don’t get to enjoy the very early season because most turkey hunting seasons begin after most of the hens have bred. By then, toms have become accustomed to hens coming to them rather than the other way around. Dominant birds at least have what they want and can be tougher to call. Still, some subtler calling will sometimes work, especially on subordinate or satellite toms.

But again, be subtle. Those sub-dominant toms are interested in hens but also wary of getting their butts kicked by a more dominant bird. Another generality that will get stronger as the season progresses is that your calling may be more effective later in the morning and later in the day. Early morning is a hustle and bustle of harems, but as the hens gradually peel off to breed, lonely longbeards become more vulnerable. Birds venture farther from the roost and so should you. Troll along, calling loudly every so often until you get a response. Then park your carcass and tone down your calling, leaving longer periods between calling bouts to build the suspense.

How to Call to Late-Season Turkeys

As hunting and breeding seasons wind down hunters have to literally step up their game. You may have to walk for miles trying to locate a late season gobbler. Once you do, it’s time to go “old school” with your calling. The old adage that says, “yelp three times on a box call, then wait an hour,” is not too far off, though I prefer a slate, and can only wait about 20-30 minutes before calling or moving again. Some old males have all but lost interest in hens and about the only way to trick them is to lie in ambush around feeding areas or trying a little guy talk in the form of deep, raspy gobbler yelps.

Calling Late-Season Gobblers
Late season gobblers can be particularly finicky and often require subtlety and patience.

Any Time

Regardless of what stage of the season you’re in, it’s still crucial to “taking a turkey’s temperature before serenading your quarry.” Give a few calls and see how a gobbler reacts. If he booms back and cuts you off you can really pour it on; be aggressive. If he responds but seems tentative, play it cool and aloof. And if he packs up and moves away you should do so as well. go find another turkey to hunt and leave the uncooperative one for a later hour or another day. Always remember, be patient when hunting turkeys.

Hunting Wild Turkeys
Match your calling to the season for greater turkey hunting success.

Travis “T-Bone” Turner Bio, Wife, Weight Today, Age

0

It’s been quite a journey watching Travis “T-Bone” Turner on Bone Collector but it seems like this is the end for this extremely talented hunter. In late 2021, Travis was diagnosed with an extremely fast-growing malignant cancer, and the only way to get rid of it was to amputate his leg!

Keep reading this Travis “T-Bone” Turner Bio to learn more. 2222

What Happened To Travis “T-Bone” Turner From Bone Collector?

It was February 1, 2022, when Travis “T-Bone” Turner first revealed the devastating news via IG and FB that he was having a leg amputation surgery.

According to him, he went to a hospital in July 2021 to treat an infected tick bite. And while he was there, the star also asked an ER doctor about the knot on his right shin. Since the knot was roughly the size of a grape, the doctor told him it was likely nothing but to keep an eye on it.

By next month the knot had grown to the size of a golf ball, and he was immediately referred to a general surgeon. Furthermore, when the turn for his examination arrived, the knot was even bigger with two additional knots beside it.

And when the knot finally grew to the size of a tennis ball and was “busting through the skin and bleeding,” the doctors knew they needed to perform a biopsy.

10 days after the biopsy, Travis was informed that he had fibrosarcoma, a rare form of extremely fast-growing malignant cancer. In addition, it was so larger and intertwined that it was impossible to remove all of cancer by removing the tumors.

Thus, he was prompted to amputate his leg.

The surgery then took place on the first week of Feb 2022, and by the second week, Travis was on the recovery road. “Just a quick update. The surgery went well. My leg stump is sore. But still in great spirits and feel good other than that,” Travis updated his fans on Feb 9, via FB post.

Travis “T-Bone” Turner Weight Today

Travis “T-Bone” Turner was reportedly over 136 kg (300 lbs) as of 2022. However, after the leg amputation surgery, he must have lost a certain amount of weight.

If you don’t know, this isn’t Travis’s first surgery. Back in late 2004, he underwent stomach bypass surgery, after which his weight steadily declined from 247 kg (544 lbs) to 227 kg (501lbs) on Oct. 20, and down to 172 kg (379 lbs) on April 30, 2005.

Who Is Travis “T-Bone” Turner Wife?

Travis “T-Bone” Turner’s wife Michelle Turner is a teacher who reportedly worked at Coweta County School in Coweta County, Georgia.

The two were married back on December 23, 2003, after dating for over 2 and a half years. And even as of 2022, the lovebirds were still going strong, with Travis never shying away from flaunting her over his socials.

On Michelle’s 39th birthday (i.e on June 8, 2019), Travis took it to his FB to write, “Happy Birthday to my lovely wife Michelle. My ride or die, a partner in crime, baby mama. Main squeeze, better half, anchor of the homestead.”

Talking about their kids, Travis and Michelle welcomed their son named Archer on September 28, 2005. And yes, the name “Archer” comes from their obsession with the archery thing.

Travis “T-Bone” Turner Net Worth

Travis “T-Bone” Turner garnered a net worth of under $700 thousand by 2022.

An archery guru and hunter, Travis first made his mark in the hunting world after winning the 1991 ASA Archery World Championship. At the time, he was also working as the owner and manager of one of the largest archery shops in Georgia. And with the win, he was able to make long-standing relationships with companies such as Realtree, Hoyt, Bone Collector, and Whitetails Unlimited.

The guy then went on to work as a bow technician for national celebrities and pro athletes. Finally, in 2008, he received an invitation from Michael Waddell to join his dream team of Bone Collector and got shot to the international limelight.

Besides these, Travis also was working as a spokesman for Whitetails Unlimited.

To mention his qualifications, Travis is an ASA and APA certified professional archer who is a 4-time Georgia State Cham. He is well-versed in wildlife management, has a great reputation in the outdoor industry, and owned “TboneOutdoors.com.”

Travis “T-Bone” Turner Age

Travis “T-Bone” Turner was 41 years of age when he had his leg amputated in 2022.

He receives his birthday wishes on August 8, making him of the Leo zodiac.

Who Are Travis “T-Bone” Turner Parents?

Travis’s parents were hunters too. His dad was a fireman in Dayton, but the family then had to move to Atlanta when he was transferred. And that was where Travis learned how to hunt.

Out of all the people that influenced him, Travis said that his dad was his number one icon. “He took me squirrel hunting and fishing when I was 4 or 5 years old. He bought me my first bow for getting good grades when I was 9 or 10,” the star explained.

Unfortunately, Travis’s lost his mother to cancer in 2020.

Related FAQs

  • Where Is Travis “T-Bone” Turner From?

Travis was born in Dayton, Ohio, and grew up in Atlanta.

As of 2022, he resided in Hogansville, GA, with his wife and son.

  • Is Travis “T-Bone” Turner On Instagram?

Yes, here’s his IG @tboneoutdoors.

Also, find him on FB @tboneoutdoors, Twitter @tboneoutdoors, and Youtube @tboneoutdoors.

  • How Tall Is Travis “T-Bone” Turner?

Travis is a 6 feet 3 inches (190 cm) big-framed guy.

Best Air Rifle Deals

Popular Posts

Pump Air Rifles vs Break Barrel

0
Exploring the Pros and Cons: Pump Air Rifle vs Break Barrel - Unveiling the key differences and advantages between two popular air rifle mechanisms....

PCP vs CO2 Guns: Which One is Better?

0
The most talked-about debate between hunters and gun enthusiasts is what the best power source of a gun is.  The five main sources of power...

Air Rifle Scope vs. Rifle Scope – Which One Fits Your Shooting Needs?

0
"Air Rifle Scope vs Rifle Scope: Unveiling the Ultimate Precision Optics. Discover the essential differences and benefits of these two optical devices, empowering shooters...