The 17 HMR is among the finest commercial rimfires cartridges available. It is accurate, easy to shoot, and a well-placed shot is fatal for most animals. It’s widely considered one of the most accurate rimfire rifles and the best small game hunting gun available on the market.
The best animals to hunt with a 17 HMR are raccoons, rabbits, prairie dogs, squirrels, and coyotes. The 17 HMR is one of the most accurate rifles for hunting, and precision is of the utmost importance when hunting small animals.
The rest of this article will delve into the best animals to hunt with a 17 HMR.
Every year, almost 1.5 million Americans go rabbit hunting. Most states permit rabbit hunting, and some even pay professional hunters to reduce the rabbit population in areas where they’ve become invasive.
While hunting rabbits may seem easy, you’ll have to prepare thoroughly for a successful hunt. Rabbits are excellent listeners and are likely to hear you from a distance. If you wait long enough, they may escape what they believe to be a threat.
Most shooters choose the 17 HMR as their weapon of choice for rabbit hunting since it is the most effective and precise rimfire cartridges.
The typical rimfire’s rifle trajectory is not as good as the 17 HMR, which also has a faster velocity. Considering that a lighter projectile is less wind-resistant, a faster projectile also means less time for winds to steer the bullet off course.
Because of this, 17 HMR is an excellent choice for rabbit hunting.
2. Squirrels
Squirrels are challenging to hunt because of their unpredictable movements and ability to move through tree canopies. Squirrel hunting seasons are long, and hunters can legally chase squirrels for several months or more per year.
The 17 HMR is popular for squirrel hunting because the soft recoil makes it a pleasure for hunters to shoot. At 100 yards (91.44 m), the 17 HMR fires flat enough to be effective while delivering 88 ft pounds (119 Joules) of energy.
The 17 HMR cartridges offer advantages beyond just being a flat-shooting varmint cartridge. Compared to other alternatives, the 17 HMR delivers far less flesh damage while providing an even flatter trajectory and typically higher accuracy.
Simply put, as long as you do your part to make an excellent shot, a 17 HMR will allow you to strike a squirrel from just about any visible distance.
When hunting squirrels, however, avoid shooting through the trees unless you’re an experienced hunter. There’s a high chance that the bullet may bounce off the tree and injure you.
Related How To Choose the Best Rifle for Target Shooting.
3. Raccoons
The 17 HMR is a long-range knockdown weapon that is flat-shooting, very adaptable, and built on a rimfire platform. It has a flatter trajectory than the 22LR, so you might want to use this for small game like raccoons if you’re further away.
One important thing about a 17 caliber bullet is that the bullet diameter is less than that of the case. This gives you more accuracy when you’re hunting raccoons to help protect ground-nesting birds or just for pleasure.
The 17 HMR can use bullet types well-known to centerfire shooters and has outstanding ballistic eco-efficiency, resulting in a perfect shot from a distance of 200 yards (183 m) or fewer.
4. Prairie Dogs
Although relatively harmless, prairie dogs are pests in many areas. They breed swiftly, similar to other small mammals, and an uncontrolled population might seriously harm the meadows and farms they graze on. Livestock, such as horses and cattle, can suffer severe damage from the tunnels they dig.
They may also spread fleas and carry diseases that are potentially dangerous to humans and livestock.
Hunting prairie dogs is different from hunting other animals because of their relative speed. The most popular caliber for prairie dog hunting is undoubtedly the 17 HMR because of the good velocity and medium wind drift characteristics.
It is also the cheapest option and readily available. The 17 HMR is a powerful, flat-shooting, versatile rimfire cartridge that gives long-range knockdown power. It is the best option for medium to long-range shooting of prairie dogs and better than the 22LR for this animal.
While they’re not as twitchy as rabbits, they are certainly aware of their surroundings, so you’ll have to be patient and quiet when hunting them.
5. Coyotes
Coyotes are another pest that you could hunt with the 17 HMR. However, you’ll have to manage your distance and shot placement extremely well when doing so. Coyotes are much bigger than varmints typically hunted with the 17 HMR, but a well-placed shot should still drop the animal immediately.
Nevertheless, most experts won’t recommend shooting coyotes with a 17 HMR unless you’re closer than 100 yards (91.44 m) from the animal. From further away, you may even need two or three shots to finish the coyote, which is against hunting ethics.
If you’re an experienced hunter, a 17 HMR may not be right for you in this case. However, if you can get close enough, this rifle should do the trick.
For more, check out Best All-Around Camouflage Pattern Across Multiple Biomes.
Are you tired of suffering from hearing loss after a day at the shooting range or while working in a loud environment? Hearing protection is crucial to prevent permanent damage to your ears. But with so many options on the market, it can be overwhelming to choose the right one.
Two popular brands in the hearing protection industry are AXIL and Walkers. Both offer a range of products that cater to different needs and preferences. In this article, we’ll compare the features and benefits of AXIL and Walker’s hearing protection to help you decide which brand to choose.
So, whether you’re a hunter, shooter, or work in a noisy environment, read on to find out which brand offers the best hearing protection for you.
Walker’s and Axil are both well-regarded brands in the field of hearing protection, each with its own set of unique strengths, product offerings, and user experiences, making them some of the best ear protectors for shooting on the market today.
AXIL Hearing Protection Brand
AXIL, a merger of SportEAR and Harris Hearing Group, has a history of over 60 years, specializing in the design and production of hearing protection devices. The family-owned company offers FDA-cleared products designed and engineered in the United States, focusing on enhancing and protecting hearing abilities.
AXIL’s strengths lie in its range of products, including earbuds, earmuffs, and earplugs, their commitment to quality, innovation, and customer-oriented features such as an online clinic-based hearing test, a 1-year warranty, and free shipping on orders over $50.
Walker’s Hearing Protection Brand
On the other hand, Walker’s specializes in hearing protection with various products tailored to different needs.
Their strengths lie in the excellent amplification of voices their products offer, the comfortable user experience, and the provision of different types of amplification. However, some products can be uncomfortable for extended wear.
We are going to look at one comparable set of earmuffs and Bluetooth shooting earplugs from each brand; the comparisons are;
Axil Trackr vs Walker’s Razor Slim
Walker’s Silencer BT 2.0 vs Axil GS Extreme
When evaluating these hearing protection devices, we examined the effectiveness of noise reduction, sound amplification, comfort, and durability. For AXIL and Walker’s, customers also value device features such as Bluetooth connectivity and volume control, battery life, and the ability to withstand different environmental conditions. A similar brand to Axil and Walker’s is Pro Ears; read our comparison.
Axil Trackr vs Walker Razor Earmuffs
Noise Reduction Rating (NRR)
When comparing the Noise Reduction Rating (NRR), the Axil Trackr Earmuffs outperform the Walker’s Razor Slim Earmuffs. The standard Axil Trackr Earmuffs model has an NRR of 25 dB, which indicates that it can reduce ambient noise by up to 25 dB. On the other hand, the Trackr BLU model goes even further with an NRR of 27 dB, thereby providing a higher level of noise reduction.
The Walker’s Razor Slim Earmuffs have an NRR of 23 dB. While this is a commendable rating, it falls slightly short of the noise reduction the Axil Trackr Earmuffs offers. However, this difference could be meaningful, especially in environments with high noise levels.
Noise Cancellation and Sound Reproduction
The Axil Trackr and Walker’s Razor Slim Earmuffs have advanced sound technologies. The Axil Trackr Earmuffs utilize sound-activated compression technology with a rapid reaction time, allowing the earmuffs to reduce loud noises instantly. They also have two directional microphones and high-fidelity speakers for clear, natural sound reproduction.
On the other hand, Walker’s Razor Slim Earmuffs uses active noise cancellation technology that selectively filters out harmful noise like gunfire while enabling clear communication. Furthermore, the omnidirectional microphones and speakers enhance the perception of sound direction, which can be a significant advantage in some situations.
Check out how Walker’s compares to Howard Leight in noise cancellation.
Design
In terms of design, the Axil Trackr Earmuffs feature a compact and slimline construction that is lightweight and portable. This model also includes a comfortable headband with a sturdy metal wire frame. Moreover, the earmuffs are sweat and water-resistant, making them suitable for outdoor usage and in various weather conditions.
Contrastingly, the Walker’s Razor Slim Earmuffs are characterized by their well-built and durable design. These earmuffs feature thin ear cups to minimize the bulkiness and an adjustable headband for a personalized fit. Furthermore, they are designed with comfortable ear padding to enhance the user’s comfort during prolonged usage.
Comfort
For comfort, the Axil Trackr Earmuffs have been highly praised. Their slimline design ensures minimal pressure on the ears, which is crucial for users needing to wear the earmuffs for extended periods. Furthermore, the adjustable headband and cushioned ear pads contribute to the overall comfort.
While the Walker’s Razor Slim Earmuffs are also designed with comfort in mind, the over-ear design may not be ideal for all users. For example, some shooters might find them too large or bulky, although the adjustable headband and comfortable ear padding are appreciated features.
Extra Features
The Axil Trackr Earmuffs are packed with several extra features. One standout feature is the audio input jack, which allows users to connect an external audio device. Additionally, these earmuffs have separate volume controls for hearing amplification and Bluetooth audio, providing a more customizable experience for the user.
Walker’s Razor Slim Earmuffs also offer additional features like an audio jack for connecting external devices. Furthermore, they provide adjustable volume settings through a conveniently placed volume knob, allowing users to adjust the sound level easily and quickly.
Bluetooth
The Trackr BLU model from Axil leaps the wireless technology department by offering Bluetooth connectivity. This feature facilitates audio playback and hands-free communication, allowing users to stay connected even in noisy environments.
As the latest product line, Walker’s Razor Slim Earmuffs has a model with Bluetooth capabilities. Before this, the lack of wireless connectivity might have limited the versatility and convenience, but now they are easily compared to the Axil Trackr BLU model. Now, they are both great Bluetooth ear muffs for mowing.
AXIL GS Extreme 2.0 vs Walkers Silencer Earplugs
Noise Reduction Rating (NRR) and Noise Cancellation
The Walker’s Silencer Earbuds have a respectable noise reduction rating (NRR) of 25dB for the first model and 23dB for the rechargeable second model. They provide significant protection from harmful noise levels, vital for settings with loud, sudden noises, such as shooting ranges. In contrast, AXIL’s GS Extreme 2.0 earbuds demonstrate an impressive NRR of 29dB, reflecting a higher level of noise attenuation compared to the Walker’s Silencer.
As for noise cancellation, both Walker’s Silencer and AXIL’s GS Extreme 2.0 implement an active approach. Walker’s Silencer offers multiple audio modes to suit the ambient environment, and the AXIL GS Extreme 2.0 uses sound compression technology for noise cancellation. However, despite both being effective in noise cancellation capabilities, the AXIL GS Extreme 2.0’s higher NRR could indicate better overall noise protection.
Sound Reproduction
Sound reproduction is crucial in hearing protection earbuds, particularly for those hard of hearing. The Walker’s Silencer earbuds utilize omnidirectional microphones, providing excellent sound reproduction and allowing users to hear ambient sounds clearly. On the other hand, AXIL’s GS Extreme 2.0 also offers audio enhancement features, aiding those with hearing difficulties.
Both products provide the option to amplify quieter sounds while protecting against louder, potentially harmful noises. However, while both models are praised for their sound reproduction capabilities, personal preference will likely play a significant role in choosing one.
Design and Comfort
Design and comfort significantly impact the usability of earbuds. Walker’s Silencer earbuds are praised for their comfort and customizable fit, and they come with different foam tip sizes for added convenience. These earbuds are lightweight and accompanied by a durable charging case. Similarly, the AXIL GS Extreme 2.0 earbuds also offer different earplug sizes and styles, ensuring a comfortable fit for various users. In addition, they have Sportfit ear hooks for improved retention and a compact size that adds to portability and comfort.
Each product has taken steps to ensure comfort and a good fit. However, some users might find wires on the AXIL GS Extreme 2.0 earbuds bothersome, even though it aids in keeping them together and reduces the chance of loss. Others might prefer the completely wireless design of the Walker’s Silencer earbuds.
Extra Features and Bluetooth Capability
Both earbuds offer additional features to enhance user experience. The Walker’s Silencer earbuds have a Bluetooth variant, Silencer BT, offering voice prompts and four distinct sound profiles. In addition, their application provides a customizable user interface, though some users have reported issues with it. The AXIL GS Extreme 2.0 also provides Bluetooth connectivity, volume controls, and audio enhancement features. However, some users have mentioned a slight hissing sound and sensitivity to user voice as potential drawbacks.
Overall, both the Walker’s Silencer earbuds and the AXIL GS Extreme 2.0 earbuds offer many features, ensuring user needs are met. However, personal preference and specific requirements might dictate the choice between the two, given the slight differences in characteristics and user experience.
AXIL XCOR vs Walker’s Disrupter
The Axil XCOR and Walker’s Disruptor earbuds both serve as advanced hearing protection devices with additional features for an enhanced auditory experience, but they differ in several key aspects.
The Axil XCOR offers a Single Number Rating (SNR) of 29 dB, with the ability to vary between 19-29 dB depending on the ear tip used. It features Digital Hearing Protection that compresses noises over 85dB, such as gunfire, to protect hearing while allowing ambient sounds to be heard. The XCOR also supports Bluetooth connectivity for music and calls, touch control, USB-C charging, and boasts a water and dust-resistant design. Battery life ranges up to 12 hours for Hear Control only, 6 hours for Bluetooth Audio only, and 4 hours for both.
Walker’s Disruptor, on the other hand, has a 24dB noise reduction rating and includes features such as Bluetooth, a rechargeable USB-C case, and a comprehensive set of listening modes. It offers Forward Focus Mode to prioritize sounds in front of the user, 360° Directional Sound with four microphones for true spatial awareness, Active Noise Cancellation (ANC) for reducing background noise, and Rapid Impulse Cancellation for immediate reaction to harmful noise levels. The Disruptor also pairs with a smartphone app for customizable settings.
In summary, while both products aim to provide hearing protection and enhancement, the Axil XCOR focuses on tactical use with a higher SNR and robust design, whereas Walker’s Disruptor emphasizes situational awareness and customizable sound experiences through its app and various listening modes.
AXIL vs Walker: Which is Better?
After a comprehensive comparison of the two most popular earmuff and earplug models from AXIL and Walker’s, it becomes apparent that both brands deliver high-quality, effective products tailored toward meeting diverse user needs. In addition, both companies have showcased their expertise in providing noise protection, sound reproduction, comfort, and extra features. Another notable comparison is Walkers vs Peltor hearing protection.
AXIL’s GS Extreme 2.0 earbuds and Tracker earmuffs provide impressive noise reduction ratings and sound reproduction, aiding hearing protection and enhancement. In addition, their Bluetooth capabilities, customizable fit, and additional features like volume controls speak volumes about AXIL’s dedication to providing a comprehensive hearing protection solution.
On the other hand, Walker’s Silencer earbuds and Razor earmuffs offer a slightly lower noise reduction rating but excellent sound reproduction and noise cancellation capabilities. Their commitment to comfort is seen in their customizable fit and design choices. The Silencer BT model offers four distinct sound profiles and Bluetooth connectivity for convenience. Walker also has Game Ears hearing aids.
Choosing between AXIL and Walker’s depends on your needs and personal preferences. For example, if the highest level of noise reduction is a priority, AXIL might be the better choice. However, if a completely wireless design and a more comprehensive range of sound profiles are more important to you, Walker’s could be a better fit.
In conclusion, AXIL and Walker’s produce reliable, high-quality hearing protection. It’s recommended to try both brands, evaluate them based on your personal needs, and then make an informed decision. Each brand has unique strengths and areas of specialization, providing diverse options for those seeking superior hearing protection.
A tiny fraction of whitetail hunters have taken a buck that scores over 170 typical or 195 nontypical, the minimums for entry into the Boone & Crockett record book. Many hunters feel like it’s just a stroke of luck to have a buck that size walk by, and many times it is. But that doesn’t explain why some hunters kill them with a shocking degree of regularity.
Ben Rising shot two Booners in 2015 and two in 2016. He says people push big bucks too hard in their excitement to learn more about them. Don’t dig too deep and alert them.
Several hunters have killed multiple B&C bucks over the years, which proves that they are probably doing things a little different than you and I are when you take to the whitetail woods. In talking to them, I have come up with a list if six things they’re doing that you’re probably not doing.
You’re Not Hunting Where They Live
This may seem obvious, but you have to hunt where there are. You don’t have to live there, but if you don’t have Booners where you live you must travel (or move.) Tim Young packed up and moved to Iowa and has shot two giants there and one on a roadtrip to Kentucky. Rod Owen, Adam Hays, Stan Potts and Ben Rising travel extensively to find and shoot big bucks in states other than their own.
“You have to find them first,” says Adam Hays, who has taken nine Booners including four over 200 inches. “Your best bet for finding a giant will be near sanctuaries where there is no or very limited hunting. These areas will be close to city limits, parks, industrial zones, wildlife refuges and even large tracts of land that allow no hunting. Hunting a specific animal will make you hunt harder and smarter also, just knowing he’s there!”
Rod Owen agrees.
“Killing a Booner isn’t the hardest part, the hardest part is finding one.”
Ben Rising has shot four Booners in the last two years. He says he often spends more time looking for a buck and getting access to hunt where the buck lives than actually hunting him.
You Don’t Understand How Fickle They Can Be
You can’t take chances with human intrusion, checking scouting cameras too often, or hunting in the wrong winds. To shoot a Booner you must do everything right, and get lucky, too. Patience is the key. Rod Owen tells about how he waited weeks for the perfect conditions to hunt a giant buck, but the wind switched so he literally got out of the stand and RAN all the way back to his truck.
Rod Owen shot two Booners in 2016, one in Kansas and one in Missouri. He refuses to hunt a stand until the conditions are perfect.
“People go overboard trying to get intel on these big bucks and end up hurting themselves in the long run,” according to Ben Rising. They “dig too deep” he says, risking alerting the deer that he’s being hunted.
According to Adam Hays, patience is the #1 key.
“Sometimes the most difficult part of hunting a big buck is actually not hunting him at all,” he says. “having the patience and the discipline to wait until everything is perfect before diving in for the kill.”
You’re Not Willing To Do Whatever It Takes
You are spending your time watching Monday Night Football, you’re hanging out with buddies, you’re fishing when the big buck killers are scouting. The hunters who shoot Booners make sacrifices, and they are consumed by the pursuit and learning everything they can about the deer and the land they inhabit. The drive to shoot giant deer is at a level far above the average deer hunter.
“There are hunters and there are killers,” says Rising. “The drive has to be far greater if you are going to consistently kill big ones.”
Steve Niemerg’s truck was stuck in a snowdrift so he had to wait out the blizzard in a nearby farmhouse. He’s a do-whatever-it-takes hunter so when the blizzard was over he went hunting instead of going home. He was rewarded with this giant.
With his truck stuck in a snowdrift, Steve Niemerg waited out a blizzard in a farmer’s house for two days, then instead of going home when the blizzard quit, he went hunting and killed a giant Booner that very evening.
You’re Not Hunting During the Peak Times
There are a few specific short periods each year when most Booners are shot. Hays is a big believer in the moon’s position as an influence of big buck movement. Rising says that waiting for the right moment is key.
Adam Hays has killed nine B&C bucks. He’s obviously doing something different than the average hunter. He says finding them and getting access to hunt them is the hardest part.
Hays also claims that a wind that’s good for the buck and bad for you can be the best time to hunt.
“For me, the Holy Grail of whitetail hunting is finding a big buck’s weak spot, somewhere along his travel pattern where you can get within bow range of him while he’s using the wind to his advantage”
When a peak time arrives, you must put the rest of your life on hold. You might be surprised to discover that most of these true giants were not shot during the rut. Most big buck killers agree that they prefer to kill Booners before the chaos of the rut arrives and the deer are in more predictable patterns.
You’re Not Passing On Big Bucks
Those 170 and 180 bucks were once 150 bucks. If you can’t pass up a 4-year-old 150, you will probably never shoot a 6-year-old 180. A friend in southern Iowa who owns a large farm told me he kicked a guy out of their hunting group because he wouldn’t pass up the 4-year-olds that most people would drool over.
“People like Adam [Hays] and I have learned not to smoke the tag on the first 4-year-old 160 that comes by,” says Rising. “We only have one tag in Ohio.”
That’s a tough hurdle for most hunters to get over. If you are happy with a 150-160 then so be it, but if you want to kill bucks approaching 200, you will have to let them walk.
You’re Taking Shortcuts
Most hunters rely too much on gimmicks and don’t go to the extremes necessary. You aren’t choosing your entry and exit routes wisely enough, and you aren’t using discipline to wait for perfect conditions. These big buck killers are scent control fanatics, but they don’t use that as an excuse to take shortcuts with the wind. Scent control is an honorable goal, but the belief that you can totally eliminate your scent and ignore good woodsmanship is a ticket to forkhorn land.
Hanging a treestand during the rain, letting those cameras sit for weeks and only checking them with the right wind, having the patience to wait until everything is right — these are the characteristics of a person who kills Booners. Hunting mature bucks is all about strategic moves at the right time in the right place. There are no shortcuts, you must make every move with precision.
Massachusetts hunters are preparing for the approaching spring turkey season. Subject to limitations, the season will last for several weeks and include the Youth Turkey Hunt Day. This article will go through the specifics of the Massachusetts turkey season, including crucial dates, rules, and advice on a productive hunt. So gather your supplies, and let’s begin!
During this season, a hunting or sports license, a turkey permit, and three turkey tags are needed to hunt wild turkeys in Massachusetts. For the eleventh season, beginning in April, turkey hunting will also be permitted on Cape Cod National Seashore.
MA Youth Turkey Season
MA Youth Turkey SeasonSeason Start DateSeason End DateBig Game Zones 1-13 (Youth Hunt:)22-Apr22-Apr
MA Spring Turkey Season
MA Sping Turkey SeasonSeason Start DateSeason End DateBig Game (Zones 1-13)24-Apr20-May
MA Fall Turkey Season
MA Fall Turkey SeasonHunting Season Start DateHunting Season End DateBig Game (Zones 10-13***)2-Oct25-Nov Big Game (Zones 1-9***)16-Oct25-Nov
From October 16 through October 28, 2024, hunters may use shotguns, muzzleloading shotguns, and archery tools during the autumn turkey hunting season in wildlife management zones 1 through 13. However, only archery gear is permitted during specific times of the fall season. The tables that are presented offer further information on these times.
Note: For the entire Hunting license list, view it on the mass.gov website
Hunting Regulations
Massachusetts turkey hunters need licenses and permits. Massachusetts requires a Hunting or Sporting License, a Turkey permit, and a Safety sticker. Non-residents require a Big game license, Turkey permission, and a Safety sticker. Turkey hunting with a shotgun or muzzleloader requires a safety sticker. Sighting down the barrel requires this sticker. Visit any MassWildlife office or contact [email protected] to get a new sticker.
Turkey hunting equipment rules vary in spring. Shotgun hunting is limited to gauge 10 and shot size #4. Smoothbore shotguns may only be.775 calibers and #4 shot size for muzzleloader hunting. Archery equipment must have a draw weight of at least 40 lbs at 28 inches or peak draw and well-sharpened steel broadhead blades of at least 7/8 inches. Expanding broadheads and portable releases are permitted, but airbows are not. Permitted disabled hunters may use crossbows.
During the autumn turkey season in Massachusetts, hunters must wear blaze orange caps in Wildlife Management Areas stocked with pheasants or quail.
Massachusetts, licensed turkey hunters may call turkeys for other hunters but cannot carry firearms or archery equipment if they have surpassed the season limit. Even without tags, the caller needs a license and Turkey permission. Massachusetts turkey hunters cannot utilize electronic calls, dogs, bait, drive or herd birds, or live decoys.
Hunters must rescue and utilize dead or injured game animals. The animal must be maintained or sent to someone else for processing. Damaged, decaying, ill, or contaminated animals are exempt from this regulation.
Massachusetts residents must report turkey harvests within 48 hours at a check station or online via MassFishHunt. After harvesting the turkey, you must affix the paper tag from your permit to the carcass and keep it intact until it is reported and processed for food or taxidermy. Online harvesters must put their confirmation number on the carcass tag.
Massachusetts has spring and fall turkey seasons. Spring runs from the final Monday of April to the fourth Saturday. Wildlife management zones (WMZs) affect fall. WMZ 1-9’s season runs from the 6th Monday before Thanksgiving to the Saturday after. WMZ 10-13’s season runs from the 8th Monday before Thanksgiving to the Saturday after. Sunday hunting is prohibited. There is a special kids’ turkey hunt on the Saturday before spring. This hunt requires the young turkey program and Basic hunter education.
Note: For Complete Massachusetts Turkey hunting regulation, you review the Commonwealth of Massachusetts website
When it comes to duck hunting, having the right decoys can make all the difference. To help you choose the best decoys for a successful hunting experience, we have compiled a list of the top 5 duck decoy companies, along with their top 3 decoys and why they are preferred by hunters. With these high-quality decoys in your arsenal, you’ll be well-equipped to attract and bag more ducks on your next hunting expedition.
Avian-X is a renowned brand known for its lifelike and realistic decoys. The brand was created by a group of passionate hunters who wanted to change the game in terms of realism and effectiveness in decoy design. They combine cutting-edge technology with years of field experience to produce innovative and lifelike decoys that attract more waterfowl. Avian-X offers a wide range of decoys designed to mimic a variety of duck species, each with unparalleled detail and realism. They also offer various poses and positions to create dynamic and convincing spreads that lure in wary ducks. With Avian-X, hunters can expect to experience unparalleled success on their hunts by bringing in more birds. The company prides itself on using only the highest-quality materials to ensure durability and longevity in their decoys, making them an investment that hunters can depend on season after season. Here are Avian-X’s top 3 decoys:
Avian-X Topflight Backwater Mallards
Avian-X Topflight Backwater Mallards are the ultimate choice for hunters targeting mallards in marshes, shallow water, or backwater areas. These decoys are specifically designed to mimic the natural postures and movements of mallards in these unique hunting environments. The Backwater Mallard decoys feature realistic paint schemes, intricate feather details, and lifelike body postures that make them virtually indistinguishable from live mallards. The attention to detail on these decoys is unmatched, allowing you to create an incredibly convincing spread that will attract even the most cautious ducks. Whether you’re hunting in flooded timber or small wetland areas, the Avian-X Topflight Backwater Mallards are sure to enhance your hunting success by bringing mallards in close for the perfect shot.
Avian-X Topflight Pintails
Avian-X Topflight Pintails are a must-have for any serious duck hunter. These decoys are meticulously crafted to replicate the unique features and behavior of pintail ducks with extraordinary accuracy. Their lifelike body postures and vivid paint schemes make them virtually indistinguishable from real pintails. The attention to detail, from the intricate feather patterns to the realistic eyes, is truly remarkable. These decoys draw in pintails from a distance, enticing them with their authentic appearance. With Avian-X Topflight Pintails in your decoy spread, you’ll have the confidence and edge needed to attract more pintails and increase your chances of a successful hunt.
Avian-X Topflight Canvasbacks
Avian-X Topflight Canvasbacks are a top-of-the-line choice for hunters targeting these elusive diving ducks. Known for their striking appearance and swift flight, canvasbacks can be a challenge to lure in. However, Avian-X has gone above and beyond to create incredibly realistic decoys that capture the unique characteristics of these birds. The Topflight Canvasbacks feature meticulously painted details that perfectly replicate the distinctive coloring, patterns, and feather textures of live canvasbacks. The attention to detail extends even to the realistic head positions and body postures, ensuring that these decoys look convincingly lifelike in the water. Whether you’re hunting in open water or along the shore, the Avian-X Topflight Canvasbacks are designed to maximize visibility and attract canvasbacks from a distance. With these decoys in your arsenal, you can significantly increase your chances of a successful canvasback hunt.
Flambeau Outdoors
Flambeau Outdoors is another trusted name in the duck decoy industry, celebrated for its innovation and top-quality products. Their decoys combine durability and realism, making them a favorite among hunters. Flambeau Outdoors is a renowned company that specializes in manufacturing high-quality outdoor products and gear. With a rich history that spans over seven decades, Flambeau is dedicated to providing innovative solutions for outdoor enthusiasts. Their hunting decoys, in particular, are highly regarded for their lifelike appearance and realistic features, making them a favorite among hunters. Whether you’re a seasoned hunter or a novice adventurer, Flambeau Outdoors offers a wide selection of products that are designed to enhance your outdoor experience and help you succeed in the field. With Flambeau Outdoors, you can trust that you are investing in top-quality gear that will withstand the demands of the great outdoors. Here are Flambeau Outdoors’ top 3 decoys:
Flambeau Gunning Series Mallard Decoys
Flambeau Gunning Series Mallard Decoys are a popular choice among duck hunters. These decoys are designed with attention to detail and realistic features that make them almost indistinguishable from live mallards. Made of sturdy plastic, the Flambeau Gunning Series Mallard Decoys are both durable and lightweight. They come in a variety of poses, including swimmers, feeders, and high-head drakes, making for a varied and dynamic spread. They have vibrant, non-glare paints that are both water-resistant and durable. These decoys are the perfect tool to convince mallards that your hunting area is safe and appealing. With Flambeau Gunning Series Mallard Decoys in your spread, you can expect to attract more mallards and to get closer to them than ever before.
Flambeau Master Series Mallard Decoys
The Flambeau Master Series Mallard Decoys are the epitome of realism and effectiveness in waterfowl hunting. Each decoy in this series is meticulously crafted to replicate the natural appearance and behavior of live mallards. The attention to detail is remarkable, with intricate feather patterns, lifelike body postures, and vibrant paint schemes that mimic the subtle nuances of mallards in various stages of flight and landing. These decoys are made from durable and lightweight materials, ensuring that they can withstand the harsh conditions of any hunting expedition. The Flambeau Master Series Mallard Decoys also feature removable heads, allowing hunters to customize their decoy setup and simulate different poses and positions to deceive even the most wary ducks. With their unparalleled realism, these decoys create an irresistible allure that will attract mallards from afar, increasing your chances of a successful hunt. Whether you’re a seasoned waterfowl hunter or a passionate beginner, the Flambeau Master Series Mallard Decoys are the ultimate choice for enhancing your hunting experience and bringing more ducks into range.
The Storm Front Classic Mallard decoys excel in replicating the natural appearance and behavior of live mallards. The ultraviolet (UV) paint replicates the reflective properties of real feathers, creating an additional layer of realism that can fool wary ducks. With their versatility and affordability, these decoys are a popular choice for both experienced and novice hunters.
Flambeau Storm Front 2 Wigeon Decoys
The Flambeau Storm Front 2 Wigeon Decoys are a true game-changer when it comes to waterfowl hunting. These decoys are designed to perfectly replicate the natural coloring, feather patterns, and body postures of wigeons – a diving duck species known for its elegance and agility in the water. Each decoy in this set is expertly crafted and hand-painted to accurately simulate various poses and flight positions, creating a lifelike and convincing effect that will attract wigeons from a distance. The decoys are made with Flambeau’s proprietary polymer blend material, ensuring they hold up well in any hunting conditions. They feature a weighted keel and anchor points, which provide stability in the water and prevent rotation during high winds or strong currents. For added convenience, the Storm Front 2 Wigeon Decoys also feature a realistic high-definition paint scheme, which resists chipping and fading over time. If you’re looking for premium quality wigeon decoys that will optimize your hunting results and withstand the test of time, the Flambeau Storm Front 2 Wigeon Decoys are an excellent choice.
Higdon Decoys
Higdon Decoys is a leading company in the waterfowl industry. Based in Kentucky, USA, the company specializes in creating high-quality and realistic decoys that are designed for maximum hunting success. Higdon Decoys offers a wide range of decoy types, including duck, goose, and turkey decoys, as well as various accessories such as motion decoys, wobble bases, and jerk strings. The company takes pride in using only the highest quality materials and innovative manufacturing techniques to create lifelike decoys with exceptional durability. The decoys are designed by professional hunters to reflect the latest advancements in hunting strategies, and the company frequently collaborates with experienced hunters to develop new products for improved hunting outcomes. From the Higdon Magnum Mallard Duck Decoys to the Full-Body SuperMag Snow Goose Decoys, Higdon Decoys is committed to providing hunters with reliable, effective, and top-quality decoys that can withstand the rigors of frequent use in the toughest hunting conditions. Here are Higdon Decoys’ top 3 decoys:
Higdon Magnum Mallard Duck Decoys
The Higdon Magnum Mallard Duck Decoys are among the most realistic and effective decoys available on the market today. These decoys are designed to replicate the size, shape, and coloring of live mallard ducks, providing an incredibly lifelike appearance that ensures maximum attraction of real ducks. They are made from high-quality materials and feature detailed feather patterns that create a seamless illusion. Additionally, the decoys have vibrant paint schemes that can withstand heavy use and exposure to the elements. The Magnum Mallard Duck Decoys are also equipped with weighted keels that provide stability, promote natural movement in the water, and have anchor points for easy setup and placement. For added convenience, the decoys come in four unique body postures to add variety and realism to your spread. With their unmatched realism and attention to detail, the Higdon Magnum Mallard Duck Decoys are a top choice for serious waterfowl hunters who want to improve their success rate and add a touch of authenticity to their hunting experience.
Higdon Standard Redhead Duck Decoys
The Higdon Standard Redhead Duck Decoys are a top choice for waterfowl hunters seeking a realistic and effective decoy setup. This pack includes 12 Redhead duck decoys, each meticulously designed to replicate the size, shape, and coloring of Redhead ducks, ensuring a lifelike appearance that will attract even the most discerning ducks. The decoys are made from high-quality materials and feature vibrant paint schemes that are resistant to fading, ensuring long-lasting use. Their weighted keels and anchor points provide stability and allow for easy setup and positioning. The realistic body postures of these decoys add variety to your spread, enhancing the overall effectiveness of your hunting setup.
Higdon Outdoors Standard Ringneck Duck Decoys
The Higdon Outdoors Standard Ringneck Duck Decoys are a reliable and effective tool for waterfowl hunting enthusiasts. These decoys are specifically designed to replicate the appearance of Ringneck ducks, with meticulous attention to detail in color, feather patterns, and body shape. The foam-filled construction ensures durability and buoyancy, providing a lightweight yet sturdy decoy that can withstand rough water conditions. The decoys come with weighted keels and anchor points, allowing for easy setup and ensuring stability in the water. This lifelike setup, combined with the decoys’ realistic paint schemes, creates an irresistible attraction for Ringneck ducks, luring them into shooting range. The Higdon Outdoors Standard Ringneck Duck Decoys offer hunters an excellent decoy option that is built to last, providing both functionality and realism for a successful hunting experience.
Dakota Decoy Company
Dakota Decoy Company is a reputable and innovative company in the hunting industry. With a focus on premium and realistic decoys, the company has gained recognition among serious waterfowl hunters. Based in North Dakota, USA, Dakota Decoy Company prides itself on producing high-quality decoys that mimic the appearance and movement of various waterfowl species. From mallards to snow geese, their decoys exhibit exceptional attention to detail, ensuring a lifelike and convincing look. The company utilizes advanced manufacturing techniques and durable materials to create decoys that withstand the rigors of the field. Dakota Decoy Company is committed to continual improvement, constantly innovating and enhancing their products to provide hunters with even more effective hunting tools. With their dedication to quality and realism, Dakota Decoy Company has become a trusted name in the hunting community, delivering reliable and top-notch decoys that help hunters achieve optimal hunting success. Here are Dakota Decoy Company’s top 3 decoys:
Dakota X-Treme Mallard Decoys
The Dakota X-Treme Mallard Decoys are a game-changer for avid waterfowl hunters. These decoys, designed by Dakota Decoy Company, are specifically crafted to replicate the appearance and behavior of mallard ducks with unmatched realism. Each decoy is meticulously hand-painted, showcasing intricate feather patterns and vibrant colors that accurately simulate the look of live mallards. The attention to detail extends to the decoys’ body postures, which mimic various natural positions, adding depth and authenticity to your spread. Made from durable materials, these decoys are built to last and can withstand the toughest hunting conditions. The pack includes both hens and drakes for a balanced and diverse presentation. Thanks to their weighted keels, these decoys stay stable and perform convincingly in the water, even in the face of wind and waves. Increase your hunting success with the Dakota X-Treme Mallard Decoys, the epitome of lifelike realism and durability in the field.
Dakota Decoy Signature Series Upright Geese
The Dakota Decoy Signature Series Goose 6-Pack, the ultimate solution for waterfowl hunters seeking ultra-realistic and effective goose decoys. Made from durable EVA plastic, these decoys boast a one-piece body design that enhances their durability and resilience in harsh hunting conditions. With a meticulously designed mix of postures including one sentry, three walking actives, and two relaxed actives, this package provides a dynamic and ultra-realistic appearance that is bound to attract a wide range of waterfowl. The inclusion of the Wind Walker Motion Base allows the decoys to move naturally, increasing their appeal and successfully luring wary geese to your location. Additionally, the base eliminates the need for staking the decoys into the ground, further streamlining your hunting setup. The Dakota Decoy Signature Series Goose 6-Pack offers hunters a high-quality and innovative tool for a successful and productive hunting experience.
Dakota X-Treme Blue-Winged Teal Decoys
The Dakota X-Treme Blue-Winged Teal Decoys, a must-have for waterfowl hunters who are targeting these fast-flying and elusive ducks. These decoys are specifically designed to capture the unique characteristics and essence of Blue-Winged Teal with unparalleled detail. The attention to detail is evident in the decoys’ intricate feather patterns, vibrant colors, and realistic body postures that reflect the natural movement and behavior of these agile ducks. Crafted using the highest-quality materials, these decoys are built to withstand the challenges of the field, ensuring long-lasting performance season after season. The pack includes both drakes and hens, allowing you to create a balanced and convincing spread that will attract Blue-Winged Teal from a distance. Featuring weighted keels, these decoys stay securely anchored in the water, mimicking the tranquility and confidence of real Blue-Winged Teal. Elevate your waterfowl hunting experience with the Dakota X-Treme Blue-Winged Teal Decoys, the ultimate choice for dedicated hunters seeking to replicate the magic and excitement of hunting these speedy and beautiful birds.
Final Approach
Final Approach is a well-known manufacturer of high-quality, innovative, and field-proven hunting gear and accessories for waterfowl and other game bird hunters. Established in 1993, the company has dedicated itself to providing hunters of all skill levels with the gear and tools needed to achieve their hunting goals. At Final Approach, they have a deep understanding of the demands that hunters face when searching for game, which is why they have designed and tested their products to meet or exceed the needs of modern hunters. Their selection of hunting gear includes decoys, blinds, bags, accessories, and more, all made to the highest standards of craftsmanship and quality. By constantly innovating, experimenting, and perfecting their products, Final Approach has earned its place as a trusted provider of hunting gear for seasoned and new hunters alike.
Final Approach Last Pass Mallard Decoys
Final Approach Last Pass Mallard Floaters is a remarkable decoy that combines affordability with exceptional craftsmanship. These decoys are meticulously painted, providing a stunning and lifelike appearance that is sure to deceive even the most cautious waterfowl. Designed to be lightweight and compact, they are the ideal choice for hunters who need to traverse long distances to their hunting spots or are looking to maximize the number of decoys they can carry in a mesh bag or small boat. Built with the same rugged construction and durability as the renowned Live Series Mallards, these decoys are built to withstand the rigors of the hunting season. The new carvings, created by the 17-time World Champion Pat Godin, further enhance their authenticity and overall appeal. With their one-piece design, weighted keel, and cord lock system, these decoys ensure stability and ease of use. The 12-pack includes a balanced mix of 6 drakes and 6 hens, allowing hunters to create a diverse and enticing spread. Trust in the Final Approach Last Pass Mallard Floating Duck Decoys, 12 pack, or simply known as the Last Pass Mallard Floaters, to elevate your hunting game and attract waterfowl like never before.
Final Approach HD Blue Wing Teal Floater Decoys
The Final Approach HD blue wing teal decoys are the real deal, crafted with an unparalleled attention to detail that’s a testament to the new era of excellence in decoy craftsmanship. You’ll be amazed at the intricately sculpted heads and meticulously painted tails – they’re so realistic, they’ll make you do a double-take! If you’re looking for an effortless way to add some variety to your decoy spread and attract teal and other waterfowl, these decoys are a total game-changer. Designed for early season decoy spreads when these early birds are still around in many states, they’re the perfect choice for hunters who want to create a diverse and visually appealing spread that’s sure to catch the eye of passing waterfowl. With a 12-pack that includes a mix of 8 drakes and 4 feeder hens, you’ll have everything you need to create a dynamic decoy spread that’s bound to increase your chances of a successful hunt. So, grab your hunting buddies, set up around a campfire, and get ready to elevate your waterfowl hunting game with the Final Approach HD Bluewing Teal Floater Duck Decoys!
Final Approach HD Greenwing Teal Floater Decoys
Experience the excellence of the Final Approach HD Greenwing Teal Floater Duck Decoys – a game-changer for waterfowl hunters. With unmatched detail, these decoys bring your spread to life and attract teal or add variety. The 12-pack includes 8 drakes and 4 hens, crafted from premium plastic with a realistic, one-piece design. Expertly carved by Wayne Simkin, they blend seamlessly into their surroundings. Upgrade your spread with the Final Approach HD Greenwing Teal Floater Duck Decoys for a successful and unforgettable hunt.
With the variety of options available, choosing the right duck decoys can be overwhelming. The top 5 duck decoy companies highlighted in this article offer some of the best decoys for successful hunting experiences. Whether you’re targeting mallards, canvasbacks, scaup, teal, or Canada geese, these decoys deliver on realism, durability, and effectiveness. Each company offers a range of high-quality and effective decoys that cater to different hunting needs and preferences. Whether you choose Avian-X, Flambeau Outdoors, Final Approach, Higdon Decoys, or Dakota Decoy Company, you can trust that their top-decoys will enhance your hunting experience by attracting more ducks to your spread. Invest in these premium decoys and get ready for more successful hunts ahead. Happy hunting!
I’ve said this several times over the years but I’ll say it again in case you missed it the second, third or at some time in the past. Of the states down the spine of the Rocky Mountains Idaho is my favorite destination when it comes to hunting bears. This does not mean to suggest states to the east, west and south do not have their special attributes that make them special in their own right, they certainly do, but for me there’s simply no place like Idaho, especially when it comes to bear hunting opportunities.
Based on my own personal experiences there are a number of reasons why hunting Idaho holds such a dear place in my heart. There’s the memories of successful hunts, of friends made, of riding mules into the backcountry and of camping in those remote places under ebony skies speckled with stars so bright it seems you can reach out and grab them, of the scent of spruce and fir and wood smoke on a chilled night at high elevation, of those remote places where bears grow old and big and have seen few humans. But, from the perspective of a hunter planning a bear hunt there are other reasons why Idaho is, as its nickname states, such a “gem.”
LOTS OF BEARS
According to most sources Idaho is home to between 20,000 and 30,000 black bears, but that’s just and estimate. Whatever the case Idaho is home to one of the largest black bear populations in the western United States if not the Lower 48. The population is healthy and increasing and bears are now being reported in areas of the state where sightings were considered rare just a few years ago. The highest concentration of black bears is found in the forested northern two-thirds of the state, in particular the mountain ranges, subalpine ridges, associated foothills and riparian areas along the lengthy Bitterroots along the border with Montana and Salmon River Mountains and Sawtooth Range in the central region. The remote Selkirk Mountains in the northern Panhandle, the vast Selway Region and designated wilderness areas to the south are home to some of the highest bear densities in the state. To the south, bears are also found in the Caribou Range in the southeast corner east of Pocatello and Owyhee Range in the southwest south of Boise.
LOTS OF ROOM TO HUNT/LOTS OF OUTFITTERS
More than sixty-percent of Idaho is owned by the federal government, some thirty-three million acres. More than twenty million acre of that is in the form of seven national forests. That’s about forty-percent of the state’s land area. Needless to say there is plenty of public land to hunt bears.
All my Idaho hunts have been with an outfitter in the St. Joe or Clearwater National Forests and unless the hunter has a great deal of experience in remote, do-it-yourself hunts an outfitter is recommended. This is big, rugged country and hunting with an outfitter is the easiest, safety and typically most successful way to plan and experience an Idaho bear hunt. Highly qualified and knowledgeable outfitters operate in each of the national forests offering a variety of accommodations, services and hunting packages.
A list of licensed outfitters is available from the Idaho Outfitters and Guides Association.
These same national forests are also popular among do-it- yourself hunters but careful planning is a must including where to hunt, obtaining maps, weather conditions and necessary equipment and where to camps, among other. Campgrounds are available throughout each national forest but open and closing dates, fees if any, whether reservations are needed or not, availability of drinking water and other services vary. Specific and helpful information can be obtained on each national forest as well as campgrounds can be obtained from each national forest supervisor’s office.
COLOR PHASE BEARS & HIGH SUCCESS
Color-phase bears are found throughout the western United States and parts of western Canada but Idaho offers as good a chance to kill one as any place. In general brown or chocolate-phase bears are most common in northern Idaho with cinnamon and blonde less so, although the farther south you go the percentage of lighter bears increases.
Colored bears can and are taken throughout Idaho. In some cases success boils down to being in the right place at the right time but hunting the right habitat greatly increases the odds. Colored bears are taken in the dense timber but areas that offer a combination of timber bordering open, south-facing slopes, wide-open river valleys, open brakes and canyons are general hotspots. These areas are generally warmer and it is believed the lighter hair color helps bears stay cooler. Whether hunting with an outfitter or doing it on your own the St. Joe and Clearwater National Forests, the Selway, the Salmon River country and Frank Church Wilderness and national forests in the southeast and southwest, to name but a few all offer this time of mixed habitat.
A word of note here. Hunters specifically wanting an opportunity at a colored bear should let their outfitter know of their desires when booking a hunt. Many outfitters utilize trail cameras on their baits or are familiar with the bears in their area. There’s no guarantees here but informing your outfitter beforehand can help achieve success.
HUNTING OPTIONS
Idaho offers a lengthy spring bear season but open and closing dates vary. In the Panhandle the season open as early as April and generally in May elsewhere. Closing dates are in June or July. Fall season dates also vary. Most open August 30 and some close as late as November 30, depending on the unit. Falls hunts can also be combined with hunts for elk and deer. Depending upon the unit and season hunters can hunt over bait and with dogs, in some units both are prohibited so hunters should be sure to check when booking or planning a hunt. Spot-and-stalk is legal in all units.
AFFORDABLE LICENSES
Compared to some other western states bear hunting Idaho is one of the best deals available when it comes to over the-counter hunting license and bear tag availability and fees (see Particulars below). Another bonus is resident and non-resident hunters can purchase vastly discounted bear tags in at least seventeen units and portions of two others. These same units also offer the opportunity to take two bears with discounted tags, something increasingly rather in the west. Hunters also have the option of applying for one of the controlled black hunts, although application deadline dates apply.
IDAHO PARTICULARS
Estimated Bear Population: 25,000-30,000 +/-
Legal Limit: Two (2) in some units, one (1) in some units.
Hunting Area: Black bears are basically legal game statewide except some state parks, wildlife preserves and developed areas.
Spring Hunts/Dates: Yes. Varies by unit. April 1-June 30 or late July depending upon unit.
Fall Hunts: Yes. August 30-end of November in most units.
Popular Hunting Methods: Baiting and dogs are allowed in most units. Spot-and-stalk. License Available/Fees: License are available by phone, on-line and venders statewide. Non-resident reduced/second bear license-$41.75. Non-resident full price bear license-$231.00. Non-resident hunting license-$185.00. Non-resident Junior Hunting License (ages 10-17) $91.75.
Legal Weapons-Rifles and handguns except those that take rim fire ammo;
.50 caliber and larger muzzleloaders; bows with 40 pound pull and higher; crossbows 150 pound minimum draw.
Contacts: Idaho Fish and Game, 1 (208) 334-3700; www.fishandgame.idaho.gov.
300 Blackout Ammo has a lot going for it, right up to the point at which you try to take advantage of its subsonic prowess for tasks other than punching paper. Common subsonic loads, even if tipped with a fragile match bullet such as the ubiquitous 220-grain Sierra Matchking, plow 0.30-inch diameter holes straight through fleshy targets and keep on truckin’ right into the next inconveniently located piece of real estate.
We’ve tried bullets that in other applications are positively explosive. Hornady’s 208-grain A-Max, for example, fragments violently when shoved out the muzzle at even .308 Win velocities, but from a Blackout you might as well be using a DeWalt. Getting a .30-cal to expand reliably at around 1,000 feet per second requires a specialized projectile, and they’re not exactly inexpensive.
Being cheap bastards, in times past we experimented by cutting back the jacket tip on an SMK and then boring out the meplat, thinking that this would be enough to induce expansion. Great theory, sucks in practice. Gel testing confirmed that it performs no better than an unaltered bullet, so why waste the effort? Cutting to the chase, we rounded up a small selection of expanding subs.
Note there are a few more companies who offer bullets for you to roll your own (Cutting Edge, for example), but as work has displaced gentle-paced pursuits like reloading, we’d often rather pay in money than time.
If you decide that a subsonic 300 Blackout Ammo fills your requirements for a stealthy hog slayer, or you’ve settled on that caliber for home defense duties, then you might want to avail yourself of our buyer’s guide below.
All loads were tested for velocity using both 16- and 9-inch barreled weapons. A Remington 700, equipped with a Nightforce ATACR 4-16×42 and SilencerCo Omega was employed as our longer rifle, and it was this combo that we also used for accuracy and gel testing. Five-shot groups were shot at 50, rather than 100, yards as we felt this was a realistic distance for subsonic use. The shorty gun was our budget hog hammer — a franken AR built on a Gibbz side charging upper and equipped with a Maxim Defense PDW pistol brace. Note that all loads except the Fort Scott and Gorilla offerings were supersonic from the 16-inch barrel.
Velocity readings were taken using a Caldwell G2 chronograph, which has the useful ability to store data on your phone via Bluetooth. Chrono was set up 10 feet from the muzzle, ambient temp was 69 degrees at 2,100 feet elevation, and gel testing was performed using two, 16-inch Clear Ballistics gel blocks, placed end to end.
Fort Scott 190-grain SCS Brush Hog
Ever heard of these guys? Neither had we, until we walked into a gun store near San Antonio, Texas, where the counter jockeys assured us they were well regarded by local hog hunters. Intrigued, we bought a couple of boxes for testing. Unlike the rest of the projectiles in this test, these are non-expanding, relying for their wounding abilities on becoming unstable in media more dense than air. Gasp! The fabled M16 tumbling bullet!
Despite a healthy dose of skepticism, they turned in a decent performance, coming to rest after 180 degrees of flippage and 15.5 inches of penetration in bare gel, with the bullet’s base just barely under the back end of the block. Fort Scott seems to be using a set of dies that diverges from industry norms, which resulted in a misfire rate of around 50 percent in our bolt gun — the only sample to do so. On examining the case shoulder (which, in 300 Blackout, is even less significant than Chuck Schumer’s dick) it would appear that it’s both steeper and shorter than competitive brands, allowing the case just enough room to shift forward under firing pin impact. It ran fine in our AR, though.
Gorilla Ammo 205-Grain Silverback
Gorilla’s monolithic projectile features a gaping hollow point, which initiates pretty healthy expansion after about 3 inches of penetration in gel. One of the two loads achieving subsonic velocities from our 16-inch bolt gun, it’s mouse-fart quiet even in longer barrels. Not only did it retain all its weight after impact, but petals on the copper bullet remained sharp enough to nick careless fingers when pulling it from the gel block. Accuracy was plenty good for dispatching critters at subsonic ranges.
Hornady 190-grain Sub-X
Announced in December 2017 and released for sale three months later, Hornady added an expanding subsonic bullet to its existing five 300 Blackout ammo offerings. Built to their usual standards, the bullet features a red polymer tip to initiate expansion, a detail no doubt familiar to users of their Critical Duty line of pistol ammo. In our test rifle, it proved to be an accurate and consistent performer, and if a lone flyer were discounted, would’ve turned in a 0.36-inch group. Of the conventional jacket-and-core projectiles in this test, it was the only one not to separate. Note, however, that some polymer mags may have problems in presenting the blunt tip high enough to make it up the feed ramp in your favorite semi auto. Either use regular old GI versions or Magpul’s 300 BLK-specific offering.
hornady.com
Lehigh Defense 194-Grain Maximum Expansion
Lehigh’s wicked-looking solid copper bullets turned in an admirable performance, expanding as advertised and growing sharp, symmetrical talons when shot into gel. When dug out, they showed evidence that the fast twist barrels of our test guns would’ve caused additional tissue damage, as they screwed their way through the medium — in this case making three complete revolutions before coming to rest after shedding a petal. Those wanting additional penetration should consider Lehigh’s loading; it exceeds the FBI protocol, but if you encounter bigger hogs it affords a margin of safety on quartering shots.
Noveske / Nosler 220-Grain Ballistic Tip
Averaging 20-fps faster than the otherwise similar SSA load, this collaboration between two of Oregon’s most respected gun companies is unmistakable with its ominously dark finish. Accuracy was good enough for the task at hand, and the bullet core achieved 17 inches of penetration, after parting company with the remaining jacket around the 15-inch mark. About 30-grains worth of ballistic payload was shed in total, leaving a smoky-looking trail through our gel block as it threw off particles of lead and copper.
SSA 220-grain Ballistic Tip
Silver State Ammo was acquired by Nosler in 2013, and we suspect that both this load and the Noveske/Nosler above use the same bullet, with a different polymer tip and coating. Group size was almost identical to the Nosler load, and both bullets separated from their remaining jackets after 12 to 14 inches of penetration in bare gel. As this meets the FBI requirements, we don’t see this as a negative for defensive use, because both resulting fragments penetrate sufficiently to reach vital organs.
Photos by Kenda Lenseigne
More on 300 Blackout
The Curious Origin Story of 300 Blackout
New in 2021: Magpul’s 300 Blackout 20-round PMags.
Radical Firearms Integrally Suppressed 300 Blackout SBR at SOFIC.
300 Blackout Buyer’s Guide.
300 Blackout vs 556: More than a Matter of Distance.
Lighter Score Weight When Filled Fuel Pre-filled? Top Pick: BIC Mini Lighter 0.39 oz Butane Yes Runner-Up: Clipper Mini Lighter 0.39 oz Butane Yes Best for Adverse Weather: UCO Stormproof Torch 3.21 oz Butane No UST Wayfinder Lighter 1.27 oz Butane No Zippo Matte Lighter 2.15 oz Zippo Lighter Fluid No
We bought 5 of the best backpacking lighters available and set about testing their water-resistance by soaking them in water, their wind-resistance by trying to blow them out, and their reliability by striking them until we got blisters. Our tests confirmed what backpackers have long known: the BIC Mini Lighter (commonly called the “Mini BIC”) is the best lighter for backpacking.
It is ultralight, reliable, decently water-resistant, and a great bang for your buck.
The Mini BIC’s only downside is it’s not wind-resistant. A simple windscreen can usually solve this problem though.
If you need a lighter for backpacking in extremely wet or windy conditions, we recommend the UCO Stormproof Torch. It was the most wind- and water-resistant lighter we tested.
Also, it’s important to point out the Mini BIC earned the top score in our tests by the slimmest of margins. The Clipper Mini Lighter is an excellent alternative. It isn’t as easy to find in the US, however — you’ll likely have to pick one up online or at a head shop.
Supremely affordable and available everywhere, the Mini BIC earned our Top Pick award because of its reliability, value, and ultralight weight.
When I struck the BIC 200 times, it lit a perfect 200. BIC has perfected lighting consistency.
The Mini BIC is also decently water-resistant. After performing 3 “Soak Tests” with it — submerging the lighter in water, shaking it out, and then trying to light it in 1-minute intervals — it took an average of 2 minutes before it started lighting again consistently.
(To dry it out quicker you can also run it up and down a piece of wood or your pants leg for 30 seconds.)
The BIC’s main drawback is how poorly it holds up in windy conditions. The flame is difficult to light in even a slight breeze.
Without some sort of windscreen, a BIC is hard to light in even a slight breeze. The wind was blowing a few miles per hour at the time of this photo.
It’s an easy problem to overcome though — I usually have luck with using my hand or windscreen to block the wind long enough to light my backpacking stove.
If you’re worried that you need something beefier to take into the backcountry, don’t be.
BIC lighters have been put through the ringer countless times by backpackers of all varieties. Every year plenty of AT and PCT thru-hikers complete their hikes having used only Mini BICs. And adventurer Andrew Skurka uses a BIC in his Cadillac Stove System.
Runner-Up: Clipper Mini Lighter
The Mini Clipper is another excellent backpacking lighter.
While not nearly as ubiquitous as the Mini BIC, it performed actually better in our tests.
For starters, like the Mini BIC it lit a perfect 200/200 times.
It is also slightly more wind- and water-resistant than the Mini BIC.
Where it took the BIC 2 minutes on average to start lighting consistently after having been submerged in water, it took the Clipper 1 minute. I was also able to light the Clipper more easily in a slight breeze.
You might be wondering at this point…
“If it performed better in your tests, why didn’t it get a higher score?”
Based on reports I read of backpackers who had used a Clipper for a long time, the general consensus was that a Clipper’s flint wore out quicker than a BIC’s. As such I docked it some points for being less reliable over the long-term.
In my view you still can’t go wrong if you take a Clipper on your next backpacking trip. Let price and availability be your guides if you’re undecided between the two.
Mini Clippers ship pre-filled but unlike BIC lighters they are refillable with butane. You can also purchase replacement flints and replace a used-up one yourself.
Best for Adverse Weather: UCO Stormproof Torch
Most backpackers — whether you’re a beginner or seasoned thru-hiker — don’t need this lighter.
It’s heavy, bulky, and costly relative to BICs and Clippers.
Its flame is impressive but unnecessary for all but the most adverse weather conditions.
But should you truly need a weather-resistant lighter, the UCO Stormproof Torch is your best option.
While neither truly windproof nor waterproof like UCO’s incredible stormproof matches, this lighter was the most wind- and water-resistant that we tested.
When submerged with the cap on, the inside of the lighter remained completely dry and lit immediately after shaking off the excess water. As marketed, the case is waterproof.
When submerged without the cap, it took just one minute of drying in my pants pocket before the lighter started lighting again consistently.
Its wind-resistance isn’t anything to write home about — it was pretty easy to blow out — but it was the best lighter we tested in this regard, just edging out the competition.
I do have some long-term reliability concerns with this lighter however. The more I struck it the more the flame started to sputter. If you do go with the Torch, take a back-up ignition source with you just in case.
There are two versions of this lighter: one comes with a bottle opener, the other with duct tape. I tested the duct tape version.
UST Wayfinder Lighter
The Wayfinder Lighter from UST, like the UCO Torch, is a butane lighter with piezo-electric ignition.
UST says it “performs without fail in the most adverse conditions.”
I found it to be reliably unreliable.
When I struck it 200 times, it lit just 87, the least of any lighter by far. It is marketed as “windproof” and is apparently able to withstand winds of up to 80 mph. I didn’t test it in those conditions, but I was able to blow it out by blowing air at a moderate rate.
The Wayfinder’s performance was heavily affected by being submerged in water. The inside of the lighter got wet even when the cap was on. Also, air bubbles came out of the fuel refill port, which made me wonder if water was entering the fuel chamber.
It took an average of 9 minutes of drying the lighter in my pants pocket before it lit again, and over 20 minutes before it started lighting consistently.
One of my main gripes with the Wayfinder is that there’s no way to know how much fuel is left. On backpacking trips, especially long ones, this in an important thing to know.
Overall I wasn’t impressed. The unreliability and high price point make this lighter a less than ideal choice for your next backpacking trip.
Zippo Matte Lighter
The Zippo is a classic, but it makes for a bad backpacking lighter.
The biggest drawback of this lighter is its unreliability.
Now, I don’t mean this lighter doesn’t light consistently. It does. The Zippo was the third most reliable lighter in that regard, lighting 175 out of 200 times.
In this case, I mean it’s unreliable because of the issues that stem from its fuel.
First, I had an issue with the fuel leaking. After soaking the lighter in water to test its water-resistance, the fuel started leaking on my hands, in my pants pocket, and on the outside of the lighter.
This poses two threats when out in the backcountry:
It increases your chances of running out of fuel
It poses a fire hazard should you light the lighter without realizing it’s been leaking
What’s more, the fuel evaporates slowly out of the lighter. There are numerous accounts online of people complaining about this and trying to come up with their own fixes to the problem.
This even happened to me when I took these lighters with me on an overnight backpacking trip. The Zippo had fuel in it when I left. When I returned just a day later, despite lighting it only a handful of times, it was empty.
The last thing you want on a backpacking trip is for the fuel in your lighter to leak or evaporate. As such, we don’t recommend the Zippo.
And that’s good news actually — the Zippo has the highest retail price of any of the lighters we tested, you need to buy fuel for it and refill it yourself, and it’s heavier than a backpacking lighter needs to be.
Save yourself a couple ounces and a handful of dollars: pick up a Mini BIC or Mini Clipper and be done with it.
Summary
Here are the best backpacking lighters:
BIC Mini Lighter
Clipper Mini Lighter
UCO Stormproof Torch
UST Wayfinder Lighter
Zippo Matte Lighter
Alternative Ways to Light Your Backpacking Stove or Start a Campfire
In my experience, lighters are the most popular way backpackers light stoves and start campfires.
There are other ways, though, which we’ve also written about. Consider these other products if you’d like an alternative to lighters (click on the link to see our reviews of the top options):
Fire starters
Stormproof matches
Waterproof matches
Even if you do go with a lighter, you might want to take a back-up ignition source just in case. Most backpackers I know who do this will carry one in the form of a ferro rod, magnesium fire starter, or pack of waterproof or stormproof matches.
How to Choose the Right Backpacking Lighter for Your Needs
Weight
When it comes to backpacking gear, lighter is always preferable.
The lighters we tested ranged from 0.39-3.21 oz. That isn’t terribly heavy in the grand scheme of things, but relatively speaking the heaviest lighter weighs over 8 times as much as the lightest.
Unless you want to go with our top option for adverse weather, the UCO Stormproof Torch, a lighter shouldn’t cost you more than an ounce in pack weight.
If you’ll be backpacking for an extended amount of time you might want to consider bringing a back-up lighter or, if your lighter is refillable, extra fuel.
Flint vs. Piezo-Electric Ignition
Flint lighters — like the BIC, Clipper, and Zippo — use a flint to generate sparks.
Piezo-electric lighters — like the UCO and UST — use a spring-loaded hammer to hit a piezo-electric crystal and create an electrical charge.
I found the flint lighters to be much more reliable over the long-term than the piezo-electric lighters.
Unless you need a highly weather-resistant lighter such as the UCO Stormproof Torch, I’d recommend you go with a flint lighter.
There are also battery-powered electric lighters (aka plasma lighters). These are not water-resistant and thus are less than ideal for taking into the backcountry.
Weather-Resistance
There is no perfectly windproof or waterproof backpacking lighter. However, all the lighters we tested sported some degree of weather-resistance.
Although, just because you expect to encounter adverse weather on your trip doesn’t mean that you need to bring along a highly weather-resistant lighter.
While I would generally recommend you go with a Mini BIC or Mini Clipper for the weight and cost savings, there are some situations where a highly weather-resistant lighter might be preferable — such as emergency or survival scenarios. Also, if you aren’t concerned with the extra weight and bulk it’s hard to put a price on peace of mind.
Pre-Filled vs. Empty
BICs and Clippers come pre-filled. The other three lighters we tested come empty and you must fill them with the appropriate fuel, which you also must buy.
Pre-filled lighters are less hassle and cheaper upfront. You don’t have to buy fuel or fill the lighter yourself.
Empty lighters you must buy fuel for and fill yourself. They are refillable and thus may work out to be cheaper in the long-run. The two types of fuel we used were butane for the UCO Stormproof Torch and UST Wayfinder Lighter and Zippo lighter fluid for the Zippo Matte Lighter. (The Mini Clipper can also be refilled with butane.)
Type of Fuel: Butane vs. Lighter Fluid
Backpacking lighters are generally butane lighters. The fuel they use is premium butane.
We also tested the Zippo Matte Lighter which uses Zippo Lighter Fluid.
The two types of fuel used by the lighters we tested
After testing these lighters side-by-side, I personally would never take anything other than a butane lighter on the trail.
The reason?
The Zippo started leaking fuel after being submerged in water. The fuel got on my hands, on the outside of the lighter, and on my pants pocket where I had placed the lighter to dry.
How We Tested
Soak Test
For each lighter I did the following 3 times and averaged the results:
Submerged it in water for 5 seconds
Shook off excess water for 10 seconds
Tried to light it
If it didn’t light, I stuck it in my pants pocket to dry and took it out and tried to light it in 1-minute intervals, recording how long it took before each lighter started lighting consistently again
Submerging a lighter in water for the Soak Test
Results:
Mini BIC: 2 minutes
Mini Clipper: 1 minute
UCO Stormproof Torch: immediately when submerged with cap on; 1 minute when submerged with cap off
UST Wayfinder Lighter: 9 minutes when submerged with cap on; didn’t bother testing with cap off
Zippo Matte Lighter: 20+ minutes when submerged with lid closed; didn’t bother testing with lid open
(H/T to this reddit thread for giving me the idea for this test, as well as the idea to test a Clipper lighter in the first place.)
Reliability Test
This was a straightforward test: I struck each lighter 200 times and recorded how many times each one lit.
Results:
Mini BIC: 200/200
Mini Clipper: 200/200
UCO Stormproof Torch: 200/200
UST Wayfinder Lighter: 87/200
Zippo Matte Lighter: 175/200
Lesson learned — strike a flint lighter enough times and you’ll get blisters!
Since I didn’t have time to test long-term durability, I then read reports of backpackers who had used these lighters for extended periods of time. If other hikers consistently reported that a lighter was unreliable over the long-term, I incorporated that into my final reliability rating.
Note: I removed the metal safety band from my Mini BIC prior to testing.
“Wind” Test
I don’t have a fan or leaf blower, but I do have lungs.
I lit each lighter and then tried to blow it out, starting by blowing lightly and getting progressively more forceful. It was an admittedly crude test.
Overall, I was disappointed in the wind-resistance of these lighters. If you’d like something that is truly windproof (and waterproof), read our reviews of the best stormproof matches. Otherwise, just be sure to bring along a windscreen to block the breeze.
There is just something about wooden, homebuilt tree stands. Maybe it’s because I grew up hunting from them, but I just feel more comfortable in a home-built stand, especially when facing an all-day sit. More importantly, the permanent stand expresses just that: permanence. Even though a stand built on a shared property should be open to everyone, there is a very real sense of ownership if you are the one that built it. It’s not just a stand, its Dan’s Stand or Mark’s Stand or Scott’s Stand.
Our farm has a fair amount of pressure on it during the 9-day November gun season, with up to 10 guys spread out over 300-acres of woodlots, CRP and harvested crop fields. Many of the hunters have “their” stand location and have been at that specific spot for most of their lives. Over the last couple years, I’ve been using hanging stands to hunt a 20-acre section that for a variety of reasons, has not been heavily hunted for a decade or more. In that time, I’ve recognized it as a forgotten and ignored gem.
Bucks have scrapes and rubs to let everyone know they are around. I’ve got a wooden tree stand to let other hunters know they’ve entered my zone. By constructing it, I’ll be claiming this section of the farm as my own during the crowded gun season. Even though the secrets out on how good this location has been for me, the other hunters are respectful enough not to build another stand in the vicinity. As the sole bow hunter, I am lucky to have the farm to myself during the long and quiet archery season. With this new stand, I’ll have yet another comfortable set up to use when the conditions are right to hunt a buck from that location.
DIY Deer Hunter: Build a Wooden Ladder Stand
Below are instructions to build the stand. As a bit of a disclaimer, should you decide to take this project on for yourself, understand that your safety is in your own hands. Know the limits of your carpentry skills, and the potential risks involved in constructing your own stand.
Material List
2×4 x 14 treated lumber for the legs.
2×4 lumber for steps, stand platform, seat base and braces, uprights and rails
1×6 boards for decking
14- 5/16 x 4 hex bolts, with nuts and washers to assemble the stand
2 – 6-inch eyebolts with nuts and washers to attach a ratchet strap to.
2- 1/2 x 6 lag bolts with washers
2.5 inch deck screws for decking and ladder steps
Tools
Crosscut saw, electric drill, drill bits, square, tape measure.
Instructions
The treated 2×4’s will run the entire height of the stand. Decide how tall you want the side walls of the stand platform to be and measure that distance down from the top of the treated 2×4. Drill a pilot hole in each 2 x 4 at this location. This is where the platform will bolt on to.
Build the platform base so that it will fit inside of the span created by the ladder. The overall width of my stand is 32 inches, so the floor frame works out to be 29 inches wide by 42 inches deep. Install a 2×4 floor joist in the center to help support the floor boards. On the back of the platform, pre-drill two holes for lag screws to be threaded through when mounting the stand to the tree.
Cut 1×6 decking and attach to platform using screws
Bolt the platform to the legs.
Cut 2×4’s at 32-inch lengths to use as the steps for your ladder. Screw in a step every 18-inches or so until reaching just below the platform base.
The seat frame consists of two, 42-inch, 2×4 rails running the length of the platform with 4, 32-inch long 2×4’s strung between them to make the seat itself. Bolt the front of the seat base to the ladder at your desired height above the platform.
Cut two, 42-inch top rails. They will tie the ladder to the rear uprights.
Cut two rear uprights to length. They should be level with the top of your treated 2×4’s. Bolt the uprights to the platform and top rail.
Bolt the rear of the seat base to the upright using a eyebolt. Besides holding the seat base up, the eyebolts can be used to tighten a ratchet strap around the tree for added stability and support.
With the stand in position, attach the braces between the ladder and the back of the platform base.
To get the stand standing, I brought my brother along for help and we were easily able to “walk” it from flat on the ground, to up against the tree. It’s going to take some repositioning of the stand itself to get it just right, so leave the bolts that hold the stand together just a little loose. You’ll tighten them up as you get the stand in place.
The platform is anchored to the tree using 2 lag bolts. You’ll need to bring along climbing sticks or a ladder to assist in placing the bolts, since the base of the platform will be 6-10 feet off the ground. To make this easier, I waited to screw in the floor boards until after I had secured the stand to the tree and ran the braces. As a secondary safety precaution, a ratchet strap is strung around the tree using the two eye bolts. Once the placement looks good, retighten all the bolts that hold the stand together, make sure your ratchet strap is in place, and you’re ready to hunt.
Improve and accessorize the stand by stapling camouflage fabric to the frame for additional concealment, and attaching your assorted gear hooks, camera arms, etc.
Getting a stand like this in place can sure be an exhausting job. The good news is, you’ll only have to do it once. On our farm in southern Minnesota, stands like this can last decades, only needing occasional and minor repair work.
The first day of deer rifle season is a tradition in Pennsylvania. Whether you enjoy archery or muzzleloader hunting, everyone marks the opening day of Pennsylvania’s rifle season on their calendar. All that hype, anticipation, and year-long excitement is over in one short day. Prepared, and lucky, hunters, will have one hanging at the end of the first day but many more will have to re-evaluate and adapt their deer hunting strategy if they want to harvest a late season buck in the Keystone State.
Late Season Deer Hunting Opportunities in Pennsylvania
Deer hunting the late season starts the beginning of the second week of rifle season and runs all the way to the conclusion of deer hunting in Pennsylvania, which is the last day of flintlock season.
Deer Hunting Season in Pennsylvania
Deer firearms season: November 26 – December 8.
Wildlife Management Units (WMUs) 2B, 5C and 5D both antlered and antlerless deer can be harvested with each required license.
WMUs 1A, 1B, 2A, 2C, 2D, 2E, 2F, 2G, 2H, 3A, 3B, 3C, 3D, 4A, 4B, 4C, 4D, 4E, 5A and 5B are antlered harvest only November 26 – November 30 except for those hunters having a DMAP antlerless permit, who can harvest an antlerless deer in a DMAP zone. From December 1 – December 8, both antlered and antlerless deer can be harvested.
Deer flintlock and archery after Christmas season: December 26 – January 12.
One antlered or antlerless deer can be harvested with a buck tag and additional antlerless deer can be harvested with each additional doe tag.
All Pennsylvania deer hunting season and bag limit regulations.
Late season deer hunting in Pennsylvania can be split into two distinct phases. The first is the second week of the deer firearms season. Deer hunting on public land in Pennsylvania has been overloaded with hunters the first week of rifle season and now hunting pressure is slowly decreasing. These last few days of rifle season can be productive if you know how to hunt deer.
The second phase of the late season is the after Christmas flintlock and archery season. Roughly 3 weeks after the end of the rifle season, late season flintlock and archery season provide hunters one last chance at Pennsylvania deer hunting. Hunters are restricted to using traditional flintlock muzzleloaders or archery setups during this season. It takes a completely different deer hunting strategy during these weeks, however, to score a last minute buck.
Deer Hunting Strategy for the Last Week of Rifle Season
If you are not seeing any deer while hunting the second week of rifle season, it may be time to adapt your deer hunting tactics. Here are four tips to up your deer hunting strategy in the second week.
Still-hunt bad weather days – The rifle season only lasts for two weeks in most WMUs in the state so you have to hunt when you can. This includes bad weather days. Still-hunt along ridges and on old logging roads where you can stop and glass often. The weather (rain, snow or wind) will allow you to sneak quietly and possibly make something happen and spot an unsuspecting buck. A good deer rifle scope goes a long way here if you have to take a long shot at a buck.
Re-visit your opening day plan – A buck that has been pushed from his core area on opening day will come back as pressure subsides in the second week. Go back to your opening deer hunting strategy and wait for him to come back.
Use any hunting pressure to your advantage – Some more mature bucks will go nocturnal during rifle season. The only way they will move in daylight hours is by getting bumped. Don’t be afraid to hunt where others are hunting. Let them move around and spook up a buck to your position.
Try some rut tactics – In some areas, bucks will still be in rut mode. Either late estrous does or second rut action can be found in the second week. It is not a bad idea to have your grunt call, doe bleat and even rattling horns with you. Be cautious, however, as rattling and blowing a grunt call in areas with a lot of hunting pressure may yield unwanted hunters to your area.
How to See More Deer While Hunting after Christmas
Some of the same deer hunting tips used in the second week of rifle season can also be effective in the after Christmas flintlock season. Although, deer are now back into predictable patterns, particularly their winter patterns. This deer hunting season in Pennsylvania requires more attention to basic deer needs and less around hunting pressure. Consider these three deer hunting tips and strategies when hunting the flintlock season.
Hunt mid-day – Winter will be in full force and even the deer will notice the cold temperatures. With reduced hunting pressure, bucks will move more during mid-day when temperatures warm. You want to be hunting when the sun is the highest and bucks are taking advantage of the few extra degrees of warmth.
Focus on late season food sources – Deer will be back into feeding mode trying to recover from the rut and maintain themselves during the cold. Groups of deer will usually gather around remaining food sources like mast producing ridges and remaining agricultural fields with leftover crops. Both of these locations are ideal ambush spots for late season deer hunting. Having quality hunting clothing will help you sit over these areas in the evening as temperatures drop.
Key in on deer sign – Deer sign is probably more important now than any other time of the year besides the peak rut. In winter deer are not traveling great distances. They are going from bedding areas to feeding areas and back again on a fairly consistent pattern. Areas with fresh deer sign mean deer are in the area and will be back through at some point. Hunt fresh sign and hope one of the tracks or pile of scat you find belongs to a leftover buck.
Don’t get discouraged if you have not filled your buck tag yet. There are many more days left for deer hunting in Pennsylvania besides the first day of buck season. Focus and adapt your deer hunting strategy during the second week of rifle season and during flintlock season to tag out a late season buck.
"Understanding the Legalities: Felon Ownership of Air Rifles in Tennessee"
can a felon own an air rifle in tennessee?
In the state of Tennessee, the ownership...
Exploring the Pros and Cons: Pump Air Rifle vs Break Barrel - Unveiling the key differences and advantages between two popular air rifle mechanisms....
")
")
")
")
")


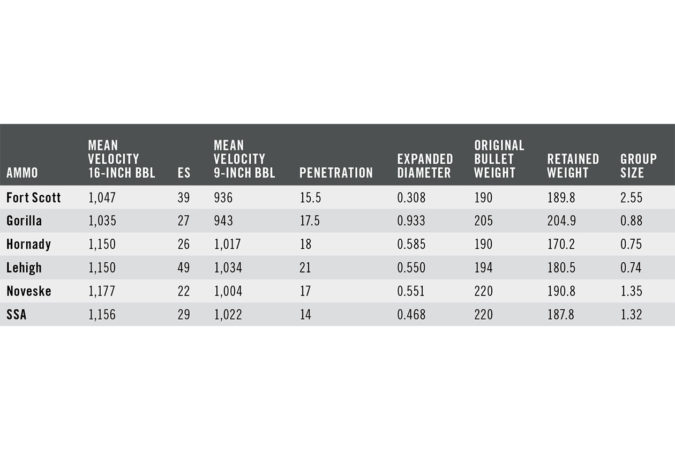
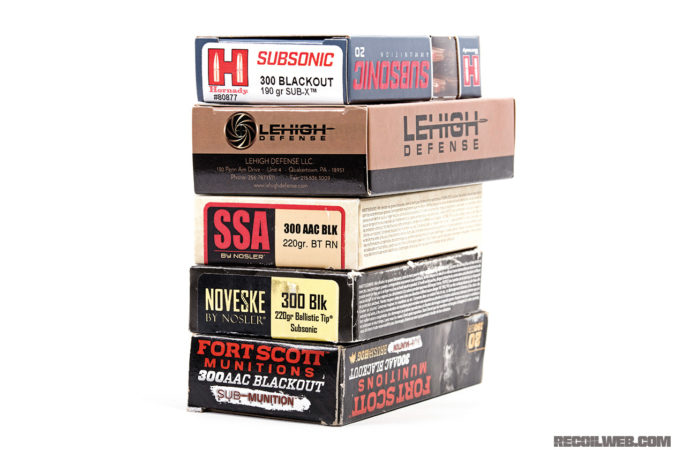
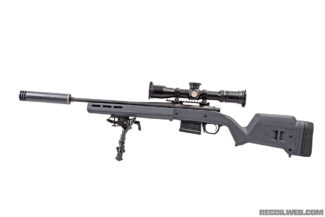
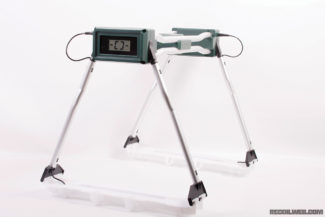
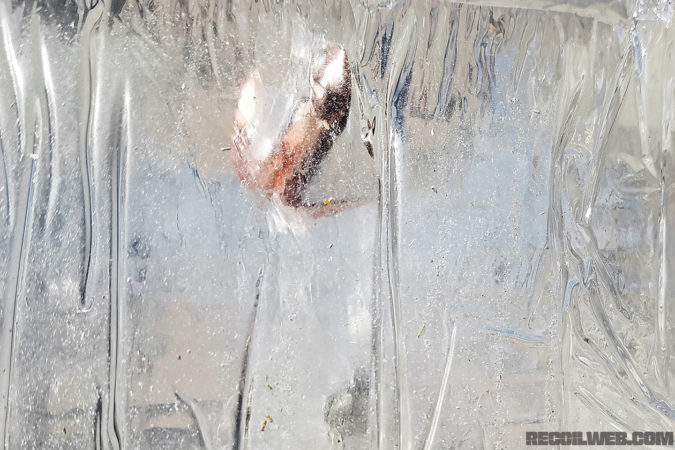
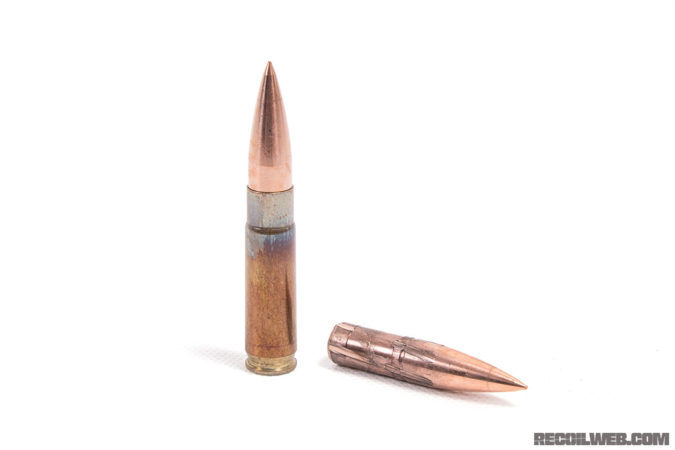
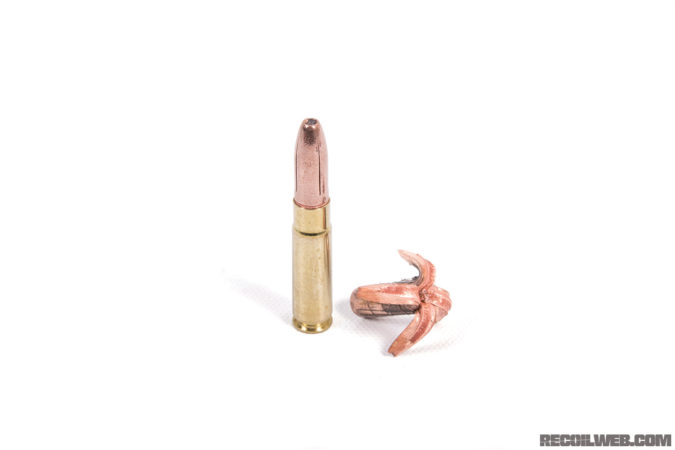
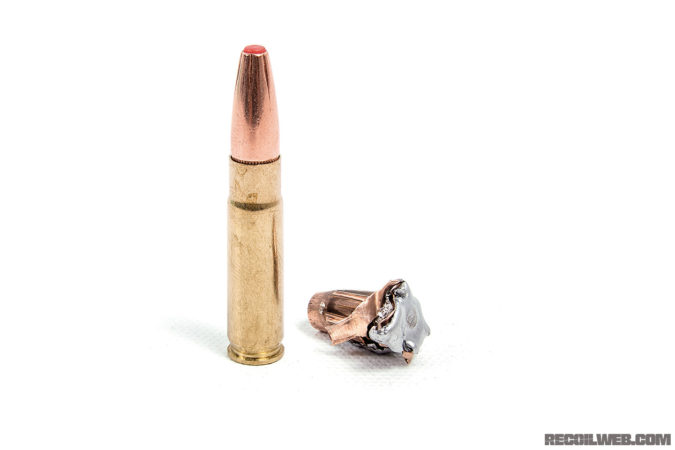
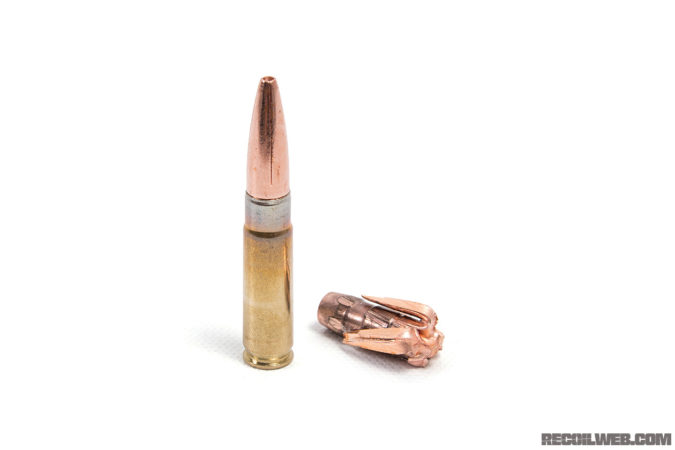
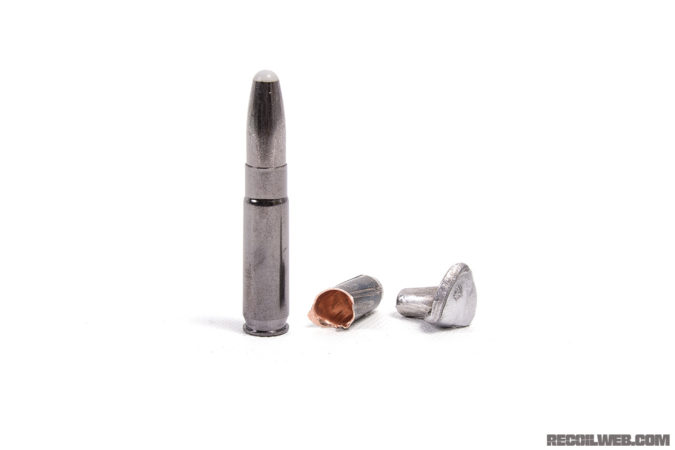
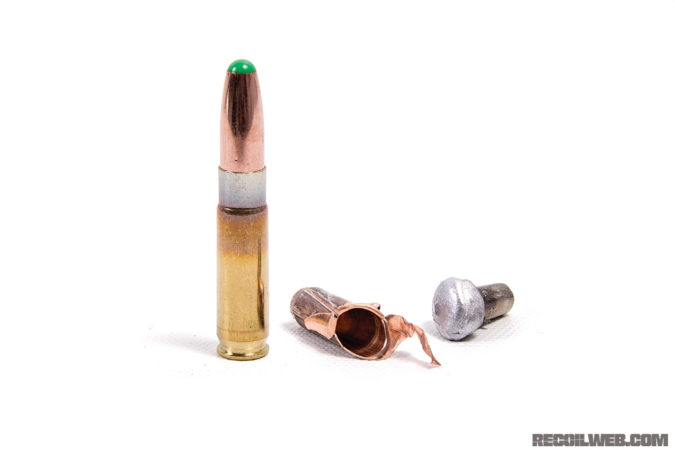
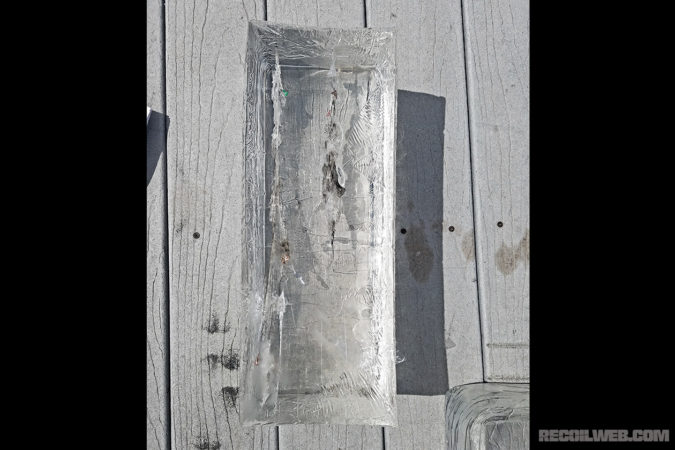

 Supremely affordable and available everywhere, the Mini BIC earned our Top Pick award because of its reliability, value, and ultralight weight.
 The Mini Clipper is another excellent backpacking lighter.
 Most backpackers — whether you’re a beginner or seasoned thru-hiker — don’t need this lighter.
 The Wayfinder Lighter from UST, like the UCO Torch, is a butane lighter with piezo-electric ignition.
 The Zippo is a classic, but it makes for a bad backpacking lighter.


