When most people think of groundhogs, they think of woodchucks. But are these two animals the same? What’s the difference between a woodchuck and a groundhog? Let’s take a closer look at these two creatures to see how they differ.
Woodchucks Vs. Groundhogs: Are They The Same Animal?
The simple answer is yes, they are the same. Woodchuck” is just another name for “groundhog.” These animals are part of the rodent family and they are in the same genus and species. So, if you’re talking about a woodchuck, you’re really talking about a groundhog.
But there is a bit more to the story. These animals are also known by other names, including “whistle-pig” and “land-beaver.” In some parts of the United States, people call them “thickwood badgers.” And in Canada, they are sometimes called “chuckies.”
How Did The Groundhog/Woodchuck Get Its Name?
The name “woodchuck” is thought to come from an Algonquian word, wuchak. It’s also possible that the name is a corruption of the Cree word otchockwia.
The name “groundhog” comes from the fact that these animals spend most of their time on the ground. They are good swimmers and tree-climbers, but they usually stick to the ground where they can dig their burrows.
So, now you know that woodchucks and groundhogs are the same animals. But what do these creatures look like? Let’s find out.
What Do Groundhogs/Woodchucks Look Like?
Groundhogs are medium-sized rodents. They have short legs and low, compact bodies. They typically weigh between 4 and 10 pounds.
Male and female groundhogs look similar, but males are usually larger than females. Groundhogs have brown fur with a light-colored patch on their chest.
Their faces are round with small ears. They have dark eyes and long whiskers. Their tails are short and hairy.
Groundhogs are proficient climbers and can climb trees to escape predators or to get a better view of their surroundings. When they feel threatened, they will often retreat to their burrows where they will be safe from harm.
Where Do Groundhogs/Woodchucks Live?
Groundhogs are found in North America, specifically in the United States and Canada. They are most commonly found in the eastern part of the continent.
These animals typically live in wooded areas, but they can also be found in fields, meadows, and even near houses and farms. They like to live in areas where there is a lot of vegetation so that they can find food to eat.
Groundhogs build their homes by digging burrows underground. These burrows can be up to 4 feet deep and 30 feet long. The entrance to the burrow is usually hidden by grass or other vegetation.
Inside the burrow, there is a nesting area where the groundhog will sleep. There is also a bathroom area where the groundhog will go to the bathroom.
Groundhogs typically live alone, but they will sometimes share their burrows with other groundhogs. A group of groundhogs living together in one burrow is called a colony.
What Do Groundhogs/Woodchucks Eat?
Groundhogs are herbivores, which means that they only eat plants. Their diet consists mostly of grass, leaves, berries, and other vegetation. They will also eat nuts, fruits, and vegetables if they can find them.
In the wintertime, when food is scarce, groundhogs will often eat their own feces in order to get nutrients.
Groundhogs get most of the water they need from the food they eat. But if they can’t find enough water in their food, they will drink from puddles, streams, and other sources of water.
The Many Names Of The Groundhog :
Whistle-Pig: This name is derived from the sound that a groundhog makes when it is alarmed. These animals are also sometimes called whistle-pigs or wood-pigs.
Thickwood badger: The groundhog is the largest member of the squirrel family and is sometimes referred to as a thickwood badger, particularly in the northern part of its range.
Canada Marmot: Groundhogs are also known as Canada marmots in some parts of their range.
Red monk: In parts of Quebec, groundhogs are referred to as red monks, a name that is derived from the color of their fur.
Scientific Family And Order:
The Eastern groundhog is scientifically known as the Marmota monax. This animal is a member of the squirrel family and the order Rodentia.
No matter what you call them, woodchucks and groundhogs are interesting creatures. Here are a few facts about these animals:
· Groundhogs are one of the largest members of the squirrel family.
· They can weigh up to 14 pounds (6.4 kg).
· They can be as long as 26 inches (66 cm), including their tails.
· Groundhogs have short legs and small ears.
· They are good swimmers and can stay underwater for up to 5 minutes.
· Groundhogs are mostly active during the day.
· They are mainly herbivores, but they will also eat insects, snails, and small rodents.
· Groundhogs can live up to 6 years in the wild and 10 years in captivity.
Groundhogs are interesting animals, but what about their reputation for predicting the weather?
Do Woodchucks Really Predict The Weather?
The groundhog has become famous for its ability to predict the weather. According to legend, if a groundhog sees its shadow on February 2 (Groundhog Day), it means that winter will last for six more weeks. But if the groundhog does not see its shadow, it means that spring is on the way.
This tradition is thought to have started with German immigrants who came to the United States in the 1700s. In Germany, a similar tradition is associated with the badger. But when these immigrants arrived in America, they found that there were no badgers. So, they started using groundhogs instead.
Over time, the groundhog became the official “weather-predictor” in the United States. The first recorded instance of Groundhog Day was in 1841. And in 1886, the first newspaper article about Groundhog Day was published in The Punxsutawney Spirit.
Today, Groundhog Day is a popular event. Every year, people gather in Punxsutawney, Pennsylvania to watch Punxsutawney Phil predict the weather.
Groundhogs As Pests :
Groundhogs can be a nuisance to homeowners and farmers.
They dig burrows on properties, which can damage crops, gardens, and lawns. These animals are also known to eat plants and vegetables.
How To Keep Woodchucks Out:
If you want to keep groundhogs away from your property, there are a few things you can do:
Install a fence: Groundhogs can climb, so it’s important to make sure that the fence is at least 4 feet (1.2 m) high. You can also add an electric wire to the top of the fence to deter these animals.
Remove food sources: If you have a garden or fruit trees on your property, groundhogs may be attracted to these areas. Try to keep these areas clean and free of debris.
Use traps: Trapping is one of the most effective ways to get rid of groundhogs. You can use live traps or lethal traps. But before you set any traps, be sure to check your local laws and regulations.
Hire a professional: If you’re having trouble getting rid of groundhogs, you may need to hire a professional wildlife control company. These companies can help you get rid of these animals in a safe and humane way.
Do it yourself method: Using an air rifle, for example, is one of the cheapest ways to get rid of groundhogs on your property.
Accuracy and precision are two key factors in shooting at any distance and with any firearm. A distance of 300 yards isn’t far enough yet to be considered ‘long range’ shooting, but it is farther than a lot of people are used to. At 50 or 100 yards mistakes and shooting errors aren’t as glaring. Without the proper knowledge and tools, at 300 yards you might be off the paper entirely, or at least far from the center. So, today we will be discussing rifle distances, scopes, tips for selecting good rifle optics for 300 yards, and shooting tips to remain effective at this distance.
Understanding the Challenges of Shooting at 300 Yards
To make informed decisions about the right 300 yard rifle scope first, we have to respect that this isn’t just backyard shooting. At 300 yards mistakes are a big deal, and the scope you choose should be considered with the same level of seriousness. Let’s discuss the challenges of hitting targets at 300 yards and beyond, and how the right rifle scope can be the difference-maker.
Bullet Drop
Bullet drop refers to the projectile’s descent due to gravity. At 300 yards you can expect to see the following.
A .308 caliber round will drop roughly between 10-12 inches (depending on specific load, conditions, and ballistic coefficient of the round).
A 6.5 Creedmoor will see a drop of around 7-9 inches.
A 5.56 round experiences a drop of approximately 11-13 inches.
Wind Drift
Another factor to reckon with is wind drift — the sideways motion of a bullet caused by crosswinds. Ballistic coefficients tell us how aerodynamically efficient a bullet is, which becomes more relevant as we shoot farther. The higher this coefficient, the less the bullet will be affected by wind drift.
For a 7 mph crosswind at 300 yards:
A .308 caliber round will drift by about 10-12 inches.
A 6.5 Creedmoor will drift around 7-9 inches.
The 5.56 round will experience a wind drift of approximately 9-11 inches.
Bullet drop and wind drift
Target Visibility
It’s basic logic: the farther the target, the harder it is to see clearly. When you’re aiming at 300 yards, being able to discern your target clearly becomes more important. A good rifle scope will not only offer magnification to bring the target into closer focus but also have clear glass that give a crisp image.
A jump from 100 to 300 yards in shooting is no small feat. Bullet drop, wind drift, and target visibility are challenges that shooters must navigate. However, with the right rifle scope hitting targets at 300 yards becomes far more achievable.
Considerations Of 300 Yard Scopes
When selecting a rifle scope for long shots, understanding specific scope features will guide you towards making a choice in deciding what a good rifle scope for 300 yards will be.
Parts of a scope
Magnification Range
Magnification is a key factor in providing a close-up view of your target. For 300 yards, a magnification range between 5x and 12x is considered suitable. It provides a clear view of the target while maintaining a decent field of view (FOV) to observe surroundings, helping shooters aim precisely and also track moving targets or changing conditions swiftly. Semi-auto shooters are sometimes concerned about being able to quickly acquire targets for closer shots, and many elect to add an offset red dot on a rifle mount for quick close-range shots.
Objective Lens Diameter
The objective lens of a rifle scope determines how much light the scope allows to influence the brightness and clarity of the image. A larger objective lens enables more light, rendering a brighter and clearer image, especially in low-light conditions. However, be mindful of the size and weight it adds to your setup, as a larger lens can be bulkier.
Reticle Type
A reticle, or “crosshairs” help a shooter select their point of aim. For 300-yard shooting, a Bullet Drop Compensator (BDC) reticle can be beneficial as it provides holdover points to account for bullet drop at various distances. Alternatively, a Mil-Dot reticle provides dots along the x and y-axes. These can be used to estimate distances and holdovers, aiding in adjusting for windage and bullet drop more dynamically.
Adjustment Turrets
Adjustment turrets are knobs on a scope that allow you to modify the reticle’s position for windage (horizontal) and elevation (vertical) to sight in your rifle scope at your desired distance. These shouldn’t be changed for windage and elevation of a single shot like in the movies.
Optics Quality
High-quality glass characterized by clear, sharp, and bright images, makes a huge difference in seeing at distances. Look for scopes with lenses that have coatings to reduce glare and enhance light transmission. Superior optical quality reduces eye strain and provides a clearer sight picture, which becomes more important as distance increases.
Durability
Your scope needs to be durable enough to withstand recoil and weather elements. Seek scopes that are fog-proof, and constructed with materials like aircraft-grade aluminum to provide longevity and reliable performance such as the Apex Falcon V2 LPVO Scope.
Eye Relief
Eye relief pertains to the distance from your eye to the scope’s ocular lens while still providing a full-sight picture. Too much or too little eye relief causes scope shadowing.
Eye relief on a scope
It also protects your eye from ‘scope eye,’ or ‘scope bite’ which happens when the gun recoils and your eye is too close. It doesn’t feel good… I’m told.
Generally, an eye relief of at least 3.5 inches is considered safe and comfortable for most shooters with a more powerful rifle. Eye relief usually decreases as magnification increases, it is important to select the right picatinny mount for your scope.
Find The Right Scope For Your Long-Range Rifle
In selecting a proper 300 yard rifle scope you have to make sure it is compatible with your rifle. Many scope reticles on the market that compensate for bullet drop are caliber-specific and not interchangeable. So be sure to do your research or you may find yourself with an expensive scope that you cannot use.
Calibers For 300 Yard Rifle Scopes
Each caliber has different external and terminal ballistics which should be considered. For example, of the three calibers we have been discussing 6.5 Creedmoor has the highest ballistic coefficient. BC is part of the external ballistics of the round and dictates why it is less affected by external factors.
. A few popular calibers for 300-yard shooting include:
.308 Winchester: Known for its accuracy and versatility, the .308 Winchester has a relatively flat trajectory, which means it doesn’t drop as quickly at longer distances. It also delivers good energy and is less affected by wind, making it a popular choice for long-range shooting.
6.5 Creedmoor: The 6.5 Creedmoor is highly regarded for its long-range precision. It combines a high ballistic coefficient with low recoil, allowing for accurate shots well beyond 300 yards. It’s known for maintaining velocity and energy at extended ranges.
5.56 NATO: While the 5.56 NATO is not typically associated with extremely long-range shooting, but is still very effective at 300 yards and beyond, especially with the right barrel twist rate. It’s lightweight, which reduces recoil, and it’s readily available, making it a budget-friendly option for intermediate-range shooting.
Popular rifle calibers
Each of these calibers has its own ballistic profile, influencing aspects like bullet drop and wind drift at 300 yards, which should inform your choice of scope and reticle. The terminal ballistics of each round should also be considered based on your goals for the firearm. Terminal ballistics is the study of what happens to a projectile, such as a bullet, upon impact with a target.
Selecting Reticle For 300-Yard Shooting
The reticle is essentially your aiming point within the scope, and choosing a type that complements your shooting style and the ballistics of your caliber goes a long way to increase precision with distance.
BDC Reticles
Bullet Drop Compensator (BDC) reticles feature holdover points that visually represent bullet drop at varied distances, making it easier to quickly adjust your aim for long shots without needing to make any rifle scope adjustments. BDC reticles are calibers and bullet weight specific so choose one that aligns with your shooting profile.
Mil-Dot Reticles
Mil-Dot reticles are another fantastic option for long-range shooting. They feature dots along the crosshairs that represent specific distances (in milliradians) and can be used to estimate the distance to your target and adjust for both bullet drop and windage. This type of reticle allows for swift adjustments and is popular among military, tactical shooters, and hunters.
BDC reticle (left) and Mil-dot reticle (right)
Illuminated Reticles
Illuminated reticles incorporate adjustable lighting into the reticle design. This helps visibility in low-light conditions – like during dawn or dusk, or in heavily shadowed areas.
This enhancement can significantly improve sight picture and target acquisition when natural lighting is suboptimal. However, don’t forget to swap out batteries, or bring extra on your hunting trip.
Looking for a scope that really does the job?
The Tacticon Armament Falcon V3 it a dedicated rifle scope that features an illuminated reticle that allows you to choose between red, green, and blue. The different color choices allow the scope to be more adaptable in different environments. With a 3x-9x range the scope is very capable at 300 yards, and the Mil-dot reticle assists shooters with hold overs for distance and wind drift. The scope comes in at a very affordable price, right around $150, and can be used for a variety of calibers.
Tips To Improve 300-Yard Shooting Performance
Effective shooting at 300 yards doesn’t only depend on choosing the right rifle scope, accounting for wind drift, and bullet drop. It also heavily relies on your shooting techniques, understanding of environmental factors, and knowledge about the ballistics of your chosen caliber. Let’s discuss some aspects that can fine-tune your 300-yard shooting abilities.
General Shooting Tips
There’s no replacement for proper shooting technique. Even minor inconsistencies in your shooting fundamentals are magnified over longer distances, transforming what might be negligible at 100 yards into a significant miss at 300 yards. Here’s a closer look at some general tips:
Trigger Pull: A smooth, consistent pull avoids disturbing the rifle’s position during firing.
Breathing: Pause your breath while squeezing the trigger to reduce movement.
Steady Shooting Position: Establish a stable position, ensuring that the rifle is well-supported and your body is relaxed. A minor error in any of these can result in a several-inch deviation at 300 yards, whereas the impact would be minimal at closer ranges like 100 yards.
Adjustment Factors
Wind Reading: Understanding how to read the wind and compensate for its effect on your projectile makes a big difference. Wind can push your bullet off course, and its impact is more pronounced at 300 yards. Look for tall grass, leaves, really anything that moves to help estimate wind speed.
Range Estimation: Accurate range estimation is key to compensating for bullet drop. Mil dot and BDC reticles will help with this. Range finders are also very useful. Don’t forget your analog skills though. In the movie Jarhead, Jamie Foxx asked his Marines how he knew the target was 300 yards away. One Marine replied “Three football fields, Sir.” When in doubt, use what you know.
Ballistics
Understanding the ballistic characteristics of your chosen caliber and ammunition is a fundamental piece of compensating for bullet drop and wind drift. The difference in bullet drop from a 55gr FMJ and 77gr OTM 5.56 round is about 4 inches at this distance, with the 77gr having less drop due to its higher ballistic coefficient.
Final Notes
Successful shooting at 300 yards comes down to marksmanship fundamentals first and foremost. After this having an accurate rifle is the next essential. Without these two there is no way to consistently make accurate shots.
A good scope will both increase accuracy and consistency once these two pieces are in place. For 300 yards it is best to have a scope with a way to compensate for environmental factors tailored to the caliber of the rifle.
Proper magnification between 5x-12x will greatly increase visibility and accuracy by making it easier to aim. Look for a scope with crisp, clear glass and keep it clean so it will serve you for years to come.
The opinions expressed in this post are those of the author and do not necessarily reflect the views and opinions of Tacticon Armament.
Have you been practicing your shooting form at home, only to grow weary of chasing stray arrows around? Try putting a backstop behind your target and save yourself the hassle.
A backstop is material placed behind archery targets to catch arrows. Backstops are normally made of a thick, spongey material that absorbs the arrow’s shock. If you released an arrow into a wall, fence or anything else solid, the arrow would break upon impact. Backstops give the arrow something to sink into if it sails past the target. Keep in mind that while backstops will help provide a larger base for the arrows to land, you should always make sure you have a wall behind the target and backstop or plenty of open space.
Hay bales are a great, inexpensive way to create a backstop for your arrows. Photo Credit: Clearwater Cottage Blog
The most common and inexpensive backstop is a hay bale. The hay is very forgiving, although it won’t last as long as a foam material. The hay bales will still serve their purpose, but you might need to rearrange it regularly and fill in any gaps that come about with use.
You can also use foam play mats – the kind that young children use in classrooms. Or other floor mats work too. No matter the material, always use an arrow puller to remove the arrows from the stop. If an arrow gets stuck, you could break it by trying to yank it out. An arrow puller gives you a good grip so you can pull cleanly without breaks.
Make sure your backstop is wider and higher than your target so you don’t have to run around to collect stray shots that miss their mark. If you need to work on your precision, or you’re practicing with a novice, a backstop will help you avoid losing arrows in the woods or backyard.
Choose a material that is long-lasting and can hold up through many rounds. Photo Credit: Tradgang
Your backstop should also be sturdy – how much so partially depends on the intensity of your draw weight. The higher the draw weight on the bow, the more force behind the arrow. For a lower draw weight, you can probably afford a thinner backstop. As you practice with your backstop, you’ll see how the material absorbs the velocity of the arrows and adjust accordingly. The fix may be as simple as moving the target and backstop further away.
The supply list is fairly minimal. All you need is:
A horse stall mat, foam play mat or hay bales
2x4s or cables
If you’re feeling crafty, you can build the backstop yourself. Photo Credit: amzn.to
You can build your backstop against your fence, create a frame for your target and backstop, or leave it free-standing. If you build your own stand, hang the backdrop from the same pipes or boards you used for the stands. Hay bales can remain free standing and can be stacked as high or wide as necessary.
Backstops are an often-overlooked part of the archery arsenal, but it’s never too late to start using one. Save yourself broken arrows and broken fences by building your own backstop in just a few hours. Backstops are a time-saver and safety precaution that can benefit every archer.
If you’ve just bought your first air rifle, you might be wondering if you should get a scope specifically for it or if you can just use a rifle scope you already have in your workshop.
When picking out a scope for your air rifle, there are many considerations, such as zoom level, optic quality, objective lens size, and the mounting system.
Shooting Mystery has the answer to the most commonly asked questions about air rifle scopes and compares them directly to regular rifle scopes in terms of their effectiveness and durability.
No, youcannot and should notuse a regular rifle scope on your air rifle. Doing so might actually break the rifle scope beyond repair.
Standard rifles fire bullets out of the barrel through pressure from ignited gasses inside the bullet. This combustion causes the familiar backward recoil you feel after pulling the trigger.
On the other hand, air rifles fire using a different method that gives it recoil that moves forward after the initial backward-moving recoil. This movement is something standard rifle scopes aren’t designed for.
This is why the inner assembly on your rifle scope will break if you use it on an air rifle scope. It’s just not designed to be used with that weapon system or handle the forward recoil it creates.
Instead of using regular rifle scopes, you should pick out a dedicated air rifle scope that’s designed to handle the recoil from the weapon.
Here are the essential things to consider when picking out an air rifle scope.
Zoom Level
There are two main types of air rifle scopes – fixed magnification and variable magnification scopes. Fixed zoom scopes are stuck on only one zoom level.
Zoom is the main feature that explains how a telescopic sight works. It allows a shooter to see at longer fixed ranges and hit a target effectively.
Meanwhile, variable zoom scopes are much more versatile because you can switch between magnification levels, such as zooming in from 3x to 15x. This is helpful when aiming at varying distances.
However, this can make the scope heavier than fixed zoom alternatives. You’ll also have to make more adjustments and re-zero the scope more often than fixed zoom scopes.
Optic Quality
An air rifle scope can have as many zoom levels as needed, but if the actual optical glass quality is poor, your shooting performance will still suffer.
You should get an air rifle scope that is clear and scratch and glare resistant. Despite the added cost, other features, like being fog-proof and waterproof, are also worth considering.
Variable scopes might have different optic lens qualities depending on the zoom level. Check reviews of the specific scope to see if the sight image quality drops when you zoom in.
Recoil Management
Some air rifles are very powerful, producing noticeable forward-jerking recoil. This can hurt or even destroy the scope if you’re not careful.
Thankfully, rifle scopes made explicitly for air rifles can easily withstand the forward recoil. Just don’t go buying cheaper, standard rifle scopes for your air rifle.
Check the product details and reviews to see if the scope is designed to be used on air rifles. If there’s no information, it’s best to pick another option.
Objective Lens Size
The objective lens size is significant in how an air rifle scope functions. The main reason to get a rifle with a smaller objective lens is that it’s more portable and generally lighter, making it a better fit for a lower-caliber air rifle.
On the other hand, getting a larger objective lens can have the crucial benefit of letting in more light into the scope. This allows you to see clearer in low-light situations.
Purchasing a scope with a larger objective lens size (40-50mm) is recommended if you regularly shoot at dawn or dusk.
Mounting System
This is how your scope optic will be attached to your air rifle. There are two main types of mounting systems: one-piece and two-piece.
Two-piece mounts are fine for most rifles and can be easier to install and take off. They’re also cheaper than one-piece mounts.
However, getting a one-piece mount is your best bet if you have an air rifle with a lot more power. These mounts are a lot better at handling recoil than two-piece mounts.
You should also get a higher mount for larger scopes and standard-sized ones for scopes that aren’t as big. This is directly connected to objective lens size. The larger the lens, the larger the mount needed.
Benefits of Using a Scope on an Air Rifle
Makes you more accurate
Variable zoom is idle for hitting targets at unique distances
Decreases eye strain versus looking through iron sights
Increases the effective range of your air rifle
Large objective lens scopes help shooters see in low light
Disadvantages of Using a Scope on an Air Rifle
Adds weight to your air rifle
Added expense for the shooter
Frequently Asked Questions
After learning more about air rifle scopes, you might have other questions about how they work. Here are the answers to the most commonly asked questions.
What’s the Best Magnification Level for an Air Rifle Scope?
The ideal magnification range for an air rifle scope is between 1x and 16x. Whether you get a fixed or variable zoom scope is up to you and your shooting preferences.
Getting a scope with a higher zoom level than 16x might not be worth it because the range on air rifles isn’t as far as on conventional rifles.
PRO TIP: If you’d like to survey your surroundings and keep an eye on elusive game, consider getting a drone with a camera to act as a scout or overwatch.
What Is a Good FPS for an Air Rifle?
Most shooters prefer a “feet per second” (FPS) count of between 600 and 900 FPS for air rifles. This is ideal for accuracy while maintaining a decent pellet size.
Handguns using the same firing technology usually have a lower FPS count because of the shorter barrel and less robust and weaker firing mechanism.
Final Thoughts
You might be tempted to save a few bucks by sticking an unused conventional rifle scope onto your air rifle. You shouldn’t do this because it might break the optic.
There are plenty of excellent air rifle scopes out there that are designed to take the forward recoil and have all the great features that you love on conventional rifle scopes.
The crucial thing to remember is that optical quality, zoom level, recoil management, mounting, and objective lens must meet your needs and that of your air rifle.
Snakehead; Scary name, scary attitude, and surprisingly delicious.
Snakehead are an invasive species in the United States but are native and a delicacy in Asia. Snakehead were believed to be introduced to the United States through illegal exotic fish dumping.
Snakehead have now been seen in 7 states since their introduction in Maryland. The largest population resides in the Potomac River drainage where they pose a large threat to the native species and ecosystems. The biggest threat they pose is an introduction to the Great Lakes where they could potentially wreak havoc on the very intricate and unique ecosystems.
Channa Argus or the Northern Snakehead are very unique fish. They have the ability to breathe oxygen and can survive out of water for 4 days. They also mature very fast and start spawning within 1-3 years. Dependent upon the ecosystem, Northern Snakehead can spawn UP TO 5 TIMES in one season from April to August, which potentially means 50,000 eggs can be laid in a season. They are very territorial during this time of year because they guard their eggs. The fry will hatch in 2-4 days and then will feed off of the embryonic sacs they are attached to. The female and male will guard these bright orange fry balls much like a female Largemouth bass. Any sort of invader is bound to get eaten.
This brings me to catching these toothy fish. TOPWATER. These fish sit in heavy vegetation, cover, and have been known to have birds, small mammals, and frogs in their bellies. Baitfish streamers, topwater frog and mice patterns, and others such as gurglers and poppers have been known to work. Along with the heavy cover and teeth, 30lb fluoro is commonly used. A wire leader could mean the difference between holding one of these slimy invaders and a lost fly. These fish may have a bad reputation and you’d think they would be easy to catch but it’s quite the opposite. These fish tend to be picky and moody. They will chase your fly all the way back to the boat but won’t eat it. If you get followed or get a short strike, change your fly and cast to the exact same area. Much like bass fishermen if a bass misses a topwater strike they can throw in a submersible bait into the same area and most likely get bit.
Now onto eating these slimy missiles of piss and vinegar. Snakehead have a slightly more firm fillet than tilapia and near-zero gaminess or fishiness. Eat the invaders is what people are calling it when they harvest these fish. So instead of giving your garden some snakehead fertilizer try filleting it up and pan-searing them.
“It is such a universal fish. If it weren’t for the name I think it would be on more menus.” “Can’t beat ’em, eat ’em,” is the slogan from Louisiana chef Philippe Parola.
“Eating invasive species is a really fun and interesting and charismatic way of attacking a very acute problem,” said Seaver, who advocates for sustainable seafood.
“Chef Chad Wells of Alewife restaurant tossed chunks of raw snakehead fish with cilantro and citrus to make something more ambitious than an $8 ceviche appetizer. It was an invasive-species eradication plan in a martini glass.”
Seaver, Parola, and Wells have been among the front lines serving snakehead on their menus. So far, snakehead has done well on restaurant menus helping combat this alien invasion.
Now if snakehead ceviche isn’t your thing these next few dishes should be simple and delicious ways to prepare snakehead.
#1 – Pan-Seared Snakehead Tacos
The most simple yet effective way to truly taste the fish is to pan-sear them. Make sure you take the skin off of your fillet. Snakeheads have large tough scales which would inhibit cooking and just wouldn’t look appetizing.
Lightly crack salt and pepper on both sides of the fillet.
A little bit of olive oil or butter in a pan and a fresh fillet of snakehead.
The Pan should be at medium heat.
I’m a huge fan of a vegetal or fruit-based salsa with fish tacos. With how firm the fillet is it can hold a good amount of salsa on top without being too heavy and masking the flavor of the fish.
Local chefs are hunting mushrooms for Lowcountry restaurant menus.
Story by Robyn Passante
Mushroom lovers search for Chicken of the Woods mushrooms October through February. Many claim the mushroom tastes like chicken. It can be used as a substitute for chicken in a vegetarian diet.
When Red Fish sous chef Josh Goldfarb spied a 7-pound Chicken of the Woods mushroom growing high on a tree earlier this year, the avid mushroom forager made a mental note to return soon with a way to retrieve it.
Unlucky for him, fellow forager Chaun Bescos spotted it too — and he keeps an extension ladder in his car all winter for just such an occasion.
“It adds to the fun of it, the treasure hunting feel,” says Bescos of the camaraderie and competition among the handful of certified mushroom foragers in the Lowcountry. Bescos, chef at WiseGuys, helped teach Goldfarb about foraging when Bescos was executive chef at Red Fish, and now the two share information — and occasional, good-natured ribbing — regarding their lucrative pastime.
Locally sourced mushrooms, prized for their flavor and their health benefits, are popping up more and more on menus across the Lowcountry, thanks to the hard, hot work of Bescos, Goldfarb and a few others.
Red Fish sous chef Josh Goldfarb shows off a massive lion’s mane mushroom he found here in the Lowcountry. The mushroom produces huge delectable fruiting bodies that can be an awesome addition to any meal.
How lucrative is it?
Chanterelles are probably the most popular and most plentiful wild mushroom in the area, and Goldfarb says a little hard work can yield a sweet paycheck. “During summertime if the weather’s right, we can pick up about 100 pounds a week if the conditions are right, and sell them for 20 bucks a pound retail,” says Goldfarb, who spends about 15 hours per week foraging in the summer, and sells first to Red Fish and then to a handful of chefs at other restaurants. “It’s hard, but it’s worth it.”
Why is it hard?
“It’s a mosquito and tick battlefield,” says Bescos, a Hawaii native who has spent time living and foraging in the Pacific Northwest and in upstate New York. “I’ll come home and have 30 ticks on me. It’s no joke. It’s hot, and you’re dripping sweat when you’re out there in the woods but you gotta dress up in full pants, long underwear, you gotta wear long-sleeved shirts. I wear two to three shirts, I tuck ’em in, long snake boots and then I put on that DEET and go.”
Goldfarb, who moved here from Dallas in 2014, agrees on the relative misery of the conditions in the South. “I come back and even after wearing 100 percent DEET, I’m covered in mosquito and chigger bites. It’s very miserable. But we enjoy getting out in the woods. And I enjoy the check that comes with it.”
OK but otherwise, how hard is it?
“I wouldn’t recommend anybody go out in the woods and try to pick mushrooms unless you absolutely know what you’re doing,” says Goldfarb, who along with Bescos had to go through a two-day training and test to become a certified forager in the state. It’s illegal for those who aren’t certified to forage and sell wild mushrooms — mostly because there are toxic lookalikes out there that can seriously harm or kill those who eat them.
“When I pick, I separate my mushrooms. I don’t put them together,” says Bescos, explaining that if he were picking chanterelles and mistakenly picked a jack-o’-lantern mushroom, the poisonous chanterelle lookalike, even if he realized his mistake and threw out the jack-o’-lantern before preparing the rest of the bunch, “that one jack would make everybody that had that dish sick, just from getting some pieces (of it) mixed in with the chanterelles.”
Where do you forage?
The guys are secretive about their specific hot spots, but Goldfarb has one prime plot in Ridgeland that isn’t technically his but has become his through the generosity of a stranger.
“We were out pickin’ and this guy drove up on this little 4×4 and said, ‘Hey, this is my land.’ We said, ‘Oh, we’re sorry, we didn’t know.’” He asked Goldfarb and his friend what they were doing and when they told him about mushroom foraging, he was intrigued. “He’s given us permission to keep returning to his land, and we’ve found lots of beautiful mushrooms — lion’s mane, Chicken of the Woods, chanterelles — over the seasons. And we invited him to come eat at Red Fish and we made him a mushroom-themed dinner for him and his family. It was really cool.”
Local ‘shrooms
There are 20 wild mushrooms now approved for certified foragers in South Carolina, North Carolina and Georgia. Three of the most common wild edibles on local menus:
Golden Chanterelles – Bright orange-yellow edible that grows on the ground with the root system of live oaks, benefiting the trees. Typically can be found from mid- to late-May until the end of October.Lion’s Mane – Edible, medicinal white mushroom with hanging spines that grows on dying oak trees. Known to enhance nerve regeneration and boost the immune system. Typically can be found between Halloween and Christmas.Chicken of the Woods – Bright yellow-orange edible that grows on dead or dying hardwood trees and is said to taste like chicken. Typically can be found from late October to mid-February.
Fun facts
Lion’s mane are large, white, shaggy mushrooms that resemble a lion’s mane as they grow. They have both culinary and medical uses.
•Mushrooms are also called toadstools.
•Unlike plants, mushrooms do not require sunlight to make energy for themselves.
•A single Portabella mushroom contains more potassium than a banana.
•Mushrooms are made up of around 90 percent water.
•China produces about half of all cultivated mushrooms.
•Mushrooms spores repel over 200,000 species of insect.
•Mushrooms have fewer calories than a rice cake.
•Ancient Egyptians referred to mushrooms as the plant of immortality in hieroglyphics.
•Mushrooms contain more protein than most vegetables.
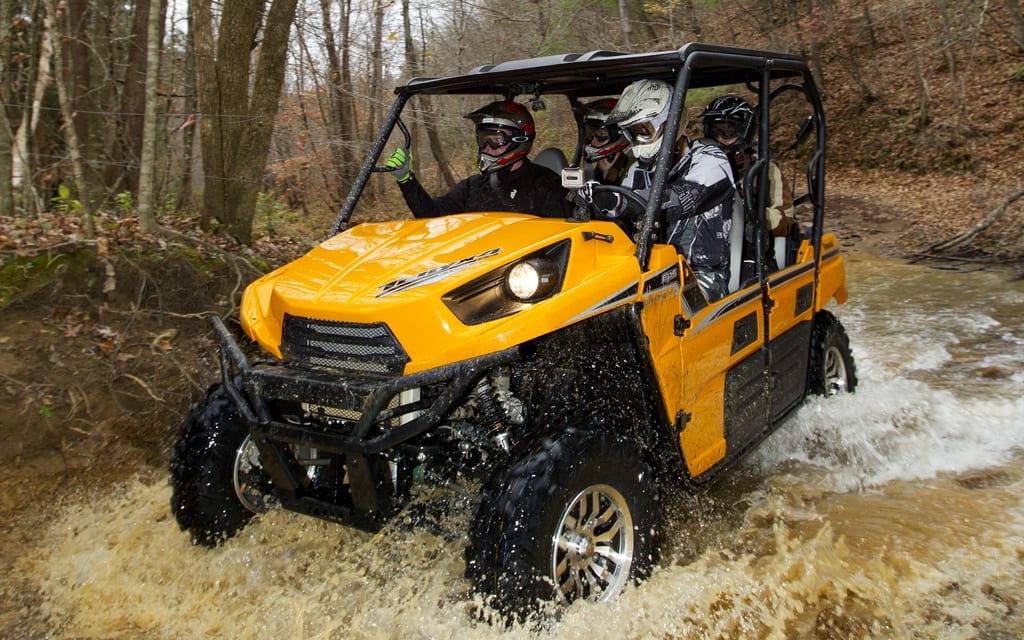
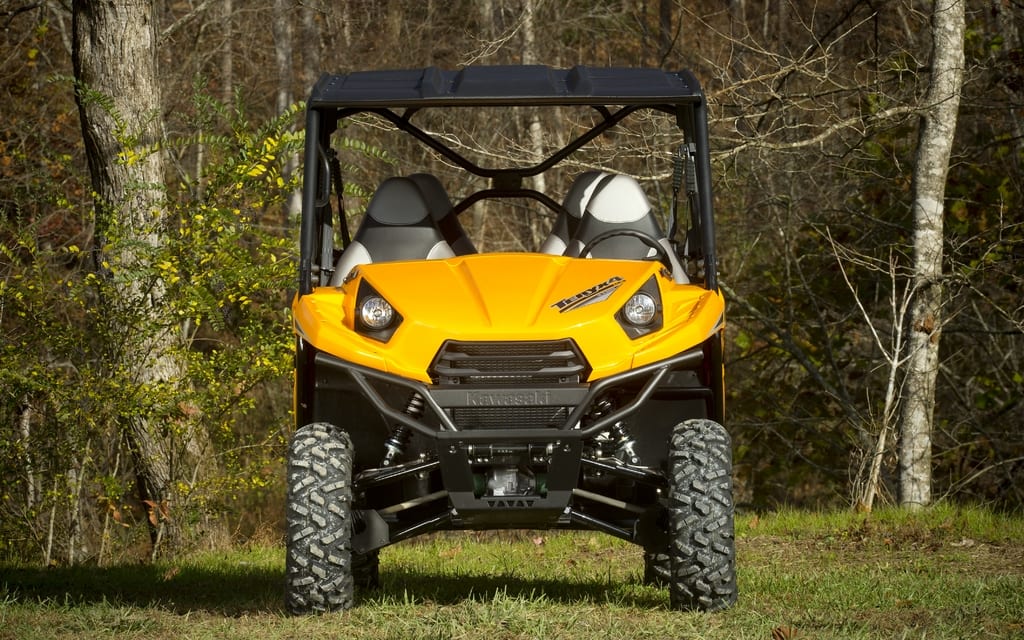
The 2012 Kawasaki Teryx4 750 4×4 4-occupant Side by Side, looks very similar to its predecessor, the Teryx 750 4×4, but its outer shell is just about the only thing that remained untouched. The 2012 Kawasaki Teryx4 750 4×4 is actually an all-new model, with an entirely different chassis and a totally new and more powerful engine. Also different is the fact that it is available with or without electric power steering; a first for team Green on this type of vehicle.
Trail riding can be an extremely pleasant and enriching experience and our time with the guys and girls from Team Green at the Brimstone Recreation Area, in Huntsville, Tennessee, was exactly that. With their successful RZR4, Polaris was first to come forward with this new concept of gathering friends or family into one recreational intended vehicle, to further heighten the fun inducing capacity of trail riding and nature exploration. The mere idea is very strong and meaningful, with the potential to revive interest in this therapeutic activity that is the responsible use of maintained trails. Another OEM joining in was something to be expected.
Kawasaki’s Teryx model has always pleased us with its fun-inducing performance and by adding two extra seats; the fun can now be shared with loved ones and that is just awesome news. It comes in a basic form, and two others offering a new level of ease and comfort, with Kawasaki’s Electric Power Steering (EPS) system. The LE model, which comes in rich and deep red or yellow, and graced with the addition of superb looking wheels and a roof, was the most stunning of the trio, when arriving at our beautiful ride site. The weatherman had called for rain, but since when do we care what the weather is like, when going out for some fresh air, to enjoy laughter inducing slow and easy obstacle conquering, or responsibly controlled speed runs through puddles of splashing brown liquid. Before I got out there to discover yet another new place of beauty to ride in, eh I mean drive in; the very first walk around an all-new model is always extra exciting and revealing.
The very first thing that pops to attention is the presence of doors, which is an improvement I have hoped to see on as many Side by Side models as possible. Take the doors off if you need to, but these should be present all the time, as it only makes the entire vehicle feel more reassuring in character, without the frequent branch whipping your legs. I just think it is more logical to consider them an integral part of such a family oriented vehicle, and the ones who don’t want them in the way when working, can easily remove them. I gave one a wiggle and no rattling was discovered, as was also the case with everything else. This family buggy is superbly easy to get in and out of. Once inside, you’ll notice a concentrated effort to position everything just right. Despite the fact that Kawasaki doesn’t fabricate cars, they gave this interior quite a bit of auto flair.
The seats are amazingly comfortable and shaped to cup each leg for a more solid bond between the vehicle and its occupants. Hold on a minute here! When I think about it, these would make for awesome car seats! I might just try and bolt a pair down in my vintage Supra. I would later discover them to be so well made, that they blended in perfectly with the suspension’s smooth yet very communicating feel to it. Combined, they rendered the whole trail riding experience smoother to enjoy than usual. A heightened level of class is also present, with a nicely drawn car-like gear selector that still feels like most other Side by Side versions in operation. Other items in the center console, which by the way shield’s heat like no other I have had the chance to stick to, like the hand operated park brake and cup holders that are close enough to reach with an arm stretch and deep enough to hold your water bottle down, even when things get interestingly rough, add to the comfort level of this cool new play safe and work hard machine. For now, I just couldn’t find anything with room for improvement. Sitting on a back seat impressed me even more, as my knees were a good inch away from the back of the front seat and I felt just as comfortable there as in the front. Remember that I am 6’3″ tall and weigh about …eh, well, you know what I mean.
So we were off. A fun and quick pace was reached without having to slam the pedal, and wait for things to happen, I love this Kawa already! Their trusted 749cc engine was entirely revised to provide 15% more power, and I felt it right away. The vehicle’s most magical element is, of course, the suspension. No use having loads of power, if the vehicle just bounces around without keeping a good grip on the ground. High-performance, compression damping and preload adjustable Showa single-chamber gas-charged shocks were installed, to take care of that business, and they really did a great job, in conjunction with those awesome seats we talked about earlier, to render our first 2012 Kawasaki Teryx4 750 4×4 experience surprisingly pleasant, and more about what the area had to offer all-around us, than how the vehicle was behaving. The stability of the vehicle on flatter grounds is also really good, with a few very logical geometric choices made by those talented Japanese engineers at Kawasaki.
Inspired by sport quads and their high needs in control and stability, they kept the width of the frame at both ends as narrow as possible, so that the lower suspension arms could be designed nice and long, to minimize camber changes during the course of the suspension travel. I was also pleased to notice the positive camber in the rear wheels of our fellow media guys up front. This provides a much better feel to the rear, as the tire patch remains at full efficiency, while negotiating turns. I guess I managed to get a few Kawasaki guys worried, when we got to an open and flat gravel area, and I started doing donuts, which of course, I am aware, is a highly non-recommended type of manoeuvre in any Side by Side, but it was important for me to find out just how stable this vehicle really was. First thing I did, was to simply slowly turn around in circles, to discover a very practical tight turn radius. Then, I gradually picked up speed, keeping the steering turned at the maximum, until the back-end started to slide out, instead of having the interior wheels look to lift off the ground. Absolutely perfect! Almost impossible to roll this thing, on this type of surface anyway, a bit like Honda’s Big Red.
Team Green engineers went back to the drawing boards, to figure out what was needed to create a safe and highly capable four-seat rec/utility Side by Side. This pretty much meant redesigning the Teryx machine from A to Z, with an all-new chassis capable of handling the extra load and the new 749cc V-twin engine with an output shaft connected to a centrifugal clutch, to better protect the engine’s components, as well as enabling the drive belt to stay constantly under tension. This significantly improves its function, while riding through rock-filled sections and extends the life of the belt.
Through precise computer-assisted analysis and lots of testing in the toughest conditions imaginable, they ended up with a totally new approach to Side by Side chassis design, using a double cross-beam configuration as the main part of the structure. The Double-X frame design provides much more torsional rigidity, than the ladder-style frame of the two-seater Teryx and most other Side by Side vehicles.
Choose 2WD, 4WD or even more traction with a simpler front differential lock, than all other Kawasaki’s, which are all equipped with manually controlled versions. Just a simple “turn like a key” style electric switch does away with the need to control the locking action with a lever. Short-turning radius, perfectly sealed rear wet brake, and front hydraulic disc brakes that stop you on a dime, sport-inspired suspension, good power, plus room for four. Suddenly the Teryx name takes on a whole new meaning! One that can be truly desirable for people looking to upgrade their old golf kart shaped multi-passenger off-road vehicle or newcomers to the activity who find ATVs too challenging to operate.
If you already own an RZR4 from Polaris, then this one might not be so appealing if you like the racy feel and performance of your current ride. If you are among those who wished for something that would fall in-between the Ranger Crew or John Deere’s new XUV 550 S4 and that extra sporty RZR4, this reliable Kawasaki blends the best of both worlds in a very effective way. You can really have fun with your gang and the next day, enjoy this helpful vehicle to push, haul, and transport a surprisingly huge amount of stuff. One thing I’ve been telling some friends thinking of switching from ATVs to a Side by Side vehicle is to consider a 4-seater, if they want to really go for adventure trips and bring a tent and all necessities for a cool and romantic camping trip.
What I am getting at is that I wouldn’t want to be in your shoes if you are a trail ride loving couple, looking to buy their first Side by Side. The new Wildcat is cool, Polaris has many new choices also, Can-Am Commander vehicles are selling like hotcakes with good reason, and the list of choices will surely keep growing. Can-Am will almost certainly also have a 4-seater to offer soon. If it can be of any help, it is sometimes more important to analyse your true needs, before you travel to a showroom. Make an informed decision and learn about a few different models that you think might fit your bill, and try to experience as many as possible, before you sign anything! Call your dealer and ask if they have a demo model to try. At the very least if you can’t ride it, sit in it anyway and do everything like you would, if you were heading out for a ride. Buckle your seat belt, see how it feels, how the seat feels, where your feet end up, is everything within reach and confortable to operate?
Even sway your body around and get a sense of what would happen to your body, while travelling on rough terrain. Is your shoulder hitting something? For me, the 2012 Kawasaki Teryx4 750 4×4, felt superb in every way and since we are concentrating our efforts on this new vehicle right now, let me outline the biggest advantages it can offer its owner. The balance that the mid-ship engine placement provides, the high-grade suspension and efforts made by engineers in positioning the chassis’ centre of gravity as low as possible. The maximized cornering stability with the front sway bar, the front-end conception with its long A-arm design and adjustment possibilities on both the front and rear shocks. Plus, last but not least, the precision control felt with the smooth operating Electric Power Steering. I think it is also important to mention that the non-EPS base model is still very easy to steer in 2WD and you will only maybe miss it if you have tried an EPS or LE model beforehand. Nicely done Green team!
As I always mention when talking about a vehicle, which is specifically designed for multi-occupant use, the safety of your loved ones should always stay your first priority. So, if you do find some eager passengers make sure they always, without any exceptions, all wear the recommended gear and that their seat belt is securely fastened. Don’t ever attack obstacles or turns with aggressiveness, just to show off the vehicles high performance abilities. Always brake, before you turn! It is a basic rule of thumb that you might remember from your driving course, which becomes all the more important off-road. This vehicle has excellent brakes and safety conscious stability built into it, so there is no reason why your trail riding experience would turn sour.
In conclusion, I have to admit being thoroughly impressed with the performances of this new family-oriented Kawasaki. There is only that front passenger’s hand-hold on the roll cage, which I don’t approve of. The stick shaped handle for the front passenger’s left hand is perfect though, and I would replace the one on the roll cage with one on the dash, to encourage whoever sits there to keep arms inside the vehicle, in case of a rollover. If you do ever get in a situation where you are passenger and the ride does fall on its right side, however unlikely if the vehicle is properly used, I would strongly suggest that you grab that interior stick handle with both hands. A wide bar across the back of the front seats offers hand holds for the rear passengers.
This might have been just a one day experience, but it was one that included very true to life trail rider challenges that attested to the vehicle’s maker’s confidence in its product, like one particularly tough climb with a tricky hook around a big tree right in the middle of it. The 2012 Kawasaki Teryx4 750 4×4 handled absolutely everything like a pro! We can’t wait to get a unit to play with it some more!
For more information on the above mentioned models, please visit the Kawasaki Website
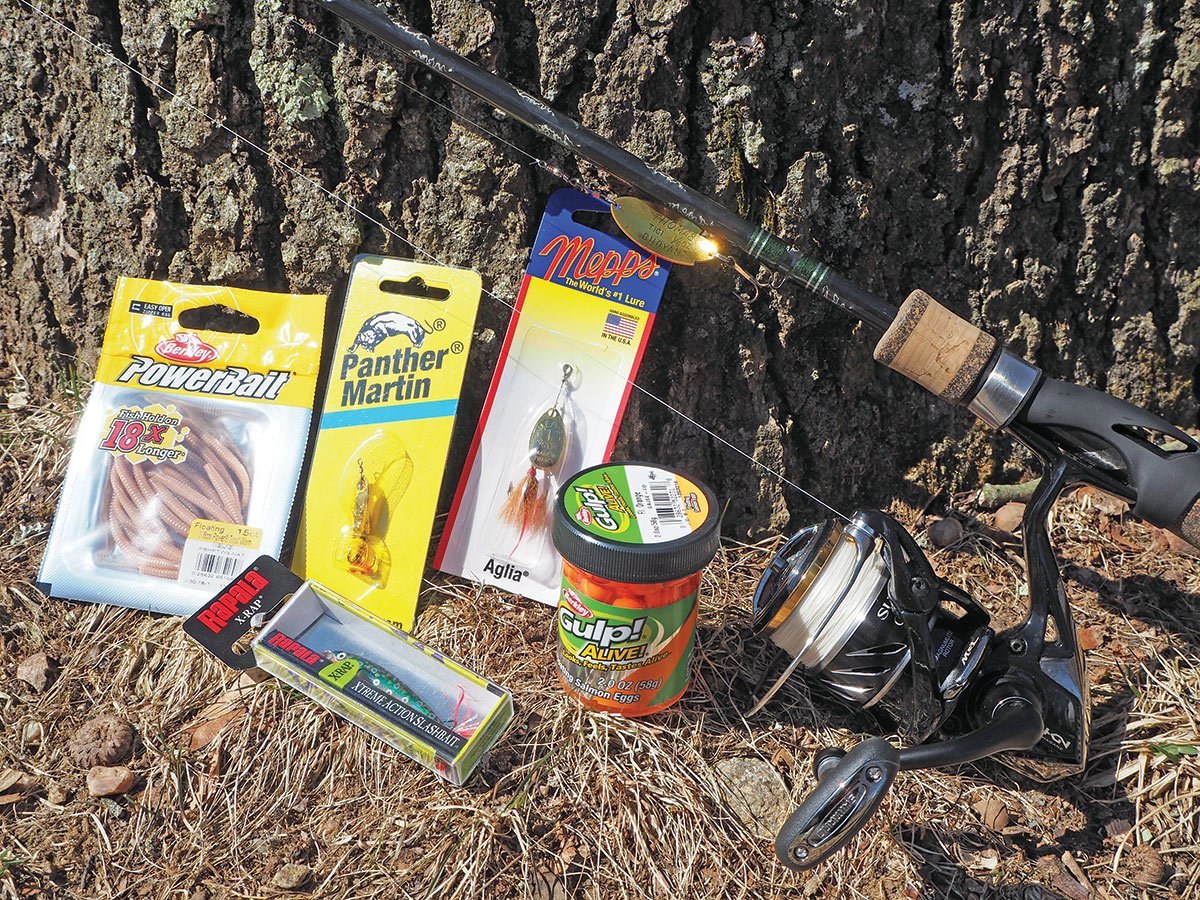
Yellow perch are a popular gamefish in their native range in parts of the Midwest and Canada, as well a wider area of North America where they now thrive.
Why not? Perch are incredibly tasty and at times can be caught in huge numbers … if you know what you’re doing.
One of the most important things you’ll need to know to catch lots of fillet-worthy perch is what to put on the hook.
This article reveals dozens of the best baits for perch we know, which at times can result in excellent catches. Some will be obvious, like the ever-effective minnows and worms. Some are a little unusual.
And a few will surprise the heck out of you but can really get the job done.
Many of these bait types can be used all year, whether under the summer sun when you might be fishing deeper water or in the dead of winter while ice fishing.
To put this article together, we consulted with Bill Janowich. Simply put, Janowich has been perfecting his fish-catching techniques longer than I’ve been alive.
“I’ve been perch fishing for over 70 years, so I’ve seen a thing or two,” said Janowich, who lives in Ohio near Lake Erie. His favorite perch bait on that Great Lake is a 2-inch shiner minnow.
“However, there are many other fisheries in the world, and many different methods of catching perch,” he told us. “Sometimes, necessity is the mother of invention.”
We already have a complete guide to yellow perch fishing on this website.
This article complements the fishing guide by going into more depth on the many baits that will have you catching these fish 12 months out of the year, whether you’re fishing them under the blazing summer sun or through the winter ice.
A variety of baits also can be used in conjunction with Janowich’s own perch-fishing kit.
“I have personally used most of these baits myself,” he said. “Live bait is usually more effective than artificial lures.”
To help you keep them all straight, we’ll divide the types of baits into broad categories.
Don’t see your secret bait for catching yellow perch? Send us a comment below.
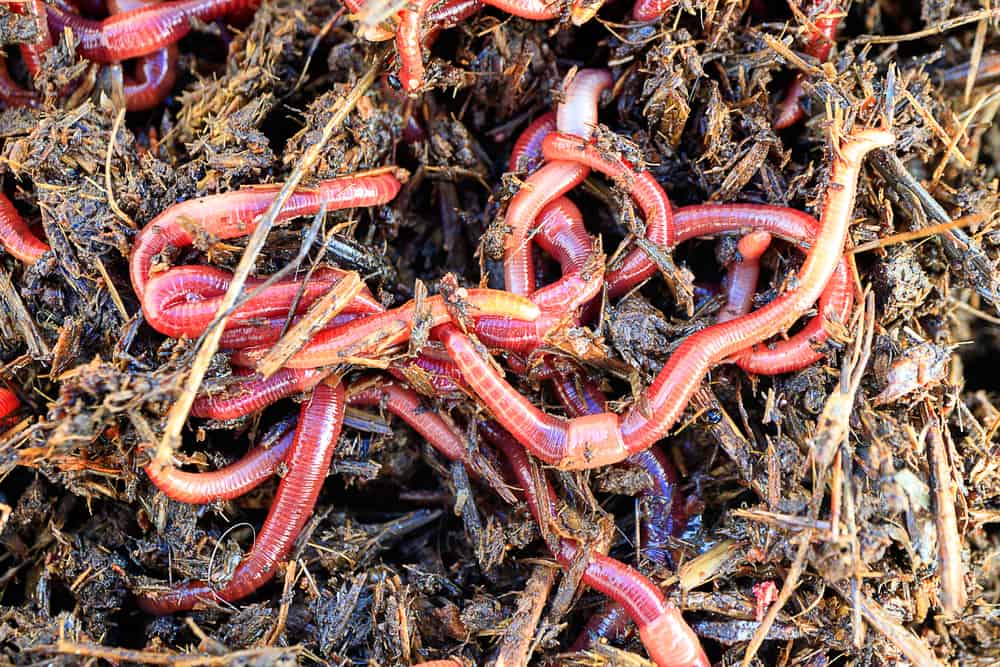
While the smaller perch feed primarily on insects and crustaceans, the big yellow perch you really want to catch love nothing better than a meal-sized minnow or cut bait.
Often the best minnow or cut baits to use are those that live in the water where you are fishing, because that’s what the perch are already eating.
One note here is that live fish aren’t always legal baits, so check the regulations where you will fish to be sure it’s allowed. In some waters or entire states, live fish and other aquatic creatures aren’t permitted because their use can result in invasive species.
Here are some great examples of using fish as bait to catch yellow perch.
Live Minnows and Other Swimmers
Various types of shiners, freshwater shad, and other small fish are incredibly effective yellow perch baits when fished live right near the bottom.
While many perch anglers prefer small minnows, Janowich likes to fish minnows in the 2- or even 3-inch size range. While that seems big for perches’ small mouths, perch love a nice meal and larger perch will be drawn to larger baits.
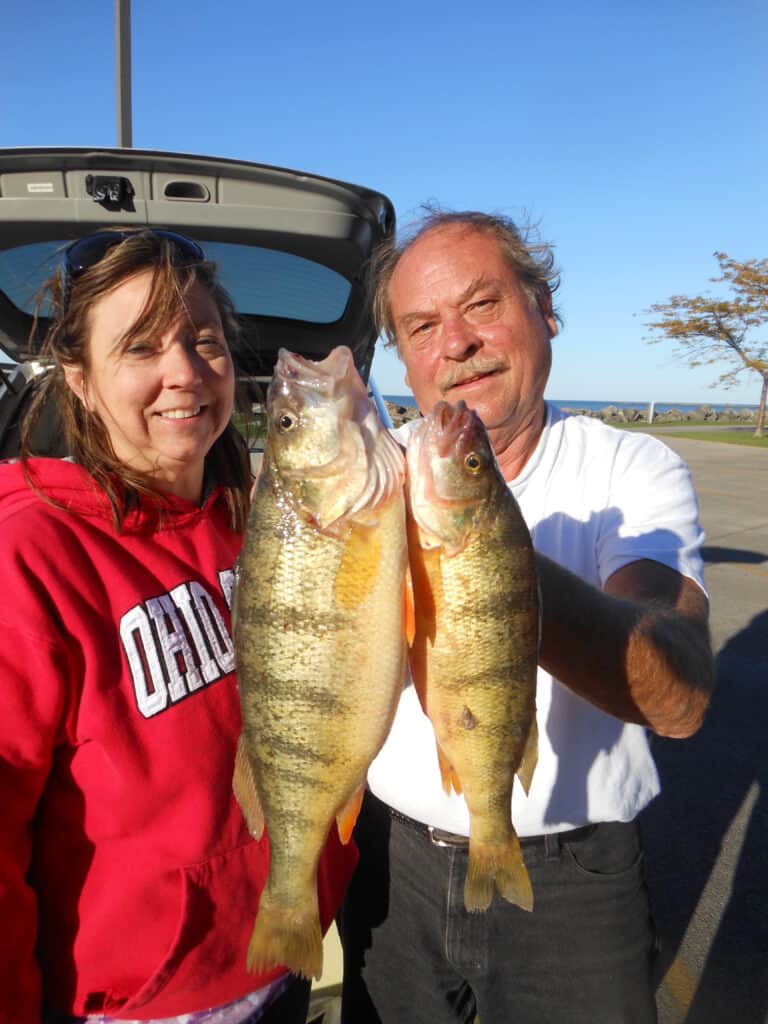
In fact, Janowich caught the 14.5-inch jumbo perch pictured above on a 3-inch emerald shiner. It was certified as an “outstanding catch” in Ohio and “fought like a northern pike,” he said.
If smaller 1-inch baits are all you can get, they will work well but also will result in catching some small yellow perch, but bigger ones also will take it.
The following are some minnow and other aquatic baits that might work well, given their availability and legality where you are fishing. Other local options may also be effective.
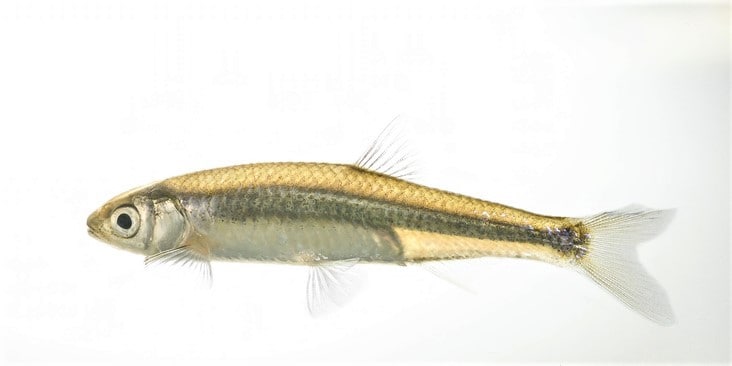
Shiners
Photo by U.S. Geological Survey
This is a common family of minnows with hundreds of types, and they are among the best live bait you can get.
For example, emerald and spottail shiners are native to the Great Lakes, where shiners are Janowich’s first choice for perch bait. Emerald shiners are more common, but those spot-tails can be excellent if you can find them.
Shiner numbers are down in some areas of the Great Lakes, so catching them can be more difficult.
Bait shops also will sell other small bait fish, such as golden shiners and fathead minnows. Minnow prices at bait stores have gone up in recent years, but they are still worth seeking out, Janowich said.
Dead minnows, including commercially brined or home-salted varieties, aren’t as good as the live variety and at times can be mushy, but these still can be among the best bait alternatives if live minnows aren’t available, Janowich added.
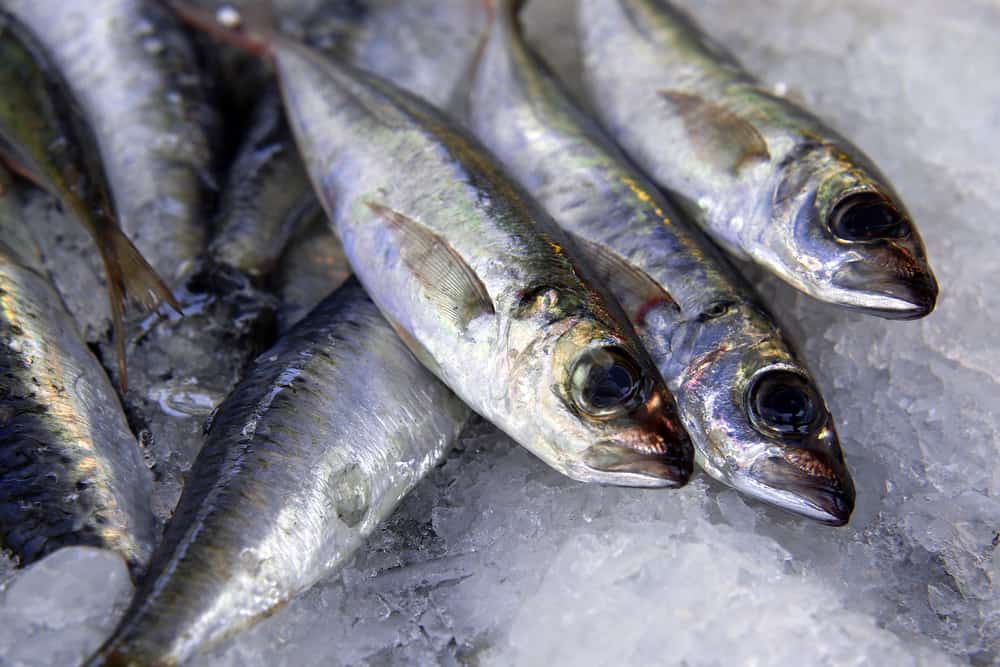
Shad (various types)
Photo courtesy of Depositphotos
Depending on where you are, there may be some freshwater shad available. Gizzard shad are fairly common in the Upper Midwest, and thread fin shad are another variety that might be available where you are.
Herring
These are in the same big family as shad and are similarly effective bait where you can obtain them.
Mosquito fish
Often can be caught in shallow water in lakes and ponds, or might be sold locally.
Suckers
There are a wide variety of suckers across the U.S., and if they co-exist with yellow perch, the small ones will be on the perch’s menu.
Gobies
Photo courtesy of the U.S. Geological Survey
These are destructive invasive species in many waters including the Great Lakes. Turn the tables when you catch one and turn them into bait.
Crayfish
Live or dead, the soft-shelled ones are especially good perch bait.
Tadpoles
Or pollywogs or whatever you call them, the larval stage of amphibians (often frogs) make excellent bait fished live. They can be found and netted in abundance at certain times of the year, often in the spring.
Freshwater Eels
Smaller eels are excellent perch baits, if you can get them. They are favorite forage for finny fishes and also have lots of action like leeches or lively worms.
Cut Baits
The above types of fish can be used dead, either whole or as cut baits.
Simply fillet larger fish and cut them into about 1-inch long strips of about a quarter inch wide, keeping the skin on to help hold your bait to the hook.
Generally speaking, the best cut baits use fish that are available in the waters where you are fishing.
Some cut bait types to consider include:
Yellow Perch
That’s right. Yellow perch are cannibals and will eat their own. Use the first one (or maybe the first smaller one) for bait to catch more in its own school.
Catch that first perch, especially a smaller one you don’t mind sacrificing, and fillet it out. Cut the fillet into strips that are 1 inch long and about a quarter inch wide, in a pennant shape and rig it up to your hook.
Other types of fish fillets also will often work.
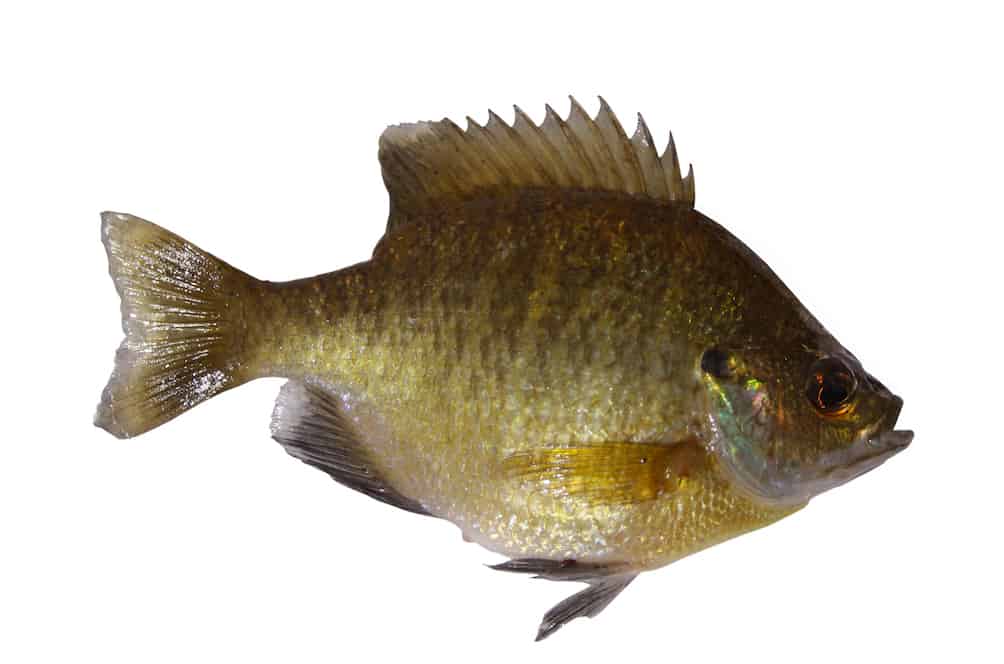
Bluegill
Photo courtesy of Depositphotos
These panfish may be fished as cut baits as described for perch, or if you can catch them small enough, they also can be great live baits for perch.
Bluegill have a naturally sweet meat, and as we’ll discuss more further down in this article, perch love sweets. (Woe is the life of a bluegill, as the bigger ones not only are good eating for humans but make excellent bait for larger fish including giant flathead catfish.)
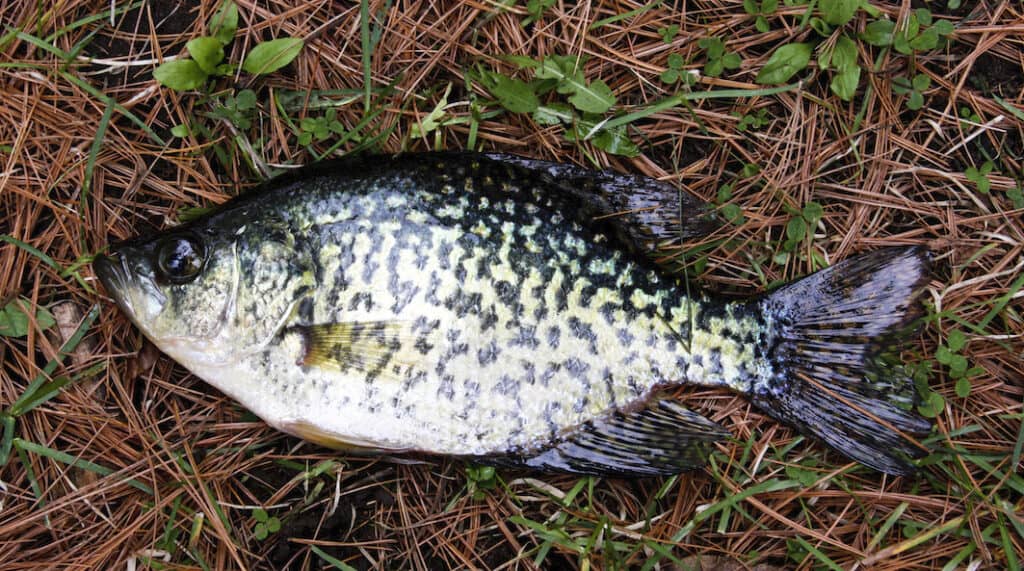
Crappie
Photo courtesy of Depositphotos
Considered in a similar orbit with yellow perch for their fine eating, crappie cut baits (or very small live crappie) are also a favorite on the perch diet.
White Bass
These are usually larger than yellow perch, but they can be used both for cut baits or, if you catch a very small one, as a live bait for perch.
White Perch
These are often predators of yellow perch, but if you catch a smaller one you can turn the tide and turn it into cut bait or use as a live bait.
Steelhead and Other Trout
While steelhead and their trout cousins are generally too large to use whole, they can be used as cut baits, including using the intestines, fins and eyes (see more on those below).
Fish Tails
Photo courtesy of Depositphotos
That’s right, if you want your bait to look like a fish, start with a fish fin.
Simply cut off a piece of the tail fin, hook it up and drop it down to where the perch are. They’ll pretty much fight to get to it first. And that’s no fish tale (but it is a fish tail).
Yellow perch and some of the other species mentioned above work great for this.
Fish Intestines
“This is an old Canadian charter technique. Catch a fish, cut it open, cut out the intestine, cut it into 3 inch strips and attach to your hook. They last forever and are an excellent bait for all kind of fis,” Janowich said. We’ll take his word for it!
Fish Eyes
Photo courtesy of Depositphotos
Fish eyes, and especially perch eyes, are a tasty offering if you’re a perch.
“Best thing is they’re free and present a ‘good-looking’ choice (sorry, couldn’t resist),” Janowich said.
Worms, Larvae and Other Crawlers
This category covers all sorts of critters in the worm and insect families that fish find irresistible.
Earthworms
Photo courtesy of Depositphotos
The old reliable worm is among the top baits for yellow perch. For one, they simply work. Also, it’s hard to beat their availability, whether from your garden or the bait shop, they are easy to get for a day of fishing.
Nightcrawlers
Photo courtesy of Depositphotos
Buy them at the store or, in some areas, catch them sticking out of their holes at night or hiding out under a piece of wood.
Also known as Canadian nightcrawlers, lob worms and dew worms, these are a premium bait for perch and other game fish.
They can be used whole or cut into pieces, depending on your needs.
There also are African and European nightcrawlers primarily available by purchasing, but the more common North American version is all you really need.
Red worms
Photo courtesy of Depositphotos
Have a garden compost bin? You probably have these small worms, also known as red wigglers. You also can purchase them directly for bait or to start a colony.
They are a little challenging to hook up, but their active wiggling on the hook is nearly impossible for a perch to pass up.
Garden Worms
Whatever you can dig up in the yard or find under a rock at the lake will probably get the job done.
Some types don’t hold on a hook as well as others.
Larval Baits
Mealworms
Photo courtesy of Depositphotos
These yellow critters are beetle larvae and make excellent perch, panfish and even trout bait.
You likely can buy them at a bait shop or pet store (they are sold as food for reptiles, aquarium fish and other pets). They also are fairly easy to raise at home, as I used to do. (Pro tip: the beetles are escape artists, so make sure you have a secure container.)
You’ll use smaller hooks with mealworms than you will with some baits, due to their size.
Waxworms
These are the larvae of a wax moth. Like mealworms, look for them both in bait and pet shops.
Ice fishermen often tip their lure hooks with these or similar live baits for added attraction.
Maggots
Photo courtesy of Depositphotos
Yes, those larvae of the pesky house fly or similar insects. Bait suppliers will carry them in some areas because they are excellent for perch and several other types of game fish, from panfish to kokanee salmon.
Squats and pinkies are generally smaller maggots from other fly species and also work for perch bait. The “caster” form of a maggot, one that is turning into a pupae, also will do the job.
Leeches
These relatives of the earthworm come many species of their own, but leeches can be broadly categorized by blood-sucking and non-blood-sucking.
If you have a choice at the bait shop or while catching your own, Janowich highly recommends the non-bloodsucking variety, and not just because you don’t want them turning the tables and making you the bait.
The non-bloodsuckers feed on lots of things perch eat, which provides a more appetizing scent from the leech.
Janowich likes to hook them right on the sucker end to allow the rest of the leech to wriggle and writhe freely in the water. Perch won’t resist it.
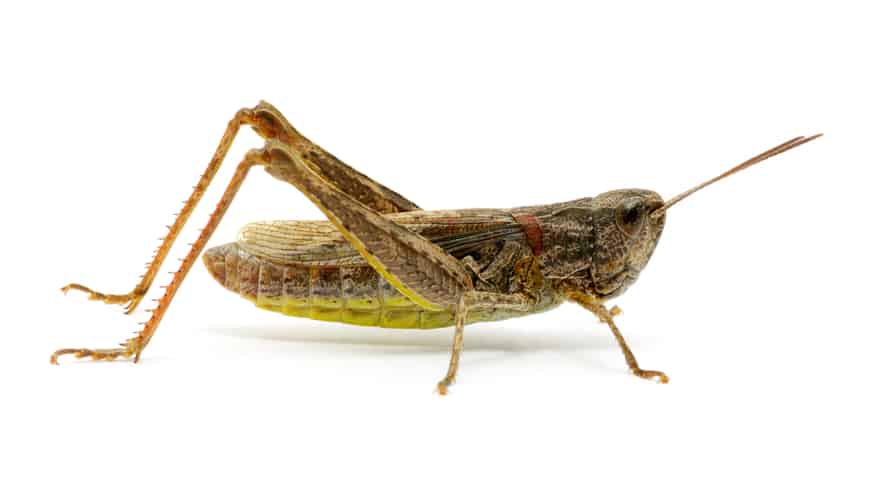
Grasshoppers
Photo courtesy of Depositphotos
Switching to baits found on land, grasshoppers are fantastic baits for perch as well as bluegill, trout and other fish that commonly eat insects.
Once the hoppers come out each year, they should be easy to net in grassy fields and similar areas.
On the hook, they wiggle enticingly, and perch can’t resist.
Crickets
Fish them like a grasshopper, with very similar results.
Compared to grasshoppers, crickets are more likely to be sold in bait shops and pet stores and might be available for longer periods.
But they are a little softer on the hook.
Imitation Baits
This section is about artificial baits made to look much like the real thing, and there are lots of options here because yellow perch will bite plenty of different things.
While purists like Janowich will nearly always stick with the real thing (and the real thing really works), imitation baits have their place.
Some anglers simply don’t want to fuss with live baits or baits that will spoil quickly. Having a jar or plastic bag full of artificial bait already in your tackle box has its appeal.
Note that I’m most experienced with the Berkley line of imitation baits, but try out the ones that work for you.
Artificial Minnows
Hate messing with the real thing … or have trouble finding them to catch or buy?
Artificial minnows along the lines of Berkley’s Gulp! minnows will often do the job, even if not quite as well as an actual live minnow.
We’ve seen some ads for products such as Magic Emerald Shine Minnows that might work similarly.
Artificial Worms
Berkley has a variety of products that fall under the category of fake worms, including PowerBait and Gulp! lines of earthworms, nightcrawlers and angle worms in natural colors as well as some brightly hued options among artificials.
But you certainly don’t have to limit yourself to Berkley products, especially in this category, as lots of companies make soft plastics in worm form.
Try scented artificial worms for increased catches.
Artificial Mealworms
Berkley’s Power Honey Worm is a good imitation bait closely resembling a mealworm, if you like to fish with smaller baits but can’t get the real wiggly kind.
Artificial Maggots
Grossed out by real maggots? Or maybe just don’t have them handy? A jar of Berkley Gulp! maggots can fill that need.
These are a very small bait and often used to tip the hook on a small lure such as spoon, spinner or jig for yellow perch as well as other game fish (including kokanee salmon where I live).
You’ll find some cheaper brands online as well, but we don’t have experience with them.
Artificial Waxworms
Not everyone makes this type as they are somewhat similar to mealworm and maggot baits, but Lunkerhunt has a few varieties that are available through various retailers.
Crappie Nibbles
These tiny pre-formed dough baits work great on the tips of lures.
How do we know? When we’re crappie fishing and put these on the tip of the jig hook, if there are yellow perch in the neighborhood, they won’t stay off the hook.
Even if you’re only after perch, try tipping the hook of a small jig with a Crappie Nibble and fishing it in schools of perch.
A few other companies make similar products as well.
From the Grocery Store
These fishing baits aren’t really intended as such, but they definitely will catch yellow perch. Fresh out of worms or minnows? Stop by the supermarket on your way to the lake.
Meat and Seafood
Hot Dogs
Photo courtesy of Depositphotos
That’s right, “tube steaks” aren’t just for baseball games and campfires. Hot dogs will catch yellow perch in addition to some other game fish (catfish, anyone?). Tear or cut them into bait-sized pieces.
Some anglers suggest that the beef hot dogs, while popular at the ol’ ballgame, are less attractive to perch than those made of chicken or turkey, Janowich said.
Also consider, “smokeys” type of franks are tougher on the hook and produce even more oily scent to attract fish.
Bacon
It’s not just what brings you to breakfast, it’ll bring perch to your fishing hook. Use pieces of bacon raw for best results, as the oily scent it sends out will get the sleepiest perch up and at ‘em. It also will stay put on your hook longer.
Chicken Liver
Photo courtesy of Depositphotos
These little organ meats are sold both in grocery stores and some bait shops. Yes, they are often thought of as catfish bait, but their scent will bring in the perch and other types of fish as well.
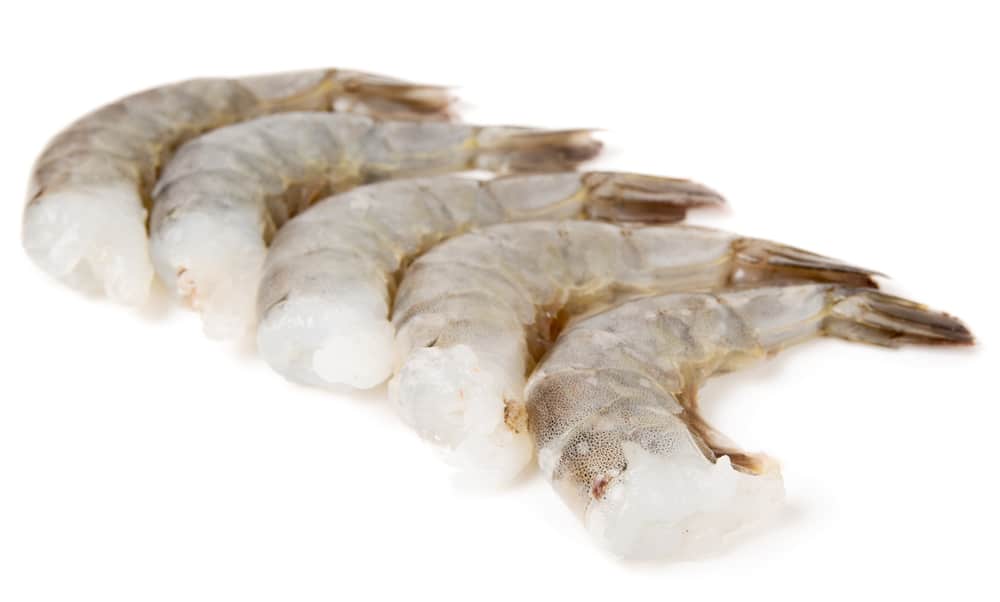
Shrimp and Prawns
Photo courtesy of Depositphotos
Though typically saltwater species are sold for human consumption, shrimp and prawns are excellent bait for quite a few freshwater fish, including perch.
Cut them into fish-sized pieces, but leave the shell unpeeled when possible, as they’ll stay on the hook better if stabbed through the tough shell.
Anchovies
If you think of anchovies only as a pizza topping or perhaps as bait for larger fish like catfish and salmon, you might be missing the boat. Or at least the perch.
Cut these oily saltwater baitfish into pieces and the perch will lining up for a salty bite.
Sardines
Photo courtesy of Depositphotos
You know those jokes about being packed together like sardines?
Well, these oily fish sold in tins have tons fish-attracting scent that a school of yellow perch won’t ignore. These are typically labeled Pacific wild caught.
On Other Store Aisles
Candy
That’s right, just like me, perch have a sweet tooth.
While it won’t last long if you hook a Hershey’s chocolate bar square on your hook, look for chewier textures that are more likely to last in the water.
Our suggestion: Try a candy gummy bear or other shape and you’re likely to land some sweet-loving perch. Heck, there are even gummy worms, so it was made to be!
Chewing Gum
Photo courtesy of Depositphotos
What’s even tougher than a gummy candy? How about chewing gum.
Janowich suggests you chew the gum yourself just a minute to get it the right consistency, but leave most of the flavor in the gum before hooking on a piece.
The sweetness will attract the fish, and the rubbery texture will help keep it on your hook.
Golden Raisins
Photo courtesy of Depositphotos
The light-colored types come in various colors and will catch the fish’s attention better than your standard black raisins.
Hook them in place and they will swell up a bit on the hook while releasing a sweet scent that appeals to perch.
Sweet Corn
Photo courtesy of Depositphotos
Buy a small can of sweet corn. The kernels are sweet, brightly colored and tough enough to stay on the hook while attracting yellow perch.
Garlic
Not a sweet or a meat, but garlic is strongly scented and for whatever reason, fish like it. Why do you think so many artificial baits are scented with it? Try the real thing if you run out of your favorite standard bait.
The Weird
Shoe Laces
Photo courtesy of Depositphotos
Uh-huh. You’ll have to cut them up, but make them look like a worm or a leech on the hook and suddenly a day on the boat when you left the bait at home is a day you’ll probably catch a perch or two.
And it really only has to work once, because you’ve already learned that fish fillets, guts and even eyes of that first catch will bring fish to your hook.
Rawhide
Even better than your typical shoe laces is rawhide, like the ones you tie up your boots with or other types of rawhide.
Strips of rawhide not only look like a tasty worm or eel, rawhide won’t rip off your hook easily. So, cowboy up and catch some perch!
Cigarette Butts
Photo courtesy of Depositphotos
This is the first time on this website that we’ve suggested anglers hook on a piece of trash, but you’d be amazed at how well it can work at times. And they really stay on the hook.
“They stay on the hook for a long time and have been known to produce large quantities of perch,” Janowich told us. “I learned this trick by accident while on a fishing trip to Georgian Bay in Canada. For giggles, I baited one on a hook in shallow, weedy water and the perch went crazy.”
Acknowledgements
Northern Ohio resident Bill Janowich contributed many of the yellow perch fishing bait ideas in this article. Janowich is a life-long perch fisherman and has developed a perch-fishing kit he sells online at catchperch.com.
Do you have a favorite yellow perch bait we haven’t covered in this article? Leaving a comment below gives us the permission to add it to this article and/or publish it elsewhere. Comments must be approved.Leave a name as you would like it to be published and an email we can use to contact you if necessary. Your email address won’t ever be published.
If you are looking for an air rifle at the lowest possible price with extraordinary features and benefits,
Whether you are participating in the Olympics, shooting in your garden or backyard, or sending a gift to a youngster, the Beeman qb78 and Beeman qb78 deluxe are the options for you to choose between.
The essential requirement of the shooter is to have the best working weapon.
Reliability is of the utmost importance.
The bulk fill of 12g CO2 in the Beeman QB78 and Beeman QB78 Deluxe caters for an average of 60 back-to-back shots per fill, and 78 shots as a whole at .177 caliber.
The bulk fill of CO2 means the ability to shoot more with consistency across the FPS range, allowing the removal of the bottle.
When done with shooting, the gas should not be stored in this pressurized form as it can damage the gun, therefore you should really use all the CO2 while shooting.
The Beeman QB78 air rifle allows only a single shot at a time before reloading is required.
This takes a bit of time of course, but those who love the traditional concept of air gun rifles would like the Beeman QB78 or Beeman QB78 Deluxe.
As we’ve alluded to, there are two models in QB78 — Standard and Deluxe.
Both are available in .177 caliber and .22 caliber.
The QB78 Deluxe has the upgraded features of a 2 stage trigger, Truglo fiber optic, and brass hardware.
For better sight alignment, the Deluxe model features a Monte Carlo Style cheek piece when using a scope,
Making it clear that though the Beeman QB78 and Deluxe models are very simple, unique and accurate at service, these might not be something to gift after use.
The rifle is perfect to have around in your car and start having fun with it in your garden or backyard because the gun is reliable despite its low cost.
The $99 price tag is very appealing since not everyone has the means for a more expensive air rifle.
But don’t let that put you off in terms of quality – if someone buys and experiences the Beeman QB78 or Beeman QB78 Deluxe, they would surely recommend it to family and friends.
It’s an exciting and reliable gun at a very low cost.
The Beeman QB78 has a gold-bolt handle and trigger as well.
The finishing is beautiful as it is quite simple and smooth looking.
The barrel length is 21.5 inches, allowing for good-distance shooting.
Color
The Beeman QB78 comes in brown, while the Deluxe is a little lighter in shade.
Those who are in search of a Classical air rifle can have QB78, and the Beeman QB78 Deluxe would be the best option due to the attractive traditional brown color.
The bluing makes the rifle much more eye-catching too.
Shooting Ability
First of all, the BeemanQB78 air rifle is light.
It’s easy to carry and shoot.
With a typical 3 9*40 AO scope, it weighs 6.5 pounds.
Compared to other PCP rifles, there is low fill pressure, therefore it’s easy to reach optimum air pressure.
Even with little modifications and adjustments, the Beeman QB78 Deluxe’s performance can be enhanced greatly.
Moreover, experienced shooters know that CO2 gas-filled air rifles are much more suitable for shooting accuracy.
Trigger
The Beeman QB78 deluxe comes with a manual guide for the adjustable trigger.
Additionally, the trigger of the Beeman QB78 air rifle is finished beautifully with the gold-bolt handle.
The Beeman QB78 deluxe air rifle is able to be upgraded with a two-stage trigger.
There is also a lock for the trigger.
The trigger is smooth, and easy to handle because of its lightweight of around 6.5 pounds.
Therefore, a shooter can control the air rifle easily; the weight is pretty fair, even for a young shooter.
If you want to assemble the trigger components, the manufacturer does warn that pushing the valve assembly beyond the transfer port may tear the O-Ring.
The trigger is unpredictable as you cannot say what would happen after the changes you made.
It is clear that even while you can remove the trigger from the stock, it can create a bit of a mess.
Therefore, I would recommend going through the manual in detail before you take any such action.
That such a comprehensive manual has been provided is one of the main reasons that the Beeman QB78 is in such demand worldwide.
You can of course still make any changes you wish, if you know what you’re doing.
The main reason for the warning is that doing so undoes the factory settings,
And if you get a little stuck in the process it could be hard to undo your work and leave the rifle in an unworkable condition.
Sight
The Beeman QB78 air rifle has front and rear sights.
The Beeman QB78 and Beeman QB78 Deluxe come with the best type of sight i.e. Fiber Optic.
The most interesting point to note here is that the rear sight can be adjusted like any other high-quality air gun for windage and elevation.
Shooters tend to opt for guns with unobstructed sights, as accuracy is the very first priority.
For clear vision, they often go with a mounted scope.
The testing scope for QB78 is CenterPoint 3-9×32.
This was used because it was the closest and the most popular hunting scope.
And the results are again incredible. It can be said that the sight of the Beeman QB78 air rifle is exceptional.
Here, you can see the performance of the Beeman QB78 Deluxe 0.22 caliber with fiber optic sights, Crossman premier HP 14.3gr pellets, and a slight elevation above the bore of 0.75 inches.
Range (yds)
Trajectory (in)
Velocity (fps)
Energy (ft.lbs)
5
0
494
7.7
7
0.2
487
7.5
10
0.4
478
7.2
13
0.45
468
7
17
0.3
456
6.6
20
0
447
6.4
23
– 0.4
438
6.1
25
– 0.8
433
6
The Deluxe is well capable of penetrating at 21 yards. Therefore, there’s no doubt that it is capable of killing birds inside 20 yards.
MountainSport Airguns used the Beeman QB78 to take down a rabbit at 42 yards:
Mods
Beeman QB78 mods are highly regarded, from simple to full-on PCP conversion power upgrades.
Without any doubt, there is no fear of the shooter for any breakage during modifications.
Therefore, it is safe to modify the rifle. The Beeman qb78 air rifle is very simple to use.
Maintenance
The Beeman QB78 rifle does not require expensive tools for maintenance.
If the surface is in need of care, just get ahold of some grease and wipes to clean it up a little.
This air rifle is pretty low maintenance and should perform well for years.
To extend this even further, regularly lubricating the seals and O Rings will help a great deal.
There are many other options for maintaining the Beeman QB78 air rifle.
These steps can be beneficial.
Without wasting any time, I will discuss the steps you can take to improve the reliability of the rifle.
Breech
You can fit a 7” by 1 ½” strip to polish all the burns of the breech tube in a 7/16” dowel with emery paper. A drill motor would be used to spin the dowel and pass the strips 200 to 600.
Tube
Here, 220 to 600 grits are used. Take emery paper strips of 7 ” x 1 ½” with 5/8” slotted dowel to spin.
Bolt
Take the Bolt and strip all of its parts. After that, polish the bolt with spin at low speed with 220 grit paper until all of its bluings goes away.
Barrel
Fine stone and Dermal are used to break the sharp edges of the “loading tray”. Emery paper of 200 to 600 is used to polish the stoned areas. You can test the smoothness of the barrel “crown” with a cotton Q tip.
Trigger
Using the grit emery paper 600, first of all, remove the trigger and sear, and then polish the contacting surface.
Precautions
While you are handling the weapon, you should be very conscious of any adjustments you make.
This helps in the future, should you wish to reset something or make more changes.
Beeman QB78 Has Three Features In Trigger Adjustment
Trigger Force Or Tension
It is set to about 4 pounds.
If you want to reduce the trigger force, just turn the screw clockwise to reduce the tension.
It is necessary to note here that the tension force must not be below 2 pounds, otherwise, if the rifle is dropped there could be an accidental firing.
Backlash
It is set to be 0.25”.
The screw can be turned clockwise to reduce this.
Beware though, that if the screw is turned too far, it can prevent the rifle from firing.
Like any mechanism, it can be compromised if mishandled.
Engagement Of Sear
0.125 inches is the set value for the sear engagement, which can be reduced by turning the screw clockwise.
Reduced sear engagement can result in accidental discharge if you drop the rifle.
Accessories
Through accessories, the shooter can make little modifications to have better results or to fulfill the requirements.
The sight and scope can be replaced if you are not satisfied.
Specifications
Beeman QB78 is a single-shot air rifle
Beeman QB78 is filled with CO2 gas
Beeman QB78 has 2 stage trigger makes the gun safer and easy to use
European hardwood stock
Manufacturer is BEEMAN
Beeman QB78 Ammo type is Pellets
Beeman QB78 action is Bolt-action
Beeman QB78 barrel style is rifled
The fire mode of the Beeman QB78 is a single shot.
Beeman QB78 rifle weight is around 6 pounds
Shots per fill for Beeman QB78 are 70.
Beeman QB78 is used for plinking and target practice
The rear sight of the Beeman QB78 is Adjustable fiber optic
The mechanism used in the Beeman QB78 is CO2
For safety, there is a manual guide for the Beeman QB78
The warranty for the rifle is 30 Days limited
Loudness is two low-medium
Rail is 11mm Dovetail
Pros and Cons
Pros
Cons
Light weight
Affordable price
Classical look
Real wood material
Accuracy is an exceptional and high performance
Complete guideline and manual
Great finishing with bluing
Trigger lock system allows having safe usage
Maintenance is easy
Better adjustment options
Made in China
Sound is loud; it is not silent. Therefore, the target can move away
It requires more time because it is a single shot; therefore; it requires much effort for the next shot.
It wastes time until the target misses or moves away
According to customers, the firing disturbs after continuous shooting
Bigger in size than gun
Price
Pricing is the most exciting part of the Beeman QB78 air rifle – it costs a mere $99!
Undoubtedly, the features and the benefits you would get from the air rifle are unbeatable at this price.
If you wish to have an air gun with quality features and a classic look, but you aren’t made of money – then this one’s for you.
Certain baits have their time and place on both native trout and fresh stockies alike; here are some of the author’s favorites.
A look at some of the best offerings to tempt a trout this month and beyond.
Regardless of whether there is a closed season with opening day festivities or year-round angling in your home waters, April fishing is synonymous with trout. Even many hardcore saltwater anglers find themselves walking down a trout stream at one point or another in the 4th month. And while the trout purists are a group all unto themselves, for most of us trout fishing is a simple leisurely activity that provides a way to bridge the gap from winter shack-nasties to spring success. Nonetheless, certain baits have their time and place on both native trout and fresh stockies alike. For the purposes of today’s column, I will skip fly fishing as it simply isn’t my area of expertise—perhaps I’ll visit it next spring.
Whether cast, jigged or trolled, spoons such as the Kastmaster, Thomas Buoyant, Little Cleo, Tom’s Taz Lure and others are great options for actively-feeding fish. When the appropriate size lure is chosen, you can just as easily fish them in a deep-woods stream as an expansive lake. When a standard cast-and-retrieve isn’t working, or when hunting fish in deep water, a count-down method can be used. Cast the spoon out and let it sink for a pre-determined amount of time before beginning the retrieve. Make note of the sink time when you begin catching as more fish will often be found there. In deep lakes, don’t be afraid to bounce the spoon off the bottom—you might just end up catching the biggest fish of the day!
Inline Spinnerbaits
Much like the spoon, an inline spinner has long been a hot trout lure. Whether you throw a Mepp’s, Rooster Tail, Blue Fox, Panther Martin or local favorite, this is a great searching lure when fish have spread out from where they were stocked. I like to set one line out with bait of some sort and then prospect the nearby waters with a spinner on a second rod. They are available in a wide range of sizes, and as a bonus there probably isn’t a fish in your lake or stream that won’t strike a spinner so your odds of simply catching are greatly improved.
Jigs
Probably not the first thing thought of by the average trout fisherman, jigs are a deadly option nonetheless. Soft plastics such as Trout Magnets, Gulp or even an old-school curly-tail grub can be mounted on a jig head and cast to schooling fish. Small hair jigs can be extremely effective on heavily-pressured fish as well as holdovers that have become more accustomed to feeding on naturally-occurring baits as opposed to hatchery pellets. One trick for using a jig of any sort in a stream is to swing it below a float and let it ride down current on an open bail.
Hard Baits
While hard baits such as the Yo-Zuri Pins Minnow have been popular with trouters for many years, other options including the Yo-Zuri crystal minnow, Rebel minnow and the Rapala minnow should not be overlooked! Many a big brown trout has fallen for a large hard bait swum in the shallows around dusk, and they also produce in fast-moving streams where they can be held in the current or swung into a seam or deep pool.
Soft Baits
The word “PowerBait” is almost synonymous these days with trout fishing. Whether you use dough, nuggets, worms or eggs, this stuff is like crack to a trout. I’ve had days where I almost didn’t have time to set a second rod at a stocked pond as trout after trout slammed a hook tipped with PowerBait. It’s easy to use, always at the ready and lasts a long time on the hook.
The Real Deal
From egg sacks to garden worms to grass shrimp (where legal) to minnows, it is tough to beat the appeal of a live bait for trout. They can be fished on the bottom, free-floated in a stream or hung below a bobber. I fish some tidal streams that dump into the salt and have the occasional sea-run trout that noses up above the salt line. I fish with grass shrimp that I trap in the days leading up to a trip, and I can even start a bit of a feeding frenzy with a regular handful or two of shrimp tossed out into the current.
So with states across the Northeast stocking hundreds of thousands of fresh brown, brook, rainbow, tiger and even golden trout over the past few weeks, now is the time to dig out that freshwater rod, grab a few lures or baits and head to your local trout stream to dust the winter cobwebs off your casting arm!
")
")
")
")
")