Hunters who share access and hunt together tend to name treestands and blinds. It’s fun and necessary, especially when trying to identify where someone is going for the day. So, if you’re slapping a handle on a spot, why not make it creative, funny or even weird? Here are 20 real-life honey holes that fall into those categories.
Kentucky hunter Logan Beach once planted a food plot close to bedding cover. We would have bucks bed on the edge off about 30 yards and wait on does, he said. We thought of it as a hotel bed and breakfast. Thus, it became Rut Roof Inn.
2. Yellow Brick Road
Another Beach special, Yellow Brick Road is self-explanatory. It’s a set on a main corridor between a major food source and a corn pile, he said. (There was) constant deer movement, and whichever way they turned off dictated which spot they would end up at for the day.
3. Crash Site
Kyle Culbreth, another Kentucky hunter, had a scare several seasons ago. In 2009, he fell from an elevated platform. I had a treestand break and fell 25-plus feet, he said. That stand location is now called Crash Site.”
4. Church
Deer diehard Luke Koch has a spot he calls going to Church. It’s at the end of a long draw, and an old, white country church is nearby. At 9 a.m., the bells toll, and you can hear it well from the treestand.
5. Easy Pickens
Big-game hunter extraordinaire Jonathan Losli hunts a lot. And this past season, he had a treestand produce in a big way. It relinquished one elk and two deer on the opener. Now, he calls that spot Easy Pickens.
6. Maternity Ward
Audrey Pfaffe is another serious whitetail hunter, and a spot she used to hunt is aptly named. There was a wooded hillside at my grandpa’s old dairy farm that the cows would always sneak off into to have their calves, she said. We call it the Maternity Ward, as a lot of bucks would bed in there since it was so thick.
7. The Penthouse
Kate Sanford is a big-buck slayer, and one of his spots is comfortable. We have an enclosed stand that a friend built, and we call it The Penthouse because it was the fanciest we had ever had, she said.
8. Cat Gut
Dave Skinner is a hunting land real estate agent and a longtime deer hunter. A spot a friend of his hunts is called Cat Gut. I’m not creative enough to come up with good names, but Cat Gut was named after the shape the river made as it winds through the property, he said. Looks like an intestinal tract.
9. Control Tower
Zack Smith hunts the outskirts of a major international airport. We have a ladder stand on a big ridge that overlooks a huge draw, and it’s way up there, he said. So, in true airport fashion, we’ve dubbed it the Control Tower.
10. Droptine Hotel
Jason Kidd had never killed a droptine deer. Then, he wrote it into existence. When Dad and I built our first shooting houses for the farm, I came up with a name for mine, he said. I took a Sharpie and wrote on the inside of the blind that it was the Droptine Hotel. I had never killed a deer with a droptine, but it sounded cool. The next year, I killed my first deer out of that old shooting house, and it had a 4-inch droptine.
11. Terror Tower
Tommy Warder’s scariest hunting spot is called Terror Tower, and for good reason. We had a 15-foot open-topped tower stand in a brushy field, he said. The stand was wired to a tree that would sway back and forth when the wind blew.
12. The Hangover Stand
Realtree’s Will Brantley is an outdoor editor, writer, and hunting outfitter. One spot that might not get hunted often is called The Hangover Stand. It’s about 100 yards from the back door of the cabin.
13. Coke Bottle Stand
Sid Herring Jr. has tagged many deer from The Coke Bottle Stand. It got the name after he found a great treestand location in a well-traveled draw. It had an old glass Coke bottle placed in a fork, and the tree had grown around it, he said. Killed many deer out of that stand on that tree.
14. Freezer Foray
Someone once unceremoniously and disrespectfully dumped an old freezer on Kevin Thayer’s property. He decided to make the best of it and shot a big 10-point buck from it. Someone else’s massive litter worked out well for him.
15. Death Bunker
Deer hunter Aaron Mudd calls one spot Death Bunker, in respect to the many whitetails and turkeys taken from it. The name comes from all the blood shed on it in years past, he said. It’s the one spot on the farm that if someone needs a deer, we go to (it). It has never failed to produce.
16. Melting Pot
Seth Martin hunts a spot called Melting Pot, because it gets hot during early archery season. The sun bakes you, he said. But if you can stand it, it’s going to produce. Later, I put a box stand there. The name stuck.
17. Buzzard Blind
Outdoor writer Darron McDougal hunted in Georgia this past season and sat in one blind a few times. He called it Buzzard Blind because of the heavy sign of buzzards frequenting it. Eventually, toward the end of the hunt, he shot a good buck from it.
18. The Land Strip
Kyle Campbell dubbed one of his favorite spots The Landing Strip. It’s on a creek crossing, and they cleared up the brush and made the crossing so wide it looks like you can land a plane in there, he said.
19. Sunglasses
One of the deadliest treestand locations on a farm I hunt gets blasted by the sunrise. On cloudless mornings, you can’t look eastward without a set of sunglasses. Thus, it came to be known as Sunglasses. But man, it’s a killer spot, and I can think of at least 10 mature bucks taken from it since 2015.
20. Dead Man Stand
Another great stand location on a property I hunt is on the edge of an old cemetery. At first, I called it Dead Man Stand. However, out of respect to those who rest there, I later changed it to Cemetery Stand. Afterward, we started knocking down some big deer from it, and it has relinquished several 4-½-plus-year-old bucks since.
Do you have some unique, funny or downright weird treestand and ground blind location names? If so, drop them in the comments section, and tell us all about them.
(Don’t Miss: 20 Deer Hunting Lies Your Granddaddy Told You)
It’s coming quick this year – ice season. Often early ice can be one of the best times of year, so let’s get ready!
We use two types of rods when ice fishing for walleyes. One is for jigging and one is a dead stick, which is simply hanging a bait in a secondary hole.
One of the things that makes catching walleyes tricky is the way they bite. They don’t really bite a bait, they suck it in. As they move close to their prey, they open their mouth, flare their gills and suck a volume of water, hopefully containing your bait, into their mouth. Then with their sharp teeth they hold the bait in their mouth, waiting for it to quit struggling while determining if they want to swallow it. If they detect something is wrong (bad taste, too much resistance, wrong texture) they just open their mouth, slam their gills tight and blow the bait out. The problem is this can all happen is less than a second!
So as a walleye angler, we need sensitivity in our equipment to not only feel a soft bite, but to feel it quickly and then set the hook before the walleye spits out our offering.
The hookset can often be problematic with walleyes, as their mouth is very boney. To set the hook point into their mouth you have to make your lure move inside the mouth, so it can drive into those bones. With a walleye this can often be difficult because of the way they are holding that bait solidly in their teeth. A hard, solid hookset, is imperative.
Lastly, the rod needs to be able to handle the fight of a walleye. Since the rods are short, normally less than 3-feet, you don’t have a nice long bow in the rod to take up the head shaking of a big walleye. These head shakes are amplified by the use of no-stretch lines (see below). So, a good walleye ice rod needs to be able to absorb the pull of the fish.
It is also important with this short length be able to keep continuous tension on the fish, so it can not throw the bait. Add to that the issue of having to fight the fish up through a small hole and you must have the right action to consistently land fish.
Jigging Rod
This is the rod you’re working by popping, dropping, jiggling, and pounding as you try to entice a walleye to first get interested, and then to strike. We use a couple of different rods for jigging. The Clam Ice Team Professional Series 26” Medium Action Walleye Rod and the JT Outdoors 30″ Gold Digger are great all-around rods. For targeting bigger walleye, we use the JT Outdoors 34″ Black Reign. All of these rods have similar attributes. The shorter ones are particularly good in one-man shacks like the Clam Legend XL Thermal and the longer rods for bigger shacks like the Clam X200 Pro Thermal.
These rods are all super sensitive and lightweight. When fishing in cold conditions, walleyes often don’t hit the bait very aggressively, once again, they are just sucking it in. Also, many times you will be getting bites as the fish chases your bait in an upward direction, so it is hard to detect the bite because they are pushing slack in the line as they bite while they swim toward you. You’ve got to be able to feel them to move on to the next step – setting the hook!
To increase sensitivity, we use a no stretch line as our mainline. The best choice out there is Berkley NanoFil. NanoFil is a uni-filament line, meaning it is a single strand of no-stretch material with no braiding or weaving. The no-stretch attribute greatly increases your ability to feel what is often a subtle bite. The beauty of uni-filament is that it does not retain water in the line, so ice build-up is greatly reduced. Nothing dampens sensitivity more than a big glob of ice on the line! The ice that does build up on NanoFil is on the outside of the line and is quickly taken off with a single sweep between your fingers. For walleye fishing, 8-10lb NanoFil is best.
Often in ice fishing conditions, the water is much clearer than in summertime. There is no algae or sediment from wind to cloud things up. For this reason, you will want to use a Fluorocarbon leader to make the line that is tied to the bait nearly invisible. We use a small #14 to #18 swivel to attach the NanoFil to the Fluorocarbon leader. The length and pound test of the leader depends on conditions. If you are targeting larger fish, then lean towards a 10lb leader made with Berkley Professional Grade 100% Fluorocarbon. For smaller fish or in super clear conditions, you might go as light as 6lb Fluorocarbon. A standard leader length is 2-feet, although in gin clear water a 4-foot one is not uncommon.
The nice thing is that you can rig your reel one time with NanoFil and then adjust your leader to the situation. You can even quickly change to a 2-pound leader if some nice crappies happen to show up! A power hookset can be achieved with these rods because they all fast taper. This means that only the last few inches of the rod have a lot of bend. Since the majority of the rod is stiff, it has a strong backbone and thus amazing hook setting power.
With the few inches on the end of the rod being extremely flexible, you have some rod bend during the fight. It is a very specific action to get the right power in the backbone but flexibility in the tip, and these three rods nailed it!
Dead stick
There are a couple instances when we use dead sticks. The first is when walleyes are in a finicky mood. Often hanging a rod with a simple jig and live minnow in a hole next to where we are jigging produces better than the jigging rod. Jigging is still important to draw the fish in, but we see it on our Lowrance HDS units all the time, a walleye comes in and looks at the jig rod, doesn’t bite, but fades over to the jig and a minnow and slurps it in.
Second, we are also big proponents of using JT Outdoor Hot Boxes for our dead sticks. These boxes have a propane heat source in them to keep the hole clear of ice, so they can be set up remotely from our shacks. They are very portable and quick to set up. These boxes really give us big advantages! If you are fishing a flat or basin area by spreading out lures similar to how you would use planer boards in the summer, you can multiply your results. If you are fishing structure it is nice to be able to set up rods in several depths. Try jigging in a shack at the top of the break with a Hot Box set at the middle or bottom of the break to cover several depths.
In any situation, the big difference between a jigging rod and a dead stick is that you’re are not typically holding the rod to detect the bite. The walleye is going to suck the bait in and either hold it while determining if it is going to eat it, or it will slowly start to move away. Since there is a delay between the bite and the hookset you need to use a much more limber rod for this set-up. Enter the JT Outdoors 36” Walleye Snare Rod. This is one of the coolest rods out there for ice fishing! It is super flexible at the tip to about half way down the rod. You could call this rod action Slow Taper. The idea is that the walleye will suck in the bait and feel little or no resistance from the rod. Remember too much resistance will make them want to spit the bait.
The Snare Rod has a built-in red ball at the end of the rod, so even at a distance you can see the slightest bite as the rod tip and ball will move slightly down. When you get to the rod at this point, a solid sweeping hookset will double over the Snare Rod enough to get into its strong backbone and drive the hooks home! We have never seen another rod on the market that duplicates this rods ability to trick a walleye into holding on to a bait with its limberness, but still have the hook setting strength of a Snare Rod!
Sometimes, especially with Hot Boxes it might take a while to get to a biting walleye. What’s interesting is that you will catch a surprising number of fish that sit still and hold on to the lure a long time. The other thing that may happen is that once the walleye determines its ok to eat the bait, it will typically swallow the bait a little deeper and it will start to move away. Correspondingly the Snare Rod will double over even more. Often the red ball will even touch the water!
This is where things get interesting. As the Snare Rod bends more and more, it also starts putting more pressure on the fish. Many times the fish will make a sudden move to try to get away. This move often puts the Snare Rod into its strong backbone and the fish will literally set the hook by its self – thus the name Snare Rod! One big advantage of the Snare rod, is once the fish is hooked up, you’ll have all kinds of flex in the rod and fish rarely get off.
Set up the Snare with the same Nanofil mainline and don’t be afraid to drop down a size or two in your leader pound test, this is a more finesse technique, so a lighter leader will often allow the minnow to swim more actively on a light jig.
With this technology, the air rifle has a shrouded sound, which diminishes the noise by 50%.
Besides this, the Hatsan Bullboss incorporates an anti-double feed system.
The anti-knock system ensures that there is no air leakage if the air rifle is dropped.
The Hatsan Bullboss can be customized according to the shooter’s preferences.
It is not only the features that can be adjusted but a Picatinny optics rail and a 6-slot Picatinny rail can be bought to add.
Hatsan tells us that the Bullboss air rifle will be even more customizable in later years as more add ons and upgrades become available.
Here I will be discussing all the features and the benefits of the Hatsan Bullboss air rifle and will leave it up to you to make an informed decision on whether it’s the best air rifle for you.
The Hatsan Bullboss has a butt pad that is adjustable for the length of pull.
The butt pad is quite friendly for your use.
All you have to do is to loosen the two screws located on the right of the stock.
After that, you have to tighten the screws so that the pad becomes solid.
Note that there is no stock length of pull and butt pad adjustment on the Bullboss model.
How to maintain Hatsan Bullboss
Here, I will be discussing the ways you can maintain the Hatsan Bullboss.
Magazine O-Rings Replacement
You shoot hundreds of times, so the magazine in which the O-rings retain the pellets should be replaced from time to time.
As you substitute the magazine, the cocking lever of the rifle becomes stiff to operate.
Moreover, if you reposition the O-ting in its groove, this may also alleviate the stiffness. Oiling can also be beneficial.
Lubrication Of The Rifle
After every 500 to 1000 shots, it is recommended to clean the barrel with a cleaning rod.
Never lubricate inside the barrel.
Always keep in mind to unload the rifle before oiling or cleaning.
Make sure that the gun barrel is clean and not blocked. Periodically apply the oil on the following parts of the air rifle.
The mechanism
The pellet probe
The cocking lever sliding surface
The stern of the magazine pin
Magazine release
Outer O-ring
The magazine axis hole
You should not attempt to disassemble the Hatsan Bullboss when it is charged, but you do have to remove and replace the air cylinder.
Never fire the Hatsan air rifle when the cylinder is empty. Otherwise, the air rifle can be damaged.
Manual Safety And Precautions
It is of the utmost importance to have safety measures when you are dealing with something dangerous.
The safety button can be set to ON and OFF manually, according to your will.
If you want to ON the safety button, pull the lever to the rear. In this way, your trigger cannot be pulled.
Moreover, if you want to turn off the safety, push the safety button forward.
Here are some precautions while using the air rifle.
Make sure the air gun is not cocked while you fill the air cylinder.
Safety is in the ON position; the magazine is not mounted in the air gun.
If the air tube is empty, fill in the air tube after cocking the air rifle and keeping the cocking bolt open at the rear.
You must have a concern for the safety measures before filling the air cylinders.
It is compulsory for the shooters to wear eye and ear protection while filling the air cylinder.
You have to monitor the air pressure from the air gauge of the hand pump/scuba charging kit while you fill the air cylinder.
Do not come in contact with eye contact while you fill the air cylinder.
The air gun will fire if not cocked correctly.
Never pull a firearm towards you by the muzzle
Do not walk, jump or run when carrying a loaded air rifle
The air gun should not be used under the influence of alcohol
Bullboss – Speed and Accuracy
Here we will measure the speed and accuracy of the Bullboss.
CALIBER
.177 Caliber
.22 caliber
.25 caliber
MAXIMUM MUZZLE VELOCITY
1170 fps
1070 fps
970 fps
ENERGY
27 ft.lbs
38 ft.lbs
42 ft.lbs
MAGAZINE CAPACITY
10
10
9
AIR TUBE VOLUME
200cc
200cc
200cc
FILL PRESSURE
200BAR
200BAR
200BAR
NUMBER OF SHOTS PER FILL
160
150
135
NUMBER OF SHOTS AT OPTIMAL VELOCITY
55
45
45
OVERALL LENGTH
935mm
935mm
935mm
BARREL LENGTH
585 mm
585 mm
585 mm
WEIGHT
4.3 kg or (9.5 lbs.)
4.3 kg or (9.5 lbs.)
4.3 kg or (9.5 lbs.)
The results may differ up to 20% owing to the change in pellet weight, temperature, elevation, shape, and other aspects.
The above results are gained with the energy when there was no constraint on the rifle calculated with the air tube at optimal pressure value .
PCP air rifles start at the minimum velocity, and then they tend to augment and acquire the highest of optimal pressure value, and then again start to decrease as the air tube pressure goes down.
Jim Chapman takes the Hatsan BullBoss air rifle in .25 caliber, to see how it will perform against feral hogs in central Texas, and the result will surprise you:
How about the Hatsan Gladius?
Another Hatsan PCP air rifle, the Hatsan Gladius comes with a maximum of 10 shots and manual loading.
The Gladius has a side lever action like the Hatsan Bullboss.
The Gladius is also available in an extended version ( Gladius Long) with a 585mm barrel and 100 fps (30 m/s) more muzzle velocity.
It allows the air rifle to perform better than Bullboss.
Below we will weigh up the Bullboss and the Gladius to find which is best.
Speed and Accuracy
The chart below details Hatsan Gladius’ velocity, energy, weight, and barrel length, and clarifies the speed and accuracy of the air rifle.
Model
Max. Muzzle Velocity
Energy
No. Of Shots per Fill
Weight
Barrel length
Joules
Ft.lbs
Gladius
1070 fps
30
22
90
4.65 kg (10.2 lbs.)
495 mm
970 fps
42
31
85
4.65 kg (10.2 lbs.)
870 fps
46
34
80
4.65 kg (10.2 lbs.)
Gladius long
1170 fps
36
27
85
4.8 kg (10.6 lbs.)
585 mm
1070 fps
51
38
75
4.8 kg (10.6 lbs.)
970 fps
57
42
65
4.8 kg (10.6 lbs.)
Due to some changes in temperature, pellet shape, pellet weight, and elevation, the Muzzle velocity can differ a bit.
The reviews for the Hatsan Bullboss .25 calibers are mostly in favor of the air rifle.
Users are happy with tools like spare magazines; tools to clean the Hatsan Bullboss air cylinder, and the consistency, power, and ease of use.
The weight of the Hatsan Bullpup is distributed so evenly that it is very easy on the shoulders.
Customers relay that it feels lighter than it actually is.
One of the reviews reveals that for the power output, the air rifle is very quiet, and can do some damage at 20 yards.
Additionally, shooters appreciate the synthetic stock and the cocking lever.
Their experience mentions that it is not an effort to cycle the next round to take another shot.
Overall, the Hatsan Bullpup is recommended by users to use at .25 calibers; the shooters find it performs the best among the 3 calibers.
Many people claim that the regulator is not necessary, but if you would like to shoot small targets at varying distances, a consistent shot string would be required for that shooter.
For most hunting, the accuracy level of the Hatsan Bullpup is quite adequate while pressure is in the green arc.
Customers find the lever action better than the bolt action.
Likewise, the magazine is easy to load and seems to operate flawlessly.
Some customers have also suggested some changes that could be made to the Hatsan Bullpup.
First of all, the first rail does not feel the sturdiest with a bipod hooked up.
The trigger of the Hatsan Bullpup is considered excellent, but it is a 2-stage trigger.
Customers would also like to see the Hatsan Bullboss QE featuring interchangeable calibers while keeping the same power and accuracy.
This is because the Bullboss does not have the same potential for three different calibers; instead, they perform differently.
Also, people claim it would be better if the butt pad was able to be adjusted.
While comparing the Hatsan Bullboss to the Gladius, customers prefer the Gladius for being an accurate and long-distance air rifle.
However, the price of Gladius is a bit higher, so that is to be expected.
Overall, people’s impressions of the Hatsan Bullboss air rifle are very positive.
Concluding Thoughtson the Hatsan Bullboss QE
The Hatsan Bullboss QE rifle encompasses each and everything you wish for your hunting trip, or even for backyard use.
The versatility & ergonomics of the Hatsan Bullpup stock make your shooting experience comfortable and memorable.
The incorporated QE technology in Hatsan Bullboss .25 adds a certain quiet to the air rifle,
Which is also loaded with realistic features like a detachable air cylinder, Picatinny rails, anti-double pellet feed, and a two-stage adjustable trigger.
In addition to this, the air rifle is perfect in accuracy and speed, and it comes with inside lever action, which is far better than a bolt action.
Other than this, the .177 caliber air rifle, .22 caliber, and .25 caliber air rifle give the best shot experience.
All three features perform differently but not the same way.
I can remember it like it was just yesterday. My dad had borrowed a bow from a family member and was tinkering with it at the dining room table. I thought to myself, “Could it be? Were we about to become archery hunters?” Up until this point, my dad and I had always toted rifles in the deer woods. Watching him shoot and sight that old bow in seemed like an agonizing process. It seemed like it took days to get it right. The sight looked like something out of a junk pile when compared to those of present day. There were no fiber optic pins or bubble levels. No, these pins were painted: a poor excuse of red and yellow. Yeah, we’ve got it pretty good today in the world of bow sights. We even have the option of having one single pin or multiple pins to look at. Pretty spoiled, right? Yet, this is a common conundrum when picking out a sight and this current topic: single pin sights versus multi-pin sights. Each have their pros and cons. Let’s look down the path of each and see which one might be the better option for you.
Single pin sights are exactly what they sound like. Within the sight housing, there is one pin for you to focus on and one alone. There isn’t a bunch of clutter in the form of other pins and target acquisition comes faster. It puts the confusion to a minimum and, in the heat of the moment, that could help a quite a bit. These sights operate on a slider, meaning that you can dial that one pin to exact yardage. It’s a huge benefit in terms of accuracy, which is probably why it is the most popular choice for target archers. This feature takes the painstaking task of pin gapping out of the equation altogether. For those that don’t know, pin gapping is where you aim between pins. Say you’ve got a 35 yard shot. You aim between your 30 and 40 yard pin. It’s a technique that works and gets the job done, but one that will never be better than single pin accuracy.
There are also some drawbacks of running a single pin sight. These have nothing to do with accuracy on the range, but everything to do with hunting because of having to adjust the sight to yardage, which poses a potential problem. Actually, it poses a few. The first is that things happen quickly out in the field sometimes. Say you’ve got a buck standing at 30 yards and have your sight adjusted to 30. You come to full draw and all of a sudden that buck jumps and runs out to 53 yards. Now, you’ve got to either know your exact holdover for 53 yards or have to let down and readjust your sight to 53. That is either going to potentially hurt you in accuracy or in time. Another issue is the actual act of adjusting your sight. Doing so involves movement and movement is what can bite you as a bowhunter. Drawing your bow back is movement enough. Adding more to the equation definitely has the potential of blowing an opportunity.
Pros
Open sight picture
Fast target acquisition
Exact yardage accuracy
Cons
Have to adjust sight for each shot
Adds in movement
Might cost one opportunity in the field
Multi-pin sights
Multi-pin sights are definitely the most popular in the bowhunting world, especially for beginners. When starting out, it’s comforting to know that you’ve got a set pin for each yardage. They come in three, five and seven pin models with the option of adding a slider to reach way out to longer yardage. These pins are usually set in 10 yard increments; often at 20, 30, 40, 50, 60, etc. That right there is probably the biggest advantage to using a multi-pin sight for hunting. It completely takes the step of adjusting the slider for each shot. That deer standing at 30, but then bounds out to 53? A hunter wouldn’t even have to let down from full draw. All they would have to do is switch the pin they were aiming with. They are a timesaver and, in the mountains, mere seconds can be the difference between notching a tag or eating tag soup. Not having to adjust to yardage also gives the advantage of less movement. And, on an archery hunt, the less movement the better.
Just like single pin sights, multi-pin sights are not all peaches and cream. While having multiple pins in the sight housing is a plus, it can also be a disadvantage. The first is clutter, especially with seven pin models. In dense cover with branches every which way covering up your sightline, having a bunch of pins doing the same thing is not optimal. It could create an issue with trying to pick a spot. All of those pins in there not only cover up the sight picture, but also add an element of confusion. If I had a dollar for every time I heard someone say “I used the wrong pin,” I could probably buy an out-of-state tag or two. It’s even happened to me. The first elk I shot at I couldn’t tell you which pin I used with how intense the situation was. That is the reality of bowhunting and why many of us thrive on it. The intensity and intimacy of close range encounters where thinking straight comes few and far between. In this regard, simpler is better with sights. There is also the issue of pin gapping, which doesn’t offer that exact yardage accuracy you get with a single pin sight.
Pros
Great for beginners
Have set pins for various yardages
Timesaver in the field
Cons
Multiple pins cover up the sight picture
Could use the “wrong pin”
Must be aware of pin gap for yardages in between set pins (no exact yardage accuracy)
Closing
Choosing between a multi-pin sight and single pin sight really comes down to you and your style of hunting in my opinion. Most spot and stalk bowhunters I know that are crawling around open country usually opt for a multi-pin sight. They need the ability to adjust yardage on the fly—especially for hunting the rut when bucks move every which way without a moment’s notice. This is what I prefer as that is the country in which I mostly hunt. However, someone in dense cover or hunting from a treestand might prefer the single pin. Being in close quarters, they know their yardage and can have that single pin set right to it, ready for action. My best advice is to try these sights out and see what you like better. Even if you are a spot and stalk hunter, you might find that you prefer the simplicity of a single pin. There is nothing wrong with that. The same can be said for hunting out of a tree. This is one of the coolest things about bowhunting to me. We have the luxury of molding our system exactly to what we want and how we want it. All of this is a far cry from those red and yellow painted pins bolted within that bent piece of metal I saw as a kid.
Check this out!
For another look at single vs. multi pin bowsights, check out this article here: Single pin bow sights: Are they really better?
Being adopted by a major military is the dream for every firearm manufacture.
But government procurement is a messy business and raises the question…Did the US Army make the right decision by choosing the Sig Sauer P320 as its new sidearm?
And just because they chose it…does the P320 make sense for you?
We’ll cover everything about the P320 in our review…from features to accuracy, reliability, ergonomics, upgrades, and pricing. By the end, you’ll know if the P320 is right for you or if the Army is stuck with a dud.
And now complete with a hands-on video review:
If that helped, please subscribe to our YouTubechannel since we’re adding new videos every week!
Times are changing and the striker fired polymer king Glock, is being given a run for its money by Sig Sauer.
Normally known for its double action, single action hammer fired pistols, Sig Sauer is the gold standard for semi-auto handguns.
Their entry into the striker fired market is the p320, a welcomed sight in a stagnating market and a very real replacement for Glock pistols for CCW and general shooting.
Not sure about gun actions? Check out our Single/Double Action vs Striker Fired article.
Why would Sig want to make a striker fired gun?
Well, striker fired guns have a lot of advantages that people love…a consistent trigger pull and increased internal safeties are the main reasons armed citizens, police agencies, and elite military units are switching to striker fired guns. The SEALS did it with the Glock 19.
The mechanisms that make up striker fired guns are also very easy to produce, assemble and easy for armorers to fix. All this makes striker guns cheaper than traditional guns.
This is where the Sig Sauer P320 comes in.
The major difference between the p320 and every other double stack pistol Sig Sauer has ever made is that others use hammers and the P320 uses a striker.
It offers the quality and reliability of Sig Sauer, with a tried and true striker system and ingenious features that make it a novel gun.
In a world of “innovative” guns, this truly is an innovated design and a step in the right direction for the future of pistols.
General Opinion and Background
The model tested for review was my personal Nitron carry in 9mm.
There has been a total of about 1,700 rounds of FMJ plinking and training ammo through it and about 250 defensive rounds through the bore. I would feel comfortable saying it has 2000 rounds total.
The best 9mm ammo for self-defense and plinking.
The only stoppages have been ammo related, all with steel cased ammo, including a squib load.
My overall impression is that this is a good pistol when compared to a Glock, XD, or M&P but subpar compared to a legacy P-series Sig Sauer gun.
The construction of the gun is better than others in its class but isn’t as good as an H&K, legacy Sig Sauer, or any of the high end 1911’s.
This is very much a carry or light duty gun.
If you shoot competition and can’t afford better, this is a good gun, otherwise look elsewhere.
If you plan on actually shooting a gun a lot, get a better gun. Better in the sense it has better ergonomics, and is more specialized for what you need.
*Update January 2019* Sig has released their civilian version of the Army’s M17…the P320-M17. Check out our full review if that suits your fancy.
Features
Safety
The Sig Sauer p320 has the usual suspect of safety features including firing pin, trigger bar, and others that make the gun just as safe as other pistols in the Sig line.
What this pistol does have that no other striker fired gun does…is a single piece trigger.
The trigger pack inside the gun is designed to have a one-piece trigger instead of the widespread two-piece hinged trigger of Glock and M&P design that houses a safety feature to control the striker. The safeties of this gun are all truly passive and operate without input from the shooter.
This makes the trigger very smooth, consistent and can be had in either a standard, short reach or small bladed design.
Fire Control Unit & Caliber X-Change
One of the coolest features of this gun is what part constitutes the “gun.”
As far as the ATF is concerned the “gun” is the part that has the serial number on it. That means everything else is just a part.
Here’s what the serialized P320 looks like…
The steel fire control unit inside the P320…
The slide, and more importantly, the grip frame, are not serialized. You can shoot all the common calibers out of this weapon by just changing slides and mags. You can also re-size the gun to your hand by having the entire grip changed, not just a few panels.
Sig calls them Caliber X-Change kits.
Sig offers kits to change sizes, Full Size, Compact, and Subcompact and caliber change kits for .380acp, 9mm, .40s&w, and .357 Sig. The kits include the new slide, grip module, and proper magazine for the caliber and grip size.
It should be noted that while Sig has said that .45 ACP kits are “coming soon” they have been “coming soon” for about 2 years, so maybe not as soon as it sounds. Currently, if your P320 is in .45 ACP you cannot change it to ANY other caliber. Likewise, if your P320 isn’t in .45 ACP, you cannot change it to .45 ACP.
This system works well but is a dumb way to go about it. To convert a Glock, for example, you choose from the calibers that your gun can fit and need a new barrel and a magazine. You can save several hundred dollars over buying a new weapon with this system.
The only annoying thing is the price…Caliber X-Change kits are around $400.
You only save $150 or so when you buy a Caliber X-Change kit. You might as well buy a new gun if you want a different size or different caliber.
Especially if you factor in the cost of extra magazines. The guns come with two, the x-change kits only have one.
Buy the new gun, thank us later.
Grip Frames
Sharing both grip frames and magazines with the P250 the P320 has the ability to tailor the size of the gun and the circumference of the grip width, with just the change of the plastic grip frame.
The serialized part of the gun the steel fire control unit mentioned above. This means you can buy grip frames online and have them shipped to your house, no FFL required.
This is perfect for people who want different grip sizes or want a pro to stipple their grip since now you can just send the hunk of plastic through the regular mail. And if they/you mess up…you’re only out $45.
Integrated Red Dot
Sig Sauer joins others with a cutout for a red dot sight available from the factory.
The twist is that theirs comes with a red dot sight installed as well. The “RX’ model comes with Sig’s own Romeo 1 red dot.
While not as proven as other red dot sights, having shot with one I’d have no problem carrying one or stacking it up next to a Leupold or Trijicon.
Take Down
The takedown of this pistol is easy and can be done without pulling the trigger. All you do is lock the slide back, rotate the takedown lever clockwise and then slide off the upper half the gun.
I have noticed that it is easier to put the slide back on with an empty magazine inserted because it lifts the slide lock and makes it easier to move the slide rearward and rotate the takedown pin counterclockwise.
Accuracy & Reliability
The gun is accurate enough to be used in a competition and will easily outshoot most shooters.
The gun functions and fires all hollow point and plinking ammo you can feed through it into one ragged hole if you do your part.
However, there are a few things to note about the accuracy of this gun.
The trigger blade is large and deeply curved. Until you get used to it the trigger can be a serious hindrance to accuracy.
The trigger pull is consistent with no stacking and seems to be within the 6-7 lbs that a striker fired gun needs.
Stacking is where the trigger gets heavier as you pull it until it breaks, common on older pistol designs, especially double action triggers.
Finally, the grip panels are good and the overall width of the grip can be tailored by ordering one of several different available plastic frames.
Ergonomics
This gun feels very much like a Sig.
The high bore axis makes it feel a little like holding a ray gun but it is very comfortable in the hand.
The plastic frame feels warm even in cold weather and the grip panels feel almost like skateboard tape, but without the sand. It’s a subdued stippling that works better than it looks. I hate saying this but…the gun almost needs to be felt in hand and fired to appreciate it.
The slide serrations should be larger, I had trouble racking the slide with sweaty hands. Deep slide serrations like those found on the S&W M&P would be great here.
Truth be told, I have huge hands so this might be a slight bias but the P320 feels good in the hand…but I don’t like the mag release or the baseplate.
I had trouble in both bare and gloved hand with the mag dropping free for a reload. This is definitely a problem and if you carry the compact or subcompact models you might have the same problem.
This is because the magazine floorplate is a piece of the grip and if you have a meaty palm then you’ll prevent the magazine from dropping free. I never had any problems with the magazine jamming and not coming out, just an ergonomic problem with the gun in general.
The feeling of the pistol is hand feels wonky with a loaded magazine, once you put rounds in the gun it handles like a dream, despite the high bore axis.
I don’t use the slide lock to run the gun but it is easy to use if you’re inclined.
The magazines when I first got them were very, very stiff and had to be downloaded by 2. The fix was for the magazines needed to be left loaded for two weeks, then you can load them to capacity.
The trigger is nothing special…it’s a decent striker fired trigger without stacking and decent weight.
I have large fingers but many report the trigger blade being too wide and uncomfortable to shoot. I didn’t find any problems while shooting, but the ladies who shot my gun had to use almost their entire finger.
Quality & Durability
The Sig P320 is an entry-level Sig gun. That doesn’t mean that it is low quality.
Sig Sauer makes by far the best polymer framed guns in the world and by far some of the most accurate and dependable pistols. You must accept the fact though…the grip frame is made to be almost disposable.
This is important because the plastic of the 320 isn’t as resilient as Glocks or M&Ps.
All the models offer Picatinny rails that are squared away under the barrel, in front of the trigger guard for mounting a light or laser. The whole gun, finish included just seems more susceptible to dings, and scratches…more so than any other gun I’ve ever used.
The finish on the gun is said to be the same as on other guns, but my Sig P250, the predecessor of the P320, seems infinitely more durable with regards to finish. This, of course, doesn’t hurt the reliability of the gun, just affects the quality and long-term appearance.
I live in South Florida, and in December the average temperature is still around 80 degrees with 70% or so humidity.
Guns rust literally on store shelves here, but the Sig P320 doesn’t. The first week I got this pistol I took it kayaking and I accidentally dropped the whole pistol into a pool of salt water.
I did nothing more than field strip it and reassemble it wet. Never had a problem with rust or reliability.
Applications
Guns obviously have more than one use but a .50 BMG rifle is bad for plinking just like a .22 LR pistol is bad for self-defense.
The Sig Sauer P320 is good for many things but there are a few models that are better suited than others.
The RX Carry is probably the most capable of the bunch. It comes with a red dot sight mounted on the slide. The carry model, in general, is a great size, it’s plenty big enough to use for serious work but small enough to conceal.
The Tacops models are a good model for duty use if you are an officer or security guard that can choose their own weapon. The factory included 21 rounds magazines are only useful for open carry or for competition/range use.
Aftermarket Support
Currently there the Sig P320 lags behind the classic Sig guns in regards for professional quality gear but it is being embraced by and large by consumer gear manufacturers.
If more agencies and large Security firms adopt the Sig P320 we might see a rise in the duty gear selection but only time will tell.
Holsters
Nearly every custom Kydex maker has holsters for this gun so for concealed carry or for range use you should be fine. Including holsters for weapon lights, red dot sights, and suppressor height sights.
If you’re an officer or security guard that can choose their own weapon this is a great pistol but it can be difficult to find retention holsters.
There are the typical level 2 and level 3 drop leg and duty holsters available from the usual suspects. However, if you need a holster for plainclothes police or detective work you’re better off with a shoulder holster than looking for a concealable holster with retention.
Magazines
The biggest downside of the Sig Sauer p320 is the premium price of magazines.
That goes for the full capacity and the state compliant models with limited round counts.
Sig Sauer does offer extended 21 round magazines to the tune of $58. Sig Sauer has also been plagued with high shipping costs and long wait times due to extreme order volume. Order from a retailer if you can find a deal or need the mags quick.
The magazines currently used are the same design from the p250 and they haven’t come down in price so I don’t believe they’ll come down in price anytime soon. Aftermarket magazines aren’t available but they could come depending on the long-term success, and honestly the competition use, of this pistol.
Weapon Light
No defensive gun is complete without a good light mounted on it, for the P320 (and most other guns) the Streamlight TLR-7 is an outstanding choice.
Delivering high lumens, great durability, and coming in at a decent price – it’s a must-have.
Parts & Upgrades
Sights aside, there aren’t many parts available for the P320 yet.
Sig Sauer offers replacement spring kits and grip modules as well as the previously mentioned caliber X-change kits. The offer a thin-bladed trigger that is available for purchase, it’s not an upgraded trigger, just a different blade.
The only “big” upgrade currently offered is the Apex Trigger kit available. I haven’t used the trigger myself so I can’t comment on its use but it is a completely flat faced trigger that looks like a competition upgrade and is getting good reports thus far.
Sig Sauer is also offering a grip module that has a built-in laser. It looks like an overgrown S&W Bodyguard .380 and is very expensive. You also lose the ability to mount a light and need a custom holster.
I’d steer clear, at least until the part has been proven in the field
Wild ramps are a type of onion that are delicious, popular, elusive, and sought after. Also called wild leeks, it is very important to properly identify and sustainably forage ramp plants. Once harvested, wild ramps make a delicious and flavorful addition to many meals!
Ramps (Allium tricoccum) are a perennial species of wild onion with a strong onion or garlic flavor. The ramp plant is wild growing in some areas and is also called wild leek, wild garlic, or ramsons.
Wild ramps are native to eastern North America and grow widespread in the eastern United States and Canada. Although I had heard much about them when I lived in the west, I had never seen them before I moved to Vermont!
Allium ursinum, also called wild garlic, is a related species that grows in Europe and Asia and can be used the same as wild leeks.
Ramps grow from March to June depending on your location. They are one of the earliest plants to forage in the spring, which is a happy sight for those of us who have long winters.
Related: What to Forage in Spring: 20 Edible and Medicinal Plants and Fungi
Where Can I Find Wild Ramps?
Wild ramps grow in eastern Canadian provinces, and in much of the northeastern United States, as far west as Minnesota and south as Georgia. It is common to find ramp plants in New England and the Appalachian mountains.
Ramps do not grow wild in the western US but can be planted and grown in a home garden. This is a wonderful way to have access to ramps and their tasty flavor without harming the population.
Wild leeks are found growing in clusters on the forest floor, often popping up through fallen leaves of deciduous hardwood forests. They tend to like damp areas but can be found in many types of rich soil.
Is Wild Leek Invasive?
Sometimes ramp plants grow in huge patches or colonies, so to the naked eye, it might appear that they are invasive. However, they take over 7 years to grow so are not considered invasive.
Wild leeks are actually protected due to overharvesting in many areas.
How to Identify Wild Ramps
To identify wild ramps for while foraging, look for plants that are low growing, about 4-12 inches high. They have 1-3 broad leaves per plant and either white or reddish-purple stems (there are 2 varieties).
Ramp plants have flowers that bloom in the summer after the leaves have died back. The flowers look similar to cultivated onion flowers and produce black seeds.
A key identifying factor is that they smell like onion or garlic. This is a very important identification characteristic as toxic look-alikes won’t have this smell.
If it doesn’t unmistakably smell like an onion, it’s not a ramp!
Do Ramps Have Poisonous Look-Alikes?
Wild ramps have two extremely dangerous and deadly toxic look-alikes. It’s just as important to identify these properly as it is to identify the ramp plant.
Both of these toxic plants have wide leaves that come up in spring, and neither of them will have an onion or garlic smell.
False Hellebore (Veratrum viride) leaves can look similar to the wild ramp plant in that they are both pleated. This toxic plant can be identified by its ribbed leaves and lack of onion scent. They grow in swamps and marshes, whereas ramps grow in wooded areas.
False Hellebore – a toxic wild ramp look-alike
Lily of the Valley (Convallaria majalis) do not have bulbs at the roots like ramps, instead, they have longer roots and rootlets along the length. They produce many bell-shaped flowers in contrast to the small daisy-like clusters that grow on ramp plants. They do not smell like onion or garlic.
Lily of the valley with bell-shaped flowers is a toxic plant
How to Forage Ramps Sustainably
In some areas, wild ramps are protected due to overharvesting so it is important to forage sustainably.
Ramps are a threatened species in many regions, and in some locations, there are regulations on harvesting them. Be sure to check your local laws before foraging them.
Ramps are slow growing, taking 7 years or more to fully mature. Completely pulling up the bulb will kill the plant, so be sure you know how to harvest them correctly before heading out to gather.
How to Collect Wild Leeks
It is best to only take one leaf per plant without pulling up the bulb. If the bulb or rhizome (the base of the bulb) is left in the ground it will continue to grow year after year.
If you find a patch where it is clear that other foragers have already taken leaves from the plants, move on to a different patch. Overharvesting the leaves is detrimental to the plant.
Harvesting leaves is much easier and cleaner than pulling up bulbs. The good news about only harvesting the leaves is that the leaves have tons of flavor, so pulling up the bulbs is not necessary!
If you live in a region where ramps grow prolifically as they do in some areas of Vermont, it can be helpful in large and very dense colonies to selectively pull up some bulbs.
The bulbs or rhizomes can be replanted either elsewhere in the forest or on your property, ultimately helping the population of ramp plants.
Before pulling up and replanting any wild leek bulbs, research to determine if it is permitted in your region.
Take seeds after the plant flowers in the summer and spread them to other areas of the forest or bring them home to plant in your garden.
How to Grow Ramps
Since the population of wild ramps is protected and in a state of decline, grow them in your yard for a great way to have access to their delicious flavors without threatening the wild population.
Grow ramps from seeds, bulbs, starts, or by transplanting wild plants or rhizomes. Read this guide on how to grow ramps in your backyard for all of the best methods.
They have a long germination period if growing from seed, and once sprouted the plants take 7 years or more to fully mature. Patience is key!
These tasty plants need shade and moisture. They tend to do best under hardwood trees, just like when finding them growing wildly.
A good way to keep this threatened plant around is by growing your own!
How to Use Ramps
Just like their smell, wild ramps have a distinct onion or garlicky taste. The taste will mellow out when cooked but are still very flavorful.
For a stronger flavor, know that wild ramps are safe to eat raw! Try them in this delicious ramp pesto recipe.
Ramp pesto
To preserve ramp leaves and enjoy them all year, make ramp butter and freeze it, or make pickled ramps.
Another great way to preserve wild leeks is to ferment them, of course! Try this ramp kraut recipe.
Add ramps to a delicious dinner and saute them in this ramp pasta, with a side of ramp focaccia bread or buttermilk ramp biscuits, yum!
However you choose to use your sustainably foraged wild ramps, they’ll be a delicious and appreciated part of your meal!
Shotguns may be the most versatile weapons on the face of the planet. When loaded with the right ammunition, the modern scattergun can effectively drop everything from tiny upland quail to charging, big-bodied bruins.
By using the best 12-gauge slugs, you can turn a simple shotgun into an impressively accurate powerhouse. The trick is matching your slugs to your shooting application.
Whether you’re looking for slugs for whitetails, dangerous game, home defense, or high-stakes competition, we’re here to help.
Most modern shotgun slugs fall into one of two categories – rifled slugs and sabot (pronounced “SAY-bo”) slugs.
Rifled slugs are designed to be used in smoothbore shotguns. The rifled slug’s defining feature is a set of exterior grooves that resemble barrel rifling. Unlike barrel rifling, the slug’s grooves do not spin the projectile. Instead, the channels allow the slug to compress slightly so it can fit through a shotgun’s choke tube.
Hornady Rifled Slug
Sabot slugs lack the rifled slug’s exterior grooves because they are designed to be used in shotguns with rifled barrels or with a smoothbore paired with a rifled choke.
Remington sabot slugs
The sabot isn’t the slug at all. The word actually refers to the plastic sleeve surrounding the projectile. As the slug travels down the barrel, the sleeve contacts the rifling, causing the whole package to spin. After the slug exits the barrel, the sleeve falls away, but the projectile continues to spin like a football, which results in better in-flight stability.
Accuracy and Energy
Sabot slugs, with their gyroscopic spin, are generally more accurate than rifled slugs – but not by much. A rifled slug can travel a good 400 yards, but it drops pretty rapidly once it passes the 100-yard mark. Hitting a target beyond that is tricky, and a rifled slug isn’t carrying a ton of kinetic energy past that point anyway.
Sabots have a slightly longer effective range, typically around 125 to 150 yards, although some designs can stretch to 200 yards. The sabot’s football-like spin and higher ballistic coefficient make it slower to shed speed.
Rifled slugs, with their blocky cylindrical profiles and exterior grooves, aren’t nearly as aerodynamic as the sleeker, more pointed sabot slug. Because it holds velocity better than a rifled slug, sabot slugs also retain more energy as it travels down range.
BEST SLUGS FOR HUNTING
While a rifle will always be ballistically superior to even the most cutting-edge shotgun load, slugs do have a place in the hunting world. They are highly effective at typical whitetail ranges, especially when hunting big woods (think inside of 100 yards).
Also, because slug velocity and power peter out past 200 yards, slugs are a safer option than a rifle when hunting in populated areas. In fact, several Midwest states limit deer season to shotguns only for that very reason.
If you plan to use your 12-gauge to punch big game tags this hunting season, here are some of the best options on the market.
Federal Premium TruBall Rifled Slug
Federal TruBall slugs have been putting venison in family freezers for decades. Designed for smoothbore scatterguns, the TruBall system features a plastic ball positioned between the wad and the slug. The design helps keep the slug centered in the barrel. The components separate at the muzzle.
Federal Premium TruBall Rifled Slug
The TruBall system helps these rifled slugs perform more like a sabot, and the company claims they deliver 1.4-inch groups at 50 yards, which is pretty freakin’ impressive for rifled slugs.
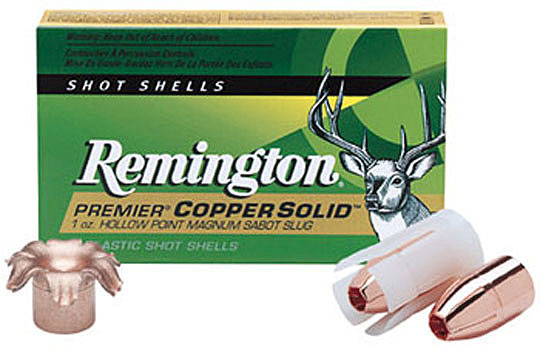
Hornady American Whitetail Slug
Loaded with a 325-grain Hornady InterLock bullet, American Whitetail slug loads deliver excellent weight retention and massive expansion. The hollow point projectiles feature a tough copper jacket surrounding a serrated lead alloy core. These babies are tough enough for the biggest-bodied whitetails in North America. They can even be used to bag close-range elk and muleys.
Hornady American Whitetail Slug
The loads also feature a rigid polycarbonate sabot with a unique buffer disc that delivers serious accuracy. If you need to stretch the effective range of your shotgun, this is the way to do it. Hornady says their American Whitetail slugs carry enough power and accuracy to drop bucks beyond 200 yards.
Winchester Super X
Winchester Super X loads have a reputation for offering reliable performance at a super-affordable price point, and their slugs are no different. The line-up includes 12-gauge rifled slugs and sabot slugs.
Winchester Super X
If you don’t want to invest a ton of cash, but still want serious knock-down performance, these are the loads you want with you in the deer woods.
Brenneke Black Magic Magnum Slugs
Sometimes when we’re in the woods, we run into things bigger and more dangerous than whitetail deer. These 602-grain slugs are designed for just such an encounter.
Brenneke Black Magic Magnum Slugs
Brennecke’s hefty slugs have notched ribs and a lead point to guarantee seamless passage through your shotgun choke. These slugs leave the muzzle at over 1500 fps and are still packing 1219 foot-pounds of power at 100 yards.
BEST SLUGS FOR HOME DEFENSE
Slugs are regularly used for deer hunting, especially in rifle-restricted states. Deer and humans aren’t all that different. They share similar body weights and depth to vital organs. When we boil defensive shooting down to pure biology, if slugs are effective for deer, they should be just as effective on nefarious bad guys.
However, there are a lot more factors to consider in a home defense scenario than basic biology.
While you might use a slug to drop a monster buck at 75 yards, most home intruders are engaged at close range, usually inside five yards, which is about the typical length of a suburban hallway.
A heavyweight slug has tons of penetration power, which is the main reason big game hunters use them. While penetration is a positive when you’re hunting whitetails, it can be a major liability in a home defense situation. At close range, a 12-gauge slug will smash through anything in its way, plowing through furniture, doors, drywall, and wall studs, and still have enough energy to eff up a body standing on the other side.
Needless to say, shooting a slug inside your home could cause serious collateral damage.
With all that said, modern ammo technology is a marvelous thing. Ammo engineers are constantly pushing the envelope when it comes to defensive ammo, and a few companies offer shotgun slugs designed specifically for defensive shooting. These loads are made to deliver effective stopping power, while minimizing the chance of dangerous over-penetration.
Still, this isn’t our top choice for home defense. But if you want to use slugs, here is what we like.
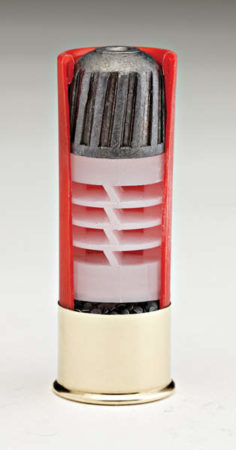
Winchester Elite Defender Segmented Rifled Slug
Winchester has several innovative loads for home defense, and one of the most appealing is their Defender Series segmented rifled slug. This one-ounce piece of lead has strategic notching on both the exterior and inside the hollow-point cavity. On impact, the slug separates into three segments to compensate for aiming errors and maximize internal damage.
Winchester Elite Defender Segmented Rifled Slug
The fragmentation slows the projectile, which helps minimize over-penetration, making them a somewhat safer option when confronting bad guys, especially in situations where your kids are sleeping in the next room.
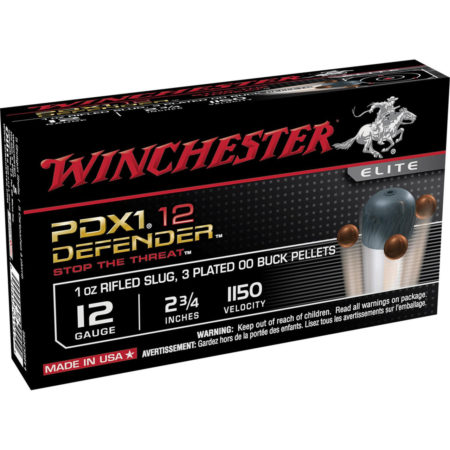
Winchester’s Defender line also includes a unique load that contains both a one-ounce rifled slug and three pellets of 00 buckshot. The load is engineered to compensate for aiming errors that often occur during adrenaline-pumping encounters, especially for inexperienced shotgunners. Because the load has extra pellets, it is still possible (at least theoretically) to hit the target even if the slug misses.
There are still some penetration issues with this load, so it may not be the best option for defensive shooting in populated areas like apartment buildings or cookie-cutter suburban neighborhoods.
BEST SLUGS FOR 3-GUN COMPETITION
Most 3 Gun matches require shooters to use both birdshot and slugs. However, using a run-of-the-mill hunting slug is going to bruise your shoulder and leave you frustrated. Low-recoil options designed specifically for competition will help increase accuracy and speed up your shot times.
Here are some options to get you started.
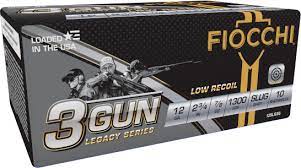
Fiocchi 3 Gun Legacy Series
Italian-owned Fiocchi makes a low-recoil slug designed specifically for 3 Gun competition. Fiocchi 3 Gun Legacy Series loads were engineered with the help of American professional speed and competition shooter, Jerry Miculek.
Packed with a 7/8-ounce rifled slug coated in red Teflon, these loads are designed to produce minimal smoke so you can pop off quick-succession shots with an unobstructed view of your target.
The slug works best in a smoothbore and leaves the muzzle at a healthy 1300 feet per second.
Fiocchi loaded these slugs in clear, easy-to-identify hulls, so you won’t mix them up with your buckshot loads on the competition field. They also feature a radiused crimp for super-fast reloads.
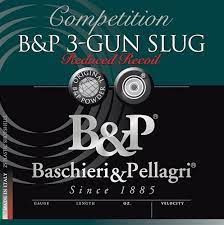
B&P Competition 3 Gun Slug
Baschieri & Pellagri have been producing top-quality shotgun ammo since 1885. To say these guys know their way around a shotshell is a major understatement. The company’s 3 Gun slugs are specially engineered to deliver consistently reliable performance, pinpoint accuracy, and reduced recoil.
B&P Competition 3 Gun Slug
LOOSE ROUNDS
With the best 12-gauge slugs, you can increase the accuracy, power, penetration, and range of your shotgun. As with all shotgunning applications, the key is pairing the right type of slug with your shooting needs.
READY FOR MORE?
12-Gauge Vs 20-Gauge Shotguns: Does Size Matter?
Best Pump-Action Shotgun: Field & Home Defense [2022]
This article contains affiliate links. We may earn a small commission if you purchase via these links.
Vortex has a reputation of producing high-quality rifle scopes in a budget range that every buyer can afford. The best thing is, you don’t have to pay extra to get their VIP warranty, and you don’t have to wonder if you’re getting the best price.
Vortex scopes consistently hold their value as they’ve proven to be rugged, reliable, and accurate machines – as you will see in our Vortex optics reviews.
Whether it’s entry-level quality, a premium, HD scope, or something in between, you can expect you’re getting the absolute best in your price range.
Vortex – they’re doing their job: providing you with quality options. It’s time you do yours – make sure you buy a scope that is as ready as you are for every situation you’re brave enough to face, be it in the field, hunt, or at the range.
The 3-9×40 specs never fail when you plan on using the same scope for a range of shooting applications. It’s also the easy pick in a lineup of similarly priced scopes because it’s made with high-performance quality iconic to the Crossfire II series.
Pros:
Price
BDC reticle
FMC optics
Capped/resettable turrets
Fog/waterproof
Cons:
Canted reticles
Take this thing out to the range or the field since you can holdover out to 500 yards with hashmarks for winddrift too. It’s easy to do with 60 MOA in travel adjustment, 1/4 MOA clicks, and the dead-hold BDC reticle. Once you’re sighted-in to your 100-yard zero, reset your turrets to “0” without any tools required.
With FMC (fully multi-coated) optics, a fast-focus eyepiece, and 3.8″ of eye relief, you’re all set to get Vortex image quality.
Unfortunately, canted reticles either happen at the range or out of the box – clearly a defect that Vortex’s VIP warranty can take care of. Good thing, it’s not the trend.
This isn’t a cheap scope like every other one in the market with a similar price tag. It’s a high-performing one with unmatched warranty coverage for range, tactical, and hunting use. For as popular as it is, it’s a good bet you know someone with this very scope on their rig – that’s why you’re here!
2. Strike Eagle 1-6X24 Review
Sporting an AR-15? For close to mid-range hunting, patrol, or law enforcement applications, the Strike Eagle 1-6x scope was made for it. With low variable power, an AR-BDC 5.56 reticle, and some high-end features to brag about, this scope is bound to please.
Pros:
Price
Glass-etched reticle
Illuminated reticle
AR-BDC reticle
30 mm tube
Cons:
Restricting eyebox
There’s some anecdotal evidence that the Strike Eagle (SE) has an unforgiving eyebox. If you plan on shooting in 3-gun comps with the SE, you mightn’t appreciate the tight parameters to achieve the right eye-to-image alignment.
Fortunately, most buyers don’t experience any optical issues, and the glass-etched, illuminated, AR-BDC reticle makes for effective shooting in the hunt, on patrol, or for home defense. The AR reticle is designed for the popular 5.56 mm cartridge, and the illuminated segmented circle makes for rapid target acquisition.
With 1/2 MOA adjustments, a wide and robust 30 mm tube body, and low, capped profile turrets, it’s really not a wonder why it’s an extremely popular AR scope for the price. The SE is set and ready to take a beating and bring down targets both near and far.
3. Viper HST 4-16×44 Review
The HST series of scopes is the perfect combination of the Viper PST and HS lines. Favorite features are meticulously paired together with a tactical approach, and what you end up with is the long-ranging Viper HST 4-16×44.
Pros:
Side focus
30 mm tube
4″ long eye relief
XD glass
Zero Stop
Cons:
Windage turret issues
It seems a rare occurrence of various windage turret issues plague the buyer. Anything from backwards spinning adjustments to loose turret attachments is the cause of frustration – nothing the VIP warranty can’t handle.
This is a tactical scope all the way. It has tall, exposed turrets that definitely demands attention, a robust 30 mm tube that provides 75 MOA in adjustments, and a fiber optic radius and Mag-View bar.
The VMR-1 MOA reticle has hashmarks for long-ranging shots with holdover points for wind correction. The reticle is in the SFP (second focal plane), so crosshairs will stay thin and won’t obscure your target for tight groupings at extended ranges.
With Extra-low dispersion (XD) glass elements, you’ll have minimal, if any at all, chromatic aberration and the best clarity a side focus and XR glass coatings can achieve. The CRS Zero Stop is always a much-appreciated feature.
If you’re after a feature-packed scope, the HST has a long list of them.
4. Viper PST Gen II 5-25X50 Review
Precision. Accuracy. Long-range. If there’s a scope worth pulling the trigger on, it’s with a PST Gen II scope. High magnification, FFP reticle, and optimum clarity – nothing is beyond your reach.
Pros:
XD glass
Glass-etched reticle
Illuminated/FFP reticle
RZR Zero Stop
30 mm tube
Cons:
Heavy
Stiff magnification ring
It goes without saying that this scope is heavy at 31.2 oz. It’s the trade-off for all the features and build quality in this precision rifle scope. The magnification ring has said to be stiff, and there’s some demand from buyers that a throw lever be included as an accessory which would be convenient for the wide 5-25x power range, but it’s a separate buy if you want it.
The glass-etched EBR-2C reticle is in the FFP (First Focal Plane) so you can reliably use the illuminated holdover points at any point in the magnification range. With 10 illumination intensity settings and “off” positions in between on the side focus knob, you can shoot accurately at any time of day. The RZR Zero Stop feature allows you to sight-in, set your zero, and return to it with ease whenever you dial out.
With a 30 mm tube, you have 70 available MOA elevation and 35 MOA windage adjustments. XD (Extra-low dispersion) glass elements and XR FMC Coatings work together with the large 50 mm aperture to bring the brightest and clearest image quality you can expect from Vortex.
This is a lot to have in a scope, but when you demand precision, you must demand the absolute best.
5. Razor HD Gen III 1-10×24 FFP Review
Vortex has released the Gen III Razor HD and the 1-10x is more comparable in configuration to the Razor HD Gen II-E than the Razor HD Gen II. For those who understand how FFP reticles and focusing works on an LPVO, the Razor HD Gen III 1-10x will meet and exceed your expectations.
Pros:
LPVO
APO/ED optics
FFP glass-etched reticle
Friction Reduction System
Low capped turrets
Cons:
Eyebox at max. mag.
The Gen III LPVO has excellent eye relief of 3.6”, however the eyebox from 8-10x (max power) has said to be unforgiving, enough so to form complaints. As expected, max magnification is better suited to those who have the time to align themselves perfectly with it.
At 1x power, the FFP reticle does get small and there is some mention of fisheye effect. The ocular focus allows for crisp reticle focus on high-powered scopes, but on an LPVO it serves to focus the image. At 1x, it’s important to use the eyepiece ring to acquire a flat image at 1x if you experience distortion. Serving as the only focusing mechanism, it has been factory-set for parallax at 150 yards.
The optics are made with an APO system, ED glass, Optically Indexed Lenses, and XR FMC coatings. It has the works to provide edge-to-edge sharpness and color-true resolution.
The reticle is glass-etched, located in the FFP, and features the EBR-9 reticle in either MOA or MRAD with drop and windage compensation. The 1 MOA dot and segmented circle are illuminated with 11 intensity levels. The third turret illumination is complete with intermittent off positions and a locking mechanism.
Turrets are capped, low profile, and have ¼ MOA adjustments. The 34mm aluminum tube houses a premium brass alloy erector tube system with a chromium vanadium spring. It supports a steel-on-steel Friction Reduction System for tactile, accurate, long-lasting turret integrity.
It has optical, mechanical, and performance quality that will serve competitors, law enforcement, and target shooters well.
Vibrant blooms that will be smothered in butterflies and hummingbirds! You’ll be amazed by these extremely fragrant and ornamental vines! The sturdy twining vine Goldflame Honeysuckle (Lonicera x heckrotti ‘Goldflame’) is an incredibly hardy, native Honeysuckle Vine!
This vine has the scent of succulent sweetness as it drifts through the air from the long tubular blooms. Your Honeysuckle will easily grow to full length each year and start blooming in spring, lasting all summer long.
With no worry about invasiveness like other native species, Goldflame will fit perfectly into any garden design and size. The long tubular blooms are dark-pink and yellow and hang in bold clusters that absolutely smother this plant!
These 2-inch blooms appear in the hundreds and you will be amazed by these exotic flowers! They are a favorite among pollinators, butterflies and hummingbirds that will not be able to resist!
This is a vital source of nectar for all your beneficial insects and birds! With a longer bloom time than other Honeysuckle, you’ll have these visitors for weeks!
This vigorous vine can also be trained into a shrub or left to trail along the ground. It’s so adaptable to many conditions and very easy to manage.
These tropical flowers cling to a vigorously growing vine with reddish stems, and are absolutely vibrant as it twists and turns around your garden trellis and arbors.
Goldflame is a rugged semi-evergreen climber that’s virtually indestructible, even with haphazard pruning. Resistant to powdery mildew, Goldflame even tolerates some drought.
Each year, from June to September, you can look forward to lightly fragrant masses of deep pink and yellow, tubular flowers that give way to small inedible red berries in the fall which the songbirds just love.
How to Use Goldflame Honeysuckle In The Landscape
Despite being a fast-growing climbing vine, it won’t get into trouble in the landscape, Goldflame will ramble up trellis, fences and any place you encourage it to do so.
The Goldflame Honeysuckle is most often grown as a trailing vine with incredible flowers. It would create a dramatic effect climbing a trellis or your front porch rail.
Reaching near full height in a single growing season, this type of Honeysuckle is an amazing grower! Filling an area with deep blue-green foliage and bright blooms, these even work amazingly well in containers and act as both the upright thriller or a flowing spiller.
Lovely climbing over fences and hiding unsightly views while enhancing your own! These act as semi-evergreen in warmer growing zones and provide lush backdrop plants among your beds and borders. Beautifully spilling over retaining walls and rambling over hardscapes as an informal groundcover.
A delicious blend of hot pink and golden, exotic flowers smother this vigorous vine of vibrant blue-green as it twists and turns around your garden supports. Adapting to any style garden, these tame natives fill your landscape with color quickly! The long-lasting blooms are even suitable for indoor floral arrangements, filling your bouquets with sweet-smelling blooms.
Incorporate into your garden beds and borders on a trellis or an obelisk among your other planted flowers and perennials to add height, color, fragrance and drama throughout your landscape!
Looking fantastic growing up the columns of your pergolas and gazebos. No pollinator garden should be without something to attract butterflies and other visitors!
#ProPlantTips For Care
Deer resistant and extremely hardy, Goldflame Honeysuckle thrives in a wide range of USDA 4 through 9 hardiness zones. Just provide good air circulation and water to keep these bi-color pink flowers going strong all summer!
Loving the full sun, these are also tolerant of partial sun, especially when planted in hotter climates; appreciating the relief from the summer sun.
Goldflame is highly disease resistant and adaptable. Not particular about soil type, Honeysuckle Vines loves any well-drained soil that ranges from acidic to alkaline.
Take care when applying lawn fertilizers near flowering shrubs. These high nitrogen formulas are designed to produce foliage, but will not support flower development. Instead, apply an all-purpose fertilizer for blooming plants in early spring. Reapply in mid-summer, following label directions for application rates.
Flowering best in average moisture, Goldflame is very drought tolerant once established. Extremely easy care and low maintenance, these won’t need pruning but are highly conducive to pruning if needed.
Sometimes a plant performs just a bit too well in certain areas. Rest assured, Nature Hills uses Plant Sentry™ to track all federal, state and local regulations on invasive materials. We will always protect you and your community.
We’re happy to offer this selection for sale into areas where it will work beautifully without any concern. To check your availability, simply type in your Zip Code to Find Your Growing Zone in the section above the Plant Highlights.
You won’t go wrong by adding height, drama, color, and fragrance with these exotic blooms for your landscape! Goldflame Honeysuckle Vine is just the bold addition your garden beds have been craving! Order yours today from Nature Hills Nursery!
“Unveiling the Epitome of Precision: The World’s Most Expensive Air Rifle. Experience unparalleled craftsmanship, cutting-edge technology, and unrivaled performance with this masterpiece of engineering. Elevate your shooting experience to new heights with this luxurious and exclusive weapon, meticulously designed for the discerning marksman. Prepare to be captivated by its exquisite design and extraordinary accuracy – a true testament to the pursuit of perfection in the world of air rifles.”
most expensive air rifle
The world of air rifles is a diverse one, catering to both recreational shooters and professional marksmen. However, for those seeking the pinnacle of air rifle performance and craftsmanship, there are a few models that stand out as the most expensive options available. These high-end air rifles combine cutting-edge technology, precision engineering, and exquisite materials to deliver an unrivaled shooting experience.
One such example is the FX Impact MKII, hailed as one of the most advanced air rifles ever created. With a price tag reaching several thousand dollars, this Swedish-made rifle features a range of innovative features including adjustable power settings, multiple calibers to choose from, and unparalleled accuracy. The FX Impact MKII is highly sought after by serious shooters who demand nothing but the best in terms of performance and versatility.
Another contender for the title of most expensive air rifle is the Daystate Pulsar HP (High Power). Known for its exceptional build quality and attention to detail, this British masterpiece offers incredible power and precision. Equipped with state-of-the-art technology such as electronic firing systems and advanced regulators, the Daystate Pulsar HP delivers consistent shot-to-shot performance that rivals even some firearms. This level of sophistication comes at a premium price point that reflects its top-tier status in the world of air rifles.
In conclusion, the most expensive air rifles are highly sought after for their exceptional craftsmanship and cutting-edge technology. While they may come with a hefty price tag, these rifles offer unparalleled precision and performance, making them a worthy investment for serious shooters and enthusiasts who prioritize quality and accuracy in their shooting experience.
An air rifle's effective shooting range depends on various factors, including the type of rifle, the caliber, and the power source. Generally speaking, most...
")
")
")
")
")


 Review – The Best Name In The Air Rifle Game")


 It’s coming quick this year – ice season. Often early ice can be one of the best times of year, so let’s get ready!