Home Blog Page 107

Best survival axe

0

Despite the axe’s status as one of humanity’s most ancient and widespread tools, many modern preppers overlook the value an axe adds to a well-rounded survival kit. But that’s a mistake — we consider some form of an axe one of the four core bladed tools everyone should have on hand.

Axes are devastatingly effective against hard materials like wood and metal, exploiting the basic laws of physics and leverage to drive an edge through a surface with maximum force and minimum calories burned. This combination of effectiveness and efficiency makes an axe a lifesaver in situations as varied as escaping a burning office building to surviving the winter wilderness of the Pacific Northwest.

More: Not sure about all the different types of bladed tools and how to mix the right types together for your needs?

More: Survival hatchet review

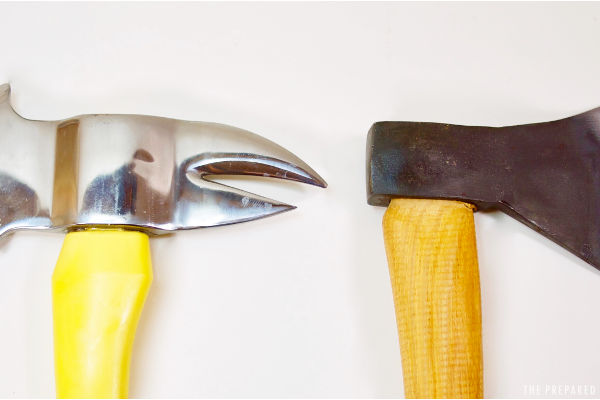
A good axe can do a lot more than just chopping, though. If an axe has the right beard, poll, and handle design, you can “choke up” on it with your hand and use it for knife-type tasks like carving, game processing, shaving fuzz sticks, and similar fine work.

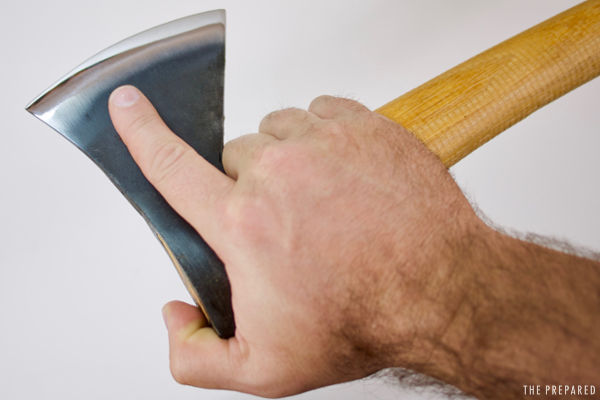
Sometimes the right axe actually works better than a field knife for certain fine cutting tasks, because the configuration pictured above places your hand and fingers very close to the working edge, giving you more control and allowing your sense of proprioception to engage in a way that it can’t with all but the smallest knives.

Full review details on the best survival axes, our criteria, contenders, and more below the fold.

If you just want to check this off your prepping list and move on without spending too much time or money, the jack-of-all-trades $80 Estwing Camper’s Axe is a heavy, steel-handled, ultra-durable classic with a great reputation. As a general-purpose survival axe from a reputable company, the Eastwing is a capable chopper that works for any type of user (skilled or unskilled) in any environment (country, suburbs, or city).

The $235 Gransfors Bruks Small Forest Axe is a legendary axe that has dominated the compact survival axe niche for decades and is widely known by the acronym “SFA.” You pay a little extra for the name, but this amazing tool is worth the premium. At only 19 inches and two pounds, it’s small enough to toe the line of being a hatchet, but gives you that axe-level power in a package you can easily carry on foot.

The very best emergency axe for city preppers is the tried-and-true $240 Fire Axe Inc JP Special 4lb Pick Head Axe with synthetic handle. Expensive, but worth it: The JP Special is a high-quality axe carried by firefighters and frequently recommended in firefighter forums because it’s a dependable beast of a chopping, breaching, and demolition tool. Because this is a personal axe and not a truck axe, it’s compact enough (though just barely) to be carried short distances on a belt or pack.

The $180 Hults Bruk Kisa Medium Sized Felling Axe is right in the sweet spot of quality, features, size, and price for an axe that’s built for processing large amounts of forest wood. It’s large enough to handle tough homesteading tasks but small enough to carry a while on foot if you needed to. Hults Bruk is a legendary brand popular among bushcrafters and preppers.

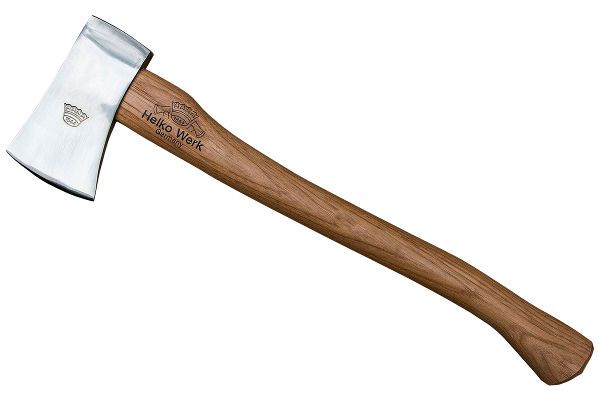
If you’d rather have just a little bit more portability in an axe that’s still capable of handling rural tasks, check out the slightly cheaper $150 Helko Journeyman. However, the Journeyman’s head shape is more suited for wood splitting than it is for knife-type work like carving.

The best budget axe for rural preppers is the $50 Council Tool 2.25# 24” Boy Axe. Made in the US (which is harder to find the cheaper you go) and based on a famous design used by the US Forest Service. You’ll sacrifice fit and finish, plus it’s meaningfully longer and heavier than the more expensive alternatives, but it will serve you well in a pinch.

Why you should trust us

I’ve professionally reviewed bladed tools for 6 years, personally used them in the bush for 35 years, and have been a prepper for 10 years.

We’ve spent an additional 55 hours preparing this review by talking with other experts in the field — ranging from firefighters and first responders to bushcrafters and preppers — and researching countless product reviews and social forum threads.

Top contenders and our selection process

We narrowed down the field to the top 20 survival axes of different sizes and features. From that list we received samples from top manufacturers to compliment the models we already owned.

Any of the axes in the top 20 will serve you well in any type of emergency, but we’ve narrowed down the list further to the ten best picks for different types of preppers in different environments.

View the spreadsheet in Google Docs

Note that axe data, particularly weights, are often wrong or misleading on ecommerce sites. For example, many sellers only list the weight of the axe head, not the overall axe. Where possible, we’ve used data directly from the manufacturer or from speciality retail sites that take care to get it right.

We’ve focused here on more lightweight, packable axes that are big enough to do useful felling work but small enough to carry on-foot for modest distances.

Our final choices come from a mix of reputation and reviews from other experts we trust, combined with our own hands-on experiences with many of these products and brands.

Axe basics

Axes are two simple machines put together: a wedge and a lever. All the members of the axe family (including hatchets and tomahawks) share the same basic anatomy:

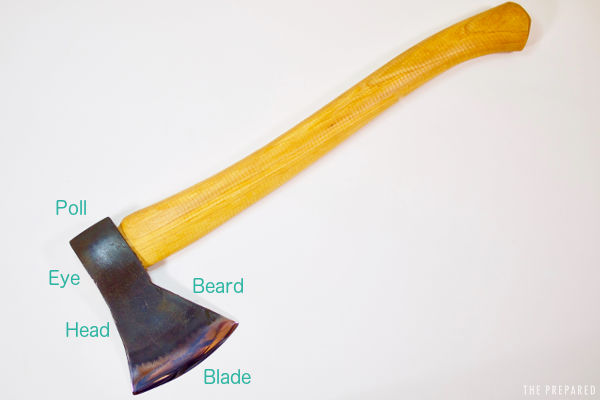
  • Head: The wedge-shaped weight at the top of the axe that does the chopping.
  • Eye: The large hole in the head that attaches around the handle.
  • Blade: The part of the axe head with the edge on it that does the chopping. Sometimes called the ‘bit’.
  • Poll: The part of the axe head opposite the blade.
  • Beard: The part of the blade that extends downward in a triangle shape.

Survival axe considerations

Weight distribution

An axe is more effective when most of the weight is in the head. When the weight is more evenly distributed between the handle and head, the laws of physics make it less “punchy”.

So when you’re comparing models, keep in mind that two axes with the exact same length, materials, and weight can have very different chopping capabilities.

Head shape

The edge shape and thickness determines how well an axe handles different materials.

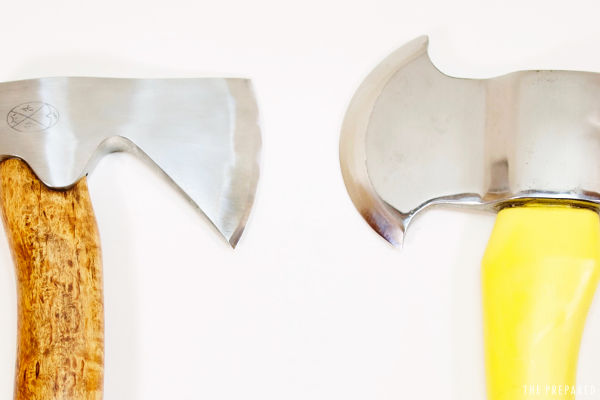
A flatter edge shape puts more of the edge in contact with the thing being chopped on each stroke, making it great for wood and other natural materials.

But that same flat edge could more easily get stuck in a totally flat surface (like a wall or door), which is why some demolition or “fireman’s” axes have half-moon shaped heads.

Those curvy edges can be awful to chop rounded natural materials with, though, which is why this factor matters when thinking about your environment.

Head thickness and cutting vs. splitting

A wide axe head (think of a “fat” pyramid) is better at using that wide angle to forcefully split pieces apart. Like splitting already-cut logs of firewood into sections: a fat wedge forces the wood apart through opposing pressure, more so than biting into the material and slicing through it.

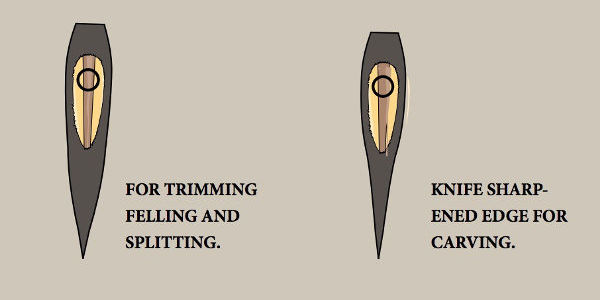
A thinner axe head acts more like a knife cutting through the material, and is better suited to cutting tasks like felling trees or limbing logs.

We generally prefer the more cutting-oriented heads that are more popular with today’s bushcrafters for their versatility in doing many different kinds of non-chopping camp chores, but for most preppers the real-world performance and usage differences between the different head thicknesses and shapes represented in this guide are subtle and not worth obsessing over.

Poll shape

You can flip an axe around and use the poll as a secondary tool.

Polls come in two varieties: hammer and spike. There’s also a ‘pick’ axe poll, but in this guide we use ‘spike’ and ‘pick’ interchangeably since they’re basically the same thing.

Hammer polls allow the axe to double as a hammer. They’re also generally safer than spike polls. There is some folklore around not using an axe poll as a hammer, but these concerns are vastly overrated. Lightweight striking is fine — it takes a lot of beating against a hard surface to deform the eye of a good axe, so go ahead and hammer those tent stakes and forget about that myth you read on the internet.

The spike or pick poll increases the axe’s effectiveness as a demolition and breaching tool, which is why you see this feature on tomahawks and dedicated breaching axes. A spike poll can also be used for digging, and is especially good at digging through hard or rocky ground.

Handle length

The mechanics of leverage means the length of the handle matters a lot for how well an axe chops. Even an inch can make a difference.

That creates a tricky tradeoff between portability and chopping ability. We favor a balance between these two factors and it’s reflected in our recommendations.

But if you were looking for a big, old-growth hardwood chopper that’ll never leave your garage, for example, you’d clearly want a longer handle.

Some handles are meant to break and be replaced

Like tires on a car, a wooden axe handle is a wear part that is designed to break down with use and be replaced periodically. Axe handle breakage is a normal thing for well-used axes, which is why hardware stores stock so many wooden replacement handles.

Breakage is also a factor for fiberglass handles that are rated to handle 1,000 pounds or more of lateral force. But it normally takes some abuse to get there.

Overstrike is a major cause of breakage for wooden and synthetic handles — especially among amateur users — and will take this valuable tool out of commission until repaired. Overstrike happens when you swing the head too far out and the part of the handle right beneath the head whacks into the log.

Common handle materials

Wood:

  • Pros: light, absorbs shock well, and is infinitely replaceable with a little effort.
  • Cons: easiest to break or splinter.

Synthetics (mostly fiberglass):

  • Pros: lightweight, very strong, good shock absorption.
  • Cons: very difficult to repair or replace.

Metal:

  • Pros: strongest, lets the axe double as a pry bar.
  • Cons: very heavy, transmits shock right to your wrists and arms.

We take those tradeoffs into consideration when thinking about urban vs. rural and skilled vs. amateur preppers. For example, if you live far away from the woods or if you have no idea how to go about fashioning a replacement axe handle, then you might pick a synthetic-handled axe and hope it never breaks.

Don’t plan to fell big trees in a disaster

For every prepper who’s within bug-out distance of a forest, chopping wood for fire and shelter is a necessary and appropriate part of surviving.

But “chopping wood” does not equal “chopping down trees with an axe.” The former is essential, while the latter is a very bad idea for anything but the smallest trees — unless you’re already experienced enough that this guide is pointless.

Felling trees is far more dangerous than it looks, especially with an axe (regardless of axe size). No matter how easy it looks on YouTube, you should not attempt to fell trees that are larger than about half a foot in diameter.

It’s also the case that even with chainsaws and trucks to haul wood in, it can take weeks to prepare enough firewood to heat a cabin for a full winter in any geography where it gets really cold. With axes it can take part of a summer, and that’s if you already know what you’re doing.

If the situation absolutely requires you to fell a tree, and there’s just no getting around it, then you should use a saw — preferably a chainsaw. This is still quite dangerous, but it’s less insane than an untrained axe user wailing away on a large tree.

Best axe for most people: Estwing Camper’s Axe

  • Price: $$
  • Specs: 26” length, 3.4 lbs weight, all-steel construction, shock-absorbing handle, general-purpose head shape
  • Pros: indestructible, great brand reputation, widely available, inexpensive
  • Cons: heavy, low splitting ability for the weight

Who should buy this: The $80 Estwing Camper’s Axe is ideal for anyone who lives in a city or suburb, where space is at a premium and they may have to chop materials besides wood.

It’s also good for someone with little or no experience using an axe, who will be prone to overstrike and other axe abuse that could quickly break a wooden or synthetic handle.

At 3.4 pounds, this axe is heavier than the more expensive alternatives, making it less preferable long on-foot bug outs. But it works well for bugging in, vehicle bug outs, or shorter on-foot trips.

If you want to optimize and specialize for a specific environment, activity, or skill level, then you can do better than the Estwing — but for affordable value and all-around flexibility, it’s impossible to beat and will last you a lifetime.

Benefits: The Estwing’s all-steel design makes it strong enough to withstand serious abuse like hard hammering or overstriking, so it’s forgiving for unskilled or fatigued/injured users.

This axe is compact enough to be easily stored in a closet or under a bed, or fit into a pack for short distances. It’s tough enough to be used to hack through a door or wall. The hammer poll can be used for striking in a pinch.

The Estwing’s head shape and edge profile are along the lines of a Hudson Bay pattern, but it’s very thin. The thinness gives it plenty of bite in our own testing and makes it a very capable cutter despite its poor weight distribution. But it will stick in wood and is not wide enough for serious log splitting.

The large beard means you can choke up on it for carving and slicing and get your hand behind the edge — but the thin, diamond shape around the edge makes this uncomfortable. So this is not a general-purpose bushcraft axe, and is not popular with bushcrafters.

The handle steel is relatively soft to help with toughness and shock absorption, but it means you can bend the axe if you attempt to pry with it. But it can be beat back into shape if that happens.

Downsides: The Estwing’s all-steel construction has three main drawbacks: lack of shock absorption, poor edge retention, and poor length-to-weight ratio. The first downside affects comfort and fatigue, and the latter two affect performance.

The steel handle transmits the shock of axe blows directly to the user’s wrists and arms. This increases fatigue when using the axe for long period. The shock-absorbing handle and softer steel help with this, somewhat, but it’s still an issue.

The ductile steel that makes the handle of this axe so tough also makes the thin, V-grind edge more quick to roll and dull than the harder, convex edges of the other axes in this guide.

The Camp Axe’s overall length is much shorter than competing wood-handled axes in the ~3.5lb range, which also reduces chopping ability by reducing leverage.

In short, this axe gives up some efficiency and portability (despite its compact size) in exchange for its incredible, amateur-friendly indestructibility.

Brand and product reputation: Our research and first-hand experience with Estwing axes indicates that this American-made brand has a sterling reputation with campers, construction workers, preppers, and outdoorsmen. We have found no significant complaints about the quality of Estwing products and consider this to be a very reliable family of tools.

Overall upgrade pick: Gransfors Bruks Small Forest Axe
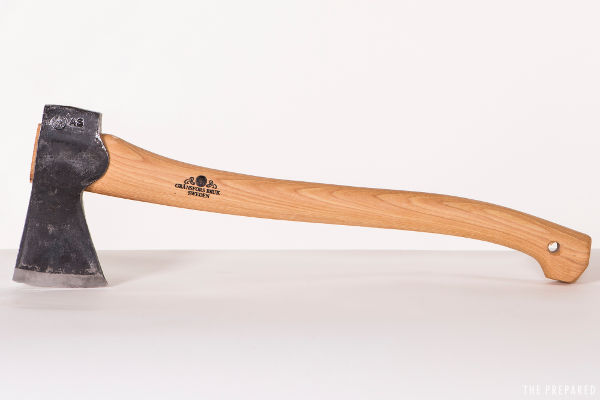
  • Price: $$$$
  • Specs: 19” length, 2b weight, hickory handle, hand-forged carbon steel head
  • Pros: unmatched reputation, iconic bushcraft and camping tool, excellent for cutting, carving, and general bushcraft chores
  • Cons: less suited for splitting, you pay a bit extra for the brand name

Who should buy this: The $235 “GB SFA” is the best compact survival axe for pack-weight-conscious preppers in the hardwood, arboreal forests of North America. This is also for preppers who want to buy the reigning champ and enjoy the resulting peace of mind from knowing you’ve got a premium tool with legendary status and celebrity endorsements.

Benefits: At 19 inches long and only 2 pounds in weight, the SFA is really more of a large hatchet than an axe, with a head that’s optimized more for cutting than splitting (thought it does split), and that can be very effectively choked up on for use in place of a knife for carving, slicing, food and game preparation, and other fine cutting chores.

The SFA is so effective at general-purpose cutting tasks that some bushcrafters who use one prefer it to the fixed-blade field knife for everything but batoning.

Downsides: The Gransfors price premium is the only downside peculiar to this axe, and it’s not nearly as high on this particular model as it is on some other axes in the Gransfors line. Any other downsides of the SFA are shared by their similarly-compact competitors — namely, the compact size reduces chopping ability and user safety compared to a full-sized axe.

Brand and product reputation: This amazing tool is the gold standard in this space, even to the point of being an important part of the cultural history of axes. Note the outsized popularity of this brand and model — thanks in part to an endorsement by famous bushcrafter Ray Mears — has created an online backlash by people who automatically dislike something so popular. Ignore them.

City and suburbs upgrade pick: Fire Axe Inc JP Special

Urban survival axe review

  • Price: $$$$
  • Specs: 28” length, 4lbs weight, 1200lb-rated fiberglass handle, forged and chromed carbon steel head
  • Pros: indestructible, great brand reputation, premium professional demolition tool
  • Cons: heavy, better for demolition than wood chopping

The $240 Fire Axe Inc JP Special 4lb Pick Head Axe is perfect for escape, rescue, demolition, and B&E in urban environments. Even though you might end up chopping down trees in Central Park, our top choices for people in developed areas are based on a handling a wide mix of materials and activities.

And when we have to choose between axes great for chopping wood vs. anything else, in this category we optimize for more urban needs like navigating damaged buildings, breaking into locked rooms and containers, making access holes for ventilation or surveillance, or busting up furniture for firewood.

Note: The above link takes you to the Fire Axe Inc JP Special with a wood handle (item# JPSW). The same axe is available with a fiberglass handle (item# JPSF) for the same price, but you need to contact the company and ask for that specific model.

Benefits: The heavy, chrome polished, carbon steel head will chop right through nails, wiring, and other tough industrial materials without taking damage.

But it’s still capable of chopping wood. Although if you’re using it on trees, the blade’s width and shape make it much better for splitting than cutting.

The pick on the back of the head is used for creating holes in sheetrock or wood, and lets the axe operate as a pry bar to force open doors and windows.

The 1200-pound rated fiberglass handle is light yet strong enough to pry with. The low weight of the handle, when combined with the heavy head, makes the axe a devastating splitter despite its short length.

Downsides: The main downside to this axe is the weight. At four pounds, it’s intended to ride for short distances on the belt.

The pick head also prevents it from easily being used as a hammer, although you can hammer with the side of the head if you have to.

The blade profile and ergonomics make it unsuited for common bushcraft tasks that involve fine work, so it has to be paired with a field knife for those jobs.

Brand and product reputation: This axe is commonly recommended on firefighter and first responder forums as an aspirational product, i.e. a speciality, premium tool that you spring for when you’re serious about your work, and that you carry with pride and plan to hand down to your children.

Because this is a niche product carried at speciality outlets, there aren’t many traditional product reviews of it, but all the discussions of it we’ve read are highly positive with no reports of flaws or quality control problems.

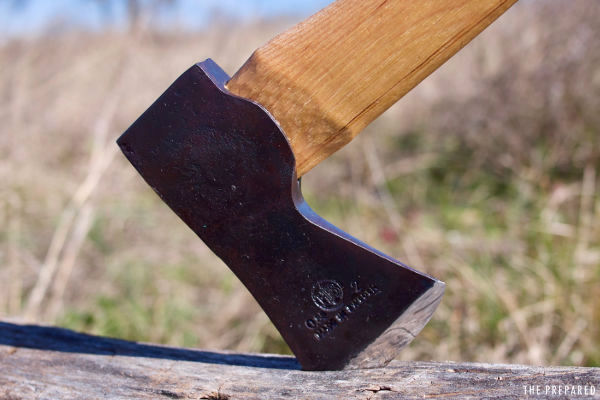
Best overall rural axe: Hults Bruk Kisa Medium Felling Axe
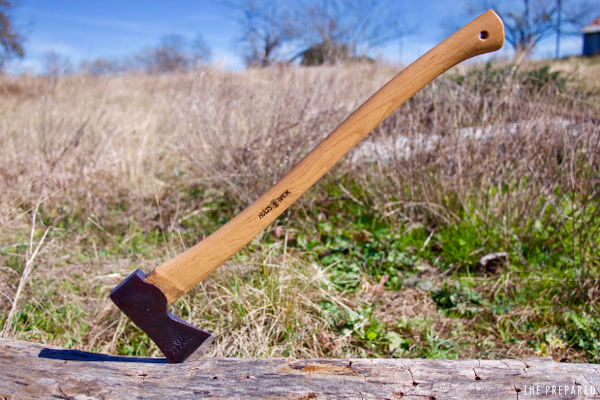
  • Price: $$$$
  • Specs: 26” length, 2,86 lbs weight, 2lb head weight, linseed oil-treated hickory handle, hand-forged carbon steel head
  • Pros: legendary brand reputation, premium bushcraft and camping tool, more of a cutter than a splitter
  • Cons: none that are particular to this axe

Who should buy this: The $180 Hults Bruk Kisa Medium Sized Felling Axe is a great choice if you live in a rural area, especially in northern areas with hardwood forests, but still care about portability.

Note that none of our rural axe recommendations are on the full-sized end of the spectrum — the very largest axes used by lumberjacks solely to fell large standing trees — because in any case you want it to be portable enough to move on foot if you really need to.

Benefits: The 26-inch Kisa axe is a bit shorter and more lightweight than would be ideal for a straight tree-felling axe. In return for not going overboard into full-sized tree felling axe territory, you get a compact axe that can do everything you’ll need an axe to do in the woods.

At 2.86 pounds, we’d consider it packable for modest distances, and many bushcrafters actually carry this axe (or one this size) as part of their standard loadout. For some experienced bushcrafters, the Kisa is the “one blade” they’d want with them in the woods.

The head is a traditional pattern that works for both cutting and splitting, but is a little more optimized for cutting. It’s easy to choke up on the head for use in non-chopping bushcraft tasks like fuzz stick making and carving. The poll can be used as a hammer in an emergency.

With the Kisa, you get a hand-forged, Swedish axe from one of the world’s oldest and most reputable axe makers, and it offers the same quality and features as the comparable $245 Gransfors Bruks Scandinavian Forest Axe at a lower price point.

Downsides: Any downsides this axe has are shared by all axes in this category, e.g. the wooden handle will break eventually, and the size and weight make it less portable than more compact axes or hatchets. But we’re aware of no downsides particular to this axe.

As with all quality wood-handled tools, you’ll want to store this axe indoors when possible — it’s not something to throw in your truck bed.

Brand and product reputation: This axe model is very popular with bushcrafters, and gets rave reviews in forums, on YouTube, and at retailer sites. Hults Bruk’s reputation is legendary, and we’re not aware of any criticisms of their quality control.

Also great for rural preppers: Helko Journeyman

  • Price: $$$
  • Specs: 20” length, 2.2 lb weight, 1.5 lb head weight, Swiss-made hickory handle, hand-forged carbon steel head
  • Pros: great brand reputation, premium wood processing tool, equally balanced between splitting and cutting abilities
  • Cons: less suited for non-chopping bushcraft work

Who should buy this: Pick up the $150 Helko Journeyman instead of the Hults Bruk Kisa if you want something that’s more portable but still good at processing hardwood.

Benefits: The Journeyman’s head shape strikes a balance between cutting and splitting ability, making it a versatile camp axe for creating fire and shelter. The head has a mirror polish to reduce getting stuck in wood and that resists rust from natural moisture. The poll is safe to use for light hammering, since the maker has explicitly designed it for such use.

Downsides: This axe’s head shape makes it a bit less ideal for carving and other knife-type work. So you’ll want to pair it with a good field knife for non-wood-processing chores.

Helko axes often don’t have quite the same hand-finished feel as the Hults Bruk axes — which might be part of the reason the competitive HB Kisa is $10-20 more — so keep that in mind if you care about aesthetics and your tastes lean more towards the traditional, rustic vibe.

Brand and product reputation: Helko is relatively obscure in the US (outside of axe-nerd circles) compared to the major US and Swedish makers, so English-language reviews of this specific model are rare. But we’ve found no complaints about the brand, and this product’s reputation is top-notch in all the sources we reviewed.

Budget pick for rural preppers: Council Tool 2.25# Boy’s Axe

  • Price: $$
  • Specs: 24” length, 3.5lb weight, 2.5lb head weight, hickory handle, hand-ground carbon steel head
  • Pros: legendary brand reputation, quality wood processing tool, balanced between splitting and cutting abilities
  • Cons: none that are particular to this axe

Who should buy this: If you want an axe specialized for rural needs but want to spend less than $100, check out the $50 Council Tool 2.25# 24” Boy’s Axe.

Benefits: The CT Boy axe is a budget offering from a premium maker, which we prefer over products made by purely budget manufacturers like Snow & Nealley. This is a well-tested design that’s based on an axe used for years by the US Forest Service, and it’s similar in size and shape to an axe preferred by bushcraft legend Mors Kochanski.

Downsides: The finishing on this is rougher than on the company’s premium lines, and the poll and eye walls aren’t hardened to support hammering. But it’s unlikely that most preppers will really notice much difference if they aren’t comparing this axe side-by-side with a premium offering.

This is a splitting and cutting axe, and not as much a general-use bushcraft/carving axe that can substitute for a field knife.

Brand and product reputation: Council Tool’s offerings are widely considered to be on-par with the best European makers, and in some cases a cut above. We have read about cases where buyers of axes in the company’s budget lines have gotten products with handle issues, but the customer service is outstanding and returns are handled professionally.

The competition

Outside of our top contenders, there’s a whole secondary group of great axes that might fit the specific price or features you’re looking for:

Snow & Neally Hudson Bay ($68): A popular American-made pick for budget compact bushcraft axes. The length and weight is typical of the classic Hudson Bay pattern. In fact, if you want to get as close as possible to the specs of the Gransfors Bruks Ray Mears Wilderness Axe, then this S&N axe is a very close match at a far cheaper price.

Wood Tools Bushcraft Axe ($63): This is a new one to us, but we got a sample and we absolutely love it. This wonderful little hand-ground axe is designed on the model of the perpetually out-of-stock Ray Mears Gransfors Bruks axe, but a bit lighter and shorter. This axe is clearly a labor of love from a boutique shop that, in our opinion, is criminally underpricing its work. We’ve used this axe in a number of pictures in this guide, including the main guide image at the top of the article, so if you like what you see then hurry up and order one before the maker figures out what’s up and doubles the price.

Helko Rheinland Pack Axe ($150): This is a beautiful, bushcraft-focused axe from Helko. It’s along the same lines as the Wood Craft Pack Axe from Council Tool, in that it’s a relatively recent, premium, retro-styled offering aimed at the bushcraft crowd. It’s designed to be lightweight and packable, and to work for carving and other bushcraft chores. Unlike all the other axes in this guide except for the Mueller axe, the axe head shape is a very traditional German all-purpose woodworking pattern. At least one expert review we’ve seen claims that fit and finish on this axe is not quite as good as competing Swedish offerings, but in terms of performance no one disputes that it can hold its own.

Helko Scout ($165): The Scout is a great cutting and splitting axe for preppers who care less about portability and more about getting through lots of wood more efficiently. Between the head weight, handle length, and head shape, this is a better high-volume wood processor than the more cutting-focused axes like the Hults Bruk Kisa, but is not as suited for use as a knife alternative for fine bushcraft work.

Hultafors Classic Hunting Axe ($130): The Hultafors-branded axes aren’t available in the US, so our European readers should give this compact bushcraft axe a very close look.

Hults Bruk Aneby ($160): This is as close as you can get to the Hultafors Classic Hunting axe in the US, and like the Classic Hunting Axe it’s a fine alternative to the Gransfors Bruks Small Forest Axe (SFA).

Ray Mears Gransfors Bruks Wilderness Axe ($175): This famous axe model was designed by Ray Mears, as a midpoint between Gransfors Bruks’ Scandinavian Forest Axe and their Small Forest Axe. It’s never in stock, but if you do score one it’s a wonderful tool. You’ll pay extra for the names on it, though.

Helko Black Forest Woodworker ($160): This is Helko’s flagship product, a beautiful, traditional design that fills the same general-purpose wilderness axe niche as the Gransfors Scandinavian Forest Axe. It has a head that’s slightly heavier than other axes in this size range, and based on overall design it’s a very good general-purpose bushcraft and survival axe.

Council Tool Wood Craft Pack Axe ($155): This axe was recently introduced, and has a ton of features aimed at the bushcraft and survival crowd. The hardened eyewall and poll are designed for hammering, and head shape is made for a mix of cutting, carving, slicing, and general camp use. It’s often out of stock, and some reviewers claim the overall fit and finish level on this model is higher than that of even the premium European axe makers.

Council Tool Velvicut Hudson Bay ($145): The Velvicut line is one of Council Tool’s two premium axe lines, which makes this the axemaker’s best Hudson Bay pattern offering. If you want a traditional Hudson Bay type axe, then this is the top of the line.

Gransfors Bruks Scandinavian Forest Axe ($245): The larger alternative to the Gransfors SFA, this iconic axe has played a major role in the revival of the premium axe scene in the US and Europe. These axes are very hard to come by online right now, and if you can find one in stock it may have a significant markup.

Snow & Nealley Single Bit 2.25# ($80): A budget wood chopper from a solid US axemaker, consider this an alternative to the Council Tool Boy’s Axe of the same size.

Mueller Biber Classic Forest Axe ($150): This axe is similar in shape to the Helko Rheinland Pack Axe, but it’s much larger. It’s a traditional German axe from an established, boutique Austrian maker, and the quality is impeccable, especially for the price.

More info about axe brands

Hultafors is one of the two top-tier Swedish axe makers that still runs its own factory (the other is Gransfors Bruks), and the products are popular with bushcrafters for their high quality and outstanding value. Hultafors axes are fully hand forged, and generally come in two finishes: a cheaper, standard finish and a more expensive, premium finish.

Hultafors also owns Hults Bruk, and axes from both brands come from the same foundry. There are some differences in labeling and branding, depending on the year, but you should consider the two brands as equivalent and just look at the specifics of the model.

Gransfors Bruks is a high-end maker of fully hand-forged Swedish axes. Thanks to a combination of craftsmanship and celebrity bushcrafter Ray Mears’ endorsements, GB has become the bushcraft community gold standard. You pay a premium for the Gransfors Bruks name, though it’s not always clear that the quality difference is worth the price difference over the other top makers — you have to evaluate on a case-by-case basis. But if you can afford to ignore the price difference, and you just want the fan favorite, then this is your axe maker.

Wetterlings is a venerable Swedish axe maker now wholly owned by Gransfors Bruks, and the latter has stopped making axes under the Wetterlings mark as of 2017. If you find a Wetterlings axe for sale it’s usually of very high quality, so buy with confidence.

Snow and Nealley is an Amish axe maker that has been based in Maine since the late 1800’s, and they’re still turning out high-quality, traditional wood-handled axes at unbeatable prices. Many of our budget picks are from this maker. The axe heads were briefly made overseas, hence a smattering of negative reviews that claim they’re made in China or Mexico, but they’re back to being made in the US out of US-sourced steel and hickory.

Estwing is an American tool maker familiar to many from big box retailers, and they make very good axes at budget prices. The Estwings’ all-metal construction — even the handle is metal — is a strength and a weakness. These axes are much heavier than their wood- and synthetic-handled counterparts, but are bombproof.

Council Tool is based in North Carolina, and the company’s premium Velvicut and Wood-Craft lines are on par in price and quality to the top European makers. Their budget axes have differences in tempering and finish from their premium line, but are still quite good. They made axes for the National Forestry service for a while, and have a sterling reputation among axe enthusiasts.

All the Council Tool axes are drop forged, which means that the blacksmith holds the heated metal with tongs while a machine hammers it. So they’re sometimes billed as “hand forged,” and this is accurate for some definition of the term, but they’re not hammer-forged like a Hults, Gransfors, or Mueller, so they don’t have quite the same aesthetics.

Helko is a German maker of fine, traditional axes for forestry and woodcraft. Their offerings generally compare in price, quality, and features to the top Swedish and American makers. Helko’s axe heads are drop-forged, like those of Council Tool.

Husqvarna is a chainsaw maker that is now in the budget axe business. The company sources its axe heads from the Hults Bruk factory, and for this reason many people on the internet who don’t know how quality control, steel selection, finishing, and tempering work have concluded that the heads must be therefore be identical to Hults Bruk/Hultafors heads. This is trivially false, as even different lines from the same maker will have different steel, tempering, and quality variances.

We haven’t included any of Husqvarna axes in our guide because the reviews are so mixed — people either love their axe or they hate it because they’ve broken the head in half. But we did want to mention this brand in order to debunk the myth that you can get a Hults Bruk head on the cheap by buying one of these budget axes and doing some of your own finishing work on it.

Mueller is a small, family-owned Austrian company that has been making axes continuously for over 300 years, and their reputation is excellent. They aren’t as widely known in some of the other high-end makers, but their price and quality are considered on par with the best. Their axe heads are fully hand forged.

Axe safety

There’s an old saying: “You can’t spell accident without axe.” Yeah, the spelling doesn’t work, but you get it. Axes are dangerous. Watch some videos and heed these tips:

  • Always use two hands.
  • Set up a dedicated safe area free of rocks, hazards, and (most importantly) other people. Nobody comes near you while you’re swinging an axe.
  • Always position yourself so you’re out of the path of your swing if you miss your target and it keeps going. Sometimes this will feel awkward and inefficient, but do it anyway.
  • Aways swing so that if the axe glances off the wood it won’t hit your body with the edge. Again, this may make your swing suboptimal, but it’s even less optimal to end up with an axe in you.
  • Always make sure your axe is sharp. Learn the best ways for preppers to sharpen blades.
  • Always carry your axe with the blade pointing toward the ground.
  • Never use your axe when the head is cold, because it will be more brittle and likely to chip. If it’s winter, then warm the head up by a fire or by placing it next to your body before using it.

Notice that two of these safety rules are about how you position your body in relation to your swing. This is hard to get right, and it’s where most people have accidents.

In general, a shorter handle takes more care to be safe with than a longer handle, because the head swings that much closer to your body and vital organs.

It also matters how long your arms are and how tall your body is in relation to the axe’s length, so a shorter axe can be safer for a smaller person. Think about this length vs. safety factor when you’re selecting and using an axe, because all that sweet portability you bought by going with a 19-inch pack axe does you no good if the edge ends up buried in your leg.

1200 fps Air Rifle

0

Introducing the Game-Changing 1200 fps Air Rifle: Precision and Power Combined! Discover an elite firearm designed to elevate your shooting experience with unparalleled velocity. With a remarkable firing speed of 1200 feet per second, this air rifle is engineered to deliver exceptional accuracy and strength. Whether you’re a seasoned marksman or a passionate hunter, prepare to revolutionize your shooting prowess with the ultimate tool for speed and precision.

1200 fps air rifle

1200 fps air rifle

A 1200 fps air rifle is a high-velocity weapon that offers an exceptional shooting experience. With its impressive muzzle velocity of 1200 feet per second, this air rifle delivers outstanding power and accuracy. Whether you are using it for hunting or target shooting, this firearm ensures a reliable and effective performance.

The high FPS (feet per second) rating of the 1200 fps air rifle provides several advantages. Firstly, it enables the shooter to achieve greater range and trajectory control, making it suitable for long-distance shooting. Additionally, the higher velocity increases the likelihood of hitting targets swiftly and more accurately, resulting in cleaner kills during hunting activities.

Furthermore, a 1200 fps air rifle often incorporates advanced features such as adjustable triggers, ergonomic grips, and superior optics to enhance user comfort and overall shooting experience. These rifles are typically designed for experienced shooters who demand precision and power in their firearms. Whether you are a seasoned hunter or a competitive shooter, the 1200 fps air rifle is sure to meet your expectations with its exceptional performance capabilities.

In conclusion, the 1200 fps air rifle offers a powerful and accurate shooting experience. Its high velocity allows for greater precision and longer range, making it an ideal choice for target shooting or small game hunting. With its advanced features and reliable performance, this air rifle is a top choice for enthusiasts looking to enhance their shooting skills.

What Does Rabbit Taste Like? (Definitive Guide)

0

What does rabbit taste like? Some people say that rabbit tastes like chicken, while others say that it has a unique flavor all its own. In this blog post, we’ll explore the different opinions on rabbit flavor and give you our thoughts on this delicate topic. Whether you’re considering getting a pet rabbit or are simply curious about what these animals taste like, read on for more information.

What Is Rabbit & Rabbit Meat?

Rabbit is a type of game meat that comes from the hare family. These animals are farmed for their meat, fur, and even their pelts, which are used to make clothing and other items. Rabbit meat is considered to be a healthy option since it’s lean and low in calories, fat, and cholesterol. It’s also a good source of protein, vitamin B12, niacin, and phosphorus.

What Does Rabbit Taste Like? Does Rabbit Taste Good (Like Chicken)?

Rabbit meat tastes a lot like chicken due to the fact that both are white meat. The biggest difference between the two is the texture. Rabbits have less fat compared to chickens, so they’re drier.

The taste of rabbit meat will depend on the age of the rabbit. The general consensus is that the younger the rabbit, the better it tastes. Older rabbits, especially wild rabbits, tend to develop a strong smell, making them hard to eat if cooked wrong.

Rabbit meat is comparable to chicken and would take on whatever spices you put on it (spicy, curry, savory, etc.).

Nutritional Benefits of Rabbit Meat:

Rabbit meat is an excellent source of animal protein and essential nutrients. It’s low in calories and fat but high in healthy Omega-3 fatty acids. Rabbit meat is also a good source of B vitamins, iron, zinc, and selenium.

If you’re looking for a healthy alternative to red meat, rabbit is a great option.

What is the History of Rabbit Meat?

Rabbit has been eaten as a food source for centuries. The first recorded instance of rabbit consumption dates back to the 4th century BC in Greece. Rabbit was a popular dish among the wealthy since it was considered luxurious meat.

Today, you can find rabbit meat at some specialty butcher shops and online retailers. You can also purchase whole rabbits or live rabbits for slaughtering.

Besides, if you want to eat rabbit meat, you might have to hunt for the wild ones.

(For more on the best air rifle for rabbits, see this post)

What is Rabbit Meat Called?

The term for Rabbit meat is ‘Coniglio’ in Italian, ‘Lapin’ in French, ‘Conejo’ in Spanish, and ‘Hasenfleisch’ in German. In Chinese, it is called ‘tuzhu yanzhi’. In English, it does not have a special name like pork, beef, veal, or venison. It is just called rabbit meat.

How To Cook Rabbit?

Rabbit is a very versatile meat, so there are many different ways to cook it. Rabbit can be roasted, grilled, stewed, stir-fried, or even made into sausage. The key to cooking a rabbit is not to overcook it, as this will make the meat tough.

Here are some tips on how to cook rabbit:

-If you’re roasting a rabbit, make sure to stuff the cavity with herbs and vegetables to keep the meat moist.

-To grill a rabbit, marinate it in your favorite sauce for at least an hour before cooking.

-For stewed rabbit, brown the meat in a pan before adding it to the stew pot.

-If you’re stir-frying rabbit, cut the meat into small pieces so it cooks evenly.

Regardless of how you cook rabbit, it’s important to remember not to overcook it. Rabbit is best cooked until it’s slightly pink in the middle.

(How To Get Rid Of Iguanas? See this post for more)

Easy Rabbit Recipe:

Grilled Rabbit with Spicy Sauce

Ingredients:

-1 rabbit, cut into pieces

-1 bottle of your favorite hot sauce

-1/4 cup olive oil

-2 tablespoons vinegar

-1 tablespoon paprika

-1 teaspoon garlic powder

-1/4 teaspoon cumin

Instructions:

1. In a large resealable bag, combine the rabbit pieces, hot sauce, olive oil, vinegar, paprika, garlic powder, and cumin. Seal the bag and shake it to coat the rabbit.

2. Let the rabbit marinate in the fridge for at least an hour (overnight is even better).

3. Preheat your grill to medium-high heat.

4. Grill the rabbit pieces for 10-12 minutes, or until cooked through. Serve immediately.

FAQs

How do you cook rabbit so it doesn’t taste gamey?

The key to cooking rabbit so it doesn’t taste gamey is to not overcook it. Rabbit is best cooked until it’s slightly pink in the middle. This will ensure that the meat is moist and tender. Another tip is to marinate the rabbit in your favorite sauce for at least an hour before cooking. This will help to tenderize the meat and give it flavor.

What does wild rabbit meat taste like?

Wild rabbit meat tends to have a strong smell, making it hard to eat if cooked wrong. The best way to cook wild rabbit is to marinate it in your favorite sauce for at least an hour before cooking. This will help to tenderize the meat and give it flavor. Another tip is to not overcook the rabbit, as this will make the meat tough. Wild rabbit is best cooked until it’s slightly pink in the middle.

Is wild rabbit meat better than domestic rabbit meat?

The taste of wild rabbit meat will depend on the age of the rabbit. The general consensus is that the younger the rabbit, the better it tastes. Older rabbits, especially wild rabbits, tend to develop a strong smell, making them hard to eat if cooked wrong. Wild rabbit is best cooked until it’s slightly pink in the middle.

How do you make rabbit sausage?

Rabbit sausage can be made by grinding up raw rabbit meat and mixing it with spices and herbs. The sausage can then be formed into patties or links and grilled, roasted, or fried. Rabbit sausage is best cooked until it’s slightly pink in the middle.

Why is Rabbit Meat Not Popular? 

There are a few reasons why rabbit meat is not as popular as other meats. One reason is that rabbits are often considered to be pets, so people may not want to eat them. Another reason is that rabbit meat can be difficult to cook if you don’t know how to do it correctly. Rabbit meat is best cooked until it’s slightly pink in the middle. If it’s overcooked, the meat can be tough and have a strong taste.

Do Different Cuts of Rabbit Taste Different? 

Different cuts of rabbits can taste different depending on how they’re cooked. For example, the loin is a leaner cut of meat that is best cooked quickly so it doesn’t dry out. The leg is a tougher cut of meat that benefits from being cooked slowly so it becomes tender. Rabbit meat is best cooked until it’s slightly pink in the middle.

How Should I Store Rabbit Meat?

Rabbit meat should be stored in the fridge and used within 2-3 days. If you’re not going to use the rabbit meat within that time frame, it can be frozen for up to 3 months. When storing rabbit meat, make sure to wrap it tightly so air doesn’t get to it. Rabbit meat is best cooked until it’s slightly pink in the middle.

What Flavors Go Well with Rabbit? 

Rabbit goes well with a variety of flavors, such as spicy, curry, savory, and sweet. Rabbit can be cooked in many different ways, such as roasting, grilling, stewing, stir-frying, or even made into sausage. The key to cooking a rabbit is not to overcook it, as this will make the meat tough.

Conclusion

Whether you’re considering getting a pet rabbit or are simply curious about what these animals taste like, we hope this blog post has been helpful. Rabbit meat is healthy and tastes similar to chicken, making it a great option for those looking for a leaner protein source. When cooking rabbit, be sure not to overcook it as this will make the meat tough. There are many different ways to cook rabbits, so experiment with different methods and find the one that you like best. 

The Fearless Safari Dogs of South Africa

0

THE WOUNDS from his fight with a baboon weren’t fully healed when Bismark charged the Cape buffalo.

We had spent the day trying to split two satellite bulls from the herd. I had been hired to photograph a plains- and dangerous-game safari in South Africa’s northernmost province of Limpopo, and I was shooting through my telephoto lens as one of the bulls broke from cover and charged.

The hunter shot the buff at 40 yards, then again. Bismark, a wire-haired Jack Russell, stood at heel beside his handler, professional hunter Divan Human. I don’t know how many shots were fired—both by the hunter and the PH—as the buffalo thundered to 15 yards, but it wasn’t dying. That’s when Bismark broke heel and tried to ride it.

A cape buffalo charging a hunter in the foreground.
The Cape buffalo charges as hunter Wayne Messbarger settles behind his rifle. Tyler Sladen

As a lifelong hunter, I’ve seen bayed bears and treed mountain lions. As a nuisance wildlife professional, I’ve pulled badgers out of holes and I’ve been face to face with rattlesnakes under houses. Nothing compares to that Cape buffalo charge. They’re called “black death” in South Africa, and I get that now. But the heart of a terrier is unmatched, and Bismark was ready to die for us.

Bismark is unshakable, but he’s no one-hit wonder. I saw a dozen blood-tracking dogs while on safari this spring; every one was a Jack Russell. The breed was first developed in Britain for fox hunting, and its prevalence in South Africa today is a byproduct of British colonialism. Although I didn’t see any on my trip, Jagd terriers (“jagd” is German for “hunt”) are also popular among South African outfitters.

The cool thing about terriers is they can do a little bit of everything. I’ve owned Jagds for nearly a decade and they’re integral to my nuisance wildlife business in the Southwest. Although it’s no longer commonplace in the U.S., terriers were originally bred for this work. They excel at finding dead animals, locating live ones, and catching critters. Because of all that tenacity packed into a small body, they also have a tendency to get hurt on the job. (As the Jack Russell Terrier Club of South Africa puts it, the “real Jack Russell terrier does not sit on the sidelines of life.”) While PHs here release their dogs on most game tracks, they don’t allow them to trail warthogs, which are notorious for killing dogs.

tiny but heroic looking jack russell terrier stands in front of downed cape buffalo
Hunter stands beside a blue wildebeest that he tracked through the brush. Jack Russell terriers can have three types of coats: smooth, wiry, or broken, which is a mix of the first two. While Jack Russells in the U.S. are all over the map when it comes to physical and personality traits, the South African dogs are very true to their breed type. And as someone who appreciates working dogs—I own 15, both terriers and bird dogs—this was especially fun to see. Tyler Sladen
long-haired jack russell terrier rests behind truck with gun propped up behind him
Bismark takes a break by the truck. Once he got back to camp each day, he would pull bones from the skinning shed to chew on. The tracking dogs were incredibly well behaved; they never ran off or even barked really, unless we were hunting and there was an animal down. They also ate like kings. Tyler Sladen

When Bismark was younger, one of Human’s clients shot a big Nile crocodile and Bismark broke at the shot. That’s scary because you’re relying on a client to not shoot your dog, but you also don’t want the animal alive enough to kill your dog. Fortunately it was a good hit, but that’s just how it goes with terriers sometimes: You can’t proof a dog until you put him in situations like that. I saw lots of animals harvested in the three weeks I was there, and only now and then would a dog slip up and break at heel.

A standard track looked like this: As soon as the shot went off and the PH released his dog, the trackers would run in and try to keep up. Because we were hunting in such thick cover—50-yard shots were far in some cases—you couldn’t see the dog 100 yards away, let alone the kudu that was just shot. It was helpful to hear barking so you could locate him.

jack russell terrier peers out from bed of pickup truck
Whenever you go to the gas station in town or run to the corner store in the Limpopo province, there are PHs from other ranches and outfitters there. And whenever you look in the bed of a parked or idling truck, you’ll find a little Jack Russell. Tyler Sladen
three hunters talk at sunset while dog rests at the feet of one
Bismark rests beside his handler, Divan Human, who discusses plans with Johan Swart, owner of Thaba-Tala Safaris (middle), and PH Divon Retief. South Africa is like the Texas of Africa—and I mean that as a compliment. The men I hunted with aren’t afraid to get dirty or get stuff done. They manage their game like Texans do (there’s a lot of high fence in South Africa). They love hunting. They love their trucks. And they love their dogs. Tyler Sladen
jack russell terrier, ears flopping with the activity, carries a big stick down a dirt road
The terriers in South Africa are used almost exclusively as blood-tracking dogs. Bismark, however, was an enthusiastic retriever to boot, and even retrieved a few birds for me. Tyler Sladen

After a shot the dog was off to the races, and the human tracker was not far behind. And the trackers were incredible. I was skeptical at first. I’ve heard stories of how great they are, but I couldn’t help thinking: I’ve hunted my whole life. How good can these guys really be? What you don’t realize is those trackers hunt year-round except for the rainy season and they track lots of animals every day.

Better yet, the dogs don’t take away from the tracker’s job because often the tracker’s job isn’t just finding downed game—it’s finding live game. South Africans only use their blood dogs for locating animals that have been hit well.

Fortunately, the Cape buffalo was well hit—several times. In the end, the bull slid to a stop just yards from our feet, with Bismark barking on its back.

rough-coated jack russell terrier sits atop dead cape buffalo
Bismark sits atop the Cape buffalo that charged us. The dogs I hunted alongside obeyed commands in Afrikaans, one of the country’s 11 official languages. Tyler Sladen
smooth-coated jack russell terrier licks blood from dead impala while hunter holds horn and another looks on
Hunter licks blood off an impala he tracked as his owner, Retief, crouches beside him and one of our excellent trackers. Resource guarding isn’t uncommon among trailing dogs, and these Jack Russells would growl if you got too close to an animal they had recovered. These were just typical terrier vocalizations and a typical terrier attitude. They never bit anyone, of course, and they would defer to their handlers. Tyler Sladen
hunter and dog walk down dirt road as sunset creates rosy sky
Bismark and Human return to camp after a long day in the field. Most hard-worked terriers are one-person dogs. Don’t get me wrong: They make great family dogs. But if you’re out and about, everyone ceases to exist to your terrier except you. Tyler Sladen

Read more OL+ stories.

The 5 Best Animals To Hunt With a .17 HMR

0

The 17 HMR is among the finest commercial rimfires cartridges available. It is accurate, easy to shoot, and a well-placed shot is fatal for most animals. It’s widely considered one of the most accurate rimfire rifles and the best small game hunting gun available on the market.

The best animals to hunt with a 17 HMR are raccoons, rabbits, prairie dogs, squirrels, and coyotes. The 17 HMR is one of the most accurate rifles for hunting, and precision is of the utmost importance when hunting small animals.

The rest of this article will delve into the best animals to hunt with a 17 HMR.

1. Rabbits

Every year, almost 1.5 million Americans go rabbit hunting. Most states permit rabbit hunting, and some even pay professional hunters to reduce the rabbit population in areas where they’ve become invasive.

While hunting rabbits may seem easy, you’ll have to prepare thoroughly for a successful hunt. Rabbits are excellent listeners and are likely to hear you from a distance. If you wait long enough, they may escape what they believe to be a threat.

Most shooters choose the 17 HMR as their weapon of choice for rabbit hunting since it is the most effective and precise rimfire cartridges.

The typical rimfire’s rifle trajectory is not as good as the 17 HMR, which also has a faster velocity. Considering that a lighter projectile is less wind-resistant, a faster projectile also means less time for winds to steer the bullet off course.

Because of this, 17 HMR is an excellent choice for rabbit hunting.

2. Squirrels

Squirrels are challenging to hunt because of their unpredictable movements and ability to move through tree canopies. Squirrel hunting seasons are long, and hunters can legally chase squirrels for several months or more per year.

The 17 HMR is popular for squirrel hunting because the soft recoil makes it a pleasure for hunters to shoot. At 100 yards (91.44 m), the 17 HMR fires flat enough to be effective while delivering 88 ft pounds (119 Joules) of energy.

The 17 HMR cartridges offer advantages beyond just being a flat-shooting varmint cartridge. Compared to other alternatives, the 17 HMR delivers far less flesh damage while providing an even flatter trajectory and typically higher accuracy.

Simply put, as long as you do your part to make an excellent shot, a 17 HMR will allow you to strike a squirrel from just about any visible distance.

When hunting squirrels, however, avoid shooting through the trees unless you’re an experienced hunter. There’s a high chance that the bullet may bounce off the tree and injure you.

Related How To Choose the Best Rifle for Target Shooting.

3. Raccoons

The 17 HMR is a long-range knockdown weapon that is flat-shooting, very adaptable, and built on a rimfire platform. It has a flatter trajectory than the 22LR, so you might want to use this for small game like raccoons if you’re further away.

One important thing about a 17 caliber bullet is that the bullet diameter is less than that of the case. This gives you more accuracy when you’re hunting raccoons to help protect ground-nesting birds or just for pleasure.

The 17 HMR can use bullet types well-known to centerfire shooters and has outstanding ballistic eco-efficiency, resulting in a perfect shot from a distance of 200 yards (183 m) or fewer.

4. Prairie Dogs

Although relatively harmless, prairie dogs are pests in many areas. They breed swiftly, similar to other small mammals, and an uncontrolled population might seriously harm the meadows and farms they graze on. Livestock, such as horses and cattle, can suffer severe damage from the tunnels they dig.

They may also spread fleas and carry diseases that are potentially dangerous to humans and livestock.

Hunting prairie dogs is different from hunting other animals because of their relative speed. The most popular caliber for prairie dog hunting is undoubtedly the 17 HMR because of the good velocity and medium wind drift characteristics.

It is also the cheapest option and readily available. The 17 HMR is a powerful, flat-shooting, versatile rimfire cartridge that gives long-range knockdown power. It is the best option for medium to long-range shooting of prairie dogs and better than the 22LR for this animal.

While they’re not as twitchy as rabbits, they are certainly aware of their surroundings, so you’ll have to be patient and quiet when hunting them.

5. Coyotes

Coyotes are another pest that you could hunt with the 17 HMR. However, you’ll have to manage your distance and shot placement extremely well when doing so. Coyotes are much bigger than varmints typically hunted with the 17 HMR, but a well-placed shot should still drop the animal immediately.

Nevertheless, most experts won’t recommend shooting coyotes with a 17 HMR unless you’re closer than 100 yards (91.44 m) from the animal. From further away, you may even need two or three shots to finish the coyote, which is against hunting ethics.

If you’re an experienced hunter, a 17 HMR may not be right for you in this case. However, if you can get close enough, this rifle should do the trick.

For more, check out Best All-Around Camouflage Pattern Across Multiple Biomes.

The Best Muzzleloader Scope in 2024

0

Today I’m going to show you the best muzzleloader scope.

In fact:

I’ve hand-tested over 10 scopes alone for this review.

The best part?

I’ve sorted the scopes by use. So whether you’re on a budget or need the best muzzleloader scopes, you’ll find it here.

Let’s dive in!

How to Choose a Muzzleloader Scope

Optics can be a crazy expensive addition to your firearm.

But don’t just go throw any old scope on top of your boom stick.

There are considerations you need to make in your purchase, and you need to be more selective if you’re putting an optic on your muzzleloader.

Glass Clarity & Reticle

One of the most important aspects of choosing a scope is to consider the glass quality. You can only shoot as well as you can see. And if you can’t see well through your new optic, you wasted your money.

Higher end scopes from brands like Nikon and Leupold will have excellent glass with crystal clear picture clarity and color fidelity.

If you choose a more affordable scope, don’t cut corners on glass. Vortex Optics makes many scopes that fall in affordable price ranges while still having a wonderfully bright sight picture.

When choosing a scope, you want to pick one that lists having fully coated lenses. This means that all of the exterior lenses have a coating that increases light transmission to your eye-this will give you a bright sight picture.

Ideally, getting fully multi-coated lenses is best. This means that all of the lenses have many coatings that improve the light transmission and cut down on glare. You’ll get a clear and bright view through the optic. And the anti-glare coatings will prevent objective lens reflections that could give away your position.

The reticle you chose is up to you. You can choose to get a reticle that is hashed to account for bullet drop (BDC reticle) to help you estimate holdover for your shots. Some shooters prefer a clean and simple duplex crosshair. I’m not sure if an illuminated reticle is really beneficial for a muzzleloader, but if you want one, no one will stop you.

Eye Relief & Eye Box

As a muzzleloader shooter, eye relief is a spec that you can’t ignore like some centerfire riflists do.

If you have an eye relief that is shorter than 3 inches, your scope is going to scrape off your eyebrow when you shoot. That’s both painful and embarrassing.

Save yourself the trouble and get a longer eye relief scope with at least 4 inches.

You also want a generous eye box with room to adjust behind your optic and still get a good sight picture. The bigger your ocular lens is, the better this feature will be.

Durability

If a scope isn’t listed as being o-ring sealed. Pass on it. It’s worth spending your hard earned money on an o-ring sealed optic. This makes it rain and waterproof.

You also should look at getting a scope that is argon or nitrogen purged. This will not only help with light transmission but will keep your scope from fogging in crummy weather.

You don’t want a hunt ruined by less than ideal weather. Invest in a durable optic from the start.

Another special consideration for muzzleloaders is to make sure that the scope you choose is shockproof or recoil proof. Your firearm has harder recoil when you shoot compared to many centerfire rifles.

You will want a scope that can handle the extra kick.

Leupold boasts that all of its scopes must survive 5,000 rounds on the Punisher- a device that mimics recoil 3x stronger than a .308.

Vortex also makes nearly indistructive scopes that are a bit more budget friendly.

No matter which brand you choose, do your homework and sift through product reviews looking for durability or other shooters using it on a muzzleloader.

Elevation & Windage Knobs

Elevation and windage knobs, also called turrets, are what you use to make fine-tuning adjustments to your scope. You use these to zero your optic, or adjust it so that your shots actually land where you’re aiming.

The elevation turret will move your shot up and down. The windage turret will adjust your shot from left to right.

Ideally, you want turrets that have a tactile and audible click that you can hear and feel when making adjustments.

Getting locking turrets that can not be accidentally turned are a nice feature, but those will add to the cost. Less expensive optics will have capped turrets with screw on caps that cover both turrets.

Some brands will send you elevation turrets that are marked to compensate for bullet drop for your particular load upon request.

Parallax & Magnification

Centerfire rifle scopes often have the parallax fixed at 100-150 yards for centerfire rifles. That’s pushing the range for a muzzleloader, where parallax should be fixed to about 75 yards.

If you want to put a centerfire rifle scope on your muzzleloader, you need to take this into consideration.

Some more expensive scopes have a side parallax adjustment so you can lock it out for your shooting distance.

Some brands will factory adjust it for you if you send your new scope to them.

A muzzleloading rifle cannot fire shots that move as fast or as far as centerfire rounds. You will not be making shots from several hundred yards away from your prey, so don’t go crazy on magnification.

A high powered scope will hurt more than it helps because it will bring your target too close to you. If you take a high powered scope on your next deer hunt, all you’ll be able to see will be a big hairy patch on the animal’s hide-if you can even find the animal at all.

High powered scopes will have a narrow field of view too-which will make it harder for you to spot your target.

When looking at scopes, the magnification is the first set of numbers before the “x”, so 1-5×24 would be a scope with magnification powers that will make your target 1 to 5 times bigger than what you can see with your naked eye.

You don’t want anything higher than 5x.

Many muzzleloading minutemen prefer a 1-5x or even 1x, 2x, or 3x fixed magnification. For muzzleloading, smaller magnification is better.

The number after the “x” is the size of the objective lens (the lens at the end of the scope) in millimeters. A 1-5×24 scope has an objective lens that’s 24 mm in diameter.

You can look here for a list of the best 1-4x scopes.

Mounting & Rings

Because your muzzleloader kicks like a mule compared to many centerfire rifles, it will do a number on your scope and the equipment you use to attach it.

You want to be sure to use a solid mount (if you need an aftermarket one) and solid rings. You don’t want to cut corners on your mounting hardware.

Here’s a great video that will help you pick top notch mounting hardware:

Final Thoughts

You can easily pick a top-notch scope for your muzzleloader. You just need to keep a few key points in mind.

You want:

  • Quality Glass
  • Low magnification
  • Highly durable scope design
  • At least 4 inches of eye relief
  • Heavy duty mounting hardware

With these 5 things in mind, you’ll be able to pick an optic-at any price range- that will fit your budget and your needs.

If you’re also looking for an ACOG, look here.

The 4 Best Muzzleloader Scope

If you’re pressed on time, here’s a quick list of the best muzzleloader scope:

  1. Vortex Diamondback 1.75-5×32: Best Overall
  2. Bushnell Banner 3-9×50: Best Muzzleloader Scope Under $100
  3. Leupold VX-3i 3.5-10×40: Best Long Range Muzzleloader Scope
  4. Simmons Truplex Prohunter 3-9×40: Best for the Budget

1. Vortex Diamondback 1.75-5×32: Best Overall

The Vortex Diamondback 1.75-5×32 is the best overall scope on the market, especially for hunters.

In fact, it’s got all the features and qualities that you could need at an affordable price that won’t break the bank.

I put this on my AR-15 to test it out months ago and have yet to take it off because it works so well.

Want to hear more? Keep reading…

Glass Clarity & Reticle

The first time I looked into this scope I was surprised to find the glass was just as clear as other scopes that are twice the price!

The lenses are fully multi-coated, which means you get a nice, bright sight picture, even in the midday sun.

The Dead-Hold BDC reticle is my favorite part of the Vortex Diamondback 1.75-5×32.

Having a bullet drop compensation reticle means that you’ll easily be able to estimate your holdover at varying distances, even as far out as 500 yards.

The reticle is second focal plane, which means that it doesn’t change size with magnification. With 1.75-5x magnification, this works great.

If you had a higher magnification to shoot at extra long distances, you might need the reticle to increase in size. But since I’m not using this scope for 3-gun competitions, my average prey is usually only around 100-300 yards.

Eye Relief & Eye Box

The Vortex Diamondback 1.75-5×32 has 3.5-3.7 inches of eye relief.

If I have one complaint about this scope, it’s that the eye relief does seem to be a little unforgiving, depending what you mount it on.

On my AR-15 it’s tolerable with a good cheek weld, but on something like 6.5 Creedmoor, it would be pretty tight.

However, I do really love that this scope has a fast focus eyepiece. This allows you to get the reticle focused quickly.

Target acquisition is fast and easy, almost as good as a prism scope or red dot sight.

Durability

This scope is built like a tank and can handle whatever you throw at it.

It’s a one-piece tube with a hard anodized finish that can take a beating. This finish also helps to keep your setup camouflaged when you’re out hunting.

Plus, it’s O-ring sealed and Argon purged, which makes it waterproof and fogproof.

If that’s not enough, it’s backed by Vortex’s unlimited lifetime warranty that covers anything that could go wrong.

Elevation & Windage Knobs

The elevation and windage turrets are ¼ MOA click adjustments.

The turrets give nice, audible clicks and have a zero reset under the caps.

Speaking of zeroing, it couldn’t be easier. After only a handful of shots, I was hitting a half inch target easily and exceptionally accurately.

And, after at least 400 rounds or so, the zero has held. I even accidentally dropped it on the gravel road and it was still dead on.

Parallax & Magnification

The Vortex Diamondback has 1.75-5x magnification.

This is the perfect range for brush hunting and big game hunting. It gives you an accurate sight picture from 100-500 yards easily.

For deer hunting, you’ll be hard pressed to find a scope that’s better than this one.

As for parallax, it’s fixed at 100 yards and I really haven’t noticed a problem.

Mounting & Rings

This scope is an excellent value, but you will need to buy your own mount.

I’d recommend getting Vortex Pro Series Rings. That’s what I used and they’re great.

As for other accessories, it doesn’t come with much. Just removable lens caps. I’d suggest getting some flip-up caps like the Vortex Optics Defender Flip Caps.

Is the Vortex Diamondback 1.75-5×32 worth it?

This scope is really the best overall scope for hunters, with all the features you need.

It has:

  • Audible click turrets
  • Fast focus eyepiece
  • 1.75-5x magnification
  • Dead-Hold BDC reticle
  • Fully multi-coated lenses
  • Shockproof, waterproof, fogproof

If you’re an avid hunter and want a scope that has all the features you’ll need to bag your prey, try the Vortex Diamondback 1.75-5×32. You won’t be disappointed.

2. Bushnell Banner 3-9×50: Best Muzzleloader Scope Under $100

The Bushnell Banner 3-9×50 is by far the most elite budget friendly muzzleloader scope I have found throughout my hunting career.

Not only does the scope come in at an amazing price, but the quality and attention to detail is apparent.

If you want to learn why this scope hasn’t come off my muzzleloader setup since the day I purchased it stick around.

Glass Clarity & Reticle

The Bushnell Banner 3-9×50 is a scope with unbelievable brightness and glass clarity.

Even with the impressively low price, Bushnell did not sacrifice any quality with the building of this scope.

The dusk and dawn brightness multi coated lens provides amazing improvements to both the clarity and brightness of the scope.

In addition, the scope has a fast-focus eyepiece that makes target acquisition even easier.

The Bushnell Banner 3-9×50 gives me great confidence whether I am out for a day on the range or sitting in a tree stand during muzzleloader season.

The reticle that comes on the Bushnell Banner 3-9×50 is the multi-x reticle.

This was my first experience with this particular reticle and I am really enjoying it so far. I tend to be slightly picky about my reticle and this one has fit my shooting style unbelievably well.

This scope was an absolute dream addition to my muzzleloader setup.

Not being my main form of hunting, I try to keep my muzzleloader setup on a tight budget and the Bushnell Banner 3-9×50 fit right into that.

Eye Relief & Eye Box

The eye relief on the Bushnell Banner 3-9×50 is very forgiving and a great option for any setup.

I have found that with the forgiving eye relief, the sight can be mounted in a comfortable position on any firearm.

I have used this primarily on my slug shotgun setup and muzzleloader setup.

It would also work great on any other rimfire options.

In addition, the scope has a fantastic field of view which makes this a great option for any hunting setup.

The Bushnell Banner 3-9×50 has got to be one of the best budget muzzleloader scopes I have used.

Also, here are some great options if you are looking for a handgun scope for those long muzzleloader hikes.

Durability

The durability so far on the Bushnell Banner 3-9×50 has been fantastic.

My muzzleloader definitely takes the stress of long hikes and some crazy weather. This scope has seen it all and continues to perform like I just took it out of the box.

The Bushnell Banner 3-9×50 is waterproof, fogproof, shockproof, and dry-nitrogen filled.

This scope has taken a beating and keeps on going. Especially in my muzzleloader setup, I need a scope that works 100% of the time no questions asked.

Elevation & Windage Knobs

The elevation and windage knobs have performed surprisingly well for the low price tag this scope comes in at.

Usually on budget scopes I find the turrets are often mushy and inconsistent.

This is not the case with the Bushnell Banner 3-9×50. The turrets have been precise and accountable every time I have used them.

They have well defined movement and sound that makes it a satisfactory scope to zero.

My zeroing process was surprisingly easy. I took the scope directly out to the range right after I got it.

In maybe 30 minutes I was able to achieve some of my best muzzleloader groupings at 100 yards.

In addition, I have rarely had to touch the turrets since I zerod for the first time.

This tells me that the zero holds fantastically well on the Bushnell Banner 3-9×50.

Parallax & Magnification

I have been using the Bushnell Banner 3-9×50 for a few months and have noticed a slight parallax as I get higher in magnification.

It is nothing excessive and certainly doesn’t hinder my shooting abilities; however, it is something that I noticed throughout my testing.

The Bushnell Banner 3-9×50 has a magnification of 3x to 9x which is perfect for my usage.

This being on my muzzleloader setup means that it is not often I am taking shots beyond 100 yards.

9x is far more magnification than is needed for a shot at that range, but it is certainly nice to have when the heart is racing and the hands are sweating.

Mounting & Rings

The Bushnell Banner 3-9×50 did not come with mounts so I purchased a set of Warne 1inch Quick Detach Rings in a Low Matte finish.

I ended up going for the quick detach mounts because I thought I was going to be swapping it out on my slug setup.

This was not the case and I can’t seem to take it off my muzzleloader because I like that setup so much.

I would also recommend getting Monstrum Rubberized Flip-Up Lens Covers (Objective Lens: 37-42mm).

These have been some of my favorite flip up lenses I have found to date.

Is the Bushnell Banner 3-9×50 worth it?

I am very cautious about spending money on budget scopes because I am unsure how long they will last me. The Bushnell Banner 3-9×50 has put all of my worries to bed and has become my favorite muzzleloader scope in my entire arsenal.

Here’s why:

  • Price
  • Clarity
  • Durability

In short: the Bushnell Banner 3-9×50 is a fantastic scope that will outperform scopes that cost over double the price.

If you are still unsure whether the Bushnell Banner 3-9×50 is the right scope for you, give it a try. I am sure you will be just as thrilled as I am.

3. Leupold VX-3i 3.5-10×40: Best Long Range Muzzleloader Scope

For the true muzzleloader fan, a high quality scope is a must.

Whether hunting or target shooting, accuracy with a muzzleloader can be tough.

The Leupold VX-3i can remove one part of that difficulty.

Glass Clarity & Reticle

The glass is some of the finest I’ve seen on a rifle scope.

A military-grade coating called DiamondCoat 2 is the reason. It allows maximum light transmission while being very scratch resistant. The lenses are built for life.

The DiamondCoat 2 also lets all colors of light in, so there is no tinting whatsoever, and it shows when you have a big buck sighted near twilight. The only thing brighter is night vision.

The duplex reticle is pretty plain, but for a muzzleloader it isn’t a big issue. You aren’t going to be taking game at 300 yards. It’s perfect for a muzzleloading application and many others.

Eye Relief & Eye Box

I’ve found the scope to be very comfortable on top of my modern front stuffer, then I found the reason.

Even at maximum magnification, the spec sheet on the Leupold boasts 3.6 inches of eye relief. It’s even greater at 3.5x power, a whopping inches. I could mount this thing on my shotty and fire 3.5 inch shells without worry of scope bite, much less the kick from any black powder rifle out there.

That said, you won’t need to adjust anything on your rifle’s mounting location to plop this guy on. It’ll work fine for pretty much every rifle out there on a standard rail.

Durability

Leupolds are tough. I’ve owned several over the years and this is one area where they never cut corners.

They have a special scope torture device at their lab, called the Punisher. This machine bangs the test design 5000 times with three times the force of a .308, and any design that doesn’t pass gets sent back to the drawing board.

It’s one of the main things I love about this brand. They are simply the toughest scopes out there, and the new DiamondCoat 2 coating adds another layer of military-grade durability to the lenses themselves.

They’re also waterproof to 33 feet and have a special proprietary gas blend inside to keep moisture out. They won’t fog or falter, even at 40 below.

Elevation & Windage Knobs

Super reliable turrets, but what else would you expect?

The clicks are firm and precise, which makes zeroing the scope a breeze.

It won’t be too often on your muzzleloader that windage and drop will be an issue, but if you do want to take a long shot, you know the drop on a lead ball can be tremendous.

Being able to click down for some skill shots to impress your friends is important, and the scope has an adjustment range of 52 MOA. It’ll give you the adjustment you need for any range you would ever want to shoot your muzzleloader.

Parallax & Magnification

Magnification ranges from 3.5 to 10, and adjusts easily with the smooth turning dial.

The adjustment is perfect for a muzzleloader scope. At 3.5x, you have a wide enough field of view to hunt accurately while still getting a huge boost in the accuracy of your shots, and 10x makes even the tiniest targets at 100 yards big enough to see.

10x is also a great magnification for testing the accuracy of your loads. We put so much effort into weighing bullets, picking the right wadding, carefully measuring powder, and greasing with the right lube, that it’s nice to see how reliable all that work really is at the range.

If there was a complaint about this scope, it would be that the parallax is non-adjustable. It’s set at 150 yards with Leupold. But again, for hunting or target shooting, the scope is still going to be tighter than most muzzleloader groups.

Plus cheek rest is a skill, and most of use wouldn’t be shooting black powder if we didn’t like a challenge.

If you won’t need the high magnification, of course, you might consider something designed for a battle rifle.

Mounting & Rings

No rings are included with the scope, and while any ole one-inch rings will do the trick, you are pairing a rugged muzzleloader to a rugged scope. Prudence dictates using something sturdy to do it, like Leupold Permanent Weaver-Style Cross-Slot rings.

Leupold also makes lens covers to work with their VX-3 line.

Is the Leupold VX-3i 3.5-10×40 worth it?

If you are looking for a budget scope, this probably isn’t it. That said, one feature of the VX-3i is that it was designed to be a bit more wallet friendly than some other Leupold scopes.

If you want the absolute best value in a quality scope for your muzzleloader, this is the one.

Let’s recap.

  • Crystal clear view
  • Military-grade coatings
  • Tremendously long eye-relief
  • Passed Leupold’s torture testing
  • Great magnification range for muzzleloaders

And it comes with the best lifetime guarantee in the world of shooting.

Really, you can’t go wrong with the Leupold VX-3i 3.5-10×40 scope. It’s the obvious choice.

4. Simmons Truplex Prohunter 3-9×40: Best for the Budget

The Simmons Truplex Prohunter 3-9×40 is a versatile scope and great quality for the price.

In fact, it’s less than half the cost of other brands and has most of the same features and qualities.

I am an avid hunter and use this scope regularly on my trips.

Want to know why? Keep reading…

Glass Clarity & Reticle

With this scope you’ll get a sharp, bright image.

The glass is high quality and the scope has multi-coated lenses to cut down on glare and give you a crystal clear sight picture.

And what about the reticle?

The Simmons Truplex Prohunter 3-9×40 has a Truplex reticle, as it says in the name. What that means is that the edge of the posts are thicker and then the crosshairs thin out towards the center.

This makes it much easier to target in low light and thicker background brush. It also makes target acquisition super quick and easy.

Eye Relief & Eye Box

You’ll get 3.75 inches of eye relief with this scope.

That’s pretty great compared to most similar scopes. And it means you won’t have to worry about how much your rifle kicks.

Plus, the Simmons Truplex Prohunter 3-9×40 has Quick Target Acquistion (QTA) eyepiece. This, along with the Truplex reticle, makes target acquisition incredibly fast. And easily comparable to something like a red dot sight.

Durability

Even though this scope is extremely affordable compared to most, Simmons didn’t stinge on the materials or features.

It is O-ring sealed, making it completely waterproof. And, it has a nitrogen purged housing too. So you don’t have to worry about your optic fogging up.

It’s also recoilproof and can handle whatever caliber rifle you want to put this scope on.

From personal experience, I can tell you that the Simmons customer service is excellent. So, even if you have a problem, you can rest assured they’ll take care of you.

And Simmons makes a lot of other products too, including scope for air rifles. Which means if you love the Truplex reticle, you can get it in different types of scopes.

Elevation & Windage Knobs

The elevation and windage turrets are easy to adjust and give you ¼ MOA adjustment clicks.

This scope has the TrueZero elevation and windage adjustment system, which gives you a locked in zero.

And speaking of zeroing, it only took me about 15 minutes, if that, to get this scope set.

The TrueZero system helps the scope hold zero extremely well. I’ve taken mine hunting many times and never had to readjust.

Parallax & Magnification

You’ll get a lot of versatility with this scope because it has a variable magnification of 3-9x.

With that range, you can shoot accurately from around 100 yard out to about 900 max.

Which makes this scope the perfect attachment for your hunting rifle. I use it mainly for varmint hunting, but feel confident I could take bigger game at greater distances with this scope.

It’s also great for just target plinking and is a lot of fun to use for shooting at the range.

Plus, the parallax is fixed at 100 yards and I haven’t had any noticeable issues with it.

Mounting & Rings

The downside to this scope is that it doesn’t come with a mount.

But, when you’re buying a scope at such a great price, you can’t expect to get too many accessories.

I went with AccuShot Picatinny/Weaver Medium Profile 2-piece 1-inch Rings for mine.

It does come with lens caps, but they’re not flip up. You just put them on when you’re not using the scope. If you want flip up covers, these Monstrum Rubberized Covers work pretty well.

Is the Simmons Truplex Prohunter 3-9×40 worth it?

This scope is the perfect choice for any avid hunter.

It has:

  • Clear Glass
  • Truplex reticle
  • Unbeatable price
  • TrueZero System
  • 3-9x variable magnification

If you’re looking for the best quality scope that’s budget friendly, try the Simmons Truplex Prohunter 3-9×40. You’ll be happy you did.

Now It’s Your Turn

I hope you enjoyed my best muzzleloader scopeguide.

Now I want to turn it over to you:

Which scope will you pick for your rifle?

Let me know by leaving a quick comment down below.

BEFORE You Buy the SIG P365, Read This REVIEW

0

Does the P365 Live Up to the Hype?!

No gun has received the attention that I’ve seen the SIG Sauer P365 receive since its announcement in January just before SHOT Show. It gets this attention in all fairness, though, because when a gun shakes up the current single-stack 9mm market, dominated by Glock 43’s and M&P Shields, it’s understandable.

For the last 6 years, gun owners have bought into the idea that a concealed carry gun needs to be slim, lightweight, single-stack, somewhere between 6-8 round capacity, and striker-fired. Concealed carriers have also bought into the idea that it MUST be single-stack for a gun to fit those requirements.

Enter the SIG P365. It is all of those things—slimmer than the Glock 43, lighter than the Shield. It has a phenomenal trigger not just for guns in this class but even for any modern defensive pistol. And then there’s the fact that it just happens to hold 10+1 rounds in its standard configuration. That’s four more rounds than the G43 and three more than the M&P Shield. Readily available 12-round magazines boost that to nearly double the capacity of the Glock.

And you wonder why people are going nuts over this pistol.

But they’re also freaking out over some other aspects of the pistol, and not necessarily in a positive way. But first, let’s talk about some of the features and specifications of the gun.

trauma gear banner

Specifications

First Impressions:

Grip

I first got my hands on the P365 just before SHOT Show at a special SIG SAUER Range Day Media event. My good friend, Kyle Lamb, was there as well doing some demonstrations for SIG. Besides being involved in the excitement surrounding the P365, Kyle also has a gun he designed in collaboration with the team at SIG based on the P320 platform, the SIG SAUER X-VTAC 9mm, which is a pretty nice piece of hardware itself.

Kyle did a little demonstration of the P365 on camera with me, and the shots you see me fire there are the first I sent downrange out of this little beast. I call it that because it is like the Little Engine That Could, small in size and stature, but big in performance!

Right away, I knew there was something pretty special about the little gun. Placing it in my hand, I was immediately surprised at how good the grip felt. The P365 takes some of its design cues from P320, X-Series pistols. Particularly in its stippling and smooth trigger guard undercut. The undercut allows the shooter to get an even higher grip on the gun for greater control and flatter shooting.

The P365 sit’s nicely in the hand’s webbing because of the grip’s backstrap and beavertail design. I saw a graphic online with the outlines of 3 of the most popular single-stack 9mm handguns overlaid and compared to the P365.

Analyzing the graphic, I could see that the P365 has a bore axis height as low as anything out there. The low bore axis is surprising because SIG Sauer guns, especially in the Classic line of pistols, have established a reputation of having a bore axis that is relatively high compared to competing designs. Not that this has kept me from shooting them quickly and efficiently.

Bore axis height is an overrated factor, but regardless the SIG P365 performs exceptionally well in this regard.

Stippling on the grip is effective and comfortable. The gun sticks in the hand like it should without being too aggressive for more sensitive skin.

Trigger

The next thing I noticed right away was the trigger. My first trigger press surprised me as I wasn’t expecting it to fire so quickly and easily. Sig says it has a 6- lb trigger.

I have not put a trigger scale on it to test, but I would say 6 lbs. seems about right. But the trigger FEELS lighter than that. It is deceptive. I’m not sure what sorcery (you will see similar references throughout this review) is going on there, but it is a very nice, light, crisp trigger for a striker-fired gun.

The trigger reset is fantastic as well. It is short and distinct. The initial take-up of the trigger is light and free. The travel of the trigger once you “hit the wall” (the point where you feel resistance in the stroke) is about a quarter-inch. Pressing the trigger through the stroke is smooth and even. Once it breaks, there is no perceptible overtravel.

Instead of having the trigger break near the rear of the trigger guard opening, it breaks with about 3/8” open space behind the trigger. The length of pull has an outstanding balance. Shooters with smaller hands will have no problem working the trigger, and larger-handed folk will use it comfortably.

Sights

The original P365 came with SIG-Lite Night Sights. I have owned several SIG pistols with these night sights. They are good, serviceable tritium-based sights, far better than what many firearm manufacturers put on their stock pistols.

However, early into the P365 launch, customer’s discovered their pistols were breaking the tritium vials due to the extreme recoil velocity of the slide. These early pistols were sent back in and replaced with SIG SAUER’s new XRAY3 Day/Night Sights. The XRAY3 sights are fantastic! They are bright in daylight or low-light conditions. The front sight is a tritium vial surrounded by a bright green circle that is very easy to pick up in rapid strings of fire.

The rear notch sight in use works more like a blacked-out rear sight in daytime use, but it also has two tritium dots that show up very nicely in low light. While you can see the two rear dots in the daytime, I don’t notice them. While shooting fast, you get a very bright front sight that is easy to find in the rear notch.

Recoil and Shootability

The next thing I discovered about the P365 is that it is easy and pleasant to shoot. I call it the “little gun that shoots like a big gun.” This is true of the felt recoil and muzzle rise that occurs when firing, but it is also true in how accurate the gun is and the ease with which confidence comes to hit your intended target.

While some smaller guns can be challenging to shoot at a distance or small targets, my experience with the P365 is that if you see that bright green front sight on the target and press the trigger smoothly, you WILL hit for what you aim.

With my Glock 43, it just seems I have to concentrate much more on the sight picture, and even then, it sometimes isn’t enough when shots go where I do not expect them to. My confidence with the P365 is very high, and I find myself shooting it in situations and challenging shots that I usually reserve for my larger, duty-sized guns.

Now back to the handgun’s recoil. Recoil with the P365, like its trigger, is deceptive. It is a small gun, to be sure, so I expected it to be snappy. But it FEELS less snappy than similar guns in this category. Watch this video of me running a Bill Drill with the gun (done at 3.5 yards and shooting a 2.5” group in 1.94 seconds). Pay attention to HOW FLAT the gun is in my hand:

That is some serious voodoo magic. This thing seems to shoot flatter than some of my much bigger, heavier guns. Your mileage may vary depending on how effective and tight you grip your gun, but it is still impressive.

BEFORE You Buy the SIG P365, Read This REVIEW

Capacity

Capacity is where the P365 gets the most significant amount of attention, and rightfully so. I don’t know what kind of witchcraft the engineers in Exeter, NH are employing, but for the size and thickness of the P365 to be able to fit 10 or 12 rounds into a profile that doesn’t look any bigger than an S&W Shield, it is pure witchcraft I’m telling you, pure mysticism!

The reality is that then-new Pistol Product Manager Phil Strader instructed engineers at SIG SAUER to design a new micro-compact pistol. And to start first by developing a double-stack magazine capable of holding at least 10 rounds and making it as small as possible.

The result? Three new patents just based around the magazine made the rest of the design much more easily achieved.

The gun comes with two 10-round magazines, one with a flush base plate and another with a slight pinky finger extension. Oddly enough, after shooting several hundred rounds, I came almost to prefer the flush baseplate when using the 10-round mags.

Due to the trigger guard undercut and other grip design features, I can sneak about half of my pinky onto the gun’s grip. But even if I couldn’t get a full grip on it, I never once felt compromised in shooting the gun well, unlike other competitor’s guns.

A 12-round magazine is also available, and while it extends the grip length, it is still just barely longer than some other guns with standard capacity magazines in them. The M&P Shield with a factory 8-round magazine is longer than the P365 with a 12-round magazine. Wizardry!! Harry Potter would be proud!

Even better than the capacity and the ability to remain a very concealable gun? The 12-round magazine makes the P365 feel and shoots like a different gun. It FILLS the hand, and it FEELS excellent!

The magazines are well-constructed metal-bodied, double-stack magazines. They are pretty much what to expect from SIG if you are familiar with their other mags. Excellent quality, great performing magazines, but they come at a cost. Currently, there are no aftermarket magazine options that I am aware of, so you’ll be getting your fill of extra mags direct from SIG.

Accuracy

The SIG SAUER P365 is accurate. Testing across many different loads, it exhibited outstanding groups. I am not the most skilled bullseye/target shooter (I prefer to go FAST), but the gun is accurate enough for a small defensive tool. Group sizes were consistently around 3 inches at 15 yards (I didn’t have a longer range to test with at the time).

My greatest challenge to shooting more accurately was the width of the front sight post, as it covered up much of the target from 15 yards and out. But I am confident that if you used a Ransom Rest to test inherent accuracy, I am sure the results would be excellent. One of the significant differences with this gun is the trigger. I don’t need to rehash the point, but it is a very shootable trigger; it lends itself to easy, accurate shooting.

Reported Failures

Reliability is the big “elephant in the room” part of the review. Much has been said about the reliability of the P365 in the months since its release. Several people, including some respected reviewers, have indicated that the gun may not be quite ready for prime time. They believed it was released too early, almost like a “beta version” to be tested by the gun-buying masses.

I am not sure what to make of this because my experience with several different P365’s has been quite positive.

But let’s take a look at some of the noted issues that have come up:

Return-to-Battery (RTB) Failures

In the first month or so of release, customers reported RTB failures. The issues seemed only to affect the very first guns that hit the streets. I shot a couple of different early models and didn’t have a single RTB issue, but many people did. Some of it could have been ammunition issues, but I think there were some legitimate concerns. SIG fixed this on a warranty basis for existing owners and all newly manufactured guns with a slightly stronger recoil spring assembly (RSA). To date, with the two different P365’s I have in my possession, I have not had a single RTB failure.

SIG-Lite Night Sight Failures

Some early guns were affected by faulty night sights. Again, Sig fixed this issue within a few weeks. All guns had their sights replaced, and new models shipped with the new XRAY3 Day/Night Sights, which are fantastic! (See above.) Also, there were some reports of sights coming loose in their sight channels. I’m not entirely sure just how widespread these issues were, but it seems Sig addressed it, as I have heard no new reports in some time.

Barrel and Slide Peening

Another “issue” that received quite a bit of attention was peening. The slide excessively banging into the corners of the barrel hood and its slamming between the barrel cam and locking lug caused the excessive peening. I never thought it was much of an issue. Even if peening occurred, I didn’t feel it would be a failure point several thousand rounds down the road. Apparently, SIG Sauer took some steps to address this, but either way, no one’s even talking about this issue anymore.

Trigger Return Spring Failures

Shortly after that, it was reported (and Tim at the Military Arms Channel experienced this on camera) that some guns were developing a trigger return spring failure. I’ve seen it mentioned that some owner’s springs broke, but I’m willing to bet most of the failures were instances of the spring popping out of position. This issue seems rectified, with no new reports of it in some time.

Primer/Striker Drag

There is much attention to so-called primer drag, where the striker remains in contact with the primer as the barrel begins unlocking from the slide. Some believe that this is the reason for several broken firing pins. I am a little unclear on this. The reason being that I have other guns that exhibit primer drag, and it is more common with small, striker-fired firearms. Part of the reason for this is that the slide/barrel takes on recoil before unlocking due to the shorter rearward travel. On larger guns, the slide and barrel stay locked together longer and provide more time for the striker to retract before unlocking. I have witnessed primer drag on many other smaller guns, including Glock, Smith & Wesson, and others. Although it does appear that drag marks on the P365 may be more pronounced. I presume this is why it garnered more attention.

Broken Firing Pins

There were a fair number of reported broken firing pins. Many believe that the primer drag is the culprit for causing this. I suppose it is possible, but let’s first establish that the firing pin itself is much harder than any primer. Regardless, there are plenty of documented instances of broken firing pins. According to SIG Sauer, it is unclear exactly how many of these occurred, but it is a limited number. Companies have developed and released hardened stainless steel replacement strikers as an aftermarket part for those highly concerned about this issue. However, as reports of broken firing pins have decreased substantially, it would seem that this is less and less of a problem affecting the product line. SIG Sauer has since redesigned the striker and reevaluated their manufacturing supplier due to some inconsistencies and out-of-spec hardness and tempering. Some firing pins were too brittle, and the primer drag likely did not help and instead exacerbated the problem.

BEFORE You Buy the SIG P365, Read This REVIEW

Failure-to-Lockback (FTL)

I’ve seen this mentioned, and in the case of one serious “reviewer,” he has tracked this statistic with monotonous consistency. I personally don’t believe many of these FTL’s are legitimate in that something with either the slide stop or magazine follower failed to work, causing the FTL. I think 99% of these are shooter-induced. What do I mean? Many shooters ride the slide stop with their dominant hand thumb because of its location and the gun’s small size. They may not notice it’s an issue just by looking at their grip, but I suspect due to the small, lightweight gun that the 365 is rotating, the slide stop up into their thumb. I have not experienced any FTL’s with either of my 2 guns. But I am confident when the shooter uses a properly-developed grip, they won’t have this issue. The problem is that most shooters do not have a good grip, and their lack of this has not been an issue on other guns they’ve fired. But it is exacerbated on this platform for whatever reason.

Various ejection/extraction/feeding issues

I think many of these are ammunition related especially in the case of steel and aluminum-cased cartridges. Most of the malfunctions I have seen in the P365 platform have occurred with steel/aluminum-cased ammo. People will counter with, “Well, my [X brand of gun] has no issue with shooting steel or aluminum-cased ammo!” That’s a fair point. But we cannot make the case that the gun will get us killed by not being reliable in a gunfight simply because it doesn’t like cheap ammo. We don’t carry (I hope) cheap ammo in our defensive guns anyway. I had one malfunction out of over 5K rounds fired with brass-cased ammunition, and it was a +P round (more on this in a moment). Everything else was either steel or aluminum.

A NOTE: M of the above problems appear resolved. However, even if a person were to have a problem with their gun, SIG Sauer has one of the best warranty and customer service programs in the industry. My interactions with SIG’s customer service department have been nothing but positive and professional exchanges.

At this point, I should mention that I have been testing two different P365’s. SIG promised to send me one for review, but I couldn’t wait, so I purchased one myself made in mid-February. You’ll note that this is just a few weeks after they were officially released.

The other gun finally arrived from SIG in late May and was manufactured in the first week of May. I could have contacted SIG and said, “Never mind sending the gun; I have one already.” But I was interested in getting my hands on another one made at a different time for comparison. I heard all these bad things, and I figured the more guns I could experience, the better my test data.

By the time the demo gun from SIG arrived, I had already put almost 2,000 rounds through my personal gun. I fired an additional 3,000 rounds through the two guns throughout the remainder of the summer, about half-and-half. So I ended up with about 3,400 rounds fired through my personal gun and 1,600 rounds through the evaluation gun from SIG. Some fired in pure evaluation, and quite a few in different training courses.

I tested the guns with minimal cleaning. The somewhat loose standard followed was no cleaning, and fresh lubrication applied only once every 500 rounds. You will see from images in this article that my guns are still dirty. I believe that it is much more critical that firearms are well lubricated than being perfectly clean. I’m done evaluating them, so now I will give them an extensive cleaning.

I tested both guns with a variety of ammunition brands, types, and weights over the summer:

  • Sig Sauer Elite Performance FMJ in 115, 124, and 147-grain varieties
  • Sig Sauer Elite Performance JHP in 115 and 124-grain loads
  • SIG Sauer 365 FMJ and V-Crown 115 grain
  • Federal 115 gr FMJ Aluminum
  • Federal 115 gr FMJ Brass
  • Hornady XTP 124 gr
  • G2 Research R.I.P.
  • Winchester Ranger-T 124 gr +P
  • Remington Golden Saber 124 gr +P
  • Winchester 147 gr JHP (Whitebox)
  • Federal Hydrashok 135 gr
  • Federal Hydrashok Deep 135 gr
  • Federal 150 gr HST Micro
  • Winchester Train & Defend (FMJ and JHP both)
  • Remington UMC 115 gr JHP
  • Fiocchi 115 gr FMJ
  • And a few others

Reliability

The gun ran perfectly smoothly until I started shooting the Federal aluminum-cased ammo. This stoppage happened about 200 rounds after shooting a variety of SIG Sauer FMJ loads. On the 212th shot, the Federal aluminum 115-grain case failed to extract, and a double-feed occurred. 16 shots later, the same thing happened. I made it through the remainder of the aluminum-cased ammo (about 80 rounds) without further issues.

One failure-to-feed malfunction occurred at around 700 rounds with one load of 124 grain Winchester Ranger-T +P. Considering the other 4500+ rounds of brass-cased (including several hundred nickel-plated cases and dozens and dozens of +P rounds as well) ammunition fired without trouble, I considered this a fluke. The malfunction that occurred was actually the next round in the magazine, taking a nosedive into the magazine body.

At around 1500 rounds, I fired my first steel-cased rounds through the guns. Neither one would run reliably with them. I averaged about 3 rounds per 10 or 12-round magazine that would double-feed when shooting steel-cased ammo. Talking with other P365 owners, this seems to be a hit-or-miss issue. Some report having no problem shooting the stuff; others have similar issues like mine.

I also tested the new SIG Sauer 365 FMJ and V-Crown 115 grain loads, designed and loaded to shoot and feel identical.

The point is that a person can practice more with the cheaper FMJ rounds and get the same velocity, recoil impulse, and point-of-impact/point-of-aim as the V-Crown JHP defensive loads.

These rounds have also been optimized for the shorter-barreled P365. I liked how they shot very much. I tested the 365 V-Crowns extensively, including in ballistic gelatin, and the performance was excellent. A full review of this ammunition is forthcoming.

Finally, around 2,500 rounds on my personally purchased P365, I experienced my first, legitimate brass-cased round failure. This failure was with a Federal Premium 115 grain brass-cased cartridge. It was a failure-to-extract malfunction. I have since had no other malfunctions with either of the two guns.

Overall, when shooting even just decent quality brass-cased loads, the P365 exhibited a 99.96% reliability rating.

I have spoken with numerous P365 owners, and I have personally witnessed several P365 owners fire their guns. Some of these were in handgun courses I instructed this year. I estimate that I have seen approximately 5,000-6,000 rounds fired through about 10 other P365 pistols. While I have seen a few malfunctions occur, and some seemed to experience more malfunctions than I did, including brass-cased ammunition, I can still count the TOTAL number of malfunctions witnessed in all these other guns on less than two hands. Worst-case scenario, the P365 is still 99.85%+ reliable. This represents a little more than 1 malfunction every 1,000 rounds, and I estimate about 1 in every 750.

How does this compare to other well-established firearms? My Glock 43 has had the same number of malfunctions in fewer rounds fired. I regularly witness malfunctions from a variety of semi-automatic handguns, including Glocks, Smith & Wesson M&P’s, Rugers, etc.

All guns have issues. Sometimes they are ammunition-caused, and I personally feel many shooters rationalize the malfunctions they do experience and claim that their gun is “100% reliable.” I haven’t met a 100% reliable semi-auto yet. Shoot them enough, and you will experience failures.

I personally feel that a failure rate of no more than 1 in every 500 rounds is an excellent standard. These numbers represent a 0.2% failure rate or a 99.8% reliability rate. You will see that the P365 falls above this standard.

Do I consider this good enough for personal defense, including EDC (Everyday Carry)? Yes, I do. As with any gun, you should do testing with a minimum of 500 rounds of your carry ammo.

I am sure some will disagree with my findings, but I can only speak from my own experience and data. And the data does not lie. Everything I wrote above is true. But even with some of the negativity surrounding the P365, here is what I found:

It is a freaking excellent gun!

That doesn’t mean it is without its faults or hasn’t had some growing pains for some people. But for me (and I can only speak from my own experience), the SIG P365 has been a very solid and reliable platform. So let me begin wrapping up my thoughts on this innovative platform:

The Bad

BEFORE You Buy the SIG P365, Read This REVIEW

The grip

I think the grip is too “shallow.” It is a very small gun. The width of the grip is less than an inch wide which is fine. But I think Sig could have increased the distance between the front strap and the back strap of the grip. That said, I think it feels very nice in hand. I like the contouring, the stippling, the length—there are many great aspects of the grip. I understand that it is a balancing act of building a compact and concealable gun, but that is also shootable for various shooters and hand sizes. I think they did an excellent job. But if I were king for a day, I would have stretched it out just a bit.

Failure-to-Extract Malfunctions

In my experience, this malfunction is the most common one to occur with the P365 platform. Also known as a “double-feed,” this is where the fired case fails to extract fully. The slide continues rearward, picks up the next round, and shoves it into the rear of the still-chambered empty casing.

To clear this MOAM (Mother-Of-All-Malfunctions), it requires the shooter to lock the slide to the rear, strip the magazine from the gun, rack the slide multiple times, insert a loaded magazine, rack the slide, and chamber a fresh round. In contrast to FTF (Failure-to-Fire) and stovepipe malfunctions that generally only require a Tap-Rack to clear, you can see how this double-feed malfunction can cost a shooter some time to clear it when they might not have that much time in a fight.

Due to the nature of this, it is a little concerning that WHEN the P365 experiences a failure, the double-feed malfunction occurs at a higher rate when compared to most other handgun platforms. I believe this is because of the unique design and small, ultra-compact size. My personal belief is that the gun unlocks a tad early while gas pressure is still elevated, locking the empty casing in the chamber. This results in the extractor slipping off the case’s rim, and we get our double-feed malfunction.

I only experienced this with steel and aluminum-cased ammunition, which are less “slick” than brass-cased ammunition. There may be something to it with the modulus of elasticity of steel and aluminum being substantially higher than brass which would result in steel and aluminum cases contracting after firing back down to an extractable size at a slower rate than brass. I don’t know; I’m just thinking here, which can be downright dangerous at times!

The Front Sight

While the new XRAY3 Day/Night Sights are excellent and visible, I feel the front sight is a tad wider than it needs to be. Or the rear notch could be wider. The width of the sights is basically the same as what you’d find on SIG’s full-sized guns, which when you shorten the distance between the front and rear sights, the front sight starts to fill the notch more and more. Typically for most people, having a little more light on either side of the front post in the notch is a little quicker to center and send the next shot. But this is a minor complaint because I shoot the P365 just fine.

Magazine Release

This is also a minor issue I have with the gun, and it may be specific to me, but I think the mag release could be different. The P365 has a raised mag release button which shape follows the contour of the grip. The P320’s have a flat raised button. I think a hybrid approach would have been better—flat, but have the rear of the button start flush with the grip. My issue is that because the grip is so small, occasionally, when I grip a little too firmly with my support hand, during recoil, my hand will accidentally depress the mag release. So I have had to relax my support hand grip slightly to avoid this.

In analyzing the instances where this occurred, I determined that my support hand palm makes contact with the rear portion of the button. Starting the button flush with the surface and manufacturing it to be flat would still enable positive activation when desired but would likely eliminate the accidental dropping of the mag. The grip is small enough that virtually any adult hand and thumb can reach the mag release even if designed as described above.

Things I Like About the P365

Accuracy-

For its size, the SIG Sauer P365 is accurate.

Modular Chassis Construction

While SIG Sauer does not advertise this fact, the reality is that the gun is built similarly to the P320. Both have a serialized “frame” or chassis that can easily be removed from the grip module. The potential exists for much future innovation and design improvements from both SIG and third-party aftermarket manufacturers. It is also convenient if a person wants to have two different grip modules with different accessories (such as one with a mounted FOXTROT365 weapon-mounted light) that would allow the owner to swap between other setups quickly. I recently picked up a FOXTROT365, and in my limited initial testing, I am quite impressed, and I look forward to putting it to use.

Feel of the Gun

It just feels good in my hand. The contouring and texturing are excellent. The ergonomics are good. The slide serrations are effective.

Trigger

There is no other small striker-fired handgun on the market with a trigger better than the one found on the P365. I also feel SIG was brilliant to have the trigger break at 90-degrees, in the “middle” of the stroke, instead of the rear of the trigger guard. Besides the trigger weight, smoothness, and break being good, the position at which it breaks is part of the secret as well, I think. It breaks before the finger can overwrap the trigger, causing any disturbance to the aim of the gun before it is fired.

Size and Capacity

What’s not to love about 10+1 rounds (standard) and 12+1 rounds (extended) in a micro-compact size and form? This is the first micro-compact gun that tempts me to consider if I could replace my Glock 19 or SIG P320 Compact, both 15-round capacity guns. Packing the P365 around is a cinch. It disappears on my body in either the Tac-Lab M.T.R. or GrayGuns/PHLSTER Classic holsters, and there was tons of holster support for it from the get-go.

Shootability

I come back to a statement I made earlier. It is the little gun that shoots like a much bigger gun. I LIKE shooting it!

The Verdict

I plan on sending a check to SIG Sauer in Exeter, New Hampshire, to pay them for the review gun they sent me. I like the P365 well enough that owning just one is not enough. Plus, I have plans for some fun upgrades and modifications I’d like to do to one of these guns, mainly because I want to. A tease?—think red dot and compensator as a start …

The P365 is a winner. 13 rounds in a tiny form that is easily concealed and is easy to shoot. Magic, I say.

Magically magical.

More Pics!

Links

SIG SAUER – www.sigsauer.com

GrayGuns – www.grayguns.com

Tac-Lab Holsters – www.facebook.com/TacLab2016/

Early Warning System: Campsite Perimeter Security

0

Chuck Norris doesn’t sleep. He waits. But for the regular Joe, being awakened from a deep sleep by a bump in the night can be a brown-pants-inducing experience. At least if you’re in your home, you’re familiar with your surroundings and should be able to navigate through it in complete darkness. You know the floor plan. You know all the avenues of approach. And, with a little prior planning and practice, you have an advantageous position where you can defend yourself and your loved ones from any attempted assault.

It’s one thing to be safe and secure in our homes. It’s quite another to maintain that same level of protection when we’re sleeping under the stars, far from civilization. Whether we’re enjoying all that Mother Nature has to offer on a relaxing camping trip or searching for sanctuary in the midst of a crisis evacuation, dusk brings on a whole new set of challenges when there are no walls and roof around you. How do we guard against those ominous sounds of creatures roaming the wilderness, looking for easy prey? How can we know the difference between man and animal?

Several factors should be considered when selecting an appropriate location to set up an overnight campsite, but that’s the topic for another article. For our purposes, we will assume we’ve selected a good location to make camp and have now progressed to the point of trying to establish some level of security.

Early Warning System: Campsite Perimeter Security

One of the most challenging aspects of setting up perimeter defenses is restricting access to your base camp. The feeling of freedom and open air that campers love also works against us when it comes to protecting our campsite from unwanted wanderers or outright intruders. While selecting a good location for the campsite is a critical first step, it’s only one step in the larger defense-in-depth strategy.

The next step is to create an early warning system for when someone or something approaches our location. For those who don’t have a lot of wilderness time under their belt, you’ll be shocked to find how noisy it is at night, as all manner of creatures venture out under the cover of darkness for their evening meal. Depending on the location and time of year, the noise can really be quite loud. Anything moving around at night can potentially have plenty of background noise to mask its movement. Additionally, if one is bedded down in a wooded area, one will notice that noise tends to ricochet off the trees, making it difficult to localize and pinpoint the source. Do not fall into the false mindset that any intruder wandering into the campsite will make enough noise to wake you and give you time to determine their intentions. Creating an early warning system will ensure you have some measure of advanced notice to an intruder, be they two- or four-legged.

Early Warning System: Campsite Perimeter Security

Early warning systems can be quite simple or very complex, but since most outdoorsmen take a minimalistic approach to travelling in nature, a simple security solution seems the best choice. Let’s look at three simple options for securing your campsite location.

The Old Tin-Can Trick

Early Warning System: Campsite Perimeter Security

If you’re a fan of AMC’s The Walking Dead TV show, then you’ve seen this zombie security system quite often. It doesn’t get any simpler than a length of string, a few empty soup cans, and some small rocks.

Cut an entrance and an exit hole in the can just small enough to lace through the string. Partially cut the lid just wide enough to add a few rocks inside the can, then press the lid shut. Lace the string through several cans, leaving enough string on either end to tie off the ends to make a string barrier. Make the barrier long enough to cover the width of the access path you want to secure. Tie off the ends of the barrier with enough tension to pull the system relatively tight and level across the ground.

A height of two to three feet off the ground is a good all-around height to protect against moderately sized animals and low enough that under the cover of darkness a person wandering around may not notice the alarm and set it off.

Early Warning System: Campsite Perimeter Security

Tip: If this type of setup appeals to you, consider getting a bag of marbles to use in the cans. They roll around much easier and seem to make a more audible alarm when banging around inside the cans. Additionally, a good length of strong fishing line will work better as a string than 550 paracord, and it weighs next to nothing.

The Modified Window/Door Alarm

Early Warning System: Campsite Perimeter Security

While the marble-in-a-can method might work for you minimalists, the MacGyver fans are going to want something a little more “techie” for their campsite. Fortunately, your favorite local hardware store or online shop should have just the thing: small window/door security alarms. Modifying their use for campsite security is only limited by your imagination.

Early Warning System: Campsite Perimeter Security

One simple option is to purchase a doorstop alarm. These alarms function by placing them directly behind a door. They are shaped similar to a doorstop with a ramped area that allows the door to slide over the ramp, effectively pressing the ramp down into the unit. When the ramp is depressed enough, a loud audible alarm is triggered.

A simple method for employing their use is to create a tripwire across an access path. Tie off one end of the fishing line to a tree or other secure object. String the wire across the path and tie the other end of the string off to a short length of stick. Find any object with some mass such as a small log or rock. Prop the object up with the stick, ensuring the line is taut across the path. Place the doorstop alarm under the object positioned in such a way that when the trip line is pulled, the stick is pulled out from under the object, allowing the object to fall on the doorstop, setting off the audible alarm.

Tip: Having four or five units in your pack gives you another simple but effective way to secure multiple access paths to your campsite. Piercing alarms going off simultaneously will be loud enough to scare away all but the most determined predators.

The CAPSS3 Option

Early Warning System: Campsite Perimeter Security

For those who take their campsite security a little more seriously, look no further than Brite-Strike Technologies, which offers a host of handheld and weapon-mounted lights for combative applications. Brite-Strike has also introduced several products for the perimeter alarm market.

The All Purpose Adhesive Light Strips (APALS) are basically solar-powered light sticks that provide about 40 lumens of green or red light for more than 12 hours on a single charge. Smaller than your standard smartphone, these units are lightweight alternatives to chemical light sticks and last twice as long. To provide the same amount of illumination as the APALS for one year, a user would need to purchase 730 chem light sticks at an average cost of $1,200. One APALS retails for about $20. This is quite a no-brainer for those looking for some late-night campsite illumination options that don’t include packing around 15 or 20 chem lights or battery-powered lanterns.

Early Warning System: Campsite Perimeter Security

Another innovative Brite-Strike product is the Camp Alert Perimeter Security System and Survival Signaling System (CAPSS3). The CAPSS3 is a lightweight and compact multifunction unit that offers both security and signaling capabilities for the outdoor enthusiast. The CAPSS3 unit comprises of a 135-decibel audible alarm unit that is triggered by a built-in metallic trip rod. Pulling the rod out of the recess in the unit triggers the alarm.

A small LED red dot is built into the side of the unit that acts as both a visual alarm and provides enough red light at night to read maps or other documents. A larger blue LED light is built into the unit along the length of the CAPSS3. It has the dual function of acting as a visual alarm and offering enough blue light to signal rescuers or to help mark one’s location for airborne search-and-rescue operations. A slide button is located on the face of the unit to allow the lights to be used for reading or signaling. Plus there’s a strobe function that can go off in conjunction with the audible alarm.

Early Warning System: Campsite Perimeter Security

A small key ring is attached to the triggering rod to provide several tripwire attachment options, and each CAPSS3 unit includes two 10-meter-long clear monofilament lines for use as a nearly invisible tripwire. Additionally, the unit comes with a small section of heavy-duty 3M double-sided adhesive tape for attaching the CAPSS3 unit to any surface, such as a tree or a rock. A few small nylon zip ties can also be used to stick the unit onto odd-shaped surfaces. The CAPSS3 survival signaling system has an MSRP of $40 — but wait, there’s more! Each CAPSS3 system also includes two blue APALS at no extra cost.

Tip: The unit is slightly smaller than a deck of cards and weighs only a few ounces, so pack several units in your day pack or bug-out bag. They certainly won’t hurt your back after a long day of hiking yet provide multiple points of security.

Layered Defense

Early Warning System: Campsite Perimeter Security

As you can see, each type of early warning system has pros and cons, but there are certainly more benefits than negatives. Plus, they’re all relatively affordable and easy to set up. If you’re a minimalistic prepper who needs to stay light and mobile, picking any one of these options can give you peace of mind if you’re forced away from your neighborhood and into unknown territory. For those who like to spend a lot of time with Mother Nature but take their personal security seriously (or perhaps their zombie defenses a little too seriously), you can always opt to layer your defenses by using a combination of these systems.

Because not all of us have Chuck Norris-like instincts, having some sort of reliable perimeter security system is the secret to getting a good night’s rest when sleeping under the stars. With the knowledge that you’ll be alerted if a predator — man or beast — enters your campsite, you’ll be ready for anything that goes bump in the night.

Beretta A300 Ultima Patrol Review: Move Over Remington 870?

0

At SHOT Show 2024, Beretta treated us to one of the more exciting reveals during their special range event.

The Italian firearms company rolled out the Ultima Patrol…a new 12-gauge semi-automatic shotgun with a particular set of skills.

Beretta A300 Ultima Patrol Review: Move Over Remington 870?

This black sheep of the A300 family is not into hunting or clays; it’s a tactical shotgun with modern features.

And while we had a brief encounter with it in Las Vegas, we weren’t going to leave a judgment call like this up to a first blush.

We got the A300 Ultima Patrol and practically ran to the range to test it out. So follow along as we walk through the specs, features, and performance.

Beretta A300 Ultima Patrol Review at a Glance

Pros

  • Lightweight
  • Upgraded features
  • Reliable

Cons

  • Rear QD hold

The Bottom Line

Beretta A300 Ultima Patrol Review: Move Over Remington 870?
Magpul DAKA Grid Organizer

Beretta has done a bang-up job of packing a lot of features into this tactical semi-automatic shotgun while keeping the price reasonable.

Specs & Features

Specs

  • Caliber: 12 gauge (3” chamber)
  • Choke: Mobilchoke
  • Length: 38”
  • Barrel Length: 19.1”
  • Action: Semi-auto (gas operated)
  • Weight: 7.1 lbs.
  • Capacity: 7+1
  • Comes with: cardboard box, owner’s manual, extra spacers

Features

  • Oversized controls
  • Accessory mounts
  • Enhanced loading port

Source: Beretta

Background

The Ultima Patrol is a new addition to the A300 family of shotguns which, up until now, has only offered hunting and sporting models.

Beretta A300 Ultima Patrol Review: Move Over Remington 870?

Building on the same receiver, Beretta shortened the stock and included other features more befitting a tactical gun while keeping it in that middle-ground price range.

Many will draw the obvious comparisons to the 1301 and will want to know the main differences. The 1301 is made in Italy, while the Ultima Patrol is made in Tennessee.

Beretta A300 Ultima Patrol Review: Move Over Remington 870?
Beretta 1301

In addition, the Ultima Patrol’s barrel is not cold hammer forged, but it does utilize a shorter forcing cone in conjunction with a falling lock bolt.

By contrast, the 1301 uses a longer forcing cone and rotating bolt head.

Who Is It For?

The owner’s manual states this shotgun is not recommended for hunting applications.

While birds of many a feather might rejoice at this news, who did the oldest gun manufacturer in the world have in mind for this shotgun?

Beretta A300 Ultima Patrol Review: Move Over Remington 870?

While strictly a guess on my part, I suspect Beretta is trying to take advantage of that recent lull in production of the Remington 870 — a trusted accessory to many law enforcement agencies.

Should a worthy yet affordable alternative rise up, many departments would have to consider it.

The shortened overall length and features make this gun a fighter that’s easier to handle in confined spaces. It will be right at home in its namesake role in law enforcement agencies across the U.S.

Beretta A300 Ultima Patrol Review: Move Over Remington 870?

However, those same features also make the Ultima Patrol a great option for a home defender.

The gun is pretty complete as is and could easily serve either role with minimal accessories.

Fit & Feel

The first thing I noticed about this shotgun was how light it is.

Beretta lists it at 7.1 pounds, but my scale showed it at 6 pounds, 15 ounces, with an optic added. Next was the texture on the grip and forend.

Beretta A300 Ultima Patrol Review: Move Over Remington 870?

It’s aggressive, to say the least, and made of black plastic, but does a great job staying in your hands as a result. The only minor problem was the QD mount in the stock. It wouldn’t hold a QD.

After contacting Beretta, I trimmed back a little of the plastic around the recess. This worked like a charm.

Beretta A300 Ultima Patrol Review: Move Over Remington 870?
Light sanding with a Dremel flattened the edges enough to allow the QD to seat.

The receiver of the model we tested was a very nice shade of grey with a flat finish, though there’s a black and camo model available too.

The sights are a ghost ring rear and a red fiber optic front. These were great, but I opted to use the included Picatinny rail on the top of the receiver to mount a red dot.

Beretta A300 Ultima Patrol Review: Move Over Remington 870?

I don’t often expect much from a shotgun trigger, but the Patrol’s is nice.

It broke cleanly at an average of 2 pounds 13 ounces with zero pre-travel. Reset was crisp, audible, and tactile and occurred after a couple millimeters of return travel.

The magazine tube easily accommodated seven rounds of 2 3/4” shells, but I found I was also able to ghost-load another shell on top of the lifter.

With one in the chamber, this created a total capacity of 9 shells ready to go!

How Does It Shoot?

With the relatively light weight of the Ultima Patrol, I was curious to see how it would handle recoil. The butt pad isn’t enormous but consists of a gel-like rubber that does much to mitigate the jarring blow of 12-gauge shells.

The recoil is still substantial, but the gas system and butt pad make it manageable. We shot well over 150 rounds during testing and didn’t need ice or Advil at the end of the day.

Beretta A300 Ultima Patrol Review: Move Over Remington 870?
Luckily our range day didn’t look like this

I was impressed with the speed of the gun and how quickly I was able to empty the magazine, though Beretta says the 1301 is a little faster.

It took three runs of this drill to sufficiently heat up the barrel enough where caution was required on the reload.

Beretta A300 Ultima Patrol Review: Move Over Remington 870?

Using the front sight, I experienced intuitive aiming, a comfortable cheek weld, and good eye alignment without having to adjust my head.

Later, the added height of the red dot broke my cheek weld slightly, but this was easily compensated for.

At SHOT Show, Beretta reps revealed to us that the Ultima Patrol was optimized for use with Federal’s Flitecontrol buckshot. They kindly sent along some for us to use during testing.

Beretta A300 Ultima Patrol Review: Move Over Remington 870?

There is often a misconception about how much spread you get with shotgun pellets.

I patterned the Ultima Patrol at 10, 15, and 20 yards with Federal’s ammo and was impressed with the tightness of the groups.

Beretta A300 Ultima Patrol Review: Move Over Remington 870?

Starting at 10 yards, the group of nine pellets was around 3 inches. Even at 20 yards, the pellets were spread over a group of only 7 inches.

With time and practice, a shooter could get comfortable making some shots requiring accuracy using this shotgun and ammo combo.

Beretta A300 Ultima Patrol Review: Move Over Remington 870?

Another key point was loading. I’m no quad loader (yet), but I still enjoyed the work Beretta clearly put into the loading port, widening it and chamfering the edges.

With the right angle used, I didn’t catch my thumb on the lifter when stuffing shells, and I really appreciated that.

The included adhesive hook-and-loop strip was a welcome addition, and I stuck on some shell carriers to affect my reloads.

Beretta A300 Ultima Patrol Review: Move Over Remington 870?

What Sets it Apart?

This is a tactical shotgun option that is feature-packed and has Beretta legacy but is made here in America for a price that’s mid-ranged. It’s not the 1301, but pretty darn close for several hundred dollars less.

A300 Ultima Patrol1301 TacticalOverall LengthBarrel LengthWeightGaugeMSRP
Beretta A300 Ultima Patrol vs. 1301 Tactical

By the Numbers

Reliability: 5/5

We ran around 150 shells through the Patrol, a variety of sizes and brands. Everything fed, fired, and ejected with perfect reliability.

Ergonomics: 4/5

The ergonomics on the Patrol are extremely sound. There currently isn’t an option for a pistol grip stock.

Accuracy: 4/5

We experienced good accuracy when testing the Patrol, particularly with the Flitecontrol ammunition.

Customization: 3/5

The M-LOK slits, pic rail, and QD ports are welcome additions you can use to add the accessories you like. In addition, the Patrol comes in black, gray, and tiger stripe camo.

Value: 4/5

With all the features in the Ultima Patrol and the mid-range price, it’s a compelling value and worth considering in lieu of the vaunted 1301.

Overall: 4/5

Upgrades for A300 Ultima Patrol

For testing purposes, we utilized the Bushnell RXS-250, and it handled the 12-gauge recoil from beginning to end without faltering.

This budget option was easily bright enough to see in direct sunlight, so bright in fact that it distorts a tiny bit on the highest setting.

Beretta A300 Ultima Patrol Review: Move Over Remington 870?

Despite this minor issue, the dot was still very usable, with its 4 MOA dot offering 10 total brightness settings in an aluminum frame featuring multi-coated glass.

Final Verdict

Beretta is serving up a solid value in the A300 Ultima Patrol, offering a package not found on comparable guns at this price point.

Beretta A300 Ultima Patrol Review: Move Over Remington 870?

Law enforcement administrators looking to outfit all their units will love the mileage they get with their budgets, and officers will enjoy the reliability and feature set.

The rest of us stand to benefit, too — by having access to a highly functioning, pedigreed, home defender made right here in America.

What’s your gut reaction to the A300 Ultima Patrol? Let us know in the comments below. Be sure to check out our top picks in 10 Best Home-Defense Tactical Shotguns [Hands-On]!

Understanding Bird Dog Field Terminology and Commands

0

Bird hunting and dog training are full of terminology and words that new hunters need to learn.

To walk the walk, bird hunters need to first learn to talk the talk. Deciphering the various terminology of the pointing dog world can be confusing. Dog training verbiage is not universal. It can vary regionally, and the dogs you are running or the program you are following may have their own verbiage, too.

Listen to more articles on Apple | Google | Spotify | Audible

When I picked up my first Deutsch Kurzhaar (DK) pup, I was greeted with a long list of required breed tests. I found myself swimming in alphabet soup in short order. I remember being told I had to run my DK in a young dog test called the Derby. When I asked how the testing system worked, the answer was a series of acronyms that ended up sounding like the teacher in Peanuts: “Wha, wha, whawa, wha.” With an overwhelming blank stare and a grin, I knew I had work to do.

Similar to learning a foreign language, there is a lot to learn when it comes to the linguistics behind training hunting dogs. Like the English language, there are many variations of saying the same thing. In this article, I will help provide you with some understanding of some of the more universally accepted terminologies we use in the field.

Bird Dog Field Terminology

Here is a glossary of terms often referred to during a hunt in the field.

  • Back Casting – Backcasting is when a dog hunts behind the handler. Dogs are primarily expected to remain in front of its handler.
  • Backing – Backing is when another dog stops and visually points to another dog’s point without the aid of scent. The backing dog should stop at first sight and remain in place through the steadiness process.
  • Biddability – A biddable dog is ready for learning with a balanced temperament and can learn very quickly.
  • Blind Retrieve – A blind retrieve is a retrieve made without the dog visually seeing the game or bumper.
  • Blinking – Blinking is when a dog overtly refuses to complete a task. Though most commonly associated with blinking birds, dogs can also blink for other tasks such as retrieving or backing another dog.
  • Brace – A brace is hunting multiple dogs together in the field at once.
  • Breaking – The act of breaking means coming off or leaving, such as breaking point to locate or capture game. As well as breaking from the blind meaning leaving the blind prior to being sent for the retrieve.
  • Breaking Cover – The dog’s willingness to leave easy terrain to search heavier thickets or brambles to locate game.
  • Bumper / Dummy – A bumper or retrieving dummies are types of retriever training equipment used to teach retrieving. A bumper comes is many shapes, sizes, weights, and colors. They can be thrown from a string or shot from a launcher. They can mimic the shape and size of real game such as the Dokken retriever training equipment.
  • Cooperation – Cooperation is the dogs want to comply and work as a team player with its handler.
  • Covert/Cover – It’s the likely areas where game can be found.
  • Creeping – Creeping also known as cat walking is the act of slowly walking into birds before or after establishing a point. Dogs that creep often do so to get deeper into the scent cone potentially flushing a wary bird.
  • Crittering – Crittering is sometimes used to describe a dog that is hunting “off target” game species such as deer, song birds, skunks, or porcupine.
  • Delayed Chase – Delayed chase is when a dog is told to leave a bird and move up ahead though instead, the dog chooses to re-engage the chase.
  • Desire – A dog with great desire has the passion and drive to get away from its handler to locate game. It’s the internal drive or fire that fuels all aspects of the hunt from the want to point, search, or desire to retrieve.
  • False Pointing / Unproductive Pointing – A false point or unproductive point is when a dog points old scent and doesn’t realize the bird is no longer there.
  • Flushing Dog – A flushing dog is characterized by hunting within gun range at all times and will put the bird in the air for close shooting opportunities. It can hunt both on land and in the water.
  • Give/Drop/Release – These are commands telling a dog to relinquish the item it’s retrieving item into the hand of its handler.
  • Gun shy – A gun-shy dog is so fearful of the sound of a gunshot that it paralyzes them in fear and can no longer be hunted at that time, or ever again depending on the severity.
  • Gun-sensitive – A gun-sensitive dog can recover from its fear of the shot and continues to hunt.
  • Hacking – Hacking is when a handler over-commands their dog to maintain control
  • Honoring – Honoring is the act of showing interest yet not interfering with another dog’s work be it pointing or retrieving.
  • Hold – Hold is a command telling a dog not to drop game or retrieving dummy/bumper.
  • Long Nose – Describes a dog’s ability to scent birds at a great distance.
  • Making Game – Making game describes when a dog is working scent to locate a bird.
  • Marker Words – Words used to identify good and bad behaviors. Yes is a word commonly used to identify behavior we want to see more of and Bad or negative tone or noise to mark behaviors we want to see less of. The word No is commonly used however it’s not a good marker word as it sounds too much like whoa.
  • Mouthing Birds – The unsavory act of playing with, breaking bones, and putting holes in the meat potentially making game unfit for the table.
  • Marking -To mark is when the dog makes a visual connection to a bird or bumper that is in the air as well as on land or in the water.
  • Nose Work – Describes a dog’s ability to use scent to locate game.
  • Obedience – Obedience is the dog’s ability to quickly follow commands without hesitation.
  • Passive Disobedient – A passive disobedient dog uses submissive acts such as cowering and rolling over as a way to avoid training pressure.
  • Parading – Parading refers to the selfish act of swinging out and/or past the handler before returning to its handler for the finished retrieve.
  • Pointing – Pointing is defined as an intense, convincing, unmistakable, and in the end productive stationary positioning of a dog in the presence of game.
  • Poison Bird – A retrieving exercise where a handler asks a dog to ignore a marked “poison” bird, then requires the dog to follow a separate set of retrieving tasks.
  • Popping – When asked to search or retrieve and the dog hesitates to require additional commands to comply often associated with trust issues. Often seen at the release for a retrieve and just before the finish of a retrieve.
  • Productive – Describes a dog that finds many birds in its search.
  • Purpose – The desirable trait of showing a purpose to find game in the dog’s search. Alternatively, a dog lacking in purpose runs the field as if being taken on its daily walk.
  • Pushing out / Nosing out the bird – The act of using its nose to push up the bird into flight. Often seen in the early steadiness work of developmental dogs or dogs that know they are not allowed to catch the bird.
  • Quartering – Quartering is a windshield wiper-type pattern out in front of a dog’s handler maximizing the potential of finding game by leaving little area untouched by the dog.
  • Recall – Recall is the trained finished position of a dog that is asked to come to you. It can be in your general vicinity, at the immediate front, or directly to the handler’s side. Preferably, the dog would be at the non-gun side so as to not be under the gun.
  • Regrip – The act of putting the bird down (without the mouth leaving the bird) so that the dog can more easily return the bird to its handler. It’s generally accepted that a dog can put down a bird to get a better grip as long as it’s not playing with the bird.
  • Relocate – The act of a dog’s ability to relocate running birds or short-flighted birds to a re-establishing point, providing another opportunity to kill the bird.
  • Roading or Riding In On Birds – When a dog locates the scent of a bird and encroaches upon it in an attempt to get as close as possible.
  • Self-Hunting – Dogs that are self-hunters will be selfish in their hunting style. This includes trying to catch birds on their own, refusing to listen to commands, and running for the hills. These types of dogs are of little use for the on-foot hunter.
  • Self Release – The dog releases from its position prior to being commanded to do so.
  • Soft – Soft is a description given to a dog that struggles to handle light training pressures and becomes fearful and submissive.
  • Started Dog – A developmental dog that has begun its steadiness process and has an obedience foundation under it.
  • Staunching Up Your Dog – Staunching up your dog is the act of supporting a pointing dog by stroking its tail, back, and shoulders to send a message of encouragement and teamwork between the dog and its handler.
  • Steady – A dog can be steady, staunch, or broke, meaning it will remain frozen in place until commanded to move. No matter the number of shots that go off, or the direction the bird flies, the dog’s feet remain planted on the ground.
  • Stealing A Point – Stealing a point is when a dog points ahead of another dog already established on point to compete for the bird.
  • Stop to Flush – When a dog stops when a target game bird flies.
  • Taking A Line – Taking a line is asking the dog to run a straight line towards an undisclosed objective until commanded to stop or until reaching its retrieving objective.
  • Takeout – A dog that chooses to attempt to capture the game on its own is ripping birds, pushing them out, nosing them up, self-released, or taking the bird out.
  • Trash Breaking – Originating from training your dog to leave trash alone in your home, trash breaking describes the training involved to keep a dog from chasing off game species such as deer, porcupine, skunks, or snakes.
  • Underfoot / Boot Licking – Underfoot or bootlicking is the act of hunting so tight to the handler that it is of little to use as a productive hunting companion.
  • Upland Hunting – Upland hunting is an American term describing the hunting of various game birds such as grouse, quail, woodcock, and pheasants.
  • Versatile Hunting Dog – A versatile hunting dog is a dog that can hunt many game species both on land and in water.
  • Wild Flush – A wild flush is when a bird takes flight when a dog approaches the bird without an opportunity to acknowledge the scent of the bird.
  • Zones of Fire – Zones of fire are used when multiple hunters gather around a pointing dog. Each gunner restricts their shooting to their zone of fire for safety reasons.

Bird Dog Field Commands

Each handler will need their own set of field commands. They are highly customizable and can be individually specific to each handler. Commands need to be easily understood by the dog; they’re usually either one or two words. It’s important to only use commands when needed and keep the list to only essential commands.

READ: How to Correctly Command Your Dog

Here are some commonly used field commands:

  • Back – The command back means to turn and take a straight line 180 degrees away from you.
  • Come/Here – This is the recall command from a stationary handler asking a dog to come to you and to finish at a specific place usually to your front or side. The come or here whistle command is traditionally two quick and short blasts or multiple short blasts in succession from a pea-less end of a two tone whistle. However, many prefer a single tone whistles for all commands.
  • Come Around – Come around is a command given to a dog as you are moving. It commands the dog to check back or check in with its handler with the requirement to finish.
  • Down – Down is a command to lay down and not to move. It has many hunting and home-living applications.
  • Fetch – Fetch is the release command given to go and retrieve a marked retrieve of a bumper or game.
  • Heel – The heel command tells the dog to come with you at your side. The dog’s front feet align with yours and remain close to your side, no further than a body width from you. The dog should also not touch your leg.
  • Kennel / Crate – The command given for the dog to go into its crate. No matter if it’s in your truck, backyard, or a kennel in your home, a dog should easily go to its crate on command.
  • Leave It – Leave it is another command with many applications. Leave the skunk, porcupine, grass, or feces alone, and don’t go back.
  • Mark – The mark command tells a dog to look ahead for a visual cue to assist in its retrieve.
  • Over – Over is a retrieving command asking a dog to take a 90-degree line right or left and remain on that line until the retrieving item is either found or another command is given.
  • Place – Place is a command telling the dog to go sit or stand at a location commonly identified by a blind mat or place board.
  • Turn Commands – Some handlers like to use a turn command in the field to control their dog’s search pattern. This can be one quick blast with a change of direction from the handler or a hand signal pointing in the direction for the dog to follow.
  • Up Front – Commands the dog to move ahead of you in its search.
  • Release Commands – A release command tells a dog that its work is done and it is free to make its own choices. Ideally, it’s a command not commonly used in normal conversation. Free, break, or release are common examples of a release command. However, using the word “okay” as a release command is a mistake many new handlers make as it’s often used in conversation, resulting in the inadvertent release of the dog.
  • Sit – The sit command asks a dog to plant its hind end on the ground.
  • Stay – The stay command lets the dog know you will be moving away from it and it must remain in place.
  • Whoa – Whoa is the command to stop or sit and not to move. Commonly, it’s one long blast of the pea side of a two-tone whistle. That being said, handlers successfully use all kinds of whistles.

It’s important to follow a consistent set of commands from early on in your dog’s development. Oftentimes, handlers will attempt to have more of a dialogue in the field which tends to confuse the dog. Your dog studies you incredibly hard each and every day to become masterful at following your commands. We can encourage clarity by doing our part in keeping to the script. In doing so, you will find a far more responsive dog who accurately follows each and every command.

Training and Troubleshooting the Recall Command with Dogs

The Importance of Training Steadiness in Bird Dogs

How to Correctly Command Your Dog

Thinking About Dog Commands to Avoid Confusion in Training

Best Air Rifle Deals

Popular Posts

How Far Can a .22 Air Rifle Pellet Travel?

0
"Unveiling the Power: Exploring the Distance Capabilities of a 22 Air Rifle Pellet. Discover the fascinating journey of a 22 air rifle pellet as...

Air Gun 101: How many types of Air Gun Sights are there and which...

0
The former American president, Joe Biden, was recently quoted saying: If you need more than ten rounds to hunt, you better stop that business and...

Guide to find Best Scope for Break Barrel Air Rifles

0
"Unlock the Perfect Shot: Discover the Best Scope for Break Barrel Air Rifles. Enhance your shooting experience with precision and accuracy, as we delve...

How to make a break barrel air rifle more powerful

0
"Unleash the Power: Mastering Break Barrel Air Rifles for Maximum Performance. Discover expert tips and techniques to enhance the power and precision of your...

Can a 22 air rifle kill a deer?

0
"Debate over whether a 22 air rifle can effectively take down a deer has sparked curiosity among hunting enthusiasts. With its lower muzzle velocity...