Home Blog Page 94

Mugolio: Pine Cone Syrup

0

Mugolio, a dark, aromatic syrup imbued with the flavor of pine cones, is the poster child for the kind of crazy cool, Illuminati-esque foodstuff foragers have access to, all for the price of a hike, or even less, depending on how close you are to some pine trees.

The syrup came on my radar when my friend Dan Farmer gave me a little jar of some he made to try. I remember it being good, but I forgot about it until I opened the Salt Cellar, and started making my own from spruce tips, which is excellent, but not quite the same as pine cone syrup (for the record both are great).

Mugolio is now still a bit of a chef secret, and available through elite specialty distributors, but the price is staggeringly high, exorbitant even, when you consider you can make nearly the exact same thing at home, for less than it costs to make a cake.

A chef secret that takes months to make

The cost of mugolio is not found in ingredients, but is paid in time. How much time is certainly up for debate, and you’ll notice my recipe turns around a lot quicker than burying a jar of pine cones and sugar in the yard and digging it up the next year (an actual recipe from Romania). You’ll want to wait at least a month for a good pine syrup, although aging it longer can be fun.

Mugolio: more than just pine cones

Real quick, some reality. I use the word mugolio interchangeably for syrups made from numerous tree parts, if you look around you’ll see mugolio usually refers to a syrup made from the young cones of mugo pine (Pinus mugo), harvested at a specific time of year, under the strictest of conditions, blah, blah, blah.

I’ve made all kinds of similar sugar based products from all kinds of conifer parts, and it isn’t some difficult, arcane thing you can only do in the light of a full moon— just the opposite.

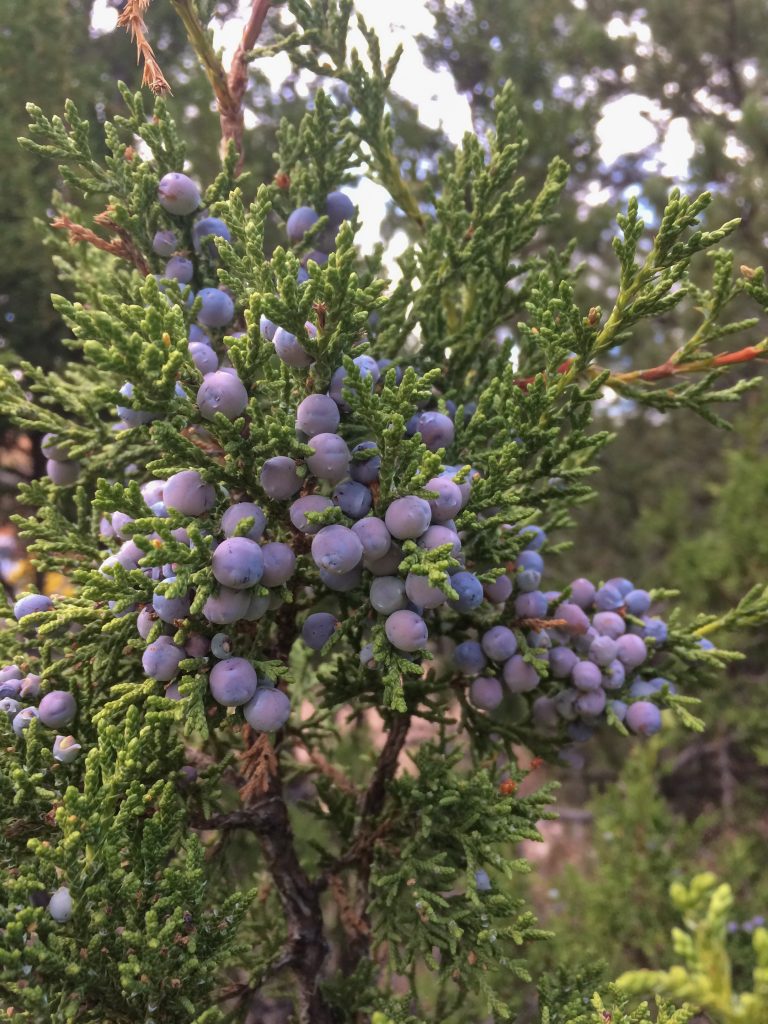
Making mugolio is easy, and there’s a very forgiving time window for harvesting cones, or other things products like cedar cones, wintergreen, juniper, or spruce tips. All of the aforementioned making excellent syrups in their own right.

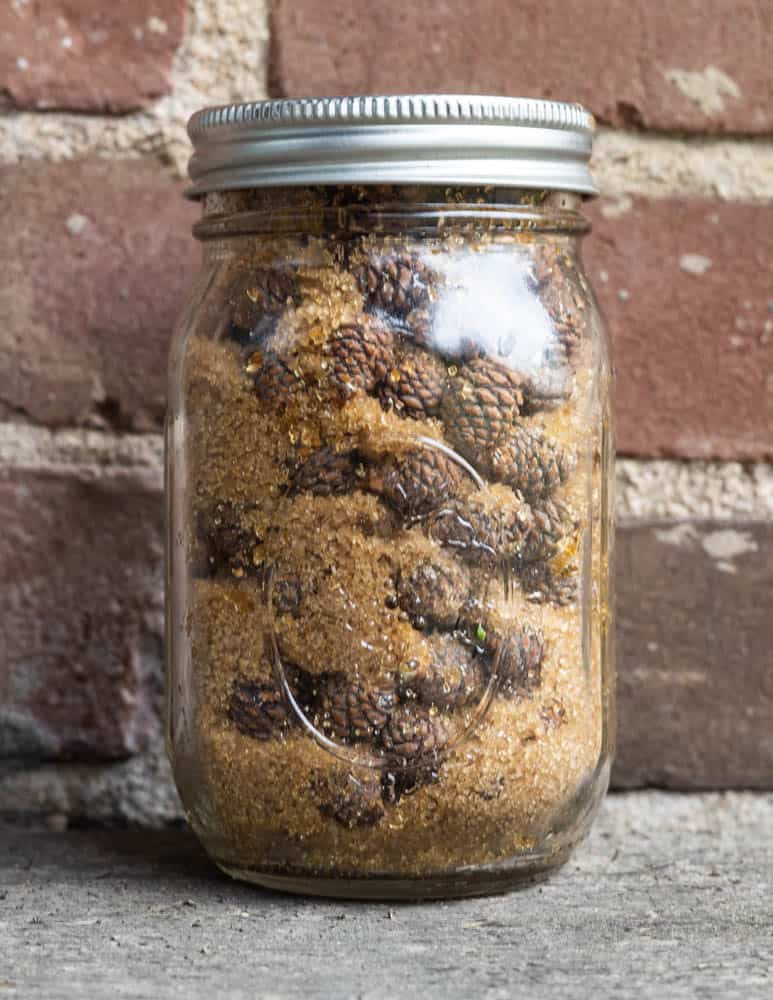
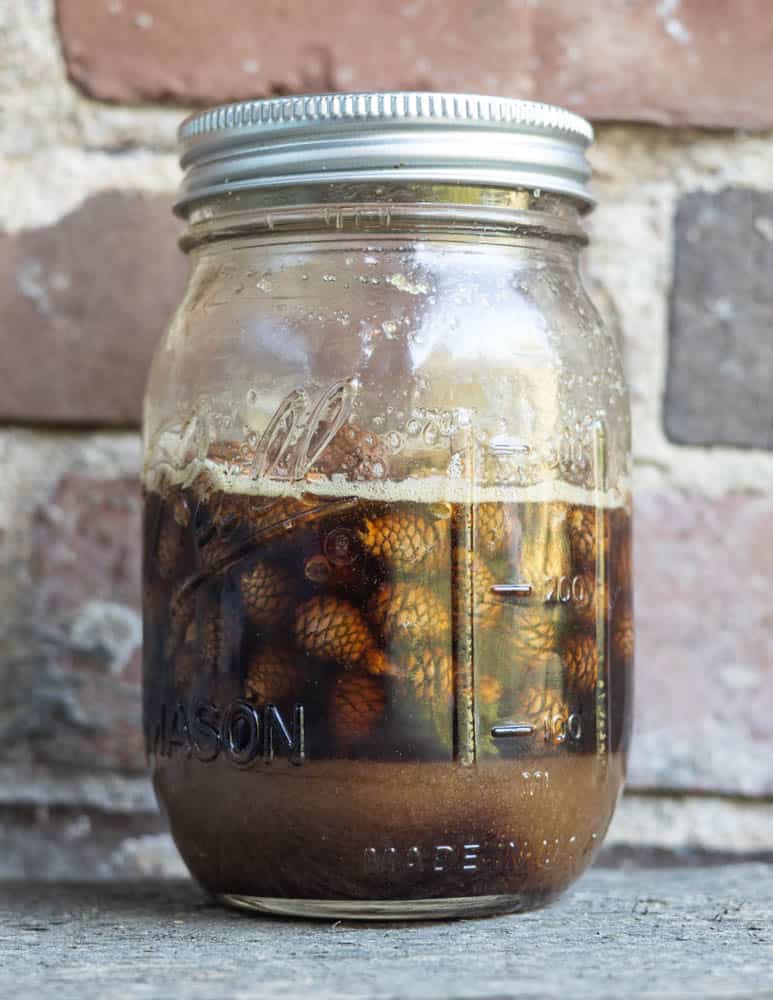
There’s something special about the pine cone syrup though. Pine cones hold more water than any other thing I’ve used, and they also ferment during the maceration process, vigorously.

The day after you combine the pine cones and sugar, there will look as if there was a rush and release of water—what was once a solid packed jar of pine cones and sugar is not 75 % full and liquid.

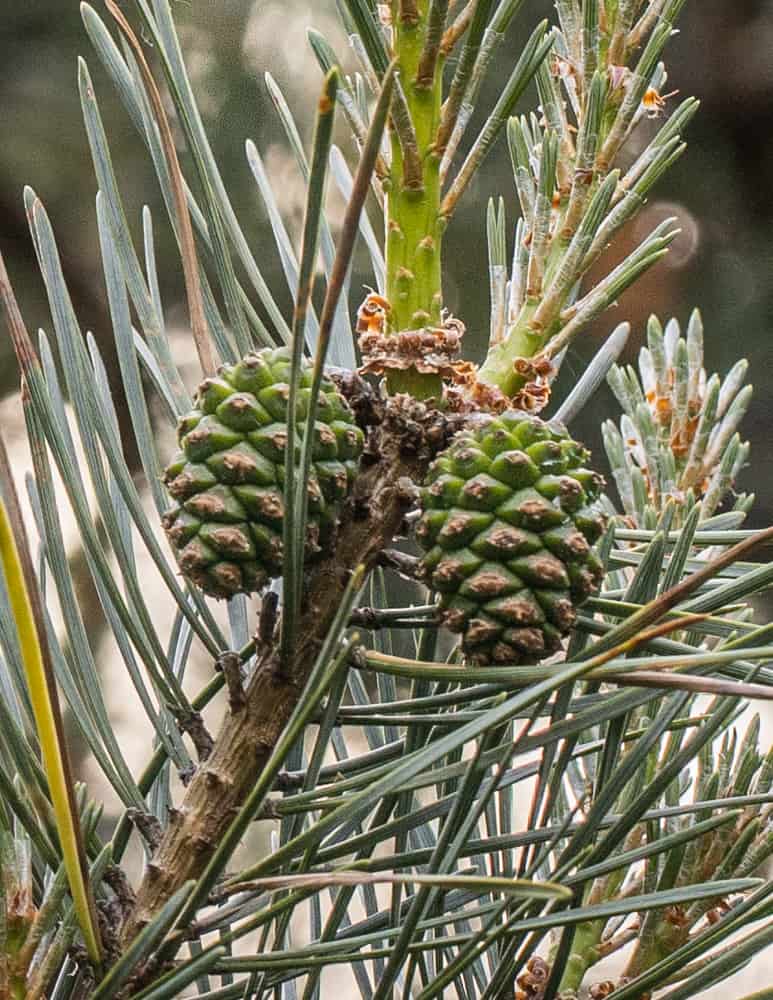
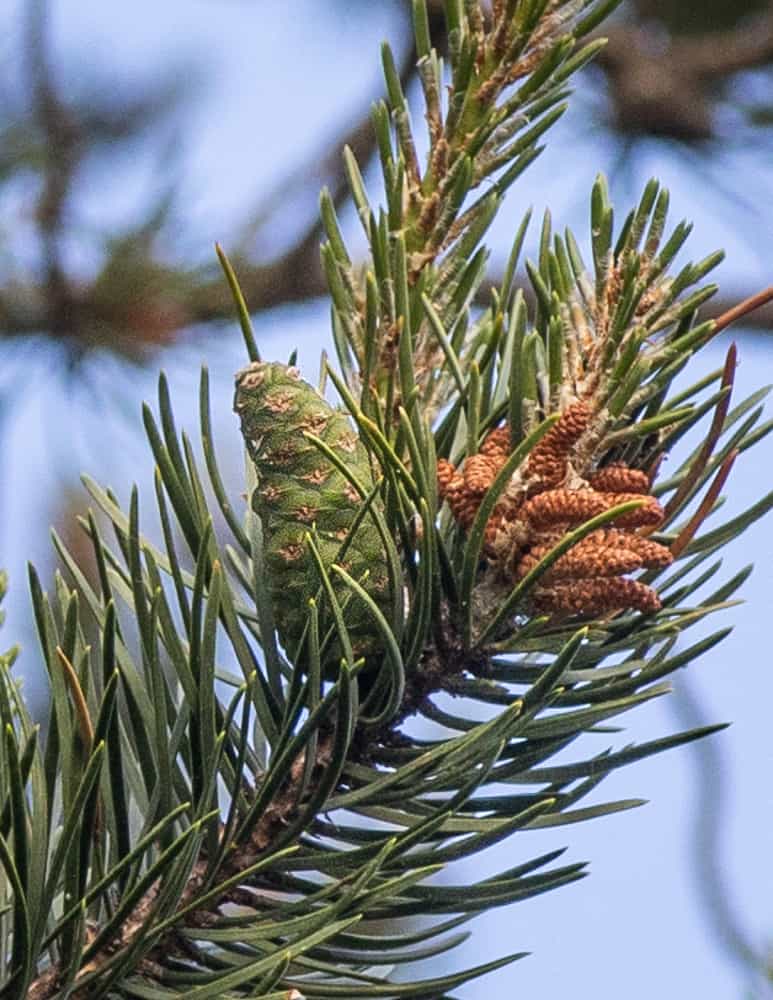
Species of unripe pine cones I’ve used to make syrup

Balsam fir cones for making pine cone syrup
Spruce cones for making pine cone syrup
Norway spruce cones for mugolio
Green black pine cones or Pinus nigra for pine cone syrup
Jack pine cones for making pine cone syrup
Unripe red pine cones for pine cone syrup

Variation in flavor between species

One of the most fascinating things about mugolio is that every species of tree you harvest unripe cones from will impart a noticeably different flavor unique to the finished product.

Once I started to notice the different flavors, I made a point out of trying to “mugolio” as many different species of unripe coniferous cone I can, and I found some fascinating things. Here’s a quick breakdown of the differences between flavors I taste.

Pinus/Pines

Mugolio made from pinus cones have a resinous, assertive taste.

Picea/Spruces

Spruces lack the aggressive resinous flavor of pines and are the most subtle of all I’ve tasted. Instead of the resinous taste, spruce cones, just like spruce tips, have a citrusy note to them, and so will syrups made from their cones.

Thuja and likely others/Cedars

The only cedar I’ve made mugolio with is the green cones Thuja occidentalis, since they’re easy to find in landscaping. It has a taste exactly like the aroma of fresh green cedar, a bit in between spruce and pine mugolios.

Abies/Firs

Of all the syrups here, and all the different flavors, the syrups I’ve made from balsam fir are the most delicious.

Firs have a resinous punch like pine mugolios, but it’s slightly less aggressive, and most noticeably, comes with strong notes of warm spices like cloves, allspice, and cinnamon.

Unfortunately, mature balsam fir trees, at least around me, seem to only want to grow cones at the very top of the tree, which can make getting enough for a batch of syrup tricky.

Using other conifer products

Other tree products like spruce tips, pine tips and cedar cones I’ve worked with are more dry, and may not ferment during the maceration process, but they can still make a fine syrup.

The point is: you can make syrups like this out of all kinds of things, and everyone I’ve had has been good. If you have spruce trees near you, take a look at the basic spruce tip syrup too, which is nearly the same, sans the fermentation. Here’s a few things I’ve used:

  • Unripe eastern white cedar cones (Thuja occidentalis. This could can be an abortifacient in high doses)
  • Juniper berries (Juniperis virginiana)
  • Spruce tips (many species)

The best part is figuring out how to use it. Somethings take some experimentation, mugolio not so much.

You can literally put it on just about anything where maple syrup would be good, and you’ll be glad you did. The syrup has the essence of pine, but with none of the strong tannins you’d expect If you took a bite out of a pine cone—just pure piney goodness.

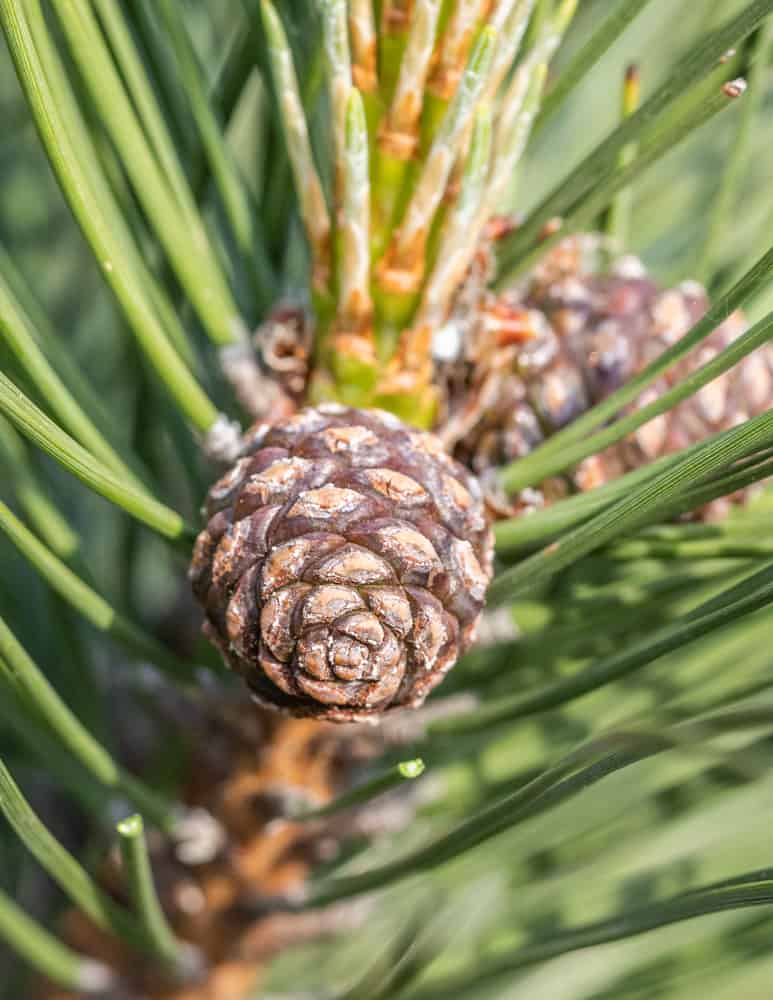
Harvest young pine cones in spring or early summer

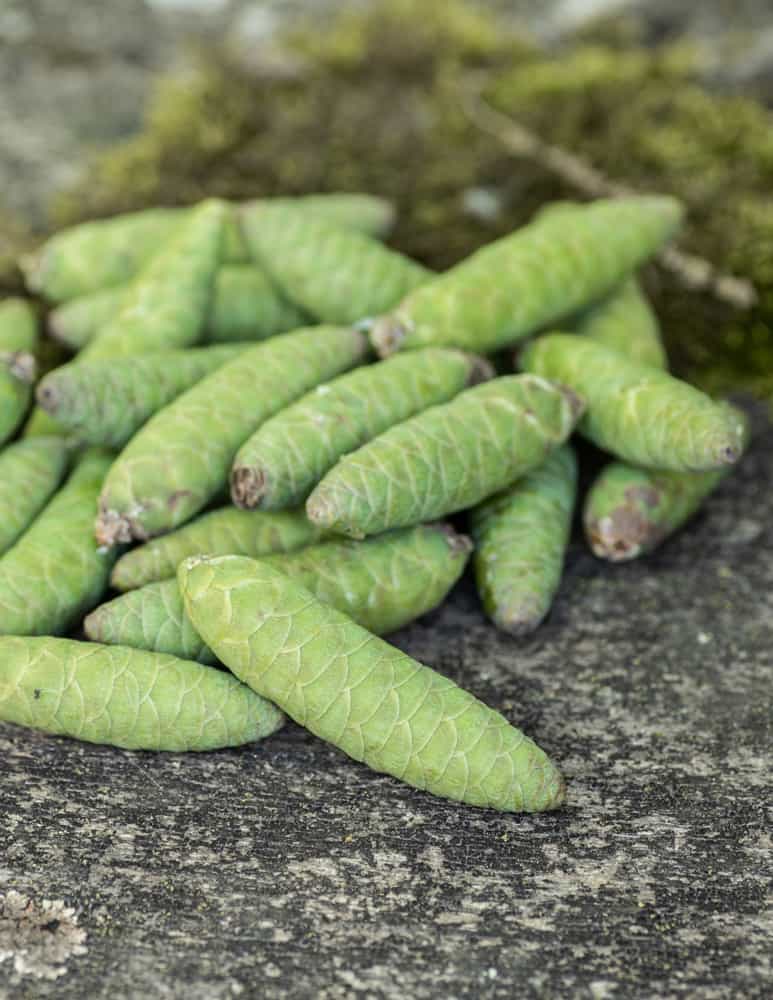
Most importantly, you are looking for unripe pine cones in the spring and early summer, not the fall, not the winter. Opened cones are not to be used.

This is up for debate, but my favorite comes from green cones as they contain more water. Purists might say that you need to harvest pine cones when they’re the size of a pinky nail, or some other arbitrary size.

I can tell you after making this for years now, that any of the pine cones pictured in the image above will make a fine syrup, but smaller cones will make a syrup with a much stronger flavor, strong enough that some people may not like it.

Another good rule of thumb I’ve found is that whatever cone you’re picking will probably be sticky and exuding resinous, sticky liquid at a prime stage for making pine cone syrup.

Making fermented foraged pine cone syrup or mugolio

Green cone=higher water content

Larger green cones hold more water in them which makes syrup making much easier, and also allows for some fermentation in the process, which adds fun flavors.

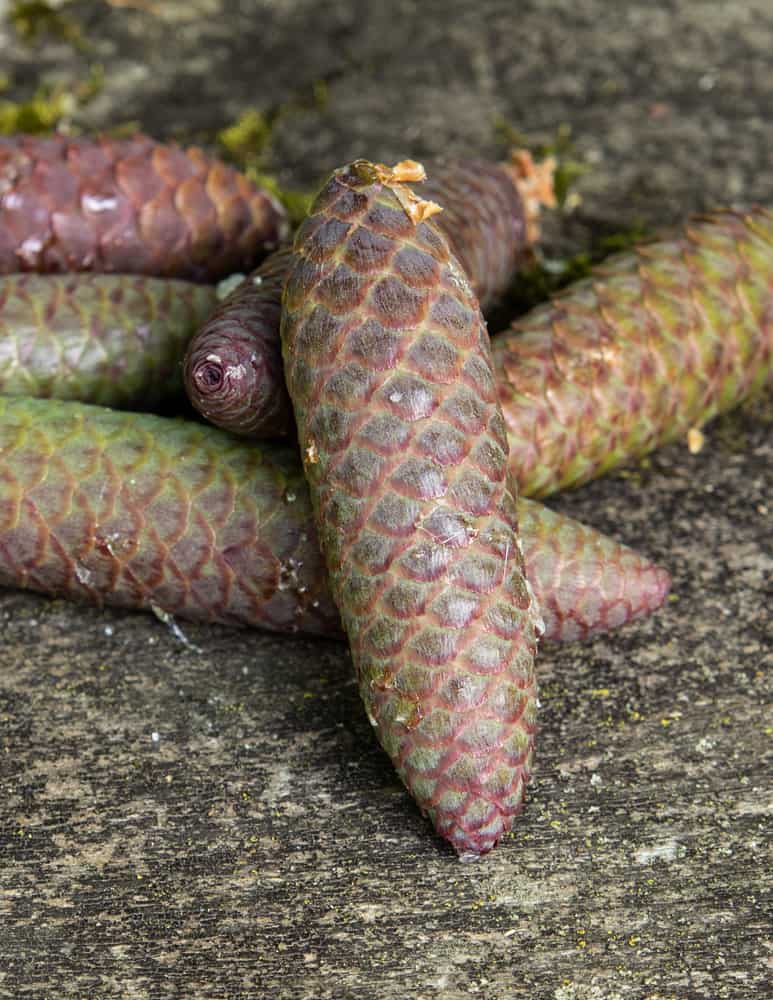
As long as the cones are meristematic and tender, and can be cut through with a knife, even if it’s into pieces with long cones like white spruce or balsam fir, they will make a good mugolio. The only cones that won’t work, are mature, tough, barky cones, like those you’d see on the ground.

Using very young pine cones

You can use young pine cones, but they’re smaller and don’t hold as much water as cones that are green, so they’re not ideal here.

If you really want to try with very young pine cones, try chopping them up medium to make it so more cones can be fit in a jar, which means more water, meaning an easier syrup. You can also add a splash of water to help it on it’s way.

Is it safe?

Yes, this is absolutely, positively safe, and there’s no need to worry about botulism. I can’t speak to the exact science of spruce tip and cedar cones syrups, (also safe) but pine cone syrup is especially safe as it ferments as it macerates, due to the higher water content of the cones if harvested at the green stage.

The extended fermentation lowers the pH, making it shelf stable. Remember that sugar is a preservative, and conifer products are all naturally acidic, which is a preservative in itself.

Consider using gloves

The most prime pine and spruce cones for making syrup will be plump, but still unripe. At this stage, most of them will be very sticky and oozing a sappy resinous substance that will quickly coat your hands and will stay for hours. Consider wearing gloves to avoid sticky hand syndrome.

Choosing the right sugar

Some recipes might call for white sugar, and while it will work and give you a flavored syrup, white sugar is more dry, and I find the clear color far less attractive than the caramel color that organic, unrefined turbinado-style sugar or even light brown sugar or a similar substitute will give.

I try to avoid using plain white sugar when I can, and I highly doubt that original mugolio recipes used such highly refined products when the first adventurous people crafted them.

Use a good sugar that you can feel good about eating, and drizzling over everything, because you’ll want to drizzle it, on, well, everything. Here’s a list of sugars that will work

Turbinado

Turbinado is slightly more dry than commercial brown sugars, but it has an excellent flavor.

Light, golden, or dark brown sugar

These are some of the most versatile and affordable, but I suggest using a high quality organic brand. The varying molasses content of the different colors of sugar is negligible in regards to the flavor of the finished syrup.

Maple sugar

Maple sugar is the most expensive you could use, and in my opinion is not the most ideal as it’s prone to crystallization from my experience. It is delicious though. If you’d like to harness the flavor of maple with your pine cones, you can just toss pine cones into maple syrup at a ratio of 1 cup of pine cones to 1 lb (2 cups) of maple syrup.

Zirbenshnaps

This stuff is unique enough that it needs a special mention. Zirbenschnaps is a liquor made with pine cones.

I’m not an expert on distillation by any means, but I’ve been working with a distillery to make similar products, and one thing we’ve been toying around with is making a rendition of it by simply using it as the sweetener in a macerated liquor.

The traditional zirbenshnaps has a red tone to its color, which makes me think they’re using a syrup made from fresh pine cones cooked immediately—not aged.

I know there’s also birch schnaps, and that’s made with reduced birch syrup, so I think using mugolio would be fine. Currently I know zirbenshnaps is only sold at ultra high-end restaurants in my area.

Whatever you make with it, it’s one of the most fascinating and delicious condiments made from wild ingredients I know of.

Making Large Batches

I occasionally make very large batches of syrup, 2 or 3 gallons at a time. Here’s a few tips on doing that if it’s something you’re interested in, especially as this is such a fun (also cheap) and interesting thing to give as gifts. The tips below are intended for those people making 1 gallon batches and up at a time.

Skimming the foam

Similar to maple syrup, when you cook large quantities of the syrup, it will begin to froth and foam at the top and will double in size quickly.

Some cones seem to create more foam than others, especially Norway Spruce. When you notice foam during the cooking process, do your best to skim it off with a spoon and discard.

After you bring the syrup to a simmer and strain, put it back in the pot and bring it to a simmer again, let it rest for a minute or two so the syrup can settle and return to it’s original volume. If you don’t do this, you run the risk of having jars that are half full after settling.

Canning for long-term storage

Pour the piping hot syrup into large jars, or, for smaller ones, pour the syrup into a pitcher with a spout, and pour directly into canning jars (4 oz mason jars make a great gift). Fill the jars nearly to the brim, leaving about ⅛ inch headspace, then, working quickly, screw on the lids tight and turn the jars upside down.

You don’t have to water bath-process this as it’s basically the same sugar concentration as maple syrup, just make sure your jars are clean. The jars will seal naturally but should be refrigerated after opening.

Here’s a few ideas for using it, and a few things yet on my list to try.

Ideas for using

  • Drizzled on pancakes, crepes waffles and other things primed for syrup.
  • Use it to flavor whipped cream
  • Excellent drizzled over soft cheese like mascarpone, labneh, chevre, etc.
  • Drizzled over fresh fruit
  • Using in place of honey, I love drizzling it over bowls of warm buttered wild rice with nuts, fruit, and yogurt for breakfast.
  • It’s good in desserts, added in small amounts like you would use honey. Dairy based desserts like ice cream, panna cotta and custards of all kinds can just be seasoned to taste with it.
  • Try adding small drizzles to salads, or whisking into vinaigrettes.
  • Mixing it with a splash of vinegar just to loosen it a bit makes a good brush on or glaze for hams, etc.
  • One of my friends adds it to whiskey

Essential Stalking and Still-Hunting Skills

0

All day I’d shadowed the herd, waiting for the right opportunity to close in for a shot. There were about 40 cow elk in the herd and five bulls, each big enough to drop the string on, should one wander within range of my longbow. I began my day still-hunting along the petering-out ends of a series of ridges and into a three-month-old burn, where I found an unlikely herd of elk bugling their way through blackened tree trunks and brush stubble. I followed them out of the burn and into a lush canyon bottom where I ran out of cover. So I watched the elk climb a barren canyon wall and crest over into the next canyon, and I then ambled my way back to camp for a snack. Those elk would find a shady northeast-facing timber patch to bed in for the day, and I figured I could catch up with them mid-afternoon when they got hungry for their own snack. And that’s just what I did, zipping an arrow through a nice bull’s lungs at 23 yards as he worked his way around the fringes of the herd at dinnertime.

Closing to within bow or rifle range of big-game animals can offer a supreme challenge that requires its own set of specialized skills. I like to divide them into two categories: stalking and still-hunting. While stalking, you first spot your quarry, and then move in for a shot. When still-hunting, you sneak your way through likely habitat in search of a shot. Here are a few tips, tactics and techniques that will help you close the distance on a wily mule deer buck or a big, call-shy bull elk. You might even employ them on a pronghorn or whitetail, if conditions are right and you possess tons of patience.

StalkingGlass Up a Beast: The first element to a successful stalk is spotting your prey. We don’t have room enough in this article to cover the intricacies of spotting in detail, but in short; use the best glass you can afford, find a good vantage point and let your eyes do most of the walking. You can cover far more country, find more animals and contaminate less territory through glass than you ever will on foot. Once you’ve spotted, watched and read the body language of your quarry, you’re ready to begin your stalk.

Plan Your Route: Before leaving your vantage point, study landmarks, choose a goal shooting position and plan your route to that position. It’s really easy to loose track of where the animal is, and where you are in relation to your goal position, once you leave your vantage point. Plan carefully, and use landmarks to guide your way.

Stay Under Cover: While executing your stalk, try to stay completely out of sight of your quarry. Land mass offers the best cover; utilize hills, rocky outcroppings, ravines and other terrain to shield you from sight. Vegetation is second best; use heavy brush, tree lines and waist-high grass to block your prey’s vision while you close the distance. If you run out of land mass and vegetative cover, you can make like a wisp of smoke and move closer using environmental changes such as drifting cloud shadows, fluctuating winds and natural distractions like other animal movement that draws your quarry’s attention.

Use a Decoy: In certain circumstances, such as stalking pronghorn across short-grass prairie, a decoy can render an otherwise impossible stalk very doable. I’ve used a folding cow (of the moo variety) decoy to close within pronghorn under those very conditions. I’ve also used folding elk decoys with good success while bowhunting elk, and I’ve hid behind my saddle horse and closed the distance on elk when hunting in mustang country, where the elk are used to seeing horses. The key is to blend in, seem like part of your quarry’s daily surroundings, and move like a cow, elk or horse, rather than like a hunter hiding behind a decoy.

Play the Wind: Always, always, keep your wind (or scent) from reaching the animal you’re trying to stalk, particularly when you’re bowhunting. If they catch your wind, the game is over. So circle that extra mile, climb that extra ridge or wait that extra hour to make sure the wind is in your favor. Speaking of wind and extra hours, often the best time of day to put a stalk on an animal—especially in high-elevation mule deer or sheep country—is after the morning thermals have performed their capricious dance and everything has settled down for the day. Wait and watch until the wind has steadied and the animal has gotten up from its first bed, grabbed a quick snack and relocated to a shady position. Now the wind and your prey are likely to stay put for a few hours, giving you an honest chance to close within archery range.

Be Aggressive: I’ve often watched novice hunters begin a stalk with the utmost care; moving slowly and stepping quietly while the animal they’re stalking is still a mile or more away. That’s silly. Your first task when stalking from long distance is to close that distance as rapidly as possible. If you don’t, that animal will likely be gone when you get there. So get out of sight, and then close in aggressively. Once you’ve closed within a couple hundred yards, then it’s time to slow down and stalk carefully.

Be Patient: It’s been said that a hunter’s biggest attribute is patience. I agree. Once you’ve closed to within earshot of your prey, it’s time to slow down, become part of the environment and drift closer for a shot. Pay critical attention to cloud movement and shadows, wind gusts and air movement, and other factors that can conceal or reveal your presence. Blend in, move in concert with nature and relax: Prey animals can feel a predator’s intent, so don’t study them with a hard gaze, and don’t covet those backstraps sizzling on your evening campfire just yet. Just stay calm, work your way into position and make a steady shot. Then you can celebrate.

Still-HuntingHunt Wildlife-Rich Areas: When still-hunting, you try to slip into an animal’s habitat, spot them before they’re aware of your presence and make a shot. Obviously, you must hunt where game likes to hang out. Use pre-season scouting, your knowledge of the area and the species, and current wind direction to decide to where to still-hunt that day.

Use the Wind: The best still-hunting days are windy. Everything in the outdoors is noisy and moving on a windy day, meaning you can move and make noise too, with less likelihood of being discovered. Your ideal strategy is to still-hunt in an upwind direction, but hunting crosswind will work just fine, too. Try to move with the wind gusts and blend in with your surroundings.

Stay in the Shadows: Direct sunlight makes you stand out like the proverbial sore thumb, no matter how good your camouflage. Do your best to keep to the shadows, especially when you stop to look and glass.

One Step, Two Looks: The biggest challenge when still-hunting is to see your prey before it sees you, so here’s how you move: take one step, then take two long looks. Study the area in front and to the sides of you intently for any motion, anything that stands out or anything out of place. What you see might be the curving line of an antler, the texture of deer hair or the flicker of an ear. Search as far away as you can see, but study everything close-in as well; while still-hunting, it’s not unusual to close within a few yards of an animal before either of you is aware of the other’s presence.

Use Binoculars: While on the subject of looking, always carry a binocular and use it. You can study surrounding brush and vegetation using your binos like a microscope. Here’s how: Look deep into the tangle with your bino, and turn the focus knob until the area you’re looking at becomes sharp. Study that region for a moment, then turn the knob a little to focus closer or further out—it’ll highlight an entirely different section of habitat. Take your time and pick the area apart piece by piece.

Don’t Hurry: Still-hunting is not a speed game. Rather, you might take an hour to cover 40 yards, or an entire afternoon to hunt through a three-acre patch of woods. But if you’ve got a good idea those 40 yards or three acres holds game, what better way to spend an hour, or an afternoon?

Still-Hunt When it’s Damp: Everything gets quiet in the woods when it’s damp, or wet from a recent rain. That makes for good sneaking conditions; sticks are less likely to snap underfoot, leaves don’t crunch like cornflakes and your movement is muted. It’s a good time to be in the woods.

Deer Walking: We don’t always get to hunt in windy, damp or quiet conditions. Sometimes it’s simply impossible to move without making noise. When that happens, just make like one of the locals; imitate the natural sounds game make while moving. One of my favorite techniques is what noted traditional hunter and archer Fred Asbell calls “deer walking.” To deer-walk, simply imitate the one-two, one-two, one-two cadence of a four-footed beast by first stepping your heel on the ground, then a split-second later snapping down the ball of your foot, to create that one-two cadence. (You can reverse this if it’s more comfortable, using a first-ball-then-heel approach.) Take a few steps, hesitate, look for game, and then move ahead a few more steps, trying to imitate a deer’s movement pattern. Try it sometime; you’ll be surprised at how well it works.

Stay Ready: Shot opportunities can happen very fast when still-hunting, so stay on your toes. Often you’ll see your quarry just a split second before he sees you. Just stay calm, make the shot and then celebrate having successfully implemented one of hunting’s most skill-demanding techniques.

The skinny on snoods, wattles and wishbones

0

But after decades of restocking the population, there are now about seven million wild turkeys in North America.

The turkey is a variety of pheasant. Archaeological evidence suggests turkeys roamed North America as far back as 10 million years ago. Native Americans domesticated them about 2,000 years ago.

A male turkey is called a “tom” and a female turkey a “hen.” A large group of turkeys is called a “flock.”

Wild turkeys are found in hardwood forests with grassy areas. They spend the night in trees. They have excellent vision and hearing but don’t see well at night. They can fly short distances at speeds of up to 90 km/h and can run at speeds of up to 40 km/h.

Domesticated turkeys do not fly — because of selective breeding — and aren’t likely to run very much, either. By the time the average turkey is ready for your table, it has been so fattened up at the factory farm that it has as much chance of achieving flight as you do.

It takes 17 to 20 weeks to raise a turkey that weighs 10.8 kilograms or more. That bird will have consumed around 30 kilograms of feed while it was alive.

Canada is one of the world’s biggest producers of turkeys. According to Statistics Canada, Canadian farmers produced 180,000 tonnes of turkey in 2008. That’s an increase of 6.5 per cent from the previous year.

Canadian consumption of turkey has remained relatively stable over the past two decades — at around 2.2 kilograms per person per year. However, production has increased substantially as Canadian turkey exports have grown by 30 per cent since 2001.

The top turkey-eating country in the world is Israel, at 11.5 kg per person every year. Here’s how other countries measure up, per person per year:

  • United States: 7.7 kg.
  • France: 5.9 kg.
  • United Kingdom: 4.8 kg.
  • European Union: 4.0 kg.

Why is this type of poultry called ‘turkey’?

There are several theories:

  • The Native American name for turkey is “firkee.”
  • The wild turkey’s call sounds like “turk-turk-turk.”
  • Christopher Columbus named them “titka,” which is the word for peacock in the Tamil language of India. Columbus thought the New World was connected to India.

Why do turkeys gobble?

Male turkeys gobble; hens make a clicking sound. The gobble is a seasonal call for the males. They also gobble when they hear loud noises and when they settle in for the night.

What are those fleshy things on turkey heads?

Are there different breeds?

Common domesticated breeds include: Bronze, Broad Breasted Bronze, Broad Breasted Large White, Black, Bourbon Red, White Holland, Narragansett and Beltsville Small White.

Why does turkey have white and dark meat?

For the same reason that chicken does: the legs and thighs contain dark meat because the muscles are more heavily exercised from walking and contain more fat than the meat that comes from the breast. White meat has less oxygen-carrying myoglobin than dark meat. The more work a muscle does — whether you’re a bird or a person — the more oxygen it needs.

What’s with the wishbone? Does it serve a purpose?

The superstition goes that when you find a wishbone, two people should each grasp one part of the wishbone pull; whoever is holding the longest part when it breaks will have their wish come true.

For turkeys — at least the ones who spend their life in the wild — the wishbone, which is called the furcula, is key to strengthening their skeleton to withstand the rigors of flight. It’s formed by the fusion of the two clavicles at the sternum.

The bone is elastic, allowing it to act as a spring that stores and releases energy during flight.

Why can’t I buy turkey eggs at the supermarket?

Turkeys also tend to be far more protective of their eggs than chickens. They’ll stay with them until they hatch and do what they can to keep you away from them.

Why do I feel sleepy after eating turkey?

Probably because you’ve had too much of it, combined with too much dessert and maybe too much of other stuff as well.

Yes, turkey contains an amino acid called L-tryptophan, which the human body needs to build certain proteins. The body uses L-tryptophan to make serotonin, which has a tranquilizing effect.

However, many foods contain the same amino acid — and in much greater quantities than turkey. Ever feel sleepy after eating raw soybeans? Maybe you should. They contain more than twice the levels of L-tryptophan than turkey does.

What’s with the cranberry sauce and stuffing?

It’s believed Native Americans taught the colonialists how to cook cranberries and different kinds of corn, squash and pumpkin dishes.

The origins of stuffing are not certain. Some experts say it’s a traditional dish made from bread and vegetables and most probably originated in Eastern Europe.

All About Juniper Berries: a Very Tasty Spice

0

juniper berries

If you’ve ever tasted gin, you know what juniper berries taste like. The flavor is sometimes described as citrusy and evergreen, sometimes as reminiscent of rosemary. Juniper fruit has both bitter and sweet overtones. It’s complex, and useful for flavoring much more than gin.

Technically, juniper berries are cones, but they’re soft, fleshy cones, rather than the more familiar, hard, spiky cones. Since this isn’t a botany class, let’s just call them berries for the sake of conversation.

The fruit of common juniper (Juniperus communis) is generally considered to be the most flavorful juniper berry, but J. virginiana (eastern red cedar) also produces tasty, edible berries. These are the two most common species in the U.S.

Juniper fruit takes about two years to ripen, so it’s not unusual to find both green (unripe) and purple/blue (ripe) fruit on the tree at the same time. And while a ripe fruit makes an excellent trail nibble, an unripe fruit is intensely bitter and unpleasant. I use them to make cocktail bitters, but not for eating out of hand.

You can buy dried juniper berries in the spice section of a good market, but it’s so easy to harvest your own, you’d be crazy not to give it a try. Plus, who knows how long those store-bought berries have been sitting on the shelf? When you forage for your own juniper, you’ll know exactly how fresh and flavorful they are.

The flavor of fresh juniper fruit is juicy and complex. Dried berries aren’t juicy, but they are spicy and enticing. Fresh or dry, juniper berries have a strong flavor, so use them in moderation. Just a few berries, coarsely ground in a mortar with a pestle, are enough to flavor an entire batch of sauerkraut. They also make a great glaze for cookies and a super-simple fermented beverage called smreka.

I’m often asked if juniper berries are safe to eat, and there’s some controversy about this subject. If eaten in huge quantities over an extended period of time, juniper berries may be toxic. But don’t let this alarm you unnecessarily.

The same can be said of other common cooking spices. For example, consuming large quantities of cassia cinnamon gives you too much coumarin, which may harm your liver and kidneys. But no one warns you not to bake with cinnamon. Because the amount we use in baking is generally safe. In the same way, using most juniper berries as a flavoring in dry rubs and marinades is perfectly safe, unless you have a specific allergy.

There is one juniper (Juniperus sabina) that may be dangerous when eaten, but scientific literature on the subject is frustratingly incomplete. Studies have been made of both the bark and essential oil of J. sabina. The amount of essential oil estimated as harmful to humans is approximately one gram. Unfortunately, this doesn’t take body weight into account and that is clearly relevant. One gram of a chemical constituent is going to have a different effect on a 200 pound man than it will on a 70 pound child. But even if we accept the one gram figure, this is considerably more essential oil than you would get in a few berries. And humans aren’t grazing on juniper bark the way livestock is.

An FDA abstract says that the fruit of J. sabina has high concentrations of several potentially dangerous phytochemicals, but is inconclusive. Here’s how it ends: “The quantity of toxic ingredients, sabinene and sabinol, in gin were unknown. Neither was anything known concerning their toxicity to man. In fact, no formal studies had ever been carried out on the chronic toxicity of these materials.”

J. sabina isn’t native to this country (although it may be sold as an ornamental), so in the United States you’re more likely to come across safe junipers like J. virginiana and J. communis if you’re foraging in the wild. I feel completely safe using the fruit of both of these plants in moderation. You, dear reader, will have to decide for yourself what you feel comfortable with. I hope you’ll taste a fruit before you decide.

The Best .300 AAC Blackout Rifles [All Budgets]

0

Today I’m going to show you the best .300 AAC Blackout Rifle.

In fact:

I’ve hand-tested over 20 guns alone for this review.

The best part?

I’ve sorted each rifle by use. So whether you’re on a budget or need the best 300 Blackout rifle, you’ll find it here.

Let’s dive in!

The 4 Best .300 AAC Blackout Rifle

If you’re pressed on time, here’s a quick list of the best 300 blackout rifles:

  1. Springfield Armory Saint: Best Overall .300 AAC Blackout
  2. IWI Tavor X95: Best for CQB
  3. Wilson Combat AR-15 Ranger: Best .300 Blackout Rifle for Hunting
  4. Daniel Defense DDM4 V7P 300 Blackout: Best for Home Defense

1. Springfield Armory Saint: Best Overall .300 AAC Blackout

For AR lovers, the introduction of the AR-15 pistol brought a euphoric excitement on par with winning your first superbowl. Not that I’ve ever won a superbowl.

But I HAVE mistakenly shouted, “I’m going to Disney World!” after pulling my first shiny AR pistol out of the box.

So, does the Springfield Armory Saint .300 AAC Blackout induce such thrilling feelings? Let’s check out if this pistol is a total whiff or a game-winning touchdown…

Accuracy

At the 50-yard line, the Saint was putting up impressive groupings of less than half an inch.

The 1:7” twisted barrel didn’t seem at all phased by repetitive shooting, so the heat didn’t warp the metal and throw off my accuracy one bit.

Springfield Armory Saint Barrel

For the close-range shooter, this 300 blackout pistol is fast and sharp as a tack. Exactly what you need for home defense.

Take it out another 50 yards, and it was still giving me groups around 2 inches, which is what I expected from an AR pistol.

After polling prospective shooters, SA decided to forego built in sights, but the top rail is plenty big for your favorite red dot.

(I’ll cover essential optics and accessories in a bit).

Reliability

Made with aircraft-grade anodized aluminum, the receiver extension and upper assembly are built to last.

Pair that with the indestructible steel barrel and bolt coated in a Melonite finish, and you’ve got one sturdy .300 AAC blackout pistol.

Once I got my ammo figured out, I put hundreds of 300 Blackout rounds through this Saint with no problems. It WAS finicky with some subsonic cartridges that caused a few frustrating misfeeds.

After I put on my suppressor, though, it was back to smooth sailing.

Sprinfield Armory Saint with Suppresor

The Accu-Tite Tension System on the lower receivers made movement negligible.

Meaning less friction, more usable years on the weapon. Also, the stock was well-built and comfortable.

Sprinfield Armory Saint Buttstock

All in all, for a close-range home defense weapon, you want it to be reliable and durable.

The SA Saint certainly did the job in these categories.

Handling

One of my favorite ergonomic features of this pistol was the well-textured grip.

Springfield Armory Saint Grip

The Saint is fitted with a Bravo Company Mod 3 grip that has built-in storage that’s perfect for the adjustment hex or a small bottle of oil.

Even though the barrel didn’t seem affected by the heat of excessive shooting, holding this 300 blackout pistol after many rounds did have me wanting a glove.

The M-LOK handguard and Carbine “H” Heavy Tungsten buffer were well-placed and made the Saint fun and comfortable to shoot.

Sprinfield Armory Saint Handguard

Trigger

I was impressed with the SA Proprietary trigger that comes standard on a Saint.

No take-up and a crisp break.

The nickel boron coated GI style was usable at about 6 and a quarter pounds of pull and had a nice Bravo Company trigger guard.

Springfield Armory Saint Trigger

The reset had a distinctive “click” that some might find obnoxious, but I thought it added a level of ease to firing that made it that much simpler to reflex fire without too much thought.

Springfield Armory Saint Trigger(2)

Magazine/Reload

The SA Saint Blackout pistol comes with a sleek 30-round Gen M3 PMAG that is the top choice for many AR marksmen.

Sprinfield Armory Saint PMAG

I found that the PMAG dropped easily from the well and the release was very convenient to access with my firing hand.

Length/Weight

One of the most compact options out there, the Saint has an overall length of 27.25 inches while still sporting a 9-inch barrel.

Springfield Armory Saint Body

It’s about mid-range in weight for an AR pistol, coming in at about 5 and a half pounds. Even fully loaded, I found that it was an easily manageable 7 pounds.

Recoil

The excellent SB Tactical SBX-K brace makes for amazing recoil control in this 300 blackout. I hardly noticed any kick and saw virtually no muzzle rise.

If you’re looking for a soft-shooter (a rare find among .300 Blackout weapons), then the Saint is one of the best out there.

Sprinfield Armory Saint Muzzle(1)

Ammo and Accessory Recommendations

My best groups came when using Remington UMC .300 AAC Blackout 120 OTFB and Hornady 300 Blackout 125 HP for higher velocities.

BUT these 300 blackout rounds didn’t seem like they were going to work WITHOUT A SUPPRESSOR.

That said, you’ll want to fit your Saint with something like the GemTech HVT-QD Tactical 300 BLK suppressor. Once I fitted this GemTech to my 300 AAC pistol, it shot beautifully without any issues.

Also mentioned above, the Saint doesn’t come standard with a sighting system.

So, to put up your best shots, I’d recommend attaching an Aimpoint Pro which makes target acquisition a breeze.

Springfiled Armory Saint with Aimpoint Pro

Price and Special Features

One of the best things about the Saint is the excellent price.

It retails for around $989.

Featuring the Direct Impingement Pistol-Length Gas Port with an adjustable gas block, the Saint can be tuned without altering the buffer, spring, or barrel.

A nice feature that most AR pistols don’t have.

Another unique feature is that beautiful brace we talked about before.

The SB Tactical qualifies this slick-shooter as a pistol, making it legal in places that otherwise would be hitting you with a fat $200 tax.

Is the Springfield Armory Saint Worth It?

If you’re looking for a compact, reliable, soft-shooting AR-15 pistol, then look no further than the Springfield Armory Saint .300 AAC Blackout.

Let’s look at a replay of the MVP features:

  • Durable
  • Light recoil
  • Great for home defense
  • Close-range groups under a half inch
  • Excellent brace

So, if you want to get in the AR pistol game for a great price and put mega accuracy, reliability, and size points on the board, then suit up with the SA Saint .300 Blackout… TOUCHDOWN!

2. IWI Tavor X95: Best for CQB

Picture this:

You’re a tactical specialist storming an enemy bunker in the sweltering Middle Eastern heat. Suddenly, a bogie pops around the corner armed to the teeth. Do you panic?

Of course not. You’ve got the most reliable, best close-quarter rifle this side of the continent. You quickly take aim, get off a few smooth rounds, target down. Now repeat indefinitely. No misfires, no thought.

Now, how would you like to hold a weapon like that in your hands? Good news: You can!

Let’s take a look at the powerhouse bullpup, IWI Tavor X95…

Accuracy

This pup is a beast at close range.

While bullpups aren’t traditionally known for their long-range accuracy, the X95 was putting out sub-2-inch groupings at 100 yards. Get even closer (25-50 yards) and I was getting five-round groupings of less than an inch.

The 1:7-inch twisted barrel with 6 grooves gave me a nice, tight shot.

IWI Tavor X95 barrel

What’s more? It comes fitted with built-in tritium front and iron back sights that conveniently fold right into the upper assembly.

You can’t get a better close-range 300 blackout bullpup than the X95.

Reliability

This weapon will stand the test of time.

Why? It’s got a long-stroke gas piston system that makes it ultra-durable, a high strength polymer stock, and a cold hammer-forged barrel.

After 500 rounds, the X95 showed no signs of wear and had no issues of any kind.

Handling

Balance is where this 300 blackout semi-auto really shines.

The balance point and charging handle are closer to your body and made it comfortable to shoot repetitively.

IWI Tavor X95 charging handle

It was very easy to transition between targets, field strip, and perform all necessary shooting functions with my support hand. This weapon was perfect for close-quarter shooting.

My only encountered awkwardness was with the placement of the pistol grip that caused finger slippage behind the trigger.

IWI Tavor X95 side rail

Trigger

The X95 did have a heavier trigger pull weight around 7 and a half pounds.

Like most bullpups, the pull felt long, but the reset was more crisp than many pups I’ve fired.

Not the best trigger you’ll pull, but certainly not the worst!

Magazine/Reload

This Tavor model comes with a 30-round, 3rd Generation MagPul PMAG.

It took some practice to get the reload down (standard for a shooter who’s used to AR-15’s), but once I did, the placement of the well and ambi button made for flawless reloading.

IWI Tavor X95 magazine catch

If you have a go-to magazine for your AR’s other than a MagPul, the X95 does take any STANAG magazine.

Length/Weight

One of the best things about this 300 AAC blackout was the compact size.

IWI Tavor X95 full view

It’s got a barrel length of 16.5 inches and an overall length just over 26 inches. It was a bit heavier than your typical AR, weighing in at 7.8 pounds.

For the shooter who’s looking to fire in tight spaces (like home defense), the compact feel of the X95 was preferable to a standard AR.

Recoil Management

Talk about smooth shooting…

The X95 had virtually zero felt recoil.

It’s not a heavy caliber weapon to begin with, but throw in the long-stroke piston system and thick rubber buttpad and you’ve got great recoil management with minimal muzzle rise.

I could definitely tell this 300 blackout gun was made for the combat-ready soldier who doesn’t have time to mess with a choppy rifle.

Ammo and Accessory Recommendations

While the X95 I shot was chambered in 300 Blackout, you can also get it in 5.56 NATO (try HPR 60 grain V-Max) and in 9mm.

I found the heavier the round, the more accurate shots, so I’d stick with higher grain 300 ammo.

As far as accessories, if the built-in sights aren’t your style, check out the Aimpoint Micro T-2 red dot. It was easy to attach to the picatinny rail and upped my accuracy significantly.

I’d also recommend a trigger upgrade if you can hack it. I like the Super Sabra pack made by Geissele as it has a smoother and lighter pull.

Price and Special Features

You can pick up the X95 for a retail price of around $1,999 at most gun shops.

The compact size and long-stroke piston gas block system are the standout features of the X95.

It’s also unique in that it is significantly shorter than an AR, but the full-length barrel makes it non-NFA. What does that mean for you?

No annoying $200 tax!

IWI Tavor X95 barrel locking indicator

Is the IWI Tavor X95 Worth It?

So, with the higher price tag, is the X95 worth the investment?

After shooting this compact 300 blackout powerhouse, I can confidently say…

“Absolutely!”

It’s one of the best choices for combat shooting as well as close-quarters home defense. Here’s why:

  • Reliable
  • Compact
  • Well-balanced
  • No extra taxes
  • High polymer stock

Overall, this Israeli-made AAC blackout bullpup is a durable, well-balanced soft-shooter.

If you’re looking to take out short and mid-range targets with a high-quality 300 blackout rifle that’ll feel like it’s made just for you, then don’t miss your shot at the IWI Tavor X95.

3. Wilson Combat AR-15 Ranger: Best .300 Blackout Rifle for Hunting

Wilson Combat makes some of the most innovative, reliable, and deadly specialty weapons in the market.

But their AR-15 Ranger series may exceed even a die-hard Wilson fan’s expectations with its lightweight build and razor-sharp precision.

Let’s check out how this incredibly accurate, compact power-house will make you one of the deadliest predators in the field…

Accuracy

The Ranger is a precision paradigm.

Wilson boasts that this rifle has the lightest match-grade barrel on the market, making for extremely fast transitions between targets.

Wilson Combat AR-15 Ranger Handguard and Muzzle
Via: Vickers Tactical

And I’d have to agree.

In speed drills, I was clocking my fastest times with my smallest groups ever in part because the taper of the aluminum barrel is incredibly light and maneuverable.

Wilson Combat AR-15 Ranger Muzzle
Via: Vickers Tactical

But chances are for hunting, you’ll need more accuracy within the 100 yard mark and less speed. So, I walked out to 100 yards and was pleasantly surprised at my 1.3-inch 5-shot groups.

I’d feel more than confident taking the Ranger out for whitetail, bear, and hogs.

Reliability

Nearly every component of the Ranger is mil-spec and MP inspected.

Not to mention the corrosion-resistant NP3 coating on the bolt and hard-anodized receivers coated in a super sturdy Armor-Tuff finish that make this rifle weather and wear-proof.

Wilson Combat AR-15 Ranger Frame
Via: Vickers Tactical

I pulled my Ranger straight from the box and put about 500 rounds through without incident.

Then, without lubricating a thing, I put through 500 more.

I’m not sure how long I could’ve sat there plinking, but after 1000 rounds the smooth action and sturdy hardware felt like they’d barely taken a hit.

Wilson Combat AR-15 Handguard and Rail
Via: Vickers Tactical

This rifle will last as long as you need and is reliable enough for any length of hunting excursion.

Handling

With a midsize Wilson SLR click-adjustable gas block, the Ranger can be fine tuned to work best with whatever ammo you’re shooting.

This adjustment capability added an extra push to the already-comfortable rifle.

One thing I did find strange about the Ranger was the stock. It has such exceptional receivers, bolts, and hardware, that I didn’t expect to pick it up and feel cheap plastic.

Wilson Combat AR-15 Ranger Stock
Via: Vickers Tactical

That may have just been a first impression, though, because even later that day I couldn’t even notice the tacky-feeling stock.

Trigger

Here’s where I was sold on the Ranger.

The single-stage Tactical Trigger Unit had virtually zero take-up, no slack, and a distinct reset.

Wilson Combat AR-15 Ranger Grip and Trigger
Via: Vickers Tactical

What’s more?

This trigger pulled crisp and clean right at a light 4 pounds.

Magazine/Reload

The Ranger ships with one standard 30-round magazine that clips into the well like just about every other AR.

Wilson Combat AR-15 Ranger Magazine
Via: Vickers Tactical

Reloads were fast and easy, though I did scare away a few squirrels close by with the audible “click” as I snapped in the mag.

Since most AR-users want more than 30 rounds to work with, I’d recommend grabbing a few extra mags to keep in your bag.

Length/Weight

Virtually every metal component of the Ranger is made from lightweight billet aluminum, making it a reasonable 8 pounds.

Wilson Combat AR-15 Ranger Length
Via: Vickers Tactical

With a barrel length of 16 inches and overall extended length of 36.5 inches, this rifle is easy to maneuver in thick brush as well as ground blinds.

Recoil Management

There wasn’t much kick to this rifle.

The Rogers Super-Stock buttstock absorbs a lot of the recoil and also features a unique locking mechanism to reduce movement.

Wilson Combat AR-15 Ranger Buttstock
Via: Vickers Tactical

Price and Ammo Recommendations

The Wilson Combat Ranger retails for $2300.

But, you get every ounce of what you pay for in a lightweight, accurate, and reliable precision machine.

The Ranger has a few caliber options, but my favorite is the .300 Blackout for its power and economy.

Wilson Combat AR-15 Ranger Ammo
Via: Vickers Tactical

Here are my favorite rounds for the Ranger:

  • Hornady 110 gr GMX Full Boar: Designed for deeper penetration and higher weight retention, I love this round for quick, clean kills.
  • Winchester Deer Season XP 150 gr: Some of my best groups were with this Winchester round that was specially made to take down deer. This round fed smoothly and maintained a ton of power downrange.

Accessory Recommendations

The Ranger comes with a 10-inch MLOK rail and covers so that you can attach your favorite optics, lights, or accessories.

Wilson Combat AR-15 Ranger Scope
Via: Vickers Tactical

It also comes with a threaded muzzle fitted with an awesome Q-Comp muzzle brake.

Here are some of my favorite other add-ons for the Ranger:

  • EOTech EXPS3-0 Red Dot (Night Vision Compatible): I love this red dot for its large FOV that allows me to shoot with both eyes open. Plus, it’s night-vision compatible and has a quick-detach lever.
  • Wilson V3 Ultralight AR Scope Mount: To keep your rifle as light as possible, I’d go with this durable, lightweight mount that securely attaches your optic.
  • Viking Tactics Wide Quick Adjust Sling: This heavy-duty sling will stand up to just about any weather conditions and makes carrying my Ranger silent and comfortable.

Is the Wilson Combat Ranger Worth It?

The Wilson Combat Ranger is my favorite .300 Blackout AR-15 to take out mid to large size game.

Here’s why. It’s:

  • Lightweight
  • Compact
  • Accurate
  • Reliable

For the best groups, highest durability, and happiest shoulder in the field, I trust no other AR-15’s apart from the Wilson Combat Ranger.

4. Daniel Defense DDM4 V7P 300 Blackout: Best for Home Defense

Daniel’s Defense, headquartered in Black Creek, Georgia, has rapidly become a top of the line weapons manufacturer.

Producing the famed DDM4V7 rifle, Daniel’s Defense has now produced an AR pistol variant – the DDM4 300 Blackout Pistol.

Let’s break it down the specifics.

Accuracy

The DDM4V7 is a highly accurate blackout rifle designed to be used for competition shooting.

Daniel Defense M4V7P BLACK CREEK GA USA

(Speaking of competition shooting, if you’re into long-range shooting, check out this guide on the best .338 lapua rifles).

The barrel is an in-house fabricated, cold hammer-forged 5.56 barrel with 1:7 twist, manufactured from 4150 CV ordnance steel.

While certainly a shorter range weapon than its rifle predecessors, the .300 Blackout is most certainly a highly accurate weapon.

Daniel Defense DDM4 V7P 300 Blackout SIGHTS

In fact, I’ve shot over 100 rounds while maintaining 2” (or less) groupings. Seriously. The accuracy is spot on.

Reliability

The DDM4 300 is INSANELY reliable.

In fact:

I’ve yet to experience any malfunctions or jams – despite shooting over 200 rounds through a variety of handloaded ammo.

How is it that reliable?

For starters, the lower and upper receiver are forged out of 7075 T6 aluminum. The spring and bolt are both manufactured to MILSPEC standards. And the bolt itself is high quality 158 Carpenter steel.

Daniel Defense DDM4 V7P 300 Blackout PISTOL RECEIVER

In other words:

The Daniel Defense DDM4 is built to last.

Handling

The DDM4 is lightweight and pleasant to handle, without the sharp projections that sometimes come with other AR platform models.

Weighing in at a 5.44 pounds and measuring at 28.5 inches, the DDM4 can be moved with ease, making it a great option for sport shooting, target shooting, and self defense.

The grip, hand guards, and enlarged trigger guard is easy and comfortable to handle.

Daniel Defense DDM4 V7P 300 Blackout pistol grip

The collapsible butt stock is backed by a rubber inlay where it meets the cheek, gripping well and preventing sliding during firing.

My one complaint with the butt stock is that the rubber can sometimes grab beard hair. However, this is a minor inconvenience at most.

Trigger

The trigger is very light.

Daniel Defense DDM4 V7P 300 Blackout TRIGGER LEFT SIDE

It’s a straight bow Geissele Automatics Super Dynamic system that allows an easy pull, minimizing the chances of yanking the gun to the side while shooting.

Magazine & Reloading

The DDM4 300 ships with a standard 30 + 1 round magazine.

Daniel Defense DDM4 V7P 300 Blackout magazine

The gun itself works with all standard STANAG 4179 compliant magazines. Which means you’ll almost certainly be able to use your other AR-15 magazines with the DDM4.

As said before, the DDM4 comes with the proprietary flared magazine well, making reloading quick and easy.

Daniel Defense DDM4 V7P 300 Blackout magazine bottom

This is a blackout rifle that will not be difficult to reload in a high pressure situation — including self-defense or competition.

Length & Weight

The 300 Blackout is 28.5 inches long and only 5.44 lbs.

Daniel Defense DDM4 V7P 300 Blackout stock

Part of what makes this weapon special is that it is considered a pistol.

In other words, it does not require ATF approval or a tax stamp to get your hands on it.

The LAW Tactical folding stock adapter means that the weapon’s length can be reduced even further, making this a prime weapon for close quarters encounters.

Daniel Defense M4V7P collapsable buttstock

(A plus if you’re in law enforcement).

Recoil Management

The DDM4v7 does an excellent job of making recoil almost non-existent.

The pistol-length gas system paired with the length of the weapon means that the barrel won’t be climbing as you shoot.

Daniel Defense DDM4 V7P 300 Blackout free float rail system 2

Furthermore, the rifle comes equipped standard with Daniel Defense’s own “Muzzle Climb Mitigator,” a legal flash-hider.

Shooting this weapon is not like firing off an old 30-06 hunting rifle where your bruised shoulder will remind you that you’ve been shooting.

The recoil is pretty much zero.

Price

I’m going to admit:

The DDM4V7 .300 Blackout is an expensive weapon, costing between $1,729 to $2,016.

With many decent AR-15 variants being priced around $800, the price tag may come as somewhat of a shock.

In fact:

You certainly can get an AR-15 or AR pistol that works well for a cheaper price. However, you might encounter some reliability or accuracy issues.

That’s not the case with the DDM4V7. It’s highly accurate and reliable, and the price reflects that.

Recommended Accessories

The DDM4V7 .300 Blackout AR pistol comes with a full length MFR 9.0 rail that runs the full length of the gun.

Which means, you can upgrade this bad puppy with sick accessories. I’d recommend attaching a Nightforce NXS 2.5-0X42. Or an EOTech sight.

Is the Daniel Defense DDM4V7 Worth It?

If you’re looking for one of the best 300 AAC blackout, then the Daniel Defense DDM4 is for you.

It has great accuracy, fantastic handling, and fault-free function. In addition, its low weight and short profile makes it ideal for close quarters engagements.

In short: the DDM4 is a high quality 300 blackout rifle with high quality parts.

Now It’s Your Turn

I hope you enjoyed my best .300 AAC Blackout Rifle guide.

So as a recap:

What is the best 300 Blackout pistol? I highly recommend the Springfield Armory Saint.

What about CQB? Then opt-in for the IWI Tavor X95.

Looking for a .300 hunting rifle? Get the Wilson Combat AR-15 Ranger.

Lastly, if you’re looking for the best home defense 300 blackout rifle, then the Daniel Defense DDM4 V7P is what you’re looking for.

All of the 300 blackout rifles above are tried and tested. I’ve fired hundreds of rounds through them and have experienced no problems whatsoever.

Now I want to turn it over to you:

Which 300 AAC blackout rifle will you pick?

Let me know by leaving a quick comment down below.

Ammo test: Barnes X lead-free bullets (TSX and TTSX)

0

Broadsword takes the Barnes bullet for a spin. Is the original copper projectile that kicked off the lead-free revolution still the best?

Next in our line of lead-free bullet tests are the .30 cals on offer from Barnes in their Triple Shock X bullet range, which was introduced in 2003. These offer an all-copper bullet with a traditional hollow-point design in the TSX format, or faster expanding projectiles with the newer TTSX bullets with their polymer tip and larger hollow point format. Barnes offer a very good range of both bullet styles as well as variety of calibres, so there is something for everyone and every rifle type.

As usual we are trying to find a sweet spot where the lead-free bullets perform the same ballistically down range as traditional lead-cored bullets of the same weight, thus giving the shooter a viable lead-free option when the time comes – if you can get any!

Ammo test: Barnes X lead-free bullets (TSX and TTSX)

credit: Archant

Bullet specificationsThe TSX and TTSX bullets are not the same dimensionally. Different bullet lengths have implications on load density and accuracy as well as overall cartridge length, but we will discuss that in future articles. At present I am trying to load like for like to see the similarities and differences.

TSXThis is the original Triple Shock-style bullet from Barnes, with an all-copper construction available in flat base and boat tail designs. The 110gr TSX weighs 110.2gr, is 0.9540″ long, 0.3070″ in diameter, and has two smooth cannelure/pressure rings called Accu-Grooves and a flat base. The hollow point is very neat and uniform, and when sectioned can be seen to extend 0.4250″ into the bullet – but it is very narrow, as is the opening. This bullet has a sectional density (SD) of 0.166 and ballistic coefficient (BC) of 0.264, with an overall length of 0.955″.The 130gr TSX weighs 130.6gr, is 1.0860″ long with the same 0.3070″ diameter, Accu-Grooves and hollow point design, but this time with a slight boat-tail base. The SD is good at 0.196, as is the BC at 0.340 G1 – a very nice blend of values.The 150gr TSX as expected is 1.2365″ long, with a more obvious boat tail, and the same hollow point and diameter as the others, but with three Accu-Grooves to relieve stress/friction and fouling. A decent SD of 0.226 helps penetration and the BC of 0.369 value helps retain energy with a more streamlined flight.

Ammo test: Barnes X lead-free bullets (TSX and TTSX)

credit: Archant

Ammo test: Barnes X lead-free bullets (TSX and TTSX)

credit: Archant

Ammo test: Barnes X lead-free bullets (TSX and TTSX)

credit: Archant

TTSXThis is essentially the TSX bullet with an added tip for better aerodynamics, hence the enhanced BC values as well as better terminal expansion with its redesigned nose cavity.There is a 130gr TTSX bullet option but I could not get any for the tests. The 110gr TTSX weighs 110.4gr and is 1.0425″ long with a diameter of 0.3060″. It has a flat base, two Accu-Grooves and a large blue polymer tip 0.1825″ long and 0.1465″ in diameter, giving a better overall hollow point than the TSX bullet. When sectioned, the bullets have a larger hollow point channel for nearly half their overall length. The sectional density is the same as in the TSX with the same weight obviously but the BC has increased to 0.295 due to the more streamline tipped bullet meplat.The TTSX 150gr bullet weighs 151.0gr and is 1.3015″ long and again slimmer than the TSX bullets at 0.3060″, which is slightly curious. There are Accu-Grooves, resulting in three distinct riding rings and there is a shallow boat tail and the same polymer tip as on the 110gr TTSX. The 110gr TTSX’s SD of 0.226 is identical to the same weight TSX version but the polymer tip boosts the BC to 0.420 – a sizeable improvement over the 0.369 for the same weight TSX bullet.Standing the bullets side by side, you can instantly see the differences in height and overall aerodynamic design despite having the same weights. Most of this is the extra tip of the TTSX bullets, but the cannelure positioning is also different. Because the hollow points and expansion channel are bigger on the TTSX, the bullet has to be longer to achieve the same weight as the TSX bullet. A separate article on OAL/accuracy for all bullets tested will appear in a subsequent issue.

Ammo test: Barnes X lead-free bullets (TSX and TTSX)

credit: Archant

Ammo test: Barnes X lead-free bullets (TSX and TTSX)

credit: Archant

ReloadsI tested the Barnes bullets the same day as the Nosler lead-free E-Tips in a previous article, and therefore used the same control sample of Nosler Ballistic Tip bullets as a comparison for lead-cored bullet performance. The numbers in brackets are the Harrell Premium Culver powder values I use for instant powder measuring. I tried to match the velocities as best I could to get a true reflection of each bullet’s down-range performance.

Ammo test: Barnes X lead-free bullets (TSX and TTSX)

credit: Archant

ResultsWe are trying to see what weight a Barnes bullet needs to be to achieve the same wound channel and expansion/penetration as a corresponding weight traditional lead-cored bullet.

Ballistically the TSX and TTSX were similar to the Nosler Ballistic Tip control group when loaded with the same powder/primer, etc. But as always, the harder Barnes gave at least 50fps faster velocities. A lead-cored bullet’s jacket gives a little when travelling down the bore, while the solid-cored Barnes are more rigid, causing a pressure increase and thus more velocity. That’s why the TSX and TTSX have cannelures to relieve the pressure a little and reduce copper fouling in the bore as the rifling engages the riding bands.

Interestingly the TSX bullets all have a 0.3070″ diameter and the TTSX even smaller at 0.3060″, again to reduce friction. All the bullets retained near as damn it 100% of their weight plus a bit of media.

Now the interesting part regarding down range performance. The TSX bullets expanded very well; they always do, despite that small hollow point aperture and channel. The 110gr bullet expanded to 0.6666″, doubling its size – beastly! The 130gr TSX expanded to 0.6540″ and the larger 150gr TSX to 0.6440″; all impressive. This translates down range to good terminal ballistics. The 110gr TSX penetrated to 8.75″ with a wound channel of 5.0″, maximum width of 1.45″ and volume of 110ml. That’s almost the same as the 150gr Nosler Ballistic Tip at 120ml volume. Looking good.

The heavier 130gr TSX penetrated further, to 9.75″, with a wound channel of 4.75″, maximum width of 1.35″ and volume of 130ml – very good indeed. The 150gr TSX penetrated the most at 12.5″, with a wound channel of 4.75″, max width of 1.75″ and 100ml in the medium.

To me this proves that going lighter to 110gr or 130gr in a lead-free bullet is needed to replicate your older 150gr traditional 0.308 bullet loads with the TSX bullets tested. The 130gr looks very interesting, with a good blend of penetration and expansion, as well as excellent wound volume. I use them in my .30-47L rifle.

Next up the TTSX bullets. Will these tipped projectiles prove a point? The 110gr TTSX actually penetrated further than the same weight TSX bullets at 9.25″ and gave an impressive 5.75″ wound channel with a maximum width of 1.75″, resulting in a whopping 180ml volume. That’s 10ml more than the control Nosler Ballistic Tip 125gr bullet at nearly the same velocity. Impressive.

Again there was 100% weight retention and bullet expansion was an amazing 0.6890″, up from 0.3060″. The 150gr TTSX also impressed as it penetrated the most at 11.25″. I thought it would expand more with the better hollow point like its 110gr sibling, but still managed a 0.5915″ bullet diameter. The wound channel was impressive, recording a wound channel of 6.15″, maximum width of 2.00″ and 140ml volume.

You should also note that the larger projectile weights carried their wound channels in a linear line for longer, but outside the critical test media and thus animal body cavity. We don’t need total penetration in the UK, although our American cousins do seem to be obsessed with it.

It was also interesting to see the blue polymer tip being fragmented almost at the start of the wound channel to begin the initial expansion of the TTSX bullets. Again, note how clean the wound channels are with these Barnes bullets. You can see how the bullet rotates in flight as the medium has a definite swirl to its inner profile. People forget that a bullet’s rotation also helps to dissipate energy for a quick dispatch on game. There was no wandering of the bullets through the medium with either and these Barnes shot very true in flight.

Before the tests began, I would have said to go with the 110gr TSX or TTSX if you wanted the same performance as a normal lead-cored 150gr .30 cal bullet. That is still true. Look at the 110gr TSX’s 110ml volume and that amazing tipped TTSX 110gr bullet, which at the same velocity as the TSX gave 70ml more wound volume in the same area.

The 130gr bullet, as discussed, would be a good lead-free all-rounder for penetration and performance. I have to admit I was expecting more from the 150gr TTSX, having seen its smaller brother perform so, well but a 140ml wound channel is still 20ml more than a conventional 150gr ballistic tip. Which when you think of it means that a Barnes TTSX at 150gr mimics the traditional 150gr lead-cored control bullet weight for weight. Ah ha! We might be on to something!

Ammo test: Barnes X lead-free bullets (TSX and TTSX)

credit: Archant

ConclusionsOf the lead-free projectiles tested thus far, these offerings from Barnes seem to deliver good consistent performance. The lighter bullets give the desired combination of wound channel and volume within a more confined space – i.e. there is less penetration, which means the bullet’s energy is dumped inside the beast without over-penetration, which has always been a problem with some lead-free bullets. Also, the tipped TTSX Barnes would definitely seem to offer a very good expanding lead-free option if you still want to retain the same weight bullet that you usually use in your rifle.

I would say from a purely subjective view point that there might be some light at the end of the tunnel with regard to changing over from lead to non-lead projectiles. The trouble is supply and demand, as prices are high even if you can buy them to test. Also, as we will explore in future articles, the issues regarding load density, seating depth and rifling twist for best accuracy, make this a whole new ball game!

Contacts RayTrade Ltd Tel: 01635 253344 Barnes bulletsNorman Clark Gunsmiths Tel: 01788 579651 Reload SuppliesHannams Reloading Ltd Tel: 01977 681639 Reload suppliesHenry Krank Tel: 0113 2569163 Ramshot powdersHighland Outdoors Tel: 0845 0990252 Nosler Ballistic TipEdgar Brothers Tel: 01625 613177 Alliant Powders

MOA vs MRAD: Battle Royale Of Rifle Scope Reticle Systems

0

Picture yourself getting the jump on a big prairie dog town. You crest a hill, lay your trusty .22 across a fencepost, and peer through your scope. It’s pretty far. You might need to aim a little bit high. If only you paid more attention to the MOA vs MRAD debate.

Experience might tell you that your bullet hits a certain distance low at 150 yards and a little more at 200 yards, but “a little low” doesn’t give you much to work with, especially when you don’t even know the distance to your target. Even if you knew exactly how many inches low it was at the distance you’re trying to shoot, could you really picture that in your scope with any degree of accuracy?

What you need is a way to make precise, calculated adjustments to compensate for proven ballistic performance. That’s where minutes of angle (MOA) and milliradian (MRAD) come in. These concepts are absolutely essential to shooting well — even if all you’re doing is zeroing your pistol’s red dot — and figuring them out might be easier than you think.

What are MOA and MRAD?

Both MOA (minutes of angle) and MRAD (milliradian) are methods of measuring angular units. Bullets aren’t laser beams, so we all understand that we have to aim high to engage targets that are far away from us. Rather than calculating bullet drop to inches, creating a mental estimation of what that looks like, and aiming at a point in space above our desired point of impact, we use these angular units to get on target.

Both methods are more than capable of facilitating precision shooting. They’re not interchangeable, though, so your rifle scope, reticle spotting scope, ballistic tables, and any software you use will need to be on the same page. Eventually, you’ll learn to think in MOA or MRAD and be able to make better adjustments on the fly.

MOA: What You Need To Know

The majority of all sighting systems (scopes, red dots, holographic sights, and iron sights) sold in the U.S. use MOA because this unit works well with imperial units — specifically inches and yards.

What is MOA?

There are 360 degrees in a circle and 60 minutes in a degree. One minute (MOA) equals 1/21,600 of a circle.

At 100 yards, one MOA equals 1.047 inches. Since it’s angular, the same one-MOA angle expands to 2.094 inches at 200 yards, 3.141 inches at 300 yards, and so on. Moving your point of aim one MOA shifts your point of impact 1.047 inches at 100 yards.

That’s not very precise, so most optics use quarter-MOA adjustments. If your scope turret is labeled “one click = 1/4 MOA,” you’ll be able to refine your point of impact in 0.26-inch increments at 100 yards.

By using 1/4-MOA adjustments, we divide a circle into 86,400 slices, and each click of your turret moves your point of aim 0.004 degrees.

What About “Shooter’s MOA?”

Many people use what’s called “Shooter’s MOA,” which rounds MOA to the nearest quarter-inch. That’s why you’ll hear people say that one MOA equals one inch at 100 yards. They’ll equate one click of a 1/4-MOA turret to 0.25 inches at 100 yards rather than 0.26 inches at 100 yards.

It’s not exactly correct, but it’s close enough in some cases. At longer distances, this shortcut will catch up with you.

At 1,000 yards, .308 Win might drop 393 inches. Using MOA, your come-up in that situation (393 inches / 10.47 inches per MOA at that range) would be 37.5 MOA, and your point of aim would be 393 inches above your point of impact, matching bullet drop exactly.

If you were using Shooter’s MOA, your come-up would be 39.3 MOA (393 inches / 10 inches per shooter’s MOA at that range). Because scope turrets use actual MOA rather than Shooter’s MOA, your input of 39.25 MOA (the closest setting to 39.3) would result in a point of aim 411 inches above the center of your target and cause your bullet to impact 18.5 inches high. Unless you have a massive target, that’s a miss.

Range in Yards1/4 MOA1/4 Shooter’s MOA

MRAD: What You Need To Know

Outside of the U.S., shooters generally prefer to use MRAD over MOA. Interestingly enough, American military snipers also use the metric-based MRAD system; most precision shooters do, too.

What is MRAD?

Instead of using degrees, we can divide a circle into 6.283 radians. Inside each radian are 1,000 milliradians (mils, for short) for a total of 6,283 mils in a circle. Random, right? Damn Europeans.

There’s a method to this madness because one mil equates to 10 centimeters at 100 meters.

In the same way that we don’t make adjustments in whole MOA, we don’t make them in whole mils, either. Scopes turn in 1/10-mil increments, so one click on your turret translates to one centimeter at 100 meters.

A scope’s 1/10-mil adjustments divide a circle into 62,832 pieces, and each click moves your point of aim to 0.006 degrees.

When you range targets in yards, using MRAD can feel clumsy.

Range in Yards1/10 MRAD

But when you range targets in meters, using the 1/10 MRAD adjustments on your scope turrets is straightforward.

Range in Meters1/10 MRAD

MRAD vs MOA: Which Should You Use?

Knowing that both systems are effective doesn’t make your scope-purchasing decision any easier. There has to be a reason some shooters prefer one over the other.

Why You Should Use MRAD

Using the 100-yard example, a typical MOA scope will let you make adjustments in finer increments. Remember that, at 100 yards, 1/4 MOA equals 0.26 inches while 110 mil equals 0.36 inches. But if MOA is more precise, why do snipers and competitive shooters almost universally prefer MRAD?

In the real world, there is a practical limit to the degree of precision we’re capable of extracting from a shooting system (our rifle, scope, and ammunition).

“On the milliradian optic, I’m doing 1/10 of a mil click in whatever direction, that’s going to equal roughly 2.5 inches at 700 yards,” Eliasson said in the Vortex Edge podcast. “If I do that same click on a 1/4-minute adjustment minute of angle optic that’s about two inches — a little under, I think it is. So it’s like two, 2.5 at 700; can you shoot that good?”

Both MOA and MRAD deliver the precision you need, and MRAD scopes can save time by making adjustments in slightly larger leaps, as Eliasson discovered during his time as a Marine Corps scout sniper.

“We got the 1/4-minute adjustment optic on our gun, and I felt like I was just adjusting for days,” he said. “It was just click, click, click, click, click, click to get where I needed to go. I thought that was kind of hindering us to a degree.”

The base-10 nature of MRAD can also make life simpler when you’re shooting under pressure.

“If somebody says, ‘Come up 0.7’ that’s seven clicks,” James Hamilton, host of the Vortex Edge podcast, said. “And if they’re like, ‘1.7’ that’s 17 clicks. But if somebody says, ‘Come up 2-3/4 MOA’ I’m like, ‘Okay one click is 1/4 MOA, so that’s four clicks per one MOA, so that means four times two is eight, plus 3/4 is three, eight plus three is — you know?”

Simply put, MRAD scopes get us inside the margin of human error with less time spent converting quarters to clicks, counting tiny hash marks, and fiddling around with our scope turrets. Since most competitive shooters use MRAD, that route will also make it easier to learn from others if you have ambitions of getting started in long range shooting.

Why You Should Use MOA

Most shooters who prefer MOA optics probably appreciate the unit’s relative correlation to inches and yards rather than adapting to the metric system.

“As Americans, if you were born and raised here, we tend to think in inches, and it’s really hard to associate what 10 centimeters looks like,” Eliasson said. “Our brain kind of wants to think about it in 10 inches, not 10 centimeters.”

The combined market for MOA hunting scopes and low-power variable optics with a BDC (a bullet drop compensator reticle like the one in the Trijicon ACOG) is probably larger than it is for MRAD scopes. Red dot optics and holographic sights almost universally use MOA. That alone might be enough to sway you, especially if you don’t need a fancy mil-dot reticle.

“Some of our optics that I’m thinking of are very, very well-suited for hunting and they’re just not even available in MRAD,” Hamilton said. “In my head, I’m thinking getting the right optic is more important than getting some super-duper special unit of measurement.”

The reality is that the advantages of MRAD scopes don’t matter at the distances most people shoot. Plenty of hunters and recreational shooters do just fine by zeroing at 50 yards, having a usable point of aim out to about 200 yards, and falling back on Shooter’s MOA in a pinch.

Use Your MOA Or MRAD Reticle to Estimate Range

You can use both MOA and MRAD to perform useful calculations in the field if you have a technical reticle. Knowing how to use these formulas will help you get the most out of your scope.

Make the resulting adjustments by dialing your turrets or using a holdover based on the subtensions in your reticle.

Range Estimation

Yards to target = (size of target in inches x 95.5) / size of target in MOA

Yards to target = (size of target in inches x 27.77) / size of target in mils

To use these formulas, you’ll need to know the size of your target in inches. Between that known size, the size of the target in MOA or MRAD as measured with your reticle, and the appropriate constant (95.5 for MOA or 27.77 for MRAD), you can determine the distance to your target in yards.

Size Estimation

Size of target in inches = (yards to target x size of target in MOA) / 95.5

Size of target in inches = (yards to target x size of target in MRAD) / 27.77

The size estimation formula is based on the range estimation formula; it just solves for a different variable. This is particularly useful for hunters who want to gauge a game animal’s size from a distance.

Wind Estimation with an MOA Reticle

MOA adjustment = [wind speed x (range / 100)] / constant

Constants vary by cartridge. For .308 Win, use a constant of 12. For 6.5 Creedmoor, use a constant of 17.

MOA adjustment = (range / 100) -1

The above formula is for a full-value 10 mph wind. Changes based on a wind direction are made after calculating your hold in MOA.

Wind Estimation with an MRAD Reticle

The above pattern is fairly universal, but you may need to tweak an adjustment here or there. Your specific rifle and ammunition will have a certain wind speed at which you can use this formula.

If you shoot a “6 mph gun” in a full-value 6 mph right-to-left wind, you would hold 0.5 mils right at 500 yards. If the same wind were a half value, your hold would be 0.25 mils. If the wind were full value but 3 mph, your hold would be 0.25 mils.

READ NEXT – Precision Rifle Series Shooting: 6 Keys for Beginner Success

Why Some Farts Smell So Much Worse Than Others

0

You’re alone in the comfort of your home, so naturally, you let one rip. No shame. But the smell of your own fart is taking over, and the stench is creeping up and suffocating you. Now you’re trapped in your own foul odor – this wasn’t expected! Why is this fart disgusting, when others pass without making their presence known?

Then, as if the heavens parted, the stench disappears. You look around, double-checking that no one is home, then go back to your normal life, safe from suffocation by flatulence.

Why did your fart smell like rotten eggs at the bottom of a New York City trash heap? Was it something you ate? Is there something wrong with you, internally? Do you have a superpower you didn’t know existed? Dr. Myron Brand, a gastroenterologist at Connecticut Gastroenterology Consultants, helps set the facts straight.

YOU. You have the power to control your own gruesome odor by what you eat – not all farts are created equal. Some smell like bitter alcohol, others smell like three-month-old expired broccoli, and many smell like the aforementioned rotten eggs.

“Smelly odor is not bad, it’s just a function of what you’re eating and what your bacteria is doing inside your gastrointestinal tract. Everyone is different,” Dr. Brand explains. “Foul smell just means the carbohydrates you consume are being malabsorbed – it’s fermented.”

Ironically, the healthier the food you eat, the worse the smell. Fiber-rich foods, such as broccoli, Brussels sprouts, and quinoa, boost gut bacteria, and in return cause you to naturally pass gas. Foods with high sulfur composition, such as red meat, milk, or plant-based proteins, are the culprits of producing the foul odor. When we feed the bacteria in our gut high-protein foods, they produce a sulfur gas, which makes your farts noxious, says Dr. Brand.

“The end product of fermentation in our gastrointestinal tract is gas – carbon dioxide, hydrogen, or methane. And it’s all made from bacteria fermentation.”

But hey, it’s a small price to pay for being healthy… or is it?

When the bacteria in your gut break down all that food into hydrogen sulfide, then you produce that ghastly rotten egg fart smell.

“Some people are methane producers, and some people are hydrogen sulfide producers – which causes flatulence to smell like rotten egg. It’s all a function of what you eat,” adds Dr. Brand, helpfully reminding you that eating a steady diet of cabbage and cheeseburgers is bad on virtually every level. The common thread between rotten eggs and farts is the sulfur; if you’ve ever been to natural springs that emit sulfurous gasses, you probably recognized the stench. It may be the only thing your butt, eggs, and natural hot springs have in common.

If you have to choose based solely on how much you’ll fart, Dr. Brand recommends going high-protein. “Proteins won’t cause a lot of gas, but carbohydrates will.”

There are more extreme measures you can take, too, though it’s important to understand that what works (or goes horribly wrong) for you may do the opposite in someone else. “As a doctor, you try to manipulate this occurrence with things like the FODMAP diet or probiotics,” Dr. Brand says, which is a science-y way of saying every person is different and it’s a bit of a guessing game as to which foods make one person rip silent-but-deadlies and another go about their day without emitting a hint of methane.

The low-FODMAP diet he mentions is one that limits certain types of carbohydrates that have a tendency to ferment in your gut and, as you now know, produce rancid gas. This diet is tough to follow, since it eliminates seemingly healthy foods like onions and asparagus, so it’s typically used only for people with serious gastrointestinal distress. If your flatulence is really an issue, work with a gastroenterologist or dietitian to pinpoint which carbohydrates are the cause of your discomfort or bloating. You can also check this quick primer on high-FODMAP foods vs. low-FODMAP foods, with low-FODMAP foods being the ones less likely to ferment.

Eh, not really, unless you surround yourself with people who judge you solely based on your farts, in which case you might want to rethink your friend group. You live in a symbiotic relationship with your gut bacteria – you have to feed them if you want to achieve optimal health. The average (healthy) person farts 10-20 times a day. So farting is normal.

If you continually drive people away with your potent superpower, though, it may be time to see a professional. Usually, though, a fart is a fart is a fart that won’t kill you. “Unless it’s excessive, because that’s a sign that you’re malabsorbing and not digesting carbohydrates,” you’re probably fine moving on with your life, Dr. Brand advises.

Nope. It just means you’re eating food and digesting it well – and there’s more room on the outside than on the inside.

Sign up here for our daily Thrillist email, and get your fix of the best in food/drink/fun.

7 Deadly Techniques to Catch Chinook Salmon in Rivers

0

Chinook Salmon are the king of our rivers. They are the largest salmon we catch on the Pacific Coast. And once they travel out of the ocean feeding grounds back to the river to spawn, can offer one of the most exciting fishing experiences in the Pacific Northwest. Whether you have a boat or want to fish for these giants from the river bank, I have a few winning techniques to share with you!

How to Catch Chinook Salmon in Rivers

Fishing for Chinook Salmon in rivers from the remote reaches of Alaska southbound down the Pacific Coast gives us plenty to get excited for. The northern reaches of their range brings great fishing as early as June. And as we move south towards my neck of the woods in Washington, September to November is the peak time for river fishing. Each region hosts its own favored techniques. But I can say that Oregon Chinook aren’t that much different from British Columbia Chinook. And you can’t go wrong with any of these fishing techniques throughout their entire Pacific Coast range.

Backtrolling Plugs for Chinook Salmon

Of all the boat fishing tactics, fishing with plugs is one of the most popular. A plug like a Kwikfish, Flatfish or Maglip really draws the eye of a Chinook. They wiggle and dive in the river current. Most of the time, the best fishermen will take bait wrapping thread and tie on a sliver of sardine fillet to the underside. This slows down the action of the lure and releases a heavenly scent for Chinook.

Wrapping Plugs

Chinook really get to biting when there is the perfect match of lure attraction and smell. Throughout most of their range, the wrapped bait of choice is sardine. But many of the best river Chinook fishermen will also use herring, anchovy, albacore tuna belly or sand shrimp wraps. I usually don’t deviate from sardines, but it’s worth following the local trend. Wherever you may be back trolling plugs for Chinook.

How to Fish Plugs for Chinook Salmon

Every river section can host travelling Chinook, holding Chinook or both. You can either anchor your boat in a run or hole, or slowly back troll down the stretch. You will need to judge the situation and determine what is best. If they are travelling, you can anchor with confidence and wait for them to come to you. In other situations, maneuvering your drift boat, raft or jet sled slowly down with the currents can put the plugs directly in front of Chinook and force them to either back down river or strike. Back trolling requires steady boat control, as you don’t want your plugs swinging from side to side. You want a straight track line down the current seam.

Your guys just let the wrapped Kwikfish out 40′. Why 40′? Because that’s what you decided, and of course you are the captain so they better damned well do as you say! You slowly back down the current through the run. The right rod closest to the steep bank starts pulling hard from a Chinook! Your buddy Darryl is patient and waits (what seems an eternity but in reality is only 5 seconds). The rod is doubled over and once the Chinook has turned downriver to race back to the safety of the ocean, pulling line out of the reel, Darryl grabs the rod and the battle is on! Well done Darryl! Many a weaker man would fold under pressure and yank on the fish before it is hooked properly.

Backbouncing for Chinook Salmon

You have just found a spot that looks like Chinook mecca. You anchor your boat ahead of where you think Chinook will be stacking up. Or set your guys up and slowly back down current into the zone.

The anglers have a juicy cluster of eggs, with a sliding dropper to a sinker. If the lead is too heavy it won’t back down into the zone. If it’s too light the bait won’t be in the Chinook zone along the river bottom for very long. This technique is all about the slow play. You need your bait to slowly back down right in front of the fish and give them plenty of time to see, smell and munch. You drop it down, lift the rod slightly to allow the sinker to back down another foot. Hold, lift, back down, and repeat until you are past the holding zone or get bit. The bight can feel subtle.

If the process seems painstakingly slow, you are doing it right. You let them munch. Let them eat. Then once you know they are committed, you hammer back and give the biggest hook set of your life! It’s a really fun technique and one of my favorites.

  • 2/0 to 5/0 Gamakatsu Octopus Hooks
  • 20 to 40 Pound Fluorocarbon Leader
  • Swivels and a dropper with a 1 to 6 ounce cannonball sinker, depending on current and depth
  • Salmon eggs put up with a good Egg Cure

Float Fishing for Chinook Salmon

Bobber fishing with cured salmon eggs is one of the best Chinook Salmon fishing techniques in the river’s deepest and slowest pools. Chinook will often hold in those deep spots. Most of the time, you want to have your bait as close to the river bottom as possible. Some of my favorite Chinook holes are as deep as 20′ and I want my cured eggs dredging the bottom where they are holding. A floating braided mainline is key, and you will be mending it and give control as so it doesn’t pull or push the natural drift of your float and bait. As soon as the float pulls under, I reel as fast as I can to catch up to it. I’ll follow up with a hefty hook set once the rod is bent and loaded over on a Chinook.

Drift Fishing for Chinook Salmon

I love and hate drift fishing for Chinook. I love when I find a deep and gentle run that allows me to bounce bottom with a cluster of cured salmon eggs and get bit by a Chinook. However, I hate seeing people drift fishing with beads or yarn for Chinook, where they know as well as I do that they are essentially snagging them. Drift fish with something they are going to bite! Use just enough lead to occasionally tap bottom. Knowing that your presentation is near the river bottom, in the zone. If you are trying to drag a hook into a Chinook without having them bite… Shame! Much shame! And may a curse be placed on your fishing career!

Plunking for Chinook Salmon

Plunking for Chinook is a little bit of a dying art, but in certain areas can be very effective. You find a lower river spot where you know they will be pushing up with the next high tide. You rig a juicy bait presentation. Maybe top it off with a little added float and attraction such as a Spin N Glo. The pyramid sinker is rigged off a sliding dropper. Just enough weight to anchor it in the current. The rod gets placed in a riverside rod holder. Then you sit back, sip the coffee, and wait for a grab. Best done with friends for some chit chat and jovial conversation.

Twitching Jigs for Chinook Salmon

Twitching marabou jigs used to be a very hush-hush proposition for Coho Salmon. Then the word got out. Now it’s rare to float down a river in the fall and not see everyone twitching for salmon. Chinook Salmon can be coaxed to bite if the jig is right.

Once you pitch in that jig, let it fall and then pop it up with a lift of the rod tip. Lift and fall, lift and fall. That is the name of the game. Purples and pinks tend to be the winning choice. Black and chartreuse are also a crowd favorite.

Rolling Spinners in the River for Chinook Salmon

Washington’s rivers are prime areas to roll large spinners for Coho. Chinook often times surprise us by biting them as well. Alaska anglers use spinners as a mainstay for Chinook Salmon river fishing. Down in the lower 48, a size 4 or 5 spinner is the ticket. Up North, feel free to pitch a size 5 or 6 spinner for the big boys. Cast that spinner into a slow pool or run, let it sink, and retrieve it back as slow as you possibly can. Just fast enough to get that spinner blade to spin, but no faster! Blue Fox Vibrax and Steelhead Slammer Spinners are great options!

8 Differences Between Red & Gray Squirrels (Photos, ID & Behavior)

0

Most backyards in North America have only one type of squirrel that you see regularly.

In northern and eastern regions, the two most common types are red and gray squirrels.

But if you’ve ever seen these two squirrels side-by-side then you know they’re really quite different animals! Not just in terms of size & appearance, but also in their behavior, habitat & even their diet.

So today let’s explore 8 key differences between red and gray squirrels in order to gain deeper insight about our backyard tree dwelling friends.

What’s the difference between red & gray squirrels?

Gray squirrels are much larger than red squirrels. Their tails are bushier and they have a longer skull shape. Gray squirrels also have much more color variation, including black, gray, cinnamon & blond.

To start off, take a look at this side-by-side comparison of a red squirrel on the left, and a gray squirrel on the right.

Let’s break down some things to notice about these two squirrels pictured above:

1. Color

On the surface, perhaps the most obvious difference between red and gray squirrels is their color.

A red squirrel looking very dashing in the sunlight

Generally, red squirrels will all have this same reddish brown color shown above with very little variation. Red squirrels are a species of arboreal (tree dwelling) rodent that all have fur looking more or less identical to the photo above.

However it’s important to realize that gray squirrels are NOT always gray.

One of the big differences in gray squirrels from red squirrels is that they come in many different colors including gray, black & even shades of blond.

Black is one of the most common color variations in gray squirrels, but these are actually the same species!

It’s important to realize these color variations are all part of the same species of squirrel, and can even be brothers and sisters in the same family.

This means color can be a good way to identify squirrels, but only if you remember that gray squirrel communities are multi-colored.

The basic idea is:

  • Red squirrels are always red.
  • Any other color is a gray squirrel (or possibly fox squirrel in overlapping ranges).

In most cases these rules will work, however, New York city is known to have a population of cinnamon colored gray squirrels, which could be confused with red squirrels if you don’t know the other differences.

So while color can be useful, it’s actually not the best way to identify red and gray squirrels in all cases.

So what’s the best way to identify them?

2. Size

In general, the best way to identify gray squirrels from red squirrels is by their size difference.

Gray squirrels are significantly larger than red squirrels. According to most sources, gray squirrels weigh in at a range of 400-600 grams, which is almost twice the size of the 250-330 gram red squirrels.

This size difference is very obvious just by looking at them, and is typically the fastest & most accurate way to identify squirrels in actual practice.

If you’re used to watching gray squirrels and then you suddenly see a red squirrel, their small size will really stand out to you.

Side note: If you live further south, it’s also important to know whether your area has fox squirrels which are even bigger than gray squirrels, and sometimes even interbreed with their populations.

3. Ear Tufts

Another interesting clue to help with squirrel identification is that red squirrels grow little tufts of hair on their ears during winter.

Ear tufts are a more subtle characteristic than the overall size & color, but it still gives us a bit more insight into their character.

In actual practice, you really don’t need to look at squirrels this closely to tell them apart but it’s a funny quirk and something to look for during the cold season.

4. Social Behavior: Communal vs Solitary Squirrels

A much deeper level of knowledge about squirrels comes when you go beyond identification and begin to study their behavior.

Here the differences become even more obvious because red and gray squirrels have vastly different approaches to how they interact socially with other squirrels.

So how do red & gray squirrels differ in terms of their behavior?

Gray Squirrels Are Communal Squirrels

Gray squirrels are generally considered to be much more community oriented than red squirrels.

It’s extremely common to see groups of gray squirrels all hanging out peacefully together in the same area. They share territories, food and sometimes even sleep together.

In many ways, this is really the biggest of all the differences between red and gray squirrels because red squirrels are not communally oriented at all.

Red Squirrels Are Territorial/Solitary Squirrels

Red squirrels in sharp contrast to gray squirrels are some of the most aggressively territorial animals on the planet.

They actively defend their territories, food caches & nest sites with a wide variety of loud vocalizations and visual displays of aggression.

This aggression begins quite early after the baby squirrels are born, and continues for the rest of their life. In this sense, red and gray squirrels really are polar opposites.

5. Habitat

Aside from some occasional overlap at the edges of different habitat types, gray squirrels and red squirrels also tend to occupy very different niches in their habitat.

Gray squirrels thrive in urban & suburban environments and typically prefer forests dominated by deciduous trees (like the oak & beech forests we discussed in a different article on mast trees).

Red squirrels tend to become dominant in more remote forested habitats that include a lot of coniferous trees such as spruce and fir.

For this reason, many people who live in cities have never actually seen a red squirrel, and might not even realize they exist in your area.

The quintessential “squirrel on a power line” is a gray squirrel in almost every case. In all my years living close to red squirrels I’ve only ever seen one use the power lines to move around.

6. Diet

The result (or perhaps the cause of their habitat differences) is that despite being very closely related species in the squirrel family, red and gray squirrels eat almost completely different diets.

Gray squirrels eat a lot of large fleshy deciduous nuts like acorns & walnuts, while red squirrels tend to horde the cones of coniferous trees like spruce and feast on the tiny seeds.

Both squirrels also take advantage opportunistically of hunting insects (and even eating bird eggs!) however the exact species they hunt will vary depend on the ecology of their chosen forest type.

I covered what squirrels eat in much more detail in another article.

7. Calls & Vocalizations

Red and gray squirrels each make their own distinct set of calls & vocalizations which can be used for identification and behavior interpretation.

Grey squirrels who are upset will make a raspy bark when predators are nearby. In some cases it sounds a lot like a small dog barking.

In the following video clip you’ll hear some gray squirrel barking and related alarm calls from nearby robins and other smaller birds.

The red squirrel sound is a combination of high pitched “TIP” sounds mixed with lower range “CHUCK” calls that are used in varying combinations for different situations ranging from predator alarms to territorial situations:

Because red squirrels are so territorial, overall they tend to make a lot more noise than gray squirrels.

Red squirrels also make a loud trilling scream and are generally make a lot more noise than gray squirrels who are less easily offended. You can hear this rattling “scream” call at the 20 second mark in the following clip:

I’ve written a lot more on this topic, so if you want to explore the nuances of squirrel language, go read up about why squirrels chatter and scream so much.

8. Interactions Between Red & Gray Squirrels

Another way to gain insight about these two common messengers of the forest is to look at how they interact where territories overlap.

If you ever find yourself lucky enough to live in a place that has both red squirrels and gray squirrels living in close proximity, this is an amazing opportunity to learn and study their differences.

This is where a lot of interesting questions come up to truly define the boundaries of what it means to be a red squirrel or gray squirrel including their breeding, cooperation and competition.

Can Red Squirrels And Gray Squirrels Interbreed?

Because these are two different species, red squirrels cannot interbreed with gray squirrels.

Even gray squirrels who have a reddish color to their fur are born from two gray squirrel parents. When you see these color variations, remember that size is still the key identification characteristic as explained above in point #2.

Why Are Some Squirrels Red/Black/Gray/Blond?

So if they can’t interbreed, then why are all these different color squirrels living together?

Why can a single family of squirrels include both gray, black and possibly even other colors of squirrels?

Well, this is very similar to genetic variation in red foxes which sometimes makes them black.

It’s the same as how human children can have different colored eyes or hair than their parents. It has to do with the genetic combinations and recessive genes.

As a ridiculous example, it’s a bit similar to why red hair in humans cannot be caused by having an orangutan for a parent… because humans cannot mate with orangutans.

Do Gray Squirrels And Red Squirrels Get Along?

In most cases, red and gray squirrels have such distinct niches in the forest that their territories and trails almost never overlap.

For this reason, even if you do see red and gray squirrels nearby in the same area, they typically co-exist quite peacefully.

It’s not so much that they get along, as much as they don’t have any good reason to get in each other’s way.

Do Red And Gray Squirrels Compete?

In general – red and gray squirrels do not directly compete because they occupy different habitat niches.

Red squirrels are more dominant in coniferous forests, while gray squirrels are more dominant in deciduous forests and cities.

In mixed forests, their territories can occasionally overlap, however, even in these situations they tend to use different trails and different food sources so it’s rare for this to cause problems.

Why Do Red Squirrels Chase Gray Squirrels?

In cases where their activity does overlap, typically red squirrels will be the more aggressive and likely to chase the gray squirrels.

Considering that they’re so much smaller, this can be a funny surprise to see the red squirrels acting aggressively towards gray squirrels. But it really just comes down to the fact that red squirrels are so much more territorial.

If you spend a lot of time in mixed or coniferous forests with high red squirrel populations then you know what I’m talking about. You’ve probably been yelled at by a squirrel or two in your days!

When it comes down to it, gray squirrels and red squirrels really aren’t competing over food, nesting sites or mates, so there’s no reason for them to be territorial other than the fact that red squirrels are very aggressive towards pretty much everything.

Go Look For These Differences Yourself!

So now all you have to do is go watch your local squirrels for yourself.

Making your own observations is really what brings the magic of nature to life.

  • How many of these squirrel differences can you observe in your own backyard?
  • Are you seeing signs of territorial or communal squirrel behavior?
  • What else do you notice about your local gray and red squirrels?

Let me know what you discover out there, and happy squirrel watching!

Best Air Rifle Deals

Popular Posts

Best Distance for Sighting In an Air Rifle

0
Shooting with an air rifle always seems like a thrilling experience, but if you are a newbie then you have lots to learn. One...

Guide to find Best Scope for Break Barrel Air Rifles

0
"Unlock the Perfect Shot: Discover the Best Scope for Break Barrel Air Rifles. Enhance your shooting experience with precision and accuracy, as we delve...

How to make a break barrel air rifle more powerful

0
"Unleash the Power: Mastering Break Barrel Air Rifles for Maximum Performance. Discover expert tips and techniques to enhance the power and precision of your...

How far can an air rifle shoot accurately?

0
An air rifle's effective shooting range depends on various factors, including the type of rifle, the caliber, and the power source. Generally speaking, most...

Air gun 101: The differences between .177 & .22 – Which jobs they do...

0
I’ve always believed the popular phrase: “It’s not the size of the dog in the fight that matters - but rather the size of the...