Need a salmon fishing primer (or refresher)? Here’s the short take on the types of salmon you can pursue and the various methods that are used to target each species.
Probably the most prized fish in Alaska, Kings are also one of the most difficult to catch. King salmon tend to swim in the deepest part of the river, which is typically right down the center. In places like the Kenai River, this makes it very difficult for shore anglers to catch them. However, for the patient and experimental shoreline angler, there are many opportunities to catch kings. Fish for kings a couple hours before and after a tidal change. Often, flies are used on low tides, and bait/lures are used on high tide. Before fishing for kings, make sure to get a king tag! This is the only species which requires an additional tag for legal fishing.
Flies: Use large, bright flies. Let these flow down the river at the same pace as the current (adjust weight as necessary). Kings are notoriously light biters, so if your fly stops, set the hook and hold on!
Spinning/Casting: Use large, bright lures (Vibrax size 5-6, Pixies, in pink, orange, chartreuse, blue, etc). For bait, you can use herring (near salt water) or salmon roe (all situations). This can be fished under a bobber, or from the bottom up. If you’re fishing from the bottom up, put your weight about 24” above the hook. Use any weight you’re comfortable with, but you want enough on there to either hold the bait in place under the water, or to bounce along at the same pace of the current. Use a “double mooch” (two hooks, one tied a couple inches above the other. You can buy them as premade rigs or set them up yourself. Put a golfball-sized piece of bait on the TOP hook, using the egg knot line to secure it down. Let the second hook dangle empty. Just cast this setup at your 10 o’clock position, and drift through your 2 o’clock position. Repeat.
Silver Salmon/Pink Salmon/Chum Salmon
The technique here is pretty much exactly the same as it was for King Salmon. The difference is where these fish swim. These salmon species tend to sit either in clear water or just on the edge of clear water. Clear water occurs when a small stream flows into a murky-colored stream. If there is no clear spots (or they are all clear), look for deep holes where the water slows down. This occurs around bends, behind big rocks, near trees, etc. Keep in mind that the reason fish will sit right outside of clear water is that they can be spooky. If there is a lot of bright sunlight, try using dark fly/lure patterns. These spooky fish will be less scared, and more inclined to bite.
Red Salmon
Red salmon (Sockeye) are one of Alaska’s most popular salmon. The best locations are typically the Kenai River, Russian River, and Kasilof River. These fish swim very close to the shore in medium swift currents. Don’t be the unaware fisherman who wades out 20ft only to block everyone else from catching the fish that are swimming behind you! Reds are not aggressive biters, so the common method of catching them is called “flossing”. The idea is that if you lay your line low in the water, the salmon will pick up the line in their mouth. At this point you “set the hook,” which draws the hook into the corner of the fish’s mouth. This requires using the right amount of weight so that the line and hook move along the bottom of the river at the same pace of the current (This is important***). You can use any type of weight you feel comfortable with. Splitshot, slinkies, and sinklines are all common types. Leader lengths (the line between your weight and your fly) will vary based on water conditions. On the Russian River, where the stream is narrow and quick, typical leader lengths are between 18” and 24”. On the Kenai River, where the water is deep and wide, leader length is more often between 3’ and 5’. Adjust the leader length when needed. The goal is to ensure that the line and fly lay flat along the bottom. The standard fly to use is called the Russian River Fly (~.35 cents), but more effective alternatives are the #4 sockeye special and polar shrimp. These are more effective because they have a shorter shank. In the lower/middle Kenai River you can use larger hooks (a popular option is the 2/0 Octopus hook). You can use any sort of fly, as long as you can visibly see it in the water (this helps target fish and drift speed of the fly) and is legal (see the current regulations) – this usually means smaller than size 2 or 4).
The technique is fairly simple, and if you follow it, you have a great chance to land lots of fish. First, determine where you want to fish. Pull out enough line that you can “flip” your fly out about 15-20 ft (adjust this based on where fish are). Flip your line as far as it will go to your “10 o’clock position”, which should be past and upstream of your fish. Keeping your line taught, drift the line through the water at the same pace of the current until your line points to your “2 o’clock position”. Repeat. Remember, adjust your weight if your line is moving too quickly or slowly. This will be the difference between catching and not catching fish.
I once asked a fellow here in Cherokee why I did not see many hickory trees and he said, “You won’t see many above the road.”
His point was hickory trees make the best firewood and a good tree would be cut for winter’s fuel. It is also a very heavy wood, so hauling one down the hill is a lot more sensible than hauling one up hill. Hickory has tough, durable wood which had a wide range of uses, such as tool handles, chair parts, and basket handles. The inner bark of hickory is good for finishing basket rims, and weaving a chair seat from that same inner bark will last for generations. But this series is about wild foods, and with that in mind there is a great reason to encourage more hickory trees: the nuts.
Hickory nuts are a highly nutritious and tasty food. They contain nearly as much protein as chicken and are a great source of minerals, especially calcium, magnesium, phosphorous, and potassium. They are also a good source of folate (folic acid), one of the vitamins important to expectant mothers. Hickory nuts are high in fat, but it is really good fat. The bulk of the oil consists of monounsaturated fatty acids, the beneficial kind found in olive oil and avocadoes. Oils high in monounsaturated fatty acids tend to lower LDL cholesterol (the ‘bad’ cholesterol), prevent heart disease, and decrease insulin resistance, making hickory nuts a good food for diabetics. Even though they are high in fat, nuts are also considered great food for dieters. The dense nutrients and fiber tend to satisfy hunger longer, lessening the urge for a snack. But be careful you don’t overdo it or you will lose those good effects.
If you have ever cracked hickory nuts, you know how much work it can be. The shells are very tough and picking out the nut meats is time consuming. One study determined it would take around eight hours of work to get enough calories to meet one person’s daily needs. However, this is where native technology made the process more efficient. Hickory nuts were cracked and the largest part of the shell removed. The remaining nut meats and pieces of shell were placed in the corn mortar (kanona) and pounded into a paste. The resulting paste was rolled into a large ball that was placed in boiling water to make a soup broth (kanuchi). The shells that remained in the paste would separate from the paste and sink to the bottom of the pot. So how much more efficient was the mortaring process than cracking and picking out the nut meats? The same study mentioned above found that using the corn mortar provided from 12 to 35 times more energy (depending on the type of hickory nut) than just cracking and picking. Now that’s good technology! And the taste? I once had hickory nut milk made in a blender. It had a great flavor and it was like sipping the finest cream. I can only imagine how good that soup tasted.
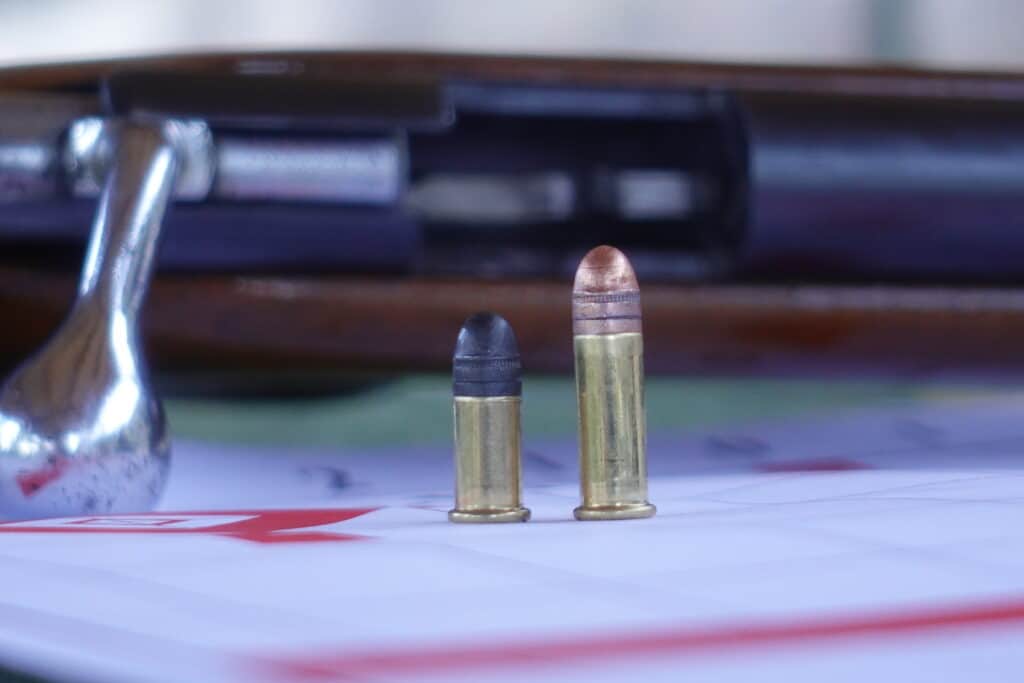
The .22 Short and the .22 Long are some of the oldest American metallic cartridges around, being invented in 1857 and 1871 respectively. Unlike other early rimfire designs, the .22 caliber options can still be found today. The problem is, it is hard to find rifles chambered in these cartridges, so a natural question to ask is can a rifle use both .22 Short and .22 Long?
Generally, .22 Short, .22 Long, and .22 Long Rifle can be safely used in the same firearms. However, some designs such as semi-automatic rifles may not cycle reliably due to lower gas pressures.
How can these cartridges be used in the same rifles? Unlike most modern centerfire cartridge designs, .22 rimfires technically straight wall designs. The only dimension which varies between the Short, Long, and Long Rifle is the length of the case and overall length. When chambered, the bullets aren’t fitted into the throat of the barrel and instead must move slightly forward before engaging the rifling.
A Brief History of .22 Rimfires
In the later half of the 19th Century, firearms manufacturers were making the transition from muzzle-loading projectiles to metallic cartridges. The Alamo in 1836 was fought with long rifles using percussion caps and flintlocks. By 1898 when Teddy Roosevelt was blazing his way through Cuba the official US military cartridge was the .30-40 Krag. In between, US firearms underwent a remarkable evolution.
This is where the .22 rimfire calibers come into play. Rimfire cartridges were an early metallic design and the link between the modern metallic cartridges we have today and the early paper cartridges used before 1850. There are also cartridges known as “pinfire” which were mostly composed of paper but this design was really a paper cartridge with a percussion cap at the base rather than a metallic design.
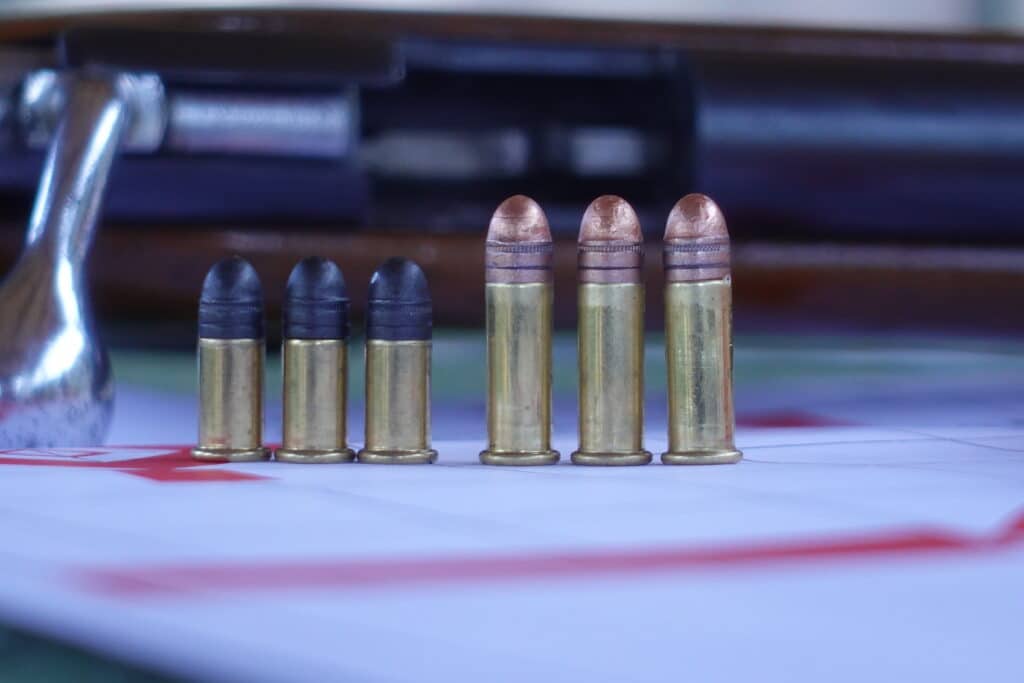
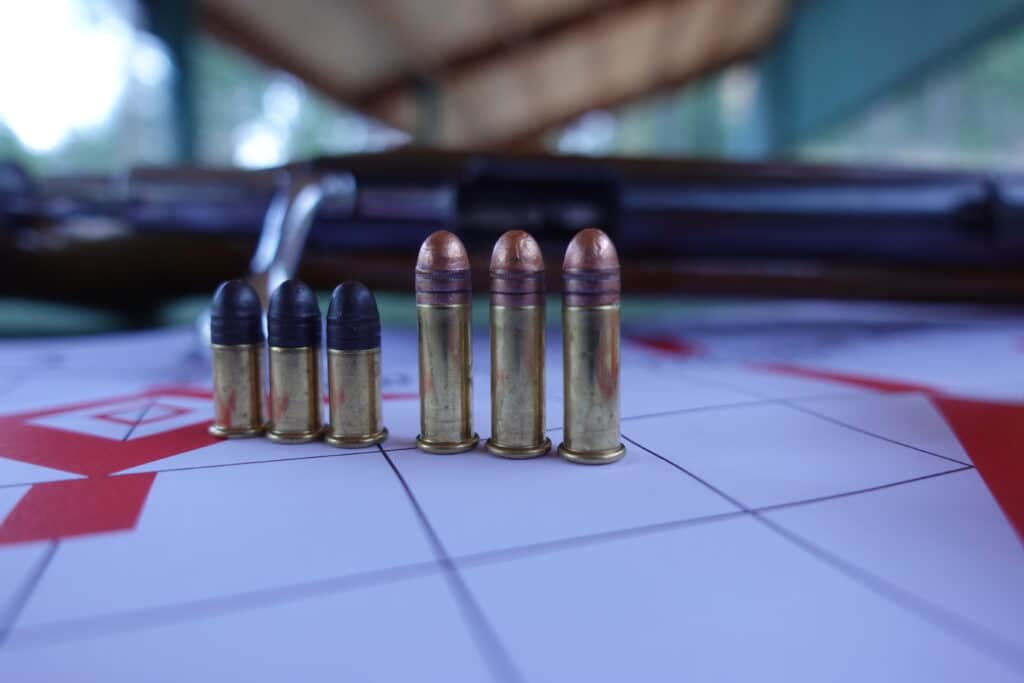
The .22 Short was conceived in 1857 primarily as a personal-defense round and for use in gallery guns which per popular at fairs of the time. It consists of a .222 caliber bullet between 25 and 30 grains in a rimmed case 0.421 inches long containing 4 grains of black powder. The .22 Long uses the same bullet in a case 0.613 inches long using 5 grains of black powder.
In contrast, the .22 LR uses a .222 caliber bullet between 30 and 40 grains in the same case as the .22 Long but with 6 grains of powder. All three share the same specs, though the .22LR is faster and has more energy. In a classic case of ‘third time’s the charm’, the .22LR took off like wildfire and has remained popular to this day.
Given the immense popularity of the .22 Long Rifle cartridge, this brings up an important question. Why go with older, slower, and more expensive cartridges?
A Couple of Benefits
Using the .22 Short and the .22 Long does have a couple of advantages. To start with, more ammunition of both can be stored. Bulk rimfire ammo is often bought and stored in buckets and boxes. Just like with nails and screws, a slightly shorter overall length means the same bucket can hold more rounds and sometimes will even weigh less.
Let’s be real here though, most people aren’t going to go through a trash can full of .22 rimfire cartridges in any reasonable amount of time. I suppose a competition shooter or someone who shoots a particularly high volume for practice will need this much ammo, but 95% of gun owners out there with a rimfire will use their gun for occasional plinking.
Besides high volume shooters, ‘preppers’ might want to take notice. The volume difference between the .22 Long and .22 Long Rifle is negligible, but the volume difference between the .22 Short and the .22 Long is basically 40%. Packing in a lot more bullets into the same space can come in handy if you are one of those people who expects to need decades of ammunition at the ready.
Similar to the advantage in storage, ammo capacity in some guns is greater with the .22 Short. Pump actions and lever guns which use a tubular magazine can be loaded with more .22 Short cartridges in the same magazine compared to either the .22 Long and the .22 Long Rifle.
One example is the Pump Action rifle offered by Henry. On the Gun’s webpage, the rifle can hold 15 Long Rifle cartridges in the tubular magazine, but it can also hold 21 Short cartridges! For squirrels, rats, and other pests this is a huge advantage!
One other advantage, if you can call it that, is some old rifles made prior to the invention of the .22 Long Rifle are specifically designed for .22 Long or .22 Short. If you collect firearms from the period and want such a rifle, getting ammunition for it is going to be cheaper than modifying the bore to accept .22 LR. Such modifications are common and can ruin the value of the rifle, or make the gun dangerous to use.
There are also situations where .22 Short or .22 Long might be preferred to .22 LR. Short range pest control doesn’t need .22 LR to be effective, and the smaller cartridges tend to be quieter in the same gun since they usually don’t exceed the sound barrier. However, the .22LR can be loaded up or down to a wide range of velocity and energy, effectively eliminating this advantage.
A Lot Drawbacks
While both cartridges can still be used, there’s no question that the .22LR has supplanted both of it’s predecessors for almost every use. The .22LR can be made subsonic, is cheaper due to mass production and wider market demand, and has enough power to reliably kill animals up to the size of coyotes.
Heck, the 22LR can even be used for self defense and hunting medium game like hogs and deer, though these uses are not recommended and may be illegal! The point is, the .22LR is accurate, popular, more powerful, and far more flexible than the .22 Short and .22 Long.
Flexibility
As stated, the .22LR can be used for a wide variety of tasks. Can the .22 Short and .22 Long technically do the same things as the Long Rifle? Sure. They can be subsonic, lethal to people and critters, and both have their own niche market. If there was no use for these rimfires then no one would be making them in 2022. However, the use of both the Short and Long is limited.
Range
The .22 Short is good to around 70 yards or so as a squirrel round. Basically, if you can find a squirrel in a tree, the .22 Short can kill it. Similarly, the .22 Long has a slightly longer range. Figures vary wildly but they seem to average out at around 100 yards. That isn’t too shabby and shouldn’t be overlooked for a varmint hunter taking game in the woods or from the roadside.
However, the .22LR can be reliably used out to 200 yards at squirrel-sized game and can reliably take a coyote at 30 yards or so. That’s pretty impressive for such a small, cheap round. The Long Rifle makes for an excellent farm and ranch gun as well as a target gun, hence why Olympians use the .22LR and precision rifle organizations like NRL22 exist.
Speed and Energy
The .22 Short is limited to around 1,050 fps at the muzzle. An especially hot load in a long barrel might reach 1,100 fps but those are outliers. The .22 Long has a slightly heavier bullet offsetting the slight increase in powder, so it’s velocity is in the same league as the .22 Short. 1,070 fps seems to be about average in modern offerings, but realistically it isn’t any different from the Short.
In contrast, the .22LR can be loaded really hot, achieving 1,700 fps. It can also be loaded slow, down to around 950 fps. This is a big reason why the .22LR is more flexible.
While the .22LR produces about 130 ft-lbs of energy at the muzzle on average, with the round touching 200 ft-lbs with hyper-velocity cartridges. The .22 Short maxes out at around 80 ft-lbs at the muzzle and the .22 Long can’t do much better. The .22 Long can be loaded hotter than the Short but that brings up another issue…
Accuracy
All three .22 rimfires are not exactly speed demons. That is actually a good thing though because the rounded nose bullet shape travels much better at slower speeds. A well balanced .22LR is very accurate out to 200 yards or so, with 300 yard accuracy still being pretty good in a match gun.
While both the .22 Short and Long can be accurate in purpose-built rifles, most people will use these calibers in a gun designed primarily for .22LR. Since the rifling isn’t engaged instantly with the shorter cartridges there is more room for a bullet to become slightly unbalanced or engage the rifling off-axis.
Like a football thrown with a less-than perfect spiral, an off-axis bullet will wobble in the air and become more susceptible to wind shear. It will also naturally deviate from it’s path. At short range, this isn’t an issue since we are talking about a fraction of an inch at 20 yards. But at longer ranges the altered flight path can significantly change point of impact in relation to point of aim.
Action Cycling
By far the biggest disadvantage to using the .22 Short and .22 Long in the same gun as a .22 Long Rifle is that auto-loading guns like the Ruger 10/22 likely won’t cycle properly.
The main issue is that the smaller powder volume produces less expanding gases in the chamber. Most semi-automatic rifles utilize a simple blowback action that requires a narrow range of gas pressure to work properly. Too much pressure, like from a 22 Mag, can break the action. Too little pressure, like from a .22 Short, and the action won’t cycle.
While not explicitly dangerous, making a semi-automatic rifle a single shot is quite annoying. What’s even more annoying though is having magazine feeding issues. Long Rifle magazines are designed for the .22LR cartrdige. Most can use the .22 Long without much issue but the stubby .22 Short has problems with a lot of magazine designs.
Recommended Rifles for .22 Short and .22 Long
With all these issues, it’s important to note that as long as the cartridge is properly fed into the chamber, any rifle designed for .22 LR will safely shoot a .22 Short or .22 Long cartridge. The risk of blowing up your gun is about as close to zero as operating a firearm can be. Still, I wouldn’t recommend using anything other than .22 LR in a semi automatic. They are finicky enough as it is.
A good lever or pump action design certainly gives the benefit of increased capacity via a tube magazine. If buying a modern gun and wanting this advantage, the Henry above is a good choice as are Henry’s lever gun variants.
Personally, I’m a bolt action guy. It’s a strong, safe design capable of tremendous accuracy. CZ USA is a good place to start for a modern bolt action rimfire, but there is one gun I have in mind that is plentiful, cheap, and simple enough that a child can use it.
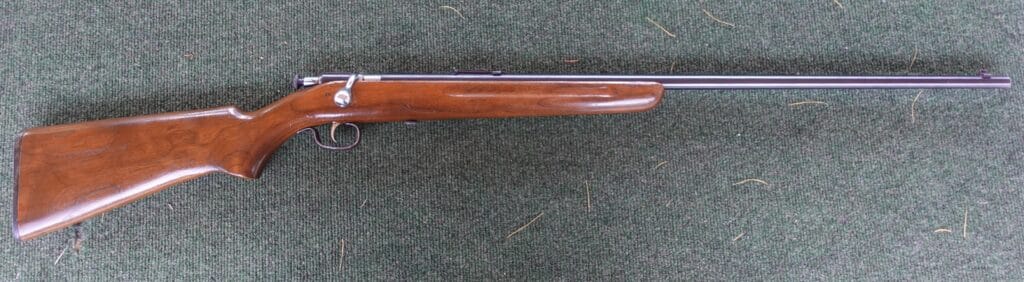
The Winchester Model 67
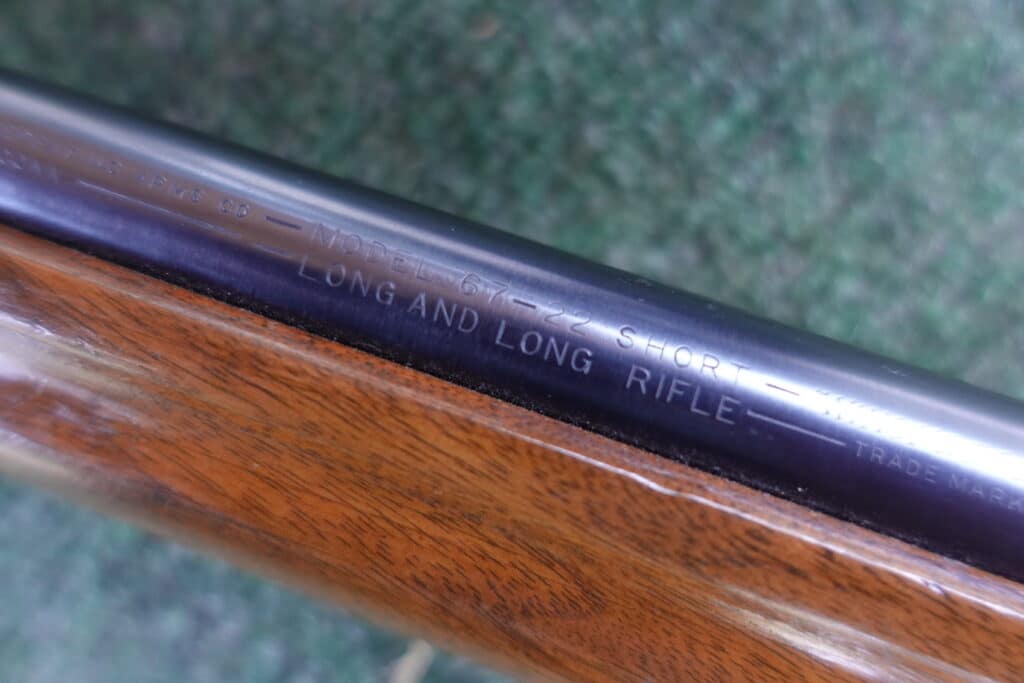
The Model 67 is not an especially noteworthy gun. It is a cheap, single shot .22 rimfire rifle capable of using .22 Short, .22 Long, and .22 Long Rifle. It was produced from 1934 to 1963. The action and barrel are held in with a single screw, and the rifle is equipped with a decent set of iron sights.
We have one in the family that was a first generation model, produced somewhere between 1934 and 1937. This rifle is “Uncle Pete’s Gun”, but that was my Mother’s uncle, so my great uncle. It shot game through the later half of the great depression in North Dakota and most likely was the gun that put food on the table at a time when affording groceries from the store wasn’t always a possibility.
This gun has been in continuous use for almost a century with minimal cleaning and only one refurbishment 20 years ago. Even figuring this gun has spent half it’s life in storage, I’d put the barrel at over 20,000 rounds and still going strong.
Looking at Gunbroker, the Model 67 can be found somewhere between $200 and $300. At a pawn shop or gun show it can likely be found for less. This is in line with the cheapest brand new 10/22 variants! It’s also better quality than a Savage rascal, so this would be a good gun for kids to learn on.
Conclusions
To answer the question in it’s simplest form, yes, 22 Short and 22 Long can be used in the same guns. The difference in pressure is minimal and besides length their dimensions are identical. Using one or the other in a gun that is chambered for both and/or 22 Long Rifle is possible. Occasionally, such a substitution can even be a good thing!
However, it is best to use the appropriate cartridge most of the time. A gun chambered for 22 Long Rifle should be use with 22 Long Rifle in most circumstances. Similarly, a rifle chambered for 22 Short or 22 Long only should NOT have 22 Lon Rifle placed in the chamber lest there be pressure issues or damage to the throat of the barrel.
When buying a gun that can use all three cartridges, look for one which says “For .22 Short, Long, and Long Rifle” or “For .22 S/L/LR”. Rifles chambered for other 22 caliber rimfire cartridges such as 22 Mag are NOT interchangeable and should be avoided.
The front sight rides are on a dovetail and are held down with a dove screw.
The dovetail is sleek and appealing, and it allows you to aim directly at your target.
The rear sight has standard RWS all metal and it has a spring-loaded ball bearing that helps it to stay put.
It also allows you to adjust for windage (allows you to adjust sight left and right)
And for elevation (allows you to adjust the sight up and down) .
If you like extra magnification then you’ll love that the Diana 48 comes with a standard RWS brand scope to provide extra magnification and improved accuracy.
Throughout all of the customer reviews, not a single user complained about the noise.
This means that it won’t be too loud for indoor target practice and can be taken out to the hunting field for a nice stealthy hunt.
Features and Benefits
Here are some of the main features of the RWS 48 and their benefits:
Features:
Ambidextrous stock
Automatic safety
Side lever cocking
Two-stage adjustable trigger
Beechwood stock
Standard RWS rear sight with spring loaded ball bearing
Single shot rifle
Benefits:
Ambidextrous Stock: The ambidextrous stock is nice because it allows both lefties and righties to use it conveniently with no awkwardness.
Automatic Safety:
Another exciting feature about the RWS 48 is the automatic safety.
The automatic safety assures that you only shoot when intended to, thereby protecting you accidental pellet discharge and potential injuries.
The automatic safety engages immediately once a pellet is inserted and the side lever is cocked back into place.
Lever Cocking:
the side lever cocking allows shooting to be more accurate because it’s less sensitive to handling.
It also accepts longer scopes for better magnification because the barrel doesn’t tip up and get in the way.
Two-Stage Adjustable Trigger: the adjustable trigger allows you to manipulate the amount of force it takes for the trigger to break and the shot to go off.
Beechwood Stock:
the beautifully finished beechwood stock on the RWS Diana 48 had high hardness, is heavily packed and has high resistance to abrasion.
So you don’t have to worry about the stock wearing out.
Standard RWS Rear Sight with spring-loaded bearing: the spring-loaded ball bearing on the RWS Diana 48 holds the setting of your site so it stays where you put it.
There’s no need to worry about losing your precious sight.
It also allows you to adjust for windage and elevation.
Single shot: the RWS Diana 48 is a single-shot rifle, meaning it only allows you to shoot one pellet at a time.
The single-shot helps with accuracy because you’ll always want your first shot to count.
Shooting Ability
The effective shooting range of RWS Diana 48 is up to 50 yards.
Some customer reviews said that it can take out squirrels with one shot from 40 yards.
It is suitable for target shooting, small game hunting, and pest control.
Unbelievablewarranty
As of this date, the Diana 48 has a limited lifetime warranty.
Diana 48 – specs
Calibre: 0.22/0.177
Velocity: 884 FPS with 0.22, 1,100 FPS with 0.177
Stock: beechwood
Barrel length: 17.0 inches
Overall length: 42.13 inches
Barrel: rifled
Front Sight: blade and ramp
Rear Sight: adjustable for windage and elevation
Buttplate: rubber
Suggested for: small game hunting/ pest control
Trigger pull: two pounds 13 ounces
Action: side lever
Safety: automatic
Powerplant: spring piston
Function: single-shot
Body Type: rifle
Weight: 8.5 pounds
Cocking effort: 39 pounds
Customer review
There are lots of customer reviews on the Diana RWS 48.
The majority of users love its accuracy, power, and fantastic design .
Its barrel gives enough space for your thumb so you don’t have to struggle when inserting the pellets.
The bluing on this rifle is dark and even, and the overall metal finish is perfect as well.
Many reviewers also boast about how the Diana 48 stands the test of time.
One owner stated that he has been using the rifle for 20 years, of which he never needed any extensive repairs.
And after years of constant use, the gun still fires as well as it did when it was new.
Pros
Cons
Beautiful beech stock
Impressive German engineering
Awesome trigger
Consistent velocities with different kinds of pellets
Remarkable Accuracy
Stands vigorously the test of time
Excellent customer service from the manufacturer
Impressive power
At 39lbs cocking, it is a bit stiff; it would be nice if the cocking was smoother.
RWS 48Price
The RWS 48 has a price range of about $400.
It is a reasonable price for a gun that provides attractive design, extreme accuracy and can last for generations.
There are a couple of different listings online with different prices, but the listing I found below is the most reasonable deal amongst e-commercial sites like Amazon, Pyramyd Air, and Walmart.
I’ve always been a fan of the Big & J deer attractant and mineral blocks. What if I could make my own deer attractant that works just as well for less money? Of course, I use corn feeders where it’s allowed (check your local hunting regulations regarding baiting), but I also build water troughs and mock scrapes to create an environment that encourages deer activity in my hunting areas.
I also like to provide additional nutritional supplementation to the deer in my hunting areas and that’s where the Big & J deer supplements became part of my plan.
Big & J can become pretty expensive, especially if you have a lot of different hunting areas. This year, I found a recipe for the ultimate deer attractant and supplement that I could make at home for a fraction of the cost of Big & J.
2 bags of brown sugar (dark will last longer than light)
2 boxes of baking soda
4 packages of cherry jello
2 big containers of grape Kool-Aid
1 big container of oats
2 cans of salt
The Short on YouTube had to be under a minute, so it’s a quick run through of my ultimate deer attractant. Let me offer a few more details about the mix and how I use it.
Mixing and Using the Ingredients
Most of the ingredients are just sweet and attract the deer with the sweetness of the item. The baking soda is the primary ingredient in most store-bought pre-mixed deer attractants and provides valuable minerals to the deer. Same with the salt.
I mix the ingredients in a 5 gallon bucket with a lid. This ingredient list almost filled the whole bucket. Pour all the ingredients in the bucket, secure the lid, and shake, rattle, and roll the bucket to mix the ingredients.
Most of these sugar-heavy ingredients will dissolve in a very short time if you don’t mix it some corn. So, I used a second 5 gallon bucket to mix equal parts of the deer attractant and deer corn. I found this causes the deer attractant to last a few days. You could also add molasses as a binder for a longer lasting deer attractant (it’s what most store bought “blocks” use as a binder).
Does It Work?
I found the deer really enjoyed the attractant and wasted no time finding it and eating it. After 8 years of hunting in West Virginia, I finally bagged my first buck! I like to think the attractant helped, although I also made two critical changes to my hunting area that also contributed to my success (stand location and how I approached the stand).
First West Virginia Buck
I didn’t use the attractant in Texas or Pennsylvania. We hunted public land in Pennsylvania where “baiting” is not allowed, so it was not an option. For Texas, we have established feeders that habituate the deer to the feeder locations, so I didn’t really feel the need for additional attractants or supplementation. However, the acorns dropped right before we arrived for hunting season. It’s possible that some additional nutrients (and sugar) could have drawn deer away from the preferred acorn food sources, resulting in more deer activity than we saw, this year.
You should always be sure that baiting is legal in your hunting area before using something like this attractant.
Optics are a critical part of using any firearm. This tool impacts the way you see and will change how you fire. Two popular optics include the Holosun 507k and the EPS Carry. In this article, we’ll discuss each product to determine which is right for you.
To determine which optic is the best choice, we will need to examine the specifications of each optic. Many details go into each product, from the reticle to the dimension of each product. Everything matters when considering the best choice.
We will go over the following:
Footprints
Reticle
Battery
Shake Awake Technology
Housing
Brightness Level
Dimensions
Pricing
Each makes a difference when comparing two optics.
Let’s dive deeper into each of the specifications. The more you know about the products, the easier it will be to choose the right one for your needs. First, we’ll talk about the footprints of each.
Footprints
The Holosun 507K and the EPS have the same footprint. The EPS has the same footprint as every optics device in the K series.
Thanks to this similarity, there is no difference between the mounting standard and the bottom surface of the red dot sight on either product.
Next, let’s talk about the reticle.
Reticle
Each product has options for multiple reticle systems. You can go with a 2 MOA dot or a 6 MOA option.
With the multi-reticle system, there is a standard 2 MOA dot and a 32 MOA ring, 2 MOA dot only, and 32 MOA ring in that order. If you pick the MRS selection, you also get Solar FailSafe. This addition allows constant charging with a quality solar-powered system.
Again, there is no winner in this category. Both products have multiple options to serve you well on the move. You may pick the reticle system that best suits your needs.
The battery is where the first differences emerge. Let’s discuss this source of power next.
Battery
The EPS Carry comes with a CR1620 battery. This device has 12,000 hours of life on circle plus dot, or 50,000 hours if you use the dot-only on setting 6. It will last even longer with a solar charging ability.
On the other hand, the Holosun 507K runs on a CR1632 battery. This option allows up to 50,000 hours of battery life on setting 6.
The CR1632 will last longer and provide more use than a CR1620 battery. The Holosun 507K is the winner in this category.
All Holosun devices come equipped with shake awake technology. Let’s talk about what this addition is next.
Shake Awake Technology
Shake Awake technology is an addition to Holosun’s optics that turns off the LED in the system when there is no motion detected. It’s designed to save energy and help the optic last for as long as possible.
Users may customize the amount of time it takes for the LED system to turn off in their settings. It’s also possible to turn off Shake Awake entirely, keeping all control to yourself.
The 507K and EPS Carry tie in this category. They both have the quality Shake Awake system.
Every optic comes in a shell to keep it safe. Let’s examine the housing for each product next.
Housing
The EPS Carry has a housing made of aircraft grade 7075 T6 aluminum. This product is one of the highest-strength aluminum alloys on the market, composed of zinc and copper as alloying ingredients. The housing is durable and meant to withstand significant damage.
The Holosun 507K has the same material protecting it from the outside world. You will receive the same benefits from this housing as you will with the other. However, it isn’t aircraft grade so it might not be as strong as the EPS Carry.
The winner in this category is the EPS Carry. Its aircraft-grade housing will help it last longer than the competing Holosun 507K.
Next, let’s consider the brightness level of the product. The better the illumination in a system, the easier it will be to see what you are aiming at in the dark and light.
Brightness Level
Both products have excellent brightness level features. Both choices have 12 levels of brightness options, eight for the daytime and four that are night vision compatible. They offer extensive visibility during every light shift while you are out.
There is no winner in this category, as both products have the same brightness level offerings. You’ll have plenty of visibility no matter which of the two you select.
We have two more categories to cover before landing on a winner. Next, let’s talk about the dimensions of each product.
Dimensions
The EPS Carry measures 1.62 x 1.19 x 0.95 inches. It weighs one ounce, and the window size measures .58 x .77 inches.
The Holosun 507K measures 1.6 x .98 x .95 inches. It weighs one ounce and has a window size of .58 x .77 inches.
These products are very similar in their dimensions, off by a fraction of an inch in the cases where there is a difference. We would say the EPS Carry is the winner, as it offers a slightly larger viewing window and device for the user.
Next, let’s talk about perhaps the most vital component – price.
Pricing
The Holosun 507K costs $320, while the EPS Carry costs $400. If you want a lower-priced EPS, nix the Carry for the EPS at $330.
When considering money, the Holosun 507K is the more economical option. It costs $80 less than the competing EPS Carry.
We’ve gone over the details of the Holosun 507K and the EPS Carry. Which one emerges as the best optics option for your firearm needs?
Conclusion
Although there are many similarities between these products, the winner is the Holosun 507K. It has a better battery life and doesn’t cost as much as the competing EPS Carry.
No matter which Holosun product you use, you are sure to have a quality experience. Each product comes equipped with items like the Shake Awake features and excellent optics, allowing for the best possible experience every time.
The fleshing knife is a key component to most fur sheds. If you’re fleshing muskrats, mink, marten and weasels, you can simply use a butter knife, or a small pelt scraper. But if you’ve got any amount of meat and fat to clean off a pelt, you need a fleshing knife.
Fleshing knives come in a variety of shapes and sizes, and a wide range of price points. The very low end, entry level fleshing knives cost around $15-25. Why so cheap? They’re simply a piece of mild steel with a handle on each end. Unlike the better knives, they’re only one sided, meaning you can do a lot of pushing, but little to no cutting unless you sharpen the convex side on your own. They also typically come unsharpened, and don’t sharpen very easily. They can get the job done, and are great for fleshing a few pelts a season, but they require a whole lot of work and will wear a guy out pretty quick trying to do much fleshing. A number of different companies make these knives, some with brand names and some without. Aside from a lack of ergonomics, the entry level fleshing knives don’t have the quality steel that will take a sharp edge and hold it. Sure, you can sharpen them, but they’ll go dull pretty quick, and won’t cut or push nearly as well. Still, if you need a fleshing knife in a pinch, or you only flesh the occasional pelt, one of these will save you a few bucks.
There’s a quick jump, both in price and quality, between the low end and high end fleshing knives – without much in between. Instead of paying less than $30, you’ll be well north of $60 for a good knife. And in my opinion, it’s well worth the added investment. I remember my disbelief when I tried my first good quality knife, a Necker 600, after spending years trying to flesh beavers with the low end knives. It was incredible. One side for pushing, and a razor edge on the other for cutting the tough spots. The high quality steel blade didn’t dull a bit, even after fleshing 20 beavers. In addition to steel quality, the ergonomic shape was easier on the hands and arms, and the knife had a level of flex to it that made for smooth strokes and less tiring. I swore I’d never go back to an entry level knife. If you can afford it, get a Necker, or equivalent fleshing knife like the Wiebe Elite or the Au Sable Superior.
In addition to the low and high end standard knives, there are a number of other styles that some folks prefer. Sheffield and Green English are a bit different style of knife, with a much wider double-edged blade. They come factory sharpened, and lots of folks like them. The Green English is available at a similar price point to the Necker, and the Sheffield is kind of the high end of the high end product – hand crafted in England with the best quality steel.
A relative newcomer to the market, the Caribou fleshing knife has had some really great reviews recently as well. The big time beaver trappers I know who have used it say it has a thinner, more flexible blade than the Necker, and they really like the precision it affords. Check it out!
Unless you’re a skilled clean skinner or one of those guys who fleshes beaver pelts with a small knife over his knee, you need a fleshing knife in the fur shed. It’s as important as the beam, and you certainly get what you pay for. The low end knives are a dime a dozen, and will get you by in a pinch, but a good fleshing knife that’s comfortable and high performing is worth every penny you spend on it. It’s an item that will last for many years, and pays for itself with every pelt you put up.
The short answer: it’s your preference. If you use the metric system (meters/centimeters) then go for MRAD. But if you measure in the empirical system (yards/inches) then MOA may be easier.
If you want a more thorough answer along with an explanation of MOA vs MRAD, then keep on reading!
Suppose you’re headed out on a hunting trip with your buddies.
You did your research, you read the best rifle scope guide, and you’re ready to go. But then your buddy starts talking in meters and your MOA turrets are adjusting in yards.
His numbers don’t match your turrets, your turrets don’t match your reticle, and now your target has bounded off to another state.
The problem: he was using MRAD while you were using MOA.
MOA and MRAD are basically two different systems of measurement.
When sighting rifle scopes, the reticle and turrets are used together to reach the most accurate shot possible. The turrets change the position of your reticle while your reticle provides an aiming point.
Your turret clicks and the hashes on your reticle can use one of two different systems of scope alignment: MOA or MRAD.
You can have the best long range scope on the market, but if you don’t sight it in using either system, it’s useless.
If you’re looking for help choosing between rifle scopes, here’s the only guide you’ll need to read.
What’s an MOA Scope?
M.O.A. stands for Minutes of Angle; a system based on degrees and minutes. This type of angle measurement is used to calculate the distance to a target and MOA turrets correction for the bullet trajectory.
Basically the math breaks down to this: there are 360 degrees in a circle, and 60 minutes in a degree for a total of 21,600 degrees.
You can find your MOA measurement by multiplying the distance in yards by 1.047, then dividing by 100. You can thank the Ancient Egyptians and Mesopotamians later.
At 200 yards, one MOA equals 2.094 inches. Out to 1,000 yards, 1 MOA equals 10.47 inches, and so on.
For those of us who aren’t Einstein, the easiest way I’ve found is to use a quick-reference conversion chart. That way you don’t miss your prize buck while scribbling away on math problems.
MOA scopes aren’t a perfect system though.
Often calculations are made with 1 MOA at 100 yards (91.4 meters), but you need to count on 100 yards with 1.05 MOA. Up to 100 yards there will be no problem with 1 to 100 comparison, but when shooting over longer distances you’ll be 5% off base and this could mean missing a shot.
This isn’t a problem if you’re only shooting at medium ranges. Read my 4×32 scope guide for more details.
I use an MOA reticle scope on my AR-15 A2 after I removed the front sights for added cool guy points. I’ll show you how to remove the AR-15 A2 sights here.
What’s an MRAD Rifle Scope?
MRAD stands for milliradians (or MIL for short), and was originally developed for artillery in the late 1800s. It’s still the preferred method for military and police force operations to this day, where you’ll commonly here it referred to as a MIL-dot reticle.
Based on a radial line, a unit of angular measurement that is equal to roughly 57.3 degrees, a milliradian is one thousandth of a radian.
This system does not come out to make a perfect circle like the MOA system. Instead, milliradians divide the circumference of a circle into 6.28 equal sections measuring 57.3 degrees each in an MRAD scope.
Thus, every circle has a circle circumference that is 6.28 radians long. Then each radian is going to be divided into 1,000 parts more, which is called Milliradians.
When calculating MRAD in a MIL-based scope, you will be calling it MIL, which is 3.6 inches at 100 yards (91.4m using the metric system) equal to 1 MIL.
I tried an MRAD scope on my M1A that happens to have the best M1A scope mount ever.
MOA vs MRAD: Which is better?
The short answer: neither. The argument is as old as time, but it’s really just the shooter’s preference of rifle scope.
The fight between MOA vs MRAD boils down to a difference in how we format degrees of angular measure. It’s fancy math terminology that basically asks if you use yards or meters.
Technically, the 1/4 MOA clicks are slightly more accurate than the 1/10 MIL, but the MIL values are somewhat easier to communicate.
Reference cards with MIL are easier to read because they are indicated by 2 numbers only, while the cards with MOA are indicated with four numbers. We could go back and forth all day, but you get the idea.
If you like other comparisons, check out my Nightforce SHV vs. Vortex PST guide.
Which do you need?
Choosing between the MOA or MRAD system will take some self reflection, so buckle up.
If you normally think in meters or centimeters, then it is easier to calculate distance with a MOA. If you normally think in yards or inches, then MRAD should be your go-to.
And if you’re not going to calculate distances, it doesn’t matter between the MRAD vs MOA. Do your thing, both types are equally effective for medium- and long-range shooting.
Another thing to take into account is that you also have to consider your hunting partners, teammates, friends, and so on. You’ll want to have a common language so you can communicate together without having to do conversions between the two systems.
Or you could be an absolute rebel and have a scope for each system, swapping it out in the field with the best quick detach scope mounts. Live your life to the fullest.
Most importantly, choose the same system for your turrets and scope reticles. I have a guide on first focal planes vs. second focal planes to help you choose the right reticle as well.
Regardless of all the math, the decision between MOA and MRAD isn’t that important. Clicks with an MOA turret are slightly more precise than clicks with a MIL turret, but at the end of the day it’s a style choice between rifle scopes.
Whitetail deer are one of the most common game animals for hunters in the USA. But how many points do you score for that big buck’s antlers? Learning how to add all the points isn’t too difficult, but it does take a little practice. Here’s a guide to counting deer points and scoring your prize buck.
You don’t have to be a math whiz to learn how to count points on deer antlers correctly. Any hunter, regardless of qualification, can count points on their buck by reading up on techniques online. The Boone and Crockett Club website includes a user-friendly, easy-to-use scoring chart that will help you score your whitetail deer quickly and accurately.
Simply follow along, punch in those numbers, and let the internal technology handle the rest. If you’re a new hunter and looking at how to count points on your buck, you’ve come to the right place. In this article, we’ll look into everything you need to know about scoring your buck and much more. Let’s get started!
Hunters have long kept track of the sizes and measurements of the racks on the deer they shoot, even before record books were established. This has made it easier for hunters to remember the size of the animals and compare them to other bucks shot by other hunters.
However, because there was no standardized method for measuring and tallying rack sizes, many hunters disagreed about which bucks were the largest. Sometimes, hunters were not using the same measurements. Even when they agreed on something, such as counting the normal points, nearly all the bucks compared had differences that produced important questions.
For example:
Which are the main points on a buck that can be scored?
What qualifies as an antler point?
What about other antler points and abnormal points?
The Boone and Crockett Club is a non-profit organization created in 1887 by Theodore Roosevelt for passionate big-game hunters. An authorized committee of B&C members took on the challenge of widening the scope of the club’s current basic methodology to a more complete, equitable, and objective measurement system.
This system was meant to recognize remarkable North American big game animals.
Their actions developed an objective, honest, and fair grading system known as the Boone and Crockett scoring system. The Boone and Crockett record book classified scores into two groups:
Boone and Crockett Awards = 160-170
Boone and Crockett All-Time Awards = 170+
Their score sheet is available on their website; you can download it and enter the measurements. If you submit the Boone and Crockett Club with your information, they’ll use it to create valuable data. This information can then be used for conservation and game management.
Typical vs. Non-typical Deer Antlers
Hunters coined “typical” and “non-typical” antlers to describe the relative size of killed bucks. A typical deer has a symmetrical rack, which means that each antler’s orientation, the direction of tines, the number of points, and general arrangement are mirror images of one another.
In contrast, a non-typical deer looks unbalanced, and you can identify them at a glance. You’ll notice that the point count on each side does not match. This imbalanced appearance can be counted easily as having six points on one antler and four on the other.
However, if you’re scoring a BC score, the difference between typical and non-typical becomes prominent. When you score a typical buck, abnormal points will be deducted from your total score. But when you score a non-typical buck, you get extra points.
The lengths of the atypical scores are included in the final net score sheet, which is the main difference between scoring a typical and a non-typical rack. On a typical buck, these values are deducted from the score sheet. The majority of non-typical points include spits and kicker points. Drop tines, for example, are far less common to come across.
How to Count Points on a Buck’s Antlers
Now that you know some basic aspects of point counting, let’s look at how to score your buck accurately.
Step 1: Measure the Antler Beam Length
The first step is to measure the entire antler length from base to tip. As a deer antler is certainly not a perfectly straight piece that you can measure with a simple ruler or tape, this process can be challenging.
You may use a flexible cable or string to measure the exact length of the main beams. You’ll want to trace the beam length using the cable/string. After you reach the end, use an alligator clip or tape, or ask a friend to mark the end.
Now measure the length of the string or cable for the beam length. After measuring, take record and repeat the process on the other antler.
Step 2: Measure the Tine to Get Your “G” Measurements
The “G” values refer to the antlers’ tines. Each tine’s measurement is assigned a G and a number, beginning with the tine closest to the skull. G1 refers to the first tine (closest to the skull), G2 corresponds to the following tine, and so on.
To obtain the “G” values, put a piece of tape over the base of the tine, aligning it with the top edge of the main beam. After placing the tape, measure from the base of the tine to the top. Repeat this for each tine and record your measurements.
Step 3: Measure Abnormal Points
What counts as abnormal? Any tine or point that does not come from the main beam. This can include leaners, stickers, kickers, and drop tines. Abnormal points are measured independently from the main tines and noted in their own category on the scoring sheet.
To be counted as a point, a tine must be at least 1 inch long, and its width should be less than its length (for example, a 2-inch tine with a 2 1/2-inch base would not count).
Step 4: Measure the Inside Spread
Calculate the inside spread of the two antlers, which is the distance between the insides of the antlers’ outer sections. This measurement is taken perpendicular to the skull’s center line. The Boone & Crockett scoring chart refers to this measurement as a “spread credit” if it is shorter than the longest main beam.
If your spread credit is longer than the main beam, then that longer main beam length will decide your overall score. For instance, if the inside spread is 22 inches and the longest of the two main beams is 20 inches, then 20 inches is used as the inside spread credit.
Step 5: Take Circumference Measurements or the “H”
You’ll probably require more than just a regular carpenter’s tape measure to finish the “H” measurements. Here you’ll need a flexible tape measure used by tailors since you’ll have to wrap it around the antlers to obtain the circumference. Alternatively, you can roll a wire around the antler, measure the wire, and then mark the circumference.
Any antler, regardless of the number of tines, will have eight total H measures, four on each side. The H1 measurement will be the least circumference between the first point and the burr. The smallest circumference between the first and second points will be the H2 measurement. Continue taking measurements until you have four measurements for both antlers.
The smallest point between the following G points is used for all other circumference measurements. If G4 is absent, H4 is taken halfway between the center of G3’s base and the main beam’s tip.
For example, if you get a 6 point without G3 or G4, find the halfway point between the G2 and the main beam’s tip, measure its circumference, and use this value as your H3 and H4 measurements.
Step 6: Add the Measurements
For this step, you’ll need your most reliable calculator. All you have to do is add your measurements together. Your buck’s green gross score is the sum of all your measures. But the net score is what counts if you want to put your score in the record books. To find it, subtract any side-to-side differences and the abnormal points.
For instance, if the left G3 number is 4.5 inches and the right G3 number is 5, you should subtract a half inch from the measures. Now that you have the net score, you must wait for the rack to dry for 60 days before recalculating the score to make it official. To determine the final score, you’ll follow the same procedure.
How To Count Points on a Buck: Quick Summary
Let’s quickly summarize the main steps to count the point on a buck:
Measure the length of the two major beams.
Measure the lengths of each point.
Add the four circumference measurements together.
Count the spread credit.
Subtract the total length of all atypical tines on a typical rack.
Subtract the difference between each main beam measurement for the right and left.
Subtract the differences in the left and right major points’ measurements.
Subtract the difference between each circumference reading.
Bottom Line
As most hunters take down one buck each season, scoring is a process best left to the professionals. A taxidermist, guide, or even a professional wild game processor can assist you in counting your points.
You’ll need a notepad, flexible tape, basic math skills or a calculator to score your prize. If you believe your buck is great enough to break a record and is qualified for a place in the records, send your bid formally by reaching the Boone and Crockett Club. A professional from the club will arrive and record your new score for everyone to see in their book.
FAQ
What counts as a point on a buck?
In hunting, a point on a buck refers to the individual tines of the antlers. A tine has to be at least one inch long and may be quickly counted by assuming that an overwhelming majority of mature whitetail bucks grow a brow tine on each antler and that the main beam tip is counted as one point. Points are typically documented on Column G, which is why hunters often refer to them as G-points. Points include the brow tine, which sticks straight up near the base of the antlers.
How rare is an 8-point buck?
8-point bucks are the most common, making up 50 percent of antlered deer in all mature buck age classes. Is an 8-point that may be average to many hunters your perfect buck? It all depends on the hunter’s preferences and criteria such as hunting pressure, available food, and the age of the buck. Ultimately, the decision of what constitutes a “perfect buck” is subjective and varies from hunter to hunter.
Do you count brow tines in the score?
Brow tines are small antlers that point forward over the deer’s eyes. These are counted for whitetail deer but not for mule deer.
How can you count a buck’s score in the field?
One quick estimation can be made by counting the number of points through your scope or binoculars. A buck that has two standing normal points per side is probably an 8-point buck. If you spot one with three standing points, it is probably a 10-point buck.
Counting deer antler points in the field is a good way to estimate the score, but you’ll need to bag the deer and let its antlers dry for 60 days before you can get an official score.
Hi there! Welcome to my review of the best saltwater fishing rods.
Saltwater fishing calls for only the best rods. You’ll find all sorts of fish, from the tiniest panfish near shore to the largest monster fish far out in the waters. This means your fishing rod has to be sensitive enough for those minuscule fish, as well as strong enough for the prize fish you’ll meet. Since saltwater is more corrosive than freshwater, a saltwater spinning rod has to be corrosion-resistant too. It’s also crucial that the fishing rod is affordable because a perfect fishing rod is pointless if you can’t have it.
The best fishing rod at satisfying all these criteria is the St Croix Legend Tournament Inshore. This corrosion-resistant fishing rod has the backbone to take on the monster fish and the sensitivity to detect timid bites. It may cost lot of pennies, but it’s worth every penny.
Everyone has different preferences though. Some of you may be looking for budget rods and others might be looking for surf fishing rods.
Before we get started, we wanted to let you choose for yourself whether to get a spinning or baitcasting rod, where possible. As such, by default, the links are to the spinning options, but we’ve also included links to the baitcasting rods of the same model where applicable.
With that out of the way, let’s begin.
Best Overall
1. St Croix Legend Tournament Inshore
Blank Material: Carbon Fiber
Guides: Aluminum Oxide
Handle Material: Cork
Power: Ranges from Light to Heavy
I’ll start the ball rolling with a saltwater rod that’s handcrafted in the USA. Designed to be unmatched in strength and durability and to have incredible sensitivity and lightness, this is the best saltwater fishing rod that money can get.
St Croix is famous among anglers for making the best premium rods. They’re always researching and developing new technologies for their rods. To date, their R&D has yielded 3 groundbreaking technologies.
The first two technologies are the Fortified Resin System (FRS) and the Advanced Reinforcing Technology (ART). Rods built with FRS are 33% stronger than rods built with the usual methods. ART is an exceptional carbon fiber that makes a rod 10 times stronger with no increase in diameter or weight. These state-of-the-art technologies combine to produce a saltwater rod that’s stronger and more durable than any other rod on the market. You’ll have no trouble even when up against the largest offshore fishes. And needless to say, this rod will last you a lifetime.
The final technology is the Integrated Poly Curve (IPC) tooling technology. IPC further enhances the rod’s strength and boosts its sensitivity by eliminating transitional points in the rod blank. Plus, carbon fiber is the most sensitive material available for rod blanks. The carbon fiber, coupled with IPC, creates an unbelievably sensitive fishing rod.
Another nice benefit of having those technologies is lightness. With these technologies, less material is needed to get the same amount of strength. As such, the rod is also extremely light.
To sum it up, the St Croix Legend Tournament Inshore excels in every aspect. But be warned, its price is not for the faint of heart. Only serious anglers who are looking to invest in the best saltwater fishing gear available should get this fishing rod.
Of course, for the premium price tag, you’ll be well-protected by the 15-year warranty. If you won’t settle for anything less than the best saltwater fishing gear and have the money to spare, this is it.
Also, as promised, here’s the link to the baitcasting version.
Best Legend Tournament Alternative
2. Penn Battalion II Inshore
Blank Material: Carbon Fiber
Guides: Fuji Alconite
Handle Material: Rubber Shrink Tubing/Cork
Power: Ranges from Medium Light to Heavy
On to our next saltwater rod, the Penn Battalion II Inshore manages to be strong and durable while still remaining a sensitive and lightweight rod. It’s no Legend Tournament, but it’s a damn good substitute.
The Penn Battalion II Inshore boasts a heavy power blank. It’s not common to see such a power rating on a carbon rod since carbon fiber is weaker than fiberglass. However, Penn achieved this with their SLC2 construction that has spiral carbon wraps for the first layer and longitudinal carbon fibers for the second layer. The result is a powerful fishing rod you can use for both inshore and offshore fishing.
Next, it’s equipped with Fuji alconite guides for a long lifespan. Fuji alconite guides are the gold standard in fishing guides. These guides are not just smooth, but also super corrosion-resistant. With the hardy SLC2 construction and these long-lasting guides, this rod will last for years to come.
Another benefit of the carbon blank is the sensitivity. As the most sensitive material, carbon fiber allows this rod to be responsive and feel the subtle bites of small fishes. In fact, it even has an extra fast action option which proves how sensitive this rod is.
As for its weight, it weighs a mere 5.3 ounces for its medium power 7 ft option. This is once again thanks to its carbon blank, as carbon fiber is the lightest material for blanks. This rod is light enough that you won’t feel tired even after a long day of fishing.
I also really like the rubber shrink tube handle. As compared to EVA and cork grips, rubber shrink tube handles provide the most secure grip and maintain this grip even when they get wet.
All in all, this top-of-the-line fishing rod delivers on all fronts, and it’s no wonder. Penn is a brand that is renowned for their quality components and tournament-tested products and rods. They hold about 1,400 IGFA world rankings for their superb performances in various saltwater game fishing tournaments.
And fret not, just because it’s a first-rate rod doesn’t mean it’ll make a hole in your wallet. It’s a fair bit less durable and a tad less strong and sensitive than the Legend Tournament. But it’s also $200 cheaper while still having all the strength and toughness needed for both offshore and inshore fishing. That’s what makes this the perfect alternative to the rather pricey Legend Tournament.
Once again, here’s the link to the baitcasting version.
Best For Surf Fishing
3. Penn Carnage III Surf Conventional
Blank Material: Composite
Guides: Titanium
Handle Material: Rubber Shrink Tubing
Power: Ranges from Medium to Medium Heavy
If you’re looking for a saltwater surf rod, the Penn Carnage III is your best bet.
For surf fishing, your rod has to be no shorter than 8 ft or you won’t be able to cast past the breaking waves. The Penn Carnage III comes in 10 ft and 11 ft to reach the monsters far out.
Of course, length isn’t the only reason to get this rod. Strength-wise, it doesn’t disappoint with its medium heavy power. You won’t be taking home any giants, but sharks and such will be no issue.
Sensitivity-wise, the moderate fast action enables you to feel the soft bites of small fish. It isn’t responsive enough for tiny fish though, so you’ll miss out on those. Still, this isn’t a huge boon since no one goes surf fishing for tiny fish anyway.
Durability-wise, the titanium guides are the sturdiest on the market. There’s also the rubber shrink tubing that’s relatively tough, very secure, and comfortable to grip.
In short, this is a well-rounded saltwater fishing rod, and the best at its length. You won’t find a better saltwater surf rod than this.
Best Carnage III Alternative
4. St Croix Triumph Surf Spinning
Blank Material: Carbon Fiber
Guides: Aluminum Oxide
Handle Material: Cork
Power: Ranges from Ultra Light to Medium Heavy
Just like the Carnage III, the St Croix Triumph Surf was designed for saltwater surf fishing.
First off, it features a SCII carbon blank that has a higher strain rate than normal carbon fibers. This means it’s stronger than other carbon fibers. Naturally, this makes the St Croix Triumph able to wrestle down any inshore fish. Unfortunately, the highest power rating for this rod is medium heavy, which isn’t enough for the bigger offshore fishes. Nevertheless, it will more than suffice for medium sized fish and even some of the larger sized species like sharks.
Other than that though, it doesn’t have any flaws.
The aluminum oxide guides are almost as corrosion-resistant as the Fuji alconite guides, and will still give you a long-lasting fishing rod.
And as mentioned earlier, carbon blanks are sensitive and light. You’ll have no trouble fishing for hours with this rod because of its lightness.
It’s also worth noting that this is a one-of-a-kind rod that uses eco-friendly parts.
Overall, this rod will perform fantastically for surf fishing. It comes in lengths from 8-10 ft, perfectly. Since surf fishing calls for 8-12 ft rods and the Penn Carnage III only runs from 10-12 ft, you can get this rod if you want something from 8-10 ft. It’s able to match the Penn Carnage III in strength and sensitivity, but loses out in hardiness, this the lower price.
That said, it’s lower price but still top-notch performance makes it a great alternative to the Carnage III. Whether you found the Carnage III out of your budget or are just looking for shorter surf rods, this is the rod for you.
Best Budget
5. Ugly Stik Bigwater
Blank Material: Composite
Guides: Stainless Steel
Handle Material: EVA Foam
Power: Ranges from Medium to Heavy
This next rod is the cheapest way to get started saltwater fishing. The Ugly Stik Bigwater Spinning Rod offers rugged strength without compromising on sensitivity.
Right off the bat, you’ll notice that this saltwater fishing rod has a graphite composite blank. This allows you to have the sensitivity of graphite and the strength of fiberglass. The graphite composite rod is further strengthened by Ugly Tech Construction. Ugly Tech is known to make unbreakable rods. This is made possible by their unique way of constructing rods. With it, you’ll be able to pick up on soft bites and handle gigantic fishes.
On top of that, this rod comes with stainless steel guides and an EVA grip. Stainless steel holds up well in saltwater and EVA foam is the most comfortable material for rod handles.
The catch is that this rod is much heavier than all the previous saltwater fishing rods. While fiberglass is stronger than carbon fiber, it’s also heavier. And while Ugly Tech Construction is strong, it uses more material.
At this price point though, those downsides are only to be expected. If you’re looking for a quality saltwater fishing rod on a tight budget, look no further.
Here’s the link to the baitcasting version.
Best Inshore
6. St Croix Teramar Southeast
Blank Material: Composite
Guides: Fuji O-Ring
Handle Material: Cork
Power: Medium Heavy
Last on the list, the St Croix Teramar Southeast lacks the strength for offshore fish, but excels for fishing inshore.
As a glance at the features would tell you, this rod sports a cork handle and Fuji O-Ring guides. O-Ring guides are made with aluminum oxide. This, together with the long-lasting cork grip, guarantees many years of service for this rod.
However, its strength is capped at medium heavy, which isn’t enough for the bigger offshore fishes. That’s why it’s only the best inshore fishing rod.
Moving on to responsiveness, the fast action guarantees you won’t miss the tugs of even tiny fish.
You’ll also be glad to hear that this rod is quite affordable, coming in at a little under 150 bucks. For those who only plan on inshore saltwater fishing, this could just be the rod you’re looking for.
Here’s the link to the baitcasting version.
What To Consider Before Buying A Saltwater Fishing Rod
By now, you should know which rod you’re going to get.
However, each rod has multiple options and each represents a different rod length, power, action, etc.
For the best saltwater fishing experience, make sure to read this buying guide so you pick the right one.
Blank Material
Rod blanks are typically made of either carbon fiber, fiberglass, or composite which is a mixture of both.
You may also have seen some graphite rods, but graphite is just another name for carbon fiber.
Carbon fiber is more expensive, more sensitive and lighter than fiberglass. On the other hand, fiberglass is stronger and more sturdy.
Composite is a material that contains the good qualities of both materials.
Composite rods have the sensitivity of carbon and the strength of fiberglass.
Of course, a pure carbon fiber rod would still be lighter and more sensitive and a pure fiberglass rod would still be stronger. But composite offers the best of both worlds.
I prefer carbon saltwater fishing rods for fishing inshore and fiberglass or composite saltwater fishing rods when I fish offshore. However, this ultimately comes down to what you value in a fishing rod.
Rod Power
Rod power refers to how much force is required to bend a rod, aka stiffness.
It’s quite commonsensical. You’ll need a stiffer rod for bigger fish.
It isn’t just the fact that a flimsy rod won’t hold up against big fish. Rods with heavier power also work better with bigger and heavier lures, which you need for big fish.
As such, you’ll need to consider where you’ll be fishing and what fish you’ll be targeting.
You’ll find smaller fish inshore than offshore, so you can go with lighter power saltwater fishing rods.
I recommend using a medium light to medium power rod for fishing inshore. You can deviate from this if you plan on only targeting panfish, in which case a light power rod will be fine.
Offshore fishes are larger, so go with at least medium heavy rods.
If you’re going after prize fish though, make sure to get at least heavy rods and get extra heavy power if possible.
Rod Action
Rod action is a measure of how high up your rod bends when you apply pressure on the rod tip.
The higher up it bends, the faster the action and the more sensitive your rod will be.
For fishing inshore where the fishes are smaller, you’ll need faster action saltwater fishing rods to feel the softer tugs.
I recommend getting at least a moderate fast action rod, although a fast action rod would be more ideal.
For offshore fishing, the fishes will be larger, meaning they’ll have stronger bites.
As such, you can afford to get a moderate or even a slow action fishing rod. Of course, more sensitivity is always good, so if you see a fast action rod available, go for it.
Rod Length
It’s critical that you get the right length because it’ll determine how far you can cast, how stiff your rod is, and your rod weight.
A longer rod gives you more leverage to cast further and is the biggest deciding factor in how far you can cast.
A longer rod also tends to mean more strength, although it will only affect your rod stiffness to a small degree.
And lastly, more length means more material and thus more weight.
As such, whether you’re fishing offshore or inshore, stick with 6-8 ft.
Unless you’re surf fishing, you won’t ever need more casting distance than an 8 ft rod will provide. A longer rod will only add on unnecessary weight. At the same time, a shorter rod than 6 ft may not cast far enough, especially if you’re fishing inshore.
If you’re going surf fishing, follow this guide to find the right rod length.
Line Guides
It is particularly important that your line guides are corrosion-resistant since you’ll be fishing in saltwater for long periods of time.
The good news is that most metals are corrosion-resistant, and ceramic is completely rust-proof.
Some of the better metals to look out for are titanium and alconite. Both of these are the best materials for guides, being strong, smooth, and highly corrosion-resistant.
Reel Seat
Lastly, though not of huge importance, reel seats will affect sensitivity to some extent. Inferior reel seats won’t hold up against larger fish and your reel can end up being ripped off.
The best reel seats will be made of metal or graphite, so look out for those materials. Minimal reel seats that expose the rod blank also provide an extra sensitivity boost, although it won’t really matter as long as you have the rod action that you want.
How To Take Care Of A Saltwater Fishing Rod
After fishing, always clean your rod with a cloth, using either freshwater or lukewarm water and vinegar or a mild detergent.
If there’s any remaining dirt, clean it off with a toothbrush, or a brush with soft bristles. You can then wipe it dry with a cloth or just let it dry by itself. However, there will always be some moisture on the rod even after wiping, so make sure to let it dry for a while more even if you’ve cleaned it with a dry cloth.
Once a month, remove the spinning reel (or your baitcasting reel, depending on which you have) and lubricate the reel seat and other moving parts, like roller guides.
Next, wipe off excess lubricant
After putting back the reel and tightening all the respective screws, apply a final layer of silicone lubricant. This will not only lubricate, but also resist water and protect the surface from wear and tear.
This next step is optional, but recommended if you want a sleek-looking rod. After you’ve completed all the previous steps, you can lightly coat your rod with bowling alley wax. This will keep your rod looking sleek and shiny. Just note that this only works on modern rods that have that polished finish.
Finally, when aboard boats, make sure to store your rods safely so that they won’t collide against hard surfaces or other rods. Rod racks are very useful for this purpose, but you can also wrap up your rods with towels to protect them.
My Verdict
Saltwater conditions are harsh, and lesser saltwater spinning rods just won’t cut it.
While all the saltwater fishing rods on this list will get the job done, the absolute cream of the crop is the St Croix Legend Tournament Inshore. It stands out even among the best saltwater rods because it excels in literally every aspect.
With that, all the best in your saltwater ventures!
An air rifle's effective shooting range depends on various factors, including the type of rifle, the caliber, and the power source. Generally speaking, most...
")
")
")
")
")


 Review – The Best Name In The Air Rifle Game")


 The fleshing knife is a key component to most fur sheds. If you’re fleshing muskrats, mink, marten and weasels, you can simply use a butter knife, or a small pelt scraper. But if you’ve got any amount of meat and fat to clean off a pelt, you need a fleshing knife.