When I can see ramp leaves starting to turn yellow in sunny areas, I know it’s time to grab some leaves to dehydrate for cooking. This rub made from ramp leaves is one of my favorite foraged seasoning blends and is great with vegetables, chicken and pork.
Dried ramp leaves are more gently than either dried onions or garlic, and come along with a bonus: that special rampy flavor you can’t buy in a store. I’ve ended up running out of leaves for the past few years in a row, so this year I made darn sure to get a lot-easy to do since they’re on my girlfriends farm.
After a few days of rotating the dehydrator trays, I had a good gallon jar or so of lightly crumbled ramp leaves-crumbled enough for storage, but not ground to a powder which will eventually lose some (but not all) of it’s flavor if it sits at room temperature.
There’s a lot of things you can do with dried ramp leaves, one of my favorites is to simply put them in broth, but they’re so much more. I’ve always wanted to make a sort of all-purpose dried ramp leaf rub / seasoning recipe that I could use with meat and vegetables though, and with plenty of dried leaves around, it was time.
Now dried ramp leaves are delicious, but too many of them can come off as a bit swampy, if that makes any sense. balance in all things. But how much balance? After a few versions, I decided to cut the ramp leaves 50% with other seasonings.
By comparison, using 50% garlic or onion powder in a rub would be offensively oniony, dried ramp leaves, on the other hand, are more delicate, and can be used with a heavier hand.
The spices here I specifically chose with the ramps flavor profile in mind. Carrot family seasonings are great here since they can easily coexist with the ramps without taking over, like cinnamon or cloves might.
Coriander was the first one I reached for, since the brightness gives a needed lift to the woodsy-ness. Cumin is another great partner, that, while strong in itself, can add a good undertone that the ramps love (another simple rub is just cumin, pepper and dried ramp leaves).
Finally, a healthy dose of fresh ground black pepper adds some warmth that won’t overpower things, and a smaller amount of paprika adds a little color and increases the affinity of the rub for contacting hot oil.
That being said, this rub is just a beginning, not an end. I really encourage you to try out my batch first, but afterwords, depending on what you’re making, there’s some other great additions you might add to the basic recipe. Here’s a few examples:
Adding lightly toasted sesame seeds can give a nice combination of flavor, similar to zaatar.
Dried oregano or even better, dried monarda fistulosa can also work well here.
If you want to use the rub with fish, increase the coriander and decrease the black pepper by half.
Substitute ground sumac for paprika
How to use
Use as a generous rub for pork and beef. Use a lighter hand for chicken or fish.
It’s great to rub on smoked meat. For the best crust, season the meat with salt, then rub with the ramp rub and allow to rest overnight before smoking. Same goes for braising.
As a sprinkle. Think freshly cooked rice, steamed vegetables, etc.
In soups. Use a light hand here since there’s a good amount of black pepper that can make soup spicy.
More
Ramps: Harvesting, Sustainability, Cooking and Recipes
Whether you are a fan of striker-fired guns or not, they are what’s hot, what’s hip, and they are here to stay.
But what has all that popularity gotten us? Well, a lot of black polymer pistols that look really similar.
There is a dizzying amount of striker-fired pistols on the market today, and it can be tough to figure out what sets them apart from the competition and, more importantly, which one might be right for you.
With that in mind, we filmed a video and compiled a list of our favorite striker-fired pistols (in no particular order) and why we think they rock.
But first…if you aren’t familiar with the differences between striker-fired and hammer-fired pistols, we have you covered with our complete breakdown here!
Now, onto our faves!
1. Sig Sauer P365 X-Macro
The X-Macro is Sig’s latest evolution of their ultra-popular micro-compact P365, and we have to say…it delivers.
The X-Macro packs a ton of features in a small package.
Even though it is only 1.1 inches wide and 5.2 inches tall, the X-Macro has a mind-boggling capacity of 17 rounds of 9mm.
No other manufacturer has managed to stuff this many rounds in a gun this size.
Features include an optics-ready slide that lets you keep the rear sight when a red dot is installed, X-Ray night sights, a full 1913 accessory rail, extended beavertail, and an integrated compensator.
The integrated compensator makes follow-up shots a breeze.
Additionally, Sig was able to retain the full frame, slide, and fire control unit compatibility with previous versions of the P365.
Overall, the solid ergonomics, a good trigger, and the compensator make the X-Macro far easier to shoot than you might expect, making it an excellent choice for those wanting to maximize capacity without getting a full-size pistol.
Don’t forget to check out our review of the P365 X-Macro in the video below or read up on the deets in our full review!
2. CZ P-10C
Sometimes guns punch above their weight class, and we definitely feel that way about the CZ P-10C.
It may look like another Glock 19-type clone, but in the end, you are getting more for your money.
While it may look run-of-the-mill, the CZ P-10C feels far from it.
For starters, users will find a surprisingly nice striker-fired trigger on the P-10C. Secondly, CZ worked their ergonomic magic to produce a gun that avoids that blocky 2×4 feeling of some other polymer pistols.
Aggressive grip texturing and slide serrations, a deep beavertail, and mild palm swells help this pistol feel like it ”locks in” to your hand.
The P-10C shoots flat and fast, even in its stock configuration.
Metal sights are also a nice upgrade over much of the competition, and optics-ready versions are also available. Metal 15-round magazines are also standard.
The result? A super flat shooting, comfortable pistol with great features that comes in under $500.
Want to know more? Head on over to see our full review of the CZ P-10C!
3. Glock 19
You knew it was coming. We knew it was coming. What list isn’t complete without a Glock 19?
The one and only Glock 19, in the flesh.
Many designs have come and gone, but the Glock 19 has remained and is widely considered the gold standard of striker-fired pistols.
Why is that? One word — reliability.
With decades of military and law enforcement use under its belt, the Glock 19 is the most time-tested handgun on this list, in addition to being the most popular handgun in the world (with the biggest aftermarket).
Glock’s widespread usage means you can get all the aftermarket bells and whistles you can dream of.
Its 15+1 capacity and 4-inch barrel have become the industry standard size for compact pistols.
The trigger isn’t the best and is pretty spongy by today’s standards, and the ergonomics are a bit blocky for our taste. However, these guns still point well, shoot well, and their simplicity and ease of use can’t be understated.
Those who put a premium on reliability, flexibility, and simplicity will be hard-pressed to find a gun that does those better.
Don’t forget to take a peek at our 3,500-round review of the Gen 5 Glock 19!
4. HK VP9
I know it sounds like heresy, but HK’s best gun just might be their cheapest one — the VP9.
The VP9 came later to the game than many of its contemporaries, but it came to play.
Why is that, you say? Well, they finally made a handgun to compete for civilian sales rather than trying to lock down military and agency contracts.
Taking aim at other striker-fired guns on the market, the VP9 set out to do a lot of things better, and it did.
The trigger is excellent, and the trigger guard offers generous room for those who shoot with gloves.
For starters, the VP9 has one of the better striker-fired triggers on the market. It is relatively crisp, with a predictable break and a fairly short reset.
Old models used 15-round magazines, while newer models have a 17-round capacity.
Where this gun truly shines is ergonomics. Not only are the backstraps interchangeable, but the side panels are too. This allows left or right-handed users to adjust the palm swell to fit them perfectly.
Good ergonomics means a good grip, and a good grip means better shooting.
Standard VP9s sport an ambidextrous paddle magazine release. It can take some getting used to, but it is quick and intuitive after the switch is made. For those that prefer a traditional button release, HK also produces a VP9-B variant.
Additionally, you get good slide serrations, as well as rear cocking wings that make racking the slide a breeze. It is capped off with a sizeable ambi slide release, making this one of the most lefty-friendly guns out there.
These guns are accurate, comfortable, and still deliver the famed quality and reliability that HK is known for.
Wondering if this is the gun for you? Take a look at the video review below or read up on it in our full review of the VP9!
5. Walther PDP
Last but definitely not least is the Walther PDP, and boy, does it have us in a lather. To be honest, we love these guns, but for a good reason.
The PDP comes in various configurations, and we love them all.
Walther’s Performance Duty Trigger has a little bit of take-up to a defined well, then a very clean break right at around 4-4.5 pounds, and a very short reset.
This is one of the beststriker-fired triggers on the market, only matched by guns like the Canik Rival (a Walther clone).
Sean Curtis letting the camera know how much he loves his PDP.
All PDPs come with optics-ready slides, but the downside is that you have to submit a request to Walther to have them mail you the adapter plate for your specific red dot.
As usual, Walther implemented excellent ergonomics in the form of good grip texture and chunky Super Terrain slide serrations.
Users with small to medium-sized hands will also appreciate the extended, easy-to-reach ambidextrous slide release.
While it lacks traditional finger grooves, there are raised portions on the grip that act as “suggestions” to help guide hand placement.
The PDP is also available in various barrel lengths and also with full-size (18+1 capacity) and compact (15+1 capacity) grip sizes.
Additionally, Walther has recently introduced the PDP-F, which features a reduced grip to trigger reach and an easier to rack slide.
You can see the flat back and reduced grip circumference of the PDP-F (front) compared to the standard PDP (rear).
Accuracy and reliability are hallmarks of all Walther duty guns; the PDP has that in spades.
Still not sold? Check out our 10,000-round review video of the PDP below and our written review!
Honorable Mentions
Narrowing it down to just five pistols was challenging; unfortunately, not everything could make the cut. With that in mind, we snuck in two pistols in the video that didn’t quite make our best of but that we still like.
Smith & Wesson M&P 2.0 Metal
Life is better with a bit of heavy metal, right?
It’s aggressive. It’s mean. And it’s fun to shoot.
Smith and Wesson took their venerable M&P and glammed it up with an all-metal frame and an improved trigger to create the M&P 2.0 Metal.
With good looks in tow, it also has a jaw-dropping performance to match. These guns are extremely accurate, fast shooting, and soft-recoiling.
They are a bit heavy for duty use for some and are on the slightly spendier side for a striker pistol, but they run.
You can see our video on the M&P 2.0 Metal below or take a look at our full written review!
Grand Power Q1S
The Grand Power Q1S is by far the strangest inclusion on the list, but hey, some of us are strange people.
Grand Power may not be at the forefront of most people’s thoughts when it comes to handguns, but they offer some great features at reasonable prices.
Much like the Beretta PX4, the Q1S features a rotating barrel design that helps reduce muzzle flip. With a smaller 3.6-inch barrel, the recoil reduction is both noticeable and welcome.
Additionally, the gun has a shockingly good 3.5-4lb trigger that breaks cleanly at 90 degrees.
Consider the fact that you get metal sights, fully ambidextrous controls, and three 12-round magazines for around $400, and you have a real sleeper on your hands.
Final Thoughts
Striker-fired pistols have improved so much in the last 15 years that it is hard to pick just five and keep the list manageable.
The good news is that striker-fired pistols are so popular there is definitely one out there for you.
If you didn’t see a specific gun here, be sure to check out our other articles, as we might just have what you are looking for.
What’s your favorite striker-fired handgun? Sound off in the comments below. Want to dive into the world of pistols even more? We got you. Check out our recommendations for the Best Beginner & Home Defense Pistols and Best Concealed Carry Guns.
Quick Answer: These are the Best EDC Backpacks of 2022
#1 – Overall Best EDC Backpack: Aer Travel Pack 2 Small
#2 –Best EDC Laptop Pack: Tortuga Laptop Backpack
#3 – Best EDC Pack Runner Up – Nomatic Travel Bag 30L
#4 – Best EDC Sling Bag: Aer Day Sling 2
#5 – Best EDC Camera Bag: Wandrd PRVKE Series Camera Bag
#6 – Best EDC Backpack for Travel: Aer Travel Pack 3
#7 – Best EDC Duffel for the Gym:Kodiak 25l Duffel
#8 – Best Leather EDC Backpack –Lakeland Fenton Leather Rucksack
#9 – Best EDC Day Hiking Pack: Osprey Daylite Plus Pack
#10 – Best EDC Pack for Organized Travel: Tropicfeel Shell
#11 – Best EDC Pack for Hipsters: The Roll Top Stubble & Co
Best EDC (Every Day Carry) Backpacks
Researching all the backpacks available on the market can become tedious. That’s why we’ve done the legwork for you and compiled our picks for the top everyday carry backpacks. From gym duffels to travel bags, we’ve got something for everyone on this list! And, if you look after your backpack properly, these guys will last you a good few years.
#1 – Overall Best EDC Backpack: Aer Travel Pack 2 Small
Compact, but spacious enough to fit a ton of gear, the Aer Travel Pack is the Goldilocks equivalent of everyday carry backpacks; not too big, not too small, just right. A little over 3 pounds, it’s still relatively lightweight, but also more durable than ultralight packs.
Inside there’s a padded compartment for a 15-inch laptop, as well as a shoe compartment that can fit up to men’s size 12. Both the main and front zippers are lockable for added protection while travelling.
On top, there’s a quick access pocket for small essential items and within the front compartment, there are additional organization pockets. These keep your pens, sunglasses, electronics, and other gear neat and easy to reach. There’s also a key chain so your keys never get lost at the bottom.
The Aer Travel Pack is small enough to be a carry-on item while flying, and the back panel of the pack acts as a pass-through for luggage handles. If you want more support, you can purchase a hip belt which comes separately.
Although the Aer Travel Pack may be on the expensive end, the combination of 1680D nylon, Duraflex plastic, and YKK zippers are built to last, while also making the pack comfortable and sturdy while carrying.
Is this the best EDC bag ever? Our team think so! They had a lot of love for this bag, but some of the stand-out features for them were the locking zips on the main section as well as the laptop pocket. They also loved the clamshell opening style of the large compartment which meant they could fit packing cubes inside and access their gear easily.
Be sure to check out our detailed Travel Pack 2 review here.
#2 – Best EDC Backpack Runner Up: Nomatic Travel Bag 30L
The Broke Backpacker team have been big fans of Nomatic gear for years. In fact from a style, functionality, and price point of view, nobody quite does it like Nomatic.
The 30 litre Nomatic Travel Bag is great for people who don’t want to own multiple backpacks; this bag can be your everyday bag AND your travel day pack all in one.
Especially if you find yourself carrying around a laptop, some clothing layers, chargers, a camera, etc – you’ll find 30 litres to be a pretty damn good size.
There will be times when you don’t end up filling up the bag to capacity each time you go out, but I prefer to have a bit more space on occasion than not enough. Do note that a 30-litre backpack is on the larger side of your typical daily grind everyday carry backpack.
Our team really loved the organisational features on this backpack, it was especially useful for digital nomads carrying around heaps of different cables, hard drives, laptops, tablets and other shiz! The different carrying configurations were also ideal for our team when they were getting on and off public transport.
Unfortunately, at this time Nomatic can’t ship to Europe, so if you are outside of the USA, go with the Aer Travel Pack 2 small instead.
#3 – Best EDC Sling Bag: Aer Day Sling 2
If you don’t need an entire backpack but still want a convenient bag for storing your phone, camera, passport, or other small essential items, then a sling bag is a perfect choice. The Aer Day Sling is also a more budget-friendly EDC pack option.
There are three pockets: a front pouch, one main compartment, and a hidden back pocket great for keeping your passport or cash safe. The main pocket can fit a 7.9-inch tablet and it has multiple organizational pouches for storing sunglasses, pens, or other small items.
The one aspect of the Aer Day Sling that could use improvement is the shoulder strap. Although it’s adjustable, there’s not much padding, which can make it a bit uncomfortable after wearing it for a long time.
Like the Aer Travel Pack, the Day Sling is made out of 1680D nylon, Duraflex plastic, and has YKK zippers on all the pockets. It’s also a good lightweight EDC pack, weighing less than a pound when empty.
Our team rated this as their favourite small EDC backpack. They loved how compact it was for all their essential items like their passport, wallet, phone, compact camera and battery pack. They felt it also offered an awesome level of organisational features for such a small pack.
PSSTTT – If you want something light, but still bigger than a sling then you might be interested in these Packable Backpacks.
#4 – Best EDC Camera Bag: Wandrd PRVKE Series Camera Bag
There’s nothing worse than having your camera gear damaged as a result of inadequate protection in your backpack or bag. The PRVKE takes all your photography needs and concerns into account and delivers an excellent everyday carry backpack.
Two sizes are available. One is 21 litres, which can be expanded to 26 litres by extending the roll top, the other is a larger 31 litres, which is expandable to 36.
Both are made of waterproof tarpaulin and YKK weather-resistant zippers. So although the specialist camera backpack wouldn’t survive being submerged, it will still hold up to heavy rain or some splashing. The water-resistant exterior is pretty tough too making this a super durable EDC backpack.
Inside are removable camera cubes so you can use the PRVKE as a normal pack on days you don’t need to bring your equipment. There’s also a dedicated laptop compartment, a tech pocket, a hidden pocket in the back, and a water bottle pocket for storing other essentials.
It’s a super functional backpack for photographers, providing a side opening directly to the camera cube for easy access to your gear on the move. You can also buy extra external carry straps to attach things like a tripod and there’s a water bottle pocket on the other side.
You can either carry the PRVKE as a backpack or a tote bag thanks to the handles on top. It also comes with a removable waist strap which helps for carrying heavier loads.
The photographers on the team were blown away by this bag and the side opening feature was a game changer. They loved that it made accessing their camera super easy and fast yet they could also keep other items separate in the upper roll top section. They also loved the material which felt durable and great at keeping the weather out.
Read the full review here.
#5 – Best EDC Laptop Pack: Tortuga Outbreaker Laptop Backpack
Although many of the best EDC packs have a spot to store a laptop, the Tortuga Outbreaker goes the extra mile and provides a bombproof laptop compartment.
Not only is this everyday backpack super comfortable, but also very stylish and well-designed to keep your laptop safe while on the go. It’s a top pack for digital nomads who need to carry a fair bit of gear.
It’s a cracking laptop backpack with extras. The outer material is VX21 waterproof sailcloth and the laptop compartment is protected with ariaprene foam. Each pocket has YKK lockable zippers to add further protection, especially while travelling.
With a 27 litre capacity, and the ability to open all the way like a suitcase, the Outbreaker can easily fit extra clothing, textbooks, your lunch, or even a pair of shoes. It’s still small enough to fit as a carry-on bag underneath an aeroplane seat, making it a great option for travellers.
Inside are mesh pockets for keeping your chargers and other essential items organised and easy to reach. In addition to the padded shoulder straps, there’s a removable sternum strap, plus top and side handles so you can carry the pack like a briefcase or tote bag.
With the padded laptop sleeve and water-resistant exterior, this is a great everyday carry backpack for that needed protection for their tech and a decent amount of room for accessories. However, some might feel it’s a little bulky for an everyday backpack for work.
Our team felt this was the best EDC laptop backpack on the market, especially for those on our team who just love keeping their gear organised. They loved the different pockets, mesh separators and zippered compartments that meant everything a digital nomad has to carry on the daily can be kept organised and accessible.
Read the full-length Tortuga Outbreaker review here.
#6 – Best Leather EDC Backpack – Lakeland Fenton Leather Rucksack
Yum, look at that lovely leather goodness! I really love a good leather backpack. The classic look leather rucksack Lakeland leather mixes high-quality waxy leather with a stylish, and even slightly retro design aesthetic. It’s a cool and fashionable backpack made for urban living whether you are headed to the gym, the coffee shop or commuting for the daily grind.
Great for going to work, The Fenton Backpack can comfortably accommodate an A4 pad and a 13″ laptop inside its dedicated laptop compartment.
The style-conscious on our team really loved the look of this bag. They felt it offered a good amount of storage for those wanting to carry enough for the day without being too bulky. They also loved the classic leather material and felt it was durable, weather resistance and would wear in nicely over the years.
#7 – Best EDC Backpack for Travel: Aer Travel Pack 2
For longer trips, you’ll want something that’s large enough to hold all your gear and belongings. The Aer Travel Pack 2 is a larger version of our number one pick for the best EDC backpack, but it’s still small enough to work as a carry-on item.
It might be a bit bulky as a commuter everyday carry backpack, but it’s great for one bag travel. It’s versatile enough to use as a carry on for a weekend break and double as an everyday backpack for exploring during the day. (Disclaimer: It’s not going to be compliant with the strict Ryanair carry-on policy, unfortunately!)
The lay-flat clamshell design of the main compartment makes it super simple to pack and keep everything organised. There’s also an easy access pocket that can fit a 15.6-inch laptop, and a shoe compartment large enough for a men’s size 13. The compression straps also keep everything tight and compact.
Thanks to the ergonomic and padded shoulder straps, your back won’t get sore even after you’ve been out walking around all day. It’s also possible to carry the Aer Travel Pack as a tote or bag thanks to the padded top and side handles.
Although the Aer Travel Pack isn’t totally waterproof, it is highly weather-resistant thanks to the 160D Cordura nylon exterior and smooth YKK zippers. Both the main and front pockets have lockable zippers for added security.
Like the smaller version of the travel pack the team felt the larger bag offered all the features they loved but in a package perfect for longer trips. They felt the bag had an air of real hard-wearing quality with fat zips and thick material. Again, the lockable laptop compartment was a feature that gave them a real sense of confidence when out and about.
#8 – Best EDC Backpack for the Gym: Aer Fit Pack 2
Ever wish your gym bag could carry more than a pair of shoes and your towel? Well, the Aer Fit Pack is the solution to your needs! This stylish bag is the perfect everyday backpack to carry your training gear but also has all the features needed to make it functional in other everyday uses.
Say goodbye to the single pocket standard gym bag you’ve been using. The Aer Fit Pack has numerous pockets, including the front-loading main pocket, a ventilated compartment for shoes up to men’s size 13, a small top pocket for valuables, and a padded laptop pocket.
With space for all your belongings, you can hit the gym then head straight to work or class without needing to swap bags or pick up any of your other possessions.
Like other Aer products, the Fit Pack is well-made and durable with a weather-resistant nylon exterior, YKK zippers, and Duraflex plastic for structure and stability.
As you can tell, Aer is popular among our team. They loved this bag due to its compact size which also managed to pack in a whole heap of features. The separate shoe section and front area where clothing can be kept are perfect for keeping things separate like sweaty gym gear.
#9 – Best EDC Duffel for the Gym: Kodiak 25l Duffel
Not only does this duffel work well for the gym, but it can also function as a travel bag or extra-large briefcase, thanks to the large carrying capacity and multiple compartments.
The Kodiak Duffel 25L has many of the same features as the Fit Pack 2 but it is simply far more elegant, stylish and yes, manly! Inside the main compartment, you can easily fit a basketball, water bottles, and other gear, plus there’s a separate ventilated pocket for shoes to help with organisation and minimize odour.
Unlike your typical gym bag, the Kodiak Duffel can also be used for work or school, thanks to the padded laptop compartment and other gear pockets for storing additional electronics, books, and travel items.
Due to its sleekness, the duffel also won’t look out of place if you bring it with you to the office or into a coffee shop.
The team loved this duffel and felt it offered a great alternative to traditional backpacks, especially for those wanting something a little more professional looking. The stylish exterior felt both sturdy, durable and hard-wearing whilst looking sleek and sophisticated at the same time.
#10 – Best Budget EDC Pack: REI Co-op Ruckpack 28
Osprey has made a name for themselves with their high-quality camping and travel gear, and the Ruckpack meets these same expectations. Not only is it functional and durable, but the Ruckpack is also made from recycled ripstop nylon if you’re interested in purchasing more sustainable products.
There’s a laptop sleeve that can also hold a hydration pack. It features both side and top main compartments, compression straps, and a small zippered top pocket for valuables. The zippered compartments are also lockable for secure travelling.
There’s a sternum strap and a very small hip belt, which is, unfortunately, lacking in padding. Other than that, the Ruckpack measures up to being a great EDC backpack without such a high price tag attached.
The team were pretty impressed by this pack for the price. They felt the volume was a good compromise between carrying enough gear without encouraging over-packing. Other features they loved were the locking zippers and laptop sleeve that can double as a hydration reservoir for great versatility.
#11 – Best EDC Day Hiking Pack: Osprey Daylite Plus Pack
This lightweight backpack does the trick for single day hiking adventures. It’s on the smaller end of EDC backpacks but is still big enough to bring the essentials without becoming too heavy while out on the trail. The compression straps also keep things as compact as possible.
Although it’s too small to fit most laptops, there’s a compartment that can fit a tablet or other similarly-sized device. You can also purchase a hydration reservoir to fit in the back pocket, or there are two side mesh pockets that are convenient for carrying water bottles.
The shoulder straps have enough padding to be comfortable for a long hike, although the hip belt is only simple webbing material. It’s also the perfect size as a personal item on an aeroplane and will fit stowed underneath your seat, but be aware that it doesn’t have lockable zippers.
It’s a bit too small for multi-day travels, but for a budget-friendly and lightweight EDC backpack for day hikes, the Daylite pack fits the bill.
The hikers on the team loved the comfort levels of this pack for wearing for long periods of time. Other features they were taken by were the front stash pocket for things like waterproof jackets. They also loved how well made the pack felt too.
Wanna know more? Check out our more detailed review for the lowdown.
#12 – Best EDC Pack for University Students: Tortuga Laptop Backpack
Both functional and stylish, the Tortuga laptop bag is the perfect backpack for your university studies, work, or travel. There’s a bombproof laptop compartment, plus another compartment for storing a tablet, both of which have padded foam for protection.
There’s plenty of space for all your textbooks, lunch or snacks while on the go, or other electronic equipment. Unfortunately, the Setout doesn’t have a hip belt, but there is a removable sternum strap to help balance the weight.
If you’re using the pack for travel, there’s a suitcase pass-through handle and the zippers on the main compartments are lockable. The clamshell design of the main compartment makes it easy to organize and use for packing clothing for an overnight or longer trip.
Although the pack isn’t waterproof, it is highly water-resistant thanks to the Durable Water Repellent (DWR) coating on the outside. The padded shoulder straps make it comfortable to carry, and there are also side and top handles to carry the Setout like a tote bag.
The team felt this pack was a solid backpack for those carrying laptops, notepads and other square items that would otherwise be awkward in rounder packs. The lockable zips again were a winner for keeping that expensive laptop safe while on the move.
#13 – Best EDC Pack For Commuters: Gulu Made Inspire Backpack
Gulu Made are a socially conscious ethical start-up based in Uganda whose credentials are amazing. The team who work at Gulu Made all trained to sew in the aftermath of Joseph Kony’s horrible civil war. They now leverage their skill to make beautiful bags and to build a future for themselves and their families.
The pack itself has certainly impressed me. It zips down into 3 main storage compartments so you can organise your files, gym kit and lunch as you see fit and there is a dedicated laptop sleeve. There is no front pocket, but the pack does have 2 water bottle slide-in pockets at the sides. Best of all, the bag is lined with beautiful colourful traditional African fabric.
This pack is great for commuters, day trips and is roomy enough for short stay vacations. It could also be used for easy day hikes but does not have a hip/waist support belt so is perhaps less suitable for strenuous mountain treks.
Gulu Made are going to be a huge player in the vegan/ethical backpack space for years to come.
The team felt for a backpack this bag looked professional enough for taking into the office or on business trips, especially for those wanting to avoid briefcases. They felt the pack had a simple and lowkey vibe whilst also packing in a heap of organisational features across the 3 main pockets.
Looking for a commuter pack that’s a bit more professional, then check out one of the business backpacks on offer instead.
#14 Best Organized EDC Backpack – Tropicfeel Shell
The Shell by Tropicfeel is a little to medium backpack with a big concept. Firstly, it is a 3 in 1 extendable backpack that begins life as a 22-litre pack, rolls up to 30 litres and then with the addition of a detachable pouch goes all the way to 40 litres.
As well as being a 3-in-1 backpack (which you can easily adapt to use as a day pack, overnight pack and carry-on pack), the Shell also has another awesome feature – a little, mini drop in pull out travel roll up wardrobe!
It’s a great bag for those who like to travel neat and also for business people who kind of need to stay presentable and organised. It’s made from fully sustainable materials making the Shell an all-round hit with us at The Broke Backpacker.
The team love the innovation packed into these backpacks and easily it made organising all their gear. The built-in wardrobe system in practice worked perfectly for any length of trip. The expandable capacity of the backpack also adds to its versatility, another plus point for our team.
#15 Best Hipster EDC Backpack – Stubble & Co The Roll Top
If you’re looking for something that is both stylish, functional and also super robust, the Roll Top is the perfect choice for an everyday carry bag. The internal main compartment offers a massive amount of space with a selection of pockets and organisers to keep smaller items easy to access.
On the outside, the thick tarp-style material is durable enough for everyday use and will keep the weather out with ease. There’s also a super practical front pocket for easy access to things like travel cards or journals.
If you’re carting around a laptop on the daily then the dedicated laptop compartment on the back panel of the bag is ideal. It means you can keep your most expensive bit of kit away from all your other gear and also keeps it much safer whilst on the move.
On top of that, if you’re a style-conscious kinda person then the hipster style of this roll top will suit you for your EDC. What we love here is that the look of this bag fits in wherever you want to take it, from the cafes of Canguu to the daily commute or bumming around Thailand, it works!
Want more options? Check out our rundown of the best Stubble & Co. bags.
Best of the Rest
If you haven’t quite found the right EDC backpack on this list, don’t give up yet! Here are a few more options for EDC packs that might have the exact feature or specifications you’re looking for in the perfect all-around pack.
Tortuga Weekender Backpack 30L
This 30-litre bag is on the larger end for EDC backpacks, making it perfect as a weekend pack while travelling or a large school bag if you’ve got heaps of gear. There’s also a dedicated laptop sleeve, and it’s big enough to fit pretty much any laptop. There is a padded front pouch that can fit up to an 8-inch tablet, plus compartments for chargers and other small electronic devices.
Since it fits easily in the overhead compartments of aeroplanes, it’s a good ‘carry-on’ bag for travel. The YKK zippers on the main compartment are also lockable for added security.
To free up extra space inside the pack, you can put your water bottle in one of the mesh pockets on the side. It’s a good idea to use the webbing loops to secure the bottle as well since sometimes bottles can slip out if you bend over.
Some members of our team prefer to keep things as light and as small as possible, for them this bag was a bit large. However, those that have a lot of gear were still suitably impressed by the organisational features packed inside this bag and just the sheer amount of stuff they could comfortably carry.
Wandrd Duo Daypack
Another great EDC pack for photographers, the Duo Daypack is a bit smaller than our top pick for a camera backpack, but it still fits a decent amount of gear.
The pop-up camera cube provides a secure spot for your camera, but it can easily be flattened if you aren’t bringing your photography gear along.
The padded laptop sleeve and padded electronic compartments keep all your devices safe while on the go. Thanks to the waterproof tarpaulin material and weather-resistant YKK zippers, the Duo Daypack will also hold up against rain showers or accidental spills.
To access your gear, the Duo has cool side-entry zippers on both sides of the main compartment. There’s also a hidden pocket in the back for keeping a passport or spare cash safe and out of sight.
The team were split when it came to the unique opening style of this bag. Those wanting to keep things simple felt it was a little unnecessary, but for the photographers on the team, they felt it was revolutionary! For them, it was like having a studio on their back where they could keep all their gear accessible and organised.
Aer Go Pack
One of Aer’s more budget-friendly EDC backpacks, the Go Pack doesn’t have all the features of the Travel Pack, but it’s also more lightweight and easily rolls up for convenient storage. There’s still a padded compartment for a laptop up to 13 inches and a quick access pocket on top.
The 300D Cordura ripstop fabric is durable, but not weather-resistant, so you’ll want to be careful if you’re caught out in a rainstorm. It also lacks lockable zippers like other Aer packs, which some travellers prefer for security.
The minimalist yet sleek design means that the Go Pack will suit a variety of settings, whether you’re on an aeroplane or catching up with friends at a cafe. It would be nice to have at least one or two gear loops on the outside, however, especially since some water bottles can slip out of the side pockets if you bend over.
For the team members looking for a pack that covers all their basic needs without being bulky or unwieldy, this bag hit the spot. For such a compact backpack the addition of a laptop sleeve, internal zippered section and front pocket was impressive. The ability to roll it down or throw it inside a bigger bag was a massive plus point too.
Osprey Talon 22 Pack
For outdoor enthusiasts, the Osprey Talon is a great EDC backpack that offers both support and organisation. Out of all the packs on this list, the Talon probably has the best hip belt with excellent padding and pockets on each side, although it’s not removable.
Designed for hiking, biking, climbing, and other outdoor sports, the Talon 22 has a helmet attachment, loops for ice tools, and trekking pole attachment points.
You can also purchase a separate hydration reservoir to fit in the back sleeve for convenient water access while on the trail. However, there’s not a designated laptop pocket, although some laptops will still fit inside the main pocket.
If you have an outdoorsy lifestyle and need an EDC backpack for your adventures, then the Osprey Talon is a good fit. This pack is a classic for hiking and our team has been big fans for years. They feel it’s a great size for day hikes without ending up too heavy. The shoulder straps and hip belt also make it one of the comfiest on our list too.
Fjallraven Raven 20L Pack
This casual backpack is good for all-around use whether you’re attending university, commuting, or travelling. The Heavy Duty Eco fabric is strong and durable, but not water-resistant, so be careful if you’re caught in a shower.
Within the main compartment, there’s a padded laptop pocket for a 15-inch model as well as a zippered security pocket for valuables. In the front pouch, there are additional mesh pockets for organization.
The padded shoulder straps offer good comfort, although the back has less ventilation than some of the other EDC packs we’ve listed. There is a top haul handle, but the pack lacks a sternum strap or hip belt.
Since it’s a bit cheaper, the Raven 20L is a great budget EDC backpack. However, if you plan on carrying heavy loads, or go hiking with your backpack, you’ll probably want something with better support and ventilation.
If you’re looking for a small EDC pack then our team rate this Fjallraven highly. When it comes to style, this bag might just be the winner! But there’s more to love than that, they also feel it offers great durability and will put up with daily abuse easily.
How to Choose the Best EDC Pack
As you can see from our list, there’s a fair amount of variety in great EDC packs depending on how you plan to use it. Below, we’ll go into more detail about how to decide which EDC pack is the best fit for your needs.
Features
From minimalist daypacks to luxury travel bags, there’s a wide variety in how many features an every day carry pack has.
Laptop sleeves, lockable zippers, water bottle pockets, and secret pouches for passport and cash are all examples of common EDC pack features.
Other things, like gear loops, spots for a hydration reservoir, and camera compartments are more specialized features designed specifically for hiking and photography.
Although having an EDC back with tons of features can be nice, usually these bags are bigger and more expensive. If all you really need is a simple, lightweight day bag, then don’t worry so much about finding a bag with all the bells and whistles.
Weight
Determining what the “right” weight for an EDC pack is can be a bit tricky and is a matter of finding a balance of size, material, and comfort.
Most EDC packs are on the lighter end since they’re intended as something to carry around on a daily basis. Larger and heavier packs are usually designed for a specific purpose, like carrying delicate camera equipment or as carry-on luggage while travelling.
If you’re planning on using this pack for hiking or travelling and will be wearing it for the majority of the day, you don’t want something that’s going to be too heavy. Go with the minimum of what you need, and keep an eye out for good hip belts and padded shoulder straps.
If you’re planning on using your EDC pack more for going to the gym or commuting, then counting the ounces isn’t as much of an issue. You can focus more on whether the pack will fit all your possessions, knowing that the time spent carrying it will be more limited.
Size
Between your pockets not being big enough and a suitcase being way too large, there’s a lot of variation in how big or small an EDC pack can be. For some people, something like the Aer Day Sling is enough, while a photographer will want something larger for all their equipment.
Sure, with a bigger pack you’ll have room for your laptop, a change of clothes, lunch, or even a spare pair of shoes, but not everyone needs all that space.
When picking an EDC pack, it can be helpful to make a list of all the things you want it to hold (laptop, water bottle, camera, phone, books, etc.).
Be mindful of size so you don’t end up with something that’s too bulky or cumbersome. Remember, this is a day pack; longer trips are where a suitcase or camping backpack comes in handy.
Best Use
A bike commuter and a travel photographer most likely won’t pick the same type of EDC pack. One person’s “everyday” use can look very different from another’s, so you’ll want to think about what style or specific features would serve you best.
If you know for sure you’ll be carrying a laptop on a regular basis, then having a padded laptop compartment is important. Frequent fliers are going to want a bag that fits with airline carry-on specifications, and often prefer features like lockable zippers or luggage pass-through on the back.
The good news is that most of the best EDC packs can function in a variety of settings. For example, the Aer Gym Duffel also has a compartment for a laptop or the Wandrd PRVKE bag has a removable camera cube for when you don’t have your photo gear along.
When selecting an EDC pack, think about both your primary and secondary intended use. For example, if you want the bag mostly for a daily commute to work, but like the idea of going hiking on the weekends, then something lightweight with padded straps, a water bottle holder, and good back ventilation is ideal.
Aesthetics
What sort of “cool” factor points does your backpack or bag have? Will it look alright to bring to a meeting at work? Do you want a bag that’s eye-catching, or something simpler and more minimalistic?
Some people care a lot about how a backpack looks, while for others functionality is the only thing that matters. Again, thinking about how you will most often be using the bag can help determine whether you should go for a certain look or not.
If you want to bring your EDC pack to more formal settings, like an office workspace or a travel business meeting, then something with a more sleek appearance is desirable. If you plan on using your EDC exclusively for biking and hikes in the woods, then you probably don’t need to worry so much about how classy the pack looks.
Weather
Thinking about where you plan on using your pack is just as important as what you need it for. Do you live somewhere with cold winters? Somewhere with lots of rain like Portland or London? Are you travelling somewhere hot and humid like Singapore or the Caribbean?
Taking the weather into account can help you decide how durable and weatherproof a bag you’ll need.
Even really good EDC packs usually aren’t waterproof to the point of being submersible, but some come close thanks to waterproof material and weather-resistant zippers.
Usually, the more weather resistant the bag is, the more it’s going to cost. However, if you’re carrying around an expensive laptop, camera equipment, or other valuables, buying a more watertight bag can actually save you money (and peace of mind) in the long run.
How and Where We Tested To Find The Best EDC Backpacks
When it came to testing out these packs we got a hold of each one of them and put them through their paces with a series of different tests. We gave each one to different members of the team in various locations around the world and let them loose with them!
Packability
A backpack is designed to carry stuff and as such, top points are awarded for how packable one is. That is especially so when it comes to the best EDC backpacks, whatever you decide to put inside them. A decent pack will maximise space and facilitate effective packing.
So we got all technicals and packed and unpacked each bag to test this out! We looked at not only how well each bag packed in our gear, but how easy that gear was to retrieve too.
Weight and Comfort of Carrying
When it comes to the best EDC bags, comfort is an important factor. As the name suggests, you’re going to be wearing these packs often, so you want them to minimise weight and maximise carry comfort. No one wants to be carrying around an awkward pack that digs into the shoulders, so we prioritised bags that were comfortable even when fully packed out.
Functionality
In order to test out how well a pack fulfilled its primary purpose we used it for this purpose. When it comes to EDC bags, each one is different and serves a different purpose. So for each one, we were sure to bear that in mind. Camera backpacks, we chucked our cameras inside and accessed how well they worked for us photographers for example. You get the idea right?
Aesthetics
Some people say that travel gear doesn’t need to look good as long as it functions. Well, those people probably listen to Nickelback! For us, the best EDC bag looks just as sexy as we do! I mean, you’re carrying that mofo around all day, every day, so we want to look good whilst doing it!
As such we also awarded points for how good a backpack looked as well as how practical it was.
Durability and Weatherproofing
A bag that you carry around every day usually has some pretty important gear inside, so for us, the best EDC packs keep the weather out and our precious stuff safe. To test this out we poured a litre of water over each one and accessed the insides of the pack.
Another important factor is durability. Using a backpack every day puts a lot of strain on the bag and they need to be reliant to stand up to such abuse. So we tested this out by being sure to give each pack a good run of consistent use and then assessed things like the material used, quality of the seam sewing, traction of the zippers and pressure points that break often.
FAQ about the Best EDC Backpacks
Still have some questions about the best EDC backpack? No problem! We’ve listed and answered the most commonly asked questions below. Here’s what people usually want to know:
Final Thoughts on the Best Everyday Carry Backpacks (EDC) Backpacks
There you have it. From gym bags to travel backpacks, hopefully, you’ve been able to find the best EDC pack for your needs and lifestyle on this list. If you’re tired of awkward tote bags or backpacks that keep ripping at the seams, then it’s probably time to invest in one of these comfortable and high-quality everyday carry packs.
This is 2022; there are PLENTY of awesome options out there, so now I can’t find an excuse for not having an awesome backpack I carry around every day. Life is too short amigos for a s*** everyday pack.
Whether you go with a great all-around option like our top pick the Aer Small Travel Pack or something like the Aer Duffel Bag if you’re regularly at the gym, an EDC pack is a great way to help stay organized in all your daily activities. Most of these packs also work great as carry on backpacks too if you’re headed away for a break from the daily grind, you can save money and use the same bag!
Good luck on your quest to find the perfect backpack that fits your daily routine. What do you think is the best EDC pack?
And for transparency’s sake, please know that some of the links in our content are affiliate links. That means that if you book your accommodation, buy your gear, or sort your insurance through our link, we earn a small commission (at no extra cost to you). That said, we only link to the gear we trust and never recommend services we don’t believe are up to scratch. Again, thank you!
Whether you’re looking to speak to colleagues, friends, family, or that witty Turkish tour guide you lost touch with, calling Turkey isn’t quite as simple as calling your fellow inhabitants of the US. But don’t worry — it’s not too complicated when you know the right steps.
And lucky for you, we’ve put together an article with everything you need to know for an international call to Turkey. This includes an easy reference for calling Turkey from the US, a list of area codes you might find handy, a trick for factoring in time differences, and a breakdown of the costs. Plus, everyone’s favorite part: how you can lower your calling expenses.
Here’s how to call Turkey from the USA in four simple steps:
1. Key in the exit code (+ or 011)
Almost every country globally has an exit code (also known as an international access code) for international calling. For calling from a landline number, enter 011 as the exit code. Dialing this international code ensures your call routes to the appropriate network outside of the United States.
If you’re on a cellphone or using OpenPhone, dialing the plus symbol (+) instead of the US exit code works too — no need to key in a three-digit number.
2. Dial the Turkey country code (90)
Dialing the country code of Turkey tells your mobile phone carrier or landline carrier that you want to reach Turkey. Again, this helps with routing your call across. Enter the code 90 without any pound symbols or asterisks, and then move to the next step.
Note: After keying in the Turkey country code, the number you’re dialing should appear as +90 or 01190.
3. Add in the area code
Like the US, Turkey uses area codes to differentiate between regions and provinces. All of them are three digits, so they’re easy to memorize and key in. Below is a table showing Turkey area codes and the location they represent.
You’ve almost made it! The last step for calling Turkey is to enter the local number supplied by your contact. This number is seven digits long and should be punched after the 3-digit area code.
For example, if you’re calling someone in Izmir, Turkey, whose 7-digit mobile number is 4413955, the full number you need to dial would look like this: +902324413955.
How to factor in the time difference when calling Turkey from the US
Due to varying time zones in the United States, it can be a hassle to calculate your recipient’s local time to ensure you’re calling at an appropriate hour. The good news is that all areas in Turkey observe the same time zone: Turkey Time (TRT). Depending on where you live in the US, here are the time differences you can expect.
Eastern Standard Time (EST): Calling from the east coast? Turkey is 7 hours ahead of you (think 7 PM to your noon).
Central Standard Time (CST): With an 8-hour difference, nobody will want your input on a project after office hours.
Mountain Standard Time (MST): Your noon lunchtime hour is the equivalent of 9 PM in Turkey.
Pacific Standard Time (PST): Most people in Turkey are preparing for a good night’s sleep during your 12 o’clock lunch break (10 PM).
Alaska Standard Time (AKST): Here’s where things start getting tricky: 12 PM in AKST is 11 PM TRT – 11 hours behind Turkey.
Hawaii-Aleutian Standard Time (HST): Turkey is a solid 13 hours ahead of Hawaii, making 12 PM Monday in Hawaii their 1 AM Tuesday.
Keep in mind Turkey doesn’t observe Daylight savings time (DST). To get a real-time snapshot of what time it is across the United States and Turkey, a tool like Savvy Time is very useful.
How much does it cost to call Turkey from the US?
Pricing is another issue you’ll have to address before placing a call to the Republic of Turkey. Depending on the length of your call, expect your provider to charge you anywhere between a few cents to a couple of dollars per minute.
Every phone provider has different rates according to the phone type, format, and country in question. If you don’t make international calls regularly, dialing Turkey should not cost you more than a few dollars per month. But if you’re always on the phone with your Turkish employee or colleague, beware: you might be incurring hundreds of dollars in monthly phone expenses.
If you want to know what it costs to call internationally on your current cell phone plan, we recommend getting in touch with your provider ASAP. But if you’re looking to slash your phone bill in general, you’re better off learning about OpenPhone.
How to lower your calling costs to Turkey
Calling Turkey from the United States doesn’t have to be expensive. With VoIP phones — which enable you to place and receive calls over the internet — your calling costs are significantly minimized. With OpenPhone, you can call your Turkish clients or team members for as low as 11 cents per minute.
A virtual phone can also be far superior to standard phones to improve your business communication. For instance, you access the following features with any OpenPhone plan:
Free unlimited calling, SMS, and MMS in Canada and the US
Shared phone numbers, which allow your team members to assist each other in fielding calls and texts
Call recording, so you can review phone calls to customers and train team members
Auto replies and snippets to help you streamline recurring tasks
Integrations with apps like HubSpot, Gong, email, Slack, and Zapier to streamline your workflow
Free phone number porting when you switch to VoIP
Detailed analytics and insights into your calls and messages
Want to experience them for yourself? Start your free trial of OpenPhone and get a better, more streamlined international calling service. Check out more guides to dialing internationally:How to call Germany from the USHow to call Spain from the USHow to call Israel from the USHow to call the UK from the US
Ask any five deer hunters what the best 308 ammo is for deer and you’ll likely get five different answers. The truth is, there are a lot of excellent deer hunting factory loads for 308 Winchester (308 Win for short) as the round is flat shooting, has amazing stopping power, and you have a wide variety of different bullet profiles to choose from.
However, if you want to ensure that you’re baking Bambi’s backstraps at deer camp instead of tracking blood trails for hours on end…Then you’ve found the right article!
Below you’ll find our top six favorite 308 Win deer hunting loads on the market for 2024. Although this is not a comprehensive list, these selections have proven time and time again to put the venison on your plate instead of bounding into the brush.
If you simply can’t wait, our favorite deer hunting round is Winchester Deer Season XP 150 gr Extreme Point. However, if you want the full list keep on scrolling or if you want to understand what makes for an amazing deer hunting cartridge, then check out our Buyer’s Guide HERE.
Quick Administrative Note: I know you’re ready for the top 6 list and it’s right below. This article is wholly focused on deer hunting, but if you’re looking for the best overall 308 Winchester ammo for hunting and target shooting, then check out this article: The Best 308 Ammo for Hunting and Target Shooting.
Optimized polymer tip for ideal penetration and expansion
Affordable
Built specifically for deer hunting
Cons
Results vary depending on the rifle
Why We Chose It
If you’re looking for a premium deer hunting round that has the terminal performance to stop a trophy whitetail or mule deer dead in its tracks, then look no further than Winchester Deer Season XP.
Winchester designed the Deer Season XP line of ammunition with the specific needs of deer hunters in mind. Descended from the legendary Winchester Power Point bullet, the Extreme Point 150-grain bullet offers deep penetration combined with wicked expansion to really quickly and ethically put down any trophy buck that wanders near your tree stand.
The secret to the Extreme Point’s effectiveness is tied to its aerodynamic polymer tip. Not only does it protect the oversized hollow point during chambering, but the tip also initiates expansion immediately when it encounters soft tissue.
This puts down deer fast so long as your shot placement is on point, and with its low price point you’ll have more than enough opportunity to get out to the range and practice those long-range hunting shots.
When you combine all of these qualities together, the result is more venison in your freezer, an amazing rack of antlers on your wall, and a story to tell your hunting buddies that you’ll never forget. And if you want that, then make sure your bolt-action deer hunting rifle is loaded with Winchester Deer Season XP 150 Extreme Point ammo this fall!
Hornady Custom 150 gr SST
Specs
Casing: Brass
Bullet Type: Super Shock Tip
Bullet Weight: 150 gr
Muzzle Velocity: 2,820 FPS
Muzzle Energy: 2,648 FT-LBS
Pros
Loaded with Hornady’s reputation for quality
Excellent weight retention and terminal performance
Availability
Cons
More expensive than Winchester
Why We Chose It
If you plan on hunting medium-sized game and want a round with a flat trajectory and devastating terminal performance, then Hornady Custom 150 gr SST ammo is what you need for your next hunt.
The Hornady SST combines everything hunters love from Hornady’s groundbreaking Interlock Soft Point design and integrates it into a hollow point projectile with a polymer tip to initiate expansion. Upon impact the tip is forced into the hollow point to initiate expansion. delivering tremendous shock to a whitetail and creating a massive wound channel that can put a deer down fast.
The SST bullet utilizes an aerodynamic secant ogive bullet profile for a flatter trajectory, tapered jacket for deep penetration, and the patented Hornady Interlock ring that locks the lead core to the jacket and thereby increasing weight retention.
All in all, the Hornady Custom 150 gr SST is an incredibly close runner-up to our top pick and is only supplanted due to a slightly higher price point. However, given Hornady’s outstanding reputation for loading incredibly accurate and deadly ammo, a slightly higher price is easily justified when you want to make sure that trophy buck ends up on your wall.
Black Hills Gold 168gr TSX
Specs
Casing: Brass
Bullet Type: Triple-Shock X
Bullet Weight: 168 gr
Muzzle Velocity: 2,650 FPS
Muzzle Energy: 2,619 FT-LBS
Pros
Great quality and reputation
High velocity for its weight
Triple-Shock X bullet offers excellent expansion and penetration
Cons
It’s pricey, but it’s also spicy
Why We Chose It
When shooters talk about Black Hills ammo, phrases like “incredibly accurate”, “extremely consistent”, and “excellent terminal ballistics” are commonplace. The Black Hills Gold 168 gr TSX holds true to this legacy and is unquestionably a deer hunting round that should be on your short list to pickup this fall.
Although this offering from Black Hills is firing a heavier bullet than our first two selections, it still maintains a high muzzle velocity and flat trajectory desired for those long range shots.
The Barnes TSX bullet is the heart of this Black Hills Gold factory load, providing unparalleled stopping power and accuracy that is stops whitetail, black bears, feral hogs, and any other 4-legged varmint dead in their tracks.
Machined from a solid piece of copper, Triple-Shock X bullets utilize a traditional hollow point bullet that offers exceptional penetration and expansion that’s needed when taking on big game animals. And as the bullet is lead-free to boot, which means it’s legal for use in states like California.
If you’re familiar with Barnes Bullets and the TSX, you’ll know that it is the big brother to their newer model, the TTSX (Tipped Trippe-Shock X) bullets. Both are excellent hunting bullets, but Black Hills opted to go with the classic model and who can blame them?
We know a lot of people talk about the price of the Black Hills Gold TSX, but when you consider you’re getting an average of 60 pounds of meat for $3, and you don’t have to spend hours tracking an injured Cervidae, it’s more than worth it!
Federal Premium 175 gr Terminal Ascent
Specs
Casing: Nickel-Plated Brass
Bullet Type: Terminal Acent
Bullet Weight: 175gr
Muzzle Velocity: 2,600 FPS
Muzzle Energy: 2,627 FT-LBS
Pros
Bonded construction for high weight retention
High ballistic coefficient for long range shots
Designed for excellent expansion at high and low velocity
Cons
You pay for performance
Why We Chose It
The Federal Terminal Ascent is not only one of the heavier bullets on our list, but it’s an exquisitely designed, polymer-tipped, and high-quality round that feeds well. The nickel-plated brass makes for smooth chambering, and the bonded lead core helps the projectile retain its weight on impact.
Federal designed the Terminal Ascent with its patented Slipstream polymer tip to give the bullet a flatter trajectory (because accuracy is important), but it also helps with low-velocity expansion.
Capable of taking big game animals like elk and caribou, the Federal Premium 175 gr Terminal Ascent is more than capable of taking down any whitetail or mule deer that crosses your path.
This Federal Premium hunting ammo is one deer hunting round that you don’t want to miss when it’s in stock even though it’s a little pricey. But as Federal says on their website regarding Terminal Ascent, “Any hunt. Any range.” And that is performance most hunters are willing to shuck out a few extra shekels for!
Hornady Precision Hunter 178 gr ELD-X
Specs
Casing: Brass
Bullet Type: Extremely Low Drag – Expanding
Bullet Weight: 178 gr
Muzzle Velocity: 2,600 FPS
Muzzle Energy: 2,672 FT-LBS
Pros
Match-grade accuracy and reliability
Backed by Hornady’s reputation and consistency
High ballistic coefficient for long-range shots
Cons
Heavier bullet weight
Heavier price tag
Why We Chose It
Any competitive shooter will tell you that match ammo is excellent for long range precision shooting, but any hunter will also tell you that match-grade ammo isn’t ethical for hunting deer (or any game, for that matter). Hornady solved this issue by taking the best qualities of their match ammo and combined it with an expanding bullet to create one of the most deadly hunting bullets ever made.
The Hornady ELD-X is one of the top long-range hunting bullets on the market, walking in the same circles as long-time standbys like the Accubond Long Range or Berger VLD.
The Hornady ELD-X integrates many of the same qualities as the SST, which was our #2 pick earlier in this article. It utilizes the Interlock system to keep the lead core and jacket of the bullet intact during expansion as well as a smooth, sleek design with a high ballistic coefficient for long-range accuracy.
Hornady combined their highly concentric AMP bullet jacket technology with their equally impressive Heat Shield tip to create a bullet that is not only streamlined but also extremely deadly.
Although Hornady Precision Hunter ammo is extremely accurate and effective against large game animals, it also carries a price tag to match that performance. However, as most hunters aren’t spending the weekend plinking with their hunting rifle and only need a few boxes of ammo per year, that price tag is well worth the added performance Hornady Precision Hunter 178 gr ELD-X offers.
Remington Core-Lokt 180 gr PSP
Specs
Casing: Brass
Bullet Type: Pointed Soft Point (PSP)
Bullet Weight: 180 gr
Muzzle Velocity: 2,743 FPS
Muzzle Energy: 2,620 FT-LBS
Pros
Affordable and Effective
Easy to find
Trusted by generations to bring home the venison
Cons
Not as accurate as some premium rounds
Why We Chose It
The Remington Core-Lokt 180 gr PSP is the closest thing you’ll get to your Grandpa’s favorite hunting rounds. You don’t get a lot of bells and whistles with these hunting cartridges, but they hit hard and simply get the job done.
Remington designed the Core-Lokt in the late 1930s and has been one of the flagship hunting cartridges for the company ever since. Although it may not be as sleek or accurate as an ELD-X, but the Core-Lokt simply slaps and can easily fell a deer with one bullet with good shot placement.
Combine all this with a price tag every hunter can afford, there’s no way that we couldn’t include this classic big game hunting round.
Parting Shots
The 308 Win has a long and storied history of being an extremely accurate and effective deer hunting round. Picking the best 308 ammo for deer is always something that is a little bit subjective, but if you pick any of the rounds on our top 6 list, we promise you won’t be disappointed.
No matter your preference, do keep in mind that ammo goes fast especially when the leaves start to change colors. When you see a few boxes available, grab them up and put them away for deer season.
You can click HERE to go back to the top of our list or scroll down to our buyer’s guide to learn more about choosing .308 ammo for hunting.
The Best 308 Ammo For Deer Buyer’s Guide
Welcome to our .308 Winchester for deer hunting buyer’s guide! In this section, we’ll review some tips to help you pick out your next favorite deer-hunting bullet. We also have tips to help you pick your next favorite .308 ammo for other hunting and shooting activities.
Finding good deer hunting ammo is pretty easy when you know what to look for. When I first started buying deer hunting ammo (many years ago), I picked up whatever box was cheap and had a picture of a deer on it (let’s be honest, that’s great marketing). Now, as an avid hunter, one of the first things I look at is the bullet type and design.
Bullets react with their targets in different ways depending on their composite and design (this is called terminal ballistics). For example, you’ve probably heard of FMJs (Full Metal Jackets). These rounds have a soft lead core covered with a thin jacket (typically copper), and they’re most useful for target shooting and plinking because they are inexpensive.
FMJ ammo is great for a fund day at the range, but they don’t expand on impact when they impact soft tissue. Despite the muzzle velocity, trajectory, and ballistic coefficient, these bullets aren’t going to create a wound channel sufficient enough to ethically take down large to medium sized game like whitetail deer or feral hogs.
Now you might think that hollow point bullets are the way to go for deer hunting, but this is also a misconception. Although jacketed hollow points are excellent for self-defense handgun ammo, they simply aren’t great for deer hunting. Most hollow point rifle bullets are match-grade (like the Sierra Matchking) and designed for long range shooting and accuracy.
Accuracy is definitely important when you line up your sights on a trophy buck. But since match ammo doesn’t offer any advantages in terminal ballistics over FMJ ammo, they simply aren’t appropriate for deer hunting.
So, the only suitable hunting ammo types are bullets that reliably expand when they encounter a big game animal. These bullets types include Soft Points, Polymer Tips, SSTs (Super Shock Tip), ballistic tips, PSP (pointed soft point), or something like the Nosler Partition.
.308 Deer Hunting Rifle and Ammo Tips
Rifle selection is an important part of deer hunting, as you need to make sure that your rifle can deliver your hunting bullets to where they need to go.
You don’t need the hottest hunting rifle on the market to put down big game, regardless of what the kind salesperson behind the gun counter tells you. Your great uncle’s Ruger Hawkeye bolt-action rifle, Granddad’s sketchy Henry 30-30 lever action rifle (speaking from experience here), or the hottest semi-automatics can all equally put deer on your kitchen table.
No matter your rifle preference, there are some things that you should know about finding the perfect cartridge to drop a mule deer on the spot.
As mentioned previously, you’ll want to get out to the range before deer season. Most factory loads (and even hand loads) perform differently depending on the rifle. These variations are further exacerbated by varying twist rates and casings.
If you love to hunt, you should love to go target shooting too. Shot placement is just as important as terminal ballistics, so pick up a few boxes of .308 ammo from different manufacturers, and get out to the range to find out which ones are most accurate in your chosen hunting rifle.
Naturally, you’ll also want to keep your rifle clean and in good working order. A rifle you don’t take care of will not take care of you (or any wild game hunting). This tip also includes taking great care of your scope (hence, also getting out to the range).
Another thing to consider when using the .308 Winchester for deer hunting is distance. The options listed above tend to perform well within 400 yards. But before you take those long-range shots, ensure your rifle and ammo will perform adequately.
Different cartridges will have different effective ranges when it comes to deer hunting. Rounds like the 30-06 Springfield and 6.5 Creedmoor have different trajectories and terminal performance compared to the 308 Win, so it’s important to understand your rifle, cartridge, and their capabilities before you ever set foot in the woods.
Frequently Asked Questions
There’s a lot that goes into hunting, ammo, and your rifle. If we didn’t cover all of your burning questions above, hang out with us for a few more minutes, and we’ll answer your most frequently asked questions.
Is this .308 ammo good for bears too?
The .308 Winchester is an excellent cartridge for black bear and is more effective than handguns for bear defense. There are multiple rounds that are effective against black bear like the Barnes VOR-TX or Nosler’s Accubond that are perfectly suited if you actively choose to pick a fight with Baloo.
Is there a difference between the .308 Norma Magnum and the .308 Winchester?
Yes, the .308 Norma Magnum uses a 338 Win Mag case necked down to fire a .30 caliber projectile. Essentially, the 308 Norma Magnum has a larger case and is more powerful than the .308 Winchester.
What does a boat tail do?
A boat tail helps a bullet reduce drag, giving it a flatter trajectory and making it less susceptible to wind deflection. This makes the bullet more aerodynamic and increases the ballistic coefficient.
Can I use the 5.56 NATO or .223 for deer hunting?
Many states prohibit the use of 5.56 NATO or 223 Remington for deer hunting. However, the bullets like a Federal Fusion or Trophy Bonded can be effective against deer when fired from a 223.
Can I buy .308 Winchester deer hunting ammo in bulk?
Absolutely! If you want to stock up, we have a lot of bulk .308 Winchester ammo available. Look for the Soft Point, PSP, or Winchester Power Point.
Back to the Best .308 Deer Hunting Ammo
Now that you have a better understanding of the .308 Winchester and the best deer-hunting ammo click HERE to go back to our favorite 308 deer hunting cartridges!
Learn how to find and identify the best wood for Bow Drill to start a fire using a Bow Drill Kit. The top trees and plants in North America for bow drill friction fire kits.
Choosing the best wood for your Bow Drill Kit is critical to success. Even if everything else is PERFECT, choosing the wrong wood will likely result in failure. This article will highlight the best trees and woody stalked plants in North America to use for carving your Bow Drill Kit. Before we get into the specific species, let first discuss some basic wood properties.
DOWNLOAD my 6 Identification Guides for the Best Bow Drill Woods in North America – FREE – just enter email below.
Best Wood for Bow Drill: Wood Properties & Selection
Dry
If the wood you choose is not bone dry then you will not succeed in making fire with your bow drill kit. An ember can only be born in the near absence of moisture. For this reason, live green wood should never be used for the spindle or the hearth board. (Live green wood is actually preferred for the bearing block, which we will discuss later.)
EXPERT FIELD TIP
It can sometimes be difficult to determine by touch if a piece of wood is dry. I’ve found that the lips, cheeks and chin are more reliable than my fingertips in determining if a piece of wood contains moisture.
If at all possible, wood for the spindle should not be gathered from the ground. With few environmental exceptions (such as extremely arid locales) wood found on the ground will be less desirable because it will have absorbed moisture. Dead standing wood and low-hanging branches are almost always drier because they are exposed to sun and wind.
Wood Types
Although I have successfully used many different types of wood for spindles, certain varieties work best. While I want you to be familiar with specific trees and plants that make excellent spindles, it’s important that you first understand their key properties.
Soft and lightweight woods are preferred over hard and dense varieties. A popular rule of thumb [LM1] is that you should be able to use your fingernail to make an indentation in the wood with little effort. While soft is preferred, the wood should not be ”punky” or rotted. It should be firm.
EXPERT FIELD TIP
I prefer to use the same exact type of wood for both the spindle and the hearth board. I’ve had the most success with this arrangement. Exceptions can be made, of course, but I prefer to cut both components from not only the same type of wood but the same piece of wood as well.
I also like to use tree branches and suckers (these are saplings growing from the base of larger trees) as opposed to the main trunks. This faster-growth wood has a more porous texture than the dense, main trunk and creates a faster ember with less effort. Along that same line, I’ve found that the faster the tree grows, the better it is for bow drill spindles. Single-season growth is always an excellent choice. It just so happens that the tree varieties that work best for bow drills also grow extremely fast.
Finally, any wood you choose should be as straight as possible and free of knots or cracks.
Drying a Green Kit
You may not find dead, standing wood of the variety you need, but you can cut live green wood and let it dry. For one kit, I typically cut a branch or sucker (preferred) about the diameter of my wrist and at least one foot long. I then split this piece in half and let it dry on a south-facing window sill for at least a week. Splitting the branch allows for a faster drying time.
DOWNLOAD my 6 Identification Guides for the Best Bow Drill Woods in North America – FREE – just enter email below.
Best Wood for Bow Drill: Specific Tree Species
As mentioned earlier, soft woods make ideal bow drill kits. Below is a list of trees in order of my preference for both the spindle and hearth board. Where applicable I also list other noteworthy facts about these incredible survival resources.
Best Bow Drill Wood: Basswood (American Linden) (Tilia Americana)
Besides balsa, I know of no softer wood than basswood. Also known as the American Linden, basswood is a favorite of wood carvers and one of the best woods for bow drill. My friends from Britain refer to this tree as Lime. Except for areas of extreme climates, basswood can be found in most of the northern hemisphere. It is a water lover and will almost always be found growing around water.
Basswood leaves are somewhat heart shaped and almost always asymmetrical. They have a small, pea-shaped fruit that dangles from a tongue-shaped bract. Young, tender basswood leaves are among my favorite wild edible greens. I make basswood salads several times a week in early spring.
The ”bass” in basswood comes from the word ”bast,” which means fiber. The inner-bark fibers of the basswood tree make incredible natural cordage. Instant basswood bark cordage can easily be obtained in spring and summer months by peeling the bark from younger suckers or saplings. You will find this cordage to be flexible and strong. I have made many a bow drill string using basswood cordage. The bark from slightly older basswood trees (3 – 5 inches in diameter) can be pounded and peeled from the trunk during the same time of year when the sap is flowing heavy. After soaking in water for 3 – 4 weeks (called “retting”) the inner bark fibers will easily peel away from the rough exterior bark in long, ribbon-like sheets.
I recall one summer when lightning struck a large basswood tree at the edge of the pond near my training facility. This powerful strike caused the bark of that large tree to be blown from the trunk in several massive sheets, around 2 feet wide and 20 feet long. After soaking them in the pond I was able to gather several wheelbarrows of basswood cordage, which I used in training for many years after.
While I’ve used basswood of every age and type for bow drill kits, my favorite is that which is sourced from sucker trees that are 2 – 4 inches in diameter. The consistency of fast-growing sucker wood is unlike wood cut from the main tree. However, green sucker wood will require drying time. If you find a standing sucker tree that’s already dead, count yourself lucky. If suckers are not available, low-hanging branches are a good second choice.
Best Bow Drill Wood: Eastern Cottonwood (Populus deltoides)
Cottonwoods were a favorite among Native Americans across North America, as the trees were used to make dugout canoes. (Often, these were coal burned.) Cottonwood trees have a triangular-shaped leaf with toothed edges. The bark is deeply fissured. Like basswoods, cottonwoods grow primarily around water. I’ve seen massive cottonwoods along streams from Arizona to Virginia. When it comes down to it, some would argue that cottonwood is the best wood for bow drill.
Cottonwoods grow very fast—almost too fast for their own good. The combination of this fast growth and their soft wood makes for very weak branches, which is a good thing when searching for stock to make your spindle and hearth board. Dead, broken branches can almost always be found littering the base of large cottonwoods and hung up in smaller trees or underbrush nearby.
During the spring, when the cottonwood bears the source of its name, one can gather not only wood for the spindle and hearth boards, but tinder bundles as well. Cottonwoods produce seeds that are covered in cotton-like down. When gathered together, these downy clusters make a very flammable tinder bundle.
Best Bow Drill Wood: Eastern Red Cedar (Juniperus virginiana)
The eastern red cedar grows primarily in the northern woods of the United States and into Canada, but I’ve had success with many different cedar varieties including western red cedar from the Pacific Northwest. Cedars are coniferous evergreens and are easily identified by their flat, fan-like branches with scaly leaves.
The dead lower branches (also known as “squaw wood”) often make excellent spindle and hearth board choices. Shredded cedar bark makes one of the most effective tinder bundles. It can easily be processed by scraping a knife at a 90-degree angle against the tree. The bark will shred off in fibrous masses that can be further processed by rubbing the shredded bark between the palms of your hands until they reach a hair-like consistency.
LEAD MAGNET: DOWNLOAD IDENTIFICATION GUIDES
Best Bow Drill Wood: Willow (Salix spp.)
There are hundreds of species of willow throughout the world, and for many, it is the best wood for bow drill. They belong to the genus Salix, and are simply called that in many areas. They love water and grow in nearly all temperate regions of the world where water is available. I’ve seen them along the banks of arroyos in the Sonoran Desert and in the marshy swamps of Maine. They grow in nearly every roadside ditch, along rivers, and at the edges of ponds. If you cut a live willow twig (called a cutting) off the tree and shove it in the ground, it will likely root and grow into a tree of its own. I’ve planted hundreds of willow trees on my own property using this method.
Willow leaves are typically long and narrow. They are widest in the middle and taper to a point on both ends. The leaf margins are finely toothed. The upper-side of the leaf is bright green, and the underside is often pale green, which gives many willows (such as the white willow, Salix alba) a silvery appearance from a distance. The bark of young trees and branches is very smooth and becomes darker and furrowed with age. Many varieties of willow, especially those related to Salix alba have brightly colored bark in early spring that can range from yellow to red.
Best Bow Drill Wood: Sycamore (Platanus occidentalis)
The sycamore tree, another water lover, is nearly impossible to misidentify and is a good wood for bow drill. Its very unique bark has a winter camouflage effect: mottled with whites, tans, creams and grays. As the tree grows, the exterior bark peels off to the ground in thin, brown curls, leaving a pure white base layer exposed. No other tree in the forest has bark that looks like or behaves like the sycamore’s. When layered into a large cigar-style roll, a thick tube of sycamore bark also makes for an excellent fire carry. It will smolder a red hot ember, which can be used to blow a tinder bundle into flame when desired.
The sycamore tree also produces small balls of clustered seeds in the fall, which can be broken apart and incorporated into a tinder bundle. The seed clusters alone don’t make an ideal tinder bundle, but they are great filler when mixed with dried grasses, pine needles or bark fibers.
Like the cottonwood, the base of all sycamores will be littered with dead and broken branches all year round. These branches make very serviceable spindles and hearth boards. Sycamores also grow suckers at the base, which can be used.
Other noteworthy bow drill trees are:
Red Alder
Staghorn Sumac
Aspen
Tulip Poplar
Best Wood for Bow Drill: Woody Stalked Plants
My first successful bow drill kit wasn’t made from a tree at all, but from a woody, stalked plant – the yucca. In fact, there are several noteworthy plants with woody stalks that make fantastic bow drill spindles and hearth boards. Some of the fastest embers I’ve seen generated with a bow drill were from those carved from woody, stalked plants. Let’s discuss a few of the most popular of these.
Yucca (Yucca spp.)
I list yucca first because it has a special place in my heart since it was the first material I learned to use in my bow drill kit. It makes an excellent choice for first-time drillers. Yucca is a plant native to America’s Southwest, not to be confused with yuca, also known as manioc or cassava, which has an edible root. Yucca is a popular ornamental plant and can now be found all over the United States and throughout the world. It grows in arid deserts as well as the four-season eastern woodlands. Even the harshest of winters will not kill it. I’ve often found it growing in old cemeteries, where it no doubt was planted as an ornamental.
The leaves of the yucca are green and sword-like. Beware of the very sharp points on the tips. They grow from a central rosette and remain green year-round. There are many different species of yucca (some even growing into large yucca trees). While not edible, the yucca root is loaded with saponins and can be crushed and used as soap for washing.
Yucca’s claim to fame is its fibrous leaves, which are filled with long, strong fibers that can be woven into durable survival cordage. (This process is covered in great detail in my Pocket Field Guide entitled NATURTAL CORDAGE.) Immediate cordage can be sourced from the green leaves, but I prefer to use the dead leaves that typically can be found around the base of the plant. It is very easy to slough off the brown, flakey exterior and extract the fibers from the already-dead, dried leaves. I have successfully used yucca leaf cordage combined with a yucca stalk spindle and hearth board for many bow drill kits. Yucca is nearly a one-stop shop when it comes to gathering bow drill kit components.
The stalk of the yucca grows from the center of the plant starting in early spring. The height and diameter it reaches depends upon the species and age of the plant. Beautiful white flowers (which are actually edible) bloom all around the stalk, creating a very impressive display in spring and summer. Soon after full bloom, the yucca stalk begins to die, dry, and harden. By late fall and all through the winter it’s ready to be cut off at the base and used for a bow drill spindle and hearth board. The lightweight, porous consistency of this dead, dry, woody stalk makes for one of the best bow drill spindles available on earth. The trick can sometimes be finding a stalk that is thick enough AND straight enough to be used as a drill and hearth.
Sotol (Dasylirion spp.)
Sotol, also known as desert spoon, is similar in appearance to yucca. It, too, is an evergreen and produces long, thin, sword-shaped leaves in a circular pattern around the base. Unlike yucca, sotol cannot handle prolonged cold and therefore grows exclusively in the warm, arid environments of America’s Southwest, including the Sonoran Desert of Arizona.
Like the yucca, sotol produces a central flower stalk that is adorned with a bristle-like plume of tiny white flowers. This stalk can grow as tall as 20 feet, and I’ve seen them as large as 2 – 3 inches in diameter. The leaf edges are lined with sharp, barbed thorns, so use caution when cutting the stalk from the base.
The dead, dry, and woody stalk is used extensively for the fire plow method of friction fire-starting and is large enough to make many bow drill kits. This stalk works incredibly well for bow drill and is highly recommended if you reside in an area where the sotol plant is native.
Elderberry (Sambucus spp.)
Elderberry is a deciduous shrub found throughout the Northern Hemisphere, except in areas with extreme climates. A year-round identifying feature of the elderberry it its bark. The exterior of the bark is covered with evenly spaced little raised ”bark warts.” This is a very unique feature of the elderberry.
In spring, the elderberry bush produces flat, dinner-plate-sized flowers, which are actually made up of many small white flowers. These flowers can be battered and fried (elderberry fritters), but they are traditionally used to make elderberry syrup after being steeped in sugar water. If left to their own devices, the flowers will ultimately transform into clusters of berries colored from purple to black. These are used to make jellies, jams, wines, and all sorts of other delicious treats. All other parts of elderberry are poisonous.
The elderberry branch is unique in that it has a very large pith with a Styrofoam consistency. It’s one of the very few bushes/trees/woody, stalked plants that can be hollowed out. It’s the soft wood of the elderberry combined with its pithy center that makes it a wonderful bow drill spindle candidate. An elderberry spindle is better paired with a hearth board made from a different type of wood. It’s challenging to create a proper hearth from an elderberry stalk because of its central pith.
*Special Note: Because of the pithy center, it can be difficult to carve the top of the spindle to a point. Consequently, it is better left rounded.
Download my 6 Bow Drill Wood Identification Guides – FOR FREE! Just enter your email below!
Mullein (Verbascum thapsus)
The dead, dry stalk of the mullein plant in fall and winter makes a very suitable bow drill spindle. Much like elderberry, it is better paired with a hearth board made from a different wood because a suitable hearth board is difficult to split out from a pithy-centered mullein stalk.
Mullein, also known as lamb’s ear, has large, pale-green, fuzz-covered leaves in spring and summer. The plant has a two-year life cycle. The first year it grows a low rosette of large fuzzy leaves that are nature’s perfect toilet paper and padded inserts for shoes. During its second year it shoots up a tall, straight, and woody stalk topped with masses of beautiful little yellow flowers. This stalk is almost always perfectly straight and I’ve started many a bow drill fire with a mullein spindle.
The woody stalk is firm, yet soft, and the center is filled with a dense pith. One fall I built an entire bow drill kit (excluding the bow string) from one giant mullein. I used the root for the bearing block; the stalk for the spindle, hearth and bow; and the leaves and seed head for the tinder bundle.
*Special Note: Because of the pithy center, it can be difficult to carve the top of the spindle to a point. Consequently, it is better left rounded.
Best Wood for Bow Drill: Carving Your First Kit
Material selection is only one component that you have to get right when starting a friction fire using the Bow Drill. You must also carve the kit correctly. To help make sure you carve the kit correctly, I’d like to give you my BOW DRILL CARVING TEMPLATES to use as your guide. They are FREE for you to use – all you have to do is enter your email below so that I know where to send them!
Download my FREE Bow Drill Carving Template by entering your email below!
Thanks for checking out my article about how to choose the best Bow Drill Wood – I hope you’ve found it helpful!
Today the pump shotgun is a pretty utilitarian tool. Most have next to no frills; any accessorizing is usually limited to lights, lasers, magazine extensions or loading ports. There’s nothing wrong with this. One does not need or even want figured wood with hand-cut checkering for defending one’s home, breaching a door or bringing down a duck in a marsh. But a century ago elegance was as much a part of gun design as practicality.
Pump- or slide-action long guns have been around for a long time. Alexander Bain of Britain received the first patent for a pump action in 1854. During the latter part of the 19th century Winchester, which was the recognized leader in lever-action repeating rifles, tasked John Browning with providing the company with its first repeating shotgun, and because Winchester was all about lever actions it wanted its repeater to be a lever-gun as well. Browning responded with what would be known as the Model 1887 shotgun. The Model 1887 enjoyed some success, but it did have some handling and reliability issues.
Winchester eventually ceded to Browning the notion that a pump-action shotgun would be a better, more reliable repeater. In 1893 the company introduced a slide-action shotgun designed by Browning. There were immediate issues with the Model 1893, one of which was the 1893 was designed for black powder shells. Ammo companies were rapidly changing to smokeless powder in their shotshells, and Winchester’s brass were terrified that they would be vulnerable to lawsuits from people injured from shooting smokeless loads in the black-powder Model ’93. Within four years Winchester redesigned the Model ’93 into the Model 1897, replete with a solid-top receiver and 2 3/4″ chambers. Another safety feature was incorporated so that the fore-end had to be pushed forward slightly to unlock the bolt before the action could be operated. It may have been the first instance of a product recall in America; Winchester offered to buy back or exchange a Model ’97 for a Model ’93. The Model ’97 was a solid shotgun with more than a million copies made during its 60-year production run.
Thomas Crossley (TC) Johnson came to work at Winchester as a 23-year-old engineer in 1885. Johnson would eventually be responsible for no less than eight of Winchester’s most iconic firearms. Soon after the turn of the 20th century Johnson began to work on a more modern design than that of the Model ’97. Competition for marketplace share was intense between gunmakers, and all of them invested heavily into keeping themselves ahead of the technological and design curve. The most objectionable feature of the Model ’97 was that damnable exposed hammer. It just seemed offensible to the sensibilities of a refined shooter. The fix that Johnson came up with was to simply hide the hammer inside an enclosed and streamlined receiver.
Johnson also redesigned the internals. Whereas the Model ’97 used a carrier or shell lifter that does double duty to lock the bolt, the Model 1912 locks the bolt directly into the receiver and has a separate bolt release activated by pulling the trigger or pushing a button at the rear of the trigger guard. The carrier is hinged at its rear and under spring tension so that when the bolt is in battery it is more or less flush with the bottom of the receiver. This arrangement is stronger than that of the 1897, though the older shotgun has never been criticized for a lack of strength. Like the Model ’97, the Model 1912 was not originally produced with a disconnector, meaning that a shooter can hold the trigger down and fire the gun by simply operating the slide. This feature seems to mostly impress people who know little about guns or how to use them, as well as the movie going public.
The Model 12—as it became known after 1919—was made from the finest steel alloys of the time. Parts were forged and required extensive, and often complicated, machining to produce them. Winchester’s marketing guys immediately christened it the “Perfect Repeater,” and like a lot of those old Winchester nicknames, it struck a chord with the shooting public and became common in usage. All of this came at a price, of course. The Model 12 was about 40 percent more expensive than the ’97, yet it consistently outsold its older brother during the 45-year-span they shared in the Winchester catalog.
When it was introduced, the Model 12 was only available in 20 gauge, 12- and 16-gauge Model 12s became available in late 1913. A 28-gauge Model 12 was brought out in 1934. Sadly, this is the rarest of Model 12s, probably as a result of The Depression and the fact that the 28 gauge—as wonderful as it is—was the prerogative of those with a fair amount of discretionary cash, something sorely lacking during The Depression and World War II. In 1933 a completely scaled down version of the Model 12—the Model 42—came out in .410 bore.
Like most of the great Winchesters, the Model 12 had its ups and downs. During its heyday it was made in Field, Skeet, Trap, Tournament and Super Pigeon grades, the differences primarily being in grades of walnut and engraving. The Heavy Duck Gun was never marked as such. Rather, it was roll marked with “Super Speed and Super X.” These guns were chambered for 3″ magnum shells and debuted in 1935. Some were made with a solid rib; others had a vent rib, but most were plain barreled. A Featherweight model came out in 1961. Beginning in 1928 some Model 12s came from the factory with a Cutts Compensator, this feature was discontinued in 1954. Some were also equipped with the competing Polychoke.
While the majority of Model 12s were field guns, quite a few saw service in the military and law enforcement. Model 12 Trench Guns were produced on special order to the military in 1919. Riot gun versions—again on special order—came about in 1918 and were produced for the subsequent 45 years. All of these marshal shotguns were available in 12 gauge only.
For much of its production run the Model 12 was the repeating shotgun that all others were judged by. Its smooth operation and reliability remains legendary among knowledgeable shotgunners. The fact that it was more expensive than its competitors meant virtually nothing, but eventually it became the shotgun’s undoing. When Remington brought out its Model 870 in 1950, the Model 12 would start feeling its age. The Remington looked almost as good as the Model 12—aficionados can tell them apart in their sleep—and the upstart was as reliable and fast handling as the older Model 12. Post-war production costs were headed into the stratosphere. The increasing costs combined with market share loss put the Model 12 on the chopping block during the infamous 1964 reorganization of the Winchester product line. Customers and gun writers screamed like a calf being branded, but as a stock broker friend of mine once said, “Never underestimate the power of money.” The Model 12 as a production gun was finished.
A few Model 12s leaked out of the Custom Shop until 1980. Another limited run—more like a trickle—was done from 1993 until 2006 by Miroku for USRAC. But the notion that function is everything and form must conform to function, aesthetics be dammed has shoved aside the notion of elegance being a critical part of a sporting tool. Too, it has become more widely accepted that tools are consumable, and replacement is simply a part of doing business.
More than 2 million Model 12s were made, and that legend of smooth operation and durability has fueled some collector interest. Model 12s can be abused, left out in the elements, dropped, kicked or worse and still keep shooting. Given even minimal care, however, a Model 12 will outlast virtually any other pump-gun. If you can find one, a Model 12 is well worth the investment. I inherited mine from an old family friend who went to his reward about 25 years ago. With it I have shot some geese on Maryland’s Eastern Shore, the Mecca of waterfowling. I may not be doing as much waterfowling as I once did, but I can’t imagine being without a Model 12.
If you’re planning to kill a wolf in the wild, you need to learn how to skin a wolf in the right way. If you’re not familiar with the procedure, here are some tips for the task. First, you’ll need to gut the animal. You should first cut out the bulging belly. This will make the skin and hair slip off. Once the animal has been gutted, you’ll need to make a small slit down its belly. Be careful not to cut into the ear area, as this will prevent it from spoiling.
If you’re planning to kill a wolf in the wild, you need to learn how to skin a wolf in the right way. If you’re not familiar with the procedure, here are some tips for the task. First, you’ll need to gut the animal. You should first cut out the bulging belly. This will make the skin and hair slip off. Once the animal has been gutted, you’ll need to make a small slit down its belly. Be careful not to cut into the ear area, as this will prevent it from spoiling.
After the skin is rolled up, you can freeze it to dry it. You can also hang the animal to dry and thaw. The next step is to prepare the wolf for skinning. After the wolf is completely defrosted, you can put it on a stretcher and hang it until it is dry to the touch. Once the wolf’s hide is completely dry, you can freeze it.
When you’ve finished skinning the wolf, you can hang it up to dry. The wolf’s skin will be much easier to remove if you hang it on a wall. If you’re not comfortable doing this, you can use a Wolf Balloon to keep the animal upright. Then, you can use a knife to cut the hide into small pieces. You should also avoid cutting yourself while skinning.
If you’re not comfortable skinning a wolf, you should purchase a wolf balloon. A wolf balloon makes the process easier and quicker. Just remember not to try this method if you’re squeamish! And if you don’t want to risk the skinning process, a gambrel is your best option. You can also hang the animal on a gambrel.
You can skin a wolf by removing its head. You can do it yourself by following a few steps. The wolf’s skin can be split and dried. After that, you can freeze the hide and sell it at a fur market. You can also take a wolf to a store that sells pelts and use it for your clothing or furniture. You’ll find a wolf’s body and hair in the local area.
Before you start skinning a wolf, be sure it’s dead. In the wild, a wolf may freeze to death. In cold weather, the animal can be frozen in the shed or at the skinning shop. It can take as much as four days to thaw completely. If you’re not careful, the animal could still be frozen before you get to it. In addition, it may be hard to distinguish a wolf from a dog by the color of its coat.
Before you begin skinning a wolf, you should take care of its feet. This helps prevent injury. Then, you’ll need to prepare the wolf’s head and neck for skinning. You’ll need a squeamish person to help you. If you’re not sure how to skin a wolf, it’s better to call a professional. This will be safer for you.
The first thing you should know about wolves is that they have a lot of senses. They have 200 million smelling cells in their noses and can detect scents up to 100 times better than humans. Moreover, wolves have 42 teeth, and their back teeth are used to crush bones. The front teeth are used for nibbling and pulling, while the tongue is used for cleaning meat. This is an important step in learning how to skin a wolf in the wild.
The wolf’s skin should be clean and dry. It should be completely free of any wounds or cuts. Before you skin a wolf, be sure to prepare its hide for skinning. In the case of a wolf, the skin will be incredibly moist and slippery. It may even be difficult to remove the fur. But that’s all part of the fun! While this process might be a bit messy, it’s a worthwhile experience for the whole family.
The first step in skinning a wolf is to prepare it for skinning. If you’re going to be skinning a wolf in the field, it is best to do it as soon as possible after the kill. If the skin is tanned too dark, it will be too difficult to carry. The last step is to remove the bones. You can use coconut oil or olive oil to tan the hides, or you can use an ice cream solution.
Peter Jones Reviews the Remington 700 and considers if it is still a good buy for deer stalkers.
What can I possibly say about the Remington 700 that has not already been said?
(Remington 700 SPS Varmint)
Well I am not going to try and be too clever here and provide you with countless stat’s and specifications, instead I am going to aim to concentrate simply on whether or not you should buy one for deer stalking.
First of all a little history…. I’ll keep it short. Remington Arms introduced the Model 700 bolt action rifle way back in 1962, since that date there have been a whole host of variants produced with a whole variety of differing specifications, materials, stock designs and calibers. Models include the 700 ADL, Model 700 BDL, Model 700 CDL, Model 700 Safari Model 700 SPS etc, etc, you get the idea!
The Remington 700 has in fact also been adapted not only for hunters but for use by both the Police and the military, both the M24 & M40 Sniper rifles were both built on the Remington 700 action. The simple common denominator however is that all Remington 700’s are produced with the aim of being an affordable mass produced rifle, and my god did Remington achieve it. There are probably more Remington 700’s knocking about (especially in the U.S) than any other bolt action rifle in the world.
The action of the 700 itself is designed with this mass production in mind and has two forward dual opposing lugs. The bolt is made from three pieces forged together (body, head, and bolt handle) and the ejector is constructed as a C clip sitting within the bolt face.
(Left: A modified Remington 700 SL)
Rifles can usually be obtained in one of three action lengths, ranging from short actions such as the .308 all the way through to Long actions for the large Magnum calibres. Detachable box magazines can be obtained however many 700’s are of the drop plate variety. These days this is to the Remington’s detriment. Drop plates are out of fashion and to my mind rightly so. Unloading the rifle in the field and having 4 rounds spill out in the dirt can be irritating to say the least.
The exact model that I have been taking a closer look at is the Remington 700 SPS Varmint. With a heavy 26 inch barrel with 1:12 twist and injection moulded stock the rifle is quite heavy weighing in at 8.5lbs. The finish is matt bluing and the fore end of the stock is a triangular style wedge with vents. The overall impression is one of a military style rifle rather than the traditional sporter that we are used to in European rifles.
Triggers on Remington’s are on the whole, let’s just say decidedly average. They simply can’t compete with the likes of Sako and Sauer and other European made rifles however that said they can usually be adjusted anywhere from 1.5lbs to 4.5lbs in weight. It is not uncommon however to find in a well loved 700 that the trigger has been modified or replaced completely.
(Above: The Remington SPS Varminth)
So let’s get back to the point, should you buy one for hunting deer? As well as having taken time to take a look at this rifle myself I also took some time today to speak with a number of gun dealers. The overriding advice seems to be yes by all means buy one but only if it’s extremely competitively priced.
I would agree entirely with these sentiments. The Remington 700 is a solid and well tested bolt action rifle of that there is no doubt, however the competition today is stiff and the old 700 Remi can simply no longer compete with the out of the box accuracy and build quality of other cheap rifles.
You can buy a new Tikka T3 these days for around £795-00. So ask yourself this. What would it be worth me buying an inferior Remi 700 for? Well all I will say is it’s got to be cheap, dirt cheap or else you might as well spend that little bit extra and get something else.
If you are on a tight budget and do decide to opt for a Remington 700 then take a while to check that you have a good one because an anomaly with the model 700 is that they can vary in quality and build. As a result amongst my shooting clients I have had some owners who simply adore their 700’s and others who swear that they will never pick up a Remi again.
The Remington 700 love it or hate it. It has been and remains an iconic rifle and will no doubt be around for many years to come.
For more Rifle Reviews click on the following link: rifle-reviews
A version of this story was originally published in September 2020.
In the springtime, as many as 18,000 hunters in Maine take part in a thrilling turkey hunt that involves trying to call in lovesick male turkeys during the mating season.
But that’s not the only opportunity for turkey hunting. Maine has a fall turkey hunting season, too — it opened on Sept. 18 and runs until Nov. 7 — though it has never caught on at the same level.
It might be the best Maine hunting season you’ve never heard of.
While spring turkey season is a harbinger of warmer days and welcomes many hunters back after a winter without hunting, the fall season overlaps with the popular upland bird season, archery deer season, part of bear season, moose season and the opening of the firearms season for deer. It doesn’t get the same attention.
The methods used during the fall season are also different, and hunters aren’t rewarded with the heart-stopping gobble of an approaching male turkey like they are when the mating season is in full swing in the springtime.
Kelsey Sullivan, game bird biologist for the Maine Department of Inland Fisheries and Wildlife, doesn’t actively pursue turkeys in the fall, said those who do have told him that finding a flock of turkeys is the first step.
“Some of the guys use dogs, where they find flocks and break them up, basically,” Sullivan said. “You come into an area where you know there are birds, you break the flock up, and then you set up where they dispersed from, and then make calls to draw them back. They want to come back together again.”
Sullivan said that the department hoped an increase in fall participation would help biologists reach management goals by stabilizing the turkey population in certain parts of the state. Thus far, that hasn’t been the case though the number of hunters is on the rise.
Sullivan thinks there may be as many as 5,000 fall turkey hunters now, compared with 3,500 a few years ago.
The season also has been extended: a turkey permit now covers spring and fall seasons, and the bag limits in much of Maine have increased.
But many of those fall turkey hunters are simply “opportunistic” hunters who are actually in the woods looking for other game, like ruffed grouse and woodcock, Sullivan said.
“They’re not all diehard turkey hunters, but they might take a bird because an opportunity presents itself,” Sullivan said.
Sullivan said that data gathered in the spring of 2019 indicates that Maine’s turkey population was about 70,000, before the nesting season. By September, when that year’s newly hatched birds were on the landscape, the population had likely swelled to 140,000, he said, before naturally trending down as birds died or were killed during the fall and winter.
“The harvest is still fairly low, and it’s still not a major tool in keeping those numbers down,” Sullivan said.
If you do go turkey hunting this year, you will need to get your turkey tagged. Due to the COVID-19 outbreak, in-person tagging for turkeys was discontinued for the spring season. Tagging stations are now open again, and hunters must register the turkeys they shoot.
While the concept of fall turkey hunting is pretty simple, the framework explaining where you can hunt and how many birds you’re allowed to take gets complicated, and deserves explanation.
First, there is no fall turkey season at all in parts of the state, including extreme northern Maine, where there aren’t as many birds as in other spots. The Wildlife Management Districts where no fall turkey hunting is allowed: 1 through 5, and 9.
In the spots where turkeys are most plentiful — WMDs 15-17 and 20-25 — there is a five-bird season bag limit. In WMD 26, there is a three-bird season limit. In WMD 28, the limit is two birds, while hunters in WMDs 6-8, 10-14, 18, 19, 27 and 29, the limit is one bird per season.
Hunters are only allowed to take two turkeys per day during the season. The bird may be a male or a female.
Wyatt Earp has said:
Fast is fine, but accuracy is everything
And I just thought how many airgunners are obsessed with muzzle velocity and muzzle energy,...
")
")
")
")
")


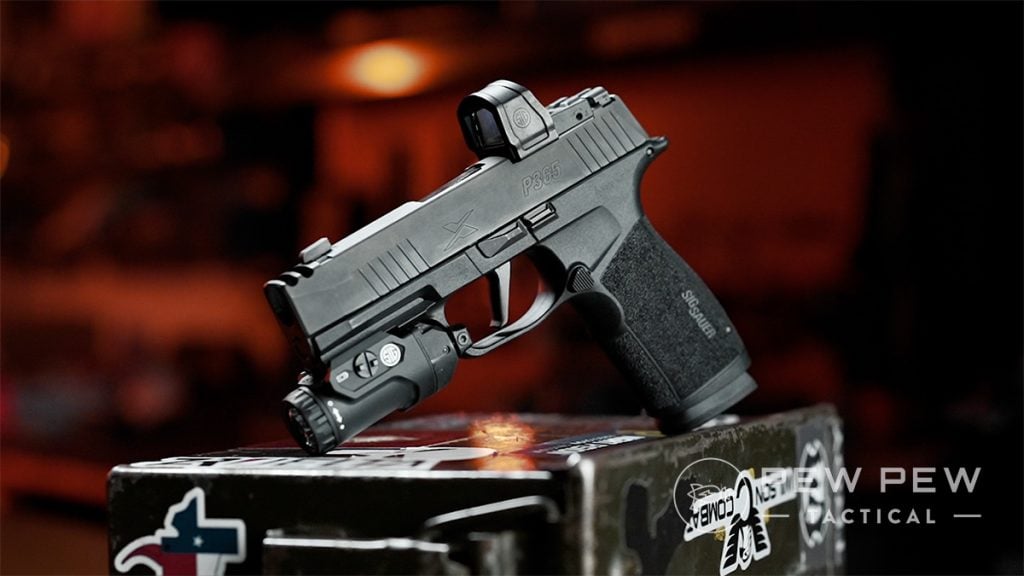

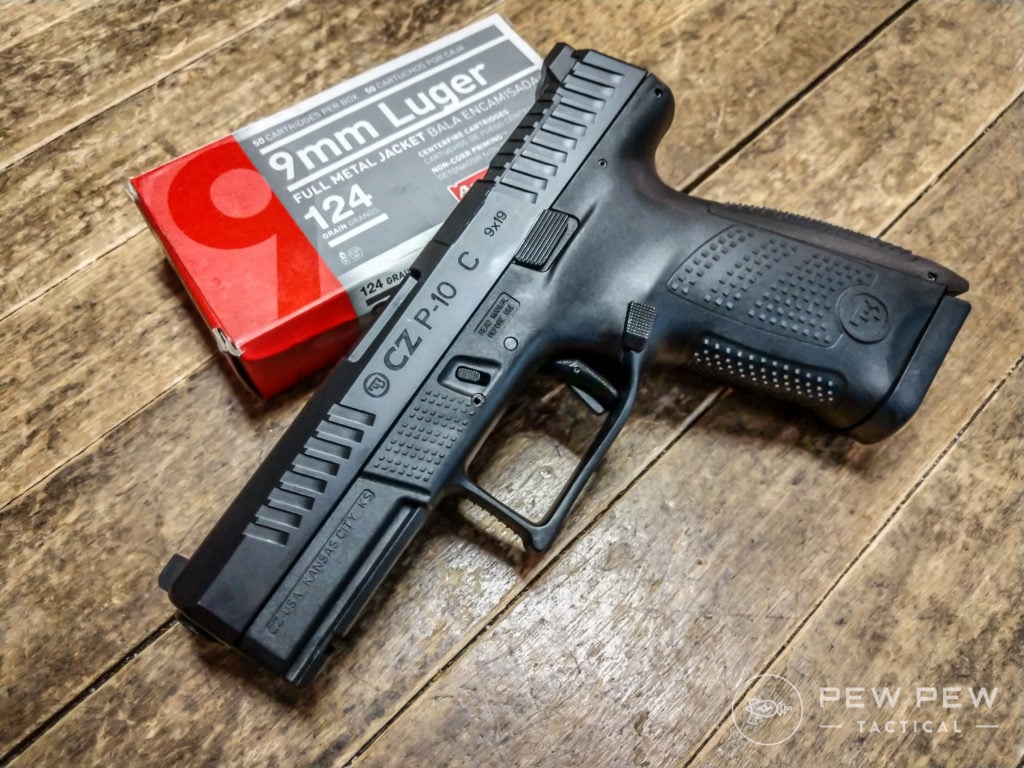

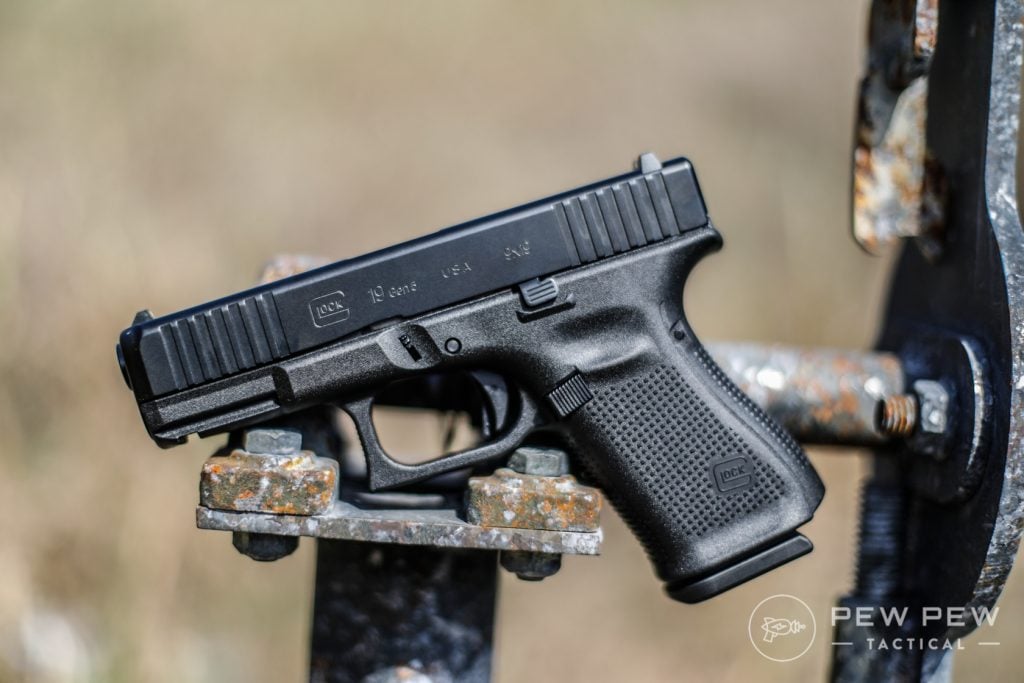
![5 Best Striker-Fired Pistols [Hands-On+Video]](https://www.pewpewtactical.com/wp-content/uploads/2024/02/Glock-19-comped-1024x576.jpg)
![5 Best Striker-Fired Pistols [Hands-On+Video]](https://www.pewpewtactical.com/wp-content/uploads/2021/07/1.-HK-VP9-Left-Side-1024x573.jpg)
![5 Best Striker-Fired Pistols [Hands-On+Video]](https://www.pewpewtactical.com/wp-content/uploads/2021/07/12.-HK-VP9-Trigger-1024x573.jpg)
![5 Best Striker-Fired Pistols [Hands-On+Video]](https://www.pewpewtactical.com/wp-content/uploads/2024/02/HK-VP9-one-handed-1024x576.jpg)
![5 Best Striker-Fired Pistols [Hands-On+Video]](https://www.pewpewtactical.com/wp-content/uploads/2022/01/2.-Walther-PDP-1024x575.jpg)
![5 Best Striker-Fired Pistols [Hands-On+Video]](https://www.pewpewtactical.com/wp-content/uploads/2024/02/Walther-PDP-ooh-1024x576.jpg)
![5 Best Striker-Fired Pistols [Hands-On+Video]](https://www.pewpewtactical.com/wp-content/uploads/2021/11/Walther-PDP-Grip-1024x683.jpg)
![5 Best Striker-Fired Pistols [Hands-On+Video]](https://www.pewpewtactical.com/wp-content/uploads/2022/07/Walther-PDP-F-grips-1024x576.jpg)
![5 Best Striker-Fired Pistols [Hands-On+Video]](https://www.pewpewtactical.com/wp-content/uploads/2024/01/Smith-Wesson-MP-9-M2-0-Metal-presenting-right-1024x576.jpg)
![5 Best Striker-Fired Pistols [Hands-On+Video]](https://www.pewpewtactical.com/wp-content/uploads/2024/02/Grand-Power-Q1S-1024x576.jpg)
![5 Best Striker-Fired Pistols [Hands-On+Video]](https://www.pewpewtactical.com/wp-content/uploads/2024/02/Best-Striker-Fired-Handguns-2-1024x576.jpg)


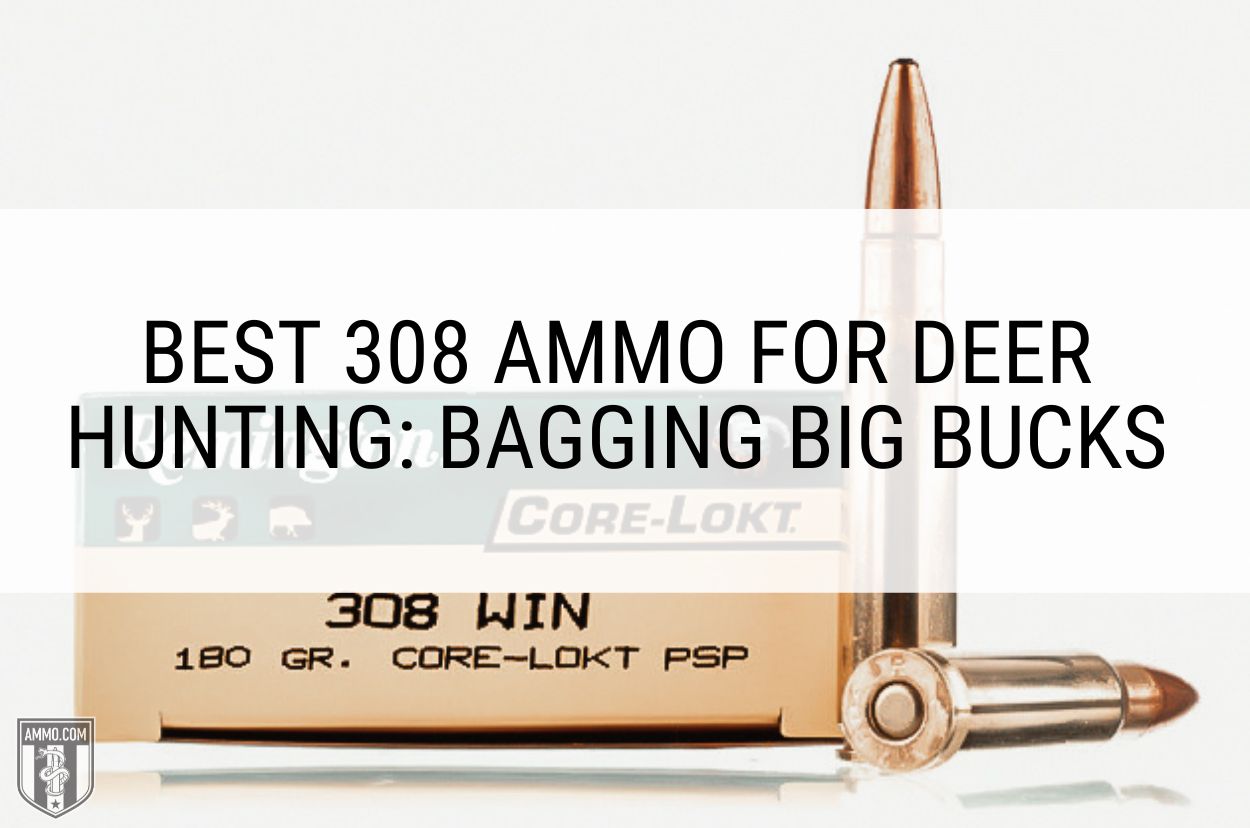


 The action of the 700 itself is designed with this mass production in mind and has two forward dual opposing lugs. The bolt is made from three pieces forged together (body, head, and bolt handle) and the ejector is constructed as a C clip sitting within the bolt face.
 (Above: The Remington SPS Varminth)


