Home Blog Page 55

7mm Rem Mag for Deer Hunting: A complete guide

0

The 7mm Remington Magnum was introduced in 1962 with Remington’s new 700 action. Since 1962 the 7mm Rem Mag has exploded in popularity and can boast of being one of the most popular magnum cartridges available to date. The 7mm’s has a large variety of bullets available making it an acceptable cartridge for anything from varmint hunting all the way up to moose.

The 7mm Rem Mag is a superb deer cartridge. With plenty of potential velocity and energy available to hunters, the 7mm Rem Mag is a practical and effective choice for hunters looking to harvest deer at all practical ranges.

Since its introduction in 1962, the 7mm Remington Magnum (7mm Rem Mag) has quickly become one of the most popular magnum cartridge and caliber combinations on the market today. This cartridge simply ticks all of the boxes that hunters look for when choosing their hunting setup to give them the best versatility in a cartridge. Although with the effectiveness of this cartridge comes the possibility of excessive damage to meat if the bullet selection is less than optimal.

Speed, Energy, Distance

With a wide variety of options for hunting style bullets available for the 7mm Rem Mag hunters can more easily choose how much speed and or energy they want out of their personal setups. With bullets coming in as low as the 139gr. SST from Hornady all the way up to 175gr. ELD-X’s your choice should reflect the expected distance and required energy of your hunt.

In this case we are looking at deer sized game. This will cover anything from Whitetail Deer, Mule Deer, and Blacktail Deer with little difference in required energy when harvesting any of these three deer species.

In general the recommended minimum energy for deer sized game is approximately 1000ft-lbs of energy. This can vary by a small margin depending on shot angles and bullet style though 1000ft-lbs is a good baseline to start from. Also in this case hunters should be reminded that most hunting style bullets require a minimum velocity of about 1800 – 2000FPS.

Looking at the factory loaded and very popular Superformace from Hornady firing a 139gr. GMX bullet hunters can expect up to 3190FPS at the muzzle with a whopping 3140ft-lbs of energy. This bullet and cartridge combination has a maximum effective range for deer sized game out to 750 yards. At this point the bullet has 1837FPS and 1041FT-LBs of energy remaining.

Now taking the larger 162gr. ELD-X in Hornady’s precision hunter ammunition hunters can expect 2940fps at the muzzle and 3109ft-lbs of energy. This bullet holds its lethality out to a staggering 800 yards where its velocity drops down to 1857fps and 1240ft-lbs of energy.

With these two rounds highlighting the abidance in potential options hunters have numerous options when picking their ammunition for their 7mm Rem Mag. With plenty of velocity and energy hunters should now consider their bullets expanding characteristics. Deer size animals do not have a large bone structure like moose or even elk so softer bullets that expand more are a viable option.

Bullets that have a lead core will expand more and transfer more energy then solid copper core bullets. With a healthy amount of both speed and energy your bullets penetration will not be your top concern and rather energy transfer will take that place. Look for Hornady’s ElD-X, Nosler’s AccuBond, and the Game King from Sierra all of these are good choices for large expanding bullets.

Avoid excessive energy in your cartridge setup to curb potential meat damage. Use a ballistic calculator and your expected hunting distance to better understand your bullet selection. Large amounts of excessive energy can lead to the loss of the front half of the animal.

The average distance of hunting shots are under 300 yards so don’t be afraid of using smaller bullets to help preserve meat.

7mm Rem Mag The Basics

The 7mm Rem Mag isn’t known for being overly hard on its operators to handle in terms of recoil. If you’re a larger build and used to shooting Magnum cartridges you will not have any concerns with the 7mm Rem Mag. Although if recoil is a concern for you a muzzle brake can be added to most rifles to help tame recoil.

A muzzle brake is highly recommended for youth hunters looking to grow into a 7mm Rem Mag over the years.

If your local laws allow for the use of a suppressor this will both reduce recoil and lower the decibels when firing.

With the popularity of the 7mm Rem Mag comes options. Like its ammo variety the choices of rifle manufactures that offer the 7mm Rem Mag in their respected platforms is abundant. This is much appreciated by hunters that prefer the feel of particular rifle manufacturers.

With multiple manufacturers also means multiple price points available to hunters looking to either splurge on a new elite setup or just get into the lifestyle of hunting. Price points can very from as low as $700 all the way up to $3000 and even higher depending on your personal flavor. One of my personal choices for a practical price point rifle is the Tikka platform that comes in around the $1100 CAN price point.

Hand-loaders will appreciate the abundance of components available to them.

I always like to point out the ability for a cartridge to go above and beyond its initial requirements. For new hunters getting into the lifestyle of hunting, deer hunting seems to be the most popular and often overlook other game animals. The 7mm Rem Mag is a superb choice for new hunters due to the fact that it has plenty of potential.

If you find yourself with the opportunity to go on an elk hunt or even a moose hunt the 7mm Rem Mag will have you covered! By simply increasing your bullets weight and possibly choosing a deeper penetrating bullet design the 7mm Rem Mag will hold its own against these larger animals.

Moose Size Comparison – How Big is a Moose Compared to Other Animals?

0

To be very clear, moose is the largest species of deer, and no other species of deer can compete with moose size or height. After moose, elk is the second largest species of deer. If you aren’t a hunter or don’t live in those parts of the world where moose are found, you are surely unaware of the actual size of the moose or maybe just have seen it in pictures.

Further Reading

Latest Reviews of top Hunting Binoculars

Latest Reviews of the Best Binoculars for money

To make it easier for you and give you a clear picture, a fully grown moose look taller and bigger than even a horse. There are different subspecies of moose that are of varying size and weight. Most of the subspecies are taller as compared to other animals.

In this article, you can find out the average size of every subspecies of deer and compare their size with humans and animals, including deer, horses, and elephants.

Moose Size Comparison – Subspecies of Moose

The name of the deer family in Latin is “Cervidae,” and the moose is the tallest and biggest species of the Cervidae family. Moose are brownish-black, almost black. Their appearance seems a little similar to a horse as both have long legs and the same body shape. However, moose have antlers while horses don’t.

Furthermore, moose have a droopy faceand dewlap covered with hairs. Their antlers are widespread, long, and have branches. So they add to the tall appearance of moose.

Moreover, there are a vast number of moose inhabited in Canada. The word moose evolved from the word “moosh,” which is from the language of the Innu people in Canada. There, “moosh” means bark eater. However, In European countries, moose are known as elk.

Moose has different subspecies, out of which four are the most prominent in Canada. These include (Alces alces America) Eastern moose from eastern Canada and the United States.

Alces andersoni, commonly known as northwestern moose, arepopulated in northern areas of Dakota, Michigan, central Canada, and Minnesota. Whereas the third subspecies is Shiras moose, inhabited in the Rocky Mountains of the United States.

Based on their distinctive traits and geographical location, some further moose species are Siberian Moose, Yakut Moose, and European moose, collectively recognized as Eurasian moose. The geographical areas affect the inhabited moose there and cause variation in their characteristics, leading to the evolution of subspecies.

Size of Different types of Moose – Comparison

All the subspecies of moose vary in their average weight, height, size of antlers, and skin color. The gigantic subspecies are Alaskan Yukon moose, mostly found near rivers in Alaska.

Alaska Moose

Male Alaskan moose can weigh more than 1800 pounds, while females have an average weight of 1000 to 1100 pounds with more than 7 feet in height. They can grow antlers of over 1.8 m in length.

Western Moose

After Alaskan moose, the second-largest subspecies is western moose from the western regions of Canada and the United States. The weight of male western moose is about 1000 to 1500 pounds, female between 600 to 800 pounds, and height is between 6 to 7 feet only up to the shoulders. Their antlers are a little smaller than the antlers of Alaskan moose, about 1.6 or 1.7 meters.

Eastern Moose

Eastern moose, which weigh around 1400 pounds, is the third-largest subspecies of moose. A male eastern moose has a height of 5.5 to 6.5 feet and weighs 1300 to 1400 pounds, while the female eastern moose can weigh around 600 to 700 pounds with 5.6 feet height.

Siberian Moose

Aside from these species, the largest subspecies of the Eurasian species is the East Siberian moose. Siberian moose are smaller in height and weight as compared to Alaskan moose.

Yellowstone Moose

Even the smallest subspecies of moose weigh up to 1000 pounds and are at least 5 to 6 feet tall. These species are named Yellowstone moose, inhabited in North America, Russia, and China.

Moose Size Comparison with Others

Moose vs. Deer

The adult male moose are called bulls, while the adult female moose are cows. Both are heavier and bigger than all other species of deer. The whitetail deer, blacktail deer, or elk cannot compete with moose size and weight.

Such as, the whitetail deer only weighs between 100 to 300 pounds with 3 feet shoulder length that is much smaller than a moose, almost half or even less than that. Similarly, an elk is also foot smaller than a moose.

Moose Size Compared To Horse

When comparing the height of a horse and moose, we consider that the height of horses is measured from their hoofs to the withers that are the part between the upper back shoulders. The average height of a horse is almost five and a half inches.

However, just like the moose, horses also vary in their height. There is also the smallest and tallest size for a horse. Comparing the tallest horse and moose, they can be almost the same height, i.e., 7 feet. But due to their bulkiness, a moose will still appear bigger than a horse.

Moose Elephant Size Comparison

No doubt that a deer, elk, or horse are smaller than moose, but comparing moose with other animals, such as elephants, one of the heaviest animals living on the earth, can make a seven-foot-tall moose seem smaller.

Like moose, different species of elephants and male and female elephants vary in average weight. An elephant can be an 11 to 13 feet tall male or only an 8 feet tall female elephant. So a female elephant and a male moose may stand at almost the height.

Moose Compared to Human

Have you ever seen a moose from close? No wonder that 7 feet or even more than that tall and heavy moose with wide antlers will make you look tiny in front of it. The moose are measured by their shoulders; their antlers make them even taller.

Even the height recorded of the tallest man alive on earth cannot exceed the height of a fully grown Alaskan moose.

Wrapping Up – Moose Size Comparison

Moose are the largest and most gigantic species of deer. Comparing moose with animals such as horse and elk give us the result that they are larger than all those animals. Similarly, humans are also tiny in front of a moose. But a moose can not exceed the height of an elephant; that is itself a large and bulky animal.

Additional Common Questions

How do moose measure up to other animals in terms of size?

In terms of size, a full-grown Alaskan moose is truly a majestic sight, often standing taller than 7 feet. To truly grasp the size of these magnificent creatures, think about those towering NBA giants, like Yao Ming, who stands at a staggering 7 feet 6 inches – a moose is essentially the Yao Ming of the animal kingdom! To further contextualize, horses, which we often perceive as large animals, measure an average of about 5 feet 4 inches at the withers, or shoulder height. This height places an average male Alaskan moose around a foot to a foot and a half taller at the shoulders than a horse. So an up-close encounter with a moose might feel a lot like standing next to an absolutely massive horse, dwarfing those familiar four-legged companions!

Do we have any animal that can size up to a moose?

Interestingly, there are animals that match up to the size of a moose, or even surpass it. One great example is the bison. Bison tend to outsize moose in most physical terms. On the scale, moose can weigh in at an impressive 1,500lbs, while bison can tip the scale up to a massive 3,000lbs or even more. When it comes to height, the moose can carry its head high up to 6.9ft at the shoulder and grow to an impressive total length of 10ft. However, bison have a naturally raised hump, which helps them achieve a total height of 11ft. Despite their towering height, bison generally maintain a body length somewhat shorter than a moose, about 9 feet. So imagine yourself on a safari tour sitting in a truck and being approached by a herd of bison. Their hump would be above your field of view, making them look like a moving wall – an experience highlighting their towering stature and sheer mass!

What is the size of a moose when it is fully grown?

As full-grown adults, male moose (also known as bulls) reach awe-inspiring dimensions, while females (cows) are somewhat smaller. The average adult bull moose stands around 6 feet tall at the shoulder. Recalling our human equivalent, that’s like standing up to the chest of a person who is 6 feet tall! As for their weight, well-fed and healthy male moose can weigh up to a massive 1,400 pounds, that’s the equivalent of carrying around seven adult humans! However, unlike in males, female moose, although also large, don’t reach these extremes. Their lower size requirements make sense from an evolutionary perspective as smaller size allows them a higher rate of survival.

How does the size of a moose compare to a car?

When we compare a moose to a car, we can gauge their size in a familiar context. A moose can tip the scales upwards to 1,500 pounds, reach a height of almost 7 feet, and extend up to 10 feet from nose to tail. In contrast, your average family car, weighing around 3,500lbs, far outweighs a moose. The car’s height, standing at around 4.75ft, is shorter compared to the towering moose. However, in terms of length, a car stretches further up to around 16.3 feet. If you’ve ever seen those road signs warning against moose in certain regions, now you know why. A collision with these massive animals can cause substantial damage due to their considerable weight and height. Just think about how your car would fare in an unfortunate meeting with this gigantic animal that’s comparable in weight to a small car and can look straight into your car window!

How To Skin A Raccoon – Step By Step Guide

0

Skinning your first raccoon can be a daunting task but it should not much different than skinning a coyote. Remember that a raccoon is more delicate than a coyote and you should take your time especially on the first one to make sure you get a good pelt when you are done.

How to skin a raccoon

The method we are going to discuss in this article is how to tube skin a raccoon. Tube skinning is one of the most common ways and it can be used when selling your fur to a fur buyer, tanning, wall hanging, or slightly modified for taxidermy purposes.

Tube skinning works for many types of animals in North America. This includes the fox, coyote, bobcat, raccoon, and anything in between. If you are looking to trap raccoon then checkout our raccoon trapping guide. It explains what traps, bait, and sets to use when trapping raccoon.

Is It Hard To Skin A Raccoon?

Skinning a raccoon can be a little hard at first. If you are skinning a raccoon for the first time it may take an hour to skin it. Take your time though you should not be in a hurry when you are first starting out and raccoon pelt will turn out good.

When I skinned my first critter I was trying really hard to do a good job and didn’t have much practice skinning. There is a learning curve to it but it is something you can learn as you watch someone skinning a raccoon and then try it a few times.

I have added several example videos at the bottom of this article so you can see when different methods of skinning a raccoon. Watch when the person skinning the raccoon is pulling and when they are cutting.

Skinning a coyote and a raccoon are very similar. Checkout our article on how to skin a coyote for more tips on skinning.

How Long Can You Wait To Skin A Raccoon?

Usually, you are hunting and trapping raccoon in the cold months. October to February is when most raccoon have the best fur.

In cold weather, raccoon will not spoil for two to three days and can be skinned. A raccoon in warm weather needs to be skinned within a few hours. Raccoon fur left on the carcass can start to spoil or get green belly and the fur will start to turn a greenish color.

Green belly is not initially bad if it is light green but as it progresses and the bacteria growing on the raccoon skin can cause the fur to slip or fall off the hide.

Green belly can be cleaned off with hydrogen peroxide and may not initially ruin a skin.

Tools For Skinning A Raccoon

  • Raccoon Gambrel
  • Skinning Knife
  • Tail stripper
  • Tail zipper or splitter

How Do You Professionally Skin A Raccoon?

Most people professionally skinning raccoon are doing it to sell the hide and make money. The tube method is the most common method when selling raccoon pelts.

Steps To Skinning A Raccoon

  • Cutting Direction: When skinning a raccoon you may think the cutting direction is down so you can get the skin off but that will cause you to nick the fur and put holes in it. Your cutting direction should be perpendicular to the carcass and should cut the white membrane that appears between the carcass and the hide when pulling down on the fur.
  • Nicking the hide is not a huge deal and can be fixed. Even professionals do it. It can be sewn together later in the fur preparation process but it is best to avoid it. If you have nicked the fur be careful when you pull the fur down off the raccoon that you are not making the hole bigger and stretching it out.
  • Hang the raccoon up upside down by the back feet with a gambrel or rope around the legs.
  • Split the fur along the back of the legs where you see a color change in the fur. Start at about the back of the knee and cut in deep. and go around the top of the anus.
  • Work the sin off around the legs by spreading the hair away from where you just cut and skinning the hide around the leg.
  • Split the fur at the knee of the raccoon and leave the rest of the fur on the foot. When you have enough fur worked down and pull the fur down to about the level of the tail.

How To Skin a Raccoon Tail

  • Skin down around the tail creating a gap between the fur on the back and the carcass. Work and skin the fur down the tail an inch or two.
  • Use a tail stripper around the meat of the tail and pull down on the fur and tail stripper while you also push up on the raccoon with the other hand right where the tail connects to the rest of the carcass.
  • Use a tail zipper or knife to split the tail all the way to the bottom so the tail can dry out.
  • You should now be able to grab a large chunk of fur and pull down all the way to the shoulders and maybe a little farther.
  • Now you should be able to stick a bar into the flesh between the neck and shoulder on both sides and pull down until the fur on the front leg goes over the elbow joint. The fur can then be cut around the leg and pulled through the leg hole.

How To skin a Raccoon Face, Ears, Lips and Eyes

  • You can now give another good tug down now that the front legs are out. The head should be the only thing left in. The fur should have stopped at the ears.
  • Cut straight into the head and you should be able to cut the ear cartilage at the base of the ear on both sides. You can now stick your finger in the ear and not too hard pull down on the hide and continue skinning.
  • You should start getting into the lips on the sides of the head. They should start to split from the carcass at the corners of the mouth. You can stick your finger in there and pull fairly hard and keep skinning down the rest of the head remembering to cut perpendicular to the carcass.
  • Next, the eyes should be cut fairly deep keeping the eyelashes intact. Again you will cut straight keeping the cuts a little deeper around the eyes.

How To skin a Raccoon Nose and Lower Jaw

  • Once both eyes are cut skin the nose all the way down the front of the head until you are about a half-inch from the end of the nose. Then cut straight towards the bottom jaw and cut the nose off. The top of the fur should now be free.
  • Next, skin the bottom jaw down about two inches from the end the cut it off leaving the bottom few inches of fur on the carcass. You won’t need that piece. You should now be done.

How To Skin Raccoon Paws or Feet

In the tube method of skinning a raccoon you should not need to skin the feet. As stated above you can cut the fur at the elbows and you will be done.

If you are skinning a raccoon for taxidermy then you will need to skin out the feet or paws. You also do not want to cut and leave any of the fur on the carcass.

When skinning out the feet first you will want to split the back of the leg instead of skinning down and cutting it off. Continue skinning down the leg until you ar a few inches from the top of the foot.

You can now split the back of the leg until you come to the big pad at the bottom of the foot. You will then start to skin down the foot until you reach the tird joint on each toe.

You will need to work down and skin each toe individually as you work the hide down. Split the third joint at each toe as you reach it. The middle toes are longer and will be farther to skin than the side toes so finish out the site toes first.

Learning More

I have added a few videos here to help you get a few perspectives on and tips on how to skin a raccoon. Watch these videos and you will see that each person has their own little tricks.

How to Skin a Raccoon Fast

Raccoon Trapping Equipment

  • MB 450 Traps
  • Best Coyote Traps
  • Pack Basket
  • Trapping Bag
  • Buckets
  • Trapping Hammer
  • Trapping Sheds
  • Trapping Cabins
  • More Trapping Equipment

Top 5 Best Streamers for Trout – And How to Fish Them

0

What are the Best Trout Streamers?

There are thousands of different types of streamer patterns available today. However, many of these flies will not catch fish when pursued with the most common methods used by practical fly fishers in trout streams across North America.

As a general rule the best trout streamers are:

  • Autumn Splendor Streamer
  • Slumpbuster with Cone Streamer
  • Zonker-Grizzly Streamer
  • Muddler Minnow Streamer
  • Muddy Buddy Streamer

If you’re looking to add some variety to your trout-fishing arsenal – or perhaps want to put some additional “pluck” into your prey – here is a list of five great streamer patterns to use in local trout streams.

Tom Dosoff Catching Nice Brown Trout

1. Autumn Splendor Streamer

The Autumn Splendor might be the most famous bugger design ever created, developed on the Roaring Fork by Tim Heng. One should not be fooled by the name because this bug catches fish all year round. It is based on a straightforward principle that works with most fish species from trout to bass and pikes, the basic idea of catching something.

The Autumn Splendor Streamer is a streamer that was originally tied in the Roaring Fork Valley of Colorado, but it has since gone viral from coast to coast! The Autumn Splendor is a more active and flamboyant version of the flash bugger that’s just as good for trout as it is for bass.

There are different ways to make this fly work, but most people use it as an indicator/strike indicator for fishing nymphs or wet flies downstream, where you fish it high in the water column on sinking lines and let it sink down on its own.

Streamer Fly Fishing for Trout Video

As far as colors go, darker colors definitely seem more attractive for fish in low light conditions, but that’s just one factor among many others that are equally important when you’re fishing streamers or buggers – it’s not just about color.

According to some anglers, another benefit of using a certain kind of flies is that they behave differently on the water, making it easier to target fish by reading their reaction and adjusting accordingly through matching their pace or speed. That’s why most fishers choose streamers over other types of flies – they can either mimic different species at once or behave like selective baits all on their own.

The Autumn Splendor isn’t the only one that’s high on demand among those who choose streamers as their go-to method of choice, you can find any number of different patterns.

2. Slump Buster with Cone

The Slumpbuster is one of the few new streamer patterns that are much more than a Wooly Bugger variant. To create a fish attracting jigging motion in the water and its matuka-style fur strip wing seductively breathes without fouling, the front end of this fly is heavily weighted.

Slumpbuster Fly Fishing Streamer in Green

The Slump Buster is an excellent choice if you’re looking to cast upstream and let it drift slowly towards you or do some jigging with it. In shallow water, use a floating line and strip it with short jabs. The head of this fly rises as it is stripped and goes between strips.

Slump Busters are meant to be fished on fast-moving rivers when fish feed near the surface, but when salmon appear in deeper areas, this bug could serve as an indicator fly for nymphs or bottom bugs too. Slumpbusters work best at depths where you need a stiff leader to get them down just a few feet from your weight upfront.

Large Brown Trout Caught on Slumpbuster

If you’re having difficulty landing a fish, try switching to a Slump Buster and casting, retrieving, and hanging on. It has the ability to move erratically through the water that excites fish.

  • Use a floating line in shallow waters and strip it with short stomps.
  • When you strip this fly, the head rises up and it dives down between strips.
  • In deeper water, utilize a full sinking line; let it sink for a moment before stripping it erratically.

Olive or Black Slump Buster streamers are perfect for all fresh and saltwater fishing adventures. Unlike zonker strips of rabbit with their very long hair, these skin strips were short-haired, nicely mottled, and thin-skinned for easy wrapping.

There’s no doubt that this fly is a great choice if you want to fool a fish with a highly visible streamer at slower speeds. Slumpbusters are perfect for shallow water fishing but can be used in all kinds of conditions.

3. Zonker-Grizzly Streamer

A Zonker Fly’s slick profile will imitate a minnow or a leech. This snag-resistant fly is ideal for bottom fishing and is a great pattern to use with nymphing techniques.

Zonker Fly Fishing Streamer - Grizzly Color

One of the most popular patterns ever, the Zonker-Grizzly Streamer is a technical fly type – it has what’s known as a high-risk profile. Especially in clear water with light penetration, this is one of the best streamers out there because it functions beautifully on depths where you can’t measure your fly line or see your indicator.

The Zonker is a great streamer that is highly effective in both still and running water. It’s usually fished with longer leaders and heavy tippet, so it can get down quickly to fish feeding near the bottom or lie on top of it if you want it to mimic a crayfish or crawfish. The black Zonker is best in clear to slightly stained water, whereas brown is great for very dirty water.

Rainbow Caught on Zonker

The Grizzly Zonker is a beautiful minnow imitation. This traditional streamer has a lot of pulsating action while swimming and is ideal for big trout, bass, and various other species.

A zonker is a fly constructed from a piece of fur. Zonker strips are strips of hide that, when wet, soften and create a fly with bulk that pulsates when retrieved. It’s great for bigger flies, such as streamers and pike fly patterns.

The Zonker Streamer is one of several popular patterns often used by fly fishing guides for steelhead and salmon. It has an extended body section that makes it very easy to tie this fly onto any size hook. This pattern’s profile reminds predators of minnows that live near stream bottoms or slow-moving rivers or ponds, thus making them eat this fly instead of your regular dry flies.

4. Muddler Minnow Streamer

Developed by Charlie Fox, one of America’s most successful anglers at longtime, Muddler Minnow Streamer is a classic and among the best flies for large, aggressive fish like pike and musky. As you might guess from its name, it’s simply a streamer that resembles a minnow, but that doesn’t mean it will only work on trout – even though there are other patterns that work better for them.

Muddler Minnow

This particular pattern can also be fished as an indicator fly for nymphs or wet flies downstream when you have a sinking line to cast with or attach it to a leader/tippet knot and drift it over the surface of the water.

One great thing about Muddler Minnow Streamers is their durability because they’re tied with deer hair instead of feathers, so they should last you a while and not tear apart too easily. Unless you break them against the rocks and logs, that is!

5. Muddy Buddy Streamer

Muddy Buddy streamers are an excellent and versatile option for any fly fisher and can be used in both fresh and salt waters. This particular fly has a weight-forward design which makes it useful when fishing deeper areas where you cannot see down to spot fish.

Muddy Buddy

The Muddy Buddy Streamer comes in several colors and if imitation is what you seek, try out the black or olive muddy buddy streamer. These colors are ideal for fishing in murky water when visibility is limited.

The black color of this streamer is perfect for the area with the most silt in river water which is usually in the deepest part. Since this fly has a larger profile, it can be used as a comfortable choice when going for larger fish.

Large steelhead caught on streamer

This fly is effective during the warm summer months when many saltwater species are feeding near the surface of the water. The best time to use this streamer is from early morning until late evening, but keep in mind that you should be aware of changing currents if fishing with this streamer.

When casting this streamer, you will want to try and keep your line as straight as possible which will help the streamer ride horizontally through the water column instead of floating vertically.

Muddy Buddy streamers are great if you’re looking for an option that can be fished in both still and running waters, sink at different depths, and imitate virtually any type of prey fish. Their weight-forward design makes them effective even when cast upstream into the current or used as an indicator fly for other nymphs or wet flies.

What Flies Do You Use for Fly Fishing?

When fly fishing, the type of fly used depends on the situation. For example, in the late summer, when the water is low and warm, mayflies, midges, and stoneflies are a good bet for catching trout. On cold winter days, midges, eggs, and worms are also effective flies to use.

Catch More with Streamers

What Is the Best Fly for Fly Fishing?

The best fly for fly fishing depends on the season. For example, when trout are feeding on nymphs and emerging insects in the early spring, an excellent fly to use is a stonefly. The best time of the day to fish is around the warmest part of the day for this type of situation.

In addition, when caddisflies start hatching in May and June, try using a fly that imitates them, such as Griffith’s Gnat or Pheasant Tail Nymph. On hot summer days when there isn’t much insect activity, you might want to use an attractor such as Royal Wolf or Elk Hair Caddis, which work well because they imitate aquatic food items such as crayfish and minnows.

Seasonal Hatch Chart for Fly Fishing

What Flies Are in Season for Fly Fishing?

The flies in season vary greatly, but for the most part, the best time for fly fishing is from May through September. Fly fishing in the winter and spring months can also be successful, but the type of fly used will typically be different. For example, caddis and stoneflies aren’t commonly used in the winter months.

In addition to these essential flies, there are many other options that work well at certain times. During cold weather in winter, try using egg patterns or small nymphs such as Pheasant Tail Nymphs. When trout are near the bottom-feeding on crayfish in summer, use Woolly Buggers or Worm Patterns.

How Much Do Flies Cost for Fly Fishing?

In general, flies cost anywhere an average of $2 to $3. Flies typically cost more the larger they are, and those are made of materials such as peacock herl, marabou, and mink fur. Flies can also be bought in bulk to reduce their price per fly.

The cost of flies can vary a significant amount depending on the materials used. Some of the most expensive flies are made from.

Fly fishing flies in nice box

What Are Fly Fishing Flies Used For?

Fly fishing flies are used to catch fish. Flies are typically used in trout fishing and come in various shapes and sizes that imitate insects. Flies will typically draw fish to the top of the water where your fly is or imitate things that fish feed on below the water.

Different patterns of flies are used based on the time of year, water conditions, and location. Flies come in all shapes and sizes with various materials used to construct them. Materials for fly construction can be very expensive with fur being one of the most expensive pieces.

Matthew Bernhardt

Conclusion

Streamer patterns are also very good for fly fishing beginners because of their size and the fact that they can easily imitate a big baitfish which is one of the most common prey in rivers and lakes, but they’re mainly used to target large trout. This article discusses five great streamer patterns for trout fishing:

  • Autumn Splendor Streamer
  • Slumpbuster with Cone
  • Zonker-Grizzly Streamer
  • Muddler Minnow Streamer
  • Muddy Buddy Streamer

Streamer patterns are among the most popular fly patterns for fly fishing. They are fantastic attractors and can be easily tied in a few minutes; they can imitate anything from baitfish to leeches, crawlers, nymphs, and more.

Different Types of Airsoft Ammo Types (Full Guide)

0

If you’re new to airsoft, the different ammo types on the market can be confusing.

Are you choosing the right BB weight for your gun?

Does the size of the BB matter?

Will your ammo selection impact performance and gameplay?

We’ve tried and tested every type of airsoft ammo on the market. This guide will answer your questions about BB colors, sizes, materials, and, more importantly, which is the best ammo for you.

Size

There are three size variations of airsoft BB: 4.5mm, 6mm, and 8mm in diameter. The most common size is 6mm. This is because most airsoft guns are manufactured to accept this pellet size.

Before buying airsoft ammunition, ensure your rifle is designed to accept 6mm BBs. Most gas-powered airsoft guns (GBB), Co2 pistols, and spring-powered guns will fire 6mm rounds.

8mm BBs are less common, but players can modify their gun barrels to shoot this larger size of ammo. However, based on feedback from the airsoft community, 8mm BBs are less efficient than 6mm BBs due to their larger surface area and air resistance.

Wind and spin from your guns’ hop-up unit can create poor accuracy.

Weight

The most commonly used weight of airsoft BB is 0.20g. But depending on the FPS of your airsoft gun, you can choose a heavier weight, such as 0.25g or 0.28g. The weight of your BB can influence trajectory, energy, and velocity (force).

You can fire a heavier-weight BB from weapons at a much higher rate. Your gun’s barrel will influence your shots’ performance and overall accuracy.

Depending on your play style, the type of rifle you have, and the different kinds of environments will decide what weight will be best for you.

Keep in mind that an airsoft gun and a BB gun are different. There is 4.5mm metal ammunition available, but these are not safe to use in airsoft.

You’ll have to consider your gun’s performance before you up which ammo weight you use. If your rifle’s internal parts aren’t powerful enough to support moving from a 0.20g to a 0.28g, it will impact how far you can shoot.

Here’s a list of all airsoft BB weights:

  • 0.12g
  • 0.20g
  • 0.22g
  • 0.25g
  • 0.28g
  • 0.30g
  • 0.32g
  • 0.36g
  • 0.38g
  • 0.40g

Most starter airsoft guns can support 0.20g out of the box. Remember, ensuring your gun’s FPS doesn’t mean you’re firing over the limit. The lighter the BB, the less it can travel over a distance.

But lighter BBs have less precision. As you’re shooting, you’ll notice your rounds become less accurate.

As you move from a beginner airsoft player to a more regular skirmisher, you might use 0.25g – 0.28g weights.

This slightly heavier weight will likely require upgrades to your rifle. Even though it’s only a few grams, it makes a big difference.

If you want to use the heaviest BBs (0.32g and above), your gun will need some serious performance upgrades. This type of BB is best suited for sniper rifles or DMRs due to the length of the barrel.

If you need clarification about the airsoft BB size, your gun allows, check for markings on the airsoft gun magazine or the handbook the manufacturer provides.

Note: the heavier the BB, the more likely it is to hurt if a player gets shot. Be conscious of your trigger discipline as you move up in weight.

Material variants

Airsoft BBs are made of plastic. There are both biodegradable and non-biodegradable options available on the market. Most brands produce high-quality BBs for both variants nowadays.

Most indoor airsoft venues will allow for non-biodegradable airsoft ammo.

This is because the BBs can be collected and disposed of properly. These non-biodegradable BBs are made of a plastic called Acrylonitrile Butadiene Styrene (or ABS for short).

However, outdoor venues such as urban sites will usually ask you to use biodegradable BBs (bio BBs). This is because they degrade over time and will not impact the environment.

They are a little more expensive, but keeping your local airsoft site environmentally friendly is worth it.

Biodegradable airsoft BBs are made of Polylactic Acids (PLA) products such as corn and starches.

As you can imagine, sweeping up 400,000 airsoft BBs at the end of the day isn’t possible (or fun).

Colors

Most airsoft BBs come in a standard white or a lighter color. The reason for this is that it improves the visibility of your shot. Shot placement and identifying your hits is much easier if the BB direction can be tracked through the air.

There are darker BB colors, such as dark green and dark blue. This naturally has an impact on visibility.

Darker BBs can sometimes be great for avoiding shot detection (i.e., opponents can’t see them coming), but they can create problems for you, too.

Tracer BBs

Tracer BBs have a luminescent coating that glows as they’re fired. Tracer BBs give you a significant advantage in indoor CQB environments where light is limited or, of course, for a night airsoft game.

For the luminescent coating to work on the BB, a tracer unit must be fitted to the end of your AEG. Your shots will then flash a cool green or red as they fly toward your opposition.

Tracers are more expensive than your standard non-glow pellets. But they’re a lot of fun and can help prevent cheat calling.

Airsoft ammo types FAQs

What ammo is used in airsoft?

Airsoft guns (sniper rifles, shotguns, pistols, and AEGs) all use BB or spherical airsoft pellets. Most commonly made out of plastic and come in the color white. The standard BB diameter is 6mm, and the most common weight is 0.20g.

What is the difference in airsoft ammo?

The main difference between airsoft ammo is size, weight, and color. The manufacturing process can differ between brands, too. Depending on the polishing process, the BB quality can vary.

This will impact performance, and your BBs will likely have imperfections if the polishing process is poor. Such as rough characteristics or small pieces of sharp plastic on the surface of the BB.

Do heavier BBs increase range?

Yes, heavier airsoft BBs travel further due to increased flight stability and path. The bigger the BB size and weight, the less likely it can be influenced by wind, rain, and other environmental elements.

Do heavier BBs hurt more?

Yes, heavier BBs hurt more. Their increased weight can result in more power and cause more damage to their intended target (i.e., other airsoft players). For safety reasons, heavier BBs are measured on a Joule’s energy chart to avoid serious injury (piercing the skin).

Is it okay to reuse BBs?

No, you can’t reuse airsoft BBs. Once they’re fired from your rifle, the integrity of the BB is compromised. In simple terms, the inside of the BB starts to crack. If you reuse BBs after they’re fired, they could shatter on the inside of your gun. You are ultimately damaging the internals of your weapon.

Steel Shot vs. Bismuth vs. Tungsten: What Gives You the Best Bang for Your Buck?

0

Have you ever been knee-deep in flooded timber, crouched alongside a tree as you watch a flock of mallards work your decoys like they read the script perfectly? You give them a few last feed chuckles as they cup their wings, and you make your shot. You swing perfectly with the appropriate lead, only to watch them all turn and fly out of your life forever, leaving you with nothing to show for it aside from possibly a wounded bird. Has this happened to you? If you’re an avid waterfowler, odds are it has.

The situation I described is all too familiar for most waterfowlers, especially since the federal banning of lead shot for waterfowl in the early ’90s. While this ban played an important role in conservation—fewer birds and other animals are now exposed to toxic lead fragments—the fact remains that most modern waterfowl loads can’t quite match the fatality of lead.

However, in recent years, variations of waterfowl loads have hit the market and gained the attention of outdoorsmen. Variations include split loads, where you could see a mix between a smaller and larger shot to give you that extra knockdown power while still providing enough pellets. Bismuth loads provide a greater density, ensuring cleaner kills. And finally, there’s the revolution of tungsten, which is nearly 70% denser than lead, providing a level of kinetic energy the likes of which hunters had never seen.

But with rising ammo prices and a lack of information surrounding the different shot loads, hunters can have a hard time figuring out which product gives them the best value. I’ll break down the pros and cons of each shot and let you make the final decision on what to put in your shotgun this season!

Steel Shot

What started off as a crunch-time decision to create an effective shot load after the federal ban of lead waterfowl loads led into it becoming the most common waterfowl and upland ammunition today. However, the progression into this wasn’t so glamorous. Steel is an extremely hard metal with a very low density (roughly 7.8 grams per cubic centimeter). This means the shot is very rough on chokes. It also has extremely lower energy rates, especially at long distances.

Over the years, the development of steel shot loads has progressed—through methods of wad advancements, powder improvements, and even shot size stacking. Many hunters have grown to appreciate steel for its low cost as well as its effectiveness in close quarters. Though the complaints regarding wounded birds have decreased with these developments, waterfowlers still feel there is too much risk associated with steel, and they often go with something a little denser and more powerful.

Bismuth Shot

Bismuth shot was the first steel alternative after the federal ban of lead shot in the United States. With a far more impressive density compared to steel (roughly 9.6 compared to 7.8), bismuth proved to be a much more fatal alternative while also being much less harsh on shotguns, especially older ones.

The introduction of bismuth also had its downsides though. Unfortunately, it’s an extremely brittle metal that was inconsistent and had a lack of durability during contact with larger birds. Combining this with its price point higher than steel, it was hard for consumers to make that switch.

The good news is that technology has caught up and improved upon those inferior earlier designs. After nearly a decade with a small market presence, bismuth has made an impressive comeback in recent years with its developments of durable metal blends, bridging that gap for waterfowlers who want better kinetic energy without paying tungsten price.

Tungsten

Tungsten has become a staple as the most effective and lethal shot option for waterfowlers, turkey hunters and upland enthusiasts alike. Tungsten super shot (TSS) has 60% greater density than the once-beloved lead shot and nearly twice the density as steel, making it a bird crusher!

Due to its high density and velocity, hunters can get the same knockdown power with smaller shot sizes, allowing for a much larger kill zone. To put this into perspective, the amount of penetration you would get from using No. 4 tungsten at 40 yards is still nearly 10% greater than the penetration you would get from using steel shot at 20 yards. This equates to fewer wounded birds and quicker limits.

The drawback to shooting tungsten is an extremely high price point. Apex Ammunition is one of the leaders in the market for tungsten waterfowl loads. For a price comparison, its TSS ammo is currently priced at nearly $5 per round, compared to its steel blend, which is roughly 92 cents per round. While this price gap can be somewhat astounding, the argument remains that while you may pay more for TSS per round, you’ll be shooting fewer shots and bagging more birds.

Best Bang For Your Buck

Whether you decide to use steel shot, bismuth, or TSS will ultimately come down to your experiences with each, your budget, and the value you see in the options. It’s no secret that while the lead ban took away a very deadly and affordable option, it is an incredible conservation move for protecting our wildlife, and there are options on the market that perform at the same level and even higher, even if at a higher price point. In my experience, using TSS has proven to be well worth the money given its knockdown power and the ability to use smaller shot sizes, giving me a lower margin of error and, thus, more harvested birds. Having said that, I am friends with many avid bird hunters who swear by the effectiveness of modern steel and bismuth loads, and their success is hard to argue with. I would encourage everybody to at least experience all three and make your decision based on how well they perform for you! Good luck this season!

READ MORE: TICK EASE FOUNDER “TICK MAN DAN” TELLS ALL ON THE DANGERS OF THESE PESTS

How Far to Lead a Dove at 40 Yards: Expert Tips for Accurate Shots

0
Image by svklimkin from Pixabay

When it comes to dove hunting, one of the most important skills a hunter must master is knowing how far to lead a dove at 40 yards. This distance can be particularly challenging for many hunters, as it requires a great deal of skill and practice to get right. The key to success lies in understanding the behavior of doves and their tendency to fly erratically, as well as the limitations of your shotgun and ammunition.

There are a number of factors that can affect your ability to lead a dove at 40 yards, including the size of your shot, the pattern of your shotgun, and the agility of the bird itself. Hunters must also be aware of any regulations or hunting laws that may apply in their area, as well as the importance of proper clothing, shelter, and camouflage. With the right training and practice, however, even novice hunters can learn to master this challenging distance and become skilled dove hunters.

Understanding Lead and Distance

What is Lead?

Lead is the amount of space that a shooter needs to aim in front of a moving target in order to hit it. When shooting at a moving target, such as a dove, hunters need to lead the target to account for the time it takes for the shot to reach the target.

Factors Affecting Lead

The amount of lead required to hit a dove at 40 yards can vary depending on a number of factors. These factors include the speed of the bird, the distance of the shot, the type of shotgun and ammunition used, and the skill level of the shooter.

Image by G.C. from Pixabay

How Far to Lead a Dove at 40 Yards?

When shooting at a dove at 40 yards, the amount of lead required will depend on the speed of the bird and the type of shotgun and ammunition used. A general rule of thumb is to lead the bird by about 3 to 4 feet, or about the length of the bird’s body.

It’s important to note that shooting at a moving target like a dove requires skill and practice. Hunters should take a course on shooting moving targets and practice regularly to improve their aim and accuracy.

In addition, it’s important to follow all hunting laws and regulations, including those related to the use of weapons and clothing. Sporting clays can also be a great way to improve your shooting skills and accuracy, as well as to learn more about the sport of hunting.

When shooting at a dove, it’s important to consider the impact of the shot on the bird and the surrounding wildlife and environment. Using a field gun with a tight pattern of pellets can help to minimize the number of pellets that miss the target and reduce the potential impact on other wildlife and water sources.

Practicing Your Shot

The Importance of Practice

For hunters looking to hit their targets accurately, practice is key. Shooting a dove at 40 yards requires skill and precision, and the only way to achieve this is through consistent practice. By practicing regularly, hunters can develop their aim, improve their technique, and get accustomed to the feel of their gun.

Image by BRRT from Pixabay

Best Practices for Practicing Your Shot

To get the most out of their practice sessions, hunters should follow these best practices:

  • Start with closer shots: Before attempting to hit a dove at 40 yards, hunters should start with closer shots to build their confidence and accuracy.
  • Use smaller shot sizes: When practicing, hunters should use smaller shot sizes to simulate the size of a dove. This will help them get a better understanding of the patterns their pellets create.
  • Practice in different environments: Hunters should practice in different environments to get accustomed to shooting in different conditions. This could include shooting on a rifle course or in a field with agile game birds.
  • Use a field gun: When practicing for dove hunting, hunters should use a field gun rather than a sport gun. Field guns are better suited for hunting game birds and will help hunters get a feel for shooting in the field.
  • Focus on technique: Hunters should focus on their technique when practicing, paying attention to their stance, grip, and aim. By improving their technique, hunters can improve their accuracy and precision.
  • Join a club: Joining a shooting club can provide hunters with access to shooting ranges and other resources for practicing their shot.

By following these best practices, hunters can improve their shooting skills and increase their chances of hitting a dove at 40 yards.

Equipment and Accessories

Shotgun and Barrel Selection

When it comes to shooting doves at 40 yards, the right equipment can make all the difference. A shotgun with a 12-gauge or 20-gauge barrel is ideal for this task. The barrel should be at least 26 inches long to provide a good balance between accuracy and maneuverability. A longer barrel may be more accurate, but it can also be cumbersome to carry around in the field.

Shot Size and Pellet Count

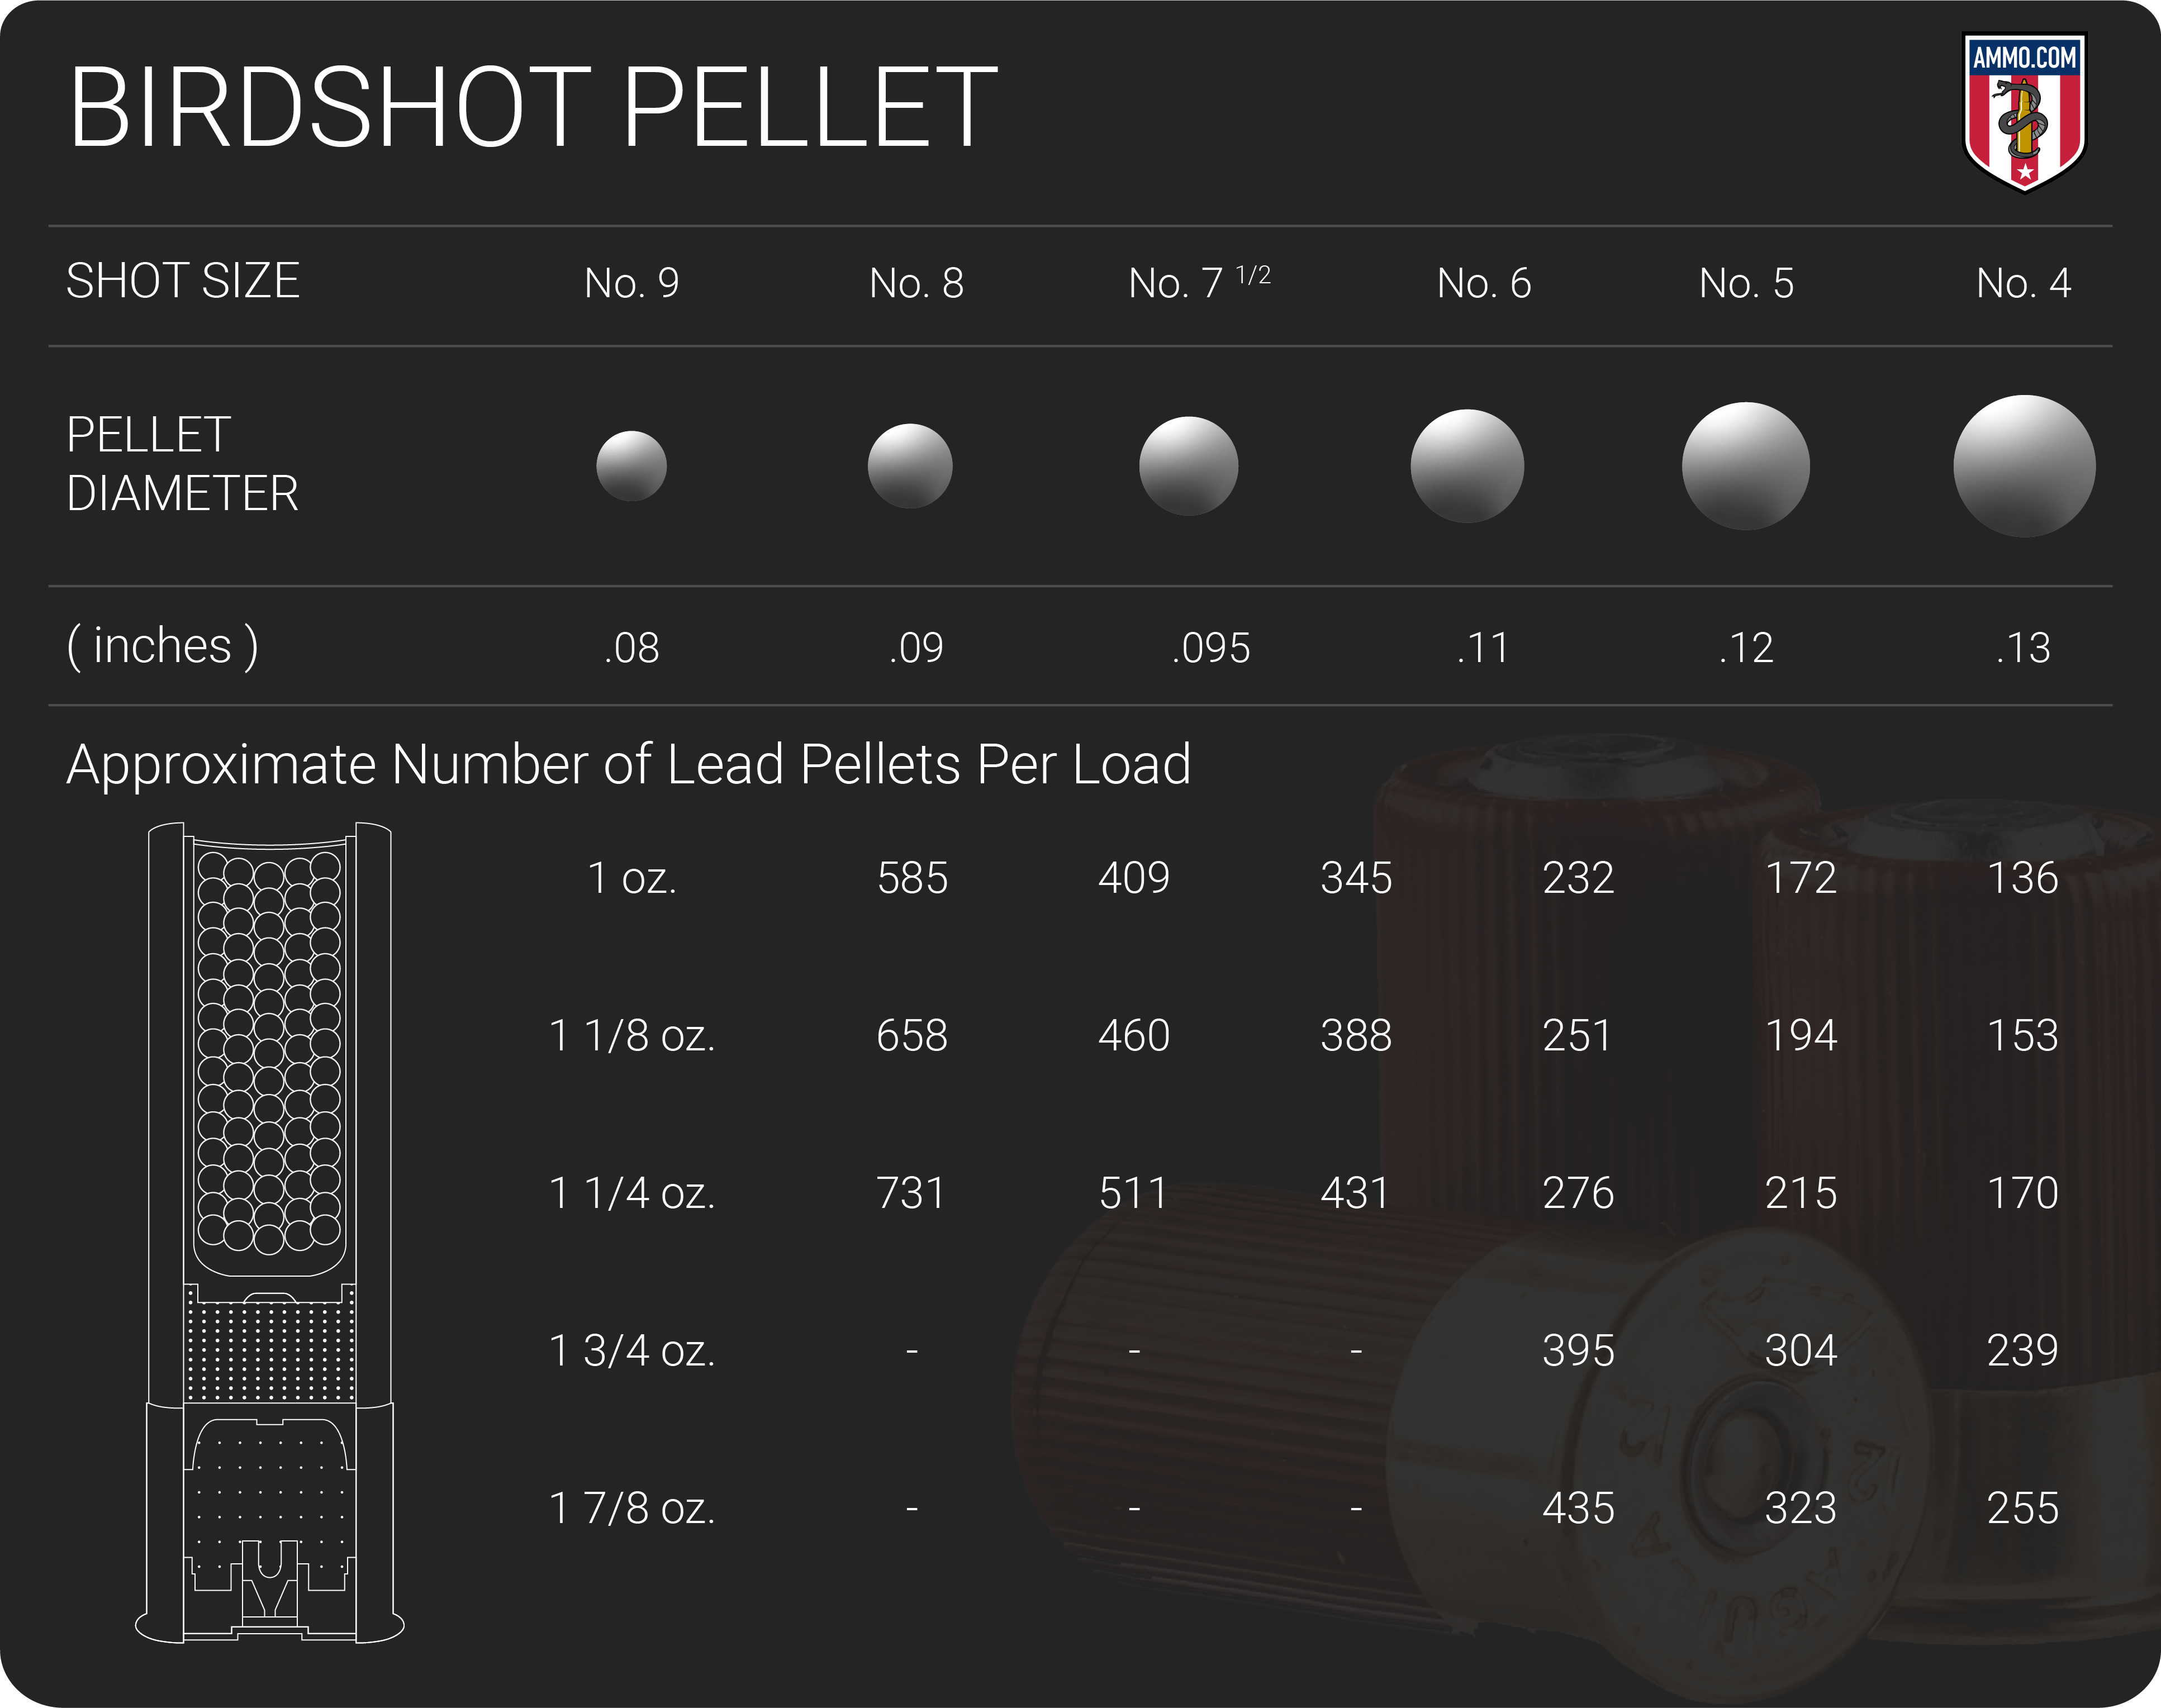
The right shot size and pellet count can also have a significant impact on your success when shooting doves at 40 yards. For this distance, a shot size of 7.5 or 8 is recommended. These sizes provide enough power to take down a dove without causing excessive damage to the bird. As for pellet count, a load of 1 1/8 ounces is a good choice for 12-gauge shotguns, while 7/8 ounces is better suited for 20-gauge shotguns.

Dove Decoys and Camouflage

Using dove decoys and camouflage can help you blend in with your surroundings and increase your chances of success. When selecting decoys, choose ones that are realistic and have natural-looking colors. Place them in a way that mimics the natural behavior of doves. As for camouflage, choose clothing that matches the environment you will be hunting in. This will help you blend in and remain undetected by the doves.

In summary, when shooting doves at 40 yards, it is crucial to have the right equipment and accessories. A 12-gauge or 20-gauge shotgun with a 26-inch barrel, a shot size of 7.5 or 8, and a pellet count of 1 1/8 ounces (for 12-gauge) or 7/8 ounces (for 20-gauge) is recommended. Using dove decoys and camouflage can also increase your chances of success.

Image by Nicky ❤️????????????❤️ from Pixabay

Regulations and Safety

Hunting Regulations for Doves

When it comes to hunting doves, hunters must follow specific regulations to ensure the safety of both the hunters and the game. Regulations vary from state to state, so it is essential to check with the local wildlife agency before heading out.

Some common regulations for dove hunting include the following:

  • Hunting season: There is a specific hunting season for doves, which varies from state to state. Hunters must follow the designated dates and times for hunting doves.
  • Bag limits: There are specific bag limits for doves, which vary from state to state. Hunters must not exceed these limits.
  • Hunting license: Hunters must have a valid hunting license to hunt doves, which can be obtained from the local wildlife agency.

Safety Precautions for Dove Hunting

Dove hunting can be dangerous if safety precautions are not taken seriously. Hunters must follow specific safety guidelines to ensure their safety and the safety of others.

Some common safety precautions for dove hunting include the following:

  • Shelter: Hunters must seek shelter in a safe area, away from other hunters, to avoid accidents.
  • Surprise: Hunters must always be aware of their surroundings and avoid surprising other hunters.
  • Hunting laws: Hunters must follow all hunting laws and regulations to avoid accidents and legal consequences.
  • Weapons: Hunters must handle their weapons with care and only shoot when they have a clear shot.
  • Clothing: Hunters must wear appropriate clothing to protect themselves from the elements and avoid accidents.
  • Food: Hunters must bring enough food and water to sustain them throughout the day.

By following these regulations and safety precautions, hunters can enjoy a safe and successful dove hunting experience.

Six Reasons Why You Won’t Kill a Booner Buck

0

A tiny fraction of whitetail hunters have taken a buck that scores over 170 typical or 195 nontypical, the minimums for entry into the Boone & Crockett record book. Many hunters feel like it’s just a stroke of luck to have a buck that size walk by, and many times it is. But that doesn’t explain why some hunters kill them with a shocking degree of regularity.

Ben Rising shot two Booners in 2015 and two in 2016. He says people push big bucks too hard in their excitement to learn more about them. Don’t dig too deep and alert them.

Several hunters have killed multiple B&C bucks over the years, which proves that they are probably doing things a little different than you and I are when you take to the whitetail woods. In talking to them, I have come up with a list if six things they’re doing that you’re probably not doing.

You’re Not Hunting Where They Live

This may seem obvious, but you have to hunt where there are. You don’t have to live there, but if you don’t have Booners where you live you must travel (or move.) Tim Young packed up and moved to Iowa and has shot two giants there and one on a roadtrip to Kentucky. Rod Owen, Adam Hays, Stan Potts and Ben Rising travel extensively to find and shoot big bucks in states other than their own.

“You have to find them first,” says Adam Hays, who has taken nine Booners including four over 200 inches. “Your best bet for finding a giant will be near sanctuaries where there is no or very limited hunting. These areas will be close to city limits, parks, industrial zones, wildlife refuges and even large tracts of land that allow no hunting. Hunting a specific animal will make you hunt harder and smarter also, just knowing he’s there!”

Rod Owen agrees.

“Killing a Booner isn’t the hardest part, the hardest part is finding one.”

Ben Rising has shot four Booners in the last two years. He says he often spends more time looking for a buck and getting access to hunt where the buck lives than actually hunting him.

You Don’t Understand How Fickle They Can Be

You can’t take chances with human intrusion, checking scouting cameras too often, or hunting in the wrong winds. To shoot a Booner you must do everything right, and get lucky, too. Patience is the key. Rod Owen tells about how he waited weeks for the perfect conditions to hunt a giant buck, but the wind switched so he literally got out of the stand and RAN all the way back to his truck.

Rod Owen shot two Booners in 2016, one in Kansas and one in Missouri. He refuses to hunt a stand until the conditions are perfect.

“People go overboard trying to get intel on these big bucks and end up hurting themselves in the long run,” according to Ben Rising. They “dig too deep” he says, risking alerting the deer that he’s being hunted.

According to Adam Hays, patience is the #1 key.

“Sometimes the most difficult part of hunting a big buck is actually not hunting him at all,” he says. “having the patience and the discipline to wait until everything is perfect before diving in for the kill.”

You’re Not Willing To Do Whatever It Takes

You are spending your time watching Monday Night Football, you’re hanging out with buddies, you’re fishing when the big buck killers are scouting. The hunters who shoot Booners make sacrifices, and they are consumed by the pursuit and learning everything they can about the deer and the land they inhabit. The drive to shoot giant deer is at a level far above the average deer hunter.

“There are hunters and there are killers,” says Rising. “The drive has to be far greater if you are going to consistently kill big ones.”

Steve Niemerg’s truck was stuck in a snowdrift so he had to wait out the blizzard in a nearby farmhouse. He’s a do-whatever-it-takes hunter so when the blizzard was over he went hunting instead of going home. He was rewarded with this giant.

With his truck stuck in a snowdrift, Steve Niemerg waited out a blizzard in a farmer’s house for two days, then instead of going home when the blizzard quit, he went hunting and killed a giant Booner that very evening.

You’re Not Hunting During the Peak Times

There are a few specific short periods each year when most Booners are shot. Hays is a big believer in the moon’s position as an influence of big buck movement. Rising says that waiting for the right moment is key.

Adam Hays has killed nine B&C bucks. He’s obviously doing something different than the average hunter. He says finding them and getting access to hunt them is the hardest part.

Hays also claims that a wind that’s good for the buck and bad for you can be the best time to hunt.

“For me, the Holy Grail of whitetail hunting is finding a big buck’s weak spot, somewhere along his travel pattern where you can get within bow range of him while he’s using the wind to his advantage”

When a peak time arrives, you must put the rest of your life on hold. You might be surprised to discover that most of these true giants were not shot during the rut. Most big buck killers agree that they prefer to kill Booners before the chaos of the rut arrives and the deer are in more predictable patterns.

You’re Not Passing On Big Bucks

Those 170 and 180 bucks were once 150 bucks. If you can’t pass up a 4-year-old 150, you will probably never shoot a 6-year-old 180. A friend in southern Iowa who owns a large farm told me he kicked a guy out of their hunting group because he wouldn’t pass up the 4-year-olds that most people would drool over.

“People like Adam [Hays] and I have learned not to smoke the tag on the first 4-year-old 160 that comes by,” says Rising. “We only have one tag in Ohio.”

That’s a tough hurdle for most hunters to get over. If you are happy with a 150-160 then so be it, but if you want to kill bucks approaching 200, you will have to let them walk.

You’re Taking Shortcuts

Most hunters rely too much on gimmicks and don’t go to the extremes necessary. You aren’t choosing your entry and exit routes wisely enough, and you aren’t using discipline to wait for perfect conditions. These big buck killers are scent control fanatics, but they don’t use that as an excuse to take shortcuts with the wind. Scent control is an honorable goal, but the belief that you can totally eliminate your scent and ignore good woodsmanship is a ticket to forkhorn land.

Hanging a treestand during the rain, letting those cameras sit for weeks and only checking them with the right wind, having the patience to wait until everything is right — these are the characteristics of a person who kills Booners. Hunting mature bucks is all about strategic moves at the right time in the right place. There are no shortcuts, you must make every move with precision.

Top 100 Duck Hunting Dog Names! (2024)

0

dog names for duck hunting

Duck hunting dogs, also called gun or bird dogs, are truly set apart from other dogs. Bred and raised specifically for duck hunting, these dogs have different personalities from other dogs-and fittingly, they should have different names from other dogs!

But the tricky question is: what should you name your duck hunting dog? In this article, we’ll break down 100 of the best dog hunting dog names for your hunting companion.

Check out these other articles: 10 Hunting Dogs That Don’t Shed and Strong Female Dog Names.

Boy Duck Hunting Dog Names

Boy Duck Hunting Dog Names

Whether you’re looking for pointer, golden retriever, or black lab duck hunting dog names, there are many available options for male duck hunting dogs. This list reflects the variety of names for boy duck hunting dogs, from the fierce to the friendly.

  1. Ace – First on our list of duck dog names, this is a great name for a dog who seems adept at just about everything.
  2. Captain – For a natural-born leader.
  3. Trooper – For a dog who can weather any storm.
  4. Dodger – Great for a dextrous and agile dog.
  5. Hunter – An on-the-nose name for an excellent duck dog.
  6. Killer – For a dog that seems extra eager about duck hunting.
  7. Trapper – For a clever and witty hunting dog.
  8. General – For an older dog who can lead a pack.
  9. Commander – For a dog with a naturally commanding presence.
  10. Marshall – Great when a dog exudes power and authority.
  11. Leader – Ideal if your dog is ready to take the helm on a hunting trip.
  12. Stalwart – For a dog that’s loyal to you to the end.
  13. Speed – One of many cool duck hunting dog names for agile dogs.
  14. Bourbon – Great if your favorite thing after a hunt is to kick back with your dog and a drink.
  15. Bud – For a true friend-or a dog who likes to drink Bud Light.
  16. Charger – For a dog who’s maybe a little more enthusiastic than intelligent.
  17. Coffee – A great name for a dog who’ll be with you at the crack of dawn.
  18. Bull – One of many great duck dog names for labs.
  19. Scout – For a hunting dog with stamina and agility.
  20. Sport – For a young, enthusiastic dog.
  21. Rogue – Best suited to a dog that follows its own rules.
  22. Ranger – Ideal for a dog that seems completely at home in the wilderness.
  23. Glory – If you think your dog is poised for success, this name could be a good luck charm.
  24. Bolt – For a dog that can speed off and bring back a duck in no time.
  25. Fighter – For a dog with spunk.

Girl Duck Hunting Dog Names

Girl Duck Hunting Dog Names

There’s an equally rich cache of cute hunting dog names for female duck hunting dogs.

  1. Dancer – Ideal for a graceful and agile dog.
  2. Fidelity – For a dog who will always stay by your side.
  3. Loyalty – Another name for a duck dog that is your ultimate partner.
  4. Faith – A name for a duck hunting dog that you can trust.
  5. Freedom – A dog that seems to belong in the wild deserves this name.
  6. Mistress – For a dog with an air of authority.
  7. Lady – For a dog that seems like she could be a royal.
  8. Huntress – For a dog that is perfectly suited to her job.
  9. Amazon – For a dog that’s commanding, authoritative, and a master hunter.
  10. Grace – For a dog that is poised and in control.
  11. Rose – A great name for a dog that’s beautiful as well as deadly.
  12. Liberty – A patriotic name for a hunting dog.
  13. Luster – For a dog with a shimmering coat.
  14. Vixen – For a dog well-suited to the wild.
  15. Willow – A name for a dog as sturdy as a tree.
  16. Goldenrod – For a dog whose fur is light and shiny.
  17. Hope – When all else seems lost, this dog will come through for you.
  18. Rebel – For a dog who you can’t get under control.
  19. Witch – For a dog who’s rambunctious-for ducks and you!
  20. Enchantress – For the dog who always attracts everyone’s attention.
  21. Bard – For a dog that’s extra vocal.
  22. Tulip – Great for a younger, more delicate hunting dog.
  23. Angel – For a dog that’s always on the ball-or an ironic name for a perpetual troublemaker.
  24. Kestrel – For a dog that’s a natural-born hunter.
  25. Glamor – A great name for a pooch with pride.

Hunting Dog Names Based on Nature

Hunting Dog Names Based on Nature

Do you want to give your duck hunting dog a name that draws on the rich symbolism of the natural world while still evoking their hunting vocation? Check out this list.

  1. Thunder – To reflect a booming presence.
  2. Lightning – If they can run this way and that in a flash.
  3. Peak – For a dog that’s the pinnacle of hunting.
  4. Cloud – For a light-colored or mysterious dog.
  5. River – If your dog moves fluidly like running water.
  6. Sunburst – For a bombastic and excitable dog.
  7. Bear – For a big, furry dog.
  8. Wolf – To remind you of their wild heritage.
  9. Birch – To reflect the stalwart integrity of the tree.
  10. Acorn – For a smaller dog you’re nourishing since birth.
  11. Basil – For a dog with a little spice.
  12. Tiger – A feline name that connotes wildness and ferocity.
  13. Falcon – Great for a fast, graceful dog.
  14. Thistle – Beautiful, but dangerous.
  15. Shark – For a dog that’s out for blood-duck blood.
  16. Hammerhead – For a dog that loves to hunt but maybe isn’t the smartest.
  17. Sawgrass – If you’re hunting in Florida, this botanical name is perfect.
  18. Oak – For a dog that’s big, dark, and sturdy.
  19. Rainbow – For a dog that seems to lighten up the place wherever they go.
  20. Typhoon – For a dog that’s an unstoppable force of nature.
  21. Bramblepelt – Good name for a dog that’s not afraid to get down and dirty.
  22. Briar – For a dog ready to dive into the depths to get its quarry.
  23. Snow – Great for a pale, mysterious hunter.
  24. Midnight – Ideal for a dog that moves in silence.
  25. Storm – The opposite: for a dog that loves to make noise.

Names for Hunting Dogs Based on History and Culture

Names for Hunting Dogs Based on History and Culture

One of the best ways to decide on a dog name is to draw from hunters (or the hunted) in history and culture). Check out some of these:

  1. Nimrod – Despite the connotation of stupidity, this is actually the name of a famed biblical hunter.
  2. Elmer – After dopey-but-eager hunter Elmer Fudd.
  3. Orion – After the constellation and the Greek mythological hunter on which it’s based.
  4. Rexxar – Perfect for fans of the Warcraft franchise.
  5. Daffy – An ironic name based on the Looney Tunes duck.
  6. Herne – A ghost hunter from English folklore.
  7. Geralt – The legendary monster hunter from the Witcher books, video games, and TV series.
  8. Artemis – After the Greek goddess of the hunt, who notably turned the hunter Actaeon into a stag and had her dogs hunt him.
  9. Diana – Named after the Roman counterpart to Artemis.
  10. Robin – After the bird and folkloric bowman Robin Hood, or the DC Comics superhero Robin.
  11. Pan – After the Greek god of wilderness and hunters.
  12. Hubertus – After the patron saint of hunters.
  13. Thor – After the superhero and Norse mythological powerhouse.
  14. Bloodsport – The gun-toting hero of The Suicide Squad.
  15. Daisy – Another ironic name: Daisy Duck.
  16. Donald – Based on Disney’s Donald Duck. Especially great if you aren’t a particular fan of Disney or have a sense of humor.
  17. Scrooge – Based on the character from Disney comics and DuckTales.
  18. Huey – The first of three brothers in DuckTales.
  19. Dewey – The blue-hat-wearing brother in DuckTales.
  20. Louie – The DuckTales brother who rocks a green outfit.
  21. Davy – Based on the folk hero and real-life man Davy Crocket.
  22. Teddy – Based on American president and naturalist Theodore Roosevelt.
  23. Mighty – After the film The Mighty Ducks and the corresponding hockey team.
  24. Wolverine – After Marvel Comics’ famous wildman superhero.
  25. Lon – Named after Lon Chaney, star of The Wolfman.

Conclusion for Duck Hunting Dog Names

If your dog is going to be a duck hunter, you’ll want to give them an appropriate name. Remember to keep their name short, easy to pronounce, and not similar to any of your family. We hope you enjoyed our list of the best duck hunting dog names and found something for your puppy!

Other articles you would like:

  • Are Goldendoodles Good Hunting Dogs?
  • Best Hypoallergenic Hunting Dogs
  • Best Shock Collar for Hunting Dogs

The Best EDC Backpacks of 2024 • Backpacks for Everyday Carry

0

Quick Answer: These are the Best EDC Backpacks of 2022

  • #1 – Overall Best EDC Backpack: Aer Travel Pack 2 Small
  • #2 – Best EDC Laptop Pack: Tortuga Laptop Backpack
  • #3 Best EDC Pack Runner UpNomatic Travel Bag 30L
  • #4 – Best EDC Sling Bag: Aer Day Sling 2
  • #5 – Best EDC Camera Bag: Wandrd PRVKE Series Camera Bag
  • #6 – Best EDC Backpack for Travel: Aer Travel Pack 3
  • #7 – Best EDC Duffel for the Gym: Kodiak 25l Duffel
  • #8 – Best Leather EDC BackpackLakeland Fenton Leather Rucksack
  • #9 – Best EDC Day Hiking Pack: Osprey Daylite Plus Pack
  • #10 – Best EDC Pack for Organized Travel: Tropicfeel Shell
  • #11 – Best EDC Pack for Hipsters: The Roll Top Stubble & Co

Best EDC (Every Day Carry) Backpacks

Researching all the backpacks available on the market can become tedious. That’s why we’ve done the legwork for you and compiled our picks for the top everyday carry backpacks. From gym duffels to travel bags, we’ve got something for everyone on this list! And, if you look after your backpack properly, these guys will last you a good few years.

#1 – Overall Best EDC Backpack: Aer Travel Pack 2 Small

Compact, but spacious enough to fit a ton of gear, the Aer Travel Pack is the Goldilocks equivalent of everyday carry backpacks; not too big, not too small, just right. A little over 3 pounds, it’s still relatively lightweight, but also more durable than ultralight packs.

Inside there’s a padded compartment for a 15-inch laptop, as well as a shoe compartment that can fit up to men’s size 12. Both the main and front zippers are lockable for added protection while travelling.

On top, there’s a quick access pocket for small essential items and within the front compartment, there are additional organization pockets. These keep your pens, sunglasses, electronics, and other gear neat and easy to reach. There’s also a key chain so your keys never get lost at the bottom.

The Aer Travel Pack is small enough to be a carry-on item while flying, and the back panel of the pack acts as a pass-through for luggage handles. If you want more support, you can purchase a hip belt which comes separately.

Although the Aer Travel Pack may be on the expensive end, the combination of 1680D nylon, Duraflex plastic, and YKK zippers are built to last, while also making the pack comfortable and sturdy while carrying.

Is this the best EDC bag ever? Our team think so! They had a lot of love for this bag, but some of the stand-out features for them were the locking zips on the main section as well as the laptop pocket. They also loved the clamshell opening style of the large compartment which meant they could fit packing cubes inside and access their gear easily.

Be sure to check out our detailed Travel Pack 2 review here.

#2 – Best EDC Backpack Runner Up: Nomatic Travel Bag 30L

The Broke Backpacker team have been big fans of Nomatic gear for years. In fact from a style, functionality, and price point of view, nobody quite does it like Nomatic.

The 30 litre Nomatic Travel Bag is great for people who don’t want to own multiple backpacks; this bag can be your everyday bag AND your travel day pack all in one.

Especially if you find yourself carrying around a laptop, some clothing layers, chargers, a camera, etc – you’ll find 30 litres to be a pretty damn good size.

There will be times when you don’t end up filling up the bag to capacity each time you go out, but I prefer to have a bit more space on occasion than not enough. Do note that a 30-litre backpack is on the larger side of your typical daily grind everyday carry backpack.

Our team really loved the organisational features on this backpack, it was especially useful for digital nomads carrying around heaps of different cables, hard drives, laptops, tablets and other shiz! The different carrying configurations were also ideal for our team when they were getting on and off public transport.

Unfortunately, at this time Nomatic can’t ship to Europe, so if you are outside of the USA, go with the Aer Travel Pack 2 small instead.

#3 – Best EDC Sling Bag: Aer Day Sling 2

If you don’t need an entire backpack but still want a convenient bag for storing your phone, camera, passport, or other small essential items, then a sling bag is a perfect choice. The Aer Day Sling is also a more budget-friendly EDC pack option.

There are three pockets: a front pouch, one main compartment, and a hidden back pocket great for keeping your passport or cash safe. The main pocket can fit a 7.9-inch tablet and it has multiple organizational pouches for storing sunglasses, pens, or other small items.

The one aspect of the Aer Day Sling that could use improvement is the shoulder strap. Although it’s adjustable, there’s not much padding, which can make it a bit uncomfortable after wearing it for a long time.

Like the Aer Travel Pack, the Day Sling is made out of 1680D nylon, Duraflex plastic, and has YKK zippers on all the pockets. It’s also a good lightweight EDC pack, weighing less than a pound when empty.

Our team rated this as their favourite small EDC backpack. They loved how compact it was for all their essential items like their passport, wallet, phone, compact camera and battery pack. They felt it also offered an awesome level of organisational features for such a small pack.

PSSTTT – If you want something light, but still bigger than a sling then you might be interested in these Packable Backpacks.

#4 – Best EDC Camera Bag: Wandrd PRVKE Series Camera Bag

There’s nothing worse than having your camera gear damaged as a result of inadequate protection in your backpack or bag. The PRVKE takes all your photography needs and concerns into account and delivers an excellent everyday carry backpack.

Two sizes are available. One is 21 litres, which can be expanded to 26 litres by extending the roll top, the other is a larger 31 litres, which is expandable to 36.

Both are made of waterproof tarpaulin and YKK weather-resistant zippers. So although the specialist camera backpack wouldn’t survive being submerged, it will still hold up to heavy rain or some splashing. The water-resistant exterior is pretty tough too making this a super durable EDC backpack.

Inside are removable camera cubes so you can use the PRVKE as a normal pack on days you don’t need to bring your equipment. There’s also a dedicated laptop compartment, a tech pocket, a hidden pocket in the back, and a water bottle pocket for storing other essentials.

It’s a super functional backpack for photographers, providing a side opening directly to the camera cube for easy access to your gear on the move. You can also buy extra external carry straps to attach things like a tripod and there’s a water bottle pocket on the other side.

You can either carry the PRVKE as a backpack or a tote bag thanks to the handles on top. It also comes with a removable waist strap which helps for carrying heavier loads.

The photographers on the team were blown away by this bag and the side opening feature was a game changer. They loved that it made accessing their camera super easy and fast yet they could also keep other items separate in the upper roll top section. They also loved the material which felt durable and great at keeping the weather out.

Read the full review here.

#5 – Best EDC Laptop Pack: Tortuga Outbreaker Laptop Backpack

Although many of the best EDC packs have a spot to store a laptop, the Tortuga Outbreaker goes the extra mile and provides a bombproof laptop compartment.

Not only is this everyday backpack super comfortable, but also very stylish and well-designed to keep your laptop safe while on the go. It’s a top pack for digital nomads who need to carry a fair bit of gear.

It’s a cracking laptop backpack with extras. The outer material is VX21 waterproof sailcloth and the laptop compartment is protected with ariaprene foam. Each pocket has YKK lockable zippers to add further protection, especially while travelling.

With a 27 litre capacity, and the ability to open all the way like a suitcase, the Outbreaker can easily fit extra clothing, textbooks, your lunch, or even a pair of shoes. It’s still small enough to fit as a carry-on bag underneath an aeroplane seat, making it a great option for travellers.

Inside are mesh pockets for keeping your chargers and other essential items organised and easy to reach. In addition to the padded shoulder straps, there’s a removable sternum strap, plus top and side handles so you can carry the pack like a briefcase or tote bag.

With the padded laptop sleeve and water-resistant exterior, this is a great everyday carry backpack for that needed protection for their tech and a decent amount of room for accessories. However, some might feel it’s a little bulky for an everyday backpack for work.

Our team felt this was the best EDC laptop backpack on the market, especially for those on our team who just love keeping their gear organised. They loved the different pockets, mesh separators and zippered compartments that meant everything a digital nomad has to carry on the daily can be kept organised and accessible.

Read the full-length Tortuga Outbreaker review here.

#6 – Best Leather EDC Backpack – Lakeland Fenton Leather Rucksack

Yum, look at that lovely leather goodness! I really love a good leather backpack. The classic look leather rucksack Lakeland leather mixes high-quality waxy leather with a stylish, and even slightly retro design aesthetic. It’s a cool and fashionable backpack made for urban living whether you are headed to the gym, the coffee shop or commuting for the daily grind.

Great for going to work, The Fenton Backpack can comfortably accommodate an A4 pad and a 13″ laptop inside its dedicated laptop compartment.

The style-conscious on our team really loved the look of this bag. They felt it offered a good amount of storage for those wanting to carry enough for the day without being too bulky. They also loved the classic leather material and felt it was durable, weather resistance and would wear in nicely over the years.

#7 – Best EDC Backpack for Travel: Aer Travel Pack 2

For longer trips, you’ll want something that’s large enough to hold all your gear and belongings. The Aer Travel Pack 2 is a larger version of our number one pick for the best EDC backpack, but it’s still small enough to work as a carry-on item.

It might be a bit bulky as a commuter everyday carry backpack, but it’s great for one bag travel. It’s versatile enough to use as a carry on for a weekend break and double as an everyday backpack for exploring during the day. (Disclaimer: It’s not going to be compliant with the strict Ryanair carry-on policy, unfortunately!)

The lay-flat clamshell design of the main compartment makes it super simple to pack and keep everything organised. There’s also an easy access pocket that can fit a 15.6-inch laptop, and a shoe compartment large enough for a men’s size 13. The compression straps also keep everything tight and compact.

Thanks to the ergonomic and padded shoulder straps, your back won’t get sore even after you’ve been out walking around all day. It’s also possible to carry the Aer Travel Pack as a tote or bag thanks to the padded top and side handles.

Although the Aer Travel Pack isn’t totally waterproof, it is highly weather-resistant thanks to the 160D Cordura nylon exterior and smooth YKK zippers. Both the main and front pockets have lockable zippers for added security.

Like the smaller version of the travel pack the team felt the larger bag offered all the features they loved but in a package perfect for longer trips. They felt the bag had an air of real hard-wearing quality with fat zips and thick material. Again, the lockable laptop compartment was a feature that gave them a real sense of confidence when out and about.

#8 – Best EDC Backpack for the Gym: Aer Fit Pack 2

Ever wish your gym bag could carry more than a pair of shoes and your towel? Well, the Aer Fit Pack is the solution to your needs! This stylish bag is the perfect everyday backpack to carry your training gear but also has all the features needed to make it functional in other everyday uses.

Say goodbye to the single pocket standard gym bag you’ve been using. The Aer Fit Pack has numerous pockets, including the front-loading main pocket, a ventilated compartment for shoes up to men’s size 13, a small top pocket for valuables, and a padded laptop pocket.

With space for all your belongings, you can hit the gym then head straight to work or class without needing to swap bags or pick up any of your other possessions.

Like other Aer products, the Fit Pack is well-made and durable with a weather-resistant nylon exterior, YKK zippers, and Duraflex plastic for structure and stability.

As you can tell, Aer is popular among our team. They loved this bag due to its compact size which also managed to pack in a whole heap of features. The separate shoe section and front area where clothing can be kept are perfect for keeping things separate like sweaty gym gear.

#9 – Best EDC Duffel for the Gym: Kodiak 25l Duffel

Not only does this duffel work well for the gym, but it can also function as a travel bag or extra-large briefcase, thanks to the large carrying capacity and multiple compartments.

The Kodiak Duffel 25L has many of the same features as the Fit Pack 2 but it is simply far more elegant, stylish and yes, manly! Inside the main compartment, you can easily fit a basketball, water bottles, and other gear, plus there’s a separate ventilated pocket for shoes to help with organisation and minimize odour.

Unlike your typical gym bag, the Kodiak Duffel can also be used for work or school, thanks to the padded laptop compartment and other gear pockets for storing additional electronics, books, and travel items.

Due to its sleekness, the duffel also won’t look out of place if you bring it with you to the office or into a coffee shop.

The team loved this duffel and felt it offered a great alternative to traditional backpacks, especially for those wanting something a little more professional looking. The stylish exterior felt both sturdy, durable and hard-wearing whilst looking sleek and sophisticated at the same time.

#10 – Best Budget EDC Pack: REI Co-op Ruckpack 28

Osprey has made a name for themselves with their high-quality camping and travel gear, and the Ruckpack meets these same expectations. Not only is it functional and durable, but the Ruckpack is also made from recycled ripstop nylon if you’re interested in purchasing more sustainable products.

There’s a laptop sleeve that can also hold a hydration pack. It features both side and top main compartments, compression straps, and a small zippered top pocket for valuables. The zippered compartments are also lockable for secure travelling.

There’s a sternum strap and a very small hip belt, which is, unfortunately, lacking in padding. Other than that, the Ruckpack measures up to being a great EDC backpack without such a high price tag attached.

The team were pretty impressed by this pack for the price. They felt the volume was a good compromise between carrying enough gear without encouraging over-packing. Other features they loved were the locking zippers and laptop sleeve that can double as a hydration reservoir for great versatility.

#11 – Best EDC Day Hiking Pack: Osprey Daylite Plus Pack

This lightweight backpack does the trick for single day hiking adventures. It’s on the smaller end of EDC backpacks but is still big enough to bring the essentials without becoming too heavy while out on the trail. The compression straps also keep things as compact as possible.

Although it’s too small to fit most laptops, there’s a compartment that can fit a tablet or other similarly-sized device. You can also purchase a hydration reservoir to fit in the back pocket, or there are two side mesh pockets that are convenient for carrying water bottles.

The shoulder straps have enough padding to be comfortable for a long hike, although the hip belt is only simple webbing material. It’s also the perfect size as a personal item on an aeroplane and will fit stowed underneath your seat, but be aware that it doesn’t have lockable zippers.

It’s a bit too small for multi-day travels, but for a budget-friendly and lightweight EDC backpack for day hikes, the Daylite pack fits the bill.

The hikers on the team loved the comfort levels of this pack for wearing for long periods of time. Other features they were taken by were the front stash pocket for things like waterproof jackets. They also loved how well made the pack felt too.

Wanna know more? Check out our more detailed review for the lowdown.

#12 – Best EDC Pack for University Students: Tortuga Laptop Backpack

Both functional and stylish, the Tortuga laptop bag is the perfect backpack for your university studies, work, or travel. There’s a bombproof laptop compartment, plus another compartment for storing a tablet, both of which have padded foam for protection.

There’s plenty of space for all your textbooks, lunch or snacks while on the go, or other electronic equipment. Unfortunately, the Setout doesn’t have a hip belt, but there is a removable sternum strap to help balance the weight.

If you’re using the pack for travel, there’s a suitcase pass-through handle and the zippers on the main compartments are lockable. The clamshell design of the main compartment makes it easy to organize and use for packing clothing for an overnight or longer trip.

Although the pack isn’t waterproof, it is highly water-resistant thanks to the Durable Water Repellent (DWR) coating on the outside. The padded shoulder straps make it comfortable to carry, and there are also side and top handles to carry the Setout like a tote bag.

The team felt this pack was a solid backpack for those carrying laptops, notepads and other square items that would otherwise be awkward in rounder packs. The lockable zips again were a winner for keeping that expensive laptop safe while on the move.

#13 – Best EDC Pack For Commuters: Gulu Made Inspire Backpack

Gulu Made are a socially conscious ethical start-up based in Uganda whose credentials are amazing. The team who work at Gulu Made all trained to sew in the aftermath of Joseph Kony’s horrible civil war. They now leverage their skill to make beautiful bags and to build a future for themselves and their families.

The pack itself has certainly impressed me. It zips down into 3 main storage compartments so you can organise your files, gym kit and lunch as you see fit and there is a dedicated laptop sleeve. There is no front pocket, but the pack does have 2 water bottle slide-in pockets at the sides. Best of all, the bag is lined with beautiful colourful traditional African fabric.

This pack is great for commuters, day trips and is roomy enough for short stay vacations. It could also be used for easy day hikes but does not have a hip/waist support belt so is perhaps less suitable for strenuous mountain treks.

Gulu Made are going to be a huge player in the vegan/ethical backpack space for years to come.

The team felt for a backpack this bag looked professional enough for taking into the office or on business trips, especially for those wanting to avoid briefcases. They felt the pack had a simple and lowkey vibe whilst also packing in a heap of organisational features across the 3 main pockets.

Looking for a commuter pack that’s a bit more professional, then check out one of the business backpacks on offer instead.

#14 Best Organized EDC Backpack – Tropicfeel Shell

The Shell by Tropicfeel is a little to medium backpack with a big concept. Firstly, it is a 3 in 1 extendable backpack that begins life as a 22-litre pack, rolls up to 30 litres and then with the addition of a detachable pouch goes all the way to 40 litres.

As well as being a 3-in-1 backpack (which you can easily adapt to use as a day pack, overnight pack and carry-on pack), the Shell also has another awesome feature – a little, mini drop in pull out travel roll up wardrobe!

It’s a great bag for those who like to travel neat and also for business people who kind of need to stay presentable and organised. It’s made from fully sustainable materials making the Shell an all-round hit with us at The Broke Backpacker.

The team love the innovation packed into these backpacks and easily it made organising all their gear. The built-in wardrobe system in practice worked perfectly for any length of trip. The expandable capacity of the backpack also adds to its versatility, another plus point for our team.

#15 Best Hipster EDC Backpack – Stubble & Co The Roll Top

If you’re looking for something that is both stylish, functional and also super robust, the Roll Top is the perfect choice for an everyday carry bag. The internal main compartment offers a massive amount of space with a selection of pockets and organisers to keep smaller items easy to access.

On the outside, the thick tarp-style material is durable enough for everyday use and will keep the weather out with ease. There’s also a super practical front pocket for easy access to things like travel cards or journals.

If you’re carting around a laptop on the daily then the dedicated laptop compartment on the back panel of the bag is ideal. It means you can keep your most expensive bit of kit away from all your other gear and also keeps it much safer whilst on the move.

On top of that, if you’re a style-conscious kinda person then the hipster style of this roll top will suit you for your EDC. What we love here is that the look of this bag fits in wherever you want to take it, from the cafes of Canguu to the daily commute or bumming around Thailand, it works!

Want more options? Check out our rundown of the best Stubble & Co. bags.

Best of the Rest

If you haven’t quite found the right EDC backpack on this list, don’t give up yet! Here are a few more options for EDC packs that might have the exact feature or specifications you’re looking for in the perfect all-around pack.

Tortuga Weekender Backpack 30L

This 30-litre bag is on the larger end for EDC backpacks, making it perfect as a weekend pack while travelling or a large school bag if you’ve got heaps of gear. There’s also a dedicated laptop sleeve, and it’s big enough to fit pretty much any laptop. There is a padded front pouch that can fit up to an 8-inch tablet, plus compartments for chargers and other small electronic devices.

Since it fits easily in the overhead compartments of aeroplanes, it’s a good ‘carry-on’ bag for travel. The YKK zippers on the main compartment are also lockable for added security.

To free up extra space inside the pack, you can put your water bottle in one of the mesh pockets on the side. It’s a good idea to use the webbing loops to secure the bottle as well since sometimes bottles can slip out if you bend over.

Some members of our team prefer to keep things as light and as small as possible, for them this bag was a bit large. However, those that have a lot of gear were still suitably impressed by the organisational features packed inside this bag and just the sheer amount of stuff they could comfortably carry.

Wandrd Duo Daypack

Another great EDC pack for photographers, the Duo Daypack is a bit smaller than our top pick for a camera backpack, but it still fits a decent amount of gear.

The pop-up camera cube provides a secure spot for your camera, but it can easily be flattened if you aren’t bringing your photography gear along.

The padded laptop sleeve and padded electronic compartments keep all your devices safe while on the go. Thanks to the waterproof tarpaulin material and weather-resistant YKK zippers, the Duo Daypack will also hold up against rain showers or accidental spills.

To access your gear, the Duo has cool side-entry zippers on both sides of the main compartment. There’s also a hidden pocket in the back for keeping a passport or spare cash safe and out of sight.

The team were split when it came to the unique opening style of this bag. Those wanting to keep things simple felt it was a little unnecessary, but for the photographers on the team, they felt it was revolutionary! For them, it was like having a studio on their back where they could keep all their gear accessible and organised.

Aer Go Pack

One of Aer’s more budget-friendly EDC backpacks, the Go Pack doesn’t have all the features of the Travel Pack, but it’s also more lightweight and easily rolls up for convenient storage. There’s still a padded compartment for a laptop up to 13 inches and a quick access pocket on top.

The 300D Cordura ripstop fabric is durable, but not weather-resistant, so you’ll want to be careful if you’re caught out in a rainstorm. It also lacks lockable zippers like other Aer packs, which some travellers prefer for security.

The minimalist yet sleek design means that the Go Pack will suit a variety of settings, whether you’re on an aeroplane or catching up with friends at a cafe. It would be nice to have at least one or two gear loops on the outside, however, especially since some water bottles can slip out of the side pockets if you bend over.

For the team members looking for a pack that covers all their basic needs without being bulky or unwieldy, this bag hit the spot. For such a compact backpack the addition of a laptop sleeve, internal zippered section and front pocket was impressive. The ability to roll it down or throw it inside a bigger bag was a massive plus point too.

Osprey Talon 22 Pack

For outdoor enthusiasts, the Osprey Talon is a great EDC backpack that offers both support and organisation. Out of all the packs on this list, the Talon probably has the best hip belt with excellent padding and pockets on each side, although it’s not removable.

Designed for hiking, biking, climbing, and other outdoor sports, the Talon 22 has a helmet attachment, loops for ice tools, and trekking pole attachment points.

You can also purchase a separate hydration reservoir to fit in the back sleeve for convenient water access while on the trail. However, there’s not a designated laptop pocket, although some laptops will still fit inside the main pocket.

If you have an outdoorsy lifestyle and need an EDC backpack for your adventures, then the Osprey Talon is a good fit. This pack is a classic for hiking and our team has been big fans for years. They feel it’s a great size for day hikes without ending up too heavy. The shoulder straps and hip belt also make it one of the comfiest on our list too.

Fjallraven Raven 20L Pack

This casual backpack is good for all-around use whether you’re attending university, commuting, or travelling. The Heavy Duty Eco fabric is strong and durable, but not water-resistant, so be careful if you’re caught in a shower.

Within the main compartment, there’s a padded laptop pocket for a 15-inch model as well as a zippered security pocket for valuables. In the front pouch, there are additional mesh pockets for organization.

The padded shoulder straps offer good comfort, although the back has less ventilation than some of the other EDC packs we’ve listed. There is a top haul handle, but the pack lacks a sternum strap or hip belt.

Since it’s a bit cheaper, the Raven 20L is a great budget EDC backpack. However, if you plan on carrying heavy loads, or go hiking with your backpack, you’ll probably want something with better support and ventilation.

If you’re looking for a small EDC pack then our team rate this Fjallraven highly. When it comes to style, this bag might just be the winner! But there’s more to love than that, they also feel it offers great durability and will put up with daily abuse easily.

How to Choose the Best EDC Pack

As you can see from our list, there’s a fair amount of variety in great EDC packs depending on how you plan to use it. Below, we’ll go into more detail about how to decide which EDC pack is the best fit for your needs.

Features

From minimalist daypacks to luxury travel bags, there’s a wide variety in how many features an every day carry pack has.

Laptop sleeves, lockable zippers, water bottle pockets, and secret pouches for passport and cash are all examples of common EDC pack features.

Other things, like gear loops, spots for a hydration reservoir, and camera compartments are more specialized features designed specifically for hiking and photography.

Although having an EDC back with tons of features can be nice, usually these bags are bigger and more expensive. If all you really need is a simple, lightweight day bag, then don’t worry so much about finding a bag with all the bells and whistles.

Weight

Determining what the “right” weight for an EDC pack is can be a bit tricky and is a matter of finding a balance of size, material, and comfort.

Most EDC packs are on the lighter end since they’re intended as something to carry around on a daily basis. Larger and heavier packs are usually designed for a specific purpose, like carrying delicate camera equipment or as carry-on luggage while travelling.

If you’re planning on using this pack for hiking or travelling and will be wearing it for the majority of the day, you don’t want something that’s going to be too heavy. Go with the minimum of what you need, and keep an eye out for good hip belts and padded shoulder straps.

If you’re planning on using your EDC pack more for going to the gym or commuting, then counting the ounces isn’t as much of an issue. You can focus more on whether the pack will fit all your possessions, knowing that the time spent carrying it will be more limited.

Size

Between your pockets not being big enough and a suitcase being way too large, there’s a lot of variation in how big or small an EDC pack can be. For some people, something like the Aer Day Sling is enough, while a photographer will want something larger for all their equipment.

Sure, with a bigger pack you’ll have room for your laptop, a change of clothes, lunch, or even a spare pair of shoes, but not everyone needs all that space.

When picking an EDC pack, it can be helpful to make a list of all the things you want it to hold (laptop, water bottle, camera, phone, books, etc.).

Be mindful of size so you don’t end up with something that’s too bulky or cumbersome. Remember, this is a day pack; longer trips are where a suitcase or camping backpack comes in handy.

Best Use

A bike commuter and a travel photographer most likely won’t pick the same type of EDC pack. One person’s “everyday” use can look very different from another’s, so you’ll want to think about what style or specific features would serve you best.

If you know for sure you’ll be carrying a laptop on a regular basis, then having a padded laptop compartment is important. Frequent fliers are going to want a bag that fits with airline carry-on specifications, and often prefer features like lockable zippers or luggage pass-through on the back.

The good news is that most of the best EDC packs can function in a variety of settings. For example, the Aer Gym Duffel also has a compartment for a laptop or the Wandrd PRVKE bag has a removable camera cube for when you don’t have your photo gear along.

When selecting an EDC pack, think about both your primary and secondary intended use. For example, if you want the bag mostly for a daily commute to work, but like the idea of going hiking on the weekends, then something lightweight with padded straps, a water bottle holder, and good back ventilation is ideal.

Aesthetics

What sort of “cool” factor points does your backpack or bag have? Will it look alright to bring to a meeting at work? Do you want a bag that’s eye-catching, or something simpler and more minimalistic?

Some people care a lot about how a backpack looks, while for others functionality is the only thing that matters. Again, thinking about how you will most often be using the bag can help determine whether you should go for a certain look or not.

If you want to bring your EDC pack to more formal settings, like an office workspace or a travel business meeting, then something with a more sleek appearance is desirable. If you plan on using your EDC exclusively for biking and hikes in the woods, then you probably don’t need to worry so much about how classy the pack looks.

Weather

Thinking about where you plan on using your pack is just as important as what you need it for. Do you live somewhere with cold winters? Somewhere with lots of rain like Portland or London? Are you travelling somewhere hot and humid like Singapore or the Caribbean?

Taking the weather into account can help you decide how durable and weatherproof a bag you’ll need.

Even really good EDC packs usually aren’t waterproof to the point of being submersible, but some come close thanks to waterproof material and weather-resistant zippers.

Usually, the more weather resistant the bag is, the more it’s going to cost. However, if you’re carrying around an expensive laptop, camera equipment, or other valuables, buying a more watertight bag can actually save you money (and peace of mind) in the long run.

How and Where We Tested To Find The Best EDC Backpacks

When it came to testing out these packs we got a hold of each one of them and put them through their paces with a series of different tests. We gave each one to different members of the team in various locations around the world and let them loose with them!

Packability

A backpack is designed to carry stuff and as such, top points are awarded for how packable one is. That is especially so when it comes to the best EDC backpacks, whatever you decide to put inside them. A decent pack will maximise space and facilitate effective packing.

So we got all technicals and packed and unpacked each bag to test this out! We looked at not only how well each bag packed in our gear, but how easy that gear was to retrieve too.

Weight and Comfort of Carrying

When it comes to the best EDC bags, comfort is an important factor. As the name suggests, you’re going to be wearing these packs often, so you want them to minimise weight and maximise carry comfort. No one wants to be carrying around an awkward pack that digs into the shoulders, so we prioritised bags that were comfortable even when fully packed out.

Functionality

In order to test out how well a pack fulfilled its primary purpose we used it for this purpose. When it comes to EDC bags, each one is different and serves a different purpose. So for each one, we were sure to bear that in mind. Camera backpacks, we chucked our cameras inside and accessed how well they worked for us photographers for example. You get the idea right?

Aesthetics

Some people say that travel gear doesn’t need to look good as long as it functions. Well, those people probably listen to Nickelback! For us, the best EDC bag looks just as sexy as we do! I mean, you’re carrying that mofo around all day, every day, so we want to look good whilst doing it!

As such we also awarded points for how good a backpack looked as well as how practical it was.

Durability and Weatherproofing

A bag that you carry around every day usually has some pretty important gear inside, so for us, the best EDC packs keep the weather out and our precious stuff safe. To test this out we poured a litre of water over each one and accessed the insides of the pack.

Another important factor is durability. Using a backpack every day puts a lot of strain on the bag and they need to be reliant to stand up to such abuse. So we tested this out by being sure to give each pack a good run of consistent use and then assessed things like the material used, quality of the seam sewing, traction of the zippers and pressure points that break often.

FAQ about the Best EDC Backpacks

Still have some questions about the best EDC backpack? No problem! We’ve listed and answered the most commonly asked questions below. Here’s what people usually want to know:

Final Thoughts on the Best Everyday Carry Backpacks (EDC) Backpacks

There you have it. From gym bags to travel backpacks, hopefully, you’ve been able to find the best EDC pack for your needs and lifestyle on this list. If you’re tired of awkward tote bags or backpacks that keep ripping at the seams, then it’s probably time to invest in one of these comfortable and high-quality everyday carry packs.

This is 2022; there are PLENTY of awesome options out there, so now I can’t find an excuse for not having an awesome backpack I carry around every day. Life is too short amigos for a s*** everyday pack.

Whether you go with a great all-around option like our top pick the Aer Small Travel Pack or something like the Aer Duffel Bag if you’re regularly at the gym, an EDC pack is a great way to help stay organized in all your daily activities. Most of these packs also work great as carry on backpacks too if you’re headed away for a break from the daily grind, you can save money and use the same bag!

Good luck on your quest to find the perfect backpack that fits your daily routine. What do you think is the best EDC pack?

The Best EDC Backpacks of 2024 • Backpacks for Everyday Carry

And for transparency’s sake, please know that some of the links in our content are affiliate links. That means that if you book your accommodation, buy your gear, or sort your insurance through our link, we earn a small commission (at no extra cost to you). That said, we only link to the gear we trust and never recommend services we don’t believe are up to scratch. Again, thank you!

Best Air Rifle Deals

Popular Posts

Air Rifle vs BB Gun: Understanding the Key Differences and Choosing the Best Option

0
"Air Rifle vs BB Gun: Unveiling the Key Differences and Choosing the Perfect Weapon for Your Shooting Needs. Delve into this comprehensive guide to...

Can you dry fire a gamo air rifle?

0
Unveiling the truth behind dry firing a Gamo air rifle, this intriguing headline delves into the possibility of safely practicing without ammunition. Join us...

Pump Air Rifles vs Break Barrel

0
Exploring the Pros and Cons: Pump Air Rifle vs Break Barrel - Unveiling the key differences and advantages between two popular air rifle mechanisms....