Let’s imagine it’s deer season and you just shot a deer. Maybe your first. Great news, right? The bad news is you didn’t see or hear it fall. Now you have an agonizing dilemma on your hands and an important decision to make. Do you climb down and take up the deer blood trail right away or give the deer more time to expire? Your decision may impact whether you find the deer or not. So before you start blood trailing deer, especially if it’s your first time doing so, here are some important questions you need to answer.
How did the deer react? Was it running instead of bounding? Was it stumbling and crashing through the underbrush instead of jumping over it? Those are both usually good signs.
How did you feel about the shot? Were you shaking from nerves, or were you very calm and relaxed?
How were the weather conditions? High winds can affect arrows and bullets alike and may steer them off-course.
Difference Between Archery and Firearms
First, there are some key differences with blood trailing deer between bow hunting and using a firearm.
Looking at the blood color and consistency is easier in many ways when bow hunting. Usually, your arrow is still at the site of impact (assuming it passed through the deer). You can inspect the blood on the arrow to get a better idea of where you shot a deer. Also, bow hunting relies on the broadhead cutting a large surface area so that the deer will bleed out quickly, and so it generally leaves a lot of evidence.
On the other hand, you can’t exactly find a bullet to inspect it after you shoot, so you will need to look at the blood on the ground or surrounding vegetation instead. Firearms rely on trauma and shock to kill an animal, and sometimes leaves less of a blood trail, especially if the bullet doesn’t pass all the way through. Although if you hit it low (in the case of a heart shot) and it comes out the other side, there should be no shortage of a blood trail.
In my experience, you will typically find a better blood trail when bow hunting than when rifle hunting. Another benefit of bow hunting deer is that you can use lighted nocks to help pinpoint where you hit. Instead of a typical nock on the end of your arrow, lighted nocks turn on when you shoot, leaving a bright light trail for your eyes to follow. Even in the daylight, lighted nocks help you see exactly where you hit a deer, based on where the light blinks out on the deer’s body. It’s even more pronounced in dimmer conditions.
Blood Color, Consistency, and Pattern
Looking at the color and consistency of any blood you find (on the ground, vegetation, or your arrow) can help you make the right decision when blood trailing deer. Depending on which organ your arrow or bullet penetrates, the blood color, consistency, and pattern will be different. Here’s a rough sketch of the various organs for a visual picture.
When it comes to reading the deer sign and figuring out how to blood trail a deer, here are some different scenarios you’re likely to encounter. In addition to your weapon, make sure you carry some basic tracking gear with you, such as a compass, some flagging tape/toilet paper, a knife, a drag rope, and a flashlight (if it will be dark).
Rich, bright red, and sprayed on the vegetation or ground…
You very likely made a heart shot. If you’ve waited the minimum 20 minutes, the deer almost certainly died 19 minutes ago. Proceed following the blood trail slowly.
Bright reddish pink and frothy…
That should be a lung shot. In many cases, heart and lung shots can be combined, and this is obviously a very fatal shot. While the deer is likely already dead, you may have only clipped one lung depending on the angle of the shot. I tend to wait another 15 minutes before taking up the trail when I see bubbles, as you can see in the photo below.
Graphic Photo: Lung shots are generally bright red and bubbly like this.
Dark red or maroon colored and watery…
This might indicate a liver shot. A liver shot deer is still going to die, but you need to wait a while longer – plan on another two hours to be safe. Either climb back into your tree stand or sneak back out and return non-essential hunting gear to your vehicle while you wait.
Brown/yellow/green, watery, and putrid-smelling…
This is never a good sign. You likely hit the deer in the intestines or stomach (called a “gut shot” or “paunch shot”). Shooting a deer in the guts will still probably be fatal (deer usually die from septic shock), but if you want any hope of finding that deer, back out quietly and return several hours later. Most wounded deer will bed down within 150-200 yards, and as long as you don’t push them, they should stay (and die) there too.
If there’s no rain in the forecast (which would ruin the blood trail) and the weather is cold enough (so the meat wouldn’t spoil), consider letting it go overnight before you start blood trailing deer. There’s a risk here if you live where the coyote or wolf population is high, and you may find a half-eaten deer in the morning. On the other hand, if you track a deer before it expires, you will likely jump them from their bed and may never see it again. In some cases, it may make more sense to just back out and cross your fingers.
Red and heavy at the site of impact, but slows to drops quickly afterward…
This is likely a muscle shot. You probably hit the neck or the front leg. It tends to bleed heavily at first, but it clots up and produces only thin droplets from there on, which usually dribble down right within the tracks. This is one time you can take a calculated risk. If you continue to pursue this deer quickly, the wound may continue to bleed. Whereas if you let this deer lie in a bed, it may clot up and you won’t be able to follow it any further. It’s risky, but worth the risk with marginally-fatal shots.
Blood Trailing Deer
If you judge the situation correctly, you can have a much easier tracking job ahead of you. But there are never guarantees, so don’t get complacent. Even if you see lots of frothy, bright red blood, you should still take your time tracking the deer, and keep your eyes up to scan ahead. With any luck, you’ll find it just a short ways down the trail. Then you can feel the emotions that come with tracking a deer and walking up to it for the first time.
The last step is getting it back home and preparing some delicious venison meals with the animal you successfully hunted and tracked. And that makes the experience that much more meaningful.
Missouri is a state with diverse landscapes, rich history, and abundant natural resources. It has over 44 million acres of land, of which about 60% is privately owned. But who are the largest landowners in Missouri, and what do they do with their land? In this article, we will reveal the top 10 landowners in Missouri and explore their backgrounds, interests, and impacts on the state.
The largest landowner in Missouri is the state itself, which owns over 3 million acres of land. This includes state parks, conservation areas, historic sites, and other public lands. The state manages these lands for various purposes, such as recreation, education, wildlife protection, and natural resource conservation. Some of the most popular state-owned attractions in Missouri are the Gateway Arch National Park in St. Louis, the Mark Twain State Park in Florida, and the Katy Trail State Park that spans across the state.
2. The United States Government
The second-largest landowner in Missouri is the federal government, which owns over 1.4 million acres of land. This includes national forests, wildlife refuges, military bases, and other federal properties. The federal government administers these lands through various agencies, such as the U.S. Forest Service, the U.S. Fish and Wildlife Service, the U.S. Army Corps of Engineers, and the National Park Service. Some of the most notable federal lands in Missouri are the Ozark National Scenic Riverways, the Mark Twain National Forest, and the Fort Leonard Wood Military Reservation.
3. Missouri Department of Conservation
The third-largest landowner in Missouri is the Missouri Department of Conservation (MDC), which owns over 460,000 acres of land. The MDC is a state agency that was established in 1937 to restore and manage the state’s fish, forest, and wildlife resources. The MDC owns and operates conservation areas, nature centers, shooting ranges, fish hatcheries, and other facilities that provide opportunities for outdoor recreation, education, research, and wildlife management. Some of the most visited MDC properties are the Busch Wildlife Area in St. Charles County, the Runge Nature Center in Jefferson City, and the Shepherd of the Hills Fish Hatchery in Branson.
4. The Ted Turner Reserves
The fourth-largest landowner in Missouri is Ted Turner, a media mogul and philanthropist who owns over 149,000 acres of land in the state. Turner is the founder of CNN, TNT, TBS, and other cable networks. He is also a passionate environmentalist and conservationist who owns more than 2 million acres of land across the U.S., making him the second-largest individual landowner in the country. Turner’s properties in Missouri are part of his Ted Turner Reserves, a collection of luxury eco-tourism destinations that offer guests access to his private ranches and wildlife reserves. Some of his ranches in Missouri are the Bar K Ranch near West Plains, the Flying S Ranch near Salem, and the Osage Hills Ranch near Rolla.
5. The Ozark National Scenic Riverways
The fifth-largest landowner in Missouri is the National Park Service (NPS), which owns over 80,000 acres of land in the state2. The NPS is a federal agency that manages national parks and other natural and cultural heritage sites across the U.S. The NPS’s largest property in Missouri is the Ozark National Scenic Riverways (ONSR), which was established in 1964 as America’s first national park to protect a river system. The ONSR encompasses over 134 miles of the Current and Jacks Fork Rivers in southern Missouri, along with their surrounding forests, caves, springs, and historic sites. The ONSR attracts over one million visitors annually who enjoy activities such as canoeing, camping, fishing, hiking
6. The Weyerhaeuser Company
The sixth-largest landowner in Missouri is the Weyerhaeuser Company, a timber and forest products company that owns over 75,000 acres of land in the state. Weyerhaeuser is one of the world’s largest private owners of timberlands, with more than 24 million acres of land in the U.S. and Canada. Weyerhaeuser’s lands in Missouri are mainly located in the southeast region of the state, where it operates several mills and plants that produce lumber, plywood, oriented strand board, and other wood products. Weyerhaeuser also manages its lands for wildlife habitat, recreation, and conservation.
7. The Pioneer Forest
The seventh-largest landowner in Missouri is the Pioneer Forest, a privately owned forest that covers over 65,000 acres of land in the state. The Pioneer Forest is owned by the L-A-D Foundation, a non-profit organization that was founded in 1962 by Leo Drey, a businessman and conservationist who is considered to be the father of sustainable forestry in Missouri. The Pioneer Forest is managed according to the principles of natural forest management, which aim to preserve the ecological integrity, diversity, and productivity of the forest. The Pioneer Forest is open to the public for hiking, hunting, fishing, and other low-impact activities.
8. The Bass Pro Shops
The eighth-largest landowner in Missouri is Johnny Morris, the founder and CEO of Bass Pro Shops, a retail chain that specializes in outdoor gear and equipment. Morris owns over 50,000 acres of land in Missouri, most of which are part of his Big Cedar Lodge resort near Branson. Big Cedar Lodge is a premier destination for outdoor enthusiasts, offering a variety of accommodations, amenities, and attractions, such as golf courses, spas, museums, restaurants, and wildlife parks. Morris also owns Dogwood Canyon Nature Park, a 10,000-acre preserve that features trails, waterfalls, caves, and wildlife.
9. The University of Missouri
The ninth-largest landowner in Missouri is the University of Missouri (MU), which owns over 40,000 acres of land in the state. MU is a public research university that was founded in 1839 as the first public institution of higher education west of the Mississippi River. MU’s lands include its four campuses in Columbia, Kansas City, Rolla, and St. Louis, as well as its research farms, forests
10. The Missouri Botanical Garden
The tenth-largest landowner in Missouri is the Missouri Botanical Garden (MBG), which owns over 30,000 acres of land in the state. The MBG is a botanical research and education institution that was founded in 1859 by Henry Shaw, a wealthy businessman and philanthropist. The MBG’s main campus in St. Louis is one of the oldest and most beautiful botanical gardens in the world, featuring a variety of gardens, conservatories, and collections of plants from around the globe. The MBG also owns and manages several other properties in Missouri, such as the Shaw Nature Reserve in Gray Summit, the Sophia M. Sachs Butterfly House in Chesterfield, and the Commerce Bank Center for Science Education in St. Louis.
Conclusion
Missouri is a state with many large and influential landowners, who own and manage millions of acres of land for various purposes. Some of these landowners are public entities, such as the state and federal governments, the MDC, and the MU. Some are private individuals or organizations, such as Ted Turner, Johnny Morris, the L-A-D Foundation, and the MBG. Some are corporations or businesses, such as Weyerhaeuser and Bass Pro Shops. All of these landowners have a significant impact on the economy, environment, culture, and history of Missouri.
Most Asked Questions and Answers
Here are some of the most asked questions and answers about the top 10 landowners in Missouri:
Q: Who is the largest individual landowner in Missouri?
A: The largest individual landowner in Missouri is Ted Turner, who owns over 149,000 acres of land in the state.
Q: Who is the largest private landowner in Missouri?
A: The largest private landowner in Missouri is Weyerhaeuser, a timber and forest products company that owns over 75,000 acres of land in the state.
Q: Who is the largest public landowner in Missouri?
A: The largest public landowner in Missouri is the state itself, which owns over 3 million acres of land.
Q: How much land does Missouri have?
A: Missouri has over 44 million acres of land, of which about 60% is privately owned.
Q: How much land does the federal government own in Missouri?
A: The federal government owns over 1.4 million acres of land in Missouri.
Q: How much land does the state government own in Missouri?
A: The state government owns over 3 million acres of land in Missouri.
Q: How much land does the MDC own in Missouri?
A: The MDC owns over 460,000 acres of land in Missouri.
Q: How much land does Ted Turner own in Missouri?
A: Ted Turner owns over 149,000 acres of land in Missouri.
Q: How much land does Johnny Morris own in Missouri?
A: Johnny Morris owns over 50,000 acres of land in Missouri.
Q: How much land does the MBG own in Missouri?
A: The MBG owns over 30,000 acres of land in Missouri.
There are so many choices when it comes to Sniper Rifles in the original Warzone, but some are simply better than others. We came up with a list of the best meta sniper rifle loadouts in Warzone Caldera.
Warzone still remains one of the greatest battle royales when it comes to weapon diversity, each weapon has its own character. Sadly, the nerfs in Season 3 made it so only a handful of the battle royale’s sniper rifles can still one-shot opponents.
To help you find the best sniper in Warzone, we’ve covered all the top-tier loadouts and attachments that maximize their efficiency. Whether you’re looking to increase your lethality or just wish to claim more long-range kills, then you can’t go wrong with these picks.
Remember, if you’re ready to dive into Warzone 2 and want to know which top-tier weapons to use, be sure to check out our list of the best Sniper Rifles to use in Warzone 2.
The best Sniper Rifle in Warzone is the Gorenko Anti-Tank Rifle. Currently, this sniper has the highest KD ratio and win rate out of all the rifles in the game and it’s easy to see why.
The Gorenko offers unmatched damage at long-range and while the 3 Line Rifle is a close contender, the Gorenko comes out on top thanks to its raw firepower.
12. Best Type 99 loadout
Attachments
Muzzle: Mercury Silencer
Barrel: Shiraishi 712mm Sniper
Optic: 1913 Variable 4-8x
Stock: Sakura CVR Custom
Underbarrel: M1930 Strife Angled
Magazine: 5.6mm 8 Round Mags
Ammunition: FMJ Rounds
Rear Grip: Leather Grip
Perk 1: Discard
Perk 2: Deep Breath
While the Type 99 may not be the most popular Sniper Rifle in Warzone, it’s still a pretty fun gun to use. Closer to the Kar98 and Swiss than some of the other options, the Type 99 is a relatively versatile sniper with good range and speed.
If you’re bored of the better options, check this Type 99 class out. But, if you find it underwhelming (which you probably will), then swap to something deadlier — like the other snipers on this list.
11. Best M82 loadout
Attachments
Muzzle: Infantry Stabilizer
Barrel: 22.6″ Combat Recon
Stock: Tactical Stock
Magazine: STANAG 9 Rnd
Rear Grip: Airborne Elastic Wrap
The M82 is a perfectly viable option in Warzone and we believe its power is nothing to scoff at. It may lack mobility compared to the higher-ranked Sniper Rifles on this list, but that isn’t to say the M82 isn’t worth taking out onto the battlefield.
Give it a go, and make sure to consult our detailed setup for the M82.
10. Best AX-50 loadout
Attachments
Muzzle: Monolithic Suppressor
Barrel: 32.0″ Factory Barrel
Laser: Tac Laser
Stock: Singuard Arms Assassin
Rear Grip: Stippled Grip Tape
A tried and tested fan-favorite over the years, the AX-50 is a solid choice but falls short compared to the other meta options in Season 5 Reloaded. While it can’t down people across the map quite as easily as the HDR and Gorenko, it’s a much more versatile option given its mobility, aim-down-sight (ADS), and firing rate advantages.
This AX-50 class maintains enough bullet velocity and accuracy to prove lethal from range, while still enjoying some mobility. You can be fairly comfortable pulling it out for a quick down during a gunfight before pushing with an AR or SMG.
Making this gun even more mobile to use is the Tac Laser, Singuard Arms Assassin Stock, and Stippled Grip Tape. The gun is quite versatile as Swagg was even able to turn it into the Intervention from Modern Warfare 2.
Make sure to check out our full breakdown of the best AX-50 loadout in Warzone right here.
9. Best Tundra loadout
Attachments
Barrel: 29.1″ Combat Recon
Laser: Ember Sighting Point
Optic: Ultrazoom Custom
Underbarrel: Patrol Grip
Magazine: Vandal Speed Loader
Despite receiving a set of hefty buffs back in the Season 5 patch, the LW3 Tundra is still sitting outside of the meta top 5. However, it’s still a powerful choice in the right players’ hands, and with the increase in damage range, it’s in a better state than ever before.
Our Tundra loadout above has great kill potential and even though it isn’t the most popular Sniper Rifle currently in Warzone, it definitely packs a punch.
8. Best Swiss K31 loadout
Attachments
Muzzle: GRU Suppressor
Barrel: 24.9” Combat Recon
Laser: SWAT 5mw Laser Sight
Underbarrel: Bruiser Grip
Rear Grip: Serpent Grip
A victim of Raven’s Season 3 nerfs, the Swiss is no longer a guaranteed one-shot down to the head anymore, stunting some of its use.
Although no longer dominant as it once was, the Swiss is still fast, has a clean default scope and reticle, and it downs enemies quite efficiently. Like the Kar98k, the Swiss is all about fast ADS, quick shots, and precision.
For a full, detailed breakdown of the best Swiss K31 loadout in Warzone, check out our dedicated class guide.
7. Best Pelington 703 loadout
Attachments
Muzzle: Stabilizer .308
Barrel: 25″ Extended
Stock: Duster Stock
Magazine: Vandal Speed Loader
Rear Grip: Field Tape
The Pelington 703 is a good Sniper Rifle for aggressive Warzone players who prefer to take quick shots. While the weapon definitely won’t do as much damage as the Gorenko or 3-Line Rifle, it does provide you with more mobility and a reduced ADS speed.
Also, with Raven buffing the Pellington’s damage in Season 5 Reloaded, it’s brilliant when paired up with a meta SMG or AR.
It’s worth noting that to knock an opponent with the Pelington, you’ll need to land headshots. So, if you’ve got a sharp aim and prefer a less stationary playstyle, consider picking up the Pelington and trying this loadout.
6. Best HDR loadout
Attachments
Muzzle: Monolithic Suppressor
Barrel: 26.9” HDR Pro
Laser: Tac Laser
Optic: Variable Zoom Scope
Stock: FTAC Champion
Following on from the Warzone Sniper weapon nerfs in Season 3, the HDR once again became a viable option thanks to its overwhelming firepower.
If you’ve ever been downed from hundreds of yards away out of nowhere, then it was probably the HDR. While this gun is heavy and slow-moving, both are entirely negligible, especially given its incredible kill potential.
This is the best HDR loadout for those who want to claim a bounty of long-range kills. It’s not about moving around, downing an enemy, and rushing in with a numbers advantage. It’s about sitting back, taking out enemies from afar, and trying to claim cross-map headshots.
Make sure to check out our full breakdown of the best HDR loadout in Warzone right here.
5. Best Kar98k loadout (Modern Warfare)
Attachments
Muzzle: Monolithic Suppressor
Barrel: Singuard Custom 27.6″
Optic: Sniper Scope
Laser: Tac Laser
Perk: FTAC Sport Comb
For what seemed like an eternity, this gun was deemed to be the best sniper in Warzone by many pros and content creators alike. It took a long, long time, but the Kar98k is no longer the king of Warzone.
The fastest ADS and mobility of the gun means it’s still a great gun to use, although its one-shot ability has been greatly tamed.
The only question mark about this Kar98 loadout is the Sleight of Hand usage, which is great for reload speed and gun swapping but can be sacrificed if you’re struggling to hit shots. If that’s the case, you can consider the Precision or the FTAC Sport Comb instead.
Make sure to check out our full breakdown of the best Kar98k loadout in Warzone right here.
4. Best Kar98k loadout (Vanguard)
Attachments
Muzzle: Scout Silencer
Barrel: VDD RE02K
Stock: Short Stock
Underbarrel: SMLE Pistol Grip
Magazine: 8MM Klauser 5 Round Fast Mag
Ammunition: FMJ Rounds
Rear Grip: Leather Grip
Perk: Fleet
Perk 2: Fully Loaded
With absolutely insane ADS speeds and a one-shot kill of up to 100 meters, the Vanguard Kar98k is ideal for aggressive Warzone players.
While you will need to be a sharpshooter with a solid aim to make this gun shine, it’s deadly in the hands of players who can quick scope their opponents from a distance.
Although the gun won’t be eliminating enemies in a single shot from massively long distances, it makes up for this shortcoming with its absurd ADS speeds and mobility.
3. Best ZRG 20mm loadout
Attachments
Muzzle: Wrapped Suppressor
Barrel: 43.9″ Combat Recon
Laser: SWAT 5mw Laser Sight
Stock: 5 Rnd
Rear Grip: Serpent Grip
Taking the third spot is none other than the ZRG 20mm Sniper Rifle from Black Ops Cold War.
Again, significant shifts in the game’s meta have allowed some underrated guns to flourish. None more so than the ZRG 20mm, which did enjoy some success when it first came out, but it has quickly become a fan favorite.
While it can’t quite contend with the 3-Line Rifle and Gorenko, its fantastic speed and great bullet velocity do make it much easier to use. Even Call of Duty streamer IceManIsaac has singled out one of the best Warzone sniper loadouts to try for the unstoppable ZRG 20mm Sniper Rifle.
Check out our own top ZRG 20mm loadout too.
2. Best 3-Line Rifle loadout
Attachments
Muzzle: Mercury Silencer
Barrel: Kovalevskaya 820mm R1MN
Optic: 1913 Variable 4-8x
Stock: ZAC Custom MZ
Underbarrel: Mark VI Skeletal
Magazine: .30-06 20 Round Mags
Ammunition: Lengthened
Rear Grip: Leather Grip
Perk 1: Silent Focus
Perk 2: On-Hand
The 3 Line-Rifle was ignored for a long time by a lot of Warzone players but a hefty set of buffs in Season 5 finally brought the gun into the fold.
Since then the rifle has been a dominant pick on Caldera that deals lethal amounts of damage. Which is why this is one of the best Warzone sniper loadouts out there.
Not only that, it’s currently the most popular rifle in the game and players are seeing a lot of success with the weapon, so don’t hesitate to make the most of this powerful sniper.
To make sure it’s the best it can be, we have a complete guide to the best 3-Line Rifle loadout here.
1. Gorenko Anti-Tank Rifle
Attachments
Muzzle: Mercury Silencer
Barrel: 420mm Empress
Optic: 1913 Variable 4-8x
Stock: Reinforced Stock
Underbarrel: GF-59 Flashlight
Magazine: 13mm AM 10 Round Mags
Ammunition: FMJ Rounds
Rear Grip: Leather Grip
Perk: Focus
Perk 2: On-Hand
The Gorenko burst into the meta in Season 5, establishing itself as one of the best Warzone sniper rifle and loadout after the one-shot nerfs to the Kar98k and Swiss. Now, the gun reigns as the top sniper in Warzone thanks to its lethality at long-range which makes it perfect for picking off opponents.
While it did get hit with a bullet velocity nerf in Season 5 Reloaded, this wasn’t enough to knock it off the top spot. It remains a devastating sniper option in the right players’ hands and offers a huge amount of damage at long range.
Best Warzone sniper support weapons
Once you’ve decided on the best Warzone sniper loadout for your individual playstyle, it’s then important you pick a solid secondary or support weapon.
Seeing as Sniper Rifles are ideal at long range, your best bet will be to find a weapon that is good at close and medium-range engagements, leaning toward whichever suits you best. We’ve listed three separate weapon loadouts that are perfect when paired with any of the sniper loadouts above.
1. Best Armguerra Warzone loadout
Muzzle: Recoil Booster
Barrel: Botti 315mm CII
Optic: Slate Reflector
Stock: Imerito SA Folding
Underbarrel: Mark VI Skeletal
Magazine: 9mm 60 Round Mags
Ammo Type: Lengthened
Rear Grip: Polymer Grip
Perk: Hardscope
Perk2: On-Hand
2. Best XM4 loadout
Muzzle: Agency Suppressor
Barrel: 13.5″ Task Force
Optic: Axial Arms 3x
Ammunition: STANAG 60 Round
Underbarrel: Field Agent Grip
3. Best MP40 loadout
Muzzle: Recoil Booster
Barrel: Krausnick 317mm 04B
Optic: Slate Reflector
Stock: Krausnick 33M Folding
Underbarrel: m1941 Hand Stop
Magazine: 7.62 Gorenko 45 Round Mags
Ammo Type: Hollow Point
Rear Grip: Polymer Grip
Proficiency: Steady
Kit: Quick
While many support weapons complement a sniper loadout in Warzone, if you’re struggling to find that perfect fit, these three should prove to be successful in the BR.
Looking for more of the best Warzone loadouts and tips? Check out our list of guides below:
Best Warzone settings to increase FPS on PC | Most popular Warzone weapons | Best Warzone loadouts | Call of Duty Warzone Mobile: Everything we know | What is Sabotage Contract in Warzone? | How to level up Vanguard weapons fast for Warzone
If you click on a product link on this page we may earn a small affiliate commission.
I want to preface what I’m about to say by making one thing clear…I love all firearms.
Big ones, small ones, common, rare, old, new, whatever — if it goes bang, it has a place in my heart.
There is nothing like slinging some heavy .308 at a decent rate of fire.
But the mostspecial place in my heart will always be held by the majesty that is the “battle rifle” — which usually means a semi-automatic chambered in .308 Winchester/7.62×51 NATO.
I’ve talked before about how much I love the .308 cartridge and how perfect it is for my needs and those of most shooters and hunters.
It’s good out to 800-yards, no sweat, and with quality match ammo, it will probably be more accurate than most shooters.
So while I love things like the 6.5 Creedmoor and .224 Valkyrie, I can’t get away from good ol’ .308.
If you are a fan of .308 and on the hunt for a new battle rifle, you might have noticed there are a few options on the market. So which is best?
.308 AR-10 on a deer hunt.
I’m going to walk you through some of the Pew Pew Tactical team’s favorite battle rifles. We’ll examine some pros of each and discuss what makes them worthy of your attention.
So without further ado…let’s dive in.
THE QUICK LIST
Best .308/7.62 Semi-Auto Rifles
1. AR-10
When the words “.308” and “semi-auto” are uttered in the same breath, most people’s minds probably go to the AR-10.
The AR-10 is the starting point not only for most modern battle rifles but for most Western semi-auto rifles in general.
The original AR-10. You can see the similarities between it and its modern counterparts.
It would go on to spawn the AR-15 and all of its variants, making it the progenitor of arguably the most popular firearm family in the world.
You can read more about the history of these rifles in our AR-10 vs. AR-15 article.
Originally developed by Eugene Stoner to replace the aging M1 Garand for the U.S. military, the AR-10 has had a long and successful life.
Sig Sauer 716i Tread AR-10
In that time, it has remained in use globally, though these days mostly in specialized circumstances or in the hands of civilians.
That said, it’s still an incredibly robust platform, and modern refinements have only made it better.
Aero Precision M5E1
The Aero M5E1 is the gold standard for people that want a customizable AR-10 without breaking the bank — though you’ll have to piece it together yourself.
Coming in somewhere between $1,200 and $2,000 depending on options, the M5E1 is an excellent choice for those who want a solid rifle that can be made great with a few small upgrades.
You can read our full review here.
Palmetto State Armory PA10
PSA is a budget firearms enthusiast’s dream come true. I’m not sure exactly how they do it, but they have everything from ammo to AR-10s at rock-bottom prices.
Best of all, their PSA-branded uppers, lowers, and complete rifles are all very cheap compared to the competition. Their fit and finish are nothing to drool over, but they go bang every time, and they’re more accurate than the price would lead you to believe.
If you’re looking for an entry model AR-10 or semi-auto .308 in general, the PA-10 from PSA is available in multiple configurations. They start at about $700 and top out at around $1100.
You can check out our reviews of the .308 and 6.5 Creedmoor versions and peep our video review of the .308 version below.
Other AR-10 Info
Simply put, the AR-10 is the king of battle rifles. They are inherently accurate, reliable, and modular. Aside from the models we listed, there are plenty of great options out there Sig 716I and higher-end options like LMT MARS-H and POF Revolution.
Be sure to check out our AR-10 vs. AR-15 and 8Best AR-10s articles if you would like to know more.
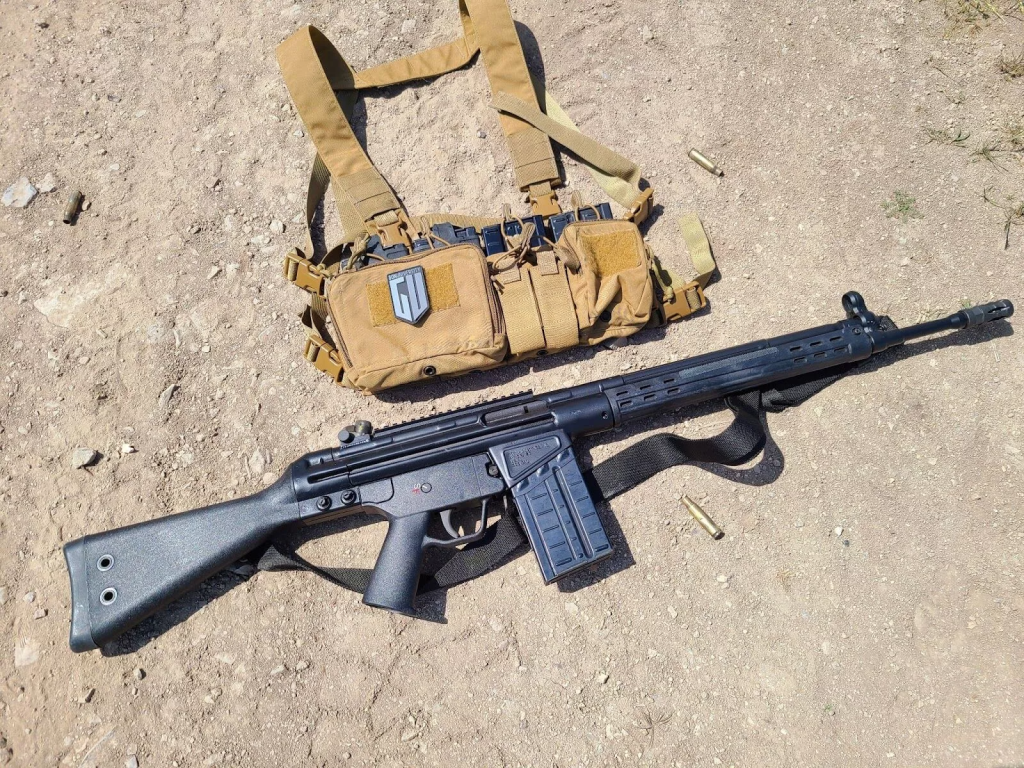
2. PTR-91
The PTR-91 is a modern variant of a gun first manufactured over half a century ago, the Heckler and Koch G3 — one of the most revered battle rifles ever produced.
PTR-91 With Welded Top Picatinny Rail (Photo: Gununiversity)
What would go on to become the H&K G3 was first produced in 1958. Primarily designed by German engineers working for the Spanish CETME development group, the CETME-C was a roller-delayed 7.62×51 rifle.
This legendary rifle would go on to inspire a number of similar rifles (and quite a few blatant copies) and be used by just about every country with a military.
The G3 has been and still is widely in service around the world. (Photo: Military Times)
The PTR 91 is an American-made G3 clone that uses tooling references from the original H&K G3 to be as accurate as possible to that original design, but with all the advancements and improvements of a modern manufacturing complex.
It also features the iconic H&K diopter sights (the little rotating drum you probably recognize most from the MP5) and a standard 5/28 threaded barrel making it ready for suppressors out of the box.
A nice bonus about these guns is the widespread availability of dirt-cheap magazines. You can find surplus magazines for $5 to $10, and new magazines can be had for as little as $10 to $15.
It’s not uncommon to run across a crate full of surplus G3 magazines at your local gun show. These things are everywhere. (Photo: kyimports)
This is a battle rifle. It’s got a stamped and welded receiver just like an AK, and the trigger does double duty as a medieval torture device. Beware, these things absolutely chew up brass; so if you are planning on reloading, this gun will literally put a dent in your plans.
I’d be comfortable calling the base model a 2 MOA gun with mid-range ammo. Stepping up to their FR model with the match-grade bull barrel is an option for those looking to squeeze a bit more accuracy out of the platform.
There are several variations of the PTR-91, but they typically run from about $1,000 to $1,400.
For a battle rifle that’ll handle anything, it’s certainly not bad at all, and I’d feel good about having one to rely on in anything from a home invasion to an alien invasion.
3. DS Arms SA58 FAL
FN Herstal developed the Fusil Automatique Léger (Light Automatic Rifle) in the 1940s and saw it completed in 1953. During the Cold War, many NATO countries adopted it as their primary battle rifle, where it earned its nickname “the right arm of the free world.”
DSA FAL, Improved Battle Carbine Version
It uses a fantastic short-stroke, spring-assisted piston action that was very modern at the time. The system is still relevant today, allowing the FAL to stand shoulder-to-shoulder with much newer firearms.
The FAL is one of the most battle-tested rifles on the planet, and usually, the trigger is considerably better than most of the G3 options out there, which may lead to better practical accuracy.
The FAL has been fielded by over 90 countries worldwide. (Photo: Warfarehistorynetwork)
I love the FAL, and it’s one of those guns I think anyone looking to build a serious gun collection should have. For me, it sits slightly above the AK and slightly below the AR-10/15 in the pantheon of shoulderable small arms.
Of course, if you want one, you’ll have to talk to an importer and get a civilian one. For that, I recommend DSA SA58 lineup. DS Arms is one of few companies producing parts and accessories for the FAL, including complete rifles.
The SA58 is a solid recreation of the FAL that holds its own against the other non-AR .308s we’ve talked about in the accuracy department. Although modern versions of these guns tend to be pricier, hovering between $1,500 to $2,500, they are fun and steeped in rich history.
Check out our review of one of DSA’s modernized FAL variants here.
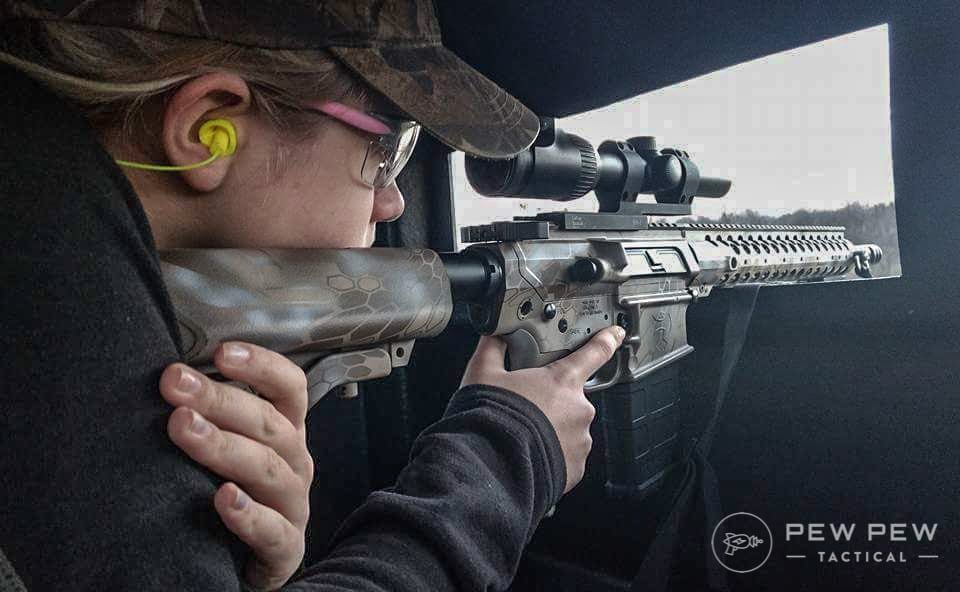
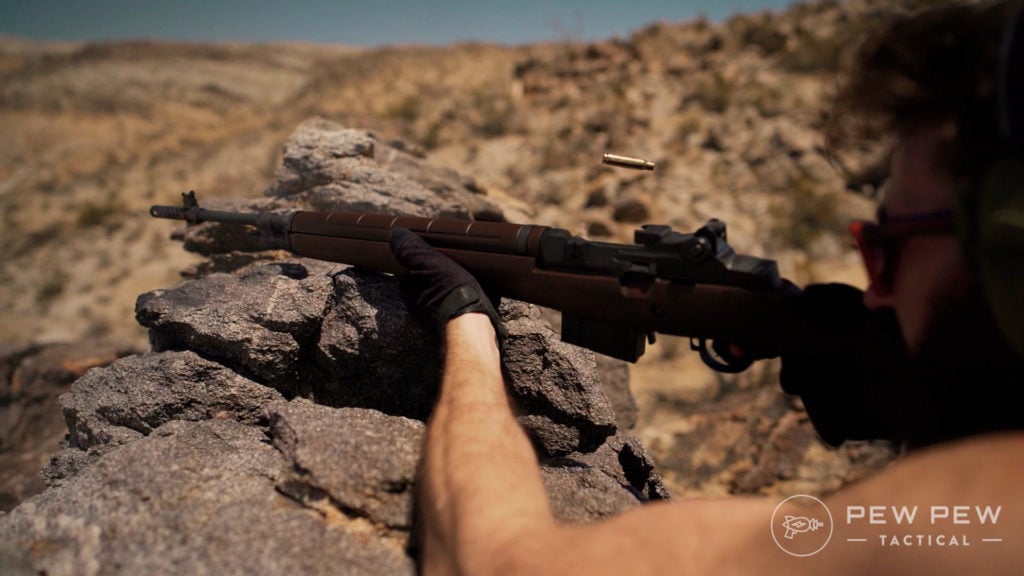
4. Springfield Armory M1A
Next up is the Springfield M1A. This is the civilian version of the iconic M14 — the rifle that trounced the AR-10 and FN FAL to become the U.S. Army’s primary battle rifle back in 1959 (however arguable those test results may be).
The M14 is, of course, a fully automatic military rifle, but the Springfield M1A is a semi-automatic, civilian version sold by Springfield Armory in various configurations.
You can get everything from the short-barreled SOCOM version to 21-inch barreled sniper configurations designed to get as much accuracy as possible out of the gun.
Some would say that M1A isn’t a great rifle, but I would disagree. Much of the accuracy of these guns is derived from a quality barrel and the mating of the action to the stock. This means that repeated detail strips of the gun can affect accuracy, especially on the base models.
Springfield M1A with a Vortex Rifle Scope
Stepping up to the Loaded model that comes with the national match barrel is a good step in the right direction if you want those tighter groups. Fiberglass bedding between the action and stock will really let show you what a properly set up M1A can do accuracy-wise.
I own one in 6.5 Creedmoor, and I couldn’t be happier, but holy moly, do I want a .308 version. I just can’t quite justify the price for a second one, given that they run anywhere from $1,299 to $2,700, depending on trim level.
These rifles are a frequent sight on the field of competition, especially in service-rifle competitions. With classic ergonomics and excellent iron sights, the M1A lends itself well to shooting without optics.
The M14 is still used in a mostly honorary capacity by the U.S. military, with one or two exceptions — an especially notable one being its use by a number of competitive rifle teams from various branches.
While it may not be the best combat rifle or the cheapest battle rifle option these days, what it lacks, it makes up for in pure soul and fun. And if you aren’t sure which model is right for you, check out our ultimate guide to the best M1A models.
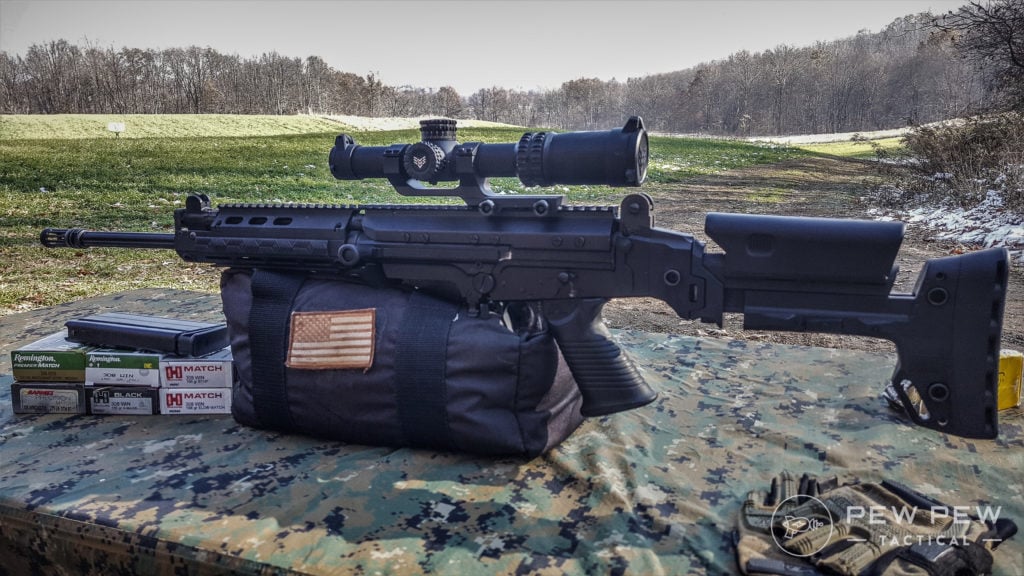
5. IWI Galil ACE Gen 2
Here comes the dark horse in the competition — the Galil ACE Gen 2 in 7.62×51 NATO. The first-generation Galil ACE was launched in 2008 but hasn’t been featured as heavily in the U.S. market, or video games for that matter, which kept it off many people’s radar.
Galil ACE Gen 2 Shooting
So what is it, you ask? In a nutshell, the Galil ACE is the ultimate refinement of the AK-47 platform. It uses the same long-stroke piston and rotating bolt design as the Kalashnikov and even sports a similar pop-off dust cover.
What does all that mean? It means you get the robust and proven durability of the AK platform, combined with the hearty build quality that IWI is known for. Sprinkle in a version chambered for 7.62 NATO, and you have a hell of a battle rifle.
Galil ACE Gen 1 and 2
IWI recently introduced the Gen 2 version of the ACE. Updates include an M-LOK handguard, AR-style buffer tube for use with your favorite stocks, improved 2-stage trigger, and improved ergonomics.
By virtue of using a long-stroke piston, the ACE is able to have a folding stock and fire when folded. It also sports a non-reciprocating charging handle on the left side. Additionally, its cold hammer forged barrel ensures good accuracy and long service life.
Galil ACE Gen 2
Although a bit heavier than the SCAR-17S or the average AR-10, the ACE is still manageable at 8.6 pounds. The ACE also benefits from using standard SR-25/AR-10 magazines.
These rifles are a bit pricier, around $1,700 to $2,000, but are far from the most expensive on this list. If you are looking for something modern that isn’t an AR-10, the ACE might be your ticket.
Want to know more about the platform? Check out our full review of the 7.62×39 Galil ACE or watch Johnny B’s video below.
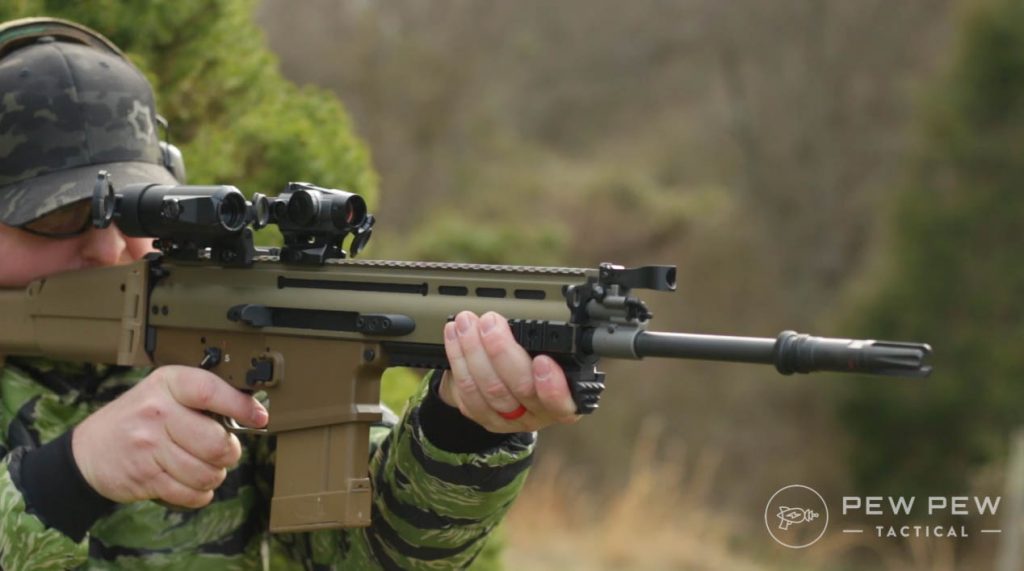
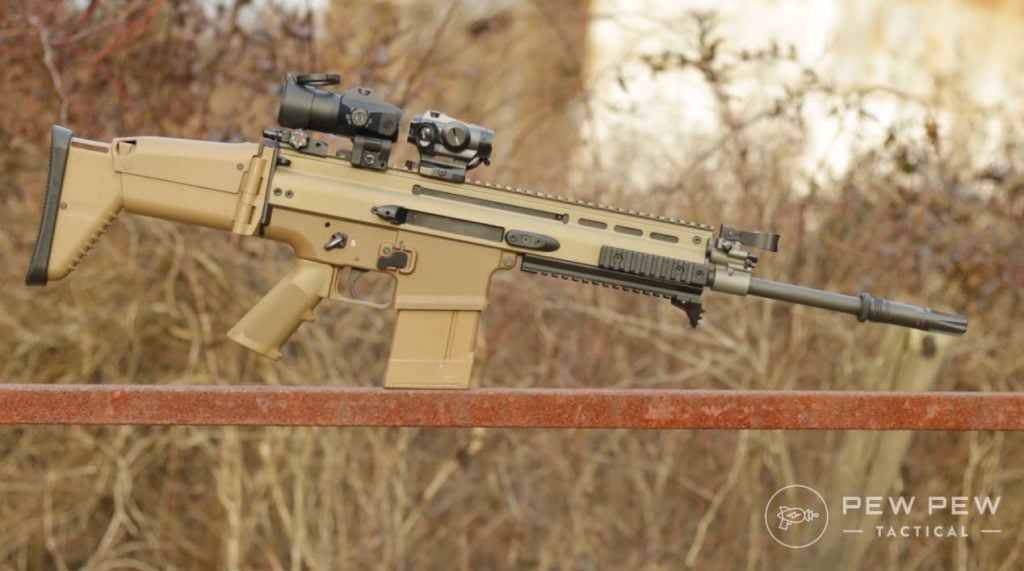
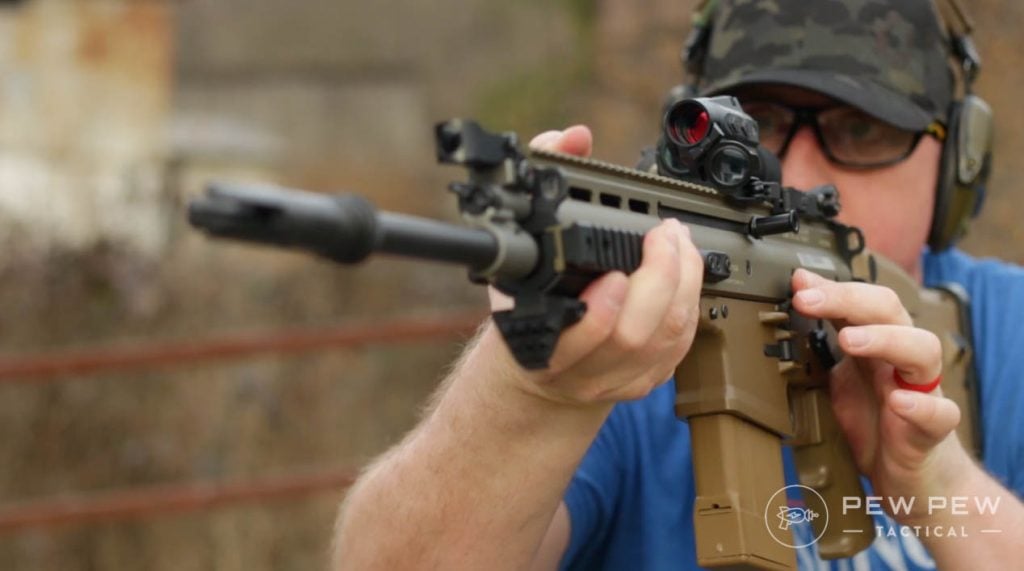
6. FN SCAR-17S
We’ve already given a spot on this list to the FN FAL, but I’d be remiss if I left out one of the most popular modern .308 battle rifles around.
FN SCAR 17S
The FN SCAR-H is a 7.62x51mm monster of a gun designed to be as modular as possible and to serve a variety of uses. From being a CQB weapon for various door-kickers and SF units to a scout sniper and sniper support platform, the SCAR-H can do it all.
A SCAR-H is a fully-automatic battle rifle capable of laying down 600 rounds a minute while also reaching out to the utmost limits of what the .308 cartridge is capable of.
Meanwhile, the SCAR-17S is the civilian version that goes bang as fast as your trigger finger can manage to go back and forth, and that’s plenty fast enough for me.
This is as solid of a rifle as you can get. The civilian version ships with a 16.5-inch barrel, but you can swap them out by removing just a few screws, allowing you to slot in any number of aftermarket barrels, from 13 to 20 inches, depending on your needs.
It uses a modern version of the short-stroke piston FN developed for the FAL, and it is currently in service in 24 countries around the world in one capacity or another.
For the civilian shooter like you and me, we get something that’s as military-tested as any rifle can be and is as close to military spec (aside from the lack of select-fire capability) as we can get.
The trigger is…not perfect, but certainly better than the FAL. The good news is that there are a considerable amount of aftermarket trigger options. If you’re going to slap a 20-inch barrel on there and stretch the SCAR out to 800 yards or more, you might consider swapping the trigger out.
All in all, it’s one of the best modern battle rifles out there and is pretty perfect if you’re looking for a heavy-duty semi-auto. The price is steep, but hey, you are getting a modern military-grade firearm, and that doesn’t always come cheap.
Be sure to check out our review of the SCAR-17S or watch the full video review below and let us know your take.
Final Thoughts
That was a look at some of the awesome semi-automatic .308 battle rifles out there. I certainly enjoyed writing it, and I hope some of this was helpful. If you haven’t found your next purchase, then hopefully, you at least learned something interesting.
Choices Choices
What do you think of these rifles? Which one is your favorite? Thinking about getting one? Be sure to check out what to feed these beasts with our article on the Best .308 Ammo for Target Shooting, Plinking, & Hunting.
Dusting clay pigeons is a great way to spend time with your shooting buddies.
Most ranges probably have a trap range, a skeet range and maybe even a sporting clays set-up of some sort. But what about the casual day out at your backyard range? How do you get those clay pigeons sailing through the air so you can smoke them?
Today we’ll take a look at some options that will allow you and your shooting buds to set up a fun clays range for the afternoon.
There are really two main types of throwers available. Manual and automatic.
The manual throwers can be as simple as this MTM Clay Target Thrower. If you practice a bit and have someone with a decent arm, this option will work. However, for a better shooting experience let’s stick to the throwers with a spring activated throwing arm.
Manual throwers are classified as “full-cock” or “3/4-cock” mechanisms. The full-cock machines mean you have to manually pull the lever back to reset it against the full force of the spring.
On the other hand, the 3/4-cock machines have a gear or clutch mechanism that only lets the arm travel in one direction and the momentum of the arm partially cocks the machine so you have much less effort required to reset the machine.
Check out this video from Do All Outdoors showing how easy the 3/4-cock traps are to reset.
Got all that? Now we’ll go into the best clay throwers.
1. Do All Outdoors – Backyard Clayhawk 3/4-Cock Trap
This trap is a great entry level 3/4-cock thrower. It has a tripod-type base that can be staked to the ground or mounted on a piece of plywood something else to make it more stable.
The trap can launch clays up to 70 yards and is adjustable up and down and side to side. It can also be configured to launch rabbit targets. These are meant to mimic a bouncing, running rabbit and roll on their edge along the ground.
2. Trius One-Step Trap
If you can’t talk someone into some range time, the One-Step allows the shooter to launch clays and shoot by themselves. This is a full-cock thrower, so the reset effort is a bit more.
However, you can load singles or doubles and also launch high-angle clays. To launch the bird simply step on the lever to release the throwing arm.
3. Do All Full-Cock Competitor Trap
For $29 you can hardly go wrong with this basic trap. The trap allows you to launch singles, stacked doubles and or side-by-side doubles. Clays can be launched up to 55 yards with this little machine. I borrowed my brother-in-law’s Competitor to teach my nephew the basics of shotgun shooting.
By easing up the spring tension a bit you can slow the targets down and allow them to “float” a bit and get new shooters into the groove and learning how to engage moving targets. A great entry level trap.
Note: this trap needs to be staked securely or mounted to something heavy so it doesn’t jump around too much.
Automatic Throwers
When you’re ready to spend more time on the range and want speed up your shooting it’s time to look at getting an automatic trap. These traps will generally be powered by a 12-volt battery and allow you to load 50 or more clay targets in the magazine.
The trap is released remotely by a wired switch or a wireless set-up depending on the model. Most of the remote switches are designed to be foot operated so you can launch targets when shooting by yourself.
The coolest thing about automatic traps is that they are available with options that move side-to-side, up and down or both so you never know exactly how the target will be launched!
4. Champion WheelyBird 2.0
The WheelyBird 2.0 is the upgraded model of the WheelyBird – and the upgrades are nice! The cycle time is only 1.75 seconds and there is now a wireless remote and a foot pedal to allow for more variation and shooting angles.
Best of all, the WheelyBird 2.0 can launch targets up to 75 yards.
The Fowl Play trap has a lot of great features for practicing your wing shooting skills. The trap will throw targets up to 55 yards and can be adjusted from 5 to 35 degrees of elevation.
To really add some challenge to your practice just bolt on the Adjustable Wobbler Kit. The Wobbler allows targets to launch from random left to right angles as well as changing the elevation. The Fowl Play trap comes with a 25 foot wired foot pedal, but a wireless upgrade is available.
This is a great thrower, to begin with, and the optional upgrades allow you to continue to improve over time.
What’s your take on it?
Closing Thoughts
If you are an aspiring wing-shooter having your own trap makes a lot of sense. As long as you have a safe area to practice these traps allow you to shoot anytime you want and will likely save you a fair amount of money over time.
If I were to purchase a manual trap today I’d definitely be looking at 3/4-cock models because of their ease of resetting.
I really like the Fowl Play automatic thrower from Do-All Outdoors because as a base model you get everything you need plus the option to upgrade and continue challenging your shooting abilities.
No matter which one you choose, you’re sure to have a blast every time the shooter yells “Pull!”.
Want more shotguns in your life? Check out our 5 Best Home-Defense Tactical Shotguns!
Do you shoot trap? What’s your favorite shotgun? Let us know in the comments! Then check out our Best Trap, Skeep, & Clay Shotguns.
The Varied Diet of Wolves: Exploring Their Consumption of Deer
Wolves are known for their adaptability when it comes to their diet. While their main prey consists of large, hooved herbivores such as moose, elk, and deer, they have also been observed consuming a variety of other animals. This includes smaller mammals like beavers, hares, marmots, and rodents, as well as fish and birds. Wolves are even known to scavenge for carrion and garbage. However, their occasional predation on domestic livestock and pets has led to conflicts with humans and a negative reputation for the species.
The specific diet of wolves depends on the availability of prey in their habitat, as well as the size and vulnerability of the prey. Different regions across the Northern Hemisphere have varying populations of ungulates (hooved animals), which serve as the primary prey for wolves. For example, Arctic wolves hunt caribou and musk-oxen in their icy habitats, while wolf packs in Idaho, Montana, and Wyoming primarily target elk, moose, deer, bighorn sheep, and mountain goats. Mexican gray wolves prefer elk and deer as their wild prey in North Carolina.
In parts of Spain and Italy, wolves tend to feast on red deer, roe deer, and wild boar. In Central Asia, ibexes, argali sheep, and wild goats are the main prey for wolves. The Himalayan wolf inhabits high altitudes in the Himalayas and Tibetan plateau where they hunt Tibetan gazelles.
While wolves can survive on 2.5 to 3.7 pounds of meat daily, successful reproduction requires them to consume 5 to 7 pounds per day. Despite this need for food intake for reproduction purposes or survival in general; however; wolves typically do not eat every day but instead follow a feast-or-famine lifestyle. They can go for days or even weeks without eating, and when they do make a successful kill, they can consume up to 20 pounds of food in one meal.
Hunting large ungulates like elk, moose, caribou, and musk-oxen is easier and safer for wolves when they hunt in packs. It takes skill, energy, and luck to successfully take down such large prey. While wolves are skilled hunters, they are not always successful due to various factors such as the age and experience of the wolf, the vulnerability of the prey (e.g., old, injured, sick or young individuals), the time of year and day, the terrain, and the weather conditions.
Research has shown that wolves tend to target the most vulnerable individuals within a herd or flock of prey species. This includes older animals, those that are injured or sickly, as well as individuals with a history of poor nutrition. By targeting these vulnerable individuals, wolves ensure their own survival by reducing competition for resources.
The relationship between wolves and their prey is complex and influenced by various factors. In some cases where more than one prey species is available in an ecosystem, wolves may switch their focus from one species to another depending on the availability and abundance of each. For example, in northeastern Minnesota’s east-central Superior National Forest where white-tailed deer, moose, and beavers are present as top menu items for wolves; researchers have observed that when moose populations declined by over half from 2006 to 2016; wolf populations almost doubled instead of decreasing. Wolves supplemented their diet by hunting white-tailed deer during this period.
Similar observations were made in other locations where wild ungulates became scarce or absent. A study conducted in Alaska’s Alexander Archipelago revealed that while ungulates represented about 65% of wolves’ diet on a regional level; the kind and proportion of ungulates varied across different locations. Sitka black-tailed deer were the main prey on several islands, while moose and mountain goats were the primary prey on the mainland. When one of these ungulate species declined or became scarce, wolves adapted by changing their prey to a variety of other species including land mammals (beaver, black bear, rodents, etc.), marine life (mammals and fish), and even birds.
In instances where wild ungulates or other wild prey are scarce or absent from the landscape, wolves may turn to alternative food sources such as domestic livestock. This brings them into direct conflict with humans and has been linked to seasonal patterns like grazing seasons when livestock are more vulnerable. Wolves have also been known to scavenge for garbage in certain areas. In Israel, wolf scat analysis revealed that they consume not only meat scraps and fruit but also non-food trash items like human hair, plastic containers, cigarettes, and eggshells.
Fruit is another surprising addition to wolves’ diets in various regions across Europe and China. Studies have found evidence of wolves consuming cherries, berries, apples, pears, figs, plums, grapes, melons; even regurgitating wild blueberries for their pups at rendezvous sites in Minnesota’s Voyageurs National Park.
Understanding the varied diet of wolves is crucial for wildlife management policies and debunking myths surrounding wolf predation. By studying what wolves eat and how it relates to their habitat and prey availability; researchers can gain insights into the ecological dynamics between predators and their prey while also addressing conflicts with humans over resources.
From Moose to Deer: Understanding the Prey Preferences of Wolves
Wolves are large carnivores that primarily prey on ungulates, such as moose, elk, and deer. However, they are not strict carnivores like some species of cats. Wolves have adapted to a more varied diet and are considered generalists and opportunistic hunters. In addition to ungulates, wolves also prey on smaller animals like beavers, hares, marmots, rodents, fish, and birds. They are also known to scavenge carrion and garbage. Unfortunately, occasional predation on domestic livestock and pets has contributed to the negative reputation of wolves among some people.
The flexibility in their diet is one of the reasons for the success of wolves as a species. It allows them to survive and thrive in various ecosystems across the Northern Hemisphere. The type of prey available, its size, and vulnerability determine what wolves eat. Different regions have different dominant prey species for wolves. For example, Arctic wolves hunt caribou and musk-oxen while elk, moose, deer, bighorn sheep, and mountain goats are the main prey for wolf packs in Idaho, Montana, and Wyoming.
Wolves can survive on 2.5 to 3.7 pounds of meat daily but require 5 to 7 pounds per day for successful reproduction. However, they do not eat every day and live a feast-or-famine lifestyle. After successfully hunting a large ungulate, a wolf can consume up to 20 pounds of food in one meal. Hunting large ungulates is easier and safer for wolves that hunt in packs compared to hunting alone.
Research has shown that wolves tend to target the most vulnerable individuals within a herd or flock of prey species. This includes the old, injured, sick or young individuals with less visibly discernable vulnerabilities such as poor nutrition history. When wild ungulates and other wild prey are scarce or absent from the landscape, wolves have been observed to switch their prey preferences. They may supplement their diet with alternate prey species or turn to domestic livestock, leading to conflicts with humans.
Understanding the prey preferences of wolves is crucial for wildlife management policies and dispelling myths and misperceptions about wolf predation. By studying what wolves eat, researchers gain insights into factors such as prey availability, vulnerability, terrain, climate, disease, and fragmented landscapes that influence wolf diets. This knowledge helps in conserving wolf populations and promoting coexistence between wolves and humans.
Feast or Famine: How Wolves Adapt Their Diet to Include Deer
Wolves are known for their adaptability when it comes to their diet. While their main prey consists of large hooved herbivores like moose, elk, and deer, they have also been observed hunting smaller animals such as beavers, hares, marmots, and rodents. In addition to these land-dwelling creatures, wolves have been known to consume fish and even birds. They are opportunistic hunters and scavengers, often feasting on carrion and garbage. However, this varied diet has also brought them into conflict with humans as they occasionally prey on domestic livestock and pets.
The flexibility in the wolf’s diet is one of the reasons for its success as a species. It allows them to survive and thrive in various ecosystems across the Northern Hemisphere. The type of prey wolves eat depends on its availability, size, and vulnerability. Different regions have different dominant prey species for wolves. For example, Arctic wolves hunt caribou and musk-oxen while elk, moose, deer, bighorn sheep, and mountain goats are the primary prey for wolf packs in Idaho, Montana, and Wyoming.
Wolves typically do not eat every day but live a feast-or-famine lifestyle. They can go days or even weeks without eating but can consume up to 20 pounds of food in a single meal after successfully hunting a large ungulate. Hunting large ungulates like elk and moose is easier and safer for wolves that hunt in packs. However, hunting success depends on various factors such as the age and experience of the wolf, vulnerability of the prey animal, time of year and day, terrain, and weather conditions.
Research has shown that wolves tend to target the most vulnerable individuals in a herd or flock of prey species. This includes old or injured individuals as well as young ones. Wolves also target prey with less visibly discernable vulnerabilities, such as a history of poor nutrition. In instances where wild ungulates and other prey are scarce or absent, wolves have been observed to switch their diet to include alternate prey species. This prey switching behavior helps them survive in environments where the primary prey species is in decline.
In some cases, when wild prey is unavailable, wolves turn to domestic livestock as a food source. This brings them into direct conflict with humans and has contributed to their negative reputation in certain areas. Wolves have also been known to scavenge from garbage dumps and consume non-food items accidentally, such as plastic containers or broken glass.
Overall, the wolf’s diet is influenced by factors such as prey availability, vulnerability, terrain, climate, and disease. Understanding what wolves eat and how they adapt their diet is crucial for wildlife management policies and dispelling myths and misperceptions about wolf predation. By studying their diet and prey relationships, researchers can gain valuable insights into the behavior and ecology of these fascinating animals.
Deer on the Menu: Unraveling the Relationship Between Wolves and Their Prey
Wolves have a diverse diet that includes large, hooved herbivores known as ungulates, such as moose, elk, and deer. However, they are not limited to these prey species and also hunt smaller animals like beavers, hares, marmots, rodents, fish, and birds. They are even known to scavenge carrion and garbage. This adaptability in their diet has contributed to the success of wolves as a species, allowing them to thrive in various ecosystems across the Northern Hemisphere.
The specific prey that wolves target depends on factors such as availability, size, and vulnerability. Different regions have different dominant prey species for wolves. For example, Arctic wolves primarily hunt caribou and musk-oxen, while wolf packs in Idaho, Montana, and Wyoming mainly rely on elk, moose, deer, bighorn sheep, and mountain goats. The Mexican gray wolf favors elk and deer as its wild prey in North Carolina.
Wolves can survive on 2.5 to 3.7 pounds of meat per day but require 5 to 7 pounds for successful reproduction. However, they do not eat every day and live a feast-or-famine lifestyle. After successfully hunting a large ungulate, a wolf can consume up to 20 pounds of food in one meal. Hunting large ungulates is easier and safer for wolves that hunt in packs compared to hunting alone.
When it comes to hunting strategies and behaviors of wolves, studies have shown that they tend to target the most vulnerable individuals within a herd or flock of prey species. This includes the old, injured, sick or young individuals with less visibly discernable vulnerabilities such as poor nutrition history.
The relationship between wolves and their prey is complex and influenced by various factors such as the number of prey animals available. Research conducted on Isle Royale, an isolated ecosystem, revealed that the moose and wolf populations tended to reflect each other. When moose numbers were high, there was more food for wolves, leading to better nutrition, higher pup survival rates, and an increase in the wolf population. As wolf numbers declined, they put less pressure on the moose populations, allowing them to rebound.
In multi-prey ecosystems where more than one prey species is available, a decline in the primary prey species can lead to two possible outcomes for the predator population. The predator population may also decline or it may continue to increase by supplementing its diet with alternate prey. This phenomenon is known as “prey switching.” For example, in northeastern Minnesota’s east-central Superior National Forest, wolves primarily target white-tailed deer, moose, and beavers. When the moose population declined significantly from 2006 to 2016, instead of decreasing in number, the wolf population almost doubled. Wolves supplemented their diet by hunting white-tailed deer and continued preying on moose calves.
In instances where wild ungulates and other wild prey are scarce or absent from the landscape, wolves exhibit flexibility and resilience in their diet. They may turn to domestic livestock as a food source, which often leads to conflicts with humans. Garbage dumps can also serve as a food source for scavenging wolves.
Studies have shown that fruit can also be part of a wolf’s diet. Scat analysis across different regions has revealed the presence of various fruits like cherries, berries, apples, pears, figs, plums grapes, melons in their diets.
Understanding what wolves eat and their relationship with prey species is crucial for wildlife management policies and dispelling myths about wolf predation. By studying these aspects of wolf ecology, researchers gain insights into how wolves interact with their environment and shape conservation strategies.
Debra Mitts-Smith, an expert in wolf literature and art, conducts research on wolves and is currently working on a cultural history of the wolf. The International Wolf Center provides educational resources and information about wolves to promote their survival and the understanding of their role in ecosystems.
Wolves and Deer: Examining the Complex Interactions in their Food Chain
Wolves and deer have a complex relationship when it comes to their food chain. Wolves primarily prey on large, hooved herbivores such as moose, elk, and deer. These ungulates make up the main source of food for wolves, but they are not the only prey that wolves target. Over half a century of research on wolves has revealed that they also prey on smaller animals such as beavers, hares, marmots, rodents, fish, and even birds. Wolves are opportunistic hunters and scavengers, which allows them to adapt to a more varied diet compared to hypercarnivores like cats who eat only meat.
Vulnerable Prey
Studies have shown that wolves tend to target the most vulnerable individuals in a herd or flock of prey species. This includes the old, injured, sick, or young animals that are easier targets for predation. Wolves also target prey with less visibly discernable vulnerabilities such as a history of poor nutrition. By focusing on these vulnerable individuals, wolves increase their chances of successful hunts and ensure their own survival.
Prey Switching
In areas where more than one prey species is available, wolf-prey relations become even more complex. When the primary prey species goes into decline or becomes scarce, two things can happen: the predator population may also decline or the predator population may continue to increase by supplementing its diet with alternate prey. Biologists call this “prey switching.” For example, in northeastern Minnesota’s Superior National Forest where white-tailed deer, moose, and beavers are the top menu items for wolves, researchers found that as the moose population declined by more than half from 2006 to 2016, wolf numbers almost doubled instead of decreasing. The wolves supplemented their diet by hunting white-tailed deer and continued to prey on moose calves, contributing to the ongoing decline of the moose population. Only when the white-tailed deer population also declined did the wolf population start to decrease.
Scavenging and Human Conflict
Wolves are known to scavenge for food, including carrion and garbage. This scavenging behavior can sometimes bring them into direct conflict with humans. In areas where wild prey is scarce or absent from the landscape, wolves may turn to domestic livestock as a food source. This leads to conflicts between wolves and livestock owners. Additionally, wolves have been observed scavenging in garbage dumps and consuming non-food trash items such as human hair, plastic containers, cigarettes, and eggshells. These behaviors highlight the flexibility of wolves’ diets and their ability to adapt to different food sources in order to survive.
Overall, studying what wolves eat provides valuable insights into their ecological role and helps shape wildlife management policies. Understanding the complex interactions between wolves and their prey species, such as deer, is crucial for maintaining balanced ecosystems and mitigating conflicts between humans and wildlife.
Dietary Flexibility of Wolves: Insights into Their Consumption of Deer
Wolves are known for their dietary flexibility and ability to adapt to different prey species. One of the main prey animals for wolves is deer, which includes species such as moose, elk, and white-tailed deer. Research has shown that wolves have a varied diet and will also prey on smaller animals such as beavers, hares, marmots, rodents, fish, and even birds. They are also known to scavenge carrion and garbage.
The type of prey that wolves consume depends on factors such as the availability of prey in their habitat, the size of the prey animal, and its vulnerability. Different wolf populations across the Northern Hemisphere have different preferred prey species. For example, Arctic wolves hunt caribou and musk-oxen, while Mexican gray wolves primarily target elk and deer. In Spain and Italy, wolves tend to feast on red deer, roe deer, and wild boar.
Wolves can survive on 2.5 to 3.7 pounds of meat daily but require 5 to 7 pounds per day for successful reproduction. However, they typically do not eat every day and live a feast-or-famine lifestyle. After successfully hunting a large ungulate like an elk or moose, a wolf can consume up to 20 pounds of food in a single meal.
While hunting large ungulates takes skill and energy, it is easier and safer for wolves that hunt in packs. Wolves are skilled hunters but not always successful due to various factors such as the age and experience of the wolf, the vulnerability of the prey animal, the time of year and day, terrain conditions, and weather.
Studies have shown that wolves tend to target the most vulnerable individuals in a herd or flock of prey species. This includes old or injured animals as well as young individuals or those with a history of poor nutrition. The flexibility and resiliency of wolves become especially apparent in areas where wild prey is scarce or absent from the landscape.
In instances where the primary prey species goes into decline, wolves may resort to “prey switching” by supplementing their diet with alternate prey. For example, when the moose population declined in northeastern Minnesota, wolves increased their predation on white-tailed deer. Similarly, in Alaska, wolves expanded their dietary niche to include a variety of species such as land mammals, marine life, and birds when ungulates became scarce.
However, when wild prey is unavailable, wolves may turn to domestic livestock as a food source, leading to conflicts with humans. They have also been known to scavenge from garbage dumps and consume non-food items incidentally.
Understanding what wolves eat and how they adapt to different prey species is crucial for wildlife management policies and dispelling myths about wolf predation. Research on the dietary flexibility of wolves provides insights into their ecological role and helps shape conservation efforts for both wolves and their prey species.
Sources:
– International Wolf Center: https://wolf.org/
– “Dietary Flexibility of Wolves: Insights into Their Consumption of Deer” (International Wolf magazine)
In conclusion, wolves are natural predators that do indeed eat deer. Their diet primarily consists of herbivores such as deer, aiding in maintaining a balanced ecosystem. Understanding the predator-prey relationship between wolves and deer is crucial for wildlife conservation efforts.
When it comes time to change a tire, you need to make sure that you have the correct socket size for the lug nuts. If you don’t have the right size socket, you could end up damaging the lug nuts or the socket itself.
In this blog post, we will discuss how to choose the right socket size for lug nuts. We will also provide a list of some of the most common socket sizes and their corresponding lug nut sizes.
What Is a Lug Nut Socket and What Size Do You Need for Your Car Wheels
A lug nut socket is a special socket that is designed to fit over the lug nuts on a car wheel. The most common socket sizes for lug nuts are 17mm, 19mm, 21mm, and 23mm.
These four sizes will generally cover 95% of your needs. However, it is always important to check the owner’s manual for your specific vehicle to ensure that you are using the correct size socket. Lug nut sockets are typically made from either steel or titanium, and they usually have a 6-point or 12-point design.
The 6-point design is more common because it provides a better grip on the lug nut, but the 12-point design can be easier to use in tight spaces. either way, having a good quality lug nut socket is essential for anyone who plans on doing their own car repairs.
How to Measure the Size of Your Lug Nuts?
Before you can measure the size of your lug nuts, you’ll need to gather a few supplies. You’ll need a tape measure, a flathead screwdriver, and a lug wrench. Once you have your supplies, park your car on level ground and set the parking brake.
Next, locate the lug nut that’s in the 12 o’clock position and insert the flathead screwdriver into the hole in the center of the nut. Twist the screwdriver until it’s snug, then use the lug wrench to loosen the nut by turning it counterclockwise. Once the nut is loose, remove it from the wheel and use the tape measure to check its diameter.
The most common sizes for lug nuts are 19mm and 21mm, but it’s always best to double-check to be sure. With a little patience and a few simple tools, measuring the size of your lug nuts is a quick and easy process.
The Different Types of Lug Nut Sockets Available on The Market
When it comes to lug nut sockets, there is a wide range of options available on the market. From shallow to deep sockets, and from standard to impact-rated, there is a socket to suit every need.
Shallow sockets are typically used for smaller nuts, while deep sockets are required for larger nuts. Standard sockets are suitable for most applications, but impact-rated sockets are designed to withstand the high torque of impact wrenches. In addition, there are a variety of head types available, including hex, Torx, and 12-point.
Hex head sockets are the most common type, but Torx head sockets are often used in high-torque applications. 12-point sockets are less common, but they offer a more secure grip than hex or Torx head sockets. With so many options available, it is easy to find the perfect socket for any job.
How to Choose the Right Socket Size for Your Car Wheels?
When you go to change a tire, it is important to choose the right socket size for your car wheels. The socket size is determined by the diameter of the holes in the wheel, and it should be slightly larger than the bolts that secure the tire to the wheel.
If the socket is too small, it will not be able to engage all of the bolts, and if it is too large, it will “cam out” and slip off of the bolt head. In both cases, you risk stripping the bolt or damaging the wheel.
To avoid these problems, check your owner’s manual or look online for the recommended socket size for your car. Once you have the right socket size, changing a tire will be a breeze.
Tips for Using a Lug Nut Socket Safely and Effectively
While lug nut sockets are generally very durable, they can be damaged if used improperly. Here are a few tips for using a lug nut socket safely and effectively:
-If possible, use an impact wrench to remove or install the lug nuts. This will help to prevent damage to the socket.
-When using the socket by hand, be sure to grip it firmly and use slow, steady movements. Sudden or jerky movements can cause the socket to slip and potentially damage the lug nuts.
-If the lug nuts are very tight, you may need to use an air ratchet or breaker bar in addition to the socket. However, be sure not to apply too much force, as this can damage the socket orstrip the threads on the lug nuts.
By following these simple tips, you can help ensure that your lug nut socket lasts for years to come.
Lug Nuts Sizes Chart/Common Lug Nut Sizes
Here’s a table of common lug nut sizes and thread pitches:
Please note that this table only includes the most commonly found lug nut sizes and thread pitches. To determine the correct lug nut size for your vehicle, refer to the owner’s manual, measure the outside diameter of the wheel stud thread, or bring a lug nut to your local hardware store and test it on available bolts.
Wheel Nut Socket Size
Knowing the right wheel nut socket size is essential for your lug nuts. It’s important to choose the right size socket for your lug nuts in order to ensure the proper torque requirements. This will help to ensure that the wheel is securely fastened to the vehicle.
Impact vs. standard lug nut sockets can also be a factor when selecting the right lug nut socket size. Impact sockets are designed for use with air powered tools and are more durable than standard sockets. Additionally, lug nut socket material options range from chrome vanadium to titanium and should be selected based on the type of lug nut being used.
Lug nut socket extension lengths are also important to consider when determining the right socket size. Longer extensions may be necessary in some applications, and it’s important to make sure the socket is compatible with the lug nut. Lug nut socket storage solutions are also available to help keep sockets organized and safe.
When selecting the right socket size, it’s important to make sure the lug nut socket fits properly. Socket brands and quality comparison is also important to consider. It’s best to use a torque wrench when tightening lug nuts to ensure proper torque settings. If a lug nut becomes stuck, there are special techniques and tools that can be used to safely remove it with a socket.
Here is a helpful 2-column table showing the most common wheel nut socket sizes in both metric and SAE measurements:
Metric Sizes SAE Sizes 17 mm 11/16-inch 19 mm 3/4-inch 21 mm 13/16-inch 22 mm 7/8-inch
What Size Socket for Chevy Lug Nuts
Knowing what size socket to use for Chevy lug nuts is essential for proper torque and wheel alignment. Depending on the model of your vehicle, the thread size of the lug nuts can differ, with common sizes including M12x1.50, M14x1.50, and 1/2-20 UNF. The hex heads of the Chevrolet Bolt lug nuts, for instance, measure 19mm or 3/4 inches, while the Chevy/GMC lug nuts have a 7/8 inch (22mm) hex.
To determine the correct size socket, check the vehicle’s owner’s manual or seek professional advice. Keep in mind that aftermarket lug nuts may have different hex head sizes even if the thread size remains the same.
To ensure your lug nuts are properly installed and secure, it’s important to adhere to the manufacturer’s lug nut torque specifications. Lug nut removal tools can be used to loosen and remove the lug nuts, but make sure you’re using the correct size for your lug nuts.
Common problems with lug nuts include cross threading, stripping of the lug nut, incorrect tightening sequence, and improper torque. Different types and materials of lug nuts may require different maintenance tips and security options.
To prevent cross threading, avoid using power tools or extensions and be aware of lug nut size compatibility when using aftermarket wheels. If desired, you can also purchase lug nut covers and accessories for added protection and aesthetics.
Here is a helpful table with some common Chevy models and their respective lug nut socket sizes:
Chevy Model Thread Size Socket Size Chevrolet Bolt M12x1.50 19mm or 3/4″ Chevy/GMC (typical) M14x1.50 22mm or 7/8″
Semi Lug Nut Socket Size
Knowing your semi lug nut socket size is essential, so make sure you check it before you buy. The most common size is 33mm, which is equivalent to 1 5/16 inches, but this can vary depending on the specific truck model and wheel type.
For example, American trucks equipped with Budd wheels may require a 1-1/2 inch hex socket with a 13/16 inch square. It’s important to follow the lug nut torque specifications for your semi-truck and ensure you use the correct socket size.
Common lug nut materials include steel, aluminum, and stainless steel, each of which requires different tightening techniques. Using the wrong socket size can be dangerous and damage your wheels, so it’s essential to have the correct size on hand to ensure proper lug nut tightening.
Impact sockets provide additional torque and are often a better choice for lug nut tightening. Additionally, there are different types of lug nut sockets, such as standard and deep, and it’s important to check compatibility with different brands of trucks. To measure the lug nut size, use a caliper to accurately measure the outer diameter of the nut.
Common Semi Lug Nut Socket Sizes:
Socket Size (mm) Socket Size (inches) Notes 33mm 1 5/16 inches Most common size for semi-truck lug nuts 1-1/2 inch hex 13/16 inch square For some American trucks with Budd wheels
Metric Lug Nut Size
Frequently check the external diameter of your wheel studs to determine the correct metric lug nut size for your vehicle. It’s important to follow the manufacturer’s torque specifications when installing lug nuts.
Common materials used for lug nuts include steel, chrome, and aluminum. For the best fitment, it’s recommended to use a torque wrench when installing lug nuts. To ensure security, consider using locking lug nuts or wheel locks. Lug nut covers and decorative options are also available for customizing the look of your vehicle.
If you need to remove a lug nut, be sure to use the correct removal tool. Make sure your lug nuts are compatible with aftermarket wheels before installing. If you’re looking for specific lug nut colors or customizations, check the availability of your desired color or design.
Alternatives to lug nuts include wheel studs and wheel bolts. Following these guidelines will help you choose the correct lug nut size and ensure secure and proper wheel fitment.
Here is a helpful table showing the most common metric lug nut sizes and their corresponding wrench sizes:
Checking your Toyota model’s lug nut size is essential before using a socket.
For most Toyota vehicles, the lug nut socket size is 21mm, which is metric in measurement. However, it’s important to note that some models, such as the new Toyota Tundra, may require a different size, like a 22mm socket.
To ensure proper lug nut torque specifications, it’s best to use a torque wrench with the correct size socket.
The lug nut removal tool, lug nut lock key, and lug nut covers are also helpful when replacing or installing lug nuts.
Additionally, make sure to check the lug nut thread size, type, torque sequence, and wrench size for your specific Toyota model.
Following these steps will ensure proper installation and a secure connection.
Here’s a helpful table showing the lug nut socket size for most Toyota vehicles:
Toyota Model Lug Nut Socket Size Most Toyota Models 21mm Toyota Tundra 22mm
Frequently Asked Questions Regarding Socket size for Lug nuts
These are the frequently asked questions related to socket size for lug nuts-
What Size Are Standard Lug Nuts?
There are a few different sizes that are considered “standard” for lug nuts, though which size is most common can vary depending on the make and model of the vehicle.
17 mm hexes are perhaps the most ubiquitous, but 19 mm and 21 mm sizes are also fairly common. You may occasionally see a lug nut with a 22 mm or 23 mm hex, and 11*16 inch (17.5 mm) and 13*16 inch (20.6 mm) sizes are even less common.
In general, it’s best to consult your vehicle’s manual or a qualified mechanic to determine which size lug nuts are required for your particular car, truck, or SUV.
Are Lug Nuts Metric or SAE?
For many car owners, the terms “metric” and “SAE” are unfamiliar. However, these two standards are actually very important when it comes to choosing the right lug nuts for your vehicle. Metric lug nuts are metric threads, meaning that the threading is in millimeters.
SAE lug nuts, on the other hand, have inches-based threads. In general, metric lug nuts are used on European vehicles, while SAE lug nuts are more commonly found on American cars. That said, there are some exceptions to this rule. For example, Audi vehicles use both metric and SAE lug nuts.
So, if you’re not sure which type of lug nut to use, it’s best to consult your owner’s manual or a qualified mechanic. Using the wrong type of lug nut can cause problems with wheel balance and alignment, so it’s important to get it right.
What Type of Socket Should Be Used for Impact Wrenches?
When it comes to impact wrenches, not just any old socket will do. These tools generate a lot of torque, and that can wreak havoc on a standard socket. That’s why impact-rated sockets are designed specifically for use with impact wrenches.
These sockets are made from stronger materials that can withstand the high torque without stripping the nuts or rounding off the edges. In addition, impact-rated sockets often have a thicker wall to help prevent them from breaking under stress.
As a result, they’re an essential part of any impact wrench kit. So, if you’re looking for the right socket for your impact wrench, make sure to choose an impact-rated model.
What Is the Difference Between a Shallow and Deep Socket?
There are a few key differences between shallow and deep sockets that are important to note. First, shallow sockets are typically used for smaller nuts, while deep sockets are required for larger nuts.
This is because the deeper socket provides more support for the nut, preventing it from turning or breaking as easily. Additionally, deep sockets often have a different design than shallow sockets, with a longer and narrower shape that is better suited for reaching into tight spaces.
Finally, deep sockets typically cost more than shallow sockets due to their increased durability and strength. When choosing a socket for a project, it is important to consider the size of the nut as well as the level of access that is needed. In most cases, a deep socket will provide the best results.
What Is the Best Way to Grip a Lug Nut Socket?
When it comes to changing a tire, one of the most important steps is properly attaching the lug nut socket. If the socket is not attached correctly, it can slip and damage the lug nuts.
To avoid this, be sure to grip the socket firmly and use slow, steady movements. It may also help to use an impact wrench, which can provide extra torque and help to prevent the socket from slipping.
With a little care and attention, you can ensure that your tires are changed safely and quickly.
Final Thoughts On How to Choose the Right Socket Size for Lug Nuts
In conclusion, finding the right socket size for your lug nuts is important. Make sure to consult your vehicle’s owner’s manual or a professional mechanic to ensure you have the right size.
With the proper tools and know-how, changing your own tires can be a simple and rewarding task. Stay safe out there!
You’ve scouted and set up stands. You’ve sighted in your guns or practiced with your bow. Finally the buck you’re looking for comes in and the shot is made. How long will the trailing process take you? Will you find your buck?
Understanding how to track and find blood can make the difference between having meat in the freezer and a trophy to hang on the wall or coming home with nothing at all. You make a plan when you hunt to increase your chance of success, but if you attempt to track without a plan, your chances of success are greatly reduced.
I sell blood-detection products to law enforcement, and my business has given me a lot of information on what to look for and what a blood trail can tell you about the hit you’ve made on a deer. I’m often called to help look for wounded deer after all hope seems to be lost, because people know that I can find blood that is not easily seen.
POINTS TO PONDER
Blood trails can be misleading. A lot of blood does not necessarily indicate a mortal wound. Nor does a seeming lack of blood necessarily mean the animal isn’t dead. The reaction of the animal and the blood pattern will give us a better understanding of how to go about making a plan to recover an animal. Normally, deer do not bleed to death. An animal that weighs 160 pounds must lose 45-plus ounces of blood to die from blood loss alone. Deer will die faster from trauma than from blood loss, and a combination of both is by far the best scenario.
Most deer can travel very fast when wounded. They can hit 35 mph, and even if they die quickly after the shot, they can travel a long distance before collapsing. A wounded deer will not go far unless it is pushed. Therefore it’s always a good idea to sit still for at least a half-hour after the shot, unless you want to make the tracking job a lot more difficult.
Deer often travel in loose family groups, and those in the rear of the group can help by showing you where the wounded animal traveled. Spooking these deer could remove helpful clues as to the whereabouts of your trophy, so always use caution.
BE OBSERVANT
Pay attention to the reaction of the deer the moment it is shot, as this is your first clue to helping you know how to find it. The reaction can be deceiving, but it is still important. I have shot deer and had them look at me like nothing happened, only to watch them fall over where they stood. I have also had many hunters tell me that they knocked the animal down, only to watch it suddenly jump up and run off, leaving lots of blood. That’s the one that I hate to hear the most.
First of all, body shots that do not hit the neck or spine will rarely make deer drop, and if the neck or spine is hit, the animal is usually disabled and will not be able to get up. Experience from the “dropped and got up and left lots of blood” situations tells me it was most likely a low shoulder or leg shot. The falling down likely means the leg was broken. Leg-muscle hits leave lots of blood in the first 100 yards, but then the blood trail fades fast. There will be lots of large spots of blood as the animal stands in one spot or leans against a tree. Even with a broken leg (or two), a deer can run very fast.
FINDING BLOOD SIGN
Another common scenario is this: “I thought I hit him, but there was no blood.” Anytime there is a wounded animal, there will be blood, even if it cannot be seen. Blood droplets, which are forced out of the body by gunfire, produce a high-velocity-impact splatter pattern. The pattern can be smaller than 1mm at the beginning of the trail. Shots taken with a bow leave medium-impact blood splatter patterns and will leave droplets around 3mm in size. Both can be difficult to see, even in the snow, so trust your instincts and follow the trail the deer took.
If the deer was hit, the blood will appear soon. If it was a high lung hit, it can take time for the body cavity to fill and blood to be forced out. Lung-shot deer often run right after the shot, and this causes blood trails to be harder to see, as the blood is spread over a larger distance. If there is no visible blood trail, wait and let the animal bed down. It will not go far and should die quickly.
Another common animal reaction is the hind leg kick. Although many lung-shot deer kick out after the shot – whether the projectile that hit them was an arrow or a bullet – this reaction could mean that the animal was hit farther back in the gut. The blood pattern and the color of the blood will be very important. Darker blood is from the stomach or liver. A liver shot is always fatal, but liver-shot deer are often hard to find because they can travel a long distance.
Green matter or food is from one of the deer’s four stomachs. A stomach shot is also fatal, but it could take 24 hours or longer for the deer to die. Give this animal at least three hours to bed down and follow up for the kill in the daytime. Make sure to circle ahead from the downwind side.
The low forward double lung shot is the best-percentage shot to take. By hitting the arteries and lungs, it will cause massive internal bleeding and drowning, causing death within about 150 yards. This pattern can start out with little blood, but it will increase as the animal starts blowing blood out the mouth and nose.
10 TIPS FOR BLOOD TRACKING
Always try to pinpoint the exact spot where your deer was standing when shot.If you deer runs off, always try to pinpoint the spot where it was last seen.Unless your deer goes down within sight, always wait a minimum of 30 minutes before taking up the trail.Use trail markers and a compass while following a blood trail.Working in pairs is best. Never have more than three people follow a blood trail.In addition to looking at the ground while following a blood trail, always look at the brush and foliage on either side of the trail.Bright ref or pinkish blood indicates an artery or lung shot.Blood with green or brown matter in it indicates a liver shot.If you think your deer is still alive, send a shooter around and ahead of the animal to try to dispatch it as you continue tracking.When all else fails, consider getting a tracking dog (where legal) or use a luminol-based blood-detecting product like Bluestar.:
Quartering-away shots cause the most damage, as the projectile will travel a longer distance through the body. Shots from a raised area (tree stand) generally give a better blood trail, as the exit hole will be lower and allow blood to leave the body cavity in greater volume.
Shooting for the tail is the worst shot anyone can make, and it often leaves only a wounded animal or spoiled meat. If the shot hits the back of the thigh, it will bleed well but the deer will not die soon, as the muscle will tighten up and help stop the bleeding. A deer shot in the anus will spread bacteria all over its insides, and the damage will be even worse if the bladder is also hit. This type of shot requires the animal to be cleaned immediately and thoroughly washed out in order to save any of the meat.
OTHER TRACKING TIPS
Blood trailers spend a lot of time looking on the ground but little time looking at the brush, where more than half the blood is usually found. Blood on brush can reveal how high or low the shot hit, helping in the recovery plans.
No hunter should be without a compass. Use it to get a bearing on the trail taken, using a marker like a unique tree to track toward. Working in pairs is best as well. One tracker should circle downwind and ahead 75 to 100 yards in case the animal is alive. The second person should take the trail. Repeat this until the animal is recovered. Remember to be safe when tracking because deer can be dangerous when wounded. Proper gun handling and line-of-fire rules must also be followed to avoid injury.
Timing is very important. Tracking too soon is the No. 1 reason why mortally wounded deer travel long distances and make recovery difficult or impossible. Tracking too slowly will cause the meat to spoil. Reading the clues properly will make the difference in how good the meat tastes, since recovery shortly after death is important. Meat with a gamey taste can be caused by slow recovery, not cleaning properly or hanging in warm weather.
PAY ATTENTION TO THE SHOT
Adrenaline runs high after the shot, and humans have a hard time controlling it. Relax, breathe deeply and take a few moments to reflect about what happened. The beginning of the trail is the most important place to get the facts about what happened and how to proceed.
The first thing we do at a crime scene is cordon off the area to keep people from altering evidence. Then we use only a few people to process the scene – again, to keep from altering or destroying the evidence. Walking on a blood trail will transfer the blood pattern from its original spot to somewhere else, or destroy it completely. Never put more than three people on a blood trail unless you think it is hopeless to recover your deer without extra people.
Unless the animal drops within sight, no trail should be taken within 30 minutes. The deer you just shot will be looking at the spot where it was wounded to see what happened. It will bed down soon and try to lick or heal the wound, usually within the first 40 yards if there is good cover. Don’t turn a 40-yard trail into a 400-yard trail!
I’ve often been asked to follow a blood trail that had a small amount of blood that suddenly had twice as much blood, then nothing. This usually means that the deer has turned 180 degrees and walked over the same trail twice, then cut off downwind at a 45- to 90-degree angle after it decided the trail it was following was not safe.
The blood left on the ground or brush is important, as it can tell much about the wound. Bright red or pink blood has lots of oxygen, indicating an artery or lung shot. Many deer trails I have followed were from shots that hit low in the shoulder or leg, leaving large amounts of blood. The blood is slightly darker with a very narrow trail 4 to 8 inches in width. This deer will likely need a second shot. Make plans to get a person ahead to dispatch the deer.
READING THE SIGN
Trails of blood more than 2 feet wide are complete pass-through shots and increase the chances of recovery greatly. Blood trails that have squirts of blood on the side of the trail 2 feet or more indicate arterial shots in the neck, heart or other major artery. As mentioned, brown or greenish blood, or blood with green or brown matter, is always a gut or liver shot. In either case, the deer will need extra time to die before you attempt to recover it. A liver shot will kill faster, but may still take two hours or more. Blood with green matter should dictate a minimum five- to six-hour wait before tracking. The tracker should attempt to put a shooter ahead to dispatch the animal in case it is still alive.
Many visual blood trails disappear when the animal’s heart stops and the blood pressure drops, as the blood is no longer being forced out of the body. Most animals can still travel 30 to 45 seconds and cover 65 yards or more before dropping, and the blood trail will be almost impossible to find without blood-tracking aids.
Many times I have found animals within 40 to 50 yards of the stand. They died close by after having run 250 to 300 yards in a long, arching circle, trying to get back to the spot where they were safe before the shot. Knowing the bedding areas on your property helps a lot if you cannot find an animal. The wind is important to a wounded deer. They will always try to get downwind of the hunter.
TOOLS OF THE TRADE
There are tools we can use in tracking. Dogs are now legal in many states, and a dog can be great tool if there is no rain or snow. However, most people do not have dogs or have the time to train them, nor do they have the money to pay a dog tracker. Dog tracker fees vary but often end up costing in excess of $150. Lights made for finding blood do not work very well, as blood absorbs light. Regardless of what you see on TV, law enforcement officials do not use lights to find blood.
There are a few luminol-based products (Tink’s and Bluestar, notably) that make blood glow in the dark. I prefer Bluestar because it was first made for forensic use. Bluestar picks up hemoglobin. Hemoglobin transports oxygen to the cells. It contains iron, which is a basic element of earth and is nearly impossible to destroy without fire.
Much time was spent to produce a product like Bluestar that investigators could use with little or no training, and much time was spent developing a product that could tell the difference between blood and other items containing iron. Bluestar is sold in tablet form, and you simply add water. This is the best tracking agent I have found on the market today. At a cost of $19.95 to track up to four deer, the cost is very affordable. You can usually cover 100 yards in 10 minutes or less, and the time saved will be worth the money spent.
Small and lightweight and sold in packs of four, Bluestar gives the hunter enough product to cover even the longest trails. Bluestar also will work well in evergreens and moss. Because the reaction with blood is so much different from “false positives,” anyone can tell the difference.
ALWAYS PINPOINT THE SPOT
Hunters often have difficulty finding the beginning of a blood trail. Before you leave your stand, use a waypoint to know where the deer was standing when shot. Also, try to pinpoint the last spot where the deer was seen after the shot was taken. A compass is perfect for this, using a marker such as a tree to find the spot.
Many times I use Bluestar only to find the start of a blood trail. To do this, spray while walking across the trail as soon as you find the blood. See if you can follow it with your eyes. If not, continue to use the Bluestar. I often use it to regain a trail when an animal changes terrain, going from leaf litter to grass fields, for example. Bluestar will work in the rain or snow. You’ll learn a lot about trailing deer when using Bluestar since you’ll see the whole trail every time you use it. Another advantage of Bluestar is that total darkness is not needed. It works well in low light just after shooting light has faded.
Since Bluestar glows bright blue in the dark, even people who are colorblind or whose eyes are “not as good as they used to be” can follow the trail without any help. No glasses or lights are needed – just water and a spray bottle. Water can be taken from streams, lakes and ponds, along with any tap or bottled water. In extreme cold, you can use window washer solvent. When using, mix a set of tablets in a sprayer and spray on the ground where the deer was standing. If the deer was hit, there will be a bright blue glow.
Last but not least, always use trail markers. This will help if you need to leave the trail for any reason and will help anyone who is trying to join you later on. This also lets you see a pattern of travel. Most likely that pattern will be an arch traveling back to the bedding area downwind of the stand. Bedding areas are thick with a good view, and they always take advantage of wind direction. They provide a perfect area for a wounded animal to seek refuge in.
No matter what happens before or after the shot, these simple tools mentioned above cost very little and will save you lots of time. More importantly, they help us all remain ethically responsible by recovering game quickly and efficiently.
“Winter Wonder: Unveiling the Enigmatic World of Deer in Chilly Seasons. Explore the hidden realm of deer as we delve into their intriguing behaviors and survival strategies during the frosty winter months. Discover how these graceful creatures adapt, forage, and navigate through snowy landscapes to endure harsh conditions and thrive amidst nature’s icy embrace.”
1. How Deer Adapt to Winter: Strategies for Staying Warm and Finding Shelter
Growing a Thicker Coat of Fur
During the winter months, deer adapt to the cold weather by growing a thicker coat of fur. This thicker fur serves as insulation, helping them retain body heat and stay warm. The outer layer of their fur consists of long, hollow hairs that trap heat, while the undercoat is made up of shorter, denser hairs that provide additional insulation.
Utilizing a Layer of Fat
In addition to their fur, deer also have a thick layer of fat under their skin. This layer acts as an extra source of insulation, helping to keep their body temperature from dropping too low. The fat layer provides an additional barrier against the cold weather and helps the deer stay warm during winter.
Finding Shelter in Thickets and Under Evergreen Trees
To seek shelter from the cold and wind, deer often bed down in thickets or under evergreen trees. These areas provide some protection from harsh weather conditions and help them conserve body heat. Additionally, if there is snow on the ground, deer will search for areas where the snow is not as deep to find better cover.
Using Antlers to Brush Away Snow
When food sources are covered with snow, deer utilize their antlers to brush away the snow and access their food. By clearing away the snow from vegetation or other food sources, they ensure they have enough sustenance during the winter months when food may be scarce.
Overall, deer employ various strategies such as growing a thicker coat of fur, utilizing a layer of fat for insulation, finding shelter in thickets or under evergreen trees, and using their antlers to clear away snow. These adaptations allow them to survive and stay warm during the challenging winter season.
2. Surviving Winter: Insights into the Winter Habits of Deer
Paragraph 1:
During winter, deer face numerous challenges in order to survive the harsh conditions. One of their key adaptations is growing a thicker coat of fur. This thick fur acts as insulation, keeping their body heat from escaping and protecting them from the cold weather. The outer layer of their fur consists of long, hollow hairs that trap heat, while the undercoat is made up of shorter, denser hairs that provide additional insulation. By growing this thicker coat, deer are able to stay warm and maintain their body temperature even in freezing temperatures.
Paragraph 2:
In addition to their fur, deer also have a layer of fat under their skin that helps them stay warm during winter. This layer of fat acts as an extra source of insulation and prevents the deer’s body temperature from dropping too low. The fat reserves provide energy for the deer during times when food may be scarce or difficult to find due to snow cover or frozen ground. By utilizing both their fur and fat reserves, deer are able to adapt to the winter conditions and survive until spring when food sources become more readily available.
List: Ways Deer Find Shelter in Winter
– Deer will seek shelter in thickets or under evergreen trees where they can find some protection from the cold winds.
– They will look for areas with less snow on the ground and avoid deep snowdrifts.
– Deer may also use natural features like rocky outcrops or dense vegetation as shelter from the elements.
– In extreme conditions, they may dig shallow depressions in the snow called “yards” where they can huddle together for warmth.
– Additionally, deer will use their antlers to brush away snow from their food sources so they can access nourishment during winter months.
3. Winter Survival Tactics: How Deer Stay Warm and Find Food in Cold Weather
Staying Warm in the Winter
During the winter, deer employ various tactics to stay warm and maintain their body temperature. As mentioned earlier, one of the key adaptations is their thick coat of fur. The outer layer of long, hollow hairs acts as insulation, trapping heat close to their bodies. Additionally, the undercoat consisting of shorter, denser hairs provides extra insulation. This combination of fur layers helps to prevent the loss of body heat and keep the deer warm even in freezing temperatures.
In addition to their fur, deer also have a layer of fat under their skin that aids in thermal regulation. This layer acts as an additional insulating barrier against the cold weather. By having this reserve of fat, deer can conserve energy and maintain a stable body temperature throughout the winter months.
Finding Food in Cold Weather
Finding food becomes more challenging for deer during the winter when vegetation is scarce and covered by snow. However, they have developed strategies to locate sources of sustenance even in these harsh conditions.
Deer are known to browse on woody plants such as shrubs and tree bark during winter when other food sources are limited. They use their antlers to brush away snow from these plants, exposing edible parts beneath. This behavior allows them to access vital nutrients and sustain themselves during periods of low food availability.
Additionally, deer have a remarkable ability to detect hidden vegetation beneath the snow using their highly sensitive sense of smell. They will actively search for patches where snow cover is thin or absent, allowing them access to grasses or other plants that may still be available for grazing.
By adapting their feeding habits and utilizing their sensory abilities effectively, deer are able to find enough food to survive through the winter months despite the challenges posed by cold weather conditions.
4. Unveiling the Secrets of Deer’s Winter Behavior and Adaptations
During the winter, deer exhibit fascinating behavior and adaptations to survive in harsh conditions. One of their remarkable adaptations is their ability to stay warm. As warm-blooded animals, deer need to maintain their body temperature in order to survive. To combat the cold weather, deer rely on their fur as insulation. Their outer layer of fur consists of long, hollow hairs that trap heat, while the undercoat is made up of shorter, denser hairs that provide additional insulation. Additionally, deer have a thick layer of fat under their skin which acts as an extra layer of insulation and helps prevent their body temperature from dropping too low.
To find shelter from the cold and wind during winter, deer employ various strategies. They often seek out thickets or take refuge under evergreen trees where they can find some protection from the elements. When there is snow on the ground, they will look for areas with less snow depth for bedding down. Deer also utilize their antlers to brush away snow from their food sources, ensuring access to necessary nourishment during this challenging season.
Overall, understanding these winter behaviors and adaptations of deer can help us appreciate their incredible ability to adapt and survive in harsh environments. By respecting their natural habitats and taking precautions while driving in areas where deer are known to cross roads, we can contribute to the conservation efforts aimed at protecting these majestic creatures.
5. From Fur to Shelter: Understanding How Deer Cope with Winter Conditions
The Importance of Insulation
Deer, being warm-blooded animals, need to maintain their body temperature in order to survive. In the winter, when the temperatures drop significantly, deer rely on their fur as a crucial adaptation for staying warm. Their fur consists of two layers – the outer layer made up of long, hollow hairs that trap heat, and the undercoat composed of shorter, denser hairs that provide additional insulation. This unique combination helps to retain the deer’s body heat and protect them from the cold.
Growing a Thicker Coat
To adapt to winter conditions, deer undergo a natural process of growing a thicker coat of fur. As the colder months approach, their bodies respond by producing more hair follicles and increasing hair growth. This thicker coat acts as an effective insulator against the harsh weather elements, preventing their body heat from escaping and helping them withstand low temperatures.
Finding Shelter
In addition to their fur, deer seek out shelter during winter to further protect themselves from the cold and wind. They often bed down in thickets or take refuge under evergreen trees which provide some barrier against the elements. When there is snow on the ground, they will actively search for areas where the snow is not as deep to find better cover. Furthermore, deer utilize their antlers by brushing away snow from food sources to ensure access to necessary nutrition during this challenging season.
By understanding how deer adapt and cope with winter conditions through their fur insulation and seeking shelter, we can appreciate their remarkable ability to survive in harsh environments. To ensure their safety and avoid accidents while driving during times when deer are most active, it is important for us humans to exercise caution on roads known for frequent deer crossings by following specific guidelines such as using high beams, maintaining vehicle condition, observing speed limits, and resisting the urge to swerve. By respecting their natural behaviors and habitats, we can coexist with these amazing creatures.
6. Driving Safely in Deer Country: Tips to Avoid Collisions During Winter Months
Paragraph 1:
During the winter months, it is important to take extra precautions while driving in areas where deer are present. With their ability to adapt to their surroundings, deer often seek shelter near roadsides and can pose a significant risk to drivers. To avoid collisions with deer, it is crucial to be aware of their behavior and follow certain safety measures.
Paragraph 2:
Firstly, being aware of when deer are most active can greatly reduce the chances of an accident. As mentioned earlier, deer are generally more active at dawn and dusk, so it is essential to exercise extra caution during these times. Use high beams whenever possible as they can help illuminate the area and make it easier to spot reflective eyes on the side of the road.
Secondly, ensuring that your vehicle is in good condition is vital for safe driving in deer country. Properly inflated tires and well-maintained brakes will provide better control over your vehicle if you encounter a sudden deer crossing. Regular maintenance checks should also include functioning headlights and windshield wipers for optimal visibility.
Thirdly, obeying posted speed limits and driving with caution in known deer crossing areas can significantly reduce the risk of collisions. When you come across a “deer crossing” sign, slow down immediately and be prepared to stop if necessary. Remember that swerving around a deer is not recommended as it may lead to loss of control or collision with oncoming traffic.
Lastly, if you spot a deer on the side of the road, resist the temptation to swerve or make sudden maneuvers. Instead, firmly apply your brakes while maintaining your lane position. This will minimize the chances of losing control and potentially causing an accident.
By following these tips and remaining vigilant while driving in areas frequented by deer during the winter months, you can greatly reduce the risk of collisions and ensure your safety as well as the well-being of these adaptive creatures.
In conclusion, deer adopt various strategies to survive the harsh winter conditions. They seek shelter in dense forests, conserve energy by reducing activity levels and foraging on available food sources such as twigs and bark. Their thick winter coat provides insulation against the cold, while their hooves adapt to aid movement on snow-covered terrain. While winter poses challenges, deer have evolved remarkable adaptations ensuring their survival until spring arrives.
Karl Kroll, left, and Donald “Buzz” Chamberlain pose with their 82 pound beaver.
In the spring of 1989, I sat down to talk with Donald “Buzz” Chamberlain and his wife Betty at their downtown Boscobel antique store. It was one of my first interviews and I was a little nervous about whether people would talk to me.
I didn’t need to worry though. People were more than happy to talk to me about the river and their escapades.
Buzz told me about his record breaking beaver that he trapped on March 28, 1951 at the mouth of the Blue River in Grant County with his buddy Karl Kroll.
Weighing in a 82 pounds, the beaver was big enough to warrant a mention in the Wisconsin Conservation Bulletin (the precursor of Wisconsin Natural Resources Magazine) of June 1951. Buzz is pictured to the right in the photo along with Karl Kroll, who helped him trap the monster animal.
Original text from the Wisconsin Conservation Bulletin for June 1951.
The two used a set trap to capture the beaver. They received $35 for the pelt which was pretty good money for the day.
Chamberlain told me that 1951 with the first year that beaver were trapped in Grant County after a trapping ban. I wondered if the large size of the beaver was related to the trapping ban. I wanted to verify the ban so I went to the State Historical Society (SHS) and checked the hunting regulations for that era. I sat in between the tightly-packed stacks at the SHS library going through the old paper regulations and found one line in the 1949-50 pamphelt regarding Beaver.
Beaver – Season, if any to be established by the Conservation Commission at its December meeting.
Text from the 1949-50 Wisconsin Trapping Regulations.
Since the pamphelt was inconclusive about a trapping ban, I contacted Jessica Rees Lohr, Wildlife Research Scientist at the Department of Natural Resources (DNR) to see if she could solve this mystery.
She put me in touch with Shawn Rossler, DNR furbearer specialist and he stated:
“My recollection is that we (WI) closed the beaver season on and off from 1903-1947. Starting in 1947 or 48, we had some form of beaver season…but I don’t know what years they were regulated or considered unprotected. I believe we had season dates that lasted anywhere from 9 – 200 days…some counties were open and others closed. That said, I don’t have any additional documents to reference that would give us specifics for the opening of Grant County to modern, regulated beaver trapping, unfortunately.”
So what do I believe?
My instinct it is to believe Buzz and that trapping was banned in Grant County in at least one year prior to 1951. That’s not the sort of thing that people just make up.
To absolutely know for sure, I’d have to dig through the Conservation Commission’s notes about trapping in that era. I tried to do this, but found no one at the DNR who would help me. Through an open records request, the DNR sent me the Wisconsin Wildlife Harvest Summary: 1930-2018. In this report, it states beaver harvest information in 1951 for just the top counties in northern Wisconsin: Vilas, Bayfield, Iron, Washburn and Sawyer. The average pelt price was $11.81 so Buzz got a good price for his beaver. Prior to 1951, there is no listing of Grant County as a place where beaver were harvested.
Does this report validate that there was no trapping of beaver in Grant County prior to 1951? Not exactly, but it’s the best that I could come up with.
For now, I choose to believe Buzz and that the large size of the beaver could have resulted from a ban on trapping in the years prior to 1951.
Buzz Chamberlain passed away July 12, 2003. He is buried in the Boscobel Cemetery in Boscobel, Wisconsin.
"Understanding the Legalities: Felon Ownership of Air Rifles in Tennessee"
can a felon own an air rifle in tennessee?
In the state of Tennessee, the ownership...
Exploring the Pros and Cons: Pump Air Rifle vs Break Barrel - Unveiling the key differences and advantages between two popular air rifle mechanisms....
"Unlock the Perfect Shot: Discover the Best Scope for Break Barrel Air Rifles. Enhance your shooting experience with precision and accuracy, as we delve...
")
")
")
")
")