Home Blog Page 24

11 Unbeatable Ice Fishing Lures to Catch More Crappie

0

Winter is here and we’ve got crappie on the brain. Whether you are targeting slab crappie the size of dinner plates or just looking to get some tasty fillets, gearing up with a few top lures is essential.

Crappie are not alway easy to catch but you don’t need a million and one lures to get the job done. Assembling a few of the best crappie lures is all it takes to hook more and bigger fish through the ice every time.

Looking to put together the ultimate crappie ice fishing tackle box? Well, you’ve come to the right place.

On this list, you’ll find 11 unbeatable crappie lures that have been proven choices among experienced ice anglers for years. Take a look at the selection below to see what you’ve been missing.

1. Demon Jig

q?_encoding=UTF8&ASIN=B00AU5O53S&Format=_SL250_&ID=AsinImage&MarketPlace=US&ServiceVersion=20070822&WS=1&tag=dobyblogs-20&language=en_US

Custom Jigs and Spins Demon Jig has a long, time-tested history of success on the ice. Take a peek in any diehard crappie angler’s arsenal and you’ll see one of these classic lures.

We put the Demon Jig at the top of this list because it may be the only lure you need to catch crappie all winter long. Its beetle shape profile and vertical hook presentation makes it ideal for delicate bait presentations that crappie often crave. And the Demon Jig’s powers don’t stop there. Choose from several tantalizing glow colors and a range of sizes that will make it your go-to bait on the ice.

How to ice fish with a Demon Jig

Demon Jigs excel at targeting early ice crappie that suspend over shallow weed beds. However, you can scale up in size to target crappie all season long at any depth. These tiny jigs require a delicate delivery with light 2-4 pound test line. We even like to add a small split shot 12 inches above the jig. This puts tension on the rod tip to help transmit bites better.

As a vertical hanging jig, it pairs well with live bait. Use a couple maggots or a juicy wax worm to tip a size 8 or 10 Demon for a finesse approach. Short, small hops just above suspended crappie drives them wild.

When live minnows are the ticket for a tough bite, switch to a size 4 or 6. Hook a minnow how you see fit and drop it down. This is a great option for a deadstick rod.

2. Acme Tungsten Sling Blade Jig

q?_encoding=UTF8&ASIN=B08L9NZS1M&Format=_SL250_&ID=AsinImage&MarketPlace=US&ServiceVersion=20070822&WS=1&tag=dobyblogs-20&language=en_US

We thought it would be nice to include a newcomer to the crappie ice fishing scene. It may be new, but it is fast earning its place in the ranks as a killer crappie bait.

The Sling Blade gets its name from a unique pivoting hook that imparts a vertical swing to any plastic or live bait on the hook. When you need to show finicky fish something fresh, grab an Acme Sling Blade. Sizes and colors for any situation are available.

How to ice fish with an Acme Tungsten Sling Blade Jig

As with any horizontal tungsten jig, tip the hook with your favorite plastic or bait. For most of ice season, a size 3 jig is fine but step up to size 5 when crappie are aggressive and you need to get back down fast.

Use a quick, consistent jigging motion to get that hook swinging. Soft plastics develop a special action on the Sling Blade that you can’t get on any other tungsten jig.

Some anglers think the swinging hook interferes with good hook sets but we find the opposite to be true. Almost every crappie gets the hook right in the top of their mouth.

3. VMC Tungsten Probe Jig

q?_encoding=UTF8&ASIN=B07PFYQW69&Format=_SL250_&ID=AsinImage&MarketPlace=US&ServiceVersion=20070822&WS=1&tag=dobyblogs-20&language=en_US

Without question, the VMC Probe Jig is a prerequisite for any ice angler wanting a universal crappie lure. The TriggerX plastic has a profile that mimics a diverse range of natural forage found in most crappie waters.

Coupled with a 1/16 or 1/32 ounce tungsten jig, this lure tempts all crappie with its seductive tail flicks. Even the slightest quiver of your rod sets the Probe Jig in motion. The 1.25” long plastic is just the right size to grab the attention of hungry fish.

How to ice fish with a VMC Tungsten Probe Jig

Like most soft plastics aimed ate getting crappie to bite under the ice, the VMC Tungsten Probe Jig is best fished with subtlety. Drop down on a school but stop short about 1 to 3 feet above them. Give a few moderate hops then make it stutter on the spot. Interested crappie will rise fast and gulp it down.

We recommend having both the 1/16 and 1/32 ounce sizes in a few different colors. Black chartreuse glow, pink chartreuse glow, natural glow, and chartreuse glow are our favorites. Tipping the Probe with a single maggot is often the best way to seal the deal on finicky fish.

4. Ratso Jig

q?_encoding=UTF8&ASIN=B006J6ZS2E&Format=_SL250_&ID=AsinImage&MarketPlace=US&ServiceVersion=20070822&WS=1&tag=dobyblogs-20&language=en_US

Custom Jigs and Spins makes another entry on our list with the ever popular Ratso Jig. This horizontal, lead-head jig yields big results on slab-sized crappie. No ice fishing kit is complete until you get a few of these.

Once you drop down through the ice with a Ratso, you’ll see why they earn their reputation year after year. The super soft, flexible body supplies the ultimate in finesse. Shake it on the spot or hold it in place. Either way, that delicate Ratso tail will mesmerize even the most clever panfish.

How to ice fish with a Custom Jigs and Spins Ratso Jig

The Ratso is ideal for shallow water applications. That’s why this is the first jig we tie on our line for early ice panfish. Choose a 1/32 or 1/64 ounce jig in chartreuse, orange sherbet or any glow color you like.

No need to tip this lure with bait. Just bounce it on the spot and that is all the convincing crappie need.

5. Lindy Little Nipper Feather Jig

q?_encoding=UTF8&ASIN=B00065PSM4&Format=_SL250_&ID=AsinImage&MarketPlace=US&ServiceVersion=20070822&WS=1&tag=dobyblogs-20&language=en_US

Sometimes it takes a more natural approach to yank a stubborn crappie through the ice. Enter the Lindy Little Nipper Feather Jig. This supremely simple jig gives all the right action using nothing but a feather.

Each barb on the feather jig moves with bewitching gentleness that not even modern soft plastics can match. Each lead jig has a contrasting feather hand tied and glued securely in place. When the bite gets tough, we reach for the Lindy Little Nipper.

How to ice fish with a Lindy Little Nipper Feather Jig

The Little Nipper isn’t necessarily the first lure we tie on for winter crappie but it certainly should be part of every ice angler’s repertoire when all else fails. Both the 1/16 and 1/32 ounces sizes in white and chartreuse are a staple in our box.

It’s hard to fish the Little Nipper Jig wrong but a slow approach highlights the fine action of the feathers. Keep it above suspended crappie where they see it best. This is not the most durable jig but it out lasts most plastics 9 times out of 10.

6. Clam Maki Plastics

Deep in the heart of ice fishing country, Maki is a household term heard in just about every conversation. Clam Maki Plastics aren’t just a recommended bait, they are a requirement for serious anglers chasing big crappie.

Maki Plastics come in all shapes and sizes. From minnow mimics to alien-like squids, all are capable of slaying monster crappie in every lake, pond and river. Each type is expertly designed to imitate some form of aquatic life for an unrivaled “match the hatch” look. Popular Maki include the Maki Jamei, Maki Mino and Maki Polli.

How to ice fish with Clam Maki Plastics

Tungsten jigs are among the best way to serve up Maki Plastics to all panfish. You’ll get the most enticing action using horizontal jig presentations. But don’t limit yourself. Some anglers like to use Maki Plastics to tip spoons or lipless crankbaits for added flare.

We prefer to pair Maki Plastics with 1/16 and 1/32 ounce tungsten jigs. Go with glow colors. Especially, when crappie are holding over deep basins where less light penetrates through ice and water. Use a gentle jigging cadence to make the Maki fingers dance.

7. Little Atom Nuggies

q?_encoding=UTF8&ASIN=B06XPL12PT&Format=_SL250_&ID=AsinImage&MarketPlace=US&ServiceVersion=20070822&WS=1&tag=dobyblogs-20&language=en_US

Little Atom Nuggies have all the right curves in all the right places. These soft plastics feature the ingredients needed to sleuth up a full limit of crappie on the ice. An ultra-finesse tail and an egg shaped body match up nicely with small tungsten jigs.

With over a dozen colors and scent impregnated into every Nuggie, this small bait packs a big wallop. When downsizing becomes the name of the game, reach for the Little Atom Nuggies.

How to ice fish with Little Atom Nuggies

There are days on the ice when schooling crappie are right below you but not a single fish wants to bite. That’s when you put on a Little Atom Nuggie. Drop it down on a small tungsten jig and work it with a light touch. The super soft tail wiggles all on its own.

This is not a search bait. The inch long plastic has a tiny profile so it’s best reserved for enticing panfish that you know are nearby.

8. Rapala Ultra Light Rippin’ Rap

You would be hard pressed to find any top lure list that doesn’t have a Rapala lure on it. Then again, Rapala produces some of the finest baits around so it makes sense. Keeping with that trend, the Ultra Light Rippin’ Rap claims a top spot as one of the best lipless crankbaits for tackling slab crappie on the ice.

Rippin’ Raps have a full compliment of vibrating BB rattles, realistic holographic eyes and textured finishes that single out big fish in the school.

How to ice fish with the Rapala Ultra Light Rippin’ Rap

Staying on top of schooling winter crappie is a constant challenge and search baits are a must. The Rippin’ Rap is among the best lures for calling in fish. Jig it aggressively to engage the intense rattles. Let it drop with a slow flutter followed by a short pause.

Once you mark fish on the flasher, tone your action down and keep it above the fish. With subtle twitches, raise it up as fish rise to strike. Color choice depends on water clarity but pearl grey shiner and glow never fail.

9. Salmo Chubby Darter

q?_encoding=UTF8&ASIN=B07YDDPYH5&Format=_SL250_&ID=AsinImage&MarketPlace=US&ServiceVersion=20070822&WS=1&tag=dobyblogs-20&language=en_US

Salmo hit a home run with the Chubby Darter. For ice anglers there is no better alternative to live bait. The plump minnow profile and potent action entice strikes when the bite gets tough.

The Chubby Darter is a vertical wobbler with no equal. Its high density foam body combines a slow sink rate with wobbling maneuvers that drive crappie wild. You’ll find this lure in two sizes and nearly a dozen life-like colors.

How to ice fish with the Salmo Chubby Darter

When ice fishing for crappie, go with the smaller 1/16 ounce size 3 Salmo Chubby Darter. As far as color choice, stick with what works where you typically fish. We like the gold yellow perch and silver red orange combinations.

Start out jigging with quick rising snaps to get the Chubby Darter wobbling. The intensity of the wobble will send this lure far outside the area of your hole. Don’t be surprised if it disappears momentarily from your flasher screen. Now, let it drop with a controlled fall. Most crappie come in for the kill as it sinks so watch for sudden slack in the line.

10. Kastmaster Spoons

No tackle box is complete without the addition of a Kastmaster Spoon. That’s why most serious ice anglers have a few on hand. The unique beveled cuts and fast sinking design lets you drop down quickly with a captivating flutter.

No spoon is better for sharp shooting crappie holding tight to structure or in deep water. With nearly limitless color and size options, the Kastmaster is one of the most versatile spoons on the ice.

How to ice fish with a Kastmaster Spoon

Kastmasters don’t get the love they deserve from ice anglers looking to take advantage of hot crappie bites. This is the ultimate spoon for picking off eater crappie without spooking the school.

Start with 1/12 ounce Kastmasters and drop them down just above marked fish. Pound it on the spot with aggressive 6 inch lifts of the rod tip to get the best jittering flash and vibration from the lure. Once fish start rising to the bait, give it a quivering lift and get them to chase. To call in fish from a distance, try a Kastmaster Rattlemaster. Tip these spoons with waxies or maggots as well.

11. Swedish Pimple Spoons

It takes true greatness to earn the mythical status Swedish Pimples hold among ice anglers. Decades of proven fish catching power means that stepping on the ice without one is ill-advised.

Great care was taken in the Swedish Pimple design to make it the best spoon under the ice. It’s delicate flutter when jigged and the classic red “flipper” keep crappie coming back for more season after season.

How to ice fish with a Swedish Pimple Spoon

The Swedish Pimple shines brightest as a finesse spoon. We opt for the small 1/10 ounce size for fussy crappie and the 1/5 ounce size when fish are deep. Keep a variety of colors on hand to accommodate different water conditions but chartreuse and yellow prism colors as well as the “Ice” lineup are our favorites.

Jig the Pimple as you would any other spoon. To really engage the mouth watering action of the flipper produce rapid twitches with your rod. Minute movements are all it takes to close the deal on curious crappie. Also, don’t forget to tip Swedish Pimples with bait.

Ice fishing for crappie

Now that you know which ice fishing lures are the best for crappie, let’s take a look at when and where to put them to use.

Finding crappie under the ice

Crappie seldom pick a spot and stay put all year long. They move from location to location to meet their basic needs as the season changes.

  • Early ice crappie tend to hold along the edges of shallow weed beds with healthy vegetation. Food is prolific and crappie will school up in the 7 to 12 foot zone on many lakes.
  • As winter progresses, you’ll often find dispersed schools of crappie suspended over deep basins. Find them anywhere from 20 to 40 feet deep, sometimes over the deepest part of the basin.
  • Once late winter arrives, crappie push to the edges of the basin adjacent to weedy flats. These weedy flats are usually the same areas crappie stage in for the spring spawn.

Tactics to catch more crappie

Ice fishing for crappie is not always a sure bet. Increasing the odds that you go home successful takes more than just luck. Put the odds in your favor with a few tips the pros always follow.

  • Fish efficiently: Pre-scout your lakes to eliminate unproductive water. By keying in on likely habitat and topography, you’ll spend more time in productive areas. Lake maps and GPS are critical components to catching more crappie.
  • Fish the prime-time bite: It’s easy to want to pack up and call it a day before the sun hits the horizon. However, some of the hottest crappie fishing on the ice occurs after dark. Check out our complete guide to ice fishing at night to make the most of the night bite.
  • Watch the weather: Cold snaps and sudden changes in weather can turn off a crappie bite. Even below the ice, crappie are sensitive to weather. Change your tactics and practice patience when the going gets tough.
  • Move, move, move: Crappie are a schooling fish. During ice fishing season, finding crappie means drilling lots of holes. Find likely spots but make sure you move around to track down the school. (Bonus tip – drop your transducer through the ice and swing it slowly from side to side to pick up fish from a wider area)

Don’t forget about live bait

If there is one bait that rarely fails to catch crappie, it’s a small live minnow. Hook a minnow on a plain hook with a split shot 6 inches above it for a killer deadstick technique. You can also try hooking a live minnow on a tungsten jig for a more active jigging approach.

Among the best live baits for crappie are maggots and waxies. As we mentioned before, tipping any lure with a waxy or maggot usually results in more strikes.

A complete crappie ice fishing arsenal should always have a little live bait on hand. Don’t miss our recent article to see the best live bait for ice fishing.

Parting words

Can’t get enough lure recommendations? Stock up this season and take a look at more of the best ice fishing lures for trout, perch and walleye.

The Ammunition Market In 2024

0

A Shifting Market

Paul Bastean, managing director at Ultimate Defense in St. Peters, Mo., said the ammunition market is shifting for dealers. Larger retailers are getting the ammunition they need, he said, but smaller retailers still are having a difficult time.

“If you have the capacity to buy a pallet, you can get ammo,” he noted. “If you only have the capacity to buy three cases, you don’t get it. If a wholesaler or manufacturer can put a label on 360 cases of ammo and send it to one place, or send 360 cases of ammo to potentially 100 different places with 100 different mailing labels, both for the same amount of markup, they’re going to send it to the one place.”

Because Ultimate Defense has been buying ammo by the pallet, Bastean said they have developed a new and different relationship with other retailers around them.

“We get along with a lot of the local gun shops in our area,” he shared. “We are now their ammunition distributor.”

According to Bastean, ammunition prices are finally starting to come down from what they were during COVID.

“U.S. manufacturers are fighting with importers now, and they’re losing,” he observed. “Importers are driving the price down.”

Bastean thinks this will continue to drive prices down, and if imported ammunition remains as available as it is now, smaller retailers will start to be able to buy lesser quantities of ammo again.

“But it may not happen,” he cautioned. “We’re not in an election cycle yet, but we can kind of see it from where we are, and this election cycle is going to be a doozy.”

Bastean said the imported ammo he’s seen is primarily from Magtech and Sellier & Bellot.

“That’s a lot of what we’re getting offered,” he said. “We’re seeing a lot of it not only from our wholesaler reps but also on emails. It’s also a lot of what my competition is advertising.”

Domestic manufacturers are struggling with price, Bastean observed.

“Winchester just came to us and they’re not even in the realm of being price competitive in 9mm,” he said. “We haven’t had a box of 9mm Winchester in here for two years or so.”

One thing affecting ammunition sales, he contends, is the effect the economy is having on disposable income.

“The guy who’s been a gun guy for more than five years has a cache of ammo he’s sitting on,” he said. “It’s never enough, but it’s at least enough that he feels comfortable he has some. The new shooters we’ve seen in the past two or three years still buy a box here and there, but inflation and disposable income are going to squeeze everything a little bit tighter. We’ve seen a slight reduction in training and memberships and from year to year, we’ve seen a pretty substantial reduction in ammunition sales.”

At one point, Bastean recalled, Ultimate Defense was the only retailer in the county with any ammunition. During that period of time, they saw a massive increase in the amount of ammunition they were selling because they were the only game in town. Then in the middle of 2022, some of the big-box stores started getting ammunition, and the store’s ammo sales decreased.

A quick chat with Field & Stream’s David E. Petzal

0

David E. Petzal is one of Field & Stream magazine’s shooting sports experts and is considered a top-rated writer in the field of guns, hunting, and shooting. That said, he leaves few topics untouched and has delighted his reader base for more than 50 years.

Petzal began at Field & Stream in 1972 as a managing editor. In ensuing years, he has held half a dozen different titles with the brand, and since 2006 has been strictly a writer, covering all manner of outdoor-related subjects, but specializing in guns and hunting.

He has pursued game all over North America, most of Africa, Europe, and New Zealand, and written about it extensively.

Petzal, who now hails from Cumberland, Maine, has written some popular books on guns, shooting, and hunting. The Total Gun Manual, co-written by Phil Bourjaily, is considered an essential read for anyone curious about different gun characteristics and for those wishing to improve their hunting and shooting skills.

Outdoor News: Describe your years growing up. Did you get to spend much time doing the outdoor sports that led to your career? Were you interested in journalism during the formative years or did that come after high school?

Petzal: I grew up on a farm in what was then an uncrowded part of New Jersey. We had a lot of land, and I roamed it every day after school, armed with either a Bear bow (60 pounds, much too heavy) or a Sheridan air rifle.

It was around the time I was 12 that I started reading Field & Stream, which was 25 cents at the soda shop. I was uninterested in writing about anything.

That didn’t come until much later when I got my first job on a magazine. I wrote a piece called, “A Bowhunter’s Guide to Rifle Shooting,” and when it came back in galley, and I saw my words in print, I was hooked.

Outdoor News: How would you describe your “paying your dues” period before joining Field & Stream?

Petzal: I paid my dues on that first job, on a little magazine titled Guns and Hunting. I was paid so little that I won’t tell your readers what it was, they wouldn’t believe me.

Bob Elman, the editor for whom I worked, was a master of both writing and magazine editing, and a perfectionist to boot.

If I made a mistake, the whole office knew about it, so I stopped making mistakes. I didn’t enjoy this, but I had the sense to realize that I was getting an education you could not buy. I stayed for 4 1⁄2 years, and stayed friends with Bob for the rest of his life.

Outdoor News: Your initial focus with Field & Stream was editor. Then you shifted into writing. How did that happen?

Petzal: There was never a decision as such. I started writing the Shooting Department every other month in 1981, and after a while I caught on with the readers and started writing about other subjects. And by the late 1990s, it dawned on everyone that I was now a writer as opposed to an editor, so I dropped the title of executive editor and became features editor.

Titles among editors is largely like virtue among whores. Your title doesn’t mean a lot unless you’re editor in chief.

Outdoor News: You focused on guns and hunting. Why the focus?

Petzal: I am damned if I know.

When I was 10 or 11, or something like that, I crawled up into the top of a closet and there, cased, was a Savage Model 99 and an M-1 Carbine that belonged to my uncle, who did a little hunting. It was like laying hold of a live electric cable. I was never the same.

Guns are the most interesting thing I know of. Same with hunting. I simply found everything about it fascinating. It’s not something you can explain rationally.

Outdoor News: Through your many years of gun journalism you’ve seen more that a few transitions from certain types of guns and ammo to others. Was this latest shift toward AR-style rifles something that was predicted? Or was it a surprise to those that have been involved in the shooting sports for many years?

Petzal: It was a surprise to me, sure enough. You have to remember that Colt began selling the first commercial ARs in 1965. They sent one of the very first to Larry Koller, who was the shooting editor of Guns and Hunting, and he loathed it and gave it to me.

I don’t think ARs really caught on until about the mid-1990s, which is a long time for something to go unnoticed. I think that very gradually, people became aware that, ergonomically, it was a couple of centuries ahead of everything else, and that you could build one (or have one built) to your own specs without spending a fortune.

I should add that I’ve seen more sheer BS printed and spoken about ARs than all other firearms combined, starting during Vietnam, when we were told that 5.56 bullets “tumbled through the air” on their way to the target.

Outdoor News: You are well known for writing some popular books on the shooting sports. If there was one piece of advice that you delivered to the readers of those books and you believed every shooter must know, what was it?

Petzal: For shooters, I’ll quote my late friend G. Sitton: “All the good shooters I know have the nervous systems of reptiles.”

Effective shooting is comprised of self-control, hand-eye coordination, and concentration, of which the most important factor is the first one. For hunters, it’s all about patience. Saxton Pope, the great bowhunter, wrote of his Yahi Indian friend Ishi that the bows Ishi made were not much good, but that Ishi had patience that was almost beyond comprehension, and that gave him all the odds he needed.

Outdoor News: During your long career you have hunted in regions of the world that many hunters only dream of. What was your favorite hunting destination and what species were you hunting?

Petzal: I love Africa above all else. When I was 10, I read a book by a professional hunter named Alexander Lake entitled Killers in Africa and I was hooked.

I enjoyed everything about Africa except tsetse flies, which are the worst insects in the world, but my favorite animal is the Cape buffalo. If you become bored on a Cape buffalo hunt, there’s something seriously the matter with you.

Outdoor News: What’s the future hold for David Petzal?

Petzal: What’s in store? Who knows? I’m grateful that I can still shoot, and still write. If I can keep it up, that’s all I can ask. Hardly anything I have ever done has worked out as I expected.

10 Popular Edible Mushrooms (And How To Cook With Them)

0

In the fall, as temperatures begin to drop, pumpkins and squash take all the glory, but let’s not forget about edible mushrooms, the ever-versatile bumper crop! While mushrooms can be found year-round, many varieties peak during the fall and winter. And with the average American consuming more than two pounds of edible mushrooms each year, we wanted to take a closer look at the top varieties.

Fun Fact: National Mushroom Day is October 15th each year!

Mushrooms are a staple ingredient in many of your favorite recipes across a variety of cultures. Out of approximately 14,000 known species of mushrooms, some are used for medicinal purposes, some can send you on a psychedelic journey, while others are delicious, healthy and edible additions to various cuisine. Even though mushrooms are grouped into the produce section at the grocery store, they technically aren’t plants. Mushrooms belong to the fungi kingdom and make their food by metabolizing dead or decaying matter. They reproduce by producing spores rather than seeds. Weird fact: mushrooms are actually more closely related in DNA to humans than to plants!

Edible Mushrooms – A Powerhouse of Nutrition

Edible Mushrooms pack a nutritional punch, making them a healthy addition to any diet. They’re high in fiber and low in fat and carbohydrates, while also being a significant source of vitamins A, C, B6, B12, and selenium. The Mushroom Council reminds us of this very unusual fact: mushrooms are the only veggie in the produce aisle that contains vitamin D!

Medicinal mushrooms have been used in Eastern medicine for thousands of years and are gaining popularity in other parts of the world. Often found in powder form, they can easily be added to smoothies, coffees, soups, etc. Different mushrooms have distinct health advantages: brain boosters, hormone balancers, antioxidant powerhouses, stress relievers, immune and energy boosters.

Long gone are the days where the lone button mushroom was the only grocery store mushroom variety available. While you can go foraging (safely!) for edible mushrooms, such as morels, or cultivate your own, you won’t need to look any further than your produce aisle for many varieties—from sweet to nutty-tasting, some even resemble the taste of lobster! Their versatility and meat-like texture (hello, portobello!) make them a popular culinary staple. Even the strangest-looking fungi—and they can get weird-looking—make a surprising and tasty addition to many meals.

Top 10 Mushroom Varieties To Try

Check out this list for a quick run-down of the more common edible mushrooms and how to include them in your cooking.

1. Button (White)

Ninety percent of mushrooms eaten are of this variety, and can easily be found at your local grocery store. With less culinary flair than the more exotic-looking mushrooms on the market, the simple button mushroom is anything but boring. This mild-tasting variety is easy to cook and adapts to the flavors of any dish. They can be eaten raw or cooked and are a popular addition to soups, stir-frys, salad, and or topped on pizzas. The easiest way to cook them is to simply saute them with a little oil.

Also called: table mushroom, common mushroom, white mushroom, or champignon de Paris.

2. Cremini (Italian Brown)

Cremini mushrooms are the brown strain cousin to the white button mushroom, just with darker, firmer, and more flavorful flesh of the white button mushroom. They are simply baby portobellos. While they have a more complex taste than the white button, the two mushrooms can be used interchangeably, and both are often widely used in savory and spicy dishes.

Also called: Italian mushroom, brown mushroom, baby portobello, or baby bella.

3. Portobello

The portobello mushroom is basically just a fully mature cremini. These dense and rich mushrooms are a staple in Italian cooking and their texture and taste make portobello an excellent meat replacement. Want a low-carb bread option? Portobello’s flat caps work well for a bun substitute. Their meaty texture also holds up well for grilling and stuffing.

Also called: portabello, portabella, Roman mushroom, field mushroom, or cappaellone.

4. Shiitake (Forest or Oak)

Shiitake mushrooms are native to East Asia, with 83% of them grown in Japan. In Japanese, shiitake means “oak fungus” where they can be found. They don an umbrella-shaped brown cap, which curl under slightly. Fresh shiitakes have a light woodsy flavor and aroma, while their dried version has a more intense umami flavor (the fifth taste, which is described as savory or meaty). You can cook with both fresh and dried shitake, however, the dried ones are more widely used. Shiitake mushrooms are low in calories, while also offering many vitamins, minerals, and health-promoting compounds to protect against cancer and inflammation and to boost your immune system. They have long been used in traditional Eastern medicine for boosting health and longevity.

Shiitake mushrooms’ distinct umami flavor is a great addition to vegetarian dishes. Often sold dried, they simply need to be soaked in hot water to soften before cooking. Saute shiitakes with greens and serve with a poached egg; add them to pasta dishes or stir-fries; make a flavorful soup, or roast them up for a crispy snack.

Also called: black forest, black winter, brown oak, Chinese black.

5. Oyster

Oyster mushrooms can be found growing on the sides of trees in the wild, however, most of these whitish and thin, fan-shaped mushrooms that you find in stores or on menus are most likely cultivated. First cultivated during World War I as a ration food, Oyster mushrooms carry a delicate aroma and subtle, savory anise flavor and are prized in many Japanese and Chinese dishes, such as soups, sauces, and stir-fries. More expensive than white button mushrooms, but less so than rarer mushrooms, such as morels, oysters require little prep work and can be eaten whole or chopped. While they can be eaten raw, cooking oyster mushrooms brings out their delicate flavor and gives it a unique velvety texture, making them the perfect addition to any barbeque (they are delicious marinated, and grilled).

Also called, tree oyster, angel’s wings, and abalone mushroom.

6. Porcini

One of the most prized mushrooms, porcini mushrooms are desired for their smooth texture and aromatic, woodsy flavor. They’re widely used in Italy and France and are referred to as cepes. Fresh porcini are beloved by gourmet chefs and are often sautéed and served as a side dish or added to risottos and pasta dishes. Fresh varieties are harder to come by in the United States, but dried ones can be restored by soaking them in hot water. Dried porcinis add rich flavor to broths and stews.

Also called: cepe, bolete, king bolete, Borowik, Polish mushroom.

7. Morel

One of the most prized edible mushrooms in the world, the morel’s honeycomb-shaped cap is distinct in appearance. Morel mushrooms are difficult to cultivate, so most morels served up in restaurants are harvested in the springtime from the wild—creating a multi-million dollar enterprise. Their rich flavor complements a wide range of dishes, and can often be found alongside meats or stuffed inside ravioli. This is one mushroom species that can’t be eaten raw—it needs to be cooked to neutralize its naturally occurring toxins. Read how to spot their poisonous lookalikes!

Also called: morchella.

8. Enoki (Snow Puff)

Enoki mushrooms feature distinct small, shiny white caps attached to thin stems. The wild types tend to be darker and shorter than their cultivated counterparts. Their crunch makes them a good raw option to top on salads. This species also cooks up well, making them a great addition to sauces, stir-fries, and soups.

Also called: Enokitake, futu, winter mushrooms, and winter fungus.

9. Chanterelle (Girolle)

This flashy yellow, trumpet-shaped mushroom is known for its unique peppery and fruity flavor. The chanterelle is difficult to cultivate, making it one of the most popular mushrooms picked in the wild. Considered a higher delicacy mushroom, cooking this fungus with fat, such as butter and cream, draws out its rich flavor, making it a great addition to sauces, soups, and soufflés.

Also called: Egg mushroom, Golden or yellow chanterelle, pfifferling.

10. Maitake

Resembling a head of cabbage with delicate, feathered edges, the maitake mushroom can be cultivated or found in the wild. The maitake mushroom grows at the base of trees and is native to North America, Europe, and China. It has been consumed for centuries in China and Japan; maitake means “dancing mushroom” in Japanese. Maitake can be found in-store or farmer’s markets in overlapping clusters, resembling a bird’s plumage. Thanks to its bird-like appearance, it is known as “hen-of-the-woods.” This earthy, peppery flavored mushroom is best served cooked with savory and salty flavors. Delicious in soups, stews, pasta dishes, ramen, sauces, and saute. It can also be found in a dietary form for your regular health regimen.

Also called: Hen-of-the-Wood, sheepshead mushroom, ram’s head, dancing mushroom.

Selecting Mushrooms

Whether foraging or purchasing cultivated mushrooms, select mushrooms that are firm, with a smooth appearance, void of any noticeable soft spots. The surface should be dry, but not dried out, and never moist or slimy. Once you get your mushrooms home, gently remove any excess dirt before storing but don’t wash them until you’re ready to eat them. And always rinse them whole, before slicing, as the exposed flesh will absorb water like a sponge.

Storing Mushrooms

Due to mushrooms’ high moisture content, they are very perishable. Store them in a container with good airflow to maximize air circulation without drying out the mushrooms. Wrap mushrooms in a paper towel and place them in an opened plastic or paper bag. Mushrooms should last in the fridge for a few days if properly stored. They can also be frozen or dried to increase shelf life.

Which Is Your Favorite Mushroom?

Which is your favorite? Not a fan? Tell us in the comments below!

Top 5 Best Scope for Ruger Precision Rifles in 2024 Ranked

0

Ruger precision rifles are so versatile yet easily affordable that they make for a great choice for entry-level precision shooters. Because of their versatility, your scope choice will also differ based on your intended use.

For instance, for the Ruger Precision Rimfire .22lr where you’ll be doing mostly short-range shooting and plinking, a magnification range of 3-9x or 4-12x will be fine for you. On the other hand, scopes with magnifications in the range of 6-24x or 5-20x are often preferred for mid to long-range shooting when your RPR is chambered in .308 or 6mm Creedmoor.

But no money is ever wasted when invested in quality optics. We reviewed some of today’s best scopes for Ruger Precision Rifles that budget-conscious shooters will love to check out. Here comes our findings.

Our Reviewed Best Scopes for Ruger Precision Rifles

Vortex Optics 2-7×32 Crossfire II riflescope (Editor’s Choice)

Vortex Optics 2-7x32 Crossfire II riflescope

The Ruger Precision Rifle is top-drawer stuff. The high-end rifle chassis is designed from the ground up. Chassis guns are those where the barrel and stock are bolted. A beauty like The Ruger Precision Rifle needs a perfect scope, one that delivers at extreme range accurately. The Ruger has a flattop profile that makes it pretty easy to mount a scope.

Crossfire II is a darn good choice. Coming from the reputable Vortex stable, this 2-7 X 32 scope is what you can score with at 1000 yards

With its multicoated lenses, and great waterproofing, this scope made of aircraft-grade aluminum is highly durable that is low weight. However it a Second Focal Plane scope.

What we liked and did not like:

  • The turrets are adjustable, are capped, and present a low profile. But they are rather squishy and do not have audible clicks. The turrets track poorly and the maximum magnification is 12x because of this.
  • We quite liked the BDC reticle. It is a great choice as you can extend the range without messing around without adjusting the turrets.
  • Another bothersome on higher magnifications upwards of 7x is the eye box of the Crossfire II. It has to be exact to fully take in the sight picture. Furthermore, the edges of the glass get blurry.
  • We found it pretty disadvantageous that the reticle is not illuminated.
  • Our team pretty much liked the fast-focus eyepiece.

We decided to compare the performance of Crossfire II. So we lined it up with the similar priced Vortex Diamondback. The glass is a great deal clearer and the reticle crisper. The eye box for the Diamond is a lot more forgiving. When we tested them at dusk, the Diamondback proved to be brighter. The Diamondback also scored higher on turret adjustment with its clear clicks.

Specifications

Pros

  • Affordable
  • Illuminated and BDC reticle options
  • Zero resettable turrets
  • Vortex transferable lifetime warranty

Cons

  • Glass not good enough with higher magnification
  • Eye box inadequate on higher magnification
  • Light transmission not so good in low light conditions.
  • Turrets do not track well

Our Verdict

The Vortex Crossfire II is a budget scope. It can help in getting your hunting and range shooting done well without breaking the bank. We can say that it is an okay scope for entry-level. It is great value for money though.

Vortex Optics Diamondback Tactical First Focal Plane Riflescopes (Great Value)

Vortex Optics Diamondback Tactical First Focal Plane Riflescopes

The Diamondback Tactical is the ideal objective Vortex for the RPG. It is a First Focal Plane scope that promises superior performance and ensures that all the requirements of you – the user – are met. Made of premium materials, the Diamondback has great loadbearing capacity.

With this high-quality scope, downing prey at a distance can be quite accurate.

The reticle is an EBR-2C MOA. This primary and important feature is pretty effective in determining ranges, windage corrections, holdovers, and leads to moving targets. Laser etchings that boast ultra-precision on the glass that ensures MOA specs tolerances are kept to the minimum possible.

It is made of aircraft-grade aluminum that is hard anodized. Fog-proof, waterproof, and shock-free, this scope passes all checks with flying colors.

Other noteworthy features are the Precision- Force Spring system and the Precision Glide Erector system make it easier for the hunter.

  • We find that the most awesome aspect of this scope is its optic system. The 6 – 24x magnification coupled with a 50 mm objective makes us sit up.
  • Another huge plus we find is the sturdy construction and well-mounted turrets. When twisted into position are near impossible to dislodge even if you bump into things or move around in the undergrowth.
  • We quite found the reticle crosshairs an optimum balance between precision aiming in poor light visibility. The windage reference dots on the droplines are a major improvement.
  • This beauty is lightweight to boot.
  • Care shows. It comes with both lens covers, a lens cloth, and a sunshade
  • By far what appealed to us the most was their guarantee policy. Vortex products come with their VIP guarantee which is a Very Important Promise. It bypasses how it happened, whose fault, or where it was purchased. Vortex undertakes that if repair is not a viable option, they will replace it. No questions asked.

Specifications

Pros

  • Has a 30 mm shock-proof tube
  • Comes with a glass that is low-dispersion
  • Reticle focusing is effortless

Cons

  • Light may be lost at higher magnifications

Our Verdict

In one sentence, the Vortex Diamondback is a marvelous piece of work. Just what the doctor ordered to partner with the Ruger Professional Gun. Vector has once again furthered their credentials in the field of optics. And wonders, it is budget-friendly too. Their warranty offered speaks volumes about their confidence in this scope. We are truly enthralled with it.

CVLIFE Hunting Rifle Scope 6-24×50 (Budget Choice)

CVLIFE Hunting Rifle Scope 6-24x50

The CVLife 6-24×50 offers plenty of features for the price it comes at. The turrets are capped, are of solid construction, and easily adjustable. The zero holds well even after many shots.

Adjustments for elevation and windage are in 1/18 inch increments with every click at 100 yards. The illumination type of this scope is AOE(around the objective end) red and green.

It is made of high-strength aluminum alloy. The reticle is a red and green mildot with 5 levels of brightness controls. A parallax adjustment is not provided. The eyepiece has accurate dioptric adjustment.

The multicoated optics enhance picture quality. The coating is scratch proof and protects from dust, smudges, and other damage.

  • We found that the adjustment range is overall sufficient but unfortunately the parallax adjustment is not provided.
  • We also found the glass quality a bit lacking and not what more expensive scopes provide. However, we admit it’s better than what we expected.
  • Another plus is that this scope is easily adjustable and once you have sighted it, hitting the target constantly is easy.
  • The mounts are not a universal fit. They are for weaver dovetail and Picatinny rails. The provided manual is not very helpful so you have to play around to figure it out. The mount scopes provided are simply not great. You have to buy additional rings and mounts to do away with the problem.

Specifications

Pros

  • Great for long-range shooting
  • Easily adjustable
  • Easily zeroed
  • Satisfactory zoom quality

Cons

  • Glass quality could be better
  • Not suitable for all rifles

Our Verdict

The CVLIFE 6-24 x 50 is one of the best scopes for Ruger Precision rifles for long-range hunting and shooting with a solid construction. The adjustments are simple and easy. You will not be handicapped getting a shot at the target once you have zeroed the scope. This scope is suitable for use in low-light conditions. The optics on other similar scopes are better though but they cost a whale lot more.

Pinty 3-9X40 Red Green Rangefinder Illuminated Optical Rifle Scope

Pinty 3-9X40 Red Green Rangefinder Illuminated Optical Rifle Scope

Pinty is an optics company that is situated in China. The scope rings can be easily fitted on any 20mm Picatinny or Weaver rails. The reticle type is the Rangefinder rather than a Mildot and is AOE red and green with 5 levels of brightness.

It is made of aerospace aluminum and is pretty sturdy and versatile. Lens covers are provided. Warranty conditions do not get a mention anywhere.

  • One huge letdown is the lack of parallax adjustment. This boils down to efficient shooting within 100 yards. Beyond that, your estimate of drop distance comes into play.
  • We found that the lenses could slip out of position darkening and blurring the objective.
  • We did discover a rather simple way to zero. Spin the focus knob on the rear till the crosshairs are visible clearly and you are good to go. But this is an area the makers need to take a keen look at. If it can zero and hold it, we are looking at a deal changer.
  • We dig the colored reticle that works superbly in low light conditions. Great value honestly.
  • We were disappointed with the limited adjustment. The problem was with the crosshairs which hamper zeroing.
  • Also, we were not impressed with the seals. They appeared somewhat flimsy. There is the danger of the nitrogen purging escaping, rendering the fog proofing and water-proofing appear dicey.
  • The included rings are of poor quality.
  • In its praise the build quality is sound.
  • We also found that the Rangefinder capabilities could be better but it’s not a deal-breaker. The calculatable range hash marks provide an alternative.
  • We loved the zoom feature. It worked pretty fine.

Specifications

Pros

  • Relatively inexpensive
  • Water and fog-proof
  • Easy to mount
  • Ideal illumination

Cons

  • A bit on the heavier side
  • Objective not adjustable

Our Verdict

Considering the price point, the Pinty appears to be of decent quality. However, we feel they may not last your entire shooting career. But then again there are few scopes, even expensive ones that may not last forever. We would welcome being more informative and come out with more details. Right now, it’s a bit sketchy and they need to be more forthcoming. A riflescope is not a toy. Hopefully, as more shooters use their scope and reviews pour in, they will get wiser. For now, have a blast on a budget.

Simmons 3-9x32mm .22 Waterproof Fogproof Matte Black Riflescope (511039)

Simmons 3-9x32mm .22 Waterproof Fogproof Matte Black Riflescope

The Simmons 3-9 x 32 .22 Mag is pretty suitable for small game hunting, varmint hunting, and target shooting. Nevertheless, the optics Simmons has put into the .22 has large-game optics into much-favored rimfire scope, the Mag .22.

This scope is far from cheap, ordinary, or flimsy. The body is constructed of one piece for unmatched durability under the most trying field conditions. It is still a budget scope but comes with a terrific booster- the lens coating that is HydoShield and can weather it all.

That’s not all. The eyepiece is Quick Target Acquisition with an eye relief of 3.75 inches for a swift and immediate sight picture. Make things a good deal comfy when out in the field, SureGrip adjustments can be used even with gloved hands.

The included rings are 1 inch with ? dovetail mounts that will fit most .22 rifle grooves.

  • We found the reticle somewhat wanting. The reticle is what Simmons terms a Truplex. The crosshairs are thick and extend all the way to the edges of the field of view. The crosshairs thin out towards the center of the reticle without a stadia line or dots to figure out ballistic yardages. A big letdown.
  • Another sore point with us is that the adjustments are somewhat non-responsive.
  • The other thing that got us a bit disappointed was the lack of a parallax adjustment feature. However, there is a Matte Black and Silver finish in this line that does feature parallax adjustment by way of an objective that is adjustable.
  • The Simmons .22 Mag is ultra-light which is a big winner.
  • A big thumbs up to this feature-packed riflescope.

Specifications

Pros

  • Affordable price
  • Body of one-piece
  • An eyepiece that is Quick Target Acquisition
  • Reliable SureGrip
  • Coating of HydroShield

Cons

  • Issues with the reticle
  • Issues with adjustment

Our Verdict

The Simmons .22 Mag riflescope hits the bullseye when it comes to the best scope for ruger precision rimfire 22. Simmons does offer what recreational hunters and shooters look for in a budget scope. Keeping it right on the money where the cost comes into play, and outperforming on quality are their hallmarks.

How to Find the Best Scopes for Ruger Precision Rifles?

Scope Parts and Controls

1. Magnification

The right magnification is undoubtedly desirable for owning a profitable and perfect scope for the Ruger Precision Rifle. Excellent magnification translates into precise zooming in and out capabilities. Magnification plays a prime role in achieving your target with zero errors and zero difficulties.

A wider range of magnification provides a clear and crisp image of the object even when the range is far. A scope with adequate versatility can be used for both short and long-range shooting effectively.

Compare your options carefully and settle for the magnification called for in the situation. Initially, you need to figure out how to best use the optics system and you should make sure of the purpose of the scope. Don’t fall for the misconception that the widest magnification range is the most ideal to bag the target easily. Opting for wider magnification will result in blurry visuals.

In our experience, a magnification range of 12-18x gives a great field view and the right high elevation adjustment opportunity. This illustration can be of help.

Magnification of scopes And how much of objective diameter is required.

Magnification of Scopes

2. Distance

This factor is at the fore when looking for the best scope for Ruger Precision rifles. Depending on your shooting style, determine the average shooting distance first. Employing a short-range scope for a long-distance target will result in weak and blurred images that will leave you pretty much frustrated.

Mid-range shooting can be anything from 600 yards to 1500 yards. Over this range, we are looking at long-range. There are quite a few scopes in the market catering to short-range and mid-range.

You need to be a bit picky when it comes to a long-range scope. They are expensive but serve your purpose well.

3. Construction

The Ruger Precision Rifle calls for great scopes constructed of aircraft-grade aluminum. This ensures ruggedness. These scopes have to possess multiple standard proofs that ensure the scope’s capability to overcome adverse weather conditions and other trying external influences.

Performance and durability are furthered by reliable O-ring sealing and efficient gas purging. These features play an important role to detect targets without bothering about moisture and fogging issues.

4. Clarity and Glass Quality

Clarity, needless to say, is another crucial touchpoint when homing on that perfect scope for your Ruger Rifle. Obviously, if the clarity is missing in the sight or image, the entire effort put in to capture a target gets tossed out.

A clarity scope is one that will render strong and clear visuals even on max magnification. The resulting detailed imagery can help you shoot a flea off your prey. So choose wisely.

5. Multiproof Technology

All adventure aspects of a scope can be accomplished perfectly if good care has gone into the gas filling and purging as well as O-ring sealing. Multiproof in the scope is a measure of good O-sealing arrangements that ensure nitrogen or argon purging offers optimal protection and performance in different weather conditions.

6. Reticle Style

In the industry, the term “reticle” simply refers to the crosshairs. The design of reticles is for many purposes, such as general hunting and low-light shooting and everything in between. There are so many different types of reticles that it is impossible to cover all of them.

To name a few, there is the original reticle, the Bullet drop Compensation reticle, the Millidot Radian reticle, The MIl reticle, the Minute of Angle reticle, the illuminated reticle, and so on.

We are interested here in what the suitable reticles are for the Ruger Precision Rifle. The starting point is that they must be practical, uncomplicated, and convenient visually for tactical operations and long-range competitors. Our research puts the Vortex EBR-2 at the forefront.

EBR Reticles for long distance shooter 
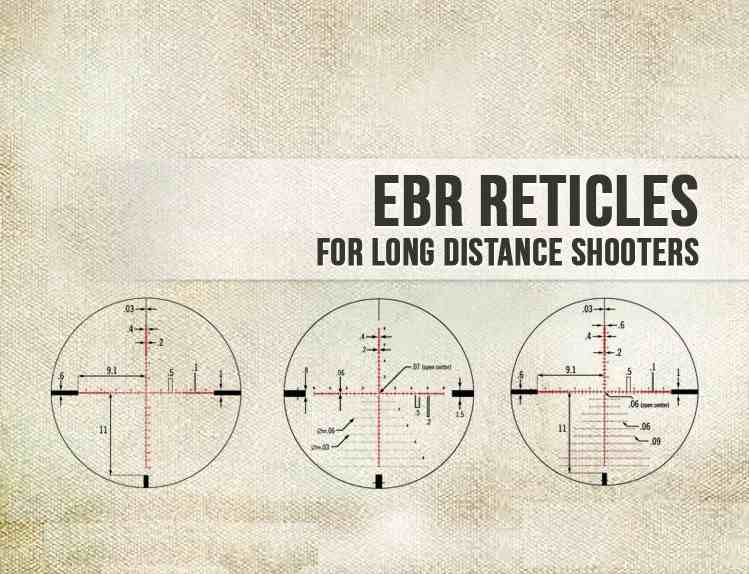
The MOAR reticle is another held in much favor.

MOAR Reticle 
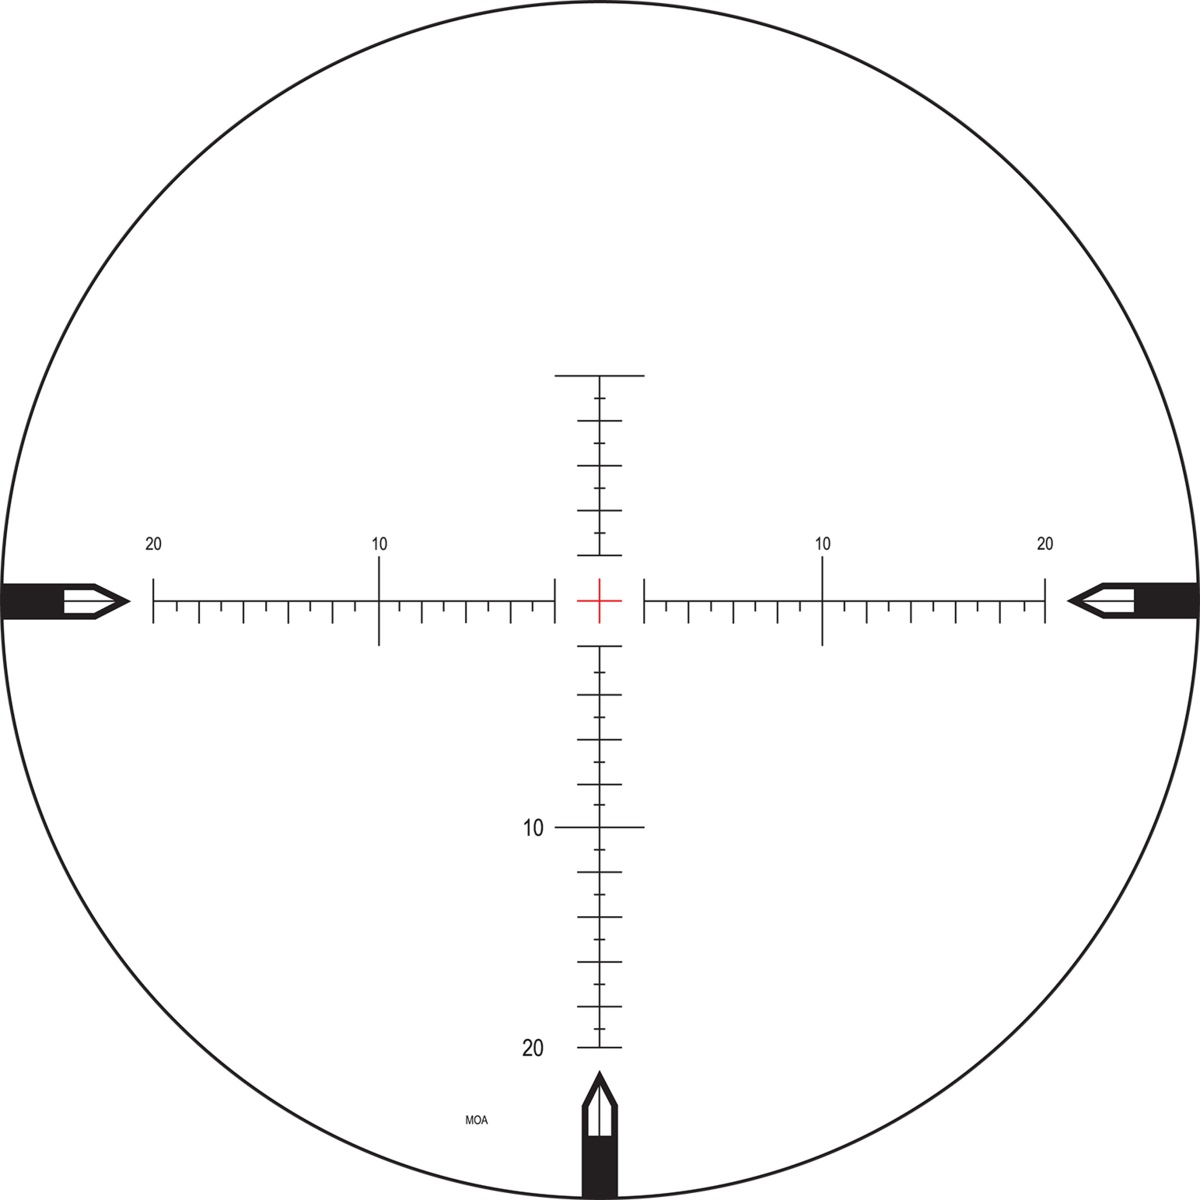
This reticle offers great precision at extreme ranges. It allows accurate range-finding and holdover estimations at the longest destinations.

Duplex Reticle

Great for beginners

Three types of reticle

The three main reticle types

7. Turrets

The fundamental and important role of the turret is that it serves to initialize your scope to zero. This is the procedure to finetune your scope’s reticle adjustment so your rounds make an impact with the target bang on. The key to understanding your optics is in understanding your turrets.

Turrets are important as they define the accuracy of your scope. Just screwing up the turrets will result in zilch. There are 3 important things to look for in a reliable turret:

  • Reliability
  • An audible “click’ sound
  • Repeatability means that the turret adjustment is immediate. This is the hallmark of a high-quality turret.

Turrets of scope 
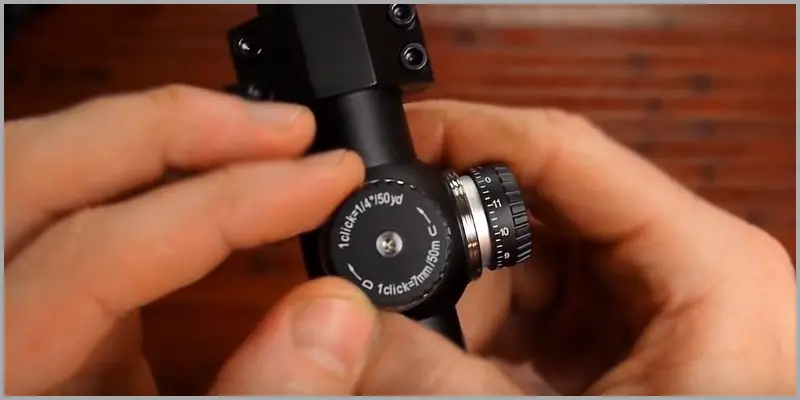
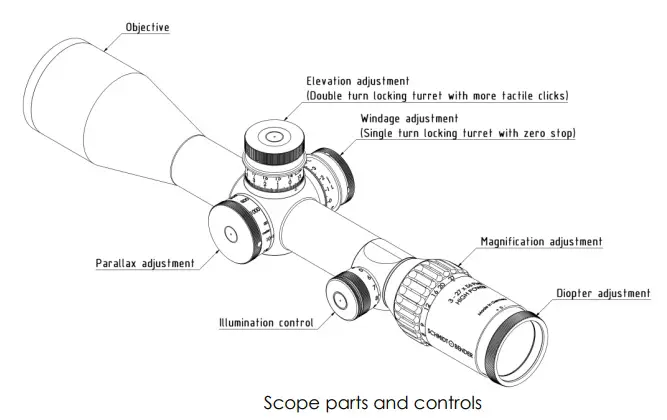
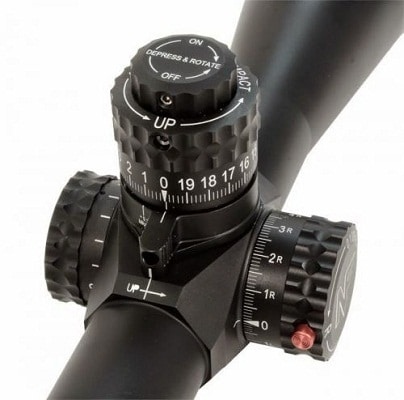
These, simply put are knobs for adjustments to your scope on the horizontal and vertical planes. Each adjustment or click is measured as a measure of MOA or MRAD. Let’s take a look at the different types of turrets:

Windage Turret- This aligns your scope’s aim from left to right.

Windage Turret of Scopes 
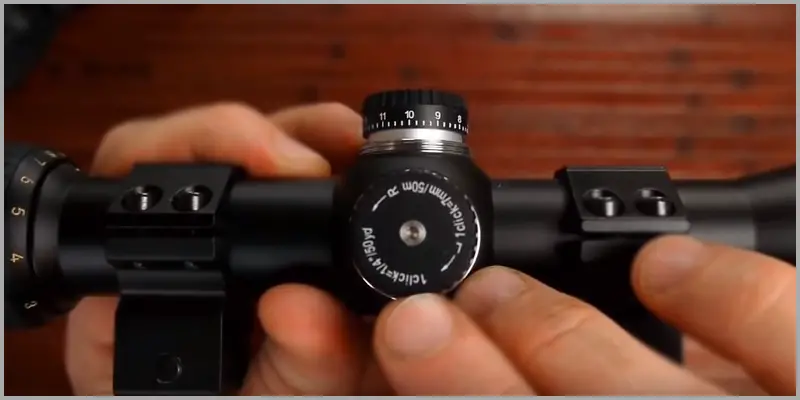
Elevation Turret – This adjusts your scope’s aim from the top to the bottom.

Elevation Turret of Scopes

Parallax Adjustment Turret- This kob eliminates parallax.

8. Ease of adjustment

The sight picture has to be pretty perfect before you fire that first shot. There are a lot of adjustments that have to be pat before you press that trigger.

  • The reticle should be centered and upright first of all. We are looking for a crisp and clear image. Blacking or smudging at the ends needs to be symmetrical. If that is not the case, we do need to readjust.
  • The next thing to have a look at is eye relief. Looking through the scope, it should be within 3-9 inches. If you are uncomfortable with how close the eyepiece is to your eye, try adding an inch more. You don’t want the recoil to give you a black eye.
  • The final adjustments will come when you take that first shot. The bullet can hit a bit high or low than anticipated. If the bullet hits high, the reticle has to be adjusted slightly higher and vice-versa. Yes, you heard that right. It’s a hit-and-trial endeavor.
  • Windage adjustments work the same way. If you score a hit to the left of the target, you want to adjust the reticle to the left.
  • Zeroing in is the sum result of the above mentioned. Set up your rifle in a static, immovable position. Fire 3 shots.
  • Check the results, make further adjustments to elevation and windage knobs till you score that perfect bullseye.
  • You are up for business now.

9. Lens coating

Cutting to the chase, lens coatings are integral. They have to be foolproof. There are four basic ways this is done:

Coated- A single layer covers only one surface of the scope.

Fully-Coated- All the external glass is coated in a single layer.

Multicoated- Several layers coat one surface

Fully Multicoated- All the external glass on the scope is coated in several layers

10. Warranty and Budget

Buy once, cry once – the only thing you need to remember when setting up a budget for your rifles. For long-range shooting and hunting, you’ll need quality glasses, and they don’t come cheap. In fact, these types of optics often end up costing more than the firearm itself.

However, not everybody can afford the best scope for Ruger Precision rifles. That’s why most of our choices were made keeping the budget-conscious gun enthusiast in mind.

Scope care and maintenance tips

A well-designed riflescope is fog-proof and water-proof. A well-designed scope is made for taking a beating. They can sure deal with a little bit of dirt and grime. But what can harm them seriously are gun cleaning solvents and powders. These will wreak havoc and cause irreparable damage. The solution- quality lens caps.

Now some Dos and Don’ts

  • Never touch your scope with your hands. This is a surefire way to mess things. Whenever there are smudges or dirt, we instinctively use our shirtsleeves to clear them off. Big, big mistake. You will scratch the lens. Use a microfiber cloth or a lens pen, please.
  • You spent big bucks for your hunting rig. Just spend a few minutes after each outing cleaning up.
  • Do not forget to examine the scope. Report any cracks or any external issues to the makers immediately. The equipment can fail so this correction/ repair/ replacement is imperative.
  • How you stow away your scope is another vital action. Make sure it is well-wrapped in a solid scope cover and we are good.

FAQs

1. What magnification do I need for my Ruger Precision Rifle?

Ans: This mainly depends on your intended use. For long-range shooting, you’ll need a higher magnification scope such as a 5-25x or 6-24x. For closer range shooting or hunting, 1-6x or 2-10x will do.

2. How Much Should I Spend on a Scope for a Ruger Precision Rifle?

Ans: By current market estimates we are looking at anything from $800 to $1500. But then there is a 2 to 1 rule; if your gun costs $1000, you should spend $500 on the scope.

3. Should I use MOA or MIL?

Ans: Both MOA or MIL have their own place. Both are linear values to decide upon. There are no clear winners here. Shoot with whatever you are comfortable with.

4. How far can the Ruger precision rifle shoot?

Ans: Out of the box, it can easily touch the coveted 1000 meter mark. The current CEO of Ruger Professional Guns, Mike Fifer pegs it at 1600 meters. Why don’t you check it out yourself?

5. Do I need to use a specific size scope rings for the Ruger Precision Rifle?

Ans: The Ruger Precision Rifle usually uses 30mm scope rings but some models may require 34mm or other sizes depending on the scope and the rifle configuration.

6. Can I use a red dot sight on a Ruger Precision Rifle?

Ans: Yes, you can use a red dot sight on the Ruger Precision Rifle if you prefer a simple and lightweight sighting system. But since most people use this bolt-action rifle for long-range shooting, a red dot sight won’t do any good in long ranges.

How to Become a Fishing Guide in Texas

0

Reading Time: 5 minutes

The Lone Star State harbors world-class fishing opportunities, whether you’re a freshwater or a saltwater enthusiast. Because of this, thousands of prospective anglers flock to its waters each year, creating plenty of business for local guides. But before you can turn pro, you’ll need to make sure you’re properly licensed to run a fishing charter. So, today you’ll find out how to become a fishing guide in Texas.

From Striper fishing on Lake Texoma to offshore Tuna fishing in the Gulf, Texas is full of hot angling fun. And depending on what kind of waters you intend to guide in, the path to doing it legally differs. Generally, you need more licenses for saltwater than for freshwater.

To give us a first-hand glimpse into the process of becoming a fishing guide, we’ve consulted with Captain Mitch Deane of Laguna Madre Anglers. Along with all the relevant steps, we’ll include his personal insights throughout the article.

Saltwater

To legally run a saltwater fishing operation in Texas, you need the following three documents:

  • Captain’s License (USCG)
  • All-Water Fishing Guide License
  • Boat Registration

Captain’s License

When I decided to become a captain, the first thing I did was contact the school where you go to get your license. It’s a 7-day class, 8 hours a day, and they do a full background check on you.It’s more intense than people think but it’s set it up so you know you’re going to pass. And you learn a lot about the water and the right and wrong ways of doing things. You also learn what the different lights mean, as well as who has the right of way.

Capt. Mitch

Your journey to becoming a Texas saltwater fishing guide begins with getting a USCG License. The course can take anywhere from a few days to a few months depending on how you choose to pace yourself. Generally, the classes last from 30 to 50 hours. The time it takes also depends on what kind of boat you intend to operate, with the 100-Ton USCG Master’s License course being the most extensive.

Before you’re issued your USCG credentials, you’ll be asked about your sea service. This encompasses the total amount of hours you’ve spent on the water since the age of 16. The minimum you need for a 6-pack license is 360 days, 90 of which must be earned in the last three years.

Other requirements include passing a physical and a drug test, as well as a background check so you can be issued your TWIC card. Finally, you’ll need a valid basic first-aid certificate.

All-Water Fishing Guide License

The first step towards becoming a captain is to get your USCG credentials. Then, you have to go to the TPWD and get a fishing guide license. Once you have that, you can start trying to gather customers.

Capt. Mitch

In Texas, you need something called an All-Water Fishing Guide License to legally operate saltwater fishing charters. This license costs $210 for residents and $1,050 for non-residents. Here you can find an overview of different licenses and fees.

Note that if you intend on guiding in saltwater on a boat, you’ll be asked to present your USCG License before you can be issued the All-Water one. Also, you’ll have to visit one of the TPWD (Texas Parks & Wildlife Department) offices in person to get this permit.

Boat Registration

Unlike in Florida or California, in Texas, the DMV (Department for Motor Vehicles) is not in charge of boat registration. Instead, the TPWD is responsible for that.

Only the owner can register a vessel. You can register either by mailing the PWD form with supplementary documents to the TPWD, or in person at a local tax collector’s office. You have to submit the boat’s bill of sale as well as the manufacturer’s statement of origin alongside your boat registration.

Depending on the length of your boat, you’ll pay between $32 to $150 to register your boat in Texas.

Boat Insurance

For most Texas fishing guide businesses, boat insurance is not mandatory. The exception is Party Boat operations, which need to have limited liability insurance covering at least $300,000. A party boat is broadly defined as any boat over 30 feet in length that takes more than six passengers.

Of course, we recommend that every charter operator purchases boat insurance. Insurance can be the difference between losing your boat or business and staying protected, in many cases. There are various packages you can get and many even cover the customers you’ll be taking fishing.

Gulf of Mexico Fishing License for Federal Waters

For fishing in federal waters in the Gulf of Mexico (over 9 miles out), you require a Coastal Pelagics permit and/or a Reef Fish permit. This depends on which species you’re targeting. Unfortunately, you can only buy it from someone who already has it. The Gulf Council, which is responsible for managing the federal waters of the Gulf of Mexico, hasn’t issued new permits since 2003.

Freshwater

If you’re fishing in a lake environment and it doesn’t have navigable waters to the ocean, you’re not required to have a Captain’s License. Non-navigable waters means there’s no commercial traffic going down them.

Capt. Mitch

For anglers who grew up fishing the Lone Star State’s lakes and want to try their hand at guiding on them, the first order of business is to check if the waters are navigable. If not, all you need is a Freshwater Fishing Guide License. It costs $132 whether you’re a Texas resident or not.

On the other hand, if you intend to fish in navigable waters, such as the Sabine River and its lakes, you’ll need a Captain’s License. In this case, the process is the same as if you were trying to qualify as a saltwater guide.

Starting Out As a Texas Fishing Guide

Get a little plan together of your goals, what you want to achieve, and how you’re going to get customers. Be patient, it takes a little time to get the clientele together. Do social media, SEO, get friendly with FishingBooker.

Capt. Mitch

The above is what Capt. Mitch had to say when we asked him to give some tips to new guides. It can be tough entering the guiding business, and in the captain’s own words – you’re often judged by the kind of fish you return to the dock with.

Everyone knows how nice it is to be out on the water fishing, but only guides know how much effort it takes to get out there and consistently put people on fish day after day. It requires skill, knowledge, and a whole lot of perseverance.

Also, don’t forget who it’s all about – customers! Sharpening your people skills and making sure everyone enjoys their time with you even when the fishing is at its slowest is how you’ll secure a legacy as a guide.

On that note, there are different avenues to get clientele. These range from word-of-mouth and building your own website, to partnering with one of the marinas in Texas. Some of the popular hubs include Galveston Yacht Basin, Seabrook Marina, Corpus Christi Marina, and Marker 37. But it really all depends on which part of the coast you’re fishing and what amenities you need.

Of course, you can also list on FishingBooker once you’re ready to begin guiding and let us hook you up with new customers. After that, it’ll be your job to ensure they have a great experience and return to fish with you!

Not from Texas? For which state or country would you like to see a licensing guide next? Let us know in the comments!

We do our best to always produce thorough, well-researched articles. That being said, the information given here should be taken “as is” and is not a replacement for professional or legal advice.

Top 5 Crossbows for 2024 | Deer & Deer Hunting

0

The new crossbows for 2024 are faster, more accurate and quieter than ever.

1. TenPoint Flatline 460

crossbows for 2024

TenPoint’s new Flatline 460 Oracle X with the Burris Oracle X rangefinding crossbow scope gets the job done quickly and efficiently. It launches arrows at 460 fps from a stable, comfortable platform measuring only 26.5 inches long and 7.5 inches wide, with a 14-inch power stroke. The RX8-Cam™ system produces such high speeds, and Vector-Quad™ cable technology utilizes four cables, eliminating cam lean and generating straight-nock travel for pinpoint accuracy. A new, 1.5-inch longer dovetail and new aluminum Scope Struts provide a rock-solid foundation for optics mounting. Plus, the center-mounted riser eliminates the nose-heavy feel of traditional crossbows. Its ultra-light, two-piece TEC-TACTICAL stock is built for comfort, with an adjustable buttplate of up to an inch for a perfect fit. The included Burris® Oracle X™ Rangefinding Crossbow Scope features a built-in laser rangefinder that is activated via wireless remote. It instantly ranges game up to 200 yards away, and allows for 20-yard aiming in the event of a battery failure. Other features include an ACUslide with Auto-Brake Gear System for safe de-cocking, S1 zero-creep 2-stage trigger, Veil Alpine camo and more.

MSRP: $3,299 | tenpointcrossbows.com

2. Wicked Ridge Blackhawk XT

crossbows for 2024

The Blackhawk XT from Wicked Ridge provides numerous features and the power to take down big game at an affordable price. Made in America, it is equipped with the built-in ACUdraw or ACUdraw 50, making cocking and de-cocking the bow quiet and easy. The ACUdraw is a fully integrated, user-friendly crank cocking device that reduces the draw weight to 5 pounds. The ACUdraw 50 takes the 50% reduction rope-cocking concept to an easy-to-use level with self-retracting cords and hooks that magnetically store in the buttstock’s unit when not in use. The bow’s 175-pound draw design consists of a lightweight riser and machined aluminum limb pockets fitted with 11-inch WRX laminated limbs. Powered by heavy-duty, machined 5S Cams and DynaFLIGHT 97 string and cables, the Blackhawk XT measures a narrow 15 inches wide and drives arrows downrange at speeds up to 380 fps. Other features include a fully integrated fore-grip backed up with elongated safety wings to keep the shooter’s hand safely below the bowstring’s path. The fully enclosed triggerguard provides added safety from accidental discharge. Its stock also features a picatinny rail below the front of the barrel to mount additional accessories. The package includes a TenPoint 4×32 scope, three Alpha-Nock Carbon arrows, a cocking device, and a quiver.

MSRP: $549 with ACUdraw; $449 with ACUdraw 50 | tenpointcrossbows.com

3. Barnett Hyper XP 405

This new crossbow utilizes the HyperFlite narrow-diameter arrows for deeper penetration, less wind drift, increased durability and engineering for delivery of maximum kinetic energy. The Hyper XP 405 features a narrow, 10-inch-wide profile when cocked. The parallel limb configuration, combined with a track-mounted string damper, significantly reduces recoil and noise while enhancing accuracy. Pairing the Hyper XP 405 with 22-inch, .204-diameter HyperFlite arrows increases the arrow’s flight and improves downrange accuracy with speeds to 405 fps and 138 foot-pounds of energy. Other features include a metal-injected molded trigger and TriggerTech Frictionless Release Technology. This provides a reliable, crisp, 3-pound pull for consistent shots and improved accuracy. An Anti-Dry Fire (ADF) system and a nock sensor ensure the crossbow cannot fire unless the arrow is loaded correctly. It also comes with finger safety reminders above the fore-grip, an adjustable buttstock for length-of-pull, and a 4-5x32mm red/green illuminated scope for bright or dim light.

MSRP: $599 | barnettcrossbows.com

4. AXE Crossbows AX440

Axe® Crossbows continues to define performance with the introduction of the AX440. At a maneuverable, stable and easily shouldered 30.5 inches long and less than 12 inches axle-to-axle (cocked), the weight of the 440 is centered over the shooter’s hand by way of a balanced shoot-through stock and riser design, and reverse limb system. This configuration empowers the most efficient part of the split limb system from just 15 inches of power stroke to launch bolts at 440 fps. The Axe cam system is linked by cables that run parallel to each other, rather than from the top of one cam to the bottom of the other. This design eliminates cam lean and limb torque, and is further enhanced by a cable brace that engages the riser to aid in the limitation of flex away from the center of the crossbow. The stock of the AX440 also eliminates the rail and utilizes dual carbon guide rods along the entire length of the stock. Combined, all of these features create a free-floating arrow system that minimizes contact, friction and torque along the arrow’s entire path. The result: greater efficiency, accuracy and speed.

MSRP: $2,099.99 | FERADYNE.COM

5. Bear Archery Constrictor Pro

crossbows for 2024

The Constrictor Pro is a proven performer, redesigned for even more power on an extremely compact frame. The Constrictor Pro measures a mere 8.125 inches wide cocked, and roughly 12 inches wide uncocked, making it perfect for hunting in tight quarters. The crossbow is equipped with an ambidextrous top mount quiver that sits on a 360-degree pivot and allows the hunter to position the quiver in any orientation. This ready-to-hunt package includes Illuminated Reticle/Speed Adjustable Scope, three Bear X TrueX arrows, a four-arrow quiver, sling, manual cocking sled and arrow lube/string wax. Available in Stone/Veil Whitetail or Stone/TrueTimber Strata color and camo combinations.

MSRP: $699.99 | beararchery.com

CHECK OUT MORE NEW GEAR FOR 2024:

Top 14 Blinds, Treestands and Targets for 2024

Top 9 Bow Sights, Releases and Rests for 2024

Top 15 Broadheads for 2024

Top 9 Hunting Arrows for 2024

Top 10 Hunting Bows for 2024

What’s the Right Fat Ratio for Venison Burgers?

0

There are a lot of reasons we hunt. Some people just love spending more time outdoors. Some like the adventure of chasing a wild animal. But come on, is there anything better than sitting around a table and sharing a wild game meal with your family and friends? Especially one that you or your child were able to harvest? It’s really something special. If you want to make it even more unique, try processing your deer yourself. That way, you know how the meat is handled from the field to the table and can make decisions on what kinds of meals you’ll prepare from it. Ground venison is always a staple for many hunters, but because deer meat is so lean, some get tripped up on the fat ratio for venison burgers. There are a few ways you can look at this, so let’s dive into the topic of venison burgers. In the video below, Michael walks you through his process of grinding deer burgers and why he loves to do this himself.

Right Fat Ratio for Venison Burgers

First off, as many hunters know, deer meat is darn close to fat-free. When you grind it alone, it produces a very lean mixture that could be too crumbly to stick together well. If you’re looking for ground venison to do chili or spaghetti with, that might be exactly what you’re looking for. It will be lean meat that crumbles nicely. But if you want to grill venison burgers, you’re going to need to add some fat.

Beef fat is the preferred source when making deer burgers. It adds some great flavor (especially if you add some trimmed ribeye fat), but it also helps bind the meat together better and helps it hold in the patty shape. You can usually find beef fat from your local butcher or the meat counter at the grocery store, so try asking around. In the finished ground meat, you’re looking for those chunks of white gold.

In terms of the right fat ratio for venison burgers, it’s a little subjective, but we have a general rule. Typically, we’ll mix in about 2 pounds of beef fat for 10 pounds of venison (12 pounds total). This comes out to about an 83/16 meat/fat mix. Now some people prefer their burgers to be fattier and juicier, so they might mix 2 pounds of fat to 8 pounds of venison. On the other hand, if you find the mix is too rich for you, you can scale the fat amount back a bit or add more meat. Play around with the fat ratio for venison burgers until you find something you really enjoy…and then write it down so you know how to repeat it the next time.

Process to Grind Deer Burgers

Obviously, this whole process starts with the right meat. Everyone seems a little different in their preferences when it comes to what meat goes in the grind pile, and it can be a hotly debated subject at deer camp. Some hunters trim every grind piece as if it were a pristine steak cut, while others just throw in ALL the extra bits – silver skin, sinew, and everything included. The bottom line is that the cleaner the meat is from all the connective tissue, the smoother it will grind, and the better texture it will have in the end. Does it have to be perfect? That depends on you, but try to clean it up fairly well.

Again, if you like a really lean grind and want to try to make some venison patties, you don’t need to add any beef fat. But you’ll probably have to be pretty delicate with it while grilling, as it might crumble to pieces. For a richer burger that holds together better, try the fat ratio for venison burgers that we discussed above (2 pounds beef fat to 10 pounds venison).

For grinding venison burgers:

Start by grinding the venison meat with a coarse dye plate to cut the meat up into small chunks. Then switch to a fine or medium dye plate, and send the venison back through with the fat.Alternate adding the venison meat and beef fat into the grinder as you go, which will help incorporate it better.At this point, you can also get creative. Add onions, garlic, and wet or dry seasonings to the grind as you go to create your perfect venison burger.When you finish a batch, try frying or grilling up a test patty to see how it holds together and see if you need to adjust the seasoning. If something’s not quite right, you can add more meat, fat, or seasonings to fix it.

As you can see in the video, we love Meat! Your Maker products. Whether you need a durable and high-quality grinder to make these patties or you need a vacuum sealer to package them at the end, they have the right tools for the job.

Packaging Your Venison Burgers

The final step in the process is packaging everything up so you can safely store it until mealtime. You can use plastic bags or freezer paper for this, but those methods are much more likely to result in freezer-burnt meat. The best way to preserve your food – whether wild game meat, store-bought meat, fish, or even other foods – is to vacuum seal it. A good vacuum sealer will suck all the air out and seal the bag securely, which will lower the chance of freezer burn greatly.

For a typical family of four, you might package the meat in 1- or 2-pound bags, which should be enough for an average meal. Or if you know you’re going to make venison burgers out of the mixture anyway, you might as well pre-shape them into patties and freeze them. That way, you just have to unthaw and throw on the grill when the time comes. Form the patties based on the sizes your family prefers, and then stack them in layers of 2 with some wax paper separating them, or just do a single layer in a vacuum seal bag. You get to make all the calls with this, which is why it’s so fun.

If finding the right fat ratio for venison burgers has been tricky before, we hope this guide will help. But at the end of the day, it’s just a guideline. Play around with the mixture of venison vs. fat until you find something you and your family truly like. And then fire up the grill and invite some friends over to share a hot meal, a cold beverage, and a few good hunting stories.What’s the Right Fat Ratio for Venison Burgers?

Say hello to Kamakai, the world's biggest tiger shark

0

Earth’s oceans are full of big surprises – something Kori Garza knows better than most.

The marine biologist has been on thousands of shark dives around the globe through the years and gets a “serene feeling” when she’s in the water with the “big beautiful predators.” But nothing could prepare her for the massive shadow that approached from the murky depths of the Pacific Ocean in November 2018.

“We all just paused, jaws dropped and were like, ‘Now that’s a shark,'” Garza said. “It was so much bigger than what you would expect anything in the water to naturally be coming towards you.”

Tiger sharks are the second deadliest in the ocean and normally reach about 12 feet long. The longest on record used to be 15 feet. This gigantic creature, who Garza and her team named Kamakai, measured in at 18 feet based on their estimations – larger than the boat used for the voyage.

“Her mouth couldn’t even close she was so big and she couldn’t really move her fins,” Garza explained. “They were kind of stuck in this position and she was slowly swimming around. Much rounder than normal, but very calm and comfortable – wasn’t aggressive or territorial.”

Garza’s crew only had an hour with the apex marine predator before it moved on. The team was diving at a shark sanctuary in French Polynesia, which meant no tagging as they would have been forced to capture the animal – a practice banned in the region since 2006.

In Garza’s new documentary, “World’s Biggest Tiger Shark?” – part of National Geographic Wild’s “Sharkfest” season – she’s joined by cinematographer Andy Casagrande for a mission to find and film Kamakai once more, while searching for any clues that might explain why sharks in the South Pacific seem to be growing bigger each year.

“When I came here I was so shocked there was this amazing hot spot for tiger sharks and nobody was talking about it,” Garza said. “It made me think of how many tiger shark hot spots are out there waiting to be found, especially in this region.”

As the team searches for Kamakai, they look for unique features that distinguish the animal from other giant tiger sharks they may happen upon, including stripe pattern, dorsal fin and white lines around the mouth.

Garza, who grew up in St. Louis, said she became intrigued with sharks after watching “Jaws” as a child, and took a particular affinity for Richard Dreyfuss’ character, Hooper, in the classic film.

“It was the coolest thing I’ve ever seen,” Garza said. “When I saw the marine biologist, I thought, ‘Wow, I want that job. How do I get that job?'”

A few years later she found herself at Hawaii Pacific University studying for her dream job. She’s been diving with sharks for a decade.

Garza said she hopes to show people tuning in to “World’s Biggest Tiger Shark?” new information on the predators, including never-before-seen hunting tactics and uncommon filming locations.

“Almost everything you see from tiger shark documentaries is from the same spot – Tiger Beach, Bahamas. I’m excited to share the French Polynesian, Tahitian sharks because it highlights our shark sanctuary, one of the biggest in the world,” she said. “It’s important to see how these sanctuaries support ecosystems with these big predators on top.”

“World’s Biggest Tiger Shark?” premieres July 19 at 8/7c on National Geographic. An encore presentation will follow on Aug. 11 at 9/8c on Nat Geo Wild.

Deer Heart

0

I’ve always associated the plant called deer heart with my times hunting Sitka blacktail deer in Southeast Alaska high country, which is something I’ve done pretty much every August since I was a kid. It’s a small, fragile plant that consists of a single heart-shaped leaf attached to a stem that usually doesn’t grow much higher than six inches. Deer heart grows from sea level, where it’s most tender and nutritious early in the summer, to mountain tops, where it’s best to eat late in the season. Deer follow it and other vegetation up mountains as summer advances. By mid-September, when deer heart is all but dead in the high country, deer descend to lower elevations for better browsing.

Last August, during a hunt, I came upon a deer I’d shot lying on a deer heart-covered bench, with semi-pulverized pieces of the plant in its mouth. There was an ethereal slant to the evening light, the sort that illuminates subtle, hard-to-see details of the landscape. I was surrounded everywhere by deer heart, except where there were cliffs, rockfaces, and the occasional clump of stunted mountain hemlock. I am frequently caught off guard by how something as seemingly simple as shifting light can reveal in an instant how miraculous the world is. I plucked a heart-shaped leaf and stuck it in my mouth. It’s peppery, like arugula, but has an aftertaste that oscillates between good and a little strong. I’d never thought a lot about deer heart, other than using the amount of it browsed as a gauge for where to hunt deer, and to try not to slip on it when it’s raining. I looked from the fields of deer heart to the dead animal, wondering why it’s so easy to become preoccupied with certain things while being blind to so much. I thanked and apologized to the deer, then sliced my knife through the hide along the backbone from the base of the skull to the tail. I cut one side of quarters free, peeled off a backstrap and, before removing a side of ribs, severed the heart and lay it upon its namesake plant.

It was dark by the time I hung my heavy game bags from a branch of a mountain hemlock. During the night I listened as the wind made the tent shudder and bushes crackle. I thought about brown bears. I washed off the deer’s blood the best I could and peed and spat around the tent, but I still smelled “delicious.” Years before, I left a trail camera on a salmon stream that had a high number of bears fishing on it a few miles from where I was hunting. As an experiment, I peed in front of where the camera was pointed to see how animals would react. I returned a few days later and found that most of the images showed bears running away, looking terrified. A young bear even dropped the salmon it was carrying in its rush to get away. One large bear, however, behaved differently. It came during the night and, instead of fleeing, crawled like a cat toward the camera. I imagined that animal crawling toward the tent and thought about becoming meat.

At home, I organized the deer meat in trays divided by roasts, steak, and scraps I’d grind into burger. I trimmed the bones; later, I’d render broth from them. My two young sons—one a toddler and the other three and a half years old—“helped” by sawing on meat with butter knives and dropping pieces of burger meat into the grinder. I sliced a heart thin and doused it with sesame oil and Montreal steak seasoning. When it was done, we snacked as I wrapped meat in freezer paper. Some people do not like the taste or texture of heart. It’s always the first part of the animal I eat, which is in a large part because it does not freeze well. It’s also delicious and, more than that, evocative of much of what I love about life in Southeast Alaska.

Three years prior, my wife and I gave our eldest son his first solid food. We wanted our kids’ first tastes of food to be of something we loved, that came from the streams and forests where we live. First we mashed up blueberries, then we tried coho salmon. It had not gone over well. Not long after, I brought a deer home and fed our son small bits of fried heart. He devoured them.

Once we had a couple of deer, as well as a good supply of salmon in the freezer, it was time to go berry picking. When the next sunny day came, we headed to one of our favorite blueberry patches in the mountains. I carried our toddler in a backpack. As we hiked a trail to a field of deer heart, his brother demanded, and constantly added details to, a story about dragons from his mother. Though it was only the third week of August, most of the plants were showing the first signs of brown. After placing the boys on drier ground where they could play and pick berries, my wife and I set to filling our buckets.

Food gathering, whether hunting or berry picking, is probably the most meditative activity I know. For a while I picked alone, my thoughts quieting as I focused on filling my bucket. Occasionally, the boys would punch or bite each other and scream and cry. Other times they giggled as they wrestled and popped blueberries into each other’s mouth. When I checked on them, they were taking turns smashing blueberries on each other’s heads, both of their smiling faces stained purplish red, sitting amidst deer heart.

The pickings were pretty good and after a couple hours we had a few gallons. I joined the boys and their mother on a small plateau covered in deer heart fringed with bushes heavily laden with blueberries. The light on the mountains had that same ethereal quality, revealing cracks and fissures worn by time in rockfaces and millions of deer hearts surrounding us.

It was hard to walk away from something so good. I placed my younger son in his backpack and, before leaving, searched for a tender looking deer heart. Near where a deer had been browsing, I plucked a leaf and then placed it in my mouth. I slowly chewed, its enigmatic taste engulfing my taste buds, as I followed my wife and older son down the mountain.

Originally published in Issue No. 26, Winter 2022

Best Air Rifle Deals

Popular Posts

How far can an air rifle shoot accurately?

0
An air rifle's effective shooting range depends on various factors, including the type of rifle, the caliber, and the power source. Generally speaking, most...

How Far Can a .22 Air Rifle Pellet Travel?

0
"Unveiling the Power: Exploring the Distance Capabilities of a 22 Air Rifle Pellet. Discover the fascinating journey of a 22 air rifle pellet as...

Can a Felon Legally Possess an Air Rifle in Tennessee?

0
"Understanding the Legalities: Felon Ownership of Air Rifles in Tennessee" can a felon own an air rifle in tennessee? In the state of Tennessee, the ownership...

Can a 22 air rifle kill a deer?

0
"Debate over whether a 22 air rifle can effectively take down a deer has sparked curiosity among hunting enthusiasts. With its lower muzzle velocity...

Can you dry fire a gamo air rifle?

0
Unveiling the truth behind dry firing a Gamo air rifle, this intriguing headline delves into the possibility of safely practicing without ammunition. Join us...