YAKIMA, Wash. – Hunting Washington’s most prized deer can take significant time and effort, not to mention a little bit of luck.
For 27-year-old Jake Fife, it took 16 years to earn an archery tag for one of Yakima County’s most coveted and restricted units, the location of which he asked not be used in this article. So when his early scouting last summer identified a buck bigger than any he’d ever seen before, bringing it home became a single-minded obsession that defined his daily routine.
“Wake up, go to work, think about the deer, get off work, go see the deer,” Fife recalled. “Think more about the deer. Come home, sleep think about the deer. Dream about the deer.”
Those dreams became haunted by a missed opportunity on the opening day of the season, Sept. 1, but nine days later Fife found the perfect chance for redemption. Countless hours of target practice finally paid off when he took down the buck, two weeks before the season ended.
Fife’s elation and pride from his first archery kill along with a full freezer plus plenty for friends from 175 pounds hanging at the meat locker provided enough rewards, but he would earn much more. The buck’s net score of 229 shattered the previous record of 2033/8 for Washington nontypical mule deer, and it won Best-of-Show in the archery category of the Horn and Antler competition at February’s Central Washington Sportsmen Show.
“It was really special due to the fact that I was able to finally get it down with a bow after a lot of failed attempts on other deer and stuff that I ended up never getting,” Fife said. “I feel pretty spoiled, but at the same time, there was a lot of hard work and disappointment before that happened.”
Fife took his first hunter’s safety course to acquire a license at eight years old, following in the footsteps of his father and grandfather.
He initially applied for the unit where he would eventually find his record-breaking buck as 10-year-old, and Fife gained experience hunting elsewhere with his father, Gary Fife. Longtime hunting partner Trevor Dallman met Fife during their freshman year at Selah High and joined him in collecting virtually all of the many deer mounts now hanging from the wall in his east Selah home.
“We started off pretty young and just kind of going together and before you know it, we just hunted well together and started having good success,” Dallman said. “Mostly deer, elk and waterfowl.”
Fife learned to hunt with rifles and muzzleloaders before finally picking up a bow a little more than three years ago. He worked hard to gain confidence and skill with his Bowtech Carbon Knight, learning how to factor in the wind and hide well enough to creep within range of a potential target. Dallman said the Naches Valley head baseball coach and P.E. teacher has always had the “eagle eye” for finding the biggest game animals, including a memorable one that got away after a close call a couple years ago.
So when Fife sent Dallman a picture of an even more massive buck, Dallman quickly agreed to be a spotter and help out however he could. That meant tagging along whenever possible, and he heard plenty of stories from days when he couldn’t make it out to join his friend.
“He’s just so dedicated, I knew he wasn’t going to go for anything else,” Dallman said. “There was multiple other bucks when he got this one that were, at any other time, ‘wow, that’s a huge buck.’”
As one of two hunters selected in late June for an archery tag on a unit known for old, large bucks, Fife found his ultimate goal after several days of scouting about three weeks before the season opened. He tried to track the buck for about six hours daily on the weekends and two to three during the week, totaling well over 50 hours.
Finding trends proved more difficult than expected as the buck wandered around to different trails, bedding down and drinking water at multiple spots. Fife figured the deer’s tendency to stay in the general area would give him a good chance, though he couldn’t imagine just how soon it would come.
Taking down a “giant”
Fife didn’t sleep much the night before he began his hunt for the buck he referred to as a “giant” in a blog post for Northwest Sportsman magazine last October.
He woke up early and shortly after the sun rose saw a shocking sight — the buck of his dreams all alone. Fife carefully worked his way to within 70 yards of the patch of sage where he believed the deer was resting, only to see it stand up 30 yards away, then bolt upon seeing a disturbance so close.
“He didn’t stop to look back to see what I was,” Fife said. “I watched him go over one ridge and then go over another ridge and then go over another ridge. I was like ‘oh my god’ and then he never came out of that one, a big canyon, so I knew he was around.”
Nerves engulfed Fife even more than before following the close encounter, but he remained patient, waiting for the ideal moment. He saw the buck out in the open and with others over the next few days, including on a couple when the unit was closed, choosing to keep his distance rather than risk another failed stalk.
Finally, on Sunday, Sept. 10, Fife discovered the buck behind a large patch of brush and watched it feed while darkening up its horns by rubbing them on and off for about two and a half hours. He also called Dallman, who went out to spot for his friend as quickly as possible on another beautiful, sunny morning.
“Pretty much I had a perfect view,” Dallman said. “You could drive this road up on this hill and I could see everything.”
He watched as Fife slowly and methodically crept towards the bottom of the draw, eventually taking off his shoes and crawling on hands and knees through cheatgrass and stickers. He eventually settled into a spot about 40 yards away, behind a bush enough to be hidden from the deer, with a slight, steady breeze blowing into his face.
But as Fife partially stood up, awkwardly off-balance, waiting for the deer to stand and turn around, he felt his bow jump a bit and realized he needed a more comfortable position. So he immediately pulled back the string, stepped up and through the bush, then when the buck got up, locked eyes, and stomped his foot down, Fife let his arrow fly.
“It just went right through him, just disappeared,” Fife said. “It happened so fast I was just like — I knew I seen that I hit him but it didn’t make much sound or anything.”
An anxious hour
Doubts about what looked like a perfect shot crept into Fife’s mind after he watched the buck sprint away at full speed, and a phone call to Dallman only confirmed those fears.
From the road, he’d seen the buck tear off through the plain at full speed showing no signs of injury, then eventually slow down before it headed into some bushes and disappeared. Fife couldn’t find any traces of blood — or his arrow — so he decided to wait an hour until about 12:30 p.m. to begin a thorough search.
Dallman directed Fife to the bushes, and there it was, a buck even bigger and more incredible than he’d seen at a distance or in his pictures. Dallman and a game warden who watched the hunt helped Fife back to the truck with his price, which he estimates weighed about 300 pounds.
The success garnered Fife plenty of attention and opportunities to tell his story to fellow hunters, but he insists the high score isn’t really important to him. He’s hoping a full mount will be done by the end of the summer, and he’ll always have some unforgettable memories.
“Not even just to get him, but to be able to hunt a deer of that caliber was pretty cool,” Fife said. “Who knows if it’ll ever happen again? It might not.”
Dicks Sporting Goods offers a generous return policy for their customers, however, there are a number of things to be aware of which we’ll cover below.
The company was established by Richard Dick Stack in 1948. Dicks Sports return policy is very generous in its terms and conditions, which is very convenient for its users.
We’ll discuss the terms outlined in their return policy, including refunds, exchanges and how to return your goods.
Customers can return their goods within 60 days of purchase, either by mail or in-store, according to the company’s terms in the Dicks Sporting Goods return policy. Dicks Sporting Good return policy allows you to return unworn, unwashed, undamaged, or defective merchandise purchased online or in-store.
Moreover, the company has extended its return period to 90 days for both online and in-store orders from the previous 60 days. This has also extended for Calia and Field, Golf Galaxy and Stream.
Most products are returnable within 30 days at Dick’s Sporting Goods Warehouse stores, which has a separate policy in place.
How To return Products at Dick’s Sporting Goods
Dicks returns gives you two options to return its product – by mail or by visiting any of the Dicks stores. We have provided the details of both the return policies below
Dicks Sporting store return policy
Before returning your products, make sure that it is unworn, unwashed, and undamaged.
Here are some easy steps to go through, if one wants to return the merchandise by paying a visit to the nearest store:
You can locate your nearest store by visiting this link.
When you know your local store to return your product, pack your product in the original packing.
Accompany your product with an original slip.
Store personnel will help you in processing your return.
Your refund will be immediately processed to your original form of payment.
You can also contact your local store operator to know more.
return policy for online Via mail
Are you too lazy to walk-in to your nearest store, Dicks provides you the option to return the items by mailing it to them.
The company will issue a refund for the purchase price of the item within 60 days of return.
To return items by mail, you need to go through the following steps:
To start your return with Dick’s Sporting, visit the website.
Go to the return page by visiting this link.
Fill in the order details and Zip code and proceed as per given instructions, and you will get the return label.
Click on the “Find order” tab to go to your order details.
The return label has a return department address (place of returning), and the packing slip contains the specific instructions to return.
Attest the return label to your package.
Now you can schedule a pickup or drop off at the carrier of your choice or UPS drop-off location.
Shipping and handling charges are not refundable.
Exchange Policy
Dicks Sporting exchange policy for the company is the same as its return policy, you need to return your items within 90 days to get the product exchanged.
Follow the below steps to get your product returned:
Start your return by visiting the website and follow the instructions as given in the ‘return by mail’ process.
Place the new order for the replacement.
See Also: Wayfair Return Policy
Refund Policy
Returns are generally directed to the original mode of payment by Dicks, make sure that the items are in original condition.
If you return your item in the store, it can take up to 14 business days for the refund to be processed to your original form of payment. If it’s been more than 14 days, you should first reach out to your bank or aggregator.
If you have returned your item by online mode, it usually takes 2—3 weeks from DICK’S Sporting Goods to receive your return for a credit to be issued. Dicks will issue Refunds to the original form of payment for the purchase price of the item, including sales tax
Type of paymentThe Number of days you will get a refund in:Refund and Credit PolicyCredit card/debit cardCashPayPal
Exclusions
They have a different policy for different products like dicks shoe return policy, dicks bike return policy, dicks sporting goods kayak return policy, dicks sporting goods return policy for online stuff, etc.
Dicks sporting goods return policy is pretty favorable for its customers; it requires you to return the items before 90 days to get a full refund. It takes 14 days for processing of your return:
Products and purchasesProduct ConditionReturn PolicyGiftYeezy productsDICK’S Sporting Goods, Golf Galaxy and Field & Stream’s all productsBaseball bats, electronic scooters and bikesElectronicsPre-owned golf clubs and demo clubs
If you wish to return without receipt, you can do so without an original sales receipt or pack slip, but the product must be returned using a valid ID, and you will receive a store credit for the lowest selling price.
FAQs
Can I return Items To Dicks Without a Receipt?
Returning goods to Dicks Sporting Goods without a receipt is possible, however, you may only be eligible for store credit and are required to present your ID. It may be possible to receive an email copy of your receipt. All decisions are final and at the discretion of management.
Conclusion
Do you know that Dick’s sporting entered into women’s athletics in 2015 and into team sports in 2016?
Dick’s Sporting Goods offer quality products, but then also you end up getting a damaged item… Hard luck! Don’t worry and file a return request immediately.
Don’t forget to check these out – GameStop, and Nike Return Policy.
For further queries about Dicks Sporting Goods return policy, I’d suggest you comment down below and our experts are more than happy to answer.
Deer hunting in Maine’s vast north woods is a wilderness experience our farm country friends find truly exciting and challenging. The area surrounding North Country Lodge provides the best habitat available for monster whitetail bucks. The big ones are here, and they challenge you to the chase.
Monster big woods bucks over 200 lb dressed weight are not uncommon. A Maine buck’s antler size can be impressive, but body weight is what Maine bucks are noted for most of all.
Northern whitetail deer are a genetically different buck than you will find at home. Bucks are naturally bred with large bodies to survive cold winters, and typically will reach an older age due to low hunting pressure. Miles and miles of woods, with very few hunters, allows these trophies to reach a maturity not often seen by our southern neighbors.
Big woods bucks often cover a large territory while searching for a hot doe, and even though they favor certain travel areas, you never know where or when you will encounter your prize. You will find hardwood ridges and fir thickets where bucks will be checking for does. Bucks will bed down in a thicket or next to a fallen tree, but just as often they will take a bed on an open slope where they can scan for movements.
Deer Population
Maine’s deer population changes yearly depending on many factors – mostly the length of winter. Northern deer can survive brutally cold temperatures, but winter survival really depends on how early green growth and buds start to appear toward spring.
When populations dipped ten to twenty years ago, we closed our lodge during November. Populations are now rebounding, and we are seeing many more deer than in past years. For this reason, and at the urging of our many hunters who have always enjoyed the lodge and hunting in the “big woods,” we are again opening the lodge for November.
The Hunt
The “woods are lovely, dark and deep” as Robert Frost wrote. Endless miles of unpaved roads and skidder trails provide unlimited access to all manner of terrain. You will be free to roam through our area’s vast spruce-fir-hardwood forest without encountering “no trespassing” signs, paved highways or even another hunter. Or you can stay close, and take a stand in a known deer crossing area.
Hunt on your own, or guides can be provided upon request. We will also provide you with maps of the area and tree stands, set up by our Professional Maine Guides, to aid you in your Whitetail Deer hunt. You are free to head out in early morning and remain out until dark – or come and go as you please. The lodge is always open.
November in Maine can bring cold temperatures, with snow from easy tracking depth to knee deep. When fresh and soft, snowy woods are silent and beautiful – perfect for silently stalking and tracking. Warm and waterproof boots and clothing are suggested. Weather can also bring 40-50 degrees at noon, with lighter clothing and layers being vital.
Cell phone service is available throughout our area, making it easy to keep in touch with your partners or to call for help when needed.
Deer Hunting Season
Maine’s firearm deer season runs for 4 weeks, typically beginning the first Monday in November. Call us for details about each season, and early opportunities for bow hunting.
Shooting time starts 30 minutes before sunrise, and ends 30 minutes after sunset. Exact time is set by the State.
Fantastic Deer Hunting Lodge
Enjoy the warm hospitality at North Country Lodge and the camaraderie of fellow hunters. We believe that comfortable accommodations, relaxation, great meals, and complete service are important parts of an enjoyable hunting experience and vital to enjoying your visit with us.
You will enjoy our beautiful lodge with its rustic atmosphere and modern conveniences such as fireplace, WIFI and maid service.
The Lodge has two large sitting rooms, complete with a large fireplace and adorned with numerous trophy mounts representing past hunts – setting the perfect stage for sharing “tall tales” about your hunts.
The Lodge has full modern conveniences, including:
Clean attractive private sleeping rooms that accommodate from 1 to 6 persons
Comfortable beds
Showers
Towels and linens
Daily cleaning service
Spacious and relaxing lounge areas
WIFI
Cell Phone Reception
Women, couples and family groups with youth hunters all find the Lodge very hospitable. Single hunters are very welcome. Call us for more information.
Firearm and archery ranges are located adjacent to the lodge for double checking and fine tuning your sights before and during your hunt.
Delicious Dining
You will enjoy dining in the Lodge’s beautiful dining room. Our kitchen staff serves the finest quality meals – All “home cooked and all you can eat” – served in a beautiful dining room.
Breakfasts are available at 5 am for those wanting to hunt early. Lunch is provided in the dining room or you may take a bag lunch for a day in the woods. Bring your thermos, and we’ll fill it with hot coffee for the trail.
Before you Choose
Be sure to compare North Country Lodge’s quality service and hunting opportunities. Ask questions. Find out why Over 75% of our hunters are return clients.
Don’t settle for less than the best.
We look forward to playing a part in your dream of bagging a “Trophy Maine Big Woods Buck”.
Deer Hunting Package
Deer hunts at North Country Lodge include:
Deluxe accommodations in a fully equipped modern hunting lodge.
Six Days of hunting
Seven Nights of lodging.
Three complete meals per day-home cooking and all you can eat.
Daily room cleaning service.
Advice from our licensed Maine guides on where to hunt and methods to use.Registered Maine Guides available upon request
Click here for our rates
Click here to obtain a Maine Hunting License online. Licenses are also available at many locations on your way here.
North Woods Tips
Two articles of hunter orange clothing are required during deer season by Maine law. November in Maine can be very cold (20F or colder). Warm clothing and rugged boots are important. A flashlight, knife, compass, matches and fire starter are also considered a necessity for hunting Whitetail Deer in Maine. Many find their GPS and Cell phones very handy.
About North Country Lodge
When you plan your hunting trips, you expect the best, with “no surprises.” The Goodman family established North Country Lodge in 1985, always making sure that guests enjoy the very best Maine hunting experience.
Location, Location, Location
North Country Lodge is nestled among the pines, spruce and hardwood ridges in Aroostook County of northern Maine. The region comprises the largest wilderness area east of the Mississippi River. We are 11 miles north of Patten Maine, and approximately 25 miles east of Maine’s largest state park (Baxter State Park) and the Maine Woods National Monument.
For well over a century, Aroostook County has offered the finest Black Bear, Whitetail deer, and moose hunting on the North American continent.
This magnificent hunters’ paradise, with hardwood ridges, rolling hills, swamps and bogs, provide the setting for an exciting and memorable experience in the vast North Maine Woods.
Maine Guides
Our staff of hunting guides has a vast knowledge of the region and the game that resides here. All have exemplary reputations earned over the years from serving hunters and the hunting industry. Our guides are active all year, either preparing for your visit, or working diligently with outdoor organizations and wildlife biologists to protect the game and the privilege to hunt.
“Air Rifle Scope vs Rifle Scope: Unveiling the Ultimate Precision Optics. Discover the essential differences and benefits of these two optical devices, empowering shooters to make informed decisions when it comes to enhancing accuracy, range, and overall shooting experience. Dive into the world of advanced optics and make your shots count with confidence.”
air rifle scope vs rifle scope
When it comes to shooting sports and hunting, having a reliable and accurate scope is essential. However, there are different types of scopes available in the market, specifically designed for air rifles or traditional firearms. Understanding the differences between an air rifle scope and a rifle scope can help you make an informed decision based on your specific shooting needs.
An air rifle scope is specifically designed to withstand the unique recoil generated by air rifles. Air rifles typically produce a forward recoil, also known as a reverse recoil, which is different from the backward recoil generated by firearms. As a result, air rifle scopes are built with reinforced internal components to handle this unique recoil mechanism. These scopes often have shorter eye relief distance and greater durability to ensure they can endure the double recoil produced by air rifles.
On the other hand, a rifle scope is designed for use with conventional firearms such as shotguns, pistols, or rifles that use gunpowder-based ammunition. These scopes are typically built with longer eye relief distances to accommodate the backward recoil generated by these firearms. Rifle scopes also come with various magnification options tailored for long-range shooting or close quarters combat. Additionally, they often feature adjustable turrets for windage and elevation adjustments.
In conclusion, while both air rifle scopes and rifle scopes serve the purpose of improving accuracy in shooting sports or hunting activities, their designs are tailored to meet the specific demands of their respective firearm types. Understanding these differences will allow you to choose the right scope that suits your shooting needs and ensures optimal performance on the range or in the field.
In conclusion, while both air rifle scopes and rifle scopes serve the same purpose of enhancing accuracy and precision, they are designed for different types of firearms. Air rifle scopes are specifically tailored to withstand the unique recoil and vibration of air rifles, whereas rifle scopes are better suited for traditional firearms. Therefore, it is crucial to choose the appropriate scope that matches the specific firearm to optimize shooting performance
To most people, spring fever means days on the water, family cookouts in the backyard, and a long-awaited wardrobe transition. For turkey hunters, however, the mainstream intrigue is only secondary to the nonstop chaos of breeding competition among gobblers, and all of the incredible hunting opportunities the season brings. The same hunters get restless once they have a taste of the action, itching all year long to get back into the budding woods with a shotgun and a repertoire of calls and strategies they’ve been sitting on since last season. And, while good game calls and effective hunting blinds are necessities, nothing throws an exclamation point on a turkey hunting approach better than some well-placed decoys. With such a large market for decoys, however, it can be difficult to know which ones are worth spending your money on.
Sometimes a big Tom just needs a little extra motivation to con him into archery or shotgun range, so we did the research to find the best turkey decoys on the market today.
This combo is perfect for areas full of especially aggressive birds, as they offer a wildly lifelike appearance that’s sure to bring big Toms in on a string. Each decoy is blow-molded and comes with two interchangeable heads to change up your presentation on the fly. And to make things more convenient in the field, they come with a carry bag for easy transport to the field, as well as carbon ground stakes for a quick-and-easy setup.
MOJO Outdoors Tail Chaser Max
For the hunters who like the run-and-gun approach, this is a hard option to beat. This turkey fan decoy comes with a printed photo-realistic Tom in a full strut position, which folds up for portability. It also features legs that help give your gun a steady rest for the shot, which will probably come in handy after being on the move just to get into position. And, if you want a little more realism, you could always attach a real turkey fan, too. At $40, this is a bargain.
Lucky Duck Lucky HD Collapsible
This is a solid, versatile option for only $70. If you’re lucky, you might even find it on sale for less. Made of durable plastic and a folding metal stake, this strutter turkey decoy folds up to make it easier to transport. Similar to the last option, this fan is also removable if you prefer having a real one, which might give you a slight edge to draw in that old, aggressive gobbler.
Dave Smith Decoys Jake Turkey Decoy
The Dave Smith brand has a great reputation for turkey decoys of exceptional quality, but they do come at price. This Jake decoy is made of a resin and has over 70-perfect five-star ratings on the Cabela’s website. The company claims its decoys can stand up to being shot multiple times without showing damage. Each includes a ground stake and a handy carry bag for transportation, and features exceptional attention to detail.
Primos Gobbstopper Turkey Decoy Combo
Anything from Primos typically lives up to the hype these days, and these soft-sided decoys are no different. Each decoy included in this combo folds up quickly with stakes and a carry bag, making them great for when you need to wander far off the beaten path for that prime spot. For $70, you get a Jake and a hen that are sure to enrage any big gobbler that sees them. Boasting a high rating on the Cabela’s website from buyers, this is a great option for shopping on a budget.
Dakota Decoy X-Treme Feeding Hen
If you want a hard plastic decoy that is designed to last many seasons, this feeder hen is a solid choice. This is perfect for a more casual setup sure to ease the nerves of hesitant birds. Built of EVA plastic, this decoy is airbrushed with fine details that will consistently draw in big birds. Additionally, the metal stake stores inside the body when not in use.
Montana Decoy Fanatic
Another fan decoy built for stalking, this option offers great portability, as well as a see-through mesh window so you never have to break the illusion of another bird. This setup allows you to sneak up on those birds that are wary of your stationary decoys. For a mere $44, you can’t go wrong.
Flextone Thunder Chick Hen Decoy
Besides having an awesome name, this is a solid decoy at a price that’ll fit almost any hunter’s budget. Blow-molded and built of a one-piece construction, this decoy boasts both durability and simplicity. Flextone also includes a carbon-fiber stake, and offers both a feeding and an upright option, which gives you flexibility in your setup. Ideally, you can buy more than one and set up a variety of different looks to coax cautious birds.
Davey Smith Mating Motion Pair
If the big birds are too wary of your strutter decoys, you may need something more to draw them in. Few decoy setups spice things up more than a controllable mating pair. A cord allows you to manipulate gobblers with this Jake-and-hen combo, which presents the potential to absolutely enrage territorial gobblers that ignore every other kind of setup. Like any other Davey Smith decoy, this combo isn’t cheap, but users swear by its effectiveness. It also comes with ground stakes and a carry bag.
Hunter’s Specialties H.S. Strut Hen and Jake Combo
These two foldable, hollow-body decoys are sure have the big gobblers running, and at an affordable price. These decoys feature flake-resistant paint that should last season after season. Both are bright and colorful, guaranteeing at least a look from any curious gobbler nearby. For the hunter on a budget, you get two solid decoys for $70.
Avian-X Strutter
For one of the best Tom turkey decoys on the market, it’s hard to go wrong with the highly-rated Avian-X. This strutting decoy comes with a silk tail standard, but includes the ability to add real feathers. Many hunters consider this the gold standard for strutting gobbler decoys, as so many have tagged out using it.
Redhead Reality Series Crazy Jake
Nothing will fill a dominant Tom with rage more than a young Jake strutting in his territory. This one is smaller than other strutting decoys, which should prove less intimidating for birds that are shy of standard-sized decoys. You can also adjust the look by mounting a real tail fan or by trimming the beard. For $50, this is a bargain.
For more outdoor content from Travis Smola, be sure to follow him on Twitter and check out his Geocaching and Outdoors with Travis YouTube channels.
READ MORE: HIGHLIGHTS FROM OUR WEST TEXAS TURKEY HUNT
Every angler considers bigger fish to be better in some way. The desire to catch bigger fish keeps the sport fresh for many people and for some, it’s the only reason they keep making casts or heading offshore. Here are some of the biggest fish ever caught in saltwater and the anglers who managed to bring them in.
What’s the Biggest Marlin Ever Caught?
When it comes to the largest marlin ever caught there can be a few different answers. The biggest marlin ever caught on rod and reel was a blue marlin out of Oahu, Hawaii. In 1970, a party of anglers fishing on the Coreene C, with Captain Cornelius Choy caught a blue marlin that weighed 1,805 pounds. This incredible fish became known as “Choy’s Monster” and hasn’t been broken for over 50 years.
The other answer for the largest marlin ever caught is a black marlin that was caught on August 4, 1953, by Alfred Glassell, Jr. This black marlin is the world record marlin according to IGFA rules. Regardless of rules this marlin is one of the one of the greatest catches in fishing the history. The black marlin was caught in Cabo Blanco, Peru, on the boat “Petrel” which was captained by Stirling Stuart. The record setting fish weighed in at 1,560 pounds and 14 and a half feet long.
What’s the Biggest Swordfish Ever Caught?
Back on May 7, 1953, Louis E. Marron caught the World Record swordfish while fishing in Iquique, Chile. Louis was fishing with his wife Genie, aboard a boat named “Flying Heart III” which was captained by Eddie Wall. This giant swordfish weighed 1,182 pounds and is still the IGFA all tackle world record.
What’s the Biggest Tuna Ever Caught?
For the largest tuna ever caught, we found both the bluefin and yellowfin world records. According to the IGFA, the bluefin tuna world record is currently held by Ken Fraser. On October 26, 1979, fishing with Captain Eric Samson on “Lady and Misty” from Port Hood, Nova Scotia, Ken managed to land a monster bluefin tuna weighing 1,496 pounds. This weight was taken after the fish had been dehydrating in the boat for nearly 10 hours.
The IGFA world record for the biggest yellowfin tuna was landed by Guy Yacom while fishing in Mexico on September 18th, 2012. This record-setting fish weighed an incredible 427 pounds. While it was not caught on rod and reel, a bigger yellowfin weighing 480 pounds was speared in 2018.
What’s the Biggest Grouper Ever Caught?
The goliath grouper is the largest grouper species in the world which means that naturally it’s responsible for the world record. The IGFA world record goliath grouper was caught May 20th, 1961 by Lynn Joyner in Fernandina Beach, Florida. This world record fish weighed an incredible 680 pounds and is unlikely to be broken with current laws banning anglers from targeting this fish or handling them outside of the water.
What’s the biggest Tarpon Ever Caught?
Finally the largest tarpon ever caught was taken off the coast of Rubane, Guinea-Bissau, Africa by Max Domecq. According to the IGFA records this inshore giant weighed 286 pounds, 9 ounces and likely was well over seven feet in length. While a story of an even bigger tarpon has come to light recently, it was not officially weighed but instead, it was released safely back into the ocean.
When it comes to shotguns, the stock is more than just a piece of wood or synthetic material that rests against your shoulder. It’s a critical component that influences the balance, handling, and overall performance of your firearm. Selecting the right stock for your shotgun can greatly enhance your shooting experience, whether in hunting, sport shooting, or tactical scenarios.
Balance: A well-chosen stock helps maintain the shotgun’s center of gravity.
Handling: The stock shape affects how the shooter grips and maneuvers the gun.
Performance: Comfort and fit can impact shooting accuracy and fatigue.
Overview of Different Stock Types
Shotgun stocks come in a variety of shapes and materials, each with its own purpose and advantage. Understanding the differences is key to making an informed decision. Below are some common types of shotgun stocks:
Traditional Wood Stocks
Synthetic Stocks
Adjustable Stocks
Collapsible/Folding Stocks
Pistol Grip Stocks
Thumbhole Stocks
Stocks for Youth and Women
Recoil-Reducing Stocks
Custom Stocks
Tactical and Specialist Stocks
Basic Anatomy of a Shotgun Stock
Components of a Shotgun Stock
A shotgun’s stock is composed of several parts, each serving a function that contributes to the weapon’s ergonomics and aesthetics. Here are the primary components:
Butt: The rear end that sits against the shooter’s shoulder.
Comb: The top part where the cheek rests.
Grip: The part where the trigger hand holds the stock.
Fore-end: The section below the barrel that the non-trigger hand supports.
How Stocks Affect Shotgun Performance
The design of a shotgun stock impacts the shooter’s comfort and the shotgun’s behavior during firing. An ergonomically sound stock can improve accuracy by offering better control and stability. Various stock shapes and lengths of pull (distance from the trigger to the end of the stock) cater to shooters’ diverse needs and preferences, impacting factors such as:
Recoil management: Some stocks are designed to absorb shock better.
Sight alignment: The stock’s height and angle can affect how the shooter aligns with the shotgun’s sights.
Factors to Consider When Choosing a Shotgun Stock
Shooting Discipline and Application
The intended use of your shotgun plays a significant role in determining the type of stock that’s most suitable for you. For example, a trap shooter might prefer a stock with an adjustable comb, while a tactical operator could opt for a stock with a pistol grip for better control.
Shooting Disciplines:
Hunting
Trap/Skeet Shooting
Tactical/Law Enforcement
Body Type and Ergonomics
Shotgun stocks should complement the shooter’s stature to prevent strain and improve performance. The right stock should feel natural in your hands and against your shoulder. It’s essential to consider features like the length of pull, drop at comb, and overall weight when selecting a stock.
Ergonomic Considerations:
Length of Pull
Drop at Heel and Comb
Grip Size and Shape
Material and Durability
Stocks are manufactured from various materials, each with its advantages and limitations in durability and field performance. It’s important to choose a stock material that can withstand environmental conditions and the rigors of use.
Many shotgun enthusiasts prefer wood stocks for their natural feel and traditional appearance. A well-crafted wood stock not only looks impressive but can also provide a warm and comfortable grip during colder weather.
Visual Attractiveness: Each wood stock has a unique grain pattern.
Sensory Experience: Wood provides a tactile warmth not found in synthetic materials.
Wood Types and Characteristics
Different woods offer various properties that affect the stock’s performance and longevity. Walnut is a popular choice due to its balance between weight, durability, and attractiveness. Other options include maple and laminate, which provide distinct advantages.
Wood Stock Options:
Walnut: Durable, with a rich finish.
Maple: Heavier, often with a striking grain.
Laminate: Layers of wood for added strength and unique color patterns.
Maintenance and Care for Wood Stocks
To preserve the beauty and function of a wood stock, it’s vital to perform regular maintenance. Exposure to moisture and temperature changes can affect the wood, so proper care is crucial.
Wood Stock Maintenance Tips:
Use a quality stock finish to protect against moisture.
Store the shotgun in a controlled environment to prevent warping.
Regularly clean and oil the wood to maintain its luster.
Synthetic Shotgun Stocks
Benefits of Synthetic Materials
Synthetic stocks, made from polymers or fiberglass, are gaining popularity due to their resistance to environmental wear and reduced maintenance compared to wood. They are an excellent option for shooters who frequently hunt or operate in harsh conditions.
Durability: Synthetic stocks can resist impacts, scratches, and weather.
Low Maintenance: Less susceptible to moisture and temperature fluctuations.
Varieties of Synthetic Stocks
Synthetics come in diverse forms, each designed to enhance the shooter’s experience and meet specific requirements. High-tech materials like carbon fiber offer strength with reduced weight, while other polymers provide affordability and ruggedness.
Types of Synthetic Stocks:
Polymer: Cost-effective and durable.
Fiberglass: Rigid and stable.
Carbon Fiber: Lightweight with high strength.
Weather Resistance and Durability
One of the main advantages of synthetic stocks is their ability to endure extreme weather conditions, from the dampness of marshlands to the dry heat of deserts, without significant wear.
Benefits of Synthetic Stock Weather Resistance:
Consistency: Performs reliably in a range of temperatures.
Longevity: Maintains structural integrity over time and use.
Adjustable Shotgun Stocks
Advantages of Adjustability
Whether you’re a competitive shooter looking to fine-tune your fit or a recreational shooter who wants a stock to accommodate different clothing and situations, adjustable stocks can be invaluable. They provide a personalized fit that can enhance performance and comfort.
Adjustable Stock Features:
Adjustable Comb: Aligns eye with the sights.
Adjustable Length of Pull: Fits a variety of arm lengths.
Adjustable Butt Pad: Alters recoil impact angle.
Types of Adjustment Features
Modern adjustable stocks come with several features tailored to improve the shooting experience. Each adjustment can make a significant difference in the shooter’s accuracy and comfort.
Common Adjustments:
Comb height and lateral position.
Length of pull adjustments using spacers or mechanical systems.
Adjustable recoil pads and cheek risers.
Target Shooters and Tactical Use
For target shooters, an adjustable stock allows for consistent cheek weld and eye alignment with the sights for every shot. In tactical environments, adjustability can aid in quickly adapting to body armor or various shooting positions.
Target Shooting:
Fine-tuning for precision shots.
Consistency between multiple shots.
Tactical Use:
Adaptability for different gears and scenarios.
Rapid adjustments to meet operational demands.
Collapsible or Folding Shotgun Stocks
Compactness and Portability
Collapsible and folding stocks are designed for shooters who need their shotguns to be as portable and discreet as possible. They’re commonly used in home defense scenarios or situations where storage space is at a premium.
Collapsible Stocks: Can be telescoped in for a shorter overall length.
Folding Stocks: The stock hinge allows it to fold alongside the receiver.
Legal Considerations and Restrictions
Before choosing a collapsible or folding stock, be aware of local and federal regulations regarding shotgun configurations, as these can vary considerably. Compliance with the law is crucial to avoid potential consequences.
Legal Aspects to Consider:
Overall length requirements.
Restrictions on collapsible or folding stock features.
Tactical and Home Defense Applications
Shotguns with collapsible or folding stocks are often favored for tactical operations and home defense, where maneuverability is essential, and the ability to quickly stow away the firearm is beneficial.
Tactical and Home Defense Considerations:
Ease of transport and storage.
Quick deployment in confined spaces.
Pistol Grip Shotgun Stocks
Pistol Grip Only vs. Pistol Grip with Shoulder Stock
Shotgun pistol grips come in two primary styles: pistol grip only and pistol grip with a traditional shoulder stock. The former offers maximum compactness, while the latter provides better stability and accuracy by allowing the shooter to shoulder the firearm.
Pistol Grip Styles:
Pistol Grip Only: For breaching and extremely close-quarters use.
Full Stock with Pistol Grip: Enhanced control with traditional shouldering.
Control and Maneuverability Aspects
A pistol grip helps in handling the shotgun, making it easier to operate and aim, especially in high-stress scenarios. It allows for a strong wrist position and potentially quicker target acquisition.
Control Advantages:
Strong and ergonomic grip.
Improved handling during dynamic movements.
Hunting versus Tactical Usage
Hunters may find traditional stocks more advantageous for the steady aim required in their discipline, while individuals interested in home defense or tactical applications might lean toward a shotgun with a pistol grip for its better control in compact spaces.
Usage Considerations:
Hunting: Traditional stocks are often preferred for stability.
Tactical: Pistol grips favored for maneuverability.
Thumbhole Shotgun Stocks
Design and Ergonomics
Thumbhole stocks integrate the grip and the butt into a single streamlined unit, allowing shooters to lock their hand in place more securely. This design can offer improved grip stability and ergonomics, which is beneficial for precision shooting.
Ergonomic Benefits:
Enhanced control during the aiming and firing process.
Reduced strain on the shooter’s wrist and forearm.
Benefits for Precision Shooting
Precision shooters, such as those engaging in sporting clays or hunting at longer distances, may prefer thumbhole stocks for the increased stability and support they provide. The design aids in maintaining consistency between shots.
Precision Shooting Advantages:
Consistent hand placement for repeatable accuracy.
Better rifle-like control for slug shooting.
Hunting and Sport Shooting Preferences
While thumbhole stocks are becoming increasingly popular in hunting and sport shooting circles, it’s essential to choose one that feels comfortable and does not impede the natural movement needed for these activities.
Sporting Preferences:
Stability for long-range hunting shots.
Comfort for extended periods at the range.
Youth and Women-Specific Shotgun Stocks
Importance of Proper Fit
Proper stock fit is crucial for all shooters, but it’s particularly vital for women and youth, who may find standard stocks too long or heavy. A well-fitted stock can make a significant difference in handling comfort and shot accuracy.
Benefits of Proper Fit:
Enhanced control and ease of use.
Increased confidence and shooting pleasure for younger or smaller shooters.
Reduced Length of Pull and other Adjustments
Shotgun stocks designed for women and youth often feature a reduced length of pull and other adjustments to cater to smaller frames. Recoil pads designed for lighter shooters can also help manage felt recoil.
Adjustments Specific to Youth and Women:
Shorter length of pull.
Smaller grip circumference.
Lighter overall weight.
Stock Options for Smaller Statures
Recognizing the diverse needs of shooters, manufacturers are offering more youth and women-specific stock options, ensuring comfortable and effective shotgun operation for everyone.
Options Available:
Compact models of popular shotguns.
Aftermarket stocks with adjustment possibilities.
Recoil-Reducing Shotgun Stocks
Technology and Features for Recoil Absorption
Recoil-reducing gun stocks incorporate technology and design features that dissipate the energy generated when a shotgun is fired. Hydraulic systems, spring mechanisms, and specialized recoil pads are some of the features used to reduce felt recoil.
Recoil Reduction Features:
Springs or hydraulic cylinders.
Sorbothane or gel recoil pads.
Counterweights and dampening systems.
Importance for Shooter Comfort and Follow-Up Shots
Minimizing recoil is not only about comfort; it can also lead to more accurate follow-up shots and reduced shooter fatigue during extended shooting sessions, such as in waterfowl hunting or competitive shooting events.
Shooter Comfort Advantages:
Less shoulder and cheek slap.
Ability to maintain focus and aim for longer periods.
Considerations for High-Volume Shooters
Shooters who spend a lot of time at the range or in the field shooting large volumes of ammunition should consider investing in a recoil-reducing stock to help mitigate long-term shoulder wear and fatigue.
Considerations for High-Volume Shooting:
Preserving shoulder health.
Extending shooting sessions without discomfort.
Custom Shotgun Stocks
Tailor-Made for Individual Needs
Custom stocks are crafted to fit an individual shooter’s specific physique and preferences. A custom fitting session with a stock maker can result in a shotgun stock that feels like an extension of the shooter’s body, potentially improving every aspect of shotgun handling.
Custom Fitting Benefits:
Precise adjustments to suit body measurements.
Craftsmanship that matches personal style and comfort requirements.
Process of Custom Stock Fitting
The custom stock fitting process often involves measuring a shooter’s dimensions and shooting stance. A stock maker then uses these measurements to craft a stock tailored for optimum fit and performance.
Custom Stock Fitting Steps:
Detailed measurement of the shooter’s physique.
Consideration of shooting style and discipline.
Creation of a stock that satisfies functional and aesthetic demands.
Costs and Benefits of Customization
While custom shotgun stocks can be a significant investment, many shooters find that the benefits in comfort, performance, and enjoyment are well worth the expense.
Custom Stock Considerations:
Higher cost compared to off-the-shelf stocks.
Long-term value in improved shooting results and satisfaction.
Tactical and Specialist Shotgun Stocks
Specialized Stocks for Law Enforcement and Military
Tactical and specialist shotgun stocks are designed to meet the stringent requirements of law enforcement and military operations. Features such as adjustability, rugged construction, and additional accessory mounting options are commonplace.
Key Features for Tactical Stocks:
Robustness to withstand rough handling.
Modular designs for attaching lights, lasers, and slings.
Conclusion
Tactical stocks often feature design elements that facilitate rapid deployment and manipulation under stress. Materials used in these stocks are typically chosen for their durability and functionality in adverse conditions.
Elements of Tactical Stock Design:
Non-slip surfaces for secure grip in all conditions.
Ergonomic shape to accommodate rapid movement and positioning.
When considering the 8.6 Blackout, the wrong question to ask is “Is it better than what we already have?” The right question to ask is “Is this the coolest cartridge design on the market?” The answer to the first question is “only for specific use cases.” The answer to the second question is, unquestionably, “YES!”
In essence, 8.6 Blackout is designed to shoot heavy .338 caliber bullets at modest supersonic or quiet subsonic speeds for hunting or self defense. The cartridge is unique for its radical 1:3 twist rate which produces extreme rotational energy to aid its terminal performance and allows it to shoot accurately with subsonic ammunition.The design allows for shorter barrels and subsonic ammunition to be used.
Despite its uniqueness, the western hunter will struggle mightily to understand the 8.6 Blackout after seeing the following table.
8.6 Blackout.338 Win Mag.308 Win
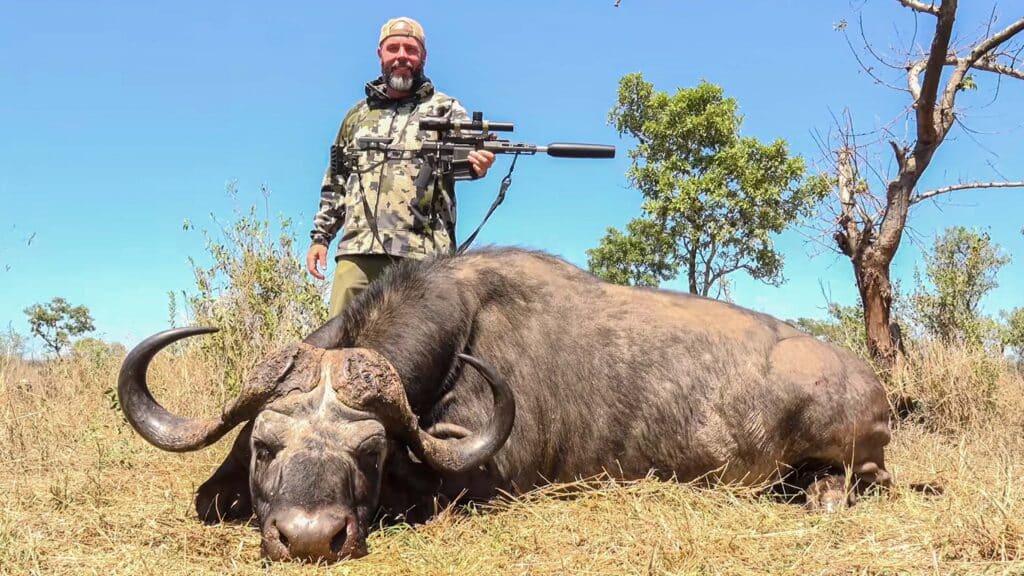
If you value flat-shooting traditional hunting rounds, then the above table would end your interest in 8.6 Blackout. Then, you see photos like one below, and you say. Wait, what? That guy killed a CAPE BUFFALO with a semi-auto rifle with a tiny 12-inch barrel? Suddenly, any hunter’s interest is piqued.
Kevin Brittingham from Q took a cape buffalo with a tiny 12″ barreled rifle chambered in 8.6 Blackout
There are many advantages of the 8.6 Blackout which have never been possible with existing cartridge designs, but they only make sense if you’re willing to take a non-traditional look at what a hunting rifle could become.
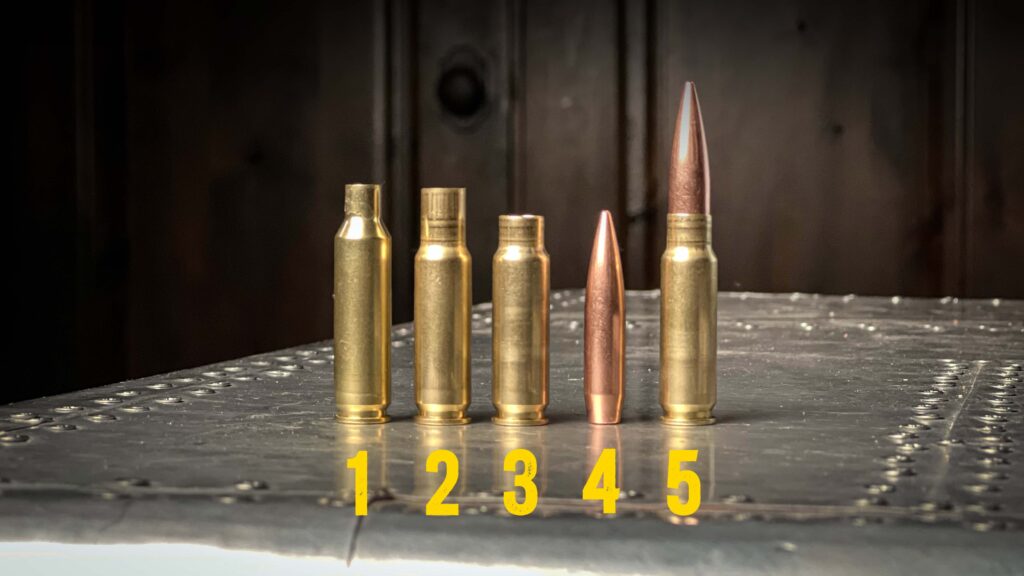
1 – A typical 6.5 Creedmoor case is the parent case for the 8.6 Blackout
2 – Put a 6.5 Creedmoor case in an 8.6 Blackout reloading die, and drop the press. You end up with a much expanded neck to fit the large bullet, and a shoulder pushed quite a bit lower
3 – Trim the case from step 2, and you have a fully prepared 8.6 Blackout case (that might require some neck turning)
4 – Grab a gigantic bullet to put in your 8.6 Blackout. Notice that this Sierra 225 MatchKing bullet is even longer than the case
5 – A completed 8.6 Blackout cartridge
Comparing 8.6 Blackout to Similar Cartridges
Not surprisingly, the most comparable cartridge to the 8.6 Blackout is its little sister-the .300 Blackout. The .300 Blackout is essentially a .223 case necked up for a giant bullet that allows the cartridge to shoot supersonic or subsonic with heavy-weight penetration.
The 8.6 Blackout essentially accomplishes a similar purpose, but in a much more powerful platform.
Rifles Available in 8.6 Blackout
So far, only three companies produce rifles in the 8.6 Blackout cartridge: Q, Faxon, and Gorilla.
Most people looking to get an 8.6 Blackout rifle will likely end up looking at Faxon Firearms. They make relatively inexpensive barrels for the AR-10 platform (commissions earned). If you already have an AR-10, you can simply screw on one of their barrels and you’re done.
For complete rifles, Faxon has two options: their bolt-action Overwatch, and the AR-10 Sentinel. I personally have their Sentinel AR-10 rifle, and I can confidently say it’s the nicest AR-10 I’ve ever owned.
Q makes high-end rifles with the “cool factor.” They have produced some very innovative suppressors, rifles like “The Fix” and now a cartridge. Looking through their website, the only model I could currently see being produced in 8.6 Blackout is The Fix as a 12″ SBR (meaning you’ll need a tax stamp and enough patience to wait for the ATF).
Gorilla Ammo also produces complete firearms. They have their GF10 Lightweight Hunting Rifle as well as their GF Bolt Action Rifle available in very limited quantities.
Prediction: Will 8.6 Blackout Take Off?
I see 8.6 Blackout is a boutique cartridge.
As a hunting cartridge, it isn’t flat shooting enough to whet the appetite of western hunters. They want cartridges like the new 7mm PRC. Eastern hunters shooting whitetail aren’t exactly clamoring for more power to kill a whitetail. They want cartridges like the 6.5 Creedmoor, or even a lever action 30-30. It frankly isn’t that hard to kill a whitetail at short range. Midwest Hunters are looking to straight-wall cartridges to follow strict state laws.
There is, however, one huge factor that may help to push 8.6 Blackout. It’s the Hornady factor. Hornady manufactures a giant amount of 6.5 Creedmoor ammunition and has worked with Q to produce brass for early production. When Hornady sorts through its backlog, I would expect them to begin producing 8.6 Blackout since they already do production runs for 6.5 Creedmoor brass, and I doubt they’ll miss an opportunity to play with a cartridge that opens up a completely new engineering need for unique bullet designs.
If the last 20 years teaches us anything, it’s that if Hornady touches a cartridge, it’s probably going to take off.
Reloading 8.6 Blackout
Since I had a bucket of 6.5 Creedmoor brass, I chose to convert that brass to 8.6 Blackout rather than waiting for brass to become available. I’m glad I didn’t wait, because it ended up being a rather enjoyable process.
I was informed by others online that Hornady 6.5 Creedmoor brass was the best option for converting, so I blindly obeyed like a sheep.
I used the Lyman dies in 8.6 Blackout which were very inexpensive. I tried other Lyman dies before that I didn’t like, but this one worked out perfectly.
I kept the expander ball in the die and went down slowly into the case, backing off and coming back down every few millimeters since it is quite a stretch from 6.5mm to 8.6mm. It would have been much better to use an expander mandrel and slowly step up each caliber to 8.6mm, but I wasn’t reloading for precision and wanted quicker results.
The brass looked pretty good at this point. The brass around the shoulder had tiny waves, but it was minimal enough for me not to be concerned.
This left a large neck on the case, which I simply ran through my Frankford Arsenal Case Trim and Prep Center to shave down. I used a trim to length of 1.675″ given that the specified case length was 1.685.” I wish there were more detailed reloading data available, but that was my best estimate for a good “trim to” length. Please, however, don’t rely on my data because I’m a layman and not a ballistician.
The next issue is the neck thickness. Unfortunately, my first batch of ammo produced too thick of a neck, so it wouldn’t fully chamber. I highly recommend the Sheridan case gauge checker for 8.6 Blackout, which was recommended to me originally on the AP2020 Youtube channel.
Next, I loaded the case with Accurate 1680 powder, which was a new powder for me. It’s extremely fine-so fine that I found it very difficult to meter and pour because the fine powder would stick in my funnel no matter what I tried.
I followed the load recommendations from Q which are published on the Faxon website. They are included below.
When doing load development, only use information from the powder or firearms manufacturer-not random blogs like this one. Always start load development low when working with supersonic rounds and work up, or vice-versa for subsonic rounds. Do not use this information for developing loads. It is for academic purposes only and may contain errors.
Crappie readily bite for nearly everyone in the spring, but these panfish become more of a challenge to catch in the heat of summer.When the summertime sun raises water temperatures above the 80-degree mark, crappie seek deeper water and heavier cover. The fish still remain active though as they feed on schools of shad passing through the crappie’s hot-weather haunts.
On my home waters of Lake of the Ozarks, summertime crappie fishing poses two problems: heavy recreational boat traffic and a lack of visible cover. I solve the first problem by fishing early and late in the day to avoid traffic. Crappie tend to burrow into the middle of brush when recreational boaters churn up the water and it becomes difficult to position my boat in the rolling waves and properly present my lure through the brush.
Some fish can also be caught in the clear water early and late in the day, but mid-day action is slow as the crappie suspend over deep water. In the stained water areas of a lake, the fish stay shallower and are easier to catch throughout the day.
Minnows are the most popular summertime bait for anglers fishing a tight line off docks or spider rigging in boats. Since a crappie’s appetite is voracious during the summer, I select larger minnows (sometimes bigger than 3 inches) for my bait. I prefer using 2/0 and 3/0 hooks because the bigger hook is easier to remove from a crappie and the fish don’t swallow it as much as they do a smaller hook.
Jigs are also productive for summertime crappie. I use either a single 1/16-ounce jig for shooting docks or a double rig for vertically jigging above brush piles. The double rig consists of a 1/16-ounce jig spaced 18 inches above a 1/8-ounce jig at the end of my line.
While my home lake lacks visible cover, Truman Lake is another one of my favorite summertime crappie fisheries that has plenty of it. Lots of standing timber was left in Truman when the Army Corps of Engineers filled the lake.The lowland lake has more turbid water so crappie can be caught in both shallow and deep water in the summertime. A shallow-water pattern produces best when a summertime shad hatch occurs, but for most of the summer you need to fish deeper water.
How To Fish For Crappie In Deep Water
The shallow pattern consists of dipping minnows with a long pole and slip-bobber system in timber along fence rows and tree lines on the main lake or creek channel. You can catch these fish less than 10 feet deep and sometimes even as shallow as 2 feet. The slip-bobber system allows you to adjust your bobber up or down to find the magic depth in which the crappie are holding. Use number 2 or 4 hooks and pinch on a couple of number 5 split shots about 2 to 3 inches above the hook. Keeping the weight close to the minnow will restrict its movement to prevent hang-ups in the heavy cover.
Summertime Crappie Fishing: Deep Water
The deep-water pattern works best in timber along main lake bluffs and channel swings during the hottest part of summer. The fish will vary in depth from 15 to 25 feet depending on the lake’s thermocline. The same slip-bobber rig used for catching shallow crappie also works in the deeper water because the fish will be suspended in the timber. If it’s too windy the bobber will bounce too much in the waves and make your presentation look unnatural. Remove the slip bobber rig then and present your minnow vertically on a tight line next to the timber to trigger a bite.Try these patterns for crappie action as hot as the summertime weather.
A guide to targeting catfish during the winter freeze.
Angler Darren Troseth catches a channel catfish through the ice in Minnesota
Fishing guide Darren Troseth of 3 Rivers Fishing Adventures in Minnesota has targeted catfish on rivers in the St. Cloud area for several decades. In 2007 he discovered the thrill of targeting catfish through the ice, mostly out of necessity since open water is scarce during Minnesota’s brutal winter months.
“Compared to all other fish of the same size, catfish will put up just as good or better of a fight than anything else in the winter so I was drawn to them,” said Troseth.
Troseth carefully targets specific waterways where he knows there are large populations of catfish and he only goes after channel catfish as they are the most active. He seeks out bodies of water that are the warmest in the winter to find the deeper holes and areas with current. Since the ideal spots for catfish have the most inconsistent ice thickness safety is his top concern.
“Safety is very important, especially in areas of moving current and early/late ice. Basic knowledge of how ice forms and paying attention to recent weather patterns need to be part of the routine. People should always be using a spud bar to check ice thickness and wear safety picks, especially during early ice. A floatation type suit such as the Striker Ice Suit is a great idea too,” said Troseth.
The sluggish bottom-feeders are finicky when it comes to surviving the winter. They mostly lay low until spring so they will test your patience and skills. You significantly increase your chances of a bite if you know where to look and how to prepare. Here is some of the top advice for experiencing the fun and unpredictable surprise of ice fishing that can not only step up your catfishing game but change it entirely.
Channel catfish are the most common type of catfish to catch through the ice as they are more active than other species
Understand catfish winter behavior Catfish look for warmer water in the winter months so they are deeper (20-feet deep in many cases). Look for places with a soft bottom and structure or deep slow-moving water where catfish cluster and move together.
Location
Start with the most obvious places such as deep holes and breaks in the water. If you are fishing the tributaries off of a major river you want to target the outside bends of creek channels in 15-25 feet of water.
Water column Just because catfish migrate to deeper water doesn’t mean they are on the bottom. The feeders will suspend above the bottom from three-feet to 10-feet. Getting the bait in this “strike zone” is imperative. Anywhere above or below and the bite won’t happen. In the winter catfish are less motivated to go after food and have a slower metabolism so bait has to be presented properly.
Finding the fish If the fish are not showing on the sonar, keep moving to areas of current such as the narrows between islands or bridges. Since catfish move in schools, they should be visible. The low light periods between 4-8 p.m. are best.
Bait Don’t be afraid to use non-traditional baits and recharge often (at least once an hour) to maximize the scent.
“Some of our best nights have been using a small piece of chicken liver,” said Troseth. “I have also found that using a “glow” jig DOES help with the bite. Glow red and green are my favorites.”
Catfish angler Darren Troseth shows off a hearty channel catfish caught through the ice after scouting out Minnesota lakes with large populations.
Experimentation Winter fishing requires experimentation. If you can see the catfish on the fish finder but they are not biting then you need to change something. You can try different depth, change the bait, or try movement in the presentation.
Tackle A combination of tip-ups and a medium to heavy rod works well for channel catfish or you can use an automatic fisherman device. The ideal line is 8-10 pound ice braid and a fishing leader. As for hooks, use a thick single wire hook since most ice fishing spoons are not made for the strong jaws and soft lips of catfish.
Presentation Very rarely will winter cats just come up and smack your bait. Cold water cats have a tendency to “taste” the bait and swim around it. They may hit it with their whiskers, circle around it some more and even go vertical by coming up from underneath to push it up. Try jigging a little to get their attention but do not overdo it or you will scare them.
Assess the bite Pay close attention to your bite detection. The majority of cold water cats are light biters. Sometimes they will barely pull a float under or even move a spring bobber during the winter.
Final thoughts Some of the best ice catfishing happens on natural lakes and rivers in states with the biggest freeze like Minnesota, Wisconsin, North Dakota, and Iowa. With a little practice and consulting with locals in the area, ice fishing for catfish can open up a whole new direction for catfish anglers.
Editors Note: For a detailed primer on ice fishing in general visit the OnTrack Fishing site.
Unveiling the truth behind dry firing a Gamo air rifle, this intriguing headline delves into the possibility of safely practicing without ammunition. Join us...
")
")
")
")
")