Home Blog Page 19

Reverse Sear Venison

0

Reverse Sear for the Win!

Simple equation of: Meat + Heat = Awesome. Yes, but there are some other things at play here. The equation comes out to be: Meat + (rate and intensity) Heat = Awesome, more or less. Scorching hot direct radiant heat is great for caramelizing the outside, creating a desired sear, and getting the fancy grill marks. However a piece of thick steak will get over charred and become well done on the outside while leaving the inside raw, leaving a bitter outside and cold inside. Indirect heat, or placing steak along side of the heat source, utilizes convection heat which slows the cooking process. Smoker grills use this style of cooking because it gives time for the heat to slowly work, allowing for more of the meat to be cooked to desired doneness. However it does take a long time, and getting a sear is difficult.

Reverse Sear embraces both styles of heating; convection and radiation to give your steak the largest amount of your desired sweet spot and a beautiful caramelized sear. Now, I can understand why some would say, “Why would you go through this whole process? My method works great.” Let me explain.

Wildgame is LEAN. Marbled fat in meat can act as insurance, to add moisture to a steak. Where a beef ribeye can handle longer periods of direct heat, venison backstrap cannot, leaving your veni gold overdone and dry. Cooking lower and slower extends your window of sweet spot cooking.

Speaking of sweet spot cooking. Reverse Sear lessens the “bullseye” effect of a steak. When cooking over direct heat, the outermost layer will be well done, and then a ring of medium, and a ring a medium rare, then finally a center spot of rare, resembling a bullseye. Reverse sear allows you to get add heat slowly, allowing the middle to come to desired temp, before the outside has exceeded that desired temp range. Leaving a consistent cook throughout the whole steak.

Sous vide is still expensive. What was once only attainable by restaurants, water immersion cooking, called sous vide is now available in the home kitchen. Set the temp on the machine or wand and the water stays consistently at that temp. Allowing for precise control, and prefect desired doneness. The only drawback is the price for one of these units is still a couple hundred dollars for a quality unit. Reverse Sear can give you similar results without an expensive purchase of a specialized tool.

Reverse Sear can be used on not just small cuts, which prevent from over cooking, but can be used for larger cuts to ensure proper cook all the way through. Using a probe thermometer or thermo-pen, a whole haunch could be cooked to medium rare with the same technique as a tenderloin.

Oh, and seeing how you are already searing in a pan at the end, you might as well make a pan sauce using those stuck on bits. Little bit of stock, little bit of cream, touch of mustard, salt and pepper, and you are adding extra distance to an already home run piece of meat.

What follows is a 9 step breakdown of doing a Reverse Sear. The basic idea is oven before pan, leave it to me to over complicate it. My bold statement is this, follow these steps and you will not be sorry, in fact you will start using this method more and more and get really good at it. I can’t say it will change your life, but bets are that you will post your outstanding results for everyone to see. Just make sure you hashtag Huntavore when you do.

Equipment:

  • Sheet Pan
  • Wire Rack
  • Probe Thermometer/Thermo Pen
  • Cast Iron Pan or Grill

Cooking:

  1. Preheat oven to 300F
  2. Season the cut of venison with salt and pepper (or whatever you like). I like to put the salt and pepper on a plate and roll the venison in it, get good coverage.
  3. Place wire rack on the sheet pan, then set the meat on the rack. Let the meat come up to room temperature.
  4. Once meat is at room temp and oven is preheated, set the whole thing in the oven. Time will depend on size of the cut or thickness of the steak.
  5. First thermometer check the center of the meat at 20 minutes. Based on how close your internal temperature has gotten, and how fast its rising, adjust check times. PRO TIP: I set a timer or I tend to check too often. “If your lookin, you ain’t cookin.”
  6. Pull the meat 5 degrees before your desired doneness. The current heat in the meat will finish the cook as you rest the venison or steak (5-10 minutes).
  7. As the meat rests, get your grill or pan hot. Add oil or butter (personally I add both) and then set the meat in the center. Give each side 30-45 seconds to let a good sear form. Make sure to hit the edges as well. HEADS UP! Steam and smoke will be a factor here, nothing to be alarmed about.
  8. Baste butter and oil over the top as the bottom sears. Remove from heat. Total sear time as little as 1-2 minutes depending on how you desire your sear.
  9. Slice, plate, serve, be a hero!

Do Bears Attack and Eat Cats? Facts & FAQ

0
bear head

Humans are typically afraid of bears and for good reason. They are big, loud, powerful, and downright intimidating. Figurately, our fear of bears is not typically warranted because bears pose little threat to us overall. Black bears, which are the most common bears humans tend to come across, are responsible for an average of one human death each year in the United States. Being around bears in the wild is less risky than driving in a vehicle.

The truth is that a bear would rather run away from a human than engage with them. So, if they try to avoid humans, do they do the same with cats? The short answer is yes, bears will almost always ignore or distance themselves from a cat that they might come across. But there is more to the story, so continue reading to find out!

divider-cat

Why Don’t Bears Usually Attack and Eat Cats?

There are multiple reasons that bears are not big threats to cats. First and foremost, cats do not usually reside in areas where bears are found unless they live near the woods or on a rural farm. Secondly, large wild cats have been known to attack bears and win, so bears may be naturally inclined to avoid felines, no matter their size. Cats are typically too fast for bears to catch up with, so they probably could not attack a cat even if they come across one. Chances are that they would run away from a cat that tried to approach them.

bear featured,Karin Jaehne, Shutterstock
Image Credit: Karin Jaehne, Shutterstock

Why Would a Bear Attack a Cat?

The biggest reason that a bear might feel the need to attack a cat is if the cat does something that is perceived as threatening, like getting between a mother and her cubs. Trying to take control over a source of food could be another reason for a bear to attack any living creature, even a cat. The threat of danger or control over food would have to seem imminent to get a reaction out of a bear. However, the chance of your cat doing anything to enrage a bear is slim.

Would a Bear Eat a Cat That They Attack?

Bears are omnivores but they eat little meat. Most of their protein comes in the form of fish and small land mammals, like rabbits. So, they may or may not eat a cat that they attack. To them, it would simply be a source of food if they are hungry. If they have recently eaten, they may leave the cat and move on. It all depends on the specific circumstances.

divider-cat

What You Can Do to Enhance Your Cat’s Safety

If you are worried about your cat coming across a bear that could harm them while spending time outside, there are a few things that you can do to help protect them. Start by attaching a large bell on your cat’s collar so they will make constant noise whenever they are moving around outside. This will help ensure that a bear does not get caught off guard and react more intensely than is necessary if your cat goes near them. The noise should also help keep bears from getting too close to your cat.

If bears are commonly seen around your property, it is a good idea to keep an eye on your cat whenever they spend time outdoors. If they tend to wander off on their own, consider using a leash to ensure that you can keep tabs on them. Keep bear spray on hand just in case you come across a bear during your outings, as it will help protect you both and provide you with extra peace of mind.

divider-paw

Summary

Fortunately, we do not have to worry about bears attacking and eating our cats. The chance is extremely low, even when living in “bear country.” However, it is always good to know about the risks of bear attacks on cats and how to minimize those risks. Do you live near bears, or have you ever encountered one close up? If so, we would love for you to tell us about your experiences by leaving a comment.

Related Reads:

  • Do Bears Attack and Eat Rabbits?
  • 14 Bear Attack Statistics & Facts to Know: How Many Attacks Happen Every Year?
  • 12 Canada Bear Attack Statistics & Facts to Know: How Many Attacks Happen Every Year?

Featured Image credit: Pexels from Pixabay

Air Guns Handling Guide – What you should know before buying your first air rifle

0

If you have already become a happy owner of a pneumatic gun or are just about to become one, this article about handling weapons safely is for you. Remember that any gun is not a toy, and you should follow a number of rules regarding the installation and removal of the tank, loading, and unloading of the gun, handling and taking care of the guns.

air guns handling guide


Do not demonstrate the gun in a large crowd of people, as this may mislead those around you, and they may mistake it for a firearm. Be sure to read all instructions before using a gun and remember that you must follow all of them (handling & possession). 90% of all accidents with air guns are due to careless handling, the perception that a gun is not loaded when it actually is and aiming it at an inappropriate target. All these cases can be avoided if a shooter handles a weapon responsibly and correctly.

General Precautions

1. Handle the gun as if it is loaded, just like you would handle a firearm .

2. Always aim in and keep the barrel pointing in a safe direction. Choose only a target that cannot be shot through and make sure that pellets will not bounce off it because of its hard surface. Never shoot into water even if you are in your own backyard.. Never point your gun at people or animals, or anything else that you are not going to shoot.

what you should know before buying your first air rifle


3. Keep your grip safety activated until you are ready to shoot. Do not pull the trigger when the grip safety activated (a pellet can get stuck in the barrel). As in any mechanical devices, the grip may fail. Even when the grip safety is activated, handle it with caution. Never point the gun at anyone or at anything you do not want to shoot.

4. When you take the gun from someone or from a safe, check if it’s discharged and the grip safety is activated.

5. Do not touch the trigger until you are ready to shoot.

6. Use special goggles while shooting.

7. If you wear eyeglasses, put the goggles on top of those.

8. Always use .177 (4.5) caliber pellets.

9. Never reuse pellets.

10. Keep the trigger, if any, locked when storing.

11. Keep your gun in a safe place at your house without pellets and CO2 cylinders.

12. Before storing the gun, make sure it is discharged and secured.

13. Do not forget that any repair of the gun is carried out only in special workshops.

do not touch the trigger until you are ready to shoot

14. Never let a loaded gun out of your hand.

15. An air gun, together with its instructions, may only be handed over to persons over 18 y/o and familiar with the principles of handling weapons.

16. Do not modify your gun. Changes may not be compatible with the design of the gun and will be contrary to these instructions. The use of such weapons can cause serious injury or death. It will also void the warranty on the gun.

17. If you have dropped your gun, inspect and check it carefully before using it again. If something changes, like the stroke of the trigger, it could mean damage to or destruction of parts of the gun. If this happens, contact a service department.

CO2 Cylinder Installation and Removal

Keep your hands and face out away from vaporizing CO2 gas. If the gas gets into contact with the skin, it can cause rapid cooling and frostbite. Before removing the cylinder from the air gun, make sure that the CO2 cylinder is empty. Slowly turn the cap counterclockwise until the noise of the vaporizing CO2 gas stops.

never let a loaded gun out of your hand

When installing and removing the CO2 cylinder:

  • Make sure that the air gun is not loaded and its grip safety is activated.
  • Slowly turn the cap counterclockwise until the noise of vaporizing CO2 gas stops. Make sure it’s all out.
  • Open the tube lid and remove the empty CO2 cylinder with the air gun barrel pointing down.
  • Insert a new cylinder/cartridge into the air gun mag with the neck facing forward.
  • Screw in the gas cylinder cap.
  • Point the air gun in a safe direction, remove the safety catch and pull the trigger.
  • If the air gun does not pop after pulling the trigger, the cylinder has not been pierced. Slightly screw the cap, slingshot the slide, and fire again until the pops are heard, it means that gas is released each time the trigger is pulled.
  • Check the grip safety.

Do not store your air gun with the cylinder inside.

Important: The CO2 cylinder may explode at temperatures above 50°C.  Do not deform or burn cylinders. Do not heat or store them at temperatures above 50C°.

Pellets Loading and Removal

Always use .177 (4.5) caliber diabolo pellets with a maximum length of 6.5 mm when firing air guns. Do not use BB (metal balls), darts, or other unsuitable projectiles for rifled barrels. The use of non-standard bullets may cause damage to you or your gun. Never reuse bullets.

Loading the pellets:

  • Check the grip safety.
  • Point the gun in a safe direction.
  • Follow the instructions of your air gun to load the pellets.
  • Before shooting, make sure that the slide is pushed forward and locked.

Discharge by shooting is the easiest way to remove a pellet. Shoot in a safe direction.

shoot in a safe direction

Discharge without shooting:

  • Activate grip safety.
  • Remove the CO2 cylinder.
  • Pull the slide back and open the barrel.
  • Insert a suitable size brush into the barrel. The barrel may be damaged if you use an incorrectly sized brush.
  • Push the pellet into the pellet ejection port direction.

If a pellet does not come out of the gun, it does not mean that there are no more of them in the mag. Shooting with insufficient CO2 pressure may cause a pellet to stuck in the barrel. If it is not possible to make a shot, it could be due to a dud caused by a pellet.

Handling

Before cleaning your air gun (grip safety) make sure there is no pellet in the barrel and remove the CO2 cylinder. The external metal parts of the gun should be cleaned from time to time. Use a soft cloth and gun oil for this purpose. The gun must be lubricated regularly after every 250 shots in order to function properly and avoid corrosion. Apply 2 to 3 drops of gun oil on external parts and inside the compression chamber. Use only airgun-rated oils. With proper care and proper handling, your gun will bring you pleasure for many years.

Author bio: Roy Emerson is a technology enthusiast, a loving father of twins, a programmer in a custom software company. Editor in chief of TheHomeDweller blog, greedy reader, and gardener.


7mm Rem Mag vs .300 Win Mag – Cartridge Comparison

0

In this cartridge comparison of the 7mm Rem Mag vs .300 Win Mag, we are dealing with two cartridges that each carry loyal users and often find themselves the subject of heated debate on numerous firearm forums and within hunting lodges. Both cartridges were released to the public hardly a year apart and further adds to the rivalry that has been raging. Regardless of where your allegiances are situated in this topic, hopefully you are coming into this with an open mind, because both of these magnum rounds are tremendous cartridges and their popularity and longevity in such a cutthroat field speaks in volumes to their performance.

For two cartridges that overlap in so many applications, it is easy to get on the path of trying to determine which cartridge is better. We are not here to lobby for one cartridge over the other. Instead, we want to present the numbers and discuss any strengths and weakness of both cartridges. By doing this, you as a reader has a better resource and source of knowledge to make your own decision.

We will look at several ballistic categories as well as other performance specs throughout the article, and we hope that in the end, you come away with information for a more educated decision based on your hunting and shooting needs.

A Brief History

While some of you might have no interest in the history of either of these rounds, we not only think it is interesting, but we think that if you have an idea of why these cartridges were designed and produced gives you a better understanding of their intended uses. Below you can find some very, very brief histories of these two cartridges.

7mm Remington Magnum

The 7mm Rem Mag has become over recent years, one of the most popular magnum rounds on the market for hunting purposes. It was released to the civilian market in 1962 and quickly gained popularity in the hunting world. This cartridge was able to match and even excel in several ballistic categories compared to the .30-06, one of the most popular long range, big game cartridges at the time, but the 7mm rem came with much more tolerable recoil when compared to other magnum cartridges on the market.

The 7mm Rem Mag is a flat shooting round that is available in a good selection of bullet weights, though maybe not as many as the .300 Win Mag. The majority of bullet weights used for the 7mm rem mag rounds for hunting purposes fall between 150 and 180gr though there are outliers of lighter and heavier bullets.

300 Winchester Magnum

The .300 Win Mag came into production by Winchester in 1963. When comparing to other popular hunting rounds, including other 30-cal bullets the .300 Win Mag is a newcomer. If you look around the internet long, you will find that there are circles of devout followers and also unbelievers in the .300 Win Mag for various reasons. In our opinion, it can’t be denied that this cartridge can fill several hunting needs and is the reason for its continued existence and in our opinion, one of the best magnum rounds of its caliber class.

This cartridge can be packed with large amounts of powder giving it a huge advantage in velocity and the ability to carry a large amount of energy over a greater distance. The cartridge is also able to be to take a variety of bullet weights. Most weights are within the 150-200 grain range, but there are several lighter and heavier rounds available. It is also available in a wide array of bullet styles which gives it a lot of versatility

This is an extremely popular caliber for long-range shooters including those chasing big game. The .300 Win Mag is not only a hunting caliber but is also favored by long range competitive shooters. While this cartridge has been and is still used in sharp shooting corners of the military, the majority of its action is found in the hunting world.

Specs

7mm Rem Mag300 Win Mag Parent Case.375 H&H Magnum.375 H&H Magnum Bullet Diameter.284”.308” Neck Diameter.315”.339” Base Diameter.532”.532” Case Length2.5”2.62” Overall Length3.29”3.34” Case Capacity82gr93.8gr Max Pressure (SAAMI)61,000psi64,000psi

Both the 7mm Rem Mag and the .300 Win Mag were designed from the same parent casing, but their final dimensions do have some very significant differences. We first notice that the caliber of bullets that the casings will accept are different. As the names imply, the .300 Win Mag takes a 30-cal (.308″) bullet, while the 7mm Rem Mag takes a smaller caliber (.284″) bullet. The case and overall length of the .300 Win Mag are slightly longer than the 7mm RM, and its overall case capacity has a larger volume.

While the .300 Win Mag has a higher case capacity and can take higher pressures, it also must send heavier grain bullets down range while maintaining necessary terminal ballistics. The 7mm Rem Mag, on the other hand, is using lighter bullets. Because of this, it will be interesting to see how these two cartridges stack up in various performance categories.

To do this, we have selected five popular rounds from each cartridge that include several different bullet weights and intended applications. For the sake of clarity and brevity, we decided on only five selections each. If your favorite round is not on the list, it’s not because we don’t think it’s a round worthy to take in the field. We have to cut it off somewhere. Below we have listed our ten selections to be used in this article.

Because a lot of the discussion is going to revolve around these ten rounds, and because we are very aware of the possible issues when trying to use a small sample size to extrapolate performance to a much larger field, we have compiled extra rounds for each cartridge. While we will not be graphing all of these rounds (that would be a nightmare for your eyes) we have calculated averages for both and will present those at the end of each section. This way, you can have more data at your disposal if you are looking to make a decision, and it will also check our small sample group and help us confirm that the results we are seeing is accurate for the cartridges as a whole.

These are factory loads, and the performance data we are looking at comes from the manufacturer’s website and well trusted and accurate ballistic performance calculators. While this is fine for comparing specific rounds, it doesn’t mean that the numbers are set in stone. It also means that if you look around at handloading website, you are going to see numbers that sometimes vastly outperform the rounds we will be looking at in this article. While hand loading and the art of balancing the various components that go into a cartridge is a topic worth discussing, it is beyond the scope of this article.

It is also not uncommon to see slightly different performance firing these rounds from your rifle compared to computer generated data. You might see slower velocities as well as changes in bullet energy and trajectory. This is common, and most are not even aware that this occurs and when it does, it is usually not a noticeable difference. What we are saying is that the differences in performance shown here will translate to differences in performance for you when using the same firearms chambered for each cartridge, so the comparisons made here are still valid.

Recoil

While most experienced hunters or competitive shooters are not too concerned with the amount of recoil, others still might be, and those with less experience definitely are concerned about recoil. And recoil does play a role in choosing a cartridge, especially if you are dealing with a decision on cartridges that can be used for similar applications. In our opinion, you can become accustomed to any recoil within reason it still stands that certain amounts can cause you to flinch or close your eyes before a shot.

We used a ballistics calculator to generate the recoil energy (ft.lb) generated from firing each of the ten rounds that we have chosen for comparison. It is important to make clear that we are looking at recoil energy and not the actual kick or felt recoil, though increased recoil energy for one round over another will often translate to increased felt recoil of the same round.

Quite a few factors can influence the recoil such as bullet weight, the amount of powder, as well as the firearm weight. We have kept some of these variables as constants to better compare the two cartridges. We kept both of these cartridges with being fired with a 9lb firearm, and the powder loads were selected from load data. Because we are looking at factory loads, we were very conservative with the amount of powder as factory loads are often loaded with grain in far less amount than the max capacity.

So as you can see, these numbers are pretty fluid and can fluctuate depending on a variety of factors. As long as you keep those variables constant from round to round, the trends we see are going to remain the same.

So, let’s take a look at the recoil energy of the ten rounds now (Graph 1).
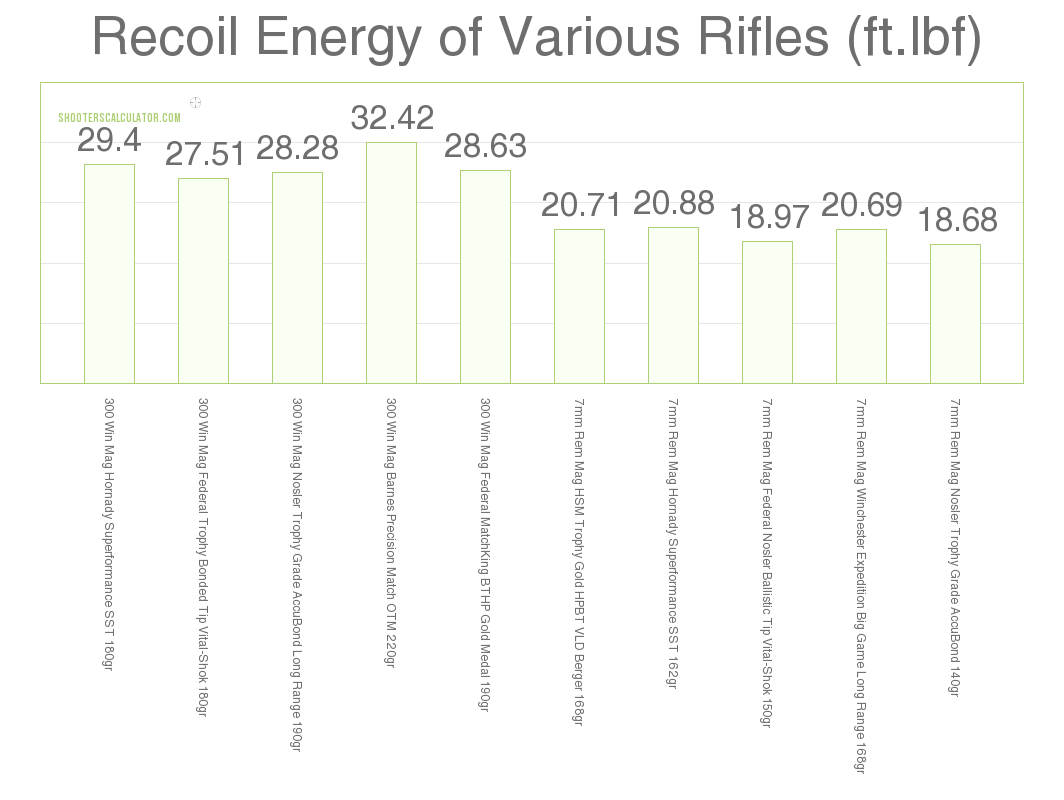
Recoil 7mm Rem Mag vs .300 Win Mag

When we look at this graph, we see a clear and distinct difference in recoil energies produced from these two cartridges. All five of the .300 Win Mag rounds produced between 27 and 32ft.lb of energy, between 7 and 14 more ft.lb of recoil energy than the 7mm Rem Mag rounds.

A rule of thumb that a lot of shooters go by is that 20ft.lb of recoil energy can influence the shot and even be uncomfortable for some shooters. Again, this is all relative and depends on who is holding the gun. If we do go by this rule, the 7mm Rem Mag rounds still could be troublesome for some hunters and marksmen though still a good bit lighter than the .300 Win Mag rounds.

When you have two cartridges that overlap in a lot of shooting situations each category deserves some consideration. For such a difference in recoil, it usually means there is a performance spec out there that the recoil energy is resultant from. Let’s continue and see what we find.

Let’s take a look at the how the recoil energy between these two cartridges compare when we work with a larger data set. You will find these tables at the end of each section throughout the article.

Average Recoil (ft.lb)

.300 Winchester Magnum7mm Remington Magnum 27.322.1

The recoil energy for these rounds was generated as we described earlier and used the same variables. With the larger sample size, we see the same trend that we saw above. The .300 Win Mag, on average, is generating around five ft.lb more recoil energy than the 7mm RM rounds and if you look at the individual rounds (not shown) they tend to group pretty tightly by cartridge type though there are some outliers for both cartridges as is often the case.

Ballistics

If you’re looking at a cartridge comparison, you are going to end up looking at the ballistic categories. If you’re a hunter, competitor, or just enjoy shooting, understanding how your cartridge of choice behaves in flight and understanding its limitations is critical to your level of success

In this section, we will take a look at several ballistic categories including the velocity, the ballistic coefficient, as well as the short and long range trajectory of the 7mm Rem Mag vs .300 Win Mag. After we have examined these sections, we should have a much clearer understanding of where these cartridges excel and where they fall short and will let us begin teasing apart applications one cartridge might be favored over the other. Of course, it might also tell us that both are more than capable of doing the same thing efficiently and effectively.

Velocity

The velocity is an interesting and critical performance spec for any cartridge comparison. While we will examine it as a standalone performance category, velocity has its hand in just about all other performance specs of a cartridge. It influences recoil, trajectory, and it even influences stopping power of the bullet in several different ways.

While you need a certain amount of velocity to get the proper terminal ballistics, there is a fine line between too little and too much velocity. It is a common mistake to think that the maximal velocity you can get out of a round means a better overall performance. If you load a round too hot it can lead to extreme pressures that become very dangerous for the shooter. If the round is not paired with the correct twist rate of the barrel, the bullet can be highly unstable in flight and become highly inaccurate.

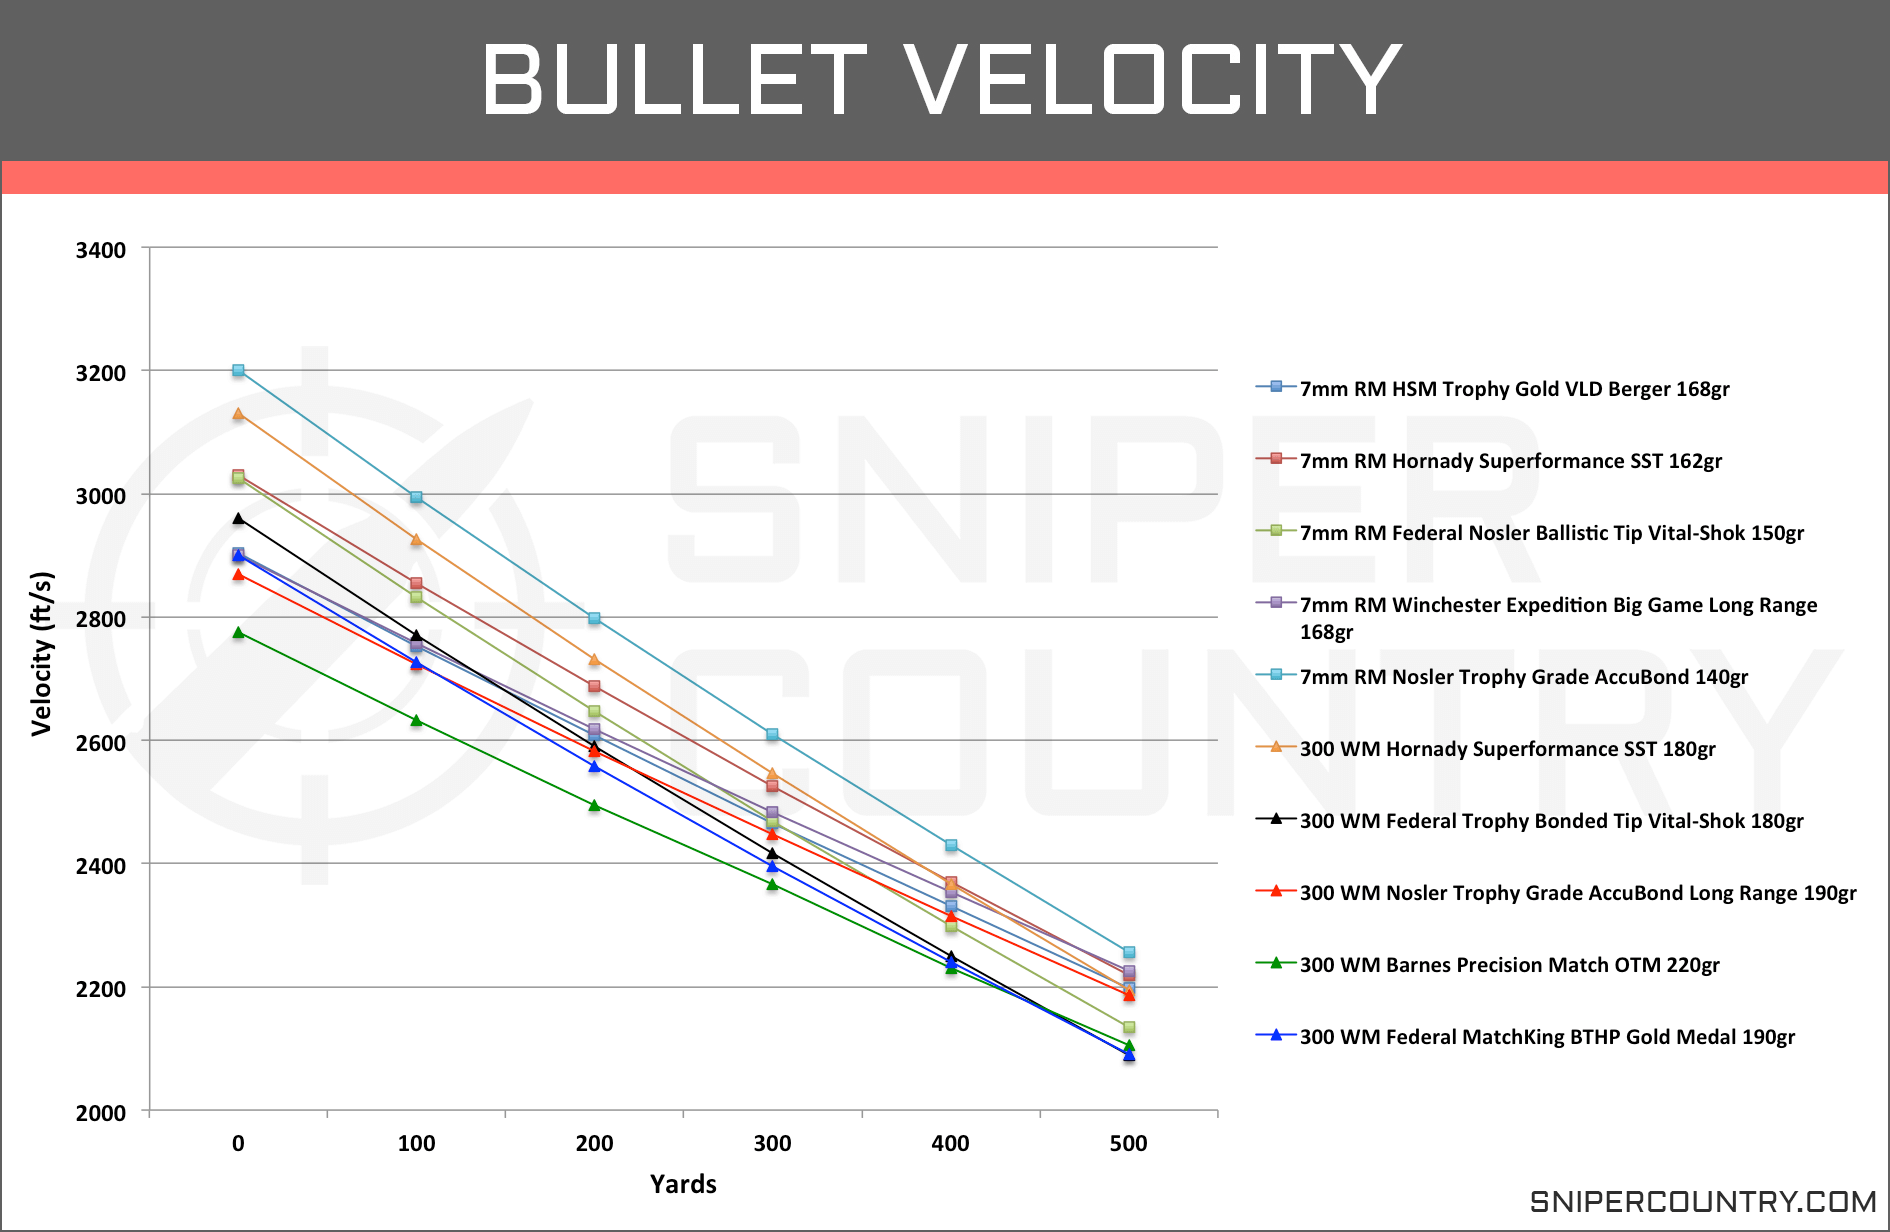
We have compiled the velocities of the ten selected rounds from the manufacturer’s websites and have listed them here. We are looking at the ft/s of each bullet as it moves from the muzzle out to 500 yards (Graph 2).

Bullet Velocity 7mm Rem Mag vs .300 Win Mag

The first thing that jumped out at us as we looked at this data is that unlike the recoil, there is not a cartridge that has an overall greater amount of velocity. Both the .300 Win Mag and 7mm Rem Mag have specific rounds that show a much higher velocity and also rounds that fall lower on the graph.

If we were to take averages of all the rounds, then there would be a slight advantage to for the 7mm Rem Mag rounds at each yard marker and each time the difference is less than 100fps. Now, 100fps for some might be a bigger deal than others, but keep in mind it’s only an average. There are 7mm Rm rounds that outperform some .300 Win Mag and vice versa.

Both cartridges maintain supersonic speeds over a 500-yard range and will maintain that rating over several hundred more yards. This is more than enough velocity to get proper terminal ballistics for these rounds but keep in mind some of these are not intended for hunting purposes.

From what we are looking at from these factory loads, velocity is definitely a wash between the 7mm Rem Mag vs .300 Win Mag, but that might not be the case when we bring in more data. Below you will find the velocity averages for the two cartridges.

Average Velocity (ft/s)

Yards.300 WM7mm RM Muzzle2976.43031.5 1002773.32828 20025902634 30023902442.7 4002236.42267 5002055.82098.2

When we look at more rounds for each cartridge, we still see that the 7mm RM has higher velocities than the .300 WM rounds at each marker through the bullet’s range. And, like the smaller sample set that we just looked at in our graph, the difference between the two cartridge’s average is less than 100fps at each yard marker.

With two cartridges that have the potential and the reputation for long range shooting, we wanted to also look at how long these cartridges can stay in supersonic flight. We have listed the average cutoff for supersonic flight in the table below.

Average Supersonic Limit (Yards)

7mm Remington Magnum.300 Winchester Magnum 1292.11258.75

We are interested in how long these rounds can maintain supersonic flight because it influences the calculations you will have to make to be accurate with long range shots. When a bullet falls below this speed barrier, its slight is less stable than it initially was and environmental factors begin to have more noticeable influence on the round. When you know when these effects start occurring, you can adjust accordingly or go with a round that might give you more flight time at these speeds.

With these two cartridges, we see fairly similar limits for supersonic flight though the 7mm RM rounds have, on average, 36 more yards of supersonic speed. In the grand scheme of things, we don’t know if that is enough to sway you towards one cartridge or the other without taking into consideration other performance specs. We do know what there is a lot of range in the limits for both cartridges.

Ballistic Coefficient

The ballistic coefficient is derived from an equation that includes input variables from specific cartridge specifications including bullet dimensions and velocity. The physics and math behind the ballistic coefficient and its implications, while interesting, is not something we are going to attempt to convey in this article, but we do urge you to check it out.

In the simplest explanation possible, the ballistic coefficient gives you an idea of how well a bullet is streamlined and how well it can overcome air resistance. The higher the BC, the better the bullet can cut through the wind, meaning it resists drag and wind drift much more efficiently than a bullet with a lower BC. As you can imagine, this makes the BC a relevant piece of information for both long range competition shooters and hunters alike.

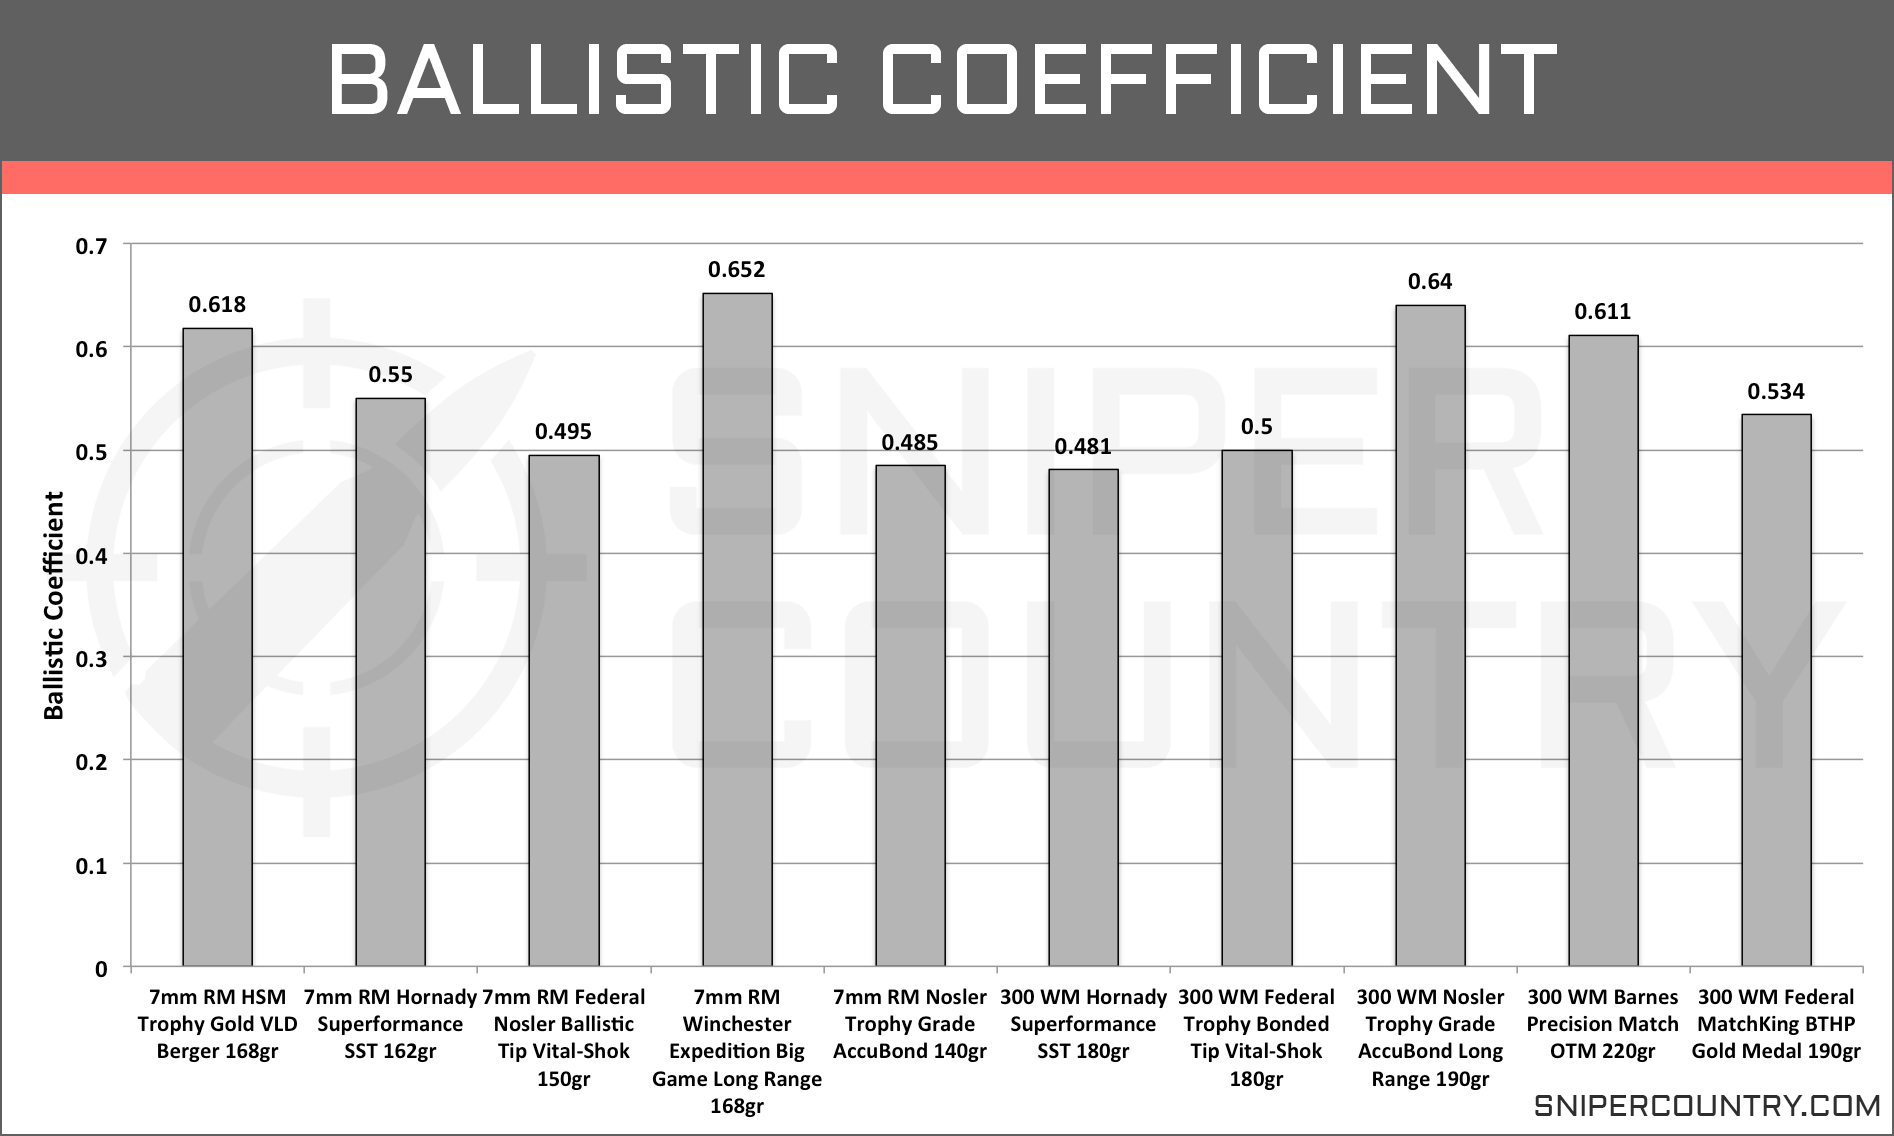
We have compiled the G1(for comparison of all bullet types) ballistic coefficients for each of the ten rounds and listed them here (Graph 3).
Ballistic Coefficient 7mm Rem Mag vs .300 Win Mag

As with the velocity, we see a lot of variation in BCs throughout all ten selected rounds and within each cartridge class. Both of these cartridges sports rounds with ballistic coefficients well over .45 and each have rounds with BCs above the .6 mark.

If you’re interested in the averages, the 7mm Rem Mag has an average BC of .56 while the .300 Win Mag has an average BC of .553. Though there is a slight difference in the averages, we don’t think it is a fair way to decide which of the cartridges have the better ballistic coefficients. If you need a round that’s going to resist wind deflection and drag, both the 7mm RM and the .300 WM have options to get the job done.

BCs are also important in the trajectories of bullets. Higher BC rounds tend to have flatter trajectories. Since these two cartridges were nearly identical in their BC’s, let’s see if the same trend continues when you look at the short and long range trajectories. Before we move on to the trajectories of these two cartridges, take a look at the average BCs of the larger sample size. It is important to remember when looking at these averages, that they are just averages and you’re not shooting averages out the barrel. It does give you a better idea of which cartridge has more options for higher performance numbers for each specific category.

Average Ballistic Coefficient

.300 Winchester Magnum7mm Remington Magnum 0.4890.483

When we looked at averages of the smaller set, the 7mm RM had a .01 difference in the averages of the rounds. In the larger data set, the .300 Win Mag had a .006 advantage over the 7mm RM rounds. Obviously, there is no real difference in the BCs of these two cartridges. If you are wanting a BC in the .05+ range, there are options for that with both of these cartridges.

Trajectory

Look on any forum discussing shooting and the ballistics of a certain cartridge, and you are bound to see the topic of trajectories pop up. We’re don’t mean to insult anyone’s intelligence, and we are probably speaking to the choir here, but a bullet’s flight path is not a straight line but rather a parabolic shape. A bullet’s design, their BC, and the muzzle velocity all influence the trajectories.

So why exactly is trajectory important, more specific, why is how flat a trajectory is so important? Even with today’s rifle optics, you can ask anyone whether adjusting for a 45″ drop or a 65″ drop is easier and 45″ will be the answer every time. Not only are you taking into account elevation but wind as well. And for hunters, where you might not have all the time in the world to take a shot, the fewer variables you have to account for the better.

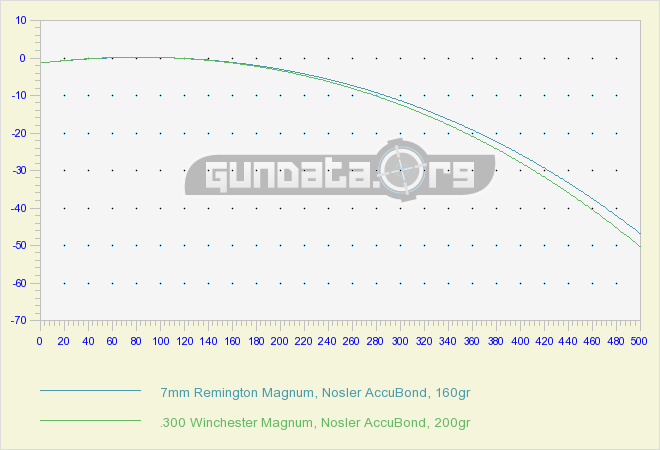
Before we launch into the short and long range trajectories, we wanted to step back and show the trajectory of two similar rounds, one for each cartridge, that uses the same bullet design and similar weights, as these cartridges allow, that come from the same manufacturer. With just two rounds, it might be easier to get an overall view of how these two cartridges stack up before we throw eight other rounds into the mix. (Graph 4).

Trajectory 7mm Rem Mag vs .300 Win Mag

From this graph, it is easy to see that these two cartridges show very similar trajectories out to 500 yards. In this case, the 7mm Rem Mag shows slightly less bullet drop than the .300 Win Mag round and even at their most distinguishable range, we are only looking at around 5” difference. And we can’t rule out the fact that we could change the bullet weights of these two rounds and close or widen the gap. With that in mind, let’s bring in a more diverse selection of rounds for each cartridge and see if we still see similar trajectories.

Short Range Trajectory

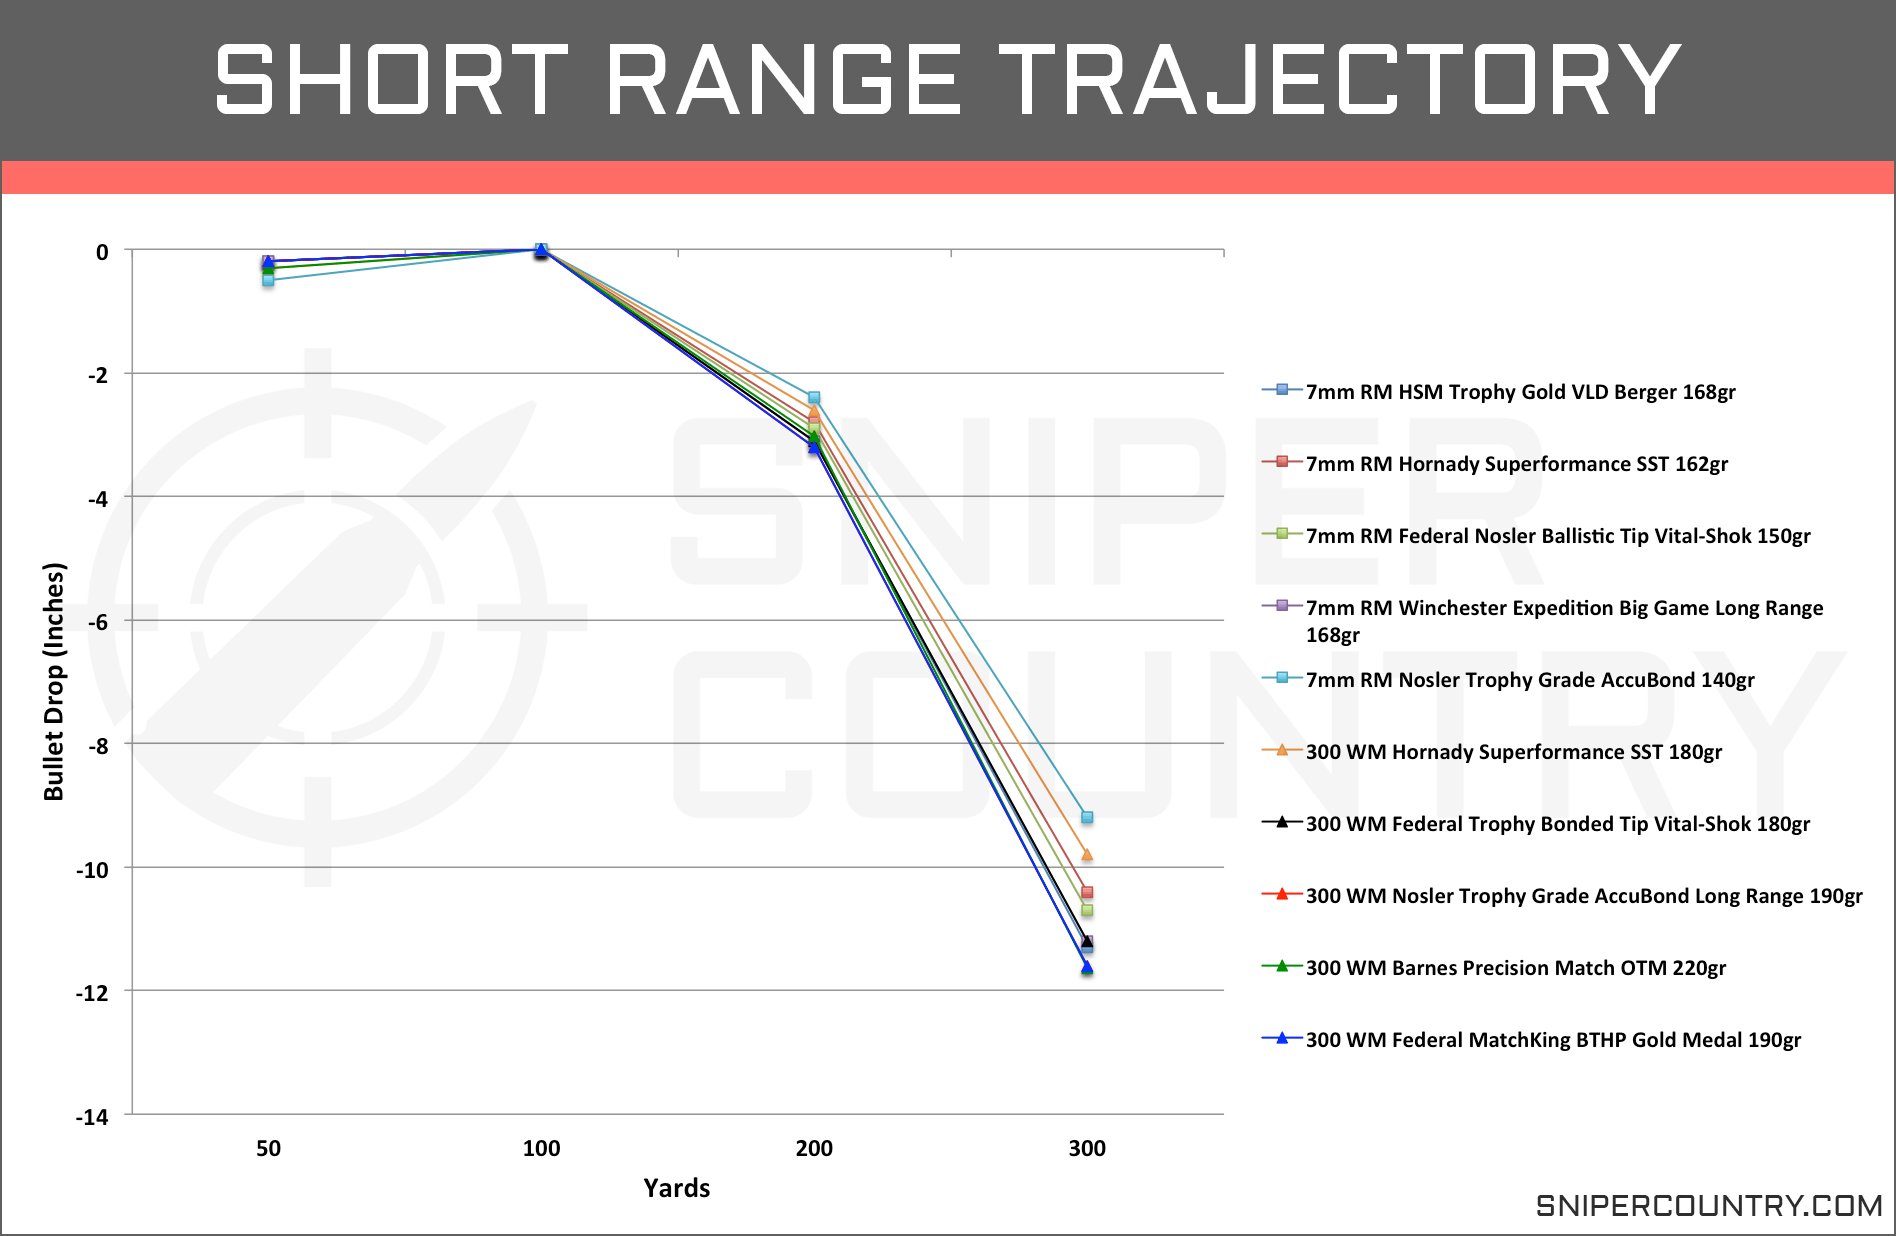
While both of these cartridges were designed with longer range capabilities in mind, they are both also hunting rounds, and with hunting, you are going to come across as much or more shots at targets within 300 yards depending on the terrain and the game. With that, we feel it’s important to look at the short range trajectories (Graph 5).
Short Range Trajectory 7mm Rem Mag vs .300 Win Mag

We are looking at the bullet drop (inches) from the 50 to 300 yards with the firearm zeroed in at 100 yards.

At the 200 yard mark, all ten of these rounds are clustered very tightly with a difference of only .7” between the flattest and steepest round. We also do not see any trend towards one cartridge having a flatter trajectory than the other. In fact, the flattest shooting and steepest dropping round are both 7mm Rem Mag rounds.

As we move out the 300-yard mark, there is a little more spread between the rounds but still no clear cut advantage for one cartridge over the other. And when we say spread out we are still looking at a range of less than 2.5”. The top two performing rounds are a 7mm Rem Mag and a .300 Win Mag option, and they only have a difference of .6″.

We are again seeing that both of these cartridges are performing very similarly. If you want a flat shooting round for short hunting situations, both the 7mm RM and the .300 WM are going to get the job done.

Below, you will find the numbers for the larger data set. We have also included an additional 400 yard marker as there are certain hunting situations where this range can be a normal shooting distance.

Average Bullet Drop (Inches) at Short Range

Yards7mm RM.300 WM 50-0.23-0.193 10000 200-2.8-2.9 300-10.7-11 400-24.5-25.6

Just as with the smaller set of rounds we just looked at, these two cartridges are nearly identical in their trajectories. The 7mm RM has a flatter trajectory throughout the bullet’s range, but the largest difference seen between the two cartridges is only 0.9 inches at the 400 yard mark. With that type of similarity, it’s hard to even say it’s an advantage. At these normal hunting ranges, you are not going to get an advantage by going with one cartridge over the other. Instead, your advantage is going to be achieved by selecting from individual rounds and both the .300 WM and the 7mm RM have rounds with phenomenal trajectories.

Long Range Trajectory

Let’s step out and take a look at the trajectories of the 7mm Rem Mag vs .300 Win Mag at increased distances (Graph 6).

Long Range Trajectory 7mm Rem Mag vs .300 Win Mag

We are again looking at the bullet drop (inches) of the ten rounds, but now we are following them out to 700 yards with the firearm zeroed in at 200 yards.

At the 300 yard mark, we are looking at insignificant differences between the two cartridges. The averages of the rounds for each cartridge have a difference of less than .4”.

As we move out to more distant markers, we start to see more of an advantage for the 7mm RM though it is still fairly close, and there are several .300 Win Mag rounds that shoot as flat or flatter than several 7mm RM rounds. Before we list some these differences between the averages of the two cartridges, it’s important to keep in mind the applications you plan to use one or both cartridges for. For hunting purposes, shots out past 500 yards get pretty dicey so the 600 and 700-yard data points are not going to be as important to you as the .300 and 400 points.

Here are the differences in averages of the 7mm Rem Mag vs .300 Win Mag; 300yds (.34”), 400yds (1.32”), 500yds (2.62”), 600yds (3.08”), and 700yds (6.96”). To some these numbers aren’t going have any sway in their decision. For others, the trend of the 7mm RM losing altitude at a slower rate than the .300 Win Mag as you increase the distance is very important.

Though the averages give a slight advantage to the 7mm Rem Mag in flat trajectories, especially as it moves out to the 600 and 700 yards range, the two top performing rounds at each yardage marker was a 7mm RM and a .300 WM. You might have more options for flat shooting rounds for the 7mm RM but be aware that there are .300 WM rounds that can easily compete for flat trajectory.

In the table below, we have listed the average bullet drop for the two cartridges below. We have also added an additional 1,000 yard marker for those who like to push their limits.

Average Bullet Drop (Inches) at Long Range

Yards.300 WM7mm RM 1001.51.4 20000 300-6.7-6.4 400-19.5-18.8 500-39.5-37.9 700-104-101 1000-295.6-286.8

Like the smaller sample set and like the averages we saw when examining the short range trajectory, there is not a whole lot of difference between these cartridges. The 7mm Rem Mag rounds have a slightly flatter trajectory, on average, and this is most pronounced at 700+ yards, but when looking at individual rounds, there is a mixture of both cartridges from the high end of the bullet drop range to the flattest shooting rounds.

Stopping Power

In this next section, we are going to look at several sub-categories of stopping power. Stopping or knockdown power as some like to call it is going to be more important to those looking to utilize these cartridges for hunting purposes.

Stopping power is extremely important in a hunter’s decision for a cartridge. For us and the majority of hunters we know, putting down an animal quickly and humanely is of utmost importance. Not only is it because we don’t want the animal to get away and we don’t want to have to track it for miles, but we also respect the animals a great deal and letting one get away wounded is the last thing we want.

Unfortunately, there is no single measurement that is going to convey to us a cartridge’s stopping power, but there are several factors that influence stopping power such as bullet energy, penetration, and bullet expansion. The two former factors are something we can work with for comparing the 7mm Rem Mag vs .300 Win Mag with computer generated data. For penetration, we will actually look at two different metrics, the sectional density and the bullet momentum.

And while we do think understanding these components of stopping power is important, it is all worthless if you can’t put the right bullet where it needs to go. A small lack of force can be made up for with an accurate shot in the vitals.

Energy

When the powder in the casing is ignited, and the bullet is forced down the barrel and down range, that energy created from the burning powder is carried by the bullet. That kinetic energy is only one factor of a rounds stopping power, but it is an important one. We know from basic physics that if the cartridge can be fitted with larger and heavier bullets and sent downrange at increased speeds (more powder) than they should carry extra force with them. Because of this, we can easily compare two cartridges rather than having to look at the individual bullet types used.

When the bullet impacts the target, this kinetic energy is transferred to the surrounding tissue and organs causing massive damage. This transfer is also affected by how the bullet reacts on impact, such as how the bullet expands. More expansion causes a larger wound and also transfers the energy carried by the bullet more efficiently. Velocity is also a key component in a bullet’s ability to expand, but for now, we are just going to stick with comparing the energies of the rounds involved.

The amount of energy that is required to bring down game varies from animal to animal. While there are general rules of thumb for what is required, nothing is set in stone, and as we just mentioned, there is more involved than just bullet energies. Still, it is accepted that 1,000ft.lb of energy is a good mark for deer while 1,500ft.lb is more suitable for elk. As the species increase in size so does the amount of energy. And like we have mentioned before, using a proper bullet and putting it in the right spot can make up for lack of energy.

Let’s take a look at the bullet energies (ft.lb) of the ten selected rounds from the muzzle out to 500 yards (Graph 7).
Kinetic Energy 7mm Rem Mag vs .300 Win Mag

Unlike the last couple of performance categories we have looked at, here we see a distinct difference between the two cartridges more so than just between different rounds. From the muzzle out to 300 yards, all of the .300 Win Mag rounds show higher bullet energy than the 7mm Rem Mag rounds. Right from the muzzle, the lowest .300 Win Mag round is carrying 3,474ft.lb of force while the highest 7mm Rem Mag round is carrying 3,303ft.lb of force. The difference between the highest .300 Win Mag and the lowest 7mm Rem Mag round is even more drastic with a difference of 615ft.lb of force.

What is interesting is that as these rounds move downrange, the gap between the two cartridges begins to close. While the three .300 Win Mag rounds maintain their lead; the other two are tightly clustered with several 7mm Rem Mag rounds.

If we look at the averages of the two cartridges at the muzzle and 500 yards, we can see how much this gap closes. At the muzzle, the .300 Win Mag rounds have an average bullet energy of 3,640ft.lb while the 7mm Rem Mag rounds have an energy of 3,162ft.lbs. That’s a difference of 478ft.lb. By the time they reach the 500-yard mark, that difference is nearly cut in half to 224.4ft.lb of difference.

While the .300 Win Mag overall has higher bullet energy, the differences are not too extreme. You can cherry pick a round from each and see quite a bit of difference as we did earlier, but there are a lot that carries very similar energies, and we saw that as they travel downrange they even out even more. And for hunting purposes, we are not sure that an extra .300 ft.lb of force is going to make much of a difference. IF you put either of them in the vital zone, they are both going drop the animal.

Let’s see if the trends continue in the same direction when we look at more rounds for both cartridges.

Average Bullet Kinetic Energy (ft.lbs)

Yards7mm RM.300 WM 03140.83479 1002733.83029 2002372.52658.4 3002051.72290 40017661988.3 5001513.31741.3

When we bring in the extra rounds, we still observe the greater kinetic energy with the .300 Win Mag rounds at each yard marker along the bullet’s flight. And like earlier, as the rounds move downrange, the gap between the two did shrink. While this category was a little more clear cut when thinking about the difference between the cartridges as a whole, there are still instances where some of the 7mm Rem rounds produced KE around or above the average of the .300 WM rounds.

And what shouldn’t be lost, is that while the .300 Win Mag does seem to have more KE, the amount that the 7mm RM rounds generate are not insignificant. Both of these rounds produce enough KE to create a lot of damage on the largest North American game at all ranges most hunting shots are taken.

Penetration (Sectional Density)

Penetration is another component to a bullet’s stopping power that we want to address in this article. For a bullet to quickly kill an animal, it must reach the vital organs. When thinking about how much penetration is necessary, you also have to think about the type of game you are hunting. A mature bull moose is going to require more penetration than a whitetail deer.

There are several factors that influence the amount of penetration that is going to occur, other than the type of animal. Some of these factors include the velocity, the caliber of the bullet, the weight of the bullet, and the bullet’s design. In this section, we are going to look at the sectional density (SD), which is a number calculated from the caliber of the bullet, as well as its weight.

The sectional density correlates with the amount of penetration a bullet will have on the target, and since we are not looking at bullet types and designs in this article, we think the SD is a good means of comparison for two cartridges. And though it is fine for looking at now, when making your final decision on a specific round, it is important that you take into account all of the factors. Understanding your bullet design, how it expands, and the velocity needed for proper expansion and penetration is a huge can be the difference between a clean kill or an injured animal you have to track through the night.

So when you look at the SDs of various cartridges and specific rounds, higher SDs correlate to deeper penetrating bullets. As an example, let’s take two rounds, both are 100gr, but one has a diameter of .100″ and the second has a diameter of .200″. The .100″ bullet is going to have a larger SD than the .200″ bullet and theoretically, deeper penetration. This is because the force behind the bullet is localized to a smaller area and can drive the bullet deeper.

We can do the same exercise, but instead look how the weight of the bullet affects the SD. With two bullets, each with a .300” diameter with one weighing 100gr and the second 150gr, the 150gr is going to have a higher sectional density and deeper penetration.

We have calculated the sectional densities for all ten of the selected rounds have compiled them here (Graph 8).

Sectional Density 7mm Rem Mag vs .300 Win Mag

Like most ballistic and other performance specs we have looked at between the 7mm Rem Mag vs .300 Win Mag, there is not a whole lot of difference between the two cartridges. On average, the 7mm Rem Mag rounds have a SD of .279 while the .300 Win Mag rounds have an average SD of .289, a hundredth of a difference. Both cartridges have their rounds with heavier bullets and subsequent higher SDs.

Though the 7mm Rem Mag rounds are a smaller caliber than the .300 Win Mag rounds, they also have lighter bullets. This difference between the two leads us to rounds that have very similar SDs.

Average Sectional Density

.300 Winchester Magnum7mm Remington Magnum 0.2840.273

Again, with the larger set of rounds, we see the sameresults from earlier. The .300 Win Mag rounds show a slightly higher sectional density than the 7mm Rem Mag rounds.

Penetration (Momentum)

The second metric that we will use to get an idea of how these two cartridges compare in potential penetration is the momentum of the bullets. Moment is simply how well an object in motion will stay in motion. Meaning, how well can the object, a bullet in this case, overcome resistance and keep moving forward. The higher the momentum, the more the bullet can penetrate after encountering resistance. And, this is of course omitting the type of bullet that is being fired which in the field, is going to have to be taken into consideration. Though, for hunting purposes, just about all of the rounds for these two cartridges are going to be designed to hold together well and over controlled expansion.

It is also important to keep the sectional density in mind when looking at momentum. The higher the sectional density, the less resistance the bullet encounters because of the smaller area that is interacting with the target.

We have graphed the bullet momentum of our ten rounds and graphed them below (Graph 9).
Momentum 7mm Rem Mag vs .300 Win Mag

From this graph, we can see that the rounds do appear to group with rounds of their respective cartridge type. The averages definitely lean towards the .300 WM rounds for higher momentum. We do see that advantage begin to shrink as the rounds move downrange with an average difference of 12lb/ft.s at the muzzle and 9lb/ft.s at the 500 yard marker.

We do see that the Barnes .300 WM round is a big boost to the averages and without it, the average performance between these cartridges would be much similar. Let’s take a look at the larger sample set and see how the two compare. Even without the highest performing round, we still see the rounds from each cartridge grouping together pretty tightly. For the .300 Win Mag rounds, all of the them leave the muzzle with over 75lb/ft.s of momentum while all of the 7mm RM rounds are below the 70lb/ft.s mark. We also do not see any overlap between rounds of different cartridges until the 500 yard mark, and even then, it is only the highest performing 7mm RM round that matches the lowest performing .300 WM round. And when we say highest or lowest performing, we mean that in regards to only the momentum numbers.

Let’s take a look at the averages of the full data sets.

Average Bullet Momentum (lb/ft.s)

Yards.300 WM7mm RM Muzzle75.466.6 10070.762.2 20064.957.9 3006153.7 40057.249.5 50052.646

When we add in more rounds, we are still seeing the same trends as before. The .300 WM rounds are generating more momentum from the muzzle out to 500 yards. We do see the difference shrink by a few lbs/ft.s but overall, the .300 Win Mag seems to have the advantage if you are wanting more momentum.

These results shouldn’t be too surprising. Given that the mass and velocity make up bullet momentum and since there was very little difference in velocity between the cartridges and the .300 WM rounds have heavier bullets, it makes sense that they generate more momentum.

Accuracy

Trying to determine which cartridge is more accurate is always a task that makes us feel a little dirty. The best method of doing this is through hundreds of rounds through several days of shooting and measuring groupings. Even then, two people’s results can be drastically different. Heck, one person’s results can be different from day to day. And we’re not discounting that method, it can be very valuable, but you just have to be cautious of who you are getting that information from. We think which cartridge has the better accuracy comes down to the person pulling the trigger and their level of experience shooting said cartridge.

If we look at some of the ballistics data such as the ballistic coefficients and the trajectories, there is not a whole lot of difference between the two cartridges in either category. The 7mm Rem Mag had on average slightly higher BCs and slightly flatter trajectories out past 500 yards than the .300 WM rounds, but as we stated during those discussions, there are rounds for both that perform better than others. And if you need some extra power at short range the differences are nowhere enough to make you decide against the .300 Win Mag. In fact, we don’t think there is a big enough difference in these categories to make you lean one way or the other regarding accuracy from the data we have looked at here.

And you can’t discount the role recoil can play in accuracy. We think that most of you here reading this article would easily adjust to the increased recoil of the .300 Win Mag, but there might be some who could easily be thrown off by the kick. And if you’re a person who enjoys burning through a box or two at the range, that extra 10ft.lb of recoil can be fatiguing and lead to a decrease in accuracy over time.

It’s all nitpicking to us. We did feel the need to mention it, but both the 7mm Rem Mag and the .300 Win Mag cartridges can drive nails with some practice on your end, and they can do it from a distance.

Price & Availability

When we look at the price of the 7mm Rem Mag vs .300 Win Mag, it can vary from round to round. Just between cartridges, we don’t think there is enough of a difference to choose one over the other based on price. Each cartridge has cheaper boxes of ammunition and each has more expensive boxes. You can definitely save a few cents per round by looking into handloading for both of these cartridges.

As far as availability goes, just about every major ammunition company are loading .300 Win Mag and 7mm RM cartridges and most of them carry several different models of each. We don’t think there is any difference in availability between the two, though there is less compared to other popular hunting rounds. And with the internet at your disposal, finding exactly what you need has never been easier.

AmmunitionPrice (20 Rounds) 7mm RM HSM Trophy Gold VLD Berger 168gr$47.99 7mm RM Hornady Superformance SST 162gr$32.29 7mm RM Federal Nosler Ballistic Tip Vital-Shok 150gr$36.79 7mm RM Winchester Expedition Big Game Long Range 168gr$43.99 7mm RM Nosler Trophy Grade AccuBond 140gr$58.00 300 WM Hornady Superformance SST 180gr$30.99 300 WM Federal Trophy Bonded Tip Vital-Shok 180gr$46.99 300 WM Nosler Trophy Grade AccuBond Long Range 190gr$48.99 300 WM Barnes Precision Match OTM 220gr$48.99 300 WM Federal MatchKing BTHP Gold Medal 190gr$52.99

Applications

As we start top close out this comparison, let’s try to take the results we have found and start teasing apart certain applications of these cartridges might be better suited or maybe applications where you can’t go wrong with either.

We have also provided the average tables throughout the article below to make it a little easier for you as we move through this section.

For long range precision shooting, both of these rounds have options to get the job done. The 7mm Rem Mag rounds have more options for higher muzzle velocities, flatter trajectories, and better BCs which helps performance greatly downrange. That is not to say that there aren’t .300 Win Mag options that can give you very similar performances, but most would rather not deal with the increased recoil for dozens of shots within a short time frame.

While both of these rounds can function in long range precision shooting, the majority of users are going to be using them in a hunting capacity. Both the 7mm Rem Mag and the .300 Win Mag can be used for medium sized game such as deer, hogs, antelope, and sheep at just about any realistic hunting range. We really like the lighter 7mm Rem Mag rounds for these game animals. Overall, both rounds are really overkill for these game animals stopping power wise, but that extra range can be a game changer.

Both cartridges also have heavy enough bullets and the terminal ballistics to be used for larger game such as elk, moose, and more exotic game and still have a wide effective range. For bigger and more dangerous game, you might like the kinetic energy and larger bullets of the .300 Win Mag but as we discussed in the previous sections, we would be comfortable with either cartridge in these hunting scenarios.

We did see slightly higher sectional density numbers, on average for the .300 Win Mag and pretty significant differences in the momentum data with the edge going to the .300 Win Mag as well. Both of these combined, barring bullet design, indicate that the .300 Win Mag should have better penetration potential. And that is not to say that the 7mm RM rounds are not going to penetrate well. Given that the cartridge is still around tells you that it is able to bring down large game efficiently. If you were of the mind to get as much penetration as possible, the numbers say the .300 WM is better suited. Even so, it’s really more about picking the correct round rather than the correct cartridge.

Best Rounds

Before we wrap up this article, we want to take the ten rounds we have been looking at and pick a couple that we think fits certain applications well.

Top Hunting Round

For the 7mm Rem Mag rounds, we are big fans of the HSM Trophy Gold VLD Berger 168gr round. We think the 168gr bullet is a great weight for hunting purposes as it has a manageable recoil. It has one the best muzzle velocities and BCs of all the rounds we looked at so you have excellent downrange ballistics, including a flat trajectory. It doesn’t have the highest amount of energy associated with it, but with the excellent Berger VLD bullet and velocity, you get more than enough penetration and expansion to take medium to large game at common hunting ranges.

For the .300 Win Mag, our choice goes to the Nosler Trophy Grade AccuBond Long Range 190gr. Some of our reasons for selecting this round is the terminal ballistics and the stopping power. This round maintains over 2,000fps throughout a 500-yard flight, which is more than enough to cause proper expansion of the ballistic tip bullet. This speed along with the sectional density is going to be more than enough to penetrate to and through vital organs of big bull elk and moose at long ranges. It might be a bit of overkill for medium sized game and you might get a bit more damaged meat, but there is little doubt that it will put them down.

Conclusion

Both of these magnum rounds have been in circulation for just about the same amount of time. More than enough to have a good feel for their strengths and their weaknesses. The fact that both are still used and still a topic of debate should give you an idea that both can be highly effective rounds in the right hands and the right situations.

We hope that this cartridge comparison of the 7mm Rem Mag vs .300 Win Mag has given you an unbiased look at some of the ballistic and other performance properties of these two rounds. We also hope that you have come to the same conclusion as we have after researching these two cartridges. With practice, either one can easily become your go to round.

Ammunition List

Why We No Longer Refill Our 1 LB Propane Bottles

0

It wasn’t long after we first got into camping that we realized there must be a better solution for carrying propane for our Coleman stove than in the disposable one-pound cylinders. After finding out that fifty million of the steel canisters are disposed of each year by campers like us, and that a quarter-million of them simply become litter, we decided it was time for a better solution.

Full Disclosure: This post includes affiliate links to the adapters we use. Our readers never pay any extra when using these links and we may earn a small commission.

Thinking that we were doing the environmentally responsible thing, we bought a small brass adapter on eBay and began refilling our own 1 lb propane bottles, only to learn later that doing so makes them illegal to transport. One-time use, disposable propane cylinders aren’t designed to the same specifications as refillable ones, and thus aren’t lawfully transportable, according to the Department of Transportation. Thankfully, we never had any accidents while transporting our refilled bottles, yet if we had, we might have been liable for any damages and paid a hefty fine.

One Incident in 10 Years Was Enough

After about a decade of refilling used one-pound Coleman and Bernzomatic propane bottles, we only had one of them develop a leaking valve, after it had been re-used about ten times. About halfway down Old Monarch Pass, west of Salida, CO, we smelled propane wafting from our cooking gear box in the back of the Jeep and had to pull over to deal with a leaking 1 lb Coleman bottle. Gas wasn’t leaking from the small relief valve on the side of the cylinder (as sometimes happens with abrupt temperature changes) but rather from its main valve, which had probably began to wear out with reuse.

This incident was enough to convince us that (in addition to being illegal to transport) refilling our used one-pound propane canisters probably wasn’t the safest alternative.

From the DOT Website:

dot refill one pound cylinders
From the DOT’s website. At least one fatality has resulted from refilling DOT 39 cylinders (disposable 1 lb. type)
one lb propane to tank adapter
Adapter for one lb. propane cylinder to 20 lb. tank.

Refilling 1 lb Propane Cylinders (For Emergency Use Only)

If a situation ever arises where you really need to re-fill a Coleman or other one-pound disposable propane cylinder (for use in a Mr. Buddy portable heater during a blackout, for example) the simple process we used does work. However, there’s even a better way than this, which we’ll get to later.

Whichever method you use, always remember that propane is a dangerous, flammable gas, so performing this process carefully and safely is very important. The photos above show some of the steps we used to refill our disposable Coleman one-pound propane bottles.

There are many videos showing how to do this and our post isn’t meant to be a tutorial on how to do so, but we’ll explain the basic principle of how it works.

Turning to the left to tighten the bottle adapter onto the 20 lb. tank.

How We Once Refilled Our One-Pound Disposable Propane Canisters

Disclaimer: The following is not to be used as instructions and is for illustrative purposes only.

Back when we used to refill our used Coleman propane cylinders using the old method, we’d find a clear spot outside on a cool day when there was some breeze blowing. After purging the remaining gas from our one-pound cylinder, we attached it to an inverted 20 lb. tank, and slowly opened the main valve. After about thirty minutes, we’d close the main valve, return the tank to its normal upright position and unscrew the 1 lb. canister. A better description of the whole process can be found here, on a website that sells a tank adapter similar to the one we used.

(Some people chill their 1 lb. propane canisters in a small bucket of ice water, etc. This condenses the gas and lowers the pressure so you can refill with a bit more propane. Careful not to overfill!)

To make sure we hadn’t overfilled them, we’d always perform a quick check using an old postal scale to see that our newly refilled 1 lb. propane bottles wasn’t any heavier than a new store-bought one, as well as to check for leaks before storing it away.

Downsides of This Method

  • You typically can’t ever fill a 1 lb. bottle to the same level as when it was new. *
  • Unless you’re using a special stand, the upturned tank is awkward and can tip over.
  • Disposable 1 lb. bottles and their internal valves aren’t made to same standards as refillable ones.
  • DOT-39 cylinders (disposable type like Coleman, Bernzomatic) are illegal to transport if refilled.

* There is a way do get more gas into a cylinder, but it requires loosening the pressure-relief valve and/or chilling the bottle.

The Flame King kit includes this easy to use valve system, which is much simpler to work with than the one-piece brass fitting that we had been using – no wrench needed.

Two Better Alternatives To Refilling Used 1 Pound Propane Bottles.

Option 1 – Flame King 1 lb. Refillable Cylinders

Since learning that owner-refilled disposable cylinders aren’t legal to transport, and that they’re not made to the same specifications as refillable ones are, we switched to carrying a couple of DOT approved refillable one-pound propane cylinders, made by Flame King. This simple system uses a special filling valve with a long extension, along with an optional propane tank stand, which solved the problem we once had of inverting the 20 lb. tank during the refilling process.

Option 2 – 5 lb Refillable Mini Tanks

The Gas Growler holds lbs of propane, lasting that much longer than a one lb bottle.

A five pound refillable propane cylinder also works very well for fueling camping stoves, with the added benefit of lasing five times longer than 1 lb. bottles, and being refillable anywhere larger tanks are filled. The Gas Growler is one example of a five pound mini-tank that is easily stored in the back of a vehicle in it’s padded carrying case. Many in the overlanding community like to carry this size propane tank since one can last as long as a month, depending on how many meals you cook a day.

The Bottom Line: Should You Ever Refill a 1. lb Propane Cylinder?

Coleman, Bernzomatic and other brands of disposable propane cylinders don’t feature heavy-duty brass tank fittings or long-life internal valves. Disposable cylinders aren’t made with the same thickness of steel (just pick one up and you’ll feel the difference) nor do they have the DOT seal of approval for reuse which would make them legal for transport. However, when making the decision to refill a cylinder, the real reason you should avoid this practice is for your own safety and that of others, not for fear of being caught by the DOT.

Benefits of Refilling Your Disposable 1 lb Propane Bottles With a Flame King or Similar System

When it comes to saving money, using some kind of reusable, refillable propane cylinder for your Coleman stove is really a no-brainier. There are the environmental benefits as well, plus not having to deal with properly disposing of all the empty canisters at the end of the camping season. In terms of savings, it currently costs about $20 to fill a 20 lb tank, while a 1 lb bottle costs us around $5 at Walmart. It’s easy math, and you can clearly see that refilling an approved tank can save a lot of money over the long run.

This 5′ extension hose features an adapter that allows you to use a 20 lb. bottle to fuel your Coleman or other camping stove which uses 1 lb. bottles.

In addition to sometimes running our Coleman camping stove directly from a 20 lb. tank, using a 5′ propane adapter hose, we’ve also been using two 16.4 ounce Flame King propane cylinders. Because these are so easy to refill, we normally don’t bring a 20 lb bottle unless we plan on being gone for more than a week.

At about $52 for the Flame King Refill Kit, which includes one refillable cylinder, we estimate that we’ve saved enough this camping season so far to pay for it already.

Disclaimer: We don’t advocate refilling used disposable propane bottles. This article does not constitute instruction. When using any approved system to refill a re-usable 1 lb cylinder, be sure to follow all of the manufacturer’s instructions to the letter. Full Disclosure: This post may include affiliate links to products we recommend. Our readers never pay any extra when using those links.

Sources:

https://www.phmsa.dot.gov/regulatory-compliance/phmsa-guidance/stop-never-refill-1-lb-propane-bottles-0

What Is The Lightest PCP Air Rifle?

0

PCP air rifles are becoming more and more popular, as they provide a lot of power in a lightweight package. But which is the lightest PCP air rifle on the market? Keep reading to learn more!

The AEA Element is a lightweight, portable PCP air rifle that can be easily carried in any backpack or toolbox. Made almost completely from carbon fiber and sporting features like an ergonomic folding stock – it’s both lightweight (2.8 pounds without the scope) yet still durable enough for all sorts of outdoor adventures.

Features:

  • CALIBER: .22 – .25
  • Weight: 2.8 LBS
  • Barrel Length: 16 Inches
  • Overall Length: 35 Inches
  • Integral Shroud
  • Cocking System: Side Bolt Lever
  • Magazine Capacity: .22 Cal (10 shots) – .25 Cal (8 shots)
  • Air Filling Pressure: 3600 PSI
  • Air Tube Capacity: 180 CC
  • Muzzle Velocity: .22 Cal (1000 FPS ,14.3 GR) – .25 Cal (850 FPS, 24 GR)
  • Muzzle Energy .22 Cal 35 ft/lbs. (45 Joules) – .25 Cal 40 ft/lbs. (55 Joules)
  • Optics: Picatinny Rail Scope Mount

(For more on the best PCP air rifle on the market, see this post)

The Top 5 Fishing Lures Of All Time (Inshore Edition)

0

Want to know what the absolute best inshore fishing lures are?

We’re constantly getting questions from the Salt Strong community about what the best lures for inshore fishing are, what our favorite lures are and how to fish each lure for different inshore species.

We decided to answer your questions once and for all and show you the top five inshore fishing lures of all time!

To do that, we came together to talk about our favorite lures. We narrowed it down to five that we think every inshore angler should have in their tackle box.

In this podcast episode, we go over the top inshore fishing lures of all time and how to best use them.

Do you have a favorite inshore fishing lure? Have any questions about our top inshore fishing lures?

Let us know in the comments below!

To learn more about the best fishing lures for every kind of fishing and get access to exclusive fishing gear, don’t forget to check out the Salt Strong Insider Fishing Club.

The Top Five Inshore Fishing Lures

We’ve narrowed down the best five fishing lures for inshore fishing after extensive research and testing.

These lures have helped us catch literally thousands of fish. Being confident in how to use them can do the same for you.

In no particular order, the top five inshore fishing lures of all time are:

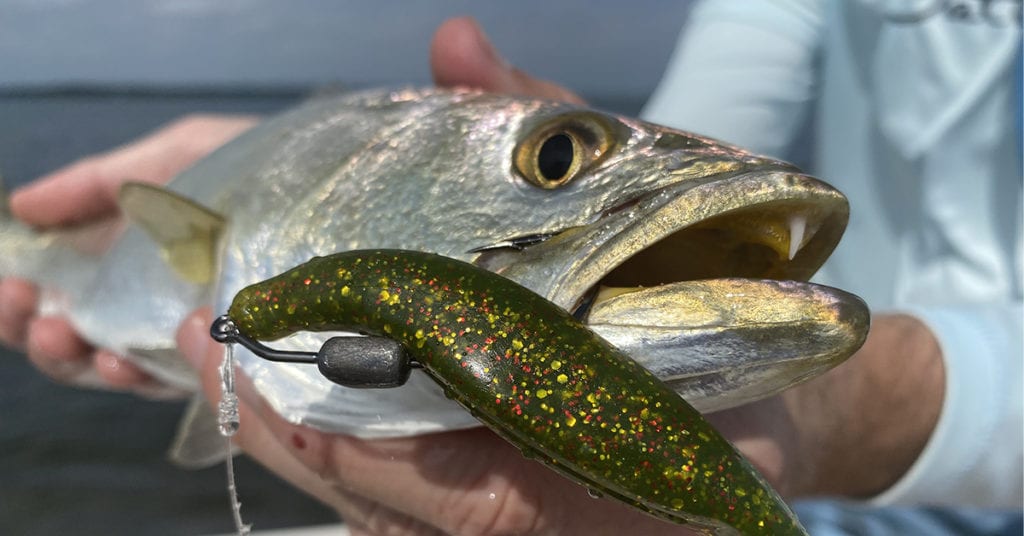
1. The Paddletail Lure

slam shady 2.0 trout attack

One of the best lures to find fish in new areas is the soft plastic paddletail on a jig head.

This is an inexpensive and easy-to-use lure that catches just about any inshore fish there is. It is especially effective for catching trout and redfish on the flats or near structure.

The paddletail jig can be worked with a straight retrieve or with a twitch-twitch motion bouncing it off the bottom. Both retrievals will catch fish.

There are many manufacturers of paddletail lures, so you have a ton to choose from.

Our personal favorite is the Slam Shady 2.0 paddletail.

It’s white with gold and silver flecks to attract fish, and the tail has incredible action that elicits tons of reaction strikes.

Click here to get a free pack to try out! (While supplies last.)

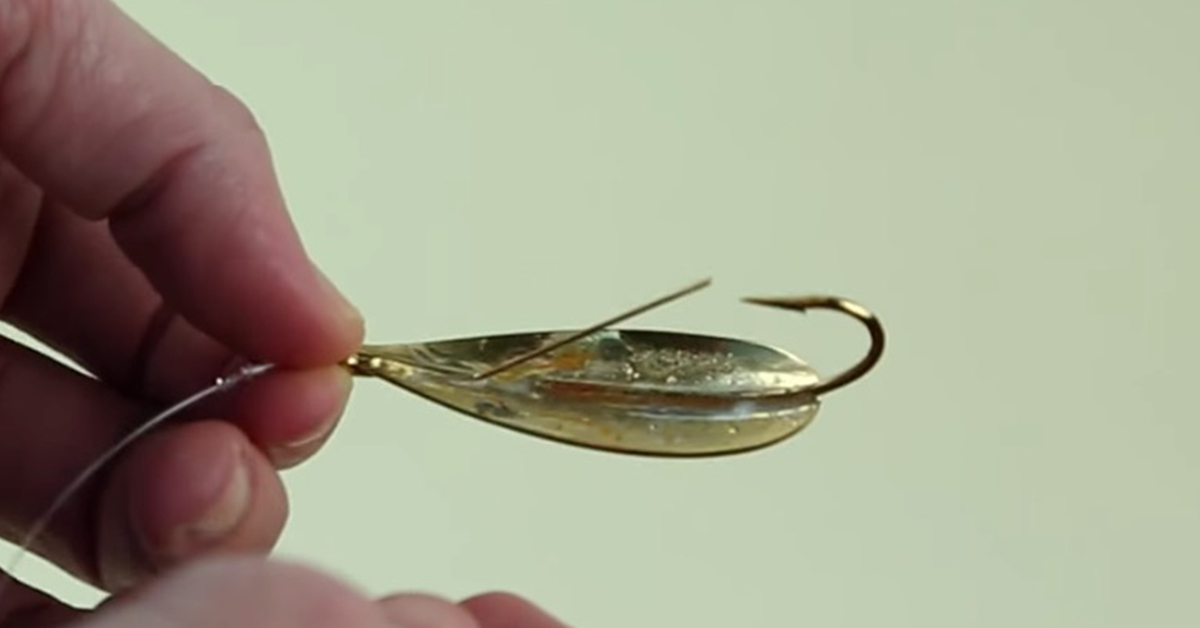
2. The Weedless Spoon

Gold Spoon Fishing Lure

This lure is a timeless classic that catches just about any kind of fish there is.

While these lures do not look spectacular compared to other fishing lures, they are extremely effective.

Spoons create a lot of vibrations and flash in the water. They are designed not to look like any prey in particular, but rather create a lot of commotion and flash that inshore fish cannot resist.

Gold spoons seem to be the most popular of all for inshore anglers, but almost any color can work just fine. Our personal favorite is the Johnson Minnow Spoon, which is a weedless spoon we can work through grass and mudflats.

3. Topwater Plugs

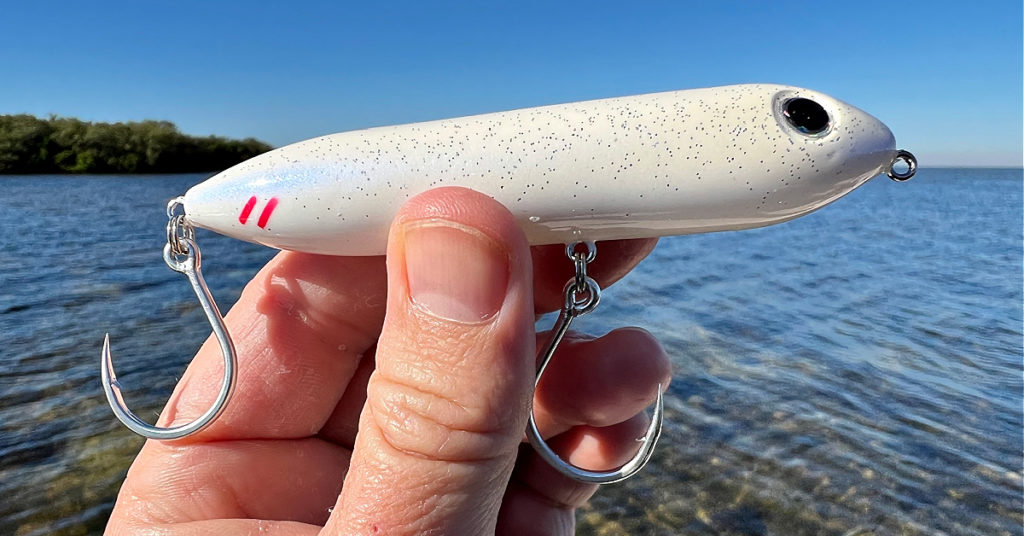
Possibly the most exciting way to catch fish, topwater lures are an effective way to entice inshore fish and produce explosive visual strikes.

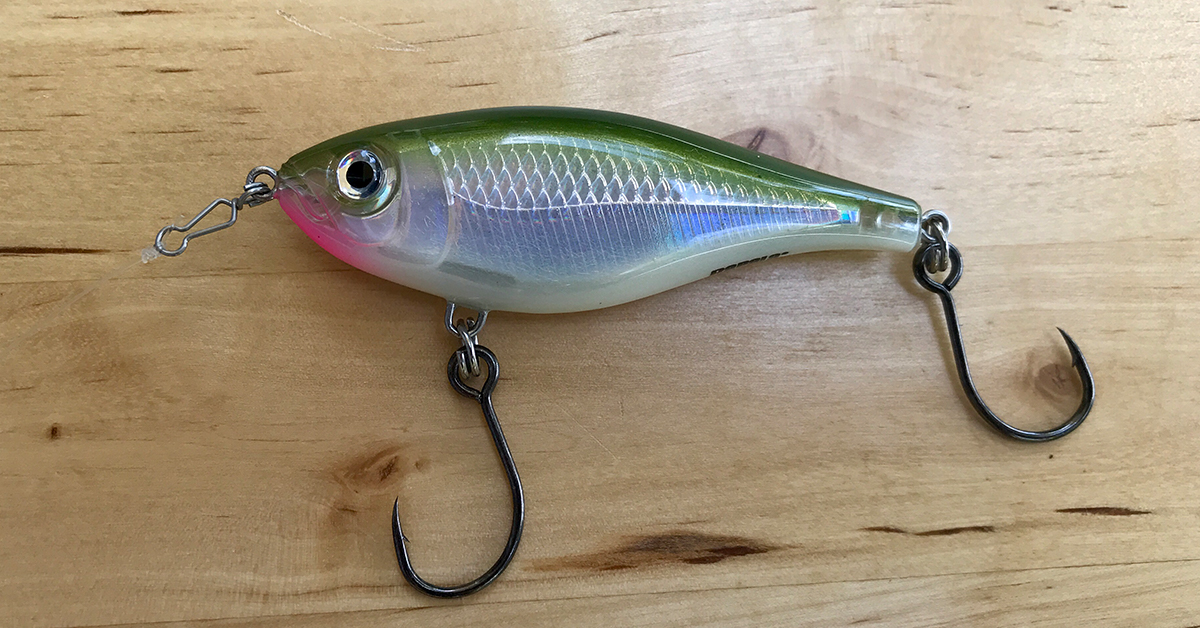
The “walk-the-dog” types of topwater lures are deadly just about anywhere there are inshore feeding fish. They are especially great over shallow water where fish do not have to rise up off the bottom too far to eat the lure.

Some of our favorite topwater plugs are the Heddon Super Spook and the Rapala Skitterwalk. We like to replace the treble hooks with single inline hooks to help keep ourselves safe and for protecting fish that are to be released. Single inline hooks dig into fish with hard mouths better than treble hooks – which is an important advantage when fishing for species such as tarpon.

Our favorite is our very own Moonwalker Topwater Lure.

Tip: fish topwater lures in the early morning and evening/night time for the best results. We particularly like the early morning because there is usually less floating debris (such as dead grass) than at night.

4. The Bucktail Jig

spro bucktail jig review

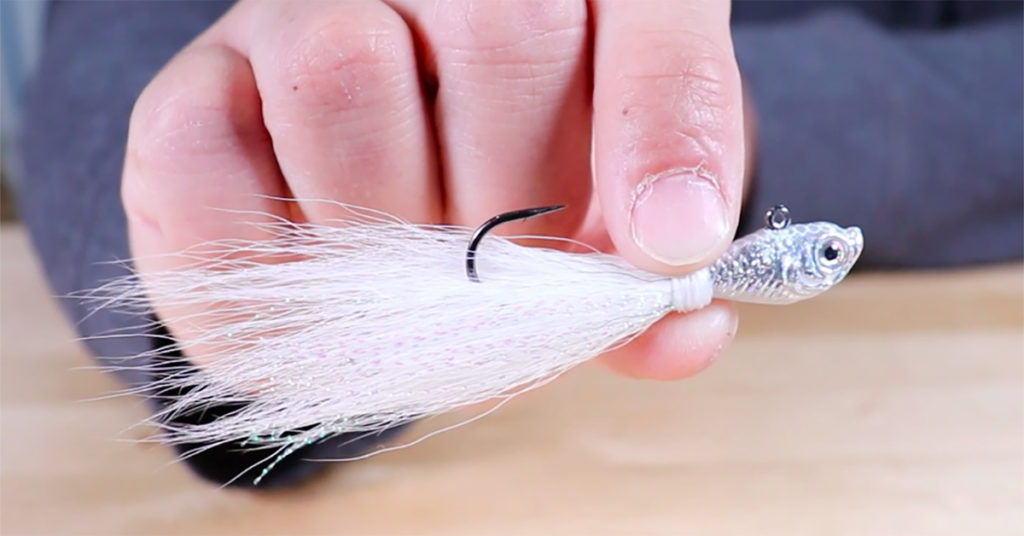
Bucktail jigs are the original gangsters of inshore fishing and are still just as effective today as they were 100 years ago.

This lure is cheap to buy and even easier to make at home if you have the materials (click here for a jig making tutorial). All it takes is a jig head, some bucktail (which you can buy online or at any fly fishing shop), and thread to hold it all together.

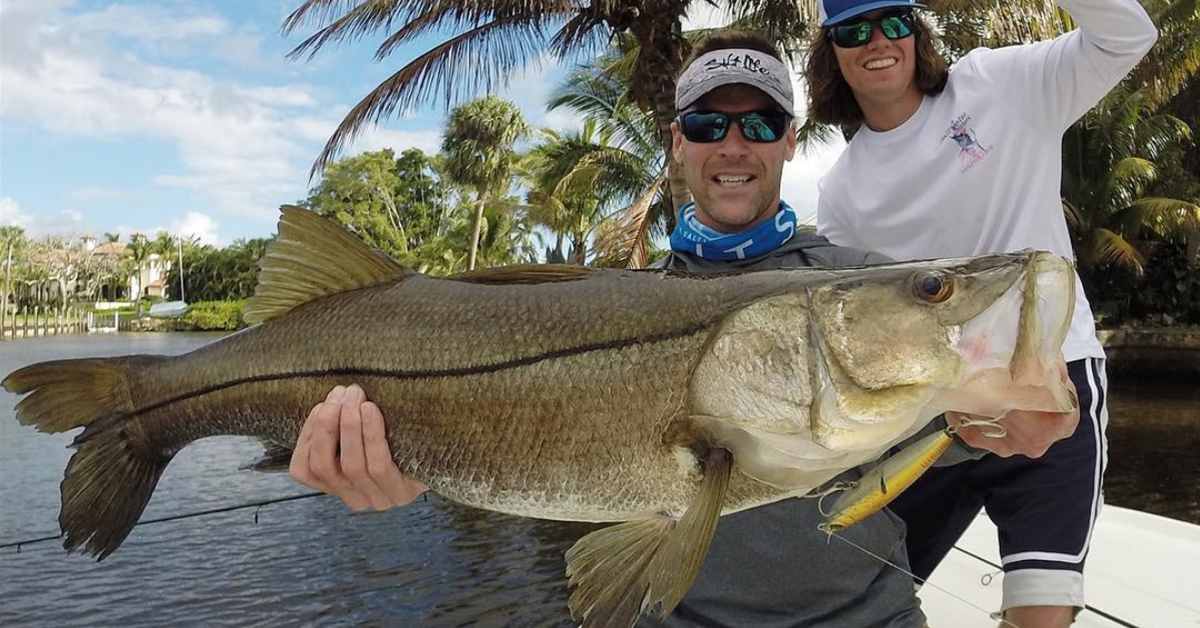
These are one of our go-to lures for big snook and are great for other inshore species such as pompano, redfish, trout, and even bass.

You can use heavier bucktails to catch massive snook and tarpon in deep water with heavy current or use tiny bucktail jigs to catch trout on the flats. Both tactics are effective.

5. Jerk Baits and Twitch Baits

speckled trout on jerk shad late spring

Suspending jerk baits and twitch baits are lures that every inshore angler should have and know how to use.

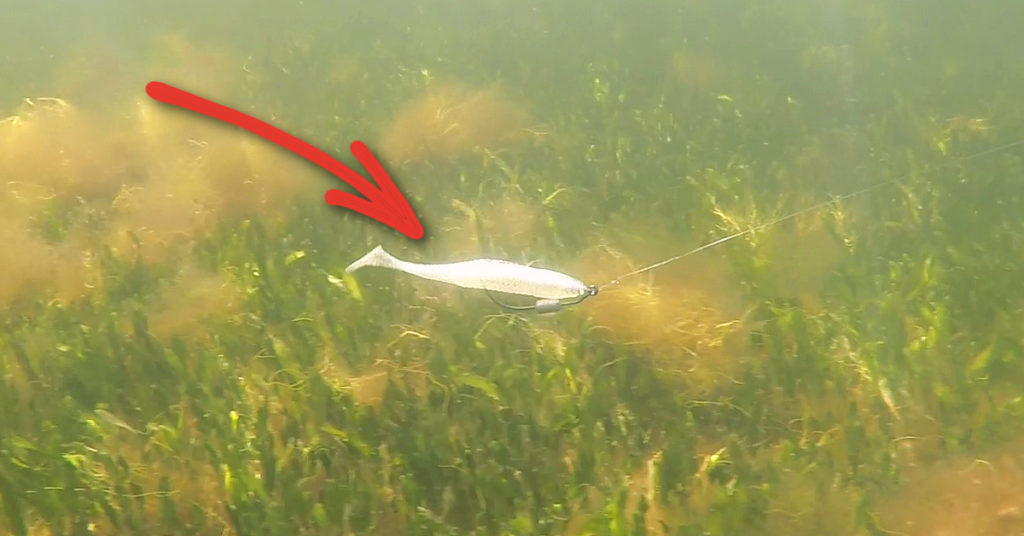
For soft plastic jerk baits, we love the 5-inch Alabama Leprechaun jerk shad rigged weedless on a weighted hook. This is our go-to rig for fishing on grass flats and is deadly for redfish, trout, snook, and pretty much any other predator fish that feeds on the flats.

Tip: These soft plastic jerk baits have to be rigged correctly in order to work. If they’re rigged incorrectly, they’ll spin or have terrible action in the water and won’t catch fish.

Note: The jerk shad is a lure that helped land a catch of a lifetime when sight fishing from our 3rd-floor balcony (see the balcony catch video here).

Conversely, hardbody twitch baits that work in a similar way to their soft plastic cousins are another lure type you need to know how to use. You can work these just like your jerk baits.

Rapala Twitch Bait

Most twitch baits are not weedless, so keeping these off the bottom is a more effective way to fish these lures.

We especially like the MirrOlure MirrOdine.

It is one of our favorite twitch baits and has a great profile in the water.

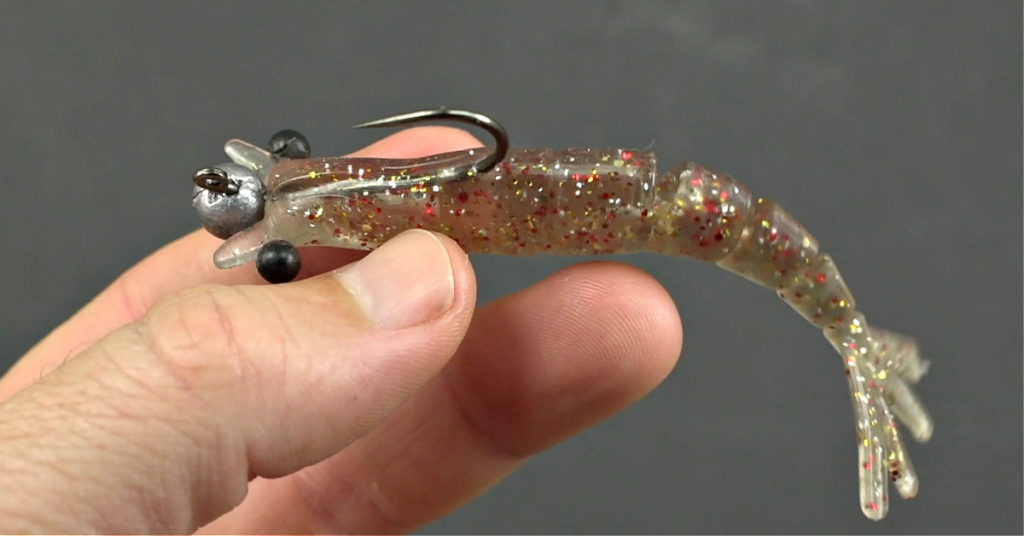
Bonus Inshore Lures: Shrimp Lures

One thing we didn’t mention in our top five inshore fishing lures list was lures that imitate shrimp.

We all know that just about any inshore fish absolutely loves to eat shrimp. Having some lures that look like shrimp is always a good idea as they will likely catch a ton of fish when you use them.

The ultimate artificial shrimp imitation is the Power Prawn shrimp lure rigged on Power Prawn jigheads. This shrimp lure is hands down the best we’ve come across and catches all species of fish!

The Berkley Gulp Shrimp on a jig head is one of our absolute favorite lures when the conditions are turned up and choppy. The scent from the Gulp Shrimp adds another element to entice the fish to eat your lure.

So far, the Gulp products are the only ones we’ve been able to find that smell so good to fish that the used ones can be cut into small pieces for catching tons of pinfish and other small baitfish.

The D.O.A. Shrimp is another staple every inshore fisherman should have. These lures are extremely versatile and can be rigged on an unweighted hook, jig head, and even a popping cork. Each method will catch fish.

Savage Gear shrimp is another one that we’ve had success with, and there of course are many more options.

Learn more about the Insider Fishing Club

Top Five Inshore Fishing Lures [PODCAST]

You can watch the video version of this podcast below (which I highly recommend), listen to the audio version by clicking the play button underneath it, or listen to it on iTunes, Stitcher, or Spotify.

salt strong podcast itunes salt strong podcast stitcher

salt strong podcast spotify

Note: Don’t forget to subscribe to the Salt Strong podcast on iTunes, Stitcher, or Spotify.

Related Podcasts:

  • IS THERE A SECRET WAY TO WORK YOUR LURE?
  • SWIMBAIT, CRANKBAIT, JERKBAIT, & TWITCHBAIT (WHAT’S THE DIFFERENCE?)

Conclusion

Jupiter Snooker with big snook on topwater

Having a couple of lures you can use confidently and often will up your fishing game and help you catch more fish.

The lures above are proven to catch fish. Knowing how to use all of them will allow you to effectively fish the entire water column, which is critical when you are trying to locate where the fish are.

Remember, the most important thing is to find the feeding zone. Most of the time when you find the feeding zone, it won’t matter what lure you’re using — the fish will eat it.

However, these lures will have you prepared for every fishing situation when you do find the feeding zone.

If you have any questions or comments about this article, let us know in the comments section.

To learn more about the Insider Fishing Club, click here now.

P.S. – To see all of the past podcast episodes, click here now.

Tight lines!

Related Articles:

  • 7 ESSENTIAL SALTWATER FISHING LURES THAT CATCH FISH PRETTY MUCH ANYWHERE
  • JOHNSON SILVER MINNOW WEEDLESS SPOON REVIEW & RIGGING TIPS
  • HOW TO CATCH MORE REDFISH, SNOOK, & GROUPER WITH JUST ONE LURE

9 Best Baitcasting Reels for Beginners in 2024 – Buyers Guide

0

Having a proper fishing reel for a specific fishing situation can make your fishing experience a whole lot better.

There is a lot of models available on the market, and choosing the right one can be a nightmare, especially for a bit less experienced angler.

Complete fishing beginners usually start their fishing adventures with spinning reels, but at some point, you may want to upgrade a bit, and learn how to use a baitcasting reel.

I wouldn’t recommend you to do so if you have no previous fishing experience, however, if you feel like you can manage, don’t let anyone stop you.

I tested a lot of baitcasting reels and decided to write this guide, to help you narrow down your choices, and choose the best baitcasting reel for beginners.

Also, I will tell you basic info about what to consider when buying a baitcasting reel and answer some common questions, in the following chapters:

9 Best Baitcasting Reels for Beginners

Now when you know what to look for when choosing the best baitcasting reels for beginners, I will make a list of the reels, including basic info about them, and all the pros and cons I have notice when I used them.

All of these have good anti backlashes properties, and will give you a lot of control over the lure and casting.

When you figure out how to use them, you are going to see how much better these are, when compared with spinning reels, when used in the same situations.

Before you move onto the more detailed descriptions, here is a quick overview chart …

#1: KastKing Royale Legend II (GT)

So, the first reel on the best baitcasting reels for beginners list is KastKing Royale Legend II (GT).

First of all, if you are buying on a budget, this reel comes at a great price. Of course, it is not as durable as some more expensive models, but it still has some great features.

Dual, magnetic and centrifugal, braking system controls the backlashes well, and while you are still in a learning process, you won’t have to untangle a huge mess.

The newer model has a greater line capacity, and the reel is quite fast. Anodized aluminum spool and a low-profile design are well made. The reel is strong and performs well, however, I don’t think it will last as long as some other reels.

The reel has 5+1 bearings that ensure smooth operation. Of course, at this price, their quality is not the same as in high-end reels, but it still works very well.

Maximum drag is 8kg/17.6 lbs.

Overall, this is a great and well-made beginner’s baitcasting reel.

#2: PisciFun Torrent

Another great option for beginners is PisciFun Torrent.

It is available in two options. Faster one, with 7.1:1 gear ratio, and slower one, with 5.3:1 gear ratio. Both are very well made.

Drag system is very dependable and the max drag is 8.1kg/18lbs, which is more than enough. The reel is made mostly from aluminum, including the handle, with carbon fiber drag washers, and it has brass drive gear.

There is a useful feature for maintenance on this reel. There is an opening on a side plate that is used for lubricating the reel.

Both options have 5+1 bearings and are really smooth. Line retrieve varies of course, and for the slower model it is 58cm/22.8 inches, while on the faster one it is 76cm/30 inches.

This low-profile baitcasting reel comes at a great price too, costing only a few dollars more than the previously mentioned reel.

Magnetic braking system operates well, although there is a slightly greater chance of backlashes here, than in the previous one. However, there is a 0-10 setting, which is very useful. It is also slightly heavier, and it weighs 0,22kg/8 ounces.

Altogether, it is a very good choice for a beginner.

#3: Abu Garcia Black Max

Abu Garcia is a classic when it comes to baitcasting reels.

I have included two on this list of the best baitcasting reels for beginners. The first one is Abu Garcia Black Max model

This low-profile reel comes with a 6.4:1 gear ratio with 66cm/26inches inches per turn, which positions it in the middle. This is great for beginners, as it can be used in various situations.

Magnetic braking system operates well, and backlashes are not a problem, if you get the settings right. It has 4+1 bearings, and those are very well made. The reel feels very smooth.

Maximum drag is 8.1kg/18lb.

Graphite frame and sideplates make it quite light. The reel weights 0.206kg/7.3 oz, which makes it just slightly harder than the first model on the list, hoverer the difference is small enough not to feel it.

Spool is made from aluminum. Price of this reel is in the same range as the previously mentioned models.

This reel really feels well. Due to the materials used in construction I don’t think it will last as some high-end models, of course, but for a beginner, it is an excellent reel to start. This reel is also a good back-up reel option.

#4: Abu Garcia Silver Max

Baitcasting Reel Abu Garcia Silver Max is another reel made by Abu Garcia (reputable manufacturer). At first sight, this reel has some similar features as the Bmax 3 model.

Gear ratio is the same, 6.4:1, and the main material is graphite, while the spool is aluminum. Breaking system is also magnetic, and operates quite well.

This reel comes with a “rocket clutch” feature, that gives the angler an opportunity to single handedly disengage or engage the spool.

It also has 5+1 bearings, which is one ball bearing more than the Bmax 3. Max drag is 8.1kg/18lb, and line retrieve is 66cm/26inches per turn.

Weight of this reel is 7.4oz, which is unnoticeably higher than the previous.

So, these two may seem the same, so what is the difference?

Well, the difference is that Smax has a rocket clutch which is a great feature for those who flip and pitch often.

For compete beginners, this feature will not be so important, so they can go with the previous model.

#5: KastKing Spartacus I & II

Spartacus is another great KastKing model. This reel exists in 2 versions, where II is a bit more advanced.

Spartacus II is among the faster reels on this list.

It has 7.1:1 gear ratio with 71cm/28 inches per turn. The 7+1 bearings ensure smooth operation. Version I has 11+1 ball bearings.

It is also very light, and weights only0.17kg/ 6oz. This is excellent for loner use and it doesn’t put a lot of pressure on your wrist.

Maximum drag is similar to other reels, and it is 8kg/17.6lbs.

Both Spartacus I and II are low profile, but the II version has it 10% lower.

Magnetic brakes go from 1 to 5 and work really well.

Spool and handle are made from aluminum, which makes them quite sturdy. Unfortunately, it has a few plastic parts too, and the main material is reinforced nylon, which I personally do not like, especially when you combine them with a relatively good spool.

I don’t think it can last very long, however; it comes at a great price. Don’t get me wrong, this is an excellent beginner option.

Spartacus I is also slower, with a gear ratio 6.4:1, with 66cm/26inches per turn if you need a slower reel. Maximum drag is the same, but this one is a bit heavier, and weights 0.2 kg/7.4oz. It also has dual braking system.

#6: KastKing MegaJaws

The first thing that amazed me on this reel is a casting distance. For a baitcaser in this price range, casting abilities are excellent. Line guide is funnel shaped and has very low friction.

It comes in a few different variations, so that you can choose among various gear ratios. Slowest one is 5.4:1, while the fastest is 9.1:1. This range cover almost all fishing techniques. These reels come with a cool feature, and that is different color for every reel speed.

Carbon fiber drag is incredibly smooth, as well as the whole reel, due to 11+1 stainless steel ball bearings. Ball bearings are double shielded to prevent damage and corrosion.

The 17.6 lbs. of drag is more than enough for beginner anglers.

Reel maintenance is also well made and simplified. There are easily accessible reel parts for lubrication.

Magnetic brake system works very well and prevents backlashes. Tension knob is adjusted by simple clicks and offers an outstanding level of control. The reel is lightweight, and it is easy to use it all day long.

It seems quite sturdy and dependable even for rough use.

#7: Shimano SLX

Shimano SLX looks absolutely excellent at first sight, and it really is. It is a bit more expensive than some cheaper models on this list, but it is worth it.

HAGANE body is used, and that is one of the best innovations from Shimano. Brass gears give smoothness and enable excellent cranking power.

This low-profile reel is very compact but despite its lightweight and small size it has incredible line capacity. SLX 150 can hold 150yards of 20 lbs. braided line.

It is available in three different gear ratios, and those are 6.3:1, 7.2:1, and 8.2:1. First two are very versatile and excellent for beginners who are still learning how to handle a baitcaster.

All models have 3+1 ball bearings but those are so well made that they are more than enough to deliver excellent smoothness.

Drag is smooth and dependable, going from 11 to 12 lbs., depending on a specific model.

Casting, reeling in, and handling the reel in general works without any flaws. You can easily cast very light lures without backlashes which is extremely important for beginners.

And one important info, lube this reel before first use.

#8: KastKing Crixus

When you look at this reel it looks similar to Shimano SLX, at least when it comes to color.

Brass pinion gears, as well as the main gear, ensure longevity and you can rest assured that the reel will last for a long time.

It is available in two gear ratios, 6.5:1 and 7.2:1, which is good enough for any beginner. Carbon infused nylon frame was used to reduce weight, and although you may think that plastic components are bad, the truth is, this one is quite good. As a beginner, you don’t need high-end reels for learning purposes.

It has 7+1 ball bearings made of stainless steel and performs very smooth. Aluminum handle and polymer grips work excellent even if the reel is wet, so you will not have slippery handles and problems while reeling in.

Drag is made with 4 carbon discs, and it delivers 17.6 lbs. of drag. Magnetic breaking can be easily adjusted and has 10 different levels of breaking.

This reel comes at an excellent price, and considering all the features, it is one of the best on the market if you are looking for your first baitcaster.

#9: KastKing Rover

And the last among the best baitcasting reels for beginners is another KastKing model, the Rover.

First of all, this reel is available in various versions, from 40 to 80.

Versions 40, 50, and 60 have a gear ratio 5.3:1, version 70 has 4.2:1 and versions 80 and 80 have 3.6:1, which is very slow, but for some users this may be necessary.

Max drags go from 6.8kg/15lbs for smaller models up to 13.6kg/30lbs for larger ones.

Aluminum sideplates and brass gears make it really sturdy. Components are very well made for a reel in this lower price range, and I think that this one can last a long time.

This is a round reel, unlike the rest of those on this list. Smaller sizes have 6+1 ball bearings, while larger ones have 4+1.

These reels are quite powerful, and the drag performs great. Braking system is centrifugal, and it can take a while for a beginner to get used to it, however, when you master it, this reel will fulfill all of your needs.

Due to increased side plates, these reels are a bit heavier than the previous models, however, this is something to expect from a more powerful reel. The smallest one weights 0.32kg/11.6oz, and the largest one weights 0.64kg/22.6oz.

Those who are in a search for a larger and more powerful reel, should consider this option. However, it would be great if you had at least some experience with smaller low-profile models first.

Most Common FAQs about Baitcasting Reels:

Beginners have a lot of questions, and that is understandable. It is better to be well informed before buying a certain product.

Here I am going to answer some of those questions. Some things have already been mentioned, but I will sum it up here, in case you missed it.

Best Baitcasting Reels for Beginners With Rod

What Should I Look for When Buying Baitcasting Reel?

The first thing I always mention when someone is asking about any kind of reel is to buy equipment made by reputable manufacturers.

By doing so, you know exactly what you are getting, even if you buy their low-end product.

You should also know what kind of fish do you want to catch and what lures and baits you will use, and based on that, consider the following features:

Rounded vs. Low profile

Low profile baitcasting reels are more popular, and many beginners choose this type.

It is mostly used for fish species like bass. It is easier to palm and gives you more control when you are casting.

Rounded baitcasting reels can hold more line and they are a common choice of anglers who use heavier lines. These go well with larger baits, but are harder to control.

Material

This is a bit complicated subject, and I will try to explain it in simple words.

You can choose between aluminum and graphite, and depending on it, the price can vary.

As a beginner, you may want to start with the cheaper ones, because the first baitcaster you buy will be used for practice and learning.

Aluminum is sturdier, and can handle rough use. A lot of anglers go for this option. Graphite is lighter but prone to damage. It is also cheaper.

When it comes to spool, they are mostly made from aluminum, however, high-end models use forged aluminum. Spools are frequently drilled to reduce weight.

Line guide can be ceramic, aluminum or titanium. The first ones are the cheapest, while titanium is the most expensive. Quality of course, follows the price.

Gear ratio

When choosing the best gear ratio, think about lures and fishing techniques.

Those using spinnerbaits should go for 7.1:1. Slower presentation usually done with crankbaits requires gear ratio around 5.4:1, which is on a slower side.

Medium option is 6.4:1, and that can be used in numerous situations.

Ball bearings

Quality comes before quantity.

Smaller number of well-made ball bearings is much better than a larger number of poorly done. Of course, if quality is the same, then you should go for a higher number.

Braking system

Backlashes are the biggest problem of baitcasting reels, and that is the reason why beginners avoid using them.

However, the technology is developing, and modern baitcasting reels are constructed in a way to reduce that.

Breaking system is there to slow down the spool while casting. Otherwise, the lure would slow down and the spool would keep turning.

There are different types of braking systems.

Magnetic ones use magnets to slow down the spool. You can make adjustments yourself.

Centrifugal ones use friction. To adjust it, use the pins by pushing them outwards.

Some reels even have two types of braking system. Magnetic one is great for beginners because it does not rely so much on an angler to operate.

Are Baitcasting Reels Good for Beginners?

Well, this depends. Anglers usually start with spincasting or spinning reels, to gain experience, learn different fishing techniques and learn how to handle the equipment.

Of course, at some point, you will “upgrade” to baitcasting reels. Even if you had a lot of experience before, you will still be a beginner when it comes to baitcasting reels.

However, if you know a lot about fishing, you will have just one task, and that is to practice with the reel.

If you have no fishing experience, learning about all the aspects of fishing, together with a baitcasting reel, may not be the best ide, because it is a bit too much. You will be frustrated and ruin the experience. However, if you are willing to take this step, don’t let my opinion stop you, although, I do not recommend it.

What’s the Best Gear Ratio for Baitcasting Reels?

All of the gear ratios have their advantages and disadvantages.

However, very fast and slow reels are made to be used in specific situations.

As a beginner, you should go for a medium speed, around 6.4:1.

Those reels can be used for both slower and faster presentations if you slightly adjust your technique, and can be used in numerous situations.

As a beginner, you should go for a medium option, to explore all the possibilities. Later on, you can always buy slower and faster ones, to use them when necessary.

What Lures Should I Use With Baitcasting Reels?

What lures to use depends on a reel gear ratio, fish species you are trying to catch, reel size and other factors, like your fishing rod too. However, I will give you a brief explanation.

You can use a variety of lures, including swimbaits, cranks, bigger worms, a bit larger jigs, crankbaits and many topwater lures too.

The problem is that if you are using very light lures, you may have some troubles with casting as a beginner. These reels are made to be used with heavier fishing lines and lures too.

For some presentations you will need slower reels, like when using crankbaits. Faster reels work great with jigs.

Medium gear ration enables you to use the majority of lures.

What Type of Rod Should I Use With a Baitcasting Reel?

You can’t combine just any rod with a baitcasting reel. Spinning rods are not an option.

Pair your baitcasting reel with a casting rod.

It has a reel seat made for a baitcaster, above the rod. Line guides are also on the upper side, and when fighting a fish, when the rod bends, force is applied down on the guides. If it was the other way around, like on spinning rods, large and powerful fish could break off the guides.

These rods have sturdier guides, and are made in a way to withstand larger fish, heavier lines and rough use.

For What Fish are Baitcasting Reels Used For?

Baitcasting reels are usually used for heavier and powerful fish species. Of course, you can use smaller models for smaller fish, but handling these reels and rods with light lures and lines is complicated. If you are fishing for species like panfish, use a spinning reel instead.

Baitcasters are mostly used for large catfish, large bass, muskies, Northern pike, salmon, and similar species.

Which Brand is Best in Baitcasting Reels?

As I already mentioned, and as I always say when it comes to any kind of fishing gear, buy from reputable manufacturers.

The rest is up to you and your personal needs. You may prefer one brand over another; however, all of these mentioned are known for their quality product.

Of course, how good a reel will be, depends on a price too. You can’t expect that an entry level, $40 reel, will last as long as a high-end, couple of hundred-dollar worth reel.

I think that many anglers, including me, would agree that Abu Garcia and KastKing makes really great baitcasting reels.

What are the Other Benefits of Baitcasting Reels?

Besides being able to handle large and powerful fish, baitcasters are extremely precise.

When you learn how to use them, you can cast very accurate, due to better control of the line.

You can also control how the lure falls into the water, so that you do not make a big splash and scare off the fish.

You have a better feeling of the line too, and can detect bites more easily. It also offers cranking power needed for lures with high drag.

And of course, casting of heavier lines and rules can be done much better with a baitcaster.

Best Baitcasting Reels for Beginners - Other Benefits

Conclusion

When choosing the best baitcasting reel for beginners, you should be aware of the fact that …

… it will take some time to learn how to use it, and you should choose models from a lower price range, with medium gear ratio, to gain some experience.

All of the reels mentioned here are quite good, and you will not go wrong with them.

Also, keep in mind that low-profile models are easier to use, and although backlashes will happen, it won’t be as bad as it could be with a round baitcaster.

Dual braking system is also a good feature, and you should consider all of this, and the features mentioned in the article, to choose the best reel for your needs.

The 10 Best Moose Hunting Cartridges

0

For many hunters, harvesting a moose is a once-in-a-lifetime bucket list trip. In that case, you want to make sure that you do everything possible before the hunt to ensure that it is successful once you arrive in your moose hunt camp.

One of the most important things you can do to set yourself up for success is to choose the right moose hunting cartridge.

The 10 Best Moose Hunting Cartridges

If you ask ten people for their opinion on the best moose hunting cartridge, you’ll get ten different answers – or maybe more. That is to say, there’s no one best cartridge for a moose hunt. There are a variety of variables that you have to take into consideration and make a personal decision for you and you alone.

With that in mind, here are ten moose hunting cartridges for you to consider.

.30-06 Springfield

It has been said that there’s not a single big game animal in North America that cannot be felled by a .30-06 bullet, and that’s no exaggeration. The .30-06 was the caliber of choice for hunters of all kinds for most of the 20th century. Even though newer calibers have come on the market, the .30-06 has remained a faithful standby that is certainly more than capable of harvesting a moose.

30-30 Winchester

There are plenty of old deer rifles floating around in .30-30 Winchester. You may have inherited one from your granddad, picked one up at a pawn shop, or even bought one new because of the cartridge’s versatility for lots of different hunting opportunities. Whatever the case, there’s absolutely no reason that you can’t take a moose with the old “Thutty-Thutty” standby – so long as you know the limitations of yourself as a shooter, your rifle as a platform, and your chosen load in the cartridge.

.308 Winchester

While the .308 Winchester is certainly not restricted to semi-automatic rifles, it’s a caliber that is certainly well-suited to them. If you wanted to hunt a moose with a semi-auto, then an AR-10 style rifle chambered in .308 is a good place to start. You’ll also have the advantage of using a platform that many shooters are already very familiar and comfortable with, making it an easy transition from the training or tactical environment to the hunting environment.

6.5 Creedmoor

For hunters who want the utmost precision in their shot, it’s hard to beat the 6.5 Creedmoor. Since it was designed for competition shooting, it’s beyond capable of delivering an exacting blow to the vitals of a moose so long as the shooter behind the rifle is capable of making the shot. Another advantage for the 6.5 Creedmoor is its availability in a wide variety of firearms, including semi-auto, lever-action, bolt-action, single-shot, and more.

.300 Winchester Magnum

The .300 Winchester Magnum is something of a Goldilocks cartridge for use on a moose. Whether you choose from one of the many factory loads available or you hand-load your own, the .300 Win Mag has proven itself time and time again as a more-than-capable moose cartridge with felt recoil that, while certainly noticeable, is more than manageable for most shooters.

.375 Ruger

If you’re looking to pack an equitable punch to that of the .375 H&H in a more manageable package, look no further than the .375 Ruger. It’s an absolute powerhouse of a cartridge that is more than capable of taking down the moose of a lifetime.

7mm Remington Magnum

Sometimes it all comes down to the proper bullet selection, and that couldn’t be more true than with the reliable 7mm Remington Magnum. If you load a 7mm Rem Mag cartridge with a heavy bullet that is tough and designed to stay together, then it becomes a low-recoil caliber that is hard to beat when it comes to moose.

.338 Winchester

The .338 Win Mag cartridge was made for the challenges of big, tough game, and it is capable of taking on that challenge and defeating it. With the right heavy-grain bullet, you can be confident that your projectile is traveling faster than most comparable loads on the market and will deliver the devastating punch needed for a quick and ethical harvest on your moose of a lifetime.

6.5-300 Weatherby Magnum

Everyone has a 6.5 cartridge these days, and Weatherby is no different. The 6.5-300 Weatherby Magnum claims to be the fastest 6.5 cartridge on the market. Because its case has comparatively larger volume than others in this caliber, it’s capable of fantastic velocities. This makes it a flat-shooting cartridge that is perfect for long-range shots on a moose.

.270 Winchester

The .270 Winchester meets the three A’s: accurate, affordable, and available. Hunters have been using the well-rounded .270 Winchester to bring down all sorts of wild game for decades – and that includes moose. Therefore, there’s no reason that you can’t take your hunting rifle that you use for other pursuits and put it to good use on a moose. A .270 is right at home on a moose hunt as well as in pursuit of deer, hogs, sheep, and more.

What to Look for When Choosing a Hunting Caliber

There are a lot of different things to consider when choosing a hunting caliber, but let’s take a look at three of the most important ones.

Availability

You can do all the research in the world and settle on a specific caliber for your moose hunt, but if you can’t find the ammo that you need, then it’s all been for nothing. That becomes even more important if you fail to bring enough ammo with you on the hunt. Your moose camp may be remote and the likelihood of finding some calibers may be slim if you need to restock.

Performance

Perhaps the most important part of choosing a hunting caliber is evaluating its performance. You’ve got to be sure that the load you choose is going to be capable of taking down the type of game you’re hunting in a quick and ethical manner. This is especially true when it comes to large animals like moose.

Cost

That ammo prices have risen exponentially in recent years is an unpleasant yet cold, hard fact. Similar to our point on availability, you’ve got to be able to afford the ammo when you find it. Some calibers are less expensive than others, but that doesn’t mean that they’re going to be any less effective at bringing down a moose.

Suppressed Hunting

Once you experience your first hunt with a suppressor, you won’t ever want to hunt without one again. If you’ve never done it before, that may sound like an exaggeration, but trust us, it’s not. Here’s why.

Benefits of Hunting With a Suppressor

Even when they were first commercially introduced in 1909, suppressors were actively marketed to hunters, and for good reason – they make hunting safer and quieter, eliminate the need for bulky hearing protection, and improve accuracy when shooting.

Here are just a few of the reasons why suppressed hunting is better hunting:

It makes the outdoors quiet again

Suppressors, when paired with the right firearm and ammo, reduce the sound of a gunshot to hearing safe levels, and “dull the edge” of the sound of a gunshot.

A suppressed rifle doesn’t disturb the game that you are after

Animals have great hearing, and that’s to their benefit – not yours. The hearing of coyotes, squirrels, wild pigs, mule deer, whitetail deer, elk, pronghorn antelope, bighorn sheep, moose, caribou, and plenty of other game animals all have incredible hearing. The sound of a gunshot can keep them out of their known territory for weeks at a time.

Hunting with a suppressor is safer

While in recent years electronic ear muffs that allow you to hear ambient noise while blocking the sound of gunfire have hit the market, the simple fact is most hunters still choose between no ear protection or wearing something that makes it hard to hear what is going on around them. Using a suppressor on your hunting rifle allows you to hear everything that is going on around you, and not damage your hearing when taking a shot.

Accuracy is improved when shooting with a suppressor

This benefit has also been touted since the early 20th century. This is because the physics of a silencer reduces felt recoil and muzzle climb. With both of these factors greatly reduced, shooters find their rifles easier to shoot. So it isn’t that silencers make the gun more accurate per se, but they make it easier for YOU to shoot your gun more accurately.

Parker StingRay Review – Compound Crossbow

0

ModelDraw WeightStrokeVelocitySuggested Arrow LengthCrossbow Length / Weight Parker StingRay Check price on Amazon.com 100-125 lbs.11″135-150 FPS Crossbow Academy: ballistics, sighting, tuning20″34.25″ / 7.5 lbs.

What Comes in the Box?

Welcome to our review of the Parker StingRay bowfishing crossbow. Each package delivered by Parker includes the following items:

  • The Parker Stingray crossbow
  • Open sight
  • Assembly hardware and tools
  • AMS Retriever Pro Bowfishing Reel
  • 200 feet of Hi-Vis Braided Dacron Line
  • 2 AMS Safety Slide kits
  • 1 Bowfishing Arrow
  • Muzzy Gator Getter 1600-gr broadhead
  • Owner’s manual
  • Warranty card

Crossbow Assembly

parker1Putting the StingRay together is amazingly simple for such a complex hunting package. The riser, or what Parker calls the front-end assembly, attaches to the stock once you’ve installed the cable slide. If your Stingray comes with a scope, it will be premounted for you, so there is no work to be done to get the scope onto the crossbow. Once you’ve attached the riser to the stock, you attach the AMS Retriever Pro Bowfishing Reel, which includes an integrated arrow quiver for storing your bowfishing arrow.

After putting your bow together, you should set the draw weight to whatever you want it to be, between 100# and 125#. The beauty of this design is that you don’t need any special tools or a bow press to set the draw weight. Once the assembly and tuning is complete, you’re ready to move on to sighting in your crossbow.

Accuracy And Power

Whether you have the open sight or the 1X scope with your x-bow, you’ll want to sight in your bow before you hit the water. I was able to have my open sights fine-tuned within a couple of shots, and then I tested the accuracy of the Stingray. The Stingray delivers arrows between 135fps and 150fps, depending on the draw weight you have set. Mine is set to the maximum 125 pounds, so the 1600-gr bowfishing arrow was hitting the target at 150 fps with almost 80 ft. lbs. of kinetic energy.

From 25 yards, I was able to maintain a 1/2″ grouping with this crossbow, and held the same grouping from 35 yards. From 50 yards, I could hold a pattern just 1-1/2” in diameter, which is more than accurate enough for serious bowfishing. With the Stingray sighted in and tested, I was ready to hit the water.

Will Hunters Enjoy the Parker Stingray?

This x-bow is designed for bowfishing, so you won’t take this up against a deer. With that said, it has the stopping power for a deer, but the speed of the arrows is probably too slow to account for the tendency of deer to string jump. I didn’t even try this bow land hunting, using it instead for what it was designed for—bowfishing.

For fishing purposes, this is an excellent crossbow. You can easily penetrate and nab the largest fish, whether you’re in fresh water or salt water. The reel works flawlessly, and the included 200 feet of high visibility line makes it easy to see where your arrow has gone. An illuminated nock will also help tremendously.

What was really exciting about this crossbow was the inclusion of the Muzzy Gator Getter arrow point. I had the good fortune of getting in on an alligator hunt, and chose the Stingray as my tool of choice for hunting gator. During my gator hunt, I was able to fill my limit of gator easily, with the Stingray performing exactly as I expected it to on this once-in-a-lifetime hunting opportunity.

Cocking The Stingray

The Stingray has an adjustable draw weight of 100 lbs. to 125 lbs., and the adjustment can be made without any special tools or a bow press. For some, this light draw weight might mean hand-cocking the crossbow, but I definitely would not recommend this. While it’s easy enough to draw by hand, using a rope cocking device makes your draw much more even and consistent, helping your accuracy considerably. Unfortunately, Parker does not include a rope cocking device with the Stingray, so I would recommend picking one up at your local archery shop when you get your Stingray.

The Crossbow Scope

Parker delivers this crossbow with either an open sight or a 1X scope. I chose the open sight, but I’ve also used the 1X scope in the past. This scope is very good quality, with coated optics for fog-resistance, and excellent light gathering capabilities for use in dark swampy areas. It sights in easily and quickly, and holds true almost indefinitely.

Bolts

Your purchase of the Parker Stingray will net you one bowfishing arrow, which many will say is all that you need. That’s probably true, because the hassle of switching your retrieval line from one arrow to another is more trouble than just pulling your arrow back in and reusing it, but you may want to invest in additional arrows in case yours becomes damaged. Parker recommends 1600-grain arrows for use with the Stingray, and attempting to use a lighter arrow than that could result in some serious problems and injuries for you and your crossbow.

Safety and Design

The Stingray is designed with boat fishing in mind, so it is small and compact. It is also lightweight, and almost perfectly balanced. It features a G2 Bull-Pup trigger with an auto-engaging ambidextrous safety and auto-engaging anti-dry fire mechanism, both of which operate reliably for each and every shot. The vented forearm’s safety finger flange is perfectly sized and positioned to keep you safe when firing your x-bow.

The AMS Retriever Pro bowfishing reel that comes with the Stingray is set up with a right-side crank, so if you are left-handed you may struggle with the retriever reel. It works perfectly, though, and serves wonderfully for reeling in that big catch when you nail it.

Warranty

All Parker crossbows are covered by a 5-year limited warranty, and Parker’s customer service representatives are easy to work with, friendly, and knowledgeable. Make sure to register your warranty within 15 days of your purchase, though, or your warranty may not be valid.

What Crossbow Case Fits the Parker StingRay?

If you use a smaller scope, the Carbon Express Deluxe Case is a nice soft carrycase for $66. If your StingRay is equipped with a bigger scope, opt for the Allen Company case. It is a $30, soft carrycase which offers more space.

Crossbow Review – Summary

Thanks for reading my review of the Parker Stingray. This is an exciting crossbow with excellent potential for hunting alligators and use in bowfishing. If you want to get involved in bowfishing, but would rather use a crossbow than a bow, the Stingray is the crossbow for you. Take a look at today’s amazon.com price on this crossbow and check out our top 10 crossbows rankings for more.

Best Air Rifle Deals

Popular Posts

Gas vs Spring Piston: Which One is Better?

0
Today, you can find 5 different types of air rifles available in the industry. They are: spring pistons, gas pistons, PCP air rifles, variable...

How Far Can a .22 Air Rifle Pellet Travel?

0
"Unveiling the Power: Exploring the Distance Capabilities of a 22 Air Rifle Pellet. Discover the fascinating journey of a 22 air rifle pellet as...

Master Small Game Hunting with an Air Rifle: Tips and Techniques

0
"Experience the thrill of small game hunting with an air rifle! Embark on a captivating journey as you test your accuracy and precision in...

Synthetic vs Wood Stock: The Final Showdown Between Brunette And Blonde

0
I understand that you’re here to get some quick facts on synthetic vs wood stocks Probably to guide your purchase.  Quick alert - the debate...

What can you kill with a 177 air rifle?

0
"Unleash Your Precision: Discover the Power of a .177 Air Rifle to Take Down Targets with Accuracy. Explore the Versatility and Potential of this...