Home Blog Page 137

The Miracle Of Nature: How Bird Poop Can Help Your Garden Grow

0

For centuries, humans have used fertilizers to help plants grow. But did you know that birds can also provide a natural fertilizer for plants? It’s true – bird poop can help plants grow, as it contains nitrogen, phosphorus, and potassium – the same three elements found in commercial fertilizers. In addition to these essential nutrients, bird droppings also contain trace amounts of other vital elements and minerals. Bird poop can also contain beneficial microorganisms that can help break down organic matter and aerate the soil. So while you may not want to use it directly on your plants, bird poop can provide an important contribution to the health and growth of your garden.

Because bird poop is a great compost material, it is also a natural fertilizer for plants. The key is to use it correctly, and to be careful not to feed it to animals that are the source of the poop. When manure from domesticated birds is used, it is best to use guano derived from seabirds. Birds’ domesticated feces have a high chemical content that aids in fruit growth and flowering plant development. This advantage is due in part to the high concentration of phosphorus found in manures containing horses or cows. When it comes to the use of bird droppings as fertilizer, there is a clear distinction between domesticated and wild birds. As a result, you will be able to keep your plants healthy and happy by knowing which types of bird poop are harmful to them.

If a wild pigeon comes into contact with a tree or shrub directly, it may become extremely acidic. Regardless of whether it is from domesticated or wild animals, handling animal manure should always be done with caution. These are some gardening tools that you can use to make container gardening easier. I will earn a commission if you link to these, which are affiliate links. Kensington Watering Cans are fashionable, strong, and dependable, and they can be used to water potted plants with precision. I enjoy using the Garden Guru Trowel because it is very durable and comfortable to use.

It is not harmful to consume them. Yes, if the droppings land directly on young, still fragile tissues, they can cause “burn” (the damage caused by the high concentration of minerals in the droppings), but this is usually very minor.

Bird-whispering or tilling is a natural activity for them whenever they come across earthworms or other insects, which helps to aerate the soil and promote plant growth, and bird-whispering also allows them to plow or till the garden soil with their beaks

They help fertilize plants by transferring pollen (via their bills) from one flower to another, similar to how bumblebees do. Bird pollination is most common in tropical areas, where it helps pollinate a few food crops such as bananas, papayas, and nutmegs.

Do Birds Make Good Fertilizer?

Yes, birds make excellent fertilizer. The droppings of birds are incredibly rich in nitrogen, phosphorus, and potassium-all essential elements for healthy plant growth. Birds also help spread the fertilizer over a wide area as they fly from place to place. Additionally, the droppings of birds can act as a natural pest repellent, helping to keep away pesky bugs and insects that can ruin crops. Finally, bird droppings can help improve soil structure and fertility, making it easier for plants to take up the nutrients they need. In short, birds make great fertilizer and can help keep gardens and farms healthy and productive.

Bird droppings are the most effective organic fertilizer because they contain the most concentrated amount of nitrogen. Birds drop their seeds in no time; after 5-7 days, you can see the results. The composition of litter can vary greatly depending on whether the bird that produced it did so before or after hatching. Deep bedding of dry peat or chopped straw should be used to house poultry. Bird organics are laid out at a rate of 15-20 cm over the entire compost heap surface. The nitrogen content of this material rapidly evaporates during storage, and by the end of 50 months, it has disappeared. During the winter months, it is possible to freeze the litter, layer it on the court, and store it in this manner.

Nitrogen is lost as nitrogen is removed from the soil in the autumn. In spring, you must plant the litter in the soil at least 2 weeks before planting. Doses should be no more than 200 g and no more than 1 kg per 1,000 square meters. When it comes to making litter, tomatoes prefer to use other organic fertilizers. In the main dressing, compost is used in 4-6 liters of liquid top dressing per season (2-3 per season). It is easy to burn plants if you come into contact with the high concentration of substances found in council litter. If this does not work, try to avoid it but if it does, bring in plenty of water.

Granular bird droppings have long been regarded as one of the most valuable types of organic fertilizers due to the nutrients they contain, which are nearly identical to mineral fertilizers. This natural fertilizer can be composted to make it more efficient and effective. Those who are new to composting can benefit from using bird droppings with other compostable materials at a rate of 1:40. Nonetheless, the compost should be thoroughly mixed to ensure efficient breakdown. A mask and gloves should be worn to prevent the inhalation of any potentially hazardous particles, and bird droppings should be handled with caution by carrying gloves. When properly applied, granular bird droppings can provide an effective and safe method for nutrient enrichment in soils.

Do Birds Help Plants Grow?

Birds not only help animals, but they also help plants. Hummingbirds pollinate flowers to produce seeds that plants need to grow. Some birds, such as the Blue Jay, actually plant seeds. They collect and hide the seeds for later consumption, but they do not return for them all, so the seeds sprout and grow into new plants when they return.

Protect Your Garden From Birds: A Better Solution Than Talking To Plants

A long-running debate about whether talking to plants aids in their growth has been ongoing. Some people swear by the technique, but there is no scientific evidence to back it up; there is no consistent evidence that talking to plants or singing to them boosts their productivity. Plants can be harmed if you have birds in your garden. Crow and blackbird populations are especially dangerous because they dig up seeds or feed on mature crops. Bird deterrent devices such as scarecrows, nets, and other bird-catching devices can be installed in your garden to keep birds at bay. While talking to plants may not provide them with the necessary growth stimulation, bird protection does.

Does Pigeon Poop Make Good Fertilizer?

Pigeon poop, also known as guano, contains a high concentration of nitrogen, making it an excellent source of nitrogen-rich fertilizer. Pigeon guano was used as a fertilizer for hundreds of years up until the introduction of agribusiness, which resulted in a more efficient and cost-effective method of production.

Avoid Feeding Pigeons: The Unintended Health Risks

Pigeon feeding has been a cherished practice among many people since its inception. This seemingly harmless practice, as it turns out, can have serious consequences for human health. Birds, particularly pigeons, have a high level of acidity, which can burn plant stems and roots rather than aid in plant growth; adding bird droppings to soil too soon can also burn plant stems and roots. Furthermore, pigeons’ excreta contains bacteria such as Escherichia coli (E. coli), which when introduced into the food or water supply can cause illness. These birds are not to be fed, so you should keep a low profile and keep a safe distance.

What Is Bird Fertilizer Called?

In Spanish, guano (Spanish for excrement) refers to a pile of birds’ or bats’ feces. Gano is a highly effective manure because it contains a high concentration of nitrogen, phosphate, and potassium, all of which are required for plant growth.

The Benefits Of Chicken Manure: A Sustainable Fertilize

Chicken manure is a valuable fertilizer that has long been regarded as a valuable agricultural and horticultural crop. This plant aids in the release of macro- and micronutrients in addition to acting as a soil amendment. As compared to other animal manures, chicken manure and the associated litter contain higher levels of nitrogen, potassium, phosphorus, and calcium as well as organic matter (Zublena, 1993). It is important to note that nitrogen content in chicken manure can aid in plant growth and development due to its ability to increase photosynthesis. Furthermore, chicken manure contains uric acid, which is produced by birds rather than mammals, in addition to the nutrients. Because Uric acid is soluble, it can be seen as a white paste when it is excreted from the kidney into the cloaca – the single body of water where the body excretes, urinates, lays eggs, and mating takes place – the other body of water empties Nitrogen is a valuable source of nitrogen that is slowly released over time, which can help to improve soil fertility and support healthy plant growth. Uric acid is a valuable nitrogen source of nitrogen. It is a valuable fertilizer that provides a variety of benefits to agricultural and horticultural activities. Nitrogen, potassium, phosphorus, and calcium are among the nutrients found in it, with uric acid assisting in the gradual release of nitrogen. As a result, chicken manure can be an efficient and environmentally friendly method of fertilize soil and promote plant growth.

What Nutrients Are In Bird Poop?

The birds are known to contain a high concentration of phosphorus and nitrogen, and when they come into contact with water, these nutrients are added. It is not uncommon for nutrients to be added to an existing ecosystem over time.

Birds poop, also known as guano, contains a plethora of plant nutrients such as nitrogen and phosphorus. If a bird dies, knowing exactly how much water it pumps out can help predict the environment’s future. nutrients are trapped in a goldilocks zone in bodies of water Seabirds produce nitrogen in the same way that fishermen do, but not as much as bean farmers. One of the most important factors in keeping ecosystems healthy is understanding the delicate balance between nutrients.

Birds’ droppings can have a significant impact on the environment in both their immediate surroundings and in their surroundings. Water contains a high concentration of phosphorus and nitrogen, which can be added to it to increase the amount of algae blooms. Because the blooms block out the light, they can overtake the water and kill the aquatic life. The spread of transmittable diseases and infestations from bird droppings on land can be greatly accelerated. Several diseases, including histoplasmosis, cryptococcosis, salmonellosis, and E. coli, can be transmitted through bird droppings, and people are exposed to them when birds fly. ectoparasites can also bite people, and over 50 different species of parasites can live in structures. As a result, it is critical to take preventative measures to avoid these types of environmental and health risks. Regular cleaning and maintenance of areas with birds should be conducted to reduce bird droppings. Furthermore, if there is an infestation, it is critical that the problem is treated correctly by a professional exterminator. When we address these issues, we can help protect the environment and the health of our communities.

Do Birds Help Plant Trees?

Yes, birds do help plant trees! A variety of birds eat the seeds of trees, transport them to other areas in their droppings, and help them to germinate. This is especially helpful for species such as the ponderosa pine, which relies on birds to carry the seeds from one area to another. In addition, some birds, such as the blue jay, will often cache or store extra seeds for future use, thus helping to spread the seeds even further and increase the likelihood of successful germination. In this way, birds can be important in helping to spread and even regenerate forests.

How do birds help trees grow? We investigated the impact of land-use intensification on aquatic trophic cascades in this study. Conserving herbivore populations can have an indirect impact on plant productivity by regulating the number of herbivores. Factors that influence the strength of atrophic cascade are still unknown. Insectivorous birds are responsible for an 16% reduction in arthropod abundance and a 14% reduction in plant damage. The eradication of pests such as Adelges cooleyi and Pseudotsuga menziesii, which were particularly prevalent in crop trees (mostly Pseudotsuga menziesii), resulted in a 30% reduction. As a result, despite this effect, birds did not cause a trophic cascade that would have resulted in increased crop tree growth.

By attracting native birds to your garden, you can contribute to the environment in a simple and rewarding way. Not only do these birds provide pollination and insect control benefits, but they also benefit from the care and maintenance provided by a well-maintained garden. If you provide a variety of native plants in your garden, you can ensure that it is a habitat for a variety of birds, who will eat the nectar, seeds, and insects that the plants provide. Trees can grow and become stronger due to the presence of wind, which aids in their growth and development. A garden that is specifically designed for the native birds of your area will provide both a positive and mutually beneficial relationship between the environment and the garden.

Are Birds Important To Plants?

Birds, whether in the wild or in captivity, disperse seeds for plants that provide us with food, medicine, timber, and recreation all over the world. Among their qualifications, they are well-traveled and have a wide range of abilities. The seeds they eat have a pulp and a seed coat, which helps them germinate.

The Vital Role Of Birds In Forest Ecosystems

Birds provide critical services to plants and other wildlife in addition to their role as an essential component of the forest ecosystem. Birds play an important role in reproduction, which is why they are important pollinators. Pollen is transferred from one flower to another to ensure that plants can continue to grow and reproduce. They provide a valuable link between flowers. Native plants spread and thrive as a result of birds’ assistance in spreading seeds. Birds, for example, provide pollination, but they are more than that. It is also important to keep their populations in balance and prevent them from growing too large in order to control insect, rodent, and other small animal populations. This helps to keep a healthy forest ecosystem as well as a diverse and vibrant environment. Birds play an important role in the health of forests by providing pollination services, regulating animal populations, and controlling insects. There is a strong link between their presence and the health and diversity of the ecosystem; they play an important role in many native plants’ survival.

What Is The Relationship Between The Birds And Trees?

Birds and trees share a commensalistic relationship, with the birds preferring a place to build their nests while the trees are unharmed and not impacted by their presence. When two species collaborate and live in the same environment, mutualism occurs.

A Symbiotic Relationship: Trees And Birds

It is beneficial for both trees and birds to have a mutually beneficial relationship. Trees, like birds, provide essential food sources, but birds also provide a valuable service to trees. A bird’s diet consists of nectar, fruits, and other tree parts, as it moves from tree to tree, scattering and distributing seeds. The birds’ pollination and spread of the seeds allows trees to reproduce and spread their species, which is a benefit for the trees. Trees provide food, shelter, and nesting sites for birds in addition to serving as food, shelter, and nesting sites. Some birds rely on certain trees for survival in order to survive. In terms of the environment, trees and birds live together. Birds eat trees and provide food and shelter, whereas trees assist in pollination and seed dispersal. It is critical to keep trees and birds together in the same area because they are mutually reliant on each other.

Do Birds Help With Seed Dispersal?

Bird seed dispersal is perhaps the most dependable method of plant seed distribution due to the birds’ ability to traverse vast distances in short periods of time.

Birds And Animals: Nature’s Seed Dispersal Agents

Animals carry them out of their fur and feet, and foxes, skunks, mice, and other small rodents inadvertently eat them and then dispose of them in their parent plants, whereas other animals such as birds eat them while carrying them in their mouths. Two of the most important components of the ecological cycle are ornithophily, which allows birds to pollinate flowers, and syzoochory, which allows birds and other animals to seed. Ornithophily ensures that flowers are pollinated, whereas syzoochory assists in the dispersal of plant seeds in order to create a more diverse environment. It not only assists flowering plants in survival, but it also provides food for birds and animals. Birds and animals can aid in the continuation of the natural cycle of ecological balance, thereby promoting a healthy environment.

Is Parrot Poop Good For Plants

Parrot poop is an interesting question when it comes to plants. While it is true that parrot poop is high in nitrogen, which is beneficial to plants, the high levels of uric acid in the poop may be harmful. Additionally, the bacteria and parasites in the poop can be hazardous to both you and the plants. Therefore, it is generally not recommended to use parrot poop to fertilize your plants.

Bird Poop On Plant Leaves

Bird poop on plant leaves can be an issue for gardeners and plant lovers alike. Not only can bird droppings be unsightly, but they can also contain bacteria that can stunt the growth of the plant or even cause disease. Furthermore, bird droppings can be high in nitrogen, which can make the leaves of the plant too acidic and cause them to burn. To avoid this problem, gardeners should provide birdhouses and bird baths to attract birds away from the plants, as well as discourage them from roosting in the area. Additionally, they may want to cover the plants with netting or cheesecloth to protect them from the droppings.

Bird Poop On Garden Vegetables

Bird poop on garden vegetables can be a distressing problem for gardeners. Unchecked, bird droppings can lead to diseases in vegetables, as well as unpleasant tastes and textures. To prevent bird poop from ruining a garden’s vegetables, it’s important to take steps to limit birds’ access to the garden. This can include netting over the vegetables, setting up scare devices, or simply keeping an eye out for birds and shooing them away. Additionally, gardeners should inspect their vegetables for signs of bird droppings and remove any affected produce before it contaminates other vegetables. With a little effort, gardeners can protect their vegetables from bird poop and enjoy a healthy crop.

How To Use Bird Poop As Fertilizer

Using bird poop as fertilizer is a great way to naturally provide essential nutrients to your garden or lawn. To use it, you can either scoop up the poop directly from the ground or purchase a bagged product that has been composted. Once you have the poop, you can either spread it directly over the soil or mix it with some water and use it as a liquid fertilizer. Another option is to mix the bird poop with compost or other organic matter to make a nutrient-rich soil. You can also use a slow release fertilizer to ensure your plants get the nutrition they need over a longer period of time. Whichever method you choose, make sure you use a mask and gloves when working with bird poop to protect yourself from any potential harm.

The most effective method for disposing of bird droppings is to turn them into organic fertilizer. Plants can easily obtain basic micro and macro elements and amino acids from processed litter. Organic fertilizer derived from recycled litter is environmentally friendly and effective in the inhibition of pathogenic micro organism, larvae, and helminth eggs. For the purpose of poultry waste disposal, there are numerous technological advancements in the works. We believe that the most effective way to process birds’ waste is to use organic and organomineral fertilizers. Because granular bird droppings contain primarily organic compounds, they do not have the same properties as soil phosphates such as iron, aluminum, or calcium. We looked into how chicken manure is processed and how organic fertilizer is obtained from it.

The microwave is one of the most recent methods of processing chicken manure. The goal of this study is to assess the effects of various doses of bird droppings powder on seed germination, plant growth, and subsequent growth. Chicken droppings that are microwaved produce a loose granular material of brown color with inclusions (feed particles), with a faint scent of the raw material and a moisture content of less than 10%. A variant with a shorter processing time, in addition to energy savings, is more rational. Microflora was found to be absent from the finished product. The following characteristics were chosen for the soil that would be used as the main soil: black soil. The pHx was 6.92, the humus was 0.41%, and the particle content was 11%.

As part of the experiment, various amounts of powder were applied to the soil: the first version included a pure grass mixture of cereals. In the second experiment, 1 g of powdered milk was added to a cereal crop mixture. It took 14 days for the experimental and control variants to be counted. The best way to stimulate plant growth and development during cereal crop planting is to introduce 2 g of powder into the soil during the seed-sowing process. The Ark plant is a safe and effective plant for the environment to use in the prevention of pathogenic microorganisms, larvae, and helminth eggs as well as weed seeds by processing litter into powder via microwave. By processing bird droppings into powder, the content of organic matter in the final product can be preserved. This type of organic fertilizer contains a high concentration of nutrients and is well adapted to plants’ needs. There is no limit to the shelf life of powder in granules; it does not have toxicity.

Create An Effective Fertilizer With Bird Droppings

Trees and other plants can benefit greatly from bird droppings as a fertilizer. It is critical to carefully manage the droppings in order to reap the full benefits. A bird poop fertilizer can be made by combining one piece of bird poop with four or five pieces of brown matter such as sawdust, straw, or other bedding materials. If necessary, water the compost mixture lightly if it is damp, but not to the point where it becomes soggy. Nitrogen-rich leaves can provide essential nutrients to trees and other plants, allowing them to grow and thrive. In fact, one study discovered that trees grew much better in areas with bird droppings. Following these steps will provide you with an effective fertilizer for your trees and other plants, as well as help the environment by recycling bird droppings.

Is Bird Poop Good Luck

It’s one of the most popular bird superstitions, and it’s true if you’re unfortunate enough to get pooped on by a bird. Because it was originally created in Russia, it is thought to be good luck; however, due to its origins, the chances of it happening are extremely slim.

According to legend, a bird poops on you or something you own, which results in good fortune. According to Russian superstition, the chances of being pooped on by a bird are extremely low. An expert in probability devised a formula to estimate the chances of being struck by bird feces in New York City.

A Blessing From The Heavens: The Good Luck Of Bird Poop

Birds poop is regarded as a blessing in many cultures around the world. It is uncommon for birds to poop on humans, and it is considered a blessing from the heavens for the animals. The Russian Orthodox Church considers it to be a lucky fruit. Jews believe it is a sign of God protection. In China, there is a belief that the bird is delivering a message from a higher power, while in India, there is a belief that it can live for a long time. It is thought that poop from birds is a sign of good fortune, whether it is on your house, in your car, or anywhere else. Despite the fact that it may not be the best experience, it is still an adventure worth taking part in because the idea that something as unique and as unexpected as this can bring you happiness and wealth is something to celebrate. As a result, don’t be too concerned if you find yourself being pooped on by a bird. Accepting the blessings that the bird has bestowed on you can help you gain good fortune.

Can Bird Droppings Kill Plants

Using Avian Control liquid bird repellent, it is possible to keep bird droppings out of the garden. The dropping of seeds can be fatal to your plants and ruin your garden for the season.

Minerals such as phosphorus (P), nitrogen (N), calcium (C), potassium (K), and magnesium (Mg) can be found in bird droppings. You will usually not be harmed by mature leaves and plant parts. uric acid (C5H4N4O3) is found in bird droppings and contributes to the white color. Gardeners, pets, and other birds are not at risk, but plants are. When a bird’s gut is passed through its seeds, it sucks up the pathogens that have already built up on the outside of the seeds. Bird droppings should not be applied directly to garden plants if there is a high amount of their waste in your garden.

DE M4 RIS Electric AEG Rifle Review

0

Our take:  The DE M4 TacSpec RIS with a built in RIS system, a flashlight, and a functional red dot scope is one of the best starter electric rifles on the market.  It is one of the best choices a starter AEG and also is one of the best deals around because of its low price tag that includes the rail system and all tactical accessories.  The DE M4 TacSpec features adjustable hop up and a rear-retractable 4-point stock extra comt.  The rail system further adds onto the upgrade potential of this gun, since you can add an almost endless amount of tactical accessories to it, including flashlights, scopes, lasers, and grenade launchers.  Also comes with a vertical RIS egrip.

de m4 ris rifle review

Note:  Carrying handle is removable; underneath it is a weaver rail to mount items such as red dot scopes.

de m4 ris accuracy

Specifications:
Operation:  Electric Automatic
Firing Modes:  Semi-automatic and Full-automatic
Muzzle Velocity:  220-240 FPS
Magazine:  50-round standard M4 magazine
Gearbox:  ABS Plastic
Hop-up:  Adjustable
Weight:  5 pounds

Ammo type:
  0.20gram seamless BBs

Package includes: 
 Rifle, rechargeable battery, wall charger, instruction manual, unjamming rod,  magazine, flashlight, red dot scope.

2022’s Top-Performing Handguns: A Look at the 10 Best-Selling Pistols

0

If you’re seeking information on top-performing handguns, you’ve come to the right location. The renowned Austrian gun manufacturer, Glock, has achieved record sales for three consecutive years. It is predicted that their revenue will surpass one billion euros soon. Here is a list of the 10 best-selling pistols in the USA for 2022.

1. Glock 43X

The Glock 43X is lightweight, weighing just 650 grams when fully loaded. It is known for its low trigger force of 2.5 kg, making it easy to use. The G43X is part of Glock’s Slimline series, which offers the same level of dependability and performance as traditional Glock models, but with a more streamlined stock and grip for enhanced maneuverability.

The advantages of the Glock 43X include its compact size, ease of use, and exceptional trigger compared to other Glock models. Additionally, it was one of the best-selling handguns in 2021 and 2022. One potential disadvantage of the Glock 43X is that it is not designed to attach optics.

Glock 43X semi-automatic handgun on a white background
Glock 43X, a compact and reliable semi-automatic handgun (Photo: XY)

2. Taurus G3C

The Taurus G3C is a new model set to replace the well-liked G2C. If you’re searching for an introductory gun or a modern 9mm handgun with dependable accuracy and ample capacity, the G3C is a noteworthy option.

Benefits of the Taurus G3C include its three safety mechanisms: a loaded barrel indicator, locking firing pin, and trigger safety. Additionally, it has an affordable price point of around 250 Euros, making it great for every day and concealed carry. It also boasts a large capacity for a compact pistol and a light trigger pull of only 600 grams. Some potential drawbacks of the Taurus G3C include its longer trigger distance and less sleek design compared to other handguns on the market.

Taurus G3C semi-automatic handgun
Taurus G3C, a compact and reliable semi-automatic handgun (Photo: XY)

3. Glock 19 Gen 5

The Glock 19 Gen 5 is optimal for gun enthusiasts who find the Glock 17 too large but do not desire the smaller Glock 43X or Glock 26 (Baby Glock). Some benefits of the Glock 19 Gen 5 include its ample frame capacity, light trigger pull, and ideal sight length for targets up to 50 meters. It is also perfect for concealed carry, with a weight comparable to that of compact Glocks. One potential disadvantage of the Glock 19 Gen 5 is that it is unsuitable for optics attachment.

Glock 19X Gen 5 semi-automatic handgun in its original packaging
Glock 19X Gen 5, a versatile and reliable handgun in its original packaging (Photo: XY)

4. Taurus G2C

Taurus G2C, a mainstay in the top 10 list, is widely popular due to its cost-effectiveness. A brand new Taurus G2C in 9mm caliber can be acquired for around 230 euros. Benefits of the Taurus G2C include its affordability as the most budget-friendly gun on the list, the compact size that makes it suitable for versatile use, ease of use, its ergonomic handle with thumb and palm rests that enable comfortable grip and control, a light trigger pull, and 12+1 rounds, which is ample for its size. A potential drawback of the Taurus G2C is its incredibly long trigger travel.

Taurus G2C semi-automatic handgun
Taurus G2C is an affordable handgun designed for concealed carry and personal defense (Photo: XY)

5. Glock 44

The Glock 44 is an excellent option for those who appreciate the Glock 19 and are searching for a .22 LR pistol. It offers a comfortable and familiar feel similar to the Glock 19 but with reduced recoil. Some benefits of the Glock 44 include its affordability and handling experience that closely mimics the Glock 19. One potential downside of the Glock 44 is that the barrel does not have a thread.

Glock 44 chambered for .22 LR on a grey background with rounds
The Glock 44 in .22 LR, with rounds scattered around on a grey background (Photo: XY)

6. Glock 43X MOS

The Glock 43X MOS is similar to the Glock 43X, with the added feature of the Modular Optic System (MOS), which allows for the replacement of the factory sights with aftermarket RDS or tritium night sights.

Glock 43X MOS semi-automatic handgun
The Glock 43X MOS is a compact and versatile semi-automatic handgun built on the same platform as the Glock 43X but with the added feature of MOS (Modular Optic System), which allows for the attachment of different types of reflex sights (Photo: XY)

7. Glock 19X

The Glock 19X is an excellent pistol for those with larger hands and who desire the full-size grip of the Glock 17 but with the thinner and shorter frame of the Glock 19 for concealed carry. Benefits of the Glock 19X include its suitability for shooters with larger hands, its a thinner casing that makes it ideal for law enforcement, its high capacity, ease of use, and smooth trigger pull. One potential downside of the Glock 19X is that it may experience issues with ammunition from certain manufacturers and a collection of debris.

Glock 19X Gen 4 with flashlight attachment in desert camouflage
The Glock 19X Gen 4 in desert camouflage, with a flashlight attachment for low-light situations (Photo: XY)

8. Smith and Wesson M&P 45 2.0

The Smith and Wesson M&P45 2.0 is a .45 caliber pistol with an altered grip angle of 18 degrees to bridge the gap between this model and the Glock.

Some advantages of the Smith and Wesson M&P45 2.0 include its tactile and audible trigger reset, very light trigger pull, especially for a .45 ACP weapon, the optimum angle of the handle for a comfortable and natural shooting position, 4 included grip inserts for adaptability to any hand size, aggressive grip for full control during shooting, 380mm groove pitch which is ideal for a .45 ACP barrel, affordability, sleek design, suitable for open carry, and equipped with adjusted optics.

Potential disadvantages of the Smith and Wesson M&P45 2.0 include its limited capacity of 10 rounds, its length of 200mm, which makes it less suitable for concealed carry, its long trigger stroke, standard white dot sights that may be inadequate for a gun in this price range, and the similar price; you may be able to purchase a Glock 19 or Glock 43X.

Smith and Wesson M&P 45 2.0 with flashlight attachment on a wooden table
The Smith and Wesson M&P 45 2.0 with a flashlight attachment and rounds on a wooden table (Photo: XY)

9. Glock 20

The Glock 20 is an excellent hunting companion due to its ample (15+1) capacity and 10mm caliber, which ensures adequate stopping power, even during an encounter with a bear. Some benefits of the Glock 20 include its large frame capacity, extended line of the 17 cm sight that allows for faster and easier targeting, superior stopping power, comfortable width of 3.4 cm, and ability to handle recoil better than any other 10mm pistol. Some potential drawbacks of the Glock 20 include its inability to be carried concealed, the tendency to collect debris, and the highest trigger pull weight of any Glock.

Glock 20 with optical sight and attached flashlight
Glock 20 with optical sight and attached flashlight (Photo: XY)

10. Glock 26 Gen 5 (Baby Glock)

The Glock 26 Gen 5, also known as the “Baby Glock,” is the second most popular subcompact pistol after the Glock 43X. Some advantages of the Glock 26 Gen 5 include its suitability for concealed carry, its impressive frame capacity within its class, its lightweight of 730 grams when loaded, affordability, and the inclusion of the Glock Marksman Barrel, which uses a barrel rifling technique based on polygonal grooves for improved accuracy. One potential downside of the Glock 26 Gen 5 is that it is not equipped for optics attachment and may be too small for individuals with larger hands.

Glock 26 Gen 4, also known as Baby Glock
Glock 26 Gen 4, also known as Baby Glock (Photo: XY)

Harvest a Post-Rut Buck with These 5 Tricks

0
Harvest a Post-Rut Buck with These 5 Tricks

While November deer hunting gets most of the headlines, those hunters who are willing to punch the clock to the late winter buzzer can still take the trophy whitetail of a lifetime. Texas bowhunter Dale Moses did just that a few years ago, preserving through a long season of hunting that eventually culminated with a cold winter day shot that downed a big non-typical whitetail he had dubbed Captain Hook. (Photo by Lynn Burkhead)

Read deer hunting articles each fall, and you’ll see a lot of stories, a lot of photographs, and a lot of chest-thumping about the month of November. Outdoor writers are notorious for their November deer hunting praise and I’m as guilty as the rest of them.

In short, it’s the Whitetail Chamber of Commerce’s best advertising material, the month when the woods are alive with colorful leaves falling to the ground on a freshening north wind and deer-hunting prospects are at their very best.

That’s because November is when estrous does are plentiful. Mr. Big and his antlered buddies are throwing caution to the wind, and every deer trail has the potential of a whitetail love triangle straight out of the latest Yellowstone episode.

But then there’s the month of December, a time when the deer woods are suddenly as barren as Ebenezer Scrooge’s bankrupt soul, a collection of weeks as dead as the proverbial door nail pulled straight from the opening lines of Charles Dicken’s “A Christmas Carol.”

If you find yourself hunting in December with an empty buck tag in your back pocket, well, good luck. Because you’re going to need it, right?

Not necessarily. Play your cards right in the season’s 11th hour—and follow these five buzzer-beating tips—and you just might end the season smiling as big as the redeemed soul of old Ebenezer when he hears Tiny Tim cry out “God bless us everyone!”

Curious as to what you can do to tag a late-season buzzer-beater buck? Follow these five cardinal rules for late-season success.

1. Hunt the Fronts

The first rule is to hunt the passage of strong cold fronts. Especially on the day or two leading up to the frontal passage as the barometer is falling, clouds are gathering, and wildlife are noticing that a storm is brewing.

Like humans do with their pre-winter storm milk and bread run rituals that wipe out the shelves at the local grocery store, wildlife do something similar as they get up, feed heavily and pile on the calories to prepare for the coming blast of Old Man Winter.

  • Read more: Tag a Whitetail When It’s Hot, Cold, Wet or Windy

That’s what a bowhunting friend of mine named Tarif Alkhatib did a few years ago when he arrowed a gnarly horned, multi-tined non-typical buck in North Texas as the first Arctic blast of the season moved in.

Bundled up in his Under Armour hunting gear as the front barreled through and dropped temps into the lower 30s with light freezing precipitation, Alkhatib downed the buck as it moved quickly by his stand.

LateDeer
Late-season deer are active before and after a cold front. (Photo by Lynn Burkhead)

One good shot from his Mathews bow and the dedicated archer was soon on the ground shaking from both excitement and the cold as he tagged one of several wall-hangers that he’s knocked down in recent seasons.

Keep in mind that the same principle applies to a day or two after a storm, as deer get back on their feet and come out to feed and move around when the sun starts shining, the precipitation ends, and temperatures start to slowly moderate.

2. Hunt the Food

The idea noted above leads to the second rule of late-season success — hunt near high-calorie food sources. In the Midwest, that might be a cut corn field or a snow-covered soybean field. In the Deep South, it could be a green food plot or an oak tree with a few acorns still laying around. And in Texas, where I live, it could be a corn feeder shelling out golden nuggets twice a day.

LateDeer
Even the buck of a lifetime can come calling if the weather is cold and there’s adequate whitetail food around. (Shutterstock image)

Hunting late-season food is exactly what Robert Taylor did at the end of the 2012 season when he arrowed a huge North Texas non-typical whitetail that was chronicled in the pages of North American Whitetail.

The key to Taylor’s hunt — which came on the evening of Dec. 29 as cold weather and the remains of the region’s 2012 White Christmas dotted the landscape — was food.

  • Read More: Field of Dreams Offer Food for Whitetails, Success for Hunters

That food was the combination of a feeder spitting corn out and a food plot that promised local deer high-caloric intake during the cold snap. That was enough to lure in several does, a good 10-point buck, and the huge bruiser that Taylor ended up shooting. All on a five-acre plot of land, no less.

Unfortunately, the Taylor buck rode a bit of a scoring roller coaster – it received a green score of 249 2/8 inches, then a 60-day entry score of 254 4/8 inches, and finally a revised Pope and Young Club panel score of 219 1/8 inches. While the middle number would have made it a Texas bow buck record, 219 and change is nothing to sneeze at and proof positive that even the buck of a lifetime can come calling if the weather is cold and there’s adequate whitetail food around.

3. Hunt Thick and Nasty Cover

On an outdoor writer’s deer hunt last December in Oklahoma with Kevin Reese and the Sight Mark optics crew, I pushed my hunting luck to the very end. But hunting a box-blind stand in a Sooner State pecan bottom during the final hour of the final day of my hunt at Dakota Stower’s most excellent North Texas Outfitters operation, I was rewarded for nothing more than sheer persistence. And sitting in a post-rut deer stand situated next to some of the area’s thickest and gnarliest cover.

LateDeer
Focus on an area’s thickest cover during the post-rut. (Photo by Lynn Burkhead)

As high cirrus clouds streamed in and muted the last hour’s shooting light that was filtering into the pecan bottom, a good 8-point buck stepped out of the creek bottom’s nasty vegetation where he had holed up and bedded down the entire day. But as he trotted through a brief window of a last-hour shooting opportunity before ducking back into the thick cover, one shot from my rifle put down the only deer I would tag in all of 2019.

A short while later, I was discarding the recipe for “tag soup” I had carried in my back pocket last fall, not to mention looking through my phone contact list for the number of a favored taxidermy shop, all thanks to my own buzzer-beater buck.

4. Hunt the Secondary Rut

A fourth rule in tagging a December bruiser is to remember that November doesn’t always have the market cornered on rutting activity.

That’s because of the secondary rut which occurs when does that weren’t bred in last month’s breeding frenzy actually cycle into estrous again approximately 28 days later.

LateDeer
The key to hunting the secondary rut successfully are to find scrapes that have been reopened, to identify and hunt preferred natural food sources that mature bucks tend to key on, and to be in the woods when late-born fawns come into their first estrous cycle in December. (Photo by Lynn Burkhead)

While some hunters debate the strength of secondary rutting activity and its effects on big buck hunting potential, you won’t find Dallas hunter Sherman Wyman arguing about it. That’s because Wyman capitalized on the secondary rut on Dec. 24, 2005 when he shot a B&C non-typical buck netting 226 4/8 inches on his low-fence ranch near Wichita Falls in the state’s Red River country.

  • Read more: Second Rut, Last Chance

“I’ve shot a lot of big deer around Christmas time,” said Wyman. “(In North Texas), everyone thinks once Thanksgiving or the first of December has come and gone, you’re done.”

Obviously not.

In Wyman’s mind, the keys to hunting the secondary rut successfully are to find scrapes that have been reopened, to identify and hunt preferred natural food sources that mature bucks tend to key on, and to be in the woods when late-born fawns come into their first estrous cycle in December.

5. Punch the Clock

A final rule to notching a tag on a December buzzer-beater buck is to employ the deer-hunting version of the photographer’s old “F8 and be there” rule.

For photographers of old-school training, that rule means to put your digital camera on manual, set the f-stop to F8 and be there for the shot.

That idea rings true for late season deer hunters too.

A deer hunting physician I once knew practiced this rule near my North Texas home many years ago just before Christmas when he carved time out of his busy holiday and professional schedule, braved some intense cold weather, and got to the nearest deer stand as the season was winding down.

Deer season, as well as the holiday season, that is.

  • Read more: How to Rally for a Late-Innings Whitetail

Dr. Wade was rewarded for his consistent punching of the clock that December when he arrowed a beautiful 163 5/8 inch net typical, a wide and beautiful racked buck that adorned the good doctor’s Christmas cards that year.

My good friend Dale Moses, a passionate bowhunter and retired Texas Game Warden, has taken numerous big deer over the years with his Mathews bow, a few of those wall-hangers getting tagged in the season’s final days. That includes a late-season buzzer-beater back in 2013, one that he dubbed “Captain Hook.”

Just after Christmas that year, in a frigid stretch of weather that was gripping the North Texas woods Moses had hunted all season, his cat-and-mouse game with this big non-typical finally ended. The whopper non-typical buck placed well in the Texas Big Game Awards Program that year, scoring 184 0/8-inches.

Want to do something similar as the 2020 deer season winds down? Then get out of that easy chair, leave the warmth of the fireplace behind, and get into your deer stand, even if it’s the season’s final hours.

Because when it comes to tagging a buzzer-beater buck, you just never know, right?

“How many guys do you know that were out on a (North Texas) deer stand on Christmas Eve?” asked Sherman Wyman.

The truth is, not very many.

Only the ones whose inner hunting flame still burns hot enough to drive them out the warm comfort of home and into the chill of the late-season whitetail woods.

Which is exactly where they hope to be to beat back Jack Frost’s wintertime chill while tagging a buzzer beater buck just in time for Christmas delivery.

Benjamin 397 Review

0

In 1992, The Crosman Corporation, a manufacturer of air guns and air gun accessories, brought Benjamin Sheridan in its entirety.

Crosman closed the operation in Racine in 1944 and moved the production line to its home location in East Bloomfield, New York.

Consequently, the manufacturing of  Benjamin Model 397 has also taken place here since that time.

Although this rifle has been made for decades, Crosman continues to put extra nice features here and there to keep the classic living up to its name.

You can find out all about them in this detailed review.

Benjamin 397 – Guntype

This is a multi-pump pneumatic air gun.

For more on the 5 types of air rifles you need to know before buying, see this post.

The Benjamin 397 has a caliber of .177 (4.5 millimeters).

(For more on how to choose the right air gun caliber for your game, see this post)

It has a single-shot action so you can shoot only once at a time.

The barrel is rifled which means that it has helical grooves inside the bore to make the bullet spin.

Moreover, the barrel is made of brass (an alloy made of copper and zinc).

Brass barrels give you lots of advantages:

First, it is pretty much non–corrosive and doesn’t rust easily.

Second, it is self-healing; as small scratches from inside the barrel, subsequent firing will smooth out these imperfections and give you much better accuracy.

In summary, having a brass barrel is a huge advantage that can make your gun last for years .

For more on things you should know about air rifle barrels before buying, see this post.

Click here to view

Stock

This gun is made of beautiful hardwood which stands against impact, stress, and abrasion in daily life.

Moreover, hardwood can be easily refinished at any time so it has a very long lifespan.

For more on the in-depth comparison between synthetic and wood stock, see this post.

The stock has a swelling part in the forearm to make pumping easier for most shooters.

Besides, the Benjamin 397 has a Monte Carlo stock with a raised comb and low heel.

Monte Carlo stock has lots of advantages including:

  • improved accuracy (because the shooter’s eyes are lined up more naturally with the sight),
  • minor recoil absorption and therefore faster follow-up shots.

Ammo

The Benjamin 397 uses .177 pellets as its only source of ammunition.

A .177 pellet is cheaper than other types of pellet .

If you look at the pellet count box, you will see that you’ll get exactly twice as many .177 as .22 for the same price.

Thus, .177 is your best bet if you plan on doing lots of target shooting and plinking.

For more on the differences between .177 & .22 and which jobs they do best, see this post.

Cocking and loading

Cocking the gun:

First, put the gun ON SAFE.

With one hand holding the receiver, use the other hand to grasp the forearm firmly and open it all the way up.

Then close it to the original position and you just perform one pumping action.

Pump the gun at least 3 times to prevent pellets from jamming in the barrel, but no more than 8 times for optimum performance.

Loading the pellet:

Put the gun ON SAFE, push the bolt handle up, and pull it rearward to open the bolt.

After that, put one pellet (with the pellet’s nose lying forward) into the loading port.

Move the bolt forward into its position, push it down to lock and you are ready to fire.

Sight

The Benjamin 397 features an open sight with a fixed front sight.

The rear sight is fully adjustable for windage adjustment (left and right) and elevation adjustment (up and down).

The iron sight is decent if you have good vision and have no need for the scope.

For more on how many types of air gun sights are out there and which one is suitable for you, see this post.

The Benjamin 397 doesn’t have a scope rail to mount the scope, so if you insist on using one, you will need either a Crosman 3/8 Intermount or the Air Venturi Weaver/Picatinny Intermount.

One thing to remember here is that you have to mount the ring in the center of the base to keep it solid,

And if the scope were any further back, it would interfere with the bolt handle

So you should get a forward-mounted scope to be able to pump the rifle in the normal way. 

Even when you do mount the scope this way, the long eye relief will make the scope too hard to see through

So do yourself a favor and get the William peep sight (shown below) instead

Air Venturi Williams 64 Peep Sight – 1
Air Venturi Williams 64 Peep Sight – 2

Because “pumper and peep are a match made in air gun heaven”, ya know.

Velocity, accuracy and power

The maximum velocity of this gun is 800 FPS.

This is a medium velocity compared to other .177 pellet guns on the market

And how about accuracy?

Chrony tests give us the results as follows: 

.177 PelletsNumber of pumpsFPSFPE
7.4 grains pellet35705.34
7.9 gr pellet35405.12 
10.5 gr pellets34755.26 
7.9 gr pellet46006.32 
10.5 gr pellet45356.68 
7.4 gr pellet6725 8.64 
 7.9 gr pellet66808.11 
10.5 gr pellets6610 8.68 
7.4 gr pellet87759.87 
7.9 gr pellet87409.61 
10.5 gr pellet86359.4 
Crosman Premier Hollowpoint 7.9 gr86998.57 
Dynamit Nobel Gecko 7 gr pellet8740.48.52 
Crosman SSP 4.0 gr8894.8 7.11 
Gamo PBA Raptor 5.4 gr8789.8 7.48 
10.5 gr CP Ultra Magnum8643.4 9.65 
Crosman Premier Hollow Point107529.92 
Crosman Premiere 7.9 gr107419.63 
RWS Superdome1078011.22 

As you can see, the actual velocities are so close to the advertised numbers. That’s a good sign for buyers.

See the video below for more numbers:

Next, let’s take a look at the performance of this rifle – The common shooting groups achieved with Benjamin 397 are: 

  • 0.5” at 33 yardst,
  • 3/4″ at 30 yards,
  • 1” at 25 yards,
  • 2” at 20 yards,
  • 1 1/2” at 35 yards out of the box,
  • 2” at 30 yards,
  • 1/4″ at 40 yards,
  • 1/4″ at 25 yards,
  • 1/4″ at 15 meters with Crosman Premiere Hollow Point,
  • 1/4″ and dime size at 30 – 40 yards. 

Moreover, it can:

  • headshot a squirrel at 50 yards,
  • kill moles, squirrels,
  • hit a milk cap at 12-13 yards,
  • shoot a dove at 20-30 yards,
  • kill 2 birds with Crosman pointed 7.9 gr at 41 yards,
  • penetrate 3/8” in a phone book 2” thick with RWS target at 10 feet for 5 pumps,
  • penetrate 1/2″ phone book 2” thick at 10 feet for 5 pumps,
  • penetrate 1/2” in a 2” phone book with RWS target at 10 feet for 8 pumps,
  • penetrate 5/8” in a 2” phone book with Gamo gold pellet at 10 feet for 8 pumps.

This gun packs one hell of a punch and if you have a problem with backyard varmint then this is a quiet, fast way to get rid of them and have some fun in the process .

Shooting Ability

The effective shooting range of the 397 is up to 50 yards.

It is ideal for spinning paper targets, casual plinking, or pest control

Loudness

Many owners report that the Benjamin 397 is relatively loud.

You can try using a heavier pellet, more of the energy will be absorbed launching the pellet and it should be a little quieter

Maintenance

To maintain the seal for a long time, always remember to put 1 pump of air into the gun when you are done shooting whether you plan to shoot again the next day or not again for another 2 years.

Specifications

  • Caliber: .177
  • Velocity: 800 FPS
  • Loudness: 4 – Medium – High
  • Barrel Length: 19.25”
  • Overall Length: 36.25”
  • Shot Capacity: Single shot
  • Cocking Effort: 3-8 pumps
  • Barrel: Rifled
  • Front Sight: Blade and Ramp
  • Rear Sight: Adjustable for windage and elevation
  • Scopeable: No
  • Trigger : Two-stage non-adjustable
  • Buttplate: plastic
  • Suggested for: Small game hunting/plinking
  • Trigger pull: 5.5 lbs
  • Action: Bolt-Action
  • Safety: Manual
  • Powerplant: Multi-pump pneumatic
  • Function: single-shot
  • Weight: 5.5 lbs

Customer review

Customers are generally satisfied with the quality of this gun.

In positive reviews, they love this gun because of its classic design, ease of handling, superb accuracy, and exciting knockdown power.

Nothing arises as a serious issue.

There are a few complaints here and there about mounting the scope on this gun

But as I said earlier in this review, you’re better off getting the William peep sight for maximum performance.

Pros and Cons

ProsCons
  • Handsome woodstock
  • Solid construction
  • Ergonomic Monte Carlo design
  • Long-lasting brass barrel
  • Actual velocity close to advertised numbers
  • Impressive accuracy
  • Fantastic power
  • Quiet
  • Decent open sight
  • No scope or accessory rail but you can fix this problem as I said earlier in this review

Price

The price for this rifle is about 150 dollars.

It’s a good price if you consider all the pros and cons of this gun.

Oh, and remember to save some bucks to get the Intermount if you insist on using the scope on this gun.

click for the lowest price

Conclusion

The Benjamin 397 is a solid gun for the money.

It’s built to last for years with the simple but effective operation, classic design, great power, and amazing accuracy.

For those interested in firearms and ammunition, you might want to explore more on 357 magnum brass to enhance your knowledge of ammunition components and reloading options. Additionally, if you’re looking to optimize your shooting experience, it’s essential to stay informed about the various ammunition choices available.

=> Check out its brother – Benjamin 392 review here

Ramps: How to Forage & Eat Wild Leeks

0

Where to find

Ramps occur in Eastern North America from Georgia to Canada. They’re easily recognized by their 1, 2, or 3 broad leaves measuring 1 to 3 1/2 inches wide and 4 to 12 inches long.

There are a couple of varieties:

Allium tricoccum var. tricoccum: These have wider leaves and red stems.

Allium tricoccum var. burdickii: Also known as narrow-leaf or white ramps.

White-stemmed narrow-leaf ramps (Allium tricoccum var. burdickii) tend to have a milder flavor than the red-stemmed variety. They also have smaller leaves (up to 1 1/2 inches wide), as well as smaller bulbs.

Ramp leaves appear from March to April and last until around mid-May to June depending on the local climate. As temperatures get warmer, the leaves will turn yellow and die.

Look for them underneath dense deciduous forest canopy in soil that’s rich with organic matter.

In general, Narrow-leaf ramps are more likely to be found in more well-drained, dryer woods, while red-stemmed ramps prefer damper soil.

That being said, it’s not uncommon to find both varieties growing side-by-side.

There are some dangerous look-alikes so be sure the plants you pick smell like onion or garlic.

Do not pick the dangerous Lily of the Valley (Convallaria majalis) or False hellebore (Veratrum genus) by mistake.

Again, make sure they smell like onion or garlic. If you’re unsure, let a knowledgeable forager confirm your find or just pass on picking.

It may also be helpful to consult multiple references for more positive identification.

Sustainability

Unfortunately for ramps, they’re super-trendy these days. Chefs, foodies, and other ramp-lovers flock to the mountains by the thousands for a chance to bask in their gourmet-ness.

“Ramp feeds,” known as ramp festivals now, have been taking a toll on ramp populations for years and the added pressure of their recent popularity has really put a hurting on their numbers.

The implications affect conservationists and foodies alike. Cindy and I are conservationists first and foragers second. What this means for us is that ramping is not only unsustainable, but it gets more arduous each year as we climb higher and longer to find undiscovered ramp patches.

Traditionally, the Cherokee dug, and still dig, ramps by leaving the roots. This is done by cutting off the bottom of the bulb with a knife while it’s still in the ground (more on the how-to below).

sustainably digging ramps
Sustainably harvesting ramps – the root is cut off and left intact in the ground.

How to harvest

If you plan on digging ramps on public land, you’ll want to look into whether local regulations restrict harvest amounts, where harvesting is permitted, etc.

In West Virginia where we live, as of 2020, the Forest Service allows harvesting for personal use only – anyone can dig up to two gallons of ramps at a time. That’s about the volume of a plastic grocery bag or, according to the USFS, about 180 plants with leaves and roots.

And digging is no longer permitted in some parks due to declining ramp populations, so please be aware of local rules and conservation issues.

Here are a few things you’ll need for harvesting ramps:

  • Time This one is really important. It’s way too easy to run up to the ramp patch after work with good intentions of sustainbly digging ramps. You get to the trailhead at 5:30pm and it’s 6pm by the time you’re digging ramps. The sun’s about to slip behind the mountains and you’re in a sudden hurry to get your ramps and get out of there. So you abandon your plan and jerk as many roots out of the ground as you can before running out. DON’T DO IT!

    Sustainably harvesting takes more time, so you really need to make allowance for it. Plus it’s a lot more fun to have a leisurely walk into the woods, not worrying about racing the waning light. If you can’t give yourself the time to do it, please consider taking only greens and leaving the bulbs undisturbed. You won’t need nearly as much time if you only harvest leaves!

  • Sharp hunting knife Make sure it’s sharp! A dull knife will do more harm than good – you’ll end up mutilating the bulb so it’s not useable as food and not viable as a plant. You may even want to touch up the blade as you dig, since the grit of the dirt will take your edge. You’ll also want to make sure the blade is at least three or four inches so you can easily reach the root without disturbing the soil.

    If you insist on digging the root, use a hori hori knife to minimize impact.

  • Backpack or shoulder bag I usually put a few plastic grocery bags in a backpack and then load a bag or two with ramps before putting them in my pack, which helps keeps the dirt out of the pack.

The most sustainable way to harvest ramps is to cut only one leaf, leaving the bulb and second leaf to continue growing. This is least impactful on the soil, the plant, and the colony as a whole.

The leaves, in my opinion are the best part, anyway, and taking only leaves is the best way to ensure the colony will remain viable.

Sustainably harvested ramp.

If you insist on taking bulbs, please dig sustainably with a knife: Simply insert your knife into the dirt at an angle and slice off a third or so of the root, leaving it in the ground to re-grow. Then pull the rest of the plant out by its stems.

It will take a little practice to get a feel for where to put the knife. You can also gently pull back the dirt from around the bulb so you can see where you’re cutting. If you do this, make sure to pull back just enough dirt to expose a little bit of the bulb and re-cover the roots after cutting.

That’s all there is to digging. Please be judicious and don’t take any more than you will use.

I find that when I overzealously harvest, it makes more work for me in the long run, because some ramps will inevitably go bad before I can get to them. There’s not much more disgusting than the smell of past-their-prime ramps. And a few ramps go a long way so there’s no need to stockpile them.

Even though we practice sustainable harvest, I’m afraid the ever-inceasing demand will eclipse the slow procreation.

According to North Carolina Extension Horticultural Specialist Jeanine M. Davis, ramps can be transplanted and cultivated from seed in climates where ramps don’t normally grow. Apparently, it takes some effort to germinate seeds when climes are warmer than ideal, but it can be done.

And once a good patch is established, it requires little maintenance. Jeanine recommends the book Having Your Ramps and Eating Them Too by the “Johnny Appleseed of Ramps” for more info on cultivating ramps. Unfortunately this book is no longer in print.

We’ve been growing our own for a while. Our homestead is located in the ramp belt now, but our previous place was outside of ramp habitat. When we lived there, our planted ramps didn’t spread because conditions weren’t ideal.

They did grow, though, and as long as we continued to plant new ramps, we always had a steady supply right outside of our door.

Where to buy

If you’re lucky enough to live in an area where ramps are abundant, it’s not uncommon to see them in the grocery store when they’re in season. Where we live, they’re also common in seasonal dishes served at local restaurants.

Ramps for sale at a local grocery store for $8.99/lb.

How to store

Ramps are only in season for a month or so, but, for us, getting them is only half the problem. I usually come back from a good ramping trip with enough for us to eat fresh before they go bad with a little extra to keep for eating later (I rarely go digging more than once a season unless I come home with a particularly light harvest).

Both leaves and bulbs can be eaten and both are delicious. They’re best used fresh, but both can be put away for eating later in the year.

The easiest way to store ramp bulbs is by freezing: Simply cut off the greens, clean the dirt off the bulbs and cut off the roots (if your ramps still have roots). Then spread the bulbs out on a sheet pan or waxed paper so they are not touching and freeze. This prevents them from sticking together.

Once they’re frozen, put them in jars or plastic containers, seal tightly and put in the freezer for up to six months. You can also wrap them individually in wax paper and store frozen in sealed jars. They can also be pickled but we don’t usually bother.

The greens won’t last long fresh and deteriorate when frozen. They can be dried, but they lose a lot of their flavor. We’ve found the best way to preserve them is by making ramp compound butter (see recipe below). A close second is ramp pesto. Either can be stored in the refrigerator in the short term or frozen for use later.

For short term storage put ramps in the refrigerator as soon as possible. They should be stored uncleaned. If a refrigerator is not immediately available ramps can be kept with the bulbs submerged in a bucket of water and placed in a cool shaded area.

The leaves will start to wilt in the refrigerator after 4 days or so and in the bucket after a day or so depending on temperature.

How to cook

Ramp bulbs and leaves can be diced and used just as you would use onions, green onions, leeks, chives and garlic, but they are much more potent. They pair well with the following:

  • pasta

  • eggs

  • chanterelle mushrooms and other wild mushrooms

  • potatoes

  • stir fried and raw greens

  • pork

Some folks like to eat ramps raw. I like a little chopped up in a salad, but ramps as a cooked vegetable are a lot more fun. My favorite way to eat them is mixed into venison burgers or in ramp and white cheddar soup. And it’s hard to beat ramps and eggs for breakfast.

Mom & Ramps Forever!
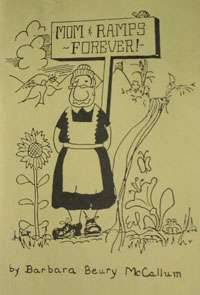
A few years back, Cindy came across this sweet little book from West Virginia called Mom & Ramps Forever! by Barbara Beury McCallum. There’s some fun anecdotal history on ramps in there. It’s also a collection of old timey recipes and stand-bys like pickled ramps and ramp champ – mashed potatoes with ramps. Here’s one of the recipes… quick and easy and sounds tasty:

Ramps With Watercress

“Fry some bacon until crisp, remove the bacon then drain off part of the bacon drippings. Put washed cress into the pan with the water that clings to it. Cook covered, until tender. Garnish with crumpled bacon, finely chopped ramps, and some chopped hard cooked eggs.”

Unfortunately, Mom & Ramps Forever! is out of print, but it’s a nice one for the collection if you can find it.

Ravin R500 Crossbow Review

0

Ravin introduced the Ravin R500 as their 2021 flagship model during the 2021 ATA Virtual Show Lancaster Archery hosted back in January. Unfortunately, it was pretty hard to get our hands on a Ravin R500 crossbow, so we couldn’t write a review any sooner than today.

Ravin introduced their new proprietary cam system; the HexCoil cam system. During the ATA virtual show, Ravin claimed it breaks the 500 feet per second barrier. Today we’ll be taking this crossbow out to the range and giving it a full review! Hopefully, we can see our first ever 500+ fps rating on our chronograph!

Ravin R500 Crossbow Specs

First Impressions

Wow! Does this …thing still qualify as a crossbow? Ravin did an amazing job at designing the R500! It’s extremely narrow because of their brand new HexCoil cam system and this new tech was also key in making this a 500 feet per second crossbow.

The crossbow can be cocked entirely electronically by the push of a button, but it can also still be cocked manually with a detachable draw handle.

Ravin introduced this crossbow with 2 different scopes. The cheapest option comes with a 100-yard illuminated scope that’s speed rated at 550 feet per second. The more expensive option comes with an “Adjustable Turret Scope”. You might be thinking what the heck may that be, but we’ll explain it all in the #OPTICS section.

The Ravin R500 only comes in the color option “Slate Gray”, but it looks incredible!

Ravin ships the R500 and the R500 Sniper fully assembled and pre-tuned.

Design and Durability

With a length of only 28 inches, the R500 is slightly longer than Ravin’s most compact crossbow the R26. Because of Ravin’s new HexCoil Cam System that can rotate 360 degrees, the width of this crossbow is a lot narrower and comes in cocked at 3.6 inches and uncocked this crossbow has a width of just 7.6 inches.

Weighing around 10 pounds, the Ravin R500 isn’t the most lightweight of crossbows. High-performance crossbows require stronger materials and this often results in a heavier weight. Actually, for what you’re getting, this crossbow isn’t even that heavy and it has a comfortable hold.

We do think that the Ravin R500 crossbow feels a bit front-heavy. After an hour or so in our range test, we already got used to it. When taking this crossbow out to the range, we recommend using a tripod.

Optics

As we mentioned earlier, Ravin offers the Ravin R500 with 2 different scopes. The “basic” R500 comes with an illuminated 100-yard scope that’s speed rated for crossbows up to 550 feet per second. This scope has a range of 30 to 100 yards and features red or green illumination. Fully multi-coated lenses, waterproof, fog-resistant, shockproof, and recoil-proof is what makes this scope an excellent option for this crossbow.

As for the more expensive option, the R500 Sniper package, Ravin installed an adjustable “Turret Scope.” This is currently the best scope Ravin has to offer. It might not be as advanced as the Garmin XERO X1i that TenPoint installed on a couple of their crossbows, but it’s the best non-electronic scope you can currently get. You can adjust the yardage via the top elevation turret and it includes all the premium features you could ask for.

Cocking

With the Ravin R500 you’ll be able to cock the crossbow with the push of a button:

Ravin equipped the R500 with their new “VersaDrive Cocking System” that utilizes a new dual screw-driven system. The VersaDrive cocking mechanism is driven by an electric cocking motor that includes a removable battery and a charger. “The internal clutch within the VersaDrive System eliminates over-cocking and allows the cocking and decocking process to be stopped or resumed at any time.”

When we first emailed Ravin about the battery pack, they replied that we should be able to get about 50 cocking/decocking cycles from 1 full charge. Depending on temperature and weather conditions, a battery may perform worse and in a new promotional video, Pete Scobell mentions a battery life of 30 to 50 cycles.

If the battery is dead, or if you’d rather cock it manually, you can simply attach the removable draw handle. The manual cocking effort is just 17 pounds with the R500 draw handle.

Performance

Now that we’ve covered the features of the new Ravin R500, we can take it out for a test and rip some arrows down the range!

With a Powerstroke of 15 inches and kinetic energy of 222 FT-LBS, Ravin claims this is the first crossbow that breaks the 500 FPS mark. As we’re confident that Ravin properly pre-tuned the crossbow, we’ll be placing a target at 100 yards and shooting a couple of test groups first.

Ravin includes 6 Ravin .003 Arrows & Field Points with all R500 packages. There are no broadheads included and currently, it’s extremely difficult to find broadheads that are speed rate for up to/over 500 fps. We’ve found 1 set of broadheads that mentioned handling speeds of up to 500 fps and those are the Thorn RIFT 2.2” expandable broadheads. We’ve ordered a couple of sets and are testing these as well!

After the first couple of shots and a couple of small adjustments, we got an extremely tight grouping. The Ravin R500 with adjustable turret scope is insanely accurate. It’s the most powerful crossbow we’ve ever fired! The arrows were buried deep inside the target, even with the Iron Man 24″ Xtreme 500 target.

We did get some issues with the nocks of the arrows. We started the day with six arrows and ended the day with two undamaged arrows. We’ve contacted Ravin and we’re waiting for new nocks to arrive. We’ll update this section once we’ve received and tested the new nocks.

When we took the R500 out to the range it was a pretty cold day and after about 36 shots our battery drained and we had to manually crank-cock the crossbow for the rest of the day. If you’re planning on going to the range on a cold day, we advise bringing an extra battery pack.

Do not shoot arrows with broadheads when shooting at targets. Your targets will wear out very quickly and it’s not worth it. Use the field points that Ravin includes with the package instead and use your broadheads for a hunt!

Recommended Accessories

Because of the insane amount of power the Ravin R500 generates, you probably need some more durable accessories. We had a hard time finding the more durable crossbow accessories, but we’ve compiled a list of accessories we recommend for this crossbow.

Arrows & Broadheads

Ravin includes 6 Ravin .003 Arrows & Field Points with the R500 packages. It’s best if you just use the Ravin arrows. If you want to take this crossbow out for a hunt, you’ll probably want some broadheads. There aren’t many broadheads that are speed-rated at 500 fps, but we’ve found a couple. We’ve tested the Thorn RIFT 2.2” expandable broadheads and they hold very well. Another set of broadheads that work very well is the Ravin Titanium broadhead.

Special 500+ FPS Targets

We tested the R500 with the Big Shot Iron Man Extreme 500 Target. This high-quality and durable crossbow target is rated for crossbows up to 500 feet per second and stops the arrows from the R500 quite well.

Another target we can recommend is the SpyderWeb ST-24XL High-Density No Speed Limit. This crossbow target does not have a speed limit. We reviewed the smaller one, the ST-18XL, this target also stops the arrows surprisingly well.

Storage and Transportation

As always, we only recommend using the official case for the crossbow unless the manufacturer doesn’t offer a case for the crossbow. Using the official case guarantees a snug fit and a properly secured and protected crossbow.

Ravin suggested we use the Ravin Soft Case R26/29/29X or the Ravin Hard Case R10/R20 for the R500 crossbow. This seemed a bit odd to us, but these crossbows almost have the same dimensions. We can confirm that the Ravin R500 fits in both cases.

Final Verdict

FAQ About the Ravin R500 Crossbow

Unlocking the Mystery: Are Deer Nocturnal?

0

“Unraveling the Mystery: Shedding Light on Deer’s Nocturnal Habits”

1. Understanding Deer Behavior: Are They Nocturnal or Diurnal?

1. Understanding Deer Behavior: Are They Nocturnal or Diurnal?

Deer behavior is a fascinating subject for hunters and wildlife enthusiasts alike. One of the most common questions asked about deer is whether they are nocturnal or diurnal animals. The truth is that deer can exhibit both diurnal and nocturnal behavior, depending on various factors such as food availability, predation risk, and human disturbance.

Nocturnal Behavior:

During certain times of the year, especially during hunting season or in areas with high human activity, deer may become more active at night and display predominantly nocturnal behavior. This shift in behavior is often triggered by the increased presence of humans in their habitat, which makes them more cautious and wary during daylight hours.

Nocturnal deer tend to feed, travel, and engage in other activities under the cover of darkness when they feel safer from potential threats. They have excellent night vision and rely on their acute senses to detect any signs of danger while foraging for food or moving through their territory.

However, it’s important to note that not all deer become completely nocturnal. Some individuals may still be active during dawn or dusk hours, which are known as crepuscular periods.

Diurnal Behavior:

In areas with less human disturbance and lower predation risk, deer are more likely to display diurnal behavior patterns. This means that they are active primarily during daylight hours, particularly around sunrise and sunset.

During these times, known as the “golden hours,” deer are often seen grazing in open fields or meadows where they can easily spot predators approaching from a distance. They use their keen eyesight and hearing abilities to stay alert while feeding on grasses, leaves, fruits, and other vegetation.

It’s worth mentioning that even though deer may be diurnal in certain areas or seasons, they still possess some level of nocturnal behavior. They may take short naps or rest during the day, especially in shaded areas or dense vegetation, to conserve energy and avoid overheating.

Understanding the factors that influence deer behavior and their activity patterns can greatly enhance your chances of spotting and hunting them. By studying their habits, scouting their movement times, and adapting your hunting strategies accordingly, you can increase your success in targeting both diurnal and nocturnal deer.

2. Unveiling the Mystery: When are Deer Most Active?

2. Unveiling the Mystery: When are Deer Most Active?

Deer, particularly white-tailed deer, are known for their crepuscular behavior, which means they are most active during dawn and dusk. During these times, the lighting conditions provide them with an advantage as they have adapted to low-light environments. This allows them to navigate their surroundings more effectively while minimizing their exposure to potential predators.

Factors Influencing Deer Activity

Several factors influence deer activity patterns throughout the day. One of the primary factors is food availability. Deer are herbivores and spend a significant amount of time foraging for food. They tend to be most active during periods when their preferred food sources are abundant and easily accessible.

Another factor that affects deer activity is weather conditions. Extreme temperatures or inclement weather can limit their movement and force them to seek shelter during the day. Additionally, hunting pressure can also influence deer behavior, causing them to become more nocturnal in areas with high human activity.

Deer Movement Times Explained

Understanding deer movement times is crucial for hunters and wildlife enthusiasts alike. As mentioned earlier, deer are most active during dawn and dusk, which are commonly referred to as the “golden hours.” During these periods, visibility is reduced due to low light conditions, making it easier for deer to move undetected.

In the morning, deer typically start moving around 30 minutes before sunrise as they search for food after a night of rest. This early morning activity continues until a few hours after sunrise when they find a suitable spot to bed down and rest during the day.

In the evening, deer become active again around two hours before sunset as they prepare for another night of feeding. They continue moving until it becomes too dark for them to see effectively.

Tactics for Hunting Nocturnal Bucks

Hunting nocturnal bucks can be challenging, but there are tactics that can increase your chances of success. One approach is to scout the area during the day to identify bedding areas and travel routes. This allows you to understand their movement patterns and plan your hunting strategy accordingly.

Another tactic is to hunt near food sources such as crop fields or oak stands, which are known to attract deer during their feeding times. Setting up trail cameras can also provide valuable insights into deer activity, helping you determine the best times to be in the field.

In conclusion, deer are primarily crepuscular animals, meaning they are most active during dawn and dusk. Understanding their activity patterns and adapting your hunting strategies accordingly can greatly improve your chances of encountering and successfully harvesting these elusive creatures.

3. Cracking the Code: Decoding Deer Sleep Patterns and Habits

3. Cracking the Code: Decoding Deer Sleep Patterns and Habits

Deer sleep patterns and habits have long been a topic of interest for hunters and wildlife enthusiasts alike. Understanding when and where deer sleep can provide valuable insights into their behavior and movement patterns.

Sleep Behavior

Deer are known to be crepuscular animals, meaning they are most active during dawn and dusk. However, their sleep behavior is quite different from diurnal or nocturnal animals. Deer do not have a typical sleep-wake cycle like humans or many other mammals. Instead, they engage in short periods of rest throughout the day and night.

During these resting periods, deer enter a state called “alert rest.” This means that while they may appear to be sleeping, they are actually still alert to potential dangers in their surroundings. They keep their senses sharp and can quickly respond to any perceived threats.

Patterns and Habitats

When it comes to choosing sleep locations, deer exhibit certain preferences. They often seek out areas with dense cover, such as thickets or brushy areas, which provide protection from predators and harsh weather conditions. Additionally, deer tend to select spots with good visibility so that they can detect approaching danger.

Deer also show a preference for sleeping near food sources. This allows them to conserve energy by minimizing the distance traveled between feeding and resting areas. In agricultural areas, deer may even sleep in crop fields or orchards if they provide sufficient cover.

Understanding these patterns can help hunters identify potential bedding areas where deer are likely to rest during the day or night. By scouting these locations during hunting season, hunters can increase their chances of encountering deer in their preferred habitats.

Overall, cracking the code of deer sleep patterns and habits requires careful observation and knowledge of their behavior. By understanding when and where deer rest, hunters can develop effective strategies to approach and hunt these elusive creatures.

4. Deer Movement Explained: Nocturnal, Diurnal, or Crepuscular?

Deer movement patterns can vary depending on the species and their environment. Some deer are primarily nocturnal, meaning they are most active during the night, while others may be diurnal, being most active during daylight hours. However, many deer exhibit a behavior known as crepuscular activity, which means they are most active during dawn and dusk.

Nocturnal Behavior

Nocturnal deer are adapted to low-light conditions and have excellent night vision. They tend to feed, move, and engage in other activities primarily at night when there is less human activity and potential predators are less active. This behavior allows them to avoid disturbances and seek food sources without interference.

In order to hunt nocturnal bucks successfully, hunters often employ specific tactics such as setting up trail cameras near feeding areas or using artificial light sources to locate them at night.

Diurnal Behavior

On the other hand, some deer species exhibit diurnal behavior and are more active during daylight hours. These deer may be seen grazing in open fields or meadows during the early morning or late afternoon when the sun is not too intense. They rest or seek shelter in shaded areas during the hottest parts of the day.

When hunting diurnal deer, it is important for hunters to scout out their feeding areas and travel routes during daylight hours in order to plan their hunting strategies accordingly.

Crepuscular Behavior

Crepuscular animals like deer are most active during twilight periods – dawn and dusk. This behavior allows them to take advantage of both low-light conditions and relative safety from predators that may be more active at night. During these times, deer will often emerge from cover to feed on grasses, leaves, fruits, or other available food sources.

Hunters who want to target crepuscular deer should focus their scouting efforts on areas where deer are likely to feed or travel during these specific times of day. This may involve setting up tree stands or ground blinds near known feeding areas or along well-used trails.

In conclusion, the movement patterns of deer can vary depending on their species and environmental factors. While some deer are primarily nocturnal or diurnal, many exhibit crepuscular behavior, being most active during dawn and dusk. Understanding these patterns and adapting hunting strategies accordingly can greatly increase the chances of a successful hunt.

5. Strategies to Spot and Hunt Nocturnal Bucks

5. Strategies to Spot and Hunt Nocturnal Bucks

Hunting nocturnal bucks can be a challenging task, as they are most active during the cover of darkness. However, with the right strategies and techniques, you can increase your chances of spotting and hunting these elusive creatures.

1. Scout During the Day

Although bucks may be more active at night, it doesn’t mean they disappear completely during the day. By scouting their feeding areas, bedding sites, and travel routes during daylight hours, you can gather valuable information about their patterns and habits. Look for fresh tracks, rubs on trees, or droppings that indicate recent deer activity.

2. Utilize Trail Cameras

Trail cameras are an excellent tool for monitoring deer movement in areas where you suspect the presence of nocturnal bucks. Set up trail cameras near food sources or along well-used trails to capture images or videos of deer activity during the night. This will help you determine the best times to plan your hunts.

3. Focus on Food Sources

Nocturnal bucks often visit food sources under the cover of darkness when they feel safer from human disturbance. Identify key food sources such as agricultural fields, orchards, or mast-producing trees in your hunting area. Set up tree stands or ground blinds near these locations to increase your chances of encountering a buck during its feeding time.

4. Use Calling Techniques

Calling techniques can be effective in luring out bucks during their nocturnal activities. Experiment with different calls such as grunt calls or rattling antlers to imitate sounds that attract male deer during their rutting season. Practice proper calling techniques and learn to mimic realistic deer vocalizations to entice a curious buck into range.

5. Hunt Transition Areas

Transition areas between bedding and feeding areas are prime spots to intercept nocturnal bucks during their movement. Look for funnels, pinch points, or narrow corridors where deer are likely to travel between these two locations. Set up your hunting position in a concealed spot along these transition areas, ensuring you have a clear shooting lane.

By implementing these strategies and adapting your hunting tactics to the nocturnal behavior of bucks, you can increase your chances of spotting and successfully harvesting these elusive creatures. Remember to always follow local hunting regulations and practice ethical hunting practices for a responsible and rewarding hunting experience.

6. Unlocking the Secrets: What Causes Deer to Become Nocturnal?

6. Unlocking the Secrets: What Causes Deer to Become Nocturnal?

Deer are primarily crepuscular animals, meaning they are most active during dawn and dusk. However, there are certain factors that can cause deer to become more nocturnal in their behavior. One of the main reasons is human disturbance. When deer feel threatened or disturbed by human presence, they tend to adjust their activity patterns to avoid encounters.

Factors Contributing to Nocturnal Behavior:

1. Hunting Pressure: Intense hunting pressure can push deer into becoming more nocturnal. As they learn to associate daytime with potential danger, they start adapting their behavior to feed and move during the cover of darkness when hunters are less active.

2. Human Encroachment: Urbanization and increased human activity in natural habitats can lead to disturbances that make deer more wary and cautious during daylight hours. They may retreat to quieter areas or adapt their habits to avoid human contact.

3. Predation Risk: The presence of predators such as coyotes or wolves can also influence deer behavior, making them more cautious and inclined towards nocturnal activities as a survival strategy.

4. Temperature and Weather: In warmer climates, deer may become more active at night when temperatures are cooler, allowing them to conserve energy during the heat of the day. Similarly, extreme weather conditions like heavy rain or snowfall may prompt deer to alter their movement patterns.

5. Food Availability: If food sources become scarce during daylight hours due to competition or depletion, deer may resort to foraging at night when there is less competition and greater availability of food resources.

It is important for hunters and wildlife enthusiasts alike to understand these factors that contribute to deer becoming nocturnal. By recognizing these triggers, it becomes possible to adjust hunting strategies or manage habitats in a way that minimizes disturbance and encourages healthier deer populations with balanced activity patterns throughout the day.

In conclusion, deer are primarily crepuscular animals, meaning they are most active during dawn and dusk. While they may exhibit nocturnal behavior in areas with high human activity or predation risk, their natural instinct is to avoid nighttime movement. Understanding their activity patterns is crucial for effective management and conservation efforts.

Best Rifle Scope For Varmint Hunting 2024 (Suit a Range of Budgets)

0

This article contains affiliate links. We may earn a small commission if you purchase via these links.

Varmint hunting is more than just an adrenaline-pumping sport, hobby, and means to earn a living.

It’s a way to manage pest populations from getting out of hand, reduce predacity on your livestock, and prevent the risks associated with disease transmission. Sounds a little more serious now, right?

So, what’s the best scope to mount on your scout, AR, or .22 rifle when you want to make an example of the jack rabbits plaguing your garden or the coyotes stalking your chickens?

Every stalker’s hunting conditions are different, so you’ll have to answer that question for yourself. But, we’ll give you a hand in which direction to aim when you’re ready to scope-up and eliminate your prey!

Top Varmint & Coyote Scopes

It would be ideal if those pesky pests prowled your property in broad daylight and slept at night like human beings do. Unfortunately, that’s hardly ever the case. Predators like hogs, coyotes, and wolves will require some stealth and the right equipment come dusk. Rodents like squirrels and prairie dogs make for a fun take-down during the day, and you may even have to be several hundred yards away to get that shot.

Because hunting conditions are going to vary widely, you best know what rifle you want to mount your varmint scope to and consider the range of your actual hunting grounds. This means that there’s not going to be the “one” scope that will get the job done, they’re all going to be different. The scope you will need will depend on what, where, and when you’re hunting.

  • Are you wild boar hunting at night? Playing whack-a-mole with groundhogs? Out-foxing the kitten-snatching fox?
  • Are you in the open plains of Wyoming or are sub-100 yard shots the average distance out where you live?
  • Will you be better off with a night vision rifle scope for nighttime hunting?
  • Is your rifle a quiet .22 LR for near-shots, or is it a .223 Remington or .220 Swift for long-distance prowess?

If you’re looking for the one-size-fits-all suggestion here, you’re going to be terribly disappointed. But, if you need an idea on what scopes could fit the bill because you already know the essential tidbits of your hunt and prey, you’re in the right place!

We’ll dish up some of the most well-known and approved varmint scopes that should give you a head start in the buying hunt.

Our Picks for the Best Rifle Scope for Varmint Hunting

1. NightForce NXS 5.5-22X56

Yeah, we went all out with this one. The NXS is good for everything, and it looks like a bad-ass that will get the job done – because it can! It has the best of everything you’d need to take down prairie dogs at 1000 yards and beyond. Crank up your power and expect to see image quality stay true.

The SFP, glass-etched, illuminated reticle with 2 MOA tall and 2 MOA wide crosshairs means extreme precision on small targets for those really long distances. The 30mm tube, Hi-Speed Turret System, and 1250G-resistance all speaks to its expertise in the field.

If there’s a scope you want on your varmint rifle or really any rifle you’re serious about hunting with, it’s going to be this NightForce. With the NXS on your side, vermin won’t stand a chance!

2. Vortex Crossfire II 3-12X56 AO Hog Hunter

If you’re in the South, you might already own one of these bad boys, and you can probably attest that it’s true to its name. The Crossfire II is an ideal scope for the avid hog hunter. When nighttime looms without the right gear and equipment, feral hog hunting shouldn’t be attempted. Instead, head out with the right stuff to be better prepared for success. What’s the right stuff? We’re glad you asked.

It would look like an illuminated center-dot reticle with V-Brite, robust and durable 30mm tube, and provisions for image focus and parallax correction – the AO. The right stuff should also include a weight that can handle heavy recoil for some serious loads barreling out towards the pig.

A lot of the right stuff sounds just like a great Vortex scope. Ha! Whaddaya know? The Vortex has it all.

3. Burris Fullfield II 4.5-14×42

Entry-level price point, mid-range performance, and high-end customer satisfaction. The Fullfield II is the right kind of mid-range scope to take deer, elk, and of course, varmints. Whether it’s squirrels, coyotes, rabbits, or foxes, this Burris scope is a hunter’s scope.

Pros:

  • Price
  • Adjustable objective
  • Ballistic Plex reticle
  • Made in Philippines
  • Lifetime warranty

Cons:

  • No other reticle available

The Fullfield II 4.5-14×42 is only available with the Ballistic Plex reticle. If you don’t like it, you may want to choose a different scope. However, it’s simple, uncluttered, and can be matched with any caliber. The Burris Ballistics Reticle Analysis Tool is an excellent calculator that will provide you with the distances for each holdover.

Being in the second focal plane, crosshairs might be a little thick for hitting squirrels at 800 yards, but it will definitely put you in range if you’re looking at bigger prey like foxes and coyotes. As additional info, it’s wire and non-illuminated.

Instead of a side focus, the Burris scope has an adjustable objective (AO) for focusing at various distances. Turrets are capped and offer up ¼ MOA adjustments with a total of 40 MOA in elevation and windage travel. According to buyers, it tracks excellently and remains accurate out to 700-800 yards. It can handle big-boy kick too beyond 50BMG.

Given its low price point, the Burris Fullfield II is a popular, quality riflescope. Since Burris backs it with their Forever Warranty, it makes the deal even sweeter. Even small things like losing the caps have been quickly replaced by the manufacturer. What you’ll need to get on your own are lens caps. It’s not such a big deal when you can grab the scope for less than $200.

4. ATN X-Sight LTV 3-9x

There are hunters that need night vision for their nighttime varmint and coyote hunts. This is where the ATN X-sight is a welcome scope to this lineup. Affordable, accurate, and simple. ATN nails it with the new design.

Pros:

  • Price
  • Digital NV
  • Ultra-lightweight
  • One Shot Zero
  • Long battery life

Cons:

  • Not smart

The LTV series of X-Sight scopes is a simplified and scaled-down version of the older X-Sight II line. Even though it’s done away with all the extra bells and whistles of digital NV, many love the bold move to make this happen.

This results in a scope that is affordable, incredibly lightweight at 1.6 lbs, and it’s a whole lot slimmer than the night vision scopes of yesterday.

It features ATN’s One Shot Zero that allows you get on point with no wasted ammo. They also kept the HD video recording feature that you can upload online to share your hog hunting success on social media.

Like many old scopes that would only last for a few hours on one battery charge, the LTV scope one-ups them all with a long-lasting battery life of 10 hours. That’s plenty of time to make one heck of a night for hogs or coyotes.

With night vision on your scope, you can take your varmint hunting skills beyond your own honey holes. Take on contracts for local ranchers and teach the kids how to rid the farm of rats. Night vision scopes could improve your varmint hunting efforts.

5. Burris Scout 2-7X32

If you haven’t heard of the Scout, shame on you! You need to get moving more as scout rifles are made to see action, and you won’t get any action if you’re not on the prowl. The Burris scope is incredibly lightweight which is perfect for lighter rifles like an AR as it won’t weigh it down or seem top-heavy.

It’s designed to sit forward on your rifle, so you have all that generous eye relief, the ability to keep two eyes open for increased situational awareness, and full clearance for mounting in front of the ejection port.

It might be a little scope, but in no way is it little in performance and quality. Index-matched, Hi-Lume coatings, one-piece tube, double internal spring-tension system, and full weatherproof-ability makes this Burris optic a winner in the field. Since it’s designed to be extremely compatible with scout setups, no vermin will escape your sights. We almost feel sorry for the little guys – not!

6. Maven CRS.1 3-12×40

To hunt in lowlight or to pick out tan varmints against tan terrains calls for the clearest and sharpest of glass. Maven answers that call with the CRS.1 3-12×40 hunting riflescope.

Pros:

  • C-series glass
  • CSHR reticle
  • Lightweight
  • Lifetime warranty
  • Made in Japan

Cons:

  • No FFP model

The CRS series of riflescopes from Maven are designed for the hunter with SFP reticles, mid-range magnification, and are completely fogproof and watertight. While FFP is becoming more popular in the hunt, SFP is still a practical focal plane for many hunting conditions and average distances, and the CRS series cater to that.

Based off the C-series of Maven’s binoculars, the CRS.1 has exceptionally clear, high contrast, sharp glass, as confirmed by my field test. Having been sourced and made in Japan, it speaks to both the optical and build quality of the scope. With superb resolution for picking out details in low light and noticeable edge-to-edge clarity, this is mid-range quality at an entry-level price point.

The CSHR reticle is wire, in the second focal plane, and based off the RS.1 SHR reticle. As such, it remains the same size from low 3x to high 12 power, and I found it to be highly visible in both lowlight and daylight bright conditions.

3x mag
3X Mag
6x mag
6X Mag
9x mag
9X Mag
12x mag
12X Mag
CSHR reticle at various magnifications – Images by Tina Fa’apoi (Own Work) for Target Tamers

Very simple yet effective, the reticle has BDC holdovers along the elevation crosshair. Turrets are low-profile and capped. Adjustments are made in ¼ MOA clicks and the 1” tube offers up a total of 50 MOA travel. These are audible and I was also able to feel the adjustments with gloves on.

From the reticle type to the magnification range, the CRS.1 scope offers the varmint hunter extreme close-range work to long-range potential. That reticle has thin center crosshairs to put it on the coyote or prairie dog even at great distances.

Backed by a lifetime unconditional warranty, Maven presents an uncomplicated rifle scope for the straightforward pest hunter.

7. Barska 4-16X50 AO Varmint

The Barska 4-16X50 AO Varmint rifle scope has earned a mention. For a scope under $100, it’s a great buy to get a taste of what high power, illuminated reticles, and parallax correction features can do for your varmint hunting.

It’s in in no way fair to compare this scope to other brands and quality that we’ve mentioned in our lineup. But, if you’re on an extremely tight budget, and you want to plink off some pests around the farm and property line, the Barska rifle scope might just make you proud!

What to Look For in a Varmint Rifle Scope

The oft repeated features are going to be reiterated over and over again whenever we recommend a rifle scope for any purpose. Buying the best of what you can afford will never get old here. Buying the best glass you can afford plus some is a mantra we live by.

To help clarify what your needs could be, let’s start with magnification. Go higher for long ranging distances, and stay with low power scopes for close-mid ranges. The higher the power, expect to spend more for ultimate clarity.

Illuminated reticles are essential to varmint hunting since critters come out of the woodworks when the sun calls it a day. Variable reticle brightness may also make all the difference when it can potentially wash out your target and sight picture.

BDC reticles are nice to have and can be vital for extreme long-range shots. However, a complicated reticle at night can easily complicate things. Know your gun and your what your rounds will do at given distances, and then a simple duplex reticle should be all you need.

Lastly, your rifle matters a lot. High-velocity and flat shooting caliber guns get it done! But, whether you’re a .22-250 or .223 loyalist, we’re not going to join in on the age-long debate right here.

  • Quality glass – The best glass is always the best buy. You’ll see a lot more and a lot further versus trumped-up scopes with poor glass.
  • Quality coatings – Same rules apply when shopping for quality glass. The coatings should match the quality glass and cost of the scope.
  • Magnification – 1-9x is plenty enough power for close-mid range shots. Higher power scopes are for long shots – you won’t need it in the woods, but you will need it for wide, open plains over several hundred yards.
  • Repeatability – Scope has to hold zero. Check on track record or be brand-specific.
  • Reticles – Opt for an extremely accurate BDC reticle for extreme long-range shooting. Basic crosshairs should get the job done for most hunting if you intimately know your rifle and loads.
  • Illuminated reticles – Enables fast target acquisition and better low-light potential.
  • Low light quality – Varmint hunting at night can’t be done if you have a low-grade scope. For nocturnal creatures or varmints that are most active at night, a night vision rifle scope or high-quality low-light scope will go miles in how long you can stay out.
  • Cost – Hunting closer to dusk? Spend more. Daylight hunting rodents sub-400 yards? You can compromise on price if budget limits you. Otherwise, spending more money on a quality scope will never be a regretful purchase.
  • Warranty – Optics will fail at some point in time. Whether it fails after a few hundred rounds or after decades of service is what matters. Invest in your scope, and ensure you buy from a company that can offer a warranty that matches the quality of the scope. Warranty not good enough? Be brand-specific.

“Last Call”

Deer and elk hunters get to mount their trophy racks to their walls. Do varmint hunters feel swindled out of their physical show of success? Not at all! While a feathered mess of a crow might not be wall-worthy, a handsome pelt makes for a conversation starter, gift, or a comfy pair of slippers.

Vermin can spread disease, cause harm to livestock, and devastate crops. The potential dangers are enough of a reason to assuage the threat – a call which many hunters are more than willing to answer. We wish you happy hunting after you’ve checked in with local, state, and federal regulations. Good luck!

Further Reading
  • How to Measure Scope Ring Height (With Pics & Calculations)
  • How to Adjust a Rifle Scope: 6 Scope Adjustments Explained!
  • How to Level a Scope on a Rifle [Step-by-Step With Pics]
  • What is a Rifle Scope Ruler (Mildot Master) & How to Use It?
  • How to Lap Scope Rings (& Is Lapping Really Necessary?)

What Is The Best Trail Camera For Battery Life ?

0

The best trail camera for battery life depends on various factors such as the camera’s power consumption, battery capacity, and usage patterns. However, some popular trail cameras known for their long battery life include the Browning Strike Force HD Pro X, Bushnell Core DS No Glow, and Reconyx HyperFire 2. These cameras often utilize efficient power management systems and low-power components to extend battery life. It is recommended to consider factors like battery type, camera settings, and environmental conditions when choosing a trail camera for optimal battery performance.

1、 “Battery Life: Key Considerations for Trail Cameras”

When it comes to trail cameras, battery life is a crucial factor to consider. After all, you want a camera that can capture images and videos for an extended period without constantly needing battery replacements or recharging. So, what is the best trail camera for battery life?

There are several trail cameras on the market that offer impressive battery life. One popular option is the Browning Strike Force HD Pro X. This camera boasts an exceptional battery life, allowing it to capture images and videos for months on end. It utilizes eight AA batteries and has a power-saving mode that conserves energy when the camera is not in use.

Another top contender is the Bushnell Core DS No Glow Trail Camera. This camera is known for its long battery life, thanks to its dual sensor technology and efficient power management system. It can last for several months on a single set of AA batteries, making it an excellent choice for long-term surveillance.

The latest advancements in trail camera technology have also introduced solar-powered options. These cameras come with built-in solar panels that recharge the batteries using sunlight. One notable example is the Spypoint Solar-Dark Trail Camera. It combines a high-quality camera with a solar panel, ensuring that the batteries stay charged even in remote locations.

It’s important to note that battery life can vary depending on factors such as camera settings, temperature, and the number of images or videos captured. However, the aforementioned trail cameras are known for their exceptional battery life and are highly recommended by outdoor enthusiasts and professionals alike.

In conclusion, when looking for the best trail camera for battery life, consider options like the Browning Strike Force HD Pro X, Bushnell Core DS No Glow, and solar-powered cameras like the Spypoint Solar-Dark. These cameras offer impressive battery life and are designed to withstand the demands of outdoor use.

2、 “Top Trail Cameras with Longest Battery Life”

The best trail camera for battery life is a crucial consideration for wildlife enthusiasts and hunters who want to capture high-quality images and videos without constantly replacing batteries. While there are several trail cameras on the market, we have compiled a list of the top trail cameras with the longest battery life to help you make an informed decision.

One of the leading trail cameras known for its exceptional battery life is the Browning Strike Force HD Pro X. It boasts an impressive battery life of up to 11 months on just six AA batteries. This camera also features a lightning-fast trigger speed, high-resolution images, and HD video recording capabilities.

Another top contender is the Reconyx HyperFire 2 HF2X. With its unique NoGlow Gen3 High Output Infrared technology, this camera can capture high-quality images and videos while conserving battery power. It can last up to one year on 12 AA batteries, making it an excellent choice for long-term surveillance.

The Bushnell Core DS No Glow is also worth mentioning. It offers an extended battery life of up to one year on just six AA batteries. This camera is equipped with dual sensors, allowing for faster trigger speeds and improved image quality.

In recent years, advancements in technology have led to the development of solar-powered trail cameras. These cameras utilize solar panels to recharge their batteries, significantly extending their battery life. The Spypoint Solar-Dark and the Stealth Cam DS4K Max are two popular options in this category.

It’s important to note that battery life can vary depending on factors such as camera settings, temperature, and usage. However, the trail cameras mentioned above have consistently proven to have the longest battery life in their respective categories.

When choosing a trail camera, it’s essential to consider your specific needs and budget. Whether you prioritize battery life, image quality, or other features, these top trail cameras will undoubtedly provide you with reliable performance and long-lasting battery power.

3、 “Comparing Battery Life of Popular Trail Camera Brands”

When it comes to trail cameras, battery life is a crucial factor to consider. After all, you want a camera that can last for an extended period without needing frequent battery changes. While there are several trail camera brands on the market, it’s essential to compare their battery life to determine the best option for your needs.

One popular trail camera brand known for its exceptional battery life is Browning. Their cameras often feature long-lasting batteries that can endure months of use before needing replacement. Additionally, Browning trail cameras utilize efficient power-saving technology, allowing them to conserve battery life while still capturing high-quality images and videos.

Another brand worth mentioning is Bushnell. They offer trail cameras with impressive battery life, ensuring that you won’t have to worry about constantly changing batteries. Bushnell cameras also come with various power-saving features, such as adjustable trigger intervals and low-power consumption modes, further extending their battery life.

Moultrie is another reputable brand known for its reliable trail cameras with excellent battery life. Their cameras often feature long-lasting batteries that can withstand extended periods of use. Moultrie also offers external power options, such as solar panels and battery packs, which can significantly extend the camera’s battery life.

It’s important to note that technology is constantly evolving, and new trail camera models are regularly released with improved battery life. Therefore, it’s advisable to stay updated with the latest releases and customer reviews to ensure you’re making an informed decision.

In conclusion, when comparing the battery life of popular trail camera brands, Browning, Bushnell, and Moultrie are known for their exceptional battery performance. However, it’s always recommended to research the latest models and customer feedback to determine the best trail camera for your specific needs.

4、 “Tips for Maximizing Battery Life on Trail Cameras”

The best trail camera for battery life is a subjective question as it depends on individual needs and preferences. However, there are several trail cameras on the market that are known for their exceptional battery life. Some popular options include the Browning Strike Force HD Pro, the Bushnell Trophy Cam HD Aggressor, and the Reconyx HyperFire 2.

These trail cameras are designed with energy-efficient features that help maximize battery life. They often use low-power consumption technology, such as infrared LEDs for night vision, which consume less energy compared to traditional flash systems. Additionally, they may have adjustable settings for trigger intervals and detection ranges, allowing users to customize the camera’s activity and conserve battery power.

To further maximize battery life on trail cameras, there are a few tips to keep in mind. Firstly, using lithium batteries instead of alkaline batteries can significantly extend the camera’s runtime. Lithium batteries have a longer lifespan and perform better in extreme temperatures. Secondly, reducing the number of photos or videos taken per trigger can help conserve battery power. Adjusting the camera’s sensitivity settings can help achieve this. Lastly, regularly checking and cleaning the camera’s lens and sensors can ensure optimal performance and prevent false triggers, which can drain the battery unnecessarily.

It’s important to note that technology is constantly evolving, and new trail cameras with improved battery life are regularly introduced to the market. Therefore, it’s recommended to research and compare the latest models and read customer reviews to find the best trail camera for battery life that suits your specific needs.

Best Air Rifle Deals

Popular Posts

Can a Felon Legally Possess an Air Rifle in Tennessee?

0
"Understanding the Legalities: Felon Ownership of Air Rifles in Tennessee" can a felon own an air rifle in tennessee? In the state of Tennessee, the ownership...

Air gun 101: How Nitro Piston technology can make your shooting sport more exciting?

0
In the air gun market today, there are many air rifles made with nitro-piston technology Even the best-selling lists on gun retailer's sites have a...

Air gun 101: The differences between .177 & .22 – Which jobs they do...

0
I’ve always believed the popular phrase: “It’s not the size of the dog in the fight that matters - but rather the size of the...

PCP vs CO2 Guns: Which One is Better?

0
The most talked-about debate between hunters and gun enthusiasts is what the best power source of a gun is.  The five main sources of power...

How far can an air rifle shoot accurately?

0
An air rifle's effective shooting range depends on various factors, including the type of rifle, the caliber, and the power source. Generally speaking, most...