Home Blog Page 13

Is Magnet Fishing Legal In California?

0

Magnet fishing in California is a bit of a grey area. There is no specific law against it, but there are laws against trespassing and littering that could be applied. So technically, magnet fishing is illegal in California if you’re doing it on private property or leaving behind trash. But if you’re careful and respectful, you can magnet fish legally across the state.

Magnet fishing enthusiasts are all over California, including in San Diego, Santa Barbara, and Los Angeles. Here are some of the main rules to follow on magnet fishing in California:

Is magnet fishing legal in California?

Affecting ecosystems:

Make sure you are always picking up your trash and any found debris from magnet fishing. Leaving behind trash or debris is littering and illegal in California. You could face serious fines for leaving trash in public areas if caught.

Also, be mindful of the ecosystem you’re in. If you’re fishing in a river or lake, you could disturb the natural habitat and harm the wildlife. Check local regulations before magnet fishing in any body of water.

Trespassing:

You can only magnet fish on the property you have permission to be on. This means no trespassing onto private property or closed-off areas. You could be fined or arrested for trespassing if you don’t have permission. Violating California law for trespassing can often carry fines of $400 or more, which is not worth the risk.

Metal detector use:

In certain areas, such as San Francisco bay, it is illegal to use a metal detector or magnet fishing equipment. This is because of the sensitive ecosystem and the potential to disturb cultural resources that are located underwater. This is a clearly posted area, and if you see signs that prohibit fishing or the use of metal detectors, it is likely an area that prohibits magnet fishing as well.

The best spots to legally magnet fish in California:

There are many spots in California that are perfect for magnet fishing, as long as you follow the rules. Here are some areas that people are flocking to for magnet fishing:

The LA river:

The LA river has many spots with bridge access and waterways that pass under highways, making it perfect for magnet fishing. However, check for signs prohibiting magnet fishing or trespassing before you start, as there are sections of the LA river that are not accessible to the public.

Legg Lake:

Legg lake is a great place to find old coins, as it is a very popular spot for fishing. This lake is located in South El Monte, CA, and is open to the public for magnet fishing.

Berkeley Marina:

Although it is part of the San Francisco bay area, the Berkeley Marina is a great spot for magnet fishing. There is public access to the water and plenty of areas to fish from the pier. This is an area that does not prohibit magnet fishing as long as you follow the rules.

Marina Del Rey:

One of the largest man made marinas in the United States. There is public access to the water and lots of parks along the channel/waterways This is also an area that does not prohibit magnet fishing as long as you follow the rules.

Common items found in Magnet fishing throughout California:

Magnet fishing in California can be a lot of fun, especially in areas that are commonly used by tourists and locals. Some of the most common items found when magnet fishing in California are:

  • Old coins
  • Buckets
  • Tools
  • Knives
  • Wedding rings

Rings are common in swimming and fishing areas, and you can often take them to the police to be returned to their owners.

If you find any cultural artifacts, such as old coins or tools, it is best to leave them in place and notify the authorities. These items could be part of California’s history and should be preserved. You should also contact authorities should you find any firearms or other weapons, as these could be dangerous.

Overall, magnet fishing is a great way to spend some time outdoors, and you can even find some valuable items. Just make sure to follow the rules and regulations in place to avoid getting fined or arrested. With a little research, you can find the perfect spot for magnet fishing in California.

How To Quickly Estimate And Score A Buck’s Antlers Before the Shot (Episode 403 Transcript) • Hunting Advice and Tips For Serious Deer And Turkey Hunters

0

This is the video transcript. To watch the video for this episode click here.

GRANT: This time of year we receive a lot of images on social media and other ways from folks asking us to help them estimate a buck’s antler score. Tell you the truth, I’m not that good at it. I try to really focus on how old they are, and usually, the antlers are something I’d like to have at home. After that, I’m probably taking a shot if I agree he’s a certain age. But I have a friend, Richard Hale, that knows a lot about estimating and actually what buck’s score because Richard is the chair of Boone and Crockett’s Record Committee. And he’s a great hunter and been scoring racks forever. Richard thanks for joining us today.

RICHARD: Thank you Grant. It’s nice to be here.

GRANT: Rich – yeah. And Richard and I have hunted together and talked a lot about in the field – I’m talking boots in the ground experience. So, I want Richard to share some of the tips he’s developed through a career of hunting and serving with Boone and Crockett on helping us estimate a buck’s score before we pull the trigger.

ANNOUNCER: GrowingDeer is brought to you by Bass Pro Shops. Also by Reconyx, Trophy Rock, Eagle Seed, Nikon, Winchester, LaCrosse Footwear, BloodSport Arrows, Flatwood Natives, Morrell Targets, Non-Typical Wildlife Solutions, Hook’s Custom Calls, Montana Decoys, Summit Treestands, Drake Non-Typical Clothing, Howes Lubricator, Genesis No-Till Drill, Yamaha, Fourth Arrow, ScentCrusher, Antler-X-Treme, iSCOPE, BoneView, Mossy Oak Properties of Heartland, Code Blue, D/Code, G5 Broadheads, Prime Bows, and Redneck Hunting Blinds.

GRANT: Collecting the dark antlers do make every deer look larger. They just show up…

GRANT: Before sharing Richard’s techniques for estimating buck score in the field, I asked him to explain the Boone and Crockett’s scoring system.

RICHARD: Eh. For a Boone and Crockett’s score, the, the first measurement that’s taken is the length of the beam, which is measured from the outside edge of the main beam in line with the eye, around the back and out to the point. That’s one of the components of the score.

RICHARD: Another measurement that everybody is aware of is the inside spread, although, it’s often confused and just, it’s not the greatest spread – it’s the inside spread of the main beam.

GRANT: Yup.

RICHARD: So, when we do that, that’s about…

GRANT: Let’s do this. So…

RICHARD: Your inside spread…

GRANT: So, we’re talking in here to in here.

RICHARD: Correct. And your inside spread is on average around, to, 10% of your score.

GRANT: 40% of a buck’s overall score on average is tine length. That’s where all the money is.

RICHARD: If you’ve got three points going up, you’re looking at a 10 point. If you’ve got four points going up, you’re looking at a 12 point.

GRANT: A great tip Richard shared about 10 pointers – three points on a side – is if there’s a difference between that G2 and G3 and a big step down to G4, it’s gonna hurt the overall score. But if a 10 pointer carries that G4 tine way out there and it sticks up high, that buck is probably gonna score fairly well.

RICHARD: Uh, the mass – which everybody likes, including me – the mass of these beams typically is about 20% of the score on, on a buck.

GRANT: Again, there’s four measurements – one measurement, two measurement, three measurements – halfway in between here – four measurement.

RICHARD: Now, another thing. You’ll see some tremendous trophy animals that have thick points, uh, and, and, I, I love those thick points. It has to be a sign of good nutrition – that’s a healthy animal just forming that. Unfortunately, the Boone and Crockett system does not in any way quantify that.

GRANT: So, Richard, this is the hunt I was on a couple years ago in Kentucky, and we’re gonna play it, and you can see what I saw live. I mean it came in. You know it was right over my shoulder.

RICHARD: This, this deer presents really well. It’s a nice looking buck. Uh, I, I noticed that it, first off it, it has a…

GRANT: Let’s roll the footage here. Let’s roll it so you’re going real time just like, like, (Inaudible).

RICHARD: Okay. Okay. So here’s the deer.

GRANT: Yeah.

RICHARD: You’re seeing a compact set of antlers. They’re not real wide – not, not really. It strikes you as a smaller deer. And then you start noticing that it’s got some point length and a pretty nice looking deer.

GRANT: Yeah, you taught us tine length is a big factor.

RICHARD: And this deer certainly has it. Um, so, my first number I’m going to throw out there – I’m going to say 138, just under 140 inches.

GRANT: Okay.

RICHARD: And then, you know I start thinking I’m a little off on this guy because he’s got tall 2s. He’s got good brows – not exceptional. He’s got really nice beams. You know, I may be five, seven points short on it – maybe 145-inch deer. Um, both the 2 and the 3 have curvature, and anytime you go around the curve you’re gaining length. So…

GRANT: Yeah, so like this right here.

RICHARD: Everything about those points is gonna measure better than your eye is telling you because your eye doesn’t pick up all that unless you’re really focused on it. So, when you see a deer with straight points, they’ll disappoint you in length. When you see a deer with a curved point or even a double – some of ‘em will curve in and then back out – those deer have long points. And with the curved beam, this deer is probably gonna be a 145-inch deer.

GRANT: You’ll notice that I actually passed this deer – certainly not ‘cause – I would’ve been proud to have those antlers on my wall. That’s a great set of antlers for me. But his body didn’t appear to be four years old. He’s sleek; his back is not sagging; his belly is not sagging. We’re not talking about aging right now, but I estimated this deer to be three years old.

GRANT: When a deer turns away – like it looks bigger there – it just gained 10 inches on me there.

RICHARD: Right. Well, part of it is you’re seeing that curvature.

GRANT: Right. It, it’s really not bigger folks but deer going away from you almost always look bigger and that gets some deer shot that shouldn’t be shot.

GRANT: Alright. So Richard here’s a different setup. This is actually at my place here at The Proving Grounds. Uh, one of my guests was hunting. And, of course, you get a situation like this. Maybe it’s wet – it looks kind of wet and damp – you don’t know there’s a deer coming, and it steps out all at once. I mean we’re talking now…

RICHARD: Right.

GRANT: …a few seconds to work. So, what’s going through your mind right off the bat? Let’s just go ahead and start this slide, Daniel; and Richard, you tell us what’s going through your mind. I see something you’ve taught us right off the bat – I’ll go before you start this. I see a big stair step here. I see – I can’t see the brow very good. Richard’s taught us to look at the brow.

RICHARD: Right.

GRANT: You tell me if I’m getting this right.

RICHARD: That’s correct.

GRANT: I can’t see the brow. Pretty decent G2; decent G3. I’m gonna say the G2 probably scores more – it’s a little bit longer…

RICHARD: Correct.

GRANT: … just because of the curvature of the beam.

RICHARD: It’s an inch and a half longer.

GRANT: Yeah, because the beam is going down – even though it look the same height here. But my G4 is one of those tiny points – inch or two.

RICHARD: Grant, that’s correct, and, I, those things jump out at me. Don’t see the brows. Usually, that’s a bad sign at this angle. We should see something if they were adequate length to score well. So, we’ve got a lot of negative factors on this deer just right off.

GRANT: Yep. And I just want to stress again. We’re not saying shoot, don’t shoot. This is all about helping you estimate the score of a buck in a hunting situation.

RICHARD: Exactly. It’s, it’s, no, it’s no issue at all whether you shoot this deer or not. I’m just trying to help you evaluate the deer to make your own decision.

GRANT: Okay, so let’s run this real time and go through it.

RICHARD: Okay.

GRANT: It’s just stepped out. Here we go.

RICHARD: So, Grant it, it seems like each thing against this deer works against it. You’ve got tiny brows – almost nonexistent – 4 on one side – no 4 on the other side. You’ve got light mass. This is not a deer that’s gonna score well.

GRANT: So, your quick estimate on this thing. He’s, he’s getting out of shot range real quick.

RICHARD: I’m, I’m thinking possibly 100 inches without doing any math. Just maybe 100, 100-inch deer.

GRANT: Yeah, yeah, 100, 110-inch deer.

RICHARD: Right. I’d say no more than 100. Easy.

GRANT: Well, it’s on my place, so I’m gonna give him 10. I’m just teasing you.

RICHARD: Well, I told Grant that. I said when a deer is on your property, you always have to deduct 10 inches because of your inherent enthusiasm.

GRANT: Richard, this was a hunt I was actually on here on my property. So, again, I’m biased. This drops off really steep, so I did not hear this deer coming. He’s actually out of bow range right now and he just stepped out in the field. So, you’re getting some of the first glances, just like I really did when this occurred.

RICHARD: Well, that, that’s, that’s a neat situation Grant. I see two things here off the bat – really three – that just strike you right off. One, is you got two points going up. You’re looking at, you’re looking at an eight point.

GRANT: Yup.

RICHARD: So, the second thing I notice is that these beams come high off the head. I mean that, that’s remarkable. You know, most of ‘em will turn out to the sides Grant. But these are, these beams are coming high off the head. So, that’s telling you this, this deer is gonna fool you a little bit. Then you look up the beam just a little bit and you’re seeing – for a deer of this size – very good brow tines. They’ve got to be four inches. They might be four and a half. So, the deer is gonna score a little better than you think – um, probably 115-inch deer.

GRANT: Okay. Let’s roll it and see what we do now that we’re rolling.

RICHARD: Okay.

GRANT: This is what I’m seeing. I see that, and I go “Ooh, look at that tine length there.”

RICHARD: Right. You’ve got a great 2. That, that bumps a little bit. You know this deer may be getting close to 120. Um, mass is ordinary for a rack of this size. Um, but.

GRANT: So, what are you giving it on mass?

RICHARD: Fourteen.

GRANT: Fourteen. Fourteen on the side. So, we would double that, it’d be 28 inches.

RICHARD: 28. A lot of symmetry; not a lot of spread; probably 12 inches inside.

GRANT: Yup.

RICHARD: Um, boy, look at that 2 now. That, that, that jumps out at you.

GRANT: Yup.

RICHARD: Um, the deer has no odd unusual points; no breakage – uh, just, just, just a beautiful deer.

GRANT: Yup.

RICHARD: Now, here, here’s a great picture, Grant, because this shows how, how tall beams will fool you. The beams come so high off the head that you look up the top of the 2, and it’s so far over the nose, that you’re thinking this is a giant deer.

GRANT: Right.

RICHARD: But as, as you go through your system, you realize that this is a young deer. It’s got a beautiful set of antlers. They’re not gonna score over 120 inches.

GRANT: Yup. So, I think that’s a critical point. This buck is what we call a high-rack buck. My generic term is a high-rack buck.

RICHARD: Right.

GRANT: And there’s only, again, eight scoreable points on here. It just doesn’t add up to much. This is nowhere close, folks. When I look at this right off the bat, I’m nowhere thinking 140, 150, 160. That’s not even in that world.

RICHARD: No, no.

GRANT: Yeah. But a great deer and got a lot of, a lot of room to grow.

RICHARD: I want to emphasize you want to look at this brow as soon as you get the chance. Because it’s the first point that goes away when there’s brush; there’s bad light; there’s a bad angle on the deer.

GRANT: Twisting around, can’t see it.

RICHARD: Right. It, it, when you get a chance to look at that brow, you want to look at it and then once you’ve done that, move on.

GRANT: Richard here’s a different situation. And, you know, I live in the Ozark Mountains. I have some food plots but there’s no ag fields around. A lot of guys hunt in places like I do. And we see deer in timber like this. I mean here’s the buck – a lot of people probably didn’t pick it up from home. You know, looking at the monitor here. But we can’t see a whole lot; we don’t get that perfect view. So, I want to play this real time, and you just start sharing with me what’s going on.

RICHARD: Okay Grant. Thank you.

GRANT: Okay, so here we go.

RICHARD: Uh, the first thing I would notice is you’re probably gonna hear this deer coming in these dry leaves. Is, so, I’m, I’m evaluating the deer before I can see it. Is it dragging its feet? An old buck will make more noise walking through the leaves when it’s on alert. It is, when its feet hit the ground, does it sound like a big deer? Um, and then you start seeing it. If you can’t see the antlers, start looking at the body. Gather, gather whatever information is presented itself to you because it may be all you’re gonna get.

RICHARD: So, you’ve got a missing brow. You really don’t have a G3 on the right beam – the deer, on the deer’s right beam…

GRANT: Yeah.

RICHARD: …what we’re seeing on the left side. You’ve got a non-typical point coming out of the base of, of the G2. Um. Nothing really extraordinary about this deer. It’s uh. If you had to put a number to this deer, you’re probably looking at 90, 90-inch deer.

GRANT: Yup. And I, I wanted to share this one because a lot of guys in the heat of the battle; coming through timber – branches, sticks, everything in the way, see this long tine, say, “Ooh, that’s a good deer.”

RICHARD: But, but you know a hunt like that Grant can be just as fun as a hunt for a giant deer, too. You know, you get an arrow through there and get it in the right spot, and that deer goes 30 yards and piles up, and you’ve had a great time.

GRANT: Well, Richard you’ve been in my shop. I’ve got a whole bunch of those out there, right? And I can re-tell and relive all those moments, my family enjoyed the venison. So again, not knocking a deer, but we get all these questions about, “What’s this buck’s score?” And I write folks back and I’ll say, you know, 110, whatever. And they go, “Oh no, it’s a 150-inch deer.” Well, I don’t want to hurt your feelings folks, but there’s some math to this, and Richard is here to tell us his formula of how that goes together.

GRANT: Richard this was a great hunt. This was actually my daughter, Raleigh. I’ve taught my kids – we’re all worried about age and, and then we’ll figure out the score later. But let’s look. A lot of hunters want to know the score. So, as we run this real time – because things happen quick here – I want you again to share with us what’s going through your mind.

RICHARD: First thing I would say here is you’re looking – it’s just great deer. You know, mature buck; big antlers. That’s just the first thing that pops in your mind.

GRANT: Okay.

RICHARD: And then you’re seeing it’s got three points up. Now, it’s going away. So, as you noted, when a deer is going away, it’s gonna look a little bigger. Right now you’re saying 150-inch deer. Uh, but then you put a little math to it. And you realize it’s a little short out on the 4s. Brows look good. Um, I’m, my feeling right now is that that buck’s gonna get away anyway because he’s, he’s moving right along and nobody’s shooting him.

RICHARD: Um. The buck has dark antlers. Dark antlers always show up better. Uh, they will, they will make you over judge ’em a little bit. So, you, you have to say that deer is a little less than 150. Um, you know, got good 2s – not exceptional; good 3s – not exceptional. Nice spread. Spread is probably 17 inch inside, average mass. This is just a great deer.

GRANT: Um-hm.

RICHARD: Um, if, to put a number to it at this point right now I’m gonna say it’s 140 plus.

GRANT: Okay.

RICHARD: Uh, it’s every bit of it. You know, that deer…

GRANT: So, let’s let this play out here. Raleigh finally gets him stopped – boom. Done. Hugging; celebrating and all that. I actually did put a tape on this deer – and I’m not saying I’m 100% accurate because I’m not a certified scorer. But I come up with like 142. You called this a low 140, so your field estimate was spot on.

RICHARD: Well, thank you, and what a beautiful deer.

RICHARD: Interesting thing about brow tines is they can be measured from the front or the back. So, you measure ‘em over the longest way. So you – sometimes you’ll see a deer that scores best coming up the front of one beam, and it will always, of course, score longest over the curve. With this one, it kind of has a double curve. And I don’t know, I’m gonna think the front. But what you know is this is a nice brow. It’s a very good brow for a good scoring deer. It’s, it’s approximately 5 inches, which is the norm on 140 to 160-inch deer.

GRANT: Richard, this is a little cheating for you because I was hunting with you on your farm. But this was a stranger deer to me. I didn’t see this deer ahead of time. I don’t think you showed me trail camera pictures or anything. So, I’m in a tree. Uh, but I want you to walk through when we start playing this. What’s going through your mind?

RICHARD: Okay.

GRANT: Alright, so this deer steps out. I’m a stranger now at a guest’s property. I don’t know this deer. So, what am I looking at Richard?

RICHARD: Well, when he was turned sideways, you noticed tall points right off.

GRANT: Yup.

RICHARD: Beams come high off the head. It’s, it’s a five point on one side but four-typical on the other, so that’s gonna hurt the score.

GRANT: Right.

RICHARD: As he turns toward you, you notice that the brows are good – not exceptionally long. One of ‘em appears to be split on the right. Um, and the tall points strike you again and the spread of about – it’s gonna be just under 16 inches.

GRANT: Okay.

RICHARD: So, those are the things I noticed. And then now – as the deer is turning his head there, look at that G2 on the left. That, that G2 is probably over 12 inches long but not 13 – matched pretty closely on the other side — just a real nice looking deer. Um, the 4 is a little weak. It’s gonna keep it from scoring real well, and it’s non-existent on the other side. A little odd point going off the left G2. Um, a great deer. I’m gonna say that, again, that deer is gonna come in there low 140s. And I don’t remember. I’m sure we probably scored it at the time. But low 140s kind of deer. The beams aren’t exceptional. Also, it’s a mature buck.

GRANT: Yeah.

RICHARD: Being a mature buck, you know, certainly something in that size range, a person would want to consider harvesting.

GRANT: Yeah. Uh, I don’t remember exactly – several years ago since Richard allowed me to have this hunt. But I believe it was like 149 kind of high one 140s- gross score, gross score.

RICHARD: That could have been. I may have been a little low on it. Um.

GRANT: It had a kicker, also, coming off that you didn’t address. So we gained two or three inches off that one side there.

RICHARD: Right.

GRANT: When you start going through the math – and Richard is giving us some great points. Okay. Average beams – 20; start adding if they’re exceptional.

RICHARD: Right.

GRANT: Taking off if they’re less; spread 15 – unless it’s really exceptional or really narrow. Mass, we’re gonna call an average good buck…

RICHARD: 17, 18 inches.

GRANT: 17 inches on a side. So we double that. We’re 36, 37 inches, somewhere in there. Okay? You starting doing the math, and all of a sudden they starts coming down a little bit.

RICHARD: That’s right. It’s a, it’s a numeric thing.

GRANT: Richard, years ago there was a buck on our property that was a clean 12 pointer. And, and I had watched him all summer through trail camera pictures, video. And I just knew this was a good deer.

RICHARD: Hmm. Hmm.

GRANT: And sure enough in October, I saw this deer moving through the woods, and I grunted, and of course he’s shed out velvet now, and he comes up, and I make a great shot, and he piles up, and I get down there. My heart just sunk because I had memories of velvet score basically in my head, and when I got the real antlers in my hand…

GRANT: Based on his experience, Richard shared that when the velvet is removed off antlers, the score can decrease by 10 to 20%. Summertime bucks – when that velvet is really full and looking big – gosh, we can easily overestimate the score by 20%.

GRANT: Richard, this has been great because you’ve taught me a lot and I’ve been doing this a long time. I’m sure you’ve helped everyone at home. But, but summarize with just, again, your overall quick field judging tips, so they can use this in their situation. ‘Cause they’re not seeing it on a video. They can’t play it back five times like we can. They’re making a five-second decision.

RICHARD: Right.

GRANT: So, we’re looking at a deer. Kind of let’s – what’s the first thing you’re thinking?

RICHARD: I’m looking at a big, mature deer with what I consider a large set of antlers. You don’t, you don’t see anything wrong with it. Uh, so, you, you throw out a number. You’re gonna say 160-inch deer. Then, the next thing I would look at – I would try to get a little numerical about it to see if this actually is a really good scoring deer.

GRANT: Hmm. Hmm.

RICHARD: The, the first thing I notice is the spread. The spread is just ordinary for a big deer. You know 18, 18-1/2 inches inside – nothing exceptional about the beams – not exceptionally short or long – just a great looking deer.

RICHARD: So, next I’m gonna look at mass – 20% of the score. And I’m gonna call that average mass for a 160-inch deer.

GRANT: Yup.

RICHARD: So, we’re gonna call it 18 inches per side.

GRANT: Seconds are ticking away. What’s the next thing you’re looking at here?

RICHARD: Grant, Grant, the next thing I’m looking at is, is the beams. And, again, the beams are just exactly what you want to see on a 160-inch deer. They come high off the head; they, they go out; they turn back in a little bit at the tips. They don’t strike you as extraordinarily long, but they’re, they’re solid, so you’re, your just gonna say 25 inches. Um, and that’s…

GRANT: And that’s per side, per beam.

RICHARD: Correct, yeah. The brow on the deer’s left antler is short. There’s just no question about it. It’s two to three inches. It really needs to be close to six inches to get a big score out of that deer.

RICHARD: Then we get to the 4s, and you’re thinking those 4s are good. They’re gonna offset the brows a little bit because they’re close to seven inches.

GRANT: Yeah. And you like anything over six inches on the 4s.

RICHARD: Five to six inches is gonna put you in that 160 inch range. So, um, all in all, I’d, I’d just stick with that number. You know, it’s a 160-inch deer – give or take two inches – and, and really a beautiful, big deer, so.

GRANT: Yeah, yeah. And so, this is just a great example. You know, if you’re hunting 150-, 160-inch deer – this is actually ended up being 160 and a little change. This is what you want to see. You want to see that spread Richard talked about; that mass. And really importantly, that tine length.

GRANT: Richard, you’ve spent a lifetime hunting deer, just like I have, and you’ve really specialized in the antler score. Your contributions to Boone and Crockett Club and whatnot. So, you actually donated a chapter to this book. You contributed a chapter just really highlighting in greater detail than what we shared today – all your field estimating tips.

RICHARD: Yes I did. Thank you.

GRANT: Yeah.

RICHARD: And there’s also some other methods outlined in there in one or two other chapters, um, which, which have merits of their own, so.

GRANT: Yeah.

RICHARD: Just because this is how I do it, doesn’t mean it’s, it’s the only way or even the best way.

GRANT: Yeah. So I would do what I do. If you’re into this stuff, go to Boone and Crockett’s website, get a copy of this book, and really study it before you get into the field this fall.

GRANT: Richard, it’s hard to do, but you’ve changed my opinion on a few things today. So thanks for being patient with me and giving me time. And I really look forward to hunting with you again this fall.

RICHARD: Great. Thank you Grant; enjoyed it.

GRANT: Hey, if you’d like to visit in person about food plots, habitat management, estimating a buck’s age or score, I’ll be at the Springfield Bass Pro store August 19th from 10:00 to 5:00. I’ll probably spend most of my time in the hunting department, and I look forward to visiting with you there.

GRANT: Daniel and I are blessed to have an elk hunt scheduled about a month and a half from now. And I’m super excited and preparing for that hunt. But it’s just as important that I slow down every day and enjoy Creation and take time and listen to what the Creator is saying to me. I hope you do the same. Thanks for watching GrowingDeer.

9mm vs 10mm – Cartridge Comparison

0

When it comes to self-defense, there are several valid arguments for the 9mm vs 10mm handgun. Both are very popular and have their advantages and disadvantages. However, the 9mm is widely regarded as the ‘ideal’ handgun for self-defense and is one of the most highly used handguns in military and police forces. This goes for both home defense and conceal and carry. The popularity of the 9mm means that largely we have to defend the 10mm to justify it as a viable option.

Understand that the decision of which handgun to buy is a very personal decision. Every person has a different preference on weight, size, power, and recoil. Some people plan to conceal and carry, while others plan to use the weapon for home defense. Some stay in the city and worry about crime, while others spend time in the wilderness and are more concerned with predators. Before making a purchase, weigh your priorities and options to find the perfect fit for your needs.

Because of this, it’s difficult to label one as a better cartridge than the other. We will take a look at these two cartridges and discuss how they are similar and how they differ in some key ballistic and performance categories. We think that by the end of the article you will see that both have merit in the world of handguns.

History

The 10mm handgun was developed through a group effort by Col. Jeff Cooper, Norma, the FBI, and Smith & Wesson. The firearm was designed for use by FBI agents but was quickly set aside for other weapons. Some people claim that the recoil was too much for the wimpy FBI agents. However, the truth is that the weight and power simply slowed down their firing. Additional weight and recoil make target acquisition take a bit longer. When an agent is defending themselves and trying to put two or three rounds on a target quickly, the 10mm was not ideal.

The FBI did find that with different ammo, the 10mm handgun performed better in speed tests. The FBI lite load drastically reduced recoil and helped with performance. However, with a lighter load, it eliminated the need for such a heavy gun. This brought the FBI back to the 9mm, .45 caliber, and sparked the design of the .40 Smith and Wesson. It makes a strong argument for the 9mm vs 10mm.

The 9mm was first developed and used by the German military in the at the turn of the 20th century. From then, the cartridge saw use in both World Wars and was eventually accepted as a highly effective caliber by other European countries and North America. The 9mm soon replaced the commonly used .38 cartridges in the law enforcement community due to its stopping power and low recoil and is probably the most highly used round behind the .40 S&W. The 9mm provided extreme ease of handling, more stopping power than previously used rounds, and could carry more rounds in the magazine.

direct comparison 9mm vs 10mm round

Let’s just take a look at the specifications of these two cartridges and see how they compare and contrast.

9mm10mm Parent Case7.65x21mm.30 Remington Bullet Diameter0.355”0.400” Neck Diameter0.380”0.423” Base Diameter0.391”0.425” Case Length0.754”.992” Overall Length1.169”1.25” Case Capacity13.3gr24.1gr Max Pressure (SAAMI)35,000psi37,500psi

From the cartridge measurements and specifications, it should jump out immediately that the 10mm Auto is a larger round than the 9mm.

10MM cartridges can hold much heavier bullets than the 9mm with some hunting and self-defense rounds coming in at 180-200gr. These bullets are much heavier than the more common weights used with 9mm rounds which commonly fall between the 115 and 140gr weight.

The 10mm Auto can be packed with a higher charge, which is needed to push such heavier caliber bullets at speeds needed for hunting and self-defense purposes. We will see shortly how these differences affect the terminal ballistics of these handgun rounds.

To compare, we select several specific rounds for each cartridge to compare in several categories. While these selections are only a small window compared to the amount of selections available, they will give us a good idea of how the two cartridges stack up next to each other, and for the most part, these trends can be extrapolated to most options available. Those rounds are listed below.

We also want to point out that you can play around with cartridge loads, including how hot the load is and the bullet type. A lot of shooters will reload their own ammunition to tailor their ammo to their needs. In this article, we are only looking at factory loads of these two handgun cartridges.

Stopping Power

One of the biggest discussion points when evaluating the 10mm vs 9mm or any other comparison of two handgun rounds is power. In self-defense, power equates to penetration or over-penetration. There are two schools of thought on power. Some gun owners want as much power as they can handle. They want to put down any target with one shot, regardless of what happens behind the target. This makes more sense for gun owners that use their handgun in the wilderness. You certainly do not want a lack of power if a bear or a wild hog is charging you.

On the other hand, is it responsible to have that much power? You might take down your target with one shot, but possibly injure or kill somebody standing behind that target or even in another room. It is quite possible for a strong round to travel through a body and then keep going through a wall. In ballistics gel tests a 9mm would typically travel about 13 inches after impact, while the 10mm was sometimes over 17 inches. This means that a 10mm could potentially travel through two people at center mass and still keep going. That is a huge amount of power. Of course, a lot of factors go into penetration and penetration is not the sole determinant of how effective a round is at disabling or deterring an aggressor.

However, in the question of bullet penetration from a 9mm versus a 10mm the key lies in the ammunition. More velocity does not always mean deeper penetration. When you switch to jacketed hollow point defense rounds, the penetration is about the same. The reason is that increased velocity causes a hollow point to spread faster after impact and to spread further. This creates more resistance and slows the bullet more than a round traveling at slower speeds. If you hit your target, the hollow point is just as safe as a 9mm round. While we will look at some numbers shortly, keep in mind that bullet type plays just as big a role in power and penetration. Two bullets with the same energy traveling downwind will penetrate differently if one is a controlled expansion bullet while the other is a hollow point.

More importantly, you should always think about the collateral damage before you fire any handgun. If you are not confident that you can hit your target without hurting other people, you do not take that shot. It is that simple. If gun owners are responsible about the way they use their firearms to defend themselves, then power is rarely an issue.

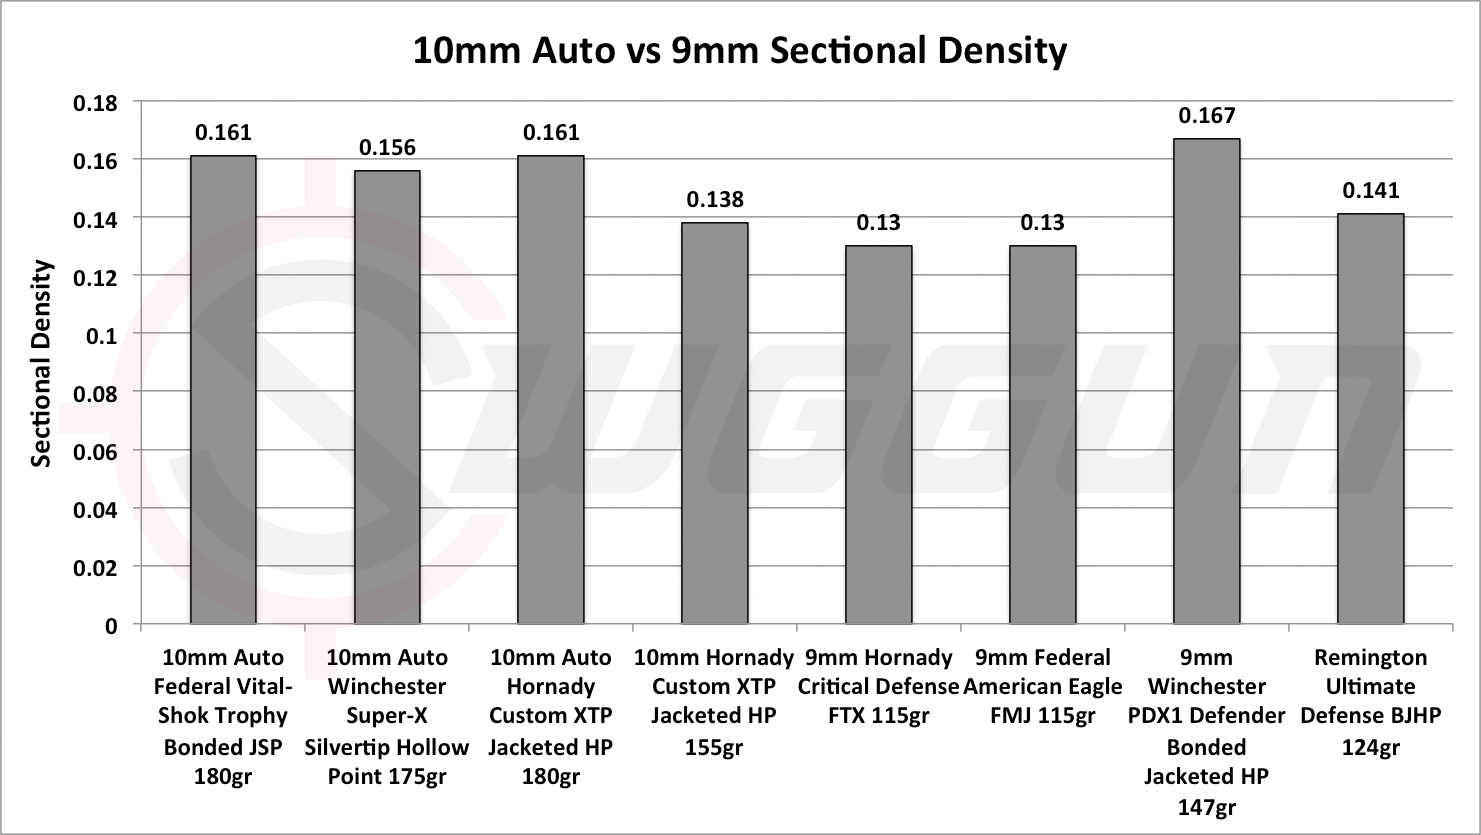
Before we move on, let’s take a look at some numbers for several popular 9mm and 10mm cartridges. We will look at the energy that is carried by the bullets, which transfers to the target and causes damage. And though we have talked briefly about penetration and the pros and cons to a deep penetrating defense-round, we will compare some sectional density data between the two.

Energy

The kinetic energy that is carried by a bullet is transferred to the surrounding tissue of the target. This kinetic energy damages and destroys tissue, organs, and nerves as it passes through. While only one variable in a bullets power, it is an important one and is easily comparable between rounds. Let’s take a look at the kinetic energy of the rounds we have selected for comparison and see if there are any trends we can pick up on.

9mm vs 10mm stopping power comparison

It is very clear from this graph that the 10mm Auto rounds carry a much higher amount of kinetic energy from the muzzle out to 50 yards. Right at the muzzle, the 10mm Auto rounds are carrying anywhere from 300-400 more ft.lbs of energy than the 9mm rounds. A lot of shooters might consider this overkill, and for the range or maybe even intruders, it may well be overkill. For taking large game or punching through cover, it’s the amount of energy that is needed to be confident in stopping a charge.

Though the 10mm Auto has a significantly more amount of energy, the 9mm is not to be scoffed at. For self-defense purposes, having a force of 250+ ft.lbs from 25 yards and in is more than enough to cause enough damage to stop an intruder in their tracks. This decrease in kinetic energy, as we will see, also aids in other characteristics that make the 9mm one of the more popular personal defense rounds throughout the world.

Penetration

The best visual method of measuring penetration is through the use of ballistic gels, which we alluded to earlier. While there is nothing wrong with this method, it sometimes gets blown out of proportion, especially when you are trying to compare it to an armored or heavily clothed target, or an animal with a thick hide and skin.

In this section, we will look at the sectional densities of the various rounds. The sectional density is a measurement that comes from the bullets diameter and weight. The higher the sectional density, the greater the penetration potential. Using this, it doesn’t matter what the target is; we can still make accurate comparisons between rounds. We should note, and we discussed this earlier, that the bullet design and jacket are also major factors in how a bullet penetrates. Hollow points with higher sectional densities still might not penetrate as much as a FMJ with a low sectional density.

Still, we have a good selection of bullet types for our 9mm and 10mm selections so the sectional densities should give us some interesting comparisons.

sectional density and penetration of the 10mm vs the 9mm

Overall, the 10mm Auto rounds have slightly higher sectional densities than the 9mm rounds. With that being said, we can see that it varies from round to round. The 147gr 9mm round has just as high a sectional density as the 10mm rounds. Others that have lower sectional densities still might penetrate more than other with higher sectional densities due to their bullet design. For example, full metal jackets have a higher penetration than hollow points because they will not expand as rapidly.

For the 10mm rounds, you do need extra penetration for some applications such as hunting. Because of this, a lot of 10mm rounds have bullet designs that feature more controlled expansion. This allows the bullets to reach vital organs of larger animals but still provide enough expansion to cause maximum damage to surrounding tissue. While penetration is an important component to a bullets and cartridges stopping power, it is only a small portion of the overall equation and has other factors that contribute such as velocity, which we will move on to in the next section.

Velocity

Talking about velocity is important when discussing two handgun cartridges that are going to be used for self-defense purposes. Velocity plays a key role in terminal ballistics of the firearm, such as the categories we just finished discussing, and it also plays a role in how the bullet behaves when shot. Though the latter isn’t discussed as often because of the ranges shots are most often taken with these rounds.

Still, we felt that velocity is an important component to properly picking the right cartridge for your needs and will take a look at the muzzle velocities out to 50 yards for the rounds we have used in previous sections.

Velocity compared 9mm versus 10mm auto

We can tell right off the bat that the 10mm Auto rounds have a higher muzzle velocity than the 9mm rounds. Most show around 100-200 ft/s increase in velocity, though the heavier 147gr 9mm round shows similar velocity patterns.

This trend continues for the rounds as they move downrange to the 50-yard mark. This trend makes sense as we already know that the 10mm Auto cartridges can pack a substantially larger amount of powder charge than the 9mm and is needed to fire the heavier pullets at a speed where the round would be effective in self-defense and hunting situations. Of course, the speed that these large bullets can travel is most likely going to mean an increase in the amount of recoil.

The increase velocities of the 10mm Auto rounds also affect the bullet’s penetration. The faster rounds can overcome resistance once it hits the target. Of course, expansion is going to slow down the round as it moves through tissue, but as a general trend, when looking at two of the same bullets, the once with a higher velocity is going to penetrate deeper.

Recoil

Recoil is probably the biggest argument in the 9mm vs 10mm debate, but it should not be. Yes, it is true that almost anybody can handle the recoil from a 9mm. Yes, the average 10mm round has noticeably more recoil than the average 9mm round. However, you will see a wide range of results based on the 10mm rounds you choose. If you go with a large, high speed round you will notice the recoil. However, there are plenty of rounds that have a similar kick to a 9mm. Experience handling firearms also plays an important role in handling recoil. Are there instances where the 10mm proved too much for certain agencies such as the short time in service for the FBI, sure, but that does not mean that is a round that no one of could become accustomed to handling with confidence.

Let’s take a look at some recoil data from several popular rounds for both cartridges.

9mm vs 10mm recoil compared

What we are looking at here is the recoil energy produced from firing each specific round. While this is not the actual felt recoil, we can be safe assuming that increased force generated is going to equate to more felt kick.

It’s also important to remember that other factors come into how much recoil is felt when firing both of these rounds. Probably the biggest factor is the weight of the handgun. Shooting the same round from a 2lb and a 1lb handgun is going to feel differently. Most handguns chambered to fire a 10mm handgun is going to be heavier than a handgun chambered to fire a 9mm. This is especially true for handguns designed for concealed carry.

Still, for comparison, we have generated the below data by using a constant firearm weight for all of the rounds.

This is a category where there is no debate. The 10mm Auto rounds produce a significantly more amount of recoil than the 9mm. While the numbers do a good job showing this distinction, we recommend shooting both of these on the range one after another if you have the opportunity. The numbers alone don’t do the difference justice.

For all but the heaviest 9mm round, the 10mm Auto rounds generate 2 to 3X the amount of recoil energy. For handguns, when you get into the 10+ ft.lb of energy for recoil, you are talking about some pretty dramatic recoil and the ability to influence your shot. It also has a big role in putting quick consecutive shots on target.

While the difference in recoil is pretty drastic, it all comes down to the purpose for which you will be using your 10mm. If you are going to be in the bush and need it for protection against predators, then a heavier round and heavier recoil makes sense. Chances are you will only get one shot off anyways. If you are a city dweller and plan on using it against two legged predators, a light round is fine. There is no real benefit to using a more powerful 10mm round for normal self-defense.

Accuracy

In our experience, accuracy with a handgun is all about the handler. At the ranges you are going to be taking shots, there is no wind at play or bullet drop to compensate for. What does effect accuracy the most is inexperience handling nerves, adrenaline, and anticipating recoil.

For the latter, it’s all about practice on the range. We don’t put a lot of stock in other peoples ideas of accuracy. Most of them are phenomenal marksmen. We don’t doubt that, but trying to measure accuracy is difficult in our eyes because of all the factors that can go into it and vary from day to day.

The shooter and the firearm all impact accuracy and to tell which round is more accurate, you need to be on the range with your own handguns and rounds and measure groupings for several days.

With that being said, all of the rounds we have listed in the article and used for comparison have a good reputation for tight groupings at ranges within 25 yards. And since we are talking about the 9mm vs 10mm, recoil is going to play a significant role in any difference in accuracy between these two rounds.

With the 10mm Auto rounds having a significantly more amount of recoil compared to the 9mm rounds there is going to be a learning curve when it comes to placing consecutive shots on target. It’s not impossible, but a lot of potential buyers are going to be looking for a handgun where they can rattle off several shots without having to bring the gun back down several inches to re-center.

Price

In the cost debate between the 9mm vs the 10mm, the 9mm has a slight edge. While the guns themselves are similar in cost, the rounds off the shelf are much more affordable for the 9mm. However, there are two significant points to consider that negate this cost difference. One is that the cost to reload your own 10mm is almost identical to the cost to reload your own 9mm ammo. More and more gun owners are moving to reloading their own ammo to save on cost. I recently wrote an article that showed reloading the average 9mm round saves 73% versus the cost of buying off the shelf.

Moreover, when disaster strikes and ammo is hard to find the 10mm will still be left on the shelf. The 9mm ammo will be the first to go because a much higher percentage of gun owners use 9mm ammo. For me, this is even more important than the cost of the round. Many people hesitated to use their .22 rounds until the option of buying online came around. You simply could not find it in stores. All in all, we would call it a wash for many gun owners.

Let’s take a quick look at how much some specific rounds of this ammunition would cost you at local retailers and online vendors.

AmmunitionPrice (20 Rounds) 9mm Hornady Critical Defense FTX 115gr$17.29 9mm Federal American Eagle FMJ 115gr$14.29 9mm Winchester PDX1 Defender Bonded Jacketed HP 147gr$18.79 9mm Remington Ultimate Defense BJHP 124gr$22.99 10mm Federal Vital-Shok Trophy Bonded JSP 180gr$32.49 10mm Winchester Super-X Silvertip Hollow Point 175gr$21.99 10mm Hornady Custom XTP Jacketed HP 180gr$16.49 10mm Hornady Custom XTP Jacketed HP 155gr$16.49

Unless you’re looking to stock up on some of the high grade hunting ammunition options for the 10mm, there is not a huge difference in price between the better 9mm and 10mm rounds.

You can buy cheaper 9mm ammunition in bulk if you’re just looking to burn some powder at the range and for this, there are not as many options for the 10mm at the same price.

Availability

This is probably the most distinctive difference between these two cartridges. Without a doubt, the 9mm is much more readily available than the 10mm. While the 10mm has had a small resurgence in the handgun world over the last couple of years, you can find an abundance of 9mm ammunition at just about any retail store that carries ammunition. With the 10mm round, you are restricted to large retailers that carry a wide range of ammunition, and even then, you might not be able to find the exact round you are looking for. The internet has made it a bit easier to get your hands on 10mm rounds, but you will also find a lot of boxes out of stock or on back order.

As we stated earlier, there are also a lot more people looking to buy 9mm ammo. For normal day to day use, there is enough to go around, but if the time came to start stocking up heavily, the 10mm, in the end, might be left sitting on the shelf. That’s of course completely hypothetical.

Applications

The purpose of your firearm may greatly determine your argument between the 10mm vs the 9mm. The 9mm has several models with several sizes and several purposes. Just looking at the Glock you have a 17 for home defense, a 19 for primary conceal and carry, and a Glock 26 for a backup or pocket pistol. All of these models have good stopping power but different sizes for anybody’s specific needs. It’s honestly one of the best all around rounds for personal protection. The stopping power and the low recoil make it a round that anyone can become comfortable handling.

The 10mm is a bit more limited. If you needed to, you could use a 10mm for conceal and carry. It would be difficult. The gun is fairly large which makes it hard to conceal and less comfortable. Its primary purpose would be for home defense or wilderness defense and hunting purposes. While this limits the marketability of the 10mm over the entire potential customer base, it makes it the perfect weapon for a portion of the market. The 10mm is a niche around if there ever was one.

Best Rounds

We have looked at several specific rounds for both the 10mm and 9mm cartridge. We want to just briefly pick some of our favorite rounds from this selection for specific purposes. This is by no means a definitive answer for the different categories as we realize that there are a multitude of other options out there and of course, personal preference is a huge factor. Still, for those shopping around, these are our list for the best hunting, self-defense, and range rounds for both the 9mm and 10mm auto cartridges.

Hunting/Wilderness Protection

We don’t recommend the 9mm as a hunting cartridge. If you are looking for a handgun cartridge that is going to be effective hunting or for defense from large predators, you really need to look at larger calibers, such as the 10mm. As far as hunting rounds go, we love the 10mm Federal Vital-Shok Trophy Bonded JSP 180gr rounds. They have the penetration and energy to get through heavy hide, skin, and bones and cause massive damage to vital organs.

Self Defense

One of our favorite 9mm self-defense rounds is the Winchester PDX1 Defender Bonded Jacketed Hollow Point. The 147gr bullet gives it a little bit more punching power and the jacketed hollow point can punch through thicker clothing and still cause a considerable amount of tissue damage. It has a bit more recoil than other 9mm rounds, but it’s nothing you cannot acclimate yourself to after a few hours on the range. Heavier handguns will minimize recoil and makes it perfect for a home defense round.

Range

For this section, we only have a pick for the 9mm, and that is the Federal American Eagle FMJ 115gr rounds. For 50 rounds under $15, it’s hard to find a better deal on reliable ammunition that is not going to jam constantly and foul up your chamber and barrel. They also make a more than effective self-defense round as well.

Conclusion

The comparison between the 9mm vs the 10mm is a tough one for us. The 10mm has die-hard fans that are incredibly loyal. These owners love the power. They like knowing that their target will be disabled with one well-place shot. However, the majority of the market prefers the 9mm. It is more versatile, easier to handle, and safer in the minds of some users. There were undoubtedly several FBI agents that would prefer the power of the 10mm. In the end, the majority ruled and smaller firearms were chosen.

Again, this is a very personal decision. We like both weapons and own both for different reasons. When heading on a hog hunt in March, the 10mm will be along. For everyday purposes, the 9mm is used. Your best bet is to try out both at the range and see how they feel. For most people, if you can handle the recoil the 10mm is pretty incredible. Take your time and find the option that best fits your needs. Despite the differences in the 9mm vs 10mm, both are quality options. We are sure you will be happy with whichever option you choose.

Minerals for Whitetails

0

Buck visit Trophy Rock mineral site

When spring rolls around, hunters everywhere gear up to begin establishing or “recharging” the mineral sites on their hunting properties. They know that deer typically begin using supplemental minerals around spring green-up and continue until early fall. Surely, the knee-deep depressions in the soil caused by repeated years of mineral supplementation are evidence of deer need, correct? Maybe, or maybe not. Growing antlers are composed mostly of proteins (80 percent by weight); whereas hardened antlers contain roughly equal amounts of proteins and minerals. Studies have shown that calcium and phosphorus are by far the two most common minerals in deer antlers, comprising 30-35 percent of the mature antler by weight. However, a University of Georgia study detected 11 different minerals in the whitetail’s antlers. In addition to calcium (19 percent) and phosphorus (10 percent), the next most common elements were magnesium (1 percent) and sodium (0.5 percent). Lesser amounts of other minerals were found including potassium, barium, iron, aluminum, zinc, strontium and manganese. Besides calcium and phosphorus, little is known about the role of other minerals in antler growth.

Clearly minerals are important in antler development. Because of the large quantities of minerals required for antler growth, whitetails have developed the ability to “bank” calcium and phosphorus in their skeletons and then transfer these minerals during antler growth. However, these body sources of calcium and phosphorus provide only a portion needed for optimum antler growth. The rest must come directly from their diet while their antlers are actively growing. Therefore, mineral supplementation prior to and during antler growth may be beneficial.

Minerals are also important for does. During gestation and lactation does have high requirements for calcium and magnesium.

Research on domestic livestock has documented numerous benefits of mineral supplementation including increased forage intake, improved forage digestion, and increased reproductive success. In contrast, most studies on whitetails have focused on the impacts on body weight and antler development. Researchers at Mississippi State University found a strong correlation between soil mineral content (primarily phosphorus) and body size, although no correlation with adult antler size was found. They concluded that soil phosphorus levels were the best indicator of body size, probably because phosphorus deficient soils are common throughout the United States.

A classic study on the mineral needs of deer was conducted at Penn State University in the 1950s. In this study, researchers did detect a difference in yearling buck antler development between supplemented and unsupplemented groups. However, these herds were fed a nutritionally deficient diet below what most whitetails would have access to in the wild. Furthermore, when the same deer were examined the following year as 2.5-year-olds, no differences were detected between the two groups.

In a similar study conducted at Auburn University, researchers tried to detect differences in body and antler size between an unsupplemented and supplemented group. This study differed from the Penn State study in that both herds were fed a nutritionally complete diet. In addition, one group was provided a commercial mineral supplement. Over a four year period the researchers were unable to detect any differences between the two deer herds.

Without question deer need minerals, and they will readily use mineral licks. But why do they use these licks and why is their use restricted primarily to the spring and summer? Many hunters believe that it is simply because bucks need the minerals for antler growth and does for raising fawns during these months. However, several studies have shown that while deer readily use mineral licks high in salt, they rarely, if ever, use pure mineral supplements. If deer were lacking minerals, why wouldn’t they use the pure mineral supplement even if salt wasn’t present? No one can say for sure, but it’s probably because most minerals by themselves are bitter.

Could the use of salt/mineral mixes simply be due to an increased need for salt? According to research, yes. During the spring and summer, deer operate at a sodium deficiency due to the high potassium and water content of the forage. This interferes with efficient sodium conversion in the body and increases the need for sodium. This makes deer actively seek out concentrated sources of sodium such as natural or man-made licks. Research in Tennessee supports this. Type of mineral formulation affected total deer use of baited sites, with a high salt formulation receiving over four times the number of daily visits from deer as other formulations.

Almost all soils more than 25-50 miles from a seacoast are low in sodium. Therefore, in these areas, salt may be just as necessary as calcium and phosphorus to whitetails during the spring and summer.

There are three main types of mineral supplements.

  1. Food additive – these minerals are combined with a supplemental feed, and deer get them while consuming the feed.
  2. Blocks – these are commercial mineral blocks placed on the ground or on a stump, and deer get the minerals by licking the block or consuming the soil below it. Research shows blocks tend to be the least effective way for deer to get supplemental minerals.
  3. Granular – these minerals are added to the soil, and deer get them by consuming the minerals and/or soil/minerals mixture. Research shows granular minerals facilitate increased consumption by animals as they’re able to literally eat (vs. lick) the mixture. There are commercial and “homemade” granular mixes available.

What does all this mean to the average deer hunter and manager? The results of these studies suggest that mineral supplementation – especially calcium, phosphorus, and sodium – may provide some benefit, especially in situations where deer are nutritionally deprived or areas with minerally deficient soils. However, age and nutrition are the two most important ingredients for producing large antlered bucks. Regardless of the intensity of mineral supplementation, a yearling buck will still be a yearling buck. Bucks must live long enough to reach physical maturity while having access to high quality nutrition to achieve maximum antler growth. Creating a lick is certainly fun, inexpensive, and watching deer respond to these licks is satisfying. Mineral licks also provide a great place to survey deer with game cameras.

So, if you have already addressed the larger concerns of habitat and herd management, mineral supplements can be another part of your overall management plan. The key is to have realistic expectations. Don’t expect to see trophy bucks walking around this fall just because you gave them a mineral boost this spring. While the advantages of mineral supplementation have not been clearly documented, neither have any disadvantages.

The Best 22LR Scopes for Target Shooting

0

Today I’m going to show you the best 22LR scope for target shooting.

In fact:

I’ve hand-tested 18 scopes alone for this review.

The best part?

I’ve sorted the scopes by use. So whether you’re on a budget or need the best 22LR optic, you’ll find it here.

Let’s dive in!

The 4 Best 22LR Scope for Target Shooting

If you’re pressed on time, here’s a quick list of the best 22LR scopes:

  1. Leupold VX-Freedom Rimfire: Best Overall 22LR Scope
  2. Vortex Crossfire II 2-7×32 Rimfire: Best Close-to-Medium Range Scope
  3. Bushnell Drop Zone-22 2-7×32: Best Short-range Varmint Hunting
  4. Athlon Argos BTR 6-24×50: Best Short-to-Long Range 22LR Scope

1. Leupold VX-Freedom Rimfire: Best Overall 22LR Scope

The Leupold VX-Freedom Rimfire is the best overall 22LR scope.

I’ve used it for hunting, target shooting, night time hunting and more.

What makes it so versatile?

Keep reading and I’ll show you…

Glass Clarity & Reticle

Here’s the thing:

When a scope is positioned at a low price point like the Leupold Freedom Rimfire, it usually equates to reduced quality.

But that’s wasn’t the case here.

In fact, the glass on this scope is just as crisp and clear as the glass used on more expensive Leupold sights.

Leupold VX Freedom Rimfire front glass

It’s also great in low light conditions, making the visibility problems I usually face with early morning shooting nonexistent.

Leupold VX Freedom Rimfire reticle

But what about the reticle?

It’s a standard duplex reticle set in the second focal plane.

This allows you to have a strong and easy to see reticle at all magnifications.

Eye Relief & Eye Box

It has a whopping 4.1” of eye relief!

That’s more than any other scope on this list.

Leupold VX Freedom Rimfire rear glass

The best part?

You can shoot with both eyes open, and accurately hit your target without worrying about getting a black eye 🙂

Durability & Weight

The VX-Freedom Rimfire is well built.

It’s crafted with lightweight aluminum that is O-ring sealed and nitrogen purged.

Leupold VX Freedom Rimfire sideview

In other words:

It’s completely shockproof, waterproof and fogproof.

In the dead of winter, with snow actively falling, I didn’t have a single temperature or fog related problem.

Elevation & Windage Knobs

The dials worked correctly, and are set at ¼ MOA with audible clicks to ensure precision.

Leupold VX Freedom Rimfire windage and elevation

However, the knobs feel cheap. The plastic used on the knobs is soft and feels like something you find in a dollar store.

Leupold VX Freedom Rimfire firedot button

Don’t get me wrong:

The knobs work fine and do exactly what they are supposed to do. I just wish Leupold used a higher quality plastic or even aluminum for the knob.

That being said, they are accurate, easy to use and track true. It’s also easy to zero, and holds zero even with strong recoil or accidental drops.

Magnification & Parallax

The 1.5-4x magnification is perfect for hunting and target shooting.

Leupold VX Freedom Rimfire magnification

In fact, I’ve used it up to 200 yards without a problem. Further than that would require more magnification. I’d recommend checking out myVortex Viper HST 4-16×44 Review.

Although parallax is fixed, I experienced no blurriness or fuzziness when shooting within 100 yards.

Leupold VX-Freedom Rimfire Review: Is It Worth It?

If you’re looking for the best overall 22 LR scope that will work in almost any situation, then the Leupold VX-Freedom Rimfire is for you.

Here’s why. It’s:

  • Affordable
  • Clear glass
  • Lightweight
  • Works well in low light
  • Short-to-medium range magnification

In short:

The Leupold VX-Freedom Rimfire Riflescope is budget friendly and easy to use scope. Plus, it’s backed by Leupold’s lifetime guarantee.

You break it, they’ll fix it…free of charge.

2. Vortex Crossfire II 2-7×32 Rimfire: Best Close-to-Medium Range Scope

Looking for the best close-to-medium range scope for target shooting? Then get a Vortex Crossfire II 2-7×32.

Not only is it affordable, but the scope’s features is built with quality.

Like what?

Keep reading to find out…

Glass Clarity & Reticle

Glass clarity is always one of the defining features on a Vortex optic and the Crossfire II 2-7x is no exception.

This scope has a fully multi-coated lens that provides a stunningly bright and clear view of your target.

Vortex Crossfire II glass clarity

The lens also has an anti-reflective coating. This reduces light absorption to minimize any glare that could appear in your sight,

What’s better is the V-plex reticle.

Vortex Crossfire II reticle

It’s a popular hunting reticle that can be used for about any hunting applications. That’s why I recommended it in my 4 best scopes for Ruger 10/22 guide.

However, it’s wire constructed. Although it’s not bad, it can break and occasionally lose their position.

This reticle is a second focal plane (SFP) which lets you increase or decrease magnification without changing the size of the reticle.

So the reticle gets to do its job without obstructing your view of the target.

Eye Relief & Eye Box

One sure sign of a quality optic is the eye relief.

A good scope should allow you to have a comfortable distance between your eye and the eyepiece while still being able to clearly see the full field of view.

The Crossfire II really delivers in this area. It offers a very forgiving 3.9 inches of eye relief at the lowest magnification and 4.7 inches at the highest magnification.

Vortex Crossfire II eyebox

The eye box (range of positioning behind the eyepiece) is also really generous. This allows for faster target acquisition and is a big reason why this optic can be recommended for both tactical use as well as for hunting.

Durability & Weight

The Vortex reputation is built on the company’s resolve to make a product that endures.

Crossfire II displays all the signs of the vortex standards

Vortex Crossfire II optic

Like other Vortex products, the Crossfire II has been designed to surpass the standards of similarly-priced riflescopes.

The hard-anodized tube is made from aircraft-grade aluminum which protects it against scratches and dings.

The design is also shockproof, ensuring that the components aren’t easily jumbled by the movement of your gun. Not to mention movements that come with normal use, such as, having it packed up with the rest of your gear in the back of your truck, or even accidentally knocking it over or dropping it.

The scope is O-ring sealed and nitrogen purged, making it both waterproof and fog proof.

If for some reason any of these features fail or your scope is damaged in any way, Vortex covers it with its VIP lifetime warranty.

The company will either repair or replace your Crossfire II, no matter what the problem is or how long you’ve had it.

To top it all off, this heavy-duty scope weighs just 14.3oz. — a comfortable addition to most rifles.

Elevation & Windage Knobs

The turrets on the Crossfire II are medium height and finger adjustable.

Vortex Crossfire II windage and elevation

The knobs have a sturdy feel to them and can be easily manipulated, even with a gloved hand. Both turrets are capped to protect your settings and can be reset back to zero after sighting in.

Windage and elevation can both be adjusted to 60 MOA with each click measuring ¼ MOA.

Magnification & Parallax

With a magnification of 2-7x, this is a scope meant for close to medium-range shooting.

Vortex Crossfire II magnification

The parallax adjustment is fixed up to 100yds which is a good fit for this level of magnification.

Vortex Optics Crossfire II 2-7×32 Review: Is It Worth It?

With a price tag of only $129, you are getting a great scope with quality features that many people pay twice as much for.

Not only that, but when you take into account the lifetime warranty, it’s almost a no brainer.

In short:

If you’re looking for a solid tactical scope that excels in hunting, then I’d recommend the Crossfire II.

3. Bushnell Drop Zone-22 2-7×32: Best Short-range Varmint Hunting

Want to do short-range varmint hunting?

Or rimfire tactical matches?

Then take a look at the Bushnell Drop Zone-22 2-7×32. It’s literally designed for the .22 LR round.

The best part?

It’s super affordable. Let’s take a closer look…

Glass Clarity & Reticle

The glass is surprisingly good.

In fact, I didn’t notice any tunnel vision from the bezel like I do with other similarly-priced optics.

But what’s even better is the Drop Zone-22 BDC reticle.

Bushnell Drop Zone-22 glass clarity

It’s specifically engineered for 38-40 grain, .22 LR high-velocity loads, with a 50-yard zero.

What that means is it specifically measures the .22 LR’s trajectory, giving you completely accurate bullet drop estimates.

This is perfect if you do short-range varmint hunting or rimfire tactical matches.

Eye Relief & Eye Box

The 3.6” of eye relief is very forgiving — even at full magnification.

Bushnell Drop Zone-22 front scope

Also, the eye box is generous. I didn’t experience any eye fatigue.

Durability & Weight

The Drop Zone-22 is built like a tank.

Bushnell Drop Zone-22 side view

It’s O-ring sealed, argon purged and crafted from durable aluminum. Which means, the scope is waterproof, fogproof and shockproof.

However, it comes at a hefty cost:

Heavy weight.

At about 19.5 ounces in weight, the Drop-Zone 22 is one of the heaviest scope in its class.

Elevation & Windage Knobs

The exposed target turrets are reliable.

They produce positive, crisp clicks. No tools are required. And the ¼ MOA is very precise.

Bushnell Drop Zone-22 windage and elevation

However, the dials are a bit stiff to turn…at first. With usage, it’ll loosen up.

Moving on, zeroing was easy. After 7 rounds, I was zeroed in. It also held zero like a champ. 82 rounds and a few hikes later, I still haven’t lost zero.

Magnification & Parallax

Just like the turrets, the power ring is also rather stiff.

The solution?

Use a throw-over lever. This makes turning the knob a breeze.

No products found.

The scope is also equipped with an adjustable side parallax knob. This is gold…considering the price of the optic.

It can adjust as low as 10 yards to infinity. A plus if you’re plinking, engaging close targets or rimfire shooting.

Bushnell Drop Zone-22 magnification

In short:

The 2-7x magnification and parallax adjustment is clean and precise.

Bushnell Optics Drop Zone-22 Review: Is It Worth It?

If you’re looking for a budget-friendly 22LR scope, then get a Bushnell Drop Zone-22.

Here’s why. It’s got:

  • Durable
  • Clear glass
  • Long eye relief
  • 22LR BDC reticle
  • Side parallax adjustment

It’s literally designed for small game hunting, plinking and rimfire shooting.

The best part?

It’s backed by Bushnell’s lifetime warranty. So if ANYTHING happens to the scope, they’ll fix er’ up for free.

4. Athlon Argos BTR 6-24×50: Best Short-to-Long Range 22LR Scope

The Athlon Argos BTR 6-24×50 is the best short-to-long range scope for your 22lr rifle.

In fact:

The Argos BTR packs in many of the features of top-dollar scopes, but for a fraction of the cost. Like what? Keep reading to find out…

Glass Clarity & Reticle

The glass on the Argos BTR is very high quality, which means the image you see through your scope is clear and crisp. In fact, the Argos BTR excels in low-light conditions.

I’ve found that it’s the perfect scope for dusk and dawn hunts. This is because the BTR is made with a fully multi-coated lens which provides fantastic light transmission.

I’ve noticed that when I zoom in to 18-24x, I get a little bit of blurriness. That said, for under $400, you really can’t beat the image clarity of the BTR.

Now let’s take a look at the reticle.

I was expecting a pretty basic reticle from this scope, especially considering the price. However, the BTR uses an illuminated, etched APMR MIL reticle. It’s anything but basic!

Here’s a look at the APMR MIL reticle:

I really like the illuminated reticle, especially when I’m shooting in low-light conditions. There are 11 brightness settings which means that I can find the perfect illumination level every time.

I do wish that the BTR had an auto-shutoff feature to help save on battery life, but I tend to keep an extra Lithium battery in my bag just in case.

Also, since the reticle is etched into the glass, you don’t need to turn on the illumination at all if you don’t want to. The etched reticle is also much more durable than a wired crosshair, so you don’t have to worry about your wires getting knocked off center.

One of the best things about the Argos BTR is that it is a first focal plane riflescope, which means that the reticle grows as you zoom in on your target. No more calculations for holdover or windage when you change your magnification.

I love that the MIL reticle works at all ranges, and this feature usually only comes in scopes that cost over $1000.

Eye Relief & Eye Box

The eye relief on the BTR is a nice, comfy 3.3 inches. This is perfect for low-to-zero recoil calibers like 22lr.

The eye box is also nice and generous, although I’ve noticed it does shrink a little as you zoom in to max.

Durability

The Argos BTR is incredibly durable. The tube is made from heat-treated, aircraft grade aluminum and is sealed with O-rings.

As if that’s not enough, the whole tube is made from a single piece of metal, which makes it stronger and more waterproof than multi-piece scope tubes. The BTR is also argon-purged and uses an etched reticle.

All of these features mean that the scope is able to handle any kind of conditions and take any kind of punishment that I might throw at it.

Elevation & Windage Knobs

Here’s the scope’s biggest con…

The turrets move very easily, with almost no resistance…which can lead to over adjusting.

However, I spent about ten minutes re-greasing the turret caps. When I was done, the turrets felt much less mushy and the clicks were a lot louder.

If you’ve never regreased turrets before, here’s a quick video showing you how to do it:

Zeroing was a very easy process. I was able to zero the scope in less than ten rounds once I was hitting paper.

And I’ve put hundreds of rounds through my 22lr since, and the zero has held true.

In my experience, these turrets have proved to be very reliable.

Parallax & Magnification

The parallax adjustment knob works very well. It’s easy to turn and accurate. This makes for easy adjustments in the field.

The 6-24x magnification is probably my favorite thing about this scope. Whether I want to shoot something ten yards out or plink a target at 1000 yards, the BTR is my go-to.

The scope image is very clear up until about 20x. After that it gets a little bit blurry, so you may want to invest in a higher-end scope if you want to do a lot of extreme distance shooting.

That said, I’ve found that the Argos BTR still functions well at 1000 yards, especially when you consider the price.

Mounting & Rings

The Argos BTR doesn’t come with any rings or a mount, so I’d suggest getting a set of High Scope Rings that fit your 22lr.

The scope does come with a set of lens covers, which is nice. It also includes a battery for the illuminated reticle.

I went ahead and bought a 50mm Athlon Sunshade to use for my daytime shooting.

It helps a lot with glare and reflections.

Is the Athlon Argos BTR 6-24×50 Worth It?

If you need an all-range scope for your 22lr, you can’t go wrong with the Argos BTR.

Here’s why. It has:

  • First focal plane
  • 6-24x magnification
  • Excellent in low-light
  • Reliable, hand-adjustable turrets
  • Illuminated, etched BTR MIL reticle
  • Fully multi-coated glass for clear, crisp image

And all of this comes in a package that costs a fraction of what other competing scopes cost.

If all of that wasn’t enough, the BTR comes with Athlon’s Gold Medal lifetime warranty, so you know you’re covered if anything happens to your riflescope.

If you want all these features in a low-cost riflescope, then the Argos BTR 6-24×50 is for you.

Looking for a riflescope for your AR? Here’s our list of the 7 Best AR-15 Scopes and Optics.

Now It’s Your Turn

I hope you enjoyed my best 22LR scope for target shooting guide.

So as a recap:

If you’re looking for the best overall .22LR target shooting scope, then get the Leupold VX-Freedom Rimfire.

What about the best close-to-medium range optic? The Crossfire II 2-7×32 is for you.

If you’re into short-range varmint hunting, then opt-in for the Bushnell Drop Zone-22.

Or if you’re looking for the best short-to-long range scope, then get the Athlon Argos BTR 6-24×50.

Whichever .22LR scope you choose, you’re bound to hit a reliable, yet effective optic. I’ve spent hundreds of rounds through each one with no failure.

Now I want to turn it over to you:

Which rifle scope will you pick for your .22LR?

Let me know by leaving a quick comment down below.

How Whitetail Deer Respond and React to Hunting Pressure

0

All whitetails react differently to pressure from humans, especially during hunting season, but research shows some clues into what they do and where they go during these months of intrusion into their areas. (Photo: Getty Images)

Recent biological studies demonstrate very clearly that white-tailed deer not only perceive their environment in fine detail, but are able to respond immediately to risks and pressure.

Legal light ends in just a few minutes, but you dare not move. You’ve heard a few deer staging around you for the past half hour, and not long ago you heard the bark of your brother’s rifle from a stand not a quarter mile away.

By Dr. Stephen Ditchkoff and Jeff Sullivan

Yet, like many nights before, you’ve been left with nothing but an aching back and a dream of what might have been, while the deer that so patiently waited for darkness to fall feast upon the food plot you leave behind. This spot used to be packed with deer, but as the season comes to a close it seems that what was once your secret honey hole has lost its magic. Now you can do nothing but wonder what gave you away, and what to change for next season.

Not surprisingly, though deer hunters across the country come from a myriad of backgrounds they all seem able to relate to one issue — sometimes it feels like the deer know where you will be before you get there. While this is an often perplexing and frustrating phenomenon for hunters, biologists have been studying the reactions of wildlife to predators for decades and have developed a theory that appears to explain the activities of whitetails during the hunting season.

LANDSCAPE OF FEAR THEORY The landscape of fear theory suggests that animals are consistently at risk from predators, which in this case would be human hunters, and that the level of risk changes based upon two main factors. First is the animal’s location: While wild predators such as wolves might be more dangerous along grassy meadows, human hunters often concentrate near roadways and open areas, and often hunt repeatedly from the same location.

The second major factor influencing risk is the time of day. For instance, human hunters are limited by legal hunting times, and most often sit only during the periods around sunrise and sunset, abandoning their stands during the midday hours. This theory can be visualized as a mountain range where mountain peaks are areas of greatest risk and valleys are areas of greatest safety. Throughout the course of a day, each area’s height changes as the risk levels associated with that area change. The objective for prey species is to stay at the lowest possible elevation while still accessing all of the resources they need to survive and reproduce.

Previous studies have long confirmed what hunters already know; deer can recognize changes in risk and react as one would expect under the landscape of fear theory. Studies ranging as far back as the 1960s have demonstrated that when hunting pressure is sufficiently high, deer increase their use of dense cover areas such as thickets or hardwood drains and then use risky areas such as bait piles only during safe periods, such as nocturnal hours. Similarly, studies have found that activity patterns of deer are such that they are more active when hunters are not in the woods and less active when they are.

A fellow researcher, Kevyn Wiskirchen, with Auburn University, recently wrote an article (in the September 2016 issue of Deer & Deer Hunting) documenting just such a pattern. He detailed how white-tailed deer suppress movement during the weekend to minimize exposure to humans. But when hunters are absent from the woods during the week, the deer become much more active.

While these studies have provided great insight into larger behavioral trends, they have all examined hunt- ing pressure in relation to an entire property or large landscape, leaving the question of how deer respond to risk at specific locations unanswered. Essentially, until now scientists have not been able to account for the potential that deer could recognize risk at a spatial scale as fine as individual hunting locations and respond accordingly. It is quite possible that the responses seen at the landscape scale are completely different from what is seen in relation to actual locations of risk, especially when hunting pressure is kept very low across a property. Fortunately, advances in technology now enable scientists to investigate such detailed behaviors.

With each additional hunting event at a given stand, deer became increasingly less likely to use the vulnerability zone around that stand during mornings and evenings (Figure 1).

RESPONSE TO LOCALIZED RISK Due to the general lack of data, and thus, understanding of how white- tailed deer respond to localized risk, we, with financial support from the South Carolina Department of Natural Resources, set out to examine this aspect of deer biology and determine the movement patterns of adult does during the hunting season with respect to hunting stands.

To accomplish our goal we darted adult female white-tailed deer and fit each with a GPS collar programmed to collect locational data every 30 minutes, allowing us to gather highly detailed information on deer movement relative to hunting pressure. Hunting on the property was strictly managed, with hunters taken to and picked up from permanent stands by guides.

We determined the GPS coordinates of every hunting stand, food plot and automatic feeder on the property, and determined the area around each stand in which a deer would be visible to a hunter (which we called the vulnerability zone). We then combined all of this information with the movement data collected by the GPS collars, and imported it into a data visualization tool known as ArcMap. This software enabled us to actually see how deer moved each day, and where they were located on the property.

We were interested in understanding how deer moved during three specific periods: Morning/Evening (from legal light to 8 a.m. and 3 p.m. to legal light), Midday (from 8 a.m. until 3 p.m.), and Night (from end of legal light to beginning of legal light the next morning). These periods were based upon changes in risk, as hunters were present only during the Morning/Evening period, a scenario likely to be true for most regions of the country where hunters choose not to sit throughout the midday hours.

Traditional knowledge, and the landscape of fear theory, would suggest that repeated hunting events at the same location would force deer to recognize that area as being of greater risk, and subsequently deer would reduce their usage of that area during times when hunters would be present, namely surrounding sunrise and sunset. This is precisely what we observed. With each additional hunting event at a given stand, deer became increasingly less likely to use the vulnerability zone around that stand during mornings and evenings (Figure 1).

Similarly, following the day that a stand was hunted, deer use of the vulnerability zone around that stand during the Morning/Evening period was at its least. But deer use of that area progressively increased with each passing day. This result was also expected, because the fear response of an animal should decrease over time, especially in hunting environments where most stands are associated with a food source such as a food plot or corn feeder. When the areas of risk are associated with a food reward, the animal must balance the trade-off of avoiding risk with miss- ing out on the nutritional benefits of visiting that location.

Next, we looked at movements during the Midday period. Interestingly, previous studies at the landscape scale had reported conflicting results. Some studies suggested that deer increase activity during midday hours as a way to make up for lost opportunities when they avoid moving during crepuscular periods, while others have claimed that deer remain cryptic during all daylight hours, thus reducing usage of risky areas.

We found that deer followed the same trends during the Midday period as they did during the Morning/Evening period. That is to say that they decreased usage of vulnerability zones around hunting stands following each additional hunting event, but increased usage as time passed. Surprisingly, we observed that deer were far less likely to utilize the vulnerability zone around a stand during the Midday period than during the Morning/Evening period.

After a fourth hunting event at a given location, deer became less likely to use the vulnerability zone immediately following a hunting event and slowly increased usage with each passing day (Figure 2).

This might seem surprising at first, because deer could safely use these areas during the midday without the risk of being exposed to hunters. We believe that this response is due to the natural feeding behavior of deer being focused on crepuscular periods and the fact that vehicle traffic through the property might have been sufficient during the Midday period to make the vulnerability zones appear risky even if they were not.

While the responses we observed during the Morning/Evening and Midday periods were much as one would expect, a very interesting trend emerged during the Night period. We have all heard a hunter complain that “all of the deer have gone nocturnal” and you might very well be that hunter yourself. If so, it probably wouldn’t surprise you to hear that deer initially increased their usage of a vulnerability zone around a stand following the first few hunting events at that location and decreased usage with each passing night since hunting had occurred. Yet this trend changed with additional continued hunting pressure at that stand. After a fourth hunting event at a given location, deer became less likely to use the vulnerability zone immediately following a hunting event and slowly increased usage with each passing day (Figure 2).

Essentially, after continued hunting pressure at a particular stand, deer changed their behavioral response at night to the same avoidance we observed during the Morning/ Evening period. This suggests that deer respond to initial hunting events by simply accessing the area during a safe time and their fear decreases as time passes. But as hunters use the area more, deer respond by avoiding the area altogether. Perhaps the deer decide, in essence, to move on to safer pastures where they may be able to feed during Morning/Evening hours instead of confining themselves to nocturnal hours only.

BEHAVIOR MODIFICATION Our findings provide us with unique insight into the behavior of white-tailed deer in response to pressure from human hunters. While hunters have long known that white- tails have the ability to modify their behavior and space use in response to hunting pressure, this study has allowed us to document exactly how deer respond to spatially explicit risk and how that response differs from responses visible at the landscape level.

While one could look at the landscape level response of this population and assume that hunting pressure was not sufficiently strong enough to force deer to alter their behavior, a more thorough investigation reveals that deer are in fact recognizing and responding to the risks posed by hunters: They are merely doing so at a small enough spatial scale to reduce the impacts on their regular activities.

It’s this minor variation in their movement and activity patterns that make it seem as though there aren’t any deer in the woods. Some might view deer as creatures randomly moving through the woods from one field to the next, but this study demonstrates that white-tailed deer not only perceive their environment in fine detail, but are able to respond to risks immediately and use infor- mation about past risk at a location to make informed future decisions about using or avoiding that location.

No matter how little you are hunting an area you are influencing the likelihood of a deer using that area again, at least for a few days. Even if you never fire the gun, there is a strong likelihood that you were still detected by at least a few deer.

TAKEAWAYS FROM THE STUDY So what does this mean for you as a hunter? Well, there are a few clear takeaways from this study that you can use to aid your quest this fall. First, no matter how little you are hunting an area you are influencing the likelihood of a deer using that area again, at least for a few days. Even if you never fire the gun, there is a strong likelihood that you were still detected by at least a few deer.

While you might have still had plenty of deer come and go blissfully unaware of your presence, others might have been spooked off as they approached from downwind, or smelled the disturbance along the path you used to reach your stand. Therefore, after hunting a location try and give that stand a few days off so that the fear response can decrease before your next hunt.

Secondly, understand how the length of your season might impact deer behavior. If you live in a New England state with shorter seasons you can expect deer to have a much stronger reaction across the landscape to hunting pressure than in Southern states with more prolonged seasons. When the season is shorter, deer can afford to avoid high value areas (food plots and feeders) for the brief season and return when it’s safer, but such avoidance might be nutritionally prohibitive in states with longer hunting seasons.
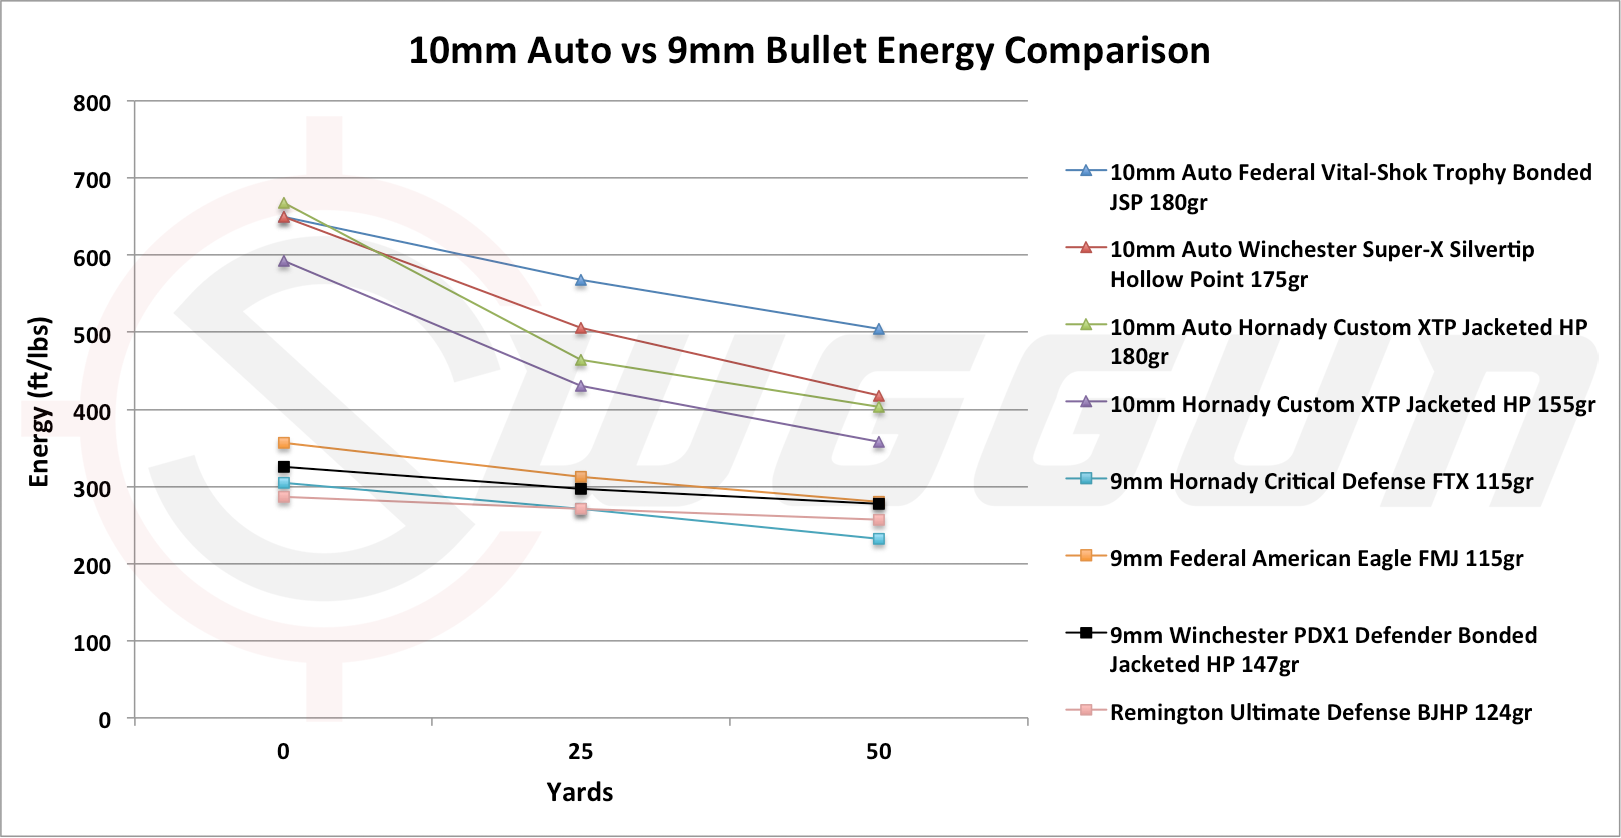
Finally, consider moving your hunting stands between seasons, while this study did not investigate if the number of hunting events at a stand the year prior caused deer to avoid an area more quickly the next season, it is a good idea to reduce your predict- ability as much as possible.

We as hunters attempt to pattern deer almost every way imaginable, from extensive scouting and note taking from years on a property to a network of game cameras trying to locate that trophy buck. Yet, with all of the effort we direct toward patterning them, it can become all too easy to forget that deer are also capable of patterning us. So this coming season, as the days grow shorter and your heart gets restless, yearning for an all too brief escape into the peaceful hunting grounds, do your best to be aware of your own patterns and embrace the opportunity to outwit your prey — not by attempting to understand their predictability, but by limiting your own.

— Jeff Sullivan completed his M.S. degree in 2016 at Auburn University studying white-tailed deer under the supervision of Dr. Steve Ditchkoff. He is currently employed by USGS at the Patuxent Wildlife Research Center.

— Dr. Steve Ditchkoff is a professor in the School of Forestry and Wild- life Sciences at Auburn University. He manages the deer research program at Auburn and has been conducting research on white-tailed deer for 25 years.

Best Rifle Bipod

0

So you have your rifle but need a way to stabilize your rifle to make clean, accurate shots? Well, look no further than a rifle bipod! In this guide, we dive into the best rifle bipod for your setup and needs.

I’ll start with some of the market’s top bipod options and then see the best options for different applications.

Caldwell XLA Pivot

The Caldwell XLA pivot bipod is a compact, lightweight aluminum bipod made for bolt action rifles and AR-15 style rifles.

The XLA pivot is a budget bipod but not a low-quality bipod.

The legs of the bipod are made of aluminum and the other parts are steel.

This bipod has two external springs that allow the legs to flip down and be resecured in the up position to make moving with the bipod easier.

Javelin Spartan Lite

The Javelin Spartan Lite is an extremely simple bipod made by Spartan Precision Equipment.

The Javelin Spartan Lite is a three-piece system that allows you to remove the legs of the bipod via a screw-on and off-based system to achieve your preferred length.

The Javelin Spartan Lite is very accurately named: it’s lite. The short-leg version is only 4.6 ounces.

The disadvantage to the Javelin system is the legs are fixed height.

The attachment system for the Javelin is supplied with a classic rifle adapter kit, which uses the sling stud that is included on most rifles.

The Javelin provides a great deal of stability since the legs are fixed height and stationery.

Harris Series Bipod

The Harris Bipod is probably one of the most well-known rifle bipods on the market. In fact, when you ask someone what bipod you should buy they are likely to recommend to you a Harris Series bipod.

The Harris bipods have earned their stripes and are extremely well known. The Harris excels at what it is for its price point. Sitting right around the $100 range, it is affordable and feature-packed.

The Harris bipod has several ways to attach it to a rifle, including a QD mount system.

One thing to note about the Harris series is the two external springs that function the same way the Caldwell bipods do. The springs all for retraction and deployment of the bipods.

This made for the perfect pairing with my Thompson Center Compass.

Magpul Rifle Bipod

The Magpul rifle bipod is my go-to bipod on my Ruger American Hunter rifle. I love this bipod, but it does have some drawbacks.

The price of the Magpul bipod is in line with other mid-tier rifle bipods. At around the $100 mark, it is incredibly competitive.

Magpul is known for its polymer products, so it’s not a huge shock that the Magpul bipod has a substantial amount of polymer in the design.

They even have a MOE version that is entirely polymer. I’ll talk about that next.

The Magpul bipod is highly compact and uses a button deployment system to allow you to adjust the height of the bipod legs.

While the Magpul bipod isn’t the lightest of the list it is the lightest with its features.

Magpul MOE Bipod

The Magpul MOE bipod is the all-polymer version of the Magpul Rifle Bipod. You may ask, why would I want a polymer bipod?

Two main things: weight and price.

The price of the polymer bipod is $74.95, which is $30-40 cheaper than its metal counterpart.

While it still provides many of the same features, the polymer is not as strong (some say sturdy) as metal.

What it loses in strength, it gains in weight reduction. The MOE bipod is only 8 ounces.

Warne Precision Bipod

Warne Precision is at the higher end of this list but is feature-packed and high-quality.

This bipod is nice because it can be adjusted from the shooting position and has rapid leg deployment and no external springs.

The Warne bipod is excellent for nearing any application from hunting to competition, and everything in between brings excellent stability.

With that stability comes a pretty sizeable cost. At $335, it isn’t a cheap option but very likely the best option for features.

Accu Shot Atlas Bipod

B&T Industries makes the Accu Shot one of the most popular high-end bipods, with everyone from recreational hunters to tier 1 military units using it.

It would be considered the current gold standard of weapon bipods.

ACCU-TAC BR-4

The ACCU-TAC BR-4 is one of the best-looking and feature-packed bi-pods on the market today.

Don’t get this confused with the Accu-Shot; they are entirely different companies.

The Accu-Tac will run on the high end of the price points for rifle bi-pods, but you get many features and an extremely high-quality design.

Adjusting the Accu-Tac Bi-Pod

The Accu-Tac B4 is easily adjusted for height and uneven surfaces. The legs are extremely easy to deploy you simply pull out and set them to the angle that works best.

You can then adjust the up-and-down height of the bi-pod by pulling down on the bottom of the Accu-Tac legs. To retract the legs, press the adjustment button on the side of the bipod.

This design is incredibly simple and one of my favorite bipod designs. It’s sturdy and easy to use.

Attaching the Accu-Tac Bi-Pod

The Accu-Tac BR-4 Bi-Pod attaches via a Picatinny rail attachment that can be adjusted easily and is on a QD mount system.

The QD mount makes it easy to attach and detach your bi-pod if you need it removed. This bi-pod does store well, but if you want to cut down the overall weight of your gun, you may want to remove it for certain applications.

In my opinion, the Accu-Tac BR-4 is one of the best rifle bipods on the mark!

MDT GRND-POD

The MDT GRND-POD bipod is a cutting-edge accessory designed to enhance the stability and accuracy of rifles, making it a favored choice among avid marksmen and professional shooters.

Crafted with precision engineering and high-quality materials, this bipod offers exceptional performance in a variety of shooting conditions.

Its versatility is a standout feature, as it provides both fixed and pivoting modes, allowing shooters to adapt to different shooting scenarios quickly.

Whether you’re in a prone position or shooting from a bench, the MDT GRND-POD delivers unmatched stability, ensuring consistent shot placement.

One of the standout features of the MDT GRND-POD is its robust construction.

It is built to withstand the rigors of the field and can endure harsh environmental conditions.

The bipod’s legs are adjustable, allowing for precise height customization to accommodate various shooting situations and terrains.

Quick and effortless deployment is possible thanks to its user-friendly design, ensuring shooters spend less time setting up and more time focusing on their targets.

With the MDT GRND-POD bipod, shooters can significantly improve their shooting accuracy, making it an indispensable tool for those who demand peak performance from their rifles.

How to Choose a Rifle Bipod

Choosing the best rifle bipod for your rifle is a crucial decision that can significantly impact your shooting experience and accuracy.

With numerous options available on the market, it’s essential to consider several key factors to make an informed choice.

  1. Bipod Type: There are primarily two types of bipods: fixed and pivoting. Fixed bipods offer stability but limited flexibility in target tracking. Pivoting bipods provide the ability to pan and tilt, allowing for smoother tracking of moving targets. Consider your shooting style and the types of situations you’ll encounter when choosing between these two types.
  2. Height Adjustment: Look for a bipod with adjustable leg height. This feature allows you to adapt to various terrains and shooting positions, such as prone, sitting, or bench shooting. Telescoping legs or quick-release mechanisms are beneficial for easy and quick height adjustments.
  3. Build Quality: Invest in a bipod made from durable materials like aluminum or steel. Quality construction ensures longevity and reliability, even in rugged conditions. Weather-resistant coatings can also protect your bipod from the elements.
  4. Attachment Method: Consider how the bipod attaches to your rifle. Picatinny rail or swivel stud mounts are common options. Ensure compatibility with your rifle’s attachment points.
  5. Leg Design: The shape and design of the bipod legs can affect stability. Some bipods feature wider, non-slip rubber feet or spiked feet for better grip on various surfaces.
  6. Weight: The weight of your bipod can impact portability. For hunting or long-distance shooting, a lightweight option might be preferable. However, for benchrest shooting or precision shooting, a heavier, more stable bipod may be ideal.
  7. Price: Quality bipods come in a range of prices. While it’s tempting to opt for the most budget-friendly option, investing in a reputable brand and model often pays off in terms of durability and performance.
  8. User-Friendliness: Look for features that enhance ease of use, such as quick-deploy legs or one-handed adjustments. These can be especially handy in fast-paced shooting situations.
  9. Reviews and Recommendations: Seek out reviews from experienced shooters and consider their recommendations. Online forums and user reviews can provide valuable insights into the performance and reliability of specific bipods.
  10. Brand Reputation: Well-known brands in the shooting industry often have a track record of producing quality accessories. Research the reputation of the brand you’re considering to ensure you’re getting a reliable product.

Ultimately, the choice of a bipod for your rifle should align with your shooting needs and preferences.

Taking the time to evaluate these factors will help you select a bipod that enhances your shooting experience and improves your accuracy in the field or at the range.

Hunting Rifle Bipods

Nearly any bipod can be a hunting bipod but to drill down and find the best hunting rifle bipod you need to know what type of hunting you’ll be doing.

For example, if you are hunting from a tree stand or climbing stand,rr a bipod either doesn’t make much sense or will need to be very specific to your needs since there typically isn’t much to rest your bipod legs on in a climbing stand.

In short, determining what will work as the best rifle bipod for hunting will largely depend on how you plan to hunt.

Best Budget Bipod Rifle

My best budget bipod recommendation will likely come as no surprise as this company has a long-standing reputation.

The Magpul MOE bipod takes the budget best rifle bipod category handily. With its $75 price tag and solid performance, it takes the gold on budget and quality.

Best Rifle Bipod for Long Range Shooting

The Harris series of bipods are the most popular among professional shooters; having over 45% of the professional shooting market, they are #1 for long-range shooting.

While they may not be the best or the most expensive, they are certainly the most popular when it comes to the best rifle bipod.

Build a inexpensive hog proof deer feeder.

0

Every year I see pictures of downed deer feeders with their contents spilled out on the ground like a giant steel pinata. Most likely culprits are hogs and cattle. On our ranch in the Texas Hill Country we employ multiple wildlife corn and protein feeders inside of a pen that have helped tremendously at keeping wild hogs from destroying feeders and has actually cut the hog traffic on the ranch to almost none.

What you will need.

6 Feed lot panels. 60″ tall and 16′ in length. If you can round up used panels even better as these will need to be cut. If you have old roll wire lying around that will work as well. 48″ tall panels can be purchased as well and this will save you from having to cut the panels down

24 T posts.

The ever popular T-post driver.

Bailing wire…the fix it all.

When you decided on your feeder location stick a t post in the center temporarily, then with the help of a friend measure out approximately 15 from the t-post outwards, you are shooting for a 30′ diameter enclosure. Most feeders will cast around a 24′ spread of corn. Mark the spot and continue to measure out several more spots from center to outer edge. When you have a general area laid out begin by driving a few t posts along the perimeter every 10′-12′ feet. Once your a circle beings to take shape start placing the panels, smaller holes on bottom, on the outside of the T-posts and secure with bailing wire making sure your panels over lap at least one section of the squares. We want to keep animals out so it is important the t-posts are inside the panels. Now your circle may vary in size but 24′-30′ is about what you’re shooting for. You may find that your panels do not reach each other when your circle is complete and that is ok. This is where you’ll want to install your access gate. This can be anything from a smaller section of panel to an old chain link fence gate. If you find your panels over lap a bit at the end over your circle that is ok as this may be used for a gate. Now place the rest of your tposts inside the panels, you want to have about 3 tposts per panel. Now go to town with your bailing wire. Set your feeder up. Stake the legs down with T-posts! This will protect it in case the swine manage to get under the panel as they have been known to pull up the panels if they can get their snouts under it.

Now deer are excellent jumpers but we still like to cut the top section down with bolt cutters to about 48″-50″. Make sure you cut down to the next section as you don’t want any steel protrusions sticking up that may injure wildlife. This is where using old field panels is great, not many folks like cutting brand new ones down if they plan on reusing them after deer season. Some people will actually cut smaller holes in the panel close to the ground for fawns to get into the pens, but remember if a fawn can get in so can smaller hogs. We have been running these pens for years and have yet to have a feral hog get into one. There is always a possibility as hogs are jumpers as well! You can use roll wire as well as this is a fairly inexpensive set up. Always reuse old material lying around as it will save you money that you can be using to fill the feeders with. Hope this helps, good luck Bone Hunters!

Canine tail docking FAQ

0

A: Tail docking of some breeds may be based on a belief that their non-working members experience risks similar to working dogs; more commonly, however, it is to conform to a distinctive breed appearance or standard. Survey data indicate that preventive tail docking of pet dogs is unnecessary.18,21 Therefore tail docking of non-working dogs, even if their breed was originally developed for working purposes, is considered a cosmetic procedure unless evidence exists to the contrary. In countries such as the United Kingdom where tail docking is legally prohibited (with a few exemptions) the breed standards of traditionally docked breeds have been amended.22

Q: Do dogs need to have tails?

A: It is natural for most dogs to have tails based upon their descent from a tailed species. However there is no strong evidence that naturally bobbed or surgically docked dogs are physically or psychologically disadvantaged. There is some early, but inconclusive, data that raises questions as to whether docking impairs communication with other dogs23 or may increase the risk of developing incontinence.24

Q: Is tail docking painful?

A: Tail docking is painful.25 The intensity or duration of the pain under ideal or typical circumstances is difficult to quantify. Painful procedures conducted in the neonatal period when the nervous system is vulnerable can result in negative long-term changes which affect how pain is processed and perceived later in life.26,27

Q: Why does AVMA policy oppose cosmetic tail docking?

A: The essential question is not “How harmful is the procedure?”, but rather “Is there sufficient justification for performing it?” Performing a surgical procedure for cosmetic purposes (i.e., for the sake of appearance) implies the procedure is not medically indicated. Because dogs have not been shown to derive self-esteem or pride in appearance from having their tails docked (common reasons for performing cosmetic procedures on people), there is no obvious benefit to our patients in performing this procedure. The only benefit that appears to be derived from cosmetic tail docking of dogs is the owner’s impression of a pleasing appearance. In the opinion of the AVMA, this is insufficient justification for performing a surgical procedure.

Q: What forms of tail removal would not be considered cosmetic?

A: The naturally bobbed animal is not considered “docked.” Bobbed genetics exist in many pedigreed breeds (e.g., Old English Sheepdog, Australian Shepherd17) and have been introduced into others (e.g., Boxer28). Some breeders, both historically and currently, would prefer problematic conformation to be corrected via breeding alone.

Removal of a dog’s tail for medical reasons is not referred to as “docking.” The most common reason for amputation or partial amputation of a dog’s tail is traumatic injury where repair of the entire tail is not possible or advisable. Amputation may also occur in the case of tail deformities that negatively impact a dog’s function or increase risk of injury. An argument might be made for removal of the tail of a dog on the basis of repeated prior injury.

Precautionary removal of the tail of a young puppy needs to be based on compelling evidence that the animal is at high risk of tail trauma due to congenital defect, breed and/or planned working activity. However, such a justification must be supported by evidence such as empirical data or impartial expert opinion based on extensive, directly relevant experience.

REFERENCES

1. Podberscek AL, Paul AS, Serpell J. Companion Animals and Us: Exploring the Relationships Between People and Pets. Cambridge University Press, 2000; 307. 2. Fleming. The wanton mutilation of animals. The Nineteenth Century, a Monthly Report, 1895;37:440. 3. Drury WD. British Dogs, Their Points, Selection, and Show Preparation. L.U. Gill: London. 1903. p. 165 4. Hallock C. The Sportsman’s Gazetteer and General Guide. Forest and Stream: New York. 1877. p. 456. 5. Shields G. The American Book of the Dog. Rand, McNally: Chicago. 1891 6. almer, RM. All about Airedales: A Book of General Information Valuable to Dog Lovers and Owners, Breeders and Fanciers, Illustrated from Selected Photographs of Noted Dogs and Rare Scenes. The Airedale Terrier Reviewed. 3-A Publishing Co.: Seattle. 1916; 53. 7. Coren, S. How Dogs Think: Understanding the Canine Mind. Simon and Schuster, 2004; 106 8. Youatt W, Lewis EJ. The Dog. Leavitt and Allen, 1857 Available at: http://books.google.com/books?id=wxkPAAAAYAAJ Accessed December 15, 2008. 9. Bennett PC, Perini E. Tail docking in dogs: can attitude change be achieved? Aust Vet J 2003;81:277-82. 10. Sonntag, Q. Cosmetic tail docking. Vet News 2004;Feb:4-5. 11. Noonan GJ, Rand JS, Blackshaw JK, et al. Tail docking in dogs: a sample of attitudes of veterinarians and dog breeders in Queensland. Aust Vet J 1996;73:86-88. 12. Lytton, N. Toy Dogs and Their Ancestors: Including the History and Management of Toy Spaniels, Pekingese, Japanese and Pomeranians. Duckworth & Co: London. 1911; 91. 13. Moissac, JE. The fight against cosmetic surgery. Canadian Veterinary Journal 2009;50:11231124. 14. Australian Veterinary Association: Surgical alteration to the natural state of animals: http://www.ava.com.au/node/1085 accessed January 31, 2013 14. RCVS Guide to professional Conduct: http://www.rcvs.org.uk/advice-and-guidance/guide-to-professional-conduc… accessed January 31 2013. 16. Lee RB. A History and Description of the Modern Dogs of Great Britain and Ireland. H. Cox: London. 1897. p. 220-221. 17. Sasson-Brickson G. The bobtail trait in Australian shepherds – part I: a historical perspective and docking Regulations in various countries. Aussie Times 2005;March-April 18. Diesel G, Pfeiffer D, Crispin S, et al. Risk factors for tail injuries in dogs in Great Britain. Vet Rec 2010;166:812-817. 19. Strejffert G. Tail injuries of shorthaired German point dogs born in Sweden 1989, 1992 http://www.cdb.org/countries/sweden.htm Accessed June 28, 2010 20. Milne, E. The Truth about Cats and Dogs. Book Guild Publishing, 2007; 118. 21. Darke PG, Thrusfield MV, Aitken CG. Association between tail injuries and docking in dogs. Vet Rec 1985;116:409 22. Kennel Club: Breed Standard tail clauses – traditionally docked breeds: http://www.thekennelclub.org.uk/cgi-bin/item.cgi?id=1359 Accessed January 31st 2013 23. Leaver, SDA, Reimchen TE. Behavioural responses of Canis Familiaris to different tail lengths of a remotely-controlled life-size dog replica. Behaviour 2008;145:377-390. 24. Thrusfield P, Holt M. Association in bitches between breed, size, neutering and docking, and acquired urinary incontinence due to incompetence of the urethral sphincter mechanism. Vet Rec 1993;133:177-180. 25. Noonan G, Rand J, Blackshaw J, et al. Behavioural observations of puppies undergoing tail docking. Appl Anim Behav Sci 1996;4: 335-342. 26. LaPrarie JL, Murphy AZ. Long Term Impact of Neonatal Injury in Male and Female Rats: Sex Differences, Mechanisms and Clinical Implications. Frontiers in Neuroendocrinology 2010;31:193-202. 27. Vega-Avelaira D, McKelvy R, Hathway G et al. The emergence of adolescent onset pain hypersensitivity following neonatal nerve injury. Molecular Pain 2012;8:30. Accessible online at: http://www.molecularpain.com/content/8/1/30 28. Haworth K, Putt W, Cattanach B et al. Canine homolog of the T-box transcription factor T; failure of the protein to bind to its DNA target leads to a short-tail phenotype. Mammalian Genome 2001;12:212-218.

This information has been prepared as a service by the American Veterinary Medical Association. Redistribution is acceptable, but the document’s original content and format must be maintained, and its source must be prominently identified.

Ravin R500 Crossbow Review

0

Ravin introduced the Ravin R500 as their 2021 flagship model during the 2021 ATA Virtual Show Lancaster Archery hosted back in January. Unfortunately, it was pretty hard to get our hands on a Ravin R500 crossbow, so we couldn’t write a review any sooner than today.

Ravin introduced their new proprietary cam system; the HexCoil cam system. During the ATA virtual show, Ravin claimed it breaks the 500 feet per second barrier. Today we’ll be taking this crossbow out to the range and giving it a full review! Hopefully, we can see our first ever 500+ fps rating on our chronograph!

Ravin R500 Crossbow Specs

First Impressions

Wow! Does this …thing still qualify as a crossbow? Ravin did an amazing job at designing the R500! It’s extremely narrow because of their brand new HexCoil cam system and this new tech was also key in making this a 500 feet per second crossbow.

The crossbow can be cocked entirely electronically by the push of a button, but it can also still be cocked manually with a detachable draw handle.

Ravin introduced this crossbow with 2 different scopes. The cheapest option comes with a 100-yard illuminated scope that’s speed rated at 550 feet per second. The more expensive option comes with an “Adjustable Turret Scope”. You might be thinking what the heck may that be, but we’ll explain it all in the #OPTICS section.

The Ravin R500 only comes in the color option “Slate Gray”, but it looks incredible!

Ravin ships the R500 and the R500 Sniper fully assembled and pre-tuned.

Design and Durability

With a length of only 28 inches, the R500 is slightly longer than Ravin’s most compact crossbow the R26. Because of Ravin’s new HexCoil Cam System that can rotate 360 degrees, the width of this crossbow is a lot narrower and comes in cocked at 3.6 inches and uncocked this crossbow has a width of just 7.6 inches.

Weighing around 10 pounds, the Ravin R500 isn’t the most lightweight of crossbows. High-performance crossbows require stronger materials and this often results in a heavier weight. Actually, for what you’re getting, this crossbow isn’t even that heavy and it has a comfortable hold.

We do think that the Ravin R500 crossbow feels a bit front-heavy. After an hour or so in our range test, we already got used to it. When taking this crossbow out to the range, we recommend using a tripod.

Optics

As we mentioned earlier, Ravin offers the Ravin R500 with 2 different scopes. The “basic” R500 comes with an illuminated 100-yard scope that’s speed rated for crossbows up to 550 feet per second. This scope has a range of 30 to 100 yards and features red or green illumination. Fully multi-coated lenses, waterproof, fog-resistant, shockproof, and recoil-proof is what makes this scope an excellent option for this crossbow.

As for the more expensive option, the R500 Sniper package, Ravin installed an adjustable “Turret Scope.” This is currently the best scope Ravin has to offer. It might not be as advanced as the Garmin XERO X1i that TenPoint installed on a couple of their crossbows, but it’s the best non-electronic scope you can currently get. You can adjust the yardage via the top elevation turret and it includes all the premium features you could ask for.

Cocking

With the Ravin R500 you’ll be able to cock the crossbow with the push of a button:

Ravin equipped the R500 with their new “VersaDrive Cocking System” that utilizes a new dual screw-driven system. The VersaDrive cocking mechanism is driven by an electric cocking motor that includes a removable battery and a charger. “The internal clutch within the VersaDrive System eliminates over-cocking and allows the cocking and decocking process to be stopped or resumed at any time.”

When we first emailed Ravin about the battery pack, they replied that we should be able to get about 50 cocking/decocking cycles from 1 full charge. Depending on temperature and weather conditions, a battery may perform worse and in a new promotional video, Pete Scobell mentions a battery life of 30 to 50 cycles.

If the battery is dead, or if you’d rather cock it manually, you can simply attach the removable draw handle. The manual cocking effort is just 17 pounds with the R500 draw handle.

Performance

Now that we’ve covered the features of the new Ravin R500, we can take it out for a test and rip some arrows down the range!

With a Powerstroke of 15 inches and kinetic energy of 222 FT-LBS, Ravin claims this is the first crossbow that breaks the 500 FPS mark. As we’re confident that Ravin properly pre-tuned the crossbow, we’ll be placing a target at 100 yards and shooting a couple of test groups first.

Ravin includes 6 Ravin .003 Arrows & Field Points with all R500 packages. There are no broadheads included and currently, it’s extremely difficult to find broadheads that are speed rate for up to/over 500 fps. We’ve found 1 set of broadheads that mentioned handling speeds of up to 500 fps and those are the Thorn RIFT 2.2” expandable broadheads. We’ve ordered a couple of sets and are testing these as well!

After the first couple of shots and a couple of small adjustments, we got an extremely tight grouping. The Ravin R500 with adjustable turret scope is insanely accurate. It’s the most powerful crossbow we’ve ever fired! The arrows were buried deep inside the target, even with the Iron Man 24″ Xtreme 500 target.

We did get some issues with the nocks of the arrows. We started the day with six arrows and ended the day with two undamaged arrows. We’ve contacted Ravin and we’re waiting for new nocks to arrive. We’ll update this section once we’ve received and tested the new nocks.

When we took the R500 out to the range it was a pretty cold day and after about 36 shots our battery drained and we had to manually crank-cock the crossbow for the rest of the day. If you’re planning on going to the range on a cold day, we advise bringing an extra battery pack.

Do not shoot arrows with broadheads when shooting at targets. Your targets will wear out very quickly and it’s not worth it. Use the field points that Ravin includes with the package instead and use your broadheads for a hunt!

Recommended Accessories

Because of the insane amount of power the Ravin R500 generates, you probably need some more durable accessories. We had a hard time finding the more durable crossbow accessories, but we’ve compiled a list of accessories we recommend for this crossbow.

Arrows & Broadheads

Ravin includes 6 Ravin .003 Arrows & Field Points with the R500 packages. It’s best if you just use the Ravin arrows. If you want to take this crossbow out for a hunt, you’ll probably want some broadheads. There aren’t many broadheads that are speed-rated at 500 fps, but we’ve found a couple. We’ve tested the Thorn RIFT 2.2” expandable broadheads and they hold very well. Another set of broadheads that work very well is the Ravin Titanium broadhead.

Special 500+ FPS Targets

We tested the R500 with the Big Shot Iron Man Extreme 500 Target. This high-quality and durable crossbow target is rated for crossbows up to 500 feet per second and stops the arrows from the R500 quite well.

Another target we can recommend is the SpyderWeb ST-24XL High-Density No Speed Limit. This crossbow target does not have a speed limit. We reviewed the smaller one, the ST-18XL, this target also stops the arrows surprisingly well.

Storage and Transportation

As always, we only recommend using the official case for the crossbow unless the manufacturer doesn’t offer a case for the crossbow. Using the official case guarantees a snug fit and a properly secured and protected crossbow.

Ravin suggested we use the Ravin Soft Case R26/29/29X or the Ravin Hard Case R10/R20 for the R500 crossbow. This seemed a bit odd to us, but these crossbows almost have the same dimensions. We can confirm that the Ravin R500 fits in both cases.

Final Verdict

FAQ About the Ravin R500 Crossbow

Best Air Rifle Deals

Popular Posts

Air gun 101: How Nitro Piston technology can make your shooting sport more exciting?

0
In the air gun market today, there are many air rifles made with nitro-piston technology Even the best-selling lists on gun retailer's sites have a...

How Do Break Barrel Air Rifles Work?

0
A break barrel air rifle is a type of airgun where the barrel breaks open at a hinge point just above the breech. This...

How to find Best Scope for your Break Barrel Air Rifle?

0
Unlock the Perfect Shot: Discover the Best Scope for Break Barrel Air Rifles. Enhance your shooting experience with precision and accuracy, as we delve...