Home Blog Page 125

It’s Almost Shed Antler Time: Here Are Some Tips to Track Them Down

0

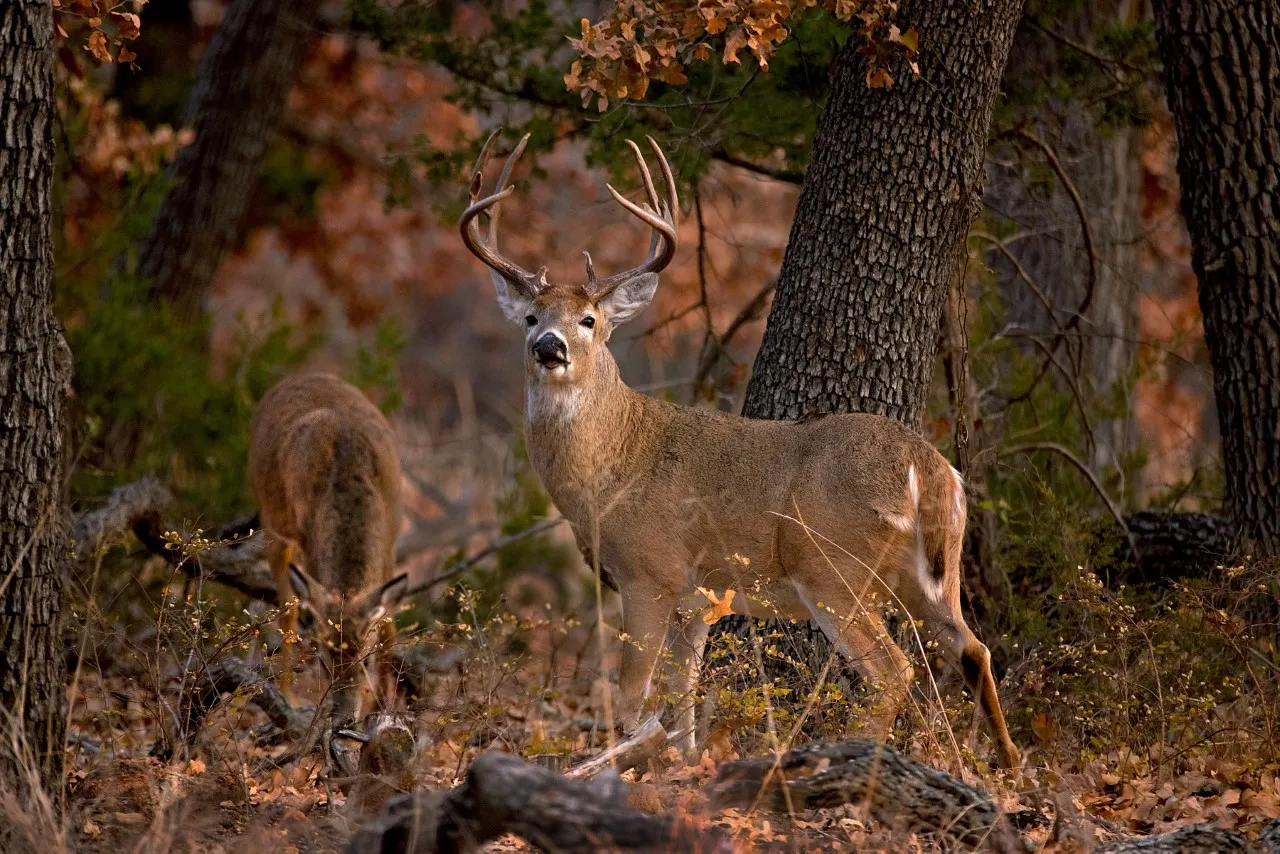
In late winter, it is time to start keeping your eyes on the ground when out in the wild (and even your own backyard), as deer will begin to shed their antlers after the rut season is over.

Whitetail deer, since they are most prominent, get the larger share of shed hunting attention, but elk antlers can be found as well, and actually earn quite a bit of money if sold to the right person.

Location, location, location

In different locations, the dates at which the deer will shed their antlers varies. Here in Ohio, whitetail deer begin to shed their antlers after December, and will continue to all the way into early May in some areas.

Where do you start looking? In essence, everywhere the bucks have been in the last month is a good start. If you hunted the area, did you place bait or scent lures out to attract them? What deer trails were extremely active? Where were their bedding areas when the cold winds of winter were whipping around? What ridge lines did the deer travel in search of food and to watch out for predators? Put yourself in the buck’s place.

Shed hunting technique

How do you spot them? It does take practice but soon you will be able to see them pretty easily.

Look for anything out of place in the woods; more often than not the bleach white of bones can stand out in a grassy or brushy area. The glint of a wet antler in the sunlight is a give away, and so is a white-colored antler shed on the dark forest floor.

Binoculars are an immense help. Take your time and scan every inch you can.

Canine help

Some deer shed hunters have employed man’s best friend to help them in their search for antlers. Some dogs pick this up quickly, but some do not. I have yet to use a dog, but many swear by them and if you already have a dog that brings home bones, you are ahead of the game.

Double up

Deer will drop their antlers next to each other, or miles apart. It’s hit or miss. Finding two from the same deer is akin to finding two needles in a haystack. Okay, maybe not that difficult, but you get the idea. It’s rare, but it can happen.

When you find one, make slow circles around that area to see if you can find the second matching one.

Reap the rewards

What do you do with them after you find them? You can sell them, use them in craft ideas or set them around the home for some rustic decoration. Another good use is a rattling antler set. Calling in bucks next season with the real thing is a great way to use a mimicked sound to increase your chances of hunting success.

Get out there now and start hunting for those deer shed antlers before some one else finds them or the mice and squirrels eat them for the calcium content. It is great exercise and great fun!

NEXT: HERE’S HOW THERAPY WOLVES ARE HELPING VETS WITH PTSD

Effective Range — How Far Can You Push the SAINT Victor 9mm Carbine?

0

By Beyond Seclusion

In today’s article, Beyond Seclusion uses a Springfield Armory SAINT Victor to try to determine what the effective range of a 9mm carbine is. While a 9mm pistol is suitable at 0-25 yards, the ballistics of the cartridge make shooting the handgun at 50 or 75 yards a trickier proposition. Yet, rifles and carbines are expected to provide excellent accuracy at 100 yards or 100 meters. Does shooting a 9mm round from a carbine offer a significant long-range advantage over a pistol?

how far can a 9mm carbine shoot effectively long range 100 yards 200 yards 300 yards
How far can a 9mm carbine shoot effectively? The author shows a reasonably long range of hits on steel at 100 yards, 200 yards, 300 yards and 400 yards.

When it comes to guns and shooting, what do most of us like to do? Sure, we all consider self-defense, but what do we truly like to do more than anything? Send rounds down range, “BANG THE STEEL”, test our skills, have a reason to spend time with friends outside, and just enjoy shooting without breaking the bank.

Many of us also like the challenge of shooting at distance, not just up close at 50 yards and under. But what if we took a pistol caliber carbine (PCC), which is normally intended for closer-in distances, and pushed it out to longer ranges? Springfield’s SAINT Victor 9mm may just be the solution we are looking for regarding this project.

Let’s see just how far we can shoot a 9mm carbine.

The Platform: SAINT 9mm Carbine

Why the SAINT Victor 9mm? This is where the time-tested 9mm chambering comes into play. It has been in service with militaries around the world for more than 100 years in pistol, carbine and submachine gun forms. It is also a very pleasant-shooting round. You can carry a lot of rounds and accurately put them on target quickly, efficiently, and most important, accurately. The FBI even went back to the 9mm after many years with the .40, an endorsement particularly attractive to the civilian market.

sighting in 9mm saint victor pistol caliber carbine ar rifle
The author sighted in his Primary Arms GLx 2X Compact Prism scope at 50 yards. With the BDC reticle, ringing steel was quick and easy.

The Springfield SAINT Carbine is an excellent gun that feeds reliably from industry-standard stick magazines. It uses top quality materials and construction. As an industry-leading pistol-caliber carbine, it should be an excellent platform to test the maximum effective range of the 9mm.

We are not here to debate the effectiveness of the 9mm hollow point compared to other calibers — that is an entirely different debate. I will say it is my preferred choice for concealed carry and home/self-defense. Remember, we are not talking in the military sense here folks; we are talking about the civilian world. So, with that in mind, addressing the desires mentioned above regarding going to range, practice, fun, accuracy, cost of ammo, distance, etc., the 9mm is definitely a top contender in my opinion.

effective range of 9mm cartidge shot from pistol caliber carbine 300 yd shots on video
From a rest, the author was accurate out to 300 yards and beyond with the Springfield SAINT 9mm rifle.

For most of its history with the military, the 9mm was primarily chambered in pistols and submachine guns. It was about 20-30 years ago we started really seeing PCC’s introduced into the civilian market. They really took hold and are now incredibly popular. The reasons why are everything we just mentioned. One of the biggest reasons is the cost and availability of ammo, not to mention accuracy out of a rifle and the extra velocity you get with the longer barrel.

I typically get at least an extra 200+ fps of muzzle velocity from a 16” rifle barrel compared to a pistol-length barrel. That also typically gets you 100+ ft/lbs of energy from the rifle and puts us in and around 500+ ft/lbs of energy, which is nothing to turn your nose up at. It’s shy of a 5.56 NATO carbine’s power, but easily surpasses that of the standard 115 gr. 9mm ammo.

So What Is the Effective Range of a PCC?

So, what does that mean for us? We can have our cake and eat it too.

We can shoot more for less than any other caliber other than the .22 LR, and we get an audible “BANG” on the steel out to 200 yards — and even 300. I actually tested this once — I was able to punch through 3” of pine wood and ring the steel at 400 yards with 16”-barreled PCC with a scope. That’s pretty reasonable penetration for a pistol caliber past 100 yards.

aiming the 9mm pistol caliber carbine to test accuracy and effective range using a prism scope sighted in at 50 yards
The Primary Arms optic allows the shooter to get on target fast at close ranges. When properly sighted in, the reticle allows you to adjust for ranges quickly.

At 50 yards, we can achieve MOA groups and easily bang the steel out to 200 yards.

Not long ago, Springfield introduced the SAINT VICTOR 9mm Carbine. Their SAINT line has been very successful with an outstanding reputation for quality and accuracy. It made perfect sense to add the 9mm to that line.

With a 16” barrel and SAINT AR quality, we should easily be able to reach out to 200 yards. I included the link below to the SAINT Carbine for all the specs & tech. With an optic with a bullet drop compensator (BDC) reticle, I was actually able to reach out to 300 yards. I will be completely honest, it is a real challenge at 300. The hold-over is somewhere around 6-12 feet depending on the ammo and bullet weight. With absolutely no wind, it is very repeatable. The bullet is going really slow at that distance, and any wind will really move it. 200 is ridiculously easy and with little hold-over with a 50-yard zero.

I used a Primary Arms GLx 2x Compact Prism Scope with the ACSS Gemini reticle and BDC. It was absolutely perfect for this gun. We zeroed at 50 yards just like described in the manual, and the BDC took us out to 200 yards without difficulty.

testing the effective range of 9mm ammo ammunition cartridge on the range with an ar-15 rifle carbine gun arm
The author was able to keep rounds on steel at 200 yards without support. From the bench with a magnified optic, the effective distance doubled.

The SAINT 9mm is light and streamline. It just feels comfortable in the hands both for bench shooting and standing. If you are shooting from the bench with a bag, you may find the 32-round mag challenging. You will have to have a pretty tall bag, or simply get a 10- or 20-round mag so it is not digging into the table. I was very surprised how easily I was able to consistently hit the steel at 200 yards standing. The 16” barrel really helps with that.

Conclusion on 9mm Bullets from the AR Platform

The 9mm PCC has very little recoil. You literally could shoot all day with no notable effect on your shoulder — maybe your wallet, but not your shoulder. It’s just fun to shoot and, with the ability to reach out to 200 yards, which compared to a pistol, offers a better experience. What’s not to like?

The bottom line? 9mm is cheap, and you can shoot more for less. That lends the pistol cartridge to be a very fun shooter that is still practical and effective. And, as I’ve hopefully demonstrated here more accurate than many people would assume.

Editor’s Note: Please be sure to check out The Armory Life Forum, where you can comment about our daily articles, as well as just talk guns and gear. Click the “Go To Forum Thread” link below to jump in and discuss this article and much more!

Join the Discussion

Go to forum thread

Featured in this video

How to Build a Hog Pit from Concrete Blocks

0

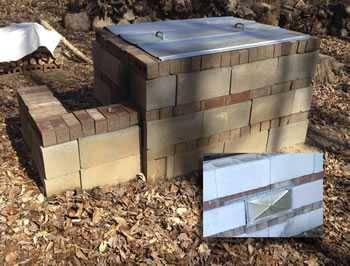
Above are some of the old school concrete block pits at Jackie Hite’s Bar-B-Q in Batesburg-Leesville, SC. Below are plans for building your own no-frills pit suitable for a butterflied 75 pound hog, enough to feed about 35 people. It is designed so it can be a temporary structure or you can make it permanent. If you cut the head and remove the trotters at the knees and elbows, you can fit a 100 pounder or more on this rig. But don’t throw away the head and trotters. Just place them on the stretcher next to the torso. If you plan on cooking larger hogs, you can scale this plan up. You must cook with indirect heat. Click here for instructions on how to prep and cook the hog.

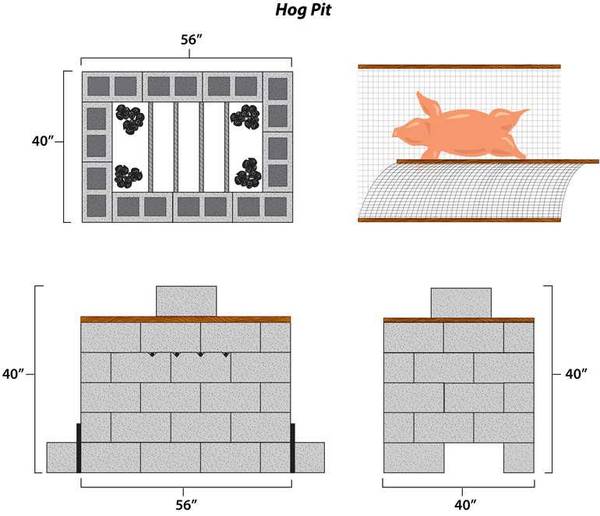
illustration of dimensions for hog pit constructed from concrete blocks

Materials

  • SIDES: 54 concrete blocks 16″ x 8″ x 8″ (actually 15.75 x 7.75 x 7.75″). This will get your hog 32 ” above the embers, plus a course to hold the lid. Cost about $54.
  • LID: 4 x 8′ sheet of 1/4″ plywood, cut down to about 44 x 60″ for the lid. Note that Hite uses sheets of cardboard for his lids as seen in the photo above, but I strongly advise against this. He is a master of fire control, and if yours burn, they could ruin the hog. And then you have no lid. Cost about $10. Usually the lid will not be a tight fit. If it is you can crack it open with a stone or make a vent by cutting a hole in it.
  • HEAT SHIELD: Half of a 4 x 8′ sheet of 1/4″ plywood cut down to 20 x 36″ for the optional heat shield. Cost about $10.
  • PROTECTION: 2 rolls heavy duty aluminum foil. Cost about $30.
  • COOKING GRATE: 4 lengths of 48″ each of 3/8″ rebar. You can use a sheet of expanded metal rather than rebar if you wish. Cost about $5 per 10′ bar, 3 bars needed.
  • STRETCHER: Non-climbable uncoated fence wire or rabbit wire at least 14 gauge, 46 x 72″. Do not use galvanized metal because it can give off noxious gases. Cost about $30 for a 50′ roll.
  • STRETCHER HANDLES: 2 boards 1″ x 2″ x 6′ each. Cost about $2.
  • STRETCHER HANDLES: 100 bare wire loop ties, 6″ each. Cost about $2.50.
  • DAMPERS: 2 pieces lightweight sheet metal, about 20″ x 10″ each or you can use sheet pans. They will go over the openings in the sides to help you control oxygen to the coals if it runs too hot. Cost about $15.

Optional

  • More rebar to pound from the top down into the ground to prevent the blocks from shifting. Cost about $15.
  • Mortar to lock the blocks permanently into place. Cost about $10.
  • Lightweight sheet metal for the lid, about 44 x 60″. Cost about $30.
  • Lightweight sheet metal for the heat shield, about 30 x 48″. Cost about $30.
  • 20 bags (40 pounds each) premix concrete for a 3″ thick slab FOR THE BASE AND BOTTOM. Cost about $40.

Tools

  • Fire extinguisher.
  • Wire cutter.
  • Level.
  • Hack saw.
  • Hammer.
  • Chisel.
  • Utility stapler and plenty of staples.
  • Wheel barrow, steel drum, or charcoal grill to start coals.
  • Shovel.
  • Garden hose or buckets of water or fire extinguisher.
  • Good digital oven thermometer.

About the pit

Keep the pit at least 10′ from buildings and overhanging trees in case there is a grease fire. Keep a fire extinguisher rated for grease on hand. Fire extinguishers rated ABC can handle most everything except combustible metals. Beware, they contain a yellow powder that can damage electrical devices.

Start by clearing a base that is 4′ x 5′ by removing grass and prepare an all dirt or sand base at least 2″ thick. You will need to discard some of it when you are done because fat and meat drippings may get in the dirt. The dogs will roll in it and it will attract insects, mice, you name it. If needed, you can buy sand at a hardware store. I recommend lining the pit with aluminum foil.

Make sure the ground is level. Stack the concrete blocks 4 rows high, 3 full lengths and then turn one block on each course, staggering the blocks so they overlap as in the illustration. Notice that I have left out a block on the head and tail side so you can add coals and wood and rake them around. Cover these wholes with a board and a concrete block when they are not in use.

Make notches in the blocks with a hammer and chisel deep enough to hold the rebar so the next course of blocks will lie flat on the course below. Put the rebar on top of the fourth course of blocks. Don’t put the top course of blocks on yet.

The stretcher

To carry the hog and hold it in place on the pit, you need to build a stretcher. It is two poles for the stretcher bearers on either side, and a wire mesh sling in between for the hog. Non-climbable fence wire is heavier gauge and sturdier than chicken wire. You can use chicken wire for but it would be a good idea to use two layers. Make sure the wire is not coated with plastic. For something more permanent, use heavy duty expanded metal mesh. Do not use galvanized, it can create toxins.

Make the sling of the wire wide enough to rest on the rebar and hang over the edges of the pit by at least 1′ on either side. Attach two 6′ lengths of 1″ x 2″ boards for handles with staples and reinforce them with the wire loop ties. Then lay another section of mesh over the top of the first and fasten it to one of the handles, but leave the other open. Attach a handle to the open edge. You then have a reversible stretcher so you can flip the hog.

About the heat shield

I specified a sheet of plywood cut down to 20 x 36″ for an optional heat shield. If you bank your coals to the sides and corners properly you may not need it, but I recommend you have it on hand in case something starts to burn or overcook. This goes on top of the rebar and beneath the stretcher to shield the hog from direct heat. This size leaves space between the shield and the inside of the pit so hot air can rise alongside the shield and bounce off the lid. You will remove it late in the cook when it is time to crisp the skin. Wrap it in aluminum foil and staple down the foil. Don’t worry, it won’t burn unless you have a grease fire because the pig-sitter fell asleep or spent too much time in the toilet. If the pit is to be a permanent structure, make your heat shield from sheet metal, preferably aluminum because it won’t rust.

The cover

Cover the bottom of the plywood lid with foil. If you wish, you can use a sheet metal top instead of plywood.

Other designs for whole hog cookers from readers

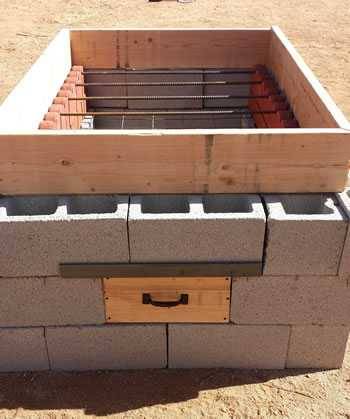
Here’s the “Hog Cabin” built by Jacob Hanson of Tucson, AZ. Notice the innovation : He used half width blocks along the sides and put scalloped garden edging to hold the rebar. He also put an access door with an angle iron header. The wood frame holds a removable pitched roof, not shown.

concrete block hog pit with rebar and scalloped garden edging

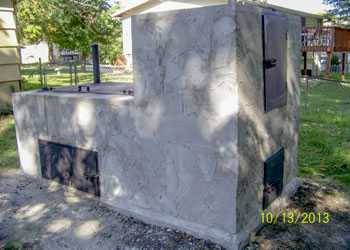
James Brownfield of Kansas City built this beauty from concrete blocks. On the left is the hog pit and on the right he tacked on a separate vertical smoker. The hog pit side is a little larger than my design: 66″ long (4 blocks), 47″ wide (3 blocks) and 35″ tall (4 blocks) with a 2″ top cap. The interior measures 52″ long by 32″ wide. The cooking grate is 20″ above the coals and he has another grate 10″ under the cooking grate on which he can cover with foil and/or cheap catering pans to catch the grease. Both grates are simply expanded metal that rest on rebar. There’s some pretty nifty metalwork for the pit top, chimney, doors, and smoker shelving. The whole shebang sits on a concrete slab he poured.

concrete block hog pit and vertical smoker

Carl Herbert built this pit. The insert shows the access door on the other side.

concrete and brick hog pit with detail showing access door on other side

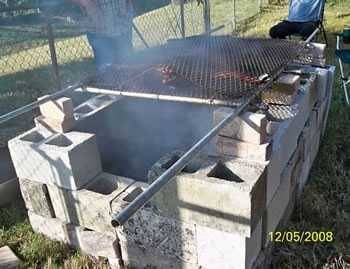
From Jim S. This guy built a simple quick and dirty pit, below.

simple concrete hog pit with a chain link fence as a cooking grate

David Wm. Reed of Texas A&M has a good article on roasting cochon au lait, French for suckling pig, and a novel design for a pig roaster with the hog hanging by his hind legs.

Where to shoot a squirrel with an air rifle?

0

“Optimal Target Placement: Mastering Squirrel Hunting with an Air Rifle. Discover the exact spot to aim, enhancing your accuracy and ensuring humane squirrel control. Uncover effective techniques for responsible hunting, enabling efficient pest management without compromising safety or ethics.”

where to shoot a squirrel with an air rifle

where to shoot a squirrel with an air rifle

When it comes to hunting squirrels with an air rifle, accurate shot placement is crucial for ethical and humane kills. The ideal target area to shoot a squirrel with an air rifle is the head or chest region. Aim for the head if you are confident in your shooting skills, as a well-placed shot will result in instant death. However, this can be a challenging task due to the small size and quick movements of squirrels. Therefore, many hunters opt for chest shots as they offer a larger target area and have a higher chance of hitting vital organs.

For a chest shot on a squirrel, aim at the center of its body just behind the front legs. This area contains vital organs such as the heart and lungs. It is important to choose an air rifle with sufficient power and accuracy to ensure a clean kill. A.177 or.22 caliber air rifle with adequate velocity is recommended for hunting squirrels effectively. Additionally, always take into consideration your surroundings and make sure you have a safe backstop before taking any shot.

In conclusion, it is crucial to prioritize safety and ethical considerations when deciding where to shoot a squirrel with an air rifle. Aim for a precise headshot, ensuring a quick and humane kill. Always be aware of your surroundings and follow local laws and regulations regarding hunting or pest control.

How far can an air rifle shoot accurately?

0

An air rifle’s effective shooting range depends on various factors, including the type of rifle, the caliber, and the power source. Generally speaking, most air rifles have an accurate range of about 50 to 100 yards. However, high-powered air rifles with larger calibers can achieve accurate shots at distances up to 200 yards or even more.

The accuracy of an air rifle also relies heavily on the shooter’s skill and experience. Factors such as wind speed and direction, bullet drop, and projectile stability play a significant role in determining how far an air rifle can shoot accurately. Additionally, the quality of the rifle’s optics and ammunition can greatly influence its effective range.

It is important for shooters to understand their specific air rifle’s capabilities by conducting regular practice sessions at different distances. By familiarizing themselves with their rifle’s trajectory and adjusting for external factors, shooters can maximize their accuracy and effectively extend their shooting range.

In conclusion, the accuracy and effective range of an air rifle can vary depending on various factors such as the type of rifle, pellet used, and shooter’s skill. Generally, most air rifles are accurate up to about 50-100 yards. However, with advanced technology and skilled shooters, some high-end models can achieve accurate shots up to 200 yards or even farther. Ultimately, it is important for shooters to understand their specific rifle’s capabilities and practice diligently to maximize accuracy at longer distances.


Can a 22 air rifle kill a deer?

0

“Debate over whether a 22 air rifle can effectively take down a deer has sparked curiosity among hunting enthusiasts. With its lower muzzle velocity compared to traditional firearms, we delve into the possibilities and limitations of this controversial topic to shed light on whether this lightweight weapon can indeed be lethal enough for deer hunting.”

can a 22 air rifle kill a deer

When it comes to hunting deer, using a.22 air rifle may not be the most effective or ethical choice. While it is possible for a.22 air rifle to kill a deer, it is generally not recommended due to its limited power and range. The.22 caliber is more commonly used for smaller game such as rabbits or squirrels, where accuracy and precision are more important than sheer stopping power. Deer are much larger animals and require a larger caliber rifle to ensure a humane and quick kill.

In many states, using a.22 air rifle for deer hunting is illegal due to the lack of sufficient power. Most hunting regulations require hunters to use firearms with enough energy and velocity to quickly and effectively kill the animal without causing unnecessary suffering. A.22 air rifle simply does not meet these requirements. It is important to prioritize the welfare of the animal being hunted and choose an appropriate firearm that can deliver enough force to ensure a clean kill.

Ultimately, while it may be technically possible for a skilled shooter with exceptional accuracy to kill a deer with a.22 air rifle, it is not advisable or ethical. It is always best to use firearms specifically designed for big game hunting that provide adequate power and range. This ensures that your hunting experience is safe, humane, and within legal regulations.

In conclusion, while a 22 air rifle may technically be capable of killing a deer, it is not recommended or ethical to use such a weapon for hunting large game. The limited power and potential for inhumane kills make it unsuitable for deer hunting. It is crucial to prioritize the use of appropriate firearms and techniques to ensure a quick and humane kill while respecting wildlife conservation laws.


12 Things You Need To Hold Mature Bucks On Your Property Besides Food Plots

0

Gerald Almy

whitetail buck

Food plots are for many of us the most fun and dramatically rewarding part of being a gamekeeper. But as you delve deeper into habitat and wildlife management, it becomes clear that there are plenty of other improvements that need to be made to the habitat if your goal is to attract and hold mature bucks on your property.

IT’S ABOUT CREATING A LEGACY FOR ALL FUTURE GENERATIONS. SUBSCRIBE TODAY.

Attending to these “extra” things besides food plots becomes especially important for those who, like me, only have a hundred or few hundred acres. If you have thousands of acres of mixed habitat and let young bucks walk, chances are you already have some older bucks present. For those of us with less acreage, packing the maximum amount of things that will attract and hold older bucks in a small area and managing it extra carefully are especially important. Here are 12 projects and management principles that will help make your land attractive to older-age-class deer. There are certainly other steps you can take, but these are good ones to start with. If you don’t give the deer these things, chances are your neighbors will, and that’s where they’ll go.

Before getting started, realize that to get the maximum benefit from these projects, you need to carefully analyze your property using topos, aerial photographs, and your knowledge of the land to lay them out for maximum attractiveness to the deer and maximum enhancement of your hunting success. The latter aspect requires careful consideration of things such as best access to stand sites, prevailing wind direction, sun angle, approach cover, and other factors. But knowing where the different types of cover and food are that you have put in place will help you know how the deer will travel and where they will likely bed as they make use of the habitat enhancements you’ve made. 1. Create a transition corridor for mature bucks. Most land is to open for prime deer habitat and big bucks don’t get old by traveling where they can often be seen. Locate a natural potential travel route from bedding to feeding areas or between doe bedding areas and make it appealing to bucks by adding a variety of shrubs or tall annual grasses and partially felling a few low value trees. This serves two purposes. Besides offering cover, a lot of the species you plant will also offer food as will the hinge-cut trees. That will make the travel corridor even more appealing. Here’s an example. You have a small stream or drainage ditch flowing through an area that could be a big buck travel route between doe bedding areas, feed fields or blocks of timber, but it’s too open. Without brush and trees, only does and young bucks will likely use it during daylight. Put in a swath of shrubs that grow 5-8 feet tall or cover grasses such as Blind Spot along the creek, however, and mature bucks will start using it because they’ll feel secure there. persimmon A number of different shrubs will work well for this project. Some good ones to consider are: native American honeysuckle bushes, dogwood shrubs (graystem, silky, or red osier), lespedeza, crab apple, Chickasaw plum, chinquapin, viburnum and indigo bush. They’ll not only create security cover, deer will nibble on most of these plants, adding to the travel corridor’s attraction.

Plant two rows of these bushes on the side of the creek a buck would likely travel, 8-12 feet apart. For variety and winter cover, you can mix in a few pines or cedars.

2. Provide minerals. Maybe you’re fortunate enough to have a natural mineral site on your property. Most of us, though, are less fortunate and need to build one or more mineral licks to satisfy the deer’s need for macro and micro elements that they don’t get enough of from natural foods, crops and food plots.

BioRocks are good. I also like to dig up and mix in Full Potential into the top 8-12 inches of soil in several key sites for every 50 acres of land. Place them in or near cover, where a mature buck is more likely to make use of them. By putting that many sites out, you can monitor which ones are most attractive and keep those activated while eliminating the others. Refresh them as needed, but avoid checking the site too often.

3. Add water. This one is pretty obvious. If a deer doesn’t have a source for water that it feels comfortable using it will move off your land to find it. If you expect him to use it during daylight, it needs to be in or adjacent to cover, with a route leading to it that doesn’t make him expose himself. If the source you have is in the open, you should build a travel corridor to it (see step one) with cover.

Water sources don’t have to be big or elaborate. You can often use rocks and logs to dam a small wet-weather stream. Placing water troughs, kids pools, or pond liner plastic in dug out spots is another relatively easy project. If you want to tackle both mineral and water needs in one step, consider the Banks Outdoors Watering Systems with their H2O Wild Water Mineral Supplement added to the water.

IF YOU LOVE WILDLIFE AND WANT TO IMPROVE HABITAT SUBSCRIBE TODAY!

4. Create or enhance staging areas. Crop fields and food plots are attractive to deer, but if they appear abruptly at the edge of open woods, mature bucks might not move into them until after dark. By adding or enhancing a staging area between the field and woods, older bucks will feel comfortable hanging out in these areas and perhaps even approach the plots in daylight. Cut down some low-value trees along the border to create a thicket of brush. Leaving some of the tops partially attached makes even more valuable cover. Grape vines, greenbrier and honeysuckle will grow up the fallen trees and form thick shelter that big bucks crave as they approach an open feeding area. And those plants are also great foods for deer. Add a few bushes from a nursery to fill in spots that are still too open and you’ll soon have a staging area bucks feel comfortable using well before dark. The edge should be at least 75 feet deep, 100-150 feet is better still. Be careful not to make the area too thick, though. Deer also like to socialize and see each other in these areas. 5. Plant native warm season grasses. This not only keeps more mature bucks on your property, it also benefits species such as quail, pheasants, turkeys and song-birds. Switchgrass is one of the easiest to grow and my favorite warm season grass. If you are considering planting a wet area, it’s definitely the one to choose. It can survive up to 30 days in standing water. Other species should also be considered such as Indian grass and big and little bluestem. I like to mix several of these in my plantings. These grasses will grow from 5-7 feet tall, providing great cover for both mature bucks and does which will draw in those bucks. You can plant these by broadcasting the seed and covering it lightly, but drilling is preferable. Special drills for these seeds are often available from local conservation agencies or farm co-ops. Since this is a strong conservation step for the land, government programs can sometimes be used to help finance seed purchase and planting. It’s not important to have large warm season grass fields. The main thing is to locate the stands in good strategic spots where deer will use them to bed in or go to when there’s pressure in other areas. Putting in several small plantings in long narrow fields is an excellent strategy.

I prefer not to hunt these warm season grass fields. Their best use is to hold deer on your property. On the other hand, hunting near them is a good way to intercept a buck moving out of the stand to chase a hot doe. This tactic yielded a huge eight pointer for me recently with bases just shy of six inches.

6. Add shrubs and vines. Habitats that are mostly open crop fields and mature woods can benefit from releasing and enhancing any shrubs and vines present and planting others. If you have Japanese honeysuckle, fertilizing can double the forage production of this non-native, but still valuable plant for deer. Also nurture any raspberry, blackberry, greenbrier, and plum shrubs on the property. These offer both food and valuable cover.

Trim them back if they are growing too high for deer to reach or pull the vines down. Also daylight them if low-value trees are shading them by cutting back overhanging branches of those trees. Adding lime and a 10-10-10 type fertilizer can also help.

If you lack these shrubs, consider planting rows or clusters of them or other plants such as strawberry bush, American beautyberry, shrub dogwoods, crabapple, and mulberry.

bedding cover7. Build big buck bedding cover. Mature deer might walk through your land or venture onto it looking for does as the rut swings in. They might visit food plots you’ve created for a bite to eat, but you’ll never have old bucks stay on your land without good bedding cover.

Fortunately, that’s easy to create if you don’t have it. The first step is to select a good location. I like to position it far from human activity, close to the center of the property. A good spot would be on a shelf or bench or just a slight rise if that’s all the elevation that’s available. The heads of hollows are also good.

Bucks like to bed high and move low in the afternoon to feed or chase does. They typically choose the leeward side of a ridge or hill based on prevailing winds. Put your beds in these spots for maximum use.

Using a chain saw, cut some low value trees in the spot you’ve chosen. Don’t knock everything down, but enough to create a jungle-like rough and congested area that bucks will take to. Cut mostly low quality, bent, injured or diseased trees, and just hinge-cut some of them. Before starting, learn the safety rules for logging and always wear the proper protective gear. If you aren’t comfortable doing this work, hire a professional. He might cut the wood for firewood or pulp and take a few saw logs that you specify to make it worth his time coming in for the job. Besides creating a bedding area, this cutting also allows additional light to enter the woods by removing some of the overhead canopy that shades the forest floor. This lets new shrubs and forbs that offer valuable deer food emerge – species such as raspberry, blackberry, honeysuckle, greenbrier and grapes. That makes the jumble of fallen timber even more appealing as a buck hideout. Maple stumps from the cutting will also generate shoots that bucks snack on. Eventually saplings will spring up, adding even more cover.

Since you build this bedding area yourself, you’ll know exactly where it is and how it’s laid out. With trail cameras you’ll be able to quickly learn the routes bucks use as they head to it in the morning and leave in the afternoon—prime stand sites.

BECOMING A GAMEKEEPER IS NOT JUST THE BEST WAY TO PRODUCE GREAT HUNTING… IT’S THE BEST LIFE! SUBSCRIBE TODAY.

8. Create a thermal refuge. To keep deer on your land during inclement weather, you need a thermal refuge. These can be anywhere from a half to several acres, close to the center of your property when possible. A dense grove of pines, spruce, or cedars offers deer thermal cover and shields them from blustery winds, snow and sleet in winter. The conifers are also immensely valuable as psychological security cover, offering great escape areas. When hunting pressure mounts on nearby lands, there’s nothing a buck craves more than thick cover and seclusion. His life depends on it. A grove of dense young evergreens in a secluded spot is just what he’s looking for. Species may vary according to what will do well in your area. I particularly like white pines. Plant as large of an area as you can, anywhere from one-half to several acres. To add extra wind protection and bedding cover, also fell several low-value small to medium trees, cutting some through and hinge-cutting others. Intersperse these through the conifer plantings.

9. Plant oaks. Most properties managed for whitetails have some of these, but you can improve their output by thinning trees around them. If you have enough open land, by all means consider planting more oaks purchased from state forestry departments or sources such as nativnurseries.com. Try to put in some early maturing and some late-maturing nut varieties. Planting these in open areas rather than woods will make them magnets for old bucks with the heavy mast crops they’ll produce there.

pears

10. Give them fruit. They may not be important in the overall nutrition of a picture of a mature buck, but trees of species like pear, apple, mulberry, peach, and persimmon offer treats that will hold and draw deer to your property. They also provide a vital energy boost just before the rigors of winter set in and are packed with phosphorous and vitamins. Plant them in areas receiving at least five hours of sunlight. Slight slopes are good, rather than bottoms. Put in at least six trees in each location so they will cross pollinate. If possible, put tree shelters around them so they don’t get damaged by deer and rabbits.

11. Delineate sanctuaries. No matter how small your property, it’s vital to have some part of it placed off limits to any human activity except entering to retrieve a hit deer. It should have some cover, perhaps including some of your bedding areas and thermal cover sites. The rougher, thicker, and steeper the terrain, the better. If it’s an ideal habitat, five or ten acres may suffice for a sanctuary. In most cases much larger areas are better, up to 25-50 percent of a property sometimes. Besides delineating sanctuaries, also keep pressure light on areas that are hunted. Don’t use a stand when the wind is wrong or where the deer will be spooked by your entrance or exit from the stand. It won’t take much of that before mature bucks either leave your property or become nocturnal. Also keep a lid on non-hunting access and activities. Mature bucks and human activity simply don’t mix.

12. Don’t just “scatter” these improvements throughout a property. Rather, integrate them so they mesh and complement each other, helping, instead of hindering, your hunting success. And don’t forget to ask for help and advice from other gamekeepers nearby with similar properties.

Often state wildlife biologists will visit your land and give recommendations for free. Institute as many of the habitat projects described here as you can and chances are any mature bucks in the area will make your land their home year-round.

RIGS AND TACTICS FOR GAR

0

It doesn’t matter if you’re talking about 200-pound alligator gar in a Texas reservoir, a 3-foot longnose in a Minnesota river, or a 5-pound shortnose in an Arkansas slough-they’re all first-class sportfish. They’re all willing biters, too, often revealing their location during summer by rolling on the surface to gulp air. They’re also powerful fighters who will launch their muscular armor-plated body into the air when hooked. The problem with gar is their tooth-filled mouth and habit of running long distances with a bait before swallowing it. This makes them difficult to hook and land with traditional rigs. But a handful of modified rigs will catch any species of gar wherever they swim.

Hooks

Gar lack any appreciable amount of flesh in their mouth, making hookups with large single hooks difficult. Small sharp treble hooks penetrate faster and the additional hook points increase your chance of a good set. Lip hook a baitfish with a #6 to #2 treble hook on a set or float rig. Gar often grab the bait sideways and slowly swim off. Wait until the fish stops and starts to swallow the bait. When he starts to run again, set the hook firmly. Quick-strike rigs and lures with multiple treble hooks increase your chance of a hookup without risking injury caused by swallowed hooks.

Snares

Wire snares like those used to catch rabbits may be the most effective gar rig of all. Make a snare by wrapping one end of a 2-foot piece of stainless steel wire around a heavy barrel swivel. Run the free end of the wire through the back of a lively baitfish, just below the dorsal fin. Swing the free end back toward the swivel and form a loose loop that slides easily on the leader. Tie your main line to the swivel and cast the rig onto a shallow flat. When a gar grabs the bait, a firm pull will tighten the snare around its beak.

Ropes

Versatile lures and flies also can be fashioned from strands of frayed nylon rope. Cut a 3- to 6-inch piece of 3/8-inch nylon rope, and thread it onto the shank of a hook, jighead, or spinnerbait as you would a plastic worm. Use a flame to fuse the rope to the hook shank, then wrap over the melted rope with strong thread or braided line. Cover the thread wraps with a couple coats of epoxy to increase the lure’s durability. Unravel the nylon strands the the base of the head, and you’re ready to fish. When a gar strikes, the lure becomes tangled in its teeth and around its snout.

Jugs

Jugs, or pop-ups as they’re called in the south, are similar to the juglines used by catfishermen. They consist of a 4-foot section of PVC pipe or a sturdy branch tied to 2-liter soda bottle. One end of a 2-foot wire leader is attached to the branch, the other to a large study hook baited with livebait or cutbait. Fleets of jugs are drifted across shallow flats at night. When a fish begins its second run, indicating it has swallowed the bait, the angler grabs the limb and attempts to haul the fish aboard.

Everyday Carry (EDC) Flashlights: The Complete Guide
0

EDC Flashlight

If you’re looking for a quality flashlight but are unsure where to start, it’s likely that an EDC flashlight is exactly what you need.

Long-lasting, powerful and compact in size, EDC flashlights are perfect for shedding light on everyday scenarios, including life-saving emergency situations.

Reliable light is of high value in unforeseen circumstances and an EDC flashlight is the best way to stay prepared.

Quick Takeaways

– EDC, or everyday carry, flashlights are ideal for feeling prepared for the various types of situations you may encounter, including personal safety and emergency standby- Compact, EDC units typically offer between 20-2000 lumens of light, sufficient for both casual daily activities and law enforcement needs- The best high quality EDC flashlights are equipped with a long battery life, impact resistant materials and an Ingress Protection rating of IP66 or higher

EDC flashlights are the perfect source of convenient, accessible light when encountering unexpected situations and are easily obtainable with a well-known name brand like Fenix.

What Is An EDC Flashlight?

EDC is an acronym for “everyday carry”, meaning that EDC flashlights refer to units that can be easily carried for everyday use, typically small enough to store in your pocket.

Although there is some overlap, EDC flashlights are defined by one’s lifestyle, as opposed to other units designed specifically for activities and destinations, such as camping or biking lights.

Everyday carry units are intended to help with anything you find useful. Whether it’s personal safety, emergency situations or shining extra light in a dimly lit closet, EDC units are ideal for feeling prepared for the various types of situations you may encounter.

What To Expect

There are many benefits to EDC flashlights since they are specifically designed to be convenient without sacrificing power. Here’s 5 qualities to look for when you’re on the hunt for a quality EDC flashlight.

Compact

One of the important characteristics of an EDC flashlight is its compact size, allowing for easy portability and accessibility. When shopping for a new unit, look for something that’s small enough to fit into your pocket or purse and the palm of your hand for quick use.

The weight of your flashlight is also important to consider. A heavy unit will feel like a burden to carry and defeat the purpose of having an EDC flashlight. At Fenix, finding a small, lightweight unit without sacrificing functionality and efficiency is easy.

Brightness

The best EDC flashlights use LED bulbs because they are brighter and more efficient than incandescent bulbs. Their light output, or brightness, is measured in lumens and can have anywhere from 20 to 2000 lumens, or more.

lumens guide

When determining the right amount of lumens for your EDC flashlight, consider how you plan to use your unit. If you only need accessible light for reading in the dark, 300-500 lumens is more than enough.

Long Battery Life

Although compact in size, quality EDC flashlights have impressively long run times due to their compatibility with rechargeable batteries.

EDC units that run on lithium or lithium-ion rechargeable batteries will not only appear brighter than those running on alkaline batteries, but also last longer due to a higher capacity for stored power.

In addition, different brightness settings and external battery level indicators found on EDC flashlights make it easy to preserve power for when you need it most.

High IP Rating

An IP rating, or Ingress Protection Rating, is a pair of numbers that represents the level of protection an object has against foreign bodies and moisture, such as dust and water.

To fully understand the different levels of protection an EDC flashlight can have, assess the chart below:

IP rating scale

Image Source: www.budind.com

An EDC flashlight with the highest level of protection will have an Ingress Protection rating of IP68, demonstrating quality and likelihood to survive a rainy day or dust storm. A rating of IP66 or higher is ideal for units intended for everyday use.

Impact Resistance

Units intended for frequent use need to be tough in the face of the unknown. High-quality EDC flashlights are made from impact resistant materials, such as:

– High strength aluminum- Toughened glass- Stainless steel

Daily use of your EDC flashlight can take a toll on inexpensive, poorly made devices, ultimately making them unreliable. When you’re shopping for an EDC unit, avoid gear made from easily breakable plastic and low-quality lens material.

Best EDC Flashlights

EDC flashlights are specifically designed to fit every carrying need. Whether you’re looking for a super bright unit or one that clips onto your pocket, Fenix offers one of the best options.

Lightweight

Fenix E03R Keychain Flashlight

Fenix E03R Keychain Flashlight

Weighing in at only 0.78 oz (22 grams), the Fenix E03R keychain flashlight shines when it comes to ultra-lightweight units. This compact flashlight is less than 2 inches in size and equipped with 260 lumens of bright light.

Latch this undetectable EDC flashlight onto your keychain to benefit from 5 different light settings and a high Ingress Protection rating of IP66.

Clip On

Fenix E28R Rechargeable 18650 EDC Flashlight

Fenix E28R Rechargeable 18650 EDC Flashlight

Although almost every Fenix flashlight features a convenient body clip, the E28R’s high output, durability and size make this unit one of the best.

This powerful EDC flashlight offers 1500 lumens of light and 5 different brightness settings in a size small enough to fit in the palm of your hand. With a protection rating of IP68, the E28R has everything you need in an EDC flashlight.

Brightness

Fenix E35 V3.0 EDC Flashlight

EDC Flashlight

Fenix’s E35 V3.0 EDC flashlight gives portable and powerful a whole new definition. This unit offers up to 3000 lumens of light with a beam distance of 787 feet with less than 5 inches of length. That’s enough light to conduct Search & Rescue!

When all you need is to illuminate the pages of your latest read, dim this EDC unit down to the lowest of 5 light settings, offering just 50 lumens of light. With its durable aluminum body and 100% resistance to water and dust, no other EDC unit compares to the offerings of Fenix’s E35 V3.0.

Compact

Fenix E30R Rechargeable EDC Flashlight

Fenix E30R Rechargeable EDC Flashlight

Rechargeable, long-lasting and fully waterproof, Fenix’s E30R provides big power in a small package. Less than 4 inches in size and weighing under 2oz, this EDC unit goes undetected in your pocket or purse.

Use one of 5 brightness settings to benefit from anywhere between 30-1600 lumens of light and know exactly when it is time to recharge with the 4-level battery indicator.

Self Defense

Fenix UC35 V2.0 LED Rechargeable Flashlight

Fenix UC35 V2.0 LED Rechargeable Flashlight

One of the most comforting features of carrying a quality EDC flashlight is accessibility to a reliable means of self-defense. Fenix’s UC35 V2.0 is not only pocket-sized and far-reaching, but also features a self-defense strobe light setting and an extreme impact resistant body.

This anti-roll and anti-slip design makes reaching for and handling this unit effortless and comfortable. Rechargeable and long-lasting, the UC35 is the perfect unit for military, policing and emergency standby.

Fenix Flashlights For Every Need

EDC flashlights quickly prove their usefulness once you start to carry one. With so many durable and dedicated options, finding the best EDC flashlight is easy with Fenix.

Find the best EDC flashlight for your needs and benefit from long-lasting, compact power by visiting Fenix Store today!

Student Rights and Restrictions on Legal Gun Ownership

0

Gun ownership and control in the U.S. has long been a contentious topic, highlighting an intricate balance between constitutional rights and public safety. At its center lies student rights as they intersect with legal restrictions on firearm possession; this article investigates this multifaceted issue by exploring its complexities, legal landscape, and role of activism in shaping its narrative. As students’ voices continue to play a crucial role in the ongoing dialogue, understanding the nuances of this debate becomes essential for finding common ground and forging equitable solutions. This article sheds light on the intricate dynamics surrounding student rights and the complexities of gun ownership in the United States.

Perspectives of the Second Amendment in the U.S. Constitution

Since 1791, when it was ratified into law, the Second Amendment of the U.S. Constitution has caused much legal and political debate over its meaning and application. Some maintain it protects unrestricted firearm ownership for individuals, while others argue its primary goal is maintaining state militias.

The Second Amendment has been interpreted differently by various Supreme Court decisions over time, as seen by landmark cases such as District of Columbia v. Heller (2008), wherein the court upheld an individual’s right to possess firearms for self-defense within their home – although these rights may be subject to regulation and limitation by certain states and governments.

Student Rights within Educational Institutions

Student gun rights can be complex. While students have Second Amendment rights like any citizen, these may be restricted by educational institutions that impose policies and regulations concerning firearms on campus in order to ensure safety for students, faculty, staff, and all others enrolled there.

Policies designed to combat gun-related incidents often include restrictions on carrying concealed weapons on campus and dormitories or bans on open carry altogether. While such regulations aim to minimize risks within educational environments, they can sometimes create tensions between students wishing to exercise their Second Amendment rights and institutions attempting to ensure a safe atmosphere.

Legal Restrictions on Student Gun Ownership

Institutional policies and federal and state laws both limit student gun ownership. For instance, the Gun-Free School Zones Act of 1990 restricts who may possess firearms on school property knowingly; this restriction covers areas surrounding elementary and secondary schools as well as restricts where students can carry firearms legally.

State laws regarding firearm possession and carrying on and off college campuses vary considerably, ranging from permitting concealed carry permits to bring guns onto campus grounds to no-carry policies on educational premises; all this can lead to considerable confusion for students navigating their rights and legal implications.

Students and Student Activism – Its Function and Implications

Debates over student rights and gun ownership have inspired widespread activism among young people. Following tragic incidents involving gun violence at educational institutions like Parkland in 2018, student-led movements advocating for tighter gun control measures gained national traction, underscoring their importance when balanced with student safety considerations.

Young people’s activism has played a critical role in shaping public opinion and legislative actions, underscoring their importance as voices for discussing gun ownership and control.

How to Navigate a Complex Landscape

Students looking to exercise their Second Amendment rights within legal restrictions and institutional policies must become familiar with their state and educational institution’s regulations regarding gun possession. This may involve researching state gun laws, applying for concealed carry permits where available, and adhering to campus firearm policies.

Students should engage in open and respectful dialogue regarding this issue with peers, educators, and policymakers to address concerns and gain an in-depth knowledge of student rights and gun ownership issues.

As students grapple with the complexities of student rights and legal restrictions on gun ownership, they also often struggle with academic responsibilities. If your schedule is tight or you need extra help with coursework, a great option for meeting academic obligations while engaging in gun control discussions is to buy a philosophy paper on speedypaper.com, a reputable academic writing service. Such an approach allows students to participate in these crucial discussions while fulfilling academic responsibilities.

Conclusion 

At its core, student rights and legal restrictions on gun ownership is an intricate issue that often causes tensions to escalate into a contentious debate. While the Second Amendment upholds an individual’s right to bear arms, educational institutions and various levels of government often impose restrictions to enhance public safety. Navigating this complex landscape successfully requires having an in-depth knowledge of relevant laws and policies as well as engaging in constructive dialogue to bridge divides about gun control and ownership.

Establishing an equitable balance between protecting students’ constitutional rights and maintaining safety in educational environments remains a formidable task. Doing so requires continuing discussions, legal tweaks, and commitments from all parties involved – students, educators, parents, and the broader community alike. With our nation grappling with this issue, it cannot be overemphasized how essential open dialogue, informed decision-making, and proactive measures against gun incidents are. Only through collective effort can equitable solutions that simultaneously protect both individual rights and public safety within institutions.

Best Air Rifle Deals

Popular Posts

How to choose the right Air Gun Caliber for your game?

0
A story is told of three Native American hunters. Two are smart, the other somewhat ignorant. On the first day of the hunting season, one of...

.22 vs .25 Air Rifle: The Ultimate Comparison Guide

0
When I first got introduced to the world of rifles, I often thought that a bigger caliber meant better performance. So, I thought that...

PCP vs CO2 Guns: Which One is Better?

0
The most talked-about debate between hunters and gun enthusiasts is what the best power source of a gun is.  The five main sources of power...

How to make a break barrel air rifle more powerful

0
"Unleash the Power: Mastering Break Barrel Air Rifles for Maximum Performance. Discover expert tips and techniques to enhance the power and precision of your...

Air Gun 101: How many types of Air Gun Sights are there and which...

0
The former American president, Joe Biden, was recently quoted saying: If you need more than ten rounds to hunt, you better stop that business and...