Home Blog Page 121

Best Air Rifles for Hunting Small Game

0

What makes a good hunting air rifle?

Most shooters’ usual perception of air guns is that they’re for target shooting, but hunters have been using these weapons for hunting since the 15th century. During these times, air rifles were expensive and only used by the rich. Over time, technology improved to the point that mass-produced examples are now available to the public at affordable prices.

Today, air guns are still used for hunting, especially for small game. “Small game” refers to animals like ducks, squirrels, turkeys, and many other species. Not all of these creatures are sought after for meat, as some prefer to hunt for sport.

No matter your reason for hunting, it’s best to arm yourself with a reliable air gun. They’re much quieter than unsuppressed firearms and usually less regulated. Some states are more air rifle-friendly, making them a viable choice instead of owning a small-bore hunting rifle.

Below are six of the best air rifles for hunting small game. They possess enough firepower to kill prey ethically, and you can even mount accessories on them. Read on to find out all about them.

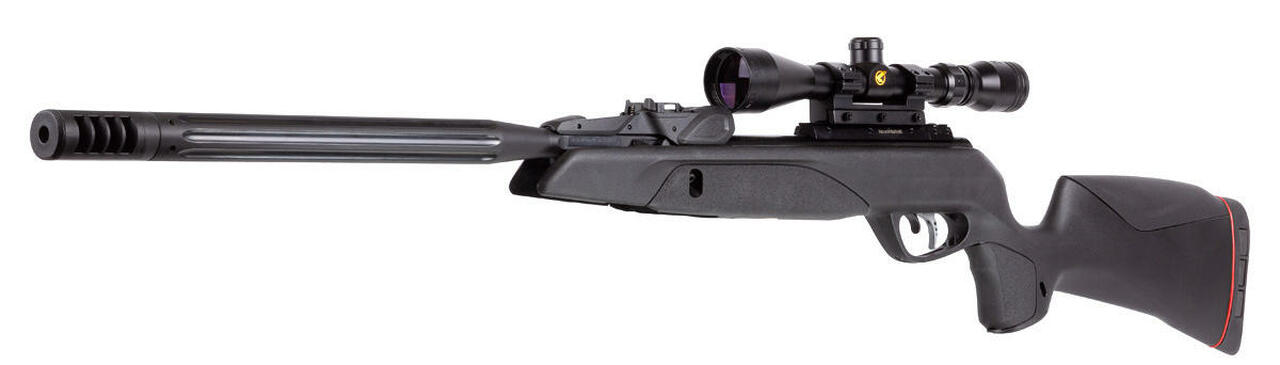
Gamo Swarm Fusion 10X Gen2 Multi-Shot Air Rifle .177 Cal, Black

Gamo Swarm

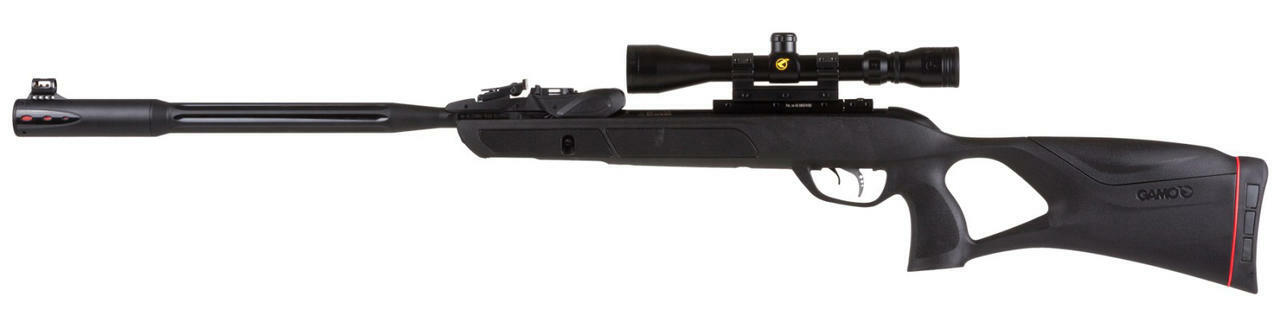
Gamo’s Swarm Fusion 10X Gen 2 Air Rifle is a sleek yet powerful weapon. It can propel .177 caliber pellets at 1,300 FPS, a muzzle velocity sufficient for quick and painless kills. The rifle achieves this via Gamo’s Inert Gas Technology gas piston, a powerful component that doesn’t kick hard.

The rifle has a built-in Whisper Fusion system for less noise when you shoot, forcing the gasses inside chambers that dampen sound.

The internal magazine holds 10 pellets, though you need to break the action open after every shot. Shooting is effortless thanks to a customizable two-stage trigger and recoil-absorbing buttpad. Your shots will only hit where you want them to go.

A 3-9x40mm scope is included in the package, and it will attach to the rifle using 11mm dovetail scope mounts. The rails are also isolated from the gun to reduce scope shaking. If you don’t want to use the scope, the iron sights will work in low-light conditions, perfect for handling pests at night.

The all-weather stock is made of black polymer, a light but durable material that endures field use easily. Its design is ergonomic and molded to fit shoulders.

Specifications

  • 1,300 FPS

  • .177 caliber pellets

  • 10 rounds in the magazine

  • Scope included

  • Highly customizable

  • Break action

Gamo Swarm Maxxim 10X GEN 2 Multi-Shot Air Rifle .177 Cal, Black

Small Game Hunting Gamo Swarm Air Rifle

Compared to the Gamo Swarm Fusion 10X, the Swarm Maxxim 10X is an older model, the second generation of the first-ever repeating 10-shot air rifle. It’s more affordable than the Fusion, but don’t count this weapon out. You can still shoot very quickly and accurately with it.

The Swarm Maxxim 10X Gen 2 has an upgraded magazine that sits lower to the barrel. It won’t interfere with the optics as a result. As the name suggests, the air rifle holds 10 rounds at most.

Thanks to the Custom Action Trigger, you can adjust the trigger pull’s two stages to your preferences. Doing so allows your finger muscles to shoot without feeling awkward, as everyone has a different comfort zone.

Gamo’s patented Whisper sound dampening technology is also mounted onto the barrel. It will capture the gasses that propel the pellet out, reducing the noise produced. That way, you can hunt without causing a disturbance.

With the help of a recoil-reducing scope rail and rubber buttpad, you can expect to shoot accurately. The included 3-9×40 scope will fit the 11mm dovetail scope mount.

Specifications

  • 1,300 FPS

  • .177 caliber pellets

  • 10 rounds in the magazine

  • Scope included

  • Highly customizable

  • Break action

Crosman Valiant SBD Air Rifle, Nitro Piston Elite .177 cal, Wood

Hunting small game with a great wood frame rifle

Unlike the two Gamo air rifles above, this Crosman Valiant SBD is a single-shot weapon. It has no magazine for extra shots, meaning you need to reload every time. However, there are advantages to a single-shot gun.

Precision is the main benefit, as repeaters promote rapid fire. Single-shot guns also conserve ammunition and prevent misfires since you can’t stuff more than one into the chamber.

Crosman’s experience with air guns led it to employ a Nitro Gas Piston Elite instead of a steel spring. As a result, it can retain its strength despite staying cocked for hours, and the cocking action is smoother. What’s more, it works perfectly fine in adverse weather.

The Clean Break Trigger on this rifle has two stages when pulling, allowing shooters to pull the trigger slowly for a perfect shot. The stages are also adjustable according to your preferences.

As the rifle is meant for single shots, the barrel is a fine example of engineering. The rifling is precise and optimizes the pellet spin. There are also mounted iron sights on the barrel if you don’t want to use optics.

By default, the package comes with a CenterPoint 4x32mm scope, a fixed zoom optic that mounts onto the 11mm dovetail rail.

Specifications

  • 1,400 FPS

  • .177 caliber pellets

  • Single-shot only

  • Scope included

  • Wooden stock

  • 70% less noise

  • Break action

Crosman Shockwave NP QuietFire Air Rifle .22 cal w/lead pellet, Black

Hunting Small Game with a quietfire rifle

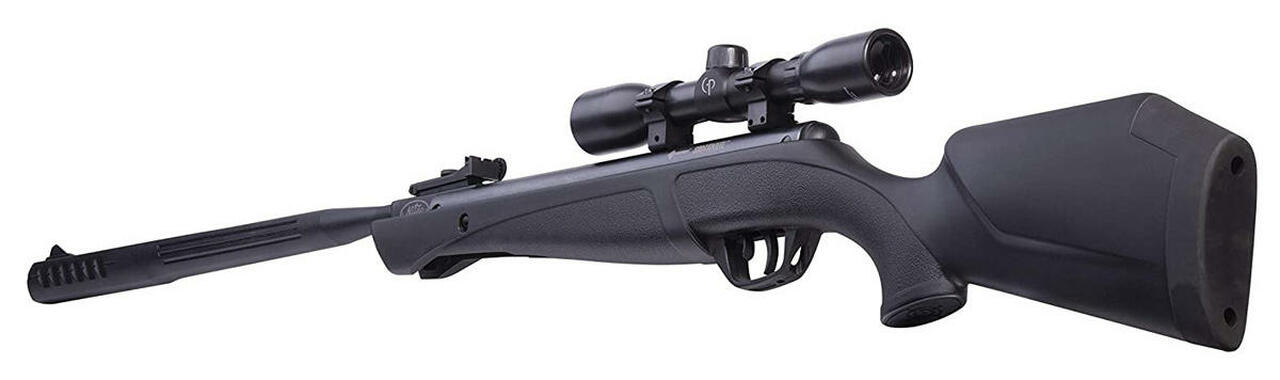
Those who want a .22 caliber single-shot air rifle will appreciate this Crosman Shockwave NP QuietFire Air Rifle. It’s painted black, and the polymer furniture is also of the same color. You can use it in any weather conditions due to its polymer stock.

Thanks to the Nitro Piston power plant, this air rifle can deliver performance most springs can’t. Springs can’t deliver 950 FPS after staying cocked for hours, but the Piston can. You’ll also find the weapon easier to cock quickly.

The QuietFire technology mounted on the barrel near the muzzle also helps reduce noise levels. It forces air to pass through two chambers, decreasing sound as it exits them. Thus, you can hunt for small game in larger numbers.

Good hunters know the importance of getting familiar with their weapons, and customization helps them create their perfect rifle. With the two-stage adjustable trigger, anyone can set where each stage is located.

You get a fixed magnification scope that mounts to dovetail rails on top of the bolt with the rifle.

Specifications

  • 975 FPS

  • .22 caliber pellets

  • Single-shot only

  • Scope included

  • Synthetic stock

  • 70% less noise

  • Break action

Crosman MAG-Fire Mission Multi-Shot Breakbarrel Air Rifle .22 cal, Black

Hunting Small Game with a Crosman

With this MAG-Fire Mission Air Rifle, hunting down pests and small game won’t be an issue. The magazine contains 10 rounds for this .22 caliber version, and the powerful Nitro Piston Elite propels them at 975 FPS. If there’s more than one animal, the MAG-Fire Mission can hit them all.

Crosman integrated its patented Quietfire technology into the barrel to reduce the rifle’s report. It helps reduce the sound immensely, so the small game doesn’t get startled as frequently. However, it doesn’t suppress the weapon entirely because ammunition is also a factor.

Accuracy is the name of the MAG-Fire Mission’s game. Several of its features are optimized for landing shots exactly where you want them. The rifled steel barrel, 11mm dovetail rail, and 4x32mm scope are all there for precise marksmanship.

That’s not all because you can also adjust the two-stage Clean Break Trigger on the rifle.

Hunting can occur in any location and weather condition, so your air rifle should be capable of withstanding damage. Although wooden stocks are beautiful, they may scratch and crack. In contrast, the thumbhole synthetic stock is ergonomic and lightweight, allowing hunters to carry this rifle for long periods without tiring.

Polymer stocks are also highly resistant to cracking, so you can expect them to stay intact despite some rougher treatment.

Despite this many components, Crosman opted to go for simplicity. The fewer moving parts there are, the lower the chances of malfunctioning.

Specifications

  • 975 FPS

  • .22 caliber pellets

  • 10 rounds in the magazine

  • Scope included

  • Synthetic stock

  • 70% less noise

  • Break action

Umarex Hammer .50 cal Air Rifle, OD Green/Black

#1 air rifle for hunting small game

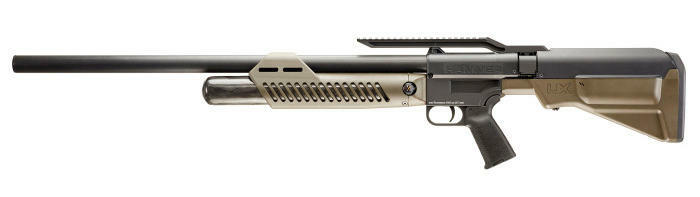
While .50 caliber air rifles were designed for big game, nothing prevents you from hunting small game with them. However, you do have to be aware that .50 leaves a larger bullet hole in the animal, so it may ruin the meat if you want to eat it. That said, Umarex’s Hammer air rifle is a powerhouse.

You can load this air rifle with heavier slugs and still expect to hit 760 FPS. This velocity might not be much, but the bullet retains more energy than lighter slugs. Thus, it will do extra damage to whatever you’re shooting.

The Hammer has two shots in the magazine, and the PCP tank has enough for three shots at 100%. The fourth shot will reach around 90% of maximum velocity before requiring a gas refill.

Besides the Picatinny top rail, you also have side M-LOK rails for extra accessories like lights and lasers. These help in low-light conditions or for aiming.

The German firearms company Walther manufacturers the barrels on the Umarex Hammer, giving it a 1:24 twist that helps the .50 caliber slug fly true. The barrel will last for years, a testament to German engineering and Walther’s almost 200 years of experience.

Specifications

  • 760 FPS

  • .50 caliber pellets

  • Two rounds in the magazine

  • M-LOK rails

  • Synthetic stock

  • 1:24 twist optimized for .50 caliber slugs

  • Straight pull bolt action

Frequently Asked Questions

What pellets are better for small game?

.177 caliber and .22 caliber pellets can work for small game. The former is usually lighter and retains less energy, despite being faster. Therefore, it may not lead to a clean and humane kill in some cases.

In contrast, .22 caliber pellets are generally slower but heavier, retaining more energy despite the lower muzzle velocity. Most people consider it the smallest caliber for hunting small game.

Despite this, it’s possible to hunt for small game with .177 caliber pellets. It takes more practice to nail an ethical kill, but it’s still doable. The caliber is more suited for the smallest of small game and pests.

No matter what rifle you own, make sure it’s powerful enough to take small game down before you go hunting. You don’t want the animal to suffer from a weak shot, so letting them pass on painlessly is the best option.

Can any scope work on an air gun?

No, as spring guns and piston rifles are actually very forceful weapons in terms of recoil and kick compared to firearms. They may damage your scope badly after extended use as the mechanisms produce a lot of vibrations. Therefore, it’s best to mount a dedicated optic on your air rifle for longevity.

Some air guns offset the problem by isolating the rails, but it’s not a foolproof solution. You’ll find air rifle-specific optics much better than a standard rifle scope you mount on your .22 LR plinking rifle.

Despite the magnification, air gun scopes may also be designed to work better at closer ranges. Therefore, they will be easier to sight in after a shooting session. Firearm scopes may not cooperate with the air rifle this way, so their performances can be subpar.

An Alternative Method

Most hunters still prefer using firearms for small game, as cartridges are powerful and easy to obtain. However, air rifle hunting only rose in popularity decades ago, and companies continue to innovate and release better weapons.

It’s possible to grab your air rifle, cock it, and take out the squirrel in your yard without the neighbors finding out. Air gun technology has become advanced to the point that they make very little noise. No one will find out you’re doing pest control on your property.

The air rifles we covered range from repeaters to single-shot guns. Whether you prefer making one precise shot or taking out several creatures, there’s something for everyone here. The rifles are also optimized for hunting, with enough velocity and retained energy to propel projectiles at acceptable speeds.

Air guns are safer in most cases, and they’re often quieter. Hunters prefer their prey to stay close for a shot, so scaring them away is less likely to happen with air rifles. However, consult your local laws before purchasing an air rifle.

Pocket Knife Parts Explained: Tip-to-Clip Anatomy

0

Belly, swedge, choil, and bevel — what the heck do these things actually mean? In the context of pocket knives, unfortunately, the answers can be complicated. While some terms are nearly universal (“edge,” for instance, or “lock”), there are certain words and phrases that can vary slightly, either from the manufacturer or the “everyday carry” community at large.

But that’s why I’m here! In conjunction with my recent explainer on shopping for your first knife, I thought it might be helpful to explain some of the various parts and pieces you’ll see referenced in most of our reviews. Many of these are shared in the world of fixed blades, but for this guide, we’re going to focus mostly on folders.

Get ready for a vocabulary overload, and no small amount of quibbling. From grinds to blade shapes and tips, the terminology and debates are almost endless. But to join (or pass up) the discussion, here’s what you’ll need to know.

Finch pocket knives
(Photo/Josh Wussow)

A Knife’s Blade and Parts

This is the natural place to start, as the shape and arrangement of the blade is likely to play the biggest role in your choice of pocket knife. Something we won’t be covering is the multitude of available steels.

If you’re looking for a deep dive into the best steel for your particular application, check out this separateexplainer from GearJunkie.

Grind

We’ll begin with the edge. That’s the sharp part that cuts things, right? True! But it’s a bit more complicated than that.

Urban EDC Supply LC Knife - Closing
(Photo/Josh Wussow)

There are several ways a blade can be ground into sharpness. For pocket knives, the most common is the flat grind and the hollow grind.

The first of these is just as it sounds — the blade slopes down from the top (or spine) until the sides join at the cutting edge. Their angles usually taper once again near the very end, forming what we call a secondary bevel. That’s the shiny part that catches the sun.

A hollow grind has all of the same parts, except that the blade steel slopes inward as it descends toward the edge instead of plunging straight down at an angle. This creates a narrower, more slicing-friendly edge that’s wider at the top and thinner at the bottom. Knives like the Buck 110 are a classic example of this design.

Buck Knives 110
Hollow grind on the Buck 110; (photo/Buck Knives)

There are other types, such as Scandi (short for Scandinavian) grind, which can be found on knives like the Cold Steel Finn Wolf. In this case, both sides of the blade descend straight down, until they angle inward to form a single, primary bevel/edge.

Cold Steel Finn Wolf
Cold Steel Finn Wolf; (photo/Cold Steel)

These are excellent for outdoor pursuits, specifically woodworking and bushcraft. Saber grinds are similar to Scandis, though they angle inward again to form a shorter, secondary bevel at the edge. Both of these are far more common on fixed blades as opposed to folders.

Tip to Belly

A knife’s belly is the part of the blade where the edge curves up toward the tip. Unlike human beings, the more belly your knife has, the better it is at sliding through things.

Some knives (like tantos) have no belly at all. These are better suited for scraping or piercing tasks. You may also see serrations near the backside of the edge (also called the heel), which are saw-like teeth best used for cutting fibrous materials like a rope.

Tanto blade
Example of a “tanto” blade; (photo/Slideordies14)

This is also where makers potentially install a sharpening choil, which is a small (usually half-moon) shaped cutout that allows users to more easily sharpen the full length of the edge.

The Benchmade Bugout, for instance, has a large choil, while the Spyderco Delica has none.

Knife choil
Knife choil; (photo/Josh Wussow)

Proceeding upward from the tip, you’ll often see a narrowed stretch of metal along the top of the blade. This is called a swedge, and it helps taper the steel into a fine point.

There are an incredible number of tip styles and, to be frank, the labeling is incredibly nebulous: reverse tanto, sheepsfoot, Wharncliffe, drop point, and clip — makers tend to play fast and loose with their naming conventions. Just know that the narrower the tip, the more delicate it is.

Near the rear of the spine, many makers include a series of small, beveled cutouts known as jimping. These are designed to provide a natural landing spot for your thumb, lending additional texture and grip.

Opening, Locking Mechanisms

This is a big one, so I’m going to boil it down to basics. Thumb studs and finger holes are exactly what they sound like. They’re added or absent bits of metal along the upper rear of the blade, which allow you to push the knife open with your thumb.

A flipper tab does the same thing, though it’s positioned on the bottom side, near the heel. Many of these also serve double duty as a blade guard, keeping your finger away from the edge once the knife is open.

Front flippers are also a thing, though these require some practice. Nail nicks are most common on traditional knives, which utilize a backspring to keep the blade semi-locked in place.

However it opens, the blade will swing open on a pivot. And surrounding the pivot, you’re likely to find things like washers or bearings to help move the action along. You’ll also see reviewers discussing a knife’s detent.

As the folks at Knives and Tools so eloquently described, this is another small bearing that lines up with a hole cut out in the hidden portion of the blade.

“Because the detent ball falls into the hole when the knife is closed, the knife will stay closed.”

So when you see a reference to “detent,” folks are generally discussing the amount of force required to pop open a blade. Simple!

Locks are a different matter. For a discussion on these, I’m going to refer you to the experts at KnifeCenter. Frankly, this topic is vast enough to be an article in itself. But it’s hard to go wrong with the basics, like a back lock, frame lock, or liner lock.

Handle and Clip

You know what a broom handle is, right?

Well, knife handles are a lot like that, only they’re attached to sharpened steel instead of rough bristles. Basically, it’s the place where you put your hand. There are plenty of materials used here, but the most common are things like G-10, FRN, Micarta, and carbon fiber.

WE Knife Banter Pocket Knife - G10 handle
Example of a G10 handle with a lanyard hole; (photo/WE Knife Co.)

These are well-suited for most general use, though metals like titanium, steel, and aluminum are also popular. Heck, you can even find wood or bone pocket knives, if you’re going the traditional route.

Best for general use: G-10, FRN. Because of their water resistance and grippy nature, these materials are perfect for most everyday tasks. Micarta also fits into this category, but can garner stains from moisture.

Best for metal-heads: stainless steel, titanium. If you’re looking for a full-metal experience, both of these make for functional handles. However, stainless steel handles can become rather weighty. And though titanium is lighter, neither offer the in-hand warmth of other materials.

Best for fancy folks: carbon fiber, wood, bone. Carbon fiber is an excellent choice for lightweight handles. While formerly limited to high-priced knives, it’s now available on several budget-friendly models. Wood and bone are most often relegated to traditional knives, though there are exceptions from Helle and Opinel.

If you’re opting for a handle made with polymer or natural material, your knife will generally have liners. These bits of steel provide structural support and give your handle scales something to sit on. You’ll also find various posts and spacers along the back, which keep the scales from pinching down on the closed blade.

Sometimes, these are hollowed out to form a lanyard hole, allowing you to loop fabric through for decoration or added grip. This passes through both the flat side that usually bears the maker’s logo (the show side), and the opposite surface known as the clip side.

Types of Pocket Clips

And that brings us to one of the things that make pocket knives, well, pocketable. Pocket clips come in many forms, but the most popular terms you’ll see are these: deep carry, reversible, and tip up/tip down.

Deep carry fits its description. These clips allow the backend of the knife to rest near the top seam of your pocket, creating a more discrete appearance. But in general, most pocket clips allow at least a portion of the knife to be seen.

Reversible and tip up/tip down are different sides of the same coin (or knife). This means that the clip can be moved and repositioned, whether it be to suit a left-handed user or someone with a preference between having the knife’s stowed tip facing upward or downward in the pocket.

Here’s a hint for new knife folks: 99% of the time, tip up is significantly easier and safer, as the back of your pocket helps keep the blade closed.

Got all that? If not, there are plenty of ways to keep the terms fresh in your memory. One of the best is this visual aid from Knafs — a poster showing everything discussed here and more. And if all else fails, pull up reviews and discussions from YouTube.

But you don’t have to know any of this stuff in order to enjoy and use a pocket knife. The most important thing to keep in mind, as with all tools, is safety.

Know where your edge is pointing, what you intend to cut, and make sure your space is clear. And if you’re still unsure as to what you’re looking for in a blade, check out our guide on how to shop for your very first knife.

How laser rangefinder modes work

0

Hunter glassing with the Vortex® Razor® 4000 Laser Rangefinder

For serious hunters, archers, and long-range shooters, understanding how and when to use target and range modes is crucial for ensuring optimal accuracy when a shot opportunity presents itself.

We’ve all been there: you’ve spent hours stalking your prey or setting up the perfect shot, only to flat out miss. Often these ruined opportunities aren’t just about shaky hands or poor conditions; they can also be due to incorrectly using your laser rangefinder.

Read on to learn how and when to use your Vortex® laser rangefinder’s target and range modes so that every time you squeeze the trigger or release an arrow, your aim is as accurate as it can be.

RANGE AND TARGET MODES EXPLAINED

Range and target modes are specialized settings on a rangefinder designed to help hunters, archers, and long-range shooters adapt to varying conditions and target characteristics. Range modes can provide distance readings that factor in elevation, angle, and atmospheric conditions, while target modes help distinguish the intended prey from its surroundings.

Choosing the appropriate mode is critical for shooting and hunting success, as it ensures that you get the most accurate distance measurements, thereby enhancing your shot’s precision when it counts.

Rangefinder Range Modes Graphic

RANGE MODES

LOS MODE

WHAT IT DOES: LOS Mode displays the actual “Line of Sight” range from the rangefinder to the target along with the slope angle.

WHEN TO USE IT: This mode is intended for shooters utilizing ballistic devices and shooting at distances beyond 500 yards with slopes greater than 15 degrees. Most commonly used ballistic devices require line of sight range input for accurate results.

HCD MODE

WHAT IT DOES: HCD or “Horizontal Component Distance” Mode is the default and primary mode for most rifle and archery applications. HCD Mode displays the slope angle compensated distance to the target.

WHEN TO USE IT: This mode is most useful for archers shooting out of a treestand, mountain hunters, and precision competitors who need an angle compensated distance for an accurate shot. Shooters simply use the appropriate level of bullet drop and wind adjustment for the range displayed and shoot. Archers use the appropriate level ground sight pin.

WHEN TO USE IT: This mode is intended for shooters utilizing ballistic devices and shooting at distances beyond 500 yards with slopes greater than 15 degrees. Most commonly used ballistic devices require line of sight range input for accurate results.

TARGET MODES

Depending on the model, Vortex® laser rangefinders offer up to four target modes to deliver accurate ranges in any hunting or shooting situation.

Rangefinder Target Modes Graphic

NORMAL MODE

WHAT IT DOES: The default Normal Mode is the standard mode that provides the targets range with the strongest range result. Utilizing the scan feature by pressing and holding the range button while in Normal Mode results in a yardage display that’s constantly updated.

WHEN TO USE IT: Normal Mode is recommended for most situations.

FIRST MODE

WHAT IT DOES: First Mode displays the closest distance when ranging.

WHEN TO USE IT: This mode is ideal for ranging a smaller target in front of other larger or more reflective objects; for example, a mule deer bedded in front of distant rocks.

LAST MODE

WHAT IT DOES: Last Mode displays the farthest distance when ranging.

WHEN TO USE IT: Last Mode is ideal for ranging a specific target behind a group of objects like brush, trees, or rocks; for example, when ranging an approaching whitetail through leaves and branches.

ELR MODE

WHAT IT DOES: ELR or “Extended Laser Range” Mode is ideal for ranging targets at extreme distances. A slightly longer response time allows for greatly extended range distances. The use of a tripod is recommended for best results.

WHEN TO USE IT: ELR Mode is perfect for ranging when Normal Mode is unable to obtain a desired range. This mode is also useful for planning long stalks. For example, range a distant landmark near the animal’s location. Drop a pin on your mobile mapping app and use this destination as a checkpoint to relocate your target. Hunter glassing with the Vortex® Viper® HD 3000 Laser Rangefinder

WHICH LASER RANGEFINDER IS RIGHT FOR YOU?

The Vortex® rangefinder lineup delivers exceptional optical clarity and accuracy essential for precise shot calculations based on the terrain, weather, and type of target. Vortex® also delivers a range of models catering to different skill levels and budgets, all backed by the VIP Warranty. Watch this Vortex® Laser Rangefinder Comparison video for a breakdown on what makes each unit unique.

Visit your local Vortex® dealer to get your hands on the different models, try out all the features, and find the best one for your hunting and shooting needs.

It’s our hope you can learn and laugh along with the expert voices we feature on this blog. We want to be clear that the opinions you see featured here are just that: opinions. The content belongs to the authors and is not necessarily the opinion of Vortex Optics.

To learn more about what you’ve read, please like, follow, and otherwise support our authors.

Best Time Of Day To Duck Hunt: Morning, Evening, Or Mid Day?

0

Best Time Of Day To Duck Hunt: Morning, Evening, Or Mid Day?

Is duck hunting best in the morning or evening? If you ask different hunters, you’ll get different answers as to when the best time of day to duck hunt is. Some swear that the crack of dawn presents the best opportunity of the day – while others claim you’ll never go home empty-handed if you hunt in the evening. There are even some people who claim the middle of the day is the sweet spot.

The morning vs mid-day vs evening debate is one of the most hotly contested among duck hunters. That’s why today, we’re going to weigh all sides of the argument to present you with our unbiased take. You’ll learn if there really is the best time of day to duck hunt – and if so, whether it is in the morning, afternoon, or evening. Let’s get right into the debate!

Is There Really A Best Time Of Day To Duck Hunt?

Most duck hunters have their personal preferences as to when the best time to hunt ducks is. But is there really any difference in conditions from morning to afternoon to evening? As a matter of fact, there are some advantages that different times of day have over others.

For example – you have more hours to hunt in the morning compared to the evening. However, those who prefer evening hunts will point to the lack of energy and focus you have if you wake up at 3 am. Meanwhile, those who prefer to hunt in the evening claim that the afternoon winds present the perfect conditions to push birds down into your decoys for a rest.

As you can imagine, though, you may also experience certain disadvantages depending on what time of day you hunt. We’ll be sure to cover those as well as we make our way through this debate so you have the full picture.

But before we get into the pros and cons of hunting ducks at different times of day, we want to provide you with a few key pieces of information. First and foremost, you must be aware of legal shooting hours in your specific region. Most of the time, you cannot hunt ducks until it is light outside. This means you are going to be limited to certain hours of the day. With that said, let’s get into the morning vs afternoon vs evening debate.

So, Is Duck Hunting Better In The Morning Or Evening?

So, is duck hunting better in the morning or evening? Or does the afternoon shift take the cake? The fact of the matter is that you can enjoy a successful hunt in the morning, afternoon, and evening. It really just comes down to your unique preferences.

To help you plan out your next hunting time, we’ll explain the advantages each time of day offers. Stick around to the very end and we’ll give you our personal opinion on when you should hunt. Let’s kick things off by making a case for the morning shift in your duck blind:

Advantages Of Duck Hunting In The Morning

There is a strong case for the morning shift as the premier time of day for hunting. Here’s why:

  • More hunting hours – The earlier you start in the day, the longer you’ll have to hunt. Getting to your blind at 4 am and preparing your decoys, then patiently waiting for legal shooting hours is your best bet to reach your bird limit that day.
  • Feeding at sunrise – One of the main feeding times for ducks and other waterfowl is at first light. They’ll leave their roosts and head to a water source to locate food – and you’ll be there waiting to say good morning to them!
  • You can still make use of the rest of your day – In favorable conditions and with a bit of luck, you can reach your limit in the first few hours of the day by starting at first light. That means you can still make use of your afternoon and evening. And if you’ve got a job to get to, you can still hunt in the mornings on weekdays without calling out.
  • Adjust your blind/decoys throughout the day – If you start in the morning, you can afford to make changes to your blind location/decoy set up as the day goes on. If you are hunting in the afternoon or evening, however, you won’t have the time to make changes on the fly.

All things considered, hunting in the morning is a great choice. There are a few drawbacks, however. First and foremost, you’re going to have to get up early. You need to have your entire blind and decoy strategy in place before first light. If you’re not a morning person, this may be worth noting.

It’s also important to note that you need a good breeze to guide ducks to your shooting zone. In the mornings, you may not get the strong wings you need for this. Furthermore, the morning sun can really affect your vision if conditions are just right (or, perhaps wrong).

Advantages Of Duck Hunting In The Middle Of The Day

We’re not going to lie – we don’t really encourage many hunters to go out in the middle of the day. In our opinion, the debate is really between mornings vs evening. Unless, of course, this is your only option. If you can’t bring yourself to wake up early, and you need to be home for an early dinner, here are the benefits you’ll enjoy of your mid-day hunt:

  • Winds pick up in the afternoons – Remember that wind factor we were just discussing? Well, winds tend to pick up as the day goes on, tapering off as the sun goes down. That means you’ll catch those later divers that don’t even start flying until late morning or early afternoon.
  • Perfect conditions for jump-shooting wood ducks – If you’re after wood ducks or geese, you’ll find that the afternoon shift presents the ideal conditions for jump-shooting. As ducks finish their morning meal and are preparing to head out until dinner, you can take your shot.

Advantages Of Duck Hunting In The Evening

When it comes to duck hunting in the evening, you’ll find all sorts of advocates claiming that it’s the ideal time. Here’s why:

  • Sleep in – Perhaps the most obvious benefit of hunting in the evening is that you get to sleep in, enjoy a nice breakfast, get some work done around the house, and still get out to set up your blind and decoys before the birds flock in. You’ll be fully alert and firing on all cylinders.
  • Feeding in the evening – As the sun goes down and temperatures drop, birds will flock back to their water for one last feeding for the day before heading to the roost. This is where you can make a killing as a hunter – literally. Once they’re done feeding they’ll head out for the evening – presenting another great opportunity.

The biggest drawback to hunting ducks in the evening is that your window for legal shooting time is going to be small. Sometimes, you may only have a 15-minute period from when ducks are flying into your shooting zone to the point when you can no longer legally shoot. It sucks spending all that time preparing just to come up empty-handed – but that is the reality for many evening duck hunters.

The Best Time Of Day To Duck Hunt: Our Verdict

All this considered, you’re probably starting to lean towards one particular time of day as the best choice for you. As we mentioned, it will come down to personal preference. And, there are many other factors to consider as well. You should also take into account the weather, the time of year, and other conditions.

With that said, our preferred time of day to hunt is in the morning. It presents the best opportunity to fill your bag and meet your limit. However, there is really no bad time to hunt!

Final Thoughts On The Best Time Of Day To Duck Hunt

Want to learn more about what it takes for a successful hunt? Our beginner’s guide on how to start duck hunting is an amazing introductory resource. We also have an essential duck hunting gear list you should check out so you can be prepared for any conditions.

No matter what time of day you decide to hunt, be sure you have all the duck hunting gear you need for a successful, comfortable, and most importantly, safe hunt. At Texas Fowlers, we’ve got everything you need at the best prices online. From waterfowl jackets to duck hunting bibs, big and tall waders, and even other duck hunting accessories or duck hunting bags. Experience all we have to offer and shop today.

Bear Hunting Dogs – 9 Dog Breeds to Keep Bears at Bay

0

Bear hunting with dogs brings a whole range of emotions to mind.

More specifically, the pretty controversial bear hounding.

However, there’s also another variant of bear hunting (which could actually be beneficial to wildlife).

But first, let’s explore bear hounding and why it often damages wildlife populations.

Some people disguise hounding as a service to society while others deem it a sick sport.

Even hunting advocates seem to turn their back on bear hounding because it’s not only unfair but damaging to wildlife1 and possibly their own dogs.

  • Bear hounding often orphans cubs
  • Being chased into trees incites incredible anxiety in the animals
  • Hounds are often hurt during encounters
  • Non-target animals are chased since controlling dogs over large distances is impossible
  • Hunters often trespass on private property, target endangered species, or chase bears onto busy roads

Why are bear cubs orphaned?

Because hunters don’t care to check or misidentify the gender.

Sometimes, they eliminate the threat on sight when encounters with their dogs ensue.

Other times, bears are chased over miles and robbed of their energy2 which may seal their fate, just for the hunters to notice the bear is off-limits due to age or gender.

But as mentioned, bear hounding is not the only way to hunt bears with dogs.

Below, I’ve listed all the breeds suitable for bear hunting.

A lot of breeds mentioned in other articles are absolutely not suitable for hunting bears in any way, shape, or form.

What Are Bear Hunting Dog Breeds Used For?

Hounding doesn’t necessarily only serve as a sport, instead bear hunting dogs are also used in some areas to control rising bear populations, but modern non-lethal methods include Karelian Bear Dogs to scare bears away.

As the polar ice melts, the number of bears roaming northern rural regions in Russia increases3.

Naturally, this creates a conflict between the inhabitants of small towns and these massive (and endangered) Polar Bears.

All parties involved will hopefully seek out a peaceful solution instead of allowing bear hunting with dogs, especially considering that it’s us humans who are destroying their natural habitat.

North America might soon face a similar problem and wildlife and law enforcement are seeking solutions.

Until now, bears who’ve gotten too used to people are either euthanized or put far away into another territory, both far from optimal solutions.

Hounding is partly allowed to serve as “population control” but all these (partly inhumane tactics) could be replaced by an altogether different method.

Organizations such as the Wind River Bear Institute created an actionable plan that includes dogs – but in a non-lethal way.

Dogs such as the Karelian Bear Dogs4 are used to scare bears away in the following steps:

  • Bears who get too close and/or too used to humans are identified
  • Bear hunting dogs are brought in to scare them (resembling Coyotes out and about to steal bear cubs)
  • Upon release, the dogs track the bear, bark, and nip at the bear’s heels until called back
  • If the bear has gotten used to a specific spot, they trap the animal and bring in the dogs to scare them and then release
  • Additional methods like firing rubber bullets can be utilized

Sadly, there’s not a lot of literature out there discussing this way of controlling bears.

Instead, most (outdated) research papers focus on traditional bear hounding and its efficacy.

Even though there aren’t a lot of resources, I’ve tried my best and compiled a list of breeds that were traditionally used and could be introduced in this more modern way below.

Any dog breed successfully working bears offers a huge upside to the old ways:

  • No known injuries to the dogs
  • Bears are not unnecessarily eliminated
  • No compromise in safety around campgrounds and National Parks for humans
  • Karelian Bears Dogs have been able to find evidence of poaching and save polar bear dens near oil or gas fields

However, not all areas (think residential) are suitable for this type of bear control.

Besides the labor to raise and train these dogs, controlling bears this way is more labor-intensive.

So now you know about hounding as well as non-lethal bear hunting with dogs, but which breeds are actually suitable?

9 Bear Hunting Dog Breeds

The best bear hunting dog breeds include the Karelian Bear Dog, Plotthound, Coonhound, Foxhound, as well as large game hunters such as the Dogo Argentino or Rhodesian Ridgeback.

Here’s the full list of dogs capable of hunting large game such as bears:

  1. Karelian Bear Dog
  2. Plotthound
  3. Coonhound
  4. American Foxhound
  5. Bloodhound
  6. German Shorthaired Pointer
  7. German Wirehaired Pointer
  8. Dogo Argentino
  9. Rhodesian Ridgeback

Karelian Bear Dog

Among the top spots for dog breeds used to work bear is the Finnish black-and-white Karelian Bear Dog.

Early breed ambassadors have been recorded in other colors as well such as red-gray or pure red.

However, black-and-white emerged as the desired color since the breed standard was formulated in 1945.

The Karelian Bear Dog looks like a cross between Border Collie and Husky with some resemblance to breeds like the Samoyed or a more wolfish German Shepherd.

While working bear is their field of expertise, they can also compete in search and rescue or sled dog trials due to their sturdy double coat and endurance.

Plott Hound

Technically also among the Coonhounds, the Plott Hound has a different ancestor though.

Plott Hounds don’t descend from English Foxhounds but rather from “Hanover hounds” in Germany.

The German immigrant who brought these dogs to the US frequently hunted bears in the mountains with his dogs.

Coonhound

There are various types of Coonhounds such as the Redbone, Bluetick, Black and Tan, American English, and Treeing Walker Coonhound.

Treeing Walker Coonhounds are among the most loving of the Hounds and quite sensible hunters too.

Ever wondered where the word “treeing” comes from?

It’s because this Hound is known to trail smaller game until it climbs a tree with the dog waiting below and barking to signal the location to the hunter.

Walker comes from the breed’s creator.

This breed is also commonly used for traditional bear hunting where the dogs hunt outside the hunter’s control and often camp for quite a long time at the bottom of the tree.

American Foxhound

The American Foxhound’s robust yet sleek frame is complimented by their soft eyes.

The bark that makes bear hunters love the American Foxhound could prove detrimental to your neighbor’s ears.

So before considering one, beware of their fierce barking which can only be controlled through training and exercise to some degree.

Bloodhound

Bloodhounds are known to be among the dogs with the best sense of smell out there (that and their incredibly long ears).

Did you know that the sloppy ears are actually there to block out sound when they’re following trails?

German Shorthaired Pointer

The German Shorthaired Pointer is a versatile hunting dog.

While Pointers are usually trained to point at birds, they can theoretically be used for pursuing and barking at bears too.

German Wirehaired Pointer

German Wirehaired Pointers could be a good fit for hunting bears.

The German Wirehaired Pointer may sound and look similar to the GSP but they’re different breeds.

While their wiry coat places first on the GWPs identifiable traits, their very loving and quite independent character is a close second.

Make sure you have plenty of time and commitment to research since this is a very active breed.

Dogo Argentino

The Dogo Argentino is the first dog of the Mastiff type on this list (there are actually 22 Mastiffs in total).

Rhodesian Ridgeback

Rhodesian Ridgebacks are actually hunting lions in packs in their home country.

Contrary to popular belief, Ridgebacks don’t actually fight the lions, but they’re good at baying them.

What is the Best Bear Hunting Dog?

The best bear hunting dog is probably the Karelian Bear Dog with Hounds coming in a close second.

What the best bear hunting dog breed is also dependent upon the climate and geography in general.

In colder climates, the Siberian Laika was commonly used for hunting and/or baying bears while Hounds are more suitable and widely available in the USA.

In theory, many other dog breeds such as large game hunters or pointers could be trained to do parts of working bear but they’re not bred specifically for this purpose.

They are bred for a variety of work though and technically could be used for working bears in a non-lethal way.

Are Karelian Bear Dogs Rare?

Karelian Bear Dogs are rare as household pets in the US while they are consistently among the top 10 in their home country Finland5.

In Finland, there are over 1000 Finnish Hounds (i.e. Karelian Bear Dogs) registered each year which puts them at spot number 7 for the most popular breeds in 2019 and 20206.

At least 700 KBDs were registered in Finland for over a decade now.

That being said, there were 50,000 registrations in total so that puts the KBD only at about 2% of the total registrations.

As of July 2024, the database has not been updated with current registration numbers.

Everywhere else in the world, it’s safe to say that the KBD is pretty rare except for countries with increasing bear populations (even then, it’s not guaranteed).

Besides North America – where hunting is regulated by each state – and Northern Europe where the KBD is used for elks, Asia and Russia come to mind but there have been no reports of the KBD being common there.

The fact of the matter is that bear dogs may save lives. Look no further than what they did in Washington.7

Sources

  1. Humane Society: Facts about bear hounding (…) ↩︎
  2. ResearchGate, 2019: Behavioral and Physiological Responses of Scandinavian Brown Bears (Ursus arctos) to Dog Hunts (…) ↩︎
  3. Phys.org, 2019: Weak Arctic ice sees 56 polar bears descend on Russian village ↩︎
  4. Beardogs.org: KBD history ↩︎
  5. Finnish Kennel Club: Karelian Bear Dog ↩︎
  6. Finnish Kennel Club, 2020: KBD registration numbers ↩︎
  7. Spokesman-Review (Washington newspaper), 2019: Washington’s first Karelian Bear Dogs, credited with busting poachers and saving kittens, die ↩︎

Disclaimer: This blog post does not substitute veterinary attention and does not intend to do so. I am not a veterinarian or pet nutritionist. If your dog shows any sign of illness, call your vet.

Best Goose Decoys of 2022

0
Best Goose Decoys of 2022

Our top pick goose decoys of 2022. (Photo courtesy of Big Al’s Decoys)

Wildfowl Podcast Episode 34

DON’T MISS Episode 34 – 2022 Giant Gear Issue Series – Decoys with MOJO and Big Al’s

Big Al’s Decoys – Ken White Super Speck Pack Silos

Big Al
Big Al’s Decoys – Ken White Super Speck Pack Silos

Big Al’s Silhouette Decoys has teamed up with former World Speck Calling Champion Ken White to develop the Super Speck pack. Ken has spent decades hunting specks on his home turf in California, learning decoying tactics that pull specks in close to the guns. These highly portable and lightweight decoys feature photo-print realism, tough fluted plastic bodies, ultra-flat low shine finish and the choice of basic or spring steel stakes. Packed in dozens with 4 searcher, 4 feeder and 4 alert body postures included.

$66 per 12 | bigalsdecoys.com

Dive Bomb Industries – V2 Snow Goose Silhouettes

Dive Bomb Industries - V2 Snow Goose Silhouettes
Dive Bomb Industries – V2 Snow Goose Silhouettes

The winner, winner chicken dinner of silhouette decoys, Dive Bomb Industries’ V2 Snows, are painted with pure black and white colors that boost realism. Each decoy is crafted from a 4mm thick corrugated material that is durable and rigid. The images are printed using non-glare ink additives, and DPI (dots per inch) printing means each side of the decoy features the same quality look, and the one-piece powder-coated spring steel stake resists rust and ensures rapid setup and take-down. You can haul these decoys anywhere.

$70/dozen | divebombindustries.com

Dakota Decoys – X-Treme Sleeper Shells

Dakota Decoys - X-Treme Sleeper Shells
Dakota Decoys – X-Treme Sleeper Shells

Great for those cold, snowy day sets when honkers hit the field and go into nap mode, Dakota’s X-Treme Sleeper Shells are single-piece sleepers, which means no heads to hassle with. They are constructed of polyethylene to guarantee seasons of use, and there is no seam line for cold-weather outings to crack. The decoys come in packs of 12 and are available in a painted version with flocked heads and tails and a full-body flock.

$250-$310 | dakotadecoy.com

SX Decoys – Lesser Combo Canada Goose Flocked

SX Decoys - Lesser Combo Canada Goose Flocked
SX Decoys – Lesser Combo Canada Goose Flocked

From the minds at SX comes the fully-flocked Lesser Canada. Not only are these Canada imposters flocked, but they are built using Flocked Bird Vision color correction and Bird Vision UV flocking to ensure maximum realism. Available in packs of 6, 12, and 24, these fakes come with SX’s patent-pending motion system and loop kits installed.

$195-$770 | sxdecoys.com

Dave Smith Decoys – Snow Goose Juvie Combo

Dave Smith Decoys - Snow Goose Juvie Combo
Dave Smith Decoys – Snow Goose Juvie Combo

Fooling a flock of snows is getting harder and harder, but when you add a few of these 10-packs to your spread, wings will cup, and body counts will go up. The realistic fold-away legs make storage easy, and the newly designed motion cone gives these juvies just-right movement. Feather matched and showcasing a two-tone paint scheme, these ultra-realistic decoys are built tough and will provide you with years of use.

$390/10-pack | davesmithdecoys.com

GHG – XD Series Full-Body Honkers Active 4-Pack

GHG - XD Series Full-Body Honkers Active 4-Pack
GHG – XD Series Full-Body Honkers Active 4-Pack

GHG’s XD Mallards are well established in waterfowl lore, and this savvy decoy maker has taken the best characteristics of this mallard series and poured them into the XD Series Full-Body Honkers. A new RealMotion System married with FlexLock Technology perfectly combines realistic movement with an integrated locking system that secures the motion bases and decoys together. This means a one-piece decoy that is a breeze to set and pick up. The detail is elaborate, and flocked heads add extra realism.

$160/4-pack | banded.com

Real-Geese – Xclipse Shadow Series

Real-Geese - Xclipse Shadow Series
Real-Geese – Xclipse Shadow Series

An affordable, custom silhouette, Real-Geese’s latest addition to its impressive decoy line — the Xclipse Shadow Series — is winning waterfowling hearts. These two-sided silhouettes showcase a non-reflective, textured surface, and the lightweight plastic boosts durability while keeping weight down. Use these dekes as stand-alone-style or sprinkle them in with shells and full-body imposters. The Xclipse comes with 20-inch powder-coated stakes that drive into any ground, and these goose-dupers are available in one and three dozen packs.

$85-$255 | webfootdecoys.com

Higdon Outdoors – Clone Snow Goose

Higdon Outdoors - Clone Snow Goose
Higdon Outdoors – Clone Snow Goose

We love stacking up snows, but doing it regularly is getting more difficult. Many waterfowl biologists’ credit this to the lack of juvenile birds, which is a result of poor hatches. Fooling snows that have survived many migrations is complex, and Higdon’s Clone Snow Goose Decoy is what the Goose Doctor ordered to pull the dupe on flocks of mature snows. This fake mimics live birds’ realistic wing beat and accurate body posture. Plus, it’s bomb-proof and performs brilliantly no matter the conditions. This motorized snow goose imposter comes with a remote, stand, power cord, storage case, and requires a 12V battery—not included.

$300 | higdonoutdoors.com

Elderberry or Water Hemlock?

0

The most common confused questions I hear on identification are about elderberries and the water hemlock. Had I not students such a confusion would have never occurred to me as to me the two species don’t look alike at all. Generally said elderberry fruit is edible, the entire water hemlock is deadly. Indeed, many call water hemlock the most deadly plant in North America. Learning to identify the two is very important.

The Elderberry, Sambucus canadensis, is a shrub with bark, to ten feet or more. Woody. Its blossom is a dense flattop. It produces, locally, black berries about BB size. It has opposite compound leaves, feathery. Most of the veins on the leaf either fade after leaving the midrib or terminate at the tip of the teeth, not in the notches. If you have a #10 magnifying glass you can see tiny veins terminating at the tips of the teeth. Occasionally an elderberry vein will terminate at a notch, but it is uncommon.

The Water Hemlock is herbaceous, two to seven feet. It has a green main stem with purple splotches, or is entirely dusky purple particularly when young. The sectioned, hollow stem has vertical grooves on the outside. It produces a fire cracker-like explosion white blossom that made up of many smaller umbrella-like blossoms. Those produce seeds, not fruit. It has alternating, compound leaves, coarse, toothy. On individual leaves most, not all, but most of the veins clearly terminate between the teeth, in the notches.

Let’s also talk about habitat. Both elderberries and water hemlock are associated with water. But there are some differences: Elderberries can tolerate more dry areas and Water Hemlock can grow in water. If you are in a dry area that is dry most of the time and you think you have one or the other it will probably be an elderberry. If you have damp ground it can be either. If it is standing water most of the time it will probably be water hemlock. Season also counts. Elderberries are year round locally. Water Hemlock can die back in the winter.

Now a closer look: Elderberries are shrubs. They are woody. They have bark. The bark is green and smooth when very young with occasional white dots that are actually lenticels, which is one way the plant exchanges gasses. With time and height the elderberry develops a familiar looking bark, smooth and brown. Now the lenticels are corky lumps seen at left. On much older plants the bark will become vertically furrowed. The inner core of the trunk and branches — the pith — is soft and can be easily reamed out. Not a long-lived plant, just a few years, it can grow to about four inches through. When it dies and dries it leaves a vertical standing small dead tree. The dead wood breaks easily and burns well.

The Water Hemlock is herbaceous, read not woody. It does not have bark. It has nodes, which are swellings where leaves attach or used to attach. The main stem has vertical groves in it and is hollow. It is often streaked with purple, or is splotched with purple. It is usually at least purple at the nodes and sometimes young plants can be entirely dusky purple. Ocassionally the entire older plant will be purple. A stem that is an inch through would be a large water hemlock. The plant is hairless. When crushed it can have a pleasant liquorish or anise scent, or it can also smell like mouse urine. Remember it is deadly and can kill in virtually minutes. The toxicity decreases vertically with the roots the most toxic and the seeds the least. Taste is not a warning sign in that those who have eaten the roots raw or cooked said they were flavorful and very enjoyable. Depending upon the size of the individual, the amount consumed and which parts consumed death will occur in 15 minutes to a little over two hours. This is not the hemlock given to Socrates which was a gentle species. This species produces severe pain and convulsions, torturing its victim horribly until death.

The leaves of both species are different, not only from a distance but close up as well. The veins of the elderberry leaf either fade as they reach the edge of the leaf or terminate at the tip of the teeth. You may need a small magnifying class to see that. The veins are most prominent as they leave the light-colored midrib. Also note that the teeth are quite small, like the edge of a small serrated steak knife.

The veins of the water hemlock are quite different. The veins of the water hemlock clearly terminate BETWEEN the larger teeth of the leaf. See arrows to right. There is no ambiguity. The veins end between the teeth. Even when a vein splits the split ends go to the notches, not to the tips of the leaf. There may be an occasional exception but the trend of the majority is very clear. You will note that while each species’ leaf has an acute tip (pointed) the elderberry leaf is round near the tip whereas the water hemlock leaf is not.

The elderberry is not without its dangers as well. The wood is toxic and has poisoned folks who have made whistles out of the green wood. Unripe elderberry fruit is toxic and the ripe fruit bothers some people. The ripe fruit is better used dried, cooked or made into wine or jelly than consumed raw.

Lastly, the “hemlock” tree is a totally different species and issue. To read more about different colored elderberries, click here.

How To Set Up A Trout Rig And Line? – An Easy And Effective Guide

0

Fishing for a trout has always seemed complicated, especially for those who are only planning to engage in this fun-filled recreational activity. However, it is not just all about fun. It is also a combination of knowledge, skills, determination, and mostly patience.Setting up fishing rigs and lines is the number one problem that can test an angler’s patience. There are a lot of variations of fishing lines and rigs that only a few can probably name.Regardless, we can always choose to make fishing a simple activity and not so complicated. That is why the internet can indeed be your ultimate best friend.This article will introduce to you the different steps to set up your trout rig and line.

Our Fishing Gears on Sale

Trout, What Is It?

A trout is a generic term used for several freshwater species. The trout is closely related to the Salmon family. Each trout can survive differently from one another. In line with that, variations of the trout can be found anywhere.

Some live in freshwater lakes and rivers, such as the lake trout. Others, notably the Rainbow Trout, can switch from living in the sea to inhabiting freshwaters. Due to the difference in habitat and environment, trouts also differ in their colors and patterns.

These colors are often acknowledged as camouflaging, in which a trout changes in color depending on the environment it is living in. What is impressive about the trout is that it changes colors if they migrate to a different place or environment.

It can be hard to determine the specific breed of trout based on their colors and look. Also, it can be challenging how to catch these trouts. Some trouts are rare to find, while some, on the other hand, can just be caught around the corners.

Before you can cast your line in the water and hang tight for a trout bite, there are many things that you ought to have as a primary concern as far as prior information. One of the prime things to know is the habitat and tendencies of the trout fish itself.

Keep in mind, your odds of winning a catch rely basically upon your capacity to pass judgment on trout behavior and afterward setting up a fishing rig and line in like manner.

Main Species Of Trout

There are three major species of trout that fishers catch, and each has its unique characteristics. These are the Brown, Brook, and Rainbow Trout.

Apart from these three, the wildcard steelhead is also known to be the same as the rainbow trout. It lives in the ocean or lakes before it spawns in the freshwater or smaller tributaries.

Meanwhile, the rainbows produce a silvery color on them. This habit, also seen in salmon, makes them a must-have catch, especially among anglers.

Know Your Trout

Because of the trouts’ ability to survive across various water and current conditions vary in their shading and skin patterns. It is intriguing to realize that a wide range of trout types exist, depending upon the external conditions that they are opened to.

Below are some quick facts to help you with acquainting yourself with this exciting fish:

        • What do they look like? The appearance of the trout fish differs over the various species. Since these fish take after the salmon family, trout itself develops to huge sizes, ensuring an extraordinary attraction for fishers and anglers in the area.
        • Trout typically have moles like imprints and their bodies, whose size and color differ from species to species. Rainbow trout are generally touched with silver, while brown-colored trout are actually what their name proposes, but with reddish spots along their length.
        • Trout fish habitat: trout are normally found in freshwater bodies, for example, lakes, and rivers, with certain species having the option to withstand the high salt content of the ocean. Trout prefer moving waterways that are colder and choose to live in calmer, less frequented zones.
        • Eating patterns: trout are known to eat various bugs (mainly aquatic insects), crustaceans, worms, and leeches. Bigger-sized trout are likewise known to feed upon smaller fish!

Where Can You Find The Trout?

You can find the trout in moving and cold water. Trout can be found in the rivers and creeks, and they love to run up and down in these locations.Trout is one of the commonly stocked game species, and it can also be found in lakes (like another species, the Lake Trout). Indeed, trout can be dropped in ponds, streams, and anywhere.Trout can grow up to massive size and swim into the ocean. They sometimes feed smaller fish in the lake. Sometimes, they eat salmon spawn and raid their beds.Amazingly, trout is also one of the accessible food for wild animals. As such, you can see it in the woods, for they are considered the Bobcats, bears, and other animals’ food.The more remote the lake or river is, the more likely you can find a trout in the water. With this, trout fishing is considered one of the best activities for anglers and outdoor enthusiasts.

The Beauty Of Trout Fishing

Without a doubt, trouts are among the most magnificent freshwater creatures that have ever prevailed in bodies of water. There are four major species of trout that are often sought after by anglers.

The Brook trout, commonly referred to as the speckled trout, is considered the easiest to catch. Meanwhile, the Cutthroat Trout (“Cutthroat” because of red-orange slash marks on their throats) dominantly occupies the country’s western part. Finally, the Rainbow and Brown Trout are both found in rivers or streams.

Setting Up The Rig

Well, all you need to figure out is your trout rig and how to set up your line. If you are wondering what the term “Rig” stands for, it is relatively simple. A rig is a term used to define the combination or arrangement of equipment or things used for fishing. A rig may be attached to a rod, carried by hand, or mounted on a boat.

How To Set Up A Trout Rig And Line?

When you get an overall idea of what the trout fish resembles, your goal of getting a fine example effectively turns out to be a lot simpler. Your best course of action is to exhibit your knowledge and set up your fishing rig and fishing line.

There are many and numerous ways on how to set up a trout rig. But, the steps and ways following this are by far the best ones out there. It has been tested and proven to catch a satisfying number of trouts.

The Things Needed For Trout Rig Setup

A rig is a group of fishing gear needed for making a decent catch. Here is a quick rundown of things that you would need to set up your fishing things and permit the fishing to progress.

      • Fishing Rod and Reel – If you do not have one yet, you can start by purchasing an affordable pick at any fishing shop near you.
      • Fishing Line – Usually, if you buy yourself a pair of fishing rods and fishing reel, the fishing line already comes with. If there are none, provide yourself with some fishing line at about 5-10 lb test fishing line. Next, spool it in the fishing reel. Ensure that your fishing line is neat and all set for trout hunting for those who already have. Ensure that there are no tangles or flaws inside the reel, or else it would significantly affect your trout adventure.
      • A Set of Hooks – For trout fishing, the best hooks to use are sizes 4-12.
      • Bobbers – A basic bobber will do. Just make sure that the bobber is big enough to prevent the split shot and hook and bait from sinking into the water.
      • Sinkers – This is the exact opposite of the bobbers. The sinkers’ weight should be light enough. So, that if it is attached to the bobber, it will not drag the bobber down.
      • Bait -Freshly picked worms can already work well for what we are about to do. But, other options also include using crickets or Berkely trout worms.

The Steps In Setting Up The Trout Rig

      1. Start with tying the fishing hook to the end of the fishing line. To this, you can use a basic knot to attach it to the line. It is best to use an Improved Clinch knot or Palomar Knot for better performance.
      2. Next, insert a line from one end of the split shot going out to the other end. Make sure that it is at a distance of 10-15 cm above the hook.
      3. The next thing to do is attach the bobber or float at the tip of the fishing line. This is quickly done by inserting the line through both the top and bottom metal hooks. Always remember that it is essential that the fishing line runs around the bobber or float. Moreover, both hooks should keep the bobber or float anchored or stationary.

There you have it. In only three easy steps, you have now set up an effective way for successful trout fishing.

Best Trout Fishing Rigs You Can Get To Know

1. Sinking Bait Trout Fishing Rig

A sinking bait rig is a ticket when trout plunges to the lake’s bottoms to look for the colder waters during warm days. All you require for a sinking bait rig is a slip sinker, swivel, hook, and bait.

What You Need:

      • slip sinker
      • swivel
      • hook
      • bait

How To Setup A Sinking Bait Trout Rig

First, rig a slip sinker and slide the eye of a slip sinker on the end of your fishing line. Next, tie a swivel to the end of the line to prevent losing the sinker. On the opposite end of the swivel, attach a 12-18″ piece of fishing line and attach your hook. Preferably a fishing line that is a somewhat lesser pound test than your mainline, that way, if your line breaks, it is just at the end of your rig.

With this arrangement, a trout will have the option to take the bait without feeling the sinker’s resistance. Likewise, you do not have a visual marker on the surface with this arrangement. Subsequently, it is ideal for saving a finger on the line to feel for any bites. You can likewise intently watch the fishing line to distinguish any movement.

2. Float Fishing Rig For Trout (Bobber Fishing Rig)

In case you have not tested it or might want a substantially more visual style of trout fishing, try the thrill of fishing for trout with a bobber. Nothing beats the excitement of watching your bobber start to move a lot over the water, then rapidly dive under the water’s surface by a trout.

While a slip bobber trout rig takes somewhat more work than a basic clip on a bobber, the slip bobber is a substantially more flexible and powerful rig for trout fishing. This is particularly obvious in deeper lakes. But, a clip-on bobber could be similarly useful in catching trout in a shallow stream or waterway.

What You Need:

      • slip bobber or clip-on bobber
      • bobber stop (for slip bobber)
      • swivel
      • Hook

How To Set Up A Bobber Rig For Trout

A slip-bobber rig works like the previously mentioned slip-sinker rig. To start, take a bobber stop that is incorporated with most slip bobbers available and string it onto the end of your fishing line. This will fill in as a movable point to stop your bobber.

By sliding this up and down the line, you can fish your lure suspended in the water, basically as deep as you need.

After the bobber stop, slide on your bobber and tie on a swivel to prevent it from sliding off your line. Much the same as the sinker arrangement, tie on a 12-18″ segment of fishing line and attach your hook.

At the point when you cast, you’ll just be managing your bobber and this short segment of the line, regardless of really fishing your lure a lot further to the point of your bobber stopping.

3. Lure Rig For Trout Fishing

This might be the easiest, and now and again, the best trout rig of all! It’s easy to set up as there are not close to the same number of segments to stress over compared with the bait fishing rig and bobber rig.

When using a lure to look for trout, you can keep it as easy as tying the lure right onto the end of your line if that is all you have. In any case, because of the lures spinning movement, this may place turns in your line that might decrease the breaking quality of the line or even cause a significant tangled wreck.

What You Need:

      • Variety of trout lures
      • Swivel (optional)
      • Leader line

How To Setup A Lure Fishing Trout Rig

The preferable strategy for connecting a trout fishing lure is to tie a clip swivel to your line’s furthest limit and attach your lure to that. Not exclusively, it will lessen line twists. Likewise, it will consider a more reasonable presentation and make it simpler to change out between lures. By rapidly rotating through lures, you can rapidly figure out what the trout will like to eat at that given time.

For Trolling, these jet divers are a Great Replacement for outriggers and heavy lead ball sinkers.

How To Setup A Fishing Line?

Since you now have an idea of setting up a trout fishing rig, your next job includes the crucial need to have a strong grasp on the most proficient method to set up a fishing line.

Same as with the trout rig, there are many selections to choose from when it comes to setting up your fishing line. Particularly for trout fishing. But, this article will show you one of the basic fishing line setups there is. Yet, even though it is basic, it is still the most effective and reliable way to set up a fishing line for trout fishing.

The Things Needed For Fishing Line Setup

      • Your fishing hooks and fishing line

The Steps In Setting Up The Fishing Line

    1. Attach the hook to the fishing line. Tie the Hook onto the Fishing Line. To do so, grab the tip of your fishing line and loop it in the tiny hole on your hook. Upon grabbing the end of the fishing line, you have already entered the hook. Twist that end to the mainline about nine times.
    2. Loopback. After you have twisted it about nine times, loop it in the tiny hole of the hook again. But, this time, on the opposite side of the hook’s hole from the first time, you have looped it in.
    3. Tighten. Once you have looped the fishing line in, pull the mainline (the longer part) to snug the twists tightly.
    4. Remove the excess line. Then, cut the extra hanging line on the other end of the fishing line closer to the hook.
    5. Prepare the line. The next steps would be the same as the ones when you are setting up your trout rig. Insert the weight, followed by the bobber, and so and so forth.

There you have it! A simple yet effective way to ensure a fishing line for a good trout adventure. Before heading out to look for some trout, read some of the tips, we have for trout fishing.

Common Things Used When Trout Fishing

Rainbow trout grow up to 12 inches long, and you can use an ultralight tackle for this type of fish. You can use a spinning reel, light/ ultralight action rod, and a 4-8 lb test fluorocarbon line for standard trout fishing.

Always remember these two important rules when trout fishing:

  1. Stocked trout needs power bait.
  2. Trout that measures over one-foot long cut insects and flies from their diet. These will not break or make the bite, but they can affect the type of trout you hook unto it.

Powerbait such as trout marshmallows or any dough bait substitute to imitate fish pellets is not a good choice for the native type of trout. Stocked trouts that grew in hatcheries and farms are being fed with fish pellets. Dough baits and power baits are created to imitate the fish pellets’ scent, texture, and size. However, if you wish to catch native trouts, they will be clueless about the glob of dough that floats in front of them.

Sometimes, you may get a bite because the trouts can be curious. However, native trouts are not conditioned to eat the pellets.

If you wish to catch bigger trouts like the brooks, browns, and steelhead, make sure to avoid the mayfly and fly. Trouts may sometimes occasionally eat small insects like flies, but they eat worms, smaller fishes, and shrimps most of the time.

Now, if you wish to imitate those trout meals when fishing, follow these tips:

Tips To Remember When Trout Fishing

  • Learn the Rules. Before heading out to fish for some trouts, the first important tip is to be aware of your location’s rules and regulations. There are certain rules and regulations when it comes to fishing. Some rules from one state or place may be different from the other. So, to be sure, always remember to check the rules.
  • Have Your Equipment Ready. If you have no fishing equipment yet available, you can look for some affordable fishing gear at fishing shops. However, fishing equipment’s logic is that the pricier the gear is, the durable, reliable, and high-quality. Of course, you also need to weigh if the price is reasonable or not.
  • Know the Perfect Location. It is important to determine the location you are going to fish to. You cannot just choose some random lake and expect to catch your desired number of fish. To save your time and effort, it is best always to double-check the best places to fish.
  • Check for Weather Updates. This goes hand in hand when choosing the perfect location. Checking the weather forecast can save you time, money, and energy.
  • Baiting Your Hook Properly. One of the most common mistakes of anglers is the way they hook their baits. Some think that everything is set once the bait is hooked. As a matter of fact, the right way to hook your bait is to let the bait follow the hook’s shape. So, you have to fill in the bait body with the shape of the hook. This is to make sure that the fish never gets away.

Those who have a messy strategy of baiting their hook will unavoidably confront the more getting away from trout, alongside lost bait.

The ideal approach to hook is to ensure that the hook goes the entire body of the bait so the trout cannot swim away after detaching the untethered, floating bits of bait.

You can consider these little things that would permit you to meet with more prominent success as you set up a trout fishing rig and fishing line.

Common Lures For Trout Fishing

To lure the trouts into your baits, you must put a type of food they use to eat. If you are going trout fishing, be sure to have at least one of these lures:

Cranks

Crankbaits may not be every angler’s first choice when trout fishing. However, big trouts will hit crankbaits, especially those who are 1/3 or ½ of their size.

Trout has sharp teeth, and they don’t have any problem eating whole portions of big baits. They can tear it into pieces and swallow it.

Critters

Critters like beetles, grasshoppers, bugs, and crickets fall into the streams and rivers with trouts all the time. As such, trouts used to see these critters and eat them. If you try drowning grasshoppers or imitators in the current, surely the trouts will go after it.

Powerbait

Dough bait can be called power bait by any trout angler. If there are trouts anywhere in the area, you can have a few power bait colors to ball up, put into a hook, and give a go.

Salmon Eggs

Trouts are known as notorious scavengers—the raid on spawning beds of fishes to feed their eggs.

You can cut one belly open, put it into a size six hook, and trouts will feed on it.

Spinners

Rooster tails and spinners are some of the best lures for trouts all over the world. You can change it easily in and out on a swivel and get bit by trouts anywhere in the lake. Their flapping blades can be added to a river current.

Spoons

Flashy spoons and those tipped with feathers and wax worms are an effective lure for trouts throughout the year.

They live in colder weather when the bite slows down. Their flashiness entices into a bite and annoys the trouts.

Swimbaits

Bigger trouts love to eat smaller baitfish. One of the best techniques you can try is eating baitfish, paddle tail, a swimbait to disrupt the column.

Tubes

The tubes imitate zooplankton that fishes eat under the sea. They can be instrumental when trout fishing, so always keep them at your tackle box.

Worm Imitators

One of the most basic trout-catching lures is the worms. Live worms can get bit by every fish under the sea.

Some downsized and soft plastic worms can be a great option, too, for the trout. Make sure to choose bright color worms so trout can detect it underwater, even in rivers and lakes.

Important Notes

Always remember to enjoy your trout adventure. Some days will be bad, and other days will be amazingly worth it. Also, trout fishing is a matter of discovering your inner happiness. You are challenged in different ways that, sometimes, most of these tips will not save you from that scenario.Nonetheless, continue to learn and develop your skills when it comes to fishing. It is only a matter of dedication and passion to which one can truly bask in the glory of catching these aquatic species. I hope that these tips may work for you well, as it has worked for me.Keep in mind that knowledge and strategy go inseparably, and to appreciate more achievement, you should practice perfecting both!

Our Fishing Gears on Sale

Great White Shark vs. Bluefin Tuna

0

Imagine an underwater Colosseum, where the ocean’s most formidable creatures go fin-to-fin in a showdown for the ages. In today’s matchup, we have the fierce predator, the Great White Shark, squaring off against the speed demon of the sea, the Bluefin Tuna. Let’s dive into this saltwater clash of the titans!

Key Differences between Great White Shark and Bluefin Tuna

The Great White Shark, known for its size and sharp teeth, is the ocean’s top predator. It’s built like a torpedo – perfect for fast, ambush attacks. The Bluefin Tuna, however, is no ordinary fish either. Recognized for its incredible speed and endurance, this fish is like the Formula 1 car of the sea. Unlike the solitary hunting shark, Bluefin Tunas often travel in schools, using their collective power and speed to evade predators.

Statistical Comparison of Great White Shark vs. Bluefin Tuna

Which Is Faster?

In a burst of speed, the Bluefin Tuna takes this round! With a recorded speed of over 43 mph, they’re the ocean’s version of sprinters. While the Great White is no slouch in the speed department, it just can’t match the breakneck pace of its shiny competitor. It’s like comparing a supercar with a freight train!

Which Is Bigger?

Without a doubt, the Great White Shark dwarfs the Bluefin Tuna, growing more than twice its length and weighing more than double. In a sheer size comparison, our shark friend is like a marine monster truck next to a compact, speedy coupe.

Which Is Tougher?

When it comes to toughness, the Great White Shark’s natural aggression, formidable jaws, and teeth designed for shearing flesh make it a terrifying force of brute strength. The Bluefin Tuna, while athletic and highly muscular, doesn’t have the same built-in weaponry. In a tussle of toughness, the shark chomps down on the victory.

Which Is Meaner?

The Great White Shark is the definitive bad boy of the ocean. With a reputation that precedes it, thanks to Hollywood movies and sensationalized media, it’s considered one of the meanest predators in the sea. Bluefin Tuna, on the other hand, are more the ‘keep to themselves’ types, more worried about being someone else’s dinner rather than picking fights. In the mean stakes, it’s the shark with a scary smile that wins!

Who Would Win This Fight

In the ultimate showdown between these two sea giants, it’s a game of speed vs. power. While the Bluefin Tuna boasts impressive speed, in a direct clash, the sheer size, aggression, and killer instinct of the Great White Shark would likely prevail. The shark’s built for hunting and overpowering its prey, and in this theoretical marine match, it would probably prove to be too much for the swift, but less equipped, Bluefin Tuna.

So, there you have it, folks! In this aquatic battle, while each contender shines in their own right, we’d place our bets on the Great White Shark coming out on top. But remember, the ocean’s a wild place and anything’s possible in the deep blue!

  • Category: Versus
  • Tag: Bluefin Tuna, Great White Shark

Improving The Traditional Cowboy Bedroll

0

The most iconic image of America’s nineteenth-century westward expansion is that of the cowboy. Hardworking, tougher than nails, and full of grit, cowboys worked as ranch hands for large cattle and sheep ranches in the out stretching American west. Besides taking care of the everyday keep of the ranch, cowboys were also hired to herd the wealthy rancher’s livestock long distances and at times through wild and dangerous country to the city markets to be sold.

Because of the rough lifestyle and often harsh conditions they lived in, cowboys had to depend on certain tools and equipment to not only get their work done, but in many instances, to survive. Some of these tools have become a part of the cowboy’s iconic image. A good horse and a comfortable saddle; an accurate and trusty rifle or hand gun—and for a few, both; a sharp and well-built knife, good boots, and his bedroll.

The cowboy bedroll was, although simplistic, a significant item in western culture. A cowboy’s bedroll served multiple purposes: such as a trunk to store his personal items, a safe box, a seat while eating, and of course a bed.

The cowboy bedroll was very portable, and extremely practical for the lifestyle cowboys lived, it was also one of the very few comforts a cowboy had, especially while out on the trail. While traveling it could easily be slung over the shoulder if walking or strapped to the back his saddle if solo. While on a drive, it would be thrown into the back of the bed wagon where it could easily be retrieved at the end of the day. While at ranch headquarters it could be unrolled on the floor or a bunk in the bunk house.

What is a Cowboy Bedroll?

The make-up and design of the classic cowboy bedroll was simple; wool blankets or bedding wrapped in a canvas tarp that usually had buckles or ties that would connect the two canvas flaps together. The bedroll could then be rolled up and strapped tight with a rope or leather strap or belt.

The cowboy bedroll was in many ways a precursor for the modern day sleeping bag. Some versions had a strap to allowed it to be carried over the shoulder. The canvas tarp was meant to provide protection from bad weather. If it rained, the canvas added a layer of protection, attempting to kept them dry and warm. This is only true, however, if the canvas was waterproofed with a combination of beeswax and linseed oil. If it wasn’t, your protection against wet weather was limited.

It is true that traditional canvas will swell and hold out water, but once it is touched from the inside it will begin to wick moister through to the inside, thus defeating the purpose for a canvas covering.

In snowy weather, the canvas would allow the cowboy to stay dry and warm, and at the same time the accumulated snow would provide an insulated layer. If the weather was warm and nice the canvas tarp could be flapped open, allowing him to enjoy the cool night are while at the same time providing a ground cloth.

Improving on the Timeless Cowboy Bedroll

It is unclear when and where the bedroll concept was first conceived. One thing is for sure, however, bedrolls have been around for a very long time, and have been used in a large variety of places and circumstances. Forty-niners used them throughout the gold rush. Soldiers used them during the American Civil War.

They have been popular in Australia for many years and come in many shapes and sizes. In Australia they are called a swag, or a swag bag. In many ways the Australian swag bag has lost the simplicity and convenience of the traditional cowboy bedroll and have at this point morphed into what most people would view as a one-man tent. Although the swag is smaller than most tents, it acts as one since you don’t keep your gear in it roll it up. This for most people destroys the point. One could argue that you might as well use a tent.

You may be wondering how Canvas Cutter has improved upon the functionality, protective qualities and durability of the traditional cowboy bedroll without destroying the simplistic nature and its convenient features.

We at Canvas Cutter follow the KIS rule or “Keep It Simple”. The design and function of the traditional cowboy bedroll is already good, which is why it has been around for almost two centuries. We knew the shape of the traditional cowboy bedroll worked, its functionality was good, the protection it could provide from the elements was fare, but often left one wanting, and the canvas traditionally used was quite durable. These things didn’t need to necessarily be changed, but rather improved and where possible simplified.Often when a company tries to improve on timeless product or idea, the improvements made decreases the products simplicity, which regularly changes the very features that made it great in the first place. So, we asked: “how can we take an already simple concept and simplify it even more while at the same time improve and modernize all its features?”

We started by analyzing what the weaknesses of the traditional cowboy bedroll were, which would allow us to identify what we needed to improve. Once we knew what we needed to improve upon, then we could focus on simplifying those improvements.

Improvement #1: Traditional Canvas to Sunforger Marine Canvas

Canvas was a great fabric choice to use for the cowboy bedroll. It is a strong fabric that can handle the abuse of life in the outdoors. Although the cotton threads woven together would swell when wet making the weave extremely tight and difficult for water to get through, unless the canvas was treated it would not hold water out for long.

In fact, even if traditional canvas is treated – often called “Duck” or “Army Duck” canvas once treated – it will still absorb water when touched from the dry inside of the canvas. This is obviously going to be a problem when one is laying inside the canvas bedroll, and constantly rubbing up against it. The water you are supposed to be protected from will slowing start making its way to the inside, leaving you to wake up cold and wet. This obviously destroys one of the main purposes for using the bedroll.

At Canvas Cutter, we knew traditional canvas does not and would not be suitable for our premier canvas bedroll. To eliminate the afore-mentioned problem one would face with the traditional cowboy bedroll, we chose to use Sunforger Marine canvas.

Sunforger canvas is made from multi-thread spun-yarn, that is woven in a crisscross and diagonal line weave, making the weave significantly tighter than traditional canvas, and increasing the canvas’s strength dramatically at the same time. Marine treated means the canvas has been double treated – making it completely waterproof. The treatment also makes the canvas extremely mildew resistant.

Because of the treatment and tighter weave, the Sunforger canvas will not wick. This means it can rain all night and all day and you will remain warm, dry, and comfortable.

Improvement #2: The Flap System to Zipper

Although the traditional cowboy bedroll did provide some protection against the wind and bad weather, that protection was limited. When the weather was windy and rainy the struggle was oh-so-real.

The canvas tarp was used to create the bedroll cover by overlapping to canvas flaps which were often tied or buckled closed. The cowboy bedroll was open ended at the head, allowing the weather and cold air to come in. Sometimes there was a flap that could be pulled over the head protecting it from rain, but not the wind and cold or any puddled water on the ground around you.

Also, it would take time and patience to flip the canvas flaps over your bedding and tie or buckle them closed while getting wet and cold in the process.

At Canvas Cutter, we used the same simple rectangular shape of the traditional cowboy bedroll, but we got rid of the canvas flaps, ties, and buckles. We simplified the design by installing one zipper.

The heavy-duty YKK zipper (which meets military grade standards), runs from the foot of the bedroll up around the head and back down to the bottom of the bedroll, allowing you to quickly and completely close the inside of the bedroll off to the wind, rain, snow, dust, bugs or rodents that might want to find their way inside.

Whether you left the bedroll back at camp or you’re laying comfortably inside it, you and your gear are protected. Canvas Cutter bedrolls have four zipper pulls and short, weather flaps on each side. These pulls and flaps allow you to unzip the bedroll several inches on each side during bad weather conditions, increasing airflow and reducing the possibility of condensation build up inside the bedroll. Two overlapping seams cover the entire zipper and add additional protection against the weather.

Improvement #3: A Piece of Rope VS 3 Quick-release Buckles

The traditional cowboy bedroll was often kept rolled up by a rope or a leather strap. These got the job done, but the idea could definitely be improved upon.

The rope or leather strap were not connected to the bedroll itself, which meant you had to keep track of it. If it got lost, your ability to keep your bed rolled up and the convenience of carrying it was lost.

To make the roll-up/unroll process, as well as the carrying of the bedroll more simple, quick, and easy, we sewed three one-inch polyester webbing straps with quick release buckles to the bottom of the bedroll and included an easy to carry handle to the bottom of the bedroll.

The quick release buckles allow you to unroll your bedroll in seconds, without the hassle of dealing with knots or keeping track of a rope or strap.

When rolling the bedroll up, the quick release bucks and straps allow you to synch the bedroll as tight as you would like. The straps can also be loosened easily while buckled.

Pioneering Bedroll Convenience

The cowboy bedroll has been an iconic piece of outdoor gear in the west for centuries because it makes life in the rugged outdoors a little easier and more comfortable. It allows you to have a mobile camp, that can be set up or taken down quickly and conveniently.

The soul who conceived the simple idea was a genius, and Canvas Cutter has taken this idea and improved it a thousand times over, hoping this better way of sleeping in the outdoors sticks around for centuries to come.

If you are looking for a light-weight and durable canvas bedroll, pick up the newest addition to our canvas bedroll line up – The SUMMIT.

Best Air Rifle Deals

Popular Posts

PCP vs Gas Piston: Which One is Better?

0
The perfect airgun is a difficult pick when you are new to gun-hunting. There are a lot of things to keep in mind, starting...

Air Rifle Scope vs. Rifle Scope – Which One Fits Your Shooting Needs?

0
"Air Rifle Scope vs Rifle Scope: Unveiling the Ultimate Precision Optics. Discover the essential differences and benefits of these two optical devices, empowering shooters...

How Does an Air Rifle Work?

0
Discover the inner workings of an air rifle with our comprehensive guide! From the mechanics behind its powerful shots to the intricate process of...

Can a 22 air rifle kill a deer?

0
"Debate over whether a 22 air rifle can effectively take down a deer has sparked curiosity among hunting enthusiasts. With its lower muzzle velocity...

PCP vs CO2 Guns: Which One is Better?

0
The most talked-about debate between hunters and gun enthusiasts is what the best power source of a gun is.  The five main sources of power...