Because trophy bucks absolutely love the solitude and security of a swamp.
It hadn’t rained at all, but the foggy afternoon mist hung so thick around me that water clung to every branch, every blade of grass and every inch of this bowhunter’s body!
The thick stand of poplars took on a surreal look as every nook and cranny faded into that dreary gray, washed-out landscape. As I scanned the dense line of willows that marked the edge of the giant swamp, I caught myself wishing for darkness so I could slip out of this hell hole. What I saw next caused my heart to skip a beat.
Standing like statues just inside the impenetrable willows were two giant white-tailed bucks, both staring intently past my ambush toward the picked cornfield where several deer had already begun feeding. How the bucks had arrived at this spot undetected astonished me. They were only about 15 yards away wearing matching socks of heavy, wet mud well past their knees!
These trophy whitetails apparently bedded somewhere out in the center of this vast morass and were in no hurry to leave the safety of its confines before total darkness. All thoughts of warming up vanished as I slowly eased my longbow from its resting spot … The next move belonged to the deer.
For many long minutes, the bucks seemed frozen in time, standing stock-still at close range but barely visible through the 15 yards of soup to the densely woven clump of willows where they held their ground. That both deer were shooters was not in question. I couldn’t begin to count points given the situation, but even though they were well within range, I had no shot.
At one point, I considered grunting softly to try to spur some action, but abandoned the idea because I knew that at such close range both bucks would pinpoint me and the game would be over. Now, with darkness closing fast and few options open, I looked down for a split second to check the water pouring down the limbs and riser of my longbow, across the fingers of my shooting glove, and also matting my feathers tightly to the cedar shaft nocked to my bowstring. Getting off an accurate shot, even at close range, would be difficult!
Not that it mattered. For when I looked back toward the bucks, they had vanished! No sound, no movement … Maybe I had imagined it all, but the muddy trail leading into the depths of the huge swamp told the story. A pair of swamp bucks had outsmarted me again.
Wherever whitetails are, there are hunters who pursue them with passion and conviction like few other trophies. A big buck is often described as a separate species in that its habits and behavior differs significantly from other whitetails, making it seemingly impossible to kill at times.
The common denominator, though, wherever they call home, is that trophy bucks absolutely love the solitude and security of a swamp. From the vast tamarack swamps in the North to cattail and willow swamps in mid-America to the brackish tidal swamps of the South, white-tailed bucks grow old by sticking like glue to the heavy cover in and around swamp country. Hunting these areas is difficult, but not impossible.
Finding a Swamp
To find a swamp, drive roads in your area or study local topo maps. These maps will show low ground clearly and these areas should be circled and checked out on foot. One beauty of swamp hunting is that it is often open to the public because the ground isn’t useable for farming or development. In my home state of Minnesota, vast acreages of swamps are open to public hunting in the form of Waterfowl Production.
Areas or Wildlife Management Areas, offering excellent hunting opportunities if you are willing to work hard at your sport (more on that later).
Pinpointing the Bucks
Whitetails aren’t amphibious, so in order for them to use a swamp there needs to be some high ground. Oak islands are a favorite hotspot of mine to locate big bucks because they will use these areas for both bedding and feeding, often staying put for days without leaving these sanctuaries during daylight hours. Aerial photos are the key here because you can locate high ground hotspots easily with them. Getting a personal aerial view can really help you get a feel for the lay of the land and how the bucks are using it. A word of caution: Bucks will often use swamps that seem devoid of high ground, so don’t overlook any areas during your search.
I hunted around a big cattail and willow swamp in Minnesota for two years while chasing a giant buck that I only saw twice, both times before the season opened. His sign was prevalent around the edges of the swamp, but I never saw him with other deer. I finally found out why after an early season snowstorm allowed me to track him back to his bedding area.
The freak storm dumped several inches of heavy snow across the landscape in early October, and after climbing down from a morning stand, I decided to check the edges of the swamp for fresh sign. I found a huge set of tracks leading back from the preferred feeding area, right through the center of the main bedding thicket, and into the heart of the nasty swamp.
Curious as to why the buck would cross this abysmal mess, I donned hip boots and followed him: A hundred yards into the heart of the cover, I heard crashing ahead of me but couldn’t see a thing because the cattails and willows were well over my head, but I soon came upon an old, dilapidated muskrat hut with a well-worn bed directly on top! That monster buck had apparently been bedding every day in the middle of this swamp, with absolutely no dry ground in sight, making him virtually unhuntable!
Find Their Weaknesses
Even bucks like the one just mentioned have weaknesses, and their Achilles Heel is the rut. Normally nocturnal and reluctant to leave their sanctuaries, even cagey old swamp trophies can be taken once they begin to travel in search of does. Such was the case for the Minnesota buck mentioned in the muskrat hut story. A month after I found his bedding spot, he made the mistake of returning to his bed a little late one morning while following a hot doe and was killed by a rifle hunter on the opposite side of the swamp. He had 17 points and grossed nearly 180 inches, but became vulnerable during the rut.
Once the rut begins in earnest, I like to spend all day every day on stand between the nastiest swamp cover I can find and areas of heaviest doe concentrations. The bucks, even the biggest ones, will show eventually, so patience is the key … along with long hours spent in the woods.
Swamp Access
Hunting swamps is difficult at best, but it is not impossible. One of the beauties of swamp hunting, especially on areas of public land, is that few hunters have the work ethic required to go off road and into the center of the nastiest cover. So for the hunter willing to go the extra mile, the reward will be unhunted country and trophy bucks.
Obviously, getting into and out of the swamp is a challenge, requiring hip boots, chest waders or, in some cases, a lightweight boat or canoe. My favorite tool is my ultra light Old Town canoe. Appropriately modeled the Pack, this swamp country super sleuth is only 12 feet long and weighs a mere 33 pounds, allowing me to carry it easily to out-of-the-way access points and then paddle silently into big buck havens.
As far as boots go, I almost always wear chest waders now when hunting swamp country whitetails. Although the water is seldom more than knee-deep, the soft bottoms of most swamps can test the height of even hip boots, and going over the top of your boots in the dark en route to your stand in the morning is a good way to ruin a hunt. Obviously, I don’t sit on stand all day wearing chest waders, but I put my regular hunting boots in my pack or lash them on the outside and then leave the waders rolled up when I hit high ground.
Favorite Tactic
My favorite swamp-hunting tactic is to get back onto some remote oak island very early in the morning, well before daylight, and wait for the big bucks to return from wherever they have been feeding and/or chasing does. Big bucks will leave the fields well before daylight but will slow down once they penetrate the edges of the swamp. A hunter who is already positioned well back into the mess will have the element of surprise on his side as the relaxed deer reaches the sanctuary.
I have actually gone so far as to sleep under my overturned canoe in order to beat the bucks to their bedding zone, but be sure to check your local regulations as this isn’t always legal, especially on public land that does not allow overnight camping.
A couple of years ago, I paddled quietly along an old drainage ditch to reach a small oak island well before daylight, and then watched a steady stream of deer pass by my stand well after the sun had risen above the trees. Included in the parade were six different bucks ranging from 2-year-olds in the 120 class to a massive 10-pointer that would have approached record book minimums. I raised my longbow several times as I tracked a nice 4×5 across the slight ridge in front of me at less than 10 yards before deciding to hold my fire.
The monster never offered me an acceptable shot. I slipped back into my canoe under the cover of darkness that evening without the weight of a big buck in the front end, but I never saw or heard another hunter and was surrounded by bucks throughout the day.
The upshot is whitetail hunters looking to score big should learn a little swamp savvy.
– Lead photo by Mike Searles
This article was published in the October 2006 edition of Buckmasters Whitetail Magazine. Join today to have Buckmasters delivered to your home.
When it comes to geese and duck hunting, the gun gets a lot of attention. Many people believe that having a successful season depends on whether or not you have the right gun. But surprisingly what affects the success of your shot is the choke. As a result, it is critical to choose the best choke for duck hunting. Use these guidelines to help you choose an appropriate choke for your firearm.
A shotgun choke is a narrowing or constriction that is present in the barrel that is usually a few inches from the muzzle. Every shotgun barrel has a choke or constriction that is either manufactured into the barrel, screwed in, or detachable.
When a shell is fired, it goes down the barrel, and the choke’s duty is to compress or constrict it before it leaves. This compression plays an important role in the patterning of the shot.
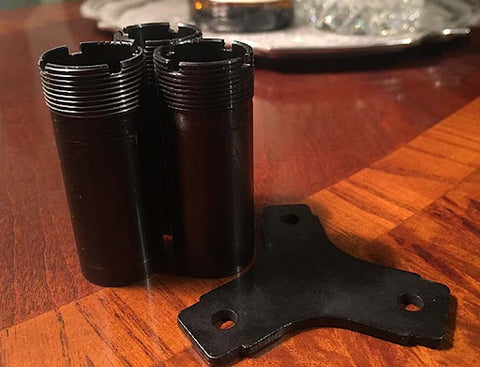
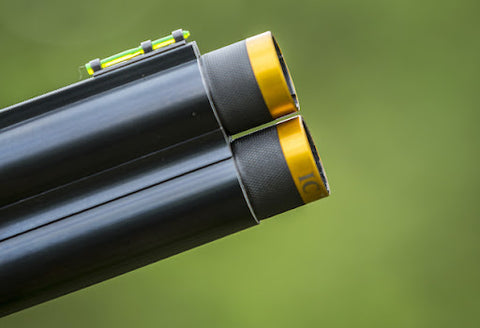
There are three types of choke tubes:
Full Choke
Modified Choke
Improved Cylinder Choke
Full Chokes
The constriction of a full choke is very tight. This choke is useful for rodents, turkeys, and other wildlife shot at 50-yard and longer distances since the shot holds together further.
Modified Chokes
The constriction in the modified choke is moderate. The bullets stay together for longer, resulting in a fuller shot string that is more helpful at longer distances. This choke is frequently utilized for duck hunting and geese hunting. Improved modified chokes are a significantly tighter version of the modified choke.
Improved Cylinder Chokes
A minor constriction exists in the improved cylinder choke. This choke helps gunshots spread rapidly. It is usually used for shooting at close ranges. It is a great option for small birds, rabbits, and other highland animals.
Whether you’re a waterfowler or a duck hunter, your goal is twofold: first, you must determine how far away the bird is when you’re firing and then choose the choke tube that produces the best pattern at that range. The only way of knowing what your choke will do while outdoors is to test it with your firearm and ammunition.
Notches on Choke Tubes
Credit: The Yorkshire Gent
Most choke tubes have notches on them. These are not accidental. The number of notches reflects how much constraint the choke provides; the more notches, the more constraint, and the more constraint the choke provides, the greater the distance of your shot pattern. However, not all chokes are made equal, and various ammunition will react differently, so it’s always a good idea to pattern your shotgun before going out hunting with it.
List of Best Chokes for Duck and Goose Hunting
Here are the best chokes for duck and goose hunting:
1) Fatal Shot Choke Tube by MOJO Outdoors
The MOJO Outdoors Fatal Shot Choke Tube is suitable for a wide range of shotguns and was developed after years of data and testing of shot patterns. It even runs different ammunition and cartridge varieties. This makes it the ideal choke tube for target sports and duck hunting. The choke is available in three lengths and has a screwless setup, allowing you to change it out as required in the field.
2) CARLSON’S 12 Gauge Choke Tube
The Carlson’s 12 Gauge Choke Tube is made for goose hunting at long-range distances and gives results similar to a full choke. The internal rings present slow the bullet down, allowing the shot to divide as it leaves the muzzle. If you’re looking for a complete package, this is the choke tube to have.
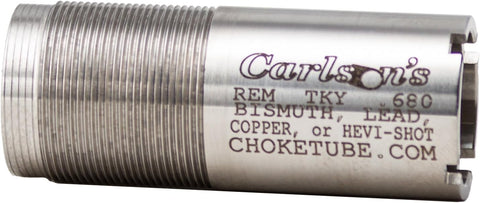
3) CARLSON’S Choke Tubes 12 Gauge for Remington
Another one from Carlson’s, this choke tube is typically recognized as one of the best and most precise designs available for turkeys. Turkeys and other birds don’t always fly in regular patterns, and they don’t always remain close, so this waterfowl choke tube comes in handy when you’re out in the woods. This can survive even the harshest weather during hunting season, thanks to its stainless steel metal body.
4) Primos TSS Turkey Choke Tube
The Primos TSS Choke Tube is a great choke for turkey hunting. The unique design offers a lengthier, more progressive taper, resulting in thick shot patterns that constrict more consistently. As a result, you get more shots. The choke is compatible with all Benneli, Remington, and Invector shotguns.
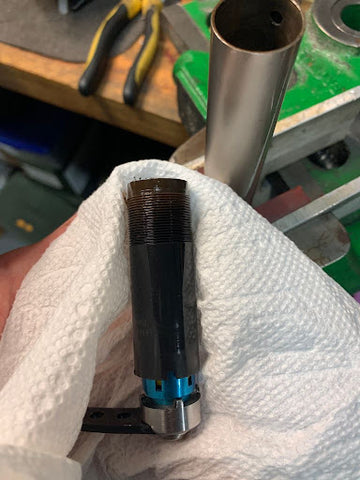
How do You Clean a Choke Tube?
Credit: Rifleshooter
A rusted-in tube is costly to remove, and it’s frequently impossible to do so without damaging the choke and maybe the chamber. Take out the choke tube at the end of each season and whenever the gun gets wet, dry it, scrub the threading on the barrel and tube, apply a dab of grease to the threads, and reinstall the choke tube in the gun. A fresh or rethreaded cylinder costs a lot more than a little grease and sweat.
What Kind of Shots Should You Shoot With Your Choke Tube?
Credit: Richard Faulks
This is entirely reliant on the choke tube’s capacity. Some choke tubes can be used with almost any shot. Other choke tubes will only allow to shoot with a lead or steel shot. Before patterning your shotgun with a certain type of shot, read the instructions on your choke tube carefully.
Summary
Because the most acceptable contact range for ducks or geese is 40 yards or less, the ideal choke for duck or goose hunting is an improved cylinder choke. If you’re going to shoot ducks or geese from a greater distance, a modified choke is the way to go.
Do you want to improve your shooting skills during hunting season? Practicing on shooting targets is the greatest way to do it. Introducing EasyShot: your best bet to improving your shot. Check us out today.
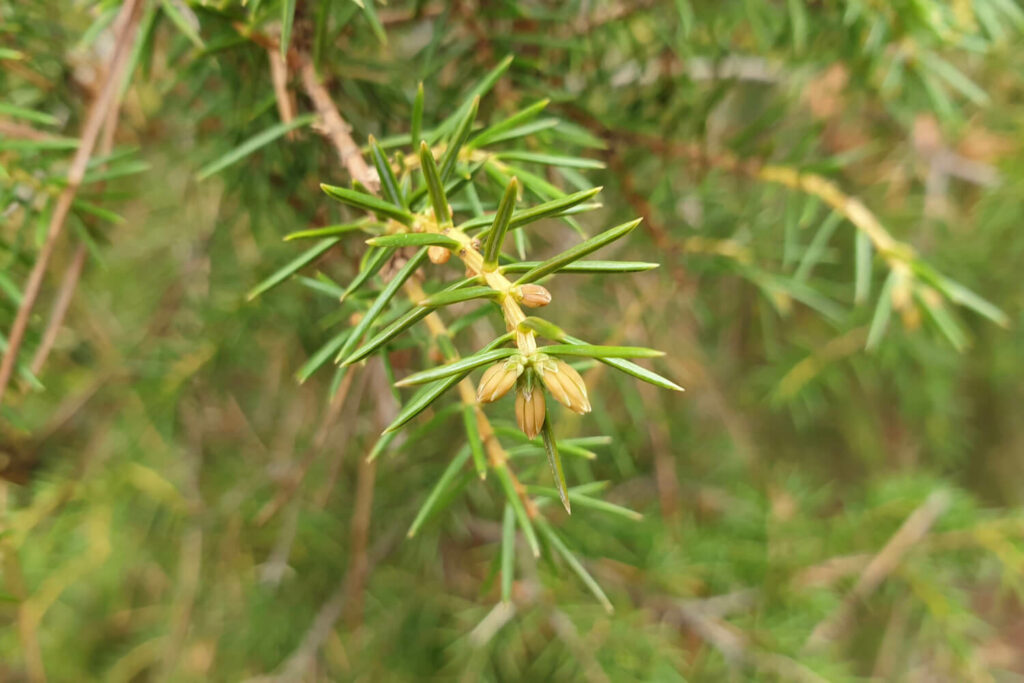
Juniper is a versatile plant with plenty of uses: in the kitchen, in gin-making, in the garden as a hedge or even as a decorative bonsai.
When thinking of juniper, its characteristic blue berries spring to mind [Photo: Kateryniuk/ Shutterstock.com]
Juniper (Juniperus) is a decorative woody plant that has a unique look, aroma and healing properties. Here you will find out how to plant and care for juniper plants and why juniper berries are technically not berries at all.
The juniper genus (Juniperus) belongs to the cypress family (Cupressaceae). The genus contains about 80 species, of which only two occur naturally in Central Europe. The other juniper varieties are almost all distributed throughout the Northern Hemisphere – from the Arctic to tropical regions. Evergreen juniper trees or juniper bushes grow upright, creeping or horizontally and give off a strong fragrance. Their leaves are needle-shaped or scaled, often soft and slightly flattened, but sometimes very pointed. Juniper flowers are often white or pink, very small and inconspicuous. Juniper is better known for its cone fruits, which are often called berries. Until the female cones have reached their blue colour, they have to ripen for up to two years. Juniper is dioecious, which means separate male and female juniper plants are needed for fertilisation.
Juniper grow as a tall tree or ground-covering shrub [Photo: Beekeepx]
But how big does juniper grow? Size varies greatly from species to species and ranges from a one metre tall shrub to a ten metre tall juniper tree. The common juniper (Juniperus communis), which is often planted in milder European climates, reaches an average height of about five to eight metres.
As well as being used as ornamental plants, juniper fruits are used to make gin, essential oils and condiments. They are also high in antioxidants and anti-inflammatory in nature – juniper berries are often used as a natural remedy to treat bronchitis.
Tip: Juniper is a traditional grave decoration, as their evergreen foliage and spire-like growth was thought to represent eternal life.
How to plant junipers: the right location and method
The Juniperus genus is very undemanding and robust, which is why you can plant any juniper in just about any location.
Only shade should be avoided: junipers need a lot of light to thrive. A place in the sun is ideal, while partial shade is tolerated too. Juniper is not overly sensitive to drought and even chalky soil is no problem for this hardy plant. Make sure the soil is well draining, though the juniper will also tolerate a location that is occasionally moist.
Tip: If you want to harvest juniper berries, plant one female and one male juniper plant.
Junipers can even be kept as a potted bonsai [Photo: qSPOoKYp/ Shutterstock.com]
Spring is the best time for planting junipers, but it is also possible to plant in early autumn. Spacing between juniper and other plants depends on the species and its growth characteristics. Place the root ball of the juniper in a bucket of water to soak. Then dig a planting hole in the desired location that is about twice the size of the root ball. If your garden soil is very heavy, you should dig the hole deeper. Mix the dug up soil with plenty of sand to improve water drainage. Then place the juniper in the hole, fill with soil and press down. Make sure to water the freshly planted juniper well.
Potted juniper: You can also keep some small junipers in pots and place them on your patio or balcony. Juniperus communis ‘Compressa’ or Juniperus squamata ‘Blue Star’, for example, are suitable for this. Add a drainage layer of clay shards to the bottom of the pot to ensure good drainage. High-quality potting soil, such as our Plantura Organic All Purpose Compost, is perfect for potted juniper.
Tip: Junipers can be used to form an excellent hedge. To do this, reduce the plant spacing and place two juniper plants per metre of hedge. The columnar juniper Juniperus scopulorum, is one variety suitable for this job.
How to care for junipers: the right location and method
There is not a huge amount to consider when caring for junipers. Although the plants grow slowly, they do not require any additional care. Only young junipers require watering and, depending on the time of planting, winter protection can be helpful.
Juniper needles are sharp, so wear gloves when working with the plant [Photo: ppuDi/ Shutterstock.com]
Juniper care: watering and fertilising
Since junipers cope well with drought, there is no need to water larger, well-established plants. However, you should water freshly planted, young junipers regularly to support healthy growth. In the first few years however, watering is only really necessary when it is dry. Likewise, junipers do not usually require fertiliser, given they are planted in a suitable location. Nonetheless, in sandy soils or in pots, apply a little slow-release fertiliser occasionally. Junipers need a nutrient balance that is low phosphorus and high in magnesium. Because of these special requirements, our Plantura Rose Food is actually ideal for junipers. You should also be sure to repot your potted junipers every so often, as fresh soil stimulates healthy growth.
Not all junipers have blue berries [Photo: Nella/ Shutterstock.com]
How to prune juniper
Juniper tolerates pruning well, which is why it is often used in topiary. Bear in mind, however, that juniper grows slowly and takes longer for new shoots to form. Although it is not strictly necessary to prune junipers, it does encourage branching. When pruning, avoid cutting into the old wood: After heavy pruning, older junipers barely produce any new shoots. A large, healthy plant can be pruned back a little more. Although, it is not guaranteed to regrow. To avoid this risk, simply remove visible dead branches in spring and regularly prune back young junipers slightly. Since juniper needles are very sharp, always wear gloves when pruning.
Common juniper pests and diseases
Although juniper is very robust, there are still some pests and diseases that plague the sturdy plant.
Phomophis blight (Phomopsis juniperivora): Also known as conifers dieback, this disease results in brown discoloured needles and small black fruiting bodies of the veru fungus that causes the disease. To treat, cut all affected parts of the plant back extensively.
Before juniper shoots die, they change colour [Photo: Grandpa/ Shutterstock.com]
Juniper ermine moth (Argyresthia trifasciata): If the shoots turn brown from the tips, you may have an ermine moth infestation on your hands. You should seek advice from a plant protection service on how to best combat this for your individual plant.
The juniper ermine moth can also be responsible for needle discolouration [Photo: DJTaylor/ Shutterstock.com]
Rust fungi (Gymnosporangium): Hawthorn rust, pear rust or juniper rust are caused by various rust fungi. You can recognise them from their yellow, tongue-shaped fruiting bodies and swollen shoots. Cut off any infested parts of the plant and dispose of them in your household waste. These fungi can spread to other plants, such as pear trees.
Juniper is one of the main hosts for rust fungi [Photo: dvande/ Shutterstock.com]
Juniper propagation
The best way to propagate junipers is from cuttings. To do this, take a young shoot from the main shoot in late summer. This should be slightly woody, but still green at the base. Cut off the stem bark with a sharp knife and remove the tip of the shoot and the lower needles. Then plant the cutting into a mixture of all purpose soil and sand and place the whole thing in a bright place with high humidity at around 20°C. Keep the soil moist at all times. By spring, roots should have formed and the juniper is ready to be repotted or transplanted outdoors.
Tip: When propagating, be sure to use a cutting from the juniper’s main shoot because the conifer shoots will “remember” their growth direction. A side shoot, on the other hand, will not grow straight up after propagation.
Are junipers winter-hardy?
A well-established juniper does not need any extra protection in winter. Though young plants should be protected with a layer of mulch. For potted juniper, place it on a wooden block and wrap it with some jute or a hessian sack to be safe.
Juniper is winter-hardy [Photo: Alexander Denisenko/ Shutterstock.com]
Harvesting and using juniper berries
Of all the varieties, common juniper (Juniperus communis) is the one most commonly used in the kitchen. The cone berries of the female juniper are ripe as soon as they turn dark blue. This happens two years after pollination. The berries are used, among other things, in juniper tea or for making gin. Other species, such as the savin juniper (Juniperus sabina), are poisonous in all parts. Juniper wood contains essential oils and are also often used to flavour meat.
Tip: Savin juniper was also used in the past for medicinal purposes. It was used, among other things, to clean wounds, for respiratory problems and abortion.
Juniper tea is said to have healing effects [Photo: ElenVik/ Shutterstock.com]
Are juniper berries poisonous?
Juniper species are slightly poisonous in some, sometimes in all, parts of the plant. While common juniper berries were used in the past for medicinal purposes, they also contain substances which, in excess, can cause irritation in the gastrointestinal tract or on the skin. Juniper should not be consumed during pregnancy or if you have kidney problems. Excessive juniper consumption is also poisonous for pets. Savin juniper is even classified as poisonous and can cause severe irritation and skin blistering from skin contact alone. Vomiting, diarrhea, and blister pain are among the most common symptoms of savin poisoning.
Juniper and heather shrubs are happy to share the same sunny, dry and sandy locations. And like juniper, the type of heather “cross-leaved heath” is very popular in gardens too. Learn all about how to care for it in our article on cross-leaved heath.
Brandon Burks and the 8.52 pound stare record meanmouth bass
*Editors Note: Originally reported to be the world record meanmouth bass, IGFA officials recently informed Brandon Burks that his record would not count because his Alabama Rig had five hooks instead of the IGFA maximum allowance of three. However, since Texas allows anglers to fish Alabama Rigs with five hooks, Brandon’s bass will be the state record, which now weighs more than the world record.
State Record Meanmouth Bass
The state record meanmouth bass weighed 8.52 lbs and was caught from Lake O.H. Ivie by fishing guide Brandon Burks who was using an Alabama Rig in January 2022. Meannmouth are a hybrid species usually consisting of half smallmouth and half spotted bass. However, Brandon’s fish and the previous world record were the rarer, largemouth and smallmouth combo. The last two state record meanmouth bass were both caught from O.H. Ivie Lake a little more than a year apart.
Big Bass Factory
A 10+ largemouth pulled from O.H. Ivie
Lake O.H. Ivie has become one of the most talked-about big bass lakes in the country because of the blimp-like bass being pulled from its waters. Two 14+ pound largemouth were caught within the first two weeks of 2022 and the lake has reported dozens of bass weighing over 10lbs in the previous seasons.
The Catch
The Texas Parks and Wildlife measuring board measuring Brandon’s bass at 23″ inches.
On the day of the catch, Brandon was guiding a client near specific structure areas where he noticed bluegill stacking up amongst the forest of trees left standing when the reservoir was flooded in 1990.
By making casts that stayed within view of his forward-facing electronics, Brandon and his client were working their A-rigs through the timber and among the large concentrations of baitfish without getting snagged. The target fish were suspending bass that nestled themselves within the standing timber as they waited to chow down on passing bluegill.
By using years of on-the-water experience with trophy caliber bass, Brandon applied a specific cadence and technique to help trigger the inactive fish into biting. Once he hooked the massive bass, he jacked up on the fish while simultaneously winching down on the reel handle, this technique might seem aggressive, but it was needed to help pull the big fish up and away from the standing timber.
After an epic battle, the client helped net the fish, which they both assumed to be a largemouth until further inspection. After taking another glance, Brandon was realized he had the world record meanmouth bass on his hands. Unaware of the meanmouth species, the guide client remained skeptical when Brandon claimed, “This is a world record fish.” Eventually, they made their way back to the ramp and contacted Texas Parks and Wildlife, who sent a representative to the boat ramp.
The Texas Sharelunker representative pulled a sample from the fish, confirmed its weight and length, and then watched Brandon release his world record catch back into the lake.
Big Bass Family
Before guiding full-time Brandon worked in the concrete business alongside his father who is an established Texas tournament angler himself. In fact, Brandon’s dad landed a 13lb largemouth from lake O.H. Ivie last year which was followed up by a 12lb fish reeled in by Brandon on the same day.As a guide he specializes in fishing tech and, more specifically, the Garmin Livescope and Lowrance Ghost forward-facing sonar units. With the latest electronics, Brandon can see and do things never before possible in fishing. For example, he can cast 80 feet in front of him and watch his lure being retrieved live on screen through his entire cast. He’s able to lift the lure over a brush pile, around a tree limb, or slow it down for a brief pause if he notices a trailing bass on the screen. Watching fish interact with his lures, or clients’ lures in live-action via today’s latest fishing technology is part of what makes Brandon Burks guide experience so unique. After leaving his job working in concrete and transitioning to a full-time guide, he made it his mission to differentiate himself from the crowd.
His on the water electronic demonstrations allow customers to try live sonar units before making a purchase but most commonly he’s jumping on a client’s boat and helping them dial in their new gear. System settings, on-the-water tutorials, and installation help are all common questions Brandon helps answer.
“If someone is willing to spend thousands of dollars on their electronics, why not pay a little bit more to get really dialed in with a guide,” Brandon said. “I have so much experience on the water and I can help eliminate the learning curve quickly and get guys familiar with their units”
Having the latest technologies and gear is great, but you still have to know how to use it. And that’s where Brandon comes in.
If you want see the Staccato P in action, check out the video review above.
As always, you can head over to Pew Pew Tactical on YouTube for more guns and gear.
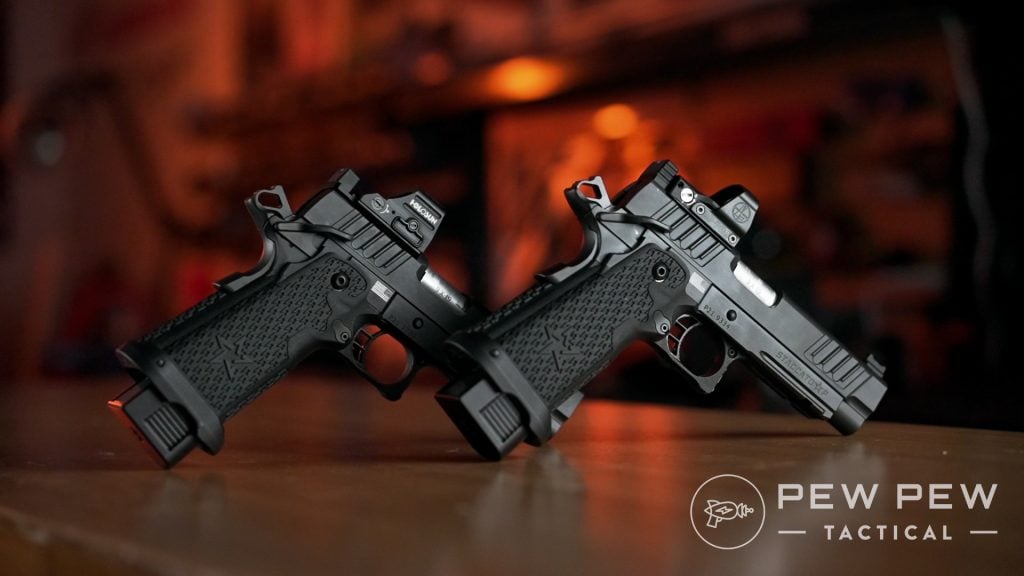
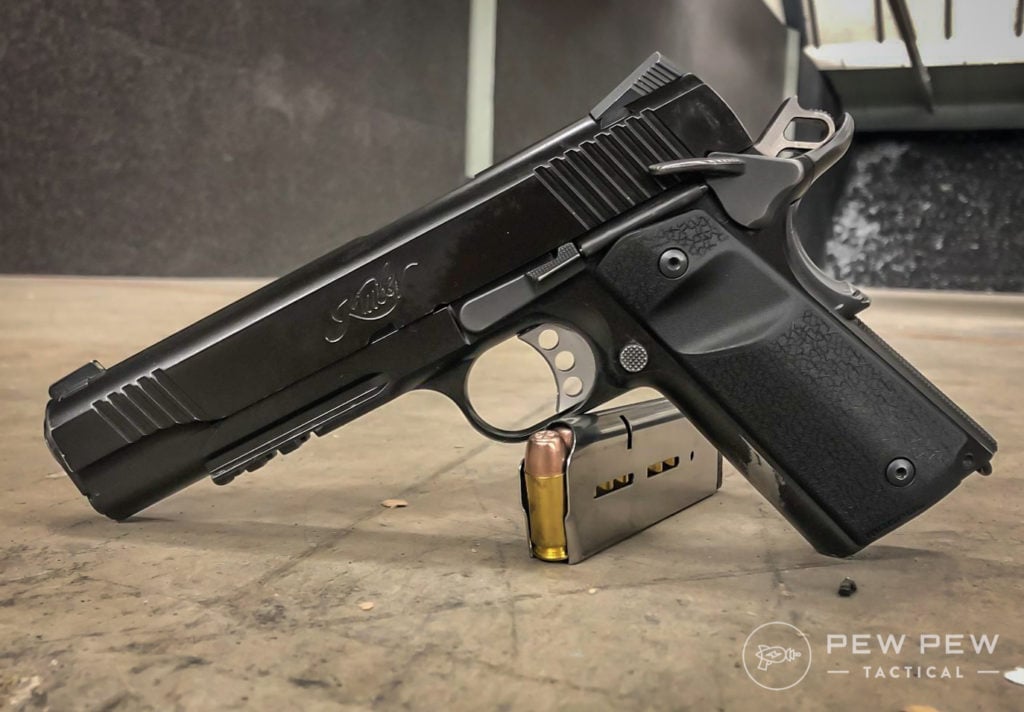
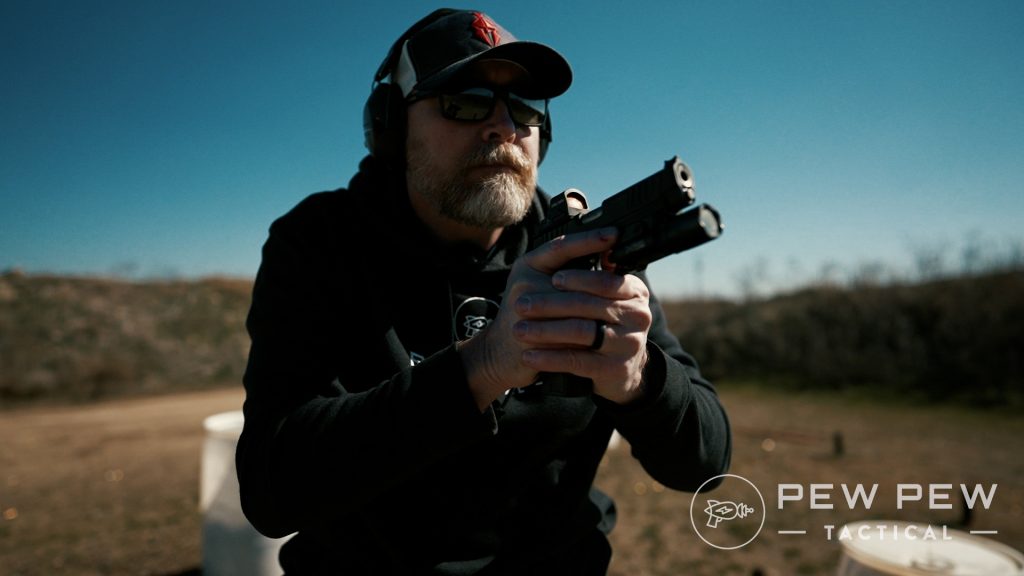
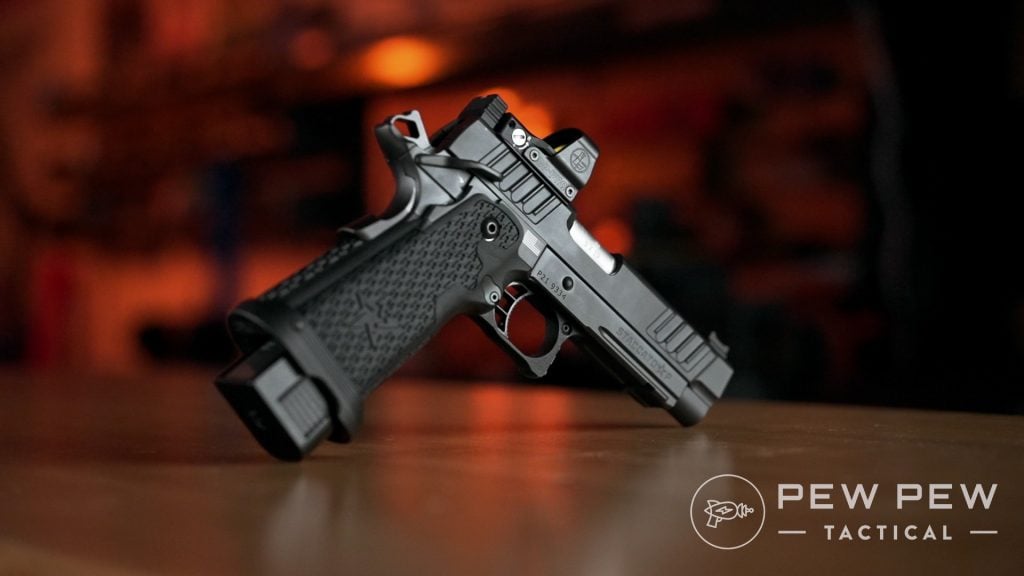
Recently, Staccato came out with a 2011 pistol called P.
While marketing included a mixture of approaches, it was clear the P was at least partially intended for law enforcement.
Staccato P pair close
Staccato claims the P is approved for duty use by more than 460 law enforcement agencies.
I think we can agree, calling a weapon duty rated sets a high standard.
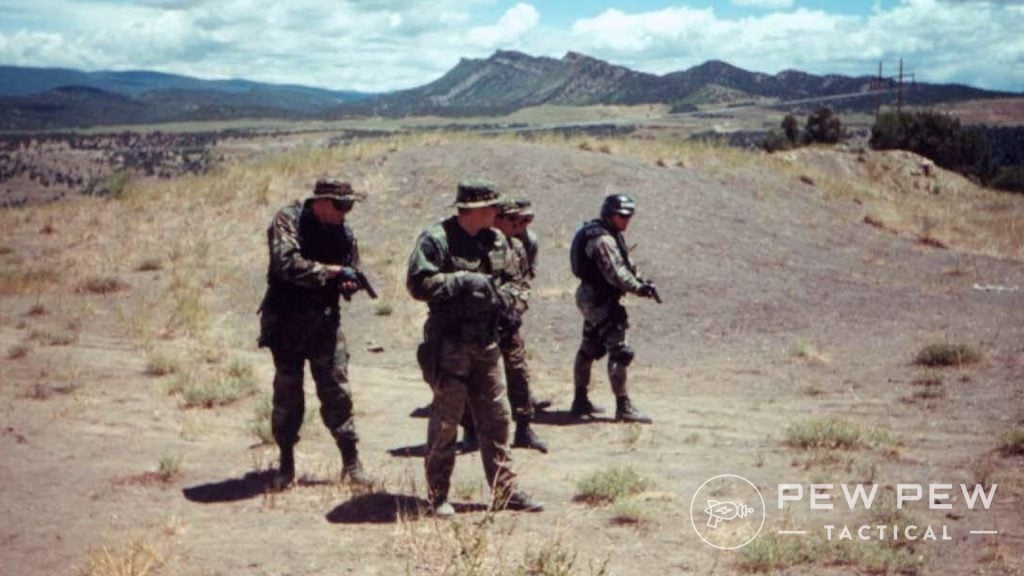
Backed by over 22 years in law enforcement, the last seven of which I served as a POST-certified handgun instructor, I intended to test the P for myself and find out if it merited that ranking.
Before digital cameras
So read on as we walk you through the specs, talk about the features, and head out to the range with this gun to find out what it’s truly capable of.
Feeling lazy to read the article? We’ve summarized the pros and cons for you.
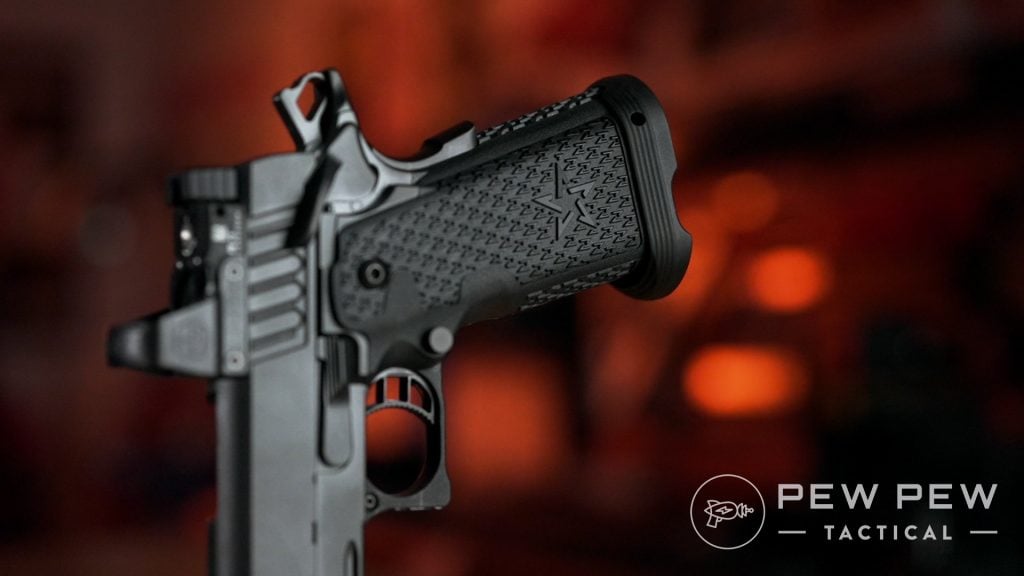
So, after 100 years added to a gun’s legacy, how did Staccato evolve the 1911? What are the main differences?
First off, the general aesthetic is still the same.
Those familiar with the lines of the 1911 will recognize that DNA in the 2011.
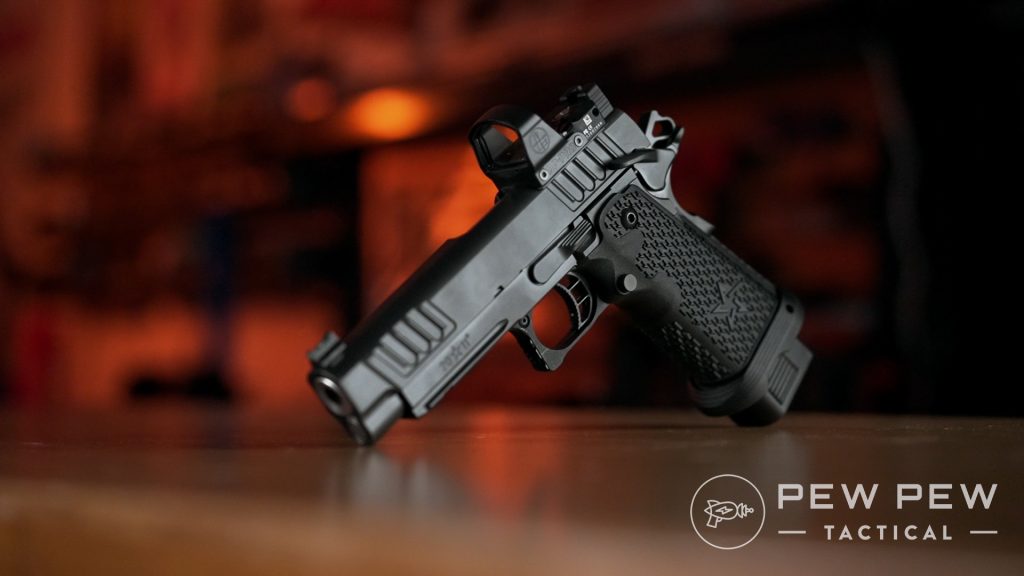
The steel frame with Leupold DeltaPoint Pro
The first big difference you notice is the grip. I’ve always appreciated the narrow but hefty feel of John Moses Browning’s beauty, but the grip on the Staccato is much thicker.
This accommodates the double-stacked, 9mm magazines. When you dig into the gun and take it apart, you notice some major differences.
The frame offers either a steel or aluminum build with a polymer exterior. This allows for increased capacity and helps mitigate some of the recoil.
Heavily textured gip
Plus, the outer texture is grippy. It’s got a raised pattern like an all-terrain tire that really hooks up in your palms.
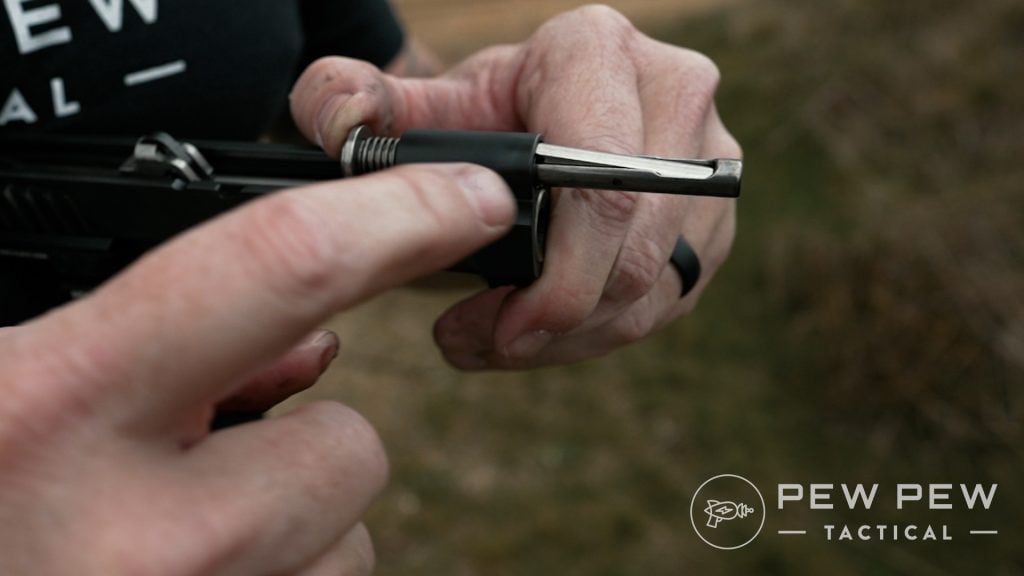
In addition, there’s no barrel bushing. Shooters compress the guide rod and spring until a clip sticks out. This catches on the end of the muzzle and locks the compressed spring in place for removal.
This is called the Dawson Precision tool-less guide rod and it is a much-appreciated improvement.
This upgrade is pure joy
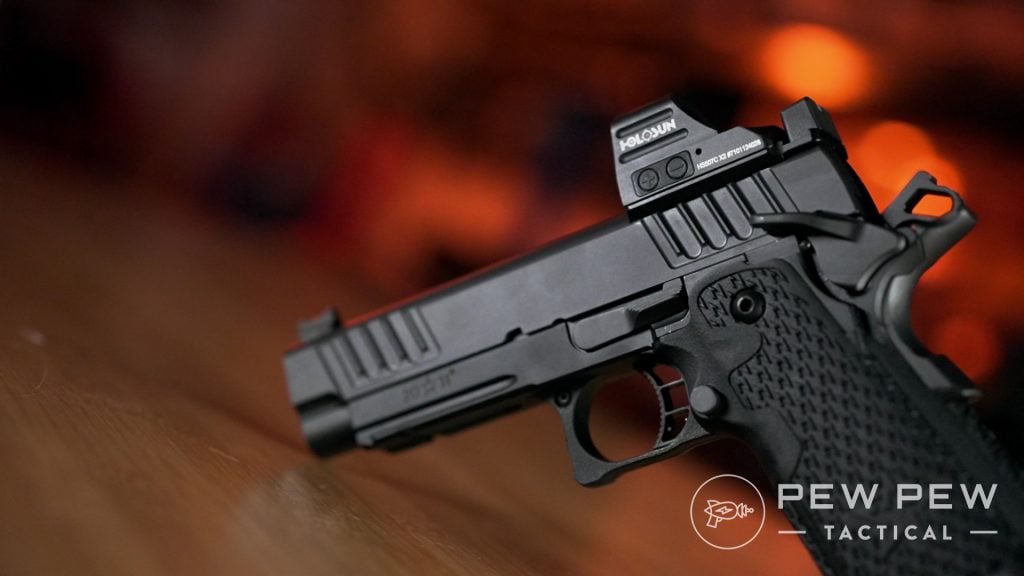
The safety and hammer are still there as is the slide stop and the skeletonized trigger gives the impression of a higher-end 1911.
Ergonomics
Let’s talk ergonomics!
First off, the grip is really big. I wear a 2X glove and I had to make adjustments. While I could reach the mag release, I couldn’t reach the slide stop lever without adjusting my grip.
It is manageable, but police agencies are a lot more diverse nowadays and can’t follow the 6 foot or better hiring practices of old. Small-handed officers might struggle with this gun a bit at first but I think the rewards would offset this.
Different techniques might be required
The P has an ambidextrous safety, but the mag release is currently only on the left side.
Interestingly, I found myself leaning more toward the aluminum frame for preference. Then again, I don’t wear a leather duty belt anymore.
Staccato P shooting side
The steel frame P weighed 2 pounds, 3 ounces on my digital scale, while the aluminum was 1 pound and 14 ounces.
To the Range!
There were a couple of questions I set out to answer with this test.
I wanted to see how the 2011 was improved for the average officer on the street and if Staccato was able to keep some of the qualities I loved about the 1911 while improving some of its shortcomings.
The Kimber Warrior which I carried on duty.
I carried a 1911 on duty which means I hold it in the highest regard. But it doesn’t mean the gun couldn’t stand some improvements.
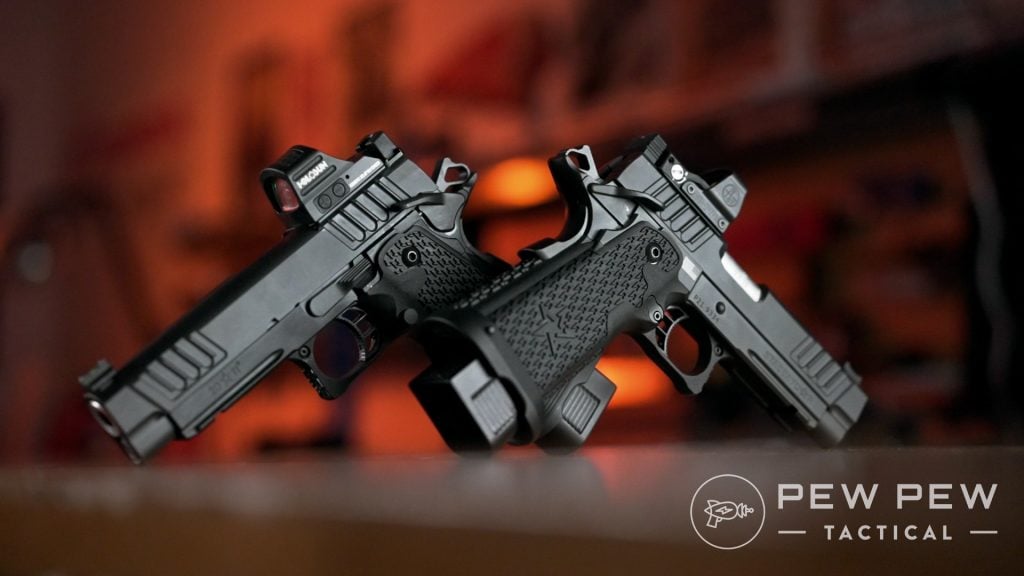
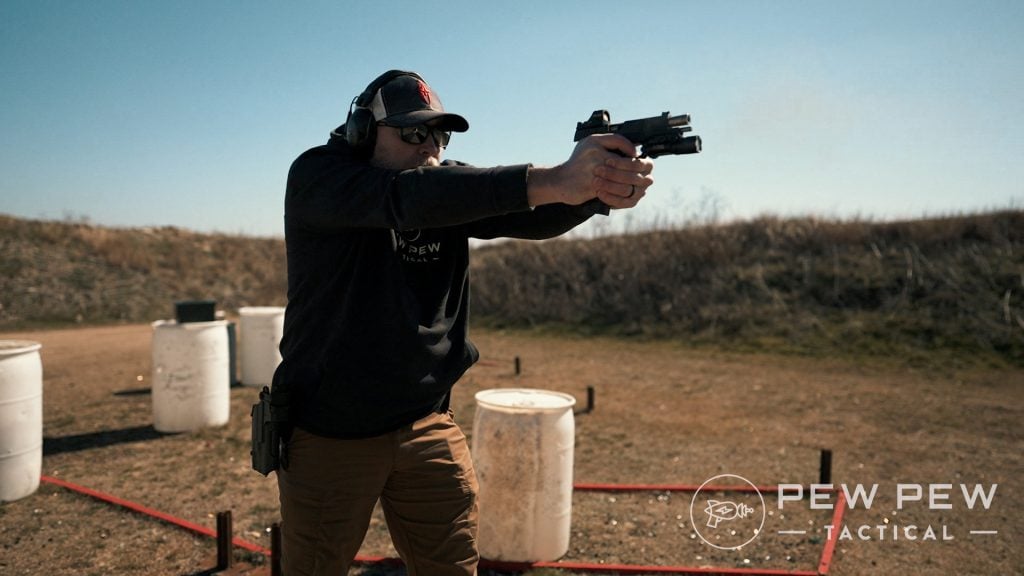
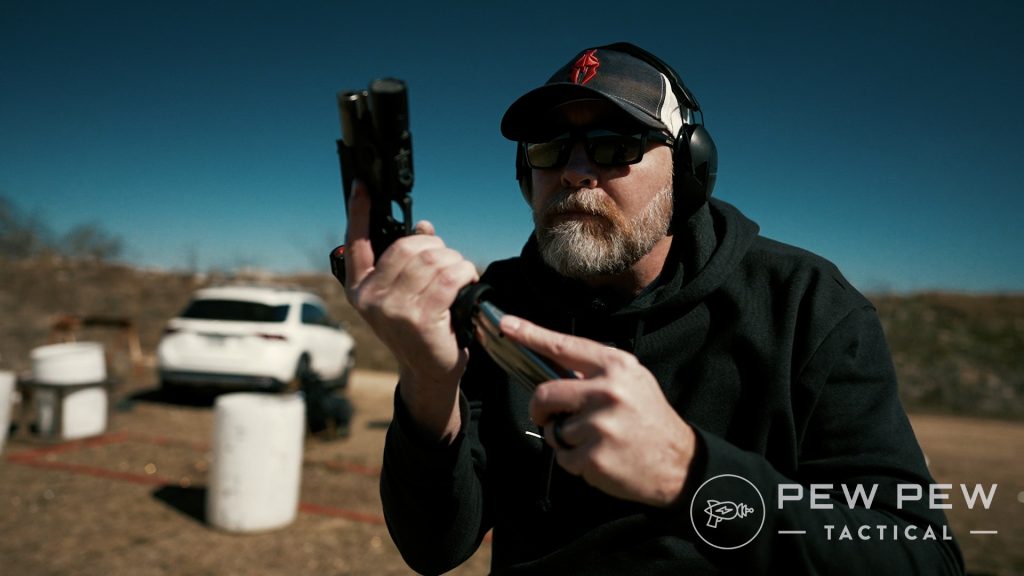
I practically ran to the range when the Staccatos came in — that’s right, I said Staccatos.
They sent two Ps, an aluminum frame, and a steel frame. Before all was said and done, I tested both and developed some preferences.
Ahh variety
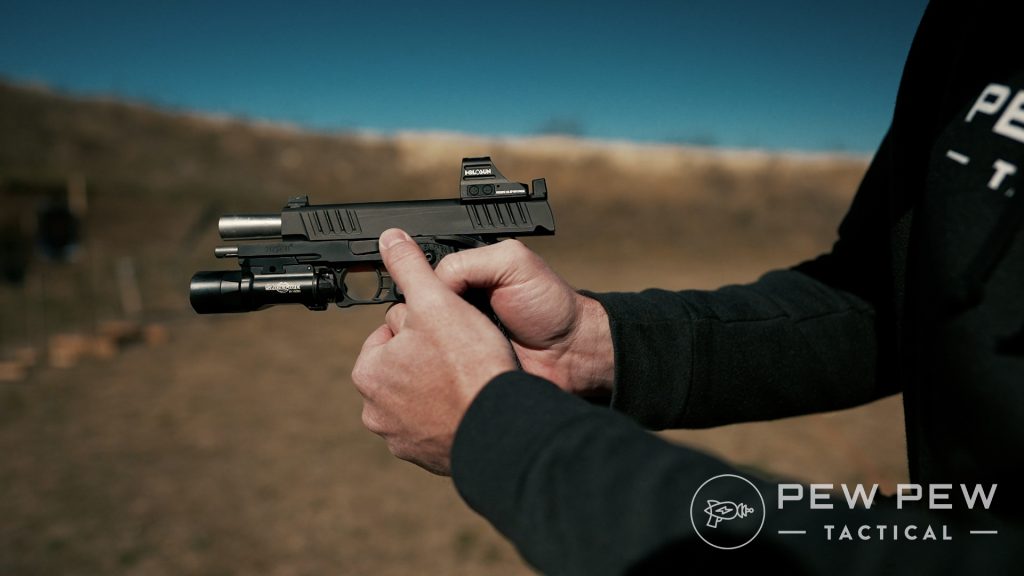
Starting out though, I ran the aluminum frame with a Holosun 507c optic and the steel frame with the Leupold DeltaPoint Pro.
I’m a huge fan of both of these red dots. (Want more red dots? Check out our article on the Best Pistol Red Dots.)
After testing began, one thing became clear right out of the gate — I’m not used to external safeties anymore!
It took some practice to implement that into my draw stroke again.
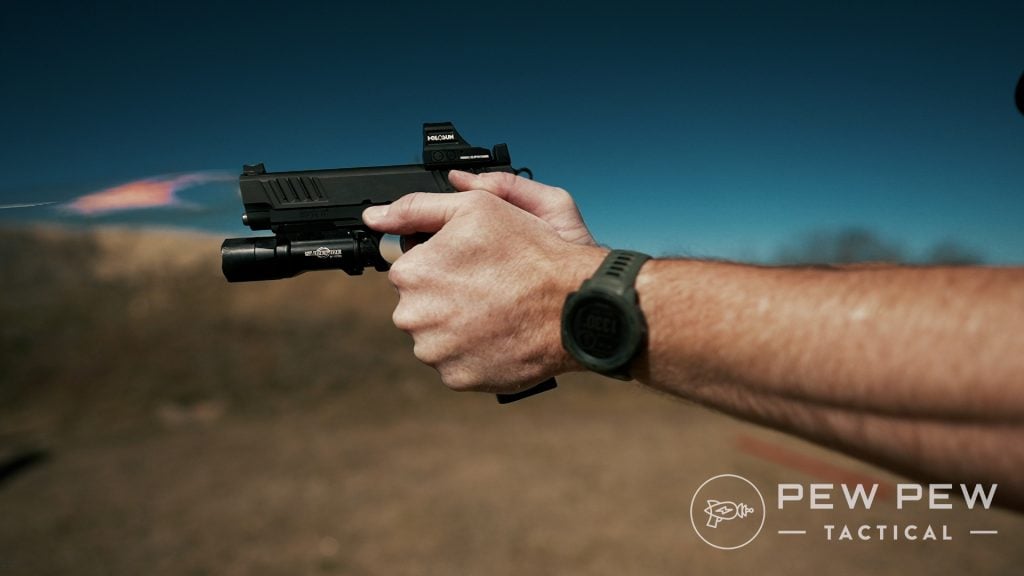
Staccato P spitfire
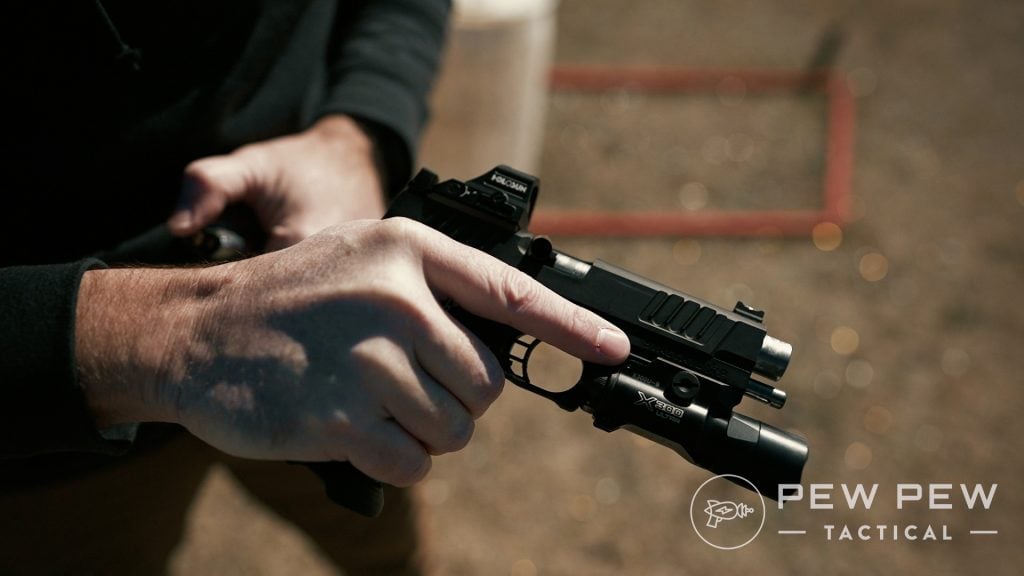
The P comes with a slide lock safety and a grip safety.
There’s a philosophy associated with these, particularly as it applies to law enforcement — they serve as the final layers of officer safety, should de-escalation and weapon retention tactics fail.
With a good grip established, I started banging away. Going back to a hammer-fired gun is like reuniting with an old, familiar, lover.
Gone was the achingly long, sometimes squishy, trigger pull so commonly associated with striker-fired guns.
Nope, this was sheer point and click joy with a short, crisp break and reset.
Mine averaged just over 2.5 pounds on a Lyman Digital Gauge, though Staccato lists it as 4 pounds.
Looking back down Memory Lane, I used to love how well I grouped shots with my 1911.
I attributed much of that performance to the trigger and it felt like the Staccato P would repeat that.
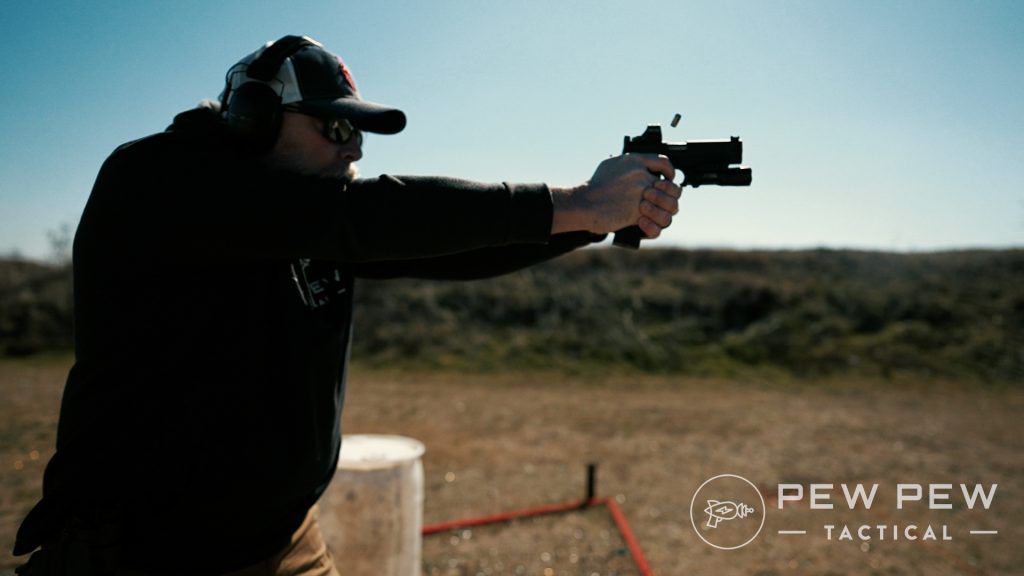
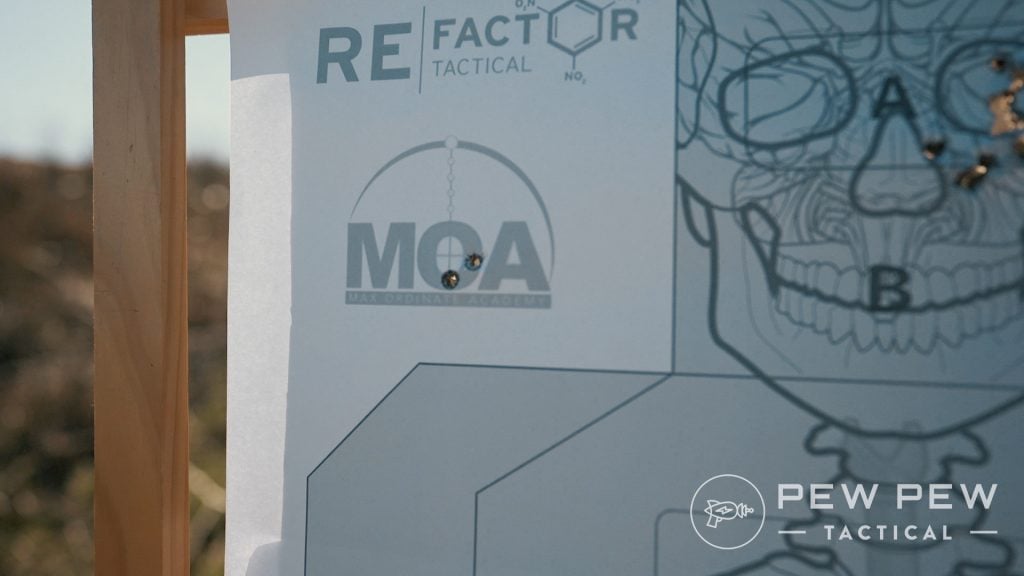
Accuracy
At 15 feet I fired off three shots for accuracy. The first and last went through the same hole but I threw the middle shot about an inch away.
Accuracy is strong with the P.
Should have been 3-in-1 but that’s on me
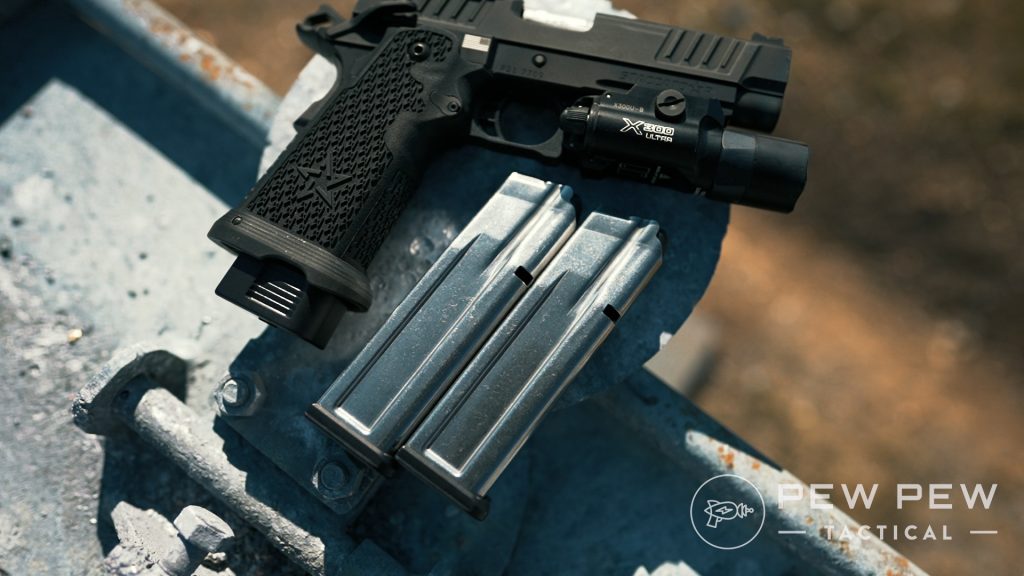
Another impression I had was loving the magazines and their added capacity. The P comes with three magazines — two are 17 rounders and the third is 20.
This means officers can walk around with 20+1 in their holster and another 34 rounds in mag pouches. That first magazine is often the most important, for obvious reasons.
20 is money
Moving onto reliability, I fired right around 1,000 rounds through each gun using American Eagle and Blazer, both at 115 grains. I also ran some 124 grain SAR USA ammo through the guns.
With the exception of two stovepipes, the guns ran flawlessly. I was able to pin this down to one box of Blazer ammo and it did not happen again.
This only happened twice, from the same box of ammo
I ran different drills from my academy curriculum during testing and really began to appreciate this new breed of gun – an evolved fighting pistol with a pedigree.
In short, both Staccatos were fantastic.
For a full breakdown on the P’s…breakdown, see our Disassembly and Reassembly video below.
By the Numbers
Ergonomics: 4/5
The grip is really big, even though I wear a 2X glove, I had to make adjustments. Smaller-handed shooters might struggle a bit. Overall, though, it’s pretty comfortable.
Reliability: 4.5/5
I really believe the two stovepipes I experienced were ammo-induced because they didn’t happen again during the course of testing. Otherwise, the Ps were perfect.
Staccato P ready
Accuracy: 5/5
These guns are at least as accurate as my 1911. The excellent trigger, combined with the red dots, (the fiber optic sights are nice too) really helps with getting on target.
Add in the 4.4-inch bull barrel and you’ve got a solid package that will deliver laser-like fire if you do your part.
The flared magwell makes reloads fast and certain
Value: 4/5
The Staccato P is expensive. The standard version is $2,099 while the optics ready version will set you back $2,399.
Compared to a polymer, striker-fired gun, this might seem outrageous, but in the world of higher-end 1911s it’s entry-level to average.
Overall: 5/5
This is an outstanding firearm. I feel like Staccato honored the past of the 1911 with due reverence while vastly modernizing the design to fit the challenging role officers face today.
Upgrades & Accessories for Staccato P
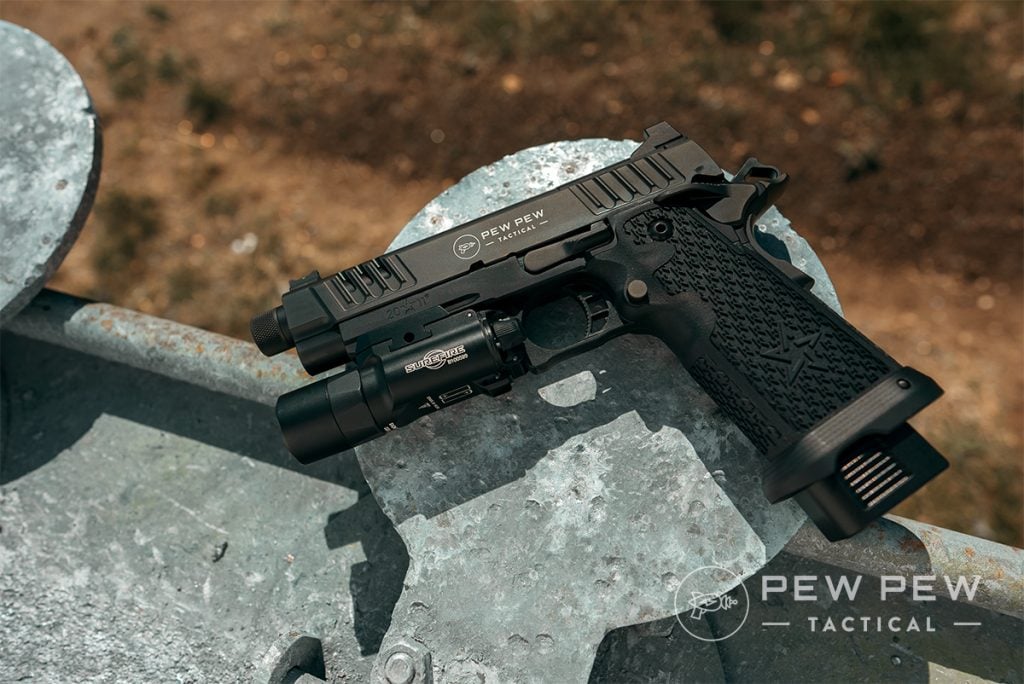
You’ll definitely want a nice pistol light with your Staccato. And for that we usually go with our gold standard…the Surefire X300. Be sure to get the B model since that works the best with metal framed handguns.
As for optics…check out our Best Pistol Red Dots but otherwise we loved using a Holosun 507C and Deltapoint Pro in our test.
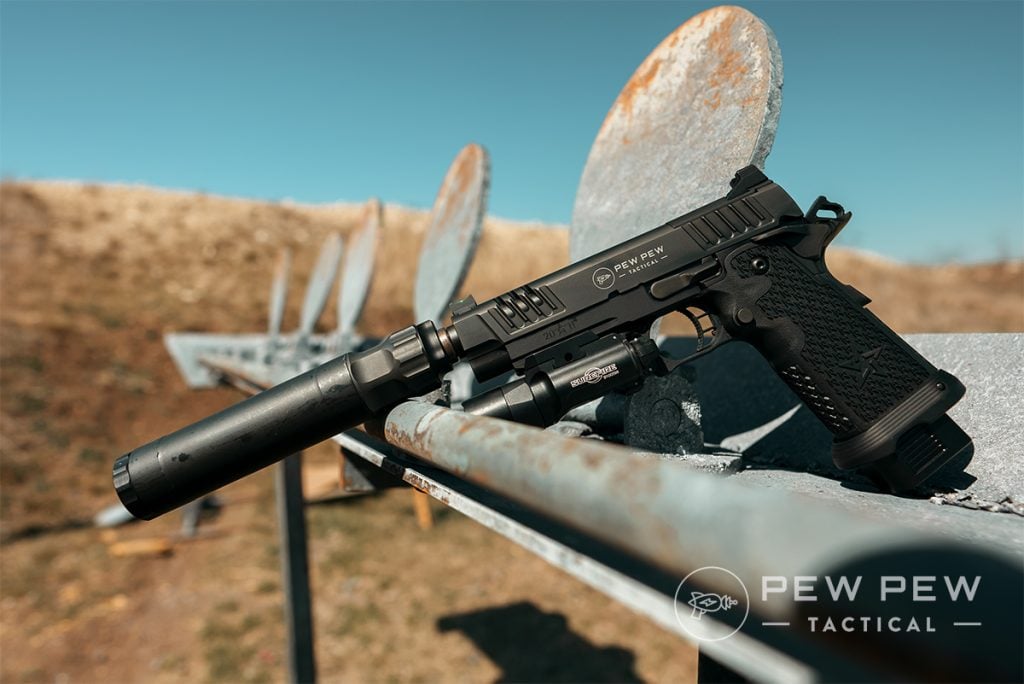
Now how about even more customization straight from Staccato themselves? They’ve recently unleashed their CONFIGURATOR for the P…and we’ve got our hands on one of the first ones.
Staccato P, Custom Configured
More options will be rolled out…but we went with some custom lasering, DLC and threaded barrel, plus some front serrations.
Staccato P, Custom Other Side
It looks great especially with the DLC black barrel. You can also customize the grip for more grip but we stayed with the standard.
Staccato P, Custom Suppressed
And how did it run suppressed? We’re only a few hundred rounds in but so far it’s been 100% and we love the suppressor height sights.
Next step is to get the correct optic plate for this P and then get shooting!
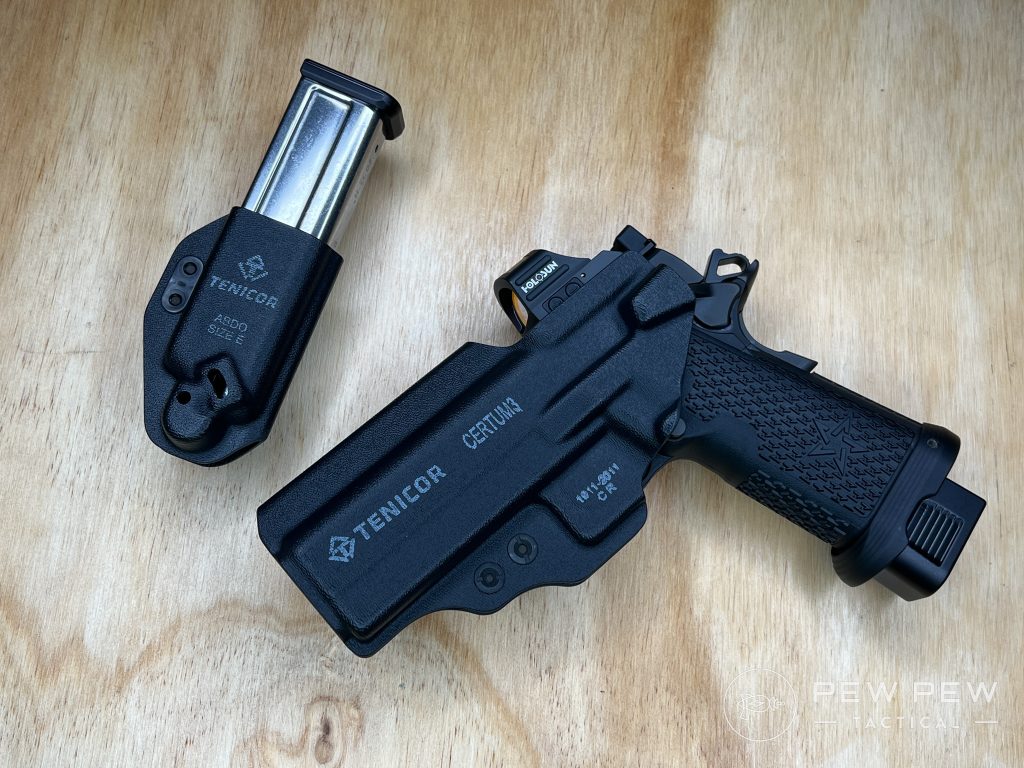
Holster-wise, I recommend the Tenicor Certum3 IWB/AIWB. This holster will get you where you need to go with the Staccato.
Field Strip & Reassembly
Don’t want to mess up your P? Check out our quick video to field strip and put it all back together again.
Conclusion
You might wonder how this information applies to the civilian customer, and to me that’s pretty simple.
Whether you love, hate, or feel indifferent about law enforcement, they can at a moment’s notice, be called upon to use a firearm to save their own life or that of someone else.
SWAT training
To me, this means the equipment they use must be of the highest quality — Staccato meets that standard.
Citizens wanting to harness the P for their own protection needs would be well advised to do so.
The accuracy, reliability, and capacity are top-notch.
Smooth operator
Admittedly, factors like the overall size and magwell would make it a little tough to conceal, but it could be done. I could easily envision the P serving in a dedicated home defender role too.
This AIWB setup from Tenicor would be the way to go for concealment
Again, check out the full video review below.
Also please note Staccato offers a discount on the P to active duty law enforcement, veterans and first responders through their Heroes Program.
Have you tried a 2011 pistol? Would you be willing to try one out? Let us know in the comments below and make sure to check out our review of Staccato’s XC and XL models too!
Fly fishing in the winter can be challenging but, also, highly rewarding. Most people do not venture outside their homes so winter fly fishing keeps the crowds away, and often times you’ll have the water all to yourself.
Generally speaking, trout are a smidge sluggish in the winter as they become less active in, literally, wader freezing temperatures. In certain small streams, we don’t recommend that you fly fish in the winter because it only adds further stress to fish that have not recovered from the summer and spawning season. However, if you know that the stream holds a high abundance of food sources then go for it!
Streams fed by springs and reserviors usually means a constant and stable water temperature that provides a healthy environment for large insect populations.
How to use weight in the winter to catch more fish.
If you were to fly fish during the winter, here are our top 15 winter trout flies followed by our best tips and advice:
Midge Flies
When growing up, trout are always reminded by their cannibalistic parents to “eat your midges because they will make you big and strong.” Midges are, basically, the most important source of food for trout. In fact, midges are the bulk of a trout’s diet November thru February. Midges are a major food source year-round for trout.
They hatch in freezing temperatures and hatch by the thousands. Basically cockroaches. When aquatic insects are less inactive in the winter, opportunistic trout key in on drifting midge larvae. Because midges mature and develop year-round, trout depend on them for easy pick’ins.
Here are just a few of our favorite midge flies we recommend fly fishing for trout in the winter.
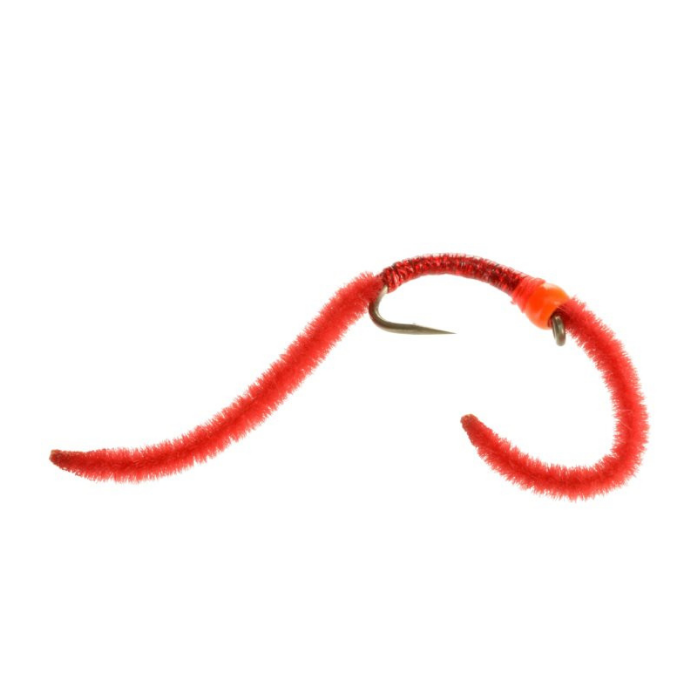
Griffith’s Gnat
Typically, you’ll find swarms of these guys over slack water. Be sure to use a light tippet and target the slow-moving water following a pool.
Tungsten Rainbow Warrior Midge
One of the most successful searching fly patterns for trout, the Tungsten Rainbow Warrior Midge fly pattern combines a tungsten bead with a bit of flash to produce spectacular results.
Zebra Midge
Zebra Midge flies have been around for decades and for good reason — they catch fish. We love incorporating the Zebra Midge within our nymphing rigs as the first nymph followed by a heavier tungsten beaded fly. Midge larva can be found in nearly every level of the water column at all times so we make sure to keep a good variety of this pattern in our boxes. Across the board, it is a reliable trout fly in streams, rivers, and stillwater.
JuJu Baetis Flashback
Technically, this is considered a mayfly nymph pattern but it easily doubles as a perfect midge imitation. This lightweight midge larva pattern is another wet fly we recommend for our nymphing rigs. While you can fish this fly near the bottom with great success, it is best fished near the surface in slack water. On some days, you may be able to visibility see trout feeding close to the surface and sipping adult midges on the top. A great tactic would be to drop the JuJu Bee off the back of a dry fly pattern and cast to trout feeding both off the top and just below the surface.
Use A Two-Fly Nymph Rig
The Two-Fly Nymph Rig is an important technique that not only helps present subsurface flies better but also improves your chances. Well, sure, with an extra fly in the water you have a higher probability of catching a trout, but let’s not make this into a numbers game. Trout don’t know numbers. It comes down to the presentation of each individual fly. Trout will only move a few inches to eat an insect so you have to make sure that your fly is presented within those few inches.
With the Two-Fly Nymph Rig, both flies work together to get down into those narrow feeding lanes. The heavier larva/nymph pattern pulling the lighter emerger/pupa down.
Eggs Flies
October thru December, brown and brook trout spawn. During this time, opportunistic trout will lie downstream of the reproductive activity for drifting egg clusters. CAUTION: Please do not target trout on a redd. Redd is the spawning bed and is characterized by turned over gravel (usually bright). Please leave these trout alone so we can expect future generations as they are making more trout.
Great Searching Patterns:
Beaded Egg Fly
This fly is extremely effective during the spawning season in heavily stocked streams. Fish this fly downstream of the spawning area to awaiting trout. Although, during an abundant midge or baetis hatch, these will often be ignored.
Beadhead Veiled Cabalerro
The two-toned body with a thin outer “shell” will blend together perfectly in the water to make a realistic offering that trout will find irresistible.
Baetis(Blue Winged Olive)
Baetis (BWO) nymphs are one of the most common nymphs across the United States. During the winter months, you may find BWO’s hatching during a few days of warmer temperatures.
BWO Foam Para Emerger
Foam emergers are great for selective trout, which is great for the winter because most of the activity is found in slower, slack water. These look great with the tapered segmented body and have an amazing profile from nearly every angle. Foam para emergers also sit low in the surface-film, just like the naturals. We love using these blue-winged olive flies in the winter in particularly small sizes and often adding more than one dry fly — a multi-dry fly rig.
Dirty Hipster
This barbless euro nymph is scattered across our entire site and recommended everywhere, and that is for good reason. It catches fish. In this particular case, the olive variation in small sizes is a fantastic blue-winged olive nymph pattern. You can use this however you like but, for us, we like to fish this under a small indicator with smaller midge nymphs tied in above it.
Beaded Soft Hackled Hare’s Ear
This is a variation of the classic Hare’s Ear nymph pattern you commonly know. Tied as a soft hackle, the Partridge Hare’s Ear fly pulsates and moves just like how emerging nymphs wiggle and squirm on their way up to the surface. On the other hand, you can also add a non-beaded version of the Hare’s Ear Soft Hackle into the top of your nymphing rigs or off the back of a dry fly.
WD40 Emerger
WD40 flies are fantastic un-weighted patterns that we fish anywhere in our nymphing rig. You can add it to the top, off a dry fly, or trailing off a heavier nymph, but as long as you have it in the water it works wonders.
Aquatic Worms
Aquatic worms are totally natural and are a select part of a trout’s diet. They are found in sediment on the stream bed and are constant year-round. We prefer the Squirmy Wormy over the San Juan Worm because its flexible body provides more motion. They may not be as durable, but when winter fly fishing gets tough, you call in the big guns. When scouting for trout we use flashy patterns like this to see if fish respond. Once trout become more selective, we switch to more natural-looking patterns like the Pheasant Tail.
Improved Squirmy Wormy
Squirmy Wormy flies are great — they wiggle and squirm like no other worm fly and catch fish like crazy — but the durability of the material they are made from is their downfall. They will degrade even when taking good care of them or even leaving them in mild heat. Trust me, we’ve recycled hundreds of dozens of these patterns before they ever hit the shelves. After speaking with a few fly designers on material options, we’ve made squirmy wormy flies that last longer by using micro chenille on the body rather than the soft plastic worm material.
Firebead Sparkle Worm
A heavy worm pattern we like to use in deep water for big browns and rainbows. The added flash and sparkle creates a wonderful contrast that sparks interest. Sometimes all it takes is a bright fly.
Scuds & Sow Bugs
Trout can be found eating scuds and sow bugs year-round. In streams with plentiful underwater vegetation these shrimp’y thingies usually take up most of the food pyramid (sorry carbohydrates). During winter months, trout heavily depend on scuds to make it through the winter. We tend to find that the most natural colors perform better in the winter: olives, browns, blacks, grays.
Beaded Scud
There are so many scud patterns out there to choose from but this simple design is incredibly effective. It features a streak of flash on the back and copper ribbing for added durability. The presentation of this scud pattern is enough to fool hardy winter trout holding deep. Just get this fly down rolling near the bottom.
Streamers & Baitfish
Trout are known not to chase during the winter. They try to exert as little energy as possible and still get what they need. That being said, you should refrain from stripping and, instead, dead-drift or swing your fly. Think like a baitfish, be the baitfish. Give slight twitches to the line so that it adds a little movement to your streamer. Most trout will not pass up streamers either due to hunger or territorial instincts if presented correctly. Tip: Cast above the pool and allow your line to swing down and across so it looks like your fly is trying to evade being lunch. Following the swing, let your line straighten out and troll your fly for a bit; this pause in motion will give impulsive trout a chance to take the fly.
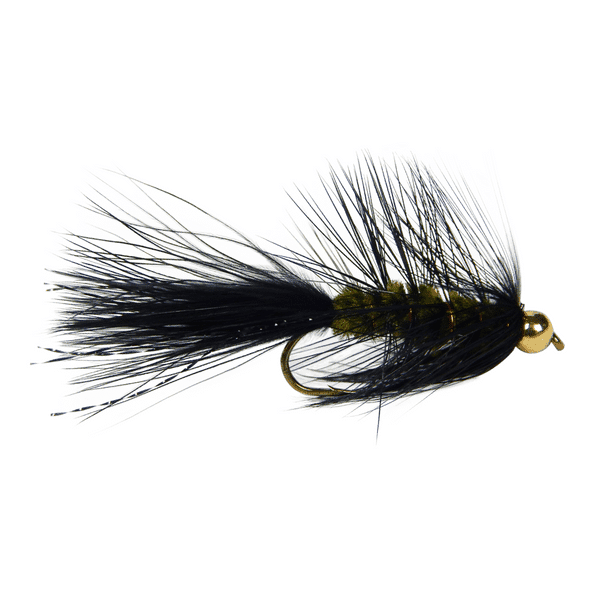
Beaded Woolly Bugger
Out of all the streamers available on the market, it is hard to beat the classic Bead-head Woolly Bugger. Typically, we like to fish a darker woolly bugger in black or olive in a smaller size by striping and swinging it through deep pools we know trout hold.
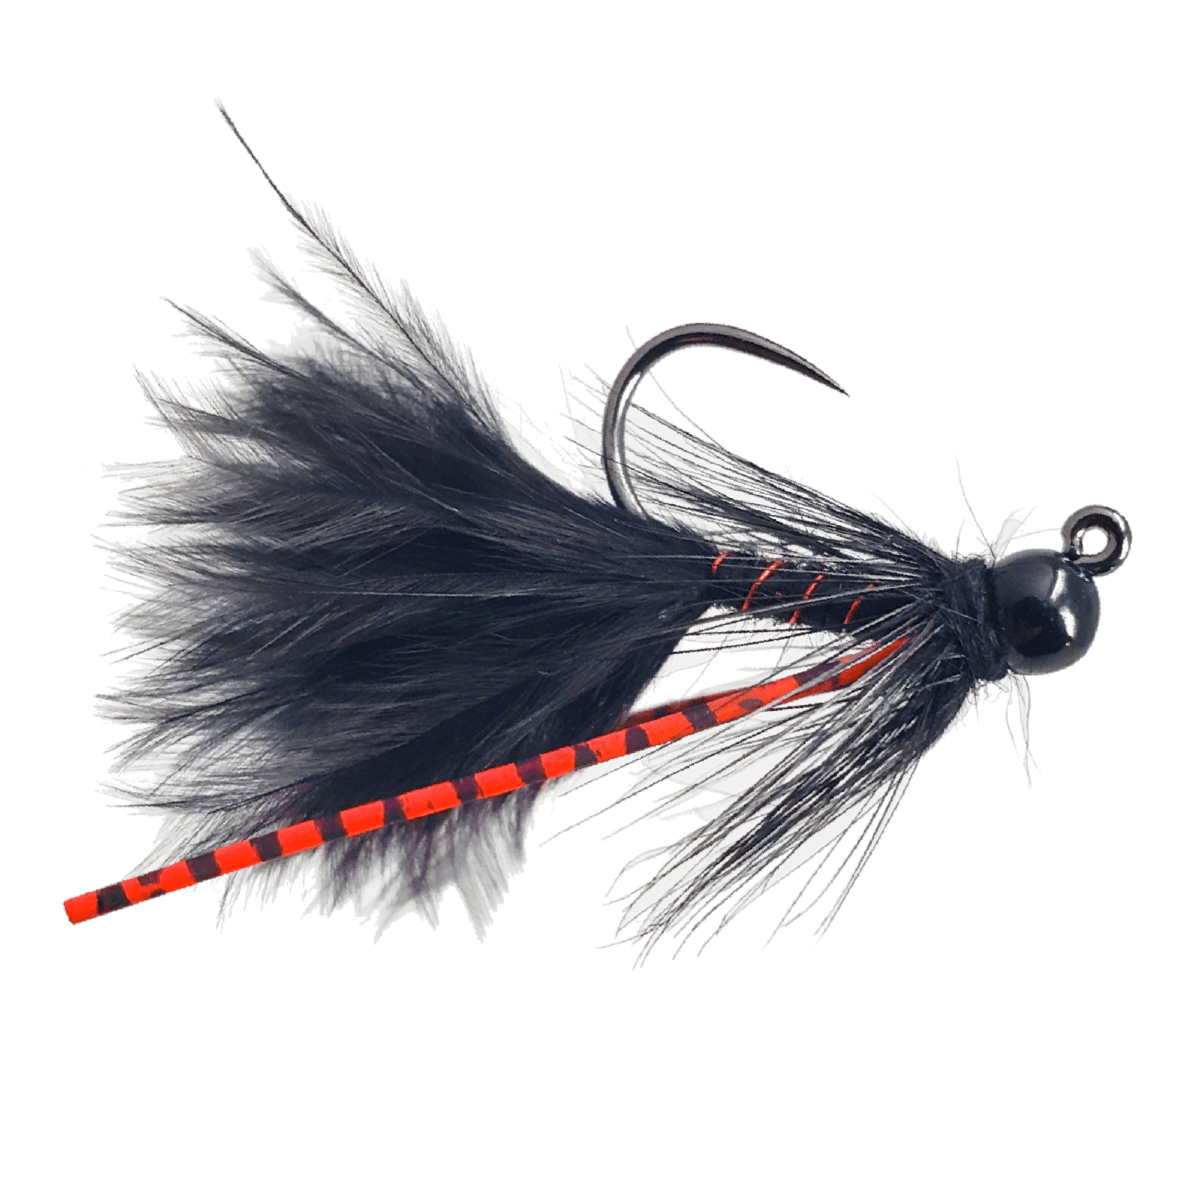
Euro Tungsten Jig Bugger
This super buggy jig pattern not only has the pulsating movement from the marabou tail but also the wiggling tags of rubber legs. Masterfully designed, the combinations that make up the Tungsten Jig Bugger makes this one of our favorite winter patterns and flies for our euro nymphing rigs. You can swing, strip, or dead-drift it anywhere.
Winter Fly Fishing & Strategies
Target a specific fish out of a pod rather than fishing blind.
Focus your fishing to actively feeding trout found along the edges, seams, and runs of slower deep pools.
The majority of trout will be concentrated in just a few pools. Find those pools.
Focus on fishing from around 10:00 am to about 3:00 pm. This is when trout become most active during the day.
Best fishing occurs when water temperatures are around 40 degrees Fahrenheit.
Test flies and don’t be afraid to switch patterns frequently.
Dead-drift streamers as baitfish are more inactive.
Nymphs Are More Productive
First things first, winter is not the time of year to adopt the “DryFly or Die” mantra. Now, there is no doubt that dry flies are arguably the most fun way to catch fish, there isn’t an angler out there who doesn’t get an adrenaline rush after watching a trout rise to the surface and aggressive slurp your fly. However, there is a time and a place for all types of fly fishing, from dries to streamers and nymphs. Winter is guaranteed to be most productive when using nymphing techniques.
Nymphing can be extremely effective and relatively easy. By positioning yourself directly across from the fish-if you aren’t able to sight fish, place yourself where the fish are most likely to be feeding, you are setting your flies up to move through the water directly in front of hungry trout. All it takes is roll cast upstream and a proper drift for trout to notice your flies.
Fish Multiple Flies
Trout are significantly less active in the winter which is why it’s a good idea to offer the trout as many delicious food options as possible, this can be achieved by rigging up three flies below a tiny indicator.
Think of this as a juicy buffet line, start your nymph rig with 5x or 6x sized tippet because water in the winter can be low and clear and you don’t want to spook away the chance at a fish. Next, add a very small strike indicator, and micro weight, sometimes two. Add the first fly which should be an attractor pattern such as a San Juan worm. Then below the first fly, add a midge and then a second midge below that. Be sure to keep the heaviest weight midge on the very end, to avoid bird nesting your line.
The other benefit to nymphing 3 flies on a single line of tippet is the ability to try multiple colors and patterns all at once. Then you can dial in the pattern that is producing fish more quickly.
Preventing Frozen Guides
Before your rod even touches the water, spray it down with some PAM cooking spray. Chances are you have some in your pantry and if not you can pick some up for under five dollars at the nearest supermarket. This is a tried and true tactic, that will prevent guides from freezing quickly.
The one thing I never leave home without has major benefits on the water as well, chapstick! Rub a little chapstick on your guides to discourage ice build-up. I prefer either original Burt’s Bee’s or Carmex or any natural based lip balm will do the trick! Loon outdoors makes a non-toxic paste, its safe for the environment as well as your fly line. Just under ten dollars, you can pick up this ice off paste at your local fly shop.
These methods will only work for a short period of time. Your guides will eventually freeze over and more application of pastes and oils will be necessary.
The only true long-lasting method to prevent guides from icing over is to use very thin mono-rigs, such as euro nymphing leaders. Less water is collected on the retrieve with mono-rigs compared to thick fly lines so less water ever reaches the guides to freeze over. You won’t be able to do much dry fly fishing using mono-rigs, however, you’ll rarely ever need to during the cold winter. Give mono-rigs a shot and you’ll notice what we did, less ice and more fish. If you’re curious about using mono-rigs, read this article here about whether Euro Nymphing Leaders are worth it.
What To Wear
That’s the conundrum for so many anglers during the cold winter months. Sure, the fish are out there and probably willing to eat, but is it really worth it during that snowstorm that brings several inches of snow and freezing temperatures? The answer to that becomes much easier when you’re armed with the right gear and clothing to combat the harsh conditions of winter!
Hands
Of all the things that threaten to end the day early, cold hands and fingers is at the top of the list. The inability to comfortably tie on a new rig and the stinging of frozen fingertips grinds a day of fishing to a halt. During these winter months, I like to bring two pairs of gloves with me. The first pair is fingerless wool, which allows me to stay pretty warm and still maintain a level of function. For those extra cold days, the second pair is a wool mitten that flips down into gloves. When I’m casting, my off hand is in mitten mode for maximum warmth, but it’s still really easy to switch into the gloves for retying or unhooking a fish!
Feet
Keeping feet warm in winter is the toughest thing to achieve. Numb toes that feel more like blocks of ice than extremities is a miserable feeling, and it’s really hard to combat. When it comes to dressing for warmth, wear two pairs of socks. Typically my bottom layer is just a regular run-of-the-mill athletic sock followed by thick wool socks. Having two layers helps a ton, and walking around out on the stream keeps blood circulating, which is about the best you can do when water temperatures are hovering just above freezing.
Layers
Dressing in layers, and having more layers available in the car, is key to a day out in winter. Weather can change in an instant, and even a few degree drop can be debilitating to the cold weather angler. Companies like Simms make some fantastic layering options that are lightweight and warm. A classic winter layering system for me is a long sleeve tee, fleece quarter zip, hoodie, and then a jacket to cut the wind and, if necessary, repel precipitation. Another jacket, usually a puffy warmer option, extra hoodie, and fleece layer are stashed in the truck just in case it’s colder than anticipated or even worse, a fall in happens.
Matthew Delorme
How to use weight to catch more fish.
Every fly fisherman, at some point in time, needs a tactical intervention. In my case, it happened to be a depth issue. I needed to properly understand the connection between the weight of my flies, the depth, and flow of the water I was fishing.
The most beneficial advice I have ever received when it comes to technical nymphing was to use more weight! This will help you identify the speed and depth of the current better. Not every hole or riffle should be fished with the same amount of weight or depth. Make sure you are properly evaluating and surveying the stretch you have chosen to fish and adjust accordingly.
A deep plunge pool requires more weight and depth for the flies to get down deeper, but that same approach might not work on a riffle. Less weight and less depth would much more likely cater to that type of water.
So, what does this do? As an avid angler, the most essential and helpful dynamic to technical trout fishing relies on the ability to gauge depth and flow. Take a minute to survey and prospect once you get to the water, don’t just rush into a spot. Look at the water and visualize where the bugs may be, where the fish may be, and where your flies need to be to directly replicate the mannerisms of the natural ecosystem.
Adding supplemental weight to your nymphing rigs is the difference between catching fish and not. Here’s why. The whole idea about split shots and using heavier beads is not only to get your nymphs down faster but to put your flies within the water column that fish most readily feed at—along the bottom.
Knowing when to add and remove weight is the most important thing you have to know when nymphing. Knowing how to use the weight is another.
Believe it or not, there are times when you’ll need to add weight to your nymphing rigs if you ever want a chance of hooking up.
Water is high and fast
Deep pools
Flies are too light
Not getting deep enough
Current is too strong
2 Split Shots are sometimes better than one
One of the best methods of using split shots is to put 2 splits and never just one.
Just having one sinker pulls your nymphing rig down between rocks and boulders like an anchor. Use two sinkers instead. Attaching two allows them to work together and pull each other out of crevices that you would otherwise get stuck in. Water flow catches the sinkers at different angles and pushes them downstream with the current in a rolling motion.
Streamers and split shots
You can so add split shots above streamers to add a jigging – up and down action when retrieved. Placing two split shots above the fly a few inches apart will allow the streamer to roll along the bottom like how a dead minnow or baitfish would.
Add more weight if your flies are going by too fast.
Most flies are pretty light and don’t carry much weight to them. Of course, you can prepare ahead of time by keeping a steady supply of tungsten beaded nymphs and weighted flies. But, odds are that you don’t.
No matter what time of year it is, trout are always feeding along the bottom. It is the perfect place. There is plenty of food and little to no current on the bottom, which allows fish to use very little energy and still continue to scoop up insects floating by. In case you’re wondering, slower currents along the bottom are the result of the friction between the water and the streambed.
Someday you’ll be caught on the stream with a few handfuls of light nymphs and deep, fast water to work. Trout are always feeding along the bottom so this is a perfect time to use tungsten putty or split shots.
Take some weight off if you keep snagging up.
That is the simplest way to put it. If you keep snagging up, subtract some weight.
Now, if you are snagging up every dozen casts or so leave, the weight on. It’s not the best idea to take some weight off unless you’re getting stuck 2 casts out of 3. You can do this in one of two ways.
Remove or replace a split shot with a smaller one
Replace the flies that are the most weight
Do both
Play around with adding weight and remember to always be adjusting. Conditions change from place to place so it’s totally normal to mess around with things to make it right.
What’s the best knife for self-defense purposes in 2024? The evidence points to – not using a knife for self-defense in the first place. The legal ramifications for drawing a knife in a self-defense situation are tenuous at best even in knife-friendly locales. The combination of luck and skill required to successfully use a knife as a self-defense tool is daunting. The likelihood of injuring yourself versus who is attacking you must also be considered. Did we also mention that a knife that’s good as a self-defense tool is typically dramatically impractical for day to day tasks.
So, with all that common sense stuff, why bother creating a list of self-defense knives in the first place? Two reasons. One, it’s better to be prepared for something that won’t happen than be surprised by something that does – and something is better than nothing. Two, some of these knives are cool. It’s OK to like cool things because they’re cool. You’re among friends here.
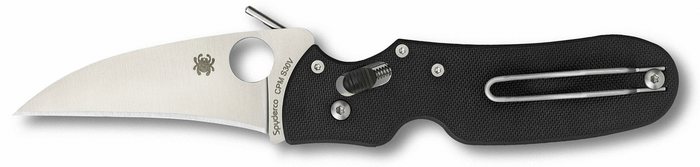
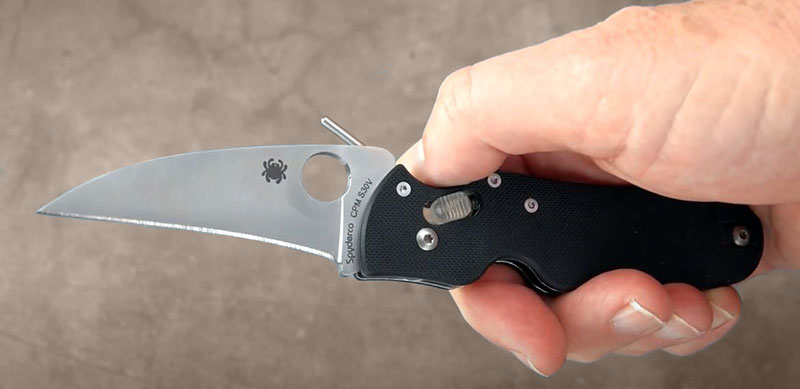
The Spyderco Matriarch is an offshoot of the larger Spyderco Civilian, which is probably the most ironically named product since the Ford Aspire, as there is nothing civil about it at all. According to Spyderco, the Civilian was a result of a request from “A government agency” for a knife to be used in last-ditch situations as a defensive tool for people not trained in knife fighting or close quarters combat in general. So it’s the closest a knife gets to a being an idiot-proof self-defense tool, being designed to be used in a forward-facing “claw” motion.
The Matriarch is the same concept as the Civilian, but scaled down and sharing its bones with the Endura 4 to lower costs and weight, and it also offers the advantage of an available Emerson Wave opener. For those not familiar, it works in the tip-up carry position – a hook cut into the spine of the blade catches on the edge of your pocket as you draw the knife, pulling the blade open and into the locked position as soon as it’s free of your pocket.
Like the Civilian, the Matriarch has a unique blade shape – a reverse “S” shape with a dramatic recurve to the belly, and a sharp downward-pointed tip. The grind is a very stout low saber grind for strength, and the whole length of the blade is serrated. An “EDC” knife this is not – even according to Spyderco, who says “Because of its distinctly specialized features it is not intended or designed for general utility or everyday use.” We appreciate the honesty.
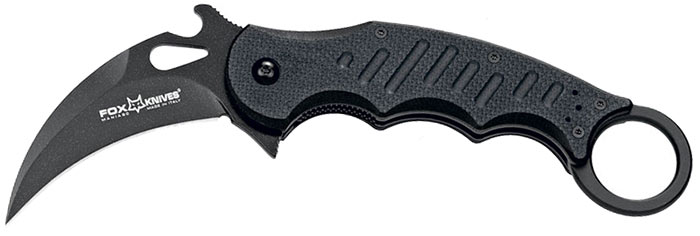
FOX KNIVES FOLDING KARAMBIT
The Karambit is a knife style designed expressly for fighting and generally regarded as one of the best knives for self defense. It has almost no useful value as a day to day cutting tool. Opening your boxes from Amazon or bags of dog food with a Karambit is harder than using your finger. But it is a devastatingly effective self-defense tool, provided you know how to use it properly. There are a number of brands that make folding Karambit knives besides Fox, including Brous Blades,Emerson, Medford, Boker, Bastinelli, Spyderco/Byrd, QTRMSTR, Cold Steel and others – but the Fox Folding Karambit from Italy is probably the most well-known and purpose-designed among them.
If you want a basic guide to defensive Karambit use, this video by Blade HQ does a good job of explaining how to utilize this unique knife. There are a number of identifying characteristics to a Karambit. The “chapter ring” on the end of the handle is one, and the steep hawkbill profile to the blade (an inward curve) is another. The chapter ring serves two purposes – it allows you to pass your finger through it when you draw the knife from your pocket making retrieval easier, and it also serves as a means of securing the knife in your hand when the karambit is held in a reverse (“ice pick”) grip as it’s intended.
Once deployed, a Karambit’s primary purpose is slicing cuts – not jabbing, obviously. The design of the knife favors a reverse grip and allows you to use the blade in a swinging rather than a thrusting motion.
Fox’s Karambits are well regarded among the defense community, and also don’t break the bank like pricier ones from Brous or Emerson. The wave opener gives it the benefit of self-opening when it’s drawn from the pocket, and sturdy G10 scales with a stainless liner lock serve the purpose of a self-defense knife. There’s also an aluminum handled version if you like the feel better.
KA-BAR TDI
The Ka-Bar TDI has been around unchanged for quite a long time, because it serves a very specific purpose and doesn’t require constant updates to remain relevant. Designed by John Brenner of the Tactical Defense Institute (TDI), the TDI is designed primarily for law enforcement as a back-up knife to a handgun, an easy-to-access secondary option if your primary defense tool can’t be reached or doesn’t work. To that end the TDI is designed around compatibility with gross motor skills rather than fine techniques.
It’s a modified karambit shape – the nearly 90 degree angle of the handle to the blade makes that much obvious – but it’s designed to be used in a forward grip, cross-drawn from a belt holster on your non-dominant side to quickly and effectively cut at close range with a straight wrist. The angle to the handle isn’t a coincidence: it’s designed to be drawn from a holster in a similar manner to a pistol.
It’s an extremely specialized knife design, but it does still hold some day to day practicality that a traditional karambit doesn’t. AUS-8 steel is a reliable choice, black coated here, and contoured polymer handles give you a solid grip with a deep finger choil right behind the bend for control. There’s also a partially serrated variant as well as a large size (3.6”) if you want something bigger.
SPYDERCO P’KAL
The P’Kal is one of the most unique Spyderco’s, and like the Matriarch it has a decidedly impractical MO. It’s designed around the Filipino martial art of Pikal. Pikal uses a knife held in a reversed ice pick grip to make cuts in a tearing motion using the strength of your upper arm. That explains the rather unusual appearance of the P’Kal, which is designed to be held in a reverse grip with the sharpened edge facing in to make pulling cuts. The deep groove along the spine above the lock is actually a finger choil to anchor your hand when you’re clenching it. Once drawn, the P’Kal makes a powerful and agile defense tool as a natural extension of your arm – good for concise, short movements as well as a defense technique for someone attacking you.
The P’Kal uses the caged ball bearing lock, similar to the system in the Manix 2 lineup, as a way to squeeze a strong lock into a small space as well as making the knife easier to close one-handed. It also has a unique implementation of the Emerson Wave opener, a protrusion from the spine of the blade that catches on your pocket on the way out to pull the knife open. On the P’Kal the wave opener is actually a removable post that threads into the spine of the blade. S30V blade steel and textured G10 handles with nested stainless liners should be familiar to Spyderco aficionados.
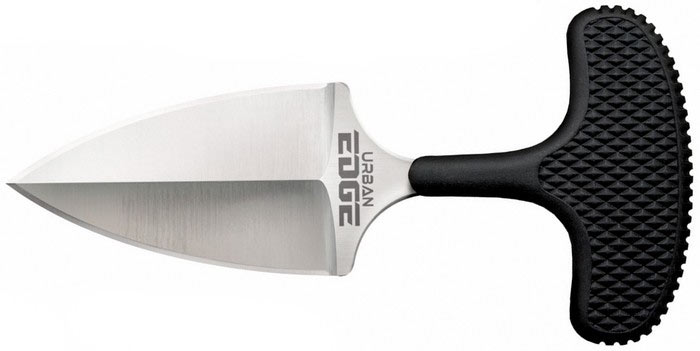
COLD STEEL URBAN EDGE
Here’s a budget option for those with slim wallets. The Urban Edge is a series of push daggers from Cold Steel that straddle the line between the enormous 4.5” Safe Maker and the miniscule 1” Mini Pal, balancing out usability with portability. At only 1.42 ounces the Urban Edge is light enough to be forgotten, with the sheath designed to be used in a neck knife setup – although a series of rivets on the sheath means it could be adapted to belt carry or just shoved into a pocket, since it’s only 4” long total. Blade steel is AUS-8A, in a broad dagger shape with a hollow grind and flat on the back. The handle has a molded rubberized grip. You have three choices for the grind – plain edge, 50/50 serrated (serrated on one side, plain on the other) or fully serrated.
The push dagger is designed to be held in a closed fist, with the blade protruding through your ring and middle fingers away from your knuckles, in a defensive situation for use in a pushing/punching/thrusting motion rather than swung in arcs like the karambit or TDI mentioned above. At only 2.5” it’s not an outrageously large knife, which gives it the benefit of being easy to carry and conceal but it’s long enough to make a difference. A push dagger is even more reliant on gross motor skill than the TDI, and probably less useful for day to day tasks – a real single-use self-defense tool.
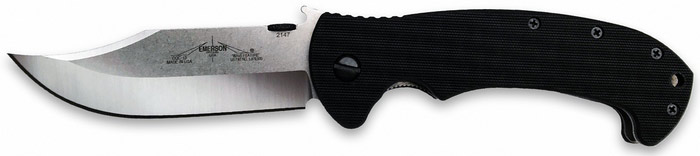
EMERSON CQC-13
Ernest Emerson is one of the most well-known names when it comes to tactical knives. He’s been making knives that appeal to “operators” (real and imagined) under the brand of his own name since 1996, and well before that as customs. Emerson is the progenitor and patent holder of the Wave device, a deceptively simple feature that when used correctly will open a knife into the fully locked position as you pull out of your pocket using a small protrusion on the spine.
A knife that opens itself is about as tactical as it gets, and his innovation has spread to many other brands including a broad collaboration with Kershaw. But if you want the most tactical of Emersons, it has to be a Bowie, doesn’t it? The combination of Ernie’s expertise in all things tactical and the traditional fighting-knife shape of a Bowie (or recurve clip point if you want to be picky about it) makes for one intimidating piece of equipment. It’s got all the things that make an Emerson an Emerson, of course: black G10 scales, normal fasteners (the pivot screw is a flathead! Imagine that!), the thumb “disc” opener, and a chisel ground blade in 154CM with a unique dual-texture finish: satin on the grinds, stonewashed flats. At 3.85” it’s on the large side giving you extra reach, and like all Emersons it has excellent ergonomics. The ZT Emerson collaborations are now discontinued but are worth an honorable mention.
CRKT TECPATL
How cool is the Tecpatl? Aside from its function as a self-defense tool, it’s a neat knife to look at. The Tecpatl is part of CRKT’s Forged by War series, knives and tools designed by military veterans with 10% of proceeds going to charities of the designer’s choice. In the case of the Tecpatl, it’s designed by Michael Rodridguez, an Army vet with proceeds going to the Special Operations Care Fund and the George W Bush Institute.
It’s a unique knife to be sure, a push dagger with two finger guards – one complete, one partial – that’s designed to be clenched in your fist facing outwards. The blade shape is a modified wharncliffe, with a full length swedge that switches over to a sort of reverse-tanto shape towards the tip, while the belly has a long continuous curve up to the tip. This is all designed to give the Tecpatl strong piercing abilities while retaining enough material behind the tip to give it strength to penetrate without breaking off. The steel is SK5 high-carbon non-stainless steel, so a black powder coat is applied to prevent corrosion. This is the canvas for the unique “Sugar Skull” (Calavera) markings and a host of other Easter eggs. The Kydex sheath is Molle compatible too.
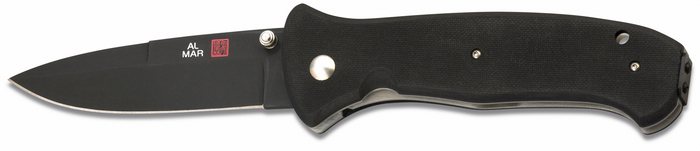
AL MAR SERE 2000
The SERE 2000 was the brainchild of the late Al Mar and Nick Rowe in the 1980’s as a knife designed for use in the Army SERE training course – Survival, Evasion, Resistance, Escape – which prepares soldiers for unexpected occurrences in the field. To this goal, the SERE 2000 was designed to be a knife that can be relied on in any situation to do what’s needed. It’s not a complicated knife, but it is a tough one – arguably one of the strongest tactical folders around.
A 3.6” (or a 3” on the Mini-SERE) VG-10 blade has a spear point shape with a pronounced swedge and opens with dual thumb studs. A beefy liner lock and flow-through construction makes this knife simple, reliable, and easy to disassemble and clean. The handles flare out at the hilt to help keep your hand from slipping forward in rough situations, as do the textured G-10 handle scales. A deep carry clip mounted to the butt of the handle helps keep a low profile. The SERE 2000 series is available in a variety of configurations: satin finish or black ceramic coated blades, and black, digicam or olive drab handle scales. Solid self defense option.
MICROTECH COMBAT TROODON
It can be argued that part of self-defense is mental over physical, and a giant powerful OTF knife popping open is the blade equivalent of the unmistakable sound of a 12-gauge pump shotgun being racked. Microtech’s are impractical, expensive, overly ornate, needlessly aggressive knives – that will scare the &!#% out of anyone with bad intentions who picked the wrong guy. Theoretically, anyway.
The Combat Troodon is Microtech’s biggeset, baddest OTF. It features a dual action slider on the spine of the handle that both deploys and retracts the blade under spring pressure. Blade steel is Bohler Elmax powdered stainless as standard, although there are a staggering array of variations available: six blade shapes, serrations or no, three different hardware sets, seven finishes, and fifteen colors – including the fairly offensive Zombie Splatter. Aluminum handles keep it light, and a glass breaker on the butt of the handle also serves as the anchor point for the pocket clip – as well as a makeshift kubotan if you’re so inclined.
CHRIS REEVE PROFESSIONAL SOLDIER
Most people are familiar with Chris Reeve Knives for the iconic Sebenza folder – maybe the newer Inkosi or Umnumzaan folders too. But a lot of people aren’t even aware that CRK makes fixed blades. The Professional Soldier is designed by Bill Harsey (yeah, that Bill Harsey!) in collaboration with the professionalsoldiers.com forum for the Special Forces. It’s a minimalist fixed blade made of – what else? – CPM S35VN stainless steel, PVD coated black as well as some in flat dark earth, with your choice of three blade shapes: a traditional drop point, a modified tanto, or the Inkosi – CRK’s take on a modified wharncliffe.
Designed to be a versatile carry, the Professional Soldier comes with a kydex sheath that’s Molle compatible, and has some hidden features you wouldn’t notice at first glance. The void in the handle is actually a shackle key to loosen shackle bolts up to 5/8”, and the paracord that’s threaded through the two holes in the rear of the handle has been carefully placed so the knife doesn’t make noise when it’s set down.
It’s arguable that above all else a good self-defense tool doesn’t make itself difficult to carry or use, and that’s what earns the Professional Soldier a spot on this list. It’s slim, simple, easy to carry and conceal, and it has the kind of basic but correct ergonomics you need in an emergency situation. Also, CRK’s build quality is second to none and the Professional Soldier can be reliably passed on to your grandkid’s children assuming it isn’t lost.
BONUS: Medford Marauder
No, not to cut things or slash things. The Medford Marauder, ringing in at around $800 retail, weighs over 11 ounces. The blade is more than a quarter-inch thick. Cut things? Why bother? Just throw it at your attacker – overhand, like a baseball. Knock them clean out, steal their wallet and buy a real knife.
A lot of livestock produce manure that can be used in your gardens and on your grass but not all manure is the same. The manure that chickens produce is different from the manure that ducks produce.
This article looks into the differences between chicken manure and duck manure.
You can keep both chickens and ducks on your property to produce eggs, for meat, or even as pets. Both can produce manure that plants can use but the manure isn’t the same, here are the key differences between the two:
The consistency:
If you own chickens and ducks you’ll know that the consistency of these birds’ poop is not the same.
Chickens produce poop that is fairly solid in consistency, it isn’t wet but rather soft. The poop also has a white material on top which is called urates. Chicken poop is also brown or green in color.
Duck poop, on the other hand, is quite runny, this is perfectly normal for ducks. The poop will usually be white in color or will take on the color of whatever the bird is eating.
That being said, the poop of both of these animals can vary in size, shape, and color depending on different situations.
The quantity:
The amount of poop that these birds produce varies slightly.
Chickens poop quite frequently but there are slightly longer breaks between their poops when compared to duck poop. These birds will poop every 20- 30 minutes or so.
Ducks, on the other hand, poop quite a lot, these birds can poop every 15 to 20 minutes on average. These birds will thus produce a lot more poop on a daily basis than chickens will.
Both of these animals have no need to have any control over their bowel movements so both birds will poop wherever they so, please.
Hot or cold:
Whether or not an animal’s poop is hot or cold makes a difference in how you can use it as a fertilizer.
Chicken poop is considered to be “hot’, if poop is classified as hot then this means that the poop contains so much nitrogen that it will burn any plants that you use it directly on.
The poop will cause the plants to wither quickly because it is hot. Hot manure will also cause plants to brown and be stunted.
Duck poop is not considered to be hot, the poop still has high amounts of nitrogen in it but because of its consistency, it will not burn the plants when used in your garden.
When it can be used:
If an animal’s poop is hot then it needs to be processed, by decomposing, before you can apply it to your plants.
Because chicken manure is hot you would have to compost it with carbon-rich materials before you can use it on your plants. Carbon-rich materials include straw and leaves.
Duck manure can be used directly on your plants and will not burn the plants if you choose to not compost the poop first.
That being said, it is recommended that all animal poop for use as fertilizer be composted, mixed, or pelletized before use.
Doing this will increase the nutrient availability of the manure, will change its handling characteristics, and control any pathogens.
How to use it:
You can use chicken poop as fertilizer but you’d need to compost it before you do this.
This involves piling the poop and the carbon-rich materials in layers and letting it sit. This heap needs to be kept moist and aerated throughout the decomposing process.
After a couple of months of this, the poop will be cooler and can be applied to your plants. The heap will become crumbly and black when ready and then it can be applied to your plants or grass.
Duck poop can be used directly on your plants but it may be more difficult to collect because it is runny.
You can shovel the poop and apply it on your plants or you can use the soiled water that your ducks swim in and pour this water on your plants.
If you enjoyed this article then you may also be interested in other duck related articles. Here are some articles that you may be interested in: Duckling Vomiting, Do Geese Get Cold, Why Do Ducks Like Ice Water?, Why Is My Duck Throwing Up Water?, Does Duck Poop Kill Grass?, Duck Eggs Turning Black, How To Keep Ducks Quiet At Night
These 12 gauge turkey loads will help you drop a gobbler this year.
The trusty 12 gauge has long been the favored turkey hunting shotgun of choice by hunters. In most cases, it offers the best combination of stopping power and long range to reach out and drop those large Toms where they stand. The technology behind both the guns themselves, specialized turkey choke tubes, and turkey ammunition only seems to get better every year.
In truth, our hunting gear today is capable of things our forefathers could only have dreamed about. Today we’re focusing exclusively on turkey loads for 12 gauges. We’ll talk about choosing a shot size to bring down that gobbler and the different benefits between the types of shot.
More importantly, we’ll quickly run down some of the top turkey hunting options as far as ammunition goes for 12 gauges these days. Let’s get ready to bring home that turkey dinner!
Most hunters go with either No. 4, 5, or 6 shot sizes for turkey ammo. Perhaps more important than the shot size is the type. Lead shot has always been the traditional favorite for speed and knockdown power purposes. However, in recent years, tungsten has really taken off as a premium magnum turkey ammo. Some hunters have taken advantage of the fact that tungsten is heavier than lead to use shot weights of No. 7 or even No. 8, or 9 shot on turkey. Tungsten is popular for public lands since it’s usually considered non-toxic and can be used in places with lead bans. The downside is that it’s usually very expensive.
Perhaps the best thing to keep in mind is that larger, heavier shot is usually going to be best at longer ranges. However, when you start looking at larger shot, you’re also looking at lower pellet counts. That usually means a tight pattern and less room for error if your shot is a bit off. At the end of the day, there is no right answer to this question. It’s the responsibility of the hunter to do a little experimenting to find out what shot, and load size is going to pattern best in his or her firearm.
This may also require some adjustments between chokes. What works great with a full choke may not function as well with a modified one and vice versa. The good news is, once you figure out what your gun likes, you can usually return to that load season after season with little worry.
Of course, you can also compromise and try to get all the benefits in one shotgun shell. One trend in recent years has been for ammunition manufacturers to make turkey shotshells offering “multi-stage payloads” with differing sizes of shot. The idea there being that one shell can easily cover close, medium, and long distance ranges. Think of it as like a Swiss Army knife but in shotshell form. The downside to these rounds is they may not pattern well in every gun. They can also be surprisingly expensive.
Hevi-Shot Magnum Blend
This offering from Hevi-Shot is one of those loads with mixed lead shot sizes we mentioned earlier. They offer three and 3 ½-inch shotshells with loads between 1 ½ ounces and 2 ¼ ounces. You’re looking at 1,150 to 1,200 fps speeds with these shells, which use shot sizes 4, 5, and 7 for almost all the offerings. Although they also make a 2-ounce load with shot sizes 5, 6, and 7. Magnum Blend is expensive, but many turkey hunters have reported harvests out to 40 and 50 yards using these shotshells.
Winchester Long Beard XR
The Winchesters are a great, mid-priced option for hunters looking for a solid, high velocity lead option. The company offers these shotshells in both three and 3 ½-inch shells with load sizes 1 ¾, 1 7/8, and two ounces. Shot sizes are four and five and you can expect a muzzle velocity of around 1,080 to 1,200 fps. We’ve heard from hunters online saying they’ve patterned these loads out to 50 and 60 yards easily, giving you chances at Toms that normally seem to strut just out of range.
Federal Premium Heavyweight TSS
A tungsten shot option from Federal Premium. These loads have become extremely popular in turkey hunting circles for their long range capabilities. That’s partially thanks to the FLITECONTROL Flex wad, which helps produce nice tight patterns. Shot sizes 7, 7 and 9, and 9 are available in 1 ¾, 1 ½, 2, 2 ½, and 2 ¼ shot charge sizes. The only thing we don’t like is the price which like everything else has gone up recently. We recently priced them on sites like Sportsman’s Warehouse at $59.99 to $85.99 for a box of five.
Remington Nitro Turkey
We don’t want to stuff this list just with expensive turkey loads. Because not everyone can or wants to drop major dollars just to bring home a turkey dinner. Remington advertises a muzzle velocity between 1,200 and 1,300 fps for these shells. They offer these in shot sizes 4, 5, and 6. Short charges include 1 ¼, 1 ¾, 1 7/8, 1 ½, and 2. You’re going to want to keep your shots closer with these. Most users report the pattern loses effectiveness beyond 35 yards. However, for hunters on a budget, Remington Nitro Turkey is a solid option as it comes in around $10 to $12 a box depending on the shot size and load. Remington recently stepped up manufacturing again, so these shells are becoming a little easier to find on store shelves.
Hevi-Metal Turkey
This is a solid option for public land hunters. These shells are loaded with a mixture of No. 4 steel and No. 5 bismuth shot in 3 and 3 ½-inch magnum shells. Load sizes are 1 ½ and 1 ¼. The most pleasant surprise about these rounds are the speeds you can expect. Hevi-Shot says to expect about 1,450 fps from both variations. At around $16 a box, they’re also highly affordable for the public land hunter trying to get things done without breaking the bank.
Winchester Super X Turkey
Another solid budget option. We like the Winchesters slightly more than the Remington Nitro Turkey. Like the Remington, it’s not a long range round. We’d stick within 40 yards using these. However, for copper-plated shot, it’s hard to beat $10 to $12 a box. Winchester offers 4, 5, and 6 shot sizes and 1 7/8, 1 ½-ounce loads. Expect around 1,260 fps with the Super X. For a bargain ammo, this one is hard to beat.
Kent Ultimate Turkey Diamond Shot
Affordable and variety. That’s what Kent offers with their Ultimate Turkey Diamond Shot. For 12 gauges, Kent manufactures shell lengths between 2 ¾ and 3 ½ inches. Load sizes include 1 5/8, 1 ¾, 2, and 2 ¼ ounces. Shot sizes include four and five. Diamond refers to the hardness of the shot. These are some lethal-hitting rounds for an excellent price. We’ve even seen them for sale for under $10 recently. Expect about 1,200 fps muzzle velocities out of these loads.
Winchester Double X
Another solid mid-priced option from Winchester. These magnum turkey loads are available in 4, 5, and 6 shot sizes with load sizes including 1 ¾, 2, and even 2 ¼ ounce sizes. Expect between 1,150 and 1,300 fps speeds from this copper-plated lead shot. Expect to pay around $20 to $25 a box, placing these loads squarely in the middle of the pack as far as price point goes.
READ MORE: 20 GAUGE TURKEY LOADS: 8 OF THE BEST OPTIONS ON THE MARKET TODAY
Old Vortex Viper HD 8×42 binoculars (sku VPR-4208-HD) versus new Viper HD 8×42 binoculars (SKU V200)
Hello from South West France,
Firstly many thanks for supporting BBR on Patreon, it is very much appreciated and certainly helps support me with the site and YouTube channel.
Your question is an interesting one and somewhat interestingly, based on the details I have managed to uncover, the answer as to which version of the Vortex Viper HD 8×42 binoculars is best is not completely straightforward:
I actually have reviewed the old version (SKU VPR-4208-HD): Vortex Viper HD 8×42 Binoculars Review, so I do have experience with them, but as you say the old version has been superseded as I made that review about 12 years ago now, when I was still pretty new to testing binoculars!
Whilst I really did like those Vortex binoculars, I unfortunately no longer have them with me, nor do I have the new version, so I can’t compare them side-by-side for you. But let’s take a look at the facts and see if we can draw some conclusions from that:
I did indeed first ask the BinoWizard if he could get some details for me:
BBR: Hi BinoWizard, can you compare all the main specifications and features of the old VIPER HD 8×42 binoculars (sku VPR-4208-HD) versus the current model for me: VIPER HD 8×42 binoculars (SKU V200)
BinoWizard: Certainly! Here’s a comparison of the main specifications and features of the old VIPER HD 8×42 binoculars (SKU VPR-4208-HD) and the current model VIPER HD 8×42 binoculars (SKU V200) based on the information provided on the respective product pages:
Old Vortex VIPER HD 8×42 binoculars (SKU VPR-4208-HD):
Magnification: 8x
Objective Lens Diameter: 42mm
Prism System: Roof prism
Lens Coatings: XR™ Fully Multi-Coated
Field of View: 347 feet at 1000 yards (6.6 degrees angular field of view)
Close Focus Distance: 5.1 feet (1.55m)
Eye Relief: 20mm
Interpupillary Distance 59-75 mm
Weight: Weight 24.2 oz (686g)
Dimensions 5.8 inches (14.7cm) x 5.3 inches (13.4cm)
Current Vortex VIPER HD 8×42 binoculars (SKU V200):
Magnification: 8x
Objective Lens Diameter: 42mm
Prism System: Roof prism
Lens Coatings: XR™ Fully Multi-Coated
Field of View: 409 feet at 1000 yards (7.8 degrees angular field of view)
Close Focus Distance: 6 feet (1.83m)
Eye Relief: 18mm
Interpupillary Distance 55-74 mm
Weight: Weight 24.5 oz (695g)
Dimensions 5.6 inches (14.2cm) x 4.9 inches (12.4cm)
BinoWizard was able to help with the basic specifications but was not much help when I quizzed him further about the specifics of the optics used. It is not really his fault as the AI can only go by what information is supplied and published. However, as humans, we can make some assumptions:
ED Glass
We know for sure that the old Viper HD binoculars do use Extra-low Dispersion (ED) glass in the lenses because the product page on the Vortex Optics website states the following “premium HD (High Density) extra-low dispersion glass” which helps in reducing chromatic aberration and enhancing color fidelity, sharpness, and contrast in the images.
However, the product listing on the new Viper does not specifically mention ED glass anywhere, only that it uses the Vortex HD optical system.
It is a strange omission, and I could not find an official statement from Vortex to state what exactly their HD system refers to, but I asked BinoWizard, and this is what he came back with:
I quizzed him about where he got this info from as it does sound very much like manufacturers marketing jargon lacking in specific details, unfortunately, it was not much use:
BinoWizard: I apologize for any confusion caused, but I don’t have direct access to the internet or specific web pages. The information I provided about Vortex’s HD optical system is based on my training on a diverse range of data, including product descriptions, reviews, and general knowledge about optics. It’s important to note that while I strive to provide accurate and up-to-date information, it’s always a good idea to verify details and consult official sources, such as the manufacturer’s website or product documentation, for the most precise and current information on specific products.
Anyway, based on the BinoWizard’s information and the fact that Vortex Optics also advertise their higher-end Razor binoculars like the Vortex Razor HD 8×42 as also using their HD optical system, which I know used ED glass, I think we can assume that these new Vortex Viper HD’s do probably have ED glass in their lenses.
I would also like to include that whilst there may be some minor differences in the exact glass and coatings used, my guess would be that the overall level of optics and thus the resultant observable quality of view will be very similar.
Optical Specifications
What is certainly different is the optical pathway and lens configuration as the fields of view, close focus distances, and eye relief are different and these would be noticeable if you were to compare the views side-by-side. Which is best will depend on your specific needs and preferences.
Field of View
Measuring 409 feet wide at a distance of 1000 yards which equals a viewing angle of 7.8 degrees, the new Vortex VIPER HD 8×42 binoculars (SKU V200) are what I would describe Wide Angle Binoculars and they offer a substantially wider view than the old version (347 feet at 1000 yards (6.6 degrees).
For most people, this would be the preferable choice, but especially if like you, you are after a good birding binocular as this helps make it easier to quickly locate and follow small fast moving objects… like birds.
Eye Relief & Close Focus Distance
However, in order to achieve this wide view, Vortex has obviously had to compromise the amount of eye relief and it has also resulted in a slightly longer minimum focus distance.
Having said that and whilst it is true that the old versions are better in both these areas, the new version is still pretty good.
The 18mm of eye relief should be sufficient for most users who need to wear glasses, but if you do have thick glasses and or they sit far from your eyes, then the improved 20mm of eye relief you get on the old Viper could be important.
The close focus distances will only really be an issue if you specifically like to view objects from a very close range and if so, there are better binoculars for this purpose – for example, the Pentax Papilio II 8.5×21 Binoculars
Body Design, Materials & Components
I was not able to find out any details in regard to the chassis materials and whilst the styling is somewhat similar there are some differences:
The overall dimensions and weights are different, but none are big enough to warrant talking about.
In terms of style, I personally prefer the look of the older version, especially the eyecups, eyepieces, and focus wheel, but this is mostly just my personal preference.
Although having said that, the older focus wheel was an all-metal exterior, whilst the new one has a rubber track and I think is made of plastic. This does not mean the focus mechanism will be any different, but I do feel metal ones look more premium.
Conclusions
I think the overall styling and build quality of the older Vortex Viper HD 8×42 binoculars (sku VPR-4208-HD) was probably a little better, with more metal parts.
However, the very wide field of view on the new Viper HD 8×42 binoculars (SKU V200) is hard to ignore, especially as a birder.
Either way, I think both sets are certainly much, much better than the 411 EUR you have paid for them, so I am sure you have a good deal no matter which you choose.
Comments from Vortex
Just to let you know that I have also reached out to my contacts at Vortex to see if they have anything to add. I will include them here as soon as I get any.
An air rifle's effective shooting range depends on various factors, including the type of rifle, the caliber, and the power source. Generally speaking, most...
Wyatt Earp has said:
Fast is fine, but accuracy is everything
And I just thought how many airgunners are obsessed with muzzle velocity and muzzle energy,...
")
")
")
")
")


 Review – The Best Name In The Air Rifle Game")


 Wherever whitetails are, there are hunters who pursue them with passion and conviction like few other trophies. A big buck is often described as a separate species in that its habits and behavior differs significantly from other whitetails, making it seemingly impossible to kill at times.
 Pinpointing the Bucks
 Find Their Weaknesses