Home Blog Page 6

The Practical Guide to Watering Your Pigs

0

As every pig farmer knows, pigs need a constant supply of fresh water, but how to give them water and how to make sure the water will never run out are important to maintain good pig performance. And here is the practical guide for reference.

automatic_pig_watering bucket_tyre_pig_watering

Simple Watering System and Drinker for Pigs

One of the simplest and best ways to water your pigs is a bucket with a brick or a large stone in the bottom to help prevent it from being overturned and split, and the bucket should be placed in a left-off tire.

This kind of waterer makes a great replacement when the automatic watering systems stop working or freeze in the winter. And a flat-wide bucket is recommended for making a better waterer. If you use a high-sided bucket, your pigs may not be able to get the water, especially for the small piglets or weaners. There is always a risk of piglets falling and drowning, so be careful when using this watering system with small piglets and weaners. If you do choose to use this system, you can fill the bucket with some stones or clean the grave to make the water level only a few inches deep at the most, which will help prevent the piglets from sinking if they fall in and they can get out easier.

Automatic Pig Watering System

The watering system for pigs is slightly different from other livestock watering systems and is mainly because of the size and shape of the animal. Pigs are strong with powerful jaw muscles and sharp teeth, which means any waterers you use have to be firm and solid enough.

The automatic water system makes it possible that you do not have to fill up pigs’ waterers every day. If your watering system is working correctly your pigs will have a constant supply of fresh water, and will never run out, which is essential for the hot days. You can switch off the automatic water system on cold days to prevent damage when it freezes and instead use the bucket-tire method.

Metal Water Feeder is Better

The metal water feeders are more durable, and hard-wearing, and also they can hold more water. Most of the internal parts and components are replaceable, so you can repair them yourself if they break down or stop working.

What Type of Piping to Use with the Water Feeder and Water Trough

This depends on what watering system you use and the diameter and thickness of the pipe needed to cope with the mains water pressure. The mains water pipe should be fitted with a stop tap which allows you to shut off the water when necessary and the water pipe needs to be as close to the mains side as possible. The water pipes need to be insulated, covered, or buried beneath the ground to prevent them from freezing and bursting during the winter. When using water pipes in a pig pen, it should be metal or copper to help prevent the pigs from lifting or bending the pipe. If the plastic pipe, make sure it is covered or out of reach of your pigs, and do not run plastic pipes across the floor of the pig pen.

5 Tips For Hunting Teal More Successfully

0

Shane Smith

Anyone who has pursued early-season teal has certainly had their share of misses at a flock of fast-flying aerial acrobatic teal. You fire off three rounds and can’t believe you missed all three times! You start taking inventory of the boxes of shells you brought, hoping you have brought enough. I would like to lay out five helpful yet disciplined tips to put into use to consistently kill more teal per box of shells.

green-winged teal

Teal Hunting Is Fast and Furious

In the world of waterfowl hunting, blue-winged teal are one of the most acrobatic of all waterfowl. As the season goes on, their acrobatics only seems to improve. Even seasoned duck hunters are left in awe at the aerial display. There are ways to improve your odds this duck season. This brings us to our first tip to put more teal on the table.

1. Smooth is fast. This is a saying we use all the time in tactical applications and is very true for wing shooting as well. Make a smooth and deliberate mount of your shotgun and move your barrel smoothly through the bird to its head and pull the trigger. Try not to play catch-up with the bird and stay behind with the hopes of snatching rapidly ahead and making a miracle shot. Keep it smooth and follow through and you will be shocked at how many more teal you will kill.

It’s opening day, your decoys are set and everything seems perfect. Experienced teal hunters know that even with everything just right, timing is everything. From Texas to Missouri and from Louisiana to Mississippi, all duck hunters know that a little teamwork goes a long way. Timing and teamwork bring us to point number two. 2. Stand ’um up. On many, many occasions, people let teal get waaay too close before they shoot. I like to try and shoot my first shot at 20-30 yards or so and teal will usually stand straight up like a skyscraper and present you much easier shots. If you wait to shoot when they are 10 yards or so, your pattern is very tight and not very forgiving. Have someone shoot first and stand up the flock and then start picking them off one at a time.

You can improve the odds of taking blue-winged teal, green-winged teal and cinnamon teal before duck season begins. Improve your odds by knowing your shotgun and how it patterns. Knowing your shotgun, its pattern at different ranges and its performance with different ammo simply cannot be taken for granted. This brings us to tip number three.

3. Change your choke/load combination. Blue/Green wing teal are the smallest dabbling ducks in the country and require much less terminal velocity to bring them down than a mallard. This is a good time for 4s, 5s or 6s to reign supreme. If you shoot an aftermarket choke tube like a Patternmaster or JEBs, take out your full or modified and opt for a “decoy” or short-range tube. Most of your shots will be less than 35 yards, and you will have a dense and gap-free pattern with a good wad stripping choke rather than a constriction-style choke.

All duck hunters have been there — it’s opening day and you sit freezing in a duck blind before the sun comes up. You’re shooting the breeze with the other hunters in the blind and sipping coffee. All at once, the sun is up and suddenly you have more blue-winged teal than you ever dreamed of bearing down on you. What do you do next? That brings us to tip number four.

4. Keep your head down and focus. It is very easy to want to look at the whole show when 50 bluewings are twisting and dive-bombing the dekes at daylight. However, this will usually lead to three spent hulls and your retriever looking at you with disgust. Pick a single bird and kill him FIRST. Don’t worry about the others that are zig-zagging like they are possessed by a devil. When your cheek meets your stock, keep it there and maintain that focus and I guarantee you will kill more birds.

If teamwork is a key factor to bagging more teal, then you don’t want to be the weak link in the duck blind. Being organized from opening day, knowing your gear, where your gear is in the blind and how to get to it quickly is key. It is common for young duck hunters to have teal buzz through and only manage one shot. That brings us to tip number five.

5. Keep other shells handy. Teal are notorious for flying the first 30-45 minutes of legal shooting time and then almost disappearing. As soon as you are done shooting, IMMEDIATELY reload. I have certainly been guilty of looking and seeing more birds approaching and raising up only to hear a “click” and realize I never reloaded my gun. Try and keep the shells in a wader pouch, bench or somewhere that is very easy and convenient to reach. I will often attempt to put shells in a loaded gun to make sure I am ready for the next bunch that falls into the blocks. Just as fast as the action can start, it can certainly end, so be sitting on go with a reloaded weapon.

This Teal Season Can Be Different

No one wants to be a weak link. The duck hunter who can only manage a few shots despite the fact that the teal were plentiful and conditions perfect. Thinking back to the last teal season, you vowed to shoot more teal. That’s why you took the time to read these tips. Try and apply these tips this year when teal season rolls around and you don’t have to be a weak link. I know some of this may seem like common sense and other parts may be new to you, but give them a shot and see if they don’t help you this teal season. Maybe this year, you can be the hunter who tagged out.

Would you shoot a white deer?

0
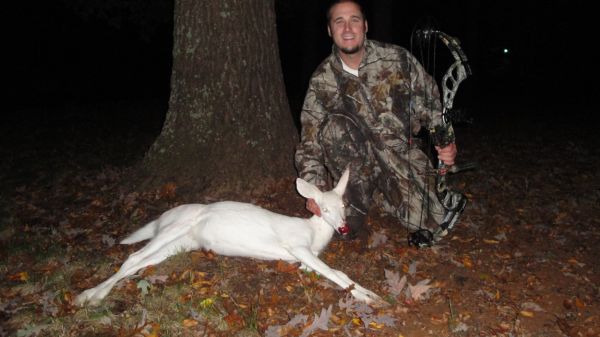
This albino deer was killed by a North Carolina hunter who had a full-body mount created by his taxidermist. A trophy by many hunters’ standards, would you shoot a white deer?

Completely legal in both Carolinas, but would you do it?

Would you shoot a white deer? If you’ve been hunting long enough, you have probably heard of someone shooting a piebald deer, and maybe even an albino, but would you pull the trigger with such an animal standing in front of you?

Albino deer are rare. Piebald deer are unusual, but not exactly rare. According to the North Carolina Wildlife Resource Commission, the traits of an albino deer (pink eyes, pink nose, white hides and hooves, and a lack of pigmentation) occur in one of every 30,000 deer. The traits of a piebald deer, which include white patches of fur on the hide which is otherwise brown, can show up in one of every 1000 deer, although those white spots can sometimes be so small as to be almost unnoticeable in many of them.

The difference between rare and unusual notwithstanding, seeing a white deer (or partially white deer) while hunting does not happen often, and in most hunters’ lifetimes, they will never see a white deer. But would they shoot one if they had the chance?

Scientifically speaking, it seems to make sense to shoot white deer at every opportunity. They are white because they have genetic deficiencies that prevent them from having normal colorations. Presumably, these deficiencies make white deer more susceptible to any number of diseases that normal deer have the ability to fight off, thanks to their genetic makeup. White deer are also more prone to predators, including man, with their inability to readily hide or blend in to their natural surroundings. It seems to make sense to stop those genes from being passed on.

Certainly, a segment of the population will say a white deer is so rare, that no one should consider shooting such an animal. Is a white deer, however, any more rare than a 12-point buck with a 25-inch spread and 16-inch brow tines? And would the rareness – does the rareness – of such a buck make it any less of a trophy for the average hunter, and would the average hunter have any qualms about shooting such a buck? Isn’t that rareness exactly what trophy hunters hope for while afield?

A recent article on SouthCarolinaSportsman.com featured a hunter who killed a small, 7-point piebald buck. The hunter is a trophy hunter, and passes up many bucks that a lot of hunters would be proud to shoot. But this deer was special to him, a trophy of another kind, and he feels lucky to have had the chance to harvest it. And while many fellow outdoorsmen offered congratulations to him through our Facebook page, a number of folks made comments vulgar enough that we had to delete them, all because they saw his actions as degrading to hunters or because they claimed he lacked morals.

White deer, whether albino or piebald, are not protected in North or South Carolina. No restrictions exist on shooting them that don’t exist for regular deer; they are fair game during deer hunting season. So with no laws against shooting these uncommon deer, what would you do if you spot one while hunting? Would you shoot it, or let it walk?

How to Hunt Squirrel: 13 Hunting Tips (Best Times, Guns, & More)

0

1. Review the Legal Terms

Most importantly, you must have the legal right to go squirrel hunting. Before you head off to the woods, get a small game license (you need licenses for almost all types of game) for the place you are going to hunt.

The terms for attaining a license vary by state or province. So, review the regulations for hunting squirrels in your specific area.

You might only be able to go hunting during specific times of the year when it is squirrel season. This season takes place in most regions during the fall and winter months. The dates vary by each place. There are also rules on where you can hunt.

You may be allowed to hunt on a certain state or provincial park grounds. Some places require you ask for direct permission from the property owner before you start hunting.

Check the bag limits, too. There may be a limit to how many squirrels you can hunt in one day, as well as during an entire season.

2. Choose the Right Time

Look for squirrels during the early morning or late afternoon hours because squirrels are most active at these times. Morning is when squirrels go out to look for food.

It is easy and necessary for them to find food early in the day when they are at their hungriest. Avoid hunting squirrels in inclement weather, as like deer, they move around and can be harder to track.

Late afternoon to early evening is when squirrels bring food back to their habitats. This is when most squirrels are busy foraging, so you should be able to spot them moving around.

3. Look in the Right Places

Plan your hunts in areas where you are the most likely to find squirrels. Check areas where there are lots of trees. These include trees that produce nuts and other items squirrels commonly consume. An oak tree is one of the most popular places to see squirrels.

Any tree that produces the types of nuts or fruit that squirrels enjoy is the place to locate squirrels. Be aware of the type of trees in the area, so you can determine if they are places squirrels may be searching for food.

4. Find the Best Weapon for Squirrel Hunting

Shop around to get the right squirrel hunting weapon before leaving on a hunting trip. Do some target practice using a small game weapon that works best for squirrels.

In the end, choosing the right squirrel hunting weapon boils down to personal choice. Here are the best weapons for squirrel hunting in my opinion:

The Shotgun

Shotgun Squirrel Hunting

Use a shotgun to cover a larger amount of space during your hunt. The spread of a shotgun shell can cover much of a squirrel’s body at once, thus ensuring a better chance of a kill without damaging too much meat.

Be sure to aim the shotgun carefully so it targets the precise area you want to shoot.

Look for a six-shot because it is large enough to target a squirrel without ruining the flesh. Also, choose a barrel 26 inches in length or greater so the shell will move precisely.

Remember, a shotgun will make a loud sound with each round. The noise will most likely scare the other squirrels away. Focus on being precise and cautious when shooting at squirrels or any other small game, for that matter.

When you take aim, remember that the spread on the shotgun shell will move outward a few centimeters after you shoot.

The .22 Caliber Rifle

22 Rifle Hunting Squirrel

The second option for a weapon to use is a .22 caliber rifle (my favorite). This rifle uses a smaller ammunition that targets the squirrel and other smaller game with precision.

The ammo will not damage much of the squirrel meat, either. A .22 caliber rifle produces a longer range than a shotgun. The rifle also lets you go after just one part of the squirrel’s body.

Aim to be accurate and hold your firearm steady. Fortunately, most .22 caliber rifles come with an automatic reloading feature. This feature lets you add multiple rounds into the rifle before you start shooting and release one of the rounds every time you fire the trigger.

Be sure to regularly clean the muzzle and barrel to get a more accurate shot.

This rifle works best when you attach a scope to it. A scope gives you a clearer view of your target. It is also important to take wind, elevation, and distance into account when using a scope.

Bow and Arrow

Bow Hunting Squirrel

Another option for hunting squirrels is with a bow and arrow. But take note that most squirrels are small and less than a foot in length.

Because they are so small, it could be difficult to hunt squirrels with a large bow and arrow. In other words, leave your deer hunting bows at home.

You should sharpen any arrow you use so it can pierce the squirrel’s body with ease. Even so, any arrow you aim incorrectly could cut through too much of the squirrel’s body, leaving little meat or fur to use.

The Air Rifle

While this might not look daunting, an air gun can be deadly to squirrels, and it is the cheaper option of the bunch. Air rifles are best suited for small game like fowl, rabbits and squirrels.

The only major downside is that it requires a lot of practice for a humane kill, as the area that you must hit is very small for an instant kill.

If you want the animal to die instantly and avoid needless pain or tons of frustration, aim for a head shot, which is also difficult to pull off on such small targets. Plus, larger squirrels can absorb multiple hits and evade if you miss the head.

Here’s some smooth action with an air rifle:

Art Lander’s Outdoors: Ky’s 2022-23 deer season begins Saturday with opening of archery season

0

Kentucky’s 2022-23 white-tailed deer season opens Saturday, with the start of archery season. The 136-day season continues through January 16.

The outlook for the 2022-23 deer season is upbeat.

“I think we’ll have a good season,” said Deer Program Coordinator Noelle Thompson. “We’re hoping for good hunting weather. We don’t have CWD (Chronic Wasting Disease) in Kentucky and have set up a surveillance zone.”

Chronic Wasting Disease (CWD) Surveillance Zone

New this season is a Chronic Wasting Disease (CWD) Surveillance Zone in five counties in the Jackson Purchase — Calloway, Fulton, Graves, Hickman and Marshall Counties — and special regulations have been established.

CWD is a fatal, neurological illness occurring in North American cervids, members of the deer family, including deer, elk, and moose.

Since its discovery in 1967, CWD has spread geographically and increased in prevalence locally. CWD is contagious and transmitted freely within and among cervid populations. No treatments or vaccines are currently available.

Of great concern to wildlife managers and the hunting community, CWD has been detected in at least 23 states, and two Canadian provinces, but does not infect livestock or humans. CWD is transmitted directly through animal-to-animal contact, and indirectly through contact with objects or environments contaminated with infectious material, including saliva, urine, feces, and carcasses of CWD-infected animals.

CWD has not been found in Kentucky, but has been detected nearby in western Tennessee.

Special regulations in Kentucky’s CWD Surveillance Zone include:

For the complete CWD Surveillance Zone regulations consult page 13 of 2022-23 Kentucky Hunting and Trapping Guide.

Kentucky deer population dynamics

The 2021-22 Kentucky White-tailed Deer Harvest and Population Report stated that “Overall, the statewide deer population estimate shows a stable to slightly decreasing trend. The 2021 statewide estimate was 919,308 deer at the start of the 2021-22 hunting season, (which is) less than 1 percent below the 10-year average.”

Zone 1 counties have the highest deer densities in the state, are considered reduction zones, with an unlimited bag limit on antlerless deer.

At the other end of the spectrum the Zone 4 counties have the lowest deer densities, and antlerless deer harvest opportunities are very limited.

The Zone 2 and Zone 3 counties are at or near population goals.

Weather influenced last season’s deer harvest

The total number of deer harvested during the 2021-22 deer season was 132,328, which is the ninth highest harvest on record, but a 6.56 percent decrease from the 2020-21 season harvest of 141,620, and 5.6 percent below the 10-year average of 140,129.

Weather played a big role in the harvest decline last season.

During the months of October and November there were several days of warmer than normal weather and rain. In December there was a record-breaking weather event, a widespread tornado outbreak.

All these factors contributed to the lower than expected deer harvest for the overall season, but in January the harvest was the highest on record for the month, 3,788.

Highlights from last season’s deer harvest

Here’s some deer harvest highlights from last season that are relevant going forward:

• The total antlered deer harvest was 68,035; 70.6 percent of which were adult males, 19.8 percent yearling males and 9.5 percent male fawns. It was the sixth highest antlered buck harvest on record.

The top three counties with highest antlered deer harvest per square mile of habitat were: Anderson County, 4.5 antlered deer/square mile; Pendleton County, 4.4 antlered deer/square mile, and Bracken County, 4.3 antlered deer/square mile.

The antlered buck harvest in Fayette County was 0.6 antlered deer/square mile, the lowest of all 120 Kentucky counties, according to the report.

Kentucky ranks in the top five for all time, in the Boone and Crockett Club record books.

• The total number of female deer harvested was 57,126, which is 11.6 percent lower than the 2020-21 season. However, the percentage of female deer harvested has been relatively stable over the last decade.

• Harvest by weapon type: archery, 14,869 deer; crossbow, 12,202 deer; modern firearm, 96,370 deer, and muzzleloader, 9,245 deer.

Kentucky 2022-23 deer season dates

For this upcoming season there are no changes to the zone status of Kentucky’s 120 counties, season lengths or bag limits.

There are 51 Zone one counties, 34 Zone two counties, 13 Zone three counties and 22 Zone four counties.

Deer season regulations

The complete regulations for the 2022-23 Kentucky deer season are available online at fw.ky.gov.

Deer season is a celebration of Kentucky’s wildlife bounty of quality antlered bucks and deer in abundance statewide. Start planning your hunts now.

Grow Bigger Bucks: Cull Bucks With Missing Brow Tines (G1)

0

Question: “We deer hunt in Uvalde County and have been trying to manage our deer. This year we have seen a 3 1/2 year old buck that would be a main frame 7 point deer if he had brow tines, but he is missing his G1s. The buck has decent beam lengths and the mass is pretty good. Will this whitetail buck ever produce brow tines in the future? The guys on our deer lease are trying to decide if we want cull this buck or leave him until next year. Should we shoot all bucks that have no brow tines to improve the deer herd or should we just wait until they are at least 4 1/2 years old?”

Response: The only way to improve the buck component of your deer herd will be to remove the bucks with unwanted antler characteristics. These deer that hunters refer to as management or cull bucks. Young bucks that have missing brow tines turn into old bucks with missing brow tines. But it gets worse. They breed each fall, spreading the gene for missing brow tines. I’ve seen ranches where most of the bucks had missing brow tines. Don’t go there!!!

Good Deer Management: Cull Bucks with Missing Brow TinesThe presence or absence of a brow tine, or the G-1 as they are referred to on a score sheet, are the most inheritable trait for antlers. Bucks that are missing one or both brow tines should be candidates for management by harvest. You don’t want the gene for missing G-1 passed on. The next time one of the hunters sees him while deer hunting they need to remove this buck as quick as possible.

Buck management or culling must begin as soon as possible. The big mistake in letting undesirable bucks get to 4 1/2 years of age or older before removal is that they have at least 3 years to spread their unwanted genes around the deer herd. Judge all of the bucks on your deer lease against one another by age and remove the animals that are obviously lower in quality. Deer management only works when the entire herd is managed, but decisions must be made on an animal by animal basis. Shoot your buck with missing brow tines the next chance you get.

SOLVED: What is the best shot size for Snow Geese?

0

The best snow goose loads are those that perform well across a wide range of conditions and provide knock down power to harvest birds cleanly. With snow goose hunting, these factors almost always come down to shot size selection.

The best shot size for snow geese is BBB steel shot. Why? Because a good patterning load of BBB steel shot contains enough pattern density and energy to consistently harvest snow geese at up to 50 yards or more. A 1.5 ounce load of BBB shot contains 91 pellets and enough energy density to retain at least 300 feet per second (FPS) out to 55 yards. My favorite load is the Kent 1 9/16 oz. BBB load.

In this guide, we’ll take a look at some of most popular shot sizes for geese and discuss what makes BBB steel shot the most effective.

Most Popular Shot Sizes for Snow Geese

Steel shot size selection for snow geese can range anywhere from #2 shot all the way up to T-shot. With such a wide range of shot sizes, it can be confusing when trying to determine which shot size is the best. The typical shot sizes for snow geese are #2’s, #1’s, BB shot, BBB shot, and T shot.

Shot Size/Pellets Per Ounce/Max Distance

  • #2 shot – 124 pellets – 40 yards
  • #1 shot – 102 pellets – 43 yards
  • BB shot – 72 pellets – 45 yards
  • BBB shot – 61 pellets – 50 yards (Best Shot Size)
  • T shot – 52 pellets – 55 yards

Snow geese aren’t the toughest of birds, so cleanly harvesting them doesn’t require large shot sizes. I’ve even used #4 shot on snow geese that were decoying close and it worked perfectly fine.

The problem with small shot though is that it doesn’t work well as an all-around pellet size. Most snow goose hunts require varying degrees of distance, angles, and other factors that work against your load the second it leaves your barrel.

Related: Need a new choke tube? Check out the list of the top performers here.

I’ve found BBB steel shot the best combination of pellet density and energy down range to cover just about any shot you should be taking within reason. It has the range for both decoying birds and those hanging up on the edge of the spread that won’t fully commit. BBB shot also has the energy to cleanly pass through snow geese resulting in less cripples and sailer’s that you have to waste time chasing.

Why BBB Steel Shot Is the Best Shot Size for Snow Geese

When you sit down and compare BBB steel shot to other shot sizes, the differences are noticeable.

  • BBB shot contains 61 pellets per ounce, or around 91 pellets for a 1.5 ounce load. This is plenty of pellets for a dense 40-50 yard pattern through an aftermarket choke.
  • Larger shot like BBB retain enough energy for shots around 50 yards or more allowing you to harvest more birds.
  • The energy density of large BBB pellets insures that birds will be harvest cleaner and reduce the amount of wounded birds.
  • BBB shot gives you the most opportunity to harvest snow geese as it’s ballistically superior for constantly changing hunting conditions.

Here is a great clip on how to pick the right pellet size for snow geese

Features to look for in the best snow goose shotgun shell loads:

  • Adequate pellet densities for the situation you’ll be hunting in. If you only shoot decoying snow geese, then the high pellet density loads of #1 shot will work well. For an all-around snow goose load, BBB’s work the best.
  • Shotgun shells above 1400fps work better. The best loads are 1600 fps or higher with steel shot.
  • Loads that pattern well with your shotgun.
  • Zinc coated pellets for corrosion resistance.
  • Sealed crimps to prevent water intrusion.
  • Hulls that cycle well with your shotgun. Some work better than others.
  • If you’re looking for the best snow goose ammo, check out our top picks here.

Popular 3 inch and 3.5 inch Waterfowl Ammo

About Pellet Sizes and Pellet Density When Choosing a Goose Load

Pellet size and density are both factors you should consider when choosing which snow goose load to shoot for the spring conservation season. An increase in pellet density will result in a decrease in pellet size and an increase in pattern density.

Example: If you normally shoot BB steel shot, you can switch to #4 Hevishot for a load that has similar ballistics in both range and pellet energy, while gaining 120 pellets.

Steel Shot Vs. High Density Shot – Which is better?

  • Steel Shot – Steel shot density is 7.9 g/cc and is the cheapest snow goose load you can buy. It works well for decoying birds, but lacks long range capabilities.
  • High Density Shot – High Density Shot comes in a wide range of materials and alloys that include Bismuth, Hevishot Alloy (Nickel, Tungsten, Iron), and Tungsten. High Density Shot is basically any shotgun pellet heavier than steel. Pellet densities range from 9 g/cc to 18 g/cc. High density pellets are the best shot type for long distance goose loads.

I’ve used both steel shot and high density loads for snow geese and my preference is high density. Why? Because the pattern density and range of heavier than lead loads is unmatched.

Steel shot is currently the lightest material used for harvesting waterfowl in the U.S. and it loses its energy really quickly down range. It also requires larger pellet sizes to retain energy, which decreases pattern density.

The best thing about steel shot is that it’s affordable and if you go through a ton of shells each season it’s more economical.

High density loads like Hevishot, Bismuth, and TSS are ballistically superior to steel in every way. Since the pellets weigh more, you can get the same ballistics out of smaller pellets, thus increasing your pattern density and putting more pellets on the birds.

High density loads pattern tighter, hold their pattern longer, and let you extend your range further out so you can cleanly harvest birds that hang up just out of range of steel shot. The major downside is cost, as Tungsten based loads are considerably more expensive than steel shot.

If money is no concern, high density shot makes for the best snow goose loads you can use. I’ve written about my top 10 tips for having a good snow goose hunt, and shooting high density loads is an important factor.

The Gaining Popularity of High Density Shot for Goose Hunting

When lead shot was outlawed for waterfowl hunting in the 1970’s, the only other option at the time was steel shot. Since then, shotgun shells for waterfowl have drastically improved to provide dependable loads that work well across a wide range of waterfowl hunting situations.

This year is no different, and the gaining popularity of high density loads for geese is now greater than ever. Between Hevishot, TSS, and Rio Bismuth shot, there’s a high density load that fits almost everyone’s budget and hunting needs.

As high density loads become even more popular, I expect the options to increase even further. High density loads are superior to steel shot in every way. Spend one season shooting it exclusively and it’s difficult to go back to steel shot.

But if you must shoot steel shot for snow geese, try BBB on your next hunt and see how it performs for you. I’ve shot many cases of it, as well as other steel shot sizes, and it is the best all-around pellet size I’ve found. If you want to try high density shot, try Hevishot #2’s for the best snow goose load ever made.

Montana Bison Hunting 2024

0

Montana Bison Hunting

Available Montana Bison Hunts – Search HF Aventures

Montana has two bison migration hunts. Unit 385-20 is on the northern border of Yellowstone National Park near the town of Gardiner, and unit 395-20 is located on the western side of the park near the town of West Yellowstone. Season dates for these hunts will be November 15, 2024-February 15, 2024, and 40 tags will again be issued for each hunt. Keep in mind that there will be a lot of Native American tribes from across several of the western states that have traditional hunting rights and will be hunting if bison are coming out of the park.

Go on More Hunts with Better Information, Join Huntin’ Fool Today!

The other bison hunt is unit 385-21, and it is only valid in the Absaroka Beartooth portion of unit 385. Season dates will be September 15-November 14. The bison population is very small, and with a hunt quota of only five, it is not available to nonresidents. This is a very remote wilderness backcountry hunt that is loaded with grizzlies. Pack animals are a must if you harvest on this hunt. Only two of the hunters reported harvesting in 2022.

Montana’s non-resident bison hunts allow hunters the chance to harvest a bison as they migrate out of Yellowstone National Park. With a combination of mild weather and a lack of good snowfall, the herd will stay safely within the confines of the park’s boundaries for the entire hunting season. This had been the case since the 2017-2018 hunting season, and only 15 total bison were harvested between the 2018 and 2021 seasons by the 320 migration permit holders. With cold weather and heavy snow, the herd of almost 6,000 animals will move into the hunting districts along the northwestern boundary of the park in search of lower elevation and better access to forage. When this happens, hunters will have good success on their hunts. Rolling the dice on 2022-2024’s weather paid off for successful bison applicants as strong winter conditions beginning in early November set the stage in driving hundreds of migratory bison out of the park. In total, state hunters killed 73 bison between the two migration hunts. In district 385-20, 34 of the 40 tags issued in the draw were filled. Another 20 hunt roster tags were later activated on that hunt and 14 of those were also filled. In district 395-20, 25 of 40 tags were filled. Another 782 bison had been harvested by tribal hunters through the first week of March 2024.

Montana Bison Draw

There is no point system for Montana bison, so your odds are the same as all other applicants. These can be extremely frustrating hunts most years, but if you want to hunt Boone and Crockett eligible bison, Montana is one of only a handful of states that offers the opportunity to do so.

Our Memberships Include The Most Accurate Draw Odds Available, Join Now!

Self-Guided Montana Bison Hunts

Over the last 20+ years, we’ve collected hunting research and data, so join Huntin’ Fool today and access the best research tools for hunting bison in Montana, including 3D Maps, Draw Odds, Consultations, and much more. Go on more hunts with better information!

Private Land, Semi-Guided, and Guided Bison Hunts in Montana

Search our database for Montana Bison opportunities.

Consult with Hunters Who Have Hunted in Your Unit, Join Now!

M0tBbVFzVnFtakU90

Montana Bison Application Deadline

The Montana Bison application deadline is May 1, 2024.

Our magazine, which is available in print and online, has everything in one location – application info, draw details and odds, fees, hunter requirements, point structure, age restrictions, youth information, weapon restrictions, other tag opportunities, hunt planning, and much more. If you would like access to all of our research, join today!

2022 MONTANA NON-RESIDENT FEES Up-Front Fees Base Hunting License $15 Conservation License $10 Bonus Point (optional/per species) $20 Bison Application Fee $50 Post Draw License Fees (if successful) Bison Permit $1,250 Bow and Arrow License (required for all archery hunts) $10 *Fees do not include the additional 2.5% convenience fee.

MT Bison Hunting Articles from Huntin’ Fool Magazine

  • Fort Peck Bison Bustin’ by Amy Hanneman
  • First Bison at 59 by Matt Langenfeld
  • Another Great Tag! by Colter Hanneman
  • Trophy Bison at 60 by Matt Langenfeld
  • My First Big Game Animal by Nancy Wollenzien

How to choose the best tent for camping with dogs (a buying guide)

0

Are you going tenting with your dog and not sure which tent is the best choice for you and your best friend? I know there are a lot of choices and it can be daunting to pick out the right dog friendly tent. After frequent camping trips with my now 9 year old dog, Ayla, I’ve been through a few different tents and I’ve definitely come to a conclusion of what I think is the best tent for camping with dogs.

Obviously, there are many factors that play a role in which tent to choose, so I will go through the main factors you should look for in a pet friendly tent and the pros and cons with different tents so that you can make a sound decision based on your dog, camping habits, and needs.

Disclosure: This post may contain affiliate links. That means that if you make a purchase through one of those links, I will get a small commission at no extra cost to you. If you have any questions about these services or products, feel free to ask me.

How to choose the best tent for camping with dogs

There are a few things you need to consider before choosing the best tent for camping with dogs. First of all, do you want the dog to sleep inside the tent or not?

The first years I camped with Ayla, I had a tunnel tent and she slept outside in the front department. Later, I got a larger tent and chose to take her inside and we both love it! Now, I would never leave her outside again.

I’ll go through the pros and cons of having your dog inside or outside the tent to help you make the best choice for you and your dog.

RELATED: Best eco friendly backpacks

Advantages of having the dog inside the tent

One major advantage of having your dog inside the tent is that it can’t wander off at night if it becomes curious of something. This means you don’t have to get up at night to chase it.

Even though the dog is in a leash, I find that they tend to slip out of their harness if they really want to.

As a result, you get a better sleep and your dog gets a more relaxed night without having to protect the tent from the outside world.

Another advantage is that it’s so cozy to have your furry friend next to you. I really noticed a big difference on Ayla once I let her come inside the tent and sleep on her blanket in her own corner. She was proud, happy, and very relaxed. Opposed to before, she now sleeps through the whole night.

Having your dog in the tent also makes it easier to leave the tent when you go to the shower or bathroom. Dogs are usually more calm when they have smaller areas to protect so the tent is the perfect place.

If it rains outside, it can be a disadvantage to have your dog sleeping on a mat on the ground as it can get wet, which in turn isn’t very comfortable. Inside the tent you know it’s dry and comfortable for your pet.

Disadvantages of having the dog inside the tent

First of all, if your dog sheds like mine, you’ll get a large amount of dog hair inside your tent. If you usually have your dog in the bed, then you probably don’t mind, so it won’t be a problem.

The other thing that could be a disadvantage is if it rains or your dog gets wet from bathing before entering the tent, it will get humid but can also smell like wet dog, depending on the breed.

On the other hand, you know that your dog is not laying on wet ground outside.

Finally, I can imagine it’s a pain to have a super active dog inside the tent if it can’t lay still and keep spinning around. Personally, I haven’t had this problem with Ayla, as she’s a very calm lady.

YOU MIGHT ALSO LIKE: How to travel locally: A responsible guide to local travel

Features to look for in a dog friendly tent

Now that you’ve hopefully made a sound decision on whether to have your dog inside or outside the tent, let’s have a look at dog-friendly tents for you and your furry friend.

I have listed a few features I think a pet-friendly tent should have (or not have) from my experience of camping with Ayla before we look at the best tents for dogs.

The less tent cords the better

I’ve had a couple of hiking tents and mountain tents with a lot of cords to help the tent stand properly and it might be my clumsiness (they also say the dog resembles its owner), but both Ayla and I found ourselves stumbling in the tent cords in more than one occasion. In the worst case scenarios, this has resulted in a partly collapsed tent.

Needless to say, I’m not a big fan of tents that need a lot of cords to stay erected and I profoundly believe that the best tents for camping with dogs are the ones with fewer cords.

Easy access in and out

Easy access to go in and out of the tent is essential when tent camping with a dog. My first tent wasn’t a very dog friendly tent. It did have a front department where she slept in her bed or blanket, but the tent was small and low.

A 2-person Bergans tunnel tent, perfect for hiking and spending the night in extreme and windy weather in the mountain.

If I had taken Ayla hiking over several days and had to carry the tent in my backpack, I’d definitely use this tent! But not for car camping.

For me, it’s also an important matter that Bergans is a sustainably conscious outdoors brand, striving for a more sustainable production chain.

The one I have now, is excellent. There is no front department, but it’s easy and straight access in and out which means fewer chances of disaster from an eager dog.

I also found a larger tent (3-4 person) with front department is easier to navigate with Ayla around, both because of the height but also because there is generally speaking more room.

Easy access to water

It’s important that your dog has easy access to water. If you have the dog in the front department of your tent, it’s possible to leave a bowl of water there so the dog can drink during the night.

If you opt for having the dog inside the tent, you need to make sure there is a water bowl outside the tent opening so you can let the dog out and drink before bed time and as soon as you wake up. This is especially important in warmer weather conditions.

When I go camping with Ayla during Spanish summer, I often give her water if I wake up in the middle of the night too.

To summarize this, you don’t want to have a tent where you have to get through several tent openings before you can get to the water.

RELATED: Eco friendly camping gear (including dog camping gear)

Best tents for camping with dogs

Based on the above and my experience, I have picked out a few top dog friendly tents to help you pick the best tent for camping with dogs based on your needs.

Vaude Campo Compact XT dome tent

Vaude has this great dome tent which has a spacious front department if you opt for letting your dog sleep outside. It does have space for a blanket or a small dog bed so that your pet can sleep comfortably.

With the front department, it’s easy to have water accessible for your dog all night.

Vaude is one of the leading outdoors brands within sustainability and the majority of their overall materials are vegan.

The only down side with this tent, are the tent cords. Otherwise, this is without a doubt one of the best tents for camping with dogs on the market.

This tent weights 3 kilos and can be packed up for shorter hikes too.

Get a Vaude Campo Compact XT dome tent here

The North Face Stormbreak tent

This tent from The North Face is a great pet friendly tent. Easy to set up, it is the perfect tent for camping with dogs.

It’s easy to get in and out and you don’t have tent cords either you or your dog can stumble in, which makes it a much better experience.

There is a small front department where you can leave a bowl of water. there is room to leave your dog outside as well, depending on the breed.

What I love about this tent, is that it’s easy and with only 3 kilos for the 3-person tent, you can carry it on small hikes too. The 1-person tent (which might be tight if your dog is bigger than a Chihuahua) only weights 1,4 kilos.

Get The North Face Stormbreak tent here

Quechua 2 seconds pop up tent

My current tent is this Quechua 2 seconds pop up tent, which is super handy. It seriously only takes a few seconds to pop it open. No tent poles needed, which means Ayla can’t walk on top of the tent and make a mess while I try to put it together.

When there’s no wind, you don’t even need to peg this tent to the ground, which makes it even quicker to get up and to pack. I also find a lot of camp grounds have hard soil or even pebbles where you pitch your tent and unless you have a hammer or huge muscles (which I definitely can’t brag about), it’s impossible to peg the tent.

This tent is spacious and easy to get in and out of both for you and your pet. I always leave a water bowl for Ayla outside, and when I wake up, I open up so she can stick her head out and drink. It’s also waterproof, which I’ve unintentionally tested by spilling a whole bottle of water over the top.

The only thing I have to pick on when it comes to this tent, is that my friends and I had problems packing it up the first few times and had to ask for help from other campers. This summer, though, I magically found the trick and now I can’t understand that I ever had a problem with it.

Note that the packaging is not suitable for hiking as it packs up really big, though perfect for car camping.

Except from being the less sustainable tent I’ve used so far, Quechua’s pop up feature goes a long way in being user friendly and the fact that you don’t need cords or pegs makes this the best pop up tent for camping with dogs.

Get a Quechua 2 seconds pop up tent here

Conclusion

Rounding up this post on the best tents for camping with dogs, I hope you have the information you need to make a sound decision on what are the best pet friendly tents for you and your dog.

If you have any thoughts, questions, other recommendations you think I should consider in this post, feel free to drop me a comment below.

Happy dog camping!

Other necessities when taking dogs camping:

READ NEXT: Benefits of sustainable tourism

Did you like this? Pin it for later!

Leave this field empty if you’re human:
Brent’s Bottom Line – My Top 3 Hooks

0

You know, it doesn’t matter what kind of bait you use if you don’t have a hook in it. That sounds simple, but when it comes to choosing the right hook, I consider that decision very carefully.

Hooks are obviously extremely important because that’s how you’re able to land a fish. However, you have to use the right style of hook for the right application. Otherwise, you decrease your chance of catching fish.

When I’m determining the type of hook I’ll use, a lot of factors come into consideration. The type of bait I’m using is certainly a big element, but so are line size, the habitat I’m fishing and the size of fish I expect to catch.

For instance, you wouldn’t use a thin wire hook with 20-pound fluorocarbon in heavy cover. Conversely, you wouldn’t use a heavy flipping hook in open water with light line. Every hook has its purpose and learning to select the right one for the job will increase your success as an angler.

Here are a few of my favorite hooks and a few details on how I use them:

HOOK 1: Gamakatsu Straight Shank Heavy Cover Flipping Hook

How I Use It: This hook is great for fishing around any shallow cover such as grass or wood. The strength allows you to set the hook and drag that fish out of cover. In this scenario, if you try to use a hook that’s too light, one of two things will happen: Either your hook will bend, if the fish will wiggle loose.

When you hook a fish in that heavy cover, those fish have so much leverage. By comparison, out in open water, the fish is pulling against you, which means they’re pulling against your line and your rod. There’s not much pressure on the hook and on the fish.

But when that fish is in the target area and he’s pinned against something, they have so much leverage that they can turn their head really hard really hard the other direction and it will bend the hook. So you need a heavier hook for that situation.

This is my choice for flipping/pitching with 22-pound Sunline Shooter fluorocarbon. I’ll rig this hook with the Yamamoto Flappin Hog and use a 4/0 for the larger size bait and a 3/0 for the smaller one.

Hook Pointer: When I feel the bite in heavy cover, I drop the rod tip, reel up any slack and set the hook pretty hard.

HOOK 2: Gamakatsu Super Line Extra Wide Gap (EWG) Hook

How I Use It: This is my choice for all 5-inch Senko applications around shallow cover, where I cast and flip the bait on 16- to 20-pound fluorocarbon. That hook holds the Senko, I believe, straighter than any other hook. It allows the bait to line up perfectly straight on the hook.

That bait falls the best without any hook in it – without anything to hinder it. By design, the bait wiggles when it falls. With any hook, if the bait is tweaked a little bit and not perfectly straight, I don’t think it falls as naturally as it’s designed to fall because you’re limiting the amount of action it has.

Depending on depth, I’ll fish the Senko on a weighted Texas rig with a 4/0 hook or a weightless Texas rig with a 3/0. With the weightless rig, the 3/0 size is better because there’s less hook and I don’t overpower the Senko and mar the action. With a standard Texas rig, weight is less of an issue.

Hook Pointer: Not only does that hook keep it perfectly straight; it allows you to Tex-pose that hook point. So you don’t have to pierce the Senko completely like you would with a standard Texas-rigged setup where the barb and the point are buried inside the bait.

Well, a Senko is a big-body bait with a lot of salt and a lot of bulk. Anytime you have to pierce that bait, your odds of catching that fish decrease.

With that EWG hook, the bend that it has allows me to run the hook point completely through the bait and then the hook point lays flat on top of that bait. Then all I do is just barely pierce the skin with the point to make it completely weedless. When I set the hook, all I’m doing is tearing through one little piece of plastic.

So this hook helps the bait sit flat without any weird bend to it and it helps with the actual hook-up ratio when you set the hook.

HOOK 3: Gamakatsu Weedless Split Shot/Drop Shot hook

How I Use It: This is my choice for wacky rigging 5-inch Senkos. Wacky rigging maximizes that classic Senko action because there’s only one point of entry, as opposed to the two points of entry that you have with a Texas-rigged bait.

The reason a Senko is so effective at tempting fish is that it has a crawly, wiggly action on the fall. Fishing it on a wacky rig allows the bait to fall as it’s made to.

I like a 1/0-2/0 hook for wacky rigging and I’ll fish this rig in shallow to mid-depths on spinning tackle. I typically use 8-pound fluorocarbon, but these hooks are heavy enough that I can get away with 16-pound line if I’m around heavier cover.

Hook Pointer: Because I’m using spinning tackle and lighter hooks, I have to take it easy on the hook set. If I drop the rod tip and set the hook like I would with a flipping presentation, I might bend the hook. With spinning gear, I’ll reel down and pull into the hook set, instead of the drop-snap method.

Here are a few more points to consider with your hooks:

Knot Choice: For all of the hooks I’ve mentioned, I attach my line with a version of a uni-knot. Essentially, you make a loop through the eye; similar to the Palomar, but then you tie a uni-knot over the main line and the tag end with the loop.

In the past, I’ve had trouble with broke lines with Palomar, but since I’ve been using this knot, I’ve had almost no trouble with knot-related break-offs. A Palomar is a great knot for reaction baits, but for any hook setting baits with lot of shock, I use this modified uni-knot.

Matching Line to Hooks: The one trick is to look at the diameter of the hook as it relates to your line. The lighter the line, the lighter the hook should be. Basically, a light line doesn’t have enough power for a heavy hook; but a heavy line has too much power for a light hook. If you go the wrong way; things will go south in a hurry.

Hook Organization: How you store your hooks can play a key role in your efficiency, particularly your ability to quickly respond to an opportunity on the water.

I keep my hooks in a Plano Utility box with slots for the different sizes. This box also carries my other terminal tackle items. I have back-up items in their original packaging in my truck, but I’ll keep a complete assortment of terminal tackle in this one box in my boat.

Doing it this way, keeps everything I need right in front of me. I don’t have to open up a box for hooks, another box for weights and another box for bobber stops. It’s faster and easier to have something right there.

Sharpening Hooks: There’s nothing wrong with touching up the tip of a hook now and then. I do it if I see the point just has a little bend or tweak in it.

However, if I think a hook’s point has worn down to the point of needing more than a casual touch-up, I’ll replace it. It takes only a few seconds to retie and I’d rather know that I have a hook that won’t let me down.

Best Air Rifle Deals

Popular Posts

Can a 22 air rifle kill a deer?

0
"Debate over whether a 22 air rifle can effectively take down a deer has sparked curiosity among hunting enthusiasts. With its lower muzzle velocity...

Can you dry fire a gamo air rifle?

0
Unveiling the truth behind dry firing a Gamo air rifle, this intriguing headline delves into the possibility of safely practicing without ammunition. Join us...

PCP vs CO2 Guns: Which One is Better?

0
The most talked-about debate between hunters and gun enthusiasts is what the best power source of a gun is.  The five main sources of power...