")
")
")
")
")


You’ll find the nests of the hawks before leaves start to grow on trees. Therefore, they’re called early nest builders.
Due to this habit, numerous large hawk nests can be found on spring trees. Thus, it’s easy for a person to identify a hawk’s nest located in Michigan.
What are the different hawks found in Michigan? The different hawks found in Michigan are Osprey, Rough-legged hawk, Northern Harrier, Sharp-shinned hawk, Cooper’s hawk, Red-shouldered hawk, Broad-winged hawk, Northern Goshawk, and Red-tailed hawk.
These hawk species are economically harmless. Some of their nests can be found on the ground and 75 feet from the ground when situated on a tree.
To identify the hawks that reside in Michigan, you have to know their appearance and behavior. This article has all the information for every hawk species that are mentioned.
Table of Contents
- Do Hawks Live in Michigan?
- How to Identify a Hawk in Michigan?
- 9 Hawks in Michigan
- What Is the Biggest Hawk in Michigan?
- Can You Shoot a Hawk in Michigan?
- What Is the Largest Bird in Michigan?
- How Do You Tell the Difference Between a Falcon and a Hawk?
- What Is the Rarest Bird in Michigan?
- Where to See Thousands of Hawks as They Migrate Through Michigan?
- Summary
Do Hawks Live in Michigan?
Hawks live in Michigan, a nesting site for these birds. The earliest record of this activity is in 1934.
How to Identify a Hawk in Michigan?
Binoculars can help you identify a hawk in Michigan, and you have to weigh these factors.
- Plumage – The underside and back plumage should be compared. The plumage of the most common hawks in Michigan, called red-tail and sharp-shinned, highly varies all over their bodies. On the other hand, the matching underside and back plumage is seen on rough-legged hawks and osprey.
- Beak shape and color – Every hawk has a unique beak. A species has a distinct one that is similar to adults and juveniles alike.
- Habitat – You can readily expect what species you can find when you know the habitat of some hawks. For instance, rough-legged and red-tailed hawks are likely to be found in farmlands, woodlands, and city areas. Since sharp-shinned hawks feed on fish, they are around waterways.
- Forms in-flight – You can’t just see the hawks perched on a tree. Even when they fly up above, you can distinguish them through their forms while flying.
9 Hawks in Michigan
Osprey
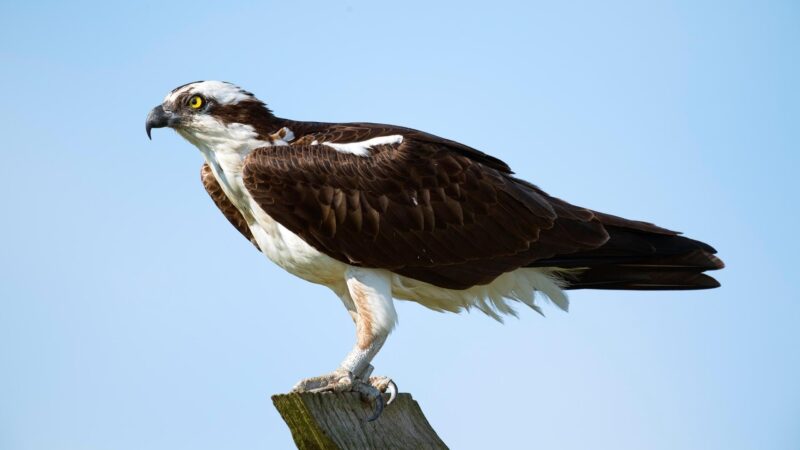
This is a large species with long wings that have carpal joints. Ospreys have unique fishing techniques, as supported by their body parts. They have long legs, curved claws, and spicules which are spiny footpads to easily grip slippery fish.
Because they dive when fishing, they have nasal valves and oily, dense plumage to prevent water from entering their nostrils.
- Appearance: It has a dark brown back and a bright white underside. There’s a morphological variation based on the regions that they occupy. Those that are in tropical and subtropical areas are smaller.
- Color: Dark brown, bright white
- Wingspan: 145 to 170 cm
- Lifespan: 25 to 26 years
- Size: 55 to 58 cm
- Weight: 1,200 to 2,000 grams
- Diet: Amphibians, birds, carrion, fish, mammals, mollusks, reptiles
- Place of Origin: All continents except Antarctica
- Characteristics: Solitary; sedentary; colonial; migratory; diurnal; motile
Rough-Legged Hawk
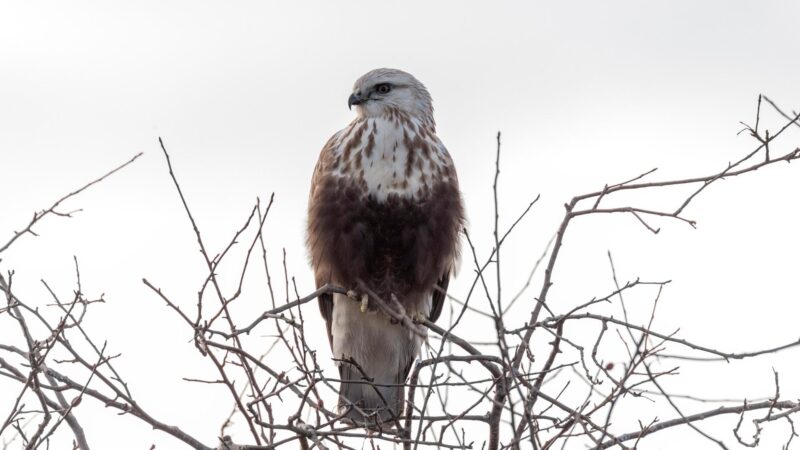
You won’t see rough-legged hawks walk as they tend to soot downs when gathering food and getting near a mate. They also fly low for their size, and they just flap their wings to reach a certain altitude.
- Appearance: Both males and females have dark and light morphs. However, the coloration varies between adults and young. There’s a black band on the edges of this bird’s underside.
- Color: Black, brown, grayish
- Wingspan: 122 to 143 cm
- Lifespan: 18 to 24 years
- Size: 46 to 59 cm
- Weight: 745 to 1,380 grams
- Diet: Birds, mammals, reptiles
- Place of Origin: Holarctic region
- Characteristics: Glides; territorial; solitary; motile; migratory; diurnal
Northern Harrier
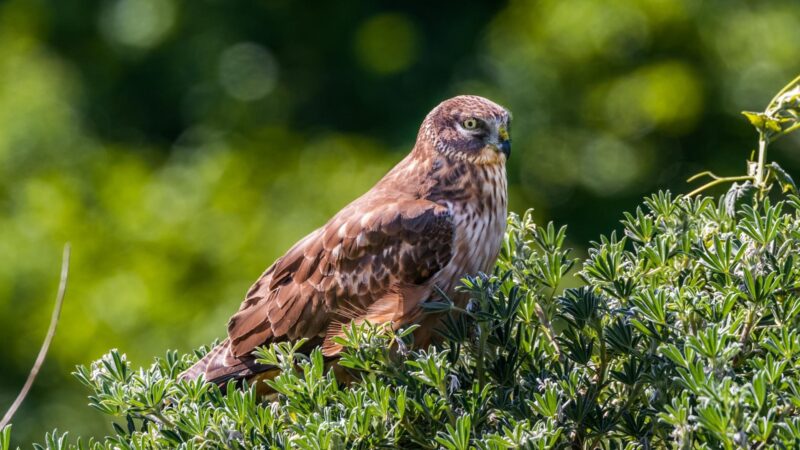
Northern harries don’t only fly, but they also hop and walk. You’ll usually see them flying low and slow near the ground. On some occasions, they would soar high. The male is more agile and flies faster than his female counterpart.
- Appearance: A Northern harrier can easily be spotted due to some unique features. Specialized feathers surround their face, so there’s like a disc that directs the sound to their ears. When it’s on a flight, a white rump patch is visible.
- Color: Gray, white, brown
- Wingspan: 380 to 384 cm
- Lifespan: Up to 16 years
- Size: 41 to 50 cm
- Weight: 290 to 600 grams
- Diet: Amphibians, birds, mammals, reptiles
- Place of Origin: Holarctic region
- Characteristics: Diurnal; migratory; motile; glides
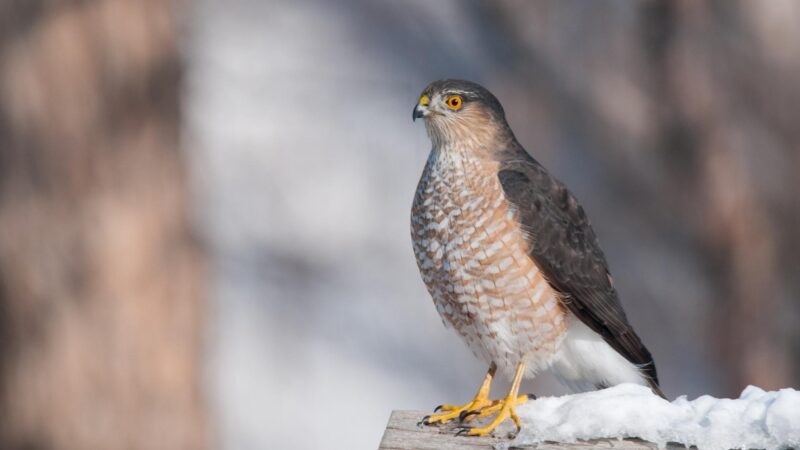
The Sharp-shinned hawk is the smallest species in North America, but it’s an opportunistic hunter. Since thus territorial, it would chase, call, and attack intruders.
- Appearance: The back of this hawk is bluish-gray or slate, and the underside is white. It has a crown in a dark hue. Moreover, it has a dark-colored beak in a hook shape.
- Color: Bluish-gray or slate, brown, white
- Wingspan: 52 to 65 cm
- Lifespan: Up to 19 years
- Size: 24 to 34 cm
- Weight: 87 to 218 grams
- Diet: Birds, insects, mammals
- Place of Origin: Nearctic and Neotropical regions
- Characteristics: Diurnal; motile; solitary; territorial; migratory
Cooper’s Hawk
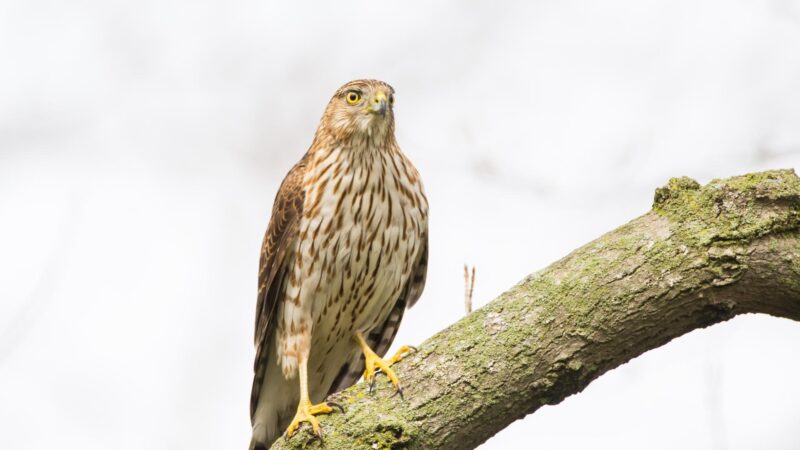
This hawk perches on a tree and waits for its prey. It lives in forests and open lands. You will be astonished to see it as this is a swift flier. With a rapid wingbeat, it can search through heavily vegetated woodlands for its food.
- Appearance: A Cooper’s hawk is medium-sized with a long, lean body. The ones that reside in the west are smaller than those in the east. When in flight, its wings appear short and rounded, while the tail is long and barred. It has a hooked bill suitable for tearing meat.
- Color: Blackish, blue-gray, white
- Wingspan: 75 to 94 cm
- Lifespan: 12 to 20 years
- Size: 35 to 50 cm
- Weight: 280 to 556 grams
- Diet: Reptiles, amphibians, mammals, birds
- Place of Origin: Nearctic and Neotropical regions
- Characteristics: Solitary; territorial; migratory; motile; diurnal
Red-Shouldered Hawk

- Appearance: This is a large, heavy species with broad wings and a long tail. The upper part of its body has the colors brown and red, while the underside is creamy. It doesn’t form a flock, as most red-shouldered hawks don’t migrate. Only those that breed in the Northern part of the US and South of Canada migrate to the North of Mexico in winter.
- Color: Dark brown, brown, reddish, creamy
- Wingspan: 92 to 107 cm
- Lifespan: Up to 20 years
- Size: 43 to 61 cm
- Weight: 550 to 700 grams
- Diet: Aquatic crustaceans, amphibians, insects, birds, reptiles, mammals
- Place of Origin: Nearctic region
- Characteristics: Diurnal; sedentary; solitary; migratory; motile
Broad-Winged Hawk
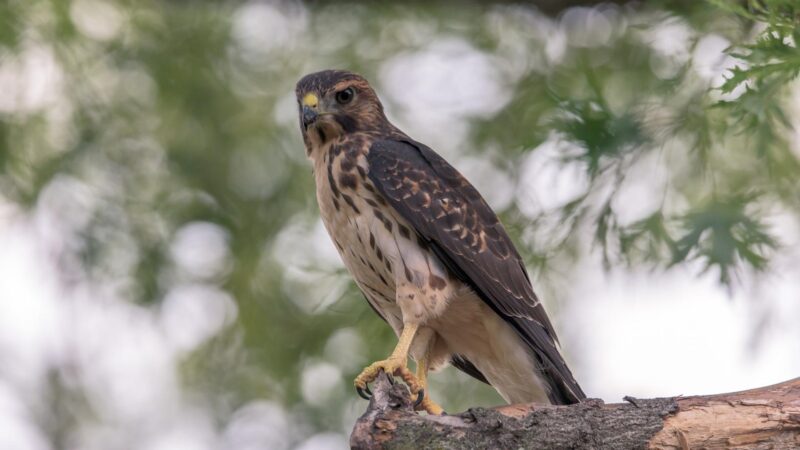
Although the Broad-winged hawk is inclined to stay in dense forests, it prefers to be near open areas like road trails, meadows, and wetlands. It doesn’t like to be near humans.
When in the peak of migration, thousands of broad-winged hawks flock together. Hence, it results in a thermal current, so every bird minimizes its energy when flying.
- Appearance: This is a small and stocky species. As a dark-colored bird, you can easily spot the white, broad stripe and the two thin lines in the middle of its body. When flying, it has pointed wing tips. But these wingtips don’t reach the tail when this bird is perched.
- Color: Dark gray, black, white
- Wingspan: 81 to 100 cm
- Lifespan: 16 to 18 years
- Size: 34 to 44 cm
- Weight: 265 to 560 grams
- Diet: Insects, birds, amphibians, reptiles, mammals
- Place of Origin: Nearctic and Neotropical regions
- Characteristics: Solitary; diurnal; migratory; motile; territorial
Northern Goshawk
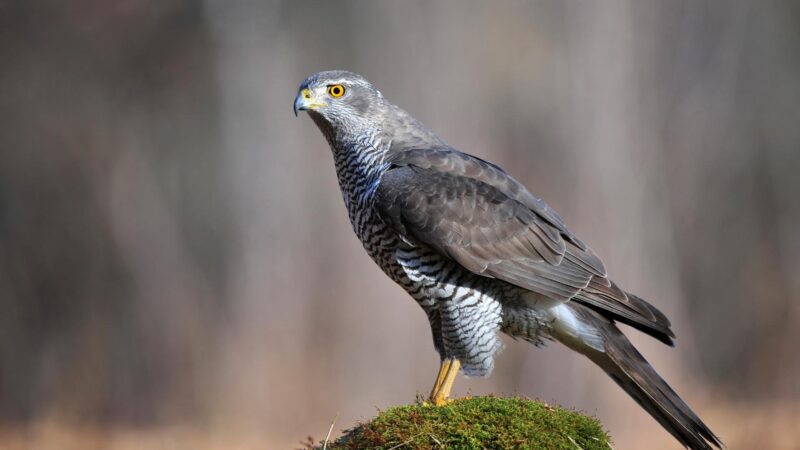
This is the largest accipiter species. It’s fascinating that it spends its entire lifetime in the same nesting area. It will only leave during winter and go to the southern area, but it returns when spring comes.
- Appearance: As an accipiter, it has a distinct white grouping of feathers, and this is like a band over the eye. You’ll also notice that the band seen on a Northern Goshawk is more striking than the other species. It has dark coloring, but the eyes are reddish-brown.
- Color: Blue-gray, black, light gray, white
- Wingspan: 98 to 115 cm
- Lifespan: 16 to 19 years
- Size: 55 to 61 cm
- Weight: 631 to 1,362 grams
- Diet: Birds, insects, mammals, reptiles
- Place of Origin: Holarctic region
- Characteristics: Sedentary; solitary; motile; diurnal; migratory
Red-Tailed Hawk
A pair of Red-tailed hawks stay in the same territory for life. This bird can adapt to different kinds of habitats at various altitudes.
It can be found in grasslands, agricultural fields, forests, and woodlands. When it comes to laying eggs, its preferred spots are large trees in an open area, wooden fence rows, and forest edges.
- Appearance: The back part of a Red-tailed hawk varies from auburn to deep brown, but the underbelly is always lighter than the other body parts. Its legs, feet, and skin on the base of the beak are all yellow.
- Color: Auburn to deep brown, brownish-red
- Wingspan: Around 122 cm
- Lifespan: 28 to 29 years
- Size: 45 to 65 cm
- Weight: 795 to 1,224 grams
- Diet: Birds, reptiles, mammals
- Place of Origin: Nearctic region
- Characteristics: Territorial; diurnal; migratory; motile
What Is the Biggest Hawk in Michigan?
Osprey is the biggest hawk in Michigan, with a wingspan of over 5 feet and a maximum weight of 2,000 grams which is twice or even four times the weight of other species.
How Big Are the Hawks in Michigan?
It depends on the species. While Osprey, Northern Goshawk, Rough-legged hawk, and red-tailed hawk are larger and weigh over a thousand grams, there are smaller species like Broad-winged hawk, Red-shouldered hawk, Northern Harrier, Cooper’s hawk, and Sharp-shinned hawk.
They just weigh a few hundred grams or around half a thousand grams. The smallest among them is a sharp-shinned hawk that can weigh 200 grams.
Can You Shoot a Hawk in Michigan?
Hawks are protected under Federal law enacted in 1918 called Migratory Bird Treaty Act. So, you can’t just shoot a hawk in Michigan any time you want.
Is It Illegal to Shoot Hawks in Michigan?
It’s illegal to shoot hawks in Michigan if you don’t have a permit. A depredation permit is usually given when the hawks are a threat to public health and safety.
What Is the Largest Bird in Michigan?
The majestic golden eagle is the largest bird in Michigan. It’s based on its 7.5 wingspans and more than 6,000 grams weight.
How Do You Tell the Difference Between a Falcon and a Hawk?
Here are the factors that you have to take note of to differentiate a falcon from a hawk:
- Size, speed, and taxonomy – Although hawks are bigger than falcons, they have shorter wings. Since falcons have longer wings, they fly faster than hawks.
- Beak vs. talon – Falcons dive and use their beaks with a notch to grab and stab prey. Hawks have talons or claws to catch their prey. They have slightly curved beaks.
What Is the Rarest Bird in Michigan?
The rarest bird in Michigan is Kirtland’s Warbler. It’s in yellow and blue-gray colors. The size of this elusive bird is the same as the sparrow.
Where to See Thousands of Hawks as They Migrate Through Michigan?
Different bird species follow the path of the Great Lakes in Michigan when they migrate. Hence, it creates a fascinating view. You’ll see thousands of hawks from the Detroit River to Keweenaw Peninsula.
Thousands of hawks create a wonderful view in the Straits of Mackinac as Lake Huron and Lake Michigan attract these avian migrants to their funnel effect.
Summary
Apart from identifying the species of hawks in Michigan, you’ll also be able to tell them apart from other birds like falcons.
If you have this ability, you won’t be confused. With this knowledge, bird watching will be more fun as you can name the birds. Even only hawk species can make identification challenging as there are variations.
Related: 8 Hawks in New Jersey | Check for Photos!
List of Sources
Ward, L. (1934). Hawks and Their Nests in Michigan. Searchable Ornithological Research Archive.
Kirschbaum, K., Watkins, P. S. (2000). Pandion haliaetus. Animal Diversity Web.
Limas, B. (2001). Circus cyaneus. Animal Diversity Web.
Good, G. (2008). Buteo lagopus. Animal Diversity Web.
Dewey, T., Perepelyuk, V. (2011). Accipiter cooperii. Animal Diversity Web.