Home Blog Page 170

Hunting Workouts | Getting in Shape for Western Hunting

0

Hunting is hard…but western hunting is just plain difficult! It strains your gear, your emotions and your body all at the same time. Hunting, regardless of the technologies we bring to the field will always remain a primal grudge match between predator and prey. The only thing we can improve upon as hunters is our fitness level. The frustration we feel during the fall hunting seasons reflects our own inability to handle the wild at her best and most fit. Some hunters forego preparations in the offseason and pay the price through not tagging an animal, being unable to keep up with the demands of the hunt or worst of all, may not be able to fully enjoy the hunt. While training to hunt may sound cliché, everyone’s journey is their own. Each person must want to take it upon themselves to be in peak form come fall. Each person’s “peak form” may be different, but your body and mental game must be at a minimum to complete your hunting adventure. This means taking hunting workouts and fitness seriously in the offseason.

PODCAST: John Stallone and Willi Schmidt – Planning and Preparing for Big Game Hunts Out of State

Before You Start: Consider Safety

Diet and exercise should always be considered under the advice and guidance of a medical professional. Their knowledge and expertise can help you understand how to fully optimize diet and exercise for you and your body based on your age, current fitness level, and any injuries. Another reason to check with health care professionals is to keep a working track of your vitals, specifically your heart. Every year hunters succumb to a fatal heart attack in the wild and they may have never known they had a lurking heart problem. The actions of the wild through hiking and heavy lifting can lead to serious strain on the heart muscle and leave you in a dangerous situation especially if you are traveling to higher elevations on your hunt. Many months before hunting season it is always good to check your cardio health. Consider building a baseline of data every spring to track year after year.

The Right Way to Start Is Through Nutrition

A truck is worthless if the gasoline is of poor quality. Poor fuel robs the vehicle of efficiency through strength and endurance. The same goes for the body, the foods we eat, and supplements we take, as they make up a large portion of the overall performance and results we see through preparing our bodies. If you are not sure where to start, start by evaluating what you are eating and consult a professional if you need help shaping a plan.

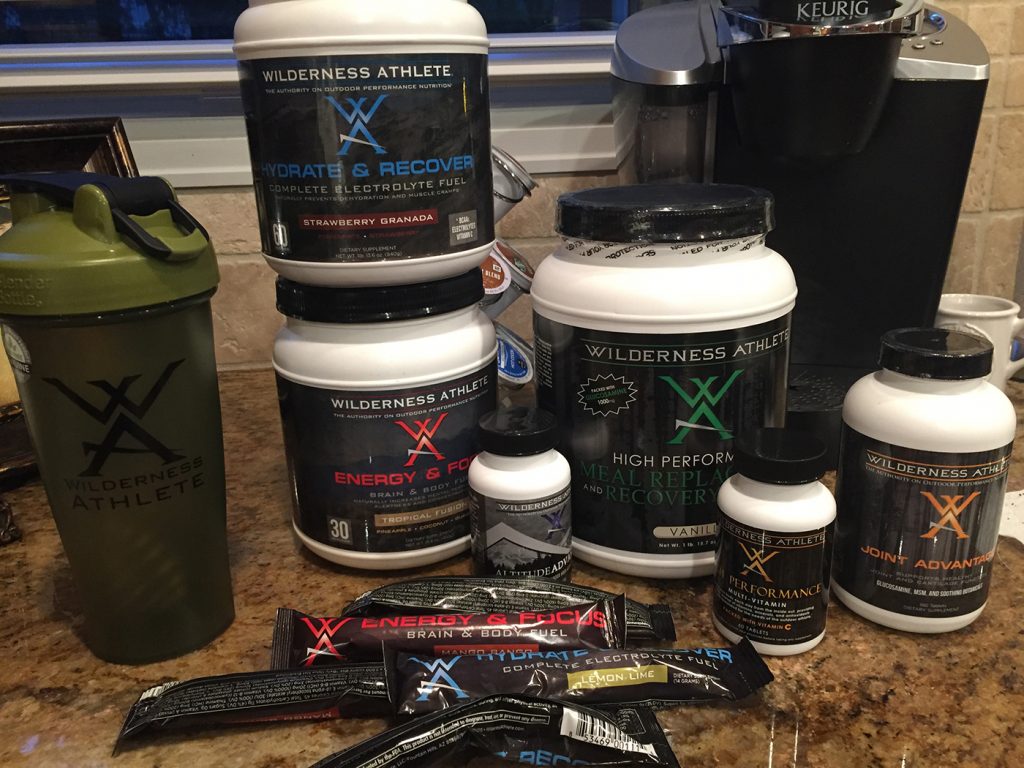
A good rule of thumb is to stick to lean proteins, vegetables, fruits, complex carbohydrates throwing out simple carbs and starches and looking into additional supplements like Wilderness Athlete products. Adding supplement powders to your breakfast smoothies are a great way to further optimize the body. Workout recovery mixes like Protein Plus or Brute Strength also help you get the most from your time in the gym or from out hammering miles on your legs by providing a balanced proportion of protein and carbohydrates and proven nutritional anti-inflammatories. When you push your body to the next level through training, it will need help through supplements to replace the nutrients you are so quickly burning.

A Body in Motion

Exercise can seem overwhelming. Thousands of hunting workouts are possible and endless numbers of movements and methods, theories and techniques create a crisscrossing mire of confusion that the everyday hunter can find frustrating. Just getting up off the couch to get to the gym and break a sweat is a daunting task if there is no direction and no plan. Exercise requires a drive, desire, determination and most of all a plan!

Every hunt is different within itself just as each game species requires different hunting tactics. Each hunt will push different parts of the body and you can make the best use of the long offseason to prepare for the specifics of your hunt. In general, there are workouts that help in overall hunting fitness.

Hunting Workouts to Focus on For Western Hunting

When it comes to mountain and western hunting your entire being must be ready for the wear and tear of the daily grind. To be able to enjoy the rigors of mountain hunting, cardio endurance and leg and core strength should be on the forefront of your offseason workouts. Just remember that big bucks, bulls, and rams are killed because you were able to get to them and keep up with them, not because you muscle flexed them to death.

Cardio health can be achieved through any different forms of exercise. Running, biking, elliptical machines, stair climbers or even high-intensity workout videos provide quality cardio routines. Consistency is the key to building cardio stamina. Nobody says that it’s the most fun exercising in the world, but it is effective and trains the mind to deal with pain. The same pain you’ll deal with on a long hunt and hopefully packing out your trophy.

Pushups, lateral raises, and shoulder presses are simple daily exercises. Pushups work the triceps and parts of the shoulder muscles in addition to core muscles, back and pectoral muscles. Pushups are a stamina building exercise using your own body weight. Consistent and daily repetitions are the key to building long-term strength and endurance through this exercise in your off season training.

Lateral raises are another easy exercise not requiring heavy weight or much time. Lateral raises are an exercise in which you raise your arm in a Y, T and I form and hold for a few seconds at a time. This work out can be done with or without weights. If you choose to use weights, use small dumb bells no greater than 15lbs.

Leg day is often skipped since it requires much more effort both physically and mentally. If you can get over the mental hump of procrastination, working out your legs is not difficult at all.

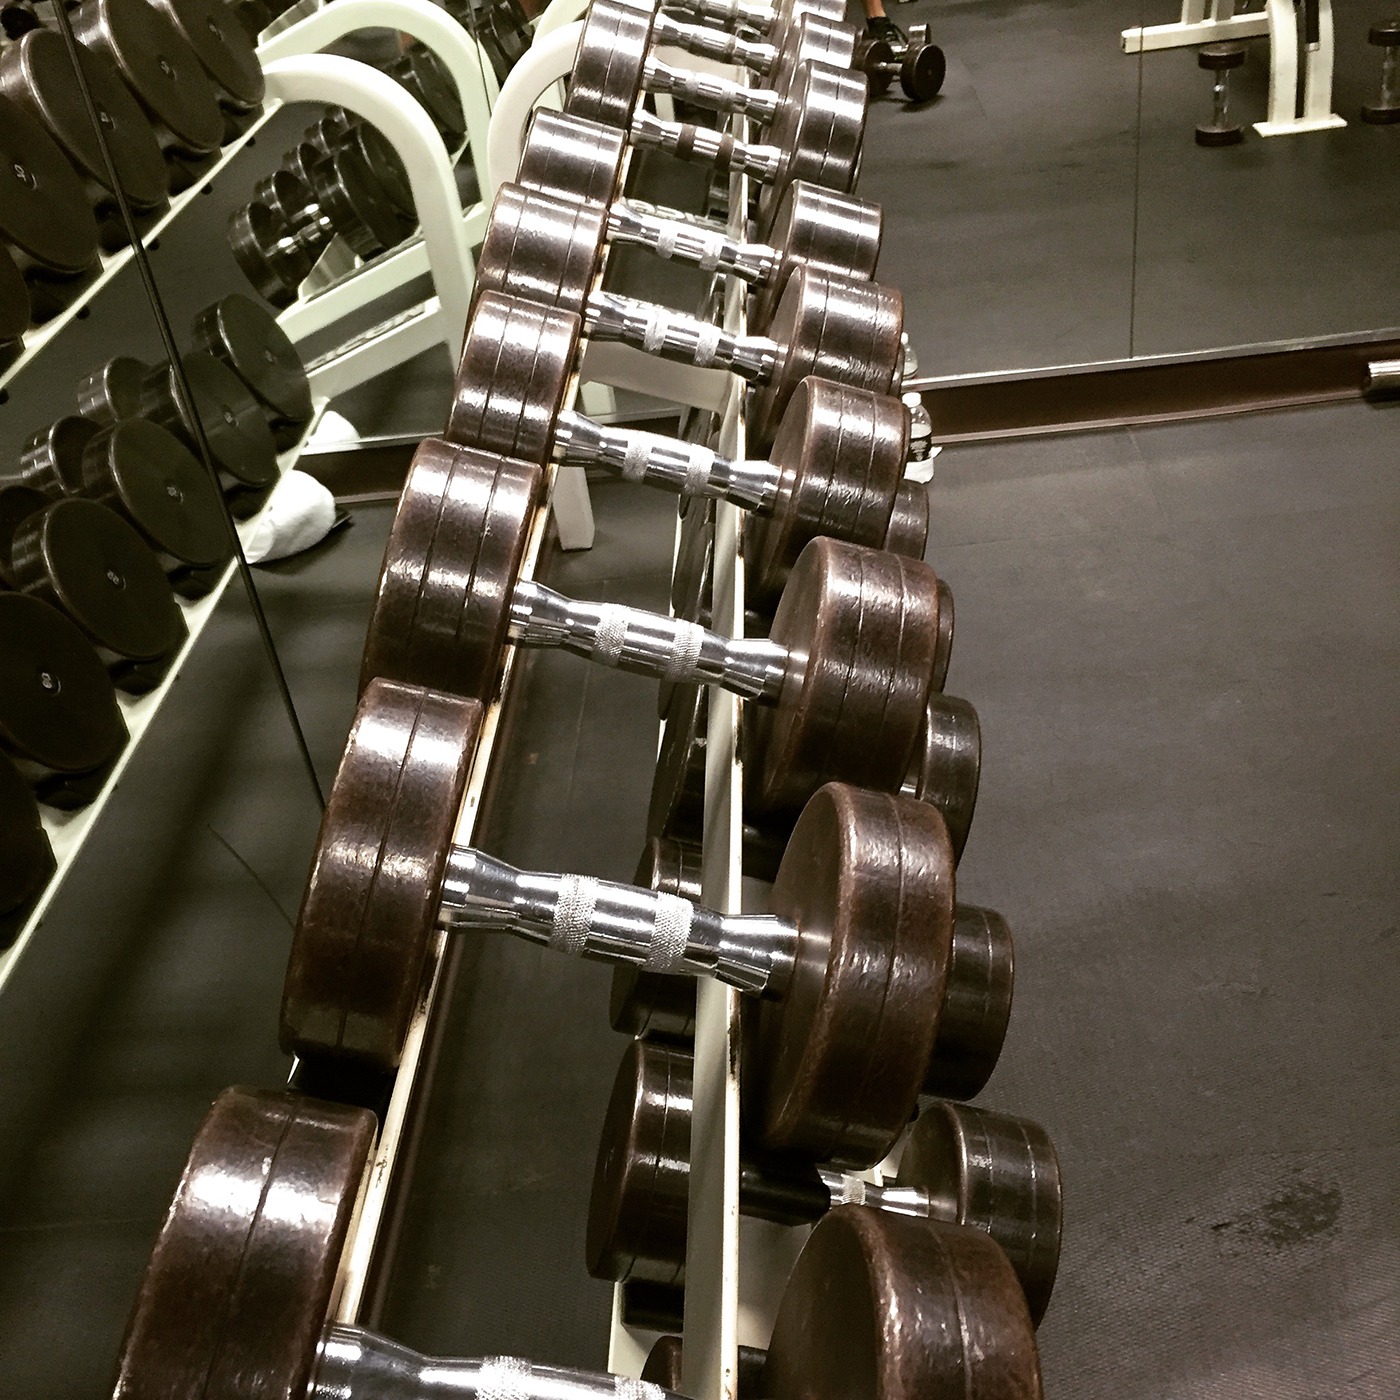
The weight room also has plenty of options to strengthen legs muscles. Squats and leg presses are widely regarded at the go-to leg exercise, and for good reason. These motions work nearly every area of your legs and build core strength and stability. The form is the key for both methods and should always be done with a spotting partner. Other exercises include motions possible with dumb bells. Vertical and side-to-side lunges holding dumb bells are great for lower body resistance training. These motions work parts of your legs regular squats cannot. In the mountains every part of your legs are worked and strained as the constant stop and go, pushing and balancing yourself is a part of each step.

Packing out any animal is an ordeal. Often times the luxury of having pack animals is not available and the tough work must be done on your own back. Having a strong core and back is one of the most overlooked aspects of off-season preparation. Sure, everyone wants a great looking six pack to play the xylophone on, yet, a strong core is beyond the glamor. A strong core provides balance and strength as it is a part of your overall base. Beyond crunches, there are other great offseason workouts you can do to build a strong core. Squats help build core strength as a part of that routine, but planks and leg lifts directly target the core. These resistant style exercises are brutally painful when done consistently in the gym but help you get the results you need.

Back muscles provide the stability and stamina for carrying heavy loads. Exercises like lateral pull downs and dumbbell rows build these back muscles. Most gyms will have a lateral pull down the machine. With a wide grip bar, the idea is to use your scapula muscles in a downward motion. Pinch your shoulder blades together for a full motion and slowly let the bar back up. Don’t overload yourself and have incorrect form as this will not help you achieve the strength and results you need for the mountains. If a lateral pull down machine is not available, pull ups can serve a similar function working both back and arm muscles through a general pulling motion. Using one’s own body focus on going straight up and down to avoid swaying from side to side. There are many variations of pull ups from wide grip to revise grips and close grip work different parts of the lateral muscles. The key is proper form and consistency.

Hunting Workout Videos

These are a handful of hunting workout videos I have recorded over the year of some of the workouts I want to do to ensure each part of my body is ready for the hunting adventure ahead!

Core and Stability

Workout: Focus on the core with a combination of workouts seen in the video below, and by using a combination of balance and Bosu balls, medicine balls, and weighted sandbags.

The Hunting Application: Core and stability workouts as seen in the video below are absolutely critical when hunting in serious and uneven terrain. This is especially true when you are traversing the rough terrain with a heavy backpack.

Barbell Lower Back and Legs

Workout: Standard squats with a barbell strengthens your lower back, legs, and core for strength and stability.

The Hunting Application: This exercise has one of the most practical applications of any hunting workout as it applies to almost every aspect of the hunt from packing in gear to scaling the mountain to packing out the animal you’ve harvested. Do NOT overlook this highly effective training exercise while preparing for your next hunting trip.

Weighted Sled

Workout: The weighted sled workout is huge for overall strength and increases endurance by raising the heart sand forcing you to control your breathing.

The Hunting Application: There’s nothing worse than going on a hunt you’ve been planning for several months and realizing once you’re there that you’re not physically prepared. Struggle with the sled, and excel on the mountain. This approach will make your hunt that much more enjoyable!

Trap Bar Deadlift

Workout: Deadlifts are a great way to strengthen your legs, back, and core

The Hunting Application: Lower back injuries are common in the mountains. Lifting totes onto the pack mules, fetching water from the spring, packing your animal back to the horses. All of these tasks are a great opportunity to get hurt if you don’t strengthen your core with exercises like this…

Weighted Pull Ups

Workout: Pull ups speak for themselves… Pull your chest up to the bar and return to rest. This exercise builds several muscle groups to increase upper body strength in general.

The Hunting Application: Whether you’re hanging a new set for whitetails or scaling the final boulder to get to a better vantage point for glassing an opposing mountain range, pull ups are the perfect exercise to give you the upper body strength you need to get where you need to be!

Shoulder Press

Workout: Shoulder press works your anterior and medial deltoid (shoulder) muscles.

The Hunting Application: You name it… Hoisting gear onto your pack horse. Hanging tree stand sets. Drawing your bow. Anything at eye level or above uses these muscles.

Rhomboid Row

Workout: Rows are a great workout for strengthening your back and specifically your rhomboids, which lie between your shoulder blades and your posterior deltoids, the rear part of your shoulder.

The Hunting Application: This exercise is critical for shot execution and being able to stay at full draw for long periods of time. You’ll be surprised how much easier your bow is to shoot after you’ve been doing this exercise for a while…

Train to Hunt Challenge:

More often than not, most hunters begin their workout programs in July to get ready for the fall. It’s difficult if you have not been working out all year to get motivated or know where to start. Fall seems a long way off and it is often difficult to begin a workout regime in the late winter or spring. Having something to train for in the summer is a great motivator. Train To Hunt was created with this in mind.

There are now nearly a dozen Challenges throughout the country where you can test your fitness and archery shooting skills with others and have something to train for. Although the format has changed for 2017, it is a great program to get you ready for the hunting season, several months before you may have gotten started, The Challenges are a one-day event, and include a 3-D archery shoot in the morning and a Challenge Course in the afternoon. The 19 target, 3-D shoot includes some hunting situations, like shooting from a kneeling position, shooting and then drawing and shooting a follow-up shot within 10 seconds. The afternoon portion includes a longer course where you pack your bow and some weight in your pack and shoot targets along the way. Your 3-D score and your time and score on the Challenge Course are combined for an overall score. Not only does this give some motivation to begin a workout program, the Challenges are a lot of fun and the camaraderie is amazing! Train to Hunt not only puts on these challenges, they also have a workout generator (see below) on the website and can help you create a daily workout depending on your available time and fitness level!

Click Here for the Workout Generator!

Conclusion…Keep the Hunt in Mind

Western hunting is hard when we make it harder than it needs to be. Aside from the challenge of the chase, your body should not have to be the reason you struggle to fill a tag. Training for hunting or performing these hunting workouts in the offseason with the goal of being able to hunt in mind should be your driving power. Don’t let the daunting task of working out or climbing a mountain be the reason your western hunting adventure failed.

The Struggle to Contain, and Eat, the Invasive Deer Taking over Hawaii

0

There should not be any land mammals living in the wild on any of the Hawaiian islands. There shouldn’t be many wild mammals, period; the only endemic mammal in Hawaii, besides marine mammals, is a single species of bat. But there are many mammals traversing the eight main islands in the archipelago today. There are wild sheep, goats, cattle, mongoose, wild boar, rabbits, rats, mice and a small but stable population of brush-tailed rock wallabies on Oahu. None of them should be there.

But the most important invasive species for a few islands, especially Maui and Molokai, is the axis deer. On Molokai, an island of only around 7,000 people, there are somewhere around 70,000 axis deer. On Maui, there are around 50,000.

The axis deer are a fascinating and multi-dimensional inhabitant. They are simultaneously invasive and part of traditional culture; they destroy food supplies and are an extremely important source of food themselves; they are protected by law and despised by some parts of law enforcement; they are wildly destructive to Hawaii and also, during the worst of COVID-19, were a beacon of hope.

***

Axis deer, which are sometimes known as chital, are native to Sri Lanka, parts of India and Nepal. They’re sometimes known as the spotted deer, because they have white spots on their tawny coats, and sometimes as the barking deer, because they are extremely vocal. They first showed up in Hawaii in 1867, given as a gift to King Kamehameha V: three bucks, four does and one male faun, for a total of eight deer. The gift-givers were from Hong Kong, then a colony of Britain. The deer were initially released on Molokai, and they multiplied quickly; some were later moved to Oahu, Lanai and, eventually, in 1959, to Maui.

“Introducing grazing animals here was considered a good thing,” says Jeff Bagshaw of the communications and outreach team for Hawaii’s Department of Forestry; he focuses on deer in Maui. Hawaii was a base to explore the Pacific and a halfway point to Asia, but some of the early sailors found it tough to restock their ships without land mammals to hunt. A few different peculiarities of the Hawaiian islands made it a great home for the axis deer. As grazers, they prefer to eat grass, but they will browse for just about anything. And Hawaiian plants, without any native mammals that might eat their leaves or shoots, never bothered to evolve thorns, spines or toxins to discourage herbivores. There’s even a variety of native Hawaiian raspberry, called the akala, that doesn’t have any thorns.

The deer found no predators in Hawaii, either; none of the wolves, big cats, terrestrial snakes or alligators that prey on them in Asia. But because they had so many predators in Asia, the deer evolved to give birth much more often than other deer species, in the hopes of outpacing the rate at which they get eaten. In Hawaii, they have no predators, but they still give birth year-round.

The dream of those early sailors was realized, but far too well: Soon, Hawaii had an absurd number of land mammals to hunt. The deer, on a few of the islands, became an environmental and sometimes a public health disaster. “They have a huge impact on all our native species,” says Bagshaw. One example: The ōhia tree, which grows in high elevation forests, is both sacred to Hawaiians and vital for the state’s water supply (when clouds come into contact with the tree, condensation forms and drips onto the ground, eventually flowing down the mountain into rivers and reservoirs). Starting in 2010, two new-to-science types of fungus were found on the tree that are harmful to it. Trees do have the ability to heal scars in their bark, which would eventually block the fungal infection, but ōhia trees heal slowly and much more slowly now because the deer nibble and rub on the bark, keeping those wounds open and the infection much more deadly.

There are more common environmental problems, too. The deer trample the land, damaging the nests of ground-nesting endemic bird species. They’ll eat a wide variety of plants, including endangered ones, which has cascading effects on insects and birds. They’ll eat just about anything, really, including crops: Farmers have reported big losses in fruit crops and vegetables, as well as damage to sugarcane. They’re a public health issue, too: They provide food for (also non-native) mosquitoes and, when they die, they can poison delicate water ecosystems. This became a much larger problem recently, when drought led to Molokai deer dying of starvation by the hundreds—although not in large enough numbers to put their population in any jeopardy. And they’re extremely dangerous to drivers; axis is just one of many deer species that seems magnetically attracted to moving vehicles.

Given all of this, it’s not unreasonable to wonder whether the deer should simply be completely eradicated from Hawaii. And, in truth, Hawaii has taken some measures to keep the deer population from spreading: It is now illegal to move deer from one island to another, and when they were illegally brought to the Big Island in 2009, it took only a few years for the government to remove them all. Even in Maui, the Department of Forestry will remove deer from particularly delicate ecosystems, especially watersheds or places where there are endangered species, provided those places are on state land. “We’re the most isolated landmass on the planet,” says Jake Muise, one of the owners of Maui Nui, a commercial venison operation in Maui. (Muise also handled removing the deer from the Big Island, a few years back.) “If our watersheds aren’t functioning properly…water is the most valuable thing we have.”

Hawaii’s governor, David Ige, has committed to what’s referred to as the “30 by ’30” plan: to fence in 30 percent of the state’s priority watersheds by 2030, largely to protect them from the deer. That may not sound like all that ambitious of a plan—only 30 percent?—but the difficulty of constructing this fencing is truly staggering. Bagshaw says that a minimum height of seven feet is necessary for hog fencing to keep out the deer, and Muise says that even that isn’t guaranteed; the deer are clever and persistent. They’d love to construct 12-foot fences instead, with proper skirting on top and bottom, but the expense is daunting. All the steel must be imported from the mainland, and constructing long expanses of fencing on extremely rugged state lands, over rivers and creeks and mountains, is a major undertaking. That same cost of installing fencing can eat into farmers’ profits too much for it to be worth it.

But for whatever efforts the Department of Forestry has taken, the process for actually eradicating these deer from Hawaii would be insanely expensive and maybe impossible; while the Department can remove deer from state land, that land is often remote and rugged and not really the preferred habitat for the deer. Getting permission from every private landowner with deer on their property, and figuring out the liability situation for having government agents with guns there, all in the service of somehow killing and removing more than a hundred thousand deer? It’s just not going to happen.

Another reason it’s not going to happen, beyond the practicalities, is that, according to Bagshaw, the deer are legally protected. The state constitution, dating back to at least 1950, has included a clause meant to protect the traditional subsistence practices of Hawaiians. But therein lies the question: What exactly is “traditional”? Hawaiian courts have set the precedent that any practice that existed in Hawaii before November 25, 1892 counts as “traditional.” That date was chosen for its importance to Hawaiian law; it was the last reorganization of the Kingdom of Hawaii’s judiciary system prior to American annexation. And the axis deer, of course, had arrived a couple of decades prior to that date. So the law that protects traditional subsistence practices applies, just barely, to a wildly destructive invasive species.

Not only is the Department of Forestry not allowed to completely eradicate axis deer from Hawaii, it is theoretically required to ensure that the population is stable and secure. Of course, that’s not a problem it’s really worrying about; the deer is so overpopulated that the idea of saving the deer is laughable. But it would have to, if it came to that.

***

Despite the fact that the axis deer doesn’t belong in Hawaii, that bit about it being protected as a subsistence practice isn’t actually that crazy. Deer hunting, although only 150 years old, has legitimately become a tradition on the islands of Molokai, Maui and Lanai. Deer, especially but not exclusively in the more rural parts of those islands, is a major part of the culture. Many families have extra chest freezers to store axis deer, and you can find it on the grill at backyard barbecues. (Most often, it’s sliced thin and marinated in teriyaki sauce, according to Muise.)

The deer also serves a pretty vital role as a source of protein. While Hawaii was perfectly capable of feeding its own population prior to European contact, the late 19th and early 20th centuries destroyed Hawaiian agriculture. Instead of planting crops that could feed the Hawaiian people, such as taro, breadfruit and coconut, Europeans (and soon, Americans) tore all that out to plant the crops that could feed foreign imperialists, such as sugarcane and pineapple. By 1936, Hawaii was, according to a University of Hawaii study, in desperate straits: Only 37 percent of its food was grown locally. The rest was, and remains today, imported, at great expense and significant risk, mostly from the mainland United States.

On Lanai, for example, the 3,100 or so residents rely in large part on the barges that deliver their food. If there’s a disruption in that service, from, say, a devastating global pandemic, store shelves are empty. Those on Lanai and Molokai, and to a lesser extent Maui, have to figure out some other way to feed themselves, and the incredibly abundant axis deer are a major part of that equation.

Of course, the deer aren’t exclusively a help. Fresh produce imported from the mainland is quite expensive in Hawaii, and backyard gardening is more than just a hobby for many Hawaiians. But as anyone who lives near a deer population knows, there are few things deer like more than absolutely destroying a carefully planted garden. They are damnably difficult to keep out, requiring at least an eight-foot fence, which is not affordable for most people. So the deer provide subsistence, but they also might take some away.

The Department of Forestry is engaged in an awkward dance regarding the deer. It can’t eradicate the deer, even if that makes ecological sense. But it’s also the agency that hands out hunting permits, and boy, is it ever handing them out. “On Maui and Molokai, there is no bag limit and there is no season,” says Bagshaw. “You can hunt ’em like a videogame from sunrise to sunset, if you want.” The permits cost $20 for the year and require no more than a gun license and an easy online application. Frankly, the Department of Forestry would love it if hunting was even more common than it is.

But the state’s resources for actually dealing with the deer problem are extremely limited. With most of the deer on private land, the ability to actually hunt on prime land tends to come down to one-on-one relationships between landowner and hunter, which isn’t much good for efficiency.

Commercial operations have been slow to take hold. Muise, a Canadian who came to Hawaii on a volleyball scholarship more than 20 years ago and never left, started Maui Nui with his wife, Ku’ulani. Muise grew up in an extremely rural part of far northern Alberta, and the self-reliant subsistence he learned there carried over to a place that’s about as different, ecologically, as any place on the planet. Maui Nui is one of the only companies selling axis deer commercially at scale, and the reason for that is, well, it’s insanely difficult to do so.

“The process of harvesting a wild animal has crazy amounts of overhead that go into it,” says Muise. It is legal to give hunted meat to anyone you want, in the United States, but to sell it, it has to be inspected. Unlike some states, Hawaii has no state meat inspection service, so Maui Nui has to go straight to the USDA. On every single hunt, a USDA inspector must accompany Maui Nui’s hunters and examine every single wild axis deer for health before giving a thumbs up to the hunter to take a shot. And that hunter can only take that one shot; the USDA regulations for humane commercial hunting strictly require that the animal be rendered unconscious immediately, with a single shot to the skull. This process is slow and liable to spook the deer, so it has to be done at night, when the deer are more calm, which requires all kinds of equipment. Maui Nui’s hunters use military-grade infrared binoculars and, as of recently, a drone, to locate deer in the dark.

Until very recently, there were no USDA-approved butchers for deer in Maui, so Maui Nui had to, at truly ridiculous expense, send whole deer carcasses via barge to processors on the mainland, and then have the broken-down deer shipped back. It now has its own butcher, but all of this—the equipment, the hunting training, the hourly fee for the USDA inspections, the butchering facility—requires an insane level of investment. The idea of, say, selling axis deer in Whole Foods? It’s not nearly as easy as going hunting.

Other states have programs to make use of overpopulated game animals. In Pennsylvania, a public-private partnership called Hunters Sharing the Harvest operates a network of deer processors throughout the state. Hunters can bring in a kill to any of these facilities, it’ll be broken down and venison—highly valuable protein!—will be put into the food bank system. Hawaii has no version of this, owing to the lack of state resources to inspect and approve processors. And that’s especially galling, because, unlike the white-tailed deer of Pennsylvania, the axis deer in Hawaii is apparently delicious. As a subtropical species, the axis deer has much less intramuscular fat, which carries that gamey flavor that many find unpleasant in other deer species. “When we talk about people eating venison, there’s a general apprehension because it’s most associated with something gamey they’ve had in the past,” says Muise. But he describes axis deer as an extremely clean, non-gamey meat, somewhere between beef and lamb in flavor.

To Muise, there’s a balancing act involved and some point at which the damage caused by the deer and the value of the animal to Hawaiian society can meet in the middle. But his operation by itself isn’t nearly large enough to slow down the population growth of the deer, let alone reduce the population to a sensible number. Neither the public nor the private sector has the ability to get the axis deer under control. And given their damage to public health, the delicate ecosystem of these islands and agriculture, the time might have come for a better plan.

8 Tips for a Successful Deer Drive

0

Thank you for returning to read my latest article. In this article I would like to talk about the lost art of the “deer drive”.

There are many people out there that discount this age old practice due to belief that it is unethical and unsportsmanlike to hunt deer or any big game in such a matter.

I think I have only seen it shown on TV hunting shows maybe once or twice ever, and I watch a lot of hunting shows.

Now to a person that did not grow up learning this style of hunting, I can see how this is true. Some people may not know how to accurately shoot at a running deer or lack the confidence to do so.

If a deer drive is not properly planned out with your hunting party, it can be very dangerous as well. But, if done safely, and properly, it is a very effective way to harvest deer.

I grew up and have lived my entire life in the state of Wisconsin. In the Midwest, the deer drive is a long standing deer camp tradition. It is however, in my opinion, being phased out by most people, preferring to emulate what they learn from watching TV and reading magazines, where such a thing is generally frowned upon. In the Midwest region of the country, until the past couple decades; deer hunting was a way to put food on the table. Hunters were not going out to specifically to harvest a trophy whitetail, although they all dreamed of doing so. Normally people would sit their stands the first day or so, but if no luck was to be had, well we made our own luck. We needed food in our freezer, and if that meant bumping that giant out of the area in hopes to put a tag on a doe for meat, well then so be it.

In my opinion, things have definitely changed.

Tip #1 Safety, Safety, Safety

Did I forget to mention safety? It is true that this can be a very dangerous tactic to use while trying to harvest deer. Always make sure everyone knows where they can and cannot safely shoot. Many hunters have paid with their lives shooting into areas where they are not supposed to during a deer drive. If there is no safe direction for walkers to shoot due to position of the standers, then the walkers should not carry their guns on the drive, to avoid temptation to shoot at a deer that may jump out of its hiding spot.

This was made clear to me on my first deer drive. I still remember like it was yesterday, my first ever deer drive. It was Thanksgiving Day in 1986. I had sat opening weekend seeing only a few deer. From what I can remember, no one had put a tag on a deer as of yet. After the Thanksgiving morning hunt we met at the trucks for lunch and started planning a drive. I was nervous, hoping I did would not screw up. Since I was using a 20 gauge shotgun, younger, and full of youthful energy, I was chosen to be one of the walkers. My father and older brothers, who had longer shooting rifles, were to be the standers. My other brother Tony was also chosen as a walker, because he also carried a shotgun. We chose to drive out a corn field that sat on the east end of the property. I was told sternly to follow the rules to ensure the utmost safety of everyone participating. My father and two other brothers would set up in the corners of the corn to catch deer that broke out of hiding. They were not allowed to shoot into the corn at all, for obvious reasons; my brother and I were in it! Tony and I were not allowed to shoot anywhere but straight down the rows of corn, this way we would not run the risk of shooting the standers stationed in the corners of the field.

We gave our predetermined signals to the standers that we were starting to walk into the field. Everyone was in place and ready for what was to come. As I took my first step into the rows, I grew ever more nervous. I was 12 years old and all of about 4 feet 8 inches tall. The corn we were walking into was over 7 feet tall! I could not see anything farther than 5 feet in front of me. All I knew was I had to walk straight through the corn and follow the rows so everyone knew where to expect me to be. I did not make it through the field 30 yards when I heard my brother Tony bellow “DEER!” and I heard shots start ringing out from his shotgun, or at least I thought it was him as I really could not see anything. I could hear corn stalks crashing all around me, and shots began to ring out from every perceivable direction. I pulled my gun up and knelt down in the middle of the corn, half expecting to get run over by a deer at any point in time. To say I was freaking out would be an understatement! For what seemed like 10 minutes, but was in reality probably only 30 seconds, the commotion subsided. My brother Tony started to yell my name to check to make sure I was safe. I did not immediately answer his calls because I was still in defense mode ready for a deer to plow through and run me over. After a few calls I finally answered him, “Ya!” They all started asking where I was. I could not answer them, as I was slightly disoriented, and my heart and brain was going at a million miles per hour. The only thing I could think of to do was put my blaze orange hat on the end of my barrel and raise it above the stalks of corn so they had a chance to see just where I was. They told me to make my way out. I gladly followed that piece of advice and walked until I reached the outskirts of the corn, leaving my hat on my gun barrel pointed above the corn the entire way, almost like a flag of surrender. As I reached the end of the corn I noticed my family standing around a doe that lay on the ground in front of them. They had taken, to the best of my childhood recollection, 3 does during that short drive. In a matter of a minute or so, my family had the much needed venison to sustain us through until the following deer season.

Tip #2 The Set-up

8 Tips for a Successful Deer Drive 1
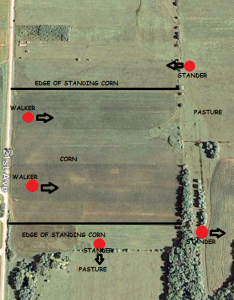
The position of the standers is paramount to the success of your drive. Standers should be set up to block all escape routes of the deer you are trying to move. I will use my hunting property to give you an example of this. The lay out of this land is simple. On the East side of the property is a large ridge with open mature hardwoods. The ridge only rises up about 10-15 feet in elevation. The West side of the land is a cow pasture that covers about 10 acres or so and runs adjacent to the road. The North end is a corn field, and the south end is a swampy area that the deer use as bedding and butts up to public land. The swampy area extends through the middle of the property essentially cutting it in half. This finger of swamp running between the hardwoods to the east and the pasture to the west makes for a perfect travel and escape route for the deer. Our walkers start by coming in on the public land to the south and push through the swamp towards the corn in the north. The deer normally follow the swamp on their way to the corn, essentially making it a pinch point. They do not like escaping through open territory, preferring to stay in cover as long as possible. We put one stander on the ridge to the east to catch any deer that shoot out the side, one in the pasture for the same reason, and then 1 or 2 along the corn to block off any way of escape. If there are any deer bedded down in the swamp, they are sure to bust out in the direction of one of the standers. The walkers in this scenario do not have much opportunity for shots due to the thickness of the cover, which is also why the deer love to hide here. If your standers have all escape routes blocked, success is assured. If there are any gaps or escape routes not covered, it is guaranteed the deer will find the weakness and exploit it.

Tip #3 Play the Wind

8 Tips for a Successful Deer Drive 2The wind is always a primary concern when it comes to hunting whitetails. The whitetail’s best defense is its sense of smell. While playing the wind during a deer drive, there are different factors to consider than just sitting in your stand. You should line up your walkers to walk with the wind, and your standers should be upwind of the drive. This allows the deer to smell the walkers. Letting the deer smell you may be something that goes against all you have been taught about hunting deer. The main purpose of letting the deer smell the walkers is to make them move before being jumped. If the deer sense your presence before you jump it they will move off towards the standers much sooner. If the deer do not know the walkers are coming towards them, you run the risk of jumping them at close range. If you startle the deer they are more likely to run full speed away. A deer at full speed is far harder to hit for the standers than one that is try to creep away. When they are moving away slower they are more likely to stop to look back at the danger, giving the shooter a chance to get a clean shot. A startled deer will not stop running until it knows it is safe. There are so many variables in taking a shot on a whitetail that is running for its life. You have to be able to hit something the size of a paper plate that is running at 30+ mph, and is bounding up and down, and zigzagging left and right. It almost seems impossible when you think about it. I have taken several deer while running, but have missed more. It is difficult to make an accurate shot at that target, and there is no way to practice for such a scenario. I have yet to see a rifle range that has moving targets that move as randomly as a running deer. There are some ranges that have a running deer moving target, but it is mainly a target that moves at a slower more predictable speed, and they move in straight lines. To make this shot requires either great skill or great luck, most of the time luck. With this in mind, I agree with most that say it is unethical for the majority of people to attempt this shot. The practice I have with this shot is the fact that I have made many of them. With deer drives firmly infused into my blood, I know what to expect when attempting a running shot. Opening day 6 years ago, I was sitting in my traditional rifle stand overlooking a corn field. Late in the morning a 7 point buck came out of the woods at full run across the cow pasture I was hunting over, headed for the corn. I knew if it hit the corn field it was going to be impossible to take it. I settled my rifle on a tree branch in front of me and started to track the deer through the iron sights of my Marlin 336 .35 Remington. This model gun is usually only good for shots under 200 yards; and that is in ideal shot conditions, but I knew my gun well. 8 Tips for a Successful Deer Drive 4
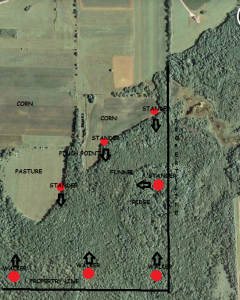
I knew the closest that deer was going to get was about 175 yards away and with it at a full run, most people would not even think of attempting it. As it got closer and closer to the corn I knew it was now or never. I concentrated on my aim, let out a deep breath, and touched off a round. The deer folded up where it was at. I would be foolish to think that a shot like that was all skill. I know for a fact that there was a lot of luck involved. If the deer would have varied any on its path to the corn, I would have missed badly, or worse, wounded the deer so it would suffer. I am confident in taking a running shot, but it is not for everyone. 99% of all shot opportunities on deer during a drive will be moving deer, anything you can do to make the deer take a slower retreat; will greatly improve your odds of success.

Tip #4 Make Noise

Make noise you say? Well that is another tip that goes against the grain of traditional thinking when it comes to whitetail hunting. There are multiple reasons for walkers to make noise while on a drive. First is for safety reasons. If the walkers are making noise, then the standers can more easily pinpoint the location of the walkers, insuring that the standers know not to fire at your location. It also gives them an educated guess as to how much farther the walkers have to go before the drive is complete. It also aids in letting the deer know the walkers are coming, giving them ample opportunity to move before being startled and jumped from their bed. Once again, a deer creeping away slowly in an attempt to be undetected is easier to shoot than a running deer. This tactic is especially effective when driving through corn fields. Deer tend to hang tight in corn and will not jump until the last second and can hide rather well between the rows. I have developed a fun and entertaining cadence when making noise through the corn. I like to talk a lot and loudly and I also try to smack corn stalks on my way through. I want them to move before I get to them.

Tip #5 Be Prepared

As a stander, never in any circumstances, relax while you are waiting for the walkers. Always have your weapon in hand and pay close attention to your surroundings. The action can happen at any time and from any direction. It can be all over in a matter of seconds. I have seen deer pushed from drives while the walkers are still hundreds of yards away, and I also have had deer come out after the drivers have passed by. As discussed before, the deer will more than likely be on the run when you see it. If you get nice and comfy and lean your weapon up against a tree next to you, it will take longer for you to set up a shot. If you have your gun already in your hand when the deer comes through, you can quickly pull up and take your shot. If you have to pick your gun up first, your opportunity might pass you by before you have a chance. Never get caught unprepared on a drive.

Even walkers on the drive need to pay close attention. If you are a walker that is allowed to shoot on the drive, your window of opportunity will be even shorter. Instead of moving towards you like the standers, the deer is moving away from you, and quickly! You may only have a second or two to try and pull off an ethical shot. If you do not have a shot, or are not carrying a weapon, you can try to signal the standers that you have a deer on its feet if you see a deer jump and start moving away.

8 Tips for a Successful Deer Drive 3A few years ago, I was a walker on a short drive at our hunting property. I was equipped with a two-way radio to communicate with the standers, and I was the only walker. I made it about a quarter of the way through my drive when I jumped 2 does and a mature 9 point buck out of a thicket. Because I paid attention to my surroundings and never relaxed during my walk I was able to see the deer and tell the standers what was coming at them. My dad was ready with his gun up and into position already by the time that buck crested the ridge line in front of him. It was the biggest buck of his life, and undoubtedly noticing what was going on in front of me greatly helped in the success of that drive.
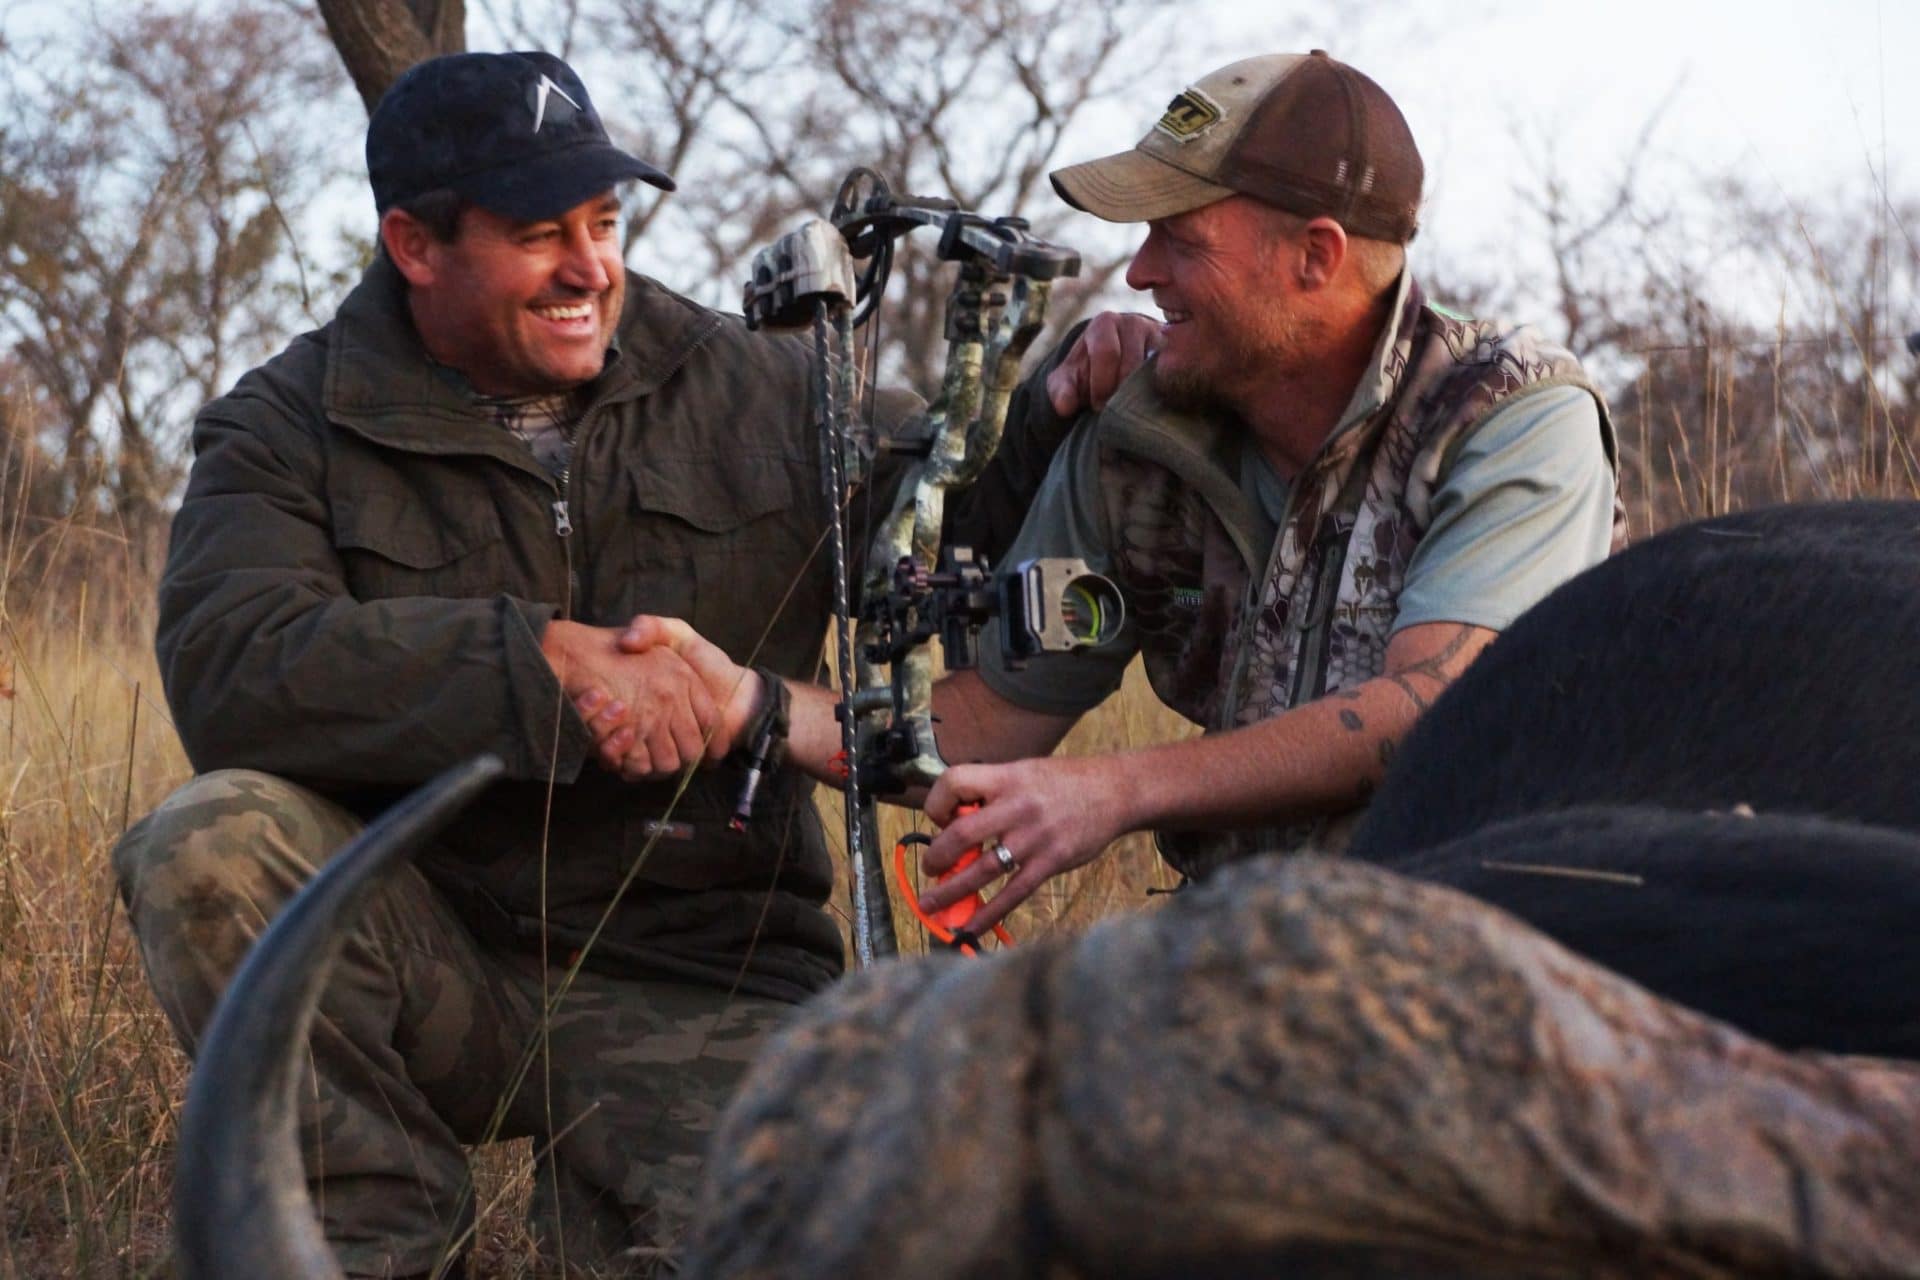
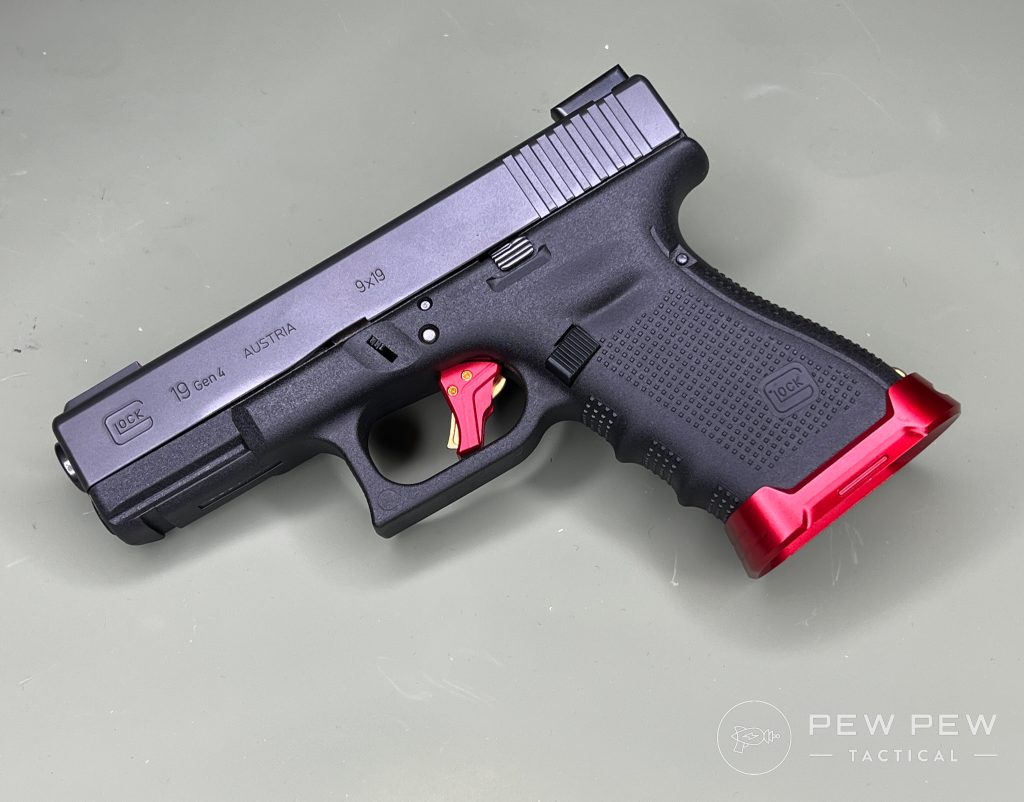
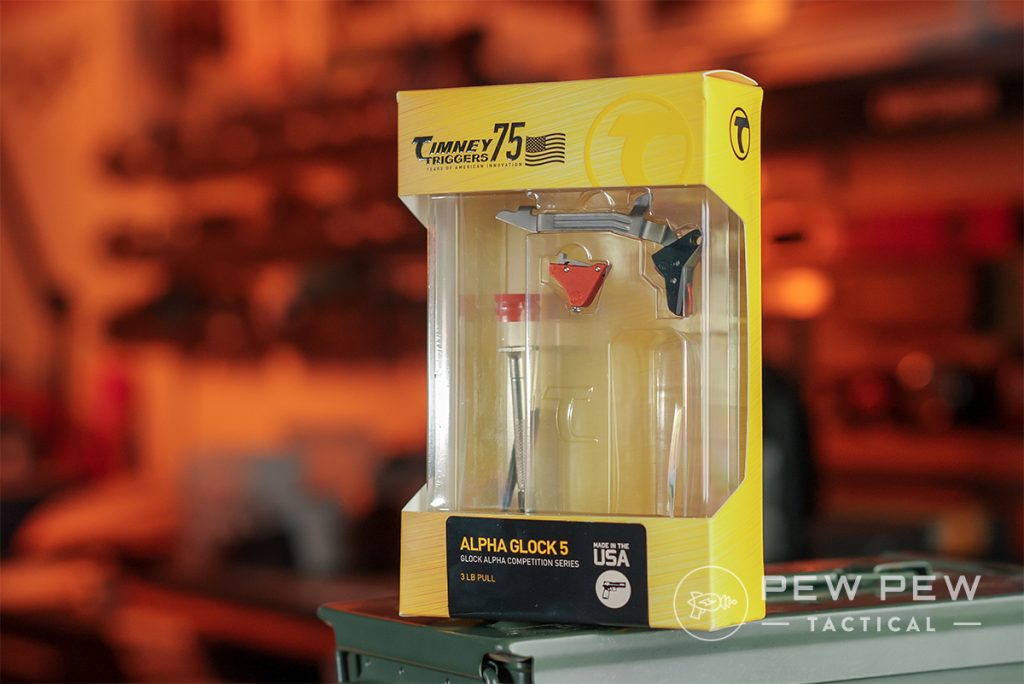
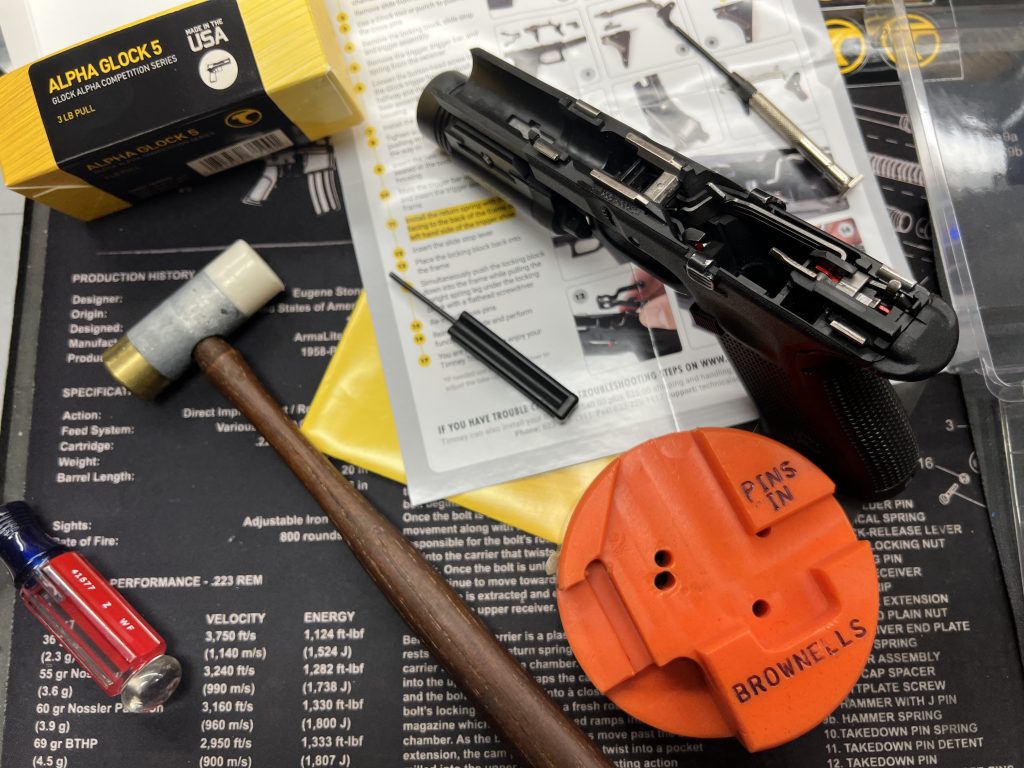
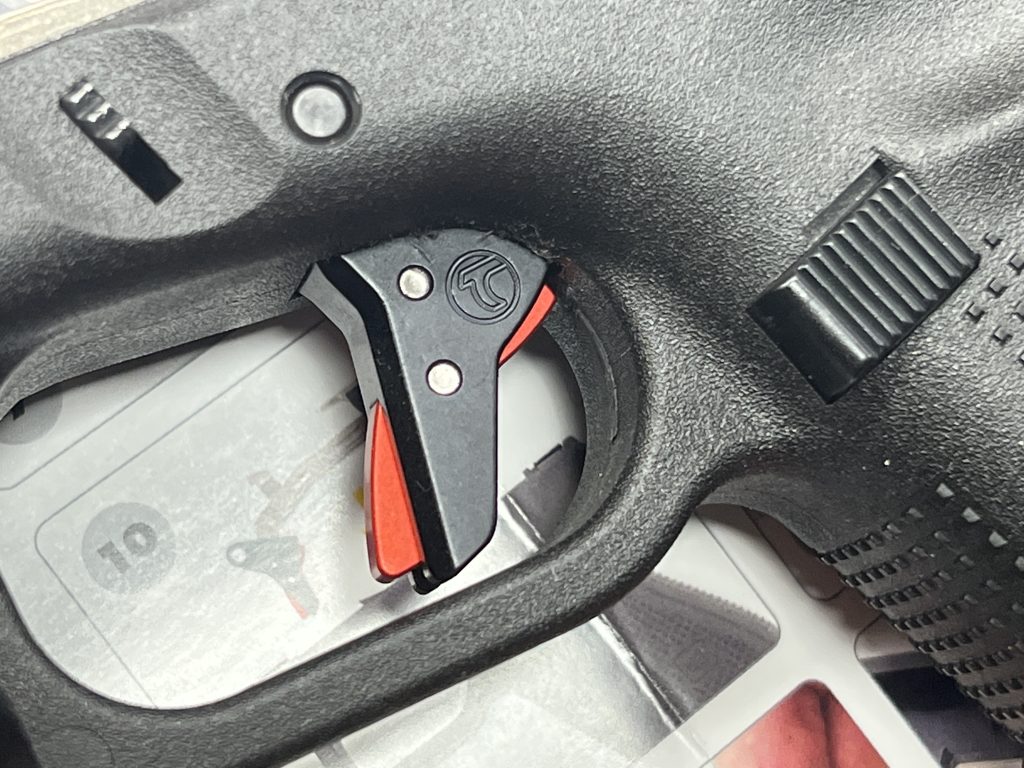
Tip #6 Lower Your Standards

While everyone would like to sit back and wait on that mature buck, it is very hard to age a deer while it is moving quickly through the woods. You may only have a couple of brief seconds to react and shoot at any given deer. You will never have the opportunity to study the deer and determine age. If you only want to shoot a buck that is 4 ½ years old or older, then deer drives may not be for you. While a small buck is fairly easy to judge while running quickly through the woods, you probably will not be able to tell the difference between 2 ½ year old and a 4 ½ year old. A running deer will appear more stretched out than a deer just standing there in a relaxed state, so you will not see if that deer has a large chest and pot belly as compared to a younger sleeker deer. And forget about trying to count points or judging score. If you try to judge the age and score of a deer before shooting, the deer will more than likely pass you by before you can figure it out.

Button bucks are another reason you may want to lower your expectations. If you are on a drive that permits you to take a doe, you run the risk of shooting buck fawns. While it is fairly easy to tell a fawn doe from a mature deer, it is not that easy with button bucks, especially in the north. By the time deer season rolls around in November, button bucks are normally the size of the adult does. Their body frame is larger than doe fawns, and can really fool you when on a full run. Even if the button buck is running next to a couple mature does, it does not look much smaller and can easily be thought to be a doe. If you do happen to shoot a buck fawn, do not get down on yourself about it. Take it from me, a professional chef, those fawns taste delicious! As I have always said, “Nothing tastes better than a baby vegetarian”.

Tip #7 Choose Your Weapons

The choice of weapons for your individual position in a deer drive is a critical factor. If you are a walker that is permitted to shoot, never carry a weapon with a scope. There are a couple reasons for this. As I mentioned before in this article, your window of opportunity will normally be shorter than that of a stander. To get a proper sight picture through your scope, it will take longer, running the possibility of missing your window. If you have a bead sight or iron sights on your gun you can more quickly acquire your target, improving your odds. I like to choose a shotgun for my weapon when I am a walker. My shots are usually close range and in dense cover. A high powered rifle bullet does not move through brush as easily as a shotgun slug. If I use a rifle, I use one without a scope and usually choose a slower moving bullet that will bust through brush without being deflected as much as a fast moving bullet. My rifle of choice is usually a lever action such as a 30-30 or my favorite, a .35 rem. Round nose bullets bust brush more easily than a pointed bullet, without as much deflection.

Walking through heavy brush where deer like to hide when pressured, can easily knock your scope off of zero, causing other headaches while deer hunting. If you knock off your zero, you will never know it, and this may cause you to miss your target or worse, wound the deer and cause it suffering.

Standers should be positioned in such a way that their gun matches the shot opportunities. If a stander has a short range rifle, then that shooter should be set up for short range shots. You do not want to set up a person with a short range rifle in a spot where his shot opportunities may be further than his guns effective range. If you have a spot in the drive where the stander has the chance to shoot out a couple hundred yards or so, you will want a long, flat shooting gun. On that same note, if the shot scenario will be something within 50 yards, you may want a shooter with a short range gun such as a shotgun or 30-30, rather than a 30-06 or 7mm-08. The cartridge you fire should always be considered when planning out your drive.

Tip #8 Driving Public Land

This is perhaps the most dangerous of situations. Public land is just that; public! Anyone, at any point in time, may wander onto the property. If you pull up to an empty parcel of land and decide you want to do a drive on it, make sure all safety rules are in place. You could all split up to your respective positions, and then another hunter could pull up, unaware of what is taking place. This puts both drivers and the other hunter in serious danger. If you believe the land is empty, but it suddenly is not, you may be shooting at a person you do not know is there. Alternatively, he might not know that there is a person walking towards him and take a shot at a deer you pushed, and put you or your standers in danger. If you choose to drive public lands, set up either a stander or walker where they can see if anyone else has entered the property, such as close to a road. This way if someone does enter the property, he can communicate to others and adjust your plan accordingly. A two-way radio helps in this so you can easily and instantly tell others, and everyone in your party is aware of what is going on.

I hope you find this article helpful when planning your next outing. While some may think this is an unethical or unsporting way of hunting, it is without doubt, an effective way to harvest deer. My party does several drives per year and has it down to a science, but the only thing we can predict, is the unpredictability of the whitetail deer.

If you follow some of these basic tactics; it will greatly increase your chances to put backstraps on the dinner table.

I would like to thank you all for taking the time to read this article. Good luck to all those venturing into the woods this fall and happy hunting!

Top 5 Dream Hunts

0

We asked our hunters what their Top Five Dream Hunts would be. Some of their answers were… well, no brainers to be honest, but a few of them took us by surprise. If you would like to have us help you make one of your dream hunts a reality, one of our hunting consultants would love to help you out.

Botes and Shad with a giant buffalo

Cape Buffalo Hunting Safari

#1 in our Top 5 Dream Hunts survey, Cape buffalo hunting has drawn more people to go hunting in Africa than all the other Big Five combined.

Regarded as one of the most ill-tempered animals on the face of the earth, Cape buffalo hunts in Africa are extremely popular. We offer cape buffalo hunts in Botswana, Mozambique, South Africa, Tanzania, and Zimbabwe. What is great about an African Safari is the amazing amount of plains game species available to hunt in addition to dangerous game. If you want to hunt “Black Death,” be sure to have the right gear, research the best calibers. If you’re a bowhunter, take your archery gear very seriously. These animals are no joke!

Ask For Pricing or More Information

Located in the heart of Argentina, also known as the dove hunting capital of the world, our hunting lodge offers a more than beautiful location, unlimited, high volume dove shooting year round combined with superb hospitality and affordable dove hunting prices

Shooting Doves in Argentina

Dream Hunt #2 kind of surprised us.

We thought that Argentina dove shooting would probably be in the top 10, but scoring #2 on our dream hunts survey?… didn’t expect that. That being said, dove hunting in Argentina is AMAZING! You can very easily shoot between 1,000 and 3,000 rounds per day!

If you’ve been thinking about doing an Argentina dove hunt, we have some great wingshooting for you. From the moment they pick you up at the airport, they do their best to make your trip to Argentina a safe, incredible and unforgettable experience. If you’d like to stay a little closer to home, we have some spectacular dove shooting in Mexico as well.

*While you’re in Argentina, you should check out the Golden Dorado River Cruiser. Just trust us on this one.

Ask For Pricing or More Information

Brown Bear Hunt in Alaska

Brown Bear Hunt

Brown bear hunting was #3 in our Top 5 Dream Hunts survey and they are available in Alaska, Kamchatka, and there are even Eurasian brown bear hunts.

Alaska brown bear hunting is at the top of most hunters’ lists, for good reason. Two of our favorites are an Alaska coastal brown bear hunt out of a luxury yacht, and the fall bear hunts (odd years) on the Alaska Peninsula.

Ask For Pricing or More Information

AJ with a spectacular Utah archery elk.

Trophy Elk Hunt

Elk hunting being dream hunt #4 on our dream hunts survey really didn’t surprise us.

Elk hunting is awesome, and if you haven’t experienced it, you should. We offer many different types of elk hunts including land owner tags, bow hunts, trophy hunts, hunting leases, private ranches, corporate hunts with large groups, and drop camps. There are so many cool options with elk hunting, it’s hard to choose a favorite hunt. If you would like to experience elk hunting for yourself, be sure to talk to one of our consultants.

Ask For Pricing or More Information

Incredible Alaskan Moose

Moose

It was no surprise that moose made our top five dream hunts.

Moose hunting can be incredibly fun, and are one of the most sought after big game animals in the world. For beginning moose hunters, the most important thing to keep in mind is that moose are huge and can be VERY difficult to pack out of the field. Finding the right moose hunting outfitters is critical, both for your success and for the enjoyment of your hunt. We have LOTS of good moose hunts to choose from and you should talk to a consultant to see which one fits your needs best.

Ask For Pricing or More Information

What are your Top 5 Dream Hunts?

Ask Us About a Hunt Request pricing and availability

The Best Red Dot Scope For Turkey Hunting in 2024

0

Today I’m going to show you the best red dot scope for turkey hunting.

In fact:

I’ve hand-tested over a dozen optics alone for this review.

The best part?

I’ve sorted the scopes by use. So whether you’re on a budget or need the best red dot sight, you’ll find it here.

Let’s dive in!

Best Red Dot Scope for Turkey Hunting

Trijicon MRO

$450-750

Aimpoint PRO

Best for Long Range

$463

Best for the Money

$310

Vortex Venom

Best for the Budget

$230

Why use a red dot sight to hunt turkey?

Turkey hunting needs reliable magnification and durability. Red dot sights are known for fast target acquisition, though, and turkey hunters have to move quick.

Red dot sights have unlimited eye relief, so you can use your peripheral vision. They’re a lighter red dot scope for turkey hunting across hard terrain. Basically, turkey hunters should use a red dot.

What qualities should you look for?

Not all red dots are built equally. Some are manufactured with better parts while others are designed for a specific purpose. With that in mind, here are some important factors to consider.

Lens Clarity

When you’re turkey hunting, quickness matters. A big part of being able to sight on your target is the reticle. Some red dots have larger dot reticles that can make it hard to see everything.

Since turkey hunting is outdoors, it also helps to have a green dot option. Red dots are great for certain environments, but green is better for outdoor use. It’s just a little more expensive.

The price is worth it, though. Green dot reticles are better to stand out against tree surroundings.

Design

You never know how long you’ll be turkey hunting, so it’s good to have lighter gear. A red dot sight doesn’t weigh as much as rifle scopes, and they’re usually more mobile.

It’s also important to have durable construction. You might even want a red dot sight that’s small enough to co-witness, so remember your turkey hunting goals.

Battery

Most red dot sights for turkey hunting use batteries that you’ll have to replace when they run out. It’s better to use one that has a common battery. Of course, you also want your battery to last.

Battery life can depend on a number of factors beyond hours of use. The brightness setting you need for turkey hunting, for example, can drain the battery faster.

Versatility

If you’re like me, you have a few guns in your collection. It’s always better if the red dot sight, like something from Vortex, can fit on several, or all, of them. This can save you money and give an accuracy edge to your shooting across the board.

The Best Red Dot Scope for Turkey Hunting

If you’re pressed on time, here’s a quick list of the best red dot scopes for turkey hunting:

  1. Trijicon MRO: Best Overall
  2. Aimpoint PRO: Best for Long Range
  3. Holosun 510c: Best for the Money
  4. Vortex Venom: Best for Budget

1. Trijicon MRO: Best Overall Red Dot Scope

One of the best manufacturers out there is Trijicon, and their MRO has quickly become my favorite red dot. It has an impressive number of features, but you’ll definitely pay for them.

Glass Clarity & Reticle Patterns

Trijicon built the MRO with efficiency in mind. It has a multi-coated lens, so I haven’t had issues with smudges or clarity.

I love how easy it is to use, too. The MRO has 8 ambidextrous settings for brightness, with 4 of them meant for night turkey hunting. The 2 MOA reticle has an intense dot that I can see in countless conditions.

Eye Relief & Eye Box

Unlimited eye relief is a great feature of red dot sights for turkey hunting. However, the Trijicon MRO stands out with one of the best fields of vision I’ve seen, literally.

Durability and Weight

The high-grade aluminum tube is matte black. It only weighs a little over 5 ounces, so it’s easy on my arms for longer turkey hunting. The 2.6-inch length also lets me mount a rifle scope to co-witness.

Once I mounted it, the MRO didn’t shift at all from recoil. Even my shotgun sights didn’t move my zero, so it’s a serious piece of machinery. Trijicon’s optic is waterproof and extremely durable.

Elevation & Windage Knobs

The adjustment knobs on my MRO give me a lot of control over the settings. Each click is ½ MOA with a total range of 70 MOA for elevation and windage.

I don’t have any trouble getting to the knobs, either. The elevation is on top of the red dot sight and windage is controlled on the side.

Parallax & Magnification

The MRO is parallax-free, so the red dot doesn’t move with the sight. I haven’t had any issues with precision or maintaining my target. As with most red dots, the magnification is 1x.

Mounting & Rings

If you need a red dot sight that can mount most of the weapons in your collection, Trijicon has you covered. I’ve been able to put it on every weapon I own, so it works for shotgun sights.

On top of that, the MRO comes with a quick-release mount. If there was a situation where I could co-witness, which hasn’t happened yet, I could swap out scopes easily.

Battery

A highlight of the MRO is the battery. I’ve never had to replace it and it’s supposed to last for 5 continuous years. I also haven’t noticed any issues with the higher brightness levels.

Is the Trijicon MRO worth it?

It’s a little more expensive, but the Trijicon MRO is one of the best red dots I’ve ever used for anything. That means it’s perfect for any turkey hunting needs.

Why? It’s got:

  • 2 MOA red dot
  • Multi-coated lens
  • Fantastic brightness settings
  • 5-year battery use
  • Quality components

For the price you’re paying, Trijicon doesn’t have my favorite warranty. It only lasts 3 years, you need proof of purchase, and it’s non-transferrable. Still, with the durability, I don’t foresee needing to repair or replace my red dot sight anytime soon.

If you want efficiency without the Trijicon price, though, you might like the Burris FastFire III. It’s a little older, but it’s got some great features, like a 3 MOA reticle for improved accuracy.

2. Aimpoint PRO: Best Long Range Red Dot Scope (rewrite)

Another trusted name in sights for turkey hunting is Aimpoint. They offer the ACO and the upgraded Aimpoint PRO, and I always recommend the latter if you can afford it. There’s a reason law enforcement and the military use the PRO.

Glass Clarity & Reticle Patterns

Similar to the Trijicon, the Aimpoint PRO has a 2 MOA reticle and multi-coated lenses. The lens reduces glare, so I’ve never had a problem shooting during the daytime.

Thanks to the red dot picture quality, turkey hunting at 150 yards or farther. With some sights for turkey hunting, night vision makes the image grainy. The PRO retains a clear picture.

Eye Relief & Eye Box

You have the traditional unlimited eye relief with a PRO. I can see everything in my field of view clearly, so I can watch for movement outside of my red dot sight.

Durability and Weight

Aimpoint is one of the best manufacturers in optics. They use quality parts for their red dot scope for turkey hunting, so I’ve never had any issues with durability. The PRO’s tube is made of aircraft-grade aluminum.

The matte-black finish has water wicking and it’s waterproof, so you don’t have to worry about rain. Humidity isn’t even a problem, because the tube is sealed to be fog-proof.

The PRO is shock-proof and scratch-proof. I’ve used mine for a while and it’s survived all of my turkey hunting trips without a scratch. I was surprised at how tough it is, since it’s only 11.6 ounces.

Elevation & Windage Knobs

The elevation and windage knobs on the Aimpoint PRO are covered with aluminum caps. They’re safe, and easy to adjust with the included tool. With ½ MOA clicks, I was able to zero my PRO at 100 yards with ease.

Parallax & Magnification

The Aimpoint PRO is parallax-free with a 1x magnification, which is pretty standard for a red dot sight.

Mounting & Rings

The PRO mounts on a low-profile Picatinny rail. Since I’ve mounted it, I haven’t had to worry about it moving from recoil on any of my firearms.

Plus, the low profile helps with my field of view. The PRO works if you need shotgun sights for turkey hunting.

Battery

The Aimpoint PRO red dot uses a 2L76 battery, which is a little less common. Still, it can run continuously for 30,000 hours, so you won’t be replacing it for at least 3 years.

The highest brightness settings might affect that, but I haven’t had any issues with battery life in the last year. My PRO has 10 brightness options. 6 of them are for daytime shooting.

The back 4 are specifically built for night vision compatibility. That means I don’t have to worry if I’m still turkey hunting when the sun goes down, and the battery hasn’t failed me yet.

Is the Aimpoint PRO worth it?

I’d argue that the Aimpoint ACO and the PRO are both worth it, but the PRO is definitely superior. The ACO has similar features, but they don’t stack up to the PRO for long range.

Here’s why:

  • Waterproof, fog-proof, shockproof
  • 10 settings for brightness
  • 30,000 hour battery life
  • Night vision

Aimpoint has a pretty good warranty, depending on your purpose. If you’re using your PRO for competitive or professional shooting, it’s only good for 2 years.

Personal use at the range and turkey hunting, though, comes with a 10-year warranty for defects, repairs, and replacement.

3. Holosun 510c: Best for the Money Red Dot Scope

One of the newer names that impressed me is Holosun. They offer a number of optics for different needs, and the 510c reflex sight is a perfect red dot sight for turkey hunting.

Glass Clarity & Reticle Patterns

The multi-coated lens of my 510c is clear, and the LED reticle helps make the image pop. It comes with a red or green dot reticle, which is perfect for anyone with astigmatism or eye struggles.

One feature that separates the Holosun is that it can switch reticles. While I love the 2 MOA red dot, it can swap to a 65 MOA circle. It can even combine the two for a dot inside a circle.

Eye Relief & Eye Box

Unlimited eye relief and a wide field of view are pretty standard with the 510c. I didn’t notice anything wrong or better.

Durability and Weight

The Holosun 510c weighs just over 8 ounces. The high-grade aluminum tube is also 3.3 inches long, so it easily fits on a rail to co-witness. I love that the sight has a titanium hood, too.

Holosun uses great products for components, so I haven’t put a dent in my 510c. It’s been on many turkey hunting trips without any issues, especially since it’s water- and dust-proof.

Elevation & Windage Knobs

The 510c comes with a T10 L key, which is used to adjust the elevation and windage knobs. It’s easy enough to do on the fly, and the ½ MOA clicks make it easy to zero your red dot sight.

Both elevation and windage adjustments max out at 50 MOA.

Parallax & Magnification

My Holosun 510c is parallax-free past 50 yards with a 1x magnification. However, the anti-reflective coating on my lenses helps with farther shots.

Mounting & Rings

One thing that I’d use as a con is that it doesn’t come with a mount. However, it can be mounted to be a low-profile, absolute co-witness red dot sight. It’s easy to mount with the tool, too. This is great for shotgun sights for turkey hunting.

Battery

Thankfully, the Holosun 510c uses a CR2032 battery, which is very easy to find a replacement for. With 50,000 hours of battery life, though, you won’t need to.

Not only can the battery last for a long time, but Holosun extended that efficiency with two amazing features: Shake Awake and Solar Failsafe.

The former means your 510c will turn on when it senses motion. The latter means that your Holosun red dot sight can use solar power to conserve battery if you’re in the sun.

As for brightness levels, you have 12 settings to choose from. 10 of them are for daylight, and I like to keep mine around 7 or 8, depending. 11 and 12 are perfect for night vision, too, so I’ve gotten a lot of use out of the 510c.

Is the Holosun 510c worth it?

Definitely. Holosun may be newer, but they’ve certainly done their homework. The 510c delivers a premium red dot sight at a premium price.

Why? It’s got…

  • 3 reticle options
  • Extended battery plus solar options
  • 12 brightness settings

Holosun has a 10-year warranty on their red dot sights. That amount of time is great, because the durability and battery of this sight mean I won’t need to consider a warranty for a lot of years.

4. Vortex Venom: Best Budget Red Dot Scope

If you’re operating on a budget, Vortex is one of the best manufacturers you can look at. The Vortex Venom isn’t necessarily the cheapest, but it’s the best quality for your dollar.

Glass Clarity & Reticle Patterns

For starters, the Venom sticks out because it has a reticle that can switch between 3 MOA and 6 MOA. Different red dot sizes can be better for short- or long-range shots.

Whether you use 6 MOA for long-range shots or not, you still want a clear sight picture. The lenses on the Venom are fully multi-coated for the perfect image.

Eye Relief & Eye Box

As usual, you’re getting unlimited eye relief and you can see everything inside and out of your Vortex Venom.

Durability and Weight

Something that I love about the Venom is how light it is. While none of the red dot sights on this list are heavy, 1.1 ounces takes the cake.

Aluminum is a lightweight material, which is why the Vortex’s tube is made with that. The tube itself is sealed with an o-ring to prevent fog or humidity from affecting the image.

You’ll get a waterproof, fog-proof, scratch-resistant red dot scope thanks to the ArmorTek coat to your Venom. For a red dot sight under $300, Vortex makes a great argument as the best.

Elevation & Windage Knobs

The adjustments on your elevation and windage knobs aren’t quite as precise as some of the more-expensive sights. Still, 1 MOA isn’t bad and they’re not hard to get to.

The max range of elevation and windage is 130 MOA and 100 MOA, respectively. It was easy to zero and I’ve barely had to readjust since.

Parallax & Magnification

Even though it has a 1x magnification with the typical parallax-free nature of red dots, I can easily hit things at 150 yards consistently.

Mounting & Rings

The Venom is also one of the most versatile red dot sights. You can put it on a Weaver or Picatinny rail and it’s adjustable for the height of your cheek weld.

Vortex made an affordable red dot sight for turkey hunters. If you need shotgun sights when you’re turkey hunting, this could be the red dot for you.

Battery

One restriction of the Venom is the 150 hours of battery life, but that’s at the brightest setting. Your CR1632 battery can handle all 10 levels of brightness for a long time.

While the 150 hours for peak brightness may seem low, you’ll get a continuous 30,000 at the lowest. It’s about your purpose and when you plan to go turkey hunting.

Is the Vortex Venom worth it?

One of the best names in optics is Vortex and the Venom has a lot of great features for the cost. It’s the only reflex sight on this list and worth adding to your collection.

Why? It’s got…

  • 3 or 6 MOA reticles
  • Variable battery life
  • 10 brightness options
  • Lightweight composition

Another great quality for the cost is the Vortex warranty. It’s transferable with a lifetime warranty to get repairs no-questions-asked. I’ve loved their customer service so far and they work fast.

Still, if you’d rather go even lower, you can get the Vortex StrikeFire II for $50 less. It’s also a great red dot scope for turkey hunting on a budget. The StrikeFire II has similar features for a little less.

Final Verdict

The best red dot scope for turkey hunting comes down to preference and purpose, but my top recommendation would be the Trijicon MRO. It’s more expensive, but you’re paying for quality and versatility.

You also get both colors of reticle and a long-lasting battery for any situation. If you need a red dot scope for a unique reason, though, you can’t go wrong with the other three.

Now It’s Your Turn

I hope you enjoyed my best red dot scope for turkey hunting guide.

Now I want to turn it over to you:

Which red dot sight will you pick for turkey hunting? Or perhaps you already have one and would like to share your thoughts.

Either way, let me know by leaving a quick comment down below.

FAQ:

How To: Load Your Pack for Backpack Hunting

0

Many hunters like to talk about the gear they bring on their hunts. The true gear nerds, like us, may even obsess over carefully-calculated spreadsheets that account for every item that enters their pack. (You can get a copy of our gear list spreadsheet.)

Once you know WHAT to pack, don’t overlook HOW to pack and WHERE to store each item that you bring. Consistency in the “how” and “where” will make a big difference in the comfort of your load, as well as in the efficiency of how you hunt.

In this video, owner of Exo Mtn Gear, Steve Speck, shows how he packs the K3 3200 for a multiday backpack hunt.

Weight Distribution

You must consider where the heaviest items you are carrying will be loaded in the pack. In general, you want to keep the heaviest items as close to your back as possible, and in the middle to upper-third of the pack, vertically.

Lighter and bulkier items, such as a sleeping bag, should be stored at the bottom of the bag, making a nice “base” to keep heavier items (such as food) propped up in the bag.

This rule of weight distribution is one reason, among many others, that we designed our hydration bladder sleeve at the back of the bag — keeping the weight close to your back. And also why we have an included water bladder hanger, keeping the water in the middle-to-upper section of the pack.

If you position heavier items further away from your back (your center of gravity) it will feel as if the load is “pulling away” from you. And if you have heavy items at the very bottom of the pack, those items can add increased pressure and fatigue to your lower back.

By strategically placing items in the bag to manage weight distribution, your pack will truly feel better than a pack that isn’t loaded properly.

Accessibility

In addition to weight distribution, consider how accessible an item needs to be. Ask yourself, “How often do I need to access this item? When do I need to access this item?”

In the example of your sleep system (sleeping bag, sleeping pad, etc), you should only need to access those items once a day, and specifically at the end of the day. For those reasons, it makes a ton of sense to store them at the bottom of the pack. In comparison, your puffy jacket — much like your sleeping bag — is a light and compressible item, but your jacket may need to be accessed and stored multiple times throughout the day. It wouldn’t make sense to bury your jacket in the pack and have to dig it out of the bottom of the bag when you sit for that morning glassing session after you’ve hiked up a ridge.

Your kill kit (knife, rope, license, etc) is another gear item that you don’t need frequent access to and can be stored out of the way. In contrast, you likely use your stove at least a couple of times each day, so it makes sense to store your stove in an easily accessible location.

Protection

Consider protection “from” as well as protection “for”. Meaning, you need to store some items in a way that protects them FROM other items. For example, in the video, Steve talks about storing his tent stakes separate from his sleeping pad, sleeping bag, and pillow, so that a tent stake can’t accidentally puncture one of those sensitive items.

When it comes to protection “for”, you are ensuring that small items are secured in a way where they won’t get lost. If you just tossed your headlamp in the main area of the pack, it could be difficult to locate, or may get lost when you pull out another item (such as a jacket) and don’t realize that the headlamp fell out of the pack at that time. Our packs feature several pockets that offer protection and dedicated storage for small items, and you can extend that functionality with the secure K3 Stash Pockets.

Consistency

As you spend more time with your pack and gear, you will develop a pack-loading and gear storage strategy that meets your needs and preferences. With time, this consistency will allow you to hunt more efficiently.

You will spend less time loading your pack before the hunt begins. You will spend less time wondering where something is when you need it during the hunt. And you will spend less time getting your gear in order and establishing camp at the end of the day. All of this time and energy saved will allow you to focus on enjoying the hunt itself.

Axil vs Walker Hearing Protection

0

Are you tired of suffering from hearing loss after a day at the shooting range or while working in a loud environment? Hearing protection is crucial to prevent permanent damage to your ears. But with so many options on the market, it can be overwhelming to choose the right one.

Two popular brands in the hearing protection industry are AXIL and Walkers. Both offer a range of products that cater to different needs and preferences. In this article, we’ll compare the features and benefits of AXIL and Walker’s hearing protection to help you decide which brand to choose.

So, whether you’re a hunter, shooter, or work in a noisy environment, read on to find out which brand offers the best hearing protection for you.

Walker’s vs AXIL Hearing Protection

Walker’s and Axil are both well-regarded brands in the field of hearing protection, each with its own set of unique strengths, product offerings, and user experiences, making them some of the best ear protectors for shooting on the market today.

AXIL Hearing Protection Brand

AXIL, a merger of SportEAR and Harris Hearing Group, has a history of over 60 years, specializing in the design and production of hearing protection devices. The family-owned company offers FDA-cleared products designed and engineered in the United States, focusing on enhancing and protecting hearing abilities.

AXIL’s strengths lie in its range of products, including earbuds, earmuffs, and earplugs, their commitment to quality, innovation, and customer-oriented features such as an online clinic-based hearing test, a 1-year warranty, and free shipping on orders over $50.

Walker’s Hearing Protection Brand

On the other hand, Walker’s specializes in hearing protection with various products tailored to different needs.

Their strengths lie in the excellent amplification of voices their products offer, the comfortable user experience, and the provision of different types of amplification. However, some products can be uncomfortable for extended wear.

We are going to look at one comparable set of earmuffs and Bluetooth shooting earplugs from each brand; the comparisons are;

  • Axil Trackr vs Walker’s Razor Slim
  • Walker’s Silencer BT 2.0 vs Axil GS Extreme

When evaluating these hearing protection devices, we examined the effectiveness of noise reduction, sound amplification, comfort, and durability. For AXIL and Walker’s, customers also value device features such as Bluetooth connectivity and volume control, battery life, and the ability to withstand different environmental conditions. A similar brand to Axil and Walker’s is Pro Ears; read our comparison.

Axil Trackr vs Walker Razor Earmuffs

Noise Reduction Rating (NRR)

When comparing the Noise Reduction Rating (NRR), the Axil Trackr Earmuffs outperform the Walker’s Razor Slim Earmuffs. The standard Axil Trackr Earmuffs model has an NRR of 25 dB, which indicates that it can reduce ambient noise by up to 25 dB. On the other hand, the Trackr BLU model goes even further with an NRR of 27 dB, thereby providing a higher level of noise reduction.

The Walker’s Razor Slim Earmuffs have an NRR of 23 dB. While this is a commendable rating, it falls slightly short of the noise reduction the Axil Trackr Earmuffs offers. However, this difference could be meaningful, especially in environments with high noise levels.

Noise Cancellation and Sound Reproduction

The Axil Trackr and Walker’s Razor Slim Earmuffs have advanced sound technologies. The Axil Trackr Earmuffs utilize sound-activated compression technology with a rapid reaction time, allowing the earmuffs to reduce loud noises instantly. They also have two directional microphones and high-fidelity speakers for clear, natural sound reproduction.

On the other hand, Walker’s Razor Slim Earmuffs uses active noise cancellation technology that selectively filters out harmful noise like gunfire while enabling clear communication. Furthermore, the omnidirectional microphones and speakers enhance the perception of sound direction, which can be a significant advantage in some situations.

Check out how Walker’s compares to Howard Leight in noise cancellation.

Design

In terms of design, the Axil Trackr Earmuffs feature a compact and slimline construction that is lightweight and portable. This model also includes a comfortable headband with a sturdy metal wire frame. Moreover, the earmuffs are sweat and water-resistant, making them suitable for outdoor usage and in various weather conditions.

Contrastingly, the Walker’s Razor Slim Earmuffs are characterized by their well-built and durable design. These earmuffs feature thin ear cups to minimize the bulkiness and an adjustable headband for a personalized fit. Furthermore, they are designed with comfortable ear padding to enhance the user’s comfort during prolonged usage.

Comfort

For comfort, the Axil Trackr Earmuffs have been highly praised. Their slimline design ensures minimal pressure on the ears, which is crucial for users needing to wear the earmuffs for extended periods. Furthermore, the adjustable headband and cushioned ear pads contribute to the overall comfort.

While the Walker’s Razor Slim Earmuffs are also designed with comfort in mind, the over-ear design may not be ideal for all users. For example, some shooters might find them too large or bulky, although the adjustable headband and comfortable ear padding are appreciated features.

Extra Features

The Axil Trackr Earmuffs are packed with several extra features. One standout feature is the audio input jack, which allows users to connect an external audio device. Additionally, these earmuffs have separate volume controls for hearing amplification and Bluetooth audio, providing a more customizable experience for the user.

Walker’s Razor Slim Earmuffs also offer additional features like an audio jack for connecting external devices. Furthermore, they provide adjustable volume settings through a conveniently placed volume knob, allowing users to adjust the sound level easily and quickly.

Bluetooth

The Trackr BLU model from Axil leaps the wireless technology department by offering Bluetooth connectivity. This feature facilitates audio playback and hands-free communication, allowing users to stay connected even in noisy environments.

As the latest product line, Walker’s Razor Slim Earmuffs has a model with Bluetooth capabilities. Before this, the lack of wireless connectivity might have limited the versatility and convenience, but now they are easily compared to the Axil Trackr BLU model. Now, they are both great Bluetooth ear muffs for mowing.

AXIL GS Extreme 2.0 vs Walkers Silencer Earplugs

Noise Reduction Rating (NRR) and Noise Cancellation

The Walker’s Silencer Earbuds have a respectable noise reduction rating (NRR) of 25dB for the first model and 23dB for the rechargeable second model. They provide significant protection from harmful noise levels, vital for settings with loud, sudden noises, such as shooting ranges. In contrast, AXIL’s GS Extreme 2.0 earbuds demonstrate an impressive NRR of 29dB, reflecting a higher level of noise attenuation compared to the Walker’s Silencer.

As for noise cancellation, both Walker’s Silencer and AXIL’s GS Extreme 2.0 implement an active approach. Walker’s Silencer offers multiple audio modes to suit the ambient environment, and the AXIL GS Extreme 2.0 uses sound compression technology for noise cancellation. However, despite both being effective in noise cancellation capabilities, the AXIL GS Extreme 2.0’s higher NRR could indicate better overall noise protection.

Sound Reproduction

Sound reproduction is crucial in hearing protection earbuds, particularly for those hard of hearing. The Walker’s Silencer earbuds utilize omnidirectional microphones, providing excellent sound reproduction and allowing users to hear ambient sounds clearly. On the other hand, AXIL’s GS Extreme 2.0 also offers audio enhancement features, aiding those with hearing difficulties.

Both products provide the option to amplify quieter sounds while protecting against louder, potentially harmful noises. However, while both models are praised for their sound reproduction capabilities, personal preference will likely play a significant role in choosing one.

Design and Comfort

Design and comfort significantly impact the usability of earbuds. Walker’s Silencer earbuds are praised for their comfort and customizable fit, and they come with different foam tip sizes for added convenience. These earbuds are lightweight and accompanied by a durable charging case. Similarly, the AXIL GS Extreme 2.0 earbuds also offer different earplug sizes and styles, ensuring a comfortable fit for various users. In addition, they have Sportfit ear hooks for improved retention and a compact size that adds to portability and comfort.

Each product has taken steps to ensure comfort and a good fit. However, some users might find wires on the AXIL GS Extreme 2.0 earbuds bothersome, even though it aids in keeping them together and reduces the chance of loss. Others might prefer the completely wireless design of the Walker’s Silencer earbuds.

Extra Features and Bluetooth Capability

Both earbuds offer additional features to enhance user experience. The Walker’s Silencer earbuds have a Bluetooth variant, Silencer BT, offering voice prompts and four distinct sound profiles. In addition, their application provides a customizable user interface, though some users have reported issues with it. The AXIL GS Extreme 2.0 also provides Bluetooth connectivity, volume controls, and audio enhancement features. However, some users have mentioned a slight hissing sound and sensitivity to user voice as potential drawbacks.

Overall, both the Walker’s Silencer earbuds and the AXIL GS Extreme 2.0 earbuds offer many features, ensuring user needs are met. However, personal preference and specific requirements might dictate the choice between the two, given the slight differences in characteristics and user experience.

AXIL XCOR vs Walker’s Disrupter

The Axil XCOR and Walker’s Disruptor earbuds both serve as advanced hearing protection devices with additional features for an enhanced auditory experience, but they differ in several key aspects.

The Axil XCOR offers a Single Number Rating (SNR) of 29 dB, with the ability to vary between 19-29 dB depending on the ear tip used. It features Digital Hearing Protection that compresses noises over 85dB, such as gunfire, to protect hearing while allowing ambient sounds to be heard. The XCOR also supports Bluetooth connectivity for music and calls, touch control, USB-C charging, and boasts a water and dust-resistant design. Battery life ranges up to 12 hours for Hear Control only, 6 hours for Bluetooth Audio only, and 4 hours for both.

Walker’s Disruptor, on the other hand, has a 24dB noise reduction rating and includes features such as Bluetooth, a rechargeable USB-C case, and a comprehensive set of listening modes. It offers Forward Focus Mode to prioritize sounds in front of the user, 360° Directional Sound with four microphones for true spatial awareness, Active Noise Cancellation (ANC) for reducing background noise, and Rapid Impulse Cancellation for immediate reaction to harmful noise levels. The Disruptor also pairs with a smartphone app for customizable settings.

In summary, while both products aim to provide hearing protection and enhancement, the Axil XCOR focuses on tactical use with a higher SNR and robust design, whereas Walker’s Disruptor emphasizes situational awareness and customizable sound experiences through its app and various listening modes.

AXIL vs Walker: Which is Better?

After a comprehensive comparison of the two most popular earmuff and earplug models from AXIL and Walker’s, it becomes apparent that both brands deliver high-quality, effective products tailored toward meeting diverse user needs. In addition, both companies have showcased their expertise in providing noise protection, sound reproduction, comfort, and extra features. Another notable comparison is Walkers vs Peltor hearing protection.

AXIL’s GS Extreme 2.0 earbuds and Tracker earmuffs provide impressive noise reduction ratings and sound reproduction, aiding hearing protection and enhancement. In addition, their Bluetooth capabilities, customizable fit, and additional features like volume controls speak volumes about AXIL’s dedication to providing a comprehensive hearing protection solution.

On the other hand, Walker’s Silencer earbuds and Razor earmuffs offer a slightly lower noise reduction rating but excellent sound reproduction and noise cancellation capabilities. Their commitment to comfort is seen in their customizable fit and design choices. The Silencer BT model offers four distinct sound profiles and Bluetooth connectivity for convenience. Walker also has Game Ears hearing aids.

Choosing between AXIL and Walker’s depends on your needs and personal preferences. For example, if the highest level of noise reduction is a priority, AXIL might be the better choice. However, if a completely wireless design and a more comprehensive range of sound profiles are more important to you, Walker’s could be a better fit.

In conclusion, AXIL and Walker’s produce reliable, high-quality hearing protection. It’s recommended to try both brands, evaluate them based on your personal needs, and then make an informed decision. Each brand has unique strengths and areas of specialization, providing diverse options for those seeking superior hearing protection.

A breakdown of different archery release aids

0

Different archery release aids for hunting

There are many versions of archery release aids, but the four most common types are: wrist strap index finger release, handheld thumb trigger release, handheld hinge release and the handheld resistance/tension type release. The features and best use of each release vary and there is a ton to consider when choosing an archery release aid. In this article, we will spend some time talking about the pros, cons, and scenarios for when you might use one over another.

Index finger releases

Index style finger release hooked on d-loop

The most popular release aid among bowhunters is the wrist strap index finger style. A major advantage of this type of release is that it’s familiar to most hunters. Most people begin hunting with a rifle where a trigger is pulled or squeezed to activate the shot. An index finger archery release is similar in that it has a trigger that has to be pulled to fire the arrow. It gives the archer the ability to control the shot precisely. Its commonly called “command shooting,” meaning that the archer commands the trigger, pulling it when the pin sight sits exactly on the spot where they want the arrow to hit. This can be a real advantage in a hunting situation where an animal is moving through timber and you need to pick your spot and fire an arrow at an exact moment or when a breeze is blowing and you need to execute a shot when your pin is precisely in the location you need it to be.

Buckle system on a wrist strap archery release

Another advantage of most index finger releases is that they commonly come with a wrist strap (either a buckle or velcro strap). This ensures you always have your release ready at hand when you need it. You may also find that a wrist strap helps you to pull your bow back easier than some other release options because you can utilize your wrist and muscles in your arms and back to pull.

There is a lot to like about index finger releases, but, for many of us, using an index finger release can eventually lead to “target panic.” The trigger itself isn’t the issue, but, rather, our tendencies and how we use it become the issue. Any time you have a trigger involved in activating the release you are inducing the conscious desire to fire the arrow when the pin is over the dot. Most people have a very hard time both aiming with the front half and executing a command shot with the back half. Trying to do both can lead to target panic. Target panic can be explained as the learned connection between the eye, brain and our release hand—the eye sees the pin cross the target, the brain triggers the fire reflex and the finger punches the trigger. Over time, we begin to anticipate the shot and that causes anxiety and flinching. Then, to ease the anxiety, subconsciously, we begin to aim and freeze outside of the intended target. Whatever the case the symptoms are the same: freezing off target, inconsistent shooting and flinching. If you want to continue shooting an index finger release you may need to rethink how you have it set up and how you shoot it.

Overall, index finger releases are easy to use, economical, and allow you to execute a shot quickly when you need to, but you may have to learn or relearn to shoot it a bit differently to get the most out of it. If you are dealing with target panic issues, check out the Tru-Fire Panic X release in the goHUNT Gear Shop which is specifically designed to help with that issue.

Let’s talk about the different index finger options. We carry several models of the Carter index finger releases: the Lucky, Quickie 1 Plus, and the Rx1. All three have hook style heads, which are great in a hunting situation because they are simple and quiet to “hook” to your D-loop. The Spot Hogg Wise Guy release is similar with a hook design head. Each of those offers something slightly different: trigger shape/angle, size of the head and trigger tension adjustability.

We also carry several closed jaw type releases. Obviously, one advantage of those is that your D-loop is enclosed and there is no way it can come out other than opening it with the trigger. The Scott Echo and Recon are excellent options as is the Hot Shot Nano, which is near the $50 to $100 price point.

Carter Lucky release showing the adjustable nylon strap

You will also notice that several of the index releases have nylon straps that connect the body of the release to the wrist strap itself. These nylon straps can easily be adjusted in length to find the best fit for each archer regardless of hand size. They also are flexible, allowing for some variations in anchor point and reducing torque. The downfall of these is that they can flop around a bit. We also carry some solid arm options like the Scott Recon, Rhino or Spot Hogg Wise Guy. Those are rigid or may offer a fold back locking option to keep them back when you don’t need them. The point of this type of release is that it won’t flop around and you’ll easily have it in your hand when you need it. Personally, I prefer the nylon strap types because of the adjustability it provides, but it truly is a personal preference.

Handheld thumb trigger/button releases

Trail Kreitzer at full draw using a Carter Chocolate Addiction thumb style archery release

I’ve often heard this type of release referred to a “thumb button.” Whether you want to call it a button or trigger, it’s the same thing. Essentially, it’s a handheld release that is activated by pulling the trigger with your thumb. Handheld thumb trigger releases seem to be growing in popularity with hunters, perhaps bleeding over from their prominence among target archers. There are some pros for handheld thumb releases. For one, I personally find that they are easier and more consistent to anchor with. The hand position utilized with a handheld release allows me to split my jaw bone between my first and second finger/knuckle. It provides an easy, comfortable, and more consistent repeatable anchor point than an index finger release. If you feel like your anchor point floats and has some inconsistencies, a handheld release can help solidify your anchor point. Most handheld releases also have closed jaw clasps that are handy when you are sitting in a tree stand or ambush hunting. Simply close the release over your D-loop and it’s hooked up and ready to go anytime you grab it. Your draw hand is free to use an elk call or stick in your jacket pocket on a cold morning.

I often overhear other bowhunters state that are switching to a thumb release so they can deal with their tendencies to punch the trigger on an index finger release. If you do it, switching releases can provide you the opportunity to relearn how to activate your release, but what I often see is that people pick up a handheld thumb release and start to punch the trigger on it, too. Target panic issues can continue or start just as easy with a handheld thumb trigger release as they do with an index finger release. This can be one negative of a thumb release unless you do some research and learn how to shoot a thumb release with back tension and relaxation through the hand, wrist, and draw arm. Another negative with a handheld release is that you have to keep track of it since it’s not attached to you although most do have a hole that you can attach a wrist tether to. One other potential downside is that many thumb releases have an audible click when the clasp is closed; however, the click is typically not loud enough to disturb an animal within range. One final negative is that in comparison to index finger releases, handheld thumb releases are quite expensive. A good thumb release can cost you a couple hundred dollars.

Carter Chocolate Addiction thumb style archery release

All around, thumb releases are great for target archery and hunting, but, if you decide to try one out, I would recommend that you take the opportunity to learn to properly shoot with one so that target panic issues don’t continue or develop. One of my favorite thumb releases is the Carter Chocolate Addiction. It has tons of adjustability, including trigger tension, trigger travel, and trigger location.

Hinge style releases

Hinge style archery release for hunting

Another type of release is the hinge release or what some may refer to it as a back tension release. It’s the type of release you may have tried to use and punched yourself in the mouth with as it went off halfway through your draw circle. It’s intimidating to a lot of us, but, in reality, it’s fairly basic and user-friendly with some tips and practice. A hinge is basically a handheld release that does not have a trigger and is only activated by the slight backward rotation of the release. When the handle rotates, it causes a searing mechanism to slip and the hook opens and the bow fires.

So how do you shoot a hinge release and why would you?

When you draw your bow with a hinge release, you draw with the weight on your index finger with very little tension on the rest of your fingers. You wrap your thumb around the thumb peg, utilizing the thumb peg as leverage to help you pull back. When you settle into your anchor point and begin your aiming process you will begin to pull through with your rhomboid back muscles, squeezing your draw arm shoulder blade back while relaxing your release hand, wrist and arm. As tension builds, the angle of the release changes, the sear slips, and the string fires. The major benefit of learning to shoot a hinge release is that it allows you to develop a subconscious surprise release. This might not sound like that much of a benefit, but, in essence, what you are doing is removing one variable from the equation and leaving only one thing to focus on…aiming! A hinge release can be a great tool for getting over target panic, but, once again, it will require commitment and learning to shoot one properly. Like the handheld thumb releases, a handheld hinge release also helps to establish a solid repeatable anchor point.

Trail Kreitzer at full draw using a hinge style archery release for hunting

Most top-tier target archers shoot a hinge release, but what about hunting with one?

I personally hunt with a hinge release and have for the past eight years. I had a bad case of panic and I almost quit archery all together. Fortunately, with the help of a friend, I learned to shoot a hinge and have rarely shot anything since. I will say that a hinge is not ideal in all hunting situations. For example, executing a very precisely timed shot is not as easy as it might be with a thumb or index finger release. Hinge releases are also handheld, which means that you have to keep track of it. It’s not as common to have a hole drilled in one to attach a wrist tether to and even on the ones that do I don’t find it comfortable to shoot with a wrist tether. So I carry it in my pack hip pocket and I absolutely have to keep track of it. Most hinges are a hook head design, which is great for quiet and quick hook-up to a D-loop, but I also can’t hang it from a D-loop like you can with many of the handheld thumb releases. So why shoot one for hunting? The best answer as to why I hunt with one is because I believe it helps me execute my best shot. Here’s an example: I was already at full draw on a 330” class bull in Wyoming when I used a cow chirp to stop him. His head swiveled, staring a hole in me as I stood out in wide open space. As my pins floated around on his vitals my inner voice was screaming, “Shoot! Shoot now! He’s going to run!” But I didn’t then; my body did exactly what it had done thousands of times, tension built, the release was a surprise when it went off and I watched the arrow hit exactly where I wanted it to. I watched the bull go down within a hundred yards. I don’t know if the outcome would have been the same had I rushed the shot. Hinge releases may not be for everybody, especially for hunting, but they are a good tool for learning a tension activated release and as a means of dealing with target panic. If you learn to shoot one and become very very comfortable with one, I personally feel that they are great for hunting and will help you make the best shot when it really counts.

Tension or resistance releases

Full draw with a Carter Evolution Plus resistance style archery release

The last release I will touch one is a tension or resistance activated release. It’s similar to a hinge, but has a built-in safety mechanism that allows you to draw the bow without fear of it firing. The Carter Evolution Plus is an example of this type of release and we just added it to our Gear Shop. It also feels more like a traditional handheld thumb trigger release and is an awesome training tool for transitioning to a thumb release. The Evolution does not have a trigger and you can’t punch it. The Evolution is fired by increasing resistance, meaning you must pull through the release for it to fire.

Carter Evolution Plus resistance style archery release

If you look at the Evolution, it appears to have a trigger, but that peg where the trigger typically is on a handheld release is actually a safety that allows you to draw the bow without fear that the bow will misfire. Once you get to full draw, you find your anchor point, take your thumb off the safety and then begin to execute your shot by pulling and building pressure on the back wall of your draw until the release fires. You can set up the Evolution at roughly five to seven pounds over your hold weight at full draw. This will allow you to release your thumb off the safety, and then build pressure to make the release go off. This type of release is truly a game changer for archers who are struggling with target panic or even archers who just want to progress and improve their shooting abilities. It can be frustrating when you initially make the switch. The most common feedback I get is that the release seems to fire sometimes and at other times the archer cannot get it to go off no matter how hard they feel like they are pulling into the backwall. In those cases, the issue is not the release; rather, it is an inconsistency with the shooter. If you will commit to it and learn to shoot it and execute the shot the same way every time, it can be a very helpful tool. In due time, it allows you to develop a subconscious, smooth, surprise release, which, in turn, grants you the opportunity to focus only on aiming. There are not many who use an Evolution for hunting, but I do know a few who have gotten proficient enough that they feel comfortable to hunt with it. Most hunters are using the Evolution to learn to shoot with back tension and then switching to a thumb trigger release to hunt. A handheld thumb release like the Carter Chocolate Addiction or the Hot Shot Vapor can be used in the same manner as the Evolution by seating the barrel of the thumb trigger on your thumb and then utilizing a relaxed hand, forearm, bicep and back tension to pull through the release to activate it. An Evolution resistance release is a great tool for any bowhunter.

In conclusion

Every archer is on a different spectrum when it comes to their experience and goals. Hopefully, everyone that reads this will find some value and direction that will help them take the next step in their progression and find a release that will help get them there.

goHUNT's INSIDER Research Tools

Best everyday or bug out boots? We review the Timberland® Earthkeepers

0

The best endorsement of a product is to use it continually and take its reliability for granted.

My Timberland® Earthkeeper boots fit that description and they have been through the wringer.

by Leon Pantenburg

There was no comparison shopping going on when I bought my Timberland Earthkeeper boots. My old Georgia® work boots were about worn out, and I was sorta looking for a new pair. The Earthkeepers were on a sale rack in Bend, Oregon, there was a pair that fit me and the price was right.

Today, I don’t think about my Timberland work boots. They’re just there, parked by the back door to the garage or they may be tossed in the back of my pickup. The Timberlands get pulled on when I mow the yard, walk the dog, climb a ladder, work with power tools, trim shrubs and trees and grub around in the garden. If I’m working outside, chances are I’ll be wearing them.

Originally released in 2007, according to the Timberland website, this boot was the start of the Earthkeepers® Edition that has grown to include shoes, clothes, and more.

Here are the specs of the Timberland Earthkeeper boots style 15551210:

  • Better Leather from a tannery rated silver by the Leather Working Group for its water, energy, and waste management practices
  • Footbed lined with leather from a tannery rated silver by the Leather Working Group for its water, energy, and waste management practices
  • 100% recycled PET laces
  • ReBOTL™ fabric lining containing at least 50% recycled plastic
  • Midsole of EVA-blend foam for high-rebound cushioning
  • Steel shank for arch support
  • TPR welt
  • Rubber outsole
  • Imported

Here’s the good stuff:

Wear: My Earthkeepers have been worn regularly for the past decade or so. Finally last fall, the sole started to separate from the upper. Some glue and a C clamp fixed that, and the soles are good for a lot more hard wear.

Comfort: It goes without saying that work boots need to be comfortable, especially if you will be standing and working all day. The Earthkeepers don’t have any sort of waterproof liner, so they are cooler than most boots with some sort of waterproof liner. This also means that you can’t wade in water without getting your feet wet. That’s fine – I have Muck Boots for wet conditions.

Style: As work boots go, these look good in most situations. I wear mine with jeans and Carharts, or with cut-offs and a T-shirt when I go to Lowe’s to pick up stuff. Working people typically don’t worry about their footwear’s appearance, but it’s nice to have a good-looking pair anyway.

Urban dwellers have discovered work boots, and the sensible footwear has a place in the big cities. If you ever have to evacuate your home due to natural or man made disasters, these are the boots you want to be wearing.

Fit: My foot size is 11, EE width, in hikers. The Earthkeepers fit my feet just right.

Laces: My boots still have the original laces, and they show minimal wear. The laces stay tied and perform as should be expected.

Care: I don’t do anything to my Earthkeepers. The boots get cleaned as needed. I suppose the leather should be treated with mink oil or some leather preservative and that may happen some day. To keep your Earthkeepers looking good, the leather should be maintained regularly.

Then there’s this:

Durability: It’s been mentioned that the sole started to separate from the upper. Considering how hard these boots have been worn, that’s acceptable. They can be re-soled.

Sole: I prefer a smooth sole on work boots. I have hikers with aggressive tread for hiking and hunting, and the soles should match the terrain. But in a boot you might be wearing to go in and out of a house, from the truck to the combine or from the barn to inside, the sole needs to be easy to scrape off and clean. Also, a smoother sole is better for climbing on ladders.

Most hiking trails these days are well-worn paths, and aggressive tread is overkill. A smoother sole is easier on the environment.

From the website: At the heart of the Timberland® brand is the core belief that a greener future is a better future. This comes to life through a decades-long commitment to make products responsibly, protect the outdoors, and strengthen communities around the world. The brand has committed to plant 50 million trees worldwide by 2025, and has a bold vision for its products to have a net positive impact on Nature by 2030, giving back more than they take.

Do you need a pair of Earthkeepers?

Everyone needs some work boots, even folks who live in the city. These boots have proven themselves, and I will be looking for a new pair if mine ever wear out!

Please click here to check out and subscribe to the SurvivalCommonSense.com YouTube channel – thanks!

Best Glock Triggers [Hands-On Tested]

0

There’s no doubt about Gaston Glock’s pistol, it’s a good gun.

But can it be better?

Absolutely.

One of the most obvious improvements would be an upgraded trigger system. There are roughly a million different upgrades for the trigger out there…so how do you choose?

That’s where we come in…we’ve bought, used, and tested the most popular triggers over thousands of rounds.

Obligatory disclaimer that you should have a qualified gunsmith install and test all this stuff.

THE QUICK LIST

Stock Glock with 25 Cent Trigger Job & 3.5 lb Connector

Let’s establish a baseline trigger.

Many will say to get a better Glock trigger, you just have to shoot it. And they are right.

Thousands and thousands of rounds (or dry-fire) will polish up the internals and make the trigger much better. Not custom 1911 level…but better than when you bought it.

We cover how to do the infamous Glock 25 Cent Trigger Job with some polishing compound and Dremel.

Another affordable upgrade I do is upgrading the stock 5 lb connector with a Lone Wolf or Ghost 3.5 lb connector. If you built a Polymer80 Glock with a Lone Wolf frame kit…you already have the 3.5 lb connector.

Doing both in my G19 brings the trigger pull down from around 6 lb 6 oz to 5 lb 4 oz and makes it much crisper and with a smoother reset. Perfect for general purpose and maintaining the stock safeties.

Here’s a quick video on the first pull and reset so we have a baseline for the others.

Perfectly manageable, but still room for improvement!

Best Glock Triggers

1. Apex Tactical Glock Enhancement Trigger

Apex is well known for improving the turd of a trigger that comes on Smith and Wesson M&Ps, especially the first models that hit the streets. Obviously, they’ve expanded, or they wouldn’t be on this list.

Apex’s Glock Enhancement Trigger came out a few years ago and is one of the most affordable drop-in trigger systems.

When I say drop-in trigger…I mean it.

It’s a self-contained system with a trigger, trigger bar, and disconnector all built together. You remove your standard Glock guts and fill in the blank. It’s a very simple installation process and very convenient.

The Apex trigger gives you a quick stop initially, so you know when to ease and squeeze the trigger. There’s some minor pull before a clean break.

Also, a much shorter reset that’s followed by a similar pull and clean break again.

Red not doing it for you…they have purple and black too.

One big difference is the flat-faced trigger that still maintains the safety features of the standard Glock. I definitely like flat-faced triggers after using the Apex a bunch. It’s also a little meatier than the other triggers, which I like.

You can combine upgrades with the Zev Competition Spring kit, which I heavily recommend. With it and a polish job…my trigger pull is 5 lb 7 oz and much smoother.

However, I found with mine that I got light primer strikes with the use of the reduced weight striker spring. So be sure to test.

If that happens to you…you might need the Zev Skeletonized Striker ($79) to take full advantage of the springs.

The Apex Glock trigger is my pick for best bang-for-the-buck since it looks cool, is reliable, improves upon the stock trigger, and is priced right.

What’s your take on the Apex trigger? Rate it below.

2. Velocity Trigger

This Velocity Trigger I got sent for testing, and I put it in a new Polymer 80 build with a SeeAll Sight and matching gold Faxon Barrel.

It’s much thinner than the Apex or stock Glock trigger. The flat-faced trigger is also ridged for your finger’s pleasure with a lower-activating safety.

With stock springs and only a 3.5 connector, I was getting 4 lb 12 oz. With the competition spring kit…it should go down some more.

However…one big thing I didn’t like was that in my P80 build and my style of pressing the trigger (pretty high up with thin fingers)…many times, the “safe-action” trigger wouldn’t engage. And I’d be left with no PEW.

Whatever at the range…annoying at a competition…but potentially deadly in a real-life encounter. Not that I would recommend having anything modified on your gun for self-defense.

Otherwise, the trigger was great…longer pull after the initial stop and a nice click.

I would recommend for competition/range if you’re finger placement is usually on the lower half of the trigger or if you have thicker fingers than I do.

3. Overwatch Precision Trigger

The Overwatch Precision is from another P80 build. It also has the competition spring kit.

With everything…I get a super soft 2 lb 12 oz trigger pull. However…it’s pretty spongy when compared to the other triggers. Nice reset, though.

But…runs into the same safety reset problem as with the Velocity (so make sure you press lower or have thicker fingers).

My pick if you really want a light trigger pull throughout. I personally prefer less spongy (even at the expense of pull-weight), so this is my least favorite trigger out of all the series.

4. Zev Fulcrum Ultimate Trigger

My favorite trigger that lives in my G34 for competition shooting. What I’ve shot the most besides stock Glock triggers.

It breaks the cleanest without a lot of pre-travel and no mushiness. Combined with a little 25-cent trigger job polishing and the lightest springs…it comes in at under 3 lb 10 oz.

It’s not much to look at when installed…but the kit comes with an entirely new trigger assembly, lightened springs, and lightened striker (or else sometimes, when you only change springs, you get light primer strikes).

Plus…adjustable pre-travel and over-travel to get YOUR perfect trigger pull. This all comes at a price, though!

5. Tyrant CNC ITTS Trigger

Want a nicer-looking trigger but don’t want to change your trigger pull?

You can check out the Tyrant CNC ITTS Trigger, which replaces the trigger shoe with something purrty.

Fully Modded P80 PF9SS (Glock 43)

Easy enough to install with instructions right here.

It keeps your original trigger pull for safety reasons but makes your Glock look a whole lot better!

Tyrant CNC Glock
Tyrant CNC Glock

And while it doesn’t change the performance of the pull, that machined aluminum sure does feel nice. They come in different color combinations too!

6. Timney Alpha Glock 5

First off, I like the Gen 5 Glock trigger and consider it to be a significant improvement over previous generations.

Pressing back on the trigger, it travels back a few millimeters with minor resistance before stopping at a pretty well-defined wall. Pushing beyond this, the trigger breaks crisply at an average of around 4 pounds on my Lyman Digital Gauge.

Timney Alpha Glock 5

Reset occurs after a slight release and is both audible and tactile. It’s a great trigger for a striker-fired gun, and I have definitely gotten used to it.

Given Timney’s overall reputation in triggers, I was excited to try the Alpha Glock 5. So I cracked open the package and started putting it in.

Timney Alpha Glock 5 install
Hold your mouth jussssst right

Installation was a little challenging due to the small parts, but the instructions were detailed and included good photos. Then, the trigger return spring has to be compressed on the inside of the locking block while installing the locking block.

After installing, I noticed the surface of the all-aluminum trigger shoe was smoother, and the interface with the safety bar in the trigger was also smoother.

The pull weight felt lighter, and I confirmed this on the gauge at an average of 2.5 pounds.

Timney Alpha Glock 5 safety
Smooth and pretty

During press, the previously defined wall before break felt softer. And finally, trigger reset felt a bit longer to reach but was still audible and tactile.

Out at the range, the trigger truly shines with a performance you soon become accustomed to and can repeat easily. It’s a great upgrade for around $150.

Honorable Mentions

There are a lot of Glock triggers. Here are some honorable mentions:

  • Agency Arms ($160): Pretty good as well…but I’d still take the Apex with the spring kit. Personal preference, though…tons of people love it.
  • Lone Wolf Adjustable ($75): The P80 kit trigger is actually pretty good…and this adjustable upgrade is not too shabby either.
  • CMC Trigger ($170): Another popular one, but was meh to me when I tried it.

Final Thoughts

We can all agree that sometimes swapping out a Glock factory trigger for something a little nicer can make all the difference when it comes to shooting.

Best Glock Triggers [Hands-On Tested]

And hopefully, we’ve given you some options to kick your Glock up a notch.

How did we do…what other triggers did we miss that we can test for the next update? Let us know. For a perfect trigger tune-up, make sure to grab a trigger pull gauge. We have our recommendations here!

Best Air Rifle Deals

Popular Posts

How Far Can a .22 Air Rifle Pellet Travel?

0
"Unveiling the Power: Exploring the Distance Capabilities of a 22 Air Rifle Pellet. Discover the fascinating journey of a 22 air rifle pellet as...

5 Types of Air Guns You Need to Know Before Buying

0
Have you ever wondered how many types of air rifles are out there? Is your head spinning around with various powerplants and you don’t know...

How to make a break barrel air rifle more powerful

0
"Unleash the Power: Mastering Break Barrel Air Rifles for Maximum Performance. Discover expert tips and techniques to enhance the power and precision of your...

PCP vs CO2 Guns: Which One is Better?

0
The most talked-about debate between hunters and gun enthusiasts is what the best power source of a gun is.  The five main sources of power...

How Do Break Barrel Air Rifles Work?

0
A break barrel air rifle is a type of airgun where the barrel breaks open at a hinge point just above the breech. This...