The Springfield Armory M1A air rifle represents an intriguing intersection of historical homage and practical functionality in the modern airgun market. As a replica of the civilian version of the legendary M14 battle rifle, it carries the weight of significant military heritage while offering contemporary air rifle enthusiasts a compelling shooting platform. Today, we will examine every aspect of this unique offering, from its construction and performance to its practical applications.
Heritage and Overview
The M1A’s lineage traces back to the M14, which was adopted by the U.S. Military in 1959 and continues in limited service today. Springfield Armory began producing the civilian M1A in 1974, and it quickly gained popularity, particularly in competition shooting. This air rifle version, manufactured by Air Venturi under a Springfield Armory license, aims to capture the essence of this storied platform while delivering practical airgun performance.
Construction and Build Quality
Physical Specifications
Overall length: 46 inches
Weight: 9.9 pounds (11.75 pounds when scoped)
Available calibers: .177 and .22
Stock: Hardwood with military-style profile
Action: Spring-piston underlever
The M1A air rifle’s construction reflects a careful balance between authenticity and functionality. The substantial weight matches that of the National Match firearm version, providing both realistic handling and practical benefits in terms of recoil management. The hardwood stock, while basic in finish, displays visible grain patterns and maintains the military aesthetic of the original.
The exterior utilizes a combination of compound materials and plastics to manage weight while maintaining durability. While some might criticize the synthetic components, particularly the brown plastic covering the forend (replacing the original’s wooden heat shields), the overall construction feels solid and purpose-built.
Performance Characteristics
Velocity and Power
The rifle demonstrates impressive performance metrics across both calibers
The Springfield Armory M1A air rifle successfully bridges the gap between collectible replica and functional air rifle. Its combination of authentic handling, solid accuracy, and reasonable price point makes it an attractive option for multiple user groups. While it has some limitations, particularly regarding scope mounting and weight, these are largely inherited from the original design and don’t significantly detract from its overall utility.
For shooters seeking a historically-inspired air rifle that delivers practical performance, the Springfield Armory M1A offers a compelling package. Its combination of authentic handling, good accuracy, and reasonable price point makes it a worthy consideration for both collectors and serious airgun enthusiasts.
When it comes time to change a tire, you need to make sure that you have the correct socket size for the lug nuts. If you don’t have the right size socket, you could end up damaging the lug nuts or the socket itself.
In this blog post, we will discuss how to choose the right socket size for lug nuts. We will also provide a list of some of the most common socket sizes and their corresponding lug nut sizes.
What Is a Lug Nut Socket and What Size Do You Need for Your Car Wheels
A lug nut socket is a special socket that is designed to fit over the lug nuts on a car wheel. The most common socket sizes for lug nuts are 17mm, 19mm, 21mm, and 23mm.
These four sizes will generally cover 95% of your needs. However, it is always important to check the owner’s manual for your specific vehicle to ensure that you are using the correct size socket. Lug nut sockets are typically made from either steel or titanium, and they usually have a 6-point or 12-point design.
The 6-point design is more common because it provides a better grip on the lug nut, but the 12-point design can be easier to use in tight spaces. either way, having a good quality lug nut socket is essential for anyone who plans on doing their own car repairs.
How to Measure the Size of Your Lug Nuts?
Before you can measure the size of your lug nuts, you’ll need to gather a few supplies. You’ll need a tape measure, a flathead screwdriver, and a lug wrench. Once you have your supplies, park your car on level ground and set the parking brake.
Next, locate the lug nut that’s in the 12 o’clock position and insert the flathead screwdriver into the hole in the center of the nut. Twist the screwdriver until it’s snug, then use the lug wrench to loosen the nut by turning it counterclockwise. Once the nut is loose, remove it from the wheel and use the tape measure to check its diameter.
The most common sizes for lug nuts are 19mm and 21mm, but it’s always best to double-check to be sure. With a little patience and a few simple tools, measuring the size of your lug nuts is a quick and easy process.
The Different Types of Lug Nut Sockets Available on The Market
When it comes to lug nut sockets, there is a wide range of options available on the market. From shallow to deep sockets, and from standard to impact-rated, there is a socket to suit every need.
Shallow sockets are typically used for smaller nuts, while deep sockets are required for larger nuts. Standard sockets are suitable for most applications, but impact-rated sockets are designed to withstand the high torque of impact wrenches. In addition, there are a variety of head types available, including hex, Torx, and 12-point.
Hex head sockets are the most common type, but Torx head sockets are often used in high-torque applications. 12-point sockets are less common, but they offer a more secure grip than hex or Torx head sockets. With so many options available, it is easy to find the perfect socket for any job.
How to Choose the Right Socket Size for Your Car Wheels?
When you go to change a tire, it is important to choose the right socket size for your car wheels. The socket size is determined by the diameter of the holes in the wheel, and it should be slightly larger than the bolts that secure the tire to the wheel.
If the socket is too small, it will not be able to engage all of the bolts, and if it is too large, it will “cam out” and slip off of the bolt head. In both cases, you risk stripping the bolt or damaging the wheel.
To avoid these problems, check your owner’s manual or look online for the recommended socket size for your car. Once you have the right socket size, changing a tire will be a breeze.
Tips for Using a Lug Nut Socket Safely and Effectively
While lug nut sockets are generally very durable, they can be damaged if used improperly. Here are a few tips for using a lug nut socket safely and effectively:
-If possible, use an impact wrench to remove or install the lug nuts. This will help to prevent damage to the socket.
-When using the socket by hand, be sure to grip it firmly and use slow, steady movements. Sudden or jerky movements can cause the socket to slip and potentially damage the lug nuts.
-If the lug nuts are very tight, you may need to use an air ratchet or breaker bar in addition to the socket. However, be sure not to apply too much force, as this can damage the socket orstrip the threads on the lug nuts.
By following these simple tips, you can help ensure that your lug nut socket lasts for years to come.
Lug Nuts Sizes Chart/Common Lug Nut Sizes
Here’s a table of common lug nut sizes and thread pitches:
Please note that this table only includes the most commonly found lug nut sizes and thread pitches. To determine the correct lug nut size for your vehicle, refer to the owner’s manual, measure the outside diameter of the wheel stud thread, or bring a lug nut to your local hardware store and test it on available bolts.
Wheel Nut Socket Size
Knowing the right wheel nut socket size is essential for your lug nuts. It’s important to choose the right size socket for your lug nuts in order to ensure the proper torque requirements. This will help to ensure that the wheel is securely fastened to the vehicle.
Impact vs. standard lug nut sockets can also be a factor when selecting the right lug nut socket size. Impact sockets are designed for use with air powered tools and are more durable than standard sockets. Additionally, lug nut socket material options range from chrome vanadium to titanium and should be selected based on the type of lug nut being used.
Lug nut socket extension lengths are also important to consider when determining the right socket size. Longer extensions may be necessary in some applications, and it’s important to make sure the socket is compatible with the lug nut. Lug nut socket storage solutions are also available to help keep sockets organized and safe.
When selecting the right socket size, it’s important to make sure the lug nut socket fits properly. Socket brands and quality comparison is also important to consider. It’s best to use a torque wrench when tightening lug nuts to ensure proper torque settings. If a lug nut becomes stuck, there are special techniques and tools that can be used to safely remove it with a socket.
Here is a helpful 2-column table showing the most common wheel nut socket sizes in both metric and SAE measurements:
Metric Sizes SAE Sizes 17 mm 11/16-inch 19 mm 3/4-inch 21 mm 13/16-inch 22 mm 7/8-inch
What Size Socket for Chevy Lug Nuts
Knowing what size socket to use for Chevy lug nuts is essential for proper torque and wheel alignment. Depending on the model of your vehicle, the thread size of the lug nuts can differ, with common sizes including M12x1.50, M14x1.50, and 1/2-20 UNF. The hex heads of the Chevrolet Bolt lug nuts, for instance, measure 19mm or 3/4 inches, while the Chevy/GMC lug nuts have a 7/8 inch (22mm) hex.
To determine the correct size socket, check the vehicle’s owner’s manual or seek professional advice. Keep in mind that aftermarket lug nuts may have different hex head sizes even if the thread size remains the same.
To ensure your lug nuts are properly installed and secure, it’s important to adhere to the manufacturer’s lug nut torque specifications. Lug nut removal tools can be used to loosen and remove the lug nuts, but make sure you’re using the correct size for your lug nuts.
Common problems with lug nuts include cross threading, stripping of the lug nut, incorrect tightening sequence, and improper torque. Different types and materials of lug nuts may require different maintenance tips and security options.
To prevent cross threading, avoid using power tools or extensions and be aware of lug nut size compatibility when using aftermarket wheels. If desired, you can also purchase lug nut covers and accessories for added protection and aesthetics.
Here is a helpful table with some common Chevy models and their respective lug nut socket sizes:
Chevy Model Thread Size Socket Size Chevrolet Bolt M12x1.50 19mm or 3/4″ Chevy/GMC (typical) M14x1.50 22mm or 7/8″
Semi Lug Nut Socket Size
Knowing your semi lug nut socket size is essential, so make sure you check it before you buy. The most common size is 33mm, which is equivalent to 1 5/16 inches, but this can vary depending on the specific truck model and wheel type.
For example, American trucks equipped with Budd wheels may require a 1-1/2 inch hex socket with a 13/16 inch square. It’s important to follow the lug nut torque specifications for your semi-truck and ensure you use the correct socket size.
Common lug nut materials include steel, aluminum, and stainless steel, each of which requires different tightening techniques. Using the wrong socket size can be dangerous and damage your wheels, so it’s essential to have the correct size on hand to ensure proper lug nut tightening.
Impact sockets provide additional torque and are often a better choice for lug nut tightening. Additionally, there are different types of lug nut sockets, such as standard and deep, and it’s important to check compatibility with different brands of trucks. To measure the lug nut size, use a caliper to accurately measure the outer diameter of the nut.
Common Semi Lug Nut Socket Sizes:
Socket Size (mm) Socket Size (inches) Notes 33mm 1 5/16 inches Most common size for semi-truck lug nuts 1-1/2 inch hex 13/16 inch square For some American trucks with Budd wheels
Metric Lug Nut Size
Frequently check the external diameter of your wheel studs to determine the correct metric lug nut size for your vehicle. It’s important to follow the manufacturer’s torque specifications when installing lug nuts.
Common materials used for lug nuts include steel, chrome, and aluminum. For the best fitment, it’s recommended to use a torque wrench when installing lug nuts. To ensure security, consider using locking lug nuts or wheel locks. Lug nut covers and decorative options are also available for customizing the look of your vehicle.
If you need to remove a lug nut, be sure to use the correct removal tool. Make sure your lug nuts are compatible with aftermarket wheels before installing. If you’re looking for specific lug nut colors or customizations, check the availability of your desired color or design.
Alternatives to lug nuts include wheel studs and wheel bolts. Following these guidelines will help you choose the correct lug nut size and ensure secure and proper wheel fitment.
Here is a helpful table showing the most common metric lug nut sizes and their corresponding wrench sizes:
Checking your Toyota model’s lug nut size is essential before using a socket.
For most Toyota vehicles, the lug nut socket size is 21mm, which is metric in measurement. However, it’s important to note that some models, such as the new Toyota Tundra, may require a different size, like a 22mm socket.
To ensure proper lug nut torque specifications, it’s best to use a torque wrench with the correct size socket.
The lug nut removal tool, lug nut lock key, and lug nut covers are also helpful when replacing or installing lug nuts.
Additionally, make sure to check the lug nut thread size, type, torque sequence, and wrench size for your specific Toyota model.
Following these steps will ensure proper installation and a secure connection.
Here’s a helpful table showing the lug nut socket size for most Toyota vehicles:
Toyota Model Lug Nut Socket Size Most Toyota Models 21mm Toyota Tundra 22mm
Frequently Asked Questions Regarding Socket size for Lug nuts
These are the frequently asked questions related to socket size for lug nuts-
What Size Are Standard Lug Nuts?
There are a few different sizes that are considered “standard” for lug nuts, though which size is most common can vary depending on the make and model of the vehicle.
17 mm hexes are perhaps the most ubiquitous, but 19 mm and 21 mm sizes are also fairly common. You may occasionally see a lug nut with a 22 mm or 23 mm hex, and 11*16 inch (17.5 mm) and 13*16 inch (20.6 mm) sizes are even less common.
In general, it’s best to consult your vehicle’s manual or a qualified mechanic to determine which size lug nuts are required for your particular car, truck, or SUV.
Are Lug Nuts Metric or SAE?
For many car owners, the terms “metric” and “SAE” are unfamiliar. However, these two standards are actually very important when it comes to choosing the right lug nuts for your vehicle. Metric lug nuts are metric threads, meaning that the threading is in millimeters.
SAE lug nuts, on the other hand, have inches-based threads. In general, metric lug nuts are used on European vehicles, while SAE lug nuts are more commonly found on American cars. That said, there are some exceptions to this rule. For example, Audi vehicles use both metric and SAE lug nuts.
So, if you’re not sure which type of lug nut to use, it’s best to consult your owner’s manual or a qualified mechanic. Using the wrong type of lug nut can cause problems with wheel balance and alignment, so it’s important to get it right.
What Type of Socket Should Be Used for Impact Wrenches?
When it comes to impact wrenches, not just any old socket will do. These tools generate a lot of torque, and that can wreak havoc on a standard socket. That’s why impact-rated sockets are designed specifically for use with impact wrenches.
These sockets are made from stronger materials that can withstand the high torque without stripping the nuts or rounding off the edges. In addition, impact-rated sockets often have a thicker wall to help prevent them from breaking under stress.
As a result, they’re an essential part of any impact wrench kit. So, if you’re looking for the right socket for your impact wrench, make sure to choose an impact-rated model.
What Is the Difference Between a Shallow and Deep Socket?
There are a few key differences between shallow and deep sockets that are important to note. First, shallow sockets are typically used for smaller nuts, while deep sockets are required for larger nuts.
This is because the deeper socket provides more support for the nut, preventing it from turning or breaking as easily. Additionally, deep sockets often have a different design than shallow sockets, with a longer and narrower shape that is better suited for reaching into tight spaces.
Finally, deep sockets typically cost more than shallow sockets due to their increased durability and strength. When choosing a socket for a project, it is important to consider the size of the nut as well as the level of access that is needed. In most cases, a deep socket will provide the best results.
What Is the Best Way to Grip a Lug Nut Socket?
When it comes to changing a tire, one of the most important steps is properly attaching the lug nut socket. If the socket is not attached correctly, it can slip and damage the lug nuts.
To avoid this, be sure to grip the socket firmly and use slow, steady movements. It may also help to use an impact wrench, which can provide extra torque and help to prevent the socket from slipping.
With a little care and attention, you can ensure that your tires are changed safely and quickly.
Final Thoughts On How to Choose the Right Socket Size for Lug Nuts
In conclusion, finding the right socket size for your lug nuts is important. Make sure to consult your vehicle’s owner’s manual or a professional mechanic to ensure you have the right size.
With the proper tools and know-how, changing your own tires can be a simple and rewarding task. Stay safe out there!
This is true even with Lew’s superior spinning rods and reels and Strike King’s premium Tour Grade fishing lines.
String the reel wrong and you’ll be plagued with line twist, short casts and poor sensitivity. Do it right and you’ll get the superior performance you expect from every Lew’s reel.
SHOP FISHING LINE
Fluorocarbon and Monofilament Lines
Spinning reels perform at their best with fluorocarbon and monofilament lines no heavier than 8-pound test. A heavier line doesn’t flow through the guides as smoothly, which reduces casting distance and efficiency.
First run the fishing line from its spool through the first guide above the reel. Then open the reel’s bail and tie the line to its spool with an Arbor knot. After tying the knot, close the bail and you are set to begin winding.
The Flat Spool Method
Lay the line’s spool on whichever side allows the line to come off of it counterclockwise. If the line comes off clockwise it will twist. As you wind the reel, run the line through your fingers below the guide and apply firm pressure.
Stop after 15 cranks or so and release the line in your fingers. If the line is limp and without twist, continue winding. If the line twists around itself, the wrong side of the spool is facing up. Flip the spool over and resume cranking. Double check the line for twist after another 15 cranks.
The Upright Spool Method
Another option is to set the line spool in some type of holder so that it sits upright on edge, or use the Strike King Sidewinder tool that comes in every package of Tour Grade Line. The line should come off the top of the spool and straight through the guide. Here again, apply finger pressure to the line as you wind.
When to Stop Winding
The reel is full when the line comes to within about 1/8-inch of the spool’s outer edge. Stopping short of this will reduce casting distance and the reel’s speed. If you fill the reel to the very edge of the spool, bird’s nests are inevitable.
Spooling Braided Line
Because braided line has no memory, it will not twist if you lay the spool flat on either side or use the upright spool method. However, braided line is so slick that it will slip on the reel’s spool regardless of the knot you use. You must first attach a length of monofilament or fluorocarbon to the reel’s spool and knot it to the braid.
Braid is so much thinner at the same diameter than monofilament or fluorocarbon that it takes up less room on the spool. Consider backing the spool with a less expensive monofilament so you don’t use more braid than you need.
The advantages of braided line are so numerous that top pros, including Oklahoma’s Andrew Upshaw, use it almost exclusively.
“Since braided line doesn’t stretch, it is super sensitive and delivers much better hook sets,” Upshaw said. “I love Strike King’s Tour Grade yellow braid because I can see it so well.”
A gossamer braid never becomes springy, so it allows for longer casts, especially with light finesse lures. You can also use a stronger line if you wish. Many pros opt for 15-pound braid.
Once you’ve got your spinning reel spooled up and have taken it fishing a few times, make sure you know how to clean and maintain it!
The Kel Tec KSG is an extremely well-known shotgun mostly for its looks and its exceptional price point.
The KelTec KSG is an extremely unique 12 gauge shotgun that provides a lot of fun and a ton of potential uses. This shotgun is a direct competitor of the IWI Tavor TS12.
About KelTec
At KelTec, they design firearms that are innovative in design and exciting to use. KelTec employs 300 American citizens – many military veterans – who come to work every day to craft unique firearms dreamed up by our team of talented engineers.
KelTec is celebrating its thirtieth year in the firearms industry. KelTec is most notably known for their very unique designs in pistols, rifles and shotguns. The design team at KelTec without a doubt has a big collective imagination.
KelTec’s Mission Statement
Our mission is to create innovative, quality firearms to help secure your world.
We believe in respect, family, the right to bear arms, and a love for our great country.
The Kel Tec KSG
The KSG for the longest time was unobtainable in the gun world. As soon as dealers got them in the shipping doors they were flying out the front (after all the appropriate paperwork had been completed).
I remember seeing the then relatively new company’s firearms in local gun shops and even handling a few on occasional trips.
I remember their pistols seemed very blocky and felt somewhat cheap in the hand, even as an inexperienced young man in the gun world.
Then I caught a glimpse of a KSG. That particular shotgun had already been sold and was awaiting pickup by the lucky new owner. I asked the salesman behind the counter if I could hold the futuristic, space-age-looking shotgun hanging on the wall.
The owner of the shop apparently overheard my request and made his way over and took the scatter gun off the wall and handed it to me after checking to make sure it was not loaded.
The very second the short shotgun was in my hands I knew I had to have one. This was the start of approximately a year and a half of trying unsuccessfully to track down one of these beasts to call my own.
While driving to see my in-laws in the neighboring county one afternoon, my wife was scrolling through Facebook and happened upon a local gun shop’s Facebook page that had just posted that they had received one of the coveted Kel Tec KSGs in stock.
Having listened to me talk about this particular shotgun for almost two full calendar years and complain every time I tracked one down but it was marked well above MSRP or bought out from under me her eyes lit up when she read the post.
She then told me what she had found and where it was located. It was in the opposite direction that we were traveling. I mumbled something under my breath and continued to drive toward my in-laws grumpier than I was when we started the journey.
The next thing I knew my wife had located the telephone number for the shop and had them on the line. She asked if the Kel Tec KSG was still available, and although I could not hear the conversation, the look on her face told me all I needed to know.
Not expecting them to hold the gun, I had my wife ask them just in case. They stated that they would in fact hold the scattergun for me to come later that evening to purchase.
After what seemed like the longest visit with the in-laws and an equally long road trip back the other direction, I finally had a KSG that was mine. Buyers remorse is real, but I can tell you that I felt no such thing after this purchase!
KelTec KSG Design
What does KSG stand for? It’s quite simple, really. KSG stands for KelTec Shotgun. A simple name for the first entry by Kel Tec into the scattergun world.
This plays perfect into the design of the Kel Tec KSG because as a pump-action shotgun it doesn’t get much simpler than that; on the surface at least.
The KSG is a 12ga, pump-action, dual magazine, bullpup design. That’s a lot to digest.
First, we will start with the action of the shotgun. There are three main types of shotguns, the first and most simple is the break barrel. This shotgun is one that you might typically see hanging over your grandpa, or great-grandpa’s fireplace.
The action of this shotgun breaks open at the rear to load and eject its shells. Typically a break barrel shotgun holds one or two rounds of ammunition, one in each barrel.
This is not always the case though as there is a current design that has three barrels and thus holds three shells at a time.
Another design that you may commonly find is a semi-automatic shotgun. This type runs either off inertia from the recoil, or gas that is siphoned off to unlock the breach and load the next round.
You might also find this type of shotgun above an old fireplace as a family heirloom or possibly a more modern iteration in the cab of a police cruiser.
The third main design bridges the technology gap between the two previously mentioned styles quite nicely.
It takes the simplicity and reliability of the break barrel and high capacity of the semi-automatic and combines the two into one package; the pump action.
A pump-action shotgun is actuated by pumping the forearm of the gun to feed, extract and eject the shells. This design is popular and is used around the world.
The design team at Kel Tec chose to make their first shotgun a pump action. They then chose to make that pump action shotgun tactical. They also made the bold choice to make their first tactical shotgun a bullpup.
Bullpup firearms seem to have a love-hate relationship in the gun industry. While most of the time they look cool and futuristic, there are several design and logistical and potential extreme safety problems to overcome.
By definition, a bullpup is any firearm whose chamber is located behind the trigger. This obviously is not an everyday occurrence.
One glaring problem with this design for the KSG is you now have the contained detonation of a shotgun shell no more than a few millimeters away from the arguably most important organ of your body. The one that thinks and makes thousands of decisions every day.
This is no light matter to consider. The folks at KelTec knew that they needed to design the receiver of the KSG to be sturdy and robust enough to handle anything that could be thrown at it.
The receiver of the KelTec KSG is made from hardened steel and is thick enough to contain any blast that may occur in the chamber. The furniture of the KSG is made from glass-reinforced polymer.
The furniture of the KSG is simple in design and functions practically. The one aspect I do not care for about the KSG furniture is the way it is attached to the gun.
KSG is known for using a clamshell-type design to cut weight and cost when manufacturing their firearms. This is no different for the KSG.
To attach each section of the clamshell, KelTec uses bolts and nuts on the opposing side that are offset into the side of the shotgun.
This detracts from the overall appearance of the scattergun and somewhat cheapens the rugged space-age look. One might even compare it to a child’s nerf gun, although it obviously is much tougher than that.
The forearm and the pistol grip is where this issue is most apparent. I wish KelTec would spend a little more time and money on this aspect of the design and make these points more solid and look more professional.
Other than the gripe with the non load-bearing aspects of this shotgun, all the rest of the construction is as solid as you can ask for.
The top rail is quality aluminum, the magazines are made from the same hardened steel that the receiver and chamber are constructed from and the stock is capped with a nice rubber pad and is much thicker than the seemingly flimsy pistol grip.
KSG Operation
As stated above, the mode of operation for the KelTec KSG is a pump action. There are similarities to other pump actions in this design.
The forearm on the KSG is wider than that of a traditional shotgun. This is because of the dual magazine tubes located underneath and parallel to each other and under the barrel.
This is noticeable when holding the shotgun, but not to the point where it is uncomfortable.
On the underside of the forearm, there is a row of picatinny rail to attach a vertical grip or hand stop. Installing one of these accessories is a good idea because as a pump-action shotgun, you have to pump the action.
If you end up pumping the action a little too hard, you may end up a few digits short after your hand slips off the front of the shotgun and into the path of the barrel.
This could be an obvious safety issue if you are not careful or cognisant of how you are operating the shotgun.
Safety
The safety of the KSG is a simple cross bolt design. This style of safety is a classic design that is easy to activate and deactivate.
The safety is clearly labeled with white paint and red paint for “safe” and “fire” respectively. While simple in design, you could accidentally activate or deactivate it on gear when the shotty is slung.
Trigger
The trigger of the KSG is made of the same glass-filled polymer that the other parts are made of. Unfortunately, this makes the trigger feel of cheap quality, but it does get the job done. The trigger pull is not horrible, it is serviceable for a combat shotgun.
I should note that there is a company that makes aftermarket parts for the KSG, one of them being an upgraded trigger. This company is MCARBO. They have a website and a YouTube channel detailing their products and installation of the same.
I feel that this is the single most needed improvement on the KSG.
Takedown of the KelTec KSG
Takedown of the KelTec KSG is interesting. After visually and physically checking to make sure the KSG is unloaded, move the magazine selector to the center of the receiver.
Next, there are two HK-style take down pins located on the bottom side of the receiver that are retained by a spring pin.
You can fully remove them when taking down the KSG for service and cleaning and KelTec designed two through holes into the pistol grip of this shotgun to hold the takedown pins so they do not end up lost in the process.
Once the takedown pins have been removed and properly stowed, lift the pistol grip section up from the rear of the receiver and rotate it toward the front of the shotgun. KelTec advises not to take this section apart any further for cleaning.
Once the pistol grip and trigger section has been removed, next you need to pull the stock out of the back of the receiver. This is accomplished by simply pulling the stock to the rear until it clears the receiver.
Next you move the forearm of the shotgun further to the rear until you can remove the bolt out of the receiver.
KelTec also advises to not take the bolt down any further that this for field strip/cleaning.
After doing these steps, you will have access to clean almost all of the KSG. If you want to remove the pump-action, you can remove the two retaining nuts at the front of the two magazine tubes.
KelTec suggests you turn the nuts in sequence of a half turn for each at a time to keep the retaining bar from binding up behind the nuts. Once these are removed you may pull the pump-action free of the frame and set it aside.
KelTec KSG Features
The KSG is only offered in one chambering, however, it is the most popular chambering for shotguns in the USA. The 12ga of the KSG means that you have all the firepower on tap that you could ever need.
The KSG comes with a removable cylinder bore choke.
This means that you can remove the factory choke and replace it with a choke tube adapter and be able to place any style choke the adapter is designed to take. This opens the possibilities of the shotgun up tremendously.
Pistol Grip
The pistol grip on the KSG is located approximately mid-way between the end of the barrel and the stock. The pistol grip is the only protrusion from this sleek scattergun.
There is checkering on the pistol grip, but it is more for aesthetics than functionality.
The trigger guard does exactly what it is intended to do. To actuate the pump of the shotgun, the slide release is located directly in front of the pistol grip and is ambidextrous.
Stock
The stock of the KSG is thick and robust. It helps that the stock is directly attached to the back of the receiver.
There is a rubber but pad that helps hold the stock in the shoulder pocket and keeps it from slipping around on clothing. It does not do much to help the recoil of the shotgun.
Magazines
Next, we have the magazines. As alluded to previously, there are dual magazines on this bullpup shotgun.
Each magazine is constructed out of hardened steel and holds 6 or seven rounds of 3” magnum shells. Yes, that’s either 12 to 14 rounds of high brass, hard hitting magnum 12ga firepower on board, pre-loaded, and ready to go.
With a 6 round Lynx Defense Shotgun Card the KSG could potentially hold up to 20 rounds (one in the chamber) of 12ga destruction on board. This is an obscene amount of ammunition to have on the shotgun itself.
Having two magazine tubes also means that you can have one mag loaded with your favorite flavor of 00 buckshot and the other full of 1oz slugs.
To choose between the two magazines all you have to do is flip the magazine selector which is located on the bottom of the receiver.
To load the KSG you have to flip the scattergun over to be able to access the magazines.
The magazines load easily enough and have individual catches to retain the shells in the magazine.
To unload each magazine, you must press the mag catch lever of each individual tube to allow the shells to bypass it and come out of the shotgun.
Sights
The rail located on the top of the KSG is solid and is made of quality aluminum. Most shotguns come with a simple bead sight or perhaps rifle-style sights if it is a rifled shotgun.
The KSG comes with neither of these but the rail allows you to place whatever sights you choose on it.
I opted to place a set of Magpul MBUS sights on my KSG. The MBUS sights allow for proper cheek weld to be able to use the sights as they were designed to be used.
Having a standard picatinny rail up top also means that you are able to place any type of red dot or holographic sight on top of the KSG. As this is a smooth bore, any quality choice of non-magnified sighting system will serve you well.
Shooting the KSG
Shooting the KSG is downright fun. Per square inch, I don’t think I possess a more powerful firearm. When the KSG is fully loaded it is a heavy beast. This weight is well balanced and because of the bullpup design, the weight is kept very close to the shooter’s body.
The balance and weight of the KSG assists greatly in recoil mitigation. That’s not to say this scattergun is a light recoiling. With full power loads you will know when you’ve pulled the trigger.
Being a pump-action, you do not have to rely on recoil from high brass rounds to cycle the action. This means that you can use reduced power or light loads in the KSG as well.
One of my all-time favorite loads to put in the KSG is the Aguila Mini shells and Mini slugs. With this loading, you can house up to 24 rounds in the twin magazines plus one making this compact shotty’s capacity just 5 rounds shy of an AR15.
Add on a Lynx Defense Shotgun card to the side of the receiver and you can add another 6 rounds contained on KelTec KSG’s frame easily eclipsing the capacity of the AR. Now that is really impressive.
Price & Models
KelTec places the MSRP (manufacturer’s suggested retail price) of the KSG currently at $900.00. This of course is just a suggestion.
These scatterguns can be found for more or less depending on the situation and simple supply and demand.
With the current political climate toward all things gun-related as it is, if you find a KSG for close to this price I’d say you’ve probably found a deal.
There are some other models and variations to the KSG that have been released through the years since the KSG first was released to the market. KelTec has a KSG25, with an overall length of 38” and a standard capacity with full power 3” shells of 25 rounds. The KSG25 has a MSRP of $1150.00.
KelTec also has two other models than that of the standard KSG and KSG25. One of these would require a tax stamp in addition to their purchase price as its shorter barrel length would make it a NFA item.
This version is called the KSG Tactical. It has a barrel length of 13.7”. The capacity of the KSG Tactical is reduced to 10 rounds of 2 ¾ “ shells. The KSG Tactical goes for around $1225.00 (plus a $200.00 tax stamp and paperwork to the federal government)
For a shotgun that only comes in at 26.1” overall length to begin with, this model seems quite trivial, and the loss of capacity puts the nail in the coffin as far as I’m concerned.
The next model that KelTec offers is the KSG Compact. The KSG Compact Keeps the overall length of the original, and the same barrel length of 18.5” but shortens the magazine tubes.
There are only two logical reasons this model exists:
For those states that have been allowed to tread on the freedom that the Constitution guarantees each and every one of us as US citizens and;
If you want to make the KSG into a SBS (short barrel shotgun) but want to take the scattergun home with you while you wait for the paperwork to come back before you chop it down to the length of the Tactical model mentioned above.
The last variation of the KSG is the KS7. The KS7 is unique as it gets a slight face lift in appearance.
The barrel length and OAL remain the same, but the KS7 loses one of its magazines, reducing its capacity to 7+1. This also means that the KS7 is a thinner and lighter package if that is important to you.
Final Thoughts
No matter which model you choose, or what kind of shells you decide to stuff in the magazine(s) of the KSG, it is next to impossible to surpass the firepower and handiness of this small scattergun.
Some have complained that the downward ejection of the shotshells can cause them to hit the wrist, but I have not experienced this over the many years and thousands of shells sent down range through my copy.
While I do think there are some areas that could be improved upon, overall the KSG is a must-have addition to any collection in my opinion.
I feel like this shotgun can fill many roles, and while I may not choose to take the KSG directly into a combat zone, it does check the “shotgun” box of home defense plans.
I believe the compactness can not be beaten and the large capacity of this shotgun is unmatched.
It is shorter and more maneuverable than a full-size AR, and more stable than a pistol. If I choose to grab a shotgun when something goes bump in the middle of the night, this is the one.
If you are in the market for a defensive shotgun the KSG is definitely a contender but be sure to weigh your options the KSG against the IWI Tavor TS 12, the Remington Tac-14, and the Benelli M4.
Being a good archer is all about consistent form, which requires muscle memory. And to build muscle memory, you need repetition through practice. Trouble is, it’s not always convenient to set up a target and shoot arrows.
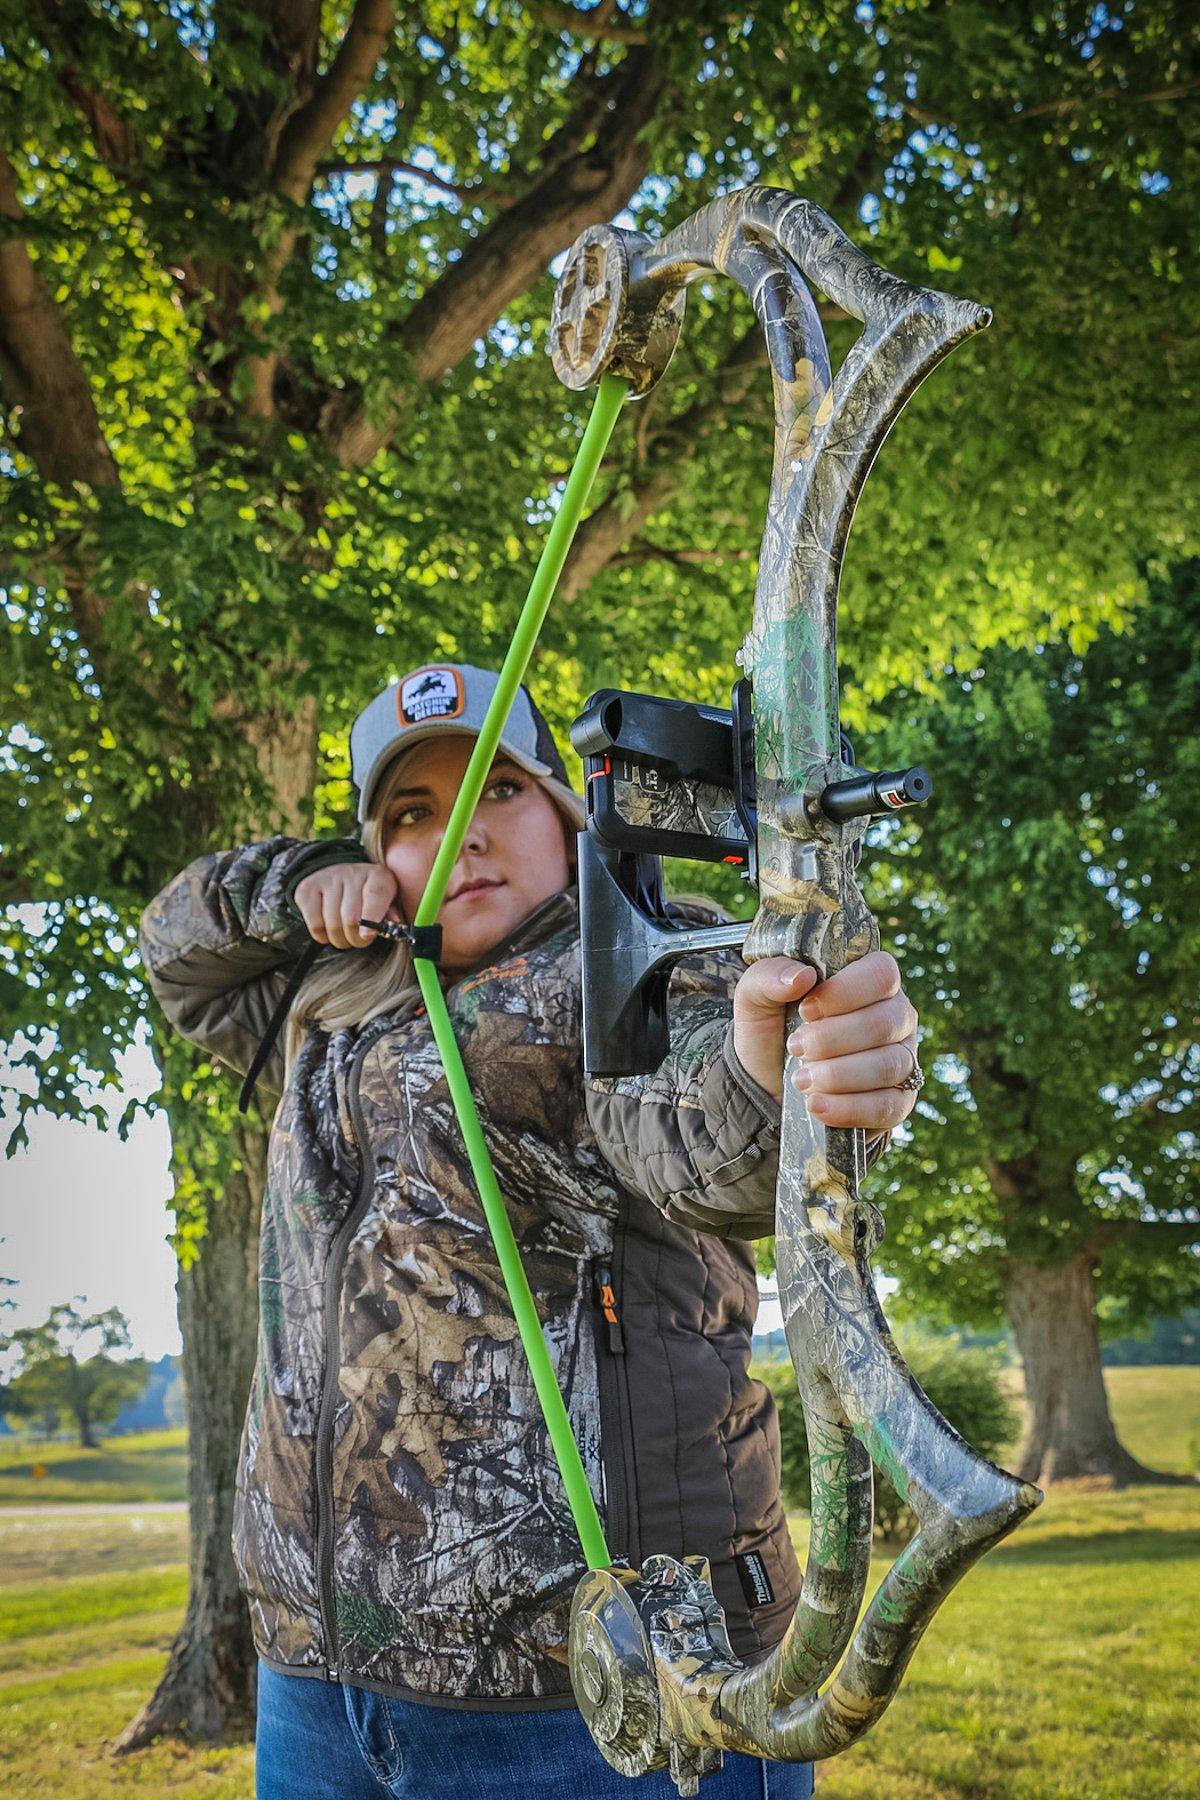
Enter AccuBow, the first augmented reality archery training device, no arrows required. I tested it, and here is the lowdown.
Product Specs
Bow junkies love specs, so here’s what you need to know about the AccuBow:
MSRP: $169.99 (AccuBow only) / $224 (phone mount and warranty included)
Personally, I like that this bow feels real. At a little over 4 pounds and 32 inches axle to axle, it’s the same size as a modern hunting bow, with a pragmatic shape and style. It isn’t going to feel like your new Mathews Vertix, but it’s designed to be as realistic as possible, which makes practicing with it more effective.
Gear Included
The main unit
D-loop attachment for your release aid
Dry-fire dampening rod
Hand grip (like most modern, ergonomic grips)
Laser sight (not legal for real bowhunting, mind you)
Level bubble
Resistance band (bow string)
Resistance dial (bow cam)
Stabilizer port (accepts real stabilizers)
Phone mount accessory (fits most smart phones)
AccuBow app (digital download)
The available phone mount accessory is for virtual archery practice. It’s easy to install. The bracket rests at a 45-degree angle, meaning the phone will be horizontal during use. You may have to remove some phones — such as the iPhone plus models — from the case for them to fit. But in most cases, that OtterBox case in Realtree EDGE will look pretty as you shoot digital bucks, buffs and bushytails.
Key Features
Augmented reality is a key feature of the AccuBow, and it adds a little spice to the practice regimen. I really enjoyed it. It allows you to practice virtual bowhunting, target archery and more with an incorporated scoring system so you can compete with yourself, and track your performance over time. I think this is a key feature that’s especially important for youth and new bowhunters.
The practice modes include:
Bowhunting
Bowfishing
Bow sight customization
Olympic target shooting
Moving target
The hunting modes have a variety of real-life challenges that include elements like wind direction, wind speed, big deer and more. They make the practice realistic, and even introduce a touch of adrenaline. If you choose to use your phone and phone mount, download the AccuBow app, available on the iPhone App Store and Google Play for Android phones. It’s user-friendly.
Special Considerations/Takeaways
Keep the following in mind if you decide to purchase an AccuBow:
Laser activation: Unscrew the laser assembly from the AccuBow. Remove its battery cover, and then pull the battery isolator tab. Replace the cover and reinstall to activate the laser.
Phone mount: In some cases, this is sold separately. Check to see if the phone mount is included before purchasing. This phone mount expands to secure most iPhone and Android models.
Adjustments, maintenance and repair: Be very careful anytime you’re working with the inner components. Handle the resistance dial with care.
Test Conclusion: AccuBow Solves Problems
Everyone has different improvement goals. While this product is more limited in teaching proper draw form, grip and stance (without third-party instruction), it shines at teaching and reinforcing other valuable archery skills including focus, holding form, stamina, stability and strength. The laser pointer training technique helps you to see whether or not you’re aiming properly. It is a great tool for shooters with target panic, as it improves your focus and form, but reduces the anticipation that comes from firing arrows.
Repetition is the key to archery practice, and the AccuBow works indoors or outdoors, day or night. I tested it inside and it worked just fine. I didn’t even annoy my wife during the process. In fact, she tried it out for herself and put her own stamp of approval on it.
This product impressed me most in the strength-building department, though. The muscles we use to draw a bow are specialized, and the AccuBow excels at working those, ultimately building them up so you can either increase draw weight or pull your current poundage with more ease. I noticed a small strength increase during the short test period.
Adjustability makes the AccuBow versatile and great for most age groups. Go to AccuBow.com for more information. Click here for tutorials and instructional videos.
Don’t Miss: Tested: Midway USA Stealth Clothing Line
Check out more stories, videos and educational how-to’s on bowhunting.
With the vote of the board in early 2004, Campbell, Hollis and two new employees, along with some very dedicated volunteers, went to work preparing for the first GSCO convention to be held in early 2005. The venue chosen was a beautiful facility, the Beau Rivage in Biloxi, Mississippi.
To say that the first GSCO convention was successful is really an understatement. Truthfully, it was wildly successful, which is extremely uncommon for international conventions. Every square inch of convention space was filled to the limit with exhibitors, and the banquets were packed. The auctions raised well over $500,000 to not only help GSCO stabilize financially but to make it possible to expand conservation efforts.
It had already been decided that the GSCO convention would stay at the Beau Rivage for at least two years. Mother Nature decided to change those plans in a rather dramatic way. Hurricane Katrina all but obliterated the Gulf Coast, including the Beau Rivage in Biloxi, in late August 2005, and suddenly GSCO had to go on an emergency shopping trip to find a location for the convention that was to take place six months later.
The search committee was very fortunate in simply moving further up the Mississippi River to Tunica, which was a relatively unknown location but had experienced extreme growth as a gambling town. GSCO signed a two-year contract with the Grand Hotel and Casino in Tunica. The facilities were not nearly as lavish as the Beau Rivage, but were sufficient and obviously GSCO had very few choices at the time.
The 2006 and 2007 conventions in little Tunica, Mississippi, were also amazingly successful. GSCO experienced huge growth in all aspects of a hunting convention. It became apparent that if GSCO wanted to continue to grow, it had to “go west.”
GSCO signed a contract with the Riviera in Las Vegas for 2008 and had a fantastic convention there … the largest and most successful to date. The next two years were spent at Bally’s, also in Las Vegas. The 2011 convention at the Paris Hotel in Las Vegas was very successful as far as monies raised, but that hotel was far too expensive and had so many hidden costs that it created a big dilemma for GSCO.
GSCO was very fortunate then to sign a contract for a much more convention-friendly city, Reno, Nevada, for 2012 through 2015. These years were great, as the Grand Sierra facility there was absolutely perfect for a convention the size GSCO had chosen to hold. The staff at the Grand Sierra and its facilities were as good as one could ever hope to have. Also in 2015, GSCO renamed what had formerly been its “Hunter and Outfitter Convention” to the more comprehensive “Slam Quest Convention.” (More about the Slam Quest name later.)
However, the Grand Sierra went through several management changes during GSCO’s years there. By 2015, it became apparent that they could not continue with the Grand Sierra and the other venues in Reno were not conducive to a GSCO-sized convention.
GSCO was very hesitant to move back to Las Vegas because of being burned in 2011 by the Paris facility. But with a lot of negotiations, the leadership was able to secure an amazing contract back at the Riviera again for 2016. This facility was old but had been remodeled, and was a perfect size. The leadership and staff were stable and easy to work with. GSCO signed a multi-year contract with them.
However, before that 2016 convention could take place, GSCO found itself in almost the same circumstance as back in 2005, when the hurricane hit the Beau Rivage. The Riviera was purchased by the city of Las Vegas and closed later that year. This turned out to be extremely fortuitous for GSCO.
The Westgate Hotel, just down the street from the Riviera, decided to honor the contracts of its now-closed rival. In fact, much of the Riviera management simply transferred to the Westgate. GSCO was able to not only get the same financial contract with the Westgate, but improved upon it. The Westgate is an upscale Las Vegas facility and much better than the Riviera in every way. It was “the place” for a GSCO convention, which has been held there each year since 2016. In fact, GSCO has signed with the Westgate through 2020. Maybe a hurricane will not hit Las Vegas and change those plans!
Around the middle of August, wing shooters start preparing for the upcoming dove season. Shotguns will be cleaned and oiled up, camo clothing will be unpacked, and the serious hunters will try to get in a few practice rounds of skeet or sporting clays. Just before the dove season starts, I see first-time hunters at my day job, stocking up on dove hunting gear. Inevitably, one of the questions asked has to do with the ideal clothing for dove hunting, but another commonly asked, and related question is can doves see color?
As a child, dove hunting was my first introduction to the sport of wing shooting. Although I was too young to carry my own shotgun then, my father and his brothers would let me take a few shots under strict supervision. After my first dove hunt, I was hooked! I eagerly looked forward to Labor Day weekend in central North Carolina when dove season opened. My love of wing shooting also led me to hunt quail, mountain grouse, woodcock, and the occasional pheasant out of state. However, dove season remains one of my favorite hunting activities.
Dove Eyesight Basics
Like most North American bird species, all species of doves have excellent vision. Their vision is acute enough to identify small food items (usually seeds) while flying along at speeds of 50+ miles per hour.
Research indicates that, due to their eye location, doves have a 340-degree field of view. And, unlike a dove’s distant relative, the pigeon, who has issues with depth perception, nearly all species of doves have very good depth perception.
Because doves rely on their eyesight as a primary means to detect danger, they are extremely good at detecting even the smallest amount of movement. While dove hunting, the hunter’s movement is usually what doves pick up on first, causing them to flare away or change course to avoid the perceived predator.
Are Doves Able to See Color?
Not only are all species of doves able to see color, but a 2007 study found that they can also see more colors in the color spectrum than a human. The portion of the eye associated with color detection is called cones. Humans have three cones, allowing us to see reds, blues, and greens. Birds, including all species of doves, have four cones allowing them to see colors invariable to the human eye. Doves are able to see blue, green, and red but can also see ultraviolet colors. So not only do doves possess superior vision compared to a human, but they can also see colors in the UV spectrum that we can’t.
In addition to being able to see a broader spectrum of colors, the additional cone in a dove’s eye also offers wavelength filtering allowing them to see the differences or contrast in color changes. Although their vision isn’t quite up to being polarized, it’s pretty darn close. The enhanced contrast is believed to assist doves in detecting movement, identifying predators, and identifying food sources on the ground.
What Should I Wear Dove Hunting?
While blaze orange or hunter orange safety clothing certainly has its place in most hunting scenarios, out in a dove field is not one of those situations. Doves can certainly detect the color orange (quite well), and the contrast between orange and a darker background would likely make the hunter easily identifiable.
While complete camouflage clothing isn’t really necessary, I would recommend wearing darker-colored or drab-colored clothing in an effort to help blend in with the background being hunted. I prefer to wear camo pants, a camo shirt, and a camo hat with a wide brim to help block out the sun.
Some dove hunters go the extra mile and wear either a face covering or face paint in an effort to make their face less visible. Personally, I don’t wear a face covering for early-season dove hunting but do while hunting late season doves.
Late season doves are far warier of hunters and movement and will flare away or flee at any movement or strange objects in their flight path. I find that dove decoys are more helpful during late-season hunts compared to opening day hunts.
FAQS
Here are some frequently asked questions related to dove hunting and a dove’s eyesight:
Do doves have good eyesight?
As I mentioned above, all species of doves have excellent eyesight with color contrast and very good depth perception. The color contrast aspect of their vision allows them to identify even slight movement as a predatory defense mechanism. In addition, their vision is acute enough to perceive predators or threats due to color contrasts that are not visible to the human eye.
Do I have to wear orange or blaze orange while Dove hunting?
First, I’d check the specific dove hunting regulations for the state where you’ll be hunting. It’s possible that your state may have regulations that mandate blaze orange safety clothing while dove hunting. However, since doves can see color, I’m not aware of a state that does mandate hunter-safety clothing during dove season.
Assuming that your state does not have a rule or regulation in place mandating hunter-orange clothing, I’d suggest not wearing any blaze orange while dove hunting. Doves are not colorblind and can see orange quite well. Wearing orange on a dove hunt could decrease your odds of a successful hunt.
Hunters stink and none of them can smell they’re own scent. That’s right. As much as we don’t want to admit it, everyone has a scent and none of us can smell it because our brains recognize it as our own.
Not to mention, humans have a very poor sense of smell compared to wild animals like deer, elk and bear.
For hunters, the bad news is that there is nothing you can do to get rid of your smell. You can wash and scrub all you want and the game you are pursuing can still smell you. And if game catches a whiff of your smell, you are out of business.
As a hunter, the best you can do is to try mask your scent from wild animals, when you are in the field. Of course there are countless products available that promise to effectively mask your scent, but not all of them work. Here are some tips on how you can mask you smell when you are hunting.
Avoid unnatural smells
A human’s scent can be easily detected by wild animals. With this in mind, it is important to not make your situation worse by adding unnatural smells that would increase the odds of an animal detecting you.
Common unnatural smells include gasoline, coffee, cigarettes, aftershave, detergents and soaps. Avoid these smells at all cost, if you want to remain undetected when hunting.
Reduce body odor
Body odor should not be confused with human scent. Body odor is produced by the growth of bacteria when you sweat. One way for hunters to reduce body odor is to use a soap that contains enzymes that kill bacteria. These soaps can help prevent bacteria growth when you sweat. Another step you can take is to dress in layers to help prevent overheating and sweating.
Dress to reduce smell
The clothing you wear can also help reduce the odds of animals smelling you. Scent control hunting clothing is specially manufactured so it prevents the production of bacteria. With less bacteria, you are less likely to smell. Of course this is not perfect, but it can make a significant difference.
Natural smells
One way to mask your scent is to use a natural smell that is familiar to animals and will not alert them to your presence. Rubbing dirt, leaves, pine needles and other natural materials on your clothing will help mask your scent from animals. Typically these materials have stronger scents than humans. They will not completely mask your odor, but they can help.
Overload
Among the many products available to help mask scents are sprays known as receptor overload. The spray confuses animals, because it overloads their system by bombarding them with so many different smells they cannot process them. This causes their brain to ignore the smells, thus keeping your scent masked from the animal.
Stay downwind
It may seem elementary, but one of the best ways to mask your scent is to keep your scent away from the animals you are hunting. Before you begin hunting, check the wind direction and make sure you are downwind of the direction from which animals will be approaching. This is a simple tactic, but it is very effective, even on days where there is very little wind.
In the fall, as temperatures begin to drop, pumpkins and squash take all the glory, but let’s not forget about edible mushrooms, the ever-versatile bumper crop! While mushrooms can be found year-round, many varieties peak during the fall and winter. And with the average American consuming more than two pounds of edible mushrooms each year, we wanted to take a closer look at the top varieties.
Fun Fact: National Mushroom Day is October 15th each year!
Mushrooms are a staple ingredient in many of your favorite recipes across a variety of cultures. Out of approximately 14,000 known species of mushrooms, some are used for medicinal purposes, some can send you on a psychedelic journey, while others are delicious, healthy and edible additions to various cuisine. Even though mushrooms are grouped into the produce section at the grocery store, they technically aren’t plants. Mushrooms belong to the fungi kingdom and make their food by metabolizing dead or decaying matter. They reproduce by producing spores rather than seeds. Weird fact: mushrooms are actually more closely related in DNA to humans than to plants!
Edible Mushrooms – A Powerhouse of Nutrition
Edible Mushrooms pack a nutritional punch, making them a healthy addition to any diet. They’re high in fiber and low in fat and carbohydrates, while also being a significant source of vitamins A, C, B6, B12, and selenium. The Mushroom Council reminds us of this very unusual fact: mushrooms are the only veggie in the produce aisle that contains vitamin D!
Medicinal mushrooms have been used in Eastern medicine for thousands of years and are gaining popularity in other parts of the world. Often found in powder form, they can easily be added to smoothies, coffees, soups, etc. Different mushrooms have distinct health advantages: brain boosters, hormone balancers, antioxidant powerhouses, stress relievers, immune and energy boosters.
Long gone are the days where the lone button mushroom was the only grocery store mushroom variety available. While you can go foraging (safely!) for edible mushrooms, such as morels, or cultivate your own, you won’t need to look any further than your produce aisle for many varieties—from sweet to nutty-tasting, some even resemble the taste of lobster! Their versatility and meat-like texture (hello, portobello!) make them a popular culinary staple. Even the strangest-looking fungi—and they can get weird-looking—make a surprising and tasty addition to many meals.
Top 10 Mushroom Varieties To Try
Check out this list for a quick run-down of the more common edible mushrooms and how to include them in your cooking.
1. Button (White)
Ninety percent of mushrooms eaten are of this variety, and can easily be found at your local grocery store. With less culinary flair than the more exotic-looking mushrooms on the market, the simple button mushroom is anything but boring. This mild-tasting variety is easy to cook and adapts to the flavors of any dish. They can be eaten raw or cooked and are a popular addition to soups, stir-frys, salad, and or topped on pizzas. The easiest way to cook them is to simply saute them with a little oil.
Also called: table mushroom, common mushroom, white mushroom, or champignon de Paris.
2. Cremini (Italian Brown)
Cremini mushrooms are the brown strain cousin to the white button mushroom, just with darker, firmer, and more flavorful flesh of the white button mushroom. They are simply baby portobellos. While they have a more complex taste than the white button, the two mushrooms can be used interchangeably, and both are often widely used in savory and spicy dishes.
Also called: Italian mushroom, brown mushroom, baby portobello, or baby bella.
3. Portobello
The portobello mushroom is basically just a fully mature cremini. These dense and rich mushrooms are a staple in Italian cooking and their texture and taste make portobello an excellent meat replacement. Want a low-carb bread option? Portobello’s flat caps work well for a bun substitute. Their meaty texture also holds up well for grilling and stuffing.
Also called: portabello, portabella, Roman mushroom, field mushroom, or cappaellone.
4. Shiitake (Forest or Oak)
Shiitake mushrooms are native to East Asia, with 83% of them grown in Japan. In Japanese, shiitake means “oak fungus” where they can be found. They don an umbrella-shaped brown cap, which curl under slightly. Fresh shiitakes have a light woodsy flavor and aroma, while their dried version has a more intense umami flavor (the fifth taste, which is described as savory or meaty). You can cook with both fresh and dried shitake, however, the dried ones are more widely used. Shiitake mushrooms are low in calories, while also offering many vitamins, minerals, and health-promoting compounds to protect against cancer and inflammation and to boost your immune system. They have long been used in traditional Eastern medicine for boosting health and longevity.
Shiitake mushrooms’ distinct umami flavor is a great addition to vegetarian dishes. Often sold dried, they simply need to be soaked in hot water to soften before cooking. Saute shiitakes with greens and serve with a poached egg; add them to pasta dishes or stir-fries; make a flavorful soup, or roast them up for a crispy snack.
Also called: black forest, black winter, brown oak, Chinese black.
5. Oyster
Oyster mushrooms can be found growing on the sides of trees in the wild, however, most of these whitish and thin, fan-shaped mushrooms that you find in stores or on menus are most likely cultivated. First cultivated during World War I as a ration food, Oyster mushrooms carry a delicate aroma and subtle, savory anise flavor and are prized in many Japanese and Chinese dishes, such as soups, sauces, and stir-fries. More expensive than white button mushrooms, but less so than rarer mushrooms, such as morels, oysters require little prep work and can be eaten whole or chopped. While they can be eaten raw, cooking oyster mushrooms brings out their delicate flavor and gives it a unique velvety texture, making them the perfect addition to any barbeque (they are delicious marinated, and grilled).
Also called, tree oyster, angel’s wings, and abalone mushroom.
6. Porcini
One of the most prized mushrooms, porcini mushrooms are desired for their smooth texture and aromatic, woodsy flavor. They’re widely used in Italy and France and are referred to as cepes. Fresh porcini are beloved by gourmet chefs and are often sautéed and served as a side dish or added to risottos and pasta dishes. Fresh varieties are harder to come by in the United States, but dried ones can be restored by soaking them in hot water. Dried porcinis add rich flavor to broths and stews.
Also called: cepe, bolete, king bolete, Borowik, Polish mushroom.
7. Morel
One of the most prized edible mushrooms in the world, the morel’s honeycomb-shaped cap is distinct in appearance. Morel mushrooms are difficult to cultivate, so most morels served up in restaurants are harvested in the springtime from the wild—creating a multi-million dollar enterprise. Their rich flavor complements a wide range of dishes, and can often be found alongside meats or stuffed inside ravioli. This is one mushroom species that can’t be eaten raw—it needs to be cooked to neutralize its naturally occurring toxins. Read how to spot their poisonous lookalikes!
Also called: morchella.
8. Enoki (Snow Puff)
Enoki mushrooms feature distinct small, shiny white caps attached to thin stems. The wild types tend to be darker and shorter than their cultivated counterparts. Their crunch makes them a good raw option to top on salads. This species also cooks up well, making them a great addition to sauces, stir-fries, and soups.
Also called: Enokitake, futu, winter mushrooms, and winter fungus.
9. Chanterelle (Girolle)
This flashy yellow, trumpet-shaped mushroom is known for its unique peppery and fruity flavor. The chanterelle is difficult to cultivate, making it one of the most popular mushrooms picked in the wild. Considered a higher delicacy mushroom, cooking this fungus with fat, such as butter and cream, draws out its rich flavor, making it a great addition to sauces, soups, and soufflés.
Also called: Egg mushroom, Golden or yellow chanterelle, pfifferling.
10. Maitake
Resembling a head of cabbage with delicate, feathered edges, the maitake mushroom can be cultivated or found in the wild. The maitake mushroom grows at the base of trees and is native to North America, Europe, and China. It has been consumed for centuries in China and Japan; maitake means “dancing mushroom” in Japanese. Maitake can be found in-store or farmer’s markets in overlapping clusters, resembling a bird’s plumage. Thanks to its bird-like appearance, it is known as “hen-of-the-woods.” This earthy, peppery flavored mushroom is best served cooked with savory and salty flavors. Delicious in soups, stews, pasta dishes, ramen, sauces, and saute. It can also be found in a dietary form for your regular health regimen.
Also called: Hen-of-the-Wood, sheepshead mushroom, ram’s head, dancing mushroom.
Selecting Mushrooms
Whether foraging or purchasing cultivated mushrooms, select mushrooms that are firm, with a smooth appearance, void of any noticeable soft spots. The surface should be dry, but not dried out, and never moist or slimy. Once you get your mushrooms home, gently remove any excess dirt before storing but don’t wash them until you’re ready to eat them. And always rinse them whole, before slicing, as the exposed flesh will absorb water like a sponge.
Storing Mushrooms
Due to mushrooms’ high moisture content, they are very perishable. Store them in a container with good airflow to maximize air circulation without drying out the mushrooms. Wrap mushrooms in a paper towel and place them in an opened plastic or paper bag. Mushrooms should last in the fridge for a few days if properly stored. They can also be frozen or dried to increase shelf life.
Which Is Your Favorite Mushroom?
Which is your favorite? Not a fan? Tell us in the comments below!
Our Favorite Flashlights for Hunting of 2024: Bright, Powerful & Durable
I’ve you’ve seriously injured a deer, elk, or any other wild game, it’s your obligation to track that animal down and harvest it, even if it’s dark out. That’s why we’re here to tell you about the best hunting flashlights of 2024. We want you to get your hands on the exact gear you need for a successful hunt.
Whether you’re tracking animals through the night, performing search and rescue after dark, scaring away bears from camp, or poking around your hunting tent, a proper flashlight is an essential piece of the hunting puzzle.
To help you choose the right option, we scoured hundreds of products in search of the brightest, most powerful, and highest-rated LED torches available today. As a result, we’ve whittled down the industry’s best hunting flashlights to the following ten best options from Fenix, Nitecore, SureFire, Streamlight, and more.
We’ve also taken a deep dive into the critical factors that go into choosing a proper light, like luminosity, throw, run time, and weather resistance. And, to help maximize your purchase, we recommended a few add-on accessories that’ll bring out the best in your light.
Ready to brighten up the night with one of 2024’s best hunting flashlights around?
Let’s get started.
Best Hunting Flashlight for the Money Fenix PD36R
Max Lumens: 1,600 Max Run Time: 115 hours at 30 lumens Batteries: USB-C rechargeable Weight: 5.6 oz Pros: Ergonomic, USB-C rechargeable, incredibly bright for its size, excellent run time, extremely durable and weather resistant, rail mount accessory add-on for guns Cons: Can get hot on turbo mode
The Fenix PD36R is the flashlight I’ll use for the 2024 elk and deer hunting seasons, and I bet it’ll be my go-to torch for many years to come. For my money, it doesn’t get better than this little beast. It does everything I could ask of it.
Straight out of the box, this flashlight feels sturdy and maneuverable in your hand. It’s big enough to get a good grip on and compact enough to clip to your belt unnoticed. It pumps out a powerful beam, has five different brightness settings, and boasts incredible run times thanks to its 5,000 mAh USB-C rechargeable battery.
Because this bad boy has high-end IPX8 water and IPX68 dust resistance, there’s no need to stress if the weather gets nasty or if it falls into the mud. To help out during rifle season, Fenix sells a mounting accessory that allows you to attach and detach the PD36R to your gun’s rail while hunting at dusk.
Thanks to its power, durability, weather resistance, and ergonomic feel, we confidently recommend the Fenix PD36R to hunters of all stripes. It’s highly versatile, too, and would make for a great everyday carry in the offseason.
PRO TIP: Order the PD36R through Fenix’s official website, and they’ll laser-engrave your flashlight with a design and/or custom text for free!
VIEW ON FENIX
USB-Rechargeable Runner Up Nitecore MH25S
Max Lumens: 1,800 Max Run Time: 1,500 hours at 1 lumen Batteries: USB-C rechargeable NL2150 Weight: 5.4 oz Pros: Bright and powerful light with a long throw, USB-C rechargeable, very durable and weather resistant Cons: Could be more ergonomic, turbo mode kills battery life
Nobody loves fumbling around with batteries when their light is losing juice, so we included another powerful USB-C rechargeable option, the Nitecore MH25S. This torch is pretty similar spec-wise to our top overall recommendation, the Fenix PD36R, so you can rest assured it’s good to go.
This bad boy is well-engineered and full of clever features. With 1, 50, 300, 1,050, and 1,800 lumen settings, it packs the brightness to thrive in any environment and has an impressive throw that reaches nearly a third of a mile on its turbo setting. It also has a handy battery indicator, automatic temperature regulation, and can clip to a gun’s rail with a tactical ring accessory.
So, why don’t I recommend the Nitecore MH25S over the Fenix PD36R? For starters, the battery life on the Fenix is slightly better, and it also has a sleeker, more ergonomic design. The Fenix also rings in 30 bucks cheaper than the Nitecore and comes with a free customized engraving.
But don’t overlook the MH25S just yet. It does pack 200 more lumens than the DP36R and has a significantly longer throw. It’s a mighty torch in a compact package and a well-deserved runner-up.
Hunter’s Favorite Do-it-All Flashlight SureFire G2X Pro
Max Lumens: 600 Max Run Time: 52 hours at 15 lumens Batteries: CR123A (2) Weight: 4.4 oz Pros: Comes in four different colors, compact, ergonomic, weapon mountable, very durable Cons: Not as many lumens as we’d like, only two different brightness settings, not USB-rechargeable
This list would be incomplete if I left out the SureFire G2X Pro. It’s a top option among hunters and outdoorsmen and is one of the most widely-used flashlights in the hunting industry. It’s a great all-around torch at an approachable price.
For starters, it’s available in four colors, giving hunters the option to choose a light that’ll match their specific kit. Like the first two lights I mentioned, it’s tough as nails, compact, ergonomic, and weapon mountable. It’s a versatile light that’ll serve you well in the field or as an everyday carry.
But I prefer my Fenix PD36R torch over this one for several reasons. For one, this flashlight uses replaceable CR123A batteries and isn’t USB-rechargeable. It puts out 600 lumens (as opposed to the PD36R‘s 1,600) and only offers two brightness levels (as opposed to five for the Fenix). Specs-wise, it just doesn’t match up.
Overall, the SureFire G2X Pro is a solid little light widely used in the field. Hunters swear by it, and its popularity is something we can’t ignore. No, I won’t swap out my Fenix for this anytime soon, but I imagine it would still get the job done if I did.
Durable, Functional, Available as Rail Mount Streamlight ProTac HL-X | Rail Mount HL-X
Max Lumens: 1,000 Max Run Time: 20 hours at 65 lumens Batteries: Rechargeable 18650 (1) Weight: 6.2 oz Pros: Ergonomic, weather resistant, USB-rechargeable batteries, highly rated for its durability, available as a rail mount for long guns Cons: Battery life isn’t great
Streamlight’s ProTac HL-X is another extremely popular flashlight among hunters and outdoorsmen, and for good reason. It’s powerful, durable, versatile, and also available in a modded version that’ll mount to the rail of your gun.
If you scour through its thousands of five-star reviews, you’ll see why hunters and outdoorsmen love the HL-X: it’s bright, reliable, and serves multiple uses. At 5.5 inches in length and with a max brightness of 1,000 lumens, we think it’s the perfect size and strength to guide you through the dark of the backcountry.
As we mentioned, Streamlight offers a version of the ProTac HL-X that can mount to your gun’s rail. For about $30 extra, this version comes with a built-in mount, retaining clips, and remote switch. Sure, this version would be more practical for tactical and self-defense situations than for hunting big game, but we wanted to highlight it nonetheless.
The ProTac HL-X checks all the boxes for hunters and backcountry explorers alike. We’re not huge fans of its below-average battery life, but other than that, we’re having a hard time finding flaws. Though we still recommend the Fenix PD36R and its optional rail mounting accessory as our top overall option, this light is a no-brainer if you’re a Streamlight fanboy (or girl).
Best Red-Green-Blue-UV Hunting Light Nitecore SRT7GT
Max Lumens: 1,000 Max Run Time: 240 hours at .1 lumens Batteries: 18650 (1) or CR123A (2) Weight: 6.1 oz Pros: Red, green, blue, and UV lights help with blood tracking, preserving night vision, and stealthiness, powerful 1,000-lumen output, very weather resistant Cons: .1, 3, 13, and 1,000-lumen settings leave a significant gap in brightness, not as compact or ergonomic as other options
Nitecore produces some of the market’s most technologically advanced flashlights and flashlights. Don’t believe me? Just check out their SRT7GT. It’s packed with loads of easy-to-access features, most notably its twisting dial that allows you to switch between red, green, blue, and UV lights.
So, how are all these different colored lights useful for hunters?
Red lights work well for stealthiness and preserving night vision
Green lights work well for blood tracking and night fishing
Blue lights also work well for blood tracking but don’t preserve night vision
UV lights are used for blood tracking but only when used with luminol
This feature-rich light could come through in the clutch for hunters, especially those who go after deer, elk, and big game at dusk and want a capable blood tracking solution.
Since I already rock a powerful headlamp with red, green, and blue lenses, I don’t need the SRT7GT. I do, however, think this torch would be an excellent option for hunters with headlamps that don’t feature multiple colored lenses. Blood tracking and privacy lights are pretty important in the deer and elk hunting world, and this versatile light has all the features to get it done.
Very Bright Option for Challenging Environments Ledlenser P18R Signature
Max Lumens: 4,500 Max Run Time: 70 hours at 30 lumens Batteries: 3 x 18650 battery pack Weight: 1.4 lb Pros: Extremely bright and powerful, slick magnetic charging system, compatible with RGB color filters, loads of high-tech features Cons: Heavy, bulky, expensive, lacks a mid-brightness setting
For most hunters, the Ledlenser P18R Signature would be overkill. But for those who get tags in ultra-challenging environments and push themselves to the limit, this hulk of a flashlight might be the ticket.
This bad boy operates at four different brightness settings — Low: 30 lumens, Mid Power: 1,000 lumens, Power: 2,600 lumens, and Boost: 4,500 lumens — that help it thrive in the darkest and most relentless terrain. Its twisting dial at its head allows for fluid adjustment between tight spot beams and wide flood lights, allowing hunters to dial in their beam diameter to fit the surroundings.
It also rocks an impressive set of ‘smart light’ features that combine to make it highly customizable and responsive. This is a high-end flashlight for which gear nerds will fall head over heels.
A flashlight this bright and powerful would be useful for hunters who traverse remote areas with few obstructions. If search and rescue is a real possibility, the Ledlenser P18R will provide you with the power you need to look for lost or injured hunters, send SOS signals, or track animals in wide-open environments.
PRO TIP: Order the P18R Signature through Ledlenser’s website, and they’ll laser-engrave your flashlight with custom text for an extra $10.
Ultralight Hat Brim Clip-On Flashlight Fenix E18R
Max Lumens: 750 Max Run Time: 70 hours at 5 lumens Batteries: USB-rechargeable Fenix 16430UP Weight: 1.7 oz Pros: Very lightweight and compact, USB-rechargeable, durable and weatherproof, can clip to a hat brim, would work great as an EDC light Cons: Small – could get lost, easy to burn through the battery at high and turbo settings
Ultralight backcountry hunters will take any opportunity to reduce their pack weight, and that’s why I’m seriously considering trying out this tiny little Fenix E18R torch for the 2024 season. It’ll give me the lumens I need, and it barely weighs a thing.
It’s a compact little bugger, too, and could stash away easily in my pocket, bino harness, or clip to my hat’s brim to work as a headlamp. It can recharge magnetically via USB, is IP68 rated to stand up against the elements, and cranks out a good amount of brightness for how compact it is. It won’t break the bank, either.
The problem is, I’m great at losing smaller gadgets like this in the heat of the moment, so I’d probably end up securing it to a lanyard to keep it from disappearing. There’s something to be said for an ergonomic flashlight, and this isn’t it.
The Fenix E18R would make a great addition to any hunter’s arsenal whose style gravitates towards lightweight and compact gear. At 750 lumens, it’ll provide plenty of light to navigate through the woods at dark as you follow a blood trail.
VIEW ON AMAZON
Best Value Buy Flashlight for Hunters Ledlenser P7
Max Lumens: 450 Max Run Time: 40 hours at 25 lumens Batteries: AAA (4) Weight: 6.2 oz Pros: Approachable price, reliable, Advanced Focus System lets you control your beam diameter, seven-year guarantee Cons: Not super powerful, weather protection isn’t great (IPX4), four AAA batteries aren’t ideal
Some hunters don’t want to drop 100 bucks on a flashlight, and we get that. For those who are after a torch that won’t break the bank, check out the Ledlenser P7. It’s a solid all-around light with plenty of great reviews.
There’s nothing mind-blowing about the P7, but we dig it anyway. Its 450 lumens are on the lower end of torches we recommend, but hunters still report a bright and powerful beam that gets the job done in the backcountry. We also appreciate its Advanced Focus System feature, which puts out tight, focused beams that can transition between spotlights and floodlights with one hand.
Its IPX4 rating is on the lower end of the water-resistance spectrum, meaning it should be able to handle splashes and light precipitation fine, but might not hold up during a prolonged downpour. Weather resistance aside, this sturdy aluminum light should be able to survive drops and falls just fine.
If you’re looking for a sturdy, reliable light from one of the industry’s most trusted brands, consider the P7. Just don’t forget to register it with Ledlenser, so it’ll be eligible for its seven-year warranty.
PRO TIP: Order the P7 through Ledlenser’s website, and they’ll laser-engrave your flashlight with custom text for an extra $10.
Brightest Torch for Search & Rescue, Distance Tracking Nitecore TM39
Max Lumens: 5,200 Max Run Time: 36 hours at 200 lumens Batteries: Rechargeable internal NPB68HD Weight: 3.0 lb Pros: Incredibly bright and powerful, crazy-long throw, massive battery life, durable, reliable Cons: Very bulky and heavy, impractical for most hunting applications, very expensive
Let’s get this out of the way immediately: the ultra-high-end Nitecore TM39 is as large and powerful of a hunting flashlight as I’m comfortable recommending. It’ll excel in rescue situations or while tracking animals in environments with few obstructions, but it would be overkill for anything else.
This absolute unit is as burly and bright as you could ever ask for. With an insane throw of 1,500 meters, it’ll shine powerful beams as far as the eye can see, whether you’re scanning for humans, animals, or anything else. Nitecore markets it as a searchlight, and that’s precisely how hunters should use it.
At three pounds, the TM39 weighs far more than anything else on this list. It’s not going to stash away unnoticed in your pack, nor will it be effortless to lug around the woods. If I were using it, I’d leave it behind at camp to use in case of emergency and clip my Fenix PD36R to my belt as my more practical hunting carry.
Much like the Ledlenser P18R Signature I wrote about earlier, I only recommend the Nitecore TM39 for those who hunt in remote areas with few obstructions and low visibility. In threatening environments where search and rescue or tracking from a distance is possible, this “tiny monster” is the high-performance torch you need.
Best Blood Tracking Light for Deer & Elk Primos Bloodhunter HD
Max Lumens: 600 Max Run Time: Not listed Batteries: CR123A (4) Weight: 1.1 lb Pros: Best option on this list for blood tracking by far, durable and water resistant, solid run time Cons: A bit bulky, serves a very specific use, will need to be paired with a traditional flashlight or headlamp
The Primos Bloodhunter HD is our favorite overall blood tracking light on the market, and it’s not even close. It’s the go-to option for deer, elk, and big game hunters worldwide and could be the difference between tracking down your kill and losing it to the darkness.
We big game hunters love to think that we’ll nail perfect double lung shots every time, but we also know that hunting rarely goes as planned. If you seriously injure an animal but don’t stop it dead in its tracks, the Primos Bloodhunter HD will help you illuminate its blood trail against leaves, sticks, and the earth.
Remember that this light serves a particular purpose: blood tracking in the dark. It isn’t your traditional hunting torch with a powerful white LED beam that can shine for hundreds of yards, so you’ll need to pair it up with a capable flashlight or headlamp if you want a well-rounded setup.
Batteries, Extra Power & Backup Light
Once you get your hands on a proper light for the upcoming hunting season, you’d better make sure it doesn’t die on you when you need it the most. Here are the batteries, power bank, and backup light that I recommend to cover your bases.
Factors We Consider When Reviewing Flashlights
There’s a lot to consider when choosing which flashlight to lead you through the darkness
The torches on this list are intricate little gadgets, so we made sure to analyze the inner workings of each device before they could make this list. Getting the exact light you need to match your hunting style is essential, so keep a close eye on the following seven considerations as you make your decision.
Lumens
Simply put, lumens are a measurement of brightness. If you’d like a more technical definition of lumens, click here.
Products on this list can shine anywhere between .5 lumens in low mode and 5,200 in turbo mode. Check out our chart below to help you visualize the brightness along this range.
Approximate Brightness in Lumens
1 – 10: Best for up-close uses like cooking, going through gear, and reading
11 – 50: Low brightness, will illuminate immediate surroundings but not much else
50 – 200: Low-to-medium brightness for hiking and use around camp
200 – 500: Medium brightness, suitable for following blood trails
500 – 1,000: Medium-to-high brightness, good for tracking animals from a distance
1,000 – 2,000: High brightness, used in military and during search and rescue missions
2,000 – 4,000: Extreme brightness, the strength of most cars’ headlights
4,000+: ‘Probably overkill’ level brightness, meant for incredibly challenging situations
Throw
A flashlight’s throw measures the longest distance its beam can reach, and is typically measured in meters.
For example, if you have a flashlight with a rated throw of 500 meters and you shine it towards a barn 400 meters away, the beam should be visible on the barn. If you shine the same flashlight towards a barn 600 meters away, the beam should weaken and disappear before it hits the barn.
Throw distance depends mainly on how concentrated your flashlight’s beam is. Spotlights, or more focused beams, will have larger throws, whereas floodlights with wider beams will have shorter throws. Many flashlights on this list allow users to switch back and forth between spotlights and floodlights.
Run Time
Run time, or how long you can expect your light’s battery to run, is measured in hours and minutes. The higher amount of lumens your light is emitting, the lower its run time will be (and vice versa). A light with multiple brightness settings will have multiple different run time ratings.
Batteries
As I mentioned, know exactly which type of battery your light requires, and bring extras along if you need them. Nobody wants to struggle through the woods at night as the beam on their flashlight keeps fading and fading.
The most common battery on this list is the CR123A, though we’ve also included a few lights that use AAAs and 18650s.
You’ll also see a couple of lights with internal batteries that you can recharge via USB, AC (wall charger), or 12-volt (car charger). If you’re hunting with one of these lights, be sure you bring along a battery bank or an inverter so you can charge it.
Durability & Weatherproofing
Hunting is tough on your gear; that’s no secret. While making this list, we did our best to include products known for their durability and weather resistance. Nobody’s got time for a light that’ll flicker and shut off after a few minutes in the rain.
Nor do you want a light that’ll break if you drop it on a rock or back over it with your car.
All the products on this list were built for the outdoors and should thrive in dicey conditions.
Click here for a detailed explanation of IPX ratings, which determine how weather-resistant your flashlight is. If you’re hunting in a dry climate, you could get away with bringing an IPX4-rated light, whereas if you’re hunting in a wet and humid climate, you’ll want to bring along something rated IPX6 or better.
Weight
As an ultralight backpacker and backcountry hunter, I keep the weight of my pack down as low as possible while remaining comfortable. Heavy kits can lead to sore knees, rolled ankles, and drained energy. We hunters need all the help we can get, so why would we want to drag a heavy pack around all day?
That’s why it’s important to consider a flashlight’s weight before committing to it. Search for a light with enough lumens for your hunt and zero in on models within a reasonable weight range.
A few ounces here and there may not seem like a big deal, but they do add up. Don’t buy a heavier light than you need, especially if you’re covering big miles in the backcountry.
Which Flashlight Will You Take Hunting in 2024?
Don’t get left in the dark; buy a robust and reliable flashlight this hunting season
Whether you need a hunting flashlight to track wounded animals through the night, light the way as you search for firewood, scare away predators from camp, or go searching for a lost hunter, you’re here for a reason.
When night falls on your hunting trip, you want to be prepared for anything.
That’s why we analyzed, reviewed, and recommended the industry’s ten brightest and best torches of 2024. From rechargeable LED lights to options with red and green settings to lights explicitly made for blood tracking, we wanted to provide our readers with various options that suit all different hunting styles.
So, what’s it going to be? Are you going to grab our top overall recommendation, the Fenix PD36R? How about the red, green, and blue capable Nitecore SRT7GT? Do you prefer the ultra-bright and powerful Ledlenser P18R Signature?
No matter the luminosity, throw, run time, or weather resistance of your future light, we hope we have simplified the buying process and helped you make up your mind. Night or day, we hope whichever product you choose gets its job done during a safe and successful harvest.
Now, grab that flashlight, pack up your gear, and get ready to brighten up the 2024 hunting season.
Related Posts
Electric Bikes for Hunting: Best Off-Road eBikes
Cellular Trail Cameras for Deer & Big Game Hunters
Exploring the Pros and Cons: Pump Air Rifle vs Break Barrel - Unveiling the key differences and advantages between two popular air rifle mechanisms....





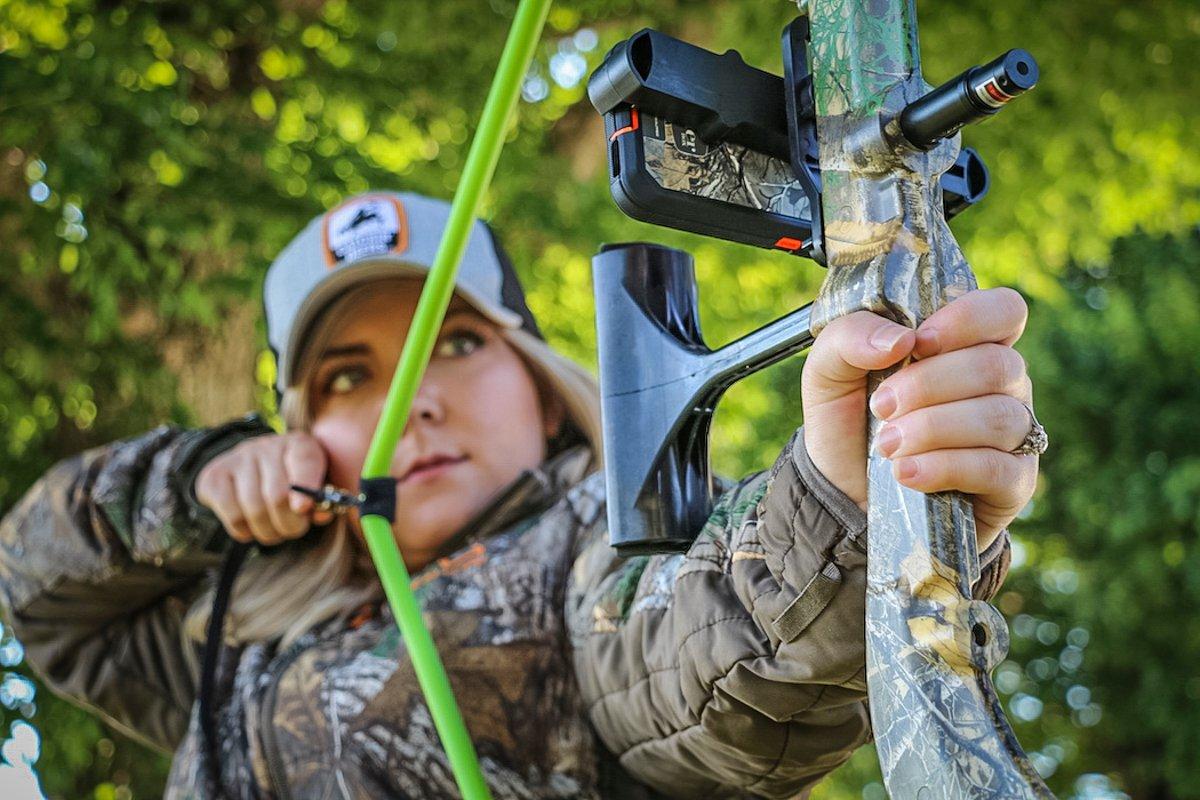
 The available phone mount accessory is for virtual archery practice. It’s easy to install. The bracket rests at a 45-degree angle, meaning the phone will be horizontal during use. You may have to remove some phones — such as the iPhone plus models — from the case for them to fit. But in most cases, that OtterBox case in Realtree EDGE will look pretty as you shoot digital bucks, buffs and bushytails.