Home Blog Page 158

The Best Scopes for Hog Hunting

0

Today I’m going to show you the best scope for hog hunting.

In fact:

I’ve hand- tested over 10 scopes alone for this review.

The best part?

I’ve sorted the scopes by use. So whether you’re on a budget or need the best AR-15 hog hunting scope, you’ll find it here.

Let’s dive in!

The 4 Best Scope For Hog Hunting

If you’re pressed on time, here’s a quick list of the best hog hunting scopes:

  1. Leupold FX-II Ultralight 2.5×20: Best Hog Hunting Scope
  2. Trijicon ACOG 3.5×35: Best Scope for Fast Target Acquisition
  3. ATN X-Sight 4K Pro 5-20x: Best Night Vision Scope for Hog Hunting
  4. Pulsar Trail 2 LRF XP50 Thermal Riflescope: Best Thermal Scope for Hog Hunting

1. Leupold FX-II Ultralight 2.5×20: Best Hog Hunting Scope

The Leupold FX-II Ultralight is a fantastic fixed-magnification scope in a lightweight, low profile package.

In fact, I think it’s the best scope for hog hunting.

Want to know why? Keep reading…

Glass Clarity & Reticle

The glass on the FX-II is very clear.

Leupold used their Index Matched Lens System to fully multicoat the scope which results in a very clear image. This is great for hogs on the move.

LEUPOLD FX-II ULTRALIGHT 2.5X20 CLARITY

Also, the light transmission in this scope is very good. In fact, it’s so good that I can get an extra 20 minutes of shooting time out of this scope versus trying to shoot with my naked eye.

This is because of Leupold’s Twilight Management System.

Now, on to the reticle.

This scope uses a simple Wide Duplex reticle. The wide posts are great for rapidly drawing my eye in to center, and the fine crosshairs are precise enough for target plinking at 150-200 yards.

LEUPOLD FX-II ULTRALIGHT 2.5X20 RETICLE

The reticle is etched into the glass and shows up really well in low-light conditions. This pairs really nicely with that great light transmission I mentioned earlier and makes for easy, clear sighting on those late-night hog hunts.

There aren’t any holdover lines, but with a fixed 2.5x magnification, you don’t really need them. This reticle excels in fast target acquisition at close to mid range.

Eye Relief & Eye Box

Here’s one of my favorite things about the FX-II:

The eye relief is a whopping 4.9 inches!

At this distance, you can even set your scope up “scout style,” where you mount the scope in front of the receiver of your rifle. This setup is a literal must-have for bolt-action guns and Garands.

Combined with the low-fixed magnification, this setup allows me to use the scope while still keeping both my eyes open. Speaking of magnification…

Magnification & Parallax

This scope provides a fixed 2.5x zoom.

I find that this amount of magnification is perfect for hog hunting since I’m usually within about 100 yards to my target.

This level of magnification is also great for rimfire plinking and varmint hunting. I’ve had a blast running the FX-II on my Ruger 10-22.

I’ve had no issues at all with parallax on this scope. That’s because Leupold has factory set the parallax adjustment to 150 yards.

Elevation & Windage Knobs

This scope uses ¼ MOA click turrets.

I like the solid “click” that I get when making adjustments, and the low-profile turrets help give the scope a sleek look.

Zeroing was quick and easy. I was zeroed in within about 5 shots and after dozens of hunts, the zero has held true.

LEUPOLD FX-II ULTRALIGHT 2.5X20 ELEVATION TURRET

Durability & Weight

I’ve come to expect durability from Leupold scopes, and the FX-II doesn’t disappoint.

The scope is waterproof to a depth of 33 feet, fogproof, scratchproof, and shock resistant. If that’s not enough, Leupold also tested the scope at temperatures from -40 to 160 degrees.

All these features mean that you can take this scope into any conditions without worrying about damaging it.

Here’s my favorite thing about this scope: It only weighs 6.5 ounces.

This low weight is not only great for my comfort as a shooter, but it makes the scope more recoil resistant, too. The heavier the scope, the more it wants to stay in place when you fire. A lighter scope travels with the rifle with less resistance.

Basically, this means that the lighter the scope, the more it’s able to take recoils without taking any internal damage or messing with your zero.

Plus, when you’re out hunting, you’d want a lightweight optic. Remember, every ounce counts 🙂

Mounting & Rings

The FX-II doesn’t ship with any mounts or rings.

So I’d recommend Low Leupold Rifleman Scope Rings to mount this scope to your rifle of choice.

The scope does include some slip on lens covers. But honestly, they felt cheap. So I went with Leupold Ultralight Flip Back Lens Covers (Eye piece: size 59060, Objective: 20mm).

These will keep your glass protected while still maintaining that nice, low weight.

Is the Leupold FX-II Ultralight 2.5×20 worth it?

The Leupold FX-II is a great riflescope that proves that great things can come in small packages.

It’s got:

  • 2.5x zoom
  • Clear glass
  • Solid “click” turrets
  • Extremely lightweight
  • High eye relief for scout setup
  • Wide duplex reticle for fast target acquisition

Plus, the whole thing is backed by Leupold’s Gold Ring Lifetime Warranty.

So if you’re looking for a durable, lightweight, affordable riflescope for close-mid range hog hunting and target shooting, the FX-II Ultralight is for you.

Still not sure what you’re looking for in a scope? Check out this Essential Guide to Choosing a Rifle Scope.

2. Trijicon ACOG 3.5×35: Best Scope for Fast Target Acquisition

For fast target acquisition, Trijicon’s ACOG 3.5×35 more than achieves expectations.

In fact, the “Advanced Combat Optical Gunsight” has been used for medium distance engagements by Marines and Special Forces since the early 90’s.

I figured if it works for them then it’ll work for me. I wasn’t wrong.

Read on to learn more…

Glass Clarity & Reticle

Crystal clear glass.

That’s what I noticed when I first looked through the Trijicon ACOG. To be honest, I’m still a little amazed by how clear it actually looks. The image detail is awesome.

To top it off, I didn’t notice any fogging in the lens during those early morning hunts. Turns out, this optic is nitrogen purged.

When choosing my ACOG, I was a little overwhelmed by the different reticle choices Trijicon offers. With some research, I decided that the green BDC chevron was the best fit for me because it’s standard for military M4s.

After a few hog hunts, I absolutely loved this reticle. Here’s why:

First, it uses a simple-to-understand Bullet Drop Compensating (BDC) feature that automatically estimates windage, holdover and distance for you. Once you sight in at let’s say 100 yards, the hash marks below the reticle are great at picking off shots out to 800 meters.

And second, the illuminated reticle doesn’t need batteries to operate. During the day, a fiber optic light gathering strand directs light to the reticle. And at night, tritium illuminates the reticle.

TRIJICON ACOG 3.5X35 RETICLE

However, I noticed that on REALLY bright days, the reticle can become too bright. This can make shooting distant targets inside a dim lit area somewhat challenging because the glow from the reticle is a little overwhelming.

I found that putting some tape on the fiber optic strand helps with reducing the illumination intensity. Simple fix in my opinion.

Speaking of fixing, the ACOG comes with a lense pen, which I use for maintenance. Keep in mind you’re not going to want to use any solvents on this (as with any high-end optic) or you’ll probably ruin the lense coating.

I haven’t done it myself but I have watched some guys hose mud off their ACOGs. Seems to work and their glass still looks great afterward!

Eye Relief & Eye Box

2.4 inches of eye relief is what you get.

Doesn’t seem like a lot, which is what I initially thought when I read the manual, but after actually using it on my rifle I’ve had no problems.

Keep in mind, troops use this ACOG on belt-fed machine guns without getting “eye punched” so you’ll be fine.

I had to remove my rear iron sight to get the proper eye relief but I don’t miss it. I even toyed with the idea of mounting iron sights offset at 45 degrees but simply decided I don’t need them with this ACOG.

The field of view when looking through the ACOG is more than generous for my needs. It also allows me to keep both eyes open, which greatly improves situation awareness.

Instead of squinting through a scope, I’m now able to more easily scan the surroundings during hog hunts and better prepare for my next target in competitive shooting.

In essence, the AGOC has noticeably improved my reaction time.

Not bad for only 2.4 inches of eye relief.

Durability

So far, the ACOG is the most dependable optic I own.

The moment I held it, I knew right off the bat this thing is built tough. And it’s true: The ACOG is forged from 7075-T6 aircraft grade aluminum alloy.

TRIJICON ACOG 3.5X35 OVERVIEW

It’ll work if I do drop it.

And I have dropped it on a few occasions.

I have a SCAR 17, which is notorious for trashing out cheap optics, and the ACOG works flawlessly when paired with it.

No busted lenses or broken seals so far, even after dropping it from a tree stand onto roots. I’ve also dropped it on gravel and concrete. It still worked like a champ.

It’s also waterproof. The most water I’ve had on mine was from rain, but the specs say it can be submerged up to 100 meters.

Elevation & Windage Knobs

I’ve dropped my ACOG hard enough to dent one of the turret caps and it still maintains zero. Turrets still work great and feel durable.

Easy to zero but slightly different than other scopes. Adjustment increments are ½ inch per (audible) click at 100 yards. 2 clicks move the bullet 1 inch on the target.

The adjustment cap lanyard saved me from rummaging through tall grass to find butterfingered caps on more than one occasion.

Keep in mind…

As with any optic, don’t force the turrets beyond their adjustment limits — damaging the prism assembly is possible.

TRIJICON ACOG 3.5X35 SIDEVIEW WITH TURRETS

Even Superman has a weakness.

Parallax & Magnification

This ACOG has a fixed 3.5x magnification. Awesome for fast target acquisition.

No fumbling with various magnifications.

Plus, with 3.5x, longer shots using the BDC reticle are fun.

3.5x has less parallax than the 4x version. Up and down movement has no parallax that I can tell. There’s some parallax with side to side movement but nothing concerning.

Mounting & Rings

This optic comes with the thumbscrew mount for “flattop” MIL-STD-1913 rails or the carry handle screw and washer set (for ARs with fixed carry handles).

Can only find the carry handle mount option? Buy the MIL-STD adapter.

Adapters are also available for weaver rails and H&K firearms.

I use my ACOG on different firearms and prefer the throw lever mount for easy removal/attachment. There’s also a quick release option

Can’t seem to get the proper eye relief for your comfort? Try the extended eye relief adapter.

Concerned about lense reflections? Grab an anti-reflection device.

The ACOG comes with a Scopecoat but you may prefer a flip cover (like myself). Only available for the objective lens and it doesn’t work with the anti-reflection device.

Is the Trijicon ACOG 3.5×35 worth it?

If you’re out hog hunting and need the best scope for fast target acquisition, then get the Trijicon ACOG 3.5×35.

TRIJICON ACOG 3.5X35 FIBER OPTIC (1)

Here’s why:

  • Built strong
  • No batteries
  • Generous FOV
  • Easy to understand BDC

I’ll have to admit:

The ACOG comes at a considerable price for a fixed magnification. But if you’re looking for fast target acquisition AND Special Forces approval, then this is it.

(Need something cheaper? Check out my review on the Aimpoint Pro vs. T1).

If you’re settled on buying this, be warned: Watch out for knockoffs. This video will help you determine what’s legit:

3. ATN X-Sight 4K Pro 5-20x: Best Night Vision Scope for Hog Hunting

The ATN X-Sight Pro is a high-tech night vision scope with a ton of advanced features.

In fact, it’s the best night vision scope available for hog hunting.

This scope packs in the kind of advanced features that you only get from a digital scope, but it looks and feels like a traditional riflescope.

How have they done this? Read on to find out.

Image Quality & Reticle

The image quality when looking through this scope is fantastic.

In the daylight, I can see every detail, and the color fidelity is incredible. This is all thanks to the 4k Ultra HD sensor that makes up the backbone of this scope.

And at night, I can clearly see my targets even in total blackness, thanks to the included infrared illuminator. This is important when hogs decide to charge in the night!

One of my favorite things about this scope is the reticle.

The X-Sight uses a digital Smart Mil Dot reticle.

ATN X-SIGHT 4K PRO 5-20X RETICLE

You can customize the variance between the mil dots using the smartphone app so that your reticle is custom tailored to your caliber and load. Plus, the reticle automatically adjusts as you increase zoom.

Eye Relief & Eye Box

Unlike many digital scopes, the X-Sight has a much more traditional eye relief.

I set mine right at 3.5 inches.

Now, here’s one of my issues with this scope:

The eye box is pretty unforgiving. There is a lot of extra information displayed in the scope image, and I find that if I don’t keep my cheek weld solid, I can’t really see any of it.

ATN X-SIGHT 4K PRO 5-20X OBJECTIVE BELL

That said, it’s still a lot more comfortable to use than my other digital scopes.

Special Features

ATN has put a lot of cool features into this scope.

One of the most advanced things this scope has is the Smart Rangefinder.

The scope will take two measurements from the reticle and calculate the distance to target. Then the range is displayed right there on screen. No more guesses.

The X-Sight also has a built-in Ballistic Calculator. Program in your weapon profile and environment data like wind and humidity using the smartphone app, and then the scope will adjust your point of impact accordingly.

Also, the X-Sight has full HD video streaming capabilities, and automatically records video when you start shooting. This is great for tracking a running target after you take your shot.

Basically, this scope does all the work for you!

Durability and Battery

This scope is pretty durable, as far as digital scopes go.

ATN X-SIGHT 4K PRO 5-20X OVERVIEW

It’s water resistant, weather resistant, and tested to operate at temperatures from -40 to 130 degrees.

The tube is made from high-grade aluminum, and it’s fogproof and shockproof too.

The battery life on this scope is great. You can run the scope for 18 hours without having to recharge it. This is perfect for long hunts, or trips where you don’t have access to a charger between hunts.

ATN X-SIGHT 4K PRO 5-20X CHARGING CABLE

Zeroing

Zeroing was incredibly quick.

This scope has a One Shot Zero system. All I had to do was take a shot, adjust my point of impact, and I was good to go.

I’ve put hundreds of rounds through my Mini-14 with this scope mounted, and have had no problems with the zero straying.

Magnification

The X-Sight gives you 5-20x variable magnification.

I’ve noticed that the image tends to pixelate a little bit at the higher magnifications, but not enough to obscure my target. I can easily shoot targets up to 800 yards out using this scope.

Also, this scope uses a smooth zoom wheel rather than buttons. I prefer the way this feels versus my other digital scopes. It acts like a traditional glass scope, which is more what I’m used to.

Mounting & Accessories

The ATN X-Sight includes a picatinny rail with standard rings, plus one L-shaped ring to use with accessories. It also includes an infrared illuminator and a sun shade, so right out of the box, it’s ready for both night and day shooting.

ATN X-SIGHT 4K PRO 5-20X RINGS

I highly recommend getting the ABL Laser Rangefinder from ATN.

It attaches right onto the side of the scope, and automatically communicates with the scope via Bluetooth. The built-in Smart Rangefinder is nice, but for hogs, you’ll want to be able to instantly get a range on your target.

The X-Sight also ships with a nice neoprene scope cover, but it doesn’t include any lens caps. I recommend Butler Creek Flip Caps (Objective Size 48, Eyepiece Size 02.)

Is the ATN X-Sight Pro 5-20x worth it?

Overall, the X-Sight Pro packs advanced digital features into a streamlined scope that resembles more traditional glass scopes.

It’s got:

  • 4k Ultra HD image
  • Comfortable eye relief
  • Customizable digital mil dot reticle
  • Automatic video recording and streaming
  • Built in Smart Rangefinder and Ballistic Calculator
  • Night Vision Mode with included infrared illuminator

Plus, the scope is covered by ATN’s 2 Year Warranty.

So if you want the best night vision scope for hog hunting at night that’s easy and comfortable to use, look no further than the X-Sight Pro. Those hogs will never see you coming!

ATN X-SIGHT 4K PRO 5-20X COATING

Need a good scope for your .22-250? Check out our top picks.

4. Pulsar Trail 2 LRF XP50 Thermal Riflescope: Best Thermal Scope for Hog Hunting

The Pulsar Trail 2 LRF XP50 is a fantastic thermal riflescope.

In fact, it’s the best thermal scope you can buy for hog hunting.

(If you’re unsure if you need a thermal or NV scope, read this article.)

Pulsar crammed a ton of hi-tech features into this scope, and managed to keep the price much lower than their competitors, too.

Want to know if the Trail 2 LRF is for you? Read on to find out.

Image Clarity & Reticle

The Trail 2 LRF produces one of the clearest digital images I’ve ever seen in a scope.

Usually, when I use a thermal scope, I can tell when I’m aiming at heat, but I can’t tell what that heat is coming from. Most thermal scopes just produce a blob of white.

PULSAR TRAIL 2 LRF XP50 NIGHT VISUAL

But the Trail 2 LRF shows every detail. I can clearly see and identify what I’m aiming at, whether it be a hog or a coyote. This is because of the advanced thermal sensor in the scope, which can detect heat up to 2000 yards away.

In fact, this scope has such a clear image, I can use it in full daylight with no problems at all.

Speaking of range, the Trail 2 LRF has a built-in laser rangefinder that displays the range to target right there in the display. No more guessing the distance to the hog — just raise your rifle, aim and shoot.

This scope also lets you swap between white-hot and black-hot modes. Between that and the 13 different reticles, I was able to find the perfect settings for every shooting scenario.

Recording and Streaming

The Trail 2 is so advanced that it connects wirelessly to your smartphone or tablet for easy recording and streaming of your hunts.

If you want to show off your hunts on YouTube or Twitch, this is definitely the scope for you!

I personally like the recording feature because I’m not the best shot in the world, and sometimes my target will try and run before falling. The recording makes it really easy to spot the location and see which direction the hog started running in.

This makes it easier and quicker to find your game after the kill.

And you don’t have to remember to press the “Record” button. The Trail 2 detects when you fire a shot and automatically records from there, so you never have to worry about missing the action.

Recorded footage is stored in the scope and can be easily downloaded to your smart device or computer once you get back home. Reliving a great hunt has never been easier!

Eye Relief

The eye relief is right under 2 inches.

This took me a little getting used to, but once I got a feel for the extended eyepiece, I had no issues at all maintaining eye box.

2 inches is a little closer than I would normally mount a scope, but you need a close relief with thermal scopes. I’ve never had any issues with scope bite and I’ve used this scope on multiple calibers of rifles.

Durability

With the Pulsar Trail 2 having so much tech, I thought this thing would be fragile.

But was I wrong.

The Trail 2 LRF was recoil tested by Pulsar for up to 12 gauge/.357 H&H. I can confirm that first hand.

Plus, the scope can be submerged in up to three feet of water and still be completely fine.

The scope is fogproof, dustproof, and frost resistant as well. So you can take this scope into any field conditions and not have to worry about breaking it.

PULSAR TRAIL 2 LRF XP50 OVERVIEW

Zeroing

Zeroing was insanely easy.

The Trail 2 uses the Pulsar “One Shot Zero” function to ensure quick and easy zeroing right out of the box.

And I’ve taken mine on dozens of hunts and had no issues with the scope straying from zero at all.

Plus, this scope allows you to save up to three different profiles, and each of these profiles has up to five range settings that you can save.

This means that you can set this scope up for 3 different rifles and swap it out between them without having to do any major settings changes.

I love this feature because it means I can zero my Trail 2 on my three favorite rifles (ex: go from my AR to my M1A) and pick which one I want to use on the night of the hunt.

Magnification

You get 1.6-12.8x magnification from this scope.

I’ve noticed no image quality issues at all even when I zoom in to max.

Also, you can either use 2x steps or zoom smoothly. The 2x steps are nice and quick for when you need to zoom in on your target fast, and the smooth zoom is nice for when I have time to be more precise.

This is great for hog hunting, when your targets could come out of the treeline at almost any range without warning.

My favorite feature on the Trail 2 though is the Picture in Picture Zoom. Picture in Picture mode puts the zoomed in image in the top portion of the display while still showing the whole zoomed out image behind it.

The Picture in Picture mode makes it really easy to zoom in on your target for a good shot while still being able to keep an eye on your background. You don’t want to miss your hog and hit some cattle because you couldn’t see it grazing just behind your target!

Accessories

The Trail 2 LRF comes with some great accessories out of the box.

It’s got a carrying case, USB cord, cleaning cloth, and a battery charger. (Also, even though it comes with its own charger, I’ve found that any micro-USB charger will work!)

The scope also comes with a weaver rail and hex wrench for mounting to your rifle of choice.

And no need for flip caps — the Trail 2 already has one built-in on the objective lens.

PULSAR TRAIL 2 LRF XP50 OBJECTIVE BELL AND CAP

Is the Pulsar Trail 2 LRF XP50 Thermal Riflescope worth it?

All in all, the Pulsar Trail 2 is an incredible thermal riflescope at about half the price of the competition.

It’s got:

  • 1.6-12.8x magnification
  • Picture in Picture mode
  • Built-in laser rangefinder
  • Detailed, clear thermal image
  • 13 different digital reticles to choose from
  • Easy automatic recording and streaming to your smart device

And if all that wasn’t enough, the Trail 2 LRF comes with Pulsar’s 3 Year Warranty.

If you want to feel like the Predator on your next hunt and need the best thermal scope for hog hunting, then the Pulsar Trail 2 is for you.

Now It’s Your Turn

I hope you enjoyed my best scope for hog hunting guide.

So as a recap:

If you’re looking for the best hog hunting scope, get the Leupold FX-II Ultralight 2.5×20.

Looking for the best scope for fast target acquisition? Choose Trijicon ACOG 3.5×35.

How about the best night vision scope for hog hunting? Then opt-in for ATN X-Sight 4K Pro 5-20x.

Lastly, if you are looking for the best thermal scope for hog hunting, I’d recommend Pulsar Trail 2 LRF XP50 Thermal Riflescope.

That said, you can’t go wrong with any of these options. After all, I have hand and torture tested all the above scopes, and proved to be reliable.

Now I want to turn it over to you:

Which rifle scope will you pick for your hog hunting?

Let me know by leaving a quick comment down below.
Wilson Combat Super Sniper Review

0
Wilson Combat Super Sniper Review

“The wind has picked up. Hold the edge of the plate.”

I maneuvered the reticle over to the edge of the plate, which was shimmering in the morning heat. I eased back on the trigger, and at the sound of the shot the rifle pushed back a bit. I watched a new dot appear on the plate, but I could not hear the impact.

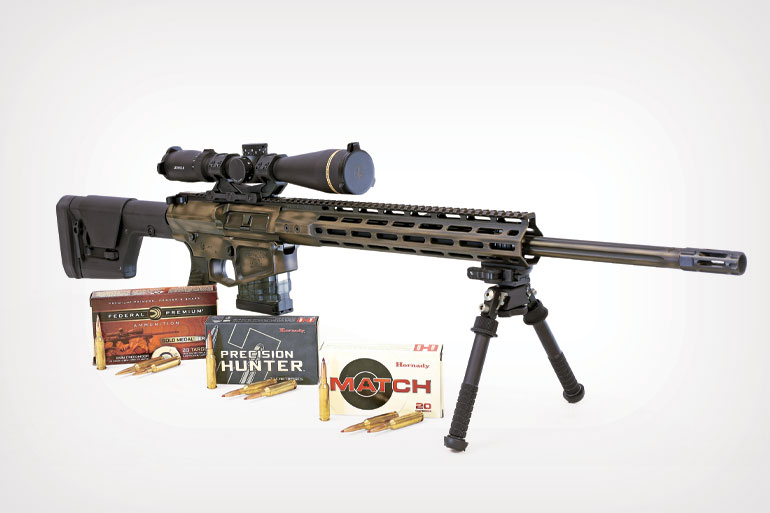
I was at Bill Wilson’s ranch, with Bill himself calling the wind for me, using a Wilson Combat Super Sniper, chambered in 6mm Creedmoor. The Super Sniper is the culmination of the knowledge base of Bill and his crew and their years of building rifles based on the Stoner system.

The Wilson Combat Super Sniper’s 20-inch barrel is heavyweight stainless with a 1:8 twist, and this particular sample had the threaded muzzle option with a Wilson Combat flash hider installed. There is also a rapid-thread muzzle brake as an option.

Wilson-Combat-Super-Sniper
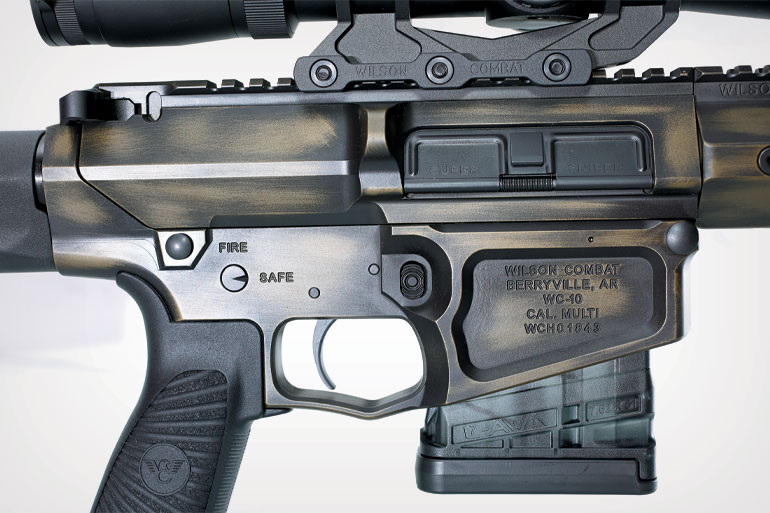
The AR-10-based Super Sniper features aluminum billet receivers with a rubber bumper between them to eliminate play. The trigger is Wilson’s excellent TTU.

The barrel is installed in a Wilson Combat BILLet upper, which is matched to a lower, and both are machined from pre-hardened billet aluminum. A small rubber bumper in the lower bears against the rear lug of the upper as you close it up for a wobble-free fit.

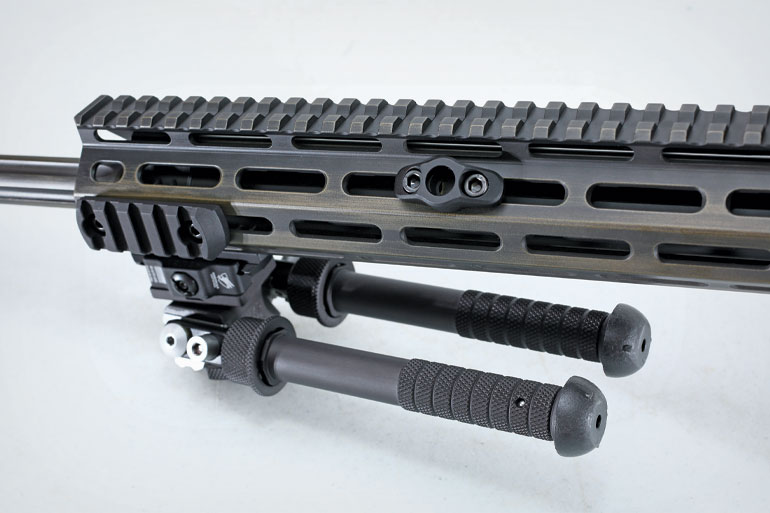
The fore-end is the company’s T.R.I.M. Rail, a free-float handguard 13.8 inches long that has M-Lok slots for mounting a bipod and any other accessories you use. The full-length optics rail up top aligns with the rail on the receiver, so there’s plenty of room for scopes, backup iron sights, night vision or other extras.

The Rogers Super-Stoc telescoping stock is standard equipment, but my sample came with an optional fixed Gen3 PRS from Magpul that adjusts for cheekpiece height and length of pull.

The lower receiver has a Wilson Combat pistol grip, made by Bravo Company with the Wilson Starburst pattern and logo on it. The trigger on my sample was Wilson’s TTU, a two-stage trigger set at four pounds. The charging handle is Bravo’s BCM Gunfighter with its larger-than-GI left-side latch. The Super Sniper’s bolt and bolt carrier are magnetic particle inspected and then NP3 coated.

In the AR-10 version of the Super Sniper, which includes the 6mm Creedmoor chambering, the rifle feeds from M110-pattern magazines. Wilson supplied one from Lancer, but Magpuls will work as well.

The base model Super Sniper is finished in black Armor-Tuff, but my test rifle featured a burnt bronze/black camo pattern. It also came with Wilson’s T V3 Ultralight scope mount. The V3 does not use the hand-tightened wheel of the firm’s Accu-Rizer but rather three crossbolts that clamp the mount to the receiver. It is lighter and sturdier, but it requires tools to install. A Leupold VX-6HD scope was installed for testing.

Wilson-Combat-Super-Sniper
The T.R.I.M. handguard sports M-Lok slots and a full-length optics rail. The finish is burnt bronze/black Armor-Tuff.

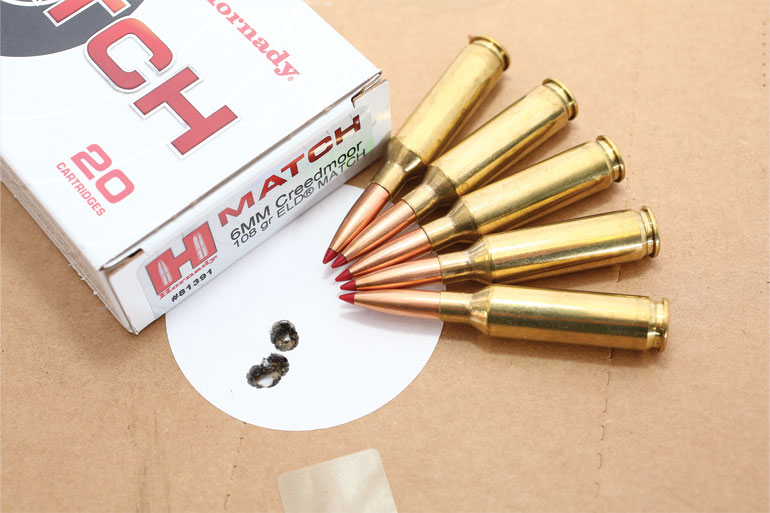
The 6mm Creedmoor is a result of the competitive demands of the Precision Rifle Series, a long-range competition that requires accuracy, flat trajectory and the ability to deliver quick follow-up shots when needed. When I was shooting with Bill Wilson, I could see all my hits out to 1,200 yards, but at the longest distance I couldn’t hear them because the 108-grain bullet didn’t ring the steel hard enough to let the sound carry back to the firing line.

I don’t have easy access to such distances back at home, so I had to content myself with punching absurdly small groups at 100 yards. The clean, crisp trigger pull of the TTU made that easy. I suspect this rifle could shoot even better than I found, as the accuracy limits are getting down to my limits.

What is this rifle for? Well, for someone who wants to get into Precision Rifle Series or similar long-range rifle competitions, this would be just the ticket because it’s scarily accurate and has mild recoil.

As a hunting rifle, the Super Sniper might not be the best choice. At a book weight of more than eight pounds, it isn’t exactly a stalking rifle, and once you load it up with a bipod, scope and ammo, you’re looking at double-digit weights. But if you’re hunting from a tree stand or a blind where you don’t have to lug the rifle very far and there’s an availability of a rest, that weight won’t matter.

As a beautifully made, utterly reliable rifle that the shooters at the gun club will envy, the Wilson Combat Super Sniper gets top marks. Yes, the starting point is a bit on the high side as AR rifles go these days. And once you add in the extras, the price does tick up, but quality costs and quality lasts. If you don’t simply blast ammo into the hillside to make noise, you’ll be a long time wearing out the Wilson Combat Super Sniper’s 6mm Creedmoor barrel.

Wilson-Combat-Super-Sniper
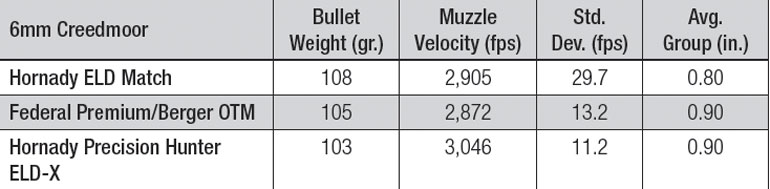
The Super Sniper demonstrated terrific accuracy, which makes it a good option for those looking to get into the long-range precision game.

Wilson Combat Super Sniper Specs

Type: AR-15, AR-10 (tested)Caliber: .223 Wylde, .224 Valkyrie, 6mm Creedmoor (tested), 6.5 Creedmoor, 6.5 Grendel, .260 Rem., .308 Win.Capacity: 20-round Lancer magazine suppliedBarrel: 20 in.Overall Length: 40.5 in.Weight: 8 lb., 11 oz.Receivers: Billet aluminum, burnt bronze/black Armor-Tuff handguard T.R.I.M. free-float M-LokStock: Magpul PRS Gen3 fixed; Bravo Company grip Wilson starburstSights: None; full-length optics railTrigger: TTU 2-stage, 4 lb. pull (measured)Price: $3,020 (base), $5,525 (as tested)Manufacturer: Wilson Combat, wilsoncombat.com

Wilson Combat Super Sniper Accuracy Results

Wilson-Combat-Super-Sniper
Notes: Accuracy results are averages of three five-shot groups at 100 yards off a Champion shooting rest. Velocities are averages of five shots measured on a LabRadar chronograph set to read 15 feet from the muzzle.

Clothing

0

Footwear

Y

our boots are the most important pieces of equipment you will bring. You can borrow a gun, jacket or pack, but rarely will you be able to borrow boots. The most important aspects are fit and comfort, followed by durability. If you have foot problems or you just want your feet to feel good, I’d recommend visiting a foot specialist and getting a set of custom orthotics made.

You should at least get an after-market insole/foot bed like Super Feet. Different boots fit different feet types. If the boot does not feel good, don’t buy it for its looks. Concerning boots, I prefer all leather for most mountain hunting situations. The Kenetrek Mountain Extreme 400 is the best I have used in any situation PERIOD!

Plastic boots are okay in cold weather and rough terrain, but are not real comfortable to walk in over flat ground. In general, boots with less side stitching are good. Gore-Tex boots work well, but I also recommend getting a pair of 13” tall, non-insulated Gore-Tex socks from Cabela’s or another laminated sock brand called Seal Skins, in the event you step in water or your feet get wet from sweat. This is cheap insurance for dry feet. Air bob type soles work well in mud and soft terrain, provide good traction, but are not very durable in rock.

Most leather boots that you see advertised for hunting are insufficient and fall apart quickly. The following are some recommendations: Kenetrek Mountain Extreme 400 are our #1 choice boot as all our guides now use them in all situations. They are very durable extremely comfortable and have almost no break in time. (Contact -Jim Winjum’s web site via our Links page). The Canada Hunter 200 or 800, Alaskan Hunter, Teton Hiker and the Denali’s. Outdoor Essentials (owned by Seighard Weitzel), sells the top of the line Meindl boots (Loggers). They have good rubber and very little side stitching and hold up well in the rocks. Danner boots work, but are not the best in steep terrain or rocks.

Other excellent boots to consider are made by Kayland, Technica, Asolo, Garmot, One Sport, Vasque, Merrell, La Sportiva, Salomon and Lowa Sheep Hunters are all good. Try to get leather boots that will handle abrasive from rocks and brush and do not break down when wet.

Your boots will last much longer if you take care of them. Wear your boots around a while before you “grease” them. I clean any oil or dirt off exposed side stitching with rubbing alcohol or acetone, then coat the stitching with Seam Grip or Freesole to prevent it from getting cut on rocks and brush. Several light coats work well. For waterproofing boots, Nikwax paste works well. Meindl makes a good Wax also. Use Montana Pitch Blend on Schnee’s boots. An old toothbrush works well for applying Nikwax. I generally heat MT Pitch Blend in a Microwave or pot of hot water and apply it with a paintbrush. Use your fingers to rub the stuff into the leather grain. Snoseal and Mink oil are not as good as those mentioned .

A trick for comfortable feet, especially on a backpack trip, where you will be unable to pack another set of boots, is to bring along another set of insoles that fit your feet slightly differently than your others. It may help prevent hot spots from forming.

A Leki or Black Diamond (“Black Diamond Carbon whippet” is my go to) telescopic hiking pole is highly recommended for most people and mandatory for people with bad knees and/or poor balance. I personally will not hike with a pack without a walking stick. One other trick for people with weak or sensitive knees is to wear a set of lightweight kneepads when hunting in rocky terrain or for stalking sheep and goats in the sharp rocks. The Sitka Timberline pants have these built in or Arcteryx also sells a very good, more durable strap-on set.

After you’ve spent all that money and time finding the right set of boots, don’t cut corners on cheap socks. Bridgedale and Lorpen makes the very best. Smart wool, Wigwam & Thorlo are excellent too. There are other brands of decent socks, but these are great. If you have high volume feet, one sock may work. Some wear a liner under a heavy sock or will wear two medium thick socks together. Experiment to find out what is best for you. Of all the clothes you wear, socks are the most important to keep clean and fresh. It is a good idea to have enough for a change every 2-3 days. Athlete’s foot and blisters are not fun. Take care of your feet.

Clothing / Outerwear:

For sheep hunts I recommend Sitka in the Optifade pattern. We all use it and it works very well in the terrain we hunt. Contact David Brinker at Sitka Gear, [email protected]. He will hook you up with the right setup for any situation. I only use clothing made by Sitka. Below there is alss some options that may work for you as well.

In general, stick with synthetics (Fleece, Schoeller, Saddlecloth, nylon/poly blends etc.) or wool. For backpacking, synthetics tend to be lighter and quicker to dry. Smart Wool is hard to beat. Wool is more odor & wind resistant than fleece, unless you use Wind stopper fleece like Beyond Fleece or Mountain Hardware. A jacket or parka with a hood is a good idea.

Make sure you have a belt or suspenders for your pants Collared shirts or Zipped pullovers work the best. A vest makes a great layering tool. Some people like them and some don’t. Down vests are very warm and work well late in the fall. A fleece or wool vest will work most of the season. A lightweight jacket made with synthetic fill (Kelvin Jacket (Sitka) or Brooks Range Jacket – Barney’s Sports) is a good idea if you get cold easily. A good hat and gloves are vital to staying comfortable.

A brimmed hat works well for warmer weather, rain and for people who don’t like hoods. They can get in the way on a backpack hunt. Later in the year, a hat with earflaps will keep your neck and ears warm. Wind block fleece gloves with a shell is a good all weather combination. For cold weather, a pair of waterfowl type, Gortex gloves (Cabela’s MT050) works well as does a mountaineering type glove made by Patagonia, Mountain Hardware or Black Diamond or Outdoor Research “OR”. I always pack an extra set of “Stormfront” gloves with me as the temperature can change at anytime. If you get cold hands easily, bring a pair of mittens also.

In warmer weather, their Microtex (Burr Barrier) and lightweight fleece is great. LL Bean makes a nice set of Worsterlon clothes and wind bloc fleece. Day One Camouflage makes some of the nicest camo fleece, especially for bow hunters. They have a huge selection of patterns to choose from. Barney’s Sport Chalet sells some excellent Wind block Fleece and lightweight backpacking clothing (The Black, 3SP Sport hill Mountain Pants are great – maybe the best all around backpacking pant made for the money).

Mountain Hardware (Wind block) and Arcteryx (Gamma MX) make excellent Wind block pants and jackets. Mountain Hardware and Arcteyrx (Gamma LT) also make excellent early season backpacking/mountain/rock pants made from a Schoeller Fabric that breathe well and are very tough.

Another great line of wind block items if made by Beyond Fleece. They can custom make any size, color, feature you want. Regarding wool, King of the Mountain is the best all around for cold weather.

Another company that makes excellent technical wool clothing is IbexWear, Filson, Sleeping Indian Designs, Pendleton & Woolrich also make nice wool clothing. If you will be backpacking, the clothing should be light, quick drying and layering is a key.

Quiet clothing is important for bow hunting. For the mountain/backpack type hunts, noise and camouflage are not as important as warmth, weight, durability, comfort, fit and layering.

Regarding Camouflage, it is not necessary, but it will help you blend into the environment. If you want Camo, Sitka is by far the best Clothing for backpacking. The pattern you choose is not critical. If you are doing a mountain hunt, choose a color that is open and blends with rocks and ledges. Sitka, Kuiu, Kryptek, Mossy Oak, Advantage, ASAT, Predator & Real tree will all work.

You are not required by law to wear hunter orange.

Rain gear is likely the most debated subject in the clothing department. If you want rain gear that is maintenance free, affordable, relatively light weight, durable and fairly quiet, consider a set of Helly Hansen Impertech in Olive Green.

REMEMBER IF YOUR HIKING IN RUBBER RAIN GEAR YOU WILL SWEAT A LOT.

Sitka Gear is what we recommend – Stormfront. You can purchase it from Cabela’s or Barney’s Sport Chalet.

Good quality, 3-ply Gore-Tex (XCR is best) shells to consider include: Patagonia, Mountain Hardware, Taiga Works, Arcteryx and the North Face, these are not camo or quiet, but can work well for mountain type backpack hunts, especially in September and later. When a Gore-Tex jacket becomes dirty and looses its DWR coating, the water will not bead up on the surface, causing it to work poorly. Gore makes a product called Revivex that works on most outerwear.

For Backpack hunting (later season sheep), I recommend this group of 3-ply Gore-Tex rain gear as it does not absorb water and is easier to dry in the wind, without a fire or stove.

To keep your pants from giving you saggy crotch syndrome, make sure they come with a set of suspenders or use a bib instead.

When you combine a waterproof layer and a quiet outer material in one package, you get a quieter product, but it also becomes heavy and more difficult to dry when saturated. If anyone can help solve this dilemma, they will be able to retire and hunt forever. This is not so much an issue on horseback or cabin/wall tent type hunts, but is very important on extended backpack style hunts. If you are comfortable hunting naked, then you will not have to worry about this dilemma.

Underwear

Layering with multiple items is better than wearing just one or two heavy layers. Synthetics are the way to go for comfort, moisture wicking and warmth. In August, bring lighter weight material; in mid-September and later, you should bring heavier weight underwear.

Try products made with Thermax, MTP, Thermastat, Capalene, Polarmax and Micro Fleece. Polypropylene is not as good as it holds odor and should not be dried in a dryer. Merino Wool underwear can work well; Smart wool, Ibex Wear, Arcteryx RHO wool and Ice Breakers are great, especially in late September and October.

I prefer neutral colors: gray, brown, green or black as they can be worn by themselves. If you have long legs, get tall bottoms or you will experience high-water syndrome. Tops with a zip-top and longer neck are warmer and more comfortable when wearing binos. Arcteryx, Cabela’s & Patagonia made great synthetic products.

Regarding underwear, briefs or boxer briefs will work. I like boxer briefs when worn alone with just pants or regular briefs when wearing long underwear bottoms. Make sure that whatever you wear does not chafe your privates (some guides call this “Baboon Butt”) as you will be walking bow-legged and your smile will fade away (this is why I recommend a tube of Tinactin in your daypack). Some people don’t wear underwear underneath long underwear bottoms. Cabela’s MTP, Apalene, Polarmax and Sporthill make great synthetics. Ibex Wear also makes a set of Wool,no-itch briefs worth trying.

Ruger Mini 14 Target Rifle

0

The Ruger Mini-14 has proven its ruggedness since it started riding around in pickups in 1974, but getting it to consistently shoot neat little groups at 100 yards has often been an exercise in frustration. Accuracy—frankly not the Mini-14’s strongpoint—has generally taken a backseat to its simple and reliable operation. With competitive action-shooting events on the rise, Ruger decided to address this issue, introducing the Mini-14 Target Rifle accompanied by claims of minute-of-angle performance.

Appropriate for a Mini-14 derivative, the Target Rifle keeps the fixed-piston gas system and rotary bolt with dual locking lugs borrowed from the M1 Garand and the line’s military inspiration, the M14. The investment-cast receiver and L-shaped charging handle have a matte-stainless finish. Scope bases integral to the receiver—a feature that debuted on the Mini-14 Ranch Rifle during the early 1980s—also fittingly appear on the Target Rifle. Ruger includes high, 1-inch rings for mounting an optic, which is mandatory since the receiver and barrel are devoid of iron sights. Other features manifest in the Mini-14 family and carried on with the Target Rifle are a Garand-style safety, stout magazine release lever and ventilated, fiberglass handguard that covers the barrel from receiver to gas block.

The similarities end there.Ruger started its Mini-14 makeover by going straight for what most often is the deciding factor in a rifle’s accuracy—the barrel. Though the lightweight, 18 1⁄2-inch barrel of the standard Ranch Rifle makes for quick and easy handling, it has many times bore the brunt of the criticism stemming from inaccuracy. The Target Rifle, in contrast, has a heavy, hammer-forged, stainless steel barrel that is .78 inch in diameter where it emerges from the gas block, with an additional 3 1⁄2 inches of length. Its six-groove rifling has a 1:9 RH twist to stabilize all but the heaviest .224-caliber match bullets.

Prominent on the barrel is a 41⁄2-inch-long, harmonic-dampening weight. The 3⁄16-inch-thick sleeve slips over the barrel, and four Allen-head screws keep it in place. A series of helical grooves on the barrel’s surface allow the position of the harmonic dampener to be changed by turning it after loosening the attachment screws. Rotating the harmonic dampener clockwise moves it toward the receiver, while turning it counterclockwise shifts it toward the muzzle.

Barrel harmonics, or the vibration of the barrel during firing, can greatly affect point of impact and group size. Functions that occur within a rifle such as the firing pin striking the primer, the ignition of the propellant, the expansion of the propellant gases and the bullet’s contact with the rifling as it travels through the bore all produce a number of vibrations that are ultimately transmitted to the barrel. These vibrations cause the barrel to move in an arc, even before the bullet has exited the bore. If these vibrations were absolutely consistent, there would be a lot of rifles shooting one-hole groups. However, their magnitude and duration vary from shot to shot, and five bullets may leave the bore when the muzzle is at five different points on the vibration-induced arc. In part, this is why even a very tight group will still somewhat resemble a triangle.

One way to control vibration is to add weight to the barrel, which soaks up the impulses. The heavy barrel on the Target Rifle works together with the harmonic dampener to reduce the amplitude of the arc, making bullet exit, and therefore point of impact downrange, more consistent. Different loads, of course, can produce different amounts of vibration, and the ability to adjust the harmonic dampener allows the shooter to tune the barrel to obtain the best accuracy with any given ammunition.

A beefy barrel does not a target rifle make, so Ruger continued overhauling the Mini-14 by giving it a stock eminently suited for shooting from the bench. The thumbhole buttstock has a large, triangular-shaped cutout just behind the pistol grip that not only lets the thumb encircle the pistol grip, but also provides a stable shelf on which its fleshy base can rest. Along with the slight swell to the pistol grip, the design promotes a steady, repeatable hold. The stock’s high, slim comb rises slightly at the heel and digs into the cheek for a tight weld. So it will nestle solidly into a sandbag, the toe is rather thin and parallels the comb for 3 inches. The stock’s lower line then curves dramatically upward before running forward to the pistol grip, forming a hook for the non-shooting hand to press against and keep the rifle firmly settled on the bench. Three removable, black plastic spacers just forward of the rubber buttpad let shooters adjust the stock’s length of pull from 14 to 15 1⁄2 inches in 1⁄2-inch increments. In keeping with the theme of the Target Rifle, Ruger gave the fore-end a 2-inch-wide flat spot to make it easy to rest the gun on sandbags or hold in an offhand position. The stock is constructed of a gray laminate that complements both the stainless finish of the rifle’s metal and the black handguard.

A Mini-14 that will shoot minute of angle? I, too, was skeptical. But to give the Target Rifle a fair chance, I topped it with a Sightron SII Big Sky 4.5-14×42 mm scope and waited for a calm day to test Ruger’s claim. I picked the 55-grain soft-point load from Black Hills to start. The first several groups from the 100-yard line were around 2 1⁄2 inches—pretty much what I expected from a Mini-14 and certainly nothing to write home about. Then I began playing with the position of the harmonic dampener and shot as many holes in the criticisms of this autoloader’s accuracy as I did targets. With this particular load, the rifle liked the forward end of the harmonic dampener to be positioned about 3⁄4 inch behind the muzzle. Thusly tuned, it produced five, five-shot groups that averaged 1.03 inches. Pretty dang close, and two of those groups measured inside the minute-of-angle standard. I tried several other loads, including some with match bullets weighing between 69 and 75 grains, but none of them delivered the accuracy of my first pick. The runner-up was the 50-grain Winchester Supreme Ballistic Silvertip load, which averaged 1.10 inches after 25 shots. Perhaps with a little more tweaking I could find the harmonic dampener’s sweet spot with these other loads and shave a little from their group sizes.

True to the nature of the Mini-14, I experienced no failures to feed or fire during testing, and that was during approximately 400 rounds of 12 ammunition types over three days. No complaints there, but I did have an issue with the Target Rifle’s trigger. At 5 1⁄2 pounds of pull weight, it’s quite heavy for a rifle intended for target work, and I had to squeeze through a lengthy amount of creep. Nonetheless, I learned to live with it, and from the factory the Target Rifle performed as advertised.

The Mini-14 is rarely described as being pinpoint accurate, and in fact, until now it was never made to be. With some modifications, Ruger has turned this ubiquitous truck gun into a rifle ideally suited for chewing out bullseyes. I’d call the Mini-14 Target Rifle accurate any day.

11 Deer Resistant Herbs To Plant This Season

0

Hungry deer can wreak havoc on any garden. They can stomp, chew, poop, and destroy all those precious herbs you worked so hard to prepare. If you live near a forest or large stretches of land, you either have to invest in quality fencing or plant herbs that deer will avoid. It seems like deer will eat just about anything, but there are some plants that they don’t mess with.

Generally, deer avoid most herbs that have a strong flavor, aromatic foliage, silvery-gray color, and/or spiky or poorly textured leaves. This includes rosemary, lavender, thyme, sage, oregano, and tarragon. The essential oils of herbs throw off the olfactory system of the deer and send them looking for other food sources.

However, contrary to popular belief, not all herbs are deer resistant. Deer will sometimes munch on basil and parsley if they don’t have any other green leaves available. Let’s take a deeper look at some of the top herbs that deer will avoid!

Lavender

Shrub of lavender growing with purple flowers. There are many blossoms coming off the stalks of each stem.
Lavender has a powerful aroma and is naturally deer-resistant.

Thanks to its powerful aroma, lavender is a naturally deer-resistant plant. Even when it isn’t flowering, the foliage of lavender has a pungent smell that deer do not like.

Deer don’t usually eat lavender due to a terpene called linalool that makes the lavender taste too strong for their liking. This essential oil is also found in many of the Mediterranean herbs below, including oregano and thyme.

Plant lavender along the margins of your vegetable garden as a companion plant. The camphorous smell of the leaves and the floral aroma of the blooms can help deter deer (and other pests) from eating your crops while simultaneously attracting beneficial insects.

Rosemary

Rosemary growing between rocks in the garden. There are other shrubs growing behind the rosemary bush and rocks at the base.
This hardy shrub will keep deer away.

Another drought-tolerant Mediterranean favorite, rosemary is repulsive to deer. The potent aroma of rosemary can help mask the smell of other plants they may be seeking, like your freshly-sown lettuce or fruiting tomatoes. Deer also dislike rubbing against the rosemary plant because of the essential oils that can rub off on their fur.

Like lavender, you can plant rosemary around the perimeter of your garden as a “deer shield.” It also works great when placed near the entry gates to your property or anywhere you suspect deer are regularly passing through.

Sage

Sage growing with a silvery sheen to the leaves. There are many stems with dozens of leaves visible up close.
Garden sage is a natural deer repellent.

Sage plants are among the most popular deer-resistant ornamentals because they offer a diversity of floral colors along the margin of a woodland. This popular herb is actually part of the Salvia genus, which includes hundreds of varieties.

From white sage to Russian sage to blue sage, all of these shrubs produce beautiful booms and aromatic leaves that repel deer. As a bonus, the leaves have a wooly or fuzzy leaf texture that hungry deer do not want in their mouths.

Oregano

Oregano growing in an herb garden and is healthy ready for harvest. The plant is growing in bunches next to one another in a small clump.
The essential oils in the oregano plant will help keep deer away.

Oregano contains two strong essential oils called carvacrol and thymol. When the fragrance of this herb hits a deer’s nose, it often sends them off in the other direction. Like rosemary, deer really hate rubbing up against oregano or stepping on it.

Thanks to its insect-repellent properties, oregano also makes an excellent vegetable companion plant. It doesn’t mind partial shade and can be interspersed in a drought-tolerant garden alongside the Mediterranean herbs described above.

Thyme

Thyme plant in the garden. It is blossoming at the top of the plant with purple flowers in the springtime. There are rocks in the background blurred out.
This low-maintenance herb can thrive in just about any type of soil.

Thyme is an extremely low-maintenance herb that thrives in poor soils without much fertility or water. As an herbaceous perennial deer barrier, thyme’s fragrant leaves are not appetizing to deer. When blooming, the strong smell of the flowers can also repel deer.

Use creeping thyme as a ground cover around your garden beds and it may prevent deer from walking in.

Lemon Balm

Lemon Balm growing with vibrant green leaves. There are many leaves clustered together during the spring growth season.
Lemon Balm has many uses in the garden and will help keep deer away.

Known for its delicious tea-making capacity, lemon balm is not quite so tasty to deer. The animals have an aversion to the fragrant leaves and flowers of this herb.

Lemon balm is a perfect low-growing border plant to keep deer out of your garden. However, it can be slightly invasive in some regions, so plant wisely.

Mint

Mint plant growing low to the ground. The plant is healthy and ready to be harvested. There is dirt visible under the plant at the base.
Mint is another herb with a pungent smell.

You will notice that all of the above herbs belong to the mint family (Lamiaceae). Mint and its relatives are the backbone of a deer-resistant herb garden.

Peppermint, spearmint, pennyroyal, ginger mint, and any other variety of mint can easily be added to the blend to add olfactory shock value to your local deer noses.

Grow mint in great abundance around the borders of your garden, but avoid planting it in your garden beds. Mint is a natural spreader that can out-compete your vegetables. However, it makes great ground cover in moist, partially shaded soils along a forest or grassland border.

Chives

Chives growing with purple flowers on top. The garden bed is made of dark brown wood and has several plants growing inside of it.
Chives have a strong smell and can help keep deer out of your garden.

The evergreen, herbal, and floral fragrances of mint-family herbs aren’t the only smells that deter deer. Chives are a perennial onion-family (Amaryllidaceae or “alliums”) herb that turns away deer as well as aphids and Japanese beetles.

Because of the strong taste and onion-y smell of chives, you can reliably plant them out in the open. They make a delicious garnish for meals and a low-maintenance, cold-tolerant ornamental.

Be sure to plant perennial chives, not annual green onions. Both are deer-resistant, but the perennial chives will grow as a clump that comes back year after year.

Dill

Dill with yellow flowers growing in garden. There are many small yellow flowers in full bloom atop of the stalks of the dill plant.
Dill has a strong aroma and taste, which help to repel deer.

Any gardener who loves pickles needs to have a self-seeding dill patch. This resilient herb is smelly and strong tasting, which makes it yet another deer-deterrent.

Sometimes known as dill weed, both blue-green foliage and yellow umbel flowers of dill have a distinctive fragrance. The plant can naturally spread into small patches and remains biennial in zones 2-8.

You can grow dill in your annual garden beds or alongside perennial herbs. While you repel deer, you also get yummy pickle flavoring!

Horseradish

Horseradish growing in garden on the ground in moist soil. The soil is rich and fertile, and the plant is ready for harvest.
Horseradish has a spicy smell, which will keep deer way.

Deer avoid horseradish at all costs. The spicy aroma of this perennial Brassica keeps most pests away. The large bushes look like weedy dock plants but smell strongly of mustards. Deer avoid the foliage as well as the spicy roots.

Tarragon

Tarragon growing in garden on the ground of an herb garden. The plant is growing and has many green leaves shooting off each stem.
Tarragon has a distinctive smell that deer will stay away from.

Whether it’s Mexican or French tarragon, this herb has a distinctive anise smell that deer strongly dislike. They tend to avoid eating or stepping on the plant.

These 18-36” bushes can be grown as perennials in zones 4 and warmer. The licorice flavor is surprisingly delicious as a garnish on chicken, fish, or vegetables. Thankfully, deer don’t find it nearly as appetizing as we do.

If you have pets, keep in mind that tarragon oils can be toxic to dogs, cats, and horses. Most animals avoid the plant anyways.

The 5 Fastest Rifle Cartridges in 2022

0

We will be looking at rifle cartridges that have a velocity of over 3,500 feet per second. There are not many of these out there. That’s because rifle cartridges aren’t the most effective mechanisms for creating high projectile speed.

If you really want to see fast projectile speed, there are a few examples. A depleted-uranium penetrator rod fired from a 120mm smoothbore main gun on the M-1 Abrams tank can go as fast as 6,000 fps. Then there’s the Navy’s Rail Gun, which uses electric current to accelerate projectiles up to 8,000 fps.

Keep in mind that velocity also produces a lot of recoils and also puts a strain on the projectile itself. There needs to be a balance between the force behind the shot to the durability of the brass cartridge as well as your shoulders. Then, there’s also the barrel durability to consider. If your ordinary rifle cartridge goes up to 8,000 fps, then it would either break apart the moment it leaves the barrel, breaks the barrel, or dislocates your shoulders from the recoil.

With that in mind, it’s already a significant achievement for rifle cartridges to breach that goes faster than 3,500 or even 4,000 feet per second while still being safe for the shooter. We’ve pretty much achieved peak velocity in 1935 when the .220 Swift reached 4,110 fps with a 48-grain bullet.

Nowadays, you can get a Swift that can top 4,300 fps without blowing itself up. Other than that, only a few cartridges can go up to 4,500 fps. To this day, no rifle cartridges managed to breach 5,000 fps. I suspect that it wouldn’t happen unless we’ve developed new bullet or gunpowder technology, or that we use something else other than gunpowder and bullets.

Consider subscribing to our channel if you haven’t already for more content like this. Without further ado, let’s get into it.

1. The .220 Swift

Winchester came up with the .220 Swift by trimming down the neck of the 6mm Lee Navy. Not many people know of this cartridge since it only served briefly in the U.S. Navy and Marine Corps with its straight-pull M 1895 rifle. Neither the gun nor its cartridge found success and they were ditched in favor of the .30/40 Krag-Jorgensen, which u nfortunately did not remain in service for long either.

The case is definitely large for a .22 centerfire and it is also semi-rimmed. To produce the Swift, Winchester had to design bullets that can withstand extreme speed, which is harder than you may think. I’ve seen the lead cores of some Swifts melting into liquid moments before hitting the target. Sometimes, the bullets would vaporize soon after leaving the barrel. That’s the kind of stress bullets are subjected to at such extreme speeds.

In addition, the speed also causes significant wear on the barrel itself. To fix this problem, Winchester turned to stainless, but then found out that it’s not possible to blue stainless steel. So they opted to iron-plate the tubes first, then blue them.

Unfortunately, the Swift was not well-received. You can thank certain gun writers for that since they labeled it as unnatural, creepy, and even dangerous. They went on to talk nonsense about it. Despite the tarnished reputation by the media, the Swift managed to survive for the simple fact that it is very accurate, fun to shoot, and does not have any more problems than other cartridges.

A 50-grain bullet can reach 3,900 fps. A 40-grain might be able to reach 4,300. If you want to down a big game in a shot without feeling much in the way of recoil, I believe 60-70-grain bullets will suffice.

2. The .257 Weatherby Magnum

This cartridge is also an ancient round, similar to the Swift. Despite its age, it has been holding up pretty well. It was designed by Roy Weatherby in 1944 and was put up for sale just a year later. Among the entire line from Roy, this one is his favorite. When people called upon to cite the virtues of hypervelocity, Roy pointed to this cartridge.

The .257 Weatherby Magnum is based on the H&H Super 30 and it is normal for all Weatherby Magnums to have very little body taper, a sharp and radiused shoulder, and plenty of powder capacity. This cartridge definitely packs a punch. Back then, Weatherby rifles used to have 24-inch barrels and with 87-grain Hornady bullets, you can expect the velocity around 3,750 fps.

If you’re thinking that this is too much for varmints, then you would be right. This would pulverize small critters. So, the .257 is best used on big game at long range where this cartridge excels. I have the best experience using 115- and 120-grain Nosler Partitions, which have a velocity in the neighborhood of 3,400 fps. Despite the velocity, the recoil is surprisingly light, especially when you think how much powder is in there. That said, the noise would be severe and the barrel life would be quite short.

3. The .30/378 Weatherby

So far, I’ve been discussing cartridges that fire only light bullets. This one deals in slugs that are 180-200 grains or more. The start of its career is quite strange as well. It all started in 1959 when the Army asked Roy Weatherby to put together a single rifle/cartridge combination so they could test the effect of hyper-velocity metal fragments on armor to mimic exploded artillery rounds.

Weatherby came up with a smoothbore rifle and he necked down his .378 round to .30 caliber. With these, he managed to achieve 5,000 fps. Of course, words of this terrifying firepower got out and the .30/378 immediately became popular. In 1996, Weatherby made it a production cartridge and it is one of his most popular rounds to date. He loads a wide variety of ammo for it. The 165-grain Barnes copper bullet can reach the velocity of 3,450 fps and the 220-grain Hornady ELD-X could reach up to 3,050 fps.

Of course, this amount of firepower is only suitable for the big game at extreme distances. Prudent hunters would choose to go with the heaviest slug possible since it would retain the most velocity over the distance. Weatherby puts a 26-inch barrel to its rifles in this caliber, so you can’t go any shorter than that. Also, you must use a brake.

Also, only use this cartridge when your target is at least 400 yards away. The further the better. Any closer than that and the damage would be horrendous. Ear protection is a must, even when hunting. The barrel life is also short, with some shooters reporting that theirs lasted as little as 600 rounds.

4. The .224 Clark

If you look at pure performance, this cartridge shouldn’t be on this list since its velocity is only 3,550 fps. However, I feel it wouldn’t do it justice considering that the Clark was designed in the early 60s. It managed to achieve that velocity with 80-grain bullets, so this is a cartridge that is at least five decades ahead of modern long-range loads such as the .224 Valkyrie. The Valkyrie achieved the same speed with 90-grainers.

The .224 Clark was the masterpiece made by a gunsmith named Kenneth Clark from Moderna, California. He figured out that initial velocity isn’t everything, but rather the retained speed downrange. He knew this half a century before everyone else. So now, you have .223 shooters who are required to use 77-grain bullets for mid-range targets at around 600 yards.

Clark then selected the .257 Roberts case, blew it out, and gave it a 30-degree shoulder. He then designed his own 80- and 82-grain bullets. The best rate of twist was 1-9, which is incredibly fast. Understandably, this puts a lot of stress on the slugs. To fix this problem, Clark built them strong and came up with a double jacket for heavier slugs, because he knew that people would use this for the big game.

The .224 Clark worked well, but it never became that popular and it eats through barrels quickly as well. Nonetheless, it is definitely a cartridge that is way ahead of its time and is worth mentioning in this list.

5. The .22 Eargesplitten Loudenboomer

If you want to go hard, then this is the best option for you. The .22 EL was created in the 1960s by a gunsmith named P.O. Ackley. His goal was to create a cartridge that can achieve 5,000 fps. It was the apocalyptic .378 Weatherby Magnum necked down to .224, with pretty much no other changes made.

Then, Ackley shipped the .22 EL rifle off to Bob Hutton who operated Hutton’s Rifle Range in Topanga, California. He did all the rifle testing for Guns & Ammo magazine in the 60s. Bob’s range was located in a box canyon, so he could make as much noise as he wanted. He would definitely be called in for questioning nowadays if someone hears the ruckus he was causing. With 50-grain bullets, Bob managed to hit 4,600 fps, but could not quite breach that 5,000 fps barrier. It is possible that we could make it using ultra-slow powders today.

The Perfect Arrow-Broadhead-Vane Build For Turkeys — Plus A Little More

0

Bowhunting longbeards with a bow and arrow is challenging enough; make it easier by choosing the right arrow, broadhead, and vane combo.

by Jace Bauserman

Wild turkeys may be tailored to be shot in the dome with a load of #5s, but they are fun to chase with archery tackle. Not to mention, in many states, stick-and-string toters get the first crack at these springtime butterballs. Tags, even for non-residents, are affordable, and generally, there are no preference or bonus points needed to hunt turkeys.

The main reason I love chasing these birds with a bow is the challenge. Calling a wild turkey into bow range is no easy job, and once that bird reads the script and falls for the blind-and-decoy, bow-mounted decoy, or outside-the-blind ambush, your accuracy has to be exceptional.

I don’t have the data, but I’d argue that bowhunters lose more turkeys each spring than most all other game animals combined.

Why?

The margin of error is minimal, and bowhunters take too long shots on a tiny target with hard-to-decipher vitals. Precision is paramount when hunting wild turkeys, and you want an uber-accurate arrow with some weight to it tipped with a large, expandable broadhead.

For the past several years, my go-to for archery turkey hunting has been Easton’s 4mm Full Metal Jacket, AAE Hybrid 23 vanes, and SEVR’s Titanium 2.0 broadheads.

Let’s discuss my arrow choice first. No, you don’t need a micro-diameter arrow to bowhunt turkeys with; I filled my quiver with Easton’s 5MM FMJs for years. However, I like the 4MM for big game, and I don’t believe there is a more accurate arrow on the planet. The 4MM cuts the wind like butter and tracks seamlessly behind a large-cut expandable, reducing friction as it passes through the target. Weighing 482-grains, my Hoyt VTM 31, set at a draw length of 29 inches and a draw weight of 65 pounds (for turkeys), pushes these arrows at 274 fps. When you crunch the numbers, that’s 80.34 foot-pounds of kinetic energy, which is enough to blow through a moose, let alone a turkey. Plus, when you shoot a heavy, micro-diameter arrow, you get exceptional accuracy, penetration, and tranquil arrow flight.

Now for my broadhead, SEVR’s Titanium 2.0. Make no mistake; there are some great broadheads on the market, and if you don’t run a SEVR, OK, please just don’t thread a fixed blade into your arrow’s insert when turkeys are on the menu. Turkeys are thin-skinned and have hollow bones, and with a kill zone that’s a little smaller than the size of a softball, a large-cutting expandable can clean up an errant shot. You want your broadhead to cause as much damage as possible.

Yes, those dense dark feathers can clog up a broadhead and seem like armor, but remember, you don’t need a ton of penetration to kill a turkey. I often prefer it if I don’t get a complete pass-through so the broadhead can stay in the bird and cause increased trauma. You want to cut a large hole, and because SEVR blades pivot as they pass through the animal, it’s more difficult for all those feathers to gum up on the blades. With vented fixed-blade broadheads, you’ll get loads of feathers pulled into the vents halting penetration, and you don’t get a large wound channel. If my life depended on killing a turkey with a bow and arrow and having that turkey expire within seconds, I’m shooting an Easton FMJ 4MM or 5MM tipped with a two-inch cut SEVR.

I geek out about making my arrows. There’s a sense of satisfaction that comes from it, and it gives one the knowledge they are making the most accurate arrow for their set-up. Shooting expandable broadheads, we don’t need to go down the straight, offset, or helical fletch rabbit hole. Bowhunting turkeys should be a close-range game, reducing the importance of the fletch number or orientation. What matters, though, is the fletching style. I want a low-profile fletch to steer my arrows with excellence and not grab a pile of feathers should the arrow pass through the bird. Tall vanes that are super stiff tend to collect massive globs of blood-soaked arrows. I also want a fletch system that welds the fletch to the arrow-like cement. If the fletch-to-arrow bond is weak, the nose of the fletch will lift, and gobs of feathers will slip in under it.

My fletch go-to, not only for turkeys but for all animals I bowhunt, is AAE’s Hybrid 23 vanes. Each vane measures 2.30 inches in length, has a height of .38 inches and weighs 5.7 grains. AAE’s Plastifletch “Lick & Stick” material with a factory-applied activator ensures great bonding when used in concert with AAE’s Maxweld Primer Pen and Max Bond Arrow Glue. The vane’s base is well-built, and I love the stabilization ridges that run horizontally along the vane. These ridges increase ease of fletch, boost durability, and aid in accuracy.

I’m always on the fence when it comes to lighted nocks. There are some good ones on the market and some poor makes. When shooting 4MM arrows, I usually avoid them as the ones I’ve shot snap easily where the nock and arrow meet. The X-size nock from Nocturnal, which would fit an Easton 5MM arrow, does work well, and I like how well the lighted nock shows up against a bird’s dark feathers. I’m more confident of my arrow’s impact when shooting a lighted nock.

Now for a little bonus section. One of the questions I get most is: “Where do I shoot a turkey with an arrow?” Great question. However, it depends on the bird’s position. Here’s my where-to-shoot a springtime noisemaker guide:

  • Broadside – Whether the bird is in strut or not, divide his body into thirds. You want to be in the middle third and, if anything, toward the top of that third. Hit a tom low, and you’ll watch him go. My broadside aiming point is about two inches back from where the wing butt disappears into the body. Hit the bird here, and you get all the goodies.
  • Quartering Toward – A quartering-toward shot is complex, and I typically wait for a full-frontal. However, if this is your shot, I try to put my arrow into the wing butt or slightly in front of it, about two inches to the quartering side of the bird’s beard. This will break the wing at the joint and give your arrow a good angle to catch other vital organs. Again, stay in the top third.
  • Quartering Away – As with big-game animals, this shot is money. Remember to stay in the middle third, come up the back leg, and let your pin find the distinct line behind the wing and below the tail fan. This happens when the bird is in strut. Slide your arrow in this spot, and it’s game over.
  • Full Frontal – This is my favorite shot on a turkey. Yes, it’s more marginal, but I know that if I do my job and execute it, it’s 100 percent lethal. Let your pin settle above the bird’s beard and start pushing and pulling.
  • Facing Away – Take the Texas heart shot. You want to put your arrow right at the base of the fan feathers. If the bird isn’t in strut, hit him right in the middle of the back, halfway up the body.

TIP: One of the best tips I can give to solve the “where” to shoot a turkey with an arrow conundrum is to get a 3-D target like Delta McKenzie’s Strutter Turkey. The target is inexpensive, and you can turn the full strut tom to any angle to improve your practice sessions.

Bowhunting turkeys is super enjoyable and highly addictive. Heed the advice in this article, and you’ll bag more birds with archery gear this spring.

The Best Wading Jacket for You

0

The rain was coming down by the bucket and I huddled under a pine tree, praying that I wouldn’t get too wet. My proprietary waterproof system had utterly failed, and I wasn’t too surprised. An old ski parka layered on top of a fleece vest wasn’t exactly the bastion of water-repellence technology I hoped it would be. As a result of being wet and cold, I was missing out on the fishing—for golden trout, of all things! If you’ve ever fished for golden trout before, you know getting to them is half the battle.

It was on this trip that I learned the real value of a solid wading jacket, and I resolved to buy a nice one after getting out of that downpour. The problem I ran into, though, was how to pick the right one for me. I wasn’t sure where to start, and the reviews of wading jackets at the time didn’t exactly clear things up for me.

That’s what I aim to do with this piece. We’ll dive into some of the features you should look for in a wading jacket, as well as some factors to consider that will likely influence your decision. As always, we’ll end with a list of wading jackets that I’ve either personally used myself or had recommended to me by anglers I know and trust.

Consider the conditions

The first thing to consider when looking for the best wading jacket for you is the conditions it’ll most likely be used in. Since I live and fish mostly in the Rocky Mountains, I don’t need a bombproof rain jacket like my buddies in southeast Alaska use. They’re in the rain more often than not. I rarely face conditions that tough.

You can quickly spend a lot of cash on wading jackets if you opt for the ultra-premium steelheader-deluxe models. While those are nice to have, they’re far from necessary for the fishing I do. There’s a fine line between being prepared and preparing for a disaster that won’t ever happen.

Keep it warm

I’m a firm believer in layering for any outdoor activity, and fishing in the rain is no exception. I prefer a rain shell over an insulating layer, as that’s what keeps me most comfortable on the water. I’m sure plenty of anglers agree with that.

But do you? That’s the key here. If you want a do-it-all wading jacket that both keeps you dry and insulates, go for it. Don’t let one person’s opinion talk you out of picking a piece of gear you know you’ll enjoy.

Packability

Finally, my favorite wading jackets are packable. They’ll squeeze down and fit in a backpack, under the seat in a drift boat, or anywhere else where they’re out of the way. A good packable wading jacket should be light, too, so that carrying it around all day if the forecast calls for rain doesn’t become an inconvenience.

So with all of these features in mind, let’s take a look at the wading jackets I’d personally recommend.

Skwala RS Jacket

  • Insane build quality
  • Thoughtful design
  • Light and packable

The Skwala RS Jacket is the standard to which I personally measure every non-insulated wading jacket. Yes, Skwala is a new company, but their products are among the best on the market. What makes the RS Jacket stand out is its insanely high build quality and attention to detail. The RS Jacket is designed a half-size larger to fit over an insulating layer and your waders, so you don’t have to worry about this jacket being a tight fit. The pull tabs for the jacket’s hood are located inside the chest pockets to eliminate anything that might potentially catch fly line. And this thing will hold up to the worst downpours imaginable. It also helps cut the wind, and is extremely well-articulated, so it doesn’t bunch up when you’re hiking, rowing, or casting. What more could you ask for from your wading jacket?

Simms Bulkley Insulated Jacket

The Best Wading Jacket for You

  • Insulated for added warmth
  • Fly box friendly pockets
  • GORE-TEX lined

The Bulkley Insulated Jacket is Simms’ answer to the worst weather conditions imaginable. Seriously, this thing is bomb-proof. For starters, it’s lined with GORE-TEX both inside and out, which Simms says will keep you dry even if you’re wading in past your belly. The PrimaLoft insulation is proven to keep you warm, and Simms engineered the sleeves to prevent water from flowing up them even if you stick your arm in the river. The pockets are designed with fly boxes in mind so you’ll always have what you need within easy reach. If the ultimate in both warmth and waterproofing are what you’re after, the Bulkley is hard to beat.

Orvis Clearwater Wading Jacket

The Best Wading Jacket for You

  • Very breathable
  • Rear D-ring for net attachment
  • Lots of pockets

The Orvis Clearwater Wading Jacket offers a ton of features in a more budget-friendly price range. I’m particularly fond of the integrated D-ring for attaching a net, which removes the need to wear a full fishing pack with this jacket. It’s designed to slip over the top of all your gear, freeing you up to move unencumbered while on the water. The Clearwater also features a three-layer nylon shell that’ll keep you dry but offers superior breathability, as well. Add on the legendary Orvis quality and you’re looking at a wonderful wading jacket.

Frogg Toggs Ultra-Lite Jacket

The Best Wading Jacket for You

  • Incredibly light
  • Cheap
  • Completely waterproof

This jacket from Frogg Toggs costs a whopping $24.99, and it’s one of my absolute favorites. This thing is light, and packs down tiny. It’ll fit in a day pack without any problem. But it’s also completely waterproof, and does a decent job of retaining some of your body heat. Now, this is a no-frills jacket, intended only to keep you dry. You’re not getting a slim, well-cut hood, or articulated sleeves. What you’re getting is the best bang-for-your-buck rain jacket on the market, and one I used for years before getting a wading jacket that had a few more features.

Patagonia Swiftcurrent Wading Jacket

The Best Wading Jacket for You

  • Made from recycled nylon
  • Low-profile pockets
  • Snag-free design

Patagonia’s Swiftcurrent Wading Jacket is just another excellent entry in the company’s line of fantastic gear. This wading jacket places an emphasis on reducing or eliminating the possibility for your fly line to snag on it, which is a feature many anglers should appreciate. The fully-waterproof shell is made from 100-percent recycled nylon and it has plenty of pockets for storing fly boxes and all your terminal tackle. The jacket only weighs a hair over 22 ounces making it extremely light and easy to stuff into a day pack.

There are tons of wading jacket options on the market, and this list is only intended as a jumping-off point. Remember to carefully consider what features you do and don’t need. Something minimalist like the Frogg Toggs might be perfect for you while your buddy may need something with all the pockets and hemmed hoods.

Regardless of what you choose, make sure to take care of the jacket so it takes care of you when you need it most.

White Oak vs. Red Oak Trees: What Are the Differences?

0

If you ask anyone to name a tree off the top of their head, oak is likely to be one of the most common answers you’ll hear. Oak trees are fairly common in the United States, and we use them for a ton of different purposes. However, many people don’t know that oak trees aren’t all the same. In fact, oak includes a large assortment of different tree species that vary quite a bit from one another. The United States is home to over 60 distinct species of oak trees alone.

You don’t need to get extremely granular with oak tree species if you don’t want to. Oak species generally belong in one of two major categories: white oak trees and red oak trees. If you enjoy oak trees and want to consider them for your own yard or landscape, you should know what you’re getting into with both white and red oak trees. So what are the differences are between white oak vs. red oak trees? Get a better idea about which one is perfect for you with the following information.

White Oak Overview

The oak trees we classify into the white oak family are usually distinguishable by their size. White oak trees can grow into massive specimens if left to their own devices. They produce many acorns, which help feed a wide variety of animals. They also provide shelter for animals. The average white oak tree usually ends up somewhere around 80 feet in height and tends to be almost as big as its height in the total width of its branches.

White Oak Appearances

As you might guess, white oak trees have a lighter wood color than red oak varieties. The bark tends to be ashier in color, and you can also characterize a white oak tree by how rough its bark is. White oak tree bark has very deep ridges that many people find attractive for their yards. In contrast to their rough and coarse bark, white oak tree leaves don’t boast any sharp angles. The leaves instead have more rounded tips.

Pros of White Oak Trees

There are plenty of benefits to owning a white oak tree. Their massive size is a draw for lots of people who enjoy larger trees. Their sizes reflect their long lives as well. Many white oak species have extremely long lifespans and can survive for centuries as long as nothing terrible happens to them. Many people also prefer white oak trees because of their gorgeous coloring during the autumn months. In terms of care, white oaks are highly resistant to drought, and they also have a high resistance to rot and disease.

Cons of White Oak Trees

There aren’t too many cons to worry about with white oaks, but the ones that exist are worth going over. Buying a young white oak tree is perfectly fine, but it’ll grow very slowly as a reflection of its extensive lifespan. You may not see your oak tree fully grown in your life if you buy it when it’s still a sapling. More mature white oaks’ imposing sizes can also make them a hassle to transplant should the need ever arise.

Red Oak Overview

When you compare them to white oak trees, red oak trees aren’t quite as towering in size. They certainly still make a statement, as they can grow up to about 75 feet. However, many usually finish growing around 60 feet instead. Also, their branches don’t stretch as far out laterally, giving them a skinnier and leaner appearance. Red oaks can survive quite well in different soil types, even highly compacted soil. They also help feed and provide adequate shelter for critters of all shapes and sizes.

Red Oak Appearances

The appearance of a red oak is almost completely opposite to that of a white oak tree. Red oak trees tend to be much darker in coloration. The bark on a red oak is also much smoother than its white oak counterparts, with very few deep ridges to find at all. As the name suggests, it isn’t rare to see a deep red tint in many of the species’ woods. Furthermore, red oak trees have much pointier ends on their leaves compared to the rounded edges of the white oak leaves.

Pros of Red Oak Trees

If you want an oak tree that you can watch quickly grow, you’ll prefer a red oak without a doubt. These trees can gain more than two feet in a year. While you won’t get as large of variety of colors in their leaves during the autumn months, red oak leaves do turn a very attractive shade of red before they fall. Additionally, red oaks can stave off the effects of many sources of pollution, and they’re much easier to transplant somewhere else when compared to white oaks.

Cons of Red Oak Trees

Some people may consider the smaller size of a red oak to be a con that they can’t budge on. In the eyes of many individuals, they aren’t quite as majestic as fully grown white oaks. Getting the right amount of water for a red oak can also be more of a balancing act than it is for a white oak tree.

Major Differences Between White and Red Oak

Let reflect on the main differences between white and red oak now. These are the factors that will probably sway your choice.

  • Leaf shape: White oaks have soft, rounded edges on their leaves, whereas red oaks have a more striking and pointy leaf shape.
  • Size: White oaks grow to be much larger than red oaks. The former reaches up to 80 feet, while the latter rarely ever goes above 70 feet.
  • Growth rate: White oaks grow much more slowly than red oak species. Red oaks can grow multiple feet in a single year.
  • Bark texture: White oak trees have bark that features a much rougher texture than red oak trees.

Now you have a better idea of the differences between white oak and red oak trees. Therefore, you can make a better decision when you find oak trees for sale. Plant Me Green provides customers with both types of oak trees. And we ensure that we only sell the highest quality trees in terms of health and longevity.

Marlin Vs Swordfish Vs Sailfish: What’s The Difference?

0

If you’re looking for a one stop shop to answer all things billfish, you’ve come to the right spot. Fishing for these beasts of the deep is among the most exciting things you can do on water.

While they may look similar to the untrained eye, there are a few major differences between these species that make all the difference when trying to hook one up. Below, we share everything you need to know when putting these species head to head- whether marlin vs swordfish or sailfish vs marlin, we’ve got you covered.

cancun sailfish

A beautiful sailfish from Captain Travis’ Cancun sailfish fishing trip.

Marlin vs Swordfish vs Sailfish: What is a billfish?

cabo san lucas marlin fishing

Marlin, Swordfish, and Sailfish are all Billfish

Up close and personal with a blue marlin from Captain Jim’s Cabo San Lucas marlin fishing trip

Billfish are some of the most advanced species on the planet. Highly migratory, billfish spend their lives in a constant state of movement, making their way from to tropical breeding grounds in the winter, and back to subtropical feeding grounds in the summer. They are located in every ocean, and some have even been tracked swimming across the entire Atlantic.

All billfish, whether swordfish vs marlin vs sailfish, have the iconic “sword” coming off the front of their body. Also called a rostrum, they use it to slice and stun their prey, making for an easy snack when they circle back around to finish the job. All billfish have advanced swim bladders that allow them to change depths rapidly without exerting a ton of energy. Some species like swordfish frequent depths around 1,500 feet deep during the day time, so it’s important have a good knowledge of the water column when fishing for them.

Where can I catch billfish?

All billfish reside in deep water. A good place to start is close to the edge of the continental shelf – the place where the relatively shallow water around land drops off into the deep blue abyss of the open ocean.

They frequent the continental shelf drop-off where ocean currents upwell nutrient rich water. These areas contain high concentrations of baitfish, and the billfish are all over them. You can also find them closer to shore around underwater seamounts and other seafloor features that attract schooling baitfish.

The migration patterns of billfish rely greatly on water temperatures. They’re able to anticipate the seasons and make the move to better feeding and breeding grounds depending on the time of year. Based on location, season, and proximity to ocean currents lets experienced billfish anglers predict their location with sometimes pinpoint accuracy.

matagorda marlin fishing

A “grander” blue marlin caught in the Gulf of Mexico far offshore from Matagorda on Captain Clayton’s overnight fishing trip

What are the differences between Marlin vs Sailfish vs Swordfish?

Understanding the differences between these apex pelagic ocean predators is the key to knowing how to catch them. While they’re all relatively similar in appearance, the behavior is often their most defining feature.

Marlin vs Sailfish vs Swordfish

kona blue marlin fishing

Marlin

A gorgeous Kona, Hawaii blue marlin caught on Captain Shawn’s sportsman’s trip

Marlin are widely regarded as the most prized gamefish species in the ocean. The largest species is the black marlin that resides in the Pacific and Indian Oceans, and can reach lengths of 15 feet and weigh over 1500 pounds. In the Atlantic, blue marlin are king, reaching lengths up to 13 feet and weighing over 1300 pounds.

The main defining features of a marlin is its dorsal fin. The fin is smaller than the other species of billfish, and connects to the spine along a soft ridge. Their bills are often shorter and more rounded than the bill of a swordfish or a sailfish.

Fishing for marlin generally means taking a boat ride out to the continental shelf or beyond. In some locations like Cabo and Hawaii, this could be a short boat ride. In other places like Texas, this could mean an overnight trip.

The best marlin lures are those that create a lot of disturbance in the water when trolling. This typically takes form of a large plastic bulb with a silicon or rubber skirt like a squid’s tentacles. Marlin are highly aggressive predators, and even the vibration and noise from the boat can attract them to your lure.

Swordfish vs Marlin vs Sailfish

key largo sailfish

Swordfish

Swordfish are another highly sought after gamefish from the depths. They are easily identified by their dorsal fin, which protrudes up from their spine almost like a shark’s. Their bill is also the longest in proportion to their body out of the other billfish.

Swordfish can reach lengths of 15 feet, and weigh over 1,400 pounds. They can tolerate a much larger temperature range than the other billfish, allowing them to dive to depths of 10,000 feet under the ocean’s surface.

Swordfish descend much deeper than other billfish species, often spending their days in waters around 1800 feet, and ascending into shallow water to feed during the night. If targeting swordfish during the day, a common technique is “deep dropping”. Deep dropping for swordfish can be done on conventional heavy tackle, using a variety of squid-like lures, but the use of electric reels has been growing in recent years. Deep dropping involves dropping your lure down to extraordinary depths, and the assistance of an electric reel helps a lot when reeling in thousands of feet of line.

Sailfish vs Swordfish vs Marlin

costa rica sailfish fishing

Sailfish

Sailfish are generally considered the most accessible of the billfish species, depending on your location. If the ride out to the continental shelf is too long, you can target sailfish a bit closer to shore. This is a main difference in blue marlin vs sailfish for example: blue marlin are usually found much further offshore.

They are characterized by a large dorsal “sail” that runs the entire length of their back. The swordfish is the only billfish that’s been observed hunting in groups, using their large sails and bills to herd prey into a “bait ball”. They then take turns darting in and out of the ball, scooping up the bait stunned by the bills of the other sailfish.

Catching sailfish is mostly done in the same manner as marlin fishing. The vibration of trolling plugs behind the boat mimics the disturbance of injured prey, and the sails attack them ferociously. Another one-of-a-kind technique is kite fishing. A kite is attached to a reel or an outrigger and released behind the boat. A lure (bait or artificial) is rigged to the kite and skates along the surface of the water mimicking a sailfish’s favorite snack – a flying fish. Once the sail bites, the line disconnects from the kite, and you’re ready to start reeling.

Looking for a swordfish, sailfish, or marlin fishing trip?

venice swordfish fishing

A trophy Louisiana swordfish caught on Captain Chandler’s Venice trophy hunt trip

Experienced guides have all the gear and experience you need to catch the billfish trophy of a lifetime. A good rule of thumb for gauging the possibility for catching billfish on a charter is how far offshore you’re going, the time of year, and location. If you’re looking to plan a billfish trip, contact us and we can recommend the best location and guide for the season.

Best Air Rifle Deals

Popular Posts

How to find Best Scope for your Break Barrel Air Rifle?

0
Unlock the Perfect Shot: Discover the Best Scope for Break Barrel Air Rifles. Enhance your shooting experience with precision and accuracy, as we delve...

Dry Firing Air Rifles: What You Need to Know

0
"Master the art of precision shooting with dry firing air rifles. Enhance your aiming skills, trigger control, and muscle memory without using ammunition. Discover...

What Is a Break Barrel Air Rifle?

0
A break barrel air rifle is a type of air rifle that uses a break action to load and unload pellets. It is one...