Home Blog Page 159

The 12 Most Expensive Mushrooms In The World

0

most expensive mushrooms in the world title card

[activecampaign form=1]The most expensive mushrooms in the world are rare and hard to cultivate. So no, you aren’t getting them at any local grocery stores. They are sensitive and not easy to mass-produce, driving consumer prices up to exorbitant amounts.

You might recognize some of the fungi listed if you’re a mushroom lover. If not, the good news is that they’re highly nutritious, delicious, and a part of haute cuisine. They are also a growing business opportunity for artisanal farmers and entrepreneurs worldwide.

Mushrooms grow wild in habitats across the globe, can be cultivated by individuals, and are produced by enterprising mushroom farmers in urban warehouses, isolated basements, caves, and under trees on a forested acreage. Maybe you’ll get lucky and find some of these under the most expensive bonsai trees in the world! The demand for “designer” mushrooms is, well, mushrooming! And some of them fetch very high prices.

Mushrooms are the “fruit” of fungi that thrive under certain conditions. They are fast-growing and adaptable and have been used by diverse cultures throughout history. Tens of thousands of varieties of fungi have been identified. But a relatively small number of edible mushrooms exist. In some ways, they are a “super” food, and modern science quickly points out their benefits.

Mushrooms are loaded with antioxidants, minerals, and healthy vitamins. Some have significant amounts of potassium, iron, manganese, Vitamin D, B2, and B6. They are also low in calories and fat and high in fiber and protein.

Mushrooms: Interesting Creatures

In a sense, mushrooms are the ultimate organic foods, in the scientific definition of “living organisms” interacting in the environment with other organisms. Certain mushrooms play an essential role in the natural world because fungi and bacteria recycle the nutrients of dead or decaying matter. They “feed” on wood, leaves, and occasionally insects, speeding the decomposition process.

It’s a complicated, multi-phase process that requires the interaction of a host of variables. Others enhance plant growth by producing the spores that help perpetuate the fungus that nourishes the soil and promotes plant growth. Light and moisture, temperature, oxygen and nitrogen levels, and other physical conditions must be just right for fungi to do their work.

Fungi exist in diverse forms and can live in water, soil, air, or on plant material. What we call mushrooms are just one step in the fungal lifecycle. Although most people consider mushrooms part of the plant world, scientists believe fungi are closely related to animals. In addition to their vital role in the environment, they “behave” differently based on where they exist.

Health Benefits and Medicinal Qualities

There is validity to the claim that mushrooms have health-giving benefits and medicinal value, including alleviating chronic pain and lowering cholesterol. Researchers continue to explore their uses. Controlled studies confirm that some mushrooms can reduce some symptoms and may impact the treatment and prevention of certain diseases.

Mushroom allergies are relatively rare, but anyone sensitive to mold is advised to approach mushrooms with caution. Symptoms can occur not only from ingestion but also from simple skin contact or by inhaling airborne spores of the fungus. Wild mushrooms have other hazards. Some are highly toxic to humans.

Others contain a substance that produces hallucinogenic or psychotropic effects. Certain strains have been used in religious ceremonies since ancient times. Foraging mushrooms in the wild is not recommended for anyone who is not thoroughly trained.

Mushrooms are adaptable, readily available, and may be prepared in various ways. They add flavor and enhance the taste and appearance of other foods. Some have a pungent odor; others taste nutty, fruity, woody, or spicy. Most can be consumed raw, steamed, sauteed, fried, baked, stuffed, or grilled. Mushrooms are available commercially in many forms — fresh, dried, canned, frozen, and sometimes preserved in oil.

Choosing the Best Mushrooms

Mushrooms are not the “perfect food,” but they are good — and they’re good for you! An appreciation for mushrooms transcends cultures and borders, but not all mushrooms are equally prized across the globe.

The first commercial mushrooms were introduced in Paris restaurants in the mid-1600s, but it was not until later that actual mushroom cultivation began. It took until the early 20th century before Dutch growers developed highly effective cultivation methods. Mushroom popularity grew followed, both in Europe and in the United States.

The classic white button mushroom, still known as the “Champignon,” or forest mushroom, is the favorite for gravy and sauces and stir-fry dishes and casseroles.

Even though they go by different names, the three most common varieties are identical. The only difference between the well-known White Button and Cremini Mushrooms is the age. Think of the little white ones as babies that turn a darker tan or light brown as they age and grow larger. They are sometimes also called Baby Bellas.

When Cremini Mushrooms are fully grown -they can grow to have a cap five inches or more in diameter — they are known as Portabella Mushrooms. These big ones are typically dark brown with a smooth cap and dark gills on the underside. All have a firm texture, and the older Cremini have a hearty, meaty flavor.

Rare and expensive mushrooms are distinctive. There are some unique varieties and some that are widely known.

Are Truffles Different From Mushrooms?

Truffles and mushrooms are both fungi’. The biggest difference is truffles are scarcer when compared to mushrooms. You’ll be able to find mushrooms at your local market, but you’ll have a hard time finding truffles.

Truffles grow in very specific conditions, making them harder to cultivate. Due to their rarity, truffles are much more expensive, which you’ll see after reading through this list.

Here are the world’s 12 most expensive mushrooms

Let’s take a look at the most expensive mushrooms and how they are produced around the world. We’ve included truffles in the list as they are mostly the same, the main differences being the size and where they grow. So whether you’re interested in growing mushrooms for profit or just curious, let’s explore these pricey pieces of fungi.

12. Kalahari Truffles

Grown in the Kalahari Desert in Namibia, and known locally as African potatoes, these are pretty cheap, but they still have some of the mystique of their higher-priced “cousins.”

Price: About $4 for a pound

These truffles are lighter brown and have a milder scent and taste than black or white truffles. In addition, they flourish in the sandy landscape and are quickly discovered just by looking for cracks in the sand. There’s no need for pigs or dogs, just a stick to pry them out of the ground in the vicinity of Camelthorn trees. They can be eaten raw, boiled with spices as a side dish, or used in creative ways to flavor meats and vegetables.

During the season, they are widely available at roadside stands, open markets, and on restaurant menus. Truffle butter is full of distinctive flavor, and one restaurant in the country’s capital city features Kalahari Truffle ice cream!

11. Oyster Mushrooms

Typically large, pale grey or pearl white, Oyster Mushrooms are also called Abalone Mushrooms. They have fluted gills and a firm, relatively short stem on the underside. Also available in blue, pink, elm, and gold, they have an oddly alien look.

Price: Retail prices range from about $5 to $15 a pound

Oyster Mushrooms have been sprouting up at Farmer’s Markets throughout the nation and are used in recipes by innovative chefs, particularly in their exotic colors. They are best used almost immediately after harvesting but will last several days if quickly dried. Easy to cultivate, they are one of the best mushroom varieties for novices, and kits for home sprouting are available in large cities or through mail-order companies.

Oyster Mushrooms have a delicate, if alien appearance, with a meaty texture and exciting flavor. Traditional in Japanese, Chinese, and Korean cooking, they are native to forest habitats in Siberian Asia, Northern Europe, and much of the United States.

10. Shiitake Mushrooms

Considered a specialty variety, these are a staple of Asian cooking, but their popularity has now spread to Western countries. They are tan or brown, with caps that are typically from two to four inches in size.

Price: From $12 to about $24 per pound, depending on location.

There are several different varieties of Shiitake, and each has a slightly different texture and taste. The Shiitake is sometimes considered a medicinal mushroom, and it is used both fresh and dried in traditional Japanese and Chinese cuisine and throughout East Asia. Touted for antimicrobial, anti-inflammatory, and anticarcinogenic properties,

Shiitake Mushrooms have a meaty, chewy texture and a pleasing taste that goes well with other ingredients. It is a staple of traditional Japanese cuisine. It is available fresh or dried in many parts of the world.

9. Lion’s Mane

Although it has a sprawling, undefined shape with no cap and no stem, Lion’s Mane looks like a round balloon with long, shaggy “hair” or spines. It is sometimes known as a pompon or Bearded Tooth Mushroom.

Price: Varies widely, from about $8 to $36 a pound.

One of the most other-worldly edible mushrooms, the Lion’s Mane, Hericium erinaceusm, has characteristic shaggy spines that give it a furry appearance. It’s found in North America, Europe, and Asia from late summer to early fall on dead or dying logs. It also is cultivated fairly quickly in controlled environments. It is white when young but can age to a yellow or tan hue.

Lion’s mane was known for its medicinal qualities before being identified as a fascinating edible mushroom. The antioxidant content is exceptionally high and is currently studied for its possible ability to regenerate nerve tissue. The flavor and texture are compared to crab or lobster.

8. Porcini Mushrooms

The highly prized Boletus Edulis, or “King Bolete,” is found in hardwood forests, typically on the ground among hemlock, spruce chestnut, and pine trees. The Italian word for them translates to “piglets.”

Price: Between $55 and $70 a pound, sliced and dried.

Porcini are not easily cultivated and don’t live everywhere, so they are sometimes difficult to find. Known for their oversized caps, sometimes up to 10 inches in diameter, they also have sturdy, fat stems and look heavy. When mature, they can weigh up to a few pounds.

They also have a distinctive hearty, nutty flavor that can be used in many different dishes. Famously found in Italy, they grow in other parts of Europe, North America, and some other countries.

7. Enoki Mushrooms

With long stems and tiny caps, these little clumps of fungi “fruit” are among the most interesting edible mushrooms. They are fun to use in many dishes and have a mild flavor reminiscent of fresh white grape or mild radish.

Price: $108.00 a pound or 25-pound packages for $388.75 by mail order.

One of the more distinctive varieties, Enoki Mushrooms, calls to mind visions of miniature cauliflower or glossy bean sprouts with little white button ends. They have significant nutritional content, with high percentages of niacin and folate, as well as thiamin, potassium, pantothenic acid, phosphorus, and riboflavin.

Enoki is easy to use in stir-fry dishes and soups; the attached ends should be cut off to separate individual strands. Common in Asian cooking, they typically retain their crunch, even when cooked.

6. Chanterelles

A golden Chanterelle almost looks flower-like when spotted on a mossy forest floor. They grow in clusters during hot, humid days following heavy rainfall. Unlike other mushrooms, they can make people sick if not fully cooked.

Price: About $225 a pound, dried.

Chanterelles are easy to identify, with smooth caps and ridges that run down each stem. They are typically found in central Europe and Ukraine, where beech trees coexist with pines. Chanterelles have a light, fruity scent with an almost spicy flavor. The golden variety is highly sought, but other colors are equally tasty. They range from orange and yellow to white.

They appear in late spring but only develop under sauna-like conditions, so they are available only until early autumn.

5. Morels

These expensive mushrooms are like little trolls standing at attention on a forest floor. With a sturdy stem and a ruffled, conical “head,” they also can look slightly comical, even when cooked and served with other foods.

Price: $254 a pound dried; between $30 and 90 a pound fresh.

Dried Morels fetch more per pound than they command when fresh. The dried ones are much lighter. The ruffled cone-shaped head of the Morel is spongy. The mushroom is found in the wild only from March through May. With a nutty flavor similar to Shiitake Mushrooms, they have a more intense, unique taste. Because they are typically small, they are served as a garnish or with an accompanying sauce.

Fresh Morels are not easily cultivated and are not readily available fresh. They can easily be foraged because of their distinctive appearance, but a better alternative is to buy dried Morels for home use.

4. Black Truffles

Because they are highly prized in Europe and challenging to harvest, a “black market” for truffles continues to exist in some areas. Trained dogs have primarily replaced the female pigs traditionally used to root out truffles. It seems the pigs devoured too many pricey mushrooms when digging them up!

Price: Wholesale prices vary from $800 to $900 a pound.

The French Black Perigord, tuber melanosporum, is still primarily a European product, harvested traditionally with the help of trained animals. However, commercial cultivation has been initiated in Australia and the United States because of high demand and long shipping delays.

Tennessee, Kentucky, California, and Oregon producers have met with some success, but it is a costly business. In 2017, more than 425 tons of fresh, dried, and canned truffles were imported into the United States, an increase of 75% from just seven years earlier, according to USDA statistics.

The primary market is for chefs and restaurants. Still, truffles are occasionally available at local markets in the states where they are harvested, just as they are in Europe during the season. New hot markets include Slovenia and Croatia, where truffles and truffle products are highly popular.

3. Matsutake Mushrooms

The Japanese Matsutake is an easily-recognizable little, pale mushroom with a well-formed cap and short stem. It has distinctive gills on the underside of the cap, and it’s appreciated for its spicy, slightly fruity flavor and aroma.

Price: $1,000 to $2,000 per pound

The Matsutake Mushroom has a spicy, somewhat fruity flavor and aroma. Typically it grows under red pine trees in the Tamba region of Japan, near Kyoto. It has traditionally been associated with the beginning of autumn and is considered a Japanese delicacy. However, its habitat is shrinking because red pine forests have been devastated by insects. Cultivation methods have not proved successful for this mushroom. Currently, it is considered to be an endangered species. Because of its rarity, the price is exceptionally high.

2. European White Truffle

Truffles grow underground, usually near the base of oak trees, and are relatively commonplace throughout Europe. Still, they are challenging to harvest, even with the help of truffle-sniffing female pigs or trained truffle dogs. The animals can detect the pungent odor of the ripe mushroom.

Price: Around $3,600 per pound, depending on the harvest and the market.

Truffles are one of the most treasures and rarest food products on Earth. The white truffle has so far resisted cultivation efforts, which is why the price is consistently high.

Interestingly, though, prices for all truffles are lower than two years ago, partially because other European countries are harvesting them more significantly.

Additionally, more locations have begun cultivating the black truffle, which makes it more readily available to chefs and mushroom lovers around the world.

The Italian white Alba, or tuber magnatum pico, still holds the crown as the most expensive truffle.

1. Yartsa Gunbu

The story behind these mushrooms is not very appetizing, but Tibetan men believe ancient texts identify the fungus as an aphrodisiac. NPR has described it as the viagra of the Himalayas Being able to afford it and to eat it even in minimal amounts, is considered a status symbol.

The Yartsa Mushroom Price is $2000 an ounce!

This parasitic fungus infects the bodies of caterpillars with tiny air-borne spores. Once the fungus is inside the caterpillar, it begins eating it alive from the inside. Gross.

The caterpillar dies in a mummified state, in an upright position, at the earth’s surface. In early spring, the fungus will begin growing up, emerging from the caterpillar carcass, to pop up out of the soil

You can harvest the long, thin-looking mushrooms between 3,000-5,000 meters above sea level in the Himalayas and the Tibetan Plateau.

Would you try these mushrooms? Let us know in the comments down below!

5-inch Senko Rigging Guide – Pro’s Choice

0

By TJ Maglio

There are very few baits responsible for more big bass, big limits, and tournament wins than the 5-inch Senko. What Gary created out of a ballpoint pen tube didn’t just change the soft plastics game, it changed bass fishing altogether.

How many bass fishermen catch their first bass on a Senko each year? And if you’ve ever got a true rookie in the boat with you, what’s the first thing you rig up for them?

A Senko no doubt.

The most brilliant thing about Senkos is their versatility. They are equally effective in the hands of top tour pros or the greenest of the green; and whether you’re fishing a mountain lake; lowland reservoir, tidal river, or a farm pond, you’re going to get bit.

Here’s the part where you may be thinking “Yeah; Senkos catch fish, tell me something new…”

What you may not know is that despite the Senko’s pedigree, one of the most common questions anglers still ask us all these years later is “what’s the best way to rig a Senko?”

We all know the truth.

There’s no wrong way to rig a Senko. You can use it cut in half on the back of a tiny Ned head or punch it through a thick mat of hyacinth behind a 2-ounce sinker. It really doesn’t matter much; as long as it’s in the water the bass eat it.

Since the vast majority of anglers realize that; I suspect the real question they are getting at is not “what’s the best way” but rather “how should I rig it?” Meaning what hook, line, rod, reel, etc.

A great way to solve questions like this is to sample a group of experts on the topic; listen to their opinions and then see where you fall. Which is exactly what we wanted to do. We decided to reach out to four of the Yamamoto Tour pros know specifically for their Senko prowess (Brent Ehrler, Larry Nixon, Jimmy Reese, and Jay Yelas); and ask them to break down how they specifically rig Senkos in a couple of the most popular ways (Texas Rigged and Wacky/Neko), so you can get a variety of details on the specifics of what terminal tackle, line, rods, and reels they use to catch fish across the country.

Hopefully these setups will help you narrow down your options as you search for the perfect setup for the way YOU fish!

Texas Rig

Brent Ehrler

Rig: 4/0 Gamakatsu Offset Round Bend, 16-pound Sunline FC Sniper fluorocarbon

Rod/Reel: Daiwa Tatula Elite MPS 7’3”, Daiwa Tatula Elite Reel (7.3:1)

Notes: Brent’s go-to Texas rig is actually weighted, which he likes as it shows the fish something a little different. “That little sinker really changes the fall of the 5-inch Senko. It’s still subtle but it has a really nice spiral on the fall; which bass don’t see a lot.”

Jimmy Reese

Rig: 5/0 Gamakatsu EWG (standard gauge), 12-pound Yo Zuri Fluorocarbon

Rod/Reel: Douglas Rods 7’2” Medium Rod LRS724F, Daiwa Tatula 150 (7.3:1)

Notes: The key to Reese’s Texas rig setup is versatility; and he keeps it on the deck pretty much all the time. “You can throw that thing up against a rock, dock, piece of wood, whatever you see – you can just pick things apart with it; and you can go pretty much anywhere around the country with that setup and go down the bank and catch fish.”

Jay Yelas

Rig: 5/0 Gamakatsu Superline EWG (heavy gauge), 15-pound Strike King Tour Grade Fluorocarbon

Rod/Reel: Lew’s Custom Speed Stick 7’ MH, Team Lew’s Hyper Mag Speed Spool (8.3:1)

Notes: Having a high-gear ratio reel is critical to Yelas with a Texas rig. “Particularly in shallow water; big bass will grab that Senko and just take off. If you can’t reel fast enough to catch up to it, you’re never going to get a good hook into it.”

Larry Nixon

Rig: 4/0 Gamakatsu EWG (standard gauge), 10-pound Sunline FC Sniper fluorocarbon

Rod/Reel: Dobyns 7’ Champion XP 705 Casting rod, Bass Pro Shops Johnny Morris Series (7.1:1)

Notes: Patience is the key when Texas rigging a 5-inch Senko says Arkansas legend Nixon. “Most of the time I fish a Texas rig weightless; and I’ve caught about a gazillion fish doing it. Just be patient and let the bait do its thing. If you’re not getting Senko bites; you very well could be fishing it too fast. Slow down and you’ll get bit.”

Wacky/Neko

5 Quick and Easy Leech Trap Ideas for Anglers

0

Do you like to fish for walleye with leeches? If so, you may want to take the time to create your own leech traps. They are easy and inexpensive to make. Most will take you less than 10 minutes to build. Here’s how to make five of them:

  1. Soda Bottle Leech Trap

You can create a quick and easy leech trap with just a pair of scissors, a roll of duct tape, a rock and a 2 liter, clear, plastic soda bottle. Start by removing the soda bottle’s cap. Next, cut the top off of the soda bottle just above the label line. Place a piece of chicken liver or stew meat into the bottom of the bottle along with a good size rock. The meat will act as bait and the rock will help to keep the trap from moving too much in the current.

Proceed by inverting the top of the bottle so it looks like a funnel. Then insert your makeshift funnel, tapered end down, into the bottom of the soda bottle. Duct tape the funnel into position. When you are ready to use the leech trap, simply set it in the water on its side. Hopefully the leeches will be enticed by the bait and crawl into the bottle.

  1. Wood Leech Trap

One of the easiest leech traps to make is a leech board. All you’ll need to make one is an old piece of porous wood and a bottle of fish oil. You can buy the fish oil through a pharmacy or health food store. In most cases a large bottle of fish oil will cost you around $35. In order to make the wood attractive to the leeches you will need to soak it in fish oil.

Some anglers prefer to make a mixture of fish oil and blood. You can get blood for your mixture from draining off packets of meat from your local butcher shop. After the wood has absorbed the oil and blood, place it into the water. The leeches will attach themselves to the wood. Once they do, remove the wood and pick the leeches off of it.

  1. Coffee Can Leech Trap

You can also make a leech trap out of an old coffee can. To do so you’ll need bait, a hammer, a sharp screw driver and a pair of vise grips. Use the screw driver and hammer to poke holes in the bottom of a coffee can. Continue by placing the bait into the bottom of the can. Finish the leech trap off by squeezing the top of the can shut with a vise grip. Leave just enough room for the leeches to get into the can. Place the baited coffee can into the water and wait for the leeches to arrive.

  1. Dunk Bag Leech Trap

I have found that a dunk bag also works well as a leech trap. You can typically pick one up through most outdoor outfitters for less than $5. Soak the bag in fish oil, place a piece of bait inside the bag and add a rock for weight so the bag won’t float away. Submerge the bag into the water and wait. The leeches will swim into the bag through the holes. Once the leeches are in the bag pull it out of the water and remove them.

  1. Jute Pouch Leech Trap

If you don’t want to use a dunk bag, a jute or burlap pouch will also work. You can typically buy a case of jute pouches through craft stores or online for less than $20. That way you can place leech traps in multiple locations. Treat the jute pouch the same way as the dunk bag. Soak it in fish oil and then add the bait as well as a rock.

How to Make a Figure 4 Deadfall Trap

0

A figure 4 deadfall trap is one of the easiest primitive traps, and all you really need is a few sticks, a sharp knife, and bait.

There’s no cordage or complicated snare knots, just the simple tension of a few sticks holding a big rock in position, just waiting for the right animal to trigger it.

figure 4 deadfall trap set under a large rock

In its simplest form, a figure 4 trap starts with just three sticks, each about 8 inches long and 1 1/2 inches in diameter. From there, each stick can be carved into a simple tension deadfall trap that comes together without any cordage or snares.

The weight of the rock pushes down on the sticks, and if the notches are crafted right, this creates tension that holds the whole deadfall trap together. It’s a precarious balance though, and all it takes is the tiniest touch on the baited end and the whole structure comes crashing down…ideally mashing your prey.

Figure four traps are wonderful if you live in an area with an abundance of large, flat-ish rocks like my home in Vermont. These types of deadfall traps are best suited to small game, such as squirrels or possibly raccoon if you find (and can move) a big enough stone.

How to Make a Figure 4 Trap

I’m starting with three pieces of dry white pine, split like kindling. The straight grain makes carving much easier, but really any branch you can find in the woods will work.

This deadfall trap has three pieces, and for simplicity, I’ll refer to them as the vertical piece, diagonal piece and trigger piece. I’ve added a 4th piece to extend the trigger deeper under the rock and lashed it together with a bit of twine, but that piece is unnecessary I found.

The vertical piece is the easiest to carve, so start there. It’s basically just a stick with a pointed end. The point isn’t carved on all sides, just two of the faces, so it comes to a long linear point at one end.

Vertical Piece in Figure 4 Trap

The base end remains flat because that’s going to rest on the ground, or more specifically, another flat rock placed on the ground. Otherwise, the heavy rock pressing down on top would just drive it into the ground like a stake. Even a small-ish flat rock, maybe 4” in diameter prevents this, and also makes it easier to set the trap with a flat surface as a work area.

Here’s the vertical piece set into the figure 4 trap. All it needs to do is hook into the notch on the diagonal piece.

Vertical Piece Assembled in Figure 4 Trap

One more important thing to note about this first piece…the sides need to be squared off. This is important, as you’ll see later, since it allows the trigger piece to hook onto this stick.

Carving the Diagonal Piece

Next up is the diagonal piece, which is a bit more complicated, and has carved portions on both ends. The top comes to a rounded point where it will support the rock, and underneath it has a small notch for holding the vertical stick in place.

Start by rounding off the top end, and then notching into the stick about 2 inches below that. The notch should have a bit of a hook to it, which will help keep the vertical piece in place when they’re connected.

Close up of 2nd piece of figure 4 trap

Carve the bottom of that same stick into a point, working just two sides so you have a long seam to hook into the 3rd piece (trigger piece).

Here’s what the diagonal piece should look like when finished:

Full Diagonal Piece for Deadfall Trap

Carving the Deadfall Trap Trigger

The final piece is the trigger stick or the horizontal piece in the figure 4 trap. This piece is the most complex because it needs to support the diagonal piece and hook onto the vertical piece. It hooks onto the side of the vertical piece, which is what creates the trigger tension.

Downward force from the weight of the rock above is pressuring the diagonal piece and trying to pull the trigger piece backward. It’s notched and hooked around the vertical piece, which is what holds the whole deadfall trap together until it’s tripped.

As I mentioned earlier, the vertical piece needs to be squared off so that the trigger piece can hook onto it. This is why…

Start by carving a notch at the back of the stick for the diagonal piece to rest against to tension the trap. Be sure to leave enough wood at the end that it won’t break out at the end when under stress. About an inch should do.

This notch should fit nicely into the bottom of your diagonal stick, and hook it in there with a bit of tension. Test the shape against your diagonal stick. This is the first of 3 different carved sections on the trigger stick.

Back of the trigger stick in figure 4 trap

Next, go to the other end and carve it into a narrow point to hold the bait. In my case, I’m using peanut butter, and more practically in the woods you might be using a tiny piece of meat or fruit and you’d need a sharp point to stick it to the trigger stick.

This is the most open-ended part of the whole trap, and really you can make it look like just about anything you’d like. Something small, so the animal has to nudge it a bit when they try to take the bait works best.

I could also imagine an alternate configuration where this trigger end is just a thin shelf to support some kind of seed or nut. It really depends on the bait you’re using, and how you want to dangle it out there.

Carving the trigger point on a figure 4 deadfall trap

Once you have that notch and the trigger point finished, place the pieces in figure 4 position to figure out where the side trip notch needs to be placed. This will vary a bit, based on the size of your wood and how you’ve carved the notches up to this point, but it should be about half way up the side of the trigger stick.

Carve the trigger notch out square so that the trigger stick hooks around the vertical stick. The finished trigger stick should look like this:

finished trigger for figure 4 trap

When I made this, I was concerned that my trigger stick was too short. As you can see, the side notch is about 2/3rds down the side of my stick and there’s not much trigger past the vertical stick on the figure 4.

I took another stick and lashed it together to extend the trigger further under the rock. In hindsight, that was completely unnecessary and the short trigger would work just as well.

I had a particularly long rock, so this trigger extension really gets the bait far underneath it. That’s totally optional, and actually limits the prey I can catch by putting the bait in a very small space.

Bait Extension Stick for deadfall trap

A shorter trigger might mean catching something like a raccoon, but this long trigger placed far under limits the trap a bit. Luckily, I was targeting a tiny red squirrel that the best squirrel traps I could find hadn’t yet managed to catch. He was fun to watch, but when he took up residence inside the ceiling of my house we had to make other arrangements.

Be careful, of course, to check any local restrictions on trapping if you plan to deploy your deadfall trap. Also be aware that the trap will crush anything that trips it…including children, pets or toes.

If you do catch small game, try out any of these squirrel recipes. We really enjoyed traditional Brunswick stew, and country fried squirrel with gravy is a great breakfast.

How to make a figure 4 deadfall trap (in about 30 minutes)

All in all, the whole deadfall trap took me about half an hour to carve, sitting at the picnic table in our yard while the kids played nearby with their Tonka trucks. I don’t have a smartphone you see, so that means I get fun project time anytime the kids are self-entertaining. This, I can tell you, was a much more satisfying way to spend a few quiet minutes than scrolling Instagram.

It was a fun skill to practice, long in advance of being in a wilderness survival situation where I needed to harvest food with minimal equipment. Even lacking a knife, this trap could be made by carving with a sharp rock. It’d take a lot longer, but you could make it happen if you had to.

For me, it’s nice to know I have that skill under my belt, and now I’m looking forward to learning other types of traps.

More Bushcraft Skills

Looking for more bushcraft skills tutorials? Read on my friends…

  • How to Clean & Gut a Groundhog
  • How to Clean a Squirrel in Under a Minute
  • Making Fatwax (Animal Fat Salve)
  • How to Render Squirrel Fat (for Cookies!)
  • How to Process Soil into Clay for Pottery
  • How to Make Primitive Arrows

How to Make a Figure 4 Deadfall Trap ~ This simple primitive trap can be made in under an hour with a few sticks and a sharp knife. Trapping is an essential skill for backwoods bushcraft survival, and this is one of the simplest types of trap. #bushcraft #survival #survivalskills

.30-30 Winchester vs .308 Winchester Ammo Comparison

0

The following ammunition cartridge ballistics information and chart can be used to approximately compare .30-30 Winchester vs .308 Winchester ammo rounds. Please note, the following information reflects the estimated average ballistics for each caliber and does not pertain to a particular manufacturer, bullet weight, or jacketing type. As such, the following is for comparative information purposes only and should not be used to make precise predictions of the trajectory, performance, or true ballistics of any particular .30-30 Winchester or .308 Winchester rounds for hunting, target shooting, plinking, or any other usage. The decision for which round is better for a given application should be made with complete information, and this article simply serves as a comparative guide, not the final say. For more detailed ballistics information please refer to the exact round in question or contact the manufacturer for the pertinent information. True .30-30 Winchester and .308 Winchester ballistics information can vary widely from the displayed information, and it is important to understand that the particular characteristics of a given round can make a substantive difference in its true performance.

Caliber Type Velocity (fps) Energy (ft-lb) .30-30 Winchester Rifle 2370 1890 .308 Winchester Rifle 2680 2620

Velocity

As illustrated in the chart, .30-30 Winchester rounds – on average – achieve a velocity of about 2370 feet per second (fps) while .308 Winchester rounds travel at a velocity of 2680 fps. To put this into perspective, a Boeing 737 commercial airliner travels at a cruising speed of 600 mph, or 880 fps. That is to say, .30-30 Winchester bullets travel 2.7 times the speed of a 737 airplane at cruising speed, while .308 Winchester bullets travel 3 times that same speed.

Various calibers

Energy

Furthermore, the muzzle energy of a .30-30 Winchester round averages out to 1890 ft-lb, while a .308 Winchester round averages out to about 2620 ft-lb. One way to think about this is as such: a foot-pound is a unit of energy equal to the amount of energy required to raise a weight of one pound a distance of one foot. So a .30-30 Winchester round exits the barrel with kinetic energy equal to the energy required for linear vertical displacement of 1890 pounds through a one foot distance, while a .308 Winchester round exiting the barrel has energy equal to the amount required to displace 2620 pounds over the same one foot distance. As a rule of thumb, when it comes to hunting, muzzle energy is what many hunters look at when deciding on what caliber of firearm / ammunition to select. Generally speaking, the higher the muzzle energy, the higher the stopping power. Again, the above is for comparative information purposes only, and you should consult the exact ballistics for the particular .30-30 Winchester or .308 Winchester cartridge you’re looking at purchasing.

Please click the above links to take a look at all of the .30-30 Winchester and .308 Winchester ammo we have in stock and ready to ship, and let us know any parting thoughts in the comment section below.

Foundry Outdoors is your trusted home for buying archery, camping, fishing, hunting, shooting sports, and outdoor gear online.

We offer cheap ammo and bulk ammo deals on the most popular ammo calibers. We have a variety of deals on Rifle Ammo, Handgun Ammo, Shotgun Ammo & Rimfire Ammo, as well as ammo for target practice, plinking, hunting, or shooting competitions. Our website lists special deals on 9mm Ammo, 10mm Ammo, 45-70 Ammo, 6.5 Creedmoor ammo, 300 Blackout Ammo, 10mm Ammo, 5.56 Ammo, Underwood Ammo, Buffalo Bore Ammo and more special deals on bulk ammo.

We offer a 100% Authenticity Guarantee on all products sold on our website. Please email us if you have questions about any of our product listings.

The Remington 870: A Look Back

0

Any gun that has 11 million copies, has been used in more than 25 countries in various military and police applications, as well as a sporting arm and has become the benchmark of pump or slide-action shotguns deserves a look back at its origins, along with an examination of why it was and remains so popular. As Remington celebrates its bicentennial, the Model 870 shotgun has been a major factor in the longevity of the company for more than a quarter of its existence.

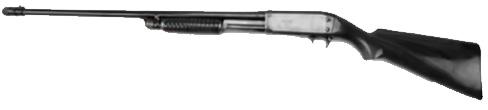
Remington had been struggling a bit in its shotgun market. From the beginning of the 20th century, Americans had been flocking toward the pump or slide-action shotgun because of its simplicity, reliability and it costing far less than any double or semi-auto. Winchester ruled the roost with its models 1897 and 1912 pumps. Their reliability had become legend, and the appeal of the Model 12 with its sleek lines pretty well spanked any of the competition. John D. Pederson had designed the Remington Model 10 slide-action, bottom-ejecting shotgun—he actually designed it in 1908, but it wasn’t brought to market until 1909—and it sold reasonably well, even serving some trench-gun duties into the 1930s. It was one of the first shotguns with a rounded profile to the rear of the receiver. The Model 10 was more fragile than the competing Winchester Model 12 so John Browning designed the Model 17 pump shotgun, retaining the bottom ejecting and loading port and successfully addressing some of the issues with the Model 10. Because of wartime production needs the Model 17 was not brought forth until 1921. Later on, the Ithaca Model 37 and the Browning BPS would share much of the engineering found in the Model 17. The Remington 870: A Look BackThe Remington Model 17 pump shotgun was a forerunner to the Model 870.

The Model 17 was a 20 gauge, and it enjoyed a fair degree of popularity as well, though it never threatened the Winchester Model 12. Another Remington engineer, Crawford C. Loomis, redesigned the Model 17 to handle 12-gauge ammo and employing side ejection, introducing it as the Model 31 in 1931. The Model 31 was produced in 12, 16 and 20 gauge and made from 1931 until 1949. Model 31s were purchased by the FBI, and one each was ascribed to each office after the Kansas City Massacre of 1933.

World War II changed everything, including manufacturing parameters. The new prevailing consideration was expense of manufacture. Cost cutting—some say cheapening—became the primary focus. With The Depression over, wages—hence manufacturing costs—were skyrocketing. Remington needed to find a less expensive way to produce pump shotguns.

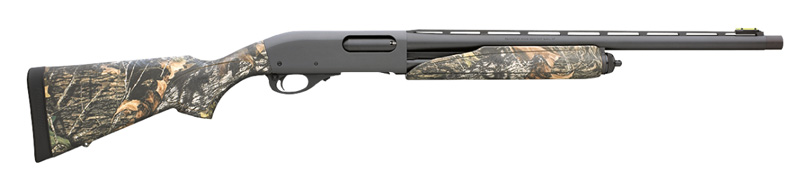
In 1948 Remington designers L. Ray Critendon, Ellis Hailston and C.R. Johnson came up with a long-recoil semi-auto shotgun that featured some new technology and design. Chief among the new innovations was the use of stamped steel parts and true interchangeability allowing the gun to be assembled with much less hand fitting. When it came time to update its pump shotgun, Remington utilized these same technologies, as well as the fire-control system developed for the 11-48. The new pump featured dual action bars that constrained the torque often imparted to the fore-end when operating it, thus making cycling the action smoother and more reliable. Instead of having to machine a recess deep within the receiver for the bolt to lock up, Remington created a hardened barrel extension with a recess machine into it to restrain the thrust of the bolt during firing. By doing this, it allowed the new pump shotgun to not only be made in less time (less expensive), it also made it easier to replicate headspacing from barrel to barrel, allowing for barrel interchangeability without tools or fitting. Like its predecessors, this new Model 870 was fed from a tubular magazine beneath the barrel originally holding four rounds.

The Model 870 was an instant success, and when it was brought to market in 1950 no fewer than 15 variations were available. That availability to be so adaptable through modular technology has been a cornerstone of the 870’s success for the past 66 years. In addition to countless grades of engraving and wood quality, the 870 has been made in deer or slug-gun garb, trap and skeet versions, waterfowl, turkey and upland configurations. It has been built to the special considerations of tactical users. The Model 870 has been available in all four shotgun chamberings and from 2 3/4″ to 3 1/2″ magnum. In short, if you have a task that can be handled with a shotgun—even some pretty obtuse ones—Remington has made an 870 to address that task wellThe Remington 870: A Look Back

Sixteen years after its debut, Remington ushered its 1 millionth Model 870 out the door. Seven years later the 2 millionth 870 was shipped. Today, 66 years after its introduction more than 11 million Model 870 shotguns have been produced. While most firearms, especially with some longevity, have undergone several design changes during their manufacture to deal with unforeseen glitches that can occur in the field, the 870 has but one that I am aware of. Older 870s were capable of being tied up if the user failed to engage the shell latch. The shell could then slip back into the receiver between the lifter and the bolt in such a way as to prevent the bolt from moving rearward, thus requiring the gun to be disassembled to clear the shell. The Flex-Tab carrier introduced around 1980 took care of this rare issue, and today it’s almost impossible to bind up an 870—unless you are me.

I’ve owned four 870s, two sporters and two in riot or tactical configuration. I had an 870 Express that I used as a rough-and-ready duck gun for a while. One rainy day on a marsh in central California I managed to somehow bend the ejector spring into a paper clip, thus turning my shotgun into an inefficient single shot. With the rain pouring down I stripped the 870, laying the barrel in the reeds above the water I was in, sitting on a T-chair made from two pieces of 2×4 screwed together in a T shape and stuck into the marsh mud. My rain parka formed a parts bowl in my lap that quickly filled with rain water, thus serving as a sort of redneck parts washer. I stripped the receiver down to where I could remove the ejector spring. After straightening it back to its original configuration, I reassembled the gun and returned to my hunt. Total elapsed time: about 10 minutes … and I didn’t lose a single part!

Remington’s Model 870 shotgun has earned its just place as the benchmark of American shotguns. It’s almost unimaginable that anyone who has owned more than one shotgun doesn’t have or hasn’t had an 870 in their closet or safe. It certainly has become an icon in that company’s 200-year history.

Best Ham Radio Base Stations – Review and Comparison

0

How to Choose the Best Ham Radio Base Station – Buyers Guide

Getting a good ham radio base station goes beyond searching for the top ones on the market. While that’s a great place to start, there are still other important factors to consider.From power output and receiver sensitivity to antenna options and digital enhancements, here’s what you should look out for when purchasing the best ham radio base station.

1. Power Output and Receiver Sensitivity

Make sure your ham radio base station has adequate power output and receiver sensitivity to ensure that you get good reception no matter the conditions. The power output should be between 5 -100 watts, and receiver sensitivity should range from 0.2-1 microvolt.

2. Antenna Options

It’s important to consider the type of antenna your ham radio base station is compatible with as antenna options will determine how well your radio performs. Look for the one with a wide frequency range and good gain value to ensure that you get the best performance from your radio.

3. Digital Enhancements

The latest ham radio base stations come with digital enhancements such as automatic notch filters, dual receivers, and noise blanking capabilities to improve user experience. Look for radio with these features for better performance.

4. Price

Compare the prices of different ham radio base stations to ensure that you get the one that fits your budget without compromising on features, performance, or build quality. Getting the best ham radio base station does not mean that you have to pay the most money and get the most expensive one.You are sure to find a great choice within options ranging from low-cost entry-level radios, that cost little money, to more expensive advanced models, so take your time to decide which one suits your needs best rather than have the price factor drive it.

5. Modes and frequency coverage

This is an important feature, as it determines if the radio meets your requirements in terms of band management. Most modern-day radios have multiple capabilities that allow you to transmit on different frequencies and modes.

6. Band and frequency

Ham radio base stations come in a range of frequencies. A single-band radio means it features one option, mostly the two-meter band on 144-148MHz. Double ones are the most common in the market, and they feature both the 2-meter band and 70 cm band. Others feature three or four frequencies.

7. Ease of operation

When buying your first ham radio base station, you want one that is user-friendly and has a short learning curve to navigate and learn how to use it.Evaluate how complex the controls are. Is it something you can learn through a user manual, or do you need some practice before acquiring your own? As a beginner, you can go for a basic radio and learn your way around it before investing in a complex option.

8. Sound clarity

Ensure you get a ham radio base station that has a clear signal and noise cancellation ability. When using a ham radio either receiving or transmitting, you don’t want distortion or signal interference as it could affect how you pass or receive information.

Some radios have an automatic inbuilt antenna that can shift across frequencies, while some need a manual one fixed within proximity. This can potentially affect its sound clarity if you are not able to fix it well, so do your research before purchasing.

9. Software

Preferably, get a radio that comes with the program software cable in the beginning. Some of the best ham radio base stations come with free software, while for others, you have to get it from a third party at a cost.

Check whether your preferred option software must be plugged into a computer to function or manually programmed, which is more applicable to experienced users.

Evaluate whether you need LAN access or not for your chosen radio software to run. For instance, some radios require a laptop to run the software through a LAN connection.

10. Accessories

Most ham radio base stations come in packages that include accessories such as headsets, microphones, and power supplies. Consider additional accessories you may need before making your purchase so that you can be sure all your requirements are met from the start.

Femoral Artery: The Blood Highway in Deer | Deer & Deer Hunting

0

Perhaps it’s because I’m an admitted deer geek, but I find whitetail anatomy absolutely fascinating. It’s come to the point where — when I’m hunting and decide I’m going to shoot a deer — I can’t focus on the deer itself.

I start focusing on bits and pieces of the deer. The whitetail’s arteries are among these “bits and pieces.”

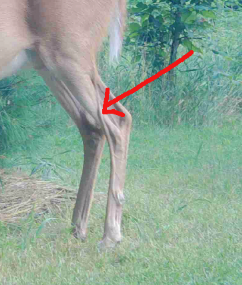
Take the femoral artery, for example. That’s the one thing the absolutely jumped out at me the first time I looked at this Browning Trail Camera image of an adult doe. Yes, the doe is awfully pretty — standing there almost broadside (technically slightly quartering to), and she seems to be heading into fall in optimum health.

But just look at that bulging artery in her leg! Quite dramatic, isn’t it?

More About Deer Anatomy

Wisconsin’s Norman Johnson and Alabama’s Dr. Phillip Bishop are two experts in this subject matter, and I’ve had the pleasure of working closely with both of them to help educate millions of whitetail bowhunters on the nuances and associated science connected with femoral artery wounds in deer.

In his work with D&DH, Johnson reminds us of how the upper hindquarters of a deer are a highly blood-rich region, just below where the aorta bifurcates (branches) to a network of other arteries, deep femoral and common femoral arteries, terminating in the lower legs. The vascularity (blood supply) to the entire rear end, including the hams, presents a very effective killing shot for a sharp, well-placed broadhead.

“While working 25 years in the field of radiology directly performing angiography on all parts of the human body, we clearly demonstrated the highly vascular blood supply to this entire region,” he continued. “Man and animal share a direct resemblance in anatomical and physiological makeup, as blood is pumped to all regions of the body. Main arteries resemble the roots of a tree comprised of divisions that branch and re-branch, finally forming smaller vessels. A large enough, razor-sharp broadhead is imperative as an anti-prothrombin (coagulation) measure.”

Study all parts of a deer when you’re hunting, and note how the arteries, joints and bones all come together. (photo by Dan Schmidt)

Both the late John Trout Jr. and Chuck Adams coined the phrase, “The deer (should be) (is) in a big heap of trouble” referring to the rear-end shot. Adams wrote this in his book, “The Complete Book of Bowhunting” (1978): “I’ve personally shot over a dozen deer in the rear-end and none went over 100 yards before keeling over.”

Trout, widely considered one of the foremost experts on blood-trailing whitetails, was more reserved. He said he had recovered many whitetails shot through the hips, even when the femoral artery was missed. He concluded: “Nonetheless, a hip shot is not a shot that any hunter should take intentionally.”

The Whitetail’s Femoral Artery

Dr. Phillip Bishop of the University of Alabama has taught us a lot about deer physiology over the years. The femoral artery topic is one instance where he shed light on what used to be a rather taboo subject, especially among bowhunters.

“Because high blood flow requires high blood pressure, the femoral arteries carry blood under very high pressure when the muscles are working hard,” Bishop writes. “Once the arteries branch several times, they are lined with smooth muscle that can tighten and reduce the diameter of the blood vessels. Every time the vessel diameter is reduced by half, the blood fl ow is reduced by a factor of 16.”

Conversely, he continued, the muscles lining the arteries can also expand, and when the diameter doubles, blood flow increases by a factor of 16. The blood flow increase from smallest to largest is like comparing a garden hose to a fireman’s hose.

“When a large artery, like the femoral artery, is cut, the high arterial pressure causes very rapid blood loss. With every contraction of the heart, the pressure rises and blood is pushed out. In the case of a shotgun slug through the hams, the blood pressure causes the bright red, oxygen-rich arterial blood to spray out impressively, leaving the biggest blood trail we’re likely ever to see from a whitetail.”

The lower branch of the femoral artery runs all the way down to the bottom of a deer’s leg. (photo by Dan Schmidt)

When the deer runs or jumps, the pressure rises and the spray is even more widely dispersed.

“The rapid loss of blood from the femoral artery, or any other major artery, causes a rapid and merciful death. Plus, a deer with a major arterial wound that has an exit outside the body will leave an easy blood trail. I have read accounts of deer expiring very quickly when one or both femoral arteries are severed.,” Bishop concludes.

The bottom line: All of these insights should be used to add depth and breadth to your knowledge of white-tailed deer anatomy. Contrary to the opinions of some of my bloodbrothers (and sisters), I would never, ever purposefully shoot a deer “in the ass” on the hopes my broadhead would severe the femoral artery. It is true: A razor-sharp broadhead to the femoral artery will put a deer down quickly, but the odds of this happening on purpose are extremely small. Granted, accidents happen. A twig deflect and arrow. You flinch badly at the shot. Etc. It happens, and if you shoot at enough deer, odds are it will happen to you.

In that event, knowing precisely where the artery is located and how it works are critical pieces of information that can help you decide which next moves to make.

The Mathematics of Deer Blood

The average white-tailed deer of about 150 pounds in live weight carries at least eight pints of blood in its arterial system. For a bowhunter to easily recover a wounded deer, the blood loss must be extensive. A deer will have to lose at least 35 percent of its total blood volume for the hunter to recover it rapidly. That means a loss of at least 2. pints of blood in the case of a 150-pound buck. The quicker the blood loss, the sooner you will recover the animal.

According to Professor Aaron Moen, a deer biologist at Cornell University, a running white-tailed deer has three times the heart rate of a bedded deer.

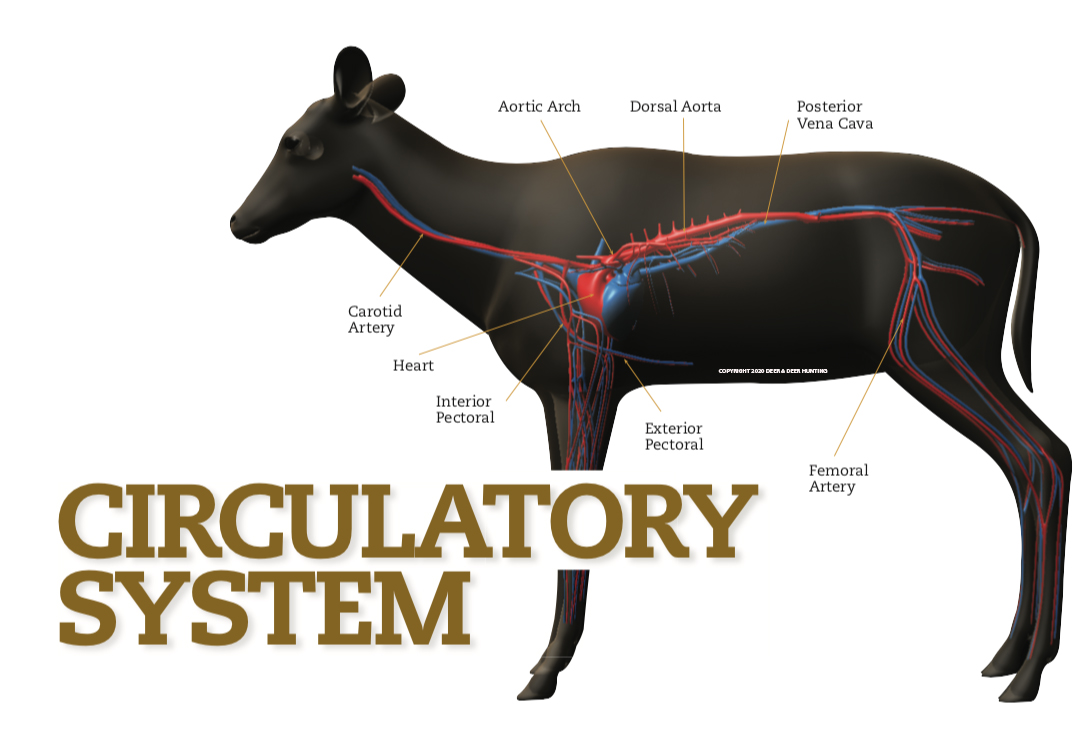
Major arteries in a whitetail literally run from top to bottom (head to toe) if you consider all of the various blood runways. (Illustration copyright Media 360 LLC. All rights reserved)

Why would we want to wait and allow the deer to bed down after being wounded? Any shock the bow-hunter hopes to inflict on a whitetail will only result through great and rapid loss of blood. Applying basic mathematics to his findings on wounded deer behavior, blood loss and shock, University of Pennsylvania researchers once presented us with this interesting and speculative scenario of a hard-hit 150-pound deer leaving a blood trail of l00 yards. They cited an example of a deer wounded to the extent of leaving a very well-defined blood trail indicative of arterial or other heavy bleeding caused by the arrow passing completely through the deer:

“This deer would have to lose 52 ounces, or about 3. pints of blood before collapse,” they reported. “Internal blood loss would have to extend to 41 ounces, or about 2ó pints to stop the deer within the trail distance of 100 yards. In other words, the internal loss rate would have to be almost four times that of the external rate in order to down the deer. Average internal blood loss needed would be .41 ounces per yard; the external rate, .11 ounces per yard.”

Final Thoughts

How far can a deer run before collapsing after a major artery has been severed? How many yards can it run before going down? In his book The Deer of North America, Leonard Lee Rue III estimates that a deer with a major rupture of its arterial system can probably run for approximately 85 to 120 seconds on the oxygen in its bloodstream and brain: “Running at a speed of 35 mph, the deer could potentially run 3,850 feet in 85 seconds, or 5,390 feet in 120 seconds. Although it is not likely that a deer will run this far, the potential exists.”

Biggest barracuda ever caught

0

Today, we embark on an exhilarating journey to explore one of the ocean’s most fearsome predators – the barracuda. Known for its powerful speed, sharp teeth, and stunning silver appearance, the barracuda is a formidable sight beneath the waves. However, what truly sets this creature apart is its jaw-dropping record – the title of the biggest barracuda ever caught.

In this article, we’ll present the compelling facts and figures surrounding this colossal catch, providing an insightful look into the world of barracudas and the thrill of angling for these remarkable fish. So, fasten your seatbelts as we unravel the tale of the largest barracuda ever recorded!

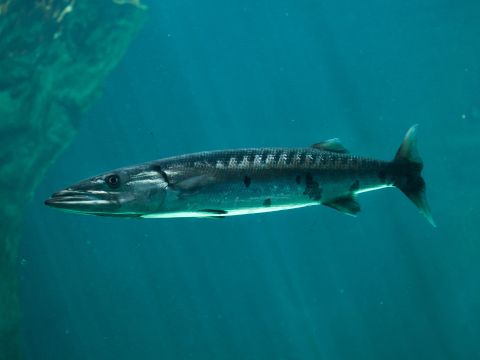
biggest barracuda ever caught

What is a barracuda?

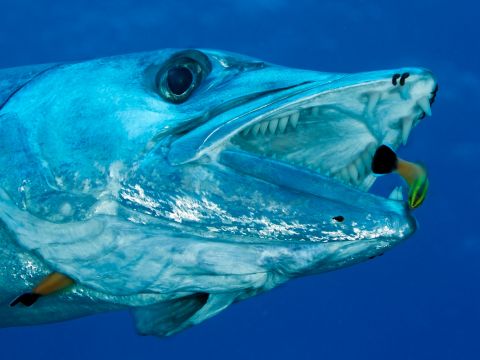
A barracuda is a predatory fish belonging to the Sphyraenidae family, found in warm, tropical, and subtropical waters across the globe. These fierce marine predators are known for their streamlined, elongated bodies, equipped with razor-sharp teeth, making them one of the most formidable hunters in the ocean. With a reputation as aggressive and fast swimmers, barracudas are at the top of the food chain in their aquatic habitats.

Physical characteristics

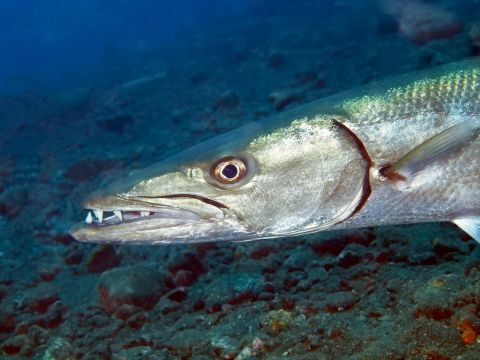
Barracudas typically have a silvery or grayish appearance with dark markings on their upper bodies, aiding in camouflage while hunting. They possess a long, cylindrical shape, which allows them to reach impressive speeds in pursuit of prey. These fish can grow to various sizes, with some species reaching lengths of up to six feet or more.

Feeding habits

As carnivorous predators, barracudas have a diverse diet, primarily consisting of small fish like anchovies, herrings, and mullets. They are ambush predators, often lying in wait near reefs, drop-offs, or underwater structures and using their incredible speed to strike unsuspecting prey.

Range and habitat

Barracudas inhabit many marine environments, including coral reefs, coastal waters, and open seas. They are commonly found in the Atlantic, Indian, Pacific Oceans, the Caribbean Sea, and the Gulf of Mexico. These fish prefer warm waters, typically 25 to 30 degrees Celsius (77 to 86 degrees Fahrenheit).

Behavior and threats

Though barracudas are generally solitary hunters, they can occasionally be seen in loose groups, especially around areas teeming with food sources. While they rarely threaten humans, barracuda attacks have been reported, often involving the fish mistaking shiny objects or dangling jewelry for prey.

Importance in ecosystems

Barracudas play a vital role in maintaining the balance of marine ecosystems. As apex predators, they help control the population of smaller fish, preventing them from overwhelming their environments. Additionally, barracudas prey on larger predators, contributing to the intricate web of life beneath the ocean’s surface.

barracuda record

What is the average size of barracudas?

Barracudas, renowned for their impressive size and fearsome appearance, exhibit considerable variability in their dimensions depending on the species and the environment in which they reside. On average, barracudas range from relatively modest lengths to strikingly large proportions. Let’s delve into the typical size specifications of these powerful predators.

The average size of barracudas can vary significantly across species. Generally, the smaller species, such as the pick handle Barracuda (Sphyraena jello) and Guinean Barracuda (Sphyraena afra), measure around 1.5 to 3 feet (45 to 90 centimeters) in length. On the other hand, larger species like the Great Barracuda (Sphyraena barracuda) can grow to formidable lengths, often reaching 4 to 6 feet (120 to 180 centimeters).

What is the largest barracuda ever caught?

In the world of angling, an astonishing record is held by a massive barracuda. On July 8th, 2019, in the waters off the coast of Fort Dodge, Florida, American fisherman Arin Long was stunned when he reeled in what would become the biggest barracuda ever caught!

Weighing in at a whopping 78 pounds (35.3 kilograms) and measuring a staggering 5 feet 8 inches (176 centimeters), this colossal catch beat the previous record previously held by an angler in Texas, which weighed 68 pounds (30.8 kilograms).

After reeling in his impressive haul, Long had to enlist the help of several onlookers to lift the massive fish onto shore. He then proudly posed for a photo with the monstrous catch, and his epic tale quickly gained traction on social media.

While Long’s feat is certainly an incredible accomplishment, it serves as a testament to the awesome power of these remarkable fish. As one of nature’s most intimidating predators, barracudas are known for their impressive size and strength, making them a thrilling challenge for any angler.

So, if you’re lucky enough to find yourself in the waters near Fort Dodge, keep an eye out – who knows, you are the one to best Arin Long’s record!

largest barracuda ever caught

How to catch a barracuda

Catching a barracuda can be an exhilarating challenge for anglers across the world. With their formidable strength and lightning-fast speed, these marine predators will test any fisherman’s mettle! To help you get started, here are a few tips and tricks for catching barracudas:

Equipment

Since barracudas possess tremendous strength, it’s important to use appropriate tackle when angling for these fish. Your best bet is to select a sturdy rod-and-reel combo with a fast action, matched with a strong braided line in the 20-40 pound (9-18 kilogram) range. You’ll also want heavy-duty hooks and lures to stand up to the barracuda’s powerful jaws.

Set-up and bait

Since these predators are ambush hunters, you’ll want to set up your tackle in areas where they can easily hide and surprise their prey. This could include deep channels, rocky outcrops, coral reefs, or even manmade structures like sunken boats or pilings. To attract the barracudas ‘ attention, you’ll want live bait such as pilchards, herring, or mackerel.

Techniques

Once you’ve set up your tackle and bait, it’s time to start fishing! Cast your line out into the water and pay close attention to any signs of movement – a telltale sign of a barracuda nearby. If you’re lucky, the fish will strike, and the fight is on! When battling a barracuda, you’ll want to use steady pressure to tire it out and avoid any sudden jerks that could break your line.

As with fishing, patience and practice are key when angling for barracudas. With the right equipment and techniques, you should be able to catch your first barracuda in no time. So, grab your tackle and head out into the waters – who knows what kind of adventure! Good luck!

Where are barracudas found?

Barracudas are found in warm, tropical waters around the world. These fierce predators inhabit many marine environments, from coral reefs to coastal areas and open seas. They can be commonly found in the Atlantic, Indian, and Pacific Oceans, the Caribbean Sea, and the Gulf of Mexico. Barracudas have also been spotted in the Mediterranean and Red Seas.

In addition to their range, barracudas are found at various depths, from shallow coastal waters to deeper offshore locations. Though they prefer murky areas where they can easily hide from prey, they can likely be encountered in almost any marine habitat. So, if you plan on fishing for barracudas, you’ll find them wherever the waters are warm!

The presence of barracudas in an area usually indicates a healthy marine environment. As apex predators, they help maintain balance in their ecosystems by controlling the population sizes of smaller fish and serving as prey for larger animals. In this way, they keep oceans and other aquatic habitats flourishing – a reminder of these remarkable creatures’ invaluable contributions to the life beneath the ocean’s surface.

record barracuda

Can you eat barracuda?

Although barracudas have razor-sharp teeth and powerful jaws, they are not considered a threat to humans. There has never been a recorded instance of an unprovoked attack on a human by a barracuda.

If you encounter one in the wild, it’s best to avoid handling them. Barracudas are strong and wild animals, so respecting their space and leaving them alone is important. It should also be noted that barracudas can become aggressive if they feel threatened or if you try to feed them, so it’s best not to do either.

In terms of eating barracuda, the answer is a bit more complicated. While they are considered delicious and nutritious fish, barracudas can contain levels of ciguatera toxin that can cause serious health issues in humans if eaten. It’s important only to consume barracuda caught in safe, clean waters and thoroughly cooked before eating.

Overall, barracudas are an intriguing species with fascinating behaviors and fascinating appearances. And while they can be a thrilling catch for experienced anglers, it’s important to take the proper safety precautions when fishing for or handling these powerful predators!

How can people help conserve barracudas?

Barracudas are an integral part of marine ecosystems. Yet, human activities such as overfishing and habitat destruction often threaten them. To help conserve these powerful predators, there are a few things that people can do:

Support sustainable fisheries

One of the easiest ways to help conserve barracudas is to buy seafood from sustainable sources. By ensuring that your seafood comes from fisheries that practice responsible fishing methods, you can help preserve the barracuda populations.

Reduce pollution

Pollution from runoff and oil spills can devastate marine life, including barracudas. To help prevent this, try to reduce your use of plastic materials and dispose of any hazardous waste properly. Additionally, you can support organizations working to protect oceans from pollution.

Engage in conservation activities

Engaging in conservation activities is a great way to help barracudas and other marine species. This could be as simple as joining a beach cleanup or volunteering with an organization dedicated to ocean conservation. You can also spread the word about the importance of conserving barracudas by talking to your friends and family about the threats they face and how to protect them.

By following these simple steps, we can all help to ensure that barracudas remain a part of our world’s marine ecosystems for generations to come. It’s up to us to be their guardians – let’s do our best!

The Best Self Defense Knife For Your Money

0

banner-best-self-defense-knives

What’s the best knife for self-defense purposes in 2024? The evidence points to – not using a knife for self-defense in the first place. The legal ramifications for drawing a knife in a self-defense situation are tenuous at best even in knife-friendly locales. The combination of luck and skill required to successfully use a knife as a self-defense tool is daunting. The likelihood of injuring yourself versus who is attacking you must also be considered. Did we also mention that a knife that’s good as a self-defense tool is typically dramatically impractical for day to day tasks.

So, with all that common sense stuff, why bother creating a list of self-defense knives in the first place? Two reasons. One, it’s better to be prepared for something that won’t happen than be surprised by something that does – and something is better than nothing. Two, some of these knives are cool. It’s OK to like cool things because they’re cool. You’re among friends here.

SPYDERCO MATRIARCH 2

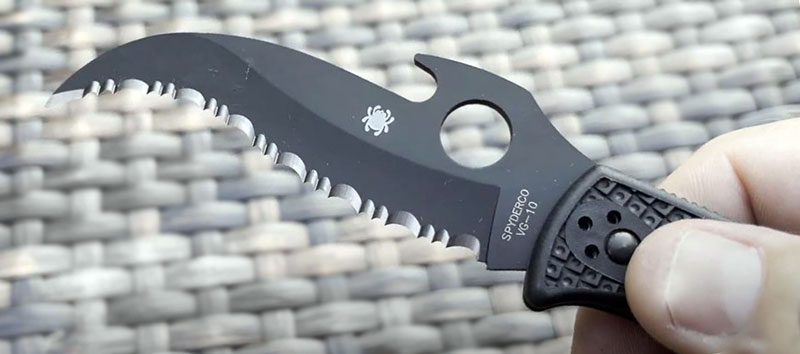
Spyderco Matriarch 2 Wave

The Spyderco Matriarch is an offshoot of the larger Spyderco Civilian, which is probably the most ironically named product since the Ford Aspire, as there is nothing civil about it at all. According to Spyderco, the Civilian was a result of a request from “A government agency” for a knife to be used in last-ditch situations as a defensive tool for people not trained in knife fighting or close quarters combat in general. So it’s the closest a knife gets to a being an idiot-proof self-defense tool, being designed to be used in a forward-facing “claw” motion.

spyderco-matriarch-2-black

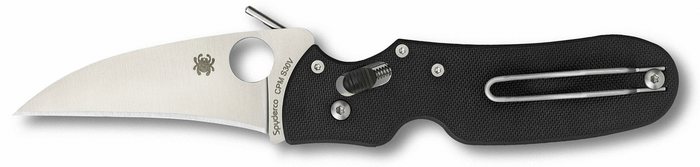
The Matriarch is the same concept as the Civilian, but scaled down and sharing its bones with the Endura 4 to lower costs and weight, and it also offers the advantage of an available Emerson Wave opener. For those not familiar, it works in the tip-up carry position – a hook cut into the spine of the blade catches on the edge of your pocket as you draw the knife, pulling the blade open and into the locked position as soon as it’s free of your pocket.

Like the Civilian, the Matriarch has a unique blade shape – a reverse “S” shape with a dramatic recurve to the belly, and a sharp downward-pointed tip. The grind is a very stout low saber grind for strength, and the whole length of the blade is serrated. An “EDC” knife this is not – even according to Spyderco, who says “Because of its distinctly specialized features it is not intended or designed for general utility or everyday use.” We appreciate the honesty.

FOX KNIVES FOLDING KARAMBIT

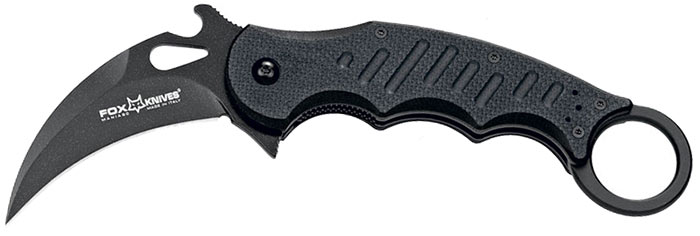
Fox Knives Folding Karambit

The Karambit is a knife style designed expressly for fighting and generally regarded as one of the best knives for self defense. It has almost no useful value as a day to day cutting tool. Opening your boxes from Amazon or bags of dog food with a Karambit is harder than using your finger. But it is a devastatingly effective self-defense tool, provided you know how to use it properly. There are a number of brands that make folding Karambit knives besides Fox, including Brous Blades, Emerson, Medford, Boker, Bastinelli, Spyderco/Byrd, QTRMSTR, Cold Steel and others – but the Fox Folding Karambit from Italy is probably the most well-known and purpose-designed among them.

If you want a basic guide to defensive Karambit use, this video by Blade HQ does a good job of explaining how to utilize this unique knife. There are a number of identifying characteristics to a Karambit. The “chapter ring” on the end of the handle is one, and the steep hawkbill profile to the blade (an inward curve) is another. The chapter ring serves two purposes – it allows you to pass your finger through it when you draw the knife from your pocket making retrieval easier, and it also serves as a means of securing the knife in your hand when the karambit is held in a reverse (“ice pick”) grip as it’s intended.

Fox-Karambit-479

Once deployed, a Karambit’s primary purpose is slicing cuts – not jabbing, obviously. The design of the knife favors a reverse grip and allows you to use the blade in a swinging rather than a thrusting motion.

Fox’s Karambits are well regarded among the defense community, and also don’t break the bank like pricier ones from Brous or Emerson. The wave opener gives it the benefit of self-opening when it’s drawn from the pocket, and sturdy G10 scales with a stainless liner lock serve the purpose of a self-defense knife. There’s also an aluminum handled version if you like the feel better.

KA-BAR TDI

KA-BAR TDI

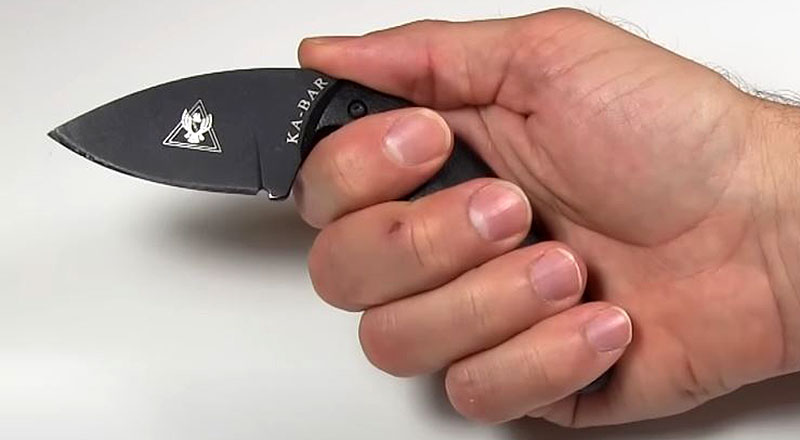
The Ka-Bar TDI has been around unchanged for quite a long time, because it serves a very specific purpose and doesn’t require constant updates to remain relevant. Designed by John Brenner of the Tactical Defense Institute (TDI), the TDI is designed primarily for law enforcement as a back-up knife to a handgun, an easy-to-access secondary option if your primary defense tool can’t be reached or doesn’t work. To that end the TDI is designed around compatibility with gross motor skills rather than fine techniques.

It’s a modified karambit shape – the nearly 90 degree angle of the handle to the blade makes that much obvious – but it’s designed to be used in a forward grip, cross-drawn from a belt holster on your non-dominant side to quickly and effectively cut at close range with a straight wrist. The angle to the handle isn’t a coincidence: it’s designed to be drawn from a holster in a similar manner to a pistol.

KaBar-TDI-real-life

It’s an extremely specialized knife design, but it does still hold some day to day practicality that a traditional karambit doesn’t. AUS-8 steel is a reliable choice, black coated here, and contoured polymer handles give you a solid grip with a deep finger choil right behind the bend for control. There’s also a partially serrated variant as well as a large size (3.6”) if you want something bigger.

SPYDERCO P’KAL

Spyderco PKal

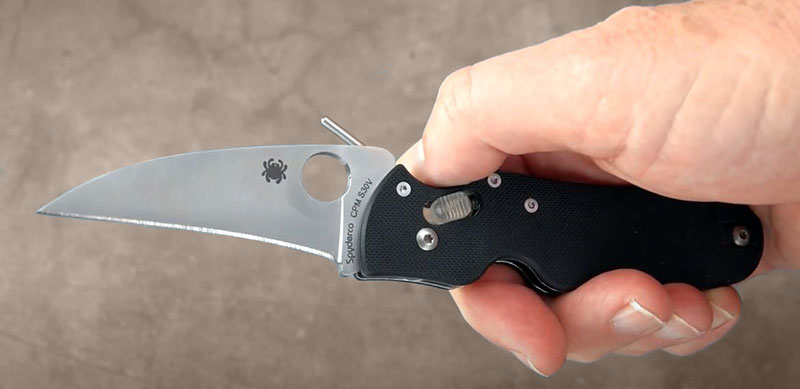
The P’Kal is one of the most unique Spyderco’s, and like the Matriarch it has a decidedly impractical MO. It’s designed around the Filipino martial art of Pikal. Pikal uses a knife held in a reversed ice pick grip to make cuts in a tearing motion using the strength of your upper arm. That explains the rather unusual appearance of the P’Kal, which is designed to be held in a reverse grip with the sharpened edge facing in to make pulling cuts. The deep groove along the spine above the lock is actually a finger choil to anchor your hand when you’re clenching it. Once drawn, the P’Kal makes a powerful and agile defense tool as a natural extension of your arm – good for concise, short movements as well as a defense technique for someone attacking you.

Spyderco-PKal-real-life

The P’Kal uses the caged ball bearing lock, similar to the system in the Manix 2 lineup, as a way to squeeze a strong lock into a small space as well as making the knife easier to close one-handed. It also has a unique implementation of the Emerson Wave opener, a protrusion from the spine of the blade that catches on your pocket on the way out to pull the knife open. On the P’Kal the wave opener is actually a removable post that threads into the spine of the blade. S30V blade steel and textured G10 handles with nested stainless liners should be familiar to Spyderco aficionados.

COLD STEEL URBAN EDGE

Cold Steel Urban Edge

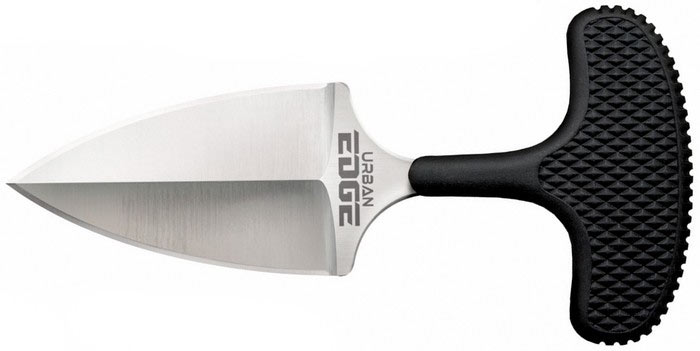
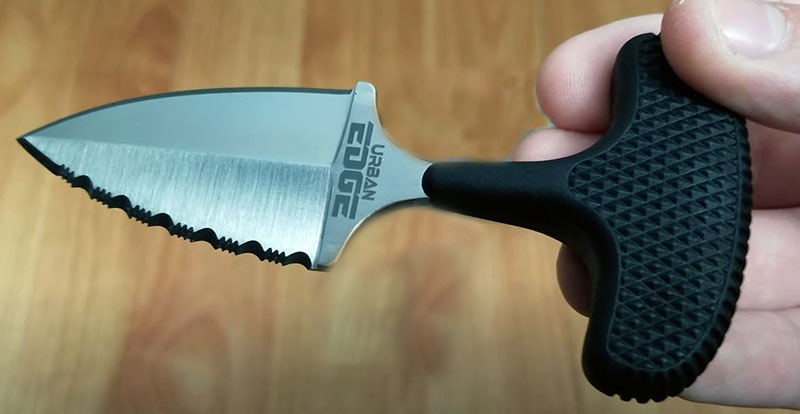
Here’s a budget option for those with slim wallets. The Urban Edge is a series of push daggers from Cold Steel that straddle the line between the enormous 4.5” Safe Maker and the miniscule 1” Mini Pal, balancing out usability with portability. At only 1.42 ounces the Urban Edge is light enough to be forgotten, with the sheath designed to be used in a neck knife setup – although a series of rivets on the sheath means it could be adapted to belt carry or just shoved into a pocket, since it’s only 4” long total. Blade steel is AUS-8A, in a broad dagger shape with a hollow grind and flat on the back. The handle has a molded rubberized grip. You have three choices for the grind – plain edge, 50/50 serrated (serrated on one side, plain on the other) or fully serrated.

Urban-Edge-real-life

The push dagger is designed to be held in a closed fist, with the blade protruding through your ring and middle fingers away from your knuckles, in a defensive situation for use in a pushing/punching/thrusting motion rather than swung in arcs like the karambit or TDI mentioned above. At only 2.5” it’s not an outrageously large knife, which gives it the benefit of being easy to carry and conceal but it’s long enough to make a difference. A push dagger is even more reliant on gross motor skill than the TDI, and probably less useful for day to day tasks – a real single-use self-defense tool.

EMERSON CQC-13

Emerson CQC-13

Ernest Emerson is one of the most well-known names when it comes to tactical knives. He’s been making knives that appeal to “operators” (real and imagined) under the brand of his own name since 1996, and well before that as customs. Emerson is the progenitor and patent holder of the Wave device, a deceptively simple feature that when used correctly will open a knife into the fully locked position as you pull out of your pocket using a small protrusion on the spine.

Emerson-CQC13-real-life

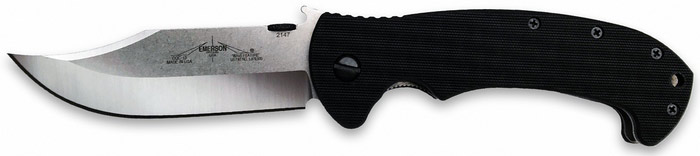
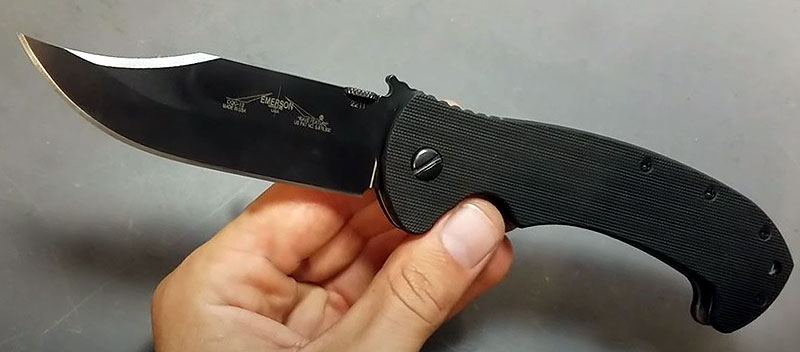
A knife that opens itself is about as tactical as it gets, and his innovation has spread to many other brands including a broad collaboration with Kershaw. But if you want the most tactical of Emersons, it has to be a Bowie, doesn’t it? The combination of Ernie’s expertise in all things tactical and the traditional fighting-knife shape of a Bowie (or recurve clip point if you want to be picky about it) makes for one intimidating piece of equipment. It’s got all the things that make an Emerson an Emerson, of course: black G10 scales, normal fasteners (the pivot screw is a flathead! Imagine that!), the thumb “disc” opener, and a chisel ground blade in 154CM with a unique dual-texture finish: satin on the grinds, stonewashed flats. At 3.85” it’s on the large side giving you extra reach, and like all Emersons it has excellent ergonomics. The ZT Emerson collaborations are now discontinued but are worth an honorable mention.

CRKT TECPATL

CRKT Tecpatl

How cool is the Tecpatl? Aside from its function as a self-defense tool, it’s a neat knife to look at. The Tecpatl is part of CRKT’s Forged by War series, knives and tools designed by military veterans with 10% of proceeds going to charities of the designer’s choice. In the case of the Tecpatl, it’s designed by Michael Rodridguez, an Army vet with proceeds going to the Special Operations Care Fund and the George W Bush Institute.

It’s a unique knife to be sure, a push dagger with two finger guards – one complete, one partial – that’s designed to be clenched in your fist facing outwards. The blade shape is a modified wharncliffe, with a full length swedge that switches over to a sort of reverse-tanto shape towards the tip, while the belly has a long continuous curve up to the tip. This is all designed to give the Tecpatl strong piercing abilities while retaining enough material behind the tip to give it strength to penetrate without breaking off. The steel is SK5 high-carbon non-stainless steel, so a black powder coat is applied to prevent corrosion. This is the canvas for the unique “Sugar Skull” (Calavera) markings and a host of other Easter eggs. The Kydex sheath is Molle compatible too.

AL MAR SERE 2000

Al Mar SERE 2000

The SERE 2000 was the brainchild of the late Al Mar and Nick Rowe in the 1980’s as a knife designed for use in the Army SERE training course – Survival, Evasion, Resistance, Escape – which prepares soldiers for unexpected occurrences in the field. To this goal, the SERE 2000 was designed to be a knife that can be relied on in any situation to do what’s needed. It’s not a complicated knife, but it is a tough one – arguably one of the strongest tactical folders around.

A 3.6” (or a 3” on the Mini-SERE) VG-10 blade has a spear point shape with a pronounced swedge and opens with dual thumb studs. A beefy liner lock and flow-through construction makes this knife simple, reliable, and easy to disassemble and clean. The handles flare out at the hilt to help keep your hand from slipping forward in rough situations, as do the textured G-10 handle scales. A deep carry clip mounted to the butt of the handle helps keep a low profile. The SERE 2000 series is available in a variety of configurations: satin finish or black ceramic coated blades, and black, digicam or olive drab handle scales. Solid self defense option.

MICROTECH COMBAT TROODON

Microtech Combat Troodon

It can be argued that part of self-defense is mental over physical, and a giant powerful OTF knife popping open is the blade equivalent of the unmistakable sound of a 12-gauge pump shotgun being racked. Microtech’s are impractical, expensive, overly ornate, needlessly aggressive knives – that will scare the &!#% out of anyone with bad intentions who picked the wrong guy. Theoretically, anyway.

The Combat Troodon is Microtech’s biggeset, baddest OTF. It features a dual action slider on the spine of the handle that both deploys and retracts the blade under spring pressure. Blade steel is Bohler Elmax powdered stainless as standard, although there are a staggering array of variations available: six blade shapes, serrations or no, three different hardware sets, seven finishes, and fifteen colors – including the fairly offensive Zombie Splatter. Aluminum handles keep it light, and a glass breaker on the butt of the handle also serves as the anchor point for the pocket clip – as well as a makeshift kubotan if you’re so inclined.

CHRIS REEVE PROFESSIONAL SOLDIER

Most people are familiar with Chris Reeve Knives for the iconic Sebenza folder – maybe the newer Inkosi or Umnumzaan folders too. But a lot of people aren’t even aware that CRK makes fixed blades. The Professional Soldier is designed by Bill Harsey (yeah, that Bill Harsey!) in collaboration with the professionalsoldiers.com forum for the Special Forces. It’s a minimalist fixed blade made of – what else? – CPM S35VN stainless steel, PVD coated black as well as some in flat dark earth, with your choice of three blade shapes: a traditional drop point, a modified tanto, or the Inkosi – CRK’s take on a modified wharncliffe.

Designed to be a versatile carry, the Professional Soldier comes with a kydex sheath that’s Molle compatible, and has some hidden features you wouldn’t notice at first glance. The void in the handle is actually a shackle key to loosen shackle bolts up to 5/8”, and the paracord that’s threaded through the two holes in the rear of the handle has been carefully placed so the knife doesn’t make noise when it’s set down.

It’s arguable that above all else a good self-defense tool doesn’t make itself difficult to carry or use, and that’s what earns the Professional Soldier a spot on this list. It’s slim, simple, easy to carry and conceal, and it has the kind of basic but correct ergonomics you need in an emergency situation. Also, CRK’s build quality is second to none and the Professional Soldier can be reliably passed on to your grandkid’s children assuming it isn’t lost.

BONUS: Medford Marauder Medford Marauder-700

No, not to cut things or slash things. The Medford Marauder, ringing in at around $800 retail, weighs over 11 ounces. The blade is more than a quarter-inch thick. Cut things? Why bother? Just throw it at your attacker – overhand, like a baseball. Knock them clean out, steal their wallet and buy a real knife.

Best Air Rifle Deals

Popular Posts

What can you kill with a 177 air rifle?

0
"Unleash Your Precision: Discover the Power of a .177 Air Rifle to Take Down Targets with Accuracy. Explore the Versatility and Potential of this...

Air gun 101: Everything you need to know about air rifle accuracy

0
Wyatt Earp has said: Fast is fine, but accuracy is everything And I just thought how many airgunners are obsessed with muzzle velocity and muzzle energy,...

Synthetic vs Wood Stock: The Final Showdown Between Brunette And Blonde

0
I understand that you’re here to get some quick facts on synthetic vs wood stocks Probably to guide your purchase.  Quick alert - the debate...