Home Blog Page 151

6 Reasons to Avoid a Clover Lawn

0

A lot of people tell me they’re interested in switching their traditional grass lawn over to a clover lawn. Now, a clover lawn could mean you are intentionally adding clover to your lawn, or it could mean you are planting only clover. Usually the people I encounter are considering a lawn made up entirely of clover — no other plants… a monoculture.

When you search Google Images for lawn alternatives you are sure to find some beautiful eye candy showing gorgeous, perfectly uniform lawns made up entirely of microclover, a cultivar of white clover bred to grow to a very short height. The human eye seems to be really attracted to simple, clean, and manicured. They like patterns and uniformity. I’m all for minimalism and simplicity, but nature often is not a fan. Nature wants diversity, chaos, checks and balances.

Clover lawn eye candy
Pretty, isn’t it? Image from Treehugger

I think most people find appeal in a clover lawn because it doesn’t need to be mowed. It also would possibly need less watering and fertilizing (though that doesn’t need to be done in a grass lawn either). These points appear at first glance to equate to fewer resources — great! They might also be attracted to the fact that clover simply is not grass, so it’s counter-culture (also wonderful).

But while I applaud anyone looking into lawn alternatives, this particular approach has some major problems.

1. It’s still a monoculture.

Monocultures, cultivation of a single plant in a given area, are difficult to maintain, especially in medium moisture environments where clover thrives. You will be battling weeds if you want to maintain a clover-only lawn. Monocultures are also risky, because you’re putting all your eggs in one basket (or is it “seeds in one packet”?). If your clover fails, there are no other plants there to cover the soil and you’ll need to start all over again attempting to establish something in exposed soil.

2. Grass will show up.

Unless you consistently use a grass-specific herbicide, grass will grow in your clover lawn. If you are trying to maintain a clover monoculture, this means you will either have to spray or pull the grass. Pulling grass, especially in an area the size of a lawn, would be exhaustive or in some cases outright impossible. If you don’t spray or pull the grass, you will need to mow the grass to avoid fines if you live in a city (most cities have ordinances limiting grass/weed heights). All of these options directly contradict many of the reasons most people are looking into a clover lawn.

Image of clover lawn by Zdeněk Chalupský on Pixabay
Image by Zdeněk Chalupský from Pixabay
3. It has less foot traffic tolerance.

Clover isn’t quite as tolerant of foot traffic as grass. For example, if I were to go outside and practice Taekwondo forms in the lawn, and I picked a spot that was more clover than grass, the repetitive spinning and pivoting would completely tear up the delicate clover stems and leaves. In comparison, grass can withstand much more abuse. I can practice for an hour in the same spot on grass, and it’ll just be flattened and spring back to full force within a day or two.

4. It’s less aggressive.

Clover is simply less aggressive than grass in spreading and growing. When you are trying to grow a lawn, this quality is highly desired. That’s why grass is used in high foot traffic areas. It’s a tough plant, but it also grows and spreads like crazy, so even if the plant is harmed, it just rapidly clones and reseeds and all is good again.

5. It dies back in the winter.

Clover also dies back in the winter and needs to grow back from the roots in the spring. So there will be a period of time where there is no ground cover. And what do you get when you mix zero plant cover with spring rain? Yes, mud. With grass, the plant above the soil stays intact but goes dormant. Then it springs back to life in the spring. Even before it’s green, it’s still there, covering the soil in a thick mat and preventing erosion and mud pits.

6. It’s resource intensive.

A clover monoculture lawn will be just as hard to maintain as a grass monoculture lawn. It may require herbicides or hours and hours of labor pulling grass and weeds. And it may need to be watered in times of drought. Plus, if you currently have a grass lawn, you will need to kill or remove the current living plants to sow the clover seeds. Then you will need keep everyone off, water consistently, and battle a major onslaught of weeds who will flock to your exposed soil until the clover is established.

My opinion

What I foresee for people who try to convert to a clover lawn is that they will eventually give up the battle against the grass and start mowing it. What they will end up with is a grass lawn with clover — which is great because clover is a very useful and beneficial additive to lawns (it fixes nitrogen), along with other great plants that tolerate mowing and foot traffic. But, it would have been a lot easier, cheaper, and less painful, to have just started off adding some clover seed into their grass lawns.

Diverse lawn with spider web
My lawn has clover, dandelion, plantain, chicory, queen anne’s lace, yarrow, and of course, grass. Wildlife from spiders to bees to rabbits to birds all enjoy the diversity.

The bottom line: If you need a lawn (find out here) use grass, but also allow biodiversity so it’s less boring, cheaper, easier to maintain, and better for the local ecology. Plants that show up in your lawn and stay there, are plants that want to grow in those conditions. As long as they are not considered invasive species let them grow! All plants have evolved to be here because they serve a purpose in their ecosystems. Nature has handed them to you as a gift. Learn what each plant is — most weeds also have human uses, too. They might be edible or medicinal or useful as cut flowers. They might also help fertilize and/or aerate your lawn and give food to wildlife. When you open your heart and your lawn to a variety of plants, amazing things happen.

Top 5 Streamers for Brook Trout + Landlocked Salmon in the Spring

0

Here in Maine and many parts of New England, springtime means ice-out and smelt runs. In the early spring, smelt are spawning. Looking for tributaries and other feeder streams to complete their duty, trout and salmon will follow suit. Smelt can enter the river in many different ways, including getting tossed through dams, so they can be ever-present in many different areas in rivers, lakes, and ponds. Trout and salmon are hungry from a long winter and ready to feed. Baitfish meals that are full of protein are high on their list. This means it is a great time to get out those streamers. Some of the biggest fish are present and feeding this time of year and some of your best chances to find these beasts is to fish streamers. Here is a short list of some of our favorite ones at the shop!

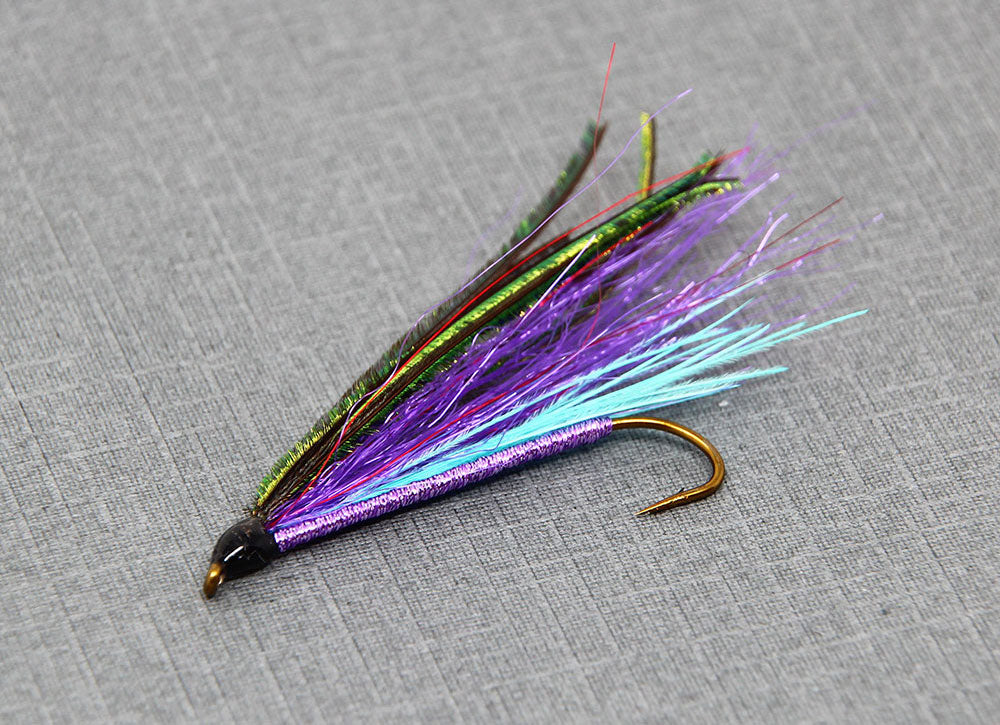
Raptor Smelt

Raptor Smelt Maine Smelt Streamer

This is streamer pattern designed here at the shop that is tied to imitate a smelt. This pattern features a wing with a combination of synthetic and natural materials including Raptor hackle, Steve Farrar SF Blend, and peacock herl. These flies are tied on size 6 Daiichi traditional streamer hooks. With smelt runs in full swing during the spring, patterns that imitate this forage are incredibly important to have in your box. These flies will work well on floating, intermediate, and sinking lines depending on the depth desired. Smelt streamers in general work very well when swung, but can induce bites by being stripped sporadically as well. If you think you will be fishing for trout and salmon that are actively feeding on smelt, be sure to pick up a few of these flies.

Check out this pattern HERE

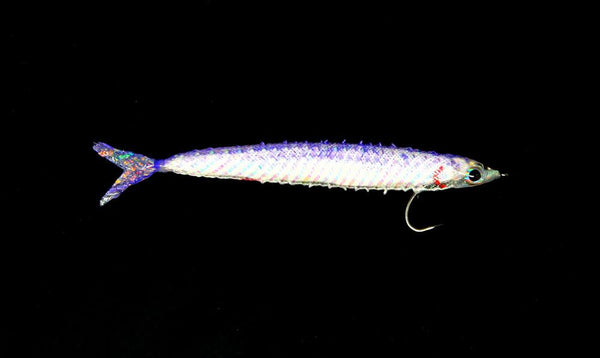
Floating Smelt

Floating Smelt Streamer Fly

The floating smelt is an incredibly effective imitation of a dead or wounded smelt. This pattern is meant to be dead drifted on the surface to imitate this but can also be swung in the current with succesful results. The floating smelt works best when fishing on tailwaters that have smelt being washed down and injured through the dam turbines. With so many of our rivers heavily dammed in Maine this is a very regular occurence. This fly is tied with E-Z Tubing stuffed with foam and colored with a marker for the dark back. Tied on a size 4 Gamakatsu B10S stinger hook and features Fish Skull Holographic Living Eyes.

Check out this Pattern HERE

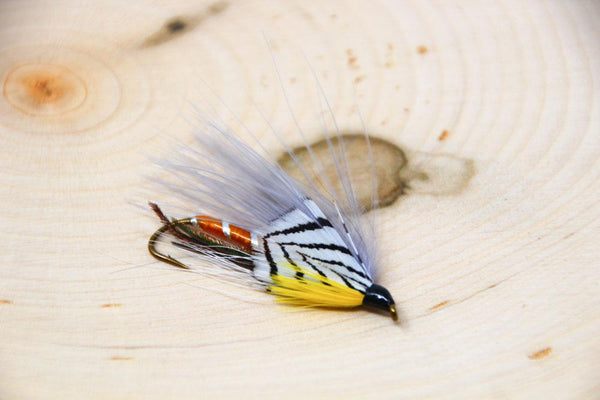
Grey Ghost

Grey Ghost Streamer Fly Maine Fly Fishing

As effective as it is famous, it doesn’t make much sense to target Maine salmon and trout without a grey ghost in your box. Originated by the famous Carrie Stevens, this is probably the best known traditional Maine streamer pattern, and for good reason. This fly is very productive in the fall for inducing a territorial reaction bite, but is also a great pattern to be throwing during smelt runs. This fly can be effectively fished on a floating, intermediate, or sinking line depending on the depth desired. We offer a marabou wing version here at the shop that seems to be especially productive in our northern rivers and streams. These flies are tied on size 6 Daiichi traditional streamer hooks.

Checkout this fly HERE

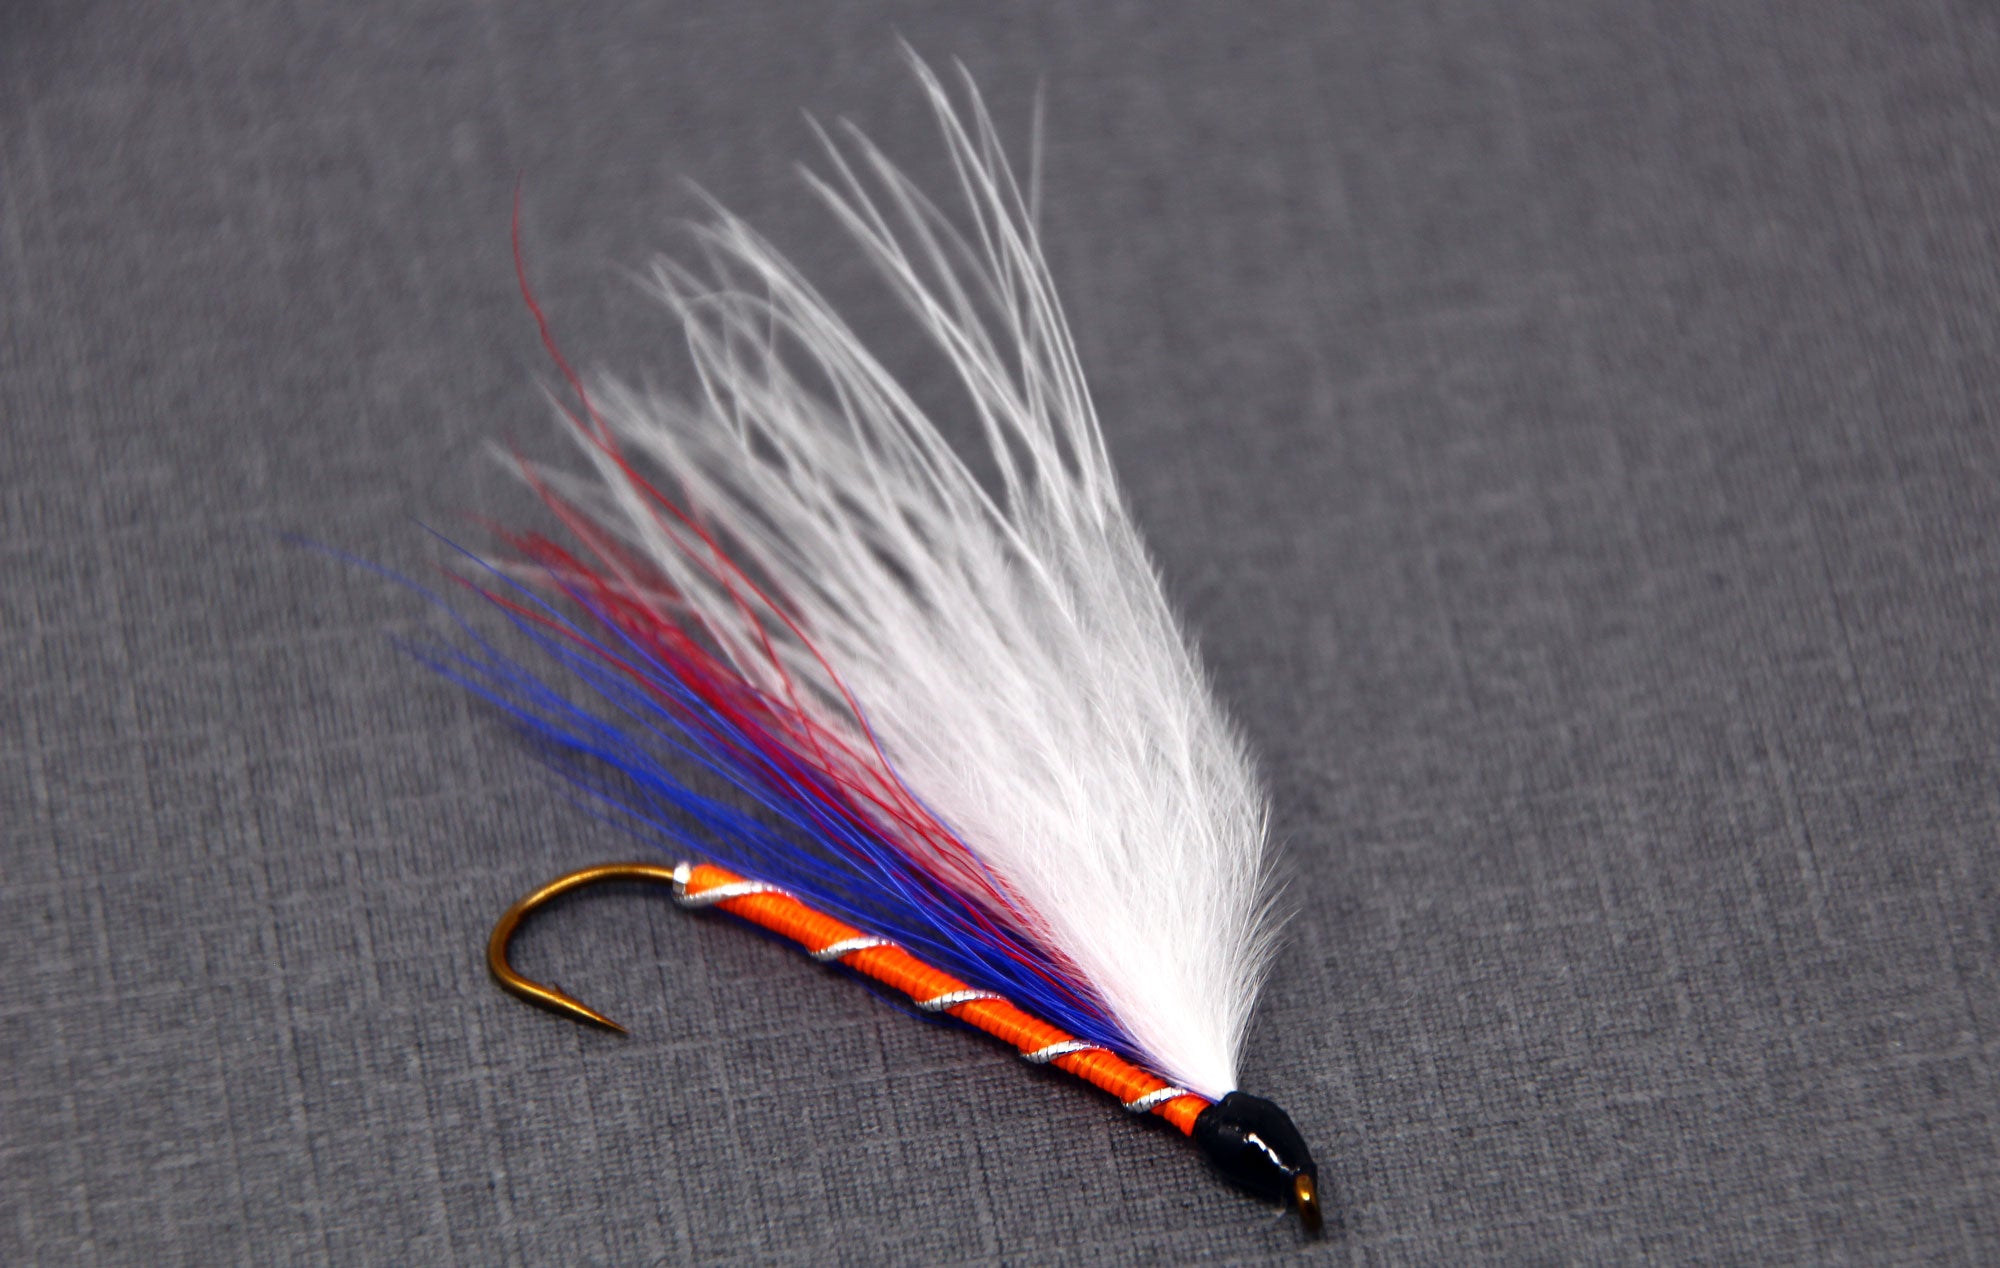
Montreal Whore

Montreal Whore Streamer Fly

Sometimes you just need the biggest piece of white marabou you can find tied onto a hook. That is what the Montreal whore is. A classic and super effective Maine “attractor style” streamer pattern, the Montreal Whore shines not only during the fall but during our smelt runs as well. This fly is a quick easy tie, but produces a lot of fish. Somewhere in between an attractor pattern and a smelt imitation, this is one fly you should be sure to have in your box. Like the Grey Ghost, this fly fishes well in both Spring and Fall months. Our version of this pattern is tied on size 6 Daiichi traditional streamer hooks.

Check out this fly HERE

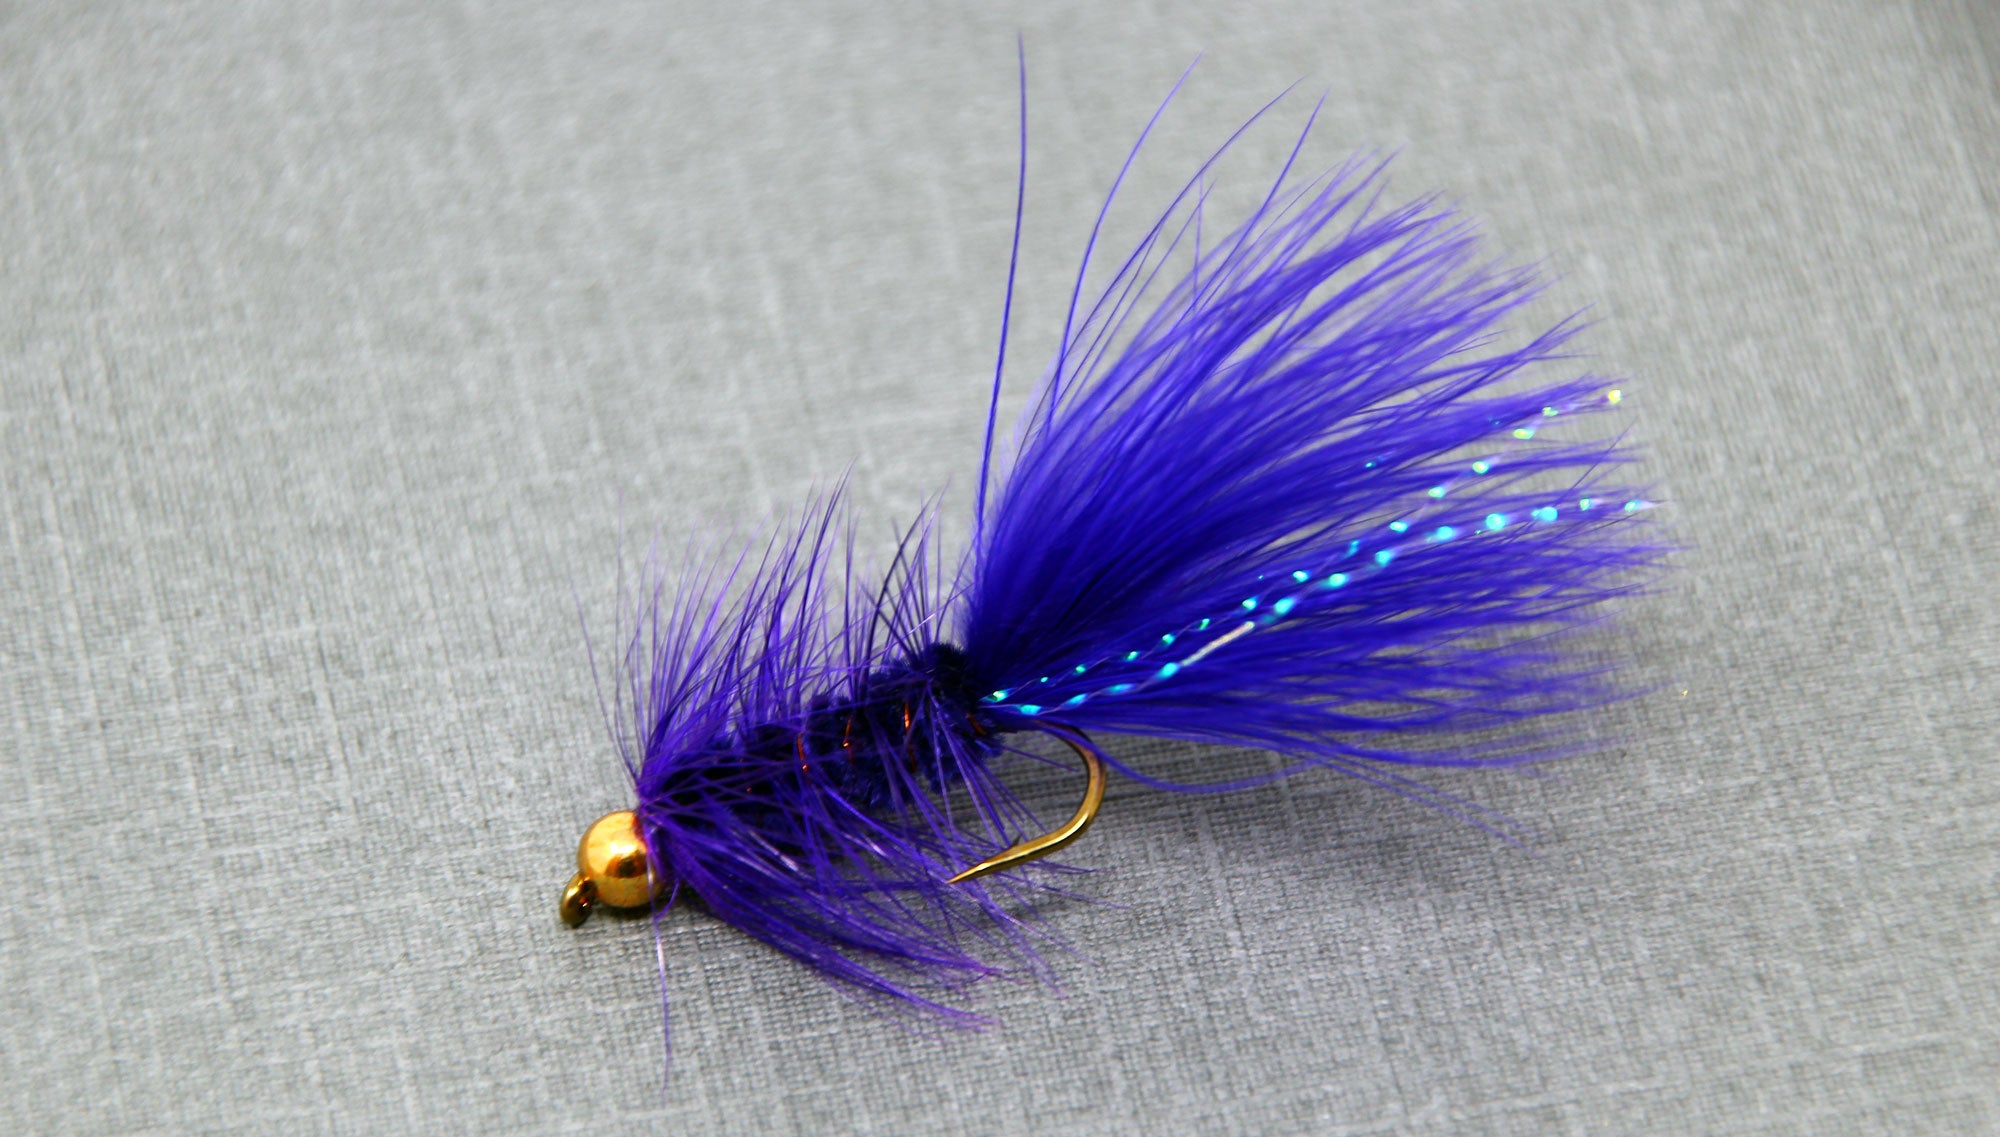
Bead Head Woolly Bugger

Purple Woolly Bugger

As obvious as it is, this one had to make the list. Woolly Buggers just down right catch fish. And in the spring when the trout and salmon are looking for a big meal after a long winter, they cannot resist this super popular pattern. In the spring we like them on the larger size 4 and 6 hooks specifically in olive, white, and purple. Black is also very productive, especially in stillwater scenarios. We have many different sizes, colors and variations at the shop.

Check out this fly HERE

AR-15 Cleaning and Maintenance [Ultimate Guide]

0

So you just bought a new AR-15 and took it to the range.

You ripped through a few boxes of ammo and now you’re home and you need to know….how do I clean this thing?

Maybe you’ve pulled the pins and separated the upper and the lower and you have no idea what to do from there.

It looks intimidating, right?

Feeling a bit overwhelmed?

No need for that, cleaning the AR-15 is pretty easy!

I’m going to show you just how easy it is to tear your rifle apart, clean it in depth, and put it all back together without fear of damaging anything or leaving any parts out.

Now…with a quick video too!

If that helped, please subscribe to our YouTube channel since we’re adding new videos every week!

Step One: Get the Tools to Clean Your AR-15

If you already have other guns, and you’re cleaning them like you should be (you are cleaning your guns regularly right?) then you most likely already have just about everything you need to clean an AR-15, except for some AR-specific things like a bore brush for your particular caliber.

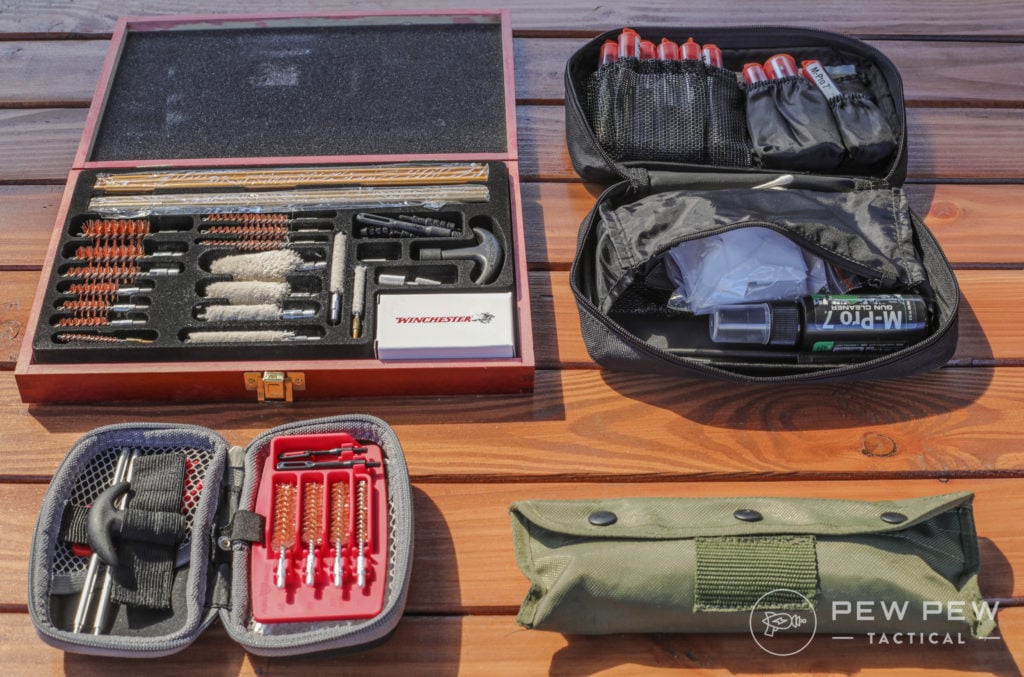
If you don’t already have cleaning supplies, or if you want to build a complete AR-15 cleaning kit that you can carry to the range or competitions, you have two options: build a kit, or buy one.

Which one is better?

That’s going to be a decision you have to make for yourself.

If you just want a kit that works, or maybe you don’t shoot your AR a lot and aren’t worried about maximizing your cleaning efficiency, then just buying a pre-made kit is perfectly fine.

But, if you are a high volume shooter and you need to clean your rifle frequently, or you’re like me and just enjoy the Zen-like process of cleaning your guns, you’ll probably want to build the perfect kit to meet your needs.

Let’s look at the pros and cons of these two approaches.

Buying a Pre-Made Gun Cleaning Kit

First, if you want to order a kit that will have just about everything you need, there’s no shame in that. Not everyone has the time or energy to build a kit from scratch, and there are several good options out there. The downsides of buying a totally pre-made kit are you can only reliably find universal cleaning kits that are going to include a bunch of extra brushes and bore snakes that you won’t necessarily need.

All Gun Cleaning Kits

Think of the pre-made kit like an off-the-rack suit. Sure it’ll work, but its never going to be as nice, or as personalized as a bespoke option.

Basically, off-the-rack is fine, but you wouldn’t want to wear it to your wedding or wear it every day.

The same goes for these pre-made kits…you wouldn’t want to rely on them for something important, say, if you’re a competition shooter, and you’ll want a more personalized option if you’re going to be using it a lot.

That being said, these kits are perfectly fine for most folks, and they’ll be good if you have other guns or other AR-15 calibers, or are looking at acquiring some in the future. Our favorite is the GuardTech.

With these kits or any kit, you buy/build, you’ll want to make sure that they include the correct size bore snakes and brushes, as well as the other tools that work with your AR-15. Make sure you match the caliber to your gun, or you’re going to have to buy another…and you’ll feel a bit silly in the process.

Check out all our favorites in Best Gun Cleaning Kits.

Building Your Own AR-15 Cleaning Kit

Because cleaning a gun is a process that can vary so much from person to person, it’s best that you build a kit that meets your own needs. You can always pick up several different pre-made kits and combine them into one giant “frankenkit”.

If you’re going to build your own kit, I recommend buying a nice case such as this Plano 3-Tray Tackle Box with Dual Top Access, but anything from a cardboard box on up will do.

Next, you’ll want a cleaning mat to keep your parts visible and to keep everything organized. A white sheet or tablecloth will do, but I like this Gun Cleaning Mat because it also includes a handy parts list, making it perfect for a beginner.

From there, you’ll want to buy the brushes and bore snakes/rods for your particular AR caliber. I’ve included some links to .223/5.56 caliber ones below since these are the most common flavors of AR on the market, but you’ll need ones that match your particular caliber.

Here are some kits that include more or less everything you need:

  • Gunmaster 223/5.56 AR Rifle Cleaning Kit ($12) – This is the one in my case up top.
  • Real Avid Gun Boss – AR/.223/5.56 Compact Rod-Type Cleaning System Kit ($30)
  • Otis Modern Sporting Rifle & AR Cleaning System ($43)

With these kits, you should have the brushes, bore snakes/rods, punches, and other various and sundry things you will need, other than your consumable cleaning supplies such as solvent, lubes, and cleaning patches.

The only other things you may find useful (especially if you want to get into some light gunsmithing) is a better punch set like this Ultimate Arms Roll Pin Punch Set ($29.99) and an AR-15 Vise Block ($49.99) that fits into the mag well of the rifle so you can secure it in a bench vise without scratching the finish on your gun.

Best AR-15 Cleaning Solvents and Lubricant

  • Hoppe’s No. 9 Gun Bore Cleaner ($7.46)
  • Hoppe’s No. 9 Lubricating Oil ($6.99)
  • CLP Oil, Solvent, and Lube Combination ($33)
  • Ballistol Multi-Purpose Aerosol Can Lubricant Cleaner Protectant ($10) (We love this one so much, we wrote a Ballistol Review)

Step 2: Prep the Area and Clear the Firearm

First, lay out your cleaning mat and throw on some gloves. Some of these chemicals are toxic and you want them in the gun, not on your skin or in your body.

Next, round up all the ammo for your gun, and move it off the table. Seriously. Get it out of the room, if possible. This eliminates the possibility of a round finding its way into the chamber at any point.

Next, clear and render safe your firearm. (That’s fancy talk for making sure the gun can’t go pew, pew pew, or pew pew pew for any reason.)

Here’s the full procedure

  1. Point the rifle in a SAFE direction.
  2. Remove the magazine.
  3. Place the weapon on safe (don’t worry if you can’t because the hammer isn’t pulled back).
  4. Lock the bolt to the rear.
  5. Visually inspect the chamber and remove any ammunition that may not have been ejected.
  6. Release the bolt.
  7. Place the weapon on safe.

Step 2: Separate the Upper Receiver from the Lower Receiver.

Push the take-down pins out and pull the two halves apart. Some pins can be pushed out with your finger, others may require the use of a punch. Be careful whatever you use so you don’t scratch your finish. I recommend a nylon punch from one of the kits above for general use.

Step 3: Remove the Charging Handle and Bolt Carrier Group

Step 4: Disassemble the Bolt Carrier Group

First, push the bolt to the rear (pictured above) and remove the firing pin retaining pin using your pick. Remove the firing pin and set it aside. Rotate the cam pin ninety degrees and remove it. Now the bolt should slide right out!

Step 5: Disassemble the Bolt

Once you have the bolt out of the bolt carrier group, use a punch and your mallet to remove the extractor pin, and then remove the extractor and set it aside.

Step 6: Remove the Buffer and Buffer Spring from the Buffer Tube

Using a calloused finger, or a punch, press down on the buffer retainer. Remove the buffer and spring from the tube. Remember the retainer is under pressure, so try not to push down on it too far and slip once the pieces are out.

Otherwise, you’ll spend the next few hours looking for it after it springs off to the other end of the room.

Step 7: Clean the Chamber and Barrel

Everyone has their method for this, but there are a few things you need to remember.

The most important thing is that you clean the chamber and barrel from rear to front. You want to make sure the debris comes out the front of the barrel, and that any brush you use on a rod is inserted from the rear – go with the bullet.

This helps keep the rifling intact. The movies are wrong; you don’t clean from the muzzle to the chamber!

This area takes some creativity to clean up, but with time you’ll find what works for you. This is a good place to drop a little bit of that Bore Cleaner you picked up.

Step 8: Clean the Bolt Carrier Group

This is easier than the chamber and barrel.

Give everything a good scrub. Look for carbon buildup, especially at the rear of the firing pin.

Clean the extractor well, attention to detail is key. I make sure my rags are all plain white and cleaned after every use with bleach.

Set one aside as an “inspection” rag so you can easily find missed carbon.

When you’re finished, reassemble the bolt carrier group in the exact opposite order of disassembly. Make sure your bolt is fully to the front so it can be reinserted in the upper. A flick of the wrist helps this along.

Step 9: Clean the Buffer Assembly

This part is easy. Get a rag with a little lube on it and wipe it all down.

Unless you took your rifle to a really cool obstacle course, you probably won’t need to get back in the tube itself. Wipe down the spring and buffer and you’re all set.

During this step, if you have a collapsible stock it’s not a bad idea to remove it and wipe down the outside of the buffer. It’s an option if you have been in a messy environment, but not needed for range trips.

Step 10: Clean the Charging Handle and Upper Receiver

Just like the buffer assembly, a lightly oiled rag is all you should really need here.

You’ll find what works best for you, but once reassembled the charging handle should move effortlessly within the upper receiver.

Step 11: Clean the Fire Control Group (FCG) and Lower Receiver

This takes a brush, oil, and patience.

It generally doesn’t get too fouled up. Pay attention to your FCG and make sure there are no cracks on the hammer or anywhere on the lower receiver.

Step 12: Reassemble your Rifle

Work backward from the takedown, just like the bolt carrier group. After the fifth time, you do this it will become second nature! It should look something like this when you’re done.

Step 13: Lubricate your Rifle

There are more details to this, but I’m going to keep it simple for right now. All the pieces of your bolt carrier group and your charging handle should receive a light coat of lubricant. It should have a nice sheen to it.

Your FCG, mag release button, bolt catch button, safety selector should all get a drop or two of lubricant. Fiddle with them a touch to work it in there. Bottom line, anything that moves needs to have a bit of lubricant on it.

Step 14: Perform a Function Check

You put all your ammo away at the beginning of this whole deal (right?) so there should be no way a round is anywhere near the chamber but do a safety check just in case.

Then:

  1. Point the weapon in a safe direction.
  2. Pull the bolt to the rear and release it forward.
  3. Place the rifle on safe. Squeeze the trigger. If the hammer doesn’t drop, you passed that step.
  4. Place the rifle on fire and pull the trigger. The hammer should fall. If it does, then you’re all finished with the hard part.

Step 16: Clean Your Magazine

This is an often overlooked step. It doesn’t need to be cleaned after every trip to the range. Just pay attention to it during loading.

Does it bind up? Can you hear dirt rattling around in there? Is it hard to load?

Cleaning the magazine is just like cleaning the buffer assembly. Use a pick or whatever you have handy to remove the base plate.

Remove the spring and follower. Wipe it all down and clean it up. Reassemble in the reverse of disassembly.

These are pretty straightforward. If you’ve invested in anti-tilt followers for your GI magazines, this is a great time to install them.

Step 17: Maintenance

Just like the break-in procedure, every rifle has its own maintenance schedule. Consult the manufacturer for more. A general rule of thumb is to give your rifle a thorough inspection every thousand rounds. Once you hit the five thousand round mark, it is a good idea to move to inspections every five hundred rounds.

The most common failures occur in the various springs (specifically the extractor spring), and in the O-Rings on the bolt carrier group. If failures begin, start there!

Keeping a clean and properly lubricated rifle will naturally reduce the risk of failure and extend the life of your rifle. During each cleaning, inspect all parts of cracks, burrs and general wear and tear that may bring your rifle out of spec.

Some Final Thing to Consider When Cleaning an AR-15

Do you shoot corrosive ammo? Check out our handy guide for more information and proper cleaning instructions.

Take your time. You want to be as thorough as possible. Really get inside the bolt carrier with every rag and cleaner you possibly can.

When inserting the firing pin retaining pin, remember the big hole is where it goes in. If you put it in the small hole on the other side, you’re going to have a bad day.

Anything that moves on your rifle should get at least one drop of lubricant whenever you clean. Just like an engine, that oil is important! I cannot stress this enough.

That about does it for this one folks, if you have any questions or want to tell us about your own cleaning procedures, drop us a line in the comments below! Want to see what can happen when you DON’T clean your AR…check out 8 Most Common AR-15 Failures.

A Beginner’s Guide to Heat Lamps for Ducklings

0

So, you’ve just brought home your newest addition to your family — baby ducks! Cute and fuzzy, ducklings melt hearts. But, don’t be fooled by their adorable faces; ducklings are challenging to take care of.

The good news? Once you’re equipped with proper knowledge, caring for your ducklings is both easy and rewarding.

The most critical aspect to keeping your duckling safe, comfortable, and happy is learning how to give them proper amounts of heat. Ducklings need to live at a specific temperature, and without their mothers around to provide them that heat, you as the owner must step in to give that heat to keep them safe and happy.

Below is everything you need to know about heat lamps for ducklings.

Do Baby Ducks Need A Heat Lamp?

Yes! They do need a heat lamp. Using a heat lamp is the best way to provide the necessary heat for them while they are babies.

When they’re young, ducklings have difficulty regulating their internal body temperatures on their own. In the wild, baby ducks stay under their mothers’ protection until they’re around one month to two months old so that their mothers can help keep them warm.

The mother ducks use their down feathers to keep them warm. At night, they snuggle together to stay warm, which is how to keep ducklings warm without a lamp.

If you’ve adopted a duckling, you’ll need to provide them with warmth since they won’t have their mothers around. The best way to accomplish this is with a heat lamp. To ensure you’re keeping a warm enough temperature, you may also want to purchase a thermometer and keep it inside their brooder.

When they are first born, set the lamp to 90 degrees. Then, drop the temperature by 5 or 10 degrees each week until you reach 70 degrees.

Check out this duckling temperature chart for more information:

Another question many duck owners have is if baby ducks need heat lamps in the summer. If your house is temperature regulated and you keep them indoors, then yes, you do. If you keep them outside and the temperature reaches 90 degrees or higher, you can remove the heat lamp. However, be sure to put the heat lamp back at night in case temperatures drop.

How Much Heat Is Too Much?

While ducklings do require heat to keep them healthy, too much of a good thing can cause problems. It’s important not to give them too much heat as this can cause health problems and even death.

As a result, many new duck owners wonder, “how do I know if my ducklings are too hot?” Luckily, ducklings aren’t subtle about how they’re feeling. If you notice your duckling is panting, breathing fast, or has moved away from the heat lamp, these are signs that your duckling is too hot.

You’ll also notice if they are too cold as they will group around the heat source and not move so they can conserve heat. If you see your ducklings huddled around the heat lamp and become lethargic, try raising the heating temperature in your brooder.

A healthy duckling will have a substantial amount of energy and, as a result, will run around the brooder. If you notice a rapid change in your ducklings’ behavior, such as becoming more lethargic, tweak the heat to see if that makes them feel better.

Heat Lamp Logistics

Many new owners also wonder, “how far should the heat lamp be from the baby ducks?” Typically, you should hang a heat lamp 18 inches above the bedding.

You’ll need to purchase an infrared heater as a regular bulb does not have the power to create enough heat for a brooder. A 250-watt heat lamp will be sufficient and can even keep up to 30 ducklings warm. If you have more than 30 ducklings, consider purchasing more than one 250 watt bulb.

Make sure to use an infrared heat lamp with a hood and place it on one side of the brooder. Putting it on one side of the brooder is vital so that the ducklings have the option to stay on the cool side if they need to cool down.

To decrease the temperature, raise the height of the infrared heat lamp by moving it further away from the floor of the brooder. You can purchase a stand that is extendable so that you can continue to raise the light stand as the ducklings grow older.

If you must, you can use a heating pad for ducklings, but those are harder because it’s challenging to regulate the temperature. Additionally, if you have more than one or two ducklings, they all won’t be able to fit on the heating pad. Therefore, your best bet is to stick with a heat lamp and a thermometer.

When Do I Need To Turn Off The Heat?

Once fully grown, ducks will have their down feathers to keep them warm. Once they have these feathers, they do not need supplemental heat. Many duck owners wonder how long do ducks need a heat lamp? Until they’re fully grown and have their down feathers.

Ducklings need the most heat at night, so you must leave your heat lamp on at night. It is safe, but make sure you buy a good brand heat lamp and follow all safety precautions.

FAQ

When Can Ducklings Sleep Outside?

Once the ducks are fully grown, they can sleep outside. When ducklings reach about two months, they fully develop their down feathers that keep them warm on their own.

How Do I Know If My Ducklings Are Cold?

If your ducklings are cold, they’ll tell you by their behavior. If you notice they’re lethargic, don’t move away from the light, and huddle together, that’s a pretty safe bet that they’re too cold.

Do Two Week Old Ducklings Need A Heat Lamp?

Yes, they do. Two-week ducklings have not developed down feathers yet.

How Cold Is Too Cold For Ducklings?

It depends on how many days/weeks the ducklings are. Typically ducklings cannot handle temperatures below 70 degrees.

The ‘Wyoming Kangaroo Release’ is Still the Best April Fools Joke Ever

0

The story of kangaroos being released into the Wyoming landscape fooled just about everyone.

On April 1, County10.com announced that the Wyoming Wild Game Department had “released the first of five planned batches of 90 Antilopine Kangaroos into the Wyoming outdoors.”

Project Sage Hopper, as it was dubbed, was meant to increase wildlife-viewing opportunities, while also providing greater hunting options for outdoorsmen and women. The well-written piece had plenty of quotable lines from wildlife officials, as well as links to all of the proper wildlife agencies.

The trouble with the story was that it was a hoax! A wonderful, convincing, magnificent hoax.

The story spread like wildfire across social media, with seemingly only a few astute readers catching onto the chicanery. The majority of people, from all of the comments I read on the various repostings of the story, seemed to have swallowed the tale hook, line and sinker.

Many folks expressed their confusion. “Why would they do this?” they asked.

More expressed their outrage and disgust with the wildlife agencies allegedly responsible for introducing a non-native species into the Wyoming environment.

I shared the story on my own page, Stumpjack Outdoors, and had to actually delete a couple of comments because they were over the top in the vulgarity and passionate anger they expressed.

Some folks decried Project Sage Hopper with declarations that the WWGD’s release of the first 90 kangaroos would surely destroy native animal populations, while others heralded the increased hunting opportunities that would result. Others wondered aloud whether or not the meat from the marsupials would be edible or how they would adapt to the harsh Wyoming winters.

It was truly a convincing hoax. My own wife paused as she read the article, being taken in for a moment. It was gloriously clever.

But alas, the pictures shown in the piece were not of kangaroos being released as part of a Wyoming migration initiative. They were of mule deer, with the featured image being photoshopped to show a kangaroo bounding away instead of an actual collared mule deer:

If people were sold on much of the content of the article a tip-off to the phoniness of it should have been in a final sentence, where the author declared that “A short-list for future proposed introductions include the koala, wallaby and the endangered Tasmanian Devil.”

If you were fortunate enough to also see a follow-up piece published later the same day by The Brine Shrimp, you would have read how the ill-mannered kangaroos were already wreaking havoc with the local population. The roos were allegedly engaged in drunken acts of vandalism, breaking and entering and other acts of mayhem.

The report stated:

Jed Cummings, a Coalville resident said “I went outside today to go to work and noticed broken glass on the ground by my truck. The kangaroos stole a few CDS from my collection. They were pretty selective about what they took. Men at Work, Midnight Oil, AC-DC, Keith Urban, Olivia Newton John and Crowded House CDs. They only took CDs made by Australian bands. That’s when I knew it was the damn kangaroos!”

It makes me smile to think of how beautifully conceived and executed this truly “fake news” piece was. It should make you smile too, even it temporarily fooled you.

Well done and hats off to whoever created this brilliant hoax.

Happy April Fools Day!

Like what you see here? You can read more great articles by David Smith at his Facebook page, Stumpjack Outdoors.

NEXT: RACCOON WILL CLEAN YOUR HOUSE FOR TREATS

WATCH

https://rumble.com/embed/u7gve.v3tp7h/

Constructing a Bear-Proof Deer Feeder

0

Upon encountering a troublesome black bear who continuously tore up my deer feeders, I decided I was going to have to come up with a better solution to the cheap plastic Moultrie ones I had installed. I began searching the hunting forums for answers but everything I read kept repeating the same old story that there is no bear-proof deer feeder. Most people suggested hanging a barrel spreader between two sturdy trees. There were plenty of examples of crafty bears getting to these as well. There are of course some massive deer feeders for sale for thousands of dollars that would work if I had the money to blow or a way to haul something that large onto the property. My property is very rugged, and everything has to be carried in by hand. After a couple of hours searching I did find a couple of designs that were small enough to bring in, but they still were close to $800.00.

There had to be a better solution. I headed into my shop and drew up some plans for a steel fortress to house a 30-gallon barrel spreader. I headed up to my local steel supplier for the raw materials, tossed a new tank on the welder and got to work.

The Bear-Proof Deer Feeder Build

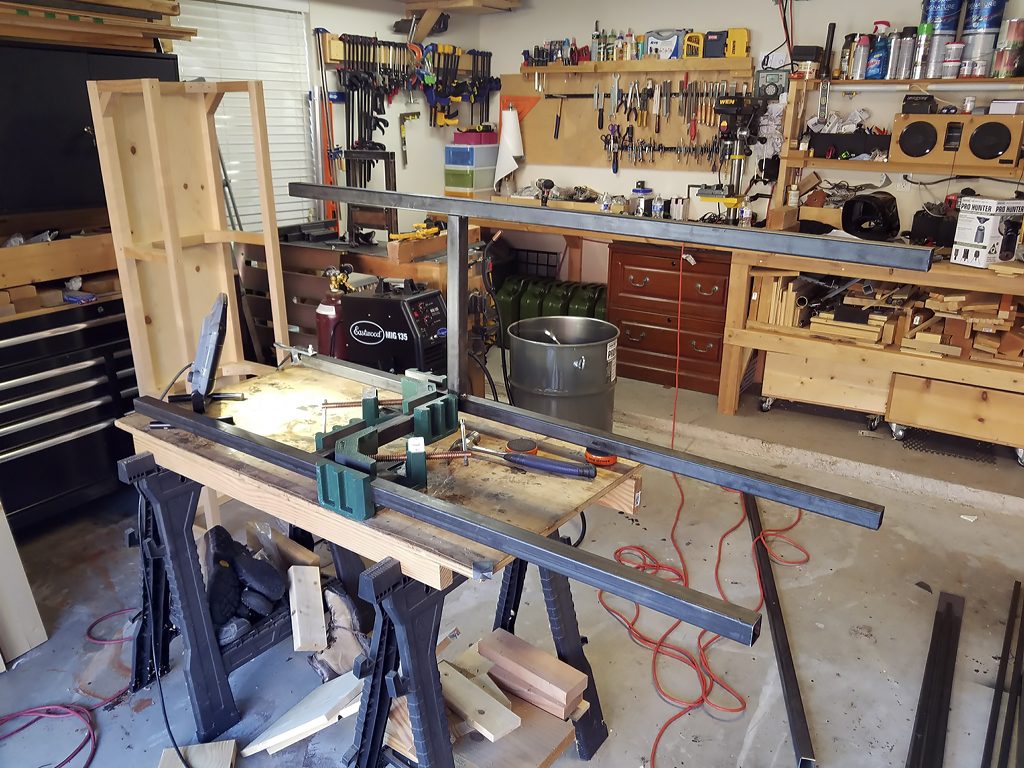
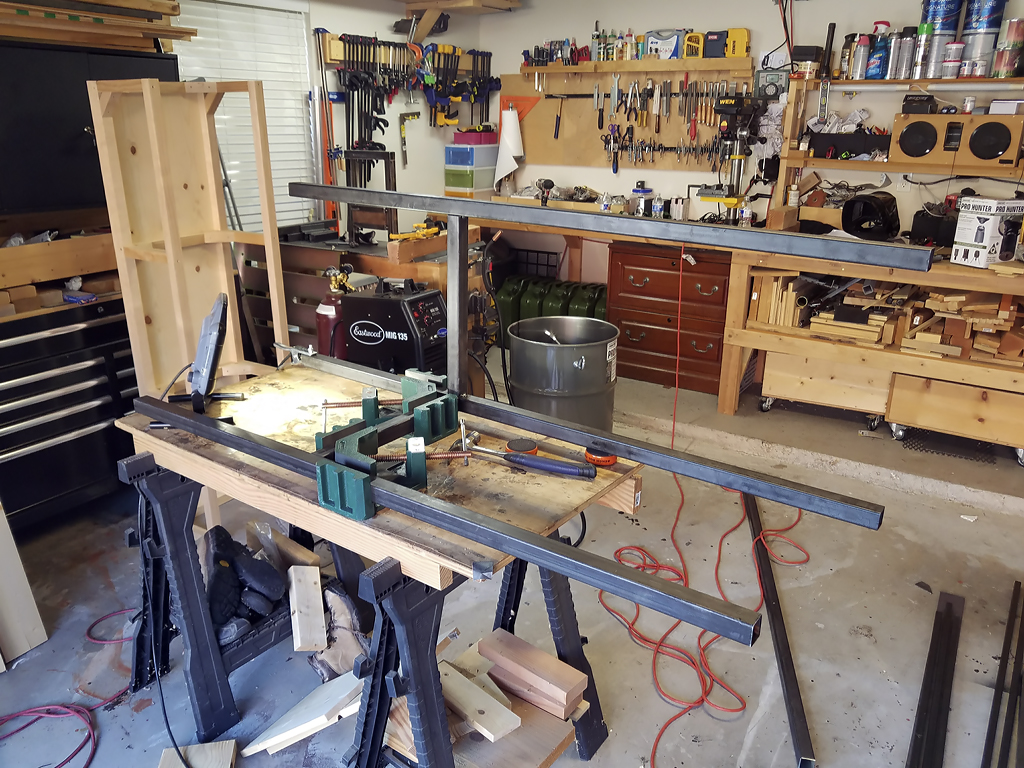
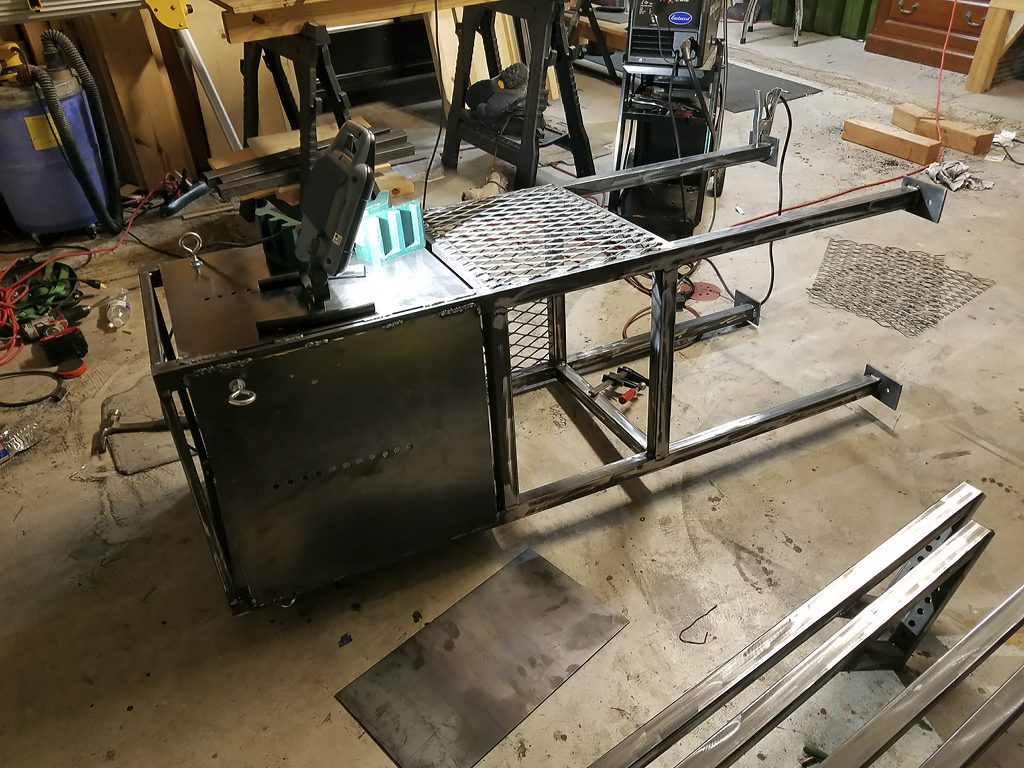
The first task was to construct a steel frame to house the barrel.

Bear-Proof Deer Feeder Frame 1

Bear-Proof Deer Feeder Frame 2

Bear-Proof Deer Feeder Frame 3

Once the frame was welded up, it was time to give the beast some armor plating. I used 1/8 inch steel plate that is plenty sturdy and didn’t kill me on the weight. Before welding them to the frame, I drilled hole sets for the support legs I had yet to complete.

Bear-Proof Deer Feeder Side Plate 1

Bear-Proof Deer Feeder Side Plate 2

To this point, it’s still just a conventional albeit heavy feeder design. The 45-degree support legs were the first real modification. These were designed to provide adequate stability to survive a hungry bear. These legs are juxtapositioned to the frame legs for added support. Because of the length of the legs, I had to make them adjustable due to the sloping, uneven terrain and they had to be removable for transport. Each leg also has a steel foot with a hole drilled to accommodate an 18-inch rebar ground stake.

Bear-Proof Deer Feeder Support Legs

Next on the list was to build out the critter cage and spray a coat of primer on the beast. The inside of the cage has sheet metal angles to ensure the feed falls outside the enclosure.

Bear-Proof Deer Feeder Critter Cage 1

Bear-Proof Deer Feeder Critter Cage 2

Time to give the beast a facelift and add a cage door for easy access to the spreader controls.

Bear-Proof Deer Feeder Finishing Touches 1

Bear-Proof Deer Feeder Finishing Touches 2

Only a few additions left to create. One of the things I noticed about my troublesome bear is that he liked to rear up on his hind legs and hug and push the feeders from the top where the container held the corn. I took a page from Mad Max and added rebar spikes attached to the upper plate panels. The spikes are sharp enough to be uncomfortable but not so sharp as to injure the bear.

Bear-Proof Deer Feeder Finishing Touches 2

For the final touches, I added a solar battery charger and put plastic end caps on all the open-ended square tube to protect the steel from moisture. Nothing left to do but load up the truck, head to Oklahoma and plant “The Beast.”

Bear-Proof Deer Feeder Finishing Touches 3

Bear-Proof Deer Feeder

After it was all said and done the Bear-Proof Deer Feeder could most likely withstand a tornado, and it only cost about $250.00 and a few weeks of fun in the shop. That’s a bargain in my book.

Update Video: After three days and many hours the bear gives up and the beast wins. Had to do a slight modification as the bear was able to spin the barrel which did cause a loss of a small amount of feed. The real issue is he tears the wire out of the solar charger which I have to fix each time.

All photographs and works are copywritten.

Any use or reproduction requires written consent.

Basic Guide to Nymphing when Fly Fishing

0

Nymphing, often known as fly fishing, is unquestionably one of the most popular types of fly fishing out there.

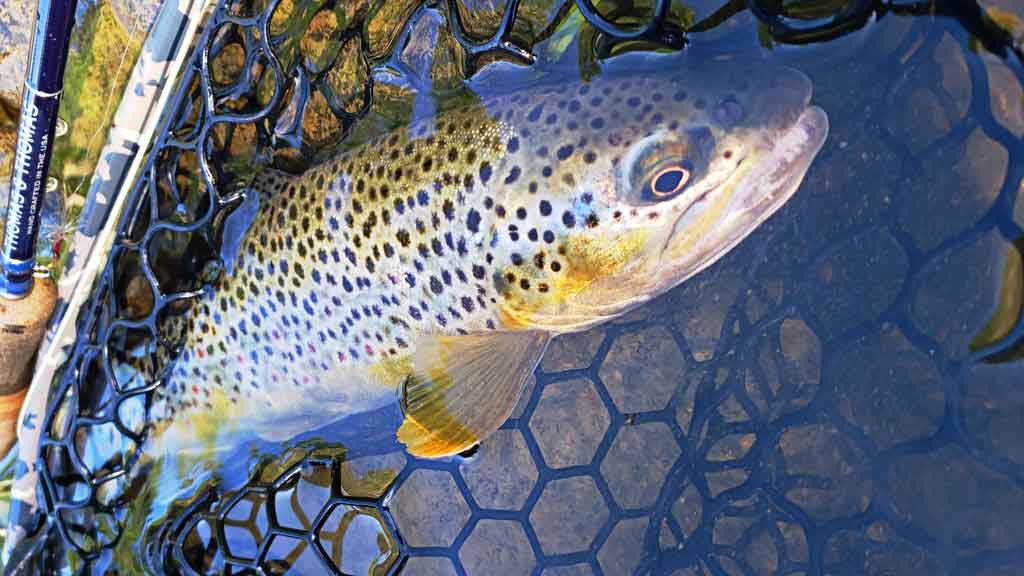
Large Brown Caught Nymphing

Nymphing is the method of fishing using artificial flies that resemble young aquatic insects, larval, or other sub-aquatic life forms such as worms and crustaceans that trout find attractive. In other words, fly fishing is the process of catching a large quantity of fish in almost any water body at any time of the year.

Before the insects become adults, mayflies, caddisflies, and stoneflies spend their juvenile years underwater as nymphs. In contrast, other species of insects swim through the water, eventually being carried downstream by the river.

Why should you be concerned about these peculiar aquatic insects and their unusual life cycle? Because nymphs are a food source for trout. And if you’d like to catch trout regularly? Knowing how to fish nymph-imitated flies is critical.

A point to remember: Nymphing is also classified as fly fishing.

To begin, let’s examine why you should fish in the first place.

Why Nymphing is the Most Effective Method of Fly Fishing

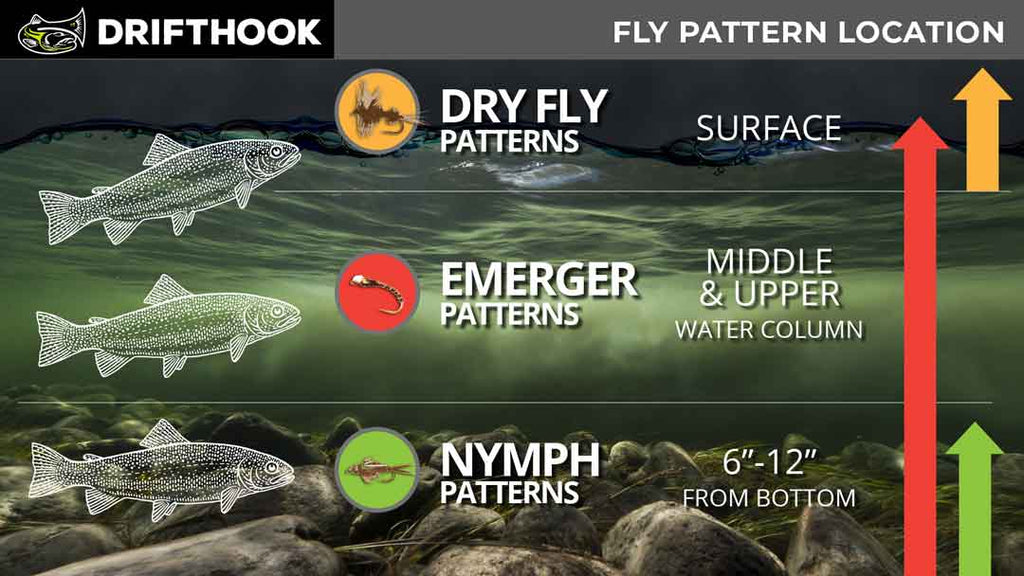
While dry flies get the bulk of attention and praise from fly fishers, the reality is that trout spend most of their time eating nymphs underwater.

Nymphs are found in lakes and rivers at all times of the year and all hours of the day. And trout spend the majority of their time eating them.

That is why nymph fishing is so effective. As trout are constantly feeding on nymphs, you do not need to time your approach or wait for the perfect hatch to start catching fish. Instead, tie one or more artificial nymph flies in color and size that match the real insects present in the water and start fishing.

When and Where to Fish Nymphs?

The beautiful part is that you can find nymph almost in any water, whether it’s a swiftly-moving freestone stream, a sparkling spring creek, or maybe even a Stillwater lake or pond. This area may be home to an aquatic insect. The nymph usually remains submerged underwater whether a hatch occurs or not.

Thus, regardless of the stream or lake, wherever you are fishing, nymph flies may be used to catch fish. The first step toward success is learning about the live nymphs that trout consume to match the artificial one to the natural insect. The second critical skill is studying the water to get your bait to the correct location with the appropriate presentation to encourage the trout to bite.

We’ll discuss how to do all of this later, but the point is to locate the lake or stream where you can find trout and use nymphs to catch them. If only catching fish and taking it back home does not quench the thirst of your adventure, provides fishing-related apparel and merchandise that will fascinate every fish enthusiast.

What Equipment Do You Need?

Often in fishing, pursuing a new species or mastering a new casting method necessitates a costly visit to the fly shop to get all new equipment. Fortunately, this is not the case with nymph fishing.

Nymphing rods may get very complex. Suppose you’re serious about getting into this type of fishing, then you should consider purchasing the drift fly rods, which in their basic form is 3wt 9ft fly rod.

The revolutionary feature of this rod is the ability to add length without untying your fly line. The rod parts extend the length of the rod from 9 feet to more than 12 feet.

This method does not require a high-performance rod. Except for neatly storing lines, your fly reel will see little activity during nymphing until you hook onto a big one. The majority of fish may be captured by handed stripping.

Here is a short review of gears needed for fly fishing:

Rod: 9-foot 4,5, or 6-weight rod with a medium-to-fast action

Reel: A standard single action fly reel that will match the weight of the rod.

Line: Floating line that is weight forward

Leader: 9-foot tapered nylon leader

Tippet: 3X, 4X, 5X, and 6X spools

Pretty straightforward, isn’t it? Of course, you’ll still need some flies and a few other pieces of nymphing-specific gear, but as long as you have that fundamental rod and reel setup, you’re ready.

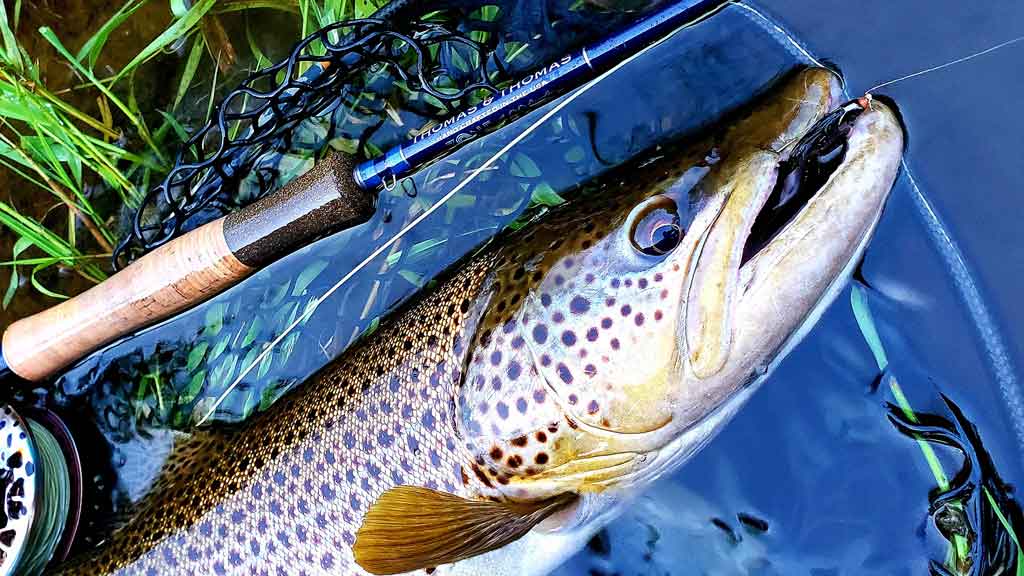
Large Trout

Modern nymphing rods, lines, and reels are incredibly well-designed for their intended use. However, if it is your first venture into fly fishing, it will be wise, to begin with, a fly rod combination capable of more than just nymphing.

With the ever-popular 9-foot 5-weight, it’s difficult to go wrong. It is enough to handle the big fish you’re likely to encounter when nymphing, and it’ll throw both conventional and indicator nymph setups effortlessly.

Unless you’re chuck-and-ducking, the only fly line you’ll need to nymph streams and rivers is a weight-forward floating line suited to your rod. If you want to try still water nymphing, a full sinking or perhaps an intermediate line will be beneficial. However, you may still catch trout in lakes with a long leader on a floating line.

Along with a well-stocked nymph box, you’ll need the following essential nymphing gear to get started: spools of tippet sizes 3X-7X, butt section or high-vis sighter material, split shot, strike indicators, nippers, and hemostats.

Built to Catch More - Best Fly Fishing Flies - Click Now

Techniques

While dry flies or streamers have their role, it’s challenging to match nymphs’ flexibility and year-round effectiveness. If you have learned to adjust your nymphing rigs and techniques to the changing circumstances of the day, you’ll be able to catch fish in every stream, pond, river, creek, or lake you visit at any time of year.

Now it’s time to tie everything together by discussing the fundamental nymphing components that apply to almost all rigging techniques. When choosing how to nymph on a new river, consider the following factors:

Depth Control

Because trout like to eat nymphs at the bottom of the stream, it is critical to get your bait under deep water. By incorporating the different techniques and rig adjustments discussed earlier, you may have control over the depth to which your flies sink.

Depth Control

When fishing in shallow or slow-moving water, conventional lightweight and indicator-less nymph setups are often sufficient to sink the fly to the bottom, as long as adequate runway is provided. As depths near 3-5 feet while current rises, rigs with the additional weight, like a Czech nymph rig or the two-fly strike indicator, start to rise.

When fishing in water more than 6 feet deep, more weight is required to bring your nymphs to the bottom. Tungsten bead-head nymphs tied to a Euro-style nymphing line with a high-vis sighter may be the key to luring fish from deep water.

Suppose circumstances deteriorate to a severe level of high swamp water with large fish in deep pools. You may need to substitute slinky weights for the split shot and catch fish chuck-and-duck style in that case.

Drift Control and Presentation

While it is essential to get your nymphs at the correct depth to attract the fish, if they are not drifting naturally, they will not lure very well (or at all). And, since natural drift is achieved by removing all drag from the nymphs, drift management is primarily a matter of line control.

Line control varies significantly across nymphing techniques. For more traditional fly casting methods, like traditional or indicator nymphing, slack must be applied continuously to ensure a drag-free drift, either via casting movements like the “tuck cast” or through frequent line mends. However, when using “tight-line” European nymphing methods, less attention is put on creating a “drag-free” drift, preferring to remain close to the flies to improve strike detection sensitivity.

Strike Detection

If your depth and drift control are reasonable, you have a better chance of getting a bite. However, unless you’re prepared and aware of what to look for, the fish will bite the hook without you knowing it.

When you’re just starting, you will find that fishing has considerable advantages using a highly visible and buoyant strike indicator. Not only will you be able to see if a fish eats your bait, but you will also know when your rig is dragging. Additionally, strike indications enable the suspension of a large amount of weight to achieve the desired depth.

To begin, fishing nymphs without a floating strike indicator requires you to rely on your senses to identify bites. By guiding your lures downstream, you can feel each bump of your rig against the bottom and the grip of a trout grabbing your fly. Additionally, when more stealth is required, whether in clear spring streams or shallow lakes, fishing with a bare leader significantly minimizes the chance of scaring away your prey.

Conclusion

With that basic setup in place, along with the methods and ideas, you’ll be well on your way to mastering nymph fishing! When you first begin, keep things simple and make an effort to appreciate every part of the nymphing experience. Catching fish is a pleasure!

About the Author

Matthew Bernhardt, a third-generation Coloradan, grew up at the forefront of the state’s fly-fishing revolution, enjoying time on the water, side by side with experienced guides and lifelong anglers.By combining his passion for fly-fishing with input from other experienced fly-fishers and guides and his fine arts degree from Colorado State University, Matthew spent five years carefully developing the Drifthook Fly Fishing System, built to help every angler catch more trout.When he’s not spending time with his wonderful family, you’ll find him out on the water catching MONSTER trout, and he anxiously looks forward to the day when his kids are old enough to join him there.

8 Best Ice Fishing Reels Reviewed

0

Hi there fellow anglers! Welcome to our in-depth exploration of the best ice fishing reels out there. Our mission? To equip you with insights you can trust. We’ve extensively researched and tested various reels to ensure our recommendations are nothing short of reliable and well-founded.

For our very top pick, it’s none other than the 13 Fishing Black Betty FreeFall Ghost Window Inline Ice Reel. Versatile, precise, and durable, you’ll be hard-pressed to find a better ice fishing reel.

Now, let’s address a common angler concern: budget. If that didn’t float your boat, we’ve got you covered with an array of seven other wallet-friendly alternatives that don’t compromise on performance. Plus, rest easy knowing our selections are favorites among tournament anglers. Many of the reels we’ve examined aren’t just popular; they’re the top choice of tournament anglers seeking peak performance. This stamp of approval underscores the dependability of these reels.

Ready to begin? We’ve also included key specifications for each reel. This is so as to make your decision-making process a breeze. Whether you’re a seasoned pro or new to the world of icy angling, we’ve got your back. Get ready to discover the ice fishing reels that will raise your frozen lake game—let’s set out on this journey together!

How We Picked the Best Ice Fishing Reels

With the wide variety of ice fishing reels, we had a bit of trouble deciding how many of each to include. Nevertheless, we eventually decided on one baitfeeder, one hybrid, four inline, and three spinning reels.

Then, we filtered them by Amazon reviews to quickly shortlist the more promising ones. From there on, it was a matter of going through each one’s specifications to find the best ones.

Then, we made sure we found some way to test each product. Some we held and cast at the local tackle store, others we owned before or currently, and the remaining ones we asked our other angler buddies for a review.

In the end, these were the eight best ice fishing reels on the market

The 8 Best Ice Fishing Reels

Note that we’ve included both spinning and inline ice fishing reels, and these are two separate types of reels. We’ll explain the pros and cons later on, so for now, just focus on finding the best ice fishing reel for yourself.

Best Overall

1. 13 Fishing Black Betty FreeFall Ghost Window Inline Ice Reel

  • Ball Bearings: 4+1
  • Gear Ratio: 2.5:1
  • Max Drag Weight: 6.6 pounds

The 13 Fishing Black Betty FreeFall Ghost Window Inline Ice Reel emerges as our top pick. With a striking blend of innovative design and performance-driven features, this reel takes the lead. What sets it apart is its versatile nature. It offers both left and right-hand retrieve interchangeability, catering to ice anglers of all preferences. Furthermore, its 1:1 gear ratio, coupled with the FreeFall trigger system, facilitates efficient line control. This enhances your ice fishing experience to new heights.

Positives: This reel presents ice anglers with a groundbreaking approach to ice fishing, thanks to its FreeFall trigger system. This mechanism provides precise control over line release and retrieval. This greatly boosts your chances of success in varying fishing conditions. This reel’s compatibility with both left and right-hand retrieves also ensures all anglers can use it. Moreover, its impressive gear ratio enhances the speed and accuracy of your line management. This further contributes to more effective ice fishing sessions.

Negatives: While this reel boasts remarkable features, it’s worth noting that this comes at a higher price point than your average ice fishing reel. Additionally, the learning curve associated with the FreeFall trigger system may require some time to achieve optimal performance.

Personal Experience: After personally testing this reel, I found the FreeFall trigger system to be a game-changer in terms of line management. Its intuitive design allowed me to precisely control my line’s descent and retrieval. This gave me a noticeable edge in adapting to changing fishing conditions. I also liked the dual retrieve option, catering to both left and right-handed anglers. It’s worth noting that while the initial price might seem steep, the benefits of the innovative technology more than justify the investment. This is especially so for those seeking a competitive edge in ice fishing.

Amazon Reviews Insight: Scouring through Amazon reviews, it’s evident that many users appreciate the FreeFall trigger system. However, some have noted a brief adjustment period to master its usage. While the price point is recognized as an investment, numerous users attest to the tangible benefits this reel provides in terms of line control and overall efficiency.

If you’re on the hunt for a reel that encapsulates innovation, adaptability, and performance, this reel should be at the top of your list. Its unique features and overall effectiveness at a reasonable price make it an extremely strong contender.

Best Hybrid

2. Clam Gravity Elite Inline Hybrid

  • Gear ratio: 3.6:1
  • Ball Bearings. 3+1
  • Max Drag Weight: 7 pounds

The Clam Gravity Elite Inline Hybrid offers a combination of clever design and versatile functionality. It seamlessly bridges the gap between inline and spinning reels, providing anglers the best of both worlds. Its hybrid design allows for smooth line release and retrieval, enhanced by a highly responsive drag system. This system adapts to varying fish sizes and fighting strengths. The Gravity Elite’s ingenious engineering also ensures that it excels across different ice fishing scenarios.

Positives: This reel deserves accolades for its unique fusion of inline reel and spinning reel features. This hybrid design grants anglers the flexibility to adapt their fishing style as needed. This makes it an excellent choice for a range of ice fishing conditions. The reel’s responsiveness in line control, paired with a reliable drag system, underscores its versatile nature. Additionally, its ergonomic construction and grip allow for long fishing sessions without fatigue.

Negatives: While this reel excels in its hybrid functionality, there may be a slight learning curve. This is particularly so for anglers accustomed to traditional reel types. Additionally, the price point is a tad higher than standalone inline or spinning reels. However, considering the amalgamation of features, this investment can be seen as a ticket to a diverse and adaptable ice fishing trip.

Personal Experience: Having put this reel to the test, I was impressed by how naturally it could switch from inline to spinning and vice versa. Its smooth drag and swift line release enabled me to adapt to various fish sizes and resistances without missing a beat. I particularly appreciated its ergonomic design. I was able to fish for two hours without any discomfort. While the initial learning curve is real, the payoffs in terms of adaptability and versatility are more than worth the effort.

Amazon Reviews Insight: Reviews from Amazon users echo this reel’s unique value proposition. Many highlight its ability to seamlessly switch between inline and spinning features. They also mentioned it provided an advantage across diverse fishing situations. Users acknowledged the initial learning curve. But at the same time, they also said the hybrid design opens up new possibilities and makes the investment worthwhile. It’s clear that anglers who value versatility in their ice fishing gear find this reel to be indispensable.

For those seeking a reel that combines the best of both inline and spinning worlds, this reel presents an enticing solution. You’re getting hybrid prowess combined with responsive performance. It’s a standout choice for ice fishing enthusiasts aiming to maximize adaptability and efficiency on the frozen water.

Best Value

3. Daiwa Crossfire CF500-3Bi

  • Ball Bearings: 3+1
  • Gear Ratio: 5.3:1
  • Max Drag Weight: 4.4 pounds

The Daiwa Crossfire CF500-3Bi secures its position as the best value ice fishing reel. It delivers a commendable blend of performance and affordability. This reel embodies the essence of cost-effectiveness without compromising on essential features. With a smooth and consistent drag system, this reel caters to both novice and experienced anglers alike. Its lightweight construction further enhances its appeal. It’s without doubt an ideal choice to ice fish for extended periods of time.

Positives: The Daiwa Crossfire CF500-3Bi earns its spot as a budget-friendly yet dependable option with its consistent drag performance. Anglers can rely on its smooth operation to handle a range of fish sizes. The lightweight design adds to its appeal, allowing anglers to enjoy hours on the ice without discomfort. Its modest price point makes it perfect for those looking for a reliable ice fishing reel without breaking the bank.

Negatives: While this reel excels in providing value, some users have noted that it may not be as suitable for larger fish or more challenging fishing conditions. Its affordability is achieved by focusing on the essentials. This means anglers looking for advanced features might need to consider other options. Despite these limitations, this reel delivers impressive performance within its niche.

Personal Experience: Having tested it out, I appreciated its simplicity and straightforward functionality. Its drag system proved reliable in managing fish of varying sizes, providing a satisfying experience. Its lightweight design contributed to a comfortable and enjoyable fishing session, even during extended periods. While it might not be the most advanced option available, its value proposition makes it an excellent entry point. For those looking to venture into ice fishing or seeking a budget-friendly solution, this is it.

Amazon Reviews Insight: Insights from Amazon reviews echo its value-driven approach. Users frequently commend its smooth drag operation and lightweight build, making it a solid choice for casual anglers and beginners. While some acknowledge its limitations in handling larger fish, they appreciate the balance between cost and performance.

For anglers looking to maximize value without compromising on performance, this reel offers a compelling solution. Its dependable drag system, lightweight design, and budget-friendly pricing make it an attractive choice. Those new to ice fishing or seeking a solid affordable ice fishing reel will want to give it a shot.

Best Baitfeeder

4. Okuma Ceymar Baitfeeder Spinning Reel

  • Ball Bearings: 7+1
  • Gear Ratio: 5.0:1
  • Max Drag Weight: 6.6-17.6 pounds

The Okuma Ceymar Baitfeeder Spinning Reel takes center stage as the best baitfeeder ice fishing reel, bringing a balance of precision and versatility to the table. Designed to cater to the preferences of anglers who require a baitfeeder mechanism, this reel offers seamless transition between traditional spinning and baitfeeder modes. Its innovative approach allows for controlled line release and retrieval during live bait presentations, enhancing your chances of successful catches. The lightweight construction and ergonomic design further elevate its status as a standout choice for baitfeeder enthusiasts.

Positives: It shines in its specialized baitfeeder feature, enabling anglers to present live bait with finesse and control. The seamless transition between baitfeeder and spinning modes provides flexibility and precision during various fishing scenarios. Its lightweight design is optimized for prolonged fishing sessions, while its ergonomic grip ensures comfort and ease of use. The baitfeeder mechanism, combined with Okuma’s renowned build quality, makes this reel a reliable tool for angling success.

Negatives: While this reel offers advanced baitfeeder functionality, it may not cater to anglers seeking a traditional spinning experience exclusively. The baitfeeder mechanism might require some adjustment for those new to the concept, but with practice, it becomes a valuable asset. Additionally, the reel’s price point may be higher than basic spinning reels due to its specialized features.

Personal Experience: Having put this reel through its paces, I found its baitfeeder functionality to be a game-changer for live bait presentations. The ability to control line release while keeping the reel engaged enhanced my ability to attract and hook fish effectively. The lightweight build and ergonomic grip were instrumental in maintaining comfort during long fishing sessions. While there is a learning curve associated with the baitfeeder mechanism, the rewards in terms of presentation control and angling success make it a worthwhile investment.

Amazon Reviews Insight: Insights from Amazon reviews emphasize this reel’s unique baitfeeder functionality. Many users appreciate its smooth transition between modes and its impact on live bait presentations. While some mention an initial learning curve, they acknowledge the value of the baitfeeder feature in enhancing fishing outcomes. Overall, anglers seeking precise live bait presentations find the Ceymar Baitfeeder to be a reliable companion on the ice.

For those seeking a specialized reel tailored for live bait presentations, this is an exceptional choice. Its innovative baitfeeder mechanism, combined with user-friendly design and build quality, positions it as an essential tool for anglers who prioritize controlled and effective live bait fishing experiences.

Best Spinning

5. Abu Garcia Max Ice Fishing Spinning Reel

  • Ball Bearings: 4+1
  • Gear Ratio: 5.1 – 5.2:1
  • Max Drag Weight: 7-14 pounds

The Abu Garcia Max Ice Fishing Spinning Reel emerges as the best spinning reel for ice fishing, striking a harmonious balance between performance and convenience. Designed by a brand known for its quality, this reel delivers smooth and reliable operation, making it a dependable companion on frozen waters. Its lightweight construction contributes to fatigue-free angling, ensuring you can enjoy extended fishing sessions with ease. With a focus on precision and usability, the Max Ice Fishing Spinning Reel is a top-notch choice for anglers seeking a versatile and efficient spinning reel.

Positives: This reel shines in its ability to provide smooth and consistent performance, a hallmark of the Abu Garcia brand. Its responsive drag system ensures a reliable control over fish of varying sizes, enhancing your chances of successful catches. The reel’s lightweight design is optimized for ice fishing conditions, allowing anglers to stay comfortable during long hours on the ice. Its smooth operation and user-friendly features position it as a reliable and efficient tool for ice fishing enthusiasts.

Negatives: While this reel excels in delivering a reliable spinning experience, the reel’s spool size might not accommodate larger lines as effectively. Additionally, while it offers quality performance, its price point may be higher compared to entry-level spinning reels. Nonetheless, the Abu Garcia Max Ice Fishing Spinning Reel’s track record of consistent operation justifies the investment for anglers seeking a dependable spinning reel.

Personal Experience: After putting the Abu Garcia Max Ice to the test, I was impressed by its smooth and responsive performance. Its drag system provided consistent control, allowing me to handle fish with precision and confidence. The lightweight build contributed to a comfortable angling experience, even during extended sessions. While there are minor limitations in terms of spool size, the reel’s overall reliability and Abu Garcia’s reputation make it a solid choice for ice fishing endeavors.

Amazon Reviews Insight: Insights from Amazon reviews reinforce this reel’s reputation for consistent performance. Users frequently highlight its smooth drag operation and lightweight design as standout features. While some mention spool size limitations, they appreciate the overall usability and precision that the reel provides. For ice fishing enthusiasts who value a dependable spinning reel, the Max Ice Fishing Spinning Reel offers a reliable option.

For anglers in search of a versatile and dependable spinning ice fishing reel, this reel delivers on multiple fronts. Its responsive performance, lightweight design, and consistent operation make it a top contender for those seeking a spinning reel that combines efficiency and ease of use on frozen waters.

Best Lightweight

6. KastKing Centron Spinning Reel

  • Ball Bearings: 9+1
  • Gear Ratio: 4.5-5.2:1
  • Max Drag Weight: 11-17.5 pounds

The KastKing Centron Spinning Reel is our best lightweight ice fishing reel, catering to anglers who prioritize comfort and effortless handling. With its feather-light construction and ergonomic design, this reel minimizes fatigue during extended fishing sessions, making it a go-to choice for anglers of all skill levels. Its reliable drag system further contributes to a smooth and responsive fishing experience, ensuring successful catches without compromising on comfort.

Positives: This reel excels in providing an ultra-lightweight solution for ice fishing enthusiasts. Its ergonomic build ensures that anglers can fish for hours without feeling the strain of a heavy reel. The responsive drag system contributes to a smooth and efficient angling experience, enhancing your ability to land fish of varying sizes. Its budget-friendly pricing also adds to its appeal, making it an accessible option for those seeking a lightweight and reliable reel.

Negatives: While this reel stands out for its lightweight design, some users have mentioned that its line capacity may be comparatively smaller than other reels. Additionally, while it prioritizes lightweight construction, some anglers who prefer a more substantial feel in their reels might find it less suitable. Nonetheless, the Centron Spinning Reel’s focus on comfort and efficiency remains its primary strength.

Personal Experience: After using the KastKing Centron, I found its lightweight build to be a game-changer, particularly during long ice fishing sessions. Its ergonomic grip and smooth drag system allowed me to focus on the fishing experience without being hindered by reel weight. While the line capacity might be limited for certain scenarios, the Centron Spinning Reel’s lightweight nature and responsive performance make it an excellent companion for comfort-focused anglers.

Amazon Reviews Insight: Insights from Amazon reviews emphasize this reel’s lightweight design and comfortable handling. Users frequently highlight its suitability for extended fishing sessions without discomfort. While some mention it’s not able to store too much line, they appreciate its overall efficiency and accessible price point. For anglers seeking a lightweight and ergonomic solution for ice fishing, the Centron Spinning Reel offers a reliable and comfortable option.

For those prioritizing a lightweight and comfortable ice fishing reel, this reel presents an appealing choice. Its ergonomic design, responsive drag system, and budget-friendly pricing align to provide anglers with an accessible and enjoyable fishing experience on frozen waters.

Best Material

7. Piscifun ICX Carbon Ice Fishing Reel

  • Ball Bearings: 5+1
  • Gear Ratio: 5.2:1
  • Max Drag Weight: 6.6-17.6 pounds

The Piscifun ICX Carbon Ice Fishing Reel stands out as the best choice for anglers who value advanced materials and construction. This reel boasts a carbon-fiber build, which not only contributes to its lightweight nature but also enhances its durability and performance. The inclusion of a magnetic drop system and dual model lever adds an element of precision to your ice fishing endeavors, enabling controlled line management and responsive operation.

Positives: This reel impresses with its innovative use of carbon-fiber construction. This material choice ensures a lightweight reel that doesn’t compromise on strength, making it ideal for ice fishing. The incorporation of a magnetic drop system and dual model lever provides anglers with increased control over line release and retrieval, enhancing accuracy during crucial moments. The reel’s high-speed gear ratio further adds to its appeal, allowing for quick and efficient line management.

Negatives: While this reel excels in carbon-fiber construction, some users have noted that the dual model lever may require a slight learning curve to master effectively. Additionally, its advanced features and materials contribute to a slightly higher price point compared to traditional reels. Nonetheless, the reel’s innovation and performance make it a compelling choice for anglers seeking a balance between advanced features and efficiency.

Personal Experience: After using this reel, I was impressed by its lightweight feel and advanced features. The carbon-fiber construction translated to a durable yet comfortable reel, enhancing my ice fishing trip. The magnetic drop system and dual model lever allowed for precise control over line management, particularly during critical moments. While the learning curve for the dual model lever is real, the benefits of this feature are evident in improved line control and accuracy.

Amazon Reviews Insight: Amazon reviews highlight the Piscifun ICX Carbon’s advanced construction and innovative features. Users frequently appreciate its carbon-fiber build, which contributes to a lightweight yet durable reel. Some mention a brief adjustment period for the dual model lever, but they emphasize the advantages it brings to line management. While the reel’s price point might be higher, those seeking a technologically advanced and efficient ice fishing reel find value in the ICX Carbon model.

For anglers seeking a reel that incorporates cutting-edge materials and features, this reel offers an enticing solution. Its carbon fiber construction, magnetic drop system, and high-speed gear ratio combine to provide an advanced and efficient tool for ice fishing enthusiasts who prioritize innovation and performance.

Best Adaptation

8. Pflueger Trion Inline Spinning Reel

  • Ball Bearings: 6+1
  • Gear Ratio: 5.2-6.3:1
  • Max Drag Weight: 6-10 pounds

The Pflueger Trion Inline Spinning Reel earns its title as the best inline spinning reel for ice fishing by combining user-friendly design with reliable performance. This reel seamlessly integrates the benefits of both inline and spinning designs, offering anglers a versatile tool for various fishing scenarios. Its smooth drag system ensures controlled line release and retrieval, while the lightweight build contributes to a comfortable and enjoyable ice fishing experience.

Positives: This reel excels in providing anglers with the convenience of an inline ice fishing reel and the familiarity of a spinning reel. Its responsive drag system enables precise control over fish of varying sizes, contributing to successful catches. The reel’s lightweight construction is tailored for ice fishing conditions, ensuring that anglers can spend hours on the ice without discomfort. The seamless transition between inline and spinning modes makes it a versatile choice for different fishing techniques.

Negatives: While the Pflueger Trion is designed to bridge the gap between inline and spinning reels, some users have mentioned that the transition may require a slight adjustment period, especially for those new to inline designs. Additionally, its spool capacity might not be as large as some standalone spinning reels. However, the reel’s adaptability and performance across both modes remain its standout features.

Personal Experience: Having used this reel, I appreciated its ability to seamlessly switch between inline and spinning modes. The smooth drag operation and ergonomic grip enhanced my ability to manage line during various fishing scenarios. The lightweight build contributed to a comfortable fishing experience, allowing me to focus on the catch without being weighed down. While there might be a learning curve associated with inline ice fishing reels, the Trion Inline Spinning Reel’s versatility makes it an excellent choice for ice fishing enthusiasts.

Amazon Reviews Insight: Amazon reviews highlight this reel’s adaptability and ease of use. Users often praise its smooth drag performance and lightweight construction, which make it suitable for extended ice fishing sessions. While some mention a short learning curve associated with inline designs, they appreciate the convenience of seamlessly switching between inline and spinning modes. For anglers seeking a versatile and user-friendly ice fishing reel, this reel offers a reliable and adaptable solution.

For those in search of a reel that combines the best of both inline and spinning worlds, this reel stands out as an exceptional choice. Its versatility, smooth drag operation, and lightweight construction make it a go-to option for anglers who prioritize adaptability and comfort on the frozen water.

What to Consider Before Buying an Ice Fishing Reel

When embarking on your ice fishing adventures, selecting the ideal reel is of paramount importance. Ice fishing can be demanding. So having the right reel can make all the difference in your success on the frozen waters. In this comprehensive buying guide, we will explore the critical factors to consider when choosing the perfect ice fishing reel. And as promised, we’ve put a special focus on the choice between spinning reels and inline reels.

Spinning Reels VS Inline Reels

Spinning Reels:

  • Versatility: The 13 Fishing Black Betty FreeFall Ghost Window Inline Ice Reel is an excellent choice if you prefer a spinning ice fishing reel for versatility. It stands out as the best overall option and offers both left and right-hand retrieve interchangeability to cater to anglers of all preferences.
  • Smooth Drag: This reel features a smooth and responsive drag system, allowing precise control over the tension on your line, making it ideal for ice fishing, where control is critical.
  • Gear Ratio: With a gear ratio of 2.5:1, it offers efficient line management, crucial for ice fishing. The FreeFall trigger system enhances line control, making it a top choice for various ice fishing techniques.

Inline Reels:

Inline reels are much less prone to line twist than spinning reels. Basicallt, line twist is the biggest advantage of inline reels over spinning reels.

  • Recommendation 2: Clam Gravity Elite Inline Hybrid (Best Hybrid)
  • Baitfeeder Mechanism: The Clam Gravity Elite Inline Hybrid is the best choice if you prefer an inline ice fishing reel and the baitfeeder mechanism. This reel seamlessly bridges the gap between inline and spinning reels, offering versatility and smooth line release.
  • Precise Line Control: The inline design provides precise control over line release, a significant advantage when targeting cautious fish during ice fishing.
  • Compact Design: Its compact and lightweight design makes it ideal for ice fishing, where portability is crucial.

Play in the Reel

When evaluating the play in your reel, consider the following:

  • Play Reduction: The Daiwa Crossfire CF500-3Bi is an excellent choice for reducing play in your reel while providing great value. It offers a smooth and consistent drag system, ensuring precise control over your line’s tension.
  • Affordability: This reel strikes a balance between performance and affordability, making it accessible to anglers seeking a reliable ice fishing reel without breaking the bank.
  • Line Capacity: With a gear ratio of 5.3:1, it allows you to retrieve line efficiently, and is suitable for various ice fishing scenarios.

Gear Ratios

When considering gear ratios for quicker line retrieval, think about the following reel:

  • Gear Ratio: This reel boasts a gear ratio of 2.5:1, offering efficient line retrieval, especially useful when dealing with active or fast-swimming fish during ice fishing.
  • Versatility: While excelling in gear ratio, it also provides versatility with left and right-hand retrieve options, accommodating various angler preferences.

Ice Build Up

  • Ice Build-Up Resistance: The Clam Gravity Elite Inline Hybrid is an excellent choice for preventing ice build-up in frigid conditions. Its hybrid design and sealed components reduce the risk of freezing, ensuring that your reel remains functional even in the coldest of environments.
  • Versatility: While excelling in ice build-up resistance, this reel also offers the versatility of inline and spinning features, catering to various ice fishing scenarios.
  • Baitfeeder Mechanism: If you prefer live bait presentations, the baitfeeder mechanism of this reel adds an element of precision to your ice fishing endeavors while keeping ice accumulation in check.

Durability and Materials

  • Durability: The Daiwa Crossfire CF500-3Bi is an ideal choice for durability, ensuring your reel can withstand the challenges of ice fishing. Its build quality and corrosion-resistant materials make it robust and reliable even in freezing temperatures.
  • Affordability: This reel offers durability without breaking the bank, making it a valuable investment for anglers looking for a budget-friendly yet sturdy ice fishing reel.
  • Consistent Drag: The smooth and consistent drag system enhances durability by minimizing wear and tear on the reel components during fights with fish, contributing to a longer lifespan.

My Verdict

In conclusion, our journey through the realm of ice fishing reels has been nothing short of illuminating. We’ve explored a diverse range of options, each tailored to cater to different preferences and fishing styles. From versatile inline designs to responsive spinning reels, the choices are as vast as the frozen landscapes you’ll tread upon.

If you’re still pondering which reel to add to your arsenal of ice fishing tackle, my resounding recommendation is the 13 Fishing Black Betty FreeFall Ghost Window Inline Ice Reel. This gem not only offers precise control with its innovative FreeFall system but also embodies durability and functionality. It stands out as the perfect companion for your ice fishing escapades, capable of tackling a spectrum of conditions and fish sizes.

As you embark on your icy adventures, keep in mind the factors that truly matter – play in the reel, gear ratios, resistance to ice build-up, and material durability. Armed with this knowledge, you’re poised to select a reel that matches your technique and elevates your fishing experiences on the frozen expanse.

Tight lines, fellow anglers, and may your days on the ice be filled with successful catches and unforgettable moments. Oh, and here are the best ice fishing rods if you haven’t gotten one yet.

How to hunt for deer antler sheds

0

I’ve never intentionally gone shed hunting, but my daughter, Vayda, and I have been lucky enough to find antler sheds in the spring on a couple of occasions. Vayda has an eye for deer antler sheds.

She was only four years old when she found her first deer antler. We were walking through a cornfield at my grandma’s house in early spring during one of our Thursday visits. At the time, there were a couple of miniature ponies in the pasture adjacent to the cornfield and Vayda liked visiting them. She picked up the broken antler and asked why her stick looked so funny. I was shocked when I confirmed it was an antler on closer inspection.

She was proud to show off her find to my grandma and mom. And she was even more pleased when my dad told her how impressed he was later that evening.

I wouldn’t say a hobby was born. She didn’t find her next antler sheds until she was eight years old, and again, by total coincidence. This time a couple of mature bucks had each dropped an antler next to our house, just out of the yard under the cover of the pine trees sheltering where they liked to bed down.

We had only moved in six months prior to the find. Although we regularly observed the deer feeding on the apple trees in the backyard at dawn and dusk, we hadn’t realized they slept and migrated through the pines that bordered our yard.

When Vayda came running out of the woods with the large antlers, we thought she may have found a set. But after further inspection, we realized the antlers she had found had to have come from two different deer.

Dropping and growing antlers

Every year a buck deer grows a new set of antlers. The process starts after they shed last year’s rack sometime between late January and early March. Their antlers fall off because their hormone levels decrease after breeding season. If winter has been particularly tough and food sources have been scarce, deer may shed their antlers earlier than normal.

Once their antlers have been shed, they begin growing a new rack. Most bucks will have noticeable velvet-covered nubs by May. The new antlers will continue to grow through September. During late summer, the antlers will harden and the velvet outer covering will be rubbed off on small trees and shrubs. Bucks also use their antlers to spar with competing bucks in their territory and establish dominance in preparation for breeding season that begins in October and ends in December.

February through March is an ideal time to look for deer antler sheds because they will be in the best condition and the easiest to spot. After the snow melts before the spring vegetation starts to green up and grow thicker deer antlers will be the easiest to see. Additionally, finding them soon after they are shed is better because rodents will find antlers that have been laying on the ground for a while and gnaw on them for their minerals and to wear down their teeth.

How to find deer antler sheds

Scout during winter. Deer often seek places with food availability and cover during the winter. Looking for deer tracks in the snow is a great way to locate the places they frequent. Deer are most active at dusk so this is the best time to try and observe active deer.

Bucks stick together. Bucks separate from does and fawns during winter and travel in groups with other bucks. An area where you found one shed will often have others from bucks in the same group.

Look in areas that aren’t heavily hunted. Fewer bucks survive in heavily hunted areas, so areas that are not hunted can be the best places to find antler sheds.

Locate food sources. Locating food sources is a great way to narrow down places deer have frequented throughout the winter. But they aren’t necessarily the same places deer frequented during the fall. Sometimes agricultural fields become hotspots after harvest; however, woody browse in woodlots are also a favorite food source for deer in winter. Learn to identify which plants deer prefer. Oak and other late-producing mast trees attract deer during winter.

Look around bedding areas. Deer spend a lot of time in their beds conserving energy during the winter. They prefer coniferous woodlots because they provide dense cover from the wind and snow. Tall grasses, brushy thickets and heavily wooded areas are other common bedding sites. They also prefer areas that are south-facing to maximize the amount of direct sunlight they get. The southern edges of a forest or the south face of a hill would be ideal for deer during winter. The best time to check bedding areas is around ducks when deer vacate them to forage.

Check around obstacles on travel paths. Deer make travel paths from their food source to their bedding area. Once you’ve located a travel path, look for sheds near obstacles like fences or ditches. Sudden movements caused by jumping and running can knock antlers lose.

Walk slowly and have a keen eye. Walking slowly allows your eyes more time to separate antlers from broken sticks and corn stalks. Train your eyes to look for parts of antlers instead of the entire antler, so you don’t walk past a shed.

Related Content

  • Get ready now for shed hunting season
  • Best thing to do in February: Shed hunting
  • It’s deer shed hunting season

Resources

  • Ohio Department of Natural Resources

6 Black Bear Hunting Rifles & Cartridges | Bear Gun Overview 2024

0

There is an ongoing debate about what is the best black bear rifle and best cartridge for hunting trips and that debate will most likely never cease.

The biggest reason for the debate is there are tons of options out there that will get the job done. It all comes down to things like, personal preference, distance of potential shot on a black bear, distance and intensity of the hike in and out of where you’ll hunt, if there are grizzly bears, and other predators also present where you’re black bear hunting, and probably a few other factors as well.

In this article the goal is to present 6 different rifles and black bear cartridges that will all “get the job done” it just depends on your exact hunting situation as to what the best black bear gun is for you. We’ll be covering rifles from Ruger, Henry, Browning, Savage, Remington, and Mossberg.

Ruger American Ranch Rifle

Overview:

The Ruger American Ranch Rifle in 450 Bushmaster is a top-tier option for black bear hunting and more. Its 16.12″ cold hammer-forged barrel, adjustable Ruger Marksman trigger, and patented Power Bedding system ensure remarkable accuracy and consistent performance. The ergonomic Flat Dark Earth synthetic stock combines modern design with practical handling. This rifle offers affordable excellence, making it a great companion for bear hunters who value precision and reliability in the field.

Price Range: $429 – $569

Rifle Cartridge: 450 Bushmaster

Year Introduced: 2016

Why is the Ruger American Ranch Rifle in 450 Bushmaster a popular black bear gun?

The Ruger American Ranch Rifle in 450 Bushmaster has gained popularity among black bear hunters due to its unique combination of features that make it exceptionally well-suited for this type of hunting. The rifle’s 450 Bushmaster cartridge, optimized for short to medium ranges, delivers ample stopping power necessary for black bear hunting scenarios.

The 16.12″ cold hammer-forged barrel provides accuracy, while the adjustable Ruger Marksman trigger allows for precise shot control. Additionally, the ergonomic synthetic stock ensures quick and easy handling, which is crucial in situations where speed and accuracy matter.

The rifle’s compact size and manageable weight contribute to its ability to navigate through challenging terrain often encountered in bear hunting. Moreover, the included Ruger® Hybrid Muzzle Brake reduces recoil, making follow-up shots more comfortable and accurate. The Ruger American Ranch Rifle is great for hunting black bears. It has the right features for precision, power, and maneuverability.

Ruger American Ranch Rifle Specs:

Henry X Model

Overview:

Henry’s Lever Action X Model .30-30 captures the essence of classic Americana, tailored for modern black bear hunters. The .30-30 caliber lever action design merges tradition and innovation, making it an excellent choice for pursuing black bears.

Crafted with durable synthetic furniture, the rifle remains lightweight while offering versatility with in-line sling swivel studs, M-Lok accessory slots, and a Picatinny rail. The blued steel barrel is equipped with fiber optic sights, ensuring swift target acquisition in challenging scenarios. For those considering suppressors or muzzle devices, the threaded barrel (5/8×24) is accompanied by a removable thread protector.
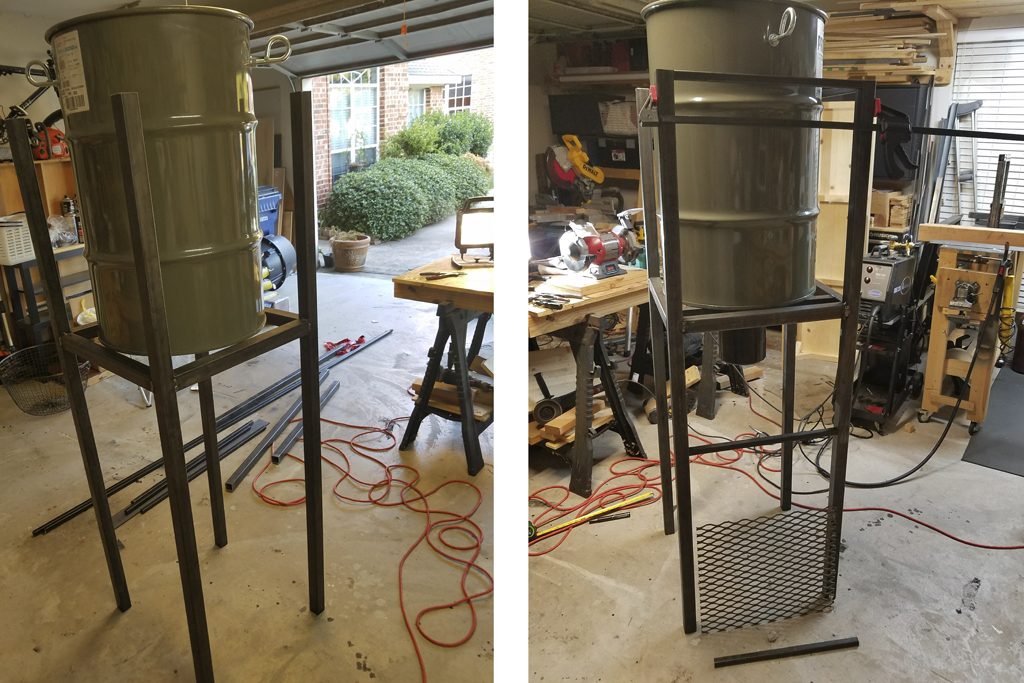
While honoring tradition with a 5-round removable tube magazine, the rifle also embraces convenience with a side loading gate for topping off rounds, ideal for bear hunting scenarios. This rifle captures the enduring spirit of the .30-30 cartridge, synonymous with black bear hunting.

Boasting a 21.375″ barrel, 1:12 twist rate, and 40.375″ overall length, the rifle weighs 8.07 lbs. It’s fully outfitted for accuracy with adjustable fiber optic sights and scope readiness, offering black bear hunters reliable precision.

The Lever Action X Model .30-30 perfectly balances heritage and modernity, making it an exceptional tool for black bear hunting in varied terrains and conditions.

Price Range: $899 – $1198

Rifle Cartridge: 30-30 Win

Year Introduced: 2021

Why Is The Henry X Model .30-30 Rifle a Popular Black Bear gun?

The Lever Action X Model .30-30 by Henry is a popular choice among black bear hunters because of its balanced blend of classic design and modern features. The .30-30 caliber offers effective stopping power for black bears, while the lever action mechanism allows quick follow-up shots. Its synthetic furniture, equipped with sling swivel studs, M-Lok slots, and a Picatinny rail, caters to practical hunting needs.

The rifle’s fiber optic sights ensure swift target acquisition, and the option for optics attachment enhances accuracy. With a threaded barrel for muzzle devices, removable tube magazine, and side loading gate, this rifle streamlines the hunting experience.

Henry X Model .30-30 Rifle Specs:

Browning 1885

Overview:

The Browning 1885 in .45-70 Govt is a sought-after option for black bear hunters, because it merges classic elegance with modern functionality. The robust .45-70

Govt caliber provides the necessary stopping power for black bear encounters, making it a reliable choice. The single-shot design encourages deliberate and accurate shots, crucial in bear hunting scenarios. Its timeless walnut stock showcases traditional craftsmanship, while the barrel’s matte blued finish ensures durability.

The rifle’s 28″ barrel, complete with adjustable sights, facilitates precise target acquisition, especially in diverse hunting environments. The single-shot action simplifies operation, reducing the risk of follow-up shots and enabling shooters to focus on accuracy. This rifle upholds the legacy of the .45-70 Govt cartridge that’s renowned for its effectiveness in bear hunting.

With its combination of classic aesthetics and dependable performance, the Browning 1885 in .45-70 Govt embodies the spirit of traditional hunting while catering to the demands of modern black bear hunters.

Price Range: $595 – $3299

Rifle Cartridge: .45-70 Govt

Year Introduced: 1985

Why Is The Browning 1885 in .45-70 Govt a Popular Black Bear Gun?

The Browning 1885 rifle in .45-70 Govt is a favored choice among black bear hunters for its classic design and powerful performance.

The .45-70 Govt caliber offers substantial stopping power, essential for black bear takedowns. The single-shot action emphasizes accuracy, while the walnut stock and matte blued barrel provide a timeless look and durability.

Browning 1885 in .45-70 Govt Rifle Specs:

Savage 110 Bear Hunter

Overview:

The Savage 110 Bear Hunter in .338 Win Mag is a prime choice for black bear hunters seeking both robust performance and durability. This rifle is equipped with the AccuFit™ system, allowing shooters to easily personalize the length-of-pull and comb height for a comfortable fit. The user-adjustable AccuTrigger™ enhances safety and accuracy by delivering a clean pull and preventing accidental discharges from jarring or dropping.

Complemented by the AccuStock™ rail system that securely cradles the action three-dimensionally, the 110 Bear Hunter offers a customized and precise shooting experience straight out of the box. The rifle features a 23-inch stainless steel fluted barrel with an adjustable muzzle brake, housed in a synthetic stock.

In terms of specifications, the rifle operates with a bolt action and accommodates the potent .338 Win Mag cartridge. The barrel boasts a length of 23 inches and features a straight fluting design, all finished in a matte treatment.

The rifle’s stock is crafted from synthetic material and the overall length of the rifle is 44.125 inches, with a rate of twist of 1 in 10.

The receiver, barrel, and other critical parts are constructed from stainless steel, ensuring durability and resistance to the elements. The rifle’s weight is 8.39 pounds, providing a balanced feel for shooters. All these features come together to make the Savage 110 Bear Hunter a reliable and effective option for black bear hunting, offering both precision and adaptability in challenging conditions.

Price Range: $899 – $1029

Rifle Cartridge: .338 Win Mag

Year Introduced: 1963

Why Is The Savage 110 Bear Hunter in .338 Win Mag a Popular Black Bear Gun?

The Savage 110 Bear Hunter in .338 Win Mag has gained popularity among black bear hunters for several reasons.

Its rugged design and powerful .338 Win Mag caliber offer the necessary stopping power for taking down black bears effectively. The AccuFit™ system, allowing customization of length-of-pull and comb height, ensures a comfortable fit for a variety of hunters, enhancing accuracy and overall shooting experience.

The user-adjustable AccuTrigger™ is a safety feature appreciated by hunters, providing a crisp and clean pull while minimizing the risk of accidental discharges, even if the firearm is dropped or bumped. The AccuStock™ system, cradling the action securely, enhances accuracy by minimizing movement during firing.

The rifle’s 23-inch stainless steel fluted barrel, coupled with the adjustable muzzle brake, contributes to accuracy by reducing recoil and muzzle rise, allowing for quicker follow-up shots.

With its combination of features, power, and adaptability, the Savage 110 Bear Hunter is well-suited for the challenges of black bear hunting. Its ability to be tailored to individual preferences, the assurance of the AccuTrigger™ system, and the precision-enhancing AccuStock™ make it a reliable choice for hunters seeking success in the unpredictable and demanding conditions of black bear hunting.

Savage 110 Bear Hunter Rifle in .338 Win Mag Specs:

Remington 700 SPS

Overview:

The Remington 700 SPS in .30-06 Springfield stands out as an excellent choice for black bear hunters seeking a potent and affordable firearm. This rifle inherits the renowned quality of the Model 700 series while being accessible in price. The Model 700 SPS, or Special Purpose Synthetic, embodies accuracy and performance, qualities vital in black bear hunting.

With its ergonomic synthetic stock and carbon steel barrel and receiver, the rifle ensures comfort and durability, crucial in demanding hunting scenarios. The matte blued finish adds a sleek touch to its appearance. Hunters are drawn to the Remington 700 SPS for its reliable performance, backed by favorable reviews and trusted recommendations from peers.

The rifle’s specifications include a 4+1 capacity and a 24-inch barrel. The matte black synthetic stock is designed for scope base attachment, catering to optical needs for precise shots. Weighing 7.37 pounds, this bolt action rifle is chambered in .30-06 Springfield, a versatile cartridge ideal for black bear hunting.

Appearing in matte black with gray panels, the Remington 700 SPS is tailored for right-handed hunters, with an overall length of 44.5 inches. The synthetic stock and 1:10 inch twist rate of the barrel contribute to accuracy, ensuring your shots count in bear country. The Remington 700 SPS in .30-06 Springfield embodies both Remington’s legacy and commitment to providing hunters with an effective tool that stands up to the challenges posed by black bear hunting environments.

Price Range: $630 – $810

Rifle Cartridge: .30-06 Springfield

Year Introduced: 1962

Why Is The Remington 700 SPS in .30-06 Springfield a Popular Black Bear Gun?

The Remington 700 SPS in .30-06 Springfield is a favored choice among black bear hunters for its winning combination of accuracy, power, and affordability. Renowned as a reliable rifle series, the Model 700 SPS maintains this reputation with the Special Purpose Synthetic version, offering hunters a cost-effective yet high-performance option.

Its ergonomic synthetic stock and durable carbon steel barrel and receiver ensure comfort and resilience in bear hunting conditions. Positive reviews and recommendations emphasize the rifle’s accuracy, crucial for precise shots required in black bear encounters.

The .30-06 Springfield cartridge’s versatility enhances its popularity, balanced by the rifle’s maneuverable 44.5-inch length and 24-inch barrel. Overall, the Remington 700 SPS in .30-06 Springfield stands as a trusted and accessible choice, meeting the demands of black bear hunting with dependable accuracy and effectiveness.

Remington 700 SPS in .30-06 Springfield Specs:

Mossberg Patriot

Overview:

The Mossberg Patriot in .308 Win has established itself as a preferred option among black bear hunters, seamlessly blending modern innovations with a touch of classic design. This value-rich bolt-action rifle resonates with those who value both tradition and progress. From its sharp appearance to its impressive accuracy, the Mossberg Patriot captures attention for its ability to deliver in the field.

Designed to cater to a variety of hunting scenarios, the Patriot accommodates short- and long-action calibers, ensuring versatility when facing the challenges of black bear hunting. The inclusion of a drop box magazine adds convenience to the hunting experience, while the fluted and threaded barrels, spanning 20″ to 24″, seamlessly combine style and function. Additional enhancements, such as the spiral fluted bolt and recessed match barrel crown, contribute to the rifle’s overall performance and appeal.

A notable feature that resonates with black bear hunters is the patented LBA® user-adjustable trigger, which provides the flexibility to fine-tune the pull weight between 2 to 7 lbs according to personal preferences. The barrel threading specifics further demonstrate Mossberg’s attention to detail, catering to various calibers and ensuring compatibility with different muzzle devices.

In the world of black bear hunting, the Mossberg Patriot in .308 Win has earned its place as a reliable and capable companion, encapsulating Mossberg’s commitment to providing hunters with a firearm that combines quality, versatility, and affordability.

Price Range: $255 – $829

Rifle Cartridge: 308 Win

Year Introduced: 2015

Why Is The Mossberg Patriot in 308 Win a Popular Black Bear Gun?

The Mossberg Patriot in .308 Win has gained popularity among black bear hunters for its versatile features tailored for effective hunting. Adaptable to different calibers, it accommodates various hunting conditions.

The drop box magazine allows quick reloads, while fluted and threaded barrels offer a balance of aesthetics and functionality. The patented LBA® user-adjustable trigger and meticulous barrel threading enhance accuracy and customization. Overall, this rifle’s adaptability, ergonomic design, and precision make it a reliable choice for successful black bear hunting.

Mossberg Patriot in 308 Win Specs:

Good luck out there on your black bear hunting trip! Hopefully this article has narrowed down your search if nothing else.

Gunbroker.com is an awesome place to find great deals on black bear hunting rifles and the best black bear cartridges you’ll need. One of the coolest parts about GunBroker.com is you can get your hands on the best bear rifles that aren’t even in production anymore. You could potentially bear hunt with a piece of history if you wanted to! Thanks for taking the time to read this article.

Best Air Rifle Deals

Popular Posts

Air gun 101: What is a PCP air rifle? Is PCP gun the best...

0
A PCP air gun is one of five types of air rifles in the market today. PCP air guns have become more and more...

PCP vs Spring Piston: Which one is better?

0
When reading about guns in the search for the first one that would be perfect for you, an age-old debate comes into question. Should...

PCP vs Gas Piston: Which One is Better?

0
The perfect airgun is a difficult pick when you are new to gun-hunting. There are a lot of things to keep in mind, starting...

PCP vs CO2 Guns: Which One is Better?

0
The most talked-about debate between hunters and gun enthusiasts is what the best power source of a gun is.  The five main sources of power...

Guide to find Best Scope for Break Barrel Air Rifles

0
"Unlock the Perfect Shot: Discover the Best Scope for Break Barrel Air Rifles. Enhance your shooting experience with precision and accuracy, as we delve...