Many people love meat because it’s a good source of protein. Do you need ideas on the tastiest meat dish for your lunch or special event? You’ll never go wrong with well-cooked deer brisket, as it has a spicy flavor when you serve it hot.
The brisket on a deer lies at the bottom of a deer’s chest, in front of the ribcage. Removing a deer’s brisket involves removing the shoulders, backstrap, and tenderloins and cutting through the cartilage.
The rest of this article will:
Delve deeper to explain where to find deer brisket.
Discuss whether you must sear a deer’s brisket.
How to remove brisket off a deer.
Where to find the best meat on a deer.
You’ll also learn the differences between venison backstrap and the tenderloin and what part of a deer is best for steaks.
Though tough, brisket is one of the most delicious meats in mammals, including deer. While butchering a deer to get the brisket may seem like a painstaking process, it’s achievable with the right tools and skills.
You can get brisket off a deer even though it’s smaller and leaner than a cow’s brisket. Using a sharp knife, you should remove it by cutting off the meat between the forelimbs on the deer’s chest through the cartilage. Also, cut out all fat up to the backbone.
Since a deer’s brisket is smaller than other big animals, removing it is a challenge to most people. However, when you follow the right butchering procedure, you can get the brisket off the carcass.
You can make the best fajitas, burgers, or sausages with this piece of meat or trim and grill it under higher heat.
Related Best Knife for Processing Deer | Hint: You Need Two.
Should Brisket Be Seared?
Brisket should be seared because it is essential to build up the meat’s flavor. However, you need to prepare it adequately before searing it and let it slow-cook in the oven or pan. Slow cooking makes the meat tender and easier for you to slice it afterward.
Searing venison brisket is a common preparation method in most traditional dishes as it adds flavor to the meat. Searing involves cooking the meat’s surface under high temperatures until it caramelizes, otherwise known as forming a brown crust.
Adding some oil creates contact between the brisket and the cooking surface.
Before you sear the brisket, trim away the fat pad on the brisket’s outer surface. A large sharp knife will come in handy during this preparation step.
Then, marinate it using salt, pepper, or other spices a day before you cook it.
Moreover, it’s important to remember that deer meat is generally tough, and storing it for a couple of days enables the aging process, which will make the meat tender, including the brisket. Do this before starting your cooking process, and you’ll have tender briskets.
After aging, trimming off fat, and marinating the deer’s brisket, you can now sear it.
If you notice that there are still some grey spots on the meat after searing, it means one side of the brisket didn’t cook well. To avoid these spots, you should ensure that you flip both sides to burn evenly.
How To Remove Deer Brisket
You might be thinking about getting a professional butcher to remove the brisket from your deer, right? However, there’s an easier way to do this in the comfort of your home.
Removing a deer’s brisket is one of the final meat-cutting steps of butchering.
After you’re through with the major butchering procedure, you can remove the brisket in a slab using the flat of your knife. Cut the meat carefully against the lower-chest region, trimming off the cod fat and tallow.
To get to the deer’s brisket, you have to butcher cut major parts. Here are the steps:
Cut and pull the shoulders from the torso of the deer to expose the cut zone which your knife will pass through.
Pull the front leg away from the torso, and with your knife’s blade parallel to the ribcage, cut the hinge area.
Remove the backstraps and the tenderloin, but trim away the excess fat layer first. To do this, find the hip bone and cut under this bone to the backbone on both sides. Loosen and get the meat off by ensuring that your knife is close to the bone.
Cut through the ribs down to the backbone. You’ll find the brisket on the outer surface of the ribs. Cut it off while your knife’s blade is against the lower-front chest region and remove any cod fat.
Check out this YouTube video that shows the process of removing a brisket:
Where Is the Best Meat on a Deer?
After butchering a deer, you’ll want to get the most out of the process. Many people go for the bigger and popular venison chunks. But where’s the best meat on a deer?
The backstraps and tenderloins are the best meat cuts of a deer. These parts are tender and will give you a succulent and delicious meal. Other preferred parts include the hindquarters, rump, and chucks.
Backstraps and tenderloins are a favorite to most venison lovers as they are tender and easy to cook. The hindquarters have a variety of uses, as you can use them as steak, in stews, kebabs, or jerky.
There are many other recipes for preparing this dish that you can try out on your own.
Is Venison Backstrap the Same As Tenderloin?
Differentiating between the venison backstrap and tenderloin can be a bit confusing.
A backstrap isn’t the same as a tenderloin. The venison backstrap is the meat along a deer’s spine on the outer part of the backbone. However, tenderloin sits beneath the spine, inside the abdominal cavity along the backbone.
Tenderloin is about 10” to 12” (25.4 to 30.48 cm) smaller than the backstrap but very delicious.
What Part of a Deer Is Best for Steaks?
Are you a steak lover? Well, you can make the best steaks from some parts of venison.
The hindquarters of the deer is best for steaks. The top and bottom rounds have extensive muscles but also have tender sections. They produce the best steaks and cuts for other dishes. Venison hindquarters are large, with cuts for various uses.
You can get the best steak from these parts in young or older deer. However, the bottom rounds are more tender than the top ones.
Final Words
You can get brisket off a deer by following the correct butchering process all by yourself. It may not be a very easy cut to make, but it’s doable. Once you have the brisket, you can leave it for a few days to age and then prepare it for cooking by marinating first.
Searing the brisket is also a great idea as it helps to lock in the flavors.
For more, check out The 5 Best Ways to Preserve Meat in the Wild.
The best crossbow broadhead for deer in 2024 is the Muzzy Trocar for its incomparable penetration and accuracy on large game.
Once so simple, choosing your crossbow broadhead has become far more complex over the past years, with the introduction of new technology to add more ‘functionality’ to the best crossbow broadheads available.
Choosing the right broadhead is a personal decision, not only depending on the shooting conditions (distance, wind), but also personal preference regarding desired penetration, accuracy, wound channel and blood trail.
You can only glean so much information online, so honestly, my best advice is to read the reviews, and then get out there and try the different broadheads until you find one that you love.
First of all I’ve rounded up some definitions of terms you’ll hear often when talking about crossbow broadheads throughout the reviews:
Cutting diameter
It refers to the minimum potential wound size a broadhead can cause, or in other words the width measurement from blade tip edge to blade tip edge.
In theory a wider diameter has more chance of damaging important tissue and reaching vital organs, although there is a possible trade off with accuracy (more surface area for the wind to take hold) and penetration (less likely to enter the animal so far).
Shock collars
A small ring placed below the broadhead where it fixes to the arrow which a) keeps the broadhead steadily in place and b) absorbs shock upon impact in order to protect the broadhead.
Grain weight
Broadhead weight is measured in grains, and most will come in both 100-grain and 125-grain options, maybe even up to 150. I generally recommend the 100-grain for best accuracy over 20-50 yards, and the 125-150s for upwards of 50-60.
The 125-grain will also provide more penetration on bigger game, and given the shorter arrows used for crossbows, can provide more weight to the front of the arrow (“front-over-center” balance), maintaining stability and reducing cross-wind influence.
Blade Tip
There are two options here, either chisel-tips which are designed for a big impact on big game, with thick hides – fur, fat and bone. Or, you can opt for the cut-on-contact tip, which aims to slice immediately with deep penetration. See informative discussion here.
Number of blades
Broadheads generally come in one, two or three-blade variations. Arguably, the two-blade achieves better penetration, and the three-blade increases the wound channel. For this reason (but not always), you would do better with two-blades for bigger game to penetrate deep and split bone.
Honestly though, there are other more important factors such as where you hit the prey, with what force, cutting diameter, what type of broadhead, and at what angle.
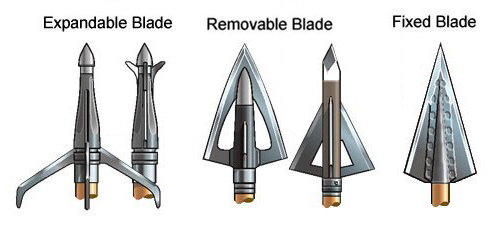
Fixed-blade or mechanical
Fixed-blades are traditional arrowheads where the broadhead blade is firmly attached to the head. There are also some ‘removable’ fixed-blade broadheads which allow you to replace a single blade, rather than the whole broadhead.
Mechanical broadheads have retractable blades which come out on impact, making the arrow flight as uninterrupted and aerodynamic as possible.
Fixed-blade or mechanical crossbow broadheads: what should I use?
Up until recently I’d have said that the fixed-blade won hands down every time. However, the mechanical broadhead is becoming more and more effective, giving experienced hunters a headache when faced with the choice.
Although mechanical broadheads are good 90% of the time, I know few people that would opt for a mechanical broadhead when faced with that really tough, make or break shot to take down the biggest game – it’s just too unreliable.
That said, maybe this perception is changing little by little, so let’s look at the facts regarding fixed-blade and mechanical broadheads.
How do mechanical broadheads work?
When an arrow is flying through the air towards its target, the more surface area that the broadhead has, the more susceptible to influence from crosswinds it will be, taking it off-course.
Step up the mechanical broadhead.
The idea of a mechanical broadhead is to reduce the surface area of the broadhead and improve on aerodynamic drag, by retracting the blades until the moment of impact, upon which the blades deploy to further increase the damage.
If the blades are withdrawn during flight, this should also improve concentricity. Concentricity is essentially the arrow spinning perfectly through the air around its centre, ensuring that the mechanical blades don’t deploy while in the air, before impact.
Ideally an arrow is steered by its fletching at the back, however what’s known as planing can occur, where the wide-surface-area broadhead takes control of the arrow’s flight path, causing long-distance inefficiencies.
A mechanical broadhead is forgiving on beginner hunters or poorly tuned crossbows.
It sounds wonderful, however mechanical broadheads have their drawbacks. These mechanical heads have a tendency not to deploy, or may come apart upon impact, ultimately failing to penetrate sufficiently and leaving the animal in distress, or getting away.
Fixed-blade broadheads
What the fixed-blade makes up for is clinical impact, or in other words strength and penetration.
These days fixed-heads have excellent designs, which make them exceptionally aerodynamic to the point where they may even match mechanical broadheads, a lot of the time.
A question of quality
Mechanical broadheads generally fail for one of two reasons.
Either the blades do not retract, and therefore they remain exposed during the flight, subjecting the arrow to influence by the wind.
Or they malfunction on impact. A high-quality design uses high-quality mechanical blades which are better fixed to the broadhead, or may even be heat-treated so that they bend, instead of snapping off.
Making sure that the broadheads you purchase are made of steel instead of aluminium will help with concentricity, too.
Choosing the best crossbow broadheads for your crossbow
The best crossbow broadheads are designed with the following functions in mind:
Penetration
An arrow may kill in any one of the following ways:
Blood loss
Damage to the nervous system
Destruction of vital organs
Septicemia or asphyxiation
The further through an animal the projectile goes, the more likely the hunter to achieve their goal of an ethical kill.
Questions to ask yourself:
How deep into the animal does your arrow seat itself?
Does it go all the way through, causing faster bleeding and a faster, more ethical death?
How does the crossbow broadhead contribute to that penetration?
Accuracy
Accuracy speaks for itself. we want to be accurate to not only hit our prey, but hit it exactly where we want to for an ethical kill.
Questions to ask yourself when reviewing the best crossbow broadheads:
How well does the bolt and broadhead leave the crossbow?
How many touch points are there with the crossbow which could alter its course on the way out?
Does the broadhead’s form (surface area) make it more or less susceptible to influence by the conditions, such as wind or rain?
Once the bolt leaves the crossbow, how does the broadhead affect the bolt’s concentricity? Does it spin more or less evenly for a true aim? Mechanical broadheads are particularly guilty of unbalancing an arrow.
Wound channel
Wound channel refers to the size of the channel made by the arrow, through the prey. An arrow kills in any one of the following ways:
Blood loss
Damage to the nervous system
Destruction of vital organs
Septicemia or asphyxiation
For an ethical kill, a large wound channel is more likely to achieve its goal. Does the crossbow broadhead help to achieve this?
Blood trail
More blood makes it easier to track game after you shoot them. The best designed crossbow broadheads, aside from causing a large wound channel, maintain heavy blood loss so as to track the animal easily.
Best crossbow in 2024
Fastest crossbow in 2024
Best Crossbow Broadhead in 2024 Reviews
The following best crossbow broadheads ratings are in no particular order, as the best depends on the game you are hunting, expected shooting distances and your experience.
NAP Spitfire Crossbow Review
Use on: small to medium-sized game over all distances
If you’re looking for a mechanical broadhead which flies like a field point and leaves a great blood trail, then the NAP Spitfire could well be the broadhead for you.
When I tested them, I had good penetration working with the 125-gr, maybe as it has a slightly smaller cutting diameter of 1.5 inches.
This nonetheless provides a reasonable wound channel and large enough blood trail to track the animal. If you get good contact though it won’t get very far thanks to the ‘Trophy Tip’ which is designed to penetrate on larger game.
Nonetheless, I’d probably use these broadheads on small to medium-sized game. The combination of the penetrative tip, decent cutting diameter and mechanical action make it perfect for deer hunting.
It has three cut-on-contact diamize sharpened blades, and the ferrule on the spitfire has microgrooves for enhanced accuracy and penetration.
Pros
best mechanical broadhead for crossbow
Best crossbow broadheads for deer
Decent blood trail
Cons
The blades have a tendency to open while stalking game
Use on: small to medium-sized game over all distances
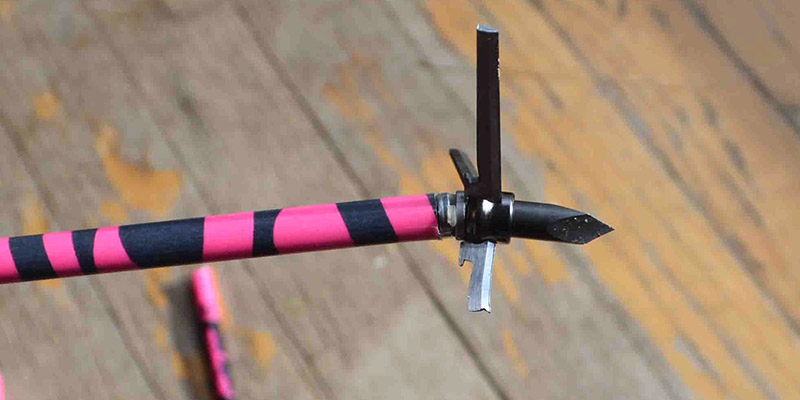
The Swhacker set of 3 broadheads are dependable mechanical broadheads, almost guaranteed to deploy thanks to their solid design.
It has a hardened high-carbon-steel, cut-on-contact, two-blade point which is razor sharp. Once you look past the initial point, you’ll find a first set of wing blades designed to cut straight through hide and the first set of ribs.
Once contact has been made, this first set of blades helps to deploy the second set of edges which don’t touch anything during initial penetration, instead opening only once inside the game, to wreak havoc on the animal’s internal organs. You won’t see too many animals make it more than 100 yards before coming to a halt.
On top of this, the Swhacker has a massive cutting diameter of 2 inches. Even if your aim is slightly off, you’re bound to hit a vital organ and bring your game down.
I found the broadhead to demonstrate solid penetration and durability, and I even found (impressively) that it could hang onto the target when tested at angles, too.
I’d use this happily on any small or medium-sized game over all distances. Find out more about the Swhacker brand and all their crossbow broadheads.
Pros
Great penetration from angles
Wide cutting diameter
Unique design
Cons
Accuracy: had strange outlier from grouping during testing which was so disappointing as I really liked this broadhead
>> Check Price on Amazon <<
G5 Outdoors Montec Fixed-blade Broadheads Review
Use on: medium to large-sized game over all distances
I would be happy to use these G5 Montec broadheads on deer, no problem. In fact, you could even make a case for use on bear and elk, as the blade angle of the Montec is designed for solid penetration, along with a thinner, more penetrative cutting diameter of 1 1/16 inches.
Despite a reduced wound channel, you’ll get a decent blood trail from heavy penetration which should easily make its way through the animal, especially over shorter distances.
Often overlooked, it’s a really simple broadhead to use – you just screw it on and shoot, and it also allows for easy sharpening, meaning you can get good (re)use out of it.
This was important, as I found that it could definitely do with a little more sharpening straight out of the box.
This 100% stainless steel broadhead is spin-tested to ensure the required weight and centricity to perform over long distances.
Use on: medium to large-sized game over all distances
I really like the Excalibur Boltcutter, in fact until I did all these recent tests it was (and maybe still will be) my fallback broadhead, whenever I wanted to feel 100% confident.
It’s got a 3-blade head with a small 1 1/16-inch diameter to maximize penetration at all distances; it’s deadly for the very biggest game out there.
It has been designed to improve accuracy over 300 FPS, stabilizing quickly as it leaves the bow.
It’s made of stainless steel to withstand high impacts and improve penetration, and it represents the perfect blend of strength, speed and accuracy.
It’s one drawback is that it costs a little more than most blades, but you can replace the individual blades, or even reuse the blades by sharpening the whole head to offset the cost and get more use out of them.
Pros
Optimized penetration
Enhanced accuracy over distances
withstands high impact
streamlined design
Cons
Expensive
>> Check Price on Amazon <<
Muzzy Trocar Fixed-blade Review
Use on: medium to large-sized game over all distances
The Muzzy Trocar is a three-blade fixed broadhead with a short stubby nose. The arrowhead has less surface area allowing for better arrow flight.
The hardened steel Trocar head-tip achieves extreme penetration, and the ferrule – built from solid steel – won’t buckle when striking bone, making it the perfect choice for large game.
It doesn’t compromise on accuracy either, thanks to the special right-helix design for solid stability; Muzzy claim they fly just like field tips, and from our experience with them, they aren’t wrong. When I tested it this broadhead achieved both the insane grouping, and massive penetration.
I like this broadhead because it’s completely customizable too. You can change the blade between three cutting diameters, between 1 inch and 1 1/14inches.
Pros
Best crossbow broadheads for accuracy
Best crossbow broadheads for penetration
Cons
N/A
>> Check Price on Amazon <<
Conclusion: the best crossbow broadheads
I found the level to be really high, and any misgivings that I had in the past about mechanical broadheads are slowly going away.
I’d even go so far as to recommend the Swhacker mechanical broadhead as the best crossbow broadheads for small game over any distance, with the Spitfire not far behind.
I liked the mechanical so much with small game because pretty much any hit with the two-inch cutting diameter would be enough to take down the animal, and the arrows would be forgiving thanks to their improved aerodynamicity.
There’s a good argument for the Swhacker or Spitfire moving up to medium-sized game like deer too. I think this is then a question of personal preference, where you should really try out both types and see what works with your crossbow specifications and personal needs.
When I moved up to large game, I decided that you can’t look any further than the Muzzy Trocar. It won hands down for penetration and accuracy, which for me are the two most important factors when shooting big game over any distance.
Rock bass and bluegill share many similarities. For this reason many people ask if they’re the same fish or different. Therefore, let’s answer, is a rock bass the same as a bluegill?
Rock bass and bluegill are different species of fish although they are from the same family. Rock bass is the A. Rupestris and bluegill is the L. macrochirus species. The most identifiable difference is the rock bass bright red or orange eye color compared to the bluegill’s dark eyes.
This article will compare both fish tastes, textures, cooking methods, costs, mercury levels and whether one can substitute for the other in recipes. In addition, I’ll do a side-by-side comparison of their habitats, appearance and compare their nutritional value.
Rock Bass vs Bluegill: Habitats, Size, Weight and Appearance
How can you tell the difference between the two fish?
To tell the difference between a rock bass and bluegill is to check their cheeks, belly colors and dorsal fins. Bluegill have blue color on the sides of their mouth and chin. Rock bass has no blue, just a dark tear drop below their eyes. Bluegill has an orange belly compared to rock bass white/silvery belly. Bluegill has a dark spot on the base of the dorsal fin rock bass doesn’t have.
Other ways to tell the difference:
Bluegill has a rounder body with the mouth more streamlined with the body. Rock bass has an elongated body with the mouth more pointier.
Rock bass has 5-7 anal fin spines, bluegill has 3 anal fin spines.
Rock bass has teeth in the mouth, bluegill has no teeth.
Rock bass has red or orange eyes, bluegill has dark eyes.
Bluegill has a small mouth, rock bass has a large mouth.
Rock bass has dark spots forming laterals lines, bluegill has no lateral lines but vertical bars.
Rock Bass and Bluegill Scientific Classifications, Families, Species
Bluegill are from:
Family: Centrarchidae
Genus: Lepomis
Species: L. macrochirus
Common nicknames: Bream, panfish, brim, sunny, sunnies, perch.
Rock bass are from:
Family: Centrarchidae
Genus: Ambloplites
Species: A. rupestris
Common nicknames: Red eye, rock perch, goggle eye.
Both species are part of the sunfish family. Other fish include smallmouth bass, largemouth bass, pumpkinseed, warmouth and crappies.
Habitats
Bluegill
Native to North America and can be found from Canada, Delaware to northern Mexico.
When fishing they can be found in streams, ponds, lakes and rivers.
They like to hide under fallen logs, piers or in weeds.
Rock Bass
Native to North America and can be found from Canada down to Florida and west to Texas. They are mostly found in the eastern and central United States.
When fishing they can be found in streams, ponds, lakes and rivers.
The species prefer rocky shorelines and vegetation areas. They can be found under docks and near swimming areas.
Watch bluegill in their natural habitat.
Appearance
Colors
Bluegills have an olive green upper body and light yellowish to orange belly. The sides of the head and chin are iridescence blue or purple. The fish have dark vertical bands on the sides. A breeding male will have more orange than yellow on the belly.
Rock bass have an olive green to golden brown upper back and sides fading down to a silvery, white belly. The species have black spots which form broken lateral stripes down the body. The have red eyes and the fish has the ability to change colors to match their surroundings for protection.
Dorsal Fins
Bluegill has one dorsal fin with 6-13 spines and 11-12 rays.
Rock bass has one dorsal fin with about 10-13 spines followed by 11-13 rays.
Anal Fins
Bluegill has three anal spines followed by 10-12 rays.
Rock bass has 5-7 anal spines followed by 10-12 rays.
Mouth
The bluegill mouth is small, and the jaw doesn’t extend to the eye line. They don’t have teeth.
The rock bass mouth is large located below the snout. They also have teeth.
The rock bass has a pointier snout compared to the bluegill which has a more streamlined mouth and head which blends into the body. A big difference between the two fish is their mouth size.
Body Shape
Bluegill are flat and have a rounder shape. The mouth hardly protrudes and is more streamlined.
Rock bass are flat and not round. They are more elongated.
Size and Weight
Bluegill average 6-7″ long and weighs less than 2 pounds.
Rock bass average 6-10″ long and weighs about one pound.
Lifespan
Bluegill average 5-6 years.
Rock bass lives up to 8-10 years.
Diet
Bluegill consume the following:
Worms
Small crustaceans
Insects
Insect larvae
Rock bass consume the following:
Smaller fish
Insects
Worms
Small crustaceans
Minnows
Both fish have a similar diet.
Bass Fishing
When looking at the sunfish family, rock bass fishing won’t win many popularity contests amongst anglers. Despite their gamefish appeal, when fishing they are strangely appealing.
They can get caught with almost any angling method. Live bait works extremely well. Bass fishing within a few feet of the bank is best.
Prior to fishing, always check with your local advisory, safety and management boards.
I recently wrote a comparison article with the species pumpkinseed. Their differences may interest you. Check out my comparison article here.
Panfish: Tastes and Textures
One of the most important things people takes into consideration when fishing or choosing a fish is its taste. When comparing the two fish, rock bass vs bluegill, does one taste like the other?
Rock bass taste similar to bluegill and has a mild to sweet taste. Rock bass and bluegill have a firm, flakey texture.
Rock bass is good eating and tastes pleasing to most people having a mild to sweet taste. The white flesh is slightly firm and flakey.
Depending on the time of year or type of water when fishing, both may taste slight muddy or fishy to some people. The fish can be soaked in milk to help eliminate any unpleasant taste or odor.
To conduct some original research, I polled clients, readers and people in food groups. I asked which one tastes better?
39% said they preferred the taste of bass rock.
34% said they preferred the taste of bluegill.
27% said they had no preference one over the other.
To conduct more research, I set up a taste test at home. Both fish were cooked the same way with the same seasonings. Three out of four people chose the rock bass.
Watch rock bass in their natural habitat.
Substitutions
When preparing recipes for dinner it’s not always possible to locate the type of fish in the store or when fishing. If you only caught one type of fish when fishing, you may ask, can I substitute one for the other?
Rock bass and bluegill can substitute for each other due to their similar tastes and textures. Both fish can be used in many of the same recipes and cooking methods. They both can be cooked by baking, broiling, steaming, grilling, deep frying and pan frying.
Bluegill substitutes:
White crappie
Black crappie
Pumpkinseed
Redbreast sunfish
Redear sunfish
Pollock
Lake herring
Rock bass substitutes:
White crappie
Black crappie
Pumpkinseed
Green sunfish
Lake herring
Tilapia
Pollock
Find out how green sunfish compared in my article, Green Sunfish – What’s The Difference?
Costs
The costs for some fish will vary depending on the type of fishing and where they’re sold. When purchasing any fish, be sure to check the label. Therefore, which fish is more expensive?
Rock bass and bluegill have a similar price. The average cost for either ones fillets are $19.43 per pound.
Rock bass fillets are extremely difficult to find for sale. Sunfish are easier to find online.
To conduct more original research for fish prices, I checked online at Walleye Direct and found the following:
Wild, bluegill fillets
$25.36 per pound
Seafood Markets:
Wild, sunfish fillets (does not specify which kind of sunfish)
$18.00 per pound
Dixon Fisheries:
Bluegill fillets
$14.95 per pound
For stocking ponds, Pond King has the following price per live fish:
Hybrid (green sunfish x bluegill) $0.75 per 3-4″ fish
Bluegill – $0.75 per 3-4″ fish
Crappie is a little easier to find online than some of the other sunfish. See how crappie compared in my article, Crappie – What’s The Difference? Let’s Compare.
Checking the prices of mackerel and other seafood at my local market
Mercury Levels
The EPA and The FDA have issued suggestions and warnings about mercury levels in fish and how often they should be consumed 1. This is especially important for young infants, pregnant women and developing children.
They established three lists:
Best fish
Good choices
Ones to avoid based
Therefore, which of the two fish has more mercury?
Rock bass and bluegill have similar levels of mercury. Both fish are listed on the FDA’s best choice of fish regarding mercury levels.
If you’re pregnant, breast feeding or has a young child, Always check with a physician prior to eating new foods or changing your dietary habits.
These mercury warnings can change over time or affect only a particular area or state. Please check with your local EPA and FDA for the current fish recommendations especially when fishing 2.
Nutrition
Both of them are an excellent source of protein, healthy fats, minerals and B vitamins. Both sunfish contain the following:
Omega-3 fatty acids
Magnesium
Potassium
Folate
Niacin
B6
B12
B5
Thiamin
Riboflavin
Iron
Selenium
Calcium
Zinc
Bluegill provides the following number of nutrients per four raw ounces:
Nutrient Resources 3 4
Both fish provide a similar percentage of the same nutrients. Keep reading the next section below to find out how the nutrients benefit health, especially omega-3s.
Since the sunfish are difficult to locate in stores, I’ll consume either fish available to me for their nutrient content, taste and health benefits.
Find out how redbreast sunfish compared in my article, Redbreast Sunfish – What’s The Difference?
Rock Bass and Bluegill Health Benefits
Omega 3 Fatty Acids
The omega-3 fatty acids are heart healthy and help keep arteries healthy. The omega-3s may help with the following:
Reduce inflammation.
Reduce plaque buildup.
Keeping bad cholesterol low.
Keeping good cholesterol high.
Lowering triglycerides
Help keep the heart rhythms more normal.
DHA and EPA, two of the fatty acids, are associated with lowering blood pressure and improving the health of blood vessels 5.
Studies suggest omega-3s from fish can help reduce joint pain and stiffness in people with rheumatoid arthritis. They may also boost the effectiveness of anti-inflammatory drugs.
Potassium
Potassium provided from either fish is approximately 400 mg. Potassium helps the body get rid of excess sodium which helps reduce fluid build-up. These help keep systolic and diastolic blood pressure lower 6.
The more potassium you consume, the more sodium your body will lose. Consuming too much sodium or not enough potassium throws off the delicate balance the kidneys need to remove the excess water 7.
According to Harvard Health, a number of studies have shown a connection between low potassium levels and increased blood pressure 8.
B Vitamins
The B vitamins provided by both fish include B1 (thiamin), B2 (riboflavin), B3 (niacin), B9 (folate) B6, B12 and B5. B vitamins help support the following:
Digestion.
Brain function.
Energy levels.
Red blood cells.
Cardiovascular disease.
Nerve function.
Selenium
There are 14.2 mcg of selenium per four ounces. Numerous studies 9 show selenium may help to protect the following:
The immune system
Thyroid
Cognitive issues
Heart disease
Phosphorus
Both fish provide approximately 203 mg of phosphorus per four ounces. It has been shown in scientific research to help with the following:
Promote healthy nerve conduction.
Aides the kidneys in waste removal.
Promote teeth and bone strength.
Muscle recovery after exercise.
Muscle contraction.
Help the body store and manage energy.
Magnesium
Both sunfish provide about 34 mg of magnesium per four ounces. It calms and relaxes the whole body including blood vessels. Magnesium has been shown to help improve sleep related problems like insomnia 10.
Magnesium helps keep blood pressure levels balanced and stable. A recent study researched 22 studies and concluded magnesium supplementation decreased diastolic and systolic blood pressure 11.
The magnesium in rock bass and bluegill helps control muscle and nerve function, blood sugar and blood pressure.
In the muscles and heart, magnesium competes with calcium to help the muscles relax after contracting. When the body is low in magnesium, calcium can over stimulate the heart muscle’s cells causing a rapid or irregular heartbeat.
Calcium
Calcium is important for blood pressure and the heart. Harvard Health reports calcium helps maintain blood pressure because it helps to control the relaxing and tightening of blood vessels 12.
Calcium also helps the following:
Build and maintain strong bones.
Muscles need calcium to function properly.
Improve nerve function.
Find out if the nutrients in redear sunfish differed in my comparison article, Redear Sunfish – Are They The Same? We Compare.
As a Certified Health Coach many of my clients ask me about seafood. In addition to educating my Health Coaching clients about bluegill and rock bass, I have researched, purchased and consumed both fish for 20 years prior to, during and after writing this article.
If you have any questions about this article don’t hesitate to email us. You can find an email on our contact page.
Read Next – More Black Crappie, Largemouth Bass and Green Sunfish Articles!
Black Crappie vs White Crappie – What’s The Difference?
Crappie vs Bass – What’s The Difference? Let’s Compare
White Crappie vs White Perch: Are They The Same? We Compare
Article Resources: Foods For Anti-Aging follows strict guidelines to ensure our content is the highest journalistic standard. It’s our mission to provide the reader with accurate, honest and unbiased guidance. Our content relies on medical associations, research institutions, government agencies and study resources. Learn more by reading our editorial policy.
FDA: Advice about Eating Fish[↩]
National Center for Biotechnology Information: Mercury accumulation in largemouth bass (Micropterus salmoides) in a Florida lake[↩]
The Topeka Capital-Journal: Keto, Paleo or Atkins diet? Hunting, fishing can help trim your waistline in 2020[↩]
Nutritiondata: Fish, sunfish, raw[↩]
National Center for Biotechnology: Marine Omega-3 Supplementation and Cardiovascular Disease[↩]
American Heart Association: How Potassium Can Help Control High Blood Pressure[↩]
National Center for Biotechnology Information: The Effect of the Sodium to Potassium Ratio on Hypertension Prevalence: A Propensity Score Matching Approach[↩]
I’m gonna be honest, I never put too much thought into arrows when I first started bowhunting. I just snagged up what the pro shop recommended and called it good.
The more time I spent behind the bow, though, the more I realized how important hunting arrow selection was. It’s another rabbit hole and a quite daunting one at that. That can make picking the right arrow for you not so straightforward. And the right arrow plays a huge part in bowhunting.
In light of that, we’ve put together our take on what arrows need to be on your radar for the upcoming 2024 fall hunting season.
Below is a list of my favorite arrows for a range of applications and budgets. This selection is evolving so be sure to check for updates, as new arrows will be added as they’re tested. At the end of our list, be sure to check out the comparison chart and buyer’s guide.
When the time comes, you need to have ultimate confidence in your arrows.(photo/Josh Kirchner)
Why You Should Trust Us
Bowhunting often reminds us that good gear is extremely important. Quality arrows can be the difference between success and an unfilled tag. We’ve used dozens of different arrows, and only the best earn our full trust.
Whether we’re hiking above treeline looking for mule deer, slinking down into the bottom of a canyon to call for black bears, or just simply spending time behind the bow at the range — arrows matter. Our lead tester Josh Kirchner has been bowhunting for ten years. Needless to say, he’s spent an incalculable amount of time fiddling with arrows to find out what works and what doesn’t.
When coming up with this list, Kirchner considered his own experience and that of those around him. He also examined market demand at a variety of price points.
At the end of the day, as bowhunters, we need ultimate confidence in our arrows. This list will cater to a wide range of hunters and cover every situation in the mountains, prairies, and hardwoods.
Buying Guide: How to Choose a Hunting Arrow
The hunting arrows listed above are wide in variety. There’s a little something for everyone. One of the major differences between some of these arrows is the arrow weight. Arrow shafts are measured in GPI (grains per inch). And some arrows have a higher GPI than others. This leads me to one of the most highly debated topics in bowhunting.
Should you use a heavy arrow or a light arrow?
We’re gonna suss that out to provide the tools you need for picking the right arrow weight for you and your hunting style.
Some experimentation is required to determine the proper arrow weight for you;(photo/Josh Kirchner)
Heavy Hunting Arrows Equal Momentum
In recent years, there’s a push for using heavier arrows for hunting. When I say heavy, I’m referring to arrows that weigh in around 500+ grains. There is a great argument for using a heavier arrow.
Weight equals more momentum, which is basically the force an arrow will retain going through an animal. More momentum means more pass-throughs and fewer chances of arrow flight being altered too much from ribs etc. This is not to be confused with kinetic energy, which is the amount of energy an arrow has on impact.
Heavier arrows are also more wind-resistant than lighter arrows. And along with that, they absorb more energy on the shot, which translates into a quieter system.
The Downside of Heavy Arrows
While there are no doubt benefits to using a heavier arrow, there are also some drawbacks. The first is that heavier arrows are just slower. This gives arrow flight a much steeper trajectory. So, there is much less room for error when it comes to judging yardage.
This could spell trouble when that elk is a few yards farther than what you thought. For the multi-pin sight users, that also means larger gaps between pins, which makes pin gapping (aiming between pins for odd yardages) much more finicky. The result is less precision accuracy when pin gapping.
As a rule of thumb, your arrow should be no shorter than the middle of your riser at full draw.(photo/Josh Kirchner)
Light Hunting Arrows Equal Speed
On the flip side of things, slimming down arrow weight is becoming shinier by the day. Less arrow weight means more arrow speed, which translates into a flatter trajectory. So, it isn’t as critical to be pinpoint accurate with yardage estimates.
In hunting situations, this can be the difference between notching a tag and following a fruitless blood trail. Along with that, you’ll also be able to stretch the tape on your sight much farther. Even if one doesn’t plan on shooting an animal at a great distance, practicing far shots hones shooting skills and makes shorter shots seem even shorter.
And when those shots land at odd yardages, therein lies another benefit, particularly for multi-pin sight users. Your pin gapping will be much tighter in the sight housing, which means precision will increase when doing something like aiming between the 30 and 40 pins for a 35-yard shot.
Cons of Lightweight Hunting Arrows
Less arrow weight does come at a cost, though. The first is giving up that momentum that we talked about. Lighter arrows don’t retain as much energy through an animal as heavier ones do. This could result in fewer pass-through shots and a higher likelihood that an arrow is thrown off course by, say a bone.
And on that note, a lighter arrow also doesn’t buck the wind as well. This is a potentially problematic situation in windy hunting conditions.
Then there is the shot. The moment of truth. When that arrow releases, it won’t nearly be as quiet as a heavier setup.
Lastly, durability seems to drop off the lighter an arrow is. So, if you miss or hit a bone, the chances of your arrow still being intact is slim.
(photo/Josh Kirchner)
Middle of the Road: A Hunting Arrow That’s Just Right
While you hold the wheel in terms of what arrow weight you’ll end up shooting, our opinion is this. Shoot a quality midweight type of arrow in relation to your setup overall.
I say this because a heavy/light arrow for one person might be a real heavy/light arrow for another based on their draw weight, draw length, etc.
By doing so, you’ll avoid many of the cons that come from the extremes on each end. It’s a best-of-all-worlds solution. There is one more thing, though, that is the most important to keep in mind.
Arrow Flight Is Everything
To cut to the chase, good arrow flight is way more critical than trying to shoot a heavy arrow or a light arrow.
There’s nothing wrong with having somewhat of a goal arrow weight in mind, but in the end, you need to shoot the arrow that is flying the best out of your setup. If your goal is 500 grains, but a 450-grain arrow is shooting lights out for you, it’d probably be wise to eat the 50 grains and go for accuracy and consistency.
Arrow weight doesn’t mean anything if you can’t put the arrow where it’s supposed to go. Focus on you and your shooting. Let your arrow weight reflect that;(photo/Josh Kirchner)
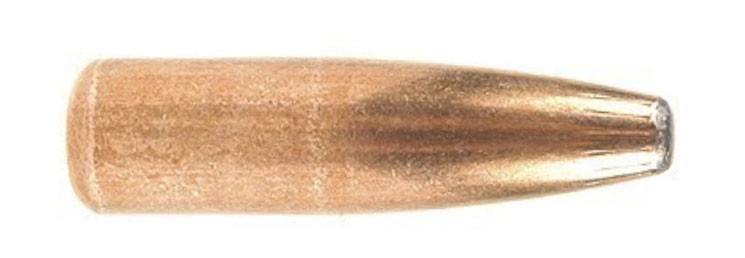
Since its inception in 1952, the .308 Win. has increasingly pilfered proponents of traditional deer hunting cartridges, such as the .270 Win. and .30-06 Springfield, and, thanks to .308 Win.-chambered “tactical” bolt-actions and modern sporting rifles (MSRs), next-generation hunters have flocked to the round, too. Due to its popularity, there’s now an abundance of ammunition (and component bullets) from which to choose for pursuing deer. Below are some of my personal favorites, and by selecting only seven, many good ones have been omitted. I also eschewed perennial favorites, such as the Core-Lokt, Power-Point and Ballistic Tip and instead opted for “different” options. Hopefully, you’ll find something new to try on your next deer hunt.
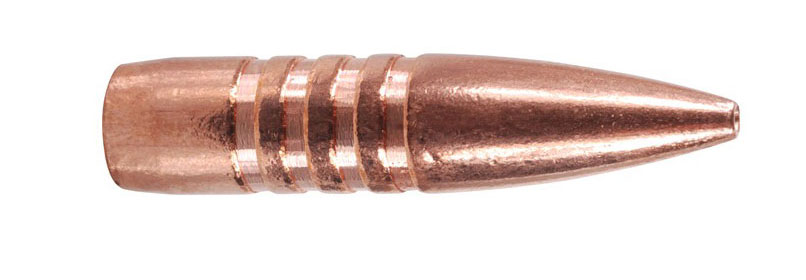
Barnes 130-grain TSX BTAmong the “gold-standard” combinations for deer hunting is the .270 Win. loaded with a quality 130-grain bullet. When loaded with the Barnes 130-grain Triple-Shock X-Bullet Boat Tail (TSX BT), you can best the downrange performance of Jack O’Connor’s baby, and with less perceived recoil to boot. With top velocities approaching 3,300 fps, the all-copper TSX BT shoots extremely flat—perfect for wide-open areas—and hits hard. Thanks to its monolithic construction, high weight retention is assured for deep penetration. Grooves in the bullet’s shank help reduce friction (and thus pressure), aid accuracy, and enable crimping. The projectile’s sole weakness is its ballistic coefficient, which is an atrocious .340; however, this can be somewhat overcome by high muzzle velocities. The Barnes 130-grain TSX BT is a handloading-only proposition right now.
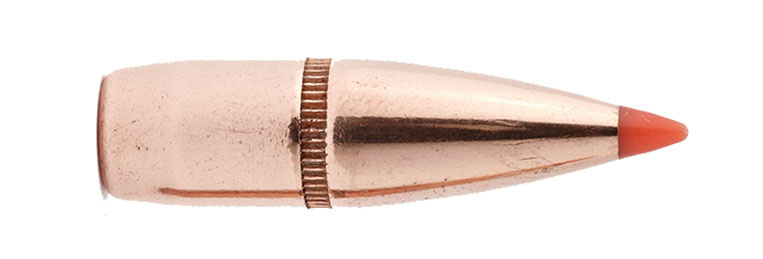
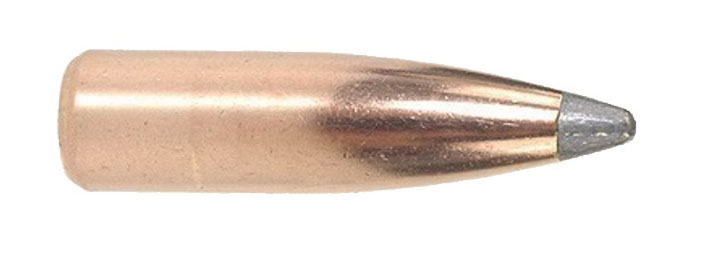
Hornady 150-grain SSTThe Hornady .30 caliber, 150-grain Super Shock Tip (SST) is aptly named—fairly-hit deer expire extremely rapidly. I know this firsthand because I’ve employed it more frequently than all others on this list. Upon impact, the sharp, red polymer tip, which, when combined with a boattail base (and streamlined shape) results in a .415 BC, is forced rearward, initiating expansion. To prevent jacket-core separation during expansion—thereby reducing penetration—the jacket is mechanically locked to the 3-percent-antimony-lead core via the raised InterLock ring. Despite their cup-and-core design, only once have I recovered a 150-grain SST, and it was when fired from a .300 Wby. Mag. Beyond phenomenal terminal performance, SSTs are superbly accurate, too. They often rival match-grade bullets. Outside of handloading, 150-grain SST .308 Win. ammunition is offered by Hornady in its Custom and Superformance lines, and the projectile is loaded in Fiocchi Extrema and Black Hills Gold, too.
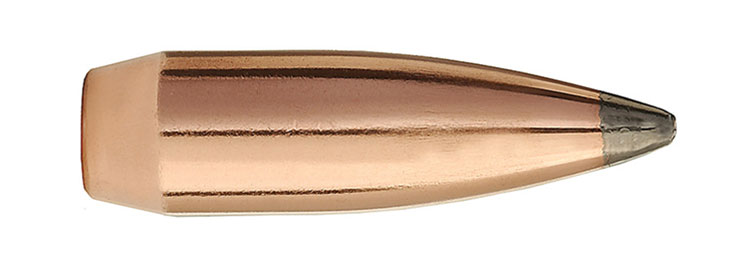
Sierra 150-grain GameKing SBTThere’s nothing flashy about Sierra’s .30 caliber, 150-grain GameKing Spitzer Boat Tail (SBT), and yet—unsurprisingly—the simple, cup-and-core-style bullet provides devastating terminal ballistics to down deer fast. Recovery distances of even the largest whitetails and mule deer are generally short (if they run at all), and the spent bullet will typically be nestled against the offside hide. It probably won’t be picture perfect—lacking a mechanical lock, jacket-core separation is a real possibility. This’ll matter not at all as you’re admiring your trophy; it did its job well. It always does. Perhaps the projectile’s only weakness is its modest BC of .380. That being said, since 150-grain GameKing SBTs are only about 30 cents each, you’ll be able to practice all year without “breaking the bank,” learning how to dial in elevation for that all-important shot. Or, just take your shot from a realistic range. At this point, these Sierra bullets are available for handloading and are also factory loaded by HSM in its GameKing line.
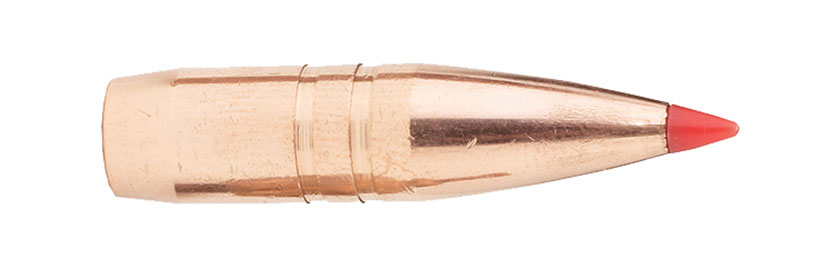
Hornady 150-grain GMXHunters who choose (or are required) to go leadless will find a great option in Hornady’s .30 caliber, 150-grain Gilding Metal eXpanding (GMX) bullet. Manufactured from copper alloy, the projectile has a polymer tip, boattail base, two relief grooves to reduce friction (and thus pressure), and fouling and aid accuracy. Expansion runs 1.5X the projectile’s pre-expansion diameter. Weight retention is upward of 95 percent, and penetration is extremely deep. It’s doubtful you’ll recover one from a broadside shot on a deer. In addition to an improved blood trail (i.e. exit hole), deep penetration offered by the GMX provides insurance for less-than-ideal shot placement. The .30 caliber, 150-grain GMX has a BC mimicking that of the like-weight SST. Outside of the biggest bears, this bullet will also work well for all North American species. It’s loaded by Hornady Superformance and Black Hills Gold.
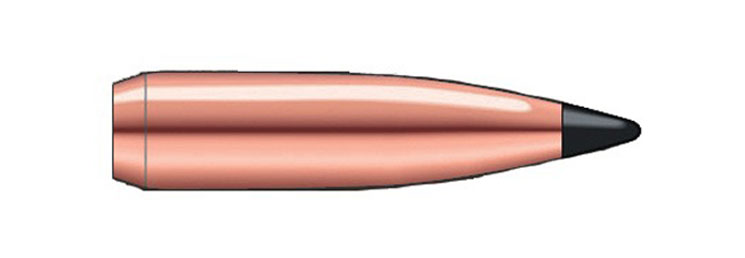
Swift 150-grain Scirocco/Scirocco IIDeer hunters looking for a projectile that will expand reliably (upward of 2.5X) at long range, but hold up during a violent, close-range impact will find it in the Swift Scirocco/Scirocco II. Enabling said performance is a lead core that’s bonded to a tapered, extra-thick, copper jacket. In addition to aiding expansion, the polymer tip—when teamed with the secant ogive and 15 degree boattail base—create a streamlined bullet that sheds velocity slower than many of the other bullets in this list. The .30 caliber, 150-grain Scirocco II has a BC of .430. Like Hornady’s GMX, don’t expect to recover many Scirocco bullets from deer-size game, and it can be employed on all North American non-dangerous animals, too. That being said, if elk is on the menu, you might consider moving up to the 165-grain variant. Accuracy is often very good, though experimentation with seating depth will be necessary for best performance. As for the 150-grain version, outside of handloading, it’s only found in Swift High Grade Hunting Ammunition.
Nosler 165-grain PartitionThe grandfather of “premium” big-game bullets, Nosler’s Partition—the 165-grain variant in particular—is a top choice for hunting deer with the .308 Win.—especially if there’s an opportunity for black bear or elk, or if you’re a one-gun hunter. Featuring dual, lead-alloy cores separated by a cross member (or “partition”), the front core is washed away during expansion and serves to further enhance trauma, all while the rear portion drives deep. So deep, in fact, that seldom will you find one in anything but the largest game animals, such as elk. Like the GMX and Scirocco, the Partition provides a measure of insurance in case of a less-than-perfect shot or steep angle. Nosler’s 165-grain Partition is factory loaded in .308 Win. ammunition (Custom and Trophy Grade).
Norma 165-grain OryxFactory loaded by Norma USA (American PH), the flat-base, semi-spitzer, 165-grain Oryx features a heavily tapered, gilding metal jacket that is bonded to the lead core. This results in rapid expansion and high weight retention—bullets exhibiting ninety-percent-plus weight retention are commonplace. Given its blunter profile, this isn’t a bullet for shooting long range, but at all practical distances, it will hit hard and penetrate deep no matter what.
Only days before this piece was written I used the 165-grain Oryx to take a medium-size Virginia buck for the freezer. Catching it feeding in a hayfield undisturbed at 40 yards, the bullet entered mid-way up the left shoulder and exited around the last rib on the opposite side. The buck traveled about 60 yards before expiring. A post-mortem inspection revealed tremendous trauma—little wonder for its rapid demise. Given the performance and strength of this bullet, it would make a good one-load option for the hunter who hunts deer but also pursues bigger, tougher species, such as elk, or is going on safari.
There’s a plethora of bullets that are suitable for deer with the .308 Win. Hopefully this article will open your eyes to a few that you might not have previously considered.
“Exploring the Enigma: Unraveling the Mystery Behind Deer Antlers’ Points. Delve into the fascinating realm of deer antlers as we unravel their purpose, growth patterns, and unique characteristics. From evolutionary advantages to behavioral cues, discover the hidden secrets behind these magnificent natural formations.”
1. “Understanding the Points on Deer Antlers: A Guide for Wildlife Enthusiasts”
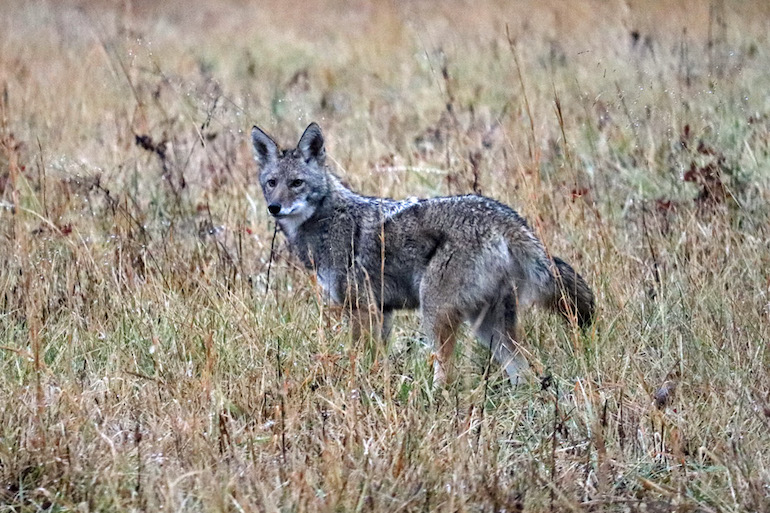
Deer antlers, with their impressive points and branching structure, have long fascinated wildlife enthusiasts. Understanding the significance of these points can provide valuable insights into the health and age of a deer.
The Significance of Points
Points are tines that branch off the main beam of a deer’s antler. These points are measured based on their length, with any tine measuring at least 1 inch being considered a point. The number of points on a deer’s antler can vary greatly, ranging from as few as two to as many as 14 or more.
The number of points on a deer’s antlers is not necessarily an indication of its age. Instead, it is more closely related to the overall health and genetics of the animal. Older bucks tend to have larger and more branched antlers, but this is not always the case.
Counting Points
When describing white-tailed bucks, hunters often refer to them by the number of points they have. For example, an eight-point buck would have four points on each side of its antlers. However, it is important to note that counting points alone does not provide a complete picture of an animal’s size or quality.
In addition to counting points, hunters also consider other attributes when scoring an animal, such as the spread (the width between the tips of the antlers), the length of the main beam, and the length of each point. These measurements help determine the overall size and quality of a deer’s antlers.
Understanding how to count and interpret points on deer antlers can enhance your appreciation for these majestic creatures and their unique characteristics. By observing these features in wildlife habitats or through photographs, you can gain valuable insights into the health and age of the deer population in your area.
2. “Decoding the Mystery: How to Count Points on Deer Antlers”
When it comes to deer antlers, counting points can be a bit of a mystery for some people. But fear not, we are here to help you decode the process!
To start, points are the tines that branch off from the main beam of the antler. In order for a point to be counted, it must measure at least 1 inch in length. These points can vary in number and shape, making each set of antlers unique.
When describing white-tailed bucks or bull elk, hunters often use the number of points as a way to identify and classify them. For example, an eight-point buck is one that has eight tines branching off its main beam. This is the most common type of antler for white-tailed deer.
It’s important to note that counting points may not always give an accurate indication of an animal’s age. While younger deer and elk typically have fewer points, older animals may have smaller and less dense antlers. The health and fitness of an animal can be better determined by examining the size and overall quality of their antlers.
In addition to counting points, hunters also consider other attributes when scoring an animal’s antlers. These include measurements such as spread (the width between the two main beams), main beam length, and length of individual points.
For elk specifically, each side is counted separately when describing their antlers. So if both sides have six points, they would be referred to as a 6×6 bull elk.
Moose antlers are measured differently than deer or elk. The most common measure of size for moose is spread – which refers to the total width between the two main beams. Other measurements taken into account include the number of points, width and length of the palm (central part of the antler), and circumference of the beam at its narrowest point.
So, the next time you come across a set of deer antlers, you’ll have a better understanding of how to count the points and appreciate the unique characteristics they possess.
3. “Exploring the Fascinating World of Deer Antler Points”
Antler points are a fascinating aspect of deer antlers that capture the attention of wildlife enthusiasts and hunters alike. These points, also known as tines, are the branches that extend from the main beam of the antler. They can vary in number and shape, creating unique characteristics for each individual deer.
The Significance of Antler Points
Antler points serve multiple purposes for deer. They are used as weapons during the breeding season, or rut, when males compete for dominance and mating rights. The number and size of antler points can indicate the strength and fitness of a buck, making them an important factor in determining which males are successful in securing mates.
Additionally, antler points can be used to estimate the age of young bucks. Yearling deer typically have spikes instead of branched antlers, which gradually develop into more complex structures as they mature. However, using antlers alone to determine age is not always reliable, as other factors such as genetics and nutrition can influence their growth.
Differentiating Antler Points
When describing deer antlers, hunters often refer to the number of points present on each side. For example, an eight-point buck would have four tines on each side of its antlers. This method allows for easy comparison and classification among different individuals.
In addition to counting points, hunters may also measure other attributes of the antlers to score an animal’s trophy potential. This includes measuring the spread (width between the two main beams), length of main beam, and length of individual points. These measurements help determine the overall size and quality of a buck’s antlers.
Understanding these aspects of deer antler points adds depth to our appreciation for these magnificent natural structures. Whether you’re a wildlife enthusiast or a hunter seeking a trophy buck, exploring the world of antler points offers a deeper understanding of deer behavior and the unique characteristics that make each individual deer truly remarkable.
4. “Demystifying Deer Antler Points: What You Need to Know”
Deer antler points can be a source of fascination and intrigue for many people. They are often used as a way to measure the size and maturity of a deer, but understanding how to count points can be confusing. Here are some key points to help demystify deer antler points:
1. Points are tines branching off the main beam
Points on deer antlers refer to the tines that branch off from the main beam of the antler. These tines must measure at least 1 inch in length to be considered as points.
2. Additional attributes can be measured for scoring
In addition to counting points, hunters may also measure other attributes of the antlers to score an animal. This includes measuring the spread (width between the tips of the antlers), main beam length, and length of individual points.
3. Different counting methods for different species
When it comes to counting points, there are different methods depending on the species of deer. For white-tailed deer, they are typically described by their total number of points. The most common type is an eight-point buck, which refers to a deer with four tines on each side.
On the other hand, elk are counted by each side of their antlers. For example, a mature elk with six points on both sides would be referred to as a 6×6 bull.
4. Age does not always determine antler size
While it is commonly believed that older deer will have larger antlers, this is not always the case. Antler size is more influenced by an animal’s overall health and genetics rather than its age alone. Deer, elk, and moose past their prime years may actually have smaller and less dense antlers.
Understanding how to count and interpret deer antler points can provide valuable insights into the size and maturity of an animal. However, it is important to remember that antlers are just one aspect of an animal’s overall health and fitness.
5. “Unveiling the Secrets of Deer Antler Points: A Comprehensive Overview”
The Importance of Antler Points
Antler points are tines that branch off the main beam of a deer’s antlers and are often used to describe and measure the size and quality of the antlers. These points are an important indicator of the health and fitness of the animal rather than its age. While antlers can vary in size and shape, the number of points can provide valuable information about the overall condition of the deer. Hunters often use these points to determine whether a buck is mature enough to harvest or if it should be allowed to continue growing.
Counting Points on White-Tailed Deer
When describing white-tailed bucks, hunters commonly refer to them by their number of points. The most common antler type for white-tailed deer is eight points, which refers to eight tines branching off each side of the main beam. However, it’s important to note that counting points alone may not provide a complete picture of a buck’s size or quality. Other attributes such as spread (the width between antlers), main beam length, and length of points are also considered when scoring an animal.
Counting Points on Elk and Moose
Unlike white-tailed deer, elk are counted by each side when referring to their antler points. For example, a mature elk with six tines branching off each side would be referred to as a 6×6. Moose, on the other hand, are primarily measured by their spread, which is the total width between their antlers. Additional measurements for moose include the number of points, width and length of palm (central part of antler), and circumference of beam at its narrowest point.
Overall, understanding how to count and interpret antler points can provide valuable insights into the size, quality, and overall health of deer, elk, and moose populations. This knowledge is essential for wildlife management and conservation efforts.
6. “Counting the Points: An In-Depth Look at Deer Antlers”
Antlers are a fascinating feature of animals in the deer family, and counting the points on these antlers can provide valuable insights into their age and health. When it comes to white-tailed bucks and bull elk, the number of points refers to the tines branching off the main beam of the antler that measure at least 1 inch. Eight points is the most common antler type for white-tailed deer, typically found on 3 or 4 year-old bucks, as well as aging bucks and those living in poor habitats.
Elk, on the other hand, are counted by each side of their antlers. The most common mature elk antlers have six points on both the left and right sides, resulting in a classification of “6×6.” This measurement system allows hunters and wildlife enthusiasts to assess an elk’s size and maturity based on its antler configuration.
For moose, size is primarily measured by spread, which refers to the total width of their antlers. Additionally, moose antler scoring takes into account other factors such as points, palm width, palm length, and circumference of beam at its narrowest point. The palm is the central part of the moose’s antler that resembles an outstretched hand.
Understanding how to count points on deer antlers provides valuable information about an animal’s age and overall health. It allows researchers and wildlife managers to monitor populations and make informed decisions regarding conservation efforts. So next time you come across a majestic set of antlers in nature or hear someone discussing them, you’ll have a better understanding of what those points signify.
In conclusion, deer antlers serve various purposes in the animal kingdom, including attracting mates, defending against predators, and establishing dominance within their social hierarchy. Understanding the different points on deer antlers provides valuable insights into their behavior and evolutionary adaptations. Further research is needed to delve deeper into this fascinating aspect of deer biology and its implications for conservation efforts.
Modern-day hunters, tactical shooters, and competition shooters rely so much on their scopes and other gun accessories to enhance their shooting accuracy. However, to improve your overall shooting accuracy, you have to practice as much as you can with your scope and rifle.
Aside from that, you also need to control the amount of recoil released by your firearm. Although you do not need to directly use your strength to manage the recoil impact, you would need a top-class mounting system.
Without a durable and reliable mounting system, your scope will not be of use to you because it is not possible to hold your scope on top of your rifle with your hands while trying to shoot at a target. Having said that, the only solution to managing the recoil effectively and ensuring that it does not affect your scope and rifle relationship is to use a tough scope ring.
There are so many scope rings out there that you can use to mount your scope to your rifle platform. In this article, we have compiled a list of the best scope rings for heavy recoil rifles. Carefully follow the reviews below to find out the best mount for your particular rifle caliber. Sit tight as we proceed…
We need to understand what riflescope rings are before we proceed to some of the best rings available. If you’re a beginner, knowing what this gun’s accessory is and how it should be used can help you be a better shooter.
If you already know what a scope ring does, you can go to the next part; otherwise, let us take a brief explanation.
The phrase scope ring is self-explanatory; even if you have never held one in your hands, you must have seen snipers in the movies shooting with a particular device called a riflescope. This riflescope is held firmly to the rifle by a scope ring, so you will never see a sniper holding the scope with their hands.
A riflescope helps to improve shooting accuracy, while a scope ring holds the scope firmly on the rifle. Scope rings are simple devices that allow you to attach the scope to your rifle and use it without difficulty. There are a lot of considerations to make before purchasing a scope ring.
Some of these include the height, type of rail, and a number of other variables. Fortunately, you will find a section in this article that provides all of the pertinent information about the subject.
So, before you proceed to the review part, check out the guide below because it will provide you with a clear idea of what to consider before purchasing any type of scope ring.
Types of Scope Rings
There are several types of scope rings available on the market for mounting a riflescope. Finding the right ring among the varieties might be difficult. To make your search easy, we have highlighted some of the ring types.
One-Piece Scope Mount
These types of mounting systems have just one piece, as the name implies. As a result, putting them on your rifle would be very easy.
Weaver Scope Mount
These are typically bolted mounts. That is, you must attach the riflescope to the mount using all of the available spots. They ensure a significantly more solid and consistent scope installation.
Dual Scope Mount
These types of scope mounting rings are more versatile than others. They allow users to have room to make adjustments to the distance between the scope rings. This makes it easier to mount the scope exactly the way you want it.
Picatinny Scope Mount
These are similar to one-piece mounts. Bolts must be used to attach both the mount and scope. As a result, you have more installation options.
Dovetail scope mount
The dovetail mounting system, which is commonly found on an air rifle and rimfire rifles, consists of two grooves that are parallel to the barrel. The dovetail rail, sometimes known as a “tip off” mount, allows a shooter to readily remove or replace attached optics. So you can mount dovetail rings easily on this base whether you want to use it on an air rifle or any other rifle.
Although we have so many other types of scope mounts, these are some of the most common or popular scope mounts.
Integral mount
Offset mount
STD scope mount
MOA mount
Quick detach mount
Market’s Top Scope Ring Brands
Let us check out some of the best brands that manufacture high-quality scope rings.
Vortex Optics
Vortex Optics was founded in 1989 as a division of the well-known corporation Sheltered Wings Inc. The firm has produced some of the best and most renowned gun attachments and optical equipment for a variety of shooting applications. This firm also makes good scope rings for rifles that have heavy recoil.
Leupold
When it comes to riflescopes, only a few firms can match the quality of the Vortex brand, and Leupold is one of those. This optical brand is among the best on the market. Its primary goal is to provide its customers with goods that are of exceptional durability, dependability, and adaptability.
Burris Optics
It makes no difference if you are looking for a rifle scope or a scope ring; Burris Optics has it all. Burris is one of the top scope ring brands in the market. they have been in business since 1972, and they are still producing quality optical accessories, including scope rings.
There are other scope ring brands like Seekins Precision and Warne. These brands are not popular when it comes to riflescopes, but when you talk of scope rings, they’re among the best.
Buying Guide for Heavy Recoil Scope Rings
Knowing everything about weapons and their accessories is crucial for a huntsman or marksman. One of the essential elements for mounting your scope is the ring, and we would help you understand all there is so that you can make an informed decision when you want to buy a ring to mount your scope on a heavy recoil rifle.
Ring Type
Traditionally, we have two major types of scope mounts. All other forms of scope mounting rings are made up of either of these two. So, first and foremost, you must decide which one you want. We’re talking about the single-piece mounts and dual-piece mounts.
As previously stated, a single-piece mounting ring has the easiest installation among the two types. Single-piece rings are often built with a light material, which allows for greater precision. Dual-piece rings, on the other hand, allow the gun owner to determine the space they want to have between the two rings.
There is no hard rule that makes one better than the other, its just a matter of preference for the shooter.
Materials Used
The type of material used to construct a scope ring or mount determines a lot on the mount. As a result, you must use caution while selecting this type of device.
Number one: The material chosen determines the weight. It is probable that it will impede your aiming accuracy if it is very heavy. As a result, you should choose a scope ring constructed with a light material.
Number two: It must not be fragile, even though it is lightweight. As a result, you must select a mount that is very strong and durable and can withstand the abuse of a heavy recoil rifle.
With these two factors in mind, we suggest that you choose anything composed of steel or aluminum. Both materials are incredibly long-lasting and lightweight, although aluminum is lighter than steel. They provide you with the highest performance you would need from your ring. With these materials, you are sure your scope rings will not break, regardless of the abuse by heavy recoil rifles.
Attachment Without Hassle
Another consideration is the ease of installation of the rings. Fitting a complicated ring may be physically and emotionally demanding. As a result, we recommend that you choose a mounting ring that is simple and easy to install.
Cost
Most shooters do not have so much to spend on shooting accessories, whether it’s a scope or a scope ring. In fact, you should not expect a shooter that is using a $200 riflescope to buy a scope ring of the same amount or more. So it is important that you double-check everything about the rings, including the cost.
Having a budget in mind before you go to the local gun shop or online marketplace would save you time that you would have spent admiring expensive and out-of-budget accessories.
Scope Rings Made of Steel Vs Aluminum
Scope rings are typically made of two sorts of materials. The first is made of steel, while the other is made of aluminum. However, there has always been a controversy over which of the two is superior. Let’s see what happens!
Weight
Aluminum is the obvious winner in terms of being lightweight. Although steel rings are not too heavy, but when compared to rings made with aluminum materials, they’re quite heavy! Because Aluminum is lighter, the total weight of the rifle and scope mount is reduced, which means you can carry your rifle and scope mount for a long walk without getting tired.
Being lighter also provides improved movement and control over the rifle. As a result, you may be more precise when aiming at or taking a shot with your rifle.
Longevity and durability
Steel is far more durable. However, aluminum comes out on top in terms of longevity. This is because steel corrodes more easily than aluminum. Aluminum, on the other hand, cannot withstand the amount of impact that steel can take.
Overall, aluminum is a better choice, even though it’s not as strong as steel. When all of the benefits are considered, it is a far superior solution over steel rings. Still, the decision is totally yours.
Best Scope Rings for Heavy Recoil Detail Reviews
Even if you’re using the most expensive and high-quality scope in the market, it will be totally useless unless you attach it to your rifle. We’ve got a solution! Here are some of the best scope rings on the market, suitable for practically any high-recoil rifle scope.
1. Vortex Precision Matched Rings
Are you looking for a rifle scope mount for your high recoil rifle? There is no need to worry any longer because we have the best ring here for you! Vortex Optics produces a wide range of high-quality shooting accessories, which includes this Vortex ring. So, if you’re looking for the best scope mount for strong recoil, look no further!
This Vortex ring offers excellent placement, allowing you to put the rings exactly where you want them to be. As a result, there is no undesired imbalance in your vision, and this allows you to have a first-class view through your optic.
This Vortex ring is well contructed. Each of the rings is made of aluminum. Aluminum is both lightweight and strong. Your shots will not be affected as a result of these features (a heavy-weighted scope ring can put additional weight on your rifle, and this could alter your accuracy).
Furthermore, the product’s remarkable sturdiness allows it to endure any abuses without difficulty.
But wait, there’s more. Vibratory toppling, serializing, and hand-bead blasting add to its toughness. It also has a type III anodized finish. As a result, we can tell you that this scope ring will have your back in practically any terrain or weather condition.
These Vortex Optics rings also have a stylish and appealing overall appearance. For you to successfully mount this ring and use it for the purpose you bought it, you have to ensure that the rings match the scope base on the rifle platform.
This rifle scope mount fits perfectly on a Picatinny rail. Trying to use it with another scope base might be challenging.
2. Seekins Precision 30mm Scope Ring
This Seekins ring is one of the market’s newest and fastest-growing optical accessory brands. The firm prioritizes ease and durability, which is why it created this gem!
Let’s go into the specifics. First and foremost, the item is superbly constructed. It is built to last and features a type III hard-coat anodized finish. This provides increasing immunity from environmental damages such as scratches, rusts, and dents.
It also gives the device the capacity to withstand very high recoil. As a result, it is a viable solution if you require consistent perseverance and endurance. You can use it with a heavy recoil rifle because it is built for that purpose.
Furthermore, the unit’s weight is quite little. It weighs about 0.19 kilos and has a plethora of features.
Because it is so light, it has no detrimental impact on your accuracy and allows you to be highly flexible. Such characteristics are essential on battlefields or during competitive shooting.
The installation of the scope ring is a breeze. Once installed on top of your rifle, you may mount almost any sort of riflescope on it. Because of its lightweight design, your gun’s mobility, precision, and control are unaffected. Pricing is also reasonable.
One of the issues with this ring is that it cannot be mounted on a weaver base; it only works on a Picatinny rail. This is because the crossbar on the base of the scope rings are too wide for a Weaver base slot. So if your rifle has a weaver rail, you will not be able to mount this Picatinny ring on it.
This Seekins ring has a 30mm ring diameter; as a result, you can only mount a scope that has the same scope tube diameter as the ring diameter.
When it comes to ring height, this Seekins scope mount has a .82-inch height. This ring height is not just low, but it is one of the lowest heights you can find. You have to ensure that the scope can sit properly on the ring without the scope bell touching the rifle barrel.
3. Warne Scope Ring
Purchasing the nicest rifle scope may be a total waste of money if you don’t have the right mounting system. However, we have a fantastic thing for you right now. With this ring, you will never have to deal with such a problem. The product has a notable method that permits you to repair practically any scope you choose.
This Warne scope mount comes with an all-fit function that allows you to fix practically any type of scope you desire without any problems. It also boasts a robust recoil control, allowing you to continually take precise and steady shots.
Installing this scope ring is also a piece of cake. The recoil control keys in both the front ring and rear ring are made of stainless steel.
This Warne scope mount is made of steel, so you can expect them to be as tough as a nail. The rings have a matte black finish that is meant to protect them from the elements. You just need to fasten the four TORX type T-15 socket cap screws (with a 25 inches/pound torque ) to get the finest experience.
4. Leupold Rifleman Rings
When it comes to mounting a high-quality riflescope, which are hard to come by, placement is everything. Not to worry, we have the ideal option for you! First and foremost, the Leupold brand will present you with a list of optical shooting accessories from which you may select the appropriate one.
Aside from being able to select the perfect size that you want, you will also benefit from the superior lifespan and ruggedity of their aceessories. Leupold scope rings are built of high-quality materials like aluminum. As a result, you are sure to enjoy excellent durabilityof the rings .
Because the rings are constructed of aluminum, this makes them quite light. As a result, the device adds no extra weight to the rifle and so does not impair your shooting ability. A heavy rifle will be inconvenient to shoot with.
Additionally, the product’s mounting mechanism is outstanding! It includes three distinct mounting bits that allow you to put the device atop your rifle with remarkable simplicity and speed.
Also, the mounting elements are constructed in a way that they can endure impacts from heavy recoil rifles. They are designed to retain and hold the rings firmly once they have been installed. Finally, you may enjoy all of this at a low cost. You now see why these rings are regarded as one of the best scope rings.
5. Burris Weaver Style Rings
Burris optics is a famous name in the field of optics. And, among all of its scope rings, this Weaver-type zee ring is the best for long range shots. Would you want to learn more? Continue reading!
Long-range rifles usually have a heavier recoil because of the distance the bullet needs to hit. Therefore you need a scope ring that is very strong and durable to mount your scope to a long-range rifle.
If you value precision, this scope ring is one of the best options you can consider. It features a bottom and top-matched fit, ensuring superior strength and a great fit. What this means is that when you add your scope to the rings, there would be no need for lapping because the rings were neatly deisgned to hold your scopes.
Also, the rings will not add a dent or scratch to your scope if you mount them correctly. The Burris rings are really lightweight. As a result, you can easily fit the gadget on your rifle.
Aside from that, the lightweight construction results in another feature (it weighs around 0.3 pounds), which is the stability of your rifle; as a result, you will be able to shoot precise shots without your rifle waving to the left or right because of the weight.
Furthermore, the rings are of the high kind, making them perfect for target shooting at long distances.
The ring’s general appearance is pretty fascinating. Unlike traditional matte-black hue of most scope rings, this ring is nickel. As a result, it offers your rifle a unique and exciting appearance.
This Burris Picatinny ring can sit perfectly on a weaver mount or Picatinny mount.
They are strong and long-lasting, making the fit for heavy recoil rifles. This wonderful product is available at a reasonable price.
6. Monstrum Tactical Cantilever Mount Dual Scope Ring
Do you want the greatest 1-inch scope ring for your heavy recoil rilfe? We’ve got just the ring for you! Because this scope ring is a one piece mount, there is no need for a lengthy installation procedure. This Monstrum ring includes a plethora of additional features.
Though the ring is slightly heavier than other mounting sytem, you can be sure that it won’t impair your gun’s mobility or precision. Also, because it is somewhat heavier, it assists with absorbing the recoil of strong rifles to a greater extent.
Its extraordinarily strong construction is another feature that makes it on the list of best heavy reoil rings to acquire. It is made of 6061 aircraft-grade aluminum. It can withstand any punishment or abuse from your rifle or the environment.
One of the disadvantages of a cantilever mount is that you cannot attach just any scope you want on them. They have a predefined spacing (2.38 inches) between the front ring and the rear ring; as a result, riflescopes that do not match that kind of ring spacing on their scope tube will not be able to sit on the rings.
The entire mount can easily be installed or uninstalled whenever you want to change the mounts. It is a Picatinny ring and will not sit properly on a Weaver rail. The mount is designed to fit a 1-inch scope tube and may be attached to any regular Picatinny rail-fitted rifle.
The entire length of the mounting system is 5.75 inches. It has a 3 inches long base, with mounting bolts placed 2 inches apart.
7. Talley Scope Ring Mount
Are you angry and frustrated because you can’t seem to find the perfect scope mounting device for your bolt action rifle or heavy recoil rilfes? If that’s the case, this rings could be of interest to you. Talley’s 40mm scope ring is a promising mountng device. Do you wish to know what distinguishes it from others? Well, this ring is incredibly strong. It is capable of surviving any heavy-duty caliber. As a result, you can shoot without fear of damaging your mounts!
Its solid design further demonstrates its abilty to hold zero at all time. As a result, overall accuracy is guaranteed. Installing this ring onto your firearm is a simple process; once completed, you will be able to use it with any scope.
The best part is that you’d get all of these benefits at the most reasonable prices.
Frequently Asked Questions
Is it possible to have a scope mount that is too low or too high?
Yes, it is possible to have a scope ring that is too high or low. If the ring is too low, you won’t be able to attach the scope, because the scope be will rub on the barrel. If it is high, there’s a good probability that you will always have to raise your face from the cheekpiece, reducing accuracy.
Is it an issue if the screw on a scope mount is overtightened?
Yes, it can damage the setup. Overtightening the mounting screw may result in damage to your scope tube.
Are the rings on a 30mm scope and 1-inch scope the same size?
No, they are not. The size of the scope tube determines the size of the mounting ring you will need. Although some rings may be used to install both a 30mm and a 1 inch optic, but it is very uncommon and you will have to lap the scope. This is not an ideal mounting procedure, and it is not recommended.
According to Yamaha, the 1000cc class is, by far, the largest in the sport/utility segment among trail riders and explorers. Since its public release on Sept. 3, Yamaha’s brand new sport/utility Wolverine RMAX2 and RMAX4 have created a firestorm of positivity and excitement among SXS enthusiasts not seen for a Japanese machine since the time when the Yamaha Rhino 660 was the sportiest machine on the market.
If a manufacturer wants to create excitement that turns into sales instead of criticism, they have to build SXSs with class leading specifications that deliver on the promise of quality and performance without major compromises. That’s exactly what Yamaha has done with their new Wolverine RMAX 1000, and enthusiasts have responded accordingly with many of our viewers split between elation over putting money down on a new RMAX and those suffering with buyer’s regret over last year’s purchase.
Many of the RMAX’ specifications are not only leading in the sport/utility class, they’re competitive or more impressive than some sport models we’ve tested. Infected with enthusiasm shared with our viewers, we met up with Factory Yamaha at Mild to Wild Off-Road in Sparta, Kentucky for a private one-on-one test day with the RMAX2. Open twice a year for public riding, Mild to Wild is the private testing grounds for our pro level test driver, Justin Frasure, owner of RAZR Sharp Customs and a former pro rock bouncer. His company builds SXS chassis, suspension parts, roll cages, bumpers, as well as complete turnkey trail and rock bouncer builds. Justin was joined by UTV on Demand editor, Chad Westcott. Chad is an avid off-roader who teaches SXS driving courses to first responders. With two drivers and 7 plus hours of seat time under our belts, we’re ready to share our impression of Yamaha’s exciting new RMAX2.
Trim Packages
The RMAX is currently available in 3 trim packages: the $19,799 base model; our test unit, the $21,999 XT-R edition; and the $23,299 Limited Edition. The standard model comes with GBC’s new Dirt Commander 2.0 radial tires with Maxxis Carnivores used on the XT-R and LE models. The XT-R and LE models also benefit from various digital throttle modes, backlit switches, blue LED interior lights, removable Adventure Pro GPS/tablet integration, Pre-installed VRX 4,500 Warn winch controlled by a switch on the dash, and upgraded front bumpers with four light pod mounts vs 2 on the standard bumper. Limited editions also benefit from a factory installed SSV Works stereo and Yamaha’s removable key controlled Speed Management system, which limits top-speed to 25MPH while still allowing full power for work or hills. Base models can be easily upgraded with any or all of the before mentioned features found on the XT-R and LE models. One item not easily upgraded are the Fox IQS shocks, which are tunable from inside the cabin. More on that later.
Engine Performance
At the heart of the new RMAX is a brand new 999cc, liquid-cooled, parallel twin-cylinder engine featuring 4 valves and double overhead cams per cylinder. Its 270° firing order helps increase torque and traction. Premium pump gas is recommended with the engine’s sport class worthy 11.2:1 compression ratio. It’s said to produce class leading horsepower and torque peaking out at 108hp at 8,500rpms with a 9,250 RPM redline. That’s 8 more HP than the General XP 1000, the 60” sport class, 4HP more than the Talon 1000, and within 2hp of the RZR XP 1000.
Yamaha is claiming a 4% reduction in rotating mass compared to the 850cc class Wolverine X2/X4 models for improved rev-ability. A counter balancer and 4-point rubber engine mounts were employed to keep vibration to a minimum.
Oil is circulated via dry-sump lubrication with an oil cooler for added cooling. A shallow sump profile on the bottom and inclined engine layout allow for a more compact design with a lower center of gravity.
Air intakes for the engine and CVT are mounted high under the hood making ingesting dirt and water less likely. There’s tool-free access to the primary foam filter with a secondary paper filter Yamaha claims will not pass dirt. Fuel is delivered via Yamaha Fuel Injection with dual, 48mm throttle bodies.
A fully automatic Yamaha’s Ultramatic CVT transmission relies on a primary wet clutch to handle engagement eliminating the need to slip the drive belt on take-offs or getting back on the gas, greatly reducing wear allowing Yamaha to cover the RMAX with their 10 year belt warranty. This type of transmission is a bit harder to tune with aftermarket clutch kits, though. Exhaust from the CVT is utilized to cool the exhaust pipe and spark plug coils. Spiral
beveled and helical cut gears with rigid gears nestled in a detached transmission along with single inline front and rear driveshafts help keep the drivetrain running smooth and quiet. Yamaha’s On-Command drive system delivers the capability of 2wd, 4wd, and 4wd with front differential lock. Available on XT-R and LE models, for the first time, Yamaha is offering multiple drive modes on a SXS with their Yamaha Chip Controlled Throttle offering sport, trail, and crawl modes. Each mode delivers full power with sport mode tuned for quick acceleration and responsiveness to throttle input. Trail mode is tuned for a more linear response and acceleration similar to a cable actuated throttle. Crawl mode offers slower response for greater traction in rocks or mud. Drive modes also affect engine braking. Trail and crawl modes offer full engine braking with sport mode tuned for smoother engine braking, preferable when coming down from speed in whooped out or choppy terrain.
The engine fires right up emitting a mild sporty rumble from the exhaust with db levels we find acceptable inside the cabin for a work capable SXS with sporty intentions. The transmission shifts smoothly and effortlessly between high, low, neutral and reverse regardless of situation. Rolling on the gas from a dead stop or getting in and out of the throttle at speed, clutch engagement is magically smooth and gearbox like with no feel of belt lash like some other CVT equipped machines. It’s one of the smoothest, most natural, feeling CVT transmission he’s experienced.
The butter smooth clutching feeds in the engine’s seamless power delivery. It’s linear, yet fun; controllable, but fast enough to provide a thrill level missing from the X2 and X4. Low-end power is respectable, easily getting the car moving on flat or slow technical terrain. Seamlessly building power into the midrange, the RMAX can generate decent trail speed without having to rev the engine hard. A strong torque curve entering the midrange allows the RMAX to tackle impressively long steep climbs instilling confidence that you’re not going to run out of power.
Pushing the limits of the engine’s performance racing from corner to corner on the roomy trails, you quickly forget that there’s a dump bed behind you. It delivers the type of engine performance we’ve come to expect from the naturally aspirated sport class, all-be-it very refined. When you ask for it, the RMAX has enough thrust to push you back in your seat. We got the tires spinning cresting mild rollers in the trail and it’s possible to break loose and steer a bit with the back end in corners, even in limited slip 4WD. We had our machine close to 60mph on one of the longer straightaways we encountered with the RMAX apparently topping out at 73MPH, so cruising at 50mph on smooth, fast trails shouldn’t be an issue.
Exploring the drive modes, crawl mode allowed us to easily crawl our way through big creek rocks with plenty of power to keep crawling and no sign of wheel spin. On the other hand, with full power on tap, Justin tackled one of the longest, steepest climbs we came across in crawl mode. Even if full power wasn’t necessary, it was there, if needed, which is brilliant.
Trail mode provides a very natural feeling acceleration that seems proportional to the demand placed on the gas pedal. It works well for any type of driving from technical to sporty; good thing as this is the only mode available on the stock base model. The gas pedal, while improved over the one on the older Wolverine X models, still drew mixed reviews with Justin wishing for a heel pocket. Fortunately, low-speed pedal bob is no longer an issue in trail or crawl modes with the digital throttle filtering out most unwanted input without feeling laggy.
Sport mode is sort of similar to slapping a ¼ turn twist throttle on your dirt bike. It doesn’t change the power capabilities of the engine; it simply delivers more gas with less movement of the throttle. Sport mode’s snappy delivery right off idle can reintroduce some unwanted pedal bob that translates to forward momentum at crawling speeds if you’re not precise with your foot. Sport mode is not about babysitting the gas, though; it’s about getting immediately into the heart of the power and it does it well. Sport mode is our mode of choice for motoring or humbling sport SXS owners on the trail.
Variable engine braking seemed perfectly matched with the different drive modes. The normal, higher level of engine braking provided in crawl and trail modes do notably better at keeping speed in check on downhills. Sport mode’s reduced engine braking does well at allowing you to coast a bit more through bumps and reduces the feeling of throwing out the Anker when letting off the gas to set up for turns.
The increased traction of Crawl mode increases the capability of what’s possible, even in limited slip 4WD. However, when negotiating slick, muddy, steep, rutted climb where all four tires are spinning, it’s nice knowing that the front differential is locked with all four tires clawing for traction regardless of what we did with the throttle or if available grip changed from one side to the other.
Overall, the engine is well mannered for all day work with performance that feels worthy of a sport SXS. The General could be out gunned.
Chassis and Suspension
The RMAX is built on a brand new steel frame. Its 64” width is ideal for adapting well to nearly all types of terrain. Most of the underside of the frame is covered by a welded on steel skid plate with a front plastic skid plate and rear CV guards. Kickouts on the lower frame rails help pretend snagging rear wheels on trees of other obstacles. Our unit came outfitted with a set of 3/8” thick, UHMWPE skid plates, protecting the underside of the frame’s armor, which we’d rather not scratch up. Plus, they help slide over rocks more easily. They’d be our number one accessory pic.
Winch-ready steel bumpers feature very overbuilt looking tie down hooks for easy trailering. A channel in the grill allows an observer to keep an eye on the winch cable helping prevent tangling and binding.
The RMAX2 utilizes dual A-Arms front with wide-arc lower arms for improved ground clearance. Dual control arms out back utilize single stamped designed lower arms for improved strength. We were impressed with the thick shock mounts and stout appearance of the exposed frame and suspension parts. Justin felt construction appeared beyond what the competition is delivering at this time.
Fox Podium 2.0 QS3 shocks are used on the standard and XT-R models with Fox IQS shocks used on the LE model. Both shocks feature nitrogen reservoirs, dual rate springs with preload adjustment, and three-way compression damping adjustability with comfort, medium, and firm settings for different speeds, terrains, and uses.. The QS3 shocks have three position dials on the shocks’ reservoirs, while the IQS system allows you to select between the different compressions’ damping settings via a switch inside the cockpit.
According to Yamaha, the shocks were optimized for maximum low-speed comfort and maximum articulation while still offering a high-level of bottoming resistance.
The RMAX2 features class-leading suspension travel at both ends with 14.2” front and 16.9” rear. That’s nearly 3” more rear suspension travel than General XP 1000, within 1/10” of an inch of Yamaha’s YXZ1000R sport SXS, and more overall travel than the 64” wide Honda Talon X sport model. Equipped with a sway bar up front, it foregoes a rear sway bar for maximum articulation.
The RMAX2’s 86.7” wheelbase is claimed to improve the contact to ground feeling on steep climbs and descents compared to the 83” wheelbase of the General XP 1000. Rolling on 30X10-14” radial tires on 14” aluminum wheels, the RMAX2 delivers the square wheel tire setup we prefer. Ground clearance is class leading at 13.8”.
Optimized for use with 29-30” tires, Yamaha’s electric power steering is now offering a 2nd mode that automatically engages to make steering easier when the front differential is locked.
Yamaha is claiming a wet weight for the RMAX2 XT-R edition of 1876.1 lbs, around 172 pounds more than the slightly more compact, but similarly appointed, 850 class Wolverine X2 XT-R, which produces 69hp in comparison to the RMAX2 108hp. The RMAX certainly enjoys a substantial power to weight advantage.
Suspension performance was outstanding on the trails we tested on. The factory suspension settings are designed for two occupants with 150lbs in the bed with room to stiffen or soften the ride. That’s where we left it for our first day of testing, although Justin said he would soften the settings a bit for driving alone. We managed to bottom the suspension on a major G-out, which Justin said pushed most sport SXS’s shocks to their limits. Even then, the RMAX never bottomed harshly and quickly regained its composure.
Even with good bottoming resistance, during rock crawling, the shocks do an excellent job of absorbing square edge impacts and allowing the suspension to respond to the demands of the terrain aided greatly by the lack of a rear sway bar. It rolls over rocks and fills in holes with the rest of the RMAX and its occupants flying along comfortably above turbulence. Come to think of it, that’s kind of how the RMAX rides when you’re flying down the trail at speed. Small bumps aren’t harsh; the suspension never seems to bottom harshly; and everything in between is well dampened while still leaving you feeling very connected to the trail. Rebound damping was quick enough that the suspension is always ready for the next bump in the rocks, emitting a fun, responsive, and lively feeling over mildly rolling trail. The RMAX2 had a lot of suspension travel and it felt like it no matter how we drove it.
Driving in limited slip 4wd a majority of the time to maximize handling, entering corners at speed dive and body roll were well controlled with just enough front-end squat and weight transfer to the outside tire to get the front end hooked up and steering precisely. Justin proclaimed that the RMAX2 is the most accurate steering SXS he’s driven! In bumpy corners where the car might start to bobble, the suspension quickly settles things down. Stability in turns is very good with the feeling of a pretty low center of gravity. When you hammer down exiting corners, you feel the back end squat and transfer its weight to the outside tire, settling into the turn like a trophy truck. Even then, the rear suspension remains very responsive to bumps keeping the ride comfortable and the driver in control.
Power steering is near perfection as we’ve come to expect on all Yamaha models. It’s light with the perfect amount of feedback keeping you feeling connected to the trail while eliminating unwanted bump feedback. The only time any real effort is required to turn the front wheels is at a dead stop with the front differential lock engaged.
Stable with precise handling, and forgiving suspension. What more can you ask for from a sport SXS, we mean sport/utility?
Brakes
The RMAX are slowed by four-wheel hydraulic disc brakes. 255mm rotors with 32mm calipers are used up front with 244.5mm rotors and 27mm calipers out back. Dual piston calipers are found at both ends. Steel-braided brake lines are used for enhanced power and feel.
The brakes deliver good feel and power, but both Chad and Justin felt the pedal required more pressure than they would like. Braking improved a bit throughout the day, but still required a good amount of pedal pressure to get the most out of the brakes.
Work Capability
While we didn’t get a chance to do any hauling or towing, with all this performance comes the capability to get work done or haul more gear out for the weekend. The RMAX2 features a cosmetically well disguised, hydraulically assisted, composite dump bed with multiple steel tie-down points and 600lb of cargo capacity. A 2” hitch receiver is rated to tow an additional ton even with the bed loaded.
Interior and Other Details
Interior comfort and attention to detail are first rate on the RMAX. Entering and exiting has been made much easier compared to older X2 models. New 3-piece doors feature interior door handles located farther from flying mud. Integrated door speaker pods are designed to make installing speakers easier with improved acoustics.
A blue backlit LED display is mounted just behind the steering wheel and is easy to read at a glance. Compared to the previous Wolverine X2 and X4, the automotive style cockpit is roomier for all occupants with nearly ½” more rearward movement for the driver’s seat. Soft touch points are located throughout. The seats feature increased bolstering with new cut and sewn seat covers. The seat belts feature tool free, 6-point adjustability in 20mm increments.
Gas and brake pedals are newly designed. A 17° tilt adjustable steering wheel is constructed of a softer durometer rubber. The passenger benefits from a new quick adjust, T-shaped grab handle with 95mm of adjustment that can be adjusted in 4mm increments.
Getting comfortable in the machine is pretty easy for most body types. At 6’2”, Chad felt that he had plenty of legroom on either side. As wide as an NFL player, his shoulder rubbed the shoulder bolster a bit when he was driving although it wasn’t serious. The steering wheel is rigid, yet soft to the touch, offering plenty of adjustment. The seats are comfortable with a design that’s well balanced for easy exiting from the car while still offering a decent amount of bolstering for aggressive driving. They seem well placed in the chassis, in relationship to the front and rear wheels, minimizing rider movement traversing bumps. While the passenger grab bar is comfortable, we hardly felt the need for it unless we were on monster descents. The three-point belts are among the most comfortable we’ve used with no uncomfortable pressure points, and we genuinely appreciated the added comfort of the soft touch points, which seemed perfectly placed . All of the switches and handles feel high quality.
Riding in the RMAX is a joy with no rattles squeaks or irritating vibrations from anywhere on the machine. There’s just the pleasant sound of the engine and a slight turbo sounding hiss from the CVT.
Interior storage includes a 5.8L passenger glove box and 2.7L center console. There are cubbies in the center console as well as driver and passenger side storage shelves. There are also 2 cup holders.
XT-R and Limited edition RMAX models benefit from Yamaha Adventure Pro GPS tablet integration along with a USB charge port. The Adventure Pro can be locked in place for security and removed for use in your car or truck. The center console is rubber sealed with pass throughs to charge your smartphone while safely inside.
All RMAX2 models come with sun tops standard featuring integration with Yamaha’s accessory windshield, cab enclosure system and mirrors.
Its modern sporty styling is accented with new LED marker lights. 7.6W LED low beams with 15.2W reflector high beam headlights are found out front with LED tail and reverse lights found out back.
Accessory Integration
If you like to accessorize your rig like us, it’s worth noting that Yamaha already has over 100 accessories ready to go for the new Wolverines. Besides the skid plates, our RMAX also benefited from Yamaha’s polycarbonate half windshield, which is far less obtrusive to your sight line than some of the curved half windshields. You might as well pick up a Yamaha accessory windshield before you leave the dealer as well. They’re a great addition to any SXS.
Conclusion
While we are typically excited about new machines, we’re blown away with the new Yamaha Wolverine RMAX2 1000. It’s certainly a contender or best in class in the sport/utility segment, but it’s more than that. Although we didn’t get the chance to test it in whooped out terrain, the RMAX 1000 seems good enough to serve the needs of many enthusiasts who’ve been wishing for a 64” wide, CVT equipped sport SXS from a Japanese manufacturer. It’s both quicker and faster than a Teryx 1000, might give the Talon 1000X a good run, and will work better for many drivers than Yamaha’s YXZ1000R on tighter trails. Plus, it will let you haul more gear, work, or tow more than any Sport SXS. Its combination of performance, versatility, and refinement is unique and why we expect the 2021 Yamaha Wolverine RMAX 1000 to become one of the top selling SXSs on the market. That’s saying a lot, but the new Wolverine RMAX2 1000 is really that good.
Tags: 2021 Yamaha Wolverine RMAX 1000 Test Review, 2021 Yamaha Wolverine RMAX2 1000 Test Review, can-am commander 1000, comparison, honda pioneer 5, Honda Talon 1000X, off road, polaris general 1000, polaris general xp 1000, Polaris RZR S 1000, Rmax, RMAX 1000 Review, RMAX 1000 Test, rmax review, Rmax test, side by side, sxs, sxs review, utv, vs, wolverine 2021, wolverine rmax, yamaha rmax 1000 vs polaris general, yamaha rmax upgrades, yamaha rmax2 review, Yamaha wolverine rmax 1000
Interested in a hunting adventure? Look no further than Alabama, where the extended hunting season and large number of turkeys make for a thrilling adventure. The Alabama Turkey season provides a range of possibilities to bag a gobbler, whether you’re an experienced hunter or a novice. The prospects of a successful hunt are high since the bulk of turkeys are taken during the spring season and because both the fall and spring seasons have hefty bag limits of five gobblers each. Although decoys are only allowed in the spring, the longer season gives you plenty of time to manoeuvre.
Alabama has more wild turkeys due to conservation efforts that began in the early 1900s. Their initiatives have opened countless hunting opportunities. Controlled burning, wildlife openings, and timber harvesting have helped the turkey rebound. Most turkeys are harvested in Alabama’s lengthy spring. Hunters may take one gobbler per day throughout the fall and spring seasons, while decoys are only allowed in spring with limited usage limitations.
Below here are Schedule for the latest Turkey Season in Alabama.
ZONE-1
Alabama Turkey SeasonStart DateEnd DateNote Zone-1Saturday, March 25, 2024Monday, May 08, 2024Decoys allowed April 4
Counties: Autauga, Baldwin, Barbour, Bibb, Blount, Butler, Bullock, Butler, Calhoun, Chambers, Cherokee, Chilton, Choctaw, Cleburne, Coffee, Conecuh, Coosa, Crenshaw, Cullman (except north of Lewis Smith Lake and north of Cullman County Road 437 and west of Interstate 65), Dale, Dallas, DeKalb, Elmore, Escambia, Et
ZONE 2
Alabama Turkey SeasonStart DateEnd DateNote Zone-2Saturday, April 01, 2024Monday, May 08, 2024Decoys allowed April 11
Counties: Franklin, Lauderdale, Lawrence, Limestone, Madison, Morgan, and Winston. Colbert, Cullman (north of Lewis Smith Lake, north of Cullman County Road 437, and west of Interstate 65).
ZONE 3
Alabama Turkey SeasonStart DateEnd DateNoteZone-3Sunday, November 19, 2024Monday, November 27, 2024No decoys allowed Zone-3Sunday, December 10, 2024Sunday, January 01, 2024No decoys allowed Zone-3Saturday, March 25, 2024Monday, May 08, 2024Decoys allowed April 4
Counties: Covington, Monroe, Randolph, Clarke, Clay, Talladega, and Covington.
Note:
Type of HuntGobbler LimitNoteGobblers OnlyOne per day, four bag limitDuring combined fall and spring season Special Youth Hunt (Decoys Allowed)Saturday & Sunday the week prior to opening of spring season Special Disabled Hunt (Decoys Allowed)One day prior to all regular season opening days. Participants must meet medical requirements of regulation 220-2-.109(2)(d)
Bag Limit
Alabama Turkey Bag LimitNote The daily limit is one gobbler.There is a total of 4 gobblers that may be taken in the autumn and spring seasons combined. No more than two gobblers may be taken from any Wildlife Management Area, Conservation and Hunting Area, or National Forest Ranger District.N/A For the first ten days of each season, only one gobbler may be taken from each WMA, CHA, and National Forest Ranger District.N/A
License Requirements
License RequiredDescription All Game Hunting Licenseunless exempt Harvest Recordpaper form or on the app Wildlife Management License and map permitIF hunting on a WMA Harvest Reporting48 hours to report turkey harvest through Game Check
U.S. Forest Service Ranger & WMA Districts
AreaStart DateEnd DateTime Limit Bankhead Ranger District; WMAs – Lauderdale, Freedom Hills, Black Warrior, Coon Gulf, Riverton CHA and Martin CHASaturday, April 08, 2024Monday, May 08, 2024daylight – 1 p.m. REMAINDER OF NATIONAL FORESTS DISTRICTS (Talladega Ranger District, Shoal Creek Ranger District, Oakmulgee Ranger District, Tuskegee Ranger District and Conecuh Ranger District) and WMAs THAT ALLOW TURKEY HUNTINGSaturday, April 01, 2024Monday, May 08, 2024daylight – 1 p.m.
Hunting Regulations for Turkey in AL
Before going out to hunt for deer or turkeys, you must have a harvest record, whether it be on paper or an app. Additionally, it is against the law to transfer any deer or turkey before noting the harvest on the harvest record and to fail to report any deer or turkey taken via Game Check.
Except for turkey, all lawful game animals and birds may be hunted from elevated tree stands only with a bow and arrow or handgun.
Hunting migrating birds or turkeys without using live decoys is not permitted.
Hunting is not permitted when using electronic dove, turkey, or waterfowl calls. However, they can summon predators when that species is being hunted.
Those decoys used for turkey hunting that include mechanical or electrical components capable of creating sound or movement or that can be controlled to do so, including any that are portable or linked to weapons like fans or reapers, are forbidden. After the first ten days of the spring turkey season, as well as during the special spring hunts for disabled people and youngsters, legal turkey decoys are permitted.
It is against the law to import, possess, sell, or offer to sell live any species of mongoose, wild rabbit or hare, deer, raccoon, fox, skunk, coyote, wild turkey, wild rodents, wild goat, sheep, antelope, or other exotic game from any region outside of Alabama, as well as any fish from the genera Clarias, Serrasalmus, or Mylopharyngodon.
Any turkey, domestic or wild, may not be released into a state’s wild region.
For entire regulations you may read our Latest Alabama Hunting seasons article.
There’s no need to let a spot rest after taking a coyote from it. Another will usually be ready to move in and take its place. (Photo by Josh Boyd)
Success is far from guaranteed when predator hunting, and every hunt holds just as many challenges as it does promise. To overcome these challenges, crafty predator hunters dig deep into their bags of tricks to turn the odds in their favor.v
Sometimes, the most overlooked or obscure tactic is the one that puts fur in the shed.
Few predator hunters’ bag of tricks run quite as deep as Tad Brown’s. Brown has spent decades chasing coyotes, bobcats and various other furbearers in every corner of the country, and he’s grown accustomed to meeting predator hunting’s challenges head-on.
The following are six of Brown’s most effective predator tips and tactics, which he regularly employs to produce consistent success.
Over the years, the idea that vehicle traffic imparts undue pressure on local predator populations has been ingrained in the average hunter’s psyche. However, Brown feels this notion is of little merit, and that traveling as close as possible to your next set by vehicle can often be among the least invasive means of access.
“I won’t walk 10 feet to my spot if I can hop in my truck. Coyotes are so used to hearing vehicles now. You have guys checking cattle, working on plots, putting up hay and driving through farms. It’s a common occurrence, and coyotes do not pay it any attention,” says Brown.
However, he does warn against throwing all caution to the wind, and stresses the importance of remaining aware of common predator hunting fundamentals. “Just get right in there with them, but use a little common sense. You still have to have the wind to your face, and it still makes sense to hide your vehicle.”
2. Hunt Past the Initial Shot
Another tactic Brown feels others overlook is to continue calling even after the hunt’s first shots have been fired. While many believe that the sound of gunfire scatters wary coyotes to parts unknown, Brown says thinking along these lines often costs hunters more shot opportunities than they ever realize.
“Guys tend to think that once they’ve fired a shot, they’ve scared everything in the country. There is nothing further from the truth. I can think of at least a half-dozen instances where I’ve killed or shot at a coyote only to have a bobcat or another coyote come into the call,” Brown says.
He also finds it helpful to vary his calling in the moments directly following a shot. “A lot of times, after I bust a coyote, I will go to a ki-yi or pup distress,” he says. “Doing so seems to have some type of instinctual effect on them, almost like a challenge of sorts. Typically, I’ll only do this for a short period of time before changing back over to a prey sound.”
3. Hunt Quality Sets Regularly
Many predator hunters believe a location can be rendered useless by overhunting it and will allow a spot to rest for a significant period between hunts, especially after it’s produced success. On the contrary, Brown feels that nature fills the void any time predators are removed from an area, and the avoidance of quality setups can cost you fur in the long run.
“Most people discount a location if they’ve already called it. Coyotes are constantly on the move, and one will almost always take the place of another,” Brown says. “It’s almost like waiting in line for the bathroom. Once you take a coyote out of an area, others will be waiting for their turn.”
Brown has seen the benefits of frequently hunting the same spots within areas of high predator traffic on numerous occasions. “There’s a spot on a ranch I hunt that is like my honey hole,” he says. “If I’m out there for four or five days, and the wind is right, that will be the first set every morning. I’ve had hunts where a coyote responds every time I call at that location.”
Over the course of his career, Tad Brown has developed numerous calls and other products for brands like M.A.D. and Hunter Specialties. (Photo courtesy of Tad Brown)
4. Prepare Spots in Advance
For most, predator hunting tends to be a run-and-gun endeavor. Hunters often seat themselves in a promising looking spot and then make decisions on the fly. However, Brown says that one of his most effective strategies is preparing sets in advance.
“There isn’t anything worse than setting down in a spot, calling in a coyote and realizing you’re not in position to take advantage of it,” he says. “I like to go into an area ahead of time and sort out whether I will be able to kill a cat or coyote if they come down a particular road. I treat my predator hunting spots just like my deer or turkey spots. I like to trim shooting lanes and make sure I can see.”
Brown feels that this level of preparation not only increases his odds of success, it makes him a more effective hunter in general. “Sizing up a spot before hunting it allows me to make decisions about where and how to set up for a certain wind, as well as how best to call,” he says. “Knowing these things in advance and preparing each spot allows me to be a more efficient predator hunter and put more fur on the board.”
5. Let Curiosity Be Their Undoing
If you ask any number of predator hunters what they do to finish reluctant coyotes or bobcats, most will be adamant about varying up their calling in a bid to entice a frenzied response. Brown, on the other hand, finds that the best medicine for stubborn predators is often to let their curiosity get the best of them.
“Most guys go to a squeaker bulb or a coaxer sound to finish cats or coyotes. I tend to do nothing. I either stop calling or turn my volume way down. They know what they heard, and shutting everything off is more than a coyote or bobcat can stand,” says Brown.
He also emphasizes the importance of staying vigilant, even if a predator seems to lose interest after calling has ceased. “A lot of times a coyote will seem to slip off, and this might make you think he’s leaving. However, if you just sit there, he’ll often pop back into sight.”
6. Scale Setups Based on Location
Many hunters approach eastern predator hunting with a broad-stroke approach, mirroring many of the techniques that are commonly used when hunting in the Midwest and West. However, Brown feels that hunters often limit themselves by not tailoring their efforts to suit the area in which they are hunting.
“When hunting out West, you typically put several miles between sets. This is rarely the case when hunting in more populated areas in the East,” he says. “You almost have to treat densely populated areas like a miniature golf course. You aren’t driving that ball a couple hundred yards; you’re putting it just a few feet. When hunting the East, I typically tone my calling volume down and make more individual sets.”
He’s also quick to point out that eastern hunters are afforded a significant amount of opportunity based upon the general lay of the land. “If you were to hunt 1,000 acres of land, even if it’s more heavily populated, you can make far more sets back East than would be the case when hunting in the West.”
Much in the world of predator hunting has remained relatively unchanged over the past several decades. However, avowed predator hunting fanatics, such as Tad Brown, continue to experiment with new and innovative means of finding success. By utilizing such techniques in your own predator hunting, you’re likely to find yourself knee-deep in skinning duties this winter.
Coyote Kit
Gear that’ll take your game to the next level.
Alps Outdoorz Enforcer
If your predator hunting keeps you on the move, the Alps Outdoorz Enforcer backpack (above) is a one-size-fits-all solution for quick, convenient and comfortable setup. The Enforcer features 800 cubic inches of storage space, a removable kickstand frame and an integrated memory foam cushion. ($169.99; alpsbrands.com)
FoxPro XWAVE
FoxPro’s new XWAVE e-caller offers hunters a level of versatility that few other calls do. It features two swiveling high-definition speakers, a compatible auxiliary jack for decoy integration and 100 pre-loaded sounds with the capacity for an additional 1,000 sounds. The XWAVE is Bluetooth-enabled, allowing hunters full control from their mobile devices. ($699.95; gofoxpro.com)
Primos Double Bull Stakeout Blind
The Double Bull Stakeout Blind with SurroundView ensures that you are never left scrambling for a hideaway when gunning for predators. This two-wall blind features translucent panels that allow you to see out without predators seeing in. The Stakeout Blind is also extremely portable, weighing only 4 1/2 pounds, and deploys in seconds. ($99.99; primos.com)
Vortex Fury HD 5000
This range-finding binocular makes it possible to glass for coyotes while simultaneously gauging their distance. While looking through these 10X42 optics, a hunter can center a small crosshair and take distance measurements out to 5,000 yards. This state-of-the-art bino features a “scan” mode, which allows for real-time distance measurement when tracking moving predators. ($1,599.99; vortexoptics.com)
Exploring the Pros and Cons: Pump Air Rifle vs Break Barrel - Unveiling the key differences and advantages between two popular air rifle mechanisms....
")
")
")
")
")


 Review – The Best Name In The Air Rifle Game")