A wild turkey’s legs, spurs, beard and plumage are decorative when properly preserved and require minimal space for displaying.
Spread tails and wings look good on a den wall and small parts such as spurs and beards can be preserved and put away for safekeeping in display boxes or displayed in shadow boxes.
But don’t hide your trophies — it is easy to make them worthy additions to your home or lodge decor.
Preserving Beards If you yank off the beard it will eventually fall apart. It is best to cut it off, leaving a small piece of skin at its base to hold the bristles together and to provide substance for gluing or tacking on a display board or plaque. Dab dry preservative such as borax on the raw end while it is still moist enough for the powder to stick. That’s all there is to preserving the beard.
Preserving Legs and Spurs One way to save the leg spurs is to cut off the whole unfeathered lower legs inject a few drops of a liquid preservative or formaldehyde into the feet and soft parts and let them dry whole. Arrange the toes the way you want them before they stiffen by pinning them on a piece of plastic foam, soft wood or cardboard. Hat pins, plain straight pins or small nails are OK. Place the pins or nails beside the toes to hold them in place. Use twine to hold the leg upright in place.
You sometimes see dried turkey legs that appear silvered on the surface. That is caused by the separation of the leg scales from the underlying tissue and is most likely to happen when the legs were cured in a warm environment. It is best to freeze-dry the injected lower legs by placing them in the freezer, uncovered, or allow the legs to dry in a cool, dehumidified environment — an air-conditioned room is usually satisfactory.
When the legs are dry, paint them with clear shellac or similar covering and spray the end joint with a persistent roach poison. Non-glossy coatings look better than glossy types. It is best not to try to color the legs. It will be very difficult for you to match the color. The natural color will usually be present if the legs are dried properly.
Some hunters like to cut off and keep only a short piece of the leg with the spur on it. To do this, cut completely across the bone on both sides close to the spur. Remove the skin from the bone around the spur and clean out the hollow bone You can leave the leg scales on if you wish.
Preserving Wings The wings and tail reveal the main color differences among the wild turkey subspecies, which makes them especially good wall trophies for your grand slam. Even if you are not into grand slamming, a turkey tail or wing makes an attractive wall mount for the den or trophy room.
To preserve a wing, cut it off close to the breast, leaving some of the shoulder plumage attached. You can remove any excess shoulder skin later. Cut the skin open along the underside of the wing. Since you will display only the back of the wing, don’t be concerned about the condition of the skin on the underside. You can remove the wing bones for making yelpers or leave them in the wing.
There are three wing sections: a meaty segment at the shoulder associated with the humerus bone; a section in the middle wing associated with the ulna and radius bones; and a smaller segment at the wing tip. You will have to dig around to get all the flesh from between and under the wing bones. Be careful not to cut off the bases of the feathers that project into the skin. Inject the wing section at the tip with liquid preservative and apply borax to the raw parts.
When all the flesh has been removed and dry preservative applied, spread the wing the way you want it to dry and place objects such as books on the large feathers to hold the wing in position as it stiffens. When you place the weights, leave the incision exposed to hasten drying.
In a day or two, the feathers will begin to stiffen in place. Check their rigidity while adjustments can still be made. After a few more days, the dried feathers will be permanently set.
If you removed the bones for making yelpers, replace the bones with something rigid to support the open wing. Stiff cardboard or a piece of thin wood can be sewed or glued to the skin from the underside to replace the bones. Do that after the wing dries.
Preserving a Tail If you want to save the tail, be especially careful to protect the tips of the feathers. Guard against the outer margin being forced backwards against anything as you transport it in the woods and when you get it in the truck or at home.
To remove the tail, hang the specimen by the neck as you would for skinning. Cut the skin across the middle of the back and peel the skin from the body toward the tail. Expose the base of the tail and cut the tail off the carcass where it narrows down just before the “pope’s nose.” Be sure to leave some of the back skin with the tail. If you don’t take enough back feathers, there will be an unappealing featherless zone at the base of the tail.
The tailbone terminates in a V-shaped configuration where the large feathers are inserted — like an oversized chicken tail. Remove that bone, along with the associated muscle and fat. The tail will be displayed in a position that will hide the underside, so don’t be concerned about how the base looks on that side.
Before beginning your cut to remove the tailbone, wiggle some of the tail feathers to see how they are inserted into the base so you’ll know where to cut. Cut out the bone. If you cut deeply into the V, some of the large feathers may come out. Work slowly and carefully so that won’t happen.
With the tailbone out, you will be able to remove most of the remaining flesh and fat. Blot and rub the fat with a cloth rag or paper towel and keep picking at it with a knife. Any fat left will gradually liquefy and flow onto the feathers in a few months. Removing the fat from the base of the tail requires 15 to 20 minutes for a thorough job.
When all the fat and flesh have been removed, put another application of borax on the raw parts. Lay the tail in a safe place with a cup of cornmeal piled on the moist base where the fat was removed and leave it overnight at room temperature. The cornmeal will absorb some of the fat. If the cornmeal becomes heavily stained with oil overnight, repeat the process with a fresh pile. Hardwood sawdust can be used in place of cornmeal.
After cleaning up the fat, place the tail flat on a large piece of wood, cardboard, plastic foam, or something similar. Spread the feathers the way you want them to dry and place books or other weights on the tail as you would on the wing. You can pin some of the feathers to hold them the way you want them to dry. Put the tail in a safe place to dry.
What I said about drying the wing applies also to the tail — check it every day or two as it dries so you can be sure it ends up spread the way you want it. It is usually attractive to mount all your turkey tails so that they are spread similarly.
When the tail is stiff, take a knife, toenail clippers or small scissors and remove any remaining dried meat and fat from the base where you took out the bone. It is easier to remove some of the last small bits after they are dry.
It is a good idea to stuff a small wad of paper toweling or cloth rag into the void where you removed the “pope’s nose.” The towel will absorb some of the oil that oozes out over time. After a few months, remove the towel and replace it with clean cloth or paper towel if it is stained with oil.
Trim the excess back skin, but be aware that the feathers of the rump have their roots well up on the back. Do any trimming a little at a time.
The very bottom end of the tail will reveal the unattractive feather bases and needs to be covered. A small plaque is good for that. You may also use cloth or leather, a simple piece of thin wood, or a patch of short plumage from some other part of the bird. If you use a piece of wood, cover it with cloth or leather, or paint it.
If you remove and save all of the back plumage with the tail mount, the result is called a “cape.” Just begin your skinning at the upper neck instead of the mid-back and leave the skin attached to the tail.
Ways to Display Body Parts 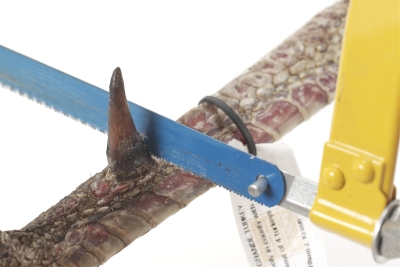
Suitable mounting materials are available from building materials stores and craft supply shops. Glass front display boxes are available from knife dealer catalogs and trophy shops. Beards and/or legs look good in glass display boxes or shadow boxes and, if properly preserved, will keep nicely that way.
For maximum protection and durability, beards can be imbedded in epoxy resin and used as paperweights. Check at large flea markets for people selling epoxy-covered items, such as pictures on wood, to find a craftsman to mount your beards and spurs in epoxy, or buy what you need at a craft supply store to do it yourself.
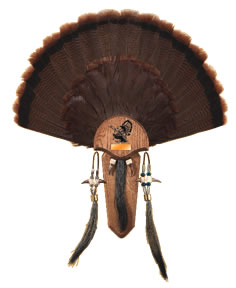
Brackets for beard displays are available from hunting supply dealers and taxidermists. Some are designed for displaying several beards and some are for both beards and a tail. If you plan to use a kit, buy one ahead of time and follow the instructions that come with it. A tail can be displayed on an easel or some similar propping device.
One way to mount a tail on the wall is to use a large rat trap with the spring parts rearranged. The trap springs will hold the tail in place against the trap base. The wooden base will be the mounting platform.
Discard the bait treadle and the wire that holds the trap when set. Remove the staples from the metal parts, move the springs to the bottom of the wooden platform, and replace the staples there. Use epoxy glue or small staples to affix a thin board to the outside of the trap’s wire hoop. Paint or cover the board as you would a plaque. Open the spring and stick the tail into the trap, allowing the force of the spring to hold the tail in place. Place a small staple on the top of the trap and hang it on the wall. You can have a metal or plastic plate engraved by the trophy shop with the date of the kill and other data.
The purpose of the thin board on the rat trap, or the wooden plaque in the store-bought kits, is to cover the unfeathered base of the turkey tail and to provide a place for a hook and for an inscription or other pertinent information.
There are many ways to cover the base of the tail and mount it on the wall. You can sew leather or felt directly to the tail base and, with a loop of twine, hang the tail upside downoor whatever you choose.
Wings can be hung on the wall. Before the wing completely dries, tie a small wire loop to a bone on the underside and hang the wing as you would a picture. Pick the balance point for the wire so it will hang level.
You can use pliers or wire cutters to modify a small spring wire plate hanger to grasp the wing by the bones on the underside. Then hang it like a plate on the wall.
Spurs can be strung together and worn as a necklace or a hat band, or used on a key chain or some other ornament. Some jewelers will make your spurs into gold-plated pendants or lapel pins.
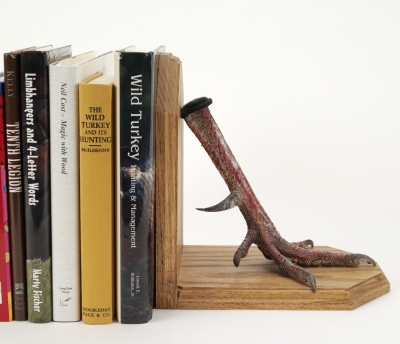
Dried legs can be saved in any position in which they dry or the toes can be spread as described earlier and the feet mounted on a board or plaque. If dried with the toes spread as though walking, a leg will stand alone on your desk or table and will look good there mounted on a thin plaque.
I have seen advertisements for bronzing turkey legs as you might do baby shoes. Watch the turkey magazines for ads, or check with a taxidermist or someone that bronzes baby shoes.
If you do woodworking, leather craft, or sewing, you can make your own display accessories. Look through hunting supply catalogs for display ideas and make your own.
(Editor’s Note: This article is an excerpt from “After the Hunt with Lovett Williams.” For ordering information and descriptions of Williams’ other published offerings, visit www.lovettwilliams.com.)


