Pain-Free Catfish Cleaning in 4 Steps

0
339
Video cleaning channel catfish
Pain-Free Catfish Cleaning in 4 Steps

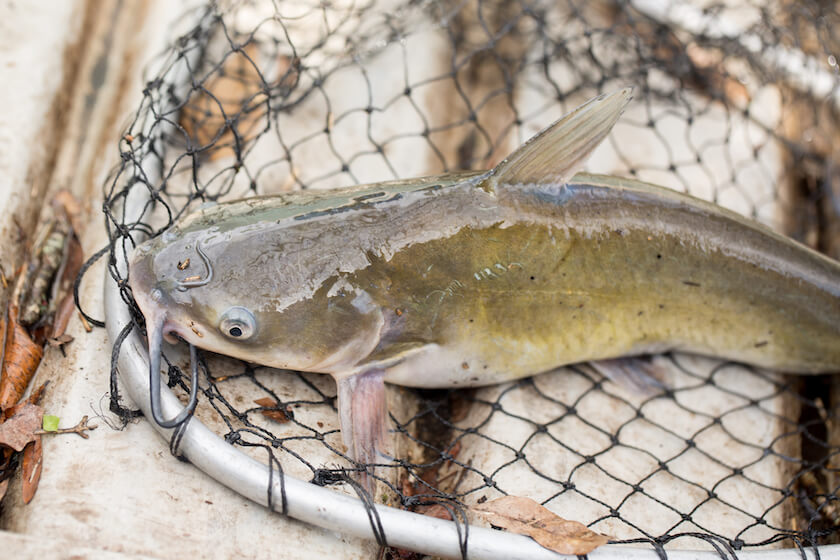
A few key tools, especially a good blade, and quick adjustments will get you dropping catfish fillets into the fryer in no time. (Shutterstock image)

Some fish are pretty easy to clean. Walleyes, perch, crappies—no problem. Others prove a little more challenging.

Take filleting a channel catfish, for instance. Not only do you have to contend with spines and a bony head, you’ve also got fish slime. Loads of it.

However, just because something seems difficult, it doesn’t mean it is. If you’re looking to transform your freshly caught cat into the guest of honor at your next summer fish fry, you can easily do so. All you need are the proper tools, the patience to take your time and the know-how to get the job done.

TOOL TIME

A well-stocked catfish cleaning arsenal consists of four things: a quality knife, a set of side-cutting pliers, a sharpener and a single Kevlar glove. My go-to knife is an 8-inch Dexter blade. The Sani-Safe handle offers a positive grip while the carbon steel holds a sure edge. I also keep an old-school 7.5-inch birch-handled Rapala knife as a backup. With any knife, you’re looking for the right combination of backbone and flexibility.

You can also go the electric route. Occasionally, I’ll switch to a 7.5-inch Rapala corded electric knife, which I run off a 1,000-watt Honda generator when I’m away from home. There’s a learning curve with an electric blade, but once you get the feel for it, filleting is a breeze.

Beyond knives, you want a good set of side cutters for clipping the spines prior to filleting. If you’re using a manual knife, a sharpener is also crucial. I like a Firestone two-stage sharpener to periodically touch up blades. Last but not least, wear a Kevlar glove on your off hand to protect against accidental cuts and pokes.

See also  .338 Winchester Magnum vs 7mm-08 Remington Ammo Comparison - Ballistics Info & Chart Caliber Ballistics Comparison 07 Dec, 2018 Posted By: Foundry Outdoors The following ammunition cartridge ballistics information and chart can be used to approximately compare .338 Winchester Magnum vs 7mm-08 Remington ammo rounds. Please note, the following information reflects the estimated average ballistics for each caliber and does not pertain to a particular manufacturer, bullet weight, or jacketing type. As such, the following is for comparative information purposes only and should not be used to make precise predictions of the trajectory, performance, or true ballistics of any particular .338 Winchester Magnum or 7mm-08 Remington rounds for hunting, target shooting, plinking, or any other usage. The decision for which round is better for a given application should be made with complete information, and this article simply serves as a comparative guide, not the final say. For more detailed ballistics information please refer to the exact round in question or contact the manufacturer for the pertinent information. True .338 Winchester Magnum and 7mm-08 Remington ballistics information can vary widely from the displayed information, and it is important to understand that the particular characteristics of a given round can make a substantive difference in its true performance. Caliber Type Velocity (fps) Energy (ft-lb) .338 Winchester Magnum Rifle 2820 3920 7mm-08 Remington Rifle 2830 2450 [Click Here to Shop .338 Winchester Magnum Ammo] [Click Here to Shop 7mm-08 Remington Ammo] VelocityAs illustrated in the chart, .338 Winchester Magnum rounds - on average - achieve a velocity of about 2820 feet per second (fps) while 7mm-08 Remington rounds travel at a velocity of 2830 fps. To put this into perspective, a Boeing 737 commercial airliner travels at a cruising speed of 600 mph, or 880 fps. That is to say, .338 Winchester Magnum bullets travel 3.2 times the speed of a 737 airplane at cruising speed, while 7mm-08 Remington bullets travel 3.2 times that same speed.Various calibersEnergyFurthermore, the muzzle energy of a .338 Winchester Magnum round averages out to 3920 ft-lb, while a 7mm-08 Remington round averages out to about 2450 ft-lb. One way to think about this is as such: a foot-pound is a unit of energy equal to the amount of energy required to raise a weight of one pound a distance of one foot. So a .338 Winchester Magnum round exits the barrel with kinetic energy equal to the energy required for linear vertical displacement of 3920 pounds through a one foot distance, while a 7mm-08 Remington round exiting the barrel has energy equal to the amount required to displace 2450 pounds over the same one foot distance. As a rule of thumb, when it comes to hunting, muzzle energy is what many hunters look at when deciding on what caliber of firearm / ammunition to select. Generally speaking, the higher the muzzle energy, the higher the stopping power. Again, the above is for comparative information purposes only, and you should consult the exact ballistics for the particular .338 Winchester Magnum or 7mm-08 Remington cartridge you're looking at purchasing. [Buy .338 Winchester Magnum Ammo] [Buy 7mm-08 Remington Ammo] Please click the above links to take a look at all of the .338 Winchester Magnum and 7mm-08 Remington ammo we have in stock and ready to ship, and let us know any parting thoughts in the comment section below.Foundry Outdoors is your trusted home for buying archery, camping, fishing, hunting, shooting sports, and outdoor gear online.We offer cheap ammo and bulk ammo deals on the most popular ammo calibers. We have a variety of deals on Rifle Ammo, Handgun Ammo, Shotgun Ammo & Rimfire Ammo, as well as ammo for target practice, plinking, hunting, or shooting competitions. Our website lists special deals on 9mm Ammo, 10mm Ammo, 45-70 Ammo, 6.5 Creedmoor ammo, 300 Blackout Ammo, 10mm Ammo, 5.56 Ammo, Underwood Ammo, Buffalo Bore Ammo and more special deals on bulk ammo.We offer a 100% Authenticity Guarantee on all products sold on our website. Please email us if you have questions about any of our product listings. Leave a commentComments have to be approved before showing up Your Name * Your Email * Your Comment * Post Comment

CULINARY CONCERNS

This qualifies as a personal choice, but I’ve generally found the best-eating channel cats—or any catfish, really—to be those in the 1- to 4-pound range. Any smaller, and there’s not much there. Any bigger—especially those caught in warm summer water—and they tend to get a bit strong and mushy.

Throughout much of the Midwest, channel cat limits are quite liberal. Blue and flathead catfish limits are a little more conservative in some places, but typically still pretty generous. Regardless, these limits translate to plenty of fish for anyone, so it’s both easy and wise to release larger cats to replenish the supply.

Step 1
GAF
Illustration by Peter Sucheski

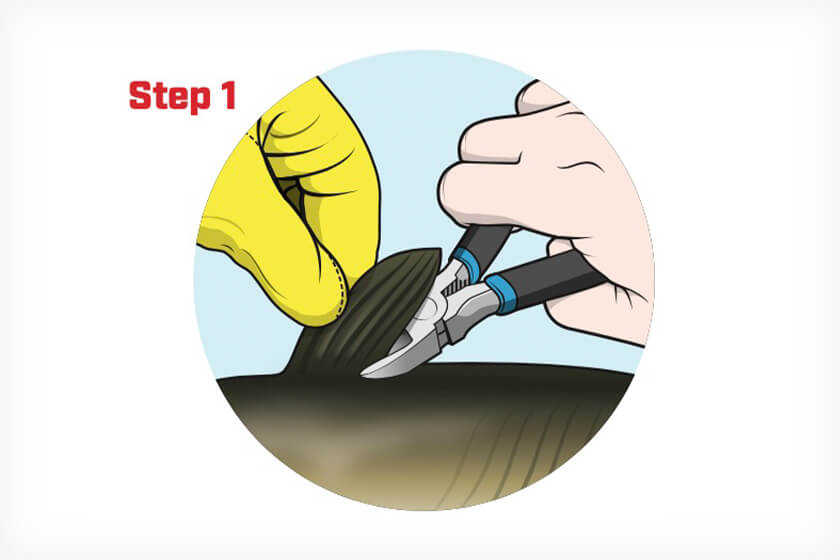
Clip the one dorsal and two pectoral spines as close to the body as possible. Some anglers skip this step, which is fine. However, I always do it to lessen chances of getting punctured during cleaning. For those unfamiliar with the event, there are few things as painful and slow to heal as a catfish “poke.” If you do get poked, rub a bit of the fish’s slime—actually a protective mucus covering—into the wound. It can work wonders, both relieving the pain and speeding up healing.

Step 2
GAF
Illustration by Peter Sucheski

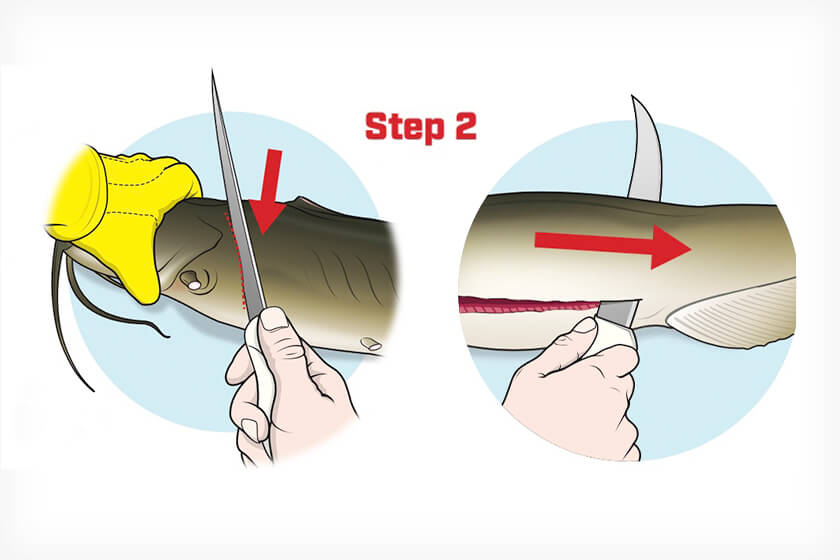
I’m a righty and prefer to work left to right, so what I’m about to describe will reflect that. Your style may differ, of course.

With the fish on its side, head to the left and gloved hand firmly on it, begin with a downward (vertical) diagonal incision at the tip of the V-shaped bone directly behind the gill cover.

The bone is easy to see and even easier to feel. With steady pressure, cut down to the spine, turn your wrist 90 degrees counterclockwise and proceed to cut toward the tail. Efficiency here involves maintaining contact with the spine and allowing the knife to do the work. Don’t saw; just use a smooth, steady motion and stop about an inch or so before completely severing the fillet.

See also  Where To Shoot A Turkey With A 22 Rifle For Clean Kill

Step 3

GAF
Illustration by Peter Sucheski

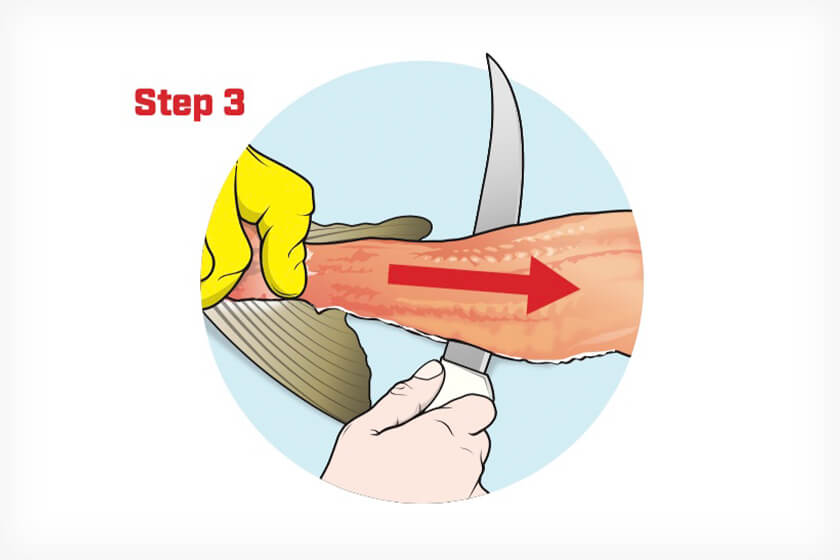
Without removing the knife from the fish, use the thick edge of the blade to flip the still-attached fillet over onto the work surface—that is, skin down and flesh up. Starting at the point where the fillet is attached to the carcass, slip the blade under the flesh and work—again smoothly—toward what was the head section of the cat. A good, sharp blade should flow easily, with only minor stutters at the intact rib bones.

Step 4
GAF
Illustration by Peter Sucheski

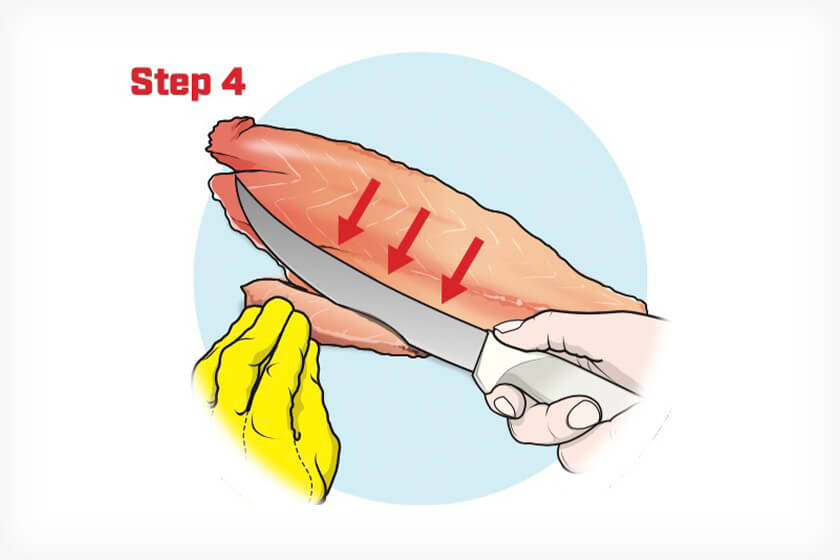
Finally, with the interior of the now-skinless fillet facing upward, use an angled blade approach to trim the entire rib cage (bones) away from the flesh. It might sound complicated, but it’s not. Slip the mid-section of the blade edge under the rib bones and let it glide toward the belly.

Repeat these steps for the other fillet. Then, rinse each fillet and drop them into a bowl of ice water to toughen them for five to 10 minutes. Next comes the most enjoyable part of the entire process: dinner.

Previous article13 Best Deer Calls
Next articleSaltwater Fly Fishing Gear Guide
Ethan Smith is a seasoned marine veteran, professional blogger, witty and edgy writer, and an avid hunter. He spent a great deal of his childhood years around the Apache-Sitgreaves National Forest in Arizona. Watching active hunters practise their craft initiated him into the world of hunting and rubrics of outdoor life. He also honed his writing skills by sharing his outdoor experiences with fellow schoolmates through their high school’s magazine. Further along the way, the US Marine Corps got wind of his excellent combination of skills and sought to put them into good use by employing him as a combat correspondent. He now shares his income from this prestigious job with his wife and one kid. Read more >>