Home Blog Page 99

Judges strike down Tennessee law allowing warrantless searches by state wildlife officials

0

The longstanding practice of conducting warrantless searches on private property by officers with the Tennessee Wildlife Resources Agency is unconstitutional, a three judge panel hearing a case in Benton County Circuit Court ruled Tuesday.

The ruling invalidates Tennessee law that TWRA has relied on to conduct warrantless searches and surveillance on private land in order to fulfill its mission of enforcing the state’s hunting, fishing and wildlife laws.

It’s an authority that is not explicitly extended to any other state or local law enforcement. The law, the judges wrote, gives rise to an “intolerable risk of abusive searches” and violates the Tennessee Constitution’s property protections. It is “unconstitutional, unlawful and unenforceable,” their ruling said.

An attorney representing Hunter Hollingsworth and Terry Rainwaters, two Benton County men who filed suit against the TWRA over warrantless searches on their lands, called the ruling a “momentous thing.”

“This is a decision that’s going to have a really huge impact on private landowners in Tennessee,” said Joshua Windham, an attorney for the Institute for Justice, a libertarian leaning law firm.

Windham said the ruling may have implications beyond Tennessee. The Tennessee Constitution’s property protection language, cited by the judges, is echoed in the constitutions of 16 other states, potentially leading to legal challenges of similar wildlife agency enforcement practices elsewhere. TWRA’s practice of patrolling private property without an owner’s consent or a warrant is not uncommon.

A spokesperson for TWRA on Wednesday did not immediately respond to questions about the ruling, or whether state officials plan to appeal.

State wildlife officers patrol private lands across the state year-round without giving owners notice, obtaining consent or appearing before a judge to make a case for a warrant, court records said.

TWRA officers sometimes investigate turkey-, dove- and deer-hunting offenses by crouching in bushes and secretly taping hunters — hiding within the line of fire in some instances cited in the lawsuit. The agency keeps no records of when or how often officers enter private property. TWRA officers do not need a supervisors’ permission before entering private land. There are no agency rule limiting how long officers may spend searching private property.

TWRA attorneys have argued that state wildlife officers must have the flexibility to enter private lands to do their jobs. The agency’s mission is to protect wildlife and enforce hunting, fishing and boating laws. The vast majority of hunting in Tennessee takes place on private property and wildlife aren’t confined to public lands, they noted.

TWRA also cited a well-established U.S. Supreme Court precedent, known as the “open fields doctrine,” which says that property owners have no “reasonable expectation of privacy” on private property deemed to be an open field — property outside the immediate vicinity of an owner’s home or yard, such as a field of crops well beyond a farmer’s homestead.

But the three judge panel in Benton County concluded that the Tennessee Constitution gives property owners more protection. Article I, Section 7 of the Tennessee Constitution provides a “broader guarantee of security for an individual’s real property than its federal counterpart,” they wrote.

Tennessee’s Constitution protects all “property, real or person, actually possessed or occupied,” the court noted. Under Tennessee Supreme Court precedent, land possessed or occupied extends beyond a homestead. Only “wild or waste lands” that are not used, farmed, fenced or otherwise utilized are excluded from those protections, the state Supreme Court has found.

The judges also concluded that the statute giving TWRA the right to enter private land amounted to a “general warrant,” giving officials wide latitude to conduct searches. “General warrants are dangerous to liberty and ought not to be granted,” the court ruled.

Hollingsworth, a Benton County railroad worker, said Wednesday he felt vindicated after years of challenging multiple TWRA officers forays onto his property, where they secretly hid behind bushes to videotape Hollingsworth, his girlfriend and friends while they hunted and socialized. They patrolled his land and surveilled his movements.

Hunter Hollingsworth on his property in Benton County. Photo: John Partipilo.

“I think it’ll be a lot more relaxing to be on my property and you won’t have to be paranoid that they’re looking at you all the time,” Hollingsworth said. “I think it’s fantastic that other people will get to enjoy their property without worrying if they’re being watched.”

Rainwaters similarly expressed “great relief to have the court recognize that searching my property without permission and without a warrant was unconstitutional.”

“It’s even better to hear that the court doesn’t believe anyone else in Tennessee should have their rights violated in the same way,” he said. “I’m going to sleep a little better tonight knowing that state officials have to respect my property rights.”

The case was heard under a new state law requiring a panel of three judges, one from each division of the state, to hear challenges to state law. Judge Donald Parish, Chancellor Jerri Bryant and Judge Russel Parkes presided over the case.

Parish, who concurred with the majority of the decision, filed a dissenting opinion in which he argued the court should have gone further.

The Institute for Justice had requested an injunction barring TWRA from entering private property — which was rejected by the panel because they had already concluded Tennessee’s law was invalid.

But Parish noted that TWRA lawyers argued that their authority to conduct warrantless searches also rests in the Tennessee Constitution’s recognition of a personal right to hunt or fish, subject to reasonable regulation.

Parish also cited a TWRA officer’s conversation with Hollingsworth in the court’s record. Hollingsworth told an officer who showed up on his property that he wasn’t invited.

“When you bought your hunting license, you invited me,” the officer told Hollingsworth.

Absent an injunction, Parish wrote, “I believe an ‘intolerable risk’ of improper searches by the TWRA persists.”

Trotline Fishing Tips

0

Trotline fishing for catfish is a tradition in the South. A weekend camping trip on the river or creek would not be complete without the excitement of slipping out on the water after dark to “run” a trotline and finding a catch of several catfish. Catfish that by the end of the weekend will find their way into some hot grease.

Trotline fishing is relatively simple in theory. A trotline is basically a length of line stretched with the use of a boat, across a section of water and fastened secure at both ends. On this line every three or four feet a hook is dangled from a drop line, essentially making it impossible for a catfish to swim by the line without being tempted by one of the baited hooks. Once “set out” the trotline is left unattended until a few hours later when the trotline is checked, fish removed, and rebaited. Trotline fishing for catfish is most effective after dark because many species of fish which would rob the trotline hook’s of their bait during day light hours often hide at night while the catfish is a very efficient at feeding in the dark. Darkest also, adds an element of anticipation to this type of fishing which is hard to explain. Trotline fishing is a form of fishing which must be tried to appreciate.

trotline

Ready made trotlines fishing kits such as the Magic Bait Trot Line are available, complete with all the essentials. These are good if you want to try trotline fishing for the first time or have doubts about how to build a trotline. These kits provide a good understanding on how to rig up and set out a trotline plus they are reasonably priced. However, a trotline is relatively simple to build and somewhat fun. Although all trotlines are fundamentally the same, there are some differences in styles. These differences in styles often relates to how the drop lines, which hold the hooks, are attached to the main stretch line. The drop lines, which are often smaller in diameter, must be attached so it can not slip or slide up and down the main stretch line. Many trotline styles accomplish this by fastening the drop lines to the main line between synthetic clamps or hand tied simple knots. This can become a little tedious and time consuming but is effective.

dropline

The style Fishing-Tips-Bait-Tackle.Com prefers was introduced to us by Jimmy, a Hardin County resident in Southeast Texas. Jimmy, who enjoys setting his trotlines around the area where Village Creek joins the Neches River, shares our philosophy that a good fishing tackle tip should inspire angler to “do it themselves” while saving both time and money. His method of making a trotline does just that by using only one size nylon braided line, sturdy snap swivels and quality hooks. Utilizing line at least two hundred pound test, he makes forearm long loops along the length of the line using a simple knot. All loops are spaced a full arm’s length wingspan apart with the first and last loop being about 10 feet from the ends.

trotline loop

These loops are the drop lines, simply attach a snap swivel using a half hitch knot then add a hook to each swivel to complete the trotline. The snap swivels are essential because catfish are notorious for twisting off a hook. Hook size may vary depending on the targeted fish generally between a 2/0 and 6/0. Also any drop line can be left hookless and used as a weight point to fish the trotline deeper.

snap swivel drop line

Jimmy showed us one more little trick with the trotline. Instead of using a bulky racking box or wrapping the trotline around a coffee can he simply rolls the trotline up as if it was a ball of yarn. This makes the trotline easy to handle and store. Plus if you like, the hooks can be removed before making the ball.

trotline ball

Although a trotline can be “set” in any place, some spots may prove more productive than others. For example, a bend in a creek or river where the water is relatively deep, near an area where a slough or small tributary feeds a larger body of water, or if the trotline does not interfere with navigation spanning it across a waterway.

Choose two anchor points along the water to stretch the trotline, anchor the first end to a tree limb, tree root, cypress knee, or anything that will hold the line secure. Tie the line low to or just under the water surface, that makes the trotline less noticeable to any by-passes. Move the boat to the next anchor point, allow the trotline to lay loosely on the water and tie off the other end. Now that the trotline has been “set out”, it can be weighed and baited.

The trotline can be weighted with a large lead sinker, a brick, an old window counter weight or anything else found around the house that is heavy enough yet small enough to manage.

Almost any thing can be used as bait for trotline fishing. Live bait work particularly well; blacktail shiner, crawfish, small bream or even earth worms. Cut bait, a portion of blue crab, chicken livers, or man made stink bait can also be effective. For the best results bait the trotline just before dark and if possible use a variety of bait. Allow the trotline to fish two or three hours before checking for a catch, likewise replace any lost bait. The trotline can be checked several times through out the night or left until morning.

catfish pic

A few safety tips on fishing trotlines are in order. When “setting out” the line, check for critters. Before tying the line off, keep an eye out for a stray snake or a pesky wasp nest.

Although a trotline can be managed by one person we recommend that anglers don’t “go it alone”, especially after dark. Keep a Knife handy, a situation may arise in which a drop line (or even the main trotline) may need to be cut immediately. If an angler is unfortunate enough to have a hook snag a hand this need becomes quite apparent. Also, nothing can be more disappointing than losing a good size catfish before it can be gotten into the boat so take a dip net.

An alternative to the trotline is the limbline. Using the same gear used to make a trotline, the limbline is tied up as if it could be fished from the end of a pole with a single hook, snap swivel, and sinker. Hang the limbline from a flexible limb that extends over a preferred fishing hole. Several limblines can sometimes be as effective as a trotline, however due to the distance between limblines generally more travel is required.

Most states have regulations on trotline fishing so be sure to familiarize yourself with the state rules. These rule may require the line not to be over a particular length or may limit the number of hooks on a line. Some states may prohibit setting a trotline across navigable waterways. Also, some state may limit the time period a trotline can be “set”, or may require name tags. Still, trotline fishing is highly recommended and can be very productive.

Fishing Tackle Tips ~ Fishing Season ~ Fishing Boat Tips Live Bait ~ Artificial Lures ~ Fishing Dictionary

Rigging and Setup for Dungeness Crab

0

How to Rig and Setup Crab Pots.

Dungeness Crabs are abundant in every bay and inlet along the Pacific Coast and are considered a summertime delicacy. The beauty of living near the saltwater and being able to head out in even a small boat and catch these tasty shellfish is not lost on thousands of people who go out crabbing every summer. I wrote this post for those of you who are new to crabbing and need a little information on what equipment you need. You can also check out our post Puget Sound Dungeness Crabbing Buying Guide for some of our favorite equipment.

A good haul of Dungeness Crab from Puget Sound. This pile will easily feed the whole family!

Crab Pots

There are many different styles of crab pots but basically you can separate them into two groups, round pots and collapsible traps.

Pots are usually geared more towards those looking to crab in deeper water or heavier currents. If you plan on trying to catch Dungeness Crab in the Pacific Ocean, where currents are strong, you want to pick up heavily weighted round pots. Pots tend to be heavier with the weight build into the frame, most weigh 10 to 20 pounds. They are also more expensive than collapsible traps. However, collapsible traps are extremely popular in areas like Puget Sound.

Collapsible traps tend to be less expensive. However, they are light weight and you need to add some pot weights so they don’t drift off. I spend most of my time crabbing in Puget Sound and the SMI/Beau Mac collapsible traps are my favorite. We typically are setting our traps in less than 80 feet of water, so a little added weight is all that is needed to keep the trap from drifting. Collapsible traps are also easier to store. If you plan on keeping your traps on your boat they are real space savers. If you are crabbing from a small boat where space is an issue, bring along the collapsible traps and assemble them one-by-one as you go!

Both traps and pots can be soaked for a long period of time. If you are planning on soaking for a few hours while fishing or overnight, traps and pots are preferred over rings.

Crab Rings

Crab rings are extremely popular, very effective, and preferred if you are looking to catch crab in shallow waters. Rings are popular with folks trying to catch crab from a dock or pier. I like to use crab rings when I am fishing in less than fifty feet. Rings lay flat on the bottom but when pulled, they create a basket that funnels crab to the bottom and keeps them there. Because a ring will simply lie on the bottom, crabs are free to come and go as they please. Fresh bait will draw them into the ring. When using rings, allowing a soak time of about 20 to 45 minutes is perfect. Crab will quickly eat away any bait. They will start searching for another food sources once the bait is gone.

Crab Trap Harness

When pulling up a crab ring, trap or pot it is important to pull it up evenly. A ring that is pulled up slanted can allow for crabs to crawl out the edge of the ring; a trap that is pulled up slanted allows crabs to potentially escape through an open door. A 3-way or 4-way harness solves this problem. These are designed to clip to the corners of a trap, or clipped evenly around a round pot or ring for a smooth and level retrieve. Harnesses are highly recommended over just tying your line to the edge of your pot/ring/trap.

Crabbing Lines

There are two options for your crabbing main line, yellow ¼ inch poly line or leaded line. Yellow poly is thinner, cheaper and it floats. Floating lines can cause problems when crabbing in an area with boat traffic. Let’s just say you have a 100’ line and decide to set your trap at a 50’ depth, lines can easily be tangled in a boat’s prop or cut off by one. If you decide to use yellow poly, be sure to clip on some weight to the line to pull it under the surface. I find snapping on a weight is a pain, and that a thin line is less comfortable to pull. Leaded lines are a little more expensive, but they offer huge benefits! Leaded line is easy to coil. You won’t have to worry about getting it tangled in someone’s prop because it sinks.

Crab Buoy

Here in Washington, we have many requirements pertaining to our crab floats. They must be half red, half white. You need to write your name and address on the buoy. They must be on the surface and visible at all times. Identifying which buoy belongs to you can be challenging at times. Use a PVC staff and either paint it a bright color or attach a flag to it, this will help you locate your pot quickly. Some folks will connect a multicolored buoy to their required red/white. I am a huge advocate of any form of customization; imagine motoring into a sea of red/white buoys and having to motor around looking for the one with your name written on it!

Bait Boxes

Bait boxes are an easy way to store bait in a trap. A bait box will slow down the crabs’ attempts to devour your bait. I prepare all of my bait boxes in advance, then I put them in a cooler so they are ready to go. Attach them permanently with wire ties or zip ties, temporarily with small bungies.

Bait Pins

If you are using a fish carcass for bait, a bait pin can be a great alternative to the bait box. Just run the pin through the mouth of a filleted out rockfish or salmon and into the bottom mesh of your ring/trap/pot.

Best Dungeness Crab Bait

Fresh baits work best. Save any filleted carcasses of salmon, trout, rockfish or lingcod because they make excellent bait for Dungeness Crab. Also, I have done very well with chicken, turkey legs and herring. One of the funnest things to do is catch flounder or sand dabs and use them in the trap.

Crab Measuring Device

Having a measuring device with you is extremely important. Every marine area has a specific minimum size requirement for crabs, and a crab measuring tool is essential. Possessing a crab that is even 1/16” under the minimum size can potentially yield you a confiscation of your entire catch and a hefty ticket.

Pot Pullers and Davits

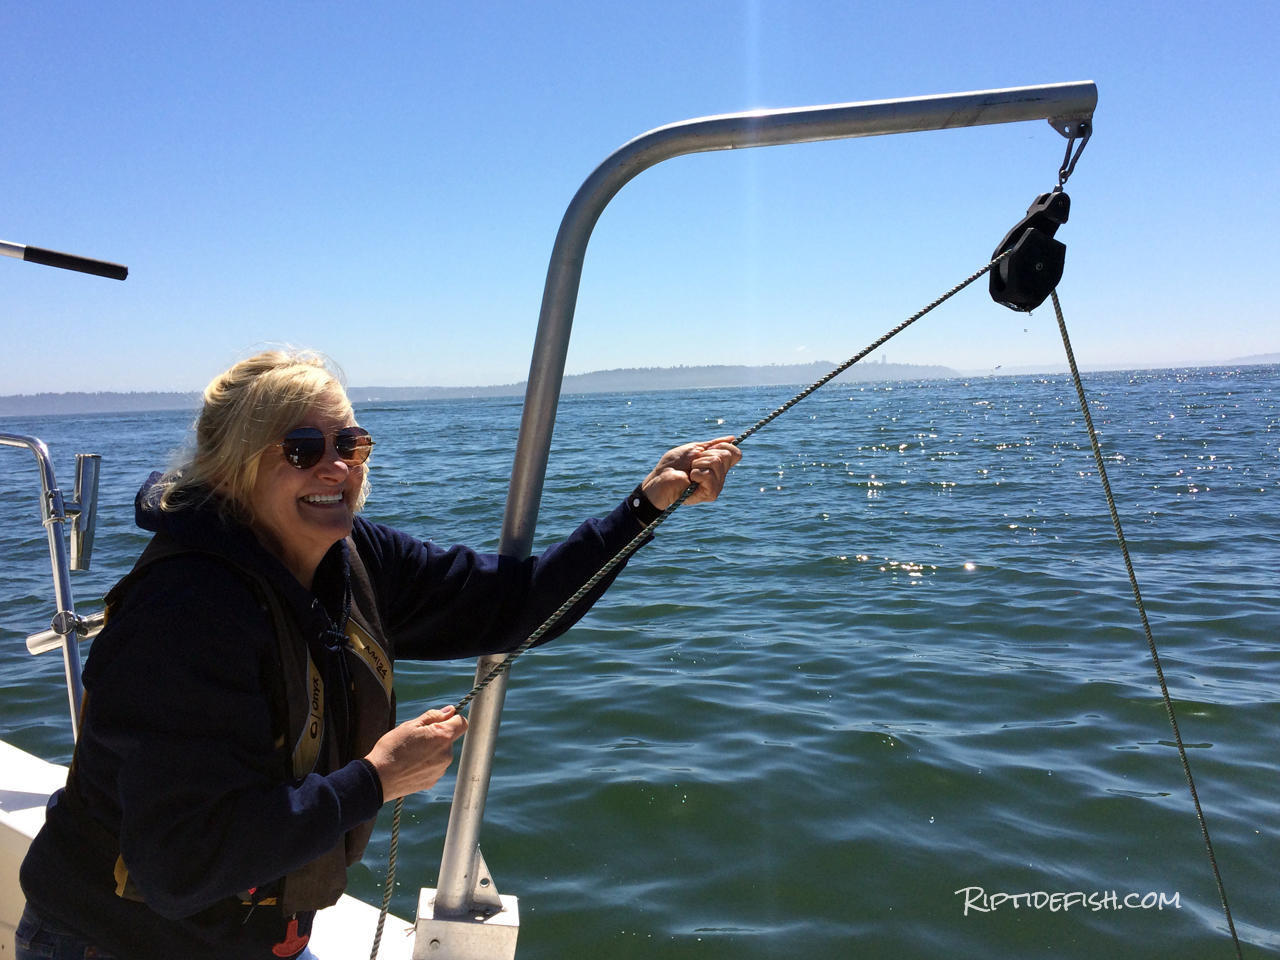
Having an electric pot puller is nice for heavy pots or crabbing in deeper water. If you plan on doing any shrimping then you definitely need to invest in one. Even having a davit with a pulley on the boat makes pulling much easier. Plus it keeps the line from rubbing on the gunwale of the boat and keeps the pot from scratching up the side of your boat.

Electric Pot Puller Suggestions

  • Scotty 2500 Electric Pot Puller – View on Amazon
Crabbing davit
A davit with a pulley makes pulling up crab pots much easier!

The Beginners Comprehensive Guide to Choosing The Right Crappie Rod Length

0

Introduction: Crappie Fishing and the Length of Rods

I was recently down at the Cabelas near the house and happened to browse through the fishing rods as one does when in a Cabelas or a BassPro.

While being familiar with crappie fishing and having my favorite rods for various purposes in various lengths, I couldn’t help but notice the sheer numbers of rods and lengths available. I can only imagine how overwhelming it can be to try and select a fishing rod, especially if you are a beginning fisherman.

With that in mind we are going to discuss what the best crappie rod length is in a given situation and why you might want to select a different length. But let’s start with a quick answer, for what is the best crappie rod length, before we dive into the details.

The ideal length of a crappie rod is dependent on the style of fishing you intend to do. For shooting the docks and targeted casting a 6 foot rod is ideal. For crappie spider rigging and trolling then a 14 to 16 foot rod is the perfect choice. When ice fishing for crappie, select a rod that’s around 2 to 3 feet in length.

Now that the best lengths are out of the way, let’s discuss why these lengths are the best.

Length of Crappie Rods – Best Crappie Rod Length for Each Fishing Style

When looking for a crappie rod you can find lengths starting as small as 2 feet and ranging all the way up to 20 feet long.

This huge variance in rod lengths is due to the nuances of fishing and the different baits, presentations and conditions present during each style of fishing.

Length for Crappie General and Targeted Casting

For all around fishing in the most flexible conditions I feel that a rod between the lengths of 5 and 7 feet is ideal. Hence why I recommend a length of about 6 ft for targeted casting. Targeted casting includes working a bait along the shore line, targeting bushes and rocky outcroppings and of course shooting the docks.

A rod that is 6 feet long is small enough that you can control your cast, but still large enough to use it to control and lead the fish. Often it is necessary to guide the fish away from certain obstacles as you real it in, you will find they attempt to snag the line on anything they can once hooked.

Ideal Length of a Crappie Rod for Ice Fishing

When talking about ice fishing for crappie I mean on lakes that have a good solid ice layer over them. In these instances you are often going to be cutting a hole in the ice and fishing through that.

Since you are fishing straight down in these cases, there is relatively little need to have a long rod to properly position the bait and retrieve your fish.

For these reasons I recommend that you select a rod that is around 2 to 3 feet in length. Keep in mind that with this length of rod you need a limber rod with light action. (Quality rods should list their action rating.)

This lighter action will help to compensate for the pull when you set the hook.

Selecting a Rod Length for Spider Rigging and Trolling

Spider Rigging and Trolling style crappie fishing is where the big rods come out. Both of these techniques use the extremely long rods crappie fishing is known for.

While it is possible to spider rig with poles as short as 8 feet in length, this frequently results in tangled lines.

With many tournaments allowing as many as 8 rods, spider rigging and trolling both take advantage of this.

Rods are mounted along the front of a boat and fanned out in several directions from there, creating the appearance of spider legs reaching over the water.

Unless there is a lot of overhanging cover such as trees the longer a rod here the less chance that you will tangle your lines. Longer rods also allow you to cover more water if fishing above channels or drop offs under the surface.

Most professional crappie fishermen prefer a rod in the vicinity of 14 to 16 feet with it seeming that 16 feet rods are the most commonly seen in tournaments.

If you know what depths you intend to fish then you can set up your rods in the style of a cane pole. In these cases the rod has no reel, simply a line that is cut close to the same length as the pole. This has the advantage of allowing you to simply pick up the rod and the fish swings to you.

If you want to adjust the depths you’re fishing at though, make sure to select a crappie rod that has eyelets and a reel.

Weight Considerations For Length

While it may not be a factor you have considered, keep in mind that the longer the pole, the more it will weigh. For instance a 16 foot Lews Wally Marshall only weighs 9.6 ounces without a reel this feels like far more when it’s all held out in front of you.

I suggest that you hold the pole for a few minutes in the store to see how comfortable it is to do so. If after a relatively short period it causes pain in your wrists then you might want to go with a shorter rod.

1,2,3 Piece Rod or Collapsable How is Length Affected?

In years past sometimes your only option for longer rods was a two or 3 piece rod. Now it is not that uncommon to find 1 piece rods up to 8 feet in length.

When selecting a rod length for crappie fishing, make sure to consider not only the overall length of the rod when assembled, but also its transport length.

This becomes even more critical if you have extended travel times to reach the fishing hole. Two and three piece rods allow you to separate the pieces and reduce their overall length in that manner.

The downside to doing so with these rods is that frequently they are still rigged for fishing and if you are not careful they can easily get tangled.

Another option is telescoping rods. These rods are frequently made from fiberglass or other light weight material and feature sections that slide into each other. These come in both cane pole styles with no eyelets as well as styles designed for reels in which eyelets are positioned at each section.

One drawback is telescoping rods can rarely be found in lengths longer than 8 to 10 feet. This means you will need a 3 or even a four piece rod if looking for rods of that length.

There are mixed opinions on collapsing fishing rods, but I do feel they definitely have a place in my fishing gear.

My favorite telescoping rod is a 6’6” KastKing Blackhawk while it’s not the super long rod used for trolling, it makes an excellent all around and general casting rod to keep in the truck.

Conclusion:

To sum it up, while there is no “best” there are definitely use cases for a specific length of crappie fishing rod.

If you take nothing else from this post though, suffice it to say that for most teenage and adult anglers a 6 foot crappie rod featuring light or ultralight action is the way to go.

This length will get them started in the sport and present them with the largest selection of fishing styles. This length of crappie rod can be used for casting, spinning, fishing with a jig and shooting the docks, you can even fish a minnow under a bobber with no problems.

If you want to know more about selecting a rod length check out this article on rod lengths by age group. In the meantime, hit the water, catch a slab or two and enjoy the outdoors.

Beretta M9A1 vs M9A3: Side by Side Comparison

0

Very few firearms have been a top choice for military, police, and civilian shooters alike for over half a century like the Beretta M9 series.

Two of the updates of the M9 design, the M9A1, and the M9A3, are still some of the more compelling full-size handguns on the market today. But, what are the differences between these two guns, and which is the best option for you?

While both of these pistols are truly world-class designs and come from the same general blueprint, there might well be some differences between the two that make one better than the other for your purposes.

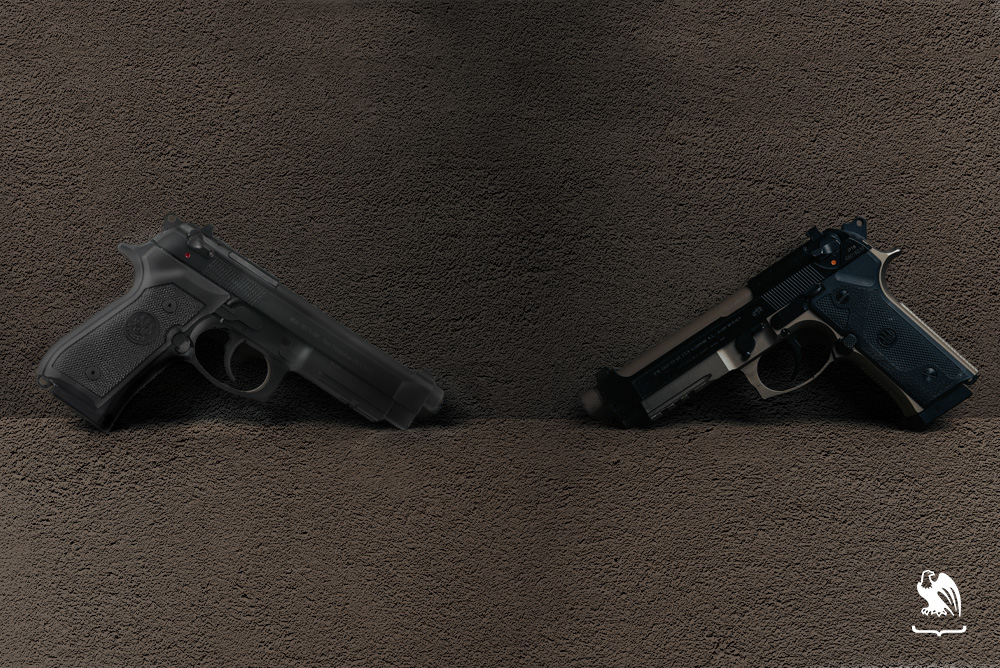
The Beretta M9A1 vs M9A3 are very similar in terms of specs and overall design. The M9A3 has a higher capacity and is a bit more customizable, with a threaded barrel, longer rail, and removable front sight. The M9A1, on the other hand, has a three-dot sight and a slightly shorter barrel.

In this article, we’ll compare each of these gun models head to head, getting into specifics of size, ergonomics, optics, controls, and more.

Products Mentioned In This Article

Beretta M9A1

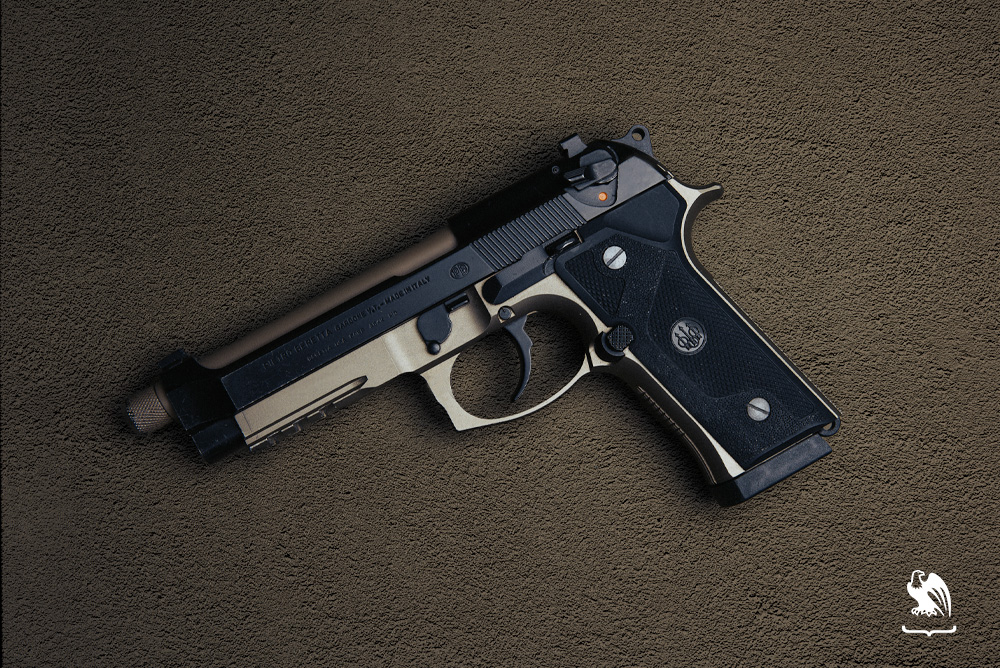
Beretta M9A1 Handgun Photography

For a lot of folks fighting in the Global war on terror, their first encounter with a pistol was a Beretta M9A1. According to Beretta’s website, the M9A1 was designed specifically to meet Marine Corps requirements that were cognizant of not only Desert Storm in 1990-91 but the then-ongoing conflicts in Iraq and Afghanistan.

The main thing that folks transitioning from the M9 to the A1 variant would be likely to notice is the inclusion of a Picatinny rail on the underside of the pistol’s frame. This allows users to attach lights and lasers, greatly enhancing the operational capabilities of the weapon. From there, the changes are more subtle.

The front and back straps, as well as the grips, of the A1 model are more aggressive than its older counterpart to make it easier to grip while sweating or wearing gloves. Additionally, the M9A1 came with magazines with a specially designed coating to resist the sand that is so common in Iraq.

Basically, you can think of the M9A1 as a slightly refreshed and face-lifted model of the M9, with both some cosmetic and performance improvements to make it a more effective weapon for troops in the field.

If you’re looking for a Kydex or hybrid Beretta M9A1 holster, check out our selection of IWB and OWB holsters here.

Beretta M9A3

Beretta M9A3 Firearm Photography

If the A1 model was a refreshed version of the M9, the A3 variant is something like what folks in the car community might call a restomod: a redesign and retrofitting that keeps the original design philosophy in mind, but that stretches performance to its limits.

The A1 model was adopted into military service in 2006. With about another decade of learning in the field, arguably the best research and development on the planet, Beretta came out with the A3 in 2015.

The M9A3 adds even more Picatinny rail to give users more options for installing lights and lasers, in addition to larger, 17-round magazines. The grip was also thinned out, with the option to add a more traditional, thicker grip. Finally, the magazine geometry was changed to make it easier to reload by feel.

In effect, the M9A3’s list of changes represents a fine-tuning of the M9A1 into one of the most compelling military pistols that are in current or recent use.

If you’re looking for a Kydex or hybrid M9A3 holster, check out our selection of IWB and OWB holsters here.

Beretta M9A1 vs M9A3: Specs

Beretta M9A1 vs M9A3: Size & Capacity

With most of these comparisons, we’re going to be splitting hairs, since both the A1 and A3 are iterations of the M9 design. There are, however, some meaningful differences when it comes to size and capacity.

As you can see in the chart above, the two pistols are very similar in size, with an inch here and an ounce there being added and subtracted in the various dimensions of the two designs.

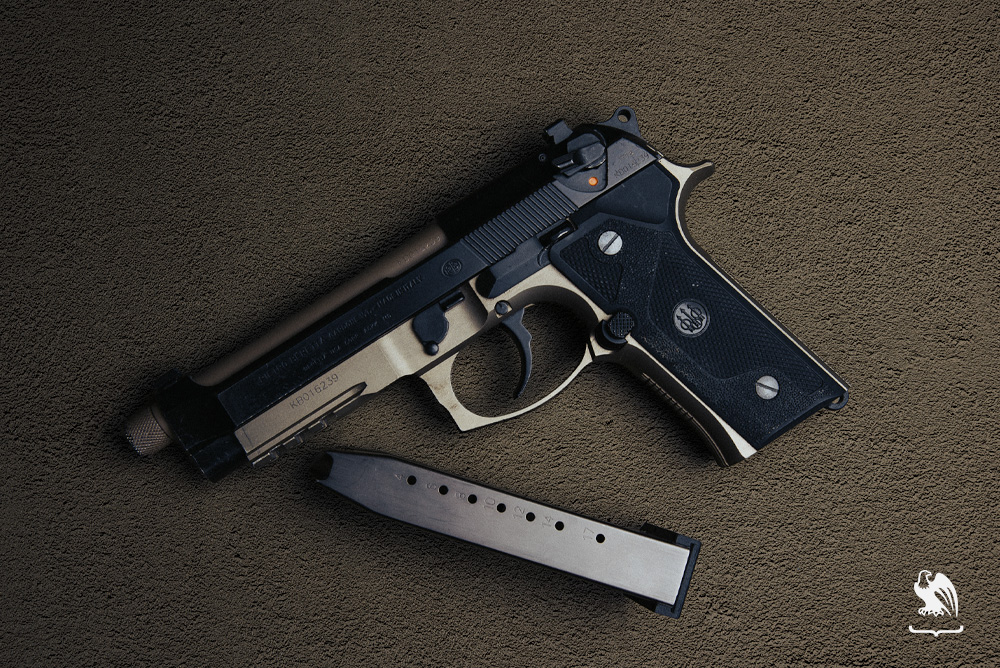
Importantly, the M9A3’s standard magazine capacity is 17 rounds, two more than the older design. Those two rounds in effectively the same sized pistol lead us to lean a little bit in the direction of the M9A3 in this category.

A Beretta M9A3 gun laying down along side its magazine - Size and Capacity

Beretta M9A1 vs M9A3: Ergonomics

Frame

The major difference in the frames between these two firearms is that the M9A3 has a slightly more vertical hand position than the M9A1. For folks picking up both of them for the first time on the same day, the A3 might feel a little more natural to point and shoot. If, on the other hand, people spent many range days with the A1, then the older model will likely feel more like home.

The difference in frame geometry is also somewhat offset given that the A3 can be used with a thicker grip that is the same size as that of the A1 as well as its standard, very slightly thinner grip profile.

Slide & Barrel

Here is where things get a little bit different: while the slide on the two guns is extremely similar, the two major upgrades on the A3 model give it the edge here.

First, the A3’s slide can be switched between models with or without a decocker. While this is a niche feature, it’s one that some folks will deeply appreciate, considering you can have a new slide shipped to your door.

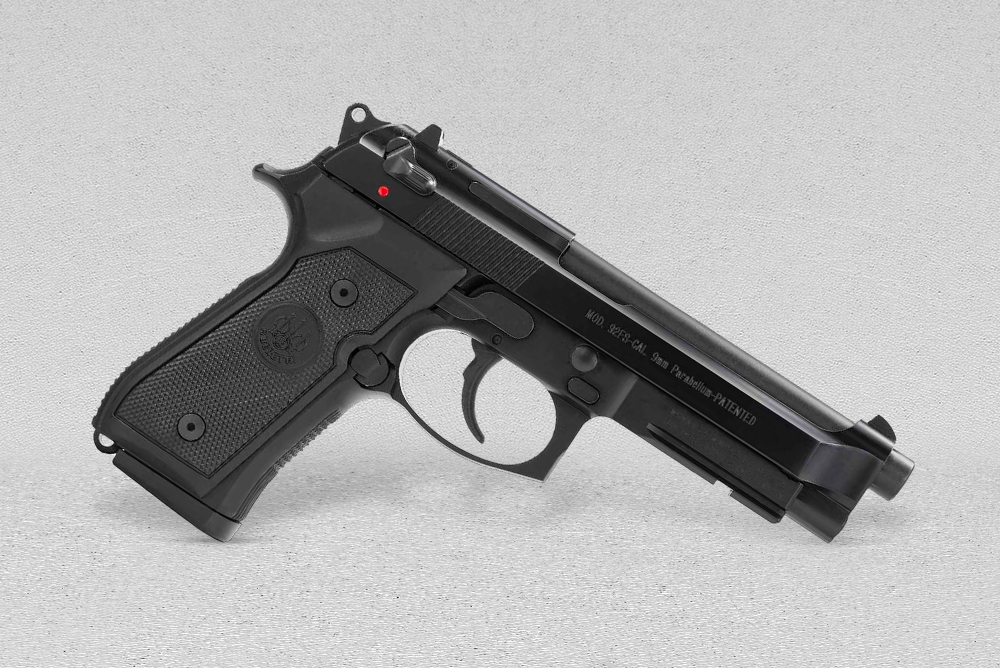
Second, the A3’s barrel comes threaded from the factory, making the A3 a better choice for people who might be thinking about suppressing their M9s.

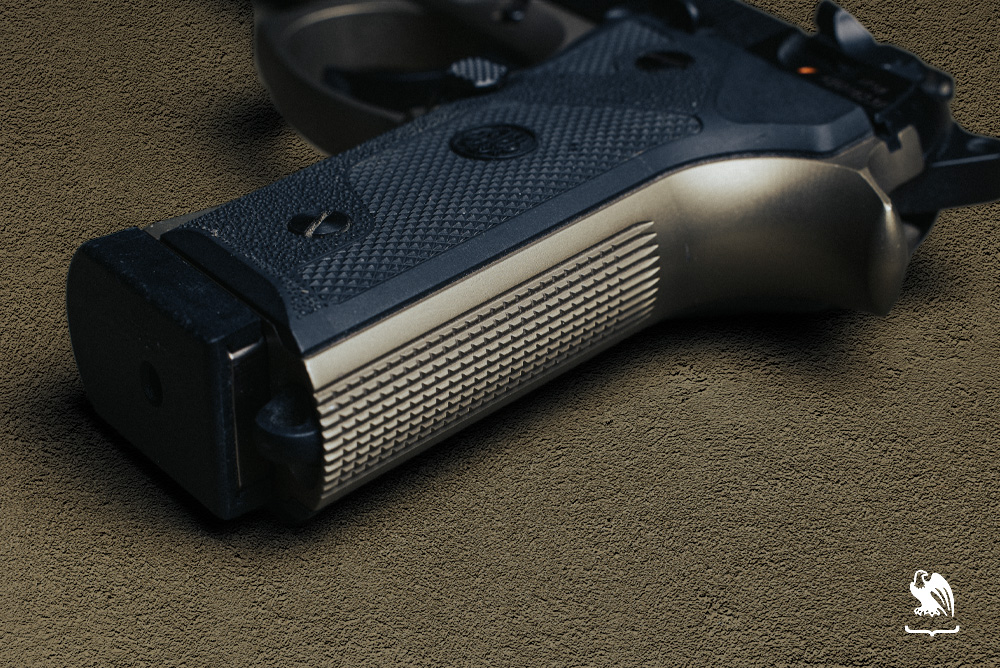
Generally, the A1 and A3 shoot very similarly in terms of their slide and barrel, but the ability to more easily suppress the A3 with the included threaded barrel might sway some folks. Oh, also, the M9A3 comes in Flat Dark Earth in case you want your M9 in a color other than black.

Close up image of the Beretta M9A3 from the back of the handgun

Beretta M9A1 vs M9A3: Sights & Optics

This might be the category in which these firearms differ most from each other, and where a lot of users might make their choice between them a little clearer.

The M9A1 comes with white three-dot sights that are relatively easy to use in the daytime, and reasonably well at night.

The rear sights are adjustable on the A1 model, meaning you can drift them left to right to zero the pistol, or replace them entirely with a mode of your choice from the aftermarket. But, and this is important, the front sights are integral and are not coming off without a grinder.So, if you like a white dot front sight, good. If not, then you might like the A3.

The A3 model was designed so both the rear and front sights are removable. This opens users up to a lot more options, including raised sights for use with suppressors, making the threaded barrel that much more useful.

You can attach a light or laser on the bottom of the frame of both the A1 and the A3. The A3 does have a longer Picatinny rail in addition to being able to swap out the front sight, which the A1 cannot do.

Beretta M9A1 vs M9A3: Controls

Safety

In their stock configurations, both the M9A1 and M9A3 have a combination decocker and safety, which makes it possible for these guns to be carried with the hammer down on a live chamber safely.

Here the edge goes to the M9A3 since it is possible to buy a slide that only has a decocker. Many folks consider the additional manual safety to be redundant and unnecessary. There are ways to do the same thing to an A1, but it’s a lot more involved than simply popping on a new slide like you can with the A3.

Trigger

The trigger on these two firearms is identical for the purposes of most shooters: it’s a double/single-action trigger that takes some getting used to.

With DA/SA triggers, the first pull is a heavy one that cocks the hammer and then fires a round, while subsequent shots are lighter and shorter. This means that the shooter will have to get used to two different trigger pulls to shoot either of these handguns well.

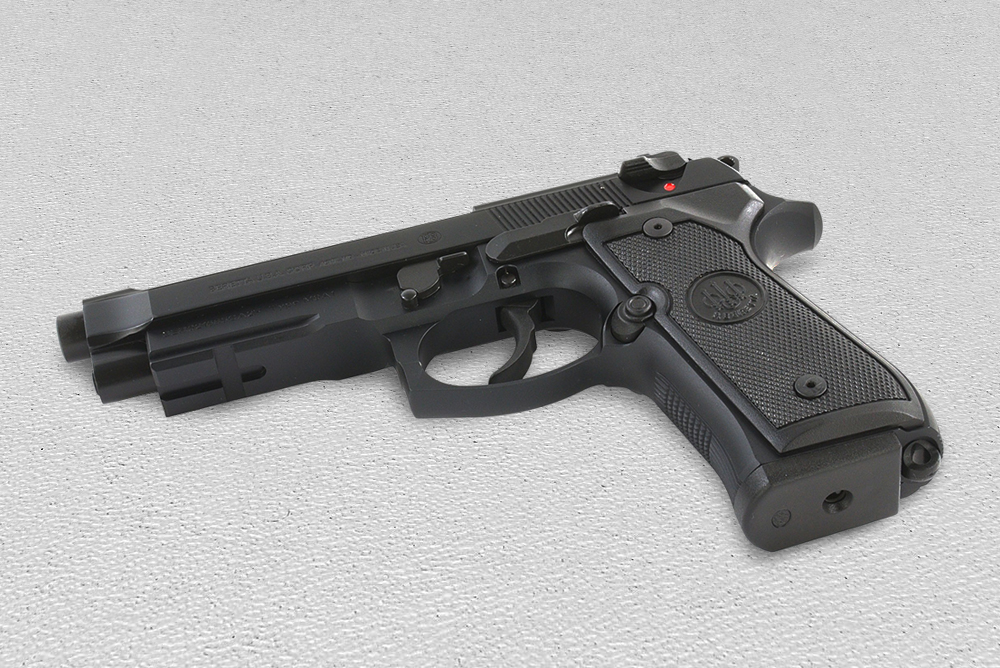
Close up imagery of the Beretta M9A1 gun laying on a flat surface

Which is Right For Me?

Because the A1 and A3 models of the M9 are so similar to each other, the choice here will be a mostly personal one depending on your preference.

If you’d like to get the most modern version of the M9, with the ability to easily use a suppressor and upgraded sights along with larger lights and lasers, then the M9A3 is for you.

The Beretta M9A3’s accuracy might be a little bit better than its older predecessor with some upgraded sights, better grips, and more optics options on the bottom of the frame. And if the accuracy doesn’t help, then you get two more rounds to hit the target.

With that said, one thing to seriously consider is the possibility of getting an awesome deal. Since the M9A1 is no longer in production, you can often buy them for less, and they make great concealed-carry guns. The Beretta M9A1 specs are certainly nothing to scoff at, and it’s an excellent defensive tool.

Summary

Both Beretta M9A1 and the Beretta M9A3 handguns - Side to side - which one is better?

The variations between the Beretta M9A1 vs M9A3 are very small. The two pistols are very similar in size, with the main differences being in their sights and slides.

Overall, both of these make an excellent choice of full-size handgun, and either one would serve you well: if you want the most modern version go for the A3 model, but an A1 at a deep discount in the local gun store would be an almost ideal gun for people who plan to shoot a lot and want good quality for the money.

If you’re looking for a new IWB, OWB, or pocket carry holster, visit our Holsters by Gun Model page for Kydex holsters that are custom-made for your weapon of choice.

Interested in items beyond holsters? Check out our Resources Page for links to recommended products like lights, lasers, first aid, maintenance, and more, and browse our selection of belts, apparel, and accessories at our website, vedderholsters.com.

To stay up-to-date on all the latest Vedder Holsters content and offerings, check out our blog and follow us on Facebook, Instagram, and Twitter. And be sure to visit our sister company, GeoGrit, for all of your American-made minimalist wallet needs.

Umarex Gauntlet Review

0

If you have been into rifles for some time, you would know about the company Umarex – the largest importer of air guns in Europe. They specialize in airguns and one of their best-selling PCPs is the Umarex Gauntlet. 

The Umarex Gauntlet is a bolt-action, 10-shot repeating air rifle that gives the best performance for shooting at a budget price. 

The gauntlet is well-regulated and is available in .22 and .25 calibers – allowing you to shoot long, consistent shot strings effortlessly. 

What sets the Umarex Gauntlet apart is its ability to shoot 60-70 shots at 900 FPS – 1000 FPS each with only a .22 caliber. 

If you are impressed by the numbers and want to know more about this splendid air gun, read on to find out. 

Umarex Gauntlet Silencer

The Umarex Gauntlet is a backyard-friendly, silent shooter that comes with a fully shrouded barrel in .177 cal, .22 cal, and .25 cal versions . 

It is a great gun for both traditional and beginner shooters as it has a lot of features that far exceed its cheap price of $300 (which may vary according to sellers). 

With a maximum velocity of 900 FPS, the Gauntlet can shoot up to 10 rounds and 60 shots per cartridge. It also comes with a regulator, a shot counter, and a string that helps adjust the grip of the silencer.

The accuracy of the weapon is about 25-50 yards at .22 cal and around 900 FPS. Umarex Gauntlet is very silent and gives you great shots with its sleek, matte-finished body. 

Umarex Gauntlet Rifle Details

The following is a compiled review of the main features of the Umarex Gauntlet. I shall let you know about all the important details you might wonder about if you are considering buying this gun. 

Hence, without further ado, here are the specifications of the Umarex Gauntlet Rifle. 

1. Gun Type

The Umarex Gauntlet is a Pre-Charged Pneumatic (PCP) type of air rifle that has a 10-shot rotary magazine. It comes with a 13-inch cubic air reservoir and a regulator that allows you to shoot at least 70 shots with a .177 caliber, 60 with a .22, and 25 with the .25 model. 

2. Stock

The stock of the Umarex Gauntlet rifle is a synthetic one with a durable, matte-black finish which does not get scratched off easily. The forestock is covered with a battle shroud to keep the noise levels low and can easily be removed to switch tanks. 

The grip is designed similarly to that of a pistol and to finish it off, there is an adjustable cheek piece on the stock for your shoulder to be comfortable at all times when taking aim. 

3. Sight

One of the Gauntlet’s downsides is that it does not come with a bundled scope. You would have to pick one and unfortunately, a large number of bundled scopes are of poor quality. The rifle has standard airgun rails, so Weaver or Picatinny rings will not be compatible with it. 

4. Performance

The Umarex Gauntlet has a maximum velocity of about 900 FPS in a .22 caliber rifle. The gun can pull off 69 shots at a Muzzle Velocity of 828 FPS which is a very consistent number. The gun has shown a good performance even with the change in pellets and is not very picky about quality to work well.

The table below represents Umarex Gauntlet’s velocity and accuracy with various pellets:

PelletVelocity (FPS)FPEAccuracy
H&N Field Target Trophy Green (10.03)843.85 FPS15.86 FPEGreat
JSB Jumbo Exact (14.35 Grain)806.91 FPS20.75 FPEGreat
Crosman Premier HP (14.3 Grain)788.16 FPS19.73 FPEGood
RWS Hobby (11.9 Grain)864.63 FPS11.9 FPEGreat
H&N Field Target Trophy Green (14.66 Grain)787.71 FPS20.2 FPEGood
Gamo Raptor Platinum (9.7 Grain)931.86 FPS18.71 FPEBest

As you can tell from the table, the Gamo Raptor Platinum works best with the Umarex Gauntlet. The H&N pellets are also a good replacement that can easily be obtained in the market.  

5. Trigger

The trigger-pull weight of the Umarex Gauntlet PCP air rifle is around 3 lbs, which is a considerable amount, but not very light. Many users have complained about the stiffness of the trigger and most negative reviews included the defect in the product.

Although it is adjustable, and a safety mode is available, many have stated that the gun is hard to cock and not very good with the safety placements.  

6. Cocking and Loading

Umarex Gauntlet is a bolt action type gun that is easy to operate but can be a bit difficult, as stated by some reviews. 

The bolt can be a bit stiff and difficult to cock and is a little hard to pull back. Another difficulty is that even though it is adjustable and comes with a manual, many users found it very hard to put it in place. 

The Gauntlet can fire up to a 10-shots in a row and the magazines are extremely smooth and easy to load. It also has tiny numbers to show you the shot you are on, which is a little detail to love about the Gauntlet’s design. 

7. Loudness

The noise levels of the Umarex Gauntlet are set at 3-Medium, which means that it is not a very loud rifle. 

You may hear a slight, low whistle that PCPs make upon firing, but the Gauntlet is fitted with a shrouded barrel. It lowers the volume and makes the rifle easy to use for practice at home too. 

The gun is not the quietest, but it prevents the rapid firing noises that you would usually get out of a gas-powered gun. 

8. Shooting Ability

At around 46 inches in length and weighing only 8.5 lbs, the Umarex Gauntlet PCP air rifle is a little heavy to carry, especially when loaded with additional accessories. However, it is this very robust and firm build that appeals to a lot of gun enthusiasts.

There is a sling that can be wrapped around the shooter’s hand or forearm to make their aim more stable. The stock’s comb is adjustable and makes for a good cheek rest for comfort. 

The best feature of its shooting abilities is its regulated air supply which makes it easy to not worry about the ‘shot curve’ that most people experience with PCP guns. The magazines are easy to load and it is nice to have at least 10 rounds of shots with a .22 caliber. 

9. Maintenance

As a PCP, there is too much maintenance that you need to keep up with for the Umarex Gauntlet. The rifle works well with most bullets and is completely safe for jam clearance or traveling. 

The gun also has a regulated design and a very low 1150 PSI that maintains pressure which makes the gun very flexible for HPA filling. Hence, you do not have to keep the tank always full at 3000 PSI to get the best performance. 

10. Accessories

The Umarex Gauntlet does not necessarily need a lot of additional tools to make its performance better as it is already a refined rifle as it is. 

However, a recommended accessory for the Umarex Gauntlet is the Umarex Gauntlet Starter Combo. It includes a 4-12×40 scope, a sling, rings, and the Air Venturi MK4 hand pump which helps your Gauntlet fill up with air. 

A pump is always a good accessory to purchase if you plan on maximizing your PCP’s performance.

If you already have a pump, you can either pick a scope or a bipod to just better your experience with the Gauntlet. A Tactical Bipod or a Heavy Duty Bipod works best with the Gauntlet. 

11. Specifications

Following is a quick table to let you know all the specifications and details of the Umarex Gauntlet. 

CategoryDetail
ManufacturerUmarex
Max Caliber.177, .22, .25
Velocity1000 FPS, 900 FPS, 900 FPS
Ammo TypePellets
ActionBolt action
Barrel StyleRifle
Fire ModeRepeated
Gun Weight8.50 kg
Overall Length46.00 inches
Barrel Length23.50 inches
Loudness3-Medium
Magazine Capacity10 rounds
MechanismPCP
Rail11mm dovetail
SafetyManual
Front SightsNone
Rear SightsNone
Shots Per Fill 60
Trigger AdjustabilitySingle-stage
Trigger Action0
UsePlinking, target practice, hunting
RecoilNone

12. Price

The Umarex Gauntlet is fairly priced at $329.99 which is a great deal for all the features it comes with. Most PCP and CO2 guns that come around this rate are not as high quality as this particular rifle is. 

The manufacturers even claim that the Umarex Gauntlet PCP is made in a way that it performs the same way as air rifles that are priced high at around $1000 at an affordable value. 

It is consistent, comes with all the necessities like magazines and regulators, and has great accuracy of 900 FPS as a 10-round rifle.


This gun will no doubt appeal to a large audience and is a complete value for money, making it no doubt, a great purchase. 

Customer Review

Overall, the Umarex Gauntlet is a great air rifle with features that you would not expect at such a low price. It is built stylishly, has great accuracy, and is not picky with pellets. 

The best part is its affordability – since most of its features outdo its cheap price. What actually suits it is the trigger and the bolt.

Most of the negative reviews had been complaining about how difficult it is to adjust the bolt and how heavy it is to carry for a long time. 

Here is a quick summary of the pros and the cons of the Umarex Gauntlet. 

ProsCons
  • Great appearance
  • Lots of features at its price
  • Affordable and efficient
  • Great accuracy
  • Adjustable and powerful
  • Stiff trigger and bolt
  • Slightly heavy
  • Hard to cock

How Does The Umarex Gauntlet Compare To Other Air Rifles?

The Umarex Gauntlet is an all-rounder beast that covers every important aspect of shooting. It excels in speed, accuracy, and comfort and is a great starting-level rifle. 

Here are a few tables that compare some of the best air rifles out there with the Umarex Gauntlet.

If you are looking to make an upgrade, perhaps this section shall help you out in clearing any doubts you have.  

Umarex Gauntlet vs Air Venturi Avenger

CategoryUmarex GauntletAir Venturi Avenger
ActionBolt ActionSidelever
Barrel StyleRifleRifle
Fire ModeRepeating shotsRepeating shots
Dimensions48.75 x 9.75 x 4.2542.75 x 22.75
Loudness3-Medium3-Medium
Magazine Capacity108
Shots Per Fill6024
MechanismPCPPCP
Velocity900 FPS (.22 cal)900 FPS (.177 cal)

Umarex Gauntlet vs Benjamin Marauder

CategoryUmarex GauntletBenjamin Marauder
ActionBolt ActionBolt Action
Barrel StyleRifleRifle
Fire ModeRepeating shotsRepeating shots
Dimensions48.75 x 9.75 x 4.2542.82 x 20.00
Loudness3-Medium2-Low-Medium
Magazine Capacity1010
Shots Per Fill6032
MechanismPCPPCP
Velocity900 FPS (.22 cal)1100 FPS (.177 cal)

Umarex Gauntlet vs Umarex Origin

CategoryUmarex GauntletUmarex Origin
ActionBolt ActionSidelever
Barrel StyleRifleRifle
Fire ModeRepeating shotsRepeating shots
Dimensions48.75 x 9.75 x 4.2543.10 x 22.90
Loudness3-Medium3-Medium
Magazine Capacity1010
Shots Per Fill6040
MechanismPCPPCP
Velocity900 FPS (.22 cal)1075 FPS (.177 cal)

Umarex Gauntlet vs Gamo Urban

CategoryUmarex GauntletGamo Urban
ActionBolt ActionBolt Action
Barrel StyleRifleRifle
Fire ModeRepeating shotsRepeating shots
Dimensions48.75 x 9.75 x 4.2545 x 3.5 x 8 
Loudness3-Medium3-Medium
Magazine Capacity1010
Shots Per Fill6030
MechanismPCPPCP
Velocity900 FPS (.22 cal)800 FPS (.177 cal)

Umarex Gauntlet vs Hatsan Flash

CategoryUmarex GauntletHatsan Flash
ActionBolt ActionBolt Action
Barrel StyleRifleRifle
Fire ModeRepeating shotsRepeating shots
Dimensions48.75 x 9.75 x 4.2512 x 45.1 x 4.2
Loudness3-Medium3-Medium
Magazine Capacity1014
Shots Per Fill60100
MechanismPCPPCP
Velocity900 FPS (.22 cal)1070 FPS (.177 cal)

Umarex Gauntlet vs Gamo Coyote

CategoryUmarex GauntletGamo Coyote
ActionBolt ActionBolt Action
Barrel StyleRifleRifle
Fire ModeRepeating shotsRepeating shots
Dimensions48.75 x 9.75 x 4.2512 x 45.1 x 4.2
Loudness3-Medium3-Medium
Magazine Capacity1010
Shots Per Fill6030
MechanismPCPPCP
Velocity900 FPS (.22 cal)1345 FPS (.177 cal)

As you can tell from the information provided, the Umarex Gauntlet goes neck to neck with trusted gun companies like Gamo and Hatsan. 

Though the more expensive guns of course excel in performance, the Umarex Gauntlet is a steal for its price. 

Conclusion

Many have praised the Umarex Gauntlet for its extreme accuracy and powerful shots which fire off so silently that you only hear a slight shift in the air. It is lightweight and convenient to carry on hunting trips or to practice daily. 

I hope that this review has been helpful in making your mind up about buying the Umarex Gauntlet. If it is a high-end performance that you want at a decent price or a starting rifle for an enthusiast, this gun will cover all the basics. 

Recommended use:

  • Target shooting/plinking
  • Pest control/small and medium game hunting: Best for hunting squirrels, rabbits, rats, pigeons, raccoons, beavers, possums, groundhogs, and coyotes.

Who Makes the Best Lithium Batteries?

0

Xin cung cấp nội dung bài viết mà bạn muốn tôi viết lại và chèn các shortcode.

Fishing In The Rain: Is it GOOD or BAD to Fish in the Rain?

0

You decided to go fishing, prepared everything like you usually do, but the weather changed. It is raining and you are wondering what to do?

Fishing in the rain can be done, and rainy weather can actually help you in some cases. What many people consider bad weather, is actually good for angles!

Environmental factors have a huge impact on fish. Rain affects river flows, it carries different insects and worms into the river from the riverbanks. That attracts fish which can feed on it. The same goes for lakes too …

Clouds, unlike sun, provide darker conditions during the day, and it can also be your advantage. So, this is your opportunity to profit the best you can from that situation.

Except that, while fishing in the rain, you will also need to think about your needs and how to protect yourself from cold, rain and possible dangers.

Here we will see how rain affects on different fishes, what gear to use, find out some rain tips and learn how to prepare yourself.

Is it Good or BAD to Fishing in the Rain? [Why?]

Depending on the season, rain can be very useful for fishing. Before I mention some tips for fishing, here are some basics.

In early spring, when the water is high and temperatures low, most of the time rain will not be your advantage.

But in warm months of the year, when water levels are lower, moderate rainfall will be the best situation for fishing adventure. The same applies to times after strong and heavy rainfalls (storms).

Very important thing to mention is to avoid fishing during heavy thunderstorms and lightning because that can be very dangerous for you.

As already mentioned, rain carries small worms and insects into the water, but also causes commotion among small living creatures in the water. This occurrence causes increase in fish activity.

Rain can also affect the water temperature, and/or blur it and darken it. In those conditions large fish can move around more than usual.

In rainy days it is good to use bigger spinners because they are more visible in the absence of sunlight and such fishing conditions. We will mention different approaches for different fish species later on.

In lakes with clear water rain will cause darker conditions and make fish more active which is good for productive fishing. Unlike rivers, lakes are prone to lack of oxygen in warm and dry months of the year. Rain will cool the water, restore some oxygen and create lower visibility for fishes, so they can’t see you and your fishing equipment.

Rain can make the water very muddy and “dense”. As rain carries living creatures into water, it can also carry large amounts of mud. Those conditions are not desirable for fishing. In that situation you should find the clearest possible spot, away from obvious mudflows from riverbanks. This problem is much bigger if you are not using a boat.

You can predict this problem if it has been raining for days prior to your fishing trip. That way you can consider possible locations before and not to use your precious fishing time for location searching.

Even the light rain can affect your fishing sucess. Together with steady light wind, it creates favorable conditions as it oxygenates the water.

Fishing In The Rain - Fly

Is Fishing Better Before or After Rain?

When talking about rainstorms, fishing is better before.

Before the storm and heavy rains, the barometric pressure lowers which is good for fish activity. Feeding frenzy can occur among fish and that’s the best time for you to present your bait and catch a fish, or more than one. Fish bites will come one after another!

During the storm the fish activity will slow down but that is not a problem because it is not advisable to fish in that conditions. In the end of the storm there is a very short time window in which pressure increases and fish are active. When the storm is over, fish will act the same as usual, or even be more inactive.

During summer and early fall you can benefit greatly from fishing before the storm. Also, at that time of the year very hard but not long-lasting thunderstorms are more frequent. If you want to try, and use the weather for your advantage, bass is one of the fishes that will react the most on weather changes.

If your weather predicting skills are not that good, there are numerous internet websites and weather mobile apps which are highly accurate and easy to use so that anyone can figure out the weather forecast. Or if you prefer, you can buy a simple barometer and have it with you while fishing.

Fishing In The Rain - Storm and Lightning

Rain Will Help You Catch More Fish like Trout, Carp and Bass

Trout, carp and bass are among fish which are the most sensible on weather conditions.

Trout reacts the most to lower light, carp to oxygen level and bass to water movement, everything caused by rainy conditions. No matter which one you prefer to catch, rain will be your best friend while fishing for them.

Trout Fishing in the Rain

Absence of sunlight will make trouts more active.

In darker conditions they lurk on their prey because they are less visible to it.

Fly-fishing for trouts in the rain will work the best …

Usually, the best time to catch trouts is low light condition like early morning or evening. Clouds and rain produce similar conditions during the whole day. Rain washes insects to the water and attracts trouts, so this is the best time to present your bait. Although this time is the best for dry flies, it is also good to try fishing deeper. Small water invertebrates are also stirred up at this time, and they are important food for trouts. Sinking flies are very useful here.

Rain brings cold weather (or at least a few degrees cooler) which is great in warmer parts of the year. You all know that trout prefer coller water.

Carp Fishing in the Rain

Fishing in the rain for carp can be beneficial but also it depends on of the season.

In warmer months quick rain showers affect carps activity. They are more active before the shower. While temperature of the water is lower, like in spring, rain will cool it even more so carp will be less active. Apparently, carps are more sensitive to wind than other fish (bass for example), so if the conditions are windy try to find a sheltered spot. Carp is also very sensitive to low oxygen levels so that is the main reason it reacts to rain.

Bass Fishing in the Rain

Although fishing in the rain is good, it affects the moving patterns of fish, so in the beginning it can be hard to locate it. If you find baitfish in those conditions, there is a high chance bass is close.

Wind is also important because water motion carries small fish, so its better to go on a downwind side of the water. You can also look for natural hiding places for small fish in harsh weather. Bass will be active and look for them.

When fishing for bass in normal conditions it is important to keep your distance from the fish. While fishing in rain you re not that visible to the bass so you can be closer. That way your casting will be more precise and your lure will not make a big splash while hitting the water surface.

Try topwater baits as bass is now more active than usual. They are aggressively biting in rainy conditions so if you are using spinners they can move faster, if you are using worms, don’t keep them in one place for too long as the bass is swimming around, not lurking from its hiding place.

What is the Must Have Gear for Fishing While Raining? [Every Angler Need!]

Fishing while raining requires an investment in good rain gear.

Imagine yourself being wet and cold and not being able to use most of your fishing day.

You will need a suit and footwear which will keep you dry and warm, even in the storms.

Cheap coats or “emergency” rain suits will not do the job. You will have to visit a specialized store and pick a jacket, pants and boots or boot covers.

It is easy to stay dry while standing in place, but while moving, walking and working with your equipment you need clothes which can handle it.

Fishing Rain Suits for Fishing

There are numerous brands that you can choose from but make sure you invest in quality products.

Prices can vary but make sure it is comfortable, you can normally move in it and that it has easy accessible pockets.

The more waterproof and heavy it is the less breathable it will be, so you decide what option is the best for you.

Light ones are usually more comfortable but less durable. If you don’t care about the prices there are high-end options that combine durability, comfort and are breathable.

If you are a beginner the best option would be multi functional rain suit you can use for other outdoor activities too. Make sure that zippers, buttons and sleeve edges are tight and fit properly.

No matter which items you decide to buy, at least the basic waterproof gear is a must to protect yourself from wet weather!

Fishing In The Rain - Suits

How Rain Affects Water Temperature and Your Fishing?

Rain can also have a significant impact on water temperature and your fishing experience.

When it’s raining, temperature of the water tends to decrease as the precipitation cools down the surface. This drop in temperature can affect fish behavior, making them less active and harder to catch.

However, fishing in the rain can be advantageous in some cases. The raindrops create a masking effect, making it harder for fish to detect your presence. This can give you an advantage when it comes to stealthy fishing.

Additionally, if you’re fishing in an area with warmer water, the rain can bring down the temperature to a more favorable range for fish activity. While fishing during sunny weather is typically considered optimal, don’t shy away from casting your line when it’s raining as it can present unique opportunities.

Adjusting your times to fish and embracing the rain can lead to successful fishing trips.

Conclusion

Fishing in the rain can be more productive than fishing during nice and sunny days.

Most of the fish species react to rain. If you use proper gear and know your locations, most certainly you will end up having one of your best fishing days. AND don’t forget your safety and avoid lightning and thunders.

Fishing in the rain is very similar to dry conditions from the technical aspect but much more productive because of how rain affects the fish behavior. So during summer and fall don’t think twice when the forecast is “bad” because fishing is one of the rare activities which are better in rain.

How to Dehydrate Morel Mushrooms

0

Dehydrating morel mushrooms is a common practice among individuals who harvest a large amount during mushroom season (lucky you!)

The dehydration process is the number one method that allows you to savor the taste of these even during the off-season, as they do not freeze well (though it is possible).

Horizontal image of morel mushrooms with a rock in the background.

Some say the best location to hunt for morels is in the Midwest, but you can find them all over the US, Europe, and beyond. This area seems to have the best vegetation and temperature to grow these tasty morsels. Look for them sprouting from mid-April to mid-June.

They usually appear after a series of spring showers, prior to the heat of summer setting in. Morels often reappear in the same spot year after year, and many hunters keep their “spots” a well guarded secret.

These fungi (yes – they are fungi) seem to prefer hillsides with plenty of rotting logs, but they may appear in unexpected spots as well. You may not find them where you’d expect – this is one reason why this variety isn’t commercially farmed.

Three basic processes exist for dehydrating morels. The first involves the use of a dehydrator. Here’s what you need to do:

1. First, wash the specimens in cool water to remove any debris.

2. Pat dry with a paper towel. Trim the stems if necessary.

3. Slice them in half, from the tip through the base of the stem.

4. Place in a single layer on each level of the dehydrator. Follow the manufacturer’s instructions for proper drying times, or check out our ultimate guide to food dehydration – it has a bunch of helpful drying times listed at the bottom.

For those individuals without a dehydrator, you can also use your oven to prepare the mushrooms.

1. Wash, dry, and cut the same way as previously outlined.

2. Cover the bottom of a cookie sheet with parchment paper. Lay out sliced mushrooms in a single layer. It is alright to have the sides touching, but they should not overlap.

3. Bake at 250°F for approximately 6 hours. During the baking process, crack open the oven door a slight amount. This allows the moisture to escape during the drying process.

Finally, the oldest known way to dry morels is to string them up and dry them in the sun.

1. Wash and prepare the individual pieces as before.

2. Cut a piece of cotton packaging string (kitchen string) that’s approximately six feet long. Thread a large-eyed needle, and insert through the center of a morel slice. Slide the mushroom along the cotton string until it’s within 12 inches of the opposite end.
3. Repeat the process with the remaining pieces, making sure they do not touch one another.

4. Hang the string in a sunny location. If you hang the string outside, be sure to bring it in at night to prevent dew from setting on it, which could introduce mold. Allow to dry in the sun for a minimum of two days.

The trick to drying morels is to make sure they are completely dry. Here’s how to test the mushrooms periodically during the drying process:

Break a small portion from the main body. It should snap when broken. If it is mushy or spongy, then moisture still exists within the cap.

Place the dehydrated specimens in a glass jar with a lid or in a resealable plastic bag. These will keep for up to six months if prepared correctly. You can further extend this by using vacuum sealing, placing them in the freezer after they’re dried (though this isn’t always recommended, as it can introduce moisture) or adding some oxygen absorbers to the sealed packaging.
Dehydrated morel mushrooms may be reconstituted by soaking them in enough cool, salted water to cover for 30 minutes, or by boiling them for 10 minutes at a low boil.

Be sure to reserve this water for cooking, as it is full of antioxidants. It makes a great addition to soups and sauces. Just let the sediment settle before adding the liquid on top to dishes.

And if you need a bit more info on the prep process, read our article on how to properly clean your mushrooms.

What’s your favorite way to dry the season’s bounty? Let us know in the comments!

Grizzly Bear Attacks, Kills Bison in Yellowstone as Visitor Rolls Camera

0

Everyone who visits Yellowstone National Park, especially these days, considers themselves an amateur photographer. They’ve all got a high quality camera attached to the phone in their pocket, and any instance of wildlife needs to be captured.

When a single grizzly bear 200 yards off the side of the road can be enough to stop traffic, then an interaction between a young bear and a young bison is definitely going to get noticed.

That was the case for Michael Daus, who was enjoying a day in Yellowstone with his family and came across this scene. In what ends up being a five-minute filmed ordeal, the bear and bison go at it, fighting mere feet from parked cars, crossing a bridge, and eventually splashing into a river.

Daus allowed the video to be used and published by Jackson Hole EcoTour Adventures, who added some interesting and educational commentary to the clip.

Grizzly Bear versus Bison Filmed at Yellowstone National Park

The incident took place near the Grand Prismatic Overlook trail, which is a particularly popular, and therefore typically crowded, part of Yellowstone Park.

This snippet, taken from the YouTube caption Daus added to the video, gives some more context:

“We knew the bear was in the area, as we saw it near the road, less than a mile before turning into the parking lot for the grand Prismatic Overlook hike. While there was a steady flow of walkers, we carried bear spray and remained on the lookout for the bear the entire time.

“We weren’t crazy about returning to find the bear so close, just beyond the opposite side of the small parking area. We didn’t even see it until we were at our vehicle. I was particularly relieved that the bear seemed more interested in the bison, so while very close to the car, we simply maintained what felt like a safe distance.

“Having lived nearby for decades not minutes, we certainly don’t want our actions or the appearance of our proximity to the animals to set any kind of bad example about approaching wildlife. The camera on this phone boasts a pretty amazing lens and zoom capabilities. So I was able to get all the shots from further than it may appear. The kids enjoyed watching safely from the sunroof of the car. Thanks for the concern, just the same.”

A fight of this magnitude, between two wild animals so revered across the United States and the rest of North America, made it that much more special to capture via video. And honestly, it’s also special because there aren’t 40 alternate angles shot and uploaded to the internet from the crowd that would have certainly been gathered if it were peak season.

In fact, for those who’ve visited Yellowstone and are familiar with the area, like our own Travis Smola, this clip came as a shock.

“I’ve been there a bunch of times, it’s one of the busiest parts of the park,” Smola said when he saw the video. “I can’t believe there weren’t 2,000 people there watching this unfold.”

Yellowstone grizzly bears have been known to prey on bison, as well as elk calves or other ungulates. Yellowstone’s wolf and bear populations are the bison’s only large predators in the Park.

READ MORE: CAT FIGHTS OFF ATTACK FROM THREE COYOTES IN SECURITY CAM FOOTAGE

Best Air Rifle Deals

Popular Posts

Air gun 101: The differences between .177 & .22 – Which jobs they do...

0
I’ve always believed the popular phrase: “It’s not the size of the dog in the fight that matters - but rather the size of the...

How far can an air rifle shoot accurately?

0
An air rifle's effective shooting range depends on various factors, including the type of rifle, the caliber, and the power source. Generally speaking, most...

Can you dry fire a gamo air rifle?

0
Unveiling the truth behind dry firing a Gamo air rifle, this intriguing headline delves into the possibility of safely practicing without ammunition. Join us...

How Far Can a .22 Air Rifle Pellet Travel?

0
"Unveiling the Power: Exploring the Distance Capabilities of a 22 Air Rifle Pellet. Discover the fascinating journey of a 22 air rifle pellet as...

Dry Firing Air Rifles: What You Need to Know

0
"Master the art of precision shooting with dry firing air rifles. Enhance your aiming skills, trigger control, and muscle memory without using ammunition. Discover...