Home Blog Page 87

How to Conceal Carry in the Summer

0

It’s that time of year again; temperatures are creeping up, sweaters are being traded for tank tops, and people are taking off on vacation. But how do you successfully conceal carry through all of this?

You may be surprised to learn that concealed carry in the summer is just as easy as it is in colder months. The trick is to piece together the right wardrobe, wear the right holster, and do your research before taking any trips.

While you will probably have to make some adjustments and exceptions while learning how to conceal carry in the summer, it’s not as difficult as it sounds. The first thing to do is make sure you have the proper equipment.

What are the Best Summer Concealed Carry Holsters?

We don’t have to tell you that different holsters work better in different situations. But what is the best holster for summertime concealed carry?

The first thing you want to look at when it comes to CCW in the summer is your carry position. Inside the waistband holsters are generally considered the best way to conceal carry in summer. These holsters can be concealed under even a simple T-shirt, making them much easier to dress for in warmer seasons.

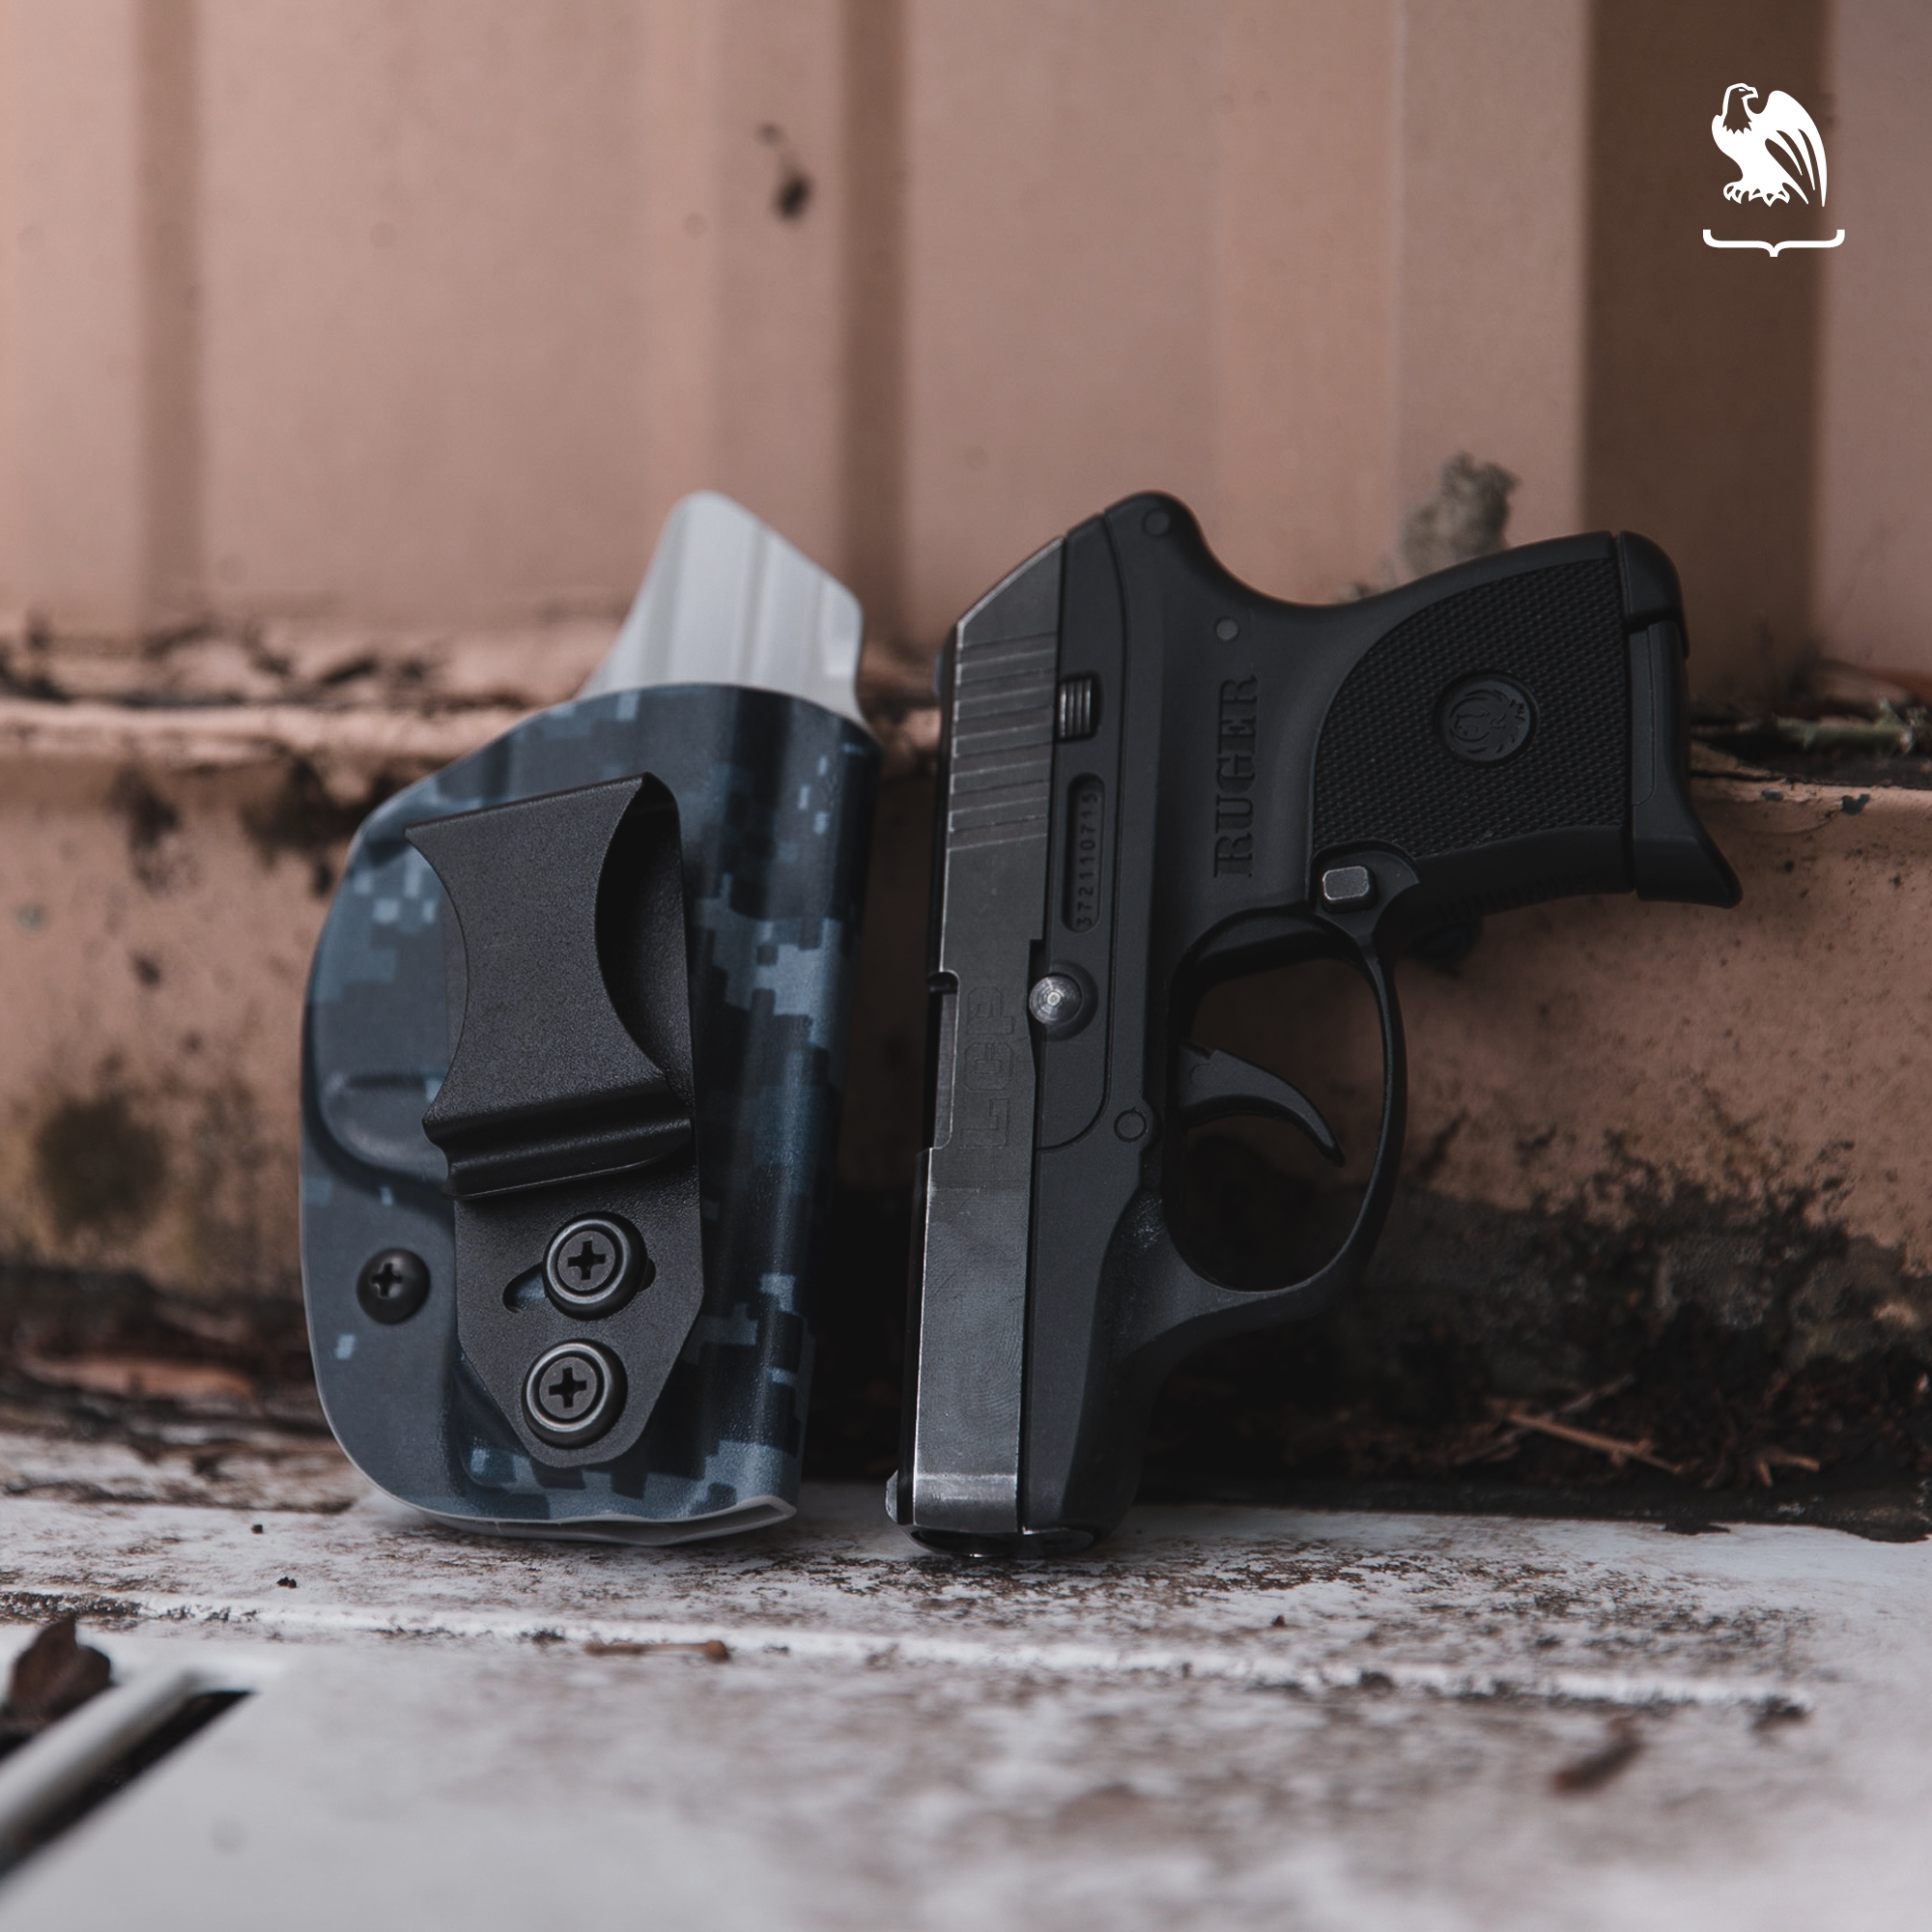
The next thing to consider is holster material. Hands down, the best holster material for summertime is Kydex. While leather is always a comfortable option, it does tend to get a bit sticky when it comes in contact with water, humidity, or sweat.

The Vedder Holsters LightTuck™ Kydex IWB holster is an excellent choice of summer concealed carry holsters. While it’s our most popular holster year-round, its slim design and built-in sweat shield make it easy to hide under lighter clothing and protect your weapon from moisture on your body.

If you just can’t bear to give up your comfortable hybrid holster during the summer months, an easy trick to avoid a sticky situation is to wear an undershirt. Yes, it’s an added layer of clothing, but having that thin layer of fabric between your holster and your skin provides a sweat barrier that allows you to carry a hybrid holster, or any holster for that matter, more comfortably.

Guns: Concealed Carry Options for Summer

LightTuck carry option for summer

In the winter, when thick layers of clothing are the norm, it’s easy to carry a gun of any size. In the summer, when these extra layers are shed for lighter, smaller articles of clothing, the smaller the gun the easier it will be to conceal.

Trading your full-sized weapon for a compact one will make concealed carrying in the summer a much easier task. If you’re looking for ideas, check out our lists of the best Glocks, Rugers, and Berettas for concealed carry.

That being said, you can successfully conceal most pistols in the summer, even larger ones, with the right holster, belt, and clothing combination. So let’s talk about how to dress for concealed carry in summer.

Concealed Carry Clothing for Summer

If you’re like most people, the minute those temperatures start to creep up, you’re trading your thick jackets and jeans for lightweight tank tops and shorts.

Not only does this make it harder to hide your muffin top, but it also makes concealing your carry pistol more difficult. But don’t worry, we have some tips and tricks for keeping things hidden under summer clothing (two birds, one stone, if you know what we mean!).

Luckily, it’s not as daunting as it seems. Concealed carry in the summer is just as easy as it is in the winter, you just have to get a bit more creative.

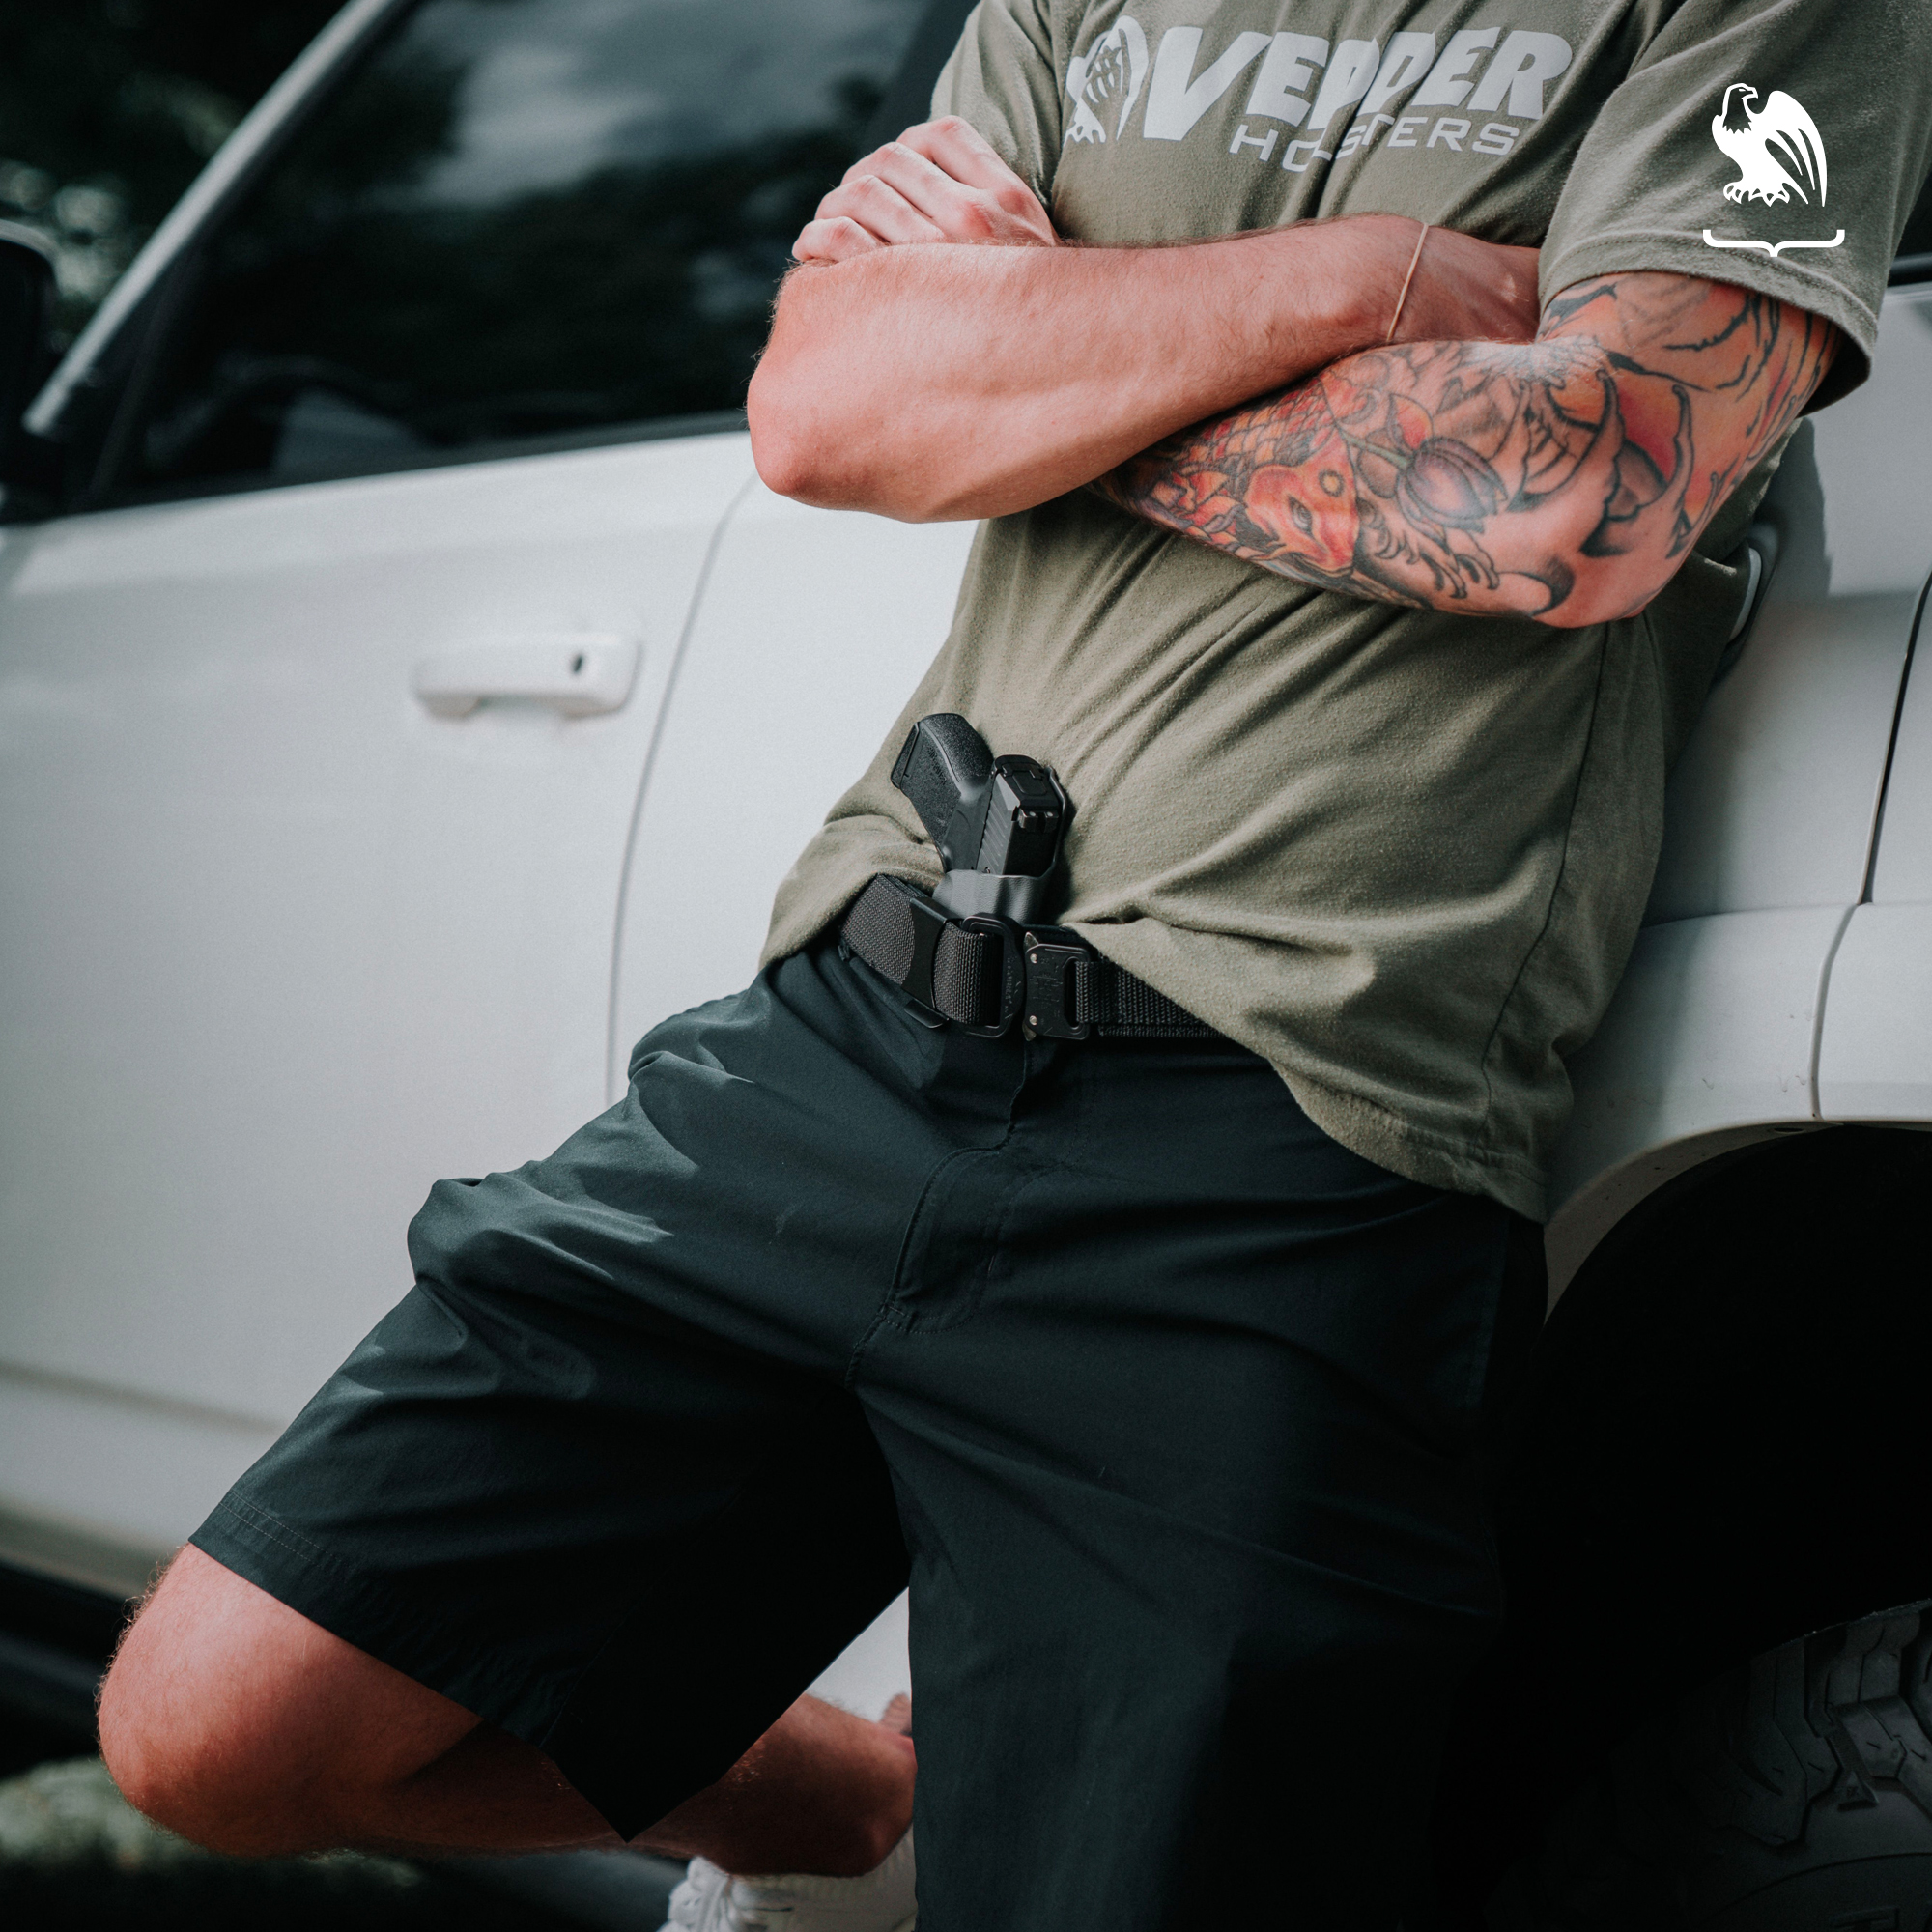
If you can pull them off, cargo shorts are your best friend. They are usually loose and riddled with pockets, making them an excellent choice for both waistband and pocket carry.

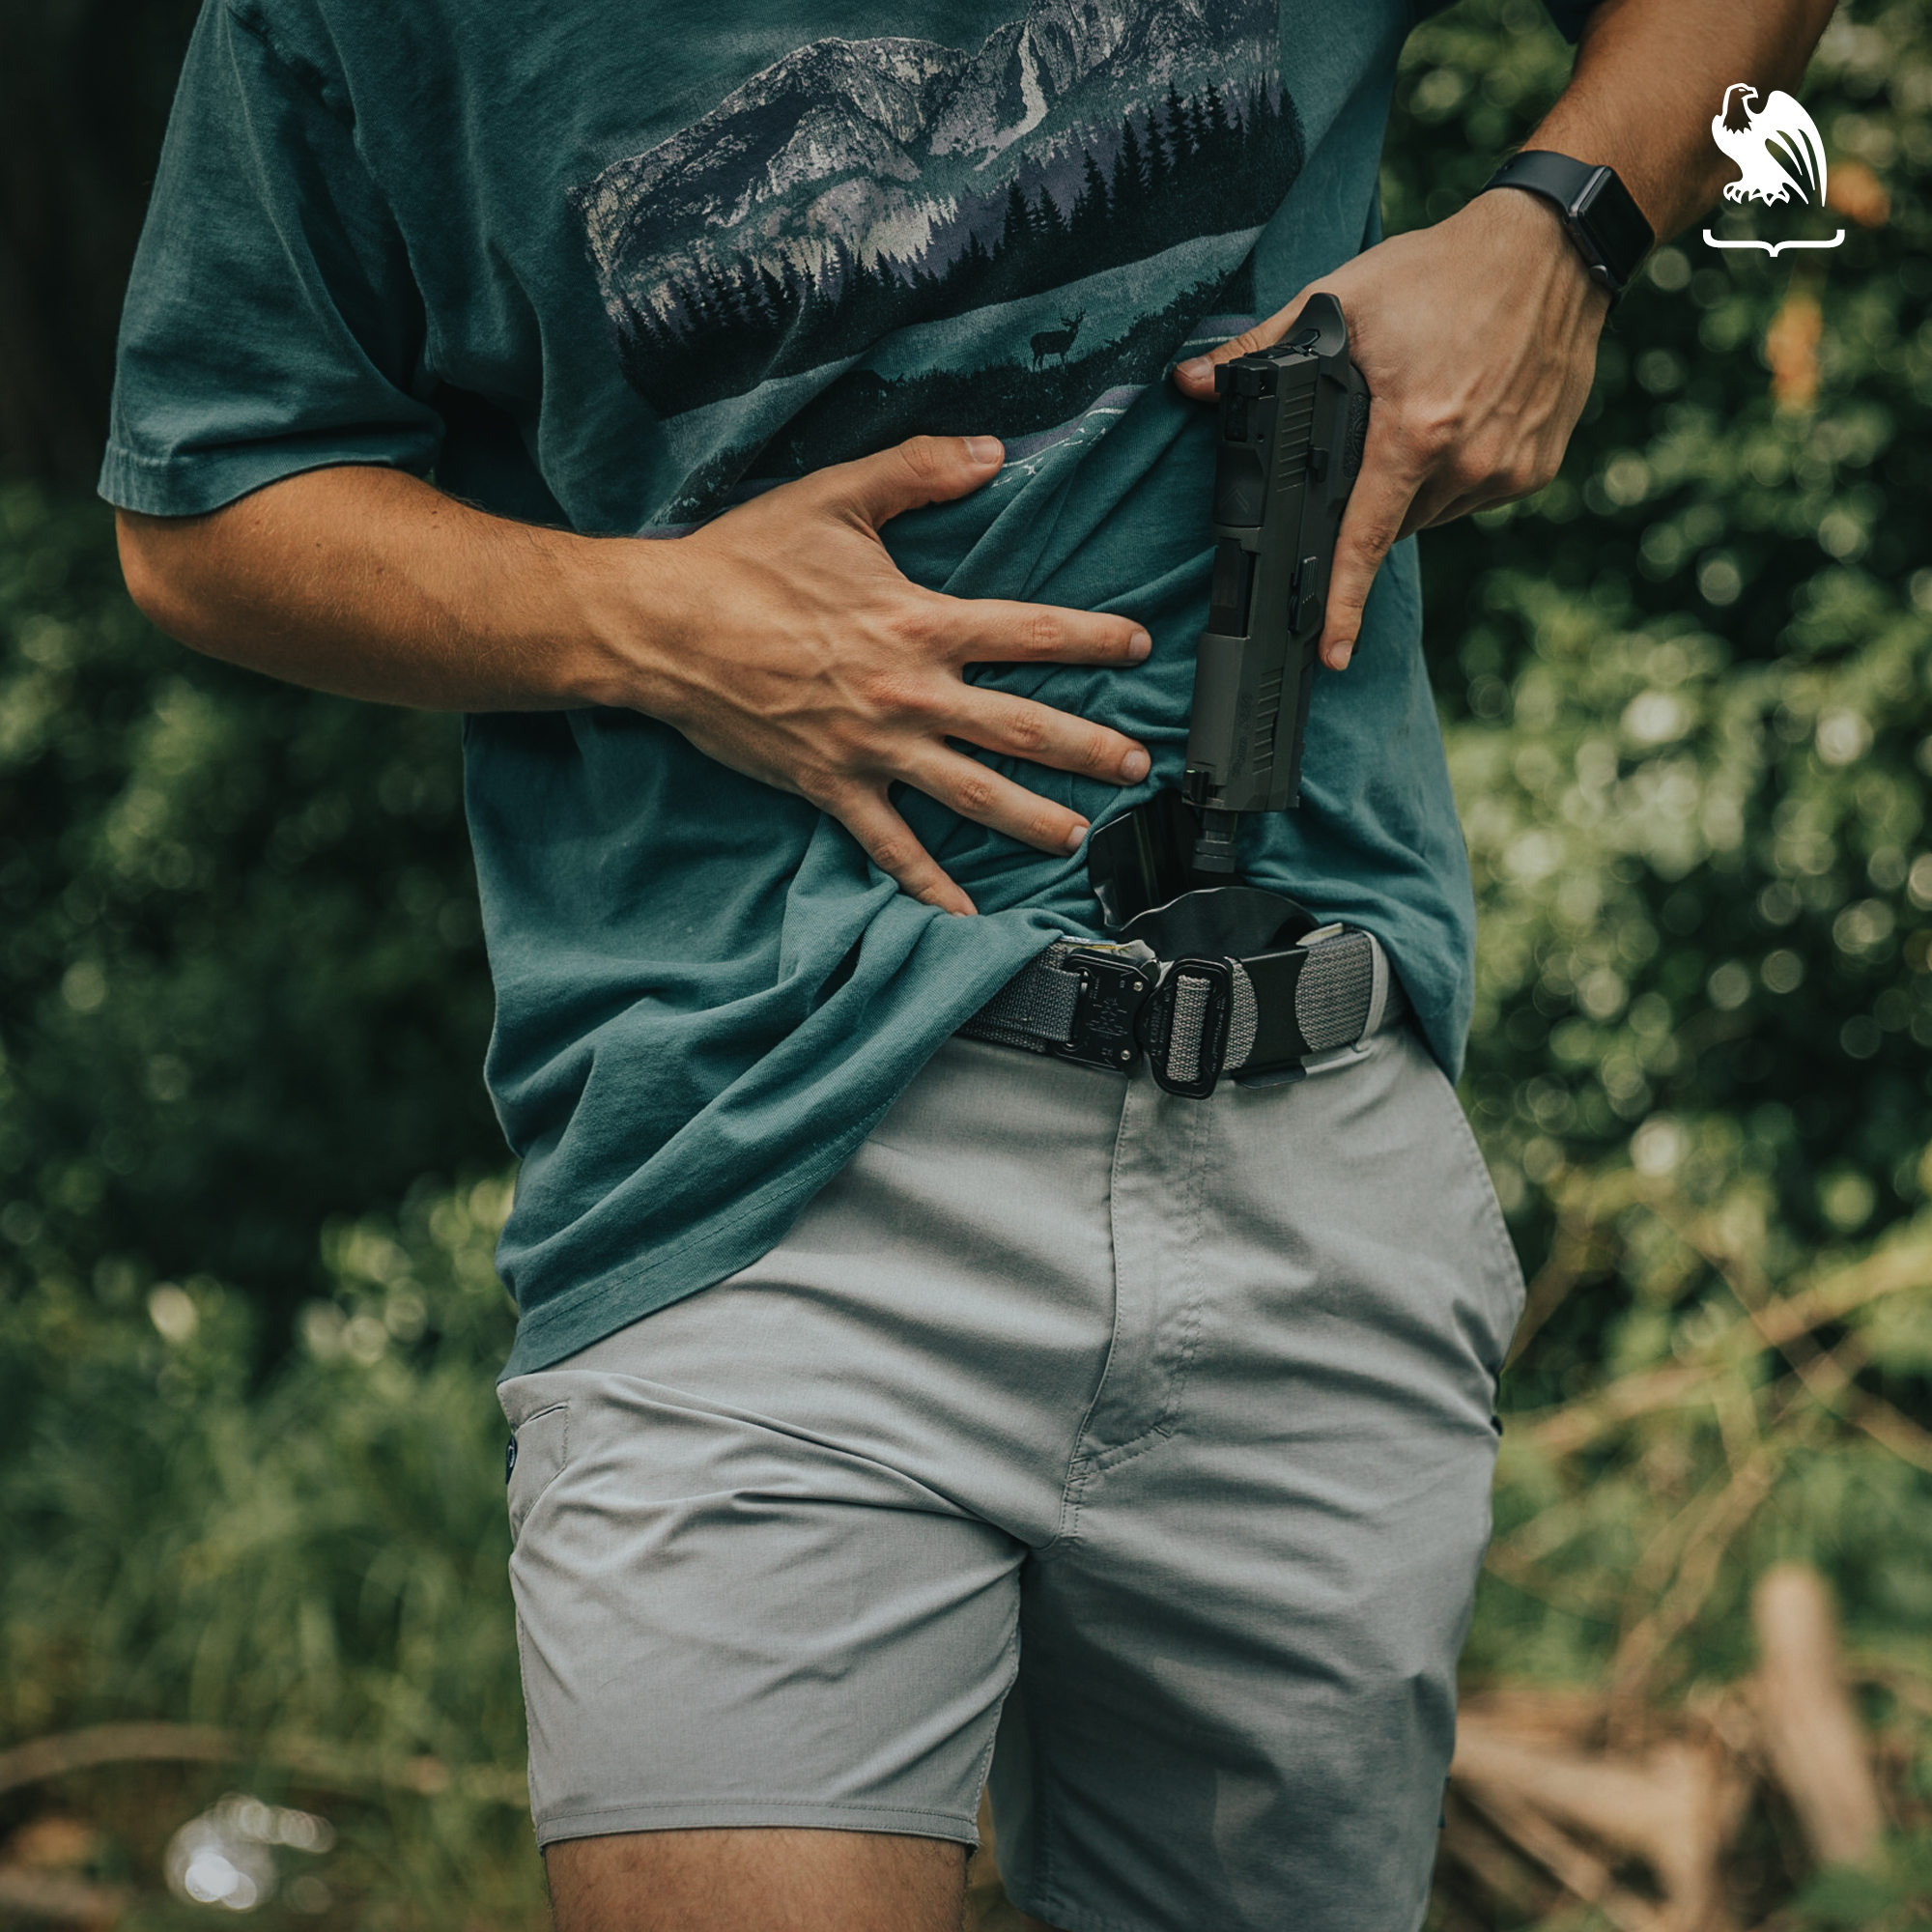
A concealable IWB holster, like the Vedder LightTuck™, is also surprisingly easy to conceal under a simple cotton T-shirt or tank top. If you prefer OWB carry, or your T-shirt just isn’t cutting it, a light, loose button-up shirt does wonders to conceal even larger pistols. Look for things like fishing shirts and Hawaiian shirts to wear either over a T-shirt or on their own.

When it comes to women’s concealed carry clothing for summer, skirts with belt loops are a great option. You can also easily conceal your gun under a loose-fitting shirt or wear a tighter shirt with a lightweight wrap or shawl-type garment to prevent printing. Any sort of shirt with an embellishment, like a knot, front tie, or another distracting style, also work well.

One of the best parts of summer fashion is that patterns and bright, distracting colors are everywhere (yet another reason Hawaiian shirts are great for CCW!). These patterns and bold colors work well to hide printing, no matter what shirt you wear.

Preventing Chaffing

Look, it’s nothing to be embarrassed about. Lots of people experience chaffing from their holster and firearm during the summer, and it’s one of the main reasons people decide to leave their weapon at home during warmer months.

If chafing has got you down, don’t worry. There are a few things you can do to help mitigate this uncomfortable situation. First, consider wearing an undershirt tucked into your pants to prevent contact between your body and carry system. If you live in a really hot and humid environment (ahem, Florida) and don’t want to wear an added layer, you can always try anti-chafing powders or rollers, which are quite effective.

Invest in a Good Gun Belt

Vedder Holsters Gun Belt

Few things reduce printing and make CCW more comfortable, like a quality gun belt. Whether you like tactical belts or stylish leather ones, a good gun belt is an easy way to make summer concealed carry a success. Unlike regular belts, EDC belts are designed to be thicker, stiffer, and more durable, preventing belt sag and reducing printing.

Use a Holster Claw

A holster claw is always a good idea and is especially useful in the summer. Holster claws are designed to reduce printing by pressing against your gun belt to draw the grip of your pistol closer to your body. You can order any Vedder LightTuck™ with an optional Holster Claw or buy one separately to add to an existing holster. It really does make a difference!

Carry Off Body

Off body carry is a bit of a controversial topic in the gun community, but sometimes it’s a good option if you’re struggling to conceal your weapon under summer clothing. If you are going to use this means of carry, it’s essential that you pair it with a proper holster. A pocket holster often works well for slipping into a purse or backpack.

Read more about the pros and cons of off body carry here.

Concealed Carrying While on Vacation

Ah, summer. The kids are out of school, the weather is warm, and the days are longer. It’s the ideal time to take that much-needed vacation. But how does concealed carry fit into your travel plans?

There are plenty of reasons why you might want to have your gun while on a trip. You’ll likely be around large groups of people and wandering into unfamiliar places, all of which warrant having a self-defense plan. But, with new places comes new rules, so how do you conceal carry while on vacation?

Concealed Carry While Driving

Holster in car

If you’re taking a road trip this summer, you’re probably wondering if you can have your gun in your vehicle with you. So long as you have a valid concealed carry permit, you can safely have a firearm in your car in most circumstances, though different rules may apply.

If you will be traveling through multiple states, it’s imperative to read up on their individual laws. Every state has different regulations when it comes to firearms, so you’ll want to make sure you’re complying with the laws where you’re going, even if you’re just passing through. You’ll also need to verify that the states you’re going to have a reciprocity agreement with the state where your carry permit is from so you don’t run into any issues.

You should also note that if you are pulled over, some states require you to disclose that you have a gun in the vehicle to the officer. Once again, read up on the laws in the states where you will be traveling before your trip so you can be prepared.

If you can bring your pistol, you’ll want to figure out how to carry comfortably while driving. You may want to consider a carry position that won’t be uncomfortable for long periods of sitting. Appendix and 4 o’clock carry are generally not recommended for driving as they tend to dig into your back or thigh after a while. Carrying strong side or cross draw works well in a vehicle as the gun sits out of the way on your hip.

You can always have your firearm off-body somewhere in your car, but if you choose to carry that way, be prepared to take it with you anytime you get out of the vehicle. You should also keep your vehicle locked while you’re fueling up so there’s no chance of someone walking away with your pistol.

Check out our article “Can You Concealed Carry While Driving?” for more tips.

Concealed Carry While Flying

We hope we don’t have to tell you that you can’t wear your gun on a plane (if you don’t know, TSA will be sure to inform you with a trip to airport jail). But you may not know that you can have a gun in your checked baggage, so long as you comply with certain rules.

The Transportation Security Administration (TSA) has a number of regulations that must be followed to check a firearm, including securing your unloaded gun in a hard-sided, locked container and checking in with airport security. Be sure to review all the rules before attempting to check a gun in your luggage.

As long as you follow the rules to the letter, you shouldn’t have any issues checking your firearm. You should be prepared to get to the airport a little early as the process does take additional time.

It’s also important to consider the city and state you will be flying into before bringing your gun. Like when taking a road trip, make sure to read up on the state’s individual laws and verify that your concealed carry permit is recognized there.

To learn more about concealed carrying while traveling by plane, check out our article here.

Other Factors to Consider

IWB (Inside the Waistband) carry Kydex Holster

Vacation Activities: Before you decide to travel with a gun, think about the activities you’ll be doing on your trip and where you will be staying.

If you’re planning a trip out here to Central Florida where you will be visiting one of our many theme parks, you won’t be able to take your weapon with you into the park and, therefore, may not want to bring it at all. On the other hand, if you’re taking a road trip to visit family, go camping, or visit some gun-friendly attractions, bringing your firearm should work out just fine.

Wherever you’re going, just be sure to check out local and state laws and think about the activities you will be participating in once you’re there. Many businesses and parks reserve the right to prohibit weapons in their establishment, so make sure you know the rules before you go.

Hotels: Another thing to consider when deciding whether or not to bring your gun on vacation is where you’re staying. If you’re staying with friends or family that you trust and are okay with you bringing your weapon into the house, then, by all means, bring your sidearm. It may be a different story if you’re staying in a hotel or rental home.

First, you must ensure the place where you will be staying doesn’t have any policies against firearms. Second, think about whether you will be able to take your gun with you when you leave your room. Whether or not you leave the “do not disturb” sign on your door, hotel staff have a key to your room and may access it at any time.

One way to help mitigate any potential issues is to bring a small travel gun safe to lock your weapon in while you leave. You can find lightweight, inexpensive options online.

Vehicle Rentals: If you’re planning to rent a car during your vacation, don’t just assume that you can have a gun in the vehicle. While many rental car agencies don’t have a specific policy against weapons in their cars, some do, so make sure you do your research beforehand.

Summary

With the right gun, holster, and clothing combo, concealed carry during warmer months doesn’t have to be difficult. When you’re learning how to conceal carry in the summer, consider the types of activities you will be participating in, the kinds of places you may visit, and the wardrobe you currently have.

If you’re looking for belts or holsters that are custom-made for your weapon of choice, we recommend visiting our Holsters by Gun Model page. For all of our belt and holster options and for more information to help you choose the carry system that works best for you, visit our Vedder Holsters website.

Looking for items beyond holsters and belts, check out our Resources Page for popular product links like lights, lasers, first aid, maintenance, and more.

*This page contains affiliate links. When you purchase a product included on this list, we receive a commission at no extra cost to you.

What Do Porcupines Eat? (Diet & Facts)

0

fPorcupines are rodents, and the name porcupine comes from Middle French porc espin, meaning “spined pig.”

There are two families of porcupines: Old World and New World porcupines. The old world porcupines are found in Africa, Asia, and South Europe, while the new world porcupines are found in North, Central, and South America.

This article provides a detailed explanation of what porcupines eat and where they live, among other things:

Facts About Porcupines

There are several interesting facts about porcupines. Here are some of them:

Habitat

Porcupines can be found in different locations depending on the species. For example, the North American porcupines live in coniferous and mixed forest habitats in Canada, Northern Mexico, and the North Eastern United States.

These animals are nocturnal and spend most of their time on trees. However, they will come down to the ground to look for food or during the winter season when there is little foliage on trees.

The Old World porcupines live in terrestrial regions such as deserts, hillsides, and woodlands. Some of these porcupines are excellent swimmers and climbers and spend most of their time in trees.

Characteristics

Porcupines are medium to large-sized animals. They have a round body with short legs and a long tail. The Old World porcupines are larger than the New World porcupines, with some weighing up to 77 pounds, while the North American porcupine is smaller, weighing between 12-35 pounds.

Porcupines have black or dark brown fur. The quills on their backs are stiff and sharp, and they use them for self-defense and to deter predators.

Reproduction

Porcupines are generally solitary animals. The male and female come together only during the breeding season between mid-summer and early fall to mate.

The gestation period for porcupines is about seven months, giving birth to one or two offspring at a time. The young ones are born with soft quills that harden after a few days.

The mother takes care of the young for about 18 months until they are ready to fend for themselves.

The Old World Porcupines VS. The New World Porcupines

In several ways, the old world porcupines(Family Hystricidae) are different from the new world porcupines(Family Erethizontidae). We discuss how the two porcupines differ below.

Old World Porcupines

Old world porcupine
Image Credit: Encyclopedia of Life

There are 11 species of old-world porcupines that are classified into eight genera. These porcupines are found in Africa, Asia, and Southern Europe.

The Old World porcupines have longer and thinner quills than the new world porcupines. The quills on their backs are used for self-defense and to deter predators. These porcupines are generally larger than the new world porcupines, with some weighing up to 77 pounds.

New World Porcupines

New world porcupine
Image Credit: Wikidata

There are 18 new world porcupines species classified into three genera. These porcupines are found in North America, Central, and South America.

The New World porcupines have shorter and thicker quills than the old world porcupines. The quills on their backs are also used for self-defense and to deter predators.

These porcupines are generally smaller than in the old world, with some weighing up to 35 pounds.

What Do Porcupines Eat?

Porcupines are herbivorous animals, and their diet consists of plants, fruits, and vegetables. They use their sharp incisors to bite off pieces of bark from trees. They also eat the leaves, stems, and roots of plants.

In the wild, porcupines eat just about anything they can find, including insects, rodents, and small reptiles. However, in captivity, their diet is much more regulated and consists mainly of plants and vegetables.

But while the diet of porcupines is general and may seem the same all through, they vary depending on the season and the types of porcupines. Here is a breakdown of what different porcupines eat:

  • North American Porcupines

The North American porcupine is a herbivorous animal, and its diet consists of plants, fruits, and vegetables such as apples, bananas, sweet potatoes, and carrots. They also eat the leaves, stems, and roots of plants.

  • Brazilian Porcupines

The Brazilian porcupine is omnivorous and will eat both plants and animals. Their diet consists of fruits, vegetables, insects, rodents, and small reptiles. They are expert climbers, which comes in handy when looking for food, allowing them to feed on a wide range of plants and small animals.

  • African Brush-tailed Porcupines

The brush-tailed porcupines are one of the largest in Africa and can weigh up to 77 pounds. They are nocturnal animals and spend most of their time on trees. The African brush tail porcupine is a herbivorous animal whose diet consists of plants, fruits, and vegetables. They are also known to feed on animal carcasses.

  • Asiatic Brush-tailed Porcupines

These porcupines are fairly small compared to other old-world porcupines but larger than the new world porcupines. They are primarily herbivorous and feed on fruits, grubs, and bamboo shoots. However, they can also feed on insects and scavenge on bones and hones.

  • Sumatran Porcupines

These porcupines occupy the Surmattan region, which is the island of Sumatra. They are the largest porcupines in Asia and can weigh up to 60 pounds. The Sumatran porcupine is a herbivorous animal, and its diet consists of plants, sugarcane, melons, and bean. However, they will also eat insects, and other animal remains to get sodium and potassium.

  • South African Porcupines

The South-African porcupines, or the Cape porcupines, are the largest of all the porcupines. They can weigh up to 110 pounds, and their quills can be up to 13 inches long. The South-African porcupine is a herbivorous animal, and its diet consists of plants, fruits, roots, bulbs, and vegetables. However, they will also eat carrions.

  • Mexican Dwarf Hairy Porcupines

The Mexican dwarf hairy porcupine is one of the smallest species of porcupines. They weigh between two to four pounds and are found in Mexico, Central America, and South America. The Mexican dwarf hairy porcupine is a herbivorous animal, and its diet consists of sweet potatoes, tree leaves, carrots, and bulbs.

  • Bristle-spined Porcupines

The bristle-spined porcupine is found in Central and South America. They are nocturnal animals and spend most of their time on trees. The bristle-spined porcupine is a herbivorous animal, and its diet consists of plants, fruits, vegetables, peanuts, and insects. However, their favorite diet is cocoa nuts, and they prefer to live in areas close to cocoa plantations.

  • Thick-spined Porcupines

The thick-spined porcupine is found in Africa and Indo-Malayan Asia. They are nocturnal animals and spend most of their time on trees. The thick-spined porcupine is a herbivorous animal, and its diet consists of plants, fruits, vegetables, and insects. However, they are not good climbers and prefer to eat fallen fruits.

Porcupines’ Diet During Seasons

Porcupines are mostly herbivorous animals, but there are some exceptions. Depending on the season, porcupines will change their diet to include more fruits and vegetables or meat.

In the winter, porcupines will eat more bark and twigs because they are looking for food that is high in calories. In the summer, porcupines will eat more fruits and vegetables because they are looking for food that is high in water content.

What Animals Kills Porcupines?

North American Porcupines
Image Credit: National Zoo

Other animals do not often kill porcupines, but there are some exceptions. This is because the quills on a porcupine can be up to 13 inches long and are very sharp, forming one of the best defenses in any animal.

One of the most common predators of porcupines is the African leopard. Other predators include the cheetah, lions, and hyenas. There have also been spotting of quills on foxes, wolves, wolverines, bobcats, fishers, lynxes, coyotes, owls, and even dogs.

Humans also kill porcupines for their meat and quills. Porcupine meat is considered a delicacy in some cultures, and the quills are used to make porcupine quill art.

Are Porcupines Good For Anything?

Porcupines have many benefits. They are a food source for many animals and provide nutrition to the animals that feed on them. Additionally, they have quills that are used to make porcupine quill art. Porcupines are also known to eat the ticks off of other animals, which helps to control the spread of Lyme disease.

Moreover, porcupines can help the forest ecosystem by eating the bark of trees. This helps to control the growth of trees and prevents forest fires. They also help in pruning trees which allows new growth. The best part is that they aren’t as problematic as other wild animals and aren’t predators.

Final Words

Porcupines are often misunderstood as dangerous because of their quills. However, they are gentle animals that mostly keep to themselves. They are interesting creatures with a surprising diet and many benefits to the ecosystem. They eat leaves, small insects, fruits, and vegetables depending on the season.

Clip-On Night Vision

0

In today’s high-tech world, the ability to see in the dark is no longer limited to the realm of science fiction. Night vision technology, once the exclusive domain of military and law enforcement, is now widely available for civilian use. Among the various night vision technologies, clip-on night vision devices have gained significant attention. They offer the unique advantage of converting a regular optical scope into a night vision device, ensuring a seamless transition from daylight to nighttime operations. This ease of use, combined with advanced technology, makes them an attractive choice for various applications, from wildlife observation to security surveillance. In the following sections, we delve into the technology behind these devices, the benefits they offer, and how to maintain them for optimal performance.

Night Vision Clip-On Systems: Technologies and Features

Modern advancements in technology have transformed night vision clip-on systems into invaluable tools for various applications. These devices are known for their unique ability to transform twilight into daylight, bringing clarity to the darkest environments. At the core of these instruments is a technology that amplifies ambient light, enhancing your vision in low-light conditions.

A typical clip on night vision scope incorporates an image intensifier tube, a protective casing, and mounting mechanisms. The image intensifier tube is the heart of the device, amplifying available light from sources like stars or moonlight. The protective casing is usually made from durable materials to withstand harsh conditions, while the mount ensures the device can be securely attached to an existing scope or optical system.

The functionality of these devices is further enhanced by features such as infrared illuminators, adjustable gain control, and automatic brightness control. The clip-on night vision scope attachment is another characteristic that stands out. It allows users to switch between standard vision and night vision without needing to re-zero or adjust their scope, offering an unparalleled level of versatility.

Benefits of Night Vision Clip-on

The benefits of using a night vision clip-on are indeed impressive, lending users a substantial edge in low-light conditions. Here are some key advantages summarized:

  1. Enhanced Visibility. The foremost benefit is the ability to see clearly in low-light conditions. This makes night vision clip-ons ideal for activities such as hunting, wildlife observation, and security surveillance.
  2. Compatibility. Clip-on systems are designed to work with existing optical equipment. This means there is no need to invest in an entirely new scope or sighting system. The clip on night vision attaches directly to your existing setup, allowing you to maintain your optical preferences and shooting style, now with the added benefit of night vision.
  3. Ease of Operation. The user-friendliness of these devices is another significant benefit. The simplicity of clipping the device onto your existing scope, coupled with intuitive controls, makes these systems user-friendly. This ease of operation is a considerable advantage, making night vision technology accessible even to beginners.
  4. Versatility. The clip-on systems are versatile, suitable for a range of applications from recreational to professional. Whether you’re a wildlife enthusiast looking to observe nocturnal animals or a security professional requiring enhanced visibility, these devices cater to a broad spectrum of needs.
  5. Cost-Effective. Considering the advanced technology they house, these devices offer a cost-effective solution for night vision. By transforming your existing optical scope into a night vision device, you avoid the cost of purchasing a separate night vision scope.

In sum, the benefits of night vision clip-ons are varied and significant, making them an invaluable tool for anyone operating in low-light conditions.

Maintenance of Night Vision Clip-On Systems

To keep your night vision clip-on functioning at its best, routine maintenance is necessary. This involves cleaning the lenses with a soft cloth and a suitable cleaning solution, ensuring the device is stored in a dry and dust-free environment, and checking the device for any signs of damage or wear. It’s also important to remember that, despite their advanced technology, these devices should not be exposed to bright light when turned on, as this can damage the internal components. Therefore, always remember to turn off your clip-on device when you’re in a well-lit environment.

In conclusion, the clip-on night vision systems offer a game-changing solution for low-light environments. Their unique blend of technology, convenience, and versatility sets them apart from other night vision devices, making them a worthy investment for anyone seeking to enhance their nocturnal adventures or operations.

Tested: AccuBow Training Device for 3D Archers and Bowhunters

0

The muscles we use to draw a bow are used few other times in life. This product excels at working those, ultimately building them up so you can either increase draw weight or pull your current poundage with more ease. (Josh Honeycutt photo)

Being a good archer is all about consistent form, which requires muscle memory. And to build muscle memory, you need repetition through practice. Trouble is, it’s not always convenient to set up a target and shoot arrows.

Enter AccuBow, the first augmented reality archery training device, no arrows required. I tested it, and here is the lowdown.

Product Specs

Bow junkies love specs, so here’s what you need to know about the AccuBow:

  • Bow weight: 4.2 pounds
  • Draw length: 21-34 inches
  • Draw weight: 10-70 pounds (with 6.5 rotation dial revolutions)
  • Axle-to-axle length: 32.25 inches
  • MSRP: $169.99 (AccuBow only) / $224 (phone mount and warranty included)

Personally, I like that this bow feels real. At a little over 4 pounds and 32 inches axle to axle, it’s the same size as a modern hunting bow, with a pragmatic shape and style. It isn’t going to feel like your new Mathews Vertix, but it’s designed to be as realistic as possible, which makes practicing with it more effective.

Gear Included

  • The main unit
  • D-loop attachment for your release aid
  • Dry-fire dampening rod
  • Hand grip (like most modern, ergonomic grips)
  • Laser sight (not legal for real bowhunting, mind you)
  • Level bubble
  • Resistance band (bow string)
  • Resistance dial (bow cam)
  • Stabilizer port (accepts real stabilizers)
  • Phone mount accessory (fits most smart phones)
  • AccuBow app (digital download)

There are other (non-AccuBow) apps that seem to be the right one in the App Store and Google Play, but are actually wrong. The correct one is shown above. (AccuBow photo)
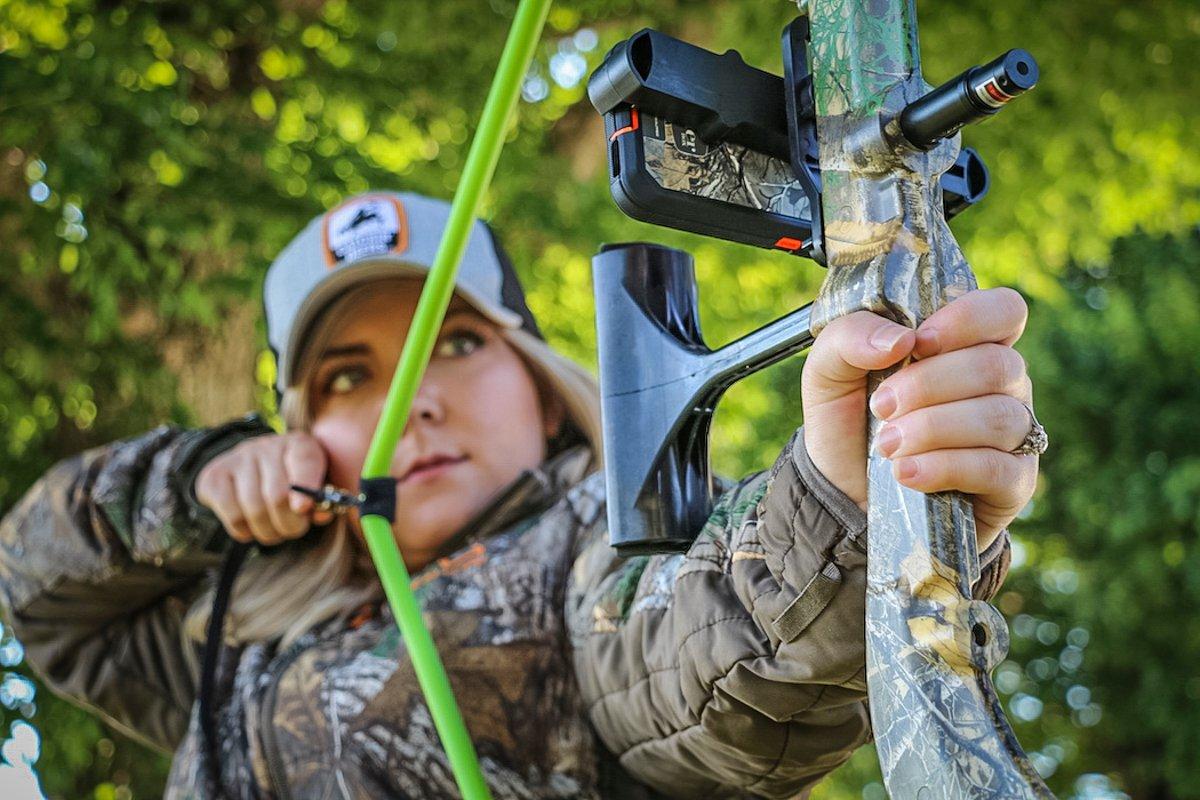
The available phone mount accessory is for virtual archery practice. It’s easy to install. The bracket rests at a 45-degree angle, meaning the phone will be horizontal during use. You may have to remove some phones — such as the iPhone plus models — from the case for them to fit. But in most cases, that OtterBox case in Realtree EDGE will look pretty as you shoot digital bucks, buffs and bushytails.

Key Features

Augmented reality is a key feature of the AccuBow, and it adds a little spice to the practice regimen. I really enjoyed it. It allows you to practice virtual bowhunting, target archery and more with an incorporated scoring system so you can compete with yourself, and track your performance over time. I think this is a key feature that’s especially important for youth and new bowhunters.

The practice modes include:

  • Bowhunting
  • Bowfishing
  • Bow sight customization
  • Olympic target shooting
  • Moving target

The hunting modes have a variety of real-life challenges that include elements like wind direction, wind speed, big deer and more. They make the practice realistic, and even introduce a touch of adrenaline. If you choose to use your phone and phone mount, download the AccuBow app, available on the iPhone App Store and Google Play for Android phones. It’s user-friendly.

Special Considerations/Takeaways

Keep the following in mind if you decide to purchase an AccuBow:

  1. Laser activation: Unscrew the laser assembly from the AccuBow. Remove its battery cover, and then pull the battery isolator tab. Replace the cover and reinstall to activate the laser.
  2. Phone mount: In some cases, this is sold separately. Check to see if the phone mount is included before purchasing. This phone mount expands to secure most iPhone and Android models.
  3. Adjustments, maintenance and repair: Be very careful anytime you’re working with the inner components. Handle the resistance dial with care.

The AccuBow is decidedly appropriate for those who suffer from target panic. It improves your focus and form and reduces the anticipation that comes with firing arrows. (Josh Honeycutt photo)

Test Conclusion: AccuBow Solves Problems

Everyone has different improvement goals. While this product is more limited in teaching proper draw form, grip and stance (without third-party instruction), it shines at teaching and reinforcing other valuable archery skills including focus, holding form, stamina, stability and strength. The laser pointer training technique helps you to see whether or not you’re aiming properly. It is a great tool for shooters with target panic, as it improves your focus and form, but reduces the anticipation that comes from firing arrows.

Repetition is the key to archery practice, and the AccuBow works indoors or outdoors, day or night. I tested it inside and it worked just fine. I didn’t even annoy my wife during the process. In fact, she tried it out for herself and put her own stamp of approval on it.

This product impressed me most in the strength-building department, though. The muscles we use to draw a bow are specialized, and the AccuBow excels at working those, ultimately building them up so you can either increase draw weight or pull your current poundage with more ease. I noticed a small strength increase during the short test period.

Adjustability makes the AccuBow versatile and great for most age groups. Go to AccuBow.com for more information. Click here for tutorials and instructional videos.

Don’t Miss: Tested: Midway USA Stealth Clothing Line

Check out more stories, videos and educational how-to’s on bowhunting.

Follow us on Facebook.

PSA Dagger Review – GLOCK 19 Comparison

0

8K

An Affordable Alternative to the Glock?

Palmetto State Armory’s PSA Dagger is getting a lot of attention because it is a GLOCK-style pistol chambered for the exceptionally popular 9mm cartridge. TLDR: The results were better than expected!

It’s probably safe to assume the AR-15 has claimed the title of “America’s Rifle.” As for pistols, the 1911 Government Model was – and possibly still is – the American champ. But given the undiminished popularity of the Austrian borne GLOCK, even in the USA, it can’t lag far behind. And imitation being the sincerest form of flattery, a growing list of polymer clones only narrows whatever gap exists.

Some are higher end versions sold for greater costs. But, apparently, another way to move a knockoff is to market it for less money. This is my review of such a pistol, Palmetto State Armory’s Dagger. Priced less than a GLOCK 19 but bearing a strong resemblance, the question begging for an answer is: How does the PSA Dagger perform?

The PSA Dagger Introduction

Produced by Palmetto State Armory – a firm known for AR-15s (see our article on building a low-cost AR-15 with Palmetto State Armory) – this polymer pistol was introduced during 2020. Since then, the Dagger has gone through several iterations. Supposedly, it’s been debugged along the way (a fairly common evolutionary practice). Based on a 9mm GLOCK 19 Gen-3, the Dagger bears a strong resemblance that extends to the internals but it’s not an identical clone. It will, however, fit inside a Glock 19 holster. More on that in a moment.

Another big difference is cost. The basic Dagger lists for around $300, a couple hundred bucks less than the GLOCK.

The 9mm Dagger Compact I received sported a flat dark earth finish. Its slide was protected by Cerakote that blended nicely with the polymer frame. Sold as a package, it was handed to me in a well-made color-coordinated soft-case – containing ten magazines! Surprised by the bubble-packed windfall, I checked the Palmetto State Armory website.

Low and behold, the same magazine rich package appeared for under $400. Upon viewing it initially, my first thought was “Prepper Kit.”

PSA Dagger Compact Specifications:

  • Capacity is 15 +1.
  • Unloaded with an empty magazine, it weighed 23 ounces on my scale.
  • Fully loaded with 16 rounds (124 grain bullets) it weighed 29.8 ounces.
  • The barrel measured 3.875 inches.
  • Overall length was 7-inches and at its thickest point, the grip, it measured 1.25-inches.

GLOCK 19 Similarities:

  • The Dagger uses the same magazines as a GLOCK 19.
  • The ten packed with the Dagger were PMAGS.
  • Supposedly most of its other parts will also interchange with a G-19, to include its frame, slide and barrel.
  • The Dagger disassembles per the GLOCK process.

Dagger Review – GLOCK Comparison

Continuing the comparison to the GLOCK 19, I reviewed the PSA Dagger through that lens.

Dagger Disassembly

Basic disassembly – or field stripping – is relatively simple.

  1. Verify the pistol is completely unloaded, to include removal of the magazine.
  2. Pull the trigger (dry-fire).
  3. Retract the slide around ¼”, and two opposing tabs in the frame are pulled downward.
  4. The entire slide assembly can now be drawn forward off the frame for removal of the guide rod and the barrel.

Because it’s a simple process, it encourages ongoing maintenance.

Reassembly is in reverse order. It’s also simpler since fiddling with the small takedown tabs is unnecessary. Still, my first couple attempts with the Dagger resulted in some minor alignment hassles. But once I got the hang of it, the slide assembly slipped on to the frame without further difficulties.

A cautionary disassembly reminder that shouldn’t be necessary – but is. Perform the “completely unloaded” step at least twice (I’ve seen this go to hell). Also, isolate the firearm from any live ammo. Better to be safe than sorry!

More Comparisons to the GLOCK 19

Following the design of a GLOCK, the Dagger’s polymer frame houses steel rail-inserts held in place by pins. However the latter’s forward locking-block insert is longer. Sans interchangeable grip inserts, the serial-numbered polymer shell features aggressive but not-irritating textured panels, a high-cut trigger guard, and a GLOCK-type accessory rail. Also, the bottom of its mag well incorporates relief cuts, useful for the removal of recalcitrant magazines. But the slide-stop and mag catch are non-reversible.

Although it was finished in flat dark earth, the slide is stainless steel, and has fore and aft cocking serrations. Touted as a “Carry Cut” design, its front and rear edges are “smoother” for snag-free draws.

The sights are mounted per a GLOCK, opening the door to a plethora of aftermarket options. The Dagger I received had a standard slide, but an optics-ready version is offered, machined to locate a miniaturized red dot ahead of the rear sight.

The barrel, also stainless, is rifled with six conventional lands and grooves (more suitable for lead bullets). Near as I can determine, it’s rifled 1:10 – the same twist today’s bullet manufacturers use to test expanding projectiles. The muzzle sits flush with the slide, and has a cleanly cut recessed face, similar to the 11-degree crown seen on many HB rifles.

Like a GLOCK, the Dagger’s recoil spring is captive, but its guide rod is stainless steel.

The front and rear sights are steel (instead of plastic). The set on this PSA Dagger were fixed three-dots, and the rear was shaped to permit single-handed slide racks. It’s also drift-adjustable for windage.

One obvious departure was the trigger which differs from a GLOCK. Instead of a separate blade, PSA went with an articulated version similar to an S&W M&P. To me it was completely familiar. If it’s not your cup of tea, supposedly, it can be swapped out for one of many GLOCK versions. I didn’t try this.

The magazine release appeared to have an ample pad, but didn’t want to let go – at least, not without exaggerated efforts. It was a real bear for me and a couple others who tried it.

On a positive note, the Dagger’s fit and finish were better than expected. Play between the slide and frame was minimal in battery and the barrel was a tight fit. In theory, at least, it should shoot. Before hitting the range to find out, I gave it a cursory cleaning and lube to begin with a “clean” slate.

Range Results

December’s range conditions hovered in the low 30s but the day was calm and overcast, ideal for a meaningful accuracy assessment. No snow either, helpful for the recovery and inspection of fired cases. I started out by loading three magazines with five rounds each, to check for function while allowing the Dagger’s parts to “settle in.”

All shooting occurred from a “ready” position. The loads are listed in their firing orders.

9mm Speer 124-grain Lawman TMJ

Speer’s FMJ-type “Total Metal Jacket” is a cut above many so-called Q-loads. It’s performed very well for me in a number of 9mm pistols. Initial five-shot groups on 15-yard steel silhouettes were encouraging, and function was 100 %. The ejection pattern was consistent, and the recovered cases appeared normal.

The slide locked open as designed on the last shot, and each magazine popped free – once the release was fully depressed. This turned out to be an even greater challenge due to the chilly weather.

Full magazines came next BUT loading them with a full 15-rounds turned into a real battle! The last couple were nigh-impossible, and my seldom-used loading device didn’t fit. But perseverance finally triumphed and the final few rounds could be easily stripped out through a push of the thumb.

They chambered normally, too. Satisfied with the Dagger’s function, I zeroed back in on a trio of repainted 15-yard silhouettes and fired a 10-shot group on each, offhand (using both hands). A good omen: Tight clusters developed directly above the sights, each of which measured around two inches.

The 25-yard accuracy tests were shot on cardboard targets, off sandbags, to capture the results. Three 5-shot groups with the same TMJs produced consistent results averaging less than 2 ½-inches – better than many pistols costing two or three times as much! And once again, the groups were close to the sights.

9mm Speer 124-grain Gold Dot JHPs

The next load up, Speer’s nickel-plated defensive offering is another high-confidence round. From the Dagger, it produced similar downrange results and functioned without issues. The ejection pattern was also consistent, and the fired cases showed no signs of problems.

9mm Federal 135-grain HYDRA-SHOK JHP “Low Recoil”

The last load tested, results were on par with the other loads and free of negative surprises. As for recoil, there may have been less. But, overall, the Dagger was completely manageable.

Hits & Misses

I wrapped up the Dagger’s range session by shooting it from various angles with Speer TMJs, some of which were fired exclusively with my support (left) hand. The pistol ran without a hitch, and, across the board, accuracy was better than expected.

The trigger behaved similarly to many other striker-fired designs. It combined a distinct reset with a consistent pull (the above listed 6 ¼ lb. weight was recorded after the range session).

My only real gripe was the magazine release. As a full-time range rat, I’ve had the opportunity to play with lots of different pistols. A few had fiddly mag releases, but this one was in a league all its own.

The oft-taught partial flip failed to remedy this issue, which is apparently hit or miss. I think it’s more a matter of the shooter’s hand size relative to the grip design. For those that encounter the problem, a possible fix is an aftermarket GLOCK release.

Not a fault of the pistol, but fully loading the PMAGS with 15 rounds was a battle (my frame of reference includes sub-gun mags). The process became easier once they’d been loaded for a few days, but I’d spring for a loading device – or different mags.

As for handling, I’m more of an S&W M&P guy. Typically, a standard GLOCK indexes muzzle-up. But, despite the absence of interchangeable grip inserts, the Dagger was more of a natural pointer for me.

Another huge plus: It shot to its sights. Speaking of which, more options are available there to include night sights, etc.

The Dagger will no doubt fit some unmolded GLOCK 19 designs. It fit two different GLOCK 19 holsters that came from Falco Holsters.

Lights and Lasers

I slipped a small QD Olight PL Mini 2 Valkyrie on the Dagger’s accessory rail, using its supplied GLOCK adapter. It locked securely in place and was a nice match for the pistol.

The Dagger does lack a loaded chamber indicator, but nickel-plated cartridges were visible in the small gap adjacent to its extractor. As a “two-fer” they also provide a useful means to differentiate defensive and practice loads.

Parting Shots

A post-shooting examination (and cleaning session) indicated no obvious problems. Then again, in total, I only fired around 200 rounds – far from a comprehensive test. However, the Dagger does come with a lifetime warranty. Is the Dagger worth it? Maybe…

The original 9mm GLOCK-17 gained rapid acceptance among law enforcement agencies and civilians. The compact 15 +1 G-19 was a logical progression. Decades later, both remain polymer gold standards regarding reliability and durability. Most GLOCK devotees will have little reason to switch, but not everyone is wedded to this brand.

Also, some shoot infrequently at best, and money is often a concern. Further rationale for the purchase of a Dagger? Maybe for use as a squirreled-away spare, or even a home defense gun. Tricked-out higher end pistols can invoke litigious perils and, the expense of a competent attorney aside, a firearm used for such purposes will likely do time in an evidence locker.

Further rationale? Returning to the Prepper Kit thought, I dragged out a 9mm Windham Weaponry AR-15 carbine, configured to run on GLOCK-17 magazines. Both the 15-shot Dagger Compact and “pistol caliber carbine” functioned with magazines of either design – a reassuring footnote, given the ten PMAGS that came with the pistol.

In closing, unlike the AR-15, like a GLOCK, the PSA Dagger has no frame-mounted safety lever. However, the” safe action” system (and its variants) is safe enough – if supported by proper training. That, and adherence to Rule #3 which stipulates strict finger-off-trigger discipline.

For more about this system and other handguns of all kinds, see my book Handguns: A Buyer’s and Shooter’s Guide.

B&C World's Record – Non-typical Sitka Blacktail

0

In 1987, at 4 a.m. on a foggy August morning in southeast Alaska, William B. Steele had a decision to make: continue driving for 20 miles on gravel roads to reach his Sitka blacktail deer hunting area, or turn around? He’d chosen a large unnamed mountain to hunt, but the closer he got, the thicker the fog became.

When he reached the mountain he decided to hunt. But the weather was so bad, he almost turned around several times during a mile-long hike to the top of a 1,500-foot ridge. An hour later Steele reached a pass on the ridge, and as he picked his way through the fog he inadvertently jumped a few deer. Frustrated, he wondered why he was even there.

Overlooking a large bowl, Steele decided to take a break and glass for animals. As he ate a sandwich, he noticed a group of Sitka blacktails (Odocoileus hemionus sitkensis) 1,200 yards away, across the valley in a muskeg. Through the fog and mist, Steele got a glance at what looked to be a heavy-antlered deer. He decided to work his way across the bowl and try to get closer. He made a mental note of where the deer stood, took a compass bearing, and headed through the brush.

The wind was light and swirling, but mostly in his face as he started to creep through the timber toward the spot where he’d marked the deer. Eventually, he ran out of cover and had to proceed across an open muskeg toward the next stand of trees.

Suddenly, in the wide open, Steele spotted two of the largest bucks he’d ever seen, feeding through the trees, just 125 feet away. They were moving to his right when he noticed a stiff-legged doe to his left. Busted, he froze. The doe knew something was wrong, but couldn’t determine the threat. Out of the corners of his eyes Steele glanced at the bucks. One had fed nearly into view.

Knowing time was running out, Steele slowly raised his .30-06 and leaned to the right as far as he could without tipping over. He could see most of the buck past the tree so he put the crosshairs on its shoulder and squeezed the trigger. The buck jumped and then raced out of sight through the muskeg. It piled up no more than 150 feet away from Steele.

Steele packed out the animal and was on his way home when a dump truck driver behind him signaled him to pull over. The driver got out and told him he had shot a deer the week before that measured in the 125-point class, and he thought that Steele’s looked to be as big. After the velvet was removed and the trophy dried, it was officially scored at 126-2/8 points.

Editor’s Note: When William B. Steele’s Sitka blacktail was originally measured, it was scored as a typical because there was no non-typical category. When the non-typical Sitka blacktail category was created at the beginning of the Boone and Crockett Club’s 25th Awards Period, the score on Steele’s great trophy was changed to 134 points. It now stands as the largest Sitka blacktail ever recorded.

Kansas Deer Season 2024-2024: A Hunter’s Guide to Kansas Deer Hunting!

0

In Kansas, deer hunting is a well-liked tradition. Kansas Deer Season 2024-2024 has plenty of opportunity for hunters to capture deer across multiple seasons and with various sorts of equipment. To help you have a great season, this guide includes important information about Kansas deer hunting dates, laws, licensing requirements, bag restrictions, and more.

Kansas Deer Hunting Season Dates

From early September through January, Kansas offers specialized deer seasons for a variety of hunting equipment. The suggested dates for Kansas’s deer seasons in 2024 and 2024 are as follows:

KS Deer SeasonDatesDescription Youth and Disability SeasonSeptember 2 – September 10, 2024Early season for youth under 18 and hunters with disabilities to deer hunt with a permit. Muzzleloader SeasonSeptember 11 – September 24, 2024Deer may be taken with muzzleloader or archery equipment during this period. Archery SeasonSeptember 11 – December 31, 2024Bowhunting for deer is open for the longest duration of any season. Pre-Rut Firearm Whitetail Antlerless-OnlyOctober 7 – October 9, 2024Brief firearm season for harvesting antlerless deer. Regular Firearm SeasonNovember 29 – December 10, 2024General firearm deer hunting season in Kansas. Extended Firearm Whitetail Antlerless-Only – 1st SegmentJanuary 1 – January 7, 2024 (Units 6, 8, 9, 10, 17)Additional antlerless deer harvest after the regular season in specific units. Extended Firearm Whitetail Antlerless-Only – 2nd SegmentJanuary 1 – January 14, 2024 (Units 1, 2, 3, 4, 5, 7, 11, 14, 16)Additional antlerless deer harvest after the regular season in specific units. Extended Firearm Whitetail Antlerless-Only – 3rd SegmentJanuary 1 – January 21, 2024 (Units 10A, 12, 13, 15, 19)Additional antlerless deer harvest after the regular season in specific units. Extended Archery Whitetail Antlerless-OnlyJanuary 22 – January 31, 2024 (Unit 19 only)Extra whitetail does can be taken in Unit 19 with archery gear. Fort Riley Military Base SeasonCheck specific datesSeparate deer season for permit holders at Fort Riley military base. Fort Leavenworth Military Base SeasonCheck specific datesSeparate deer season for permit holders at Fort Leavenworth military base.

Kansas Deer Hunting Regulations

Regulations governing license, hunter education, corpse tagging, and general hunting guidelines apply to deer hunting in Kansas. Here are several important rules:

  • Both local and nonresident hunters need the appropriate licenses. There are special, reduced licenses available.
  • Anyone born after July 1, 1957, must possess a Hunter education certification.
  • Private lands need written authorization. Public road hunting is governed by unique restrictions.
  • Game regulations include issues including gifting or selling meat, using a car or drone, or making an electronic call.
  • It is necessary to properly tag deer corpses and keep the tag on them until the meat is prepared.
  • To avoid wasting game, hunters must make an attempt to recover fallen deer.
  • Seasonal requirements dictate the sort of equipment to be utilized.
  • During the seasons for muzzleloaders and firearms, orange attire is needed.
  • Officers have the right to examine licenses, tools, and harvested game.

For complete information on permitted deer hunting in Kansas, always refer to the summary of the Kansas Department of Wildlife and Parks rules.

Kansas Deer Bag Limits

Depending on the kind of permission you have, you may harvest a certain number of deer:

Permit TypeDeer Bag LimitDescription Resident Firearm (either species/sex)One deer of any kindResident hunters using a firearm may harvest one deer of any kind. Nonresident FirearmOne antlered and one antlerless whitetail deerNonresident hunters using a firearm may harvest one antlered and one antlerless whitetail deer. MuzzleloaderOne deer of any kindHunters with a muzzleloader permit can harvest one deer of any kind. ArcheryOne deer of any kindArchery permit holders may harvest one deer of any kind. Antlerless (any type)One antlerless deer of any speciesPermit holders can harvest one antlerless deer of any species. Property Owner/MaintainerOne deer of any kindPermit allows hunting one deer of any kind on properly owned or maintained property. Antlerless (does or fawns without antler protrusions)Check unit limitsOnly does or fawns without antler protrusions are eligible for antlerless licenses. Be sure to check the unit limits specified on your permit.

Note that only does or fawns lacking antler protrusions are eligible for antlerless licenses. Check the unit limits on your permit as well.

Kansas Deer Hunting Licenses

In order to lawfully shoot deer in Kansas, you must have the appropriate hunting license in addition to the necessary season permits:

  • Kansas citizens must have a resident hunting license in order to hunt small game and waterfowl statewide, unless they are excluded.
  • For non-residents 16 years of age and older without exceptions, a hunting license is necessary. more restrictions than resident licenses.
  • For people ages 16 and above who have not yet finished hunter instruction, an apprentice hunting license is available.
  • License at a lower cost for Kansas citizens 15 years of age or younger.
  • Senior persons, handicapped veterans, and active military members may be eligible for special licenses.
  • Licenses: In addition to a regular hunting license, the proper deer licenses must be acquired.

Annual Hunting License

Residents: Unless exempted by Kansas law, all resident hunters between the ages of 16 and 74 must possess a resident hunting license.

Nonresidents: No matter their age, nonresident hunters must get a nonresident hunting license.

Fee: The data given does not specifically specify the costs associated with hunting permits for residents and non-residents.

Preference Points

Resident: A resident hunter who chooses not to participate in the current season may pay $12.50 for a preference point that will be used in a future drawing for a firearm-either-species, either-sex deer permit.

Non-resident: A non-resident hunter who wishes to forego the current season may buy a preference point that will be used in a future drawing for a white-tailed deer ticket.

Mule Deer Stamp Fee

Price: $152.50 (plus the above-mentioned nonresident white-tailed deer permit price).

An application for the Mule Deer Stamp must be submitted by a nonresident during the April application period. The applicant’s White-tailed Deer Archery or Muzzleloader Permit becomes an Either-species/Either-sex Archery or Muzzleloader Permit if it is pulled. There is no preference point system for this Mule Deer Stamp draw. If unsuccessful, the hunter will be given the permit for the successful draw unit for white-tailed deer taken with an arrow or muzzleloader.

Where to Hunt Deer in Kansas

Deer hunting is permitted on a lot of public property in Kansas:

Walk-in Hunting Access areas: The WIHA program is active on more than a million acres of private property. need a permission.

Wildlife Management Areas: Nearly 400 WMAs, ranging in size from 40 to over 10,000 acres, are designated as wildlife management areas.

State Parks: Some state parks allow limited deer shooting, although there are limits.

Federal areas: When the season is right, hunting is permitted on federal lands such as national wildlife refuges, Army Corps lakes, and national forests.

Particularly for non-resident hunters, public areas provide good possibilities for deer hunting. Make careful to investigate several regions to identify those with thriving deer populations.

Field Dressing and Processing Deer

It’s crucial to field dress harvested deer properly:

  • Use latex gloves and handle brain and spinal tissue as little as possible.
  • Covering meat and washing your equipment in vinegar water will keep them clean.
  • Quickly calm down the deer and steer clear of dragging in mud or debris.
  • Before your hunt, understand the right field dressing methods by watching video lessons.

Many hunters do their own venison processing. Some people butcher deer at meat processors. Treat all meat with hygiene. Deer meat may be used in a variety of dishes by grinding it or creating jerky out of it.

Apply for Your Kansas Deer Permit

Applications start in April! Most deer licenses in Kansas must be applied for by both citizens and non-residents.

  • The application deadline for muzzleloader and weapon licenses is June 9, 2024.
  • Applications for whitetail firearms from non-residents cost $25.
  • After the draw, unused permits could be distributed on a first-come, first-served basis.
  • Through October 1, 2024, archery licenses may be acquired over the counter.
  • If the quota allows, antlerless permits are limitless after the draw.
  • Create an account and submit your deer permit applications online at https://www.kshuntfishcamp.com. So that you don’t miss out, mark your calendar.

Your Kansas deer hunt will be successful if you do your homework and are aware of the rules, hunting seasons, and permit requirements. For a successful deer season in 2024-2024, use this information. For complete information and legal requirements, contact the Kansas Department of Wildlife and Parks.

Happy hunting!

Frequently Asked Questions

Five Rules for Recovering Liver-Shot Deer

0

blood trail qdma

I settled into my stand with favorable weather conditions and plenty of optimism for an early season September bowhunt in the rolling hills of Eastern Ohio.

As the sun dipped below the horizon, I heard a branch crack to the right and behind me. It was a buck sporting a symmetrical 8-point frame, most likely a 2½- or 3½-year-old. I was in college at the time and still a bowhunting novice, and this would be the largest buck I’d ever taken with a bow. He walked past my setup at 5 yards. I drew and made the rookie mistake of aiming with my arms and not my body. When a deer is that close to your stand and you are at full draw, bend at the waist to keep your anchor point consistent.

Lesson learned.

I shot high, and the deer bounded 15 yards away, uncertain what had just whizzed right over his spine. His confusion bought me enough time to nock another arrow, draw and shoot. The second shot hit the deer in what looked like the middle of his frame. On impact, his rear legs kicked backward and up like a bronco. He bolted as I sat shaking.

The real work was just about to start.

Every bowhunter strives for perfect shot placement, but every shot can’t hit the mark every time. Sometimes we make a lethal hit but compound less-than-desirable shot placement with mistakes in recovering the animal. A liver hit often leads to such a situation. The liver is tucked between the lungs and the rumen or stomach, so a shot that hits just slightly farther back than you would like will often hit the liver. If you think you may have hit the liver, remember these five steps to make sure you give yourself the best chance at recovery.

Back Off Right Away

My experience was a classic case of a liver hit—because of where I saw the arrow hit on impact, the deer’s reaction, and the dark red blood I found on the ground and arrow. After giving the deer a half hour, I made the mistake of going after it. I kicked him up about 100 yards from where I shot him. It was at that point I decided to depart the woods for the night and come back the next day. If ever in doubt, give the animal time.

Bring Help

I was hunting by myself, so I didn’t have the luxury of having a friend to help me find the deer – or so I thought. My uncle, who lived about an hour from the property, volunteered to come help me track. His help was invaluable because a liver hit typically produces only small, sporadic drops of blood. Several times my uncle located blood when I couldn’t. More eyeballs help. Also, check your local laws and regulations regarding the use of tracking dogs. You can’t underestimate the nose of a well-trained tracking K-9.

Get Rest and Stay Hydrated

Don’t miscalculate your rest and how you feel before and during the track. Bring water and snacks. This was especially true for me since it was September and temperatures still reached well into the 80s. If you become fatigued, your motor skills and senses suffer, and you may give up the trail too soon. Also, you need to maintain high morale, and that starts with feeling rested and nourished.

Track Your Tracking

Develop a system to mark the last spot you saw sign. Whether its tracks, blood or the site where you saw the animal, bring marking tape, glow sticks, toilet paper, or use the GPS application on your phone to track your progress. Don’t waste time and energy having to backtrack or – worse – getting lost. Take your time, and record your path.

Take a Weapon

A liver hit is a lethal shot, but it may take longer for the deer to expire than with a heart/lung hit. When you find the deer, it could still be alive. Bringing a weapon with you on any tracking job is a good idea but especially for a liver hit.

JuhaszDeer2

Fortunately, I was able to find my buck the next morning. He was on a trail only 100 yards from camp in the opposite direction from where I started to track. In total, the buck traveled about a mile and showed signs of bedding down on several occasions the night he was hit. There were times when blood was sparse and patience paid dividends. I’m hard-pressed to find a tougher animal than a whitetail, but every deer will succumb to a lethal liver hit. Follow these rules and stick with the trail and you will increase your chances of recovering your deer.

About the Author

Jeremy Juhasz is a public relations and marketing professional from Atlanta, Georgia. When he’s not in the office, Jeremy is an avid bowhunter who has chased whitetails in Western New York, Pennsylvania, Ohio, West Virginia and Georgia. Follow him on Twitter @JeremyJuhasz for all things PR, hunting and Buffalo, New York sports.

5 Things To Do When Being Checked by a Game Warden

0

There is a specialized law enforcement department that has the sole responsibility of protecting our natural resources. Collectively referred to as game wardens or conservation police officers, these men and women are the ones who interact with hunters and fishermen to make sure those taking our natural resources are following the rules, including hunting seasons, bag limits, means and methods, to name a few.

5 Things To Do When Being Checked by a Game Warden

Game wardens are probably the least known of all law enforcement officers. Most are state peace officers, which means they must know all state legislative laws as well as all the game and fish laws. Many times they work by themselves, often out of radio communication or cell phone service. Game wardens routinely encounter multiple armed violators to whom they must issue citations or take into custody on their own. Game wardens usually work more than 40 hours a week, and often are gone from their homes and families for weeks. Needless to say, game wardens are dedicated law enforcement officers.

Unfortunately, we now live in a society where disrespecting law enforcement is becoming the norm for many individuals in our communities. Many even actively seek to harm law enforcement officers. If you are in the field often enough, you will eventually encounter a game warden. How you react to that encounter can set the tone on how the interaction will go.

It is important to remember that game wardens have a job to do, and they take that job very seriously. The game wardens with whom I have spoken have told me that there are things that sportsmen and women can do to make sure that any encounter is pleasant and uneventful. Game wardens are almost all in agreement in what you can do to keep yourself as well as the officer safe, and to avoid any misunderstandings. When you encounter a game warden you should display your firearm in a safe manner, have all your documents ready for inspection, have a good attitude, comply with requests, and do not look to be offended.

5 Things To Do When Being Checked by a Game Warden

1. Make Sure Your Firearm is Displayed Safely The first thing that you should do when you see a game warden approaching is to display a safe firearm. A game warden knows that everyone they encounter is armed with either a firearm, knife or both. This ensures the safety of not only the game warden but also the person who is being checked. Remember, the game warden usually has no idea whom they are approaching, nor do they know their intent.

If you see a game warden approaching from a distance, keep your muzzle pointed in a safe direction and unload your firearm, leaving the action open to display a safe firearm. It is always a good idea to lay your firearm on the ground and place it in a rack or some other place that you can walk away from it. If the game warden appears suddenly, do not make any sudden moves with your firearm, including unloading it. With your firearm pointing in a safe direction, acknowledge the game warden and wait for him or her to ask you to unload. You can also ask the game warden if you can unload your firearm. The game warden may ask you to set the firearm down and have you move a safe distance away from it. Remember, the game warden is allowed to give you lawful requests for everyone’s safety.

It is important to remember that everyone is a little jumpy these days, and that includes game wardens who just want to make it back home to their families. Several game wardens relayed stories to me regarding individuals who refused to unload or place their firearm down. Luckily the game wardens handled the situation professionally without anyone getting hurt.

2. Have Your Documents Ready If you are hunting, you know that you need a hunting license. Your license is subject to inspection by a game warden. Most states also require a valid identification card to be on your person while engaged in hunting. Therefore, it should not be a surprise to anyone that a game warden is going to ask to see these documents. In addition to a hunting license and a valid identification card, there are other documents the game warden might ask to inspect, depending on the game you are hunting. These might include stamps, permits and tags, as well as anything else you are required to be in possession of while hunting a specific animal in a specific area.

It should go without saying that these documents should be readily accessible. This means that everything should be able to be presented to the game warden immediately. All required documents should be carried in a way that you do not have to disrobe to get to them. It you are waterfowl hunting and wearing waders, your documents should be stored in a waterproof bag in the top compartment. Licenses and other documents should not be left in the truck or back at camp. Game wardens are very busy, and they want to move on to the next hunter—just as much as you might want them to.

5 Things To Do When Being Checked by a Game Warden

3. Have a Good Attitude Most officers will tell you that an individual’s attitude is a major factor when it comes to setting the tone of the encounter. That tone is usually established within the first 60 seconds. If an individual has a bad attitude from the start, this will probably inadvertently cause an escalation of tension. An individual that has a bad attitude is more likely to fail to display a safe firearm or comply with lawful orders. Unfortunately, if this occurs, the game warden will have to address this increase in tension through the “force control continuum.” This allows any peace officer to use one force higher than the force used against him or her. Fortunately, most peace officer are trained in, and can effectively use, de-escalation techniques.

There is no reason to have a bad attitude, after all, you are hunting! You are outdoors, enjoying nature and away from the office! If you have a good attitude when you meet a game warden, you are sure to have a good attitude when the game warden leaves. If you have a bad attitude when you meet a game warden, you are sure to have a bad attitude when the game warden leaves.

4. Comply With Requests It is always important that you comply with any lawful request by a law enforcement officer, and this includes game wardens. A game warden will ask the hunter to do specific things during an encounter to keep all parties safe and to efficiently perform an inspection of game and the equipment used to take natural resources. Any failure to comply with a request from a game warden is the surest way to increase the tension of the encounter. This can lead to citations or even an arrest. The quickest way to complete an inspection and get back to hunting is to comply with any request from a game warden.

5. Don’t Get Offended Do not take anything personally. Remember, game wardens are just doing their job. We now live in a society of individuals who are looking to be offended. Just like in any profession, game wardens go through a process to achieve an end. In the case of a game warden, he or she is to conduct an inspection to make sure that all game and fish laws are being followed. There is no ulterior motive in their inspections other than doing their job.

Several wardens relayed stories that provided examples of those individuals looking to be offended. One game warden told me how he asked a waterfowl hunter on dry land, who was wearing waders, for his hunting licenses and identification. Because the hunter did not have his documents where they were readily accessible, he had to lower his waders to get to his pants pockets to retrieve them. The hunter then loudly protested, claiming the game warden had him “disrobe” in front of his family to humiliate him!

Happy people tend to be happy hunters. Unhappy people tend to be unhappy hunters. The vast majority of game wardens that I have met have generally been happy people, who truly have a passion for what they are doing and enjoy encounters with the public. Attitude is contagious. If you have a good one, you’ll quickly infect others with it!

Best Places To Hunt Whitetail Deer In Michigan

0

Whitetail hunting in Michigan is a time-honored tradition enjoyed by locals and tourists alike. Deer season attracts hunters from near and far who seek to land that coveted trophy Whitetail deer. There are many outstanding areas to hunt Whitetail within the state of Michigan, ranging from national parks to private hunting land.

This article highlights some of the best spots for Whitetail Hunting in Michigan so that you can have the best chance possible for success on your next Whitetail hunt. Get ready to explore new lands and come home with a trophy Whitetail buck this season!

Overview of Michigan’s Whitetail Hunting Season

Did you know that Michigan has more registered hunters than any other state in the United States? Whitetail hunting in Michigan is popular with hunters from far and wide due to the large concentration of deer – making it an excellent place to hunt. Whitetail hunting season typically runs twice a year, once in the late fall and then again in mid-winter. It’s important for all hunters to pay close attention to regulations for Whitetail hunting season as each state has their own specific laws.

Best Places To Hunt Whitetail Deer In Michigan
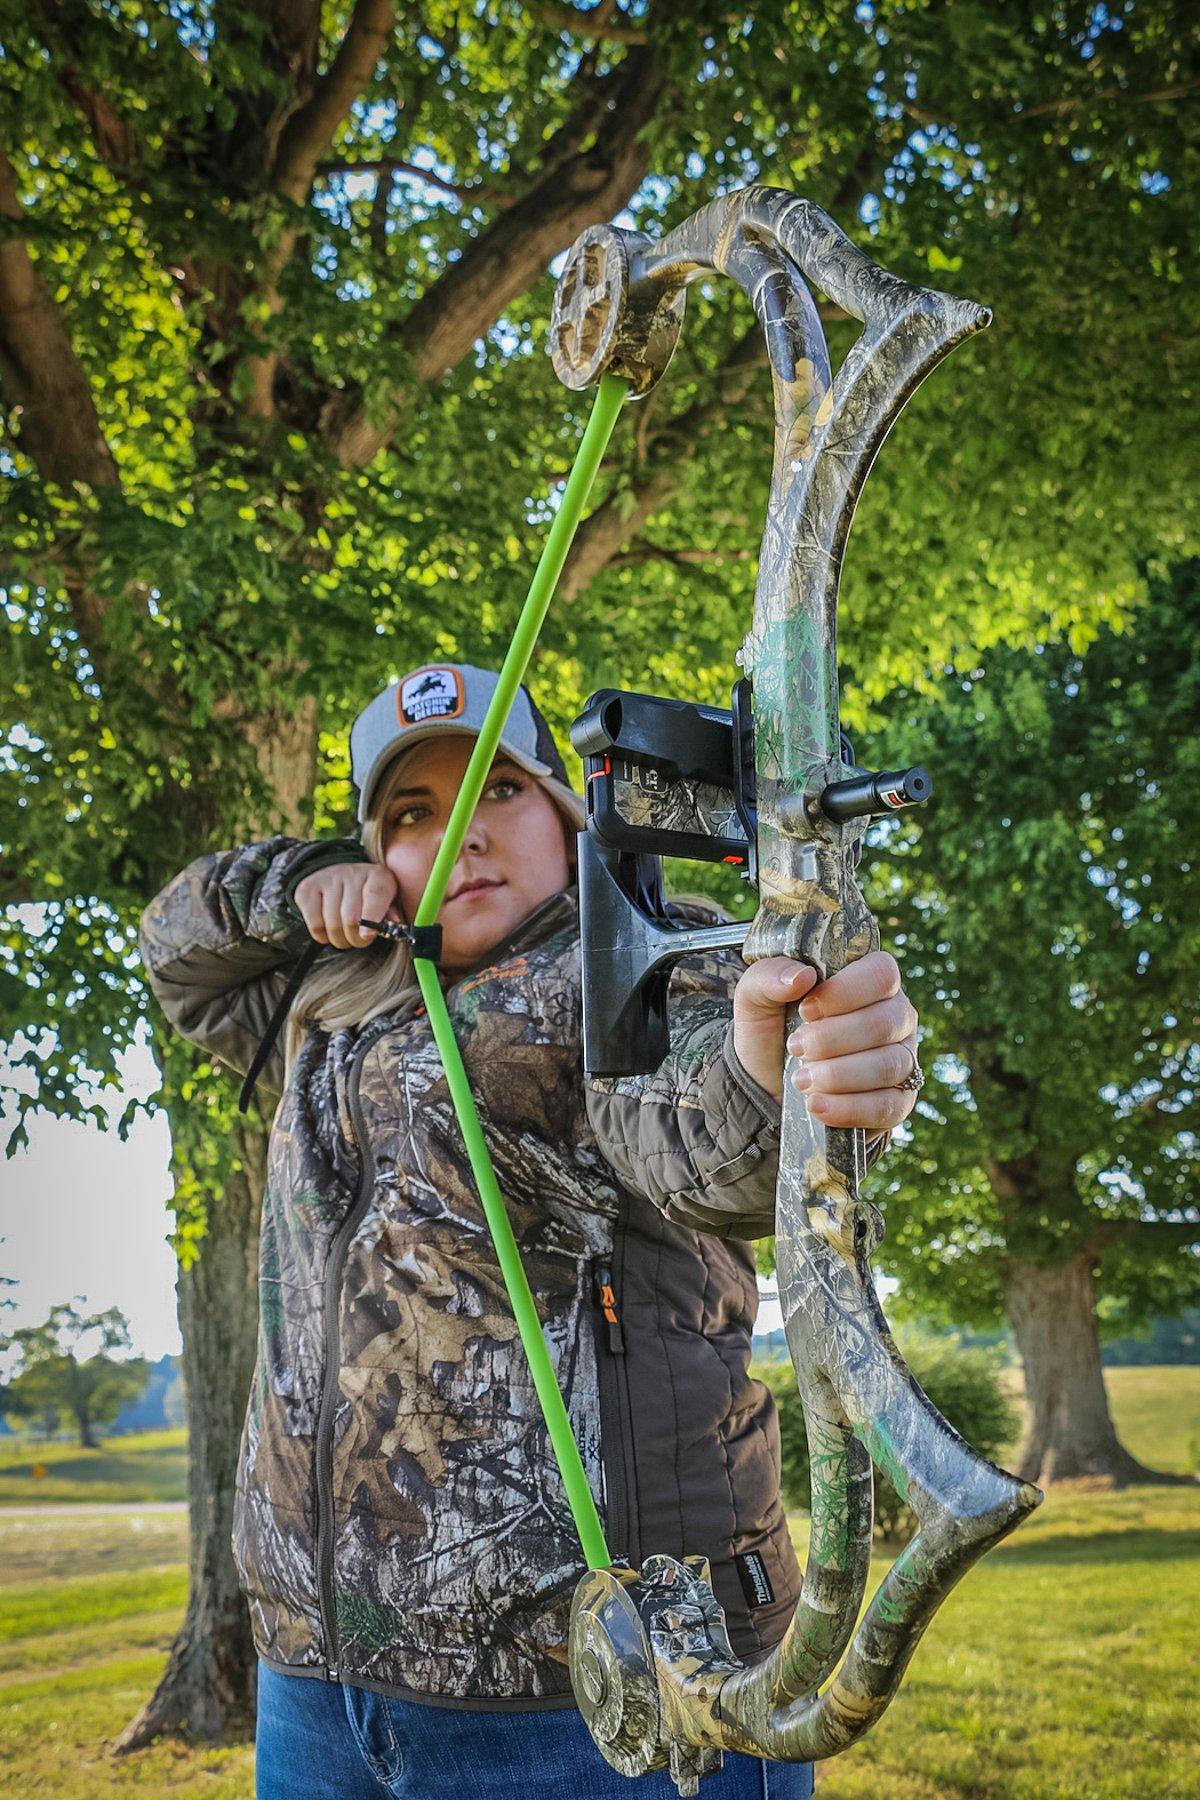
This includes certain hunting hours, limits on how much game you can take, permits and licensing information specific to Whitetail Hunting. Michigan takes these regulations seriously and provides clear guidelines on what is legal and illegal so it’s important that before heading out, hunters thoroughly look into Michigan’s state regulations.

Michigan whitetail hunting has taken a bit of a shift starting in 2022 with the new required reporting for deer harvests. To simplify things, anyone that holds a state-issued hunting license is obligated to report their successful deer harvest, meaning even those with Deer Management Assistance Permits are not exempted from this requirement.

All harvests must be reported within 72 hours – or before any transferred harvested deer – and even if you plan on processing your own harvested deer you will still have to report it through the same reporting process. DNR-issued kill tags must still be attached where applicable, though there’s no need to worry if self-reporting presents any difficulties; in these cases hunters are authorized to reach out for help from either family members, friends or other experienced hunters who could assist in completing the required documentation.

Best Regions to Hunt Whitetail Deer in Michigan

Best Places To Hunt Whitetail Deer In MichiganMichigan is a great state for hunting whitetail deer, with the best regions being located in the Upper Peninsula, Northern Lower Peninsula and Southern Lower Peninsula. The Southern Lower Peninsula is widely considered by hunters to be the best spot in the entire state when it comes to quality.

Counties along the Indiana and Ohio lines are particularly praised for their trophy-worthy bucks that you can find here. If you plan on hunting deer in Michigan, we recommend setting aside time between October 20th to November 15th. With gun season arriving on November 15th, deer tend to hide out in more remote areas until all of the shooting stops two weeks later.

Types of Hunting Properties for Whitetail Deer in Michigan

Best Places To Hunt Whitetail Deer In MichiganMichigan is home to some of the best hunting properties for whitetail deer in the United States. Anyone looking for an exciting hunt can find their perfect spot with ample opportunities for success. You can choose between public lands, where you’ll be competing with other hunters, and private hunting land where you have exclusive access to two of Michigan’s top deer species: Mule Deer and Whitetail Deer.

There are a number of considerations when selecting the best property, such as quality of cover, habitat structure and deer herd density – all factors that vary between public and private land offerings. Comparison shopping is the key to success when researching the available choices; public lands can offer amazing experiences with more open competition while private properties come with more exclusivity but require additional investments. With careful deliberation, any hunter can find the ideal location for their dream hunt in Michigan!

Best Hunting Properties in Michigan

Hunting Whitetail deer in Michigan can be a rewarding and enjoyable experience. With so many factors to consider, it is important to select the best hunting properties that suit your needs and provide an optimal experience.

The best whitetail hunting properties in Michigan are usually privately owned land since there is less likelihood of other hunters scaring away the game and more of an opportunity to tailor the land and the game that lives on it to suit your needs. Familiarize yourself with world class hunting by researching success stories, talking to experienced hunters, attending hunting seminars and reading up on scouting techniques.

Safety should always be top of mind when out on a hunt – wear blaze orange clothing for visibility and make sure to stress individual safety measures of staying within hearing range of other members for increased safety. Before you go, review all local regulations for firearms and be sure to always apply individual ethical hunting standards. With these tips in mind, enjoy the great outdoors by experiencing one of the best places to hunt Whitetail in Michigan!

Best Air Rifle Deals

Popular Posts

How Do Break Barrel Air Rifles Work?

0
A break barrel air rifle is a type of airgun where the barrel breaks open at a hinge point just above the breech. This...

Can a Felon Legally Possess an Air Rifle in Tennessee?

0
"Understanding the Legalities: Felon Ownership of Air Rifles in Tennessee" can a felon own an air rifle in tennessee? In the state of Tennessee, the ownership...

Master Small Game Hunting with an Air Rifle: Tips and Techniques

0
"Experience the thrill of small game hunting with an air rifle! Embark on a captivating journey as you test your accuracy and precision in...

Air gun 101: The differences between .177 & .22 – Which jobs they do...

0
I’ve always believed the popular phrase: “It’s not the size of the dog in the fight that matters - but rather the size of the...

Can you dry fire a gamo air rifle?

0
Unveiling the truth behind dry firing a Gamo air rifle, this intriguing headline delves into the possibility of safely practicing without ammunition. Join us...