With their bright orange color and meaty texture, chicken of the woods mushrooms are one of the most exciting edible mushrooms out there, and if you catch them at the right time they can be some of the best mushrooms you’ll ever eat. They’re a perfect wild mushroom for beginners, and something to look forward to every year.
Chicken of the Woods mushrooms (Laetiporus sulphureus) are a parasitic fungi that decays dead trees and causes a brown heart rot in living trees, making it both a parasitic and saprobic mushroom.
The fruiting body appears as a fan-shaped mushroom growing in large brackets on stumps, fallen logs, and the base of dead trees. They’re widespread across North America, but also enjoyed around the world.
The chicken of the forest.
Famous as the mushroom that tastes like chicken, they’re a great mushroom meat substitute in many dishes, making them perfect for using in vegetarian and vegan mushroom recipes. Some people like to treat them like crab or lobster.
They can grow to a massive size. In 2009 the Guinness Book of World Records listed a chicken mushroom found in United Kingdom weighing over 100 pounds.
White chickens are sometimes confused for an orange hen of the woods.
Chicken of the Woods Species
As of this writing, there should be 7 species in North America. New varieties are identified around the world regularly, and there’s at least 14 species identified in the world to date including L. xinjiangensis from China, L. cremeiporus, from Japan, and L. caribensis from the Carribean.
East Coast and Great Lakes
Laetiporus sulphureus is the type species, and are the best example of what a chicken mushroom will look like. It has yellow pores and grows on dead and dying hardwoods, especially oak, but can also grow on poplar, willow and locust.
L. sulphureus.
Laetiporus cincinnatus or white-pored chickens often grow from the roots of oak trees in a basal rosette shape, but can grow directly from trees as well. Many foragers prefer their texture and bug resistance over yellow varieties. Unlike other chickens, it causes root or butt rot instead of heart rot. It has a peachy-orange color, and cream to white spores.
L. cincinnatus.
Laetiporus huroniensis is newer addition to the genus. L. huroniensis has pale yellow pores and grows on old-growth conifers in the northeastern U.S. and Upper Midwest. It’s bright orange color is similar to L. sulphureus.
Laetiporus persicinus, or the white Chicken of the woods. L. persicinus is the only species to grow on hardwood and softwood. It has a white to pink-salmon cap that darkens to brown with age with white pores. It’s found in the southeastern United States, Australia, Asia, and South America the Caribbean.
West Coast
Laetiporus conifericola. A recently named species with a range from California to Alaska. It’s preference for conifer trees like hemlock, spruce and fir set it apart from others in the genus. The caps are the classic bright orange to peach, and and has yellow pores.
L. conifercola.
Laetiporus gilbertsonii Grows on eucalyptus or oak and is found in the Southwest as well as the west coast. Some avoid it as it can cause allergic reactions for those sensitive to it. A cousin (L.gilbertsonii var. pallidus) has white pores and grows along the Gulf Coast.
L. Gilbertsonii.
Where to Find Chicken of the Woods
You can find sulphur shelf mushrooms anywhere a tree has been infected. In the Midwest, chicken of the woods season begins in late Spring, continuing through Fall. Each host tree has its own “clock” and they’ll fruit at different times.
In Minnesota and Wisconsin I find them growing on red and white oak, but also cherry or beech are possible. On the west coast and up into Canada they grow on Coniferous trees.
Harvesting Chicken of the Woods (Video)
Finding chicken mushrooms is easy. Finding them at the perfect stage for eating is not. Young mushrooms harvested before the shelves form are the most tender.
Stages of growth: perfect, middle aged, and too old.
To harvest, cut the tender portions of chicken mushroom off with a sharp knife. The mushrooms get tough and woody quickly as they grow, and the excitement of finding one can fool you into bringing home a tough, woody mushroom. If you find a large mushroom, trim off dirt from the base.
Mushroom Bugs
Fungus gnat larvae (Sciaridae and others) will infest the mushroom quickly. Some species are more prone to them than others. As you cut, inspect the mushroom for tunneling, keep cutting until you can’t see any bug holes.
Very fresh, young mushrooms may bleed yellow juice when cut
Store fresh chicken of the woods in a Zip Loc bag with a paper towel and they can last for a week in the fridge. Larvae are harmless, but they’ll make your mushrooms go bad faster.
Mushrooms covered with flies will contain maggots/larvae.
Chicken of the Woods Look Alikes
There are no real look alikes, and there’s no false chicken of the woods. The mushroom most commonly confused with chickens are hen of the woods. The difference is easy to see: chicken mushrooms are orange or yellow and hen of the woods are brown.
Chicken of the Woods vs Hen of The Woods
Cooking Chicken of The Woods
Chickens can be substituted for chicken in any recipe, as well as other mushrooms after cutting into bite-sized pieces. They can be sauteed, breaded and fried, pickled, and cooked just about any way you could imagine.
Cooking Tips
Always cook thoroughly, at least 5-10 minutes.
Often only outer 1-2 inches of mushroom is edible.
Very young mushrooms are the best, and the whole mushroom can be tender.
Young mushrooms can be cooked in thick slices for mushroom steaks.
Young chicken mushrooms can have a lemony taste, and pair well a little acid.
To show off the mushrooms, saute them and put them on top of a dish.
Young mushrooms can be cooked in large pieces, older mushrooms must be trimmed. See below for examples.
Young Mushrooms
Young mushrooms may not need trimming.
Older Mushrooms
Only use the tender edges of older mushrooms. Save woody parts for stock.
Allergic Reactions to Chicken of The Woods
Chicken of the woods are edible, but some people have an allergic reaction no matter what species is eaten. Vomiting, nausea and diarrhea are the usual symptoms, but individual sensitivity varies. Another possible reaction is a numbing sensation in the lips after eating chicken of the woods.
Always eat a small amount of food that’s new to you. Start by eating a small serving or 1-2 ounces of cooked mushroom.
How to Preserve Chicken of the Wood
The mushrooms can be dehydrated, pickled, or frozen. Pickling is a good option that keeps the fresh texture of mushrooms. Use my Pickled Chicken of the Woods recipe.
You can dry chicken of the woods but they become very tough. Use dehydrated chicken mushrooms for soup or roasted chicken or hen mushroom stock. You can also use them to make mushroom powder, but it isn’t as good as mushrooms that are more tender.
How to Freeze Chicken of the Woods Mushrooms
Freezing is the best way to preserve these mushrooms. To freeze chicken of the woods, cook until wilted in butter and season with salt, portion into Zip Loc bags. Put the ziploc bags into a vacuum bag and then vacuum seal. Frozen mushrooms will keep for at least 6 months and often longer. You can also freeze them after making Wild Mushroom Duxelles.
Chicken of the Woods Recipes
I have lots of recipes on this site beyond what’s shown below. See the link after the recipes to go to the archive.
Chicken Fried Chicken of the Woods
Crispy, golden brown mushrooms everyone will love are a fan favorite on this site.
Wild Chicken Mushroom Thai Red Curry
Mushrooms simmered in rich coconut milk sauce with kaffir lime and spices. Many different mushrooms can be used.
Sicilian Chicken of the Woods
In Italy the mushrooms are known as fungo de carrubo and grow from carob trees. They’re traditionally simmered in a spicy tomato sauce, served with grilled bread.
More Chicken of the Woods Recipes
FAQ
References
USDA: A new species of Laetiporus (Basidiomycota, Polyporales) from the Caribbean basin
MycoKeys: Phylogeny and taxonomy of Laetiporus (Basidiomycota, Polyporales) with descriptions of two new species from western China
I’ve long dreamed of hunting in the mountains, spending days climbing, glassing, and stalking. This kind of trip has always seemed quite accessible to me, except for one aspect: getting the meat out of the woods. It would be impractical to expect to drag a deer back to the truck. Foolish, really, and out of the question with an elk. So that would mean quartering and packing the animal out. This is nothing to the hunter on horseback, or even one who is accustomed to doing it.
But here in Minnesota, it is rarely done. Dragging is the norm, and ATVs are often employed. It is unusual to ever be just too far from the road. With a western hunt or two nearing on the horizon, I have felt I needed practice- a trial run. Sure, I could study the process and know what to do, but I wouldn’t want to figure it out in the dark, on the side of a mountain, with a snowstorm coming. That would be truly foolish.
My Chance
So for the last couple seasons, I’ve been looking for an opportunity to try my hand at quartering a deer and packing it out by backpack. While I spend the opening weekend of deer season hunting with family on private land, I always try to plan other hunts to satisfy the need for meat and my need for adventure. This year’s hunt in the Mississippi riverbottoms of Houston County held much promise for taking a deer far from the road.
While I found myself over three and a half miles from the road at my farthest point, I ended up taking a nice buck about a mile and a quarter out. He was far too heavy to drag on the ground, so there was no choice but to follow through with my plan. Armed with a knife and a game bag from Koola Buck, I set myself to the task.
Halfway There
Now, when this is normally done, a person takes the quarters, loins, tenderloins, and other assorted meat from the skeleton, and leaves behind the spine and hide and as much extraneous mass as possible. The unique problem I faced on my hunt was that part about leaving the spine behind. I was hunting in the CWD Management Zone, where leaving the spine and brain material in the zone was mandatory. Dumpsters were provided so that hunters could leave that CWD-containing waste behind, to protect the rest of the state from contamination.
At home, I researched as much as I could to determine the overall legality of doing a conventional quartering job (leaving spine, hide, etc. in the field). I didn’t come up with much. A Conservation Officer might have been a good resource, but they are very busy that time of year. I hate to pester them needlessly. I figured that since the DNR didn’t want the spines contaminating the rest of the state, they wouldn’t want spines left behind in the field to potentially contaminate the environment. It seemed I might incur adverse legal attention if I didn’t take it with me. It also seemed a ridiculous notion to separate the spine/ribcage from the meat and then carry it out anyway. So I planned to remove and pack the rear quarters, and drag the remainder of the deer. I hate to do only half a job, but my choice was more or less made for me.
I still made two trips out- one with backpack, and one more to do the dragging. The game bag I used was more than roomy enough for those rear quarters, as large as they were. The straps on the outside of the Koola Buck quarter bag (not a standard feature on meat bags) made it easy to secure to my pack. Taking that much weight from the carcass made that buck more draggable, but only barely. The dragging portion took longer than I expected, and with many stops along the way. Though my backpack had been heavy, this impressed on me how much more efficient it would have been to pack the entire animal out– even in two trips. Facing even a moderate dragging job in the future, I might elect to quarter and pack.
Conclusions
Since I wound up doing the rest of the quartering job within the next couple hours (to fulfill the CWD zone requirements), I did the whole job yet that day. What I didn’t do was the actual carrying out of the front quarters, loins, etc. Frankly, that’s not a big gap in my overall experience- it doesn’t take much to imagine dropping them into a bag. I feel now I could not only do the job again, but I could do it faster and better. That’s a load off my mind.
The next step will be to get better at using my pack, so the load can ride optimally. This was the first time I had such a heavy load in it. Again, it’s not something you want to discover in the field.
The method for splitting an animal up into quarters may seem complicated, but it’s not. If you’ve ever processed your own deer, it was probably hanging in the air as you dismantled it. Quartering in the field is essentially the same, only on the ground. If you have no previous experience with any of it, just learn about the different cuts and how to separate them from the rest of the carcass. There are many online tutorials available.
Materials for this task are encouragingly minimal. A worthy backpack is required, so choose your pack for the day carefully. A good, sharp knife is necessary to get through all the skinning, separating of joints, etc. Meat bags round out the list, and the one from Koola Buck I used was great. It is rated for elk-sized needs, and just one could accommodate an entire whitetail (not that mine was light enough). Splitting the load into at least two meat bags is customary, so be sure to obtain an appropriate number of bags for your task.
Koola Buck bags like mine come in blood red, to hide the inevitable staining. After washing at home, mine was just like new again. It also proved to be tough as nails and I expect to be able to use it for years to come. After my experience with Koola Buck, I will be looking to obtain smaller sizes for deer and antelope hunts. I highly recommend these game bags to big game hunters everywhere.
Koola Buck also makes heavy-duty and antimicrobial meat bags. You can find them all at koolabuck.com.
When you’re fishing, you need to use the right equipment to make sure you have the best chance of catching a fish. One important piece of equipment is the swivel. Swivels allow your line to spin freely, which helps reduce tangles and keeps your bait from getting twisted up. In this article, we will discuss the different types of fishing swivels and how to choose the right one for your needs!
A fishing swivel is a small metal device consisting of a pivoting joint in the middle, and two metal rings attached at the ends. The metal rings are connected to the joint with an anchor inserting into the joint, which allows them to rotate freely in any direction.
The main advantage of fishing swivels is that they prevent line twist when you’re fishing with a lure or a rig that tends to rotate in the water. The most common examples of this would be inline spinners and metal spoons, which rapidly rotate during retrieval, and thus quickly end up twisting your fishing line if you use them without a swivel.
A second advantage provided by fishing swivels is that they often come with a snap attached to one end, which makes it very convenient to switch out your lure or leader line quickly while fishing.
Because of these key advantages, fishing swivels are present in most fishing rigs used by anglers. Now let’s take a closer look at the different types of fishing swivels, and how to choose the right one.
What Are The Main Types Of Fishing Swivels?
The 5 main types of fishing swivels are:
Barrel swivels
Ball-bearing swivels
Snap swivels
Three-way swivels
Finesse swivels
Together, these 5 swivel types cover more than 90% of all fishing applications where fishing swivels are used, and so are plenty to get you started. Let’s take a closer look at each of them below.
Barrel Swivel
The barrel swivel is the original fishing swivel, and simply consists of a pivoting joint with two rings attached to either end. The joint in the middle is usually round, or sometimes a small barrel.
While barrel swivels are very cheap and easy to use, they don’t prevent line twist very effectively, since their rings don’t rotate as efficiently as those of a ball-bearing swivel.
See Barrel Swivels On Amazon | See On Walmart
Ball-bearing Swivel
A ball-bearing swivel is an improved version of the barrel swivel, and comes with a ball bearing inside the pivoting joint. Due to this ball bearing, the rings of the swivel rotate much more freely than those of a standard barrel swivel, and thus prevent line twist more effectively.
The main downside of ball-bearing swivels is that they are considerably more expensive than barrel swivels. Because of this, one option is to use them only when you’re fishing with a lure type that generates a lot of line twist.
See Ball-bearing swivels On Amazon | See On Walmart
Snap Swivel
A snap swivel is an improved version of the barrel swivel that comes with a snap attached to one end, instead of the regular ring. The most common way to use a snap swivel is to tie your main fishing line to the ring of the swivel, and then use the snap to attach to the ring of a lure.
The great thing about using a snap swivel is that you can easily exchange the lure for another one at any time, which is much faster and easier than retying the line every time you want to change your lure.
See Snap Swivels On Amazon | See On Walmart
Three-way Swivel
As its name suggests, a three-way swivel consists of a pivoting joint that has three rings attached to it instead of two. The advantage of this setup is that you can add a separate leader line to one of the rings with a weight attached to the end of it.
The leader line used to attach the weight is usually weaker than the main line, which means that if the weight gets snagged on the bottom, it’s fairly easy to break it off without losing the rest of your tackle.
Three-way swivels are most commonly used for trolling rigs, since they allow you to troll a heavy weight close to the bottom without worrying too much about getting snagged.
Finesse Swivel
The finesse swivel is a relatively new swivel type that’s used for fishing with a drop shot rig. It consists of a hook that is directly attached to the swivel, and can rotate around the axis of the swivel.
While one end of the finesse swivel looks like a regular swivel ring (which is where you attach your main line), the other end looks like the clip-on ring of a drop shot weight.
The great thing about the finesse swivel is that you can use it to attach a drop shot weight via a leader line that is not directly tied to the swivel, but is instead clipped into it.
In case your weight gets snagged on the bottom, this design allows you to pull the line attached to the weight off the swivel, so you’ll only lose the weight, but not the rest of your rigging.
Swivel Sizes
Fishing swivel sizes are classified with an aught scale similar to fishing hooks, with the smallest size starting at 12, and gradually increasing as the numbers go down to size 1. After reaching size 1, swivel sizes switch to 1/0, and go up to size 12/0, which is the largest swivel size.
In general, it’s best to choose the smallest swivel size that you can get away with, since that won’t spook fish as much as an oversized swivel. For example, when fishing for trout, a size 12 swivel is most often the best choice.
However, when fishing for bigger fish with heavy lines, it’s necessary to increase the size of your swivel, since that also increases the amount of weight that the swivel can bear without breaking.
Snap Swivel Size Chart
Barrel Swivel Size Chart
What Is The Difference Between A Barrel Swivel And A Crane Swivel?
A crane swivel is an intermediate form between a barrel swivel and a ball-bearing swivel. It comes with highly polished metal parts that enable its rings to rotate better than those of a barrel swivel, but not as well as those of a ball-bearing swivel.
When in doubt, it’s usually best to opt for a ball-bearing swivel, since that guarantees the best performance. This is especially important when fishing with rotating lures, such as inline spinners and spoons.
How Do You Choose A Swivel For Fishing?
Choosing the right swivel depends on what fishing technique and what fishing lure you want to use. If you’re fishing with lures that have a heavy rotating action, it’s essential to use the best swivel you can find, which would be a ball-bearing swivel.
On the other hand, if you’re fishing with lures that don’t rotate, or with fishing rigs that don’t don’t twist up the line, you can opt for a simple barrel swivel. Also, if you want to have the flexibility of changing up your lure or presentation at any time, it makes sense to use a snap swivel, which you can use to attach a different lure or leader line very quickly.
Do Swivels Spook Fish?
In most cases, fishing swivels don’t spook fish, and you can attach them directly to your lure without any problems.
However, if you’re dealing with finicky fish, a swivel may spook them. This is most often the case when fishing in heavily pressured fisheries, where the fish have learned to avoid anything that comes with a fishing line and/or terminal tackle attached to it.
Another scenario where swivels may spook fish is when fishing in crystal clear waters, such as trout streams. And obviously the most challenging situation is when dealing with pressured fish in very clear waters.
If you find yourself in any of the situations above, you can still use a swivel, but shouldn’t attach it directly to your lure. Instead, tie a 2 to 3 foot fluorocarbon or monofilament leader between the swivel and the lure. That way, you still get the benefit of the swivel, but without spooking the fish.
When To Use a Snap Without a Swivel
Instead of using a snap swivel you can opt to use a snap without a swivel attached to it. This is a good option if your lure or rig doesn’t really generate line twist, and if you’re dealing with heavily pressure fish that spook easily (especially when fishing in very clear water).
I’ve exhaustively tested all the best 177 pellets for hunting on the market. In fact, I tested everything, including: accuracy, reliability, speed and so much more.
By the end of this guide, you’ll find the perfect pellets.
If you’re pressed on time, here’s a quick list of the best 177 pellets for hunting:
Crosman DS177 Destroyer: Best Overall 177 Pellets
H&N Terminator Hollow Points: Most Accurate 177 Pellets
Crosman Premier Super Points: Best for the Budget
GAMO Red Fire: Best for Hunting Rabbits
1. Crosman DS177 Destroyer: Best Overall 177 Pellets
With many options and styles of pellets on the market to choose from, I can easily say that the Crosman DS177 Destroyer pellets are the best on the market today.
A weekend of testing these pellets was a fun project.
You won’t believe some of the results that I had with an air rifle pellet.
So great. So surprising!
Accuracy
The accuracy of Crosman’s dish pellet was spot-on.
Most of the use that I get from my break barrel air rifle is with small game and pest removal.
Testing for that scenario was a hodge-podge course of 15-35+ yards of paper targets, water bottles, and jugs, as well as the trusty ole soda cans.
Man, I set up a treasure-trove of targets to shoot at all over the dang place for this. I was on target for all of them the entire time.
The dish style pointed-pellet/hollow-point combo was true in its travel without fail.
It was great.
Reliability
The reliability of the Destroyers was pretty remarkable given the circumstances.
With all of those tempting targets dangling from trees and sitting atop every flat surface within 40 yards, there was A LOT of shooting done on day one.
Like a kid in a candy store, I was reloading over and over for hours. I went through almost two tins of pellets in one weekend.
Yes. That’s almost 500 pellets all by my lonesome.
There were less than a handful that I would call total duds. That’s crazy good for such an affordable little pellet.
Aside from the ridiculously difficult to open tins, my indulgently excessive shooting was almost entirely smooth and failure-free.
Just goes to show, the best tools for the job don’t always have to cost an arm and a leg.
Pretty sweet when that’s the case, right?
Effective
The impeccable 7.4-grain lead Destroyer .177 pellets are tailor-made for effective performance.
This hunting pellet is designed for complete expansion and energy transfer. Not just impact triggered expansion….impact followed by expansion.
On the paper targets fixed to my trees, the expansion after impact was easy to see.
With some digging in the tree bark, I uncovered pellets that were penetrating several inches with the full bloom of the expansion.
On the bigger water jugs, the same results were visible over and over.
This advantage for my pest removal is a pretty big deal. Other expanding pellets tend to expand at the impact.
For critters like raccoons, woodchucks, or opossum, if my shot is not spot-on the pellet may strike bone and flatten without penetrating and killing the pest.
The good penetration through my target will get me past the bone and then expand in the soft tissue for humane extermination. Getting it done with one shot isn’t just about skill in shooting.
Is the Crosman Destroyer Worth it?
The Crosman DS177 Destroyer Pellet is perfect for a one-shot kill of rodents and small game that are causing trouble around my home.
It’s also such a great pellet for paper range target shooting, and plinking.
The reliable performance with even and effective expansion is ideal.
So go out and get yourself some of these little fellas. Meanwhile, I’ve got a lot of cleaning up on the test range to do! Enjoy!
2. H&N Terminator Hollow Points: Most Accurate 177 Pellets
H&N Terminator Hollow Points: with an imposing name and a vicious look, these pellets are out for blood, garden pest blood that is.
The Terminator Hollow Points are designed for pest management and “extreme accuracy.”
Will these pellets have your yard in tip-top shape or your garden in shambles?
Let’s take a look.
Construction
H&N’s claim to fame was the quality of their construction, so it’s a slam dunk here.
The material used is unpolished lead which is soft and malleable meaning it’s excellent for the “massive expansion” that is advertised for the Terminator Hollow Points.
The design is very similar to most other hollow point pellets on the market with one exception:
From the center of the head, a spike protrudes.
This assists in the initial penetration of the intended target. Additionally, there are notches around the rim of the hollow point that make it easier for the projectile to expand once it hits and enters something.
My only issue was that the pellets look a little bit rougher than what is shown in the advertisements online.
Mine came a little bit scratched up and the point was either dented or rounded enough to where I would not be able to poke myself enough to draw blood. This is extremely minor though because the performance is not affected by this slight discrepancy in looks.
I’m not sure if the point being rounded made much of a difference in effectiveness because I was still able to drop squirrels in one hit. It still gets the job done.
Now, remember this is still unpolished lead. Despite the high-quality construction, you’ll still need to clean your weapon of choice frequently to ensure good and consistent shooting
With that being said, the quality is exactly what you’d expect from H&N: Precise, solid, and dependable.
Accuracy and Practicality
High-quality construction is useless if you can’t hit where you’re aiming; luckily you’ll have no problems with the Terminator pellets.
I used these pellets for two things: garden protection and regular ol’ plinking. I had a good time with both.
H&N has the Terminator pellets being extremely accurate at 25 yards or medium range.
I can personally attest to this. For about two days, I just sat on my back patio and shot at a paper target (with a backstop of course) to see how accurate the pellets actually are.
During my testing, I found that I was able to hit roughly one-inch groups at 25 yards and half-inch groups at 12 and a half. I took this accuracy as a go-ahead to start going after pests in my garden.
I must have gotten at least 6 squirrels in three days. Five out of six squirrels were clean one hits.
There was one instance where the pellet failed to expand and went clean through. The force was sufficient to shock and knock it over long enough for a follow-up.
This brings me to another important personal point:
I do not like squirrels, they have killed many of my plants over the years, but I think an animal suffering is unnecessary. I was very satisfied that I was able to have humane kills due to the design of the pellet.
While large exit wounds are not pretty, you can rest assured that you’re no putting anything in an undue amount of pain. The exit holes are quite large. The Terminators live up to their name and have a massive expansion, like H&N claims.
Another thing I was worried about was over-penetration.
I have kind of close neighbors and initially, I was concerned about hitting windows or houses, even though I was mostly shooting into the ground when I was on the hunt.
It was a relief to find out that these pellets are superb for semi-suburban pest control. I had no over-penetration. The hollow point design and large expansion radius lend itself well to controlled velocity loss.
This means that the pellets lost speed very quickly, usually landing on top of the group behind the animal or bouncing off a tree after passing through my target. This is a great pellet if you’re worried about hitting something unintentionally.
In terms of accuracy, the Terminator Hollow Points are a very solid choice, more so if you’re space is limited.
Price
A tin of 400 unpolished lead pellets isn’t gonna break the bank at $15.39 on Amazon, slightly more expensive elsewhere.
This is definitely worth the cost, especially among similarly priced pellets and brands.
Are the H&N Terminator Hollow Points worth it?
There’s no question about it. These pellets are a must buy if you plan on taking care of a pest problem via airguns and pellet guns.
The construction, accuracy, and practicality all come together beautifully in the H&N Terminator Hollow Point pellets.
3. Crosman Premier Super Points: Best for the Budget
The Crosman Premier Super Points are the best .177 pellets for hunters on a budget.
Crosman Premier is known for their dependable pellets, and the Super Points give you consistent, precise shots without breaking the bank.
But, how do they measure up against more expensive pellets?
Let’s find out!
Accuracy
The Crosman Super Points are made to precise specifications with a far-reaching tip to ensure good, dependable, shot-to-shot accuracy.
Hitting targets within a 50-yard range is no problem. From 40 yards, my average grouping was about 1.5” using the standard iron sights on my Remington Vantage 1200.
It’s not the best accuracy I’ve ever seen, but it’s good enough to get the job done, and a great value for the lower price point.
I’ve shot these through both the Vantage 1200 and a GAMO airgun, and these pellets gave me good, dependable accuracy in both.
Shape and Fit
The Super Points have a pointed, aerodynamic design to ensure the longest range possible.
Although these pellets worked great for me in my two airguns, the fit is very dependent on the bore.
The front drive band is wider than on most pellets, so trying to squeeze them into tighter-bore firearms may damage the pellet, or cause your gun to jam!
However, they fit looser-bore guns tightly, which can give you better velocity. From what I’ve seen and read, they seem to like rotary magazines the best.
Another thing to keep in mind is that the pellets are made from premium lead – which means they can be easily deformed. Make sure you use the flat part of your finger to load them into your airgun.
Reliability
The Super Points feed very well into loosely-bore guns. Crosman Premier usually crafts high-quality lead pellets, and these are no exception.
They’re wear-resistant and give a consistently good performance.
A couple of things to note:
Lead pellets get the job done well, but as mentioned, can be very soft and easy to deform. Make sure you’re very careful, and never drop them onto any hard surfaces!
Manufacturing consistency is also not fantastic.
Although head diameter is usually very consistent, this isn’t the case here.
The weight, on the other hand, is very consistent. We’ll discuss this more in-depth later.
Despite these couple of factors that have the potential to cause issues, these pellets give you clean shots and work well in most loosely-bore airguns.
Speed
Super Points will give you close to the maximum distance you can get with airguns.
They hold their velocity well, which helps with accuracy. Based on my measurements, their average velocity is around 900 FPS!
Before I used them for hunting, I tested the pellets by shooting some through cotton targets. While most other pellets barely broke through 2 layers, these easily went through 4 layers of 100% cotton.
Size
Each Super Point weighs 7.9 grains. They’re a bit heavy to amount to Crosman’s claims of “maximum power” in an air rifle, but they still have impressive velocity and get the job done well.
The average head diameter on the Super Points is 4.52mm, and the average length is 5.37mm.
Although head diameter is usually a very tightly controlled parameter, the Super Points vary slightly from bullet to bullet.
It’s not a huge difference between each pellet, but it’s still something to take note of.
The weight, on the other hand, seems to be at a consistent 7.9 grains throughout each individual pellet.
Price
A box of 500 Super Points retails online for anywhere between $7-$15.
It’s a very good value for what you get, and these are among the cheapest .177 pellets currently on the market.
Recommendations
The Crosman Premier Super Points are great for close-range small game hunting and pest control.
They expand when they get in contact with the target, making them a great choice for hunting squirrels, groundhogs, or birds.
Serious airgunners can expect consistent, precise shots with these pellets.
If you’re a small game hunter on a budget, Super Points are a great choice.
4. GAMO Red Fire: Best for Hunting Rabbits
GAMO Red Fire pellets are the best for hunting rabbits!
Bunnies can raze my entire garden in a single night if not controlled. This means I needed to find the best option for taking care of these furry pests fast!
I’ve always done a decent job with round pellets, so why did I change things up?
What I found out after giving Red Fires a try will probably impress you as much as it did me.
Check this out.
Accuracy
The GAMO Red Fire pellets are very accurate.
Thanks in part to the cone-tipped shape of the pellet itself, GAMO’s design has maximized trajectory consistency.
I was initially testing on targets that I’d set up at 30 yards. From the first shot, I was very impressed with the performance.
No adjustments are needed. No learning curve to adapt to.
Immediately on target, I was ready to get down to business in a blink.
I value quality products, and accuracy is one of the most important features for these pellets. It’s not the only top-notch feature though.
Speed
The excellent performance of these pellets can also largely be attributed to speed.
The actual size of these pellets is a hair larger than the round pellets I’ve used in the past. I was a bit concerned by the appearance that they would be too big for my air rifle, but I was wrong.
The design of the pellet creates such a tight seal in the barrel, that the pellet comes screaming out at incredible speed.
The excellent trajectory also comes hand in hand with more effective stopping power.
Those little furballs are fast and twitchy, giving me only one shot when I catch them in my garden.
If I miss they’re long gone and I’m back to waiting. The high speed of the Red Fire pellet increases my odds of success every time.
Reliability
The GAMO Red Fire pellets are clearly reliable and well made.
Consistency in the way these are made is plain as day. Every tip is centered and in place. The tumbled appearance, without seams or visible defects, is a clear indication of the quality.
I have no worries about failures with the Red Fires.
Many round or poorly made pellets tend to veer way off target on occasion, due to irregular shapes.
I never had any trouble with that problem using the Red Fires. Both on the initial target tests and in my use afterward on the devil-bunnies, I never had a single wayward pellet.
Effective
The Red Fire pellets are so much more effective for rabbits than the round pellets I used to use.
Designed to mushroom on impact, these lethal pellets make a big difference in quickly downing my targets.
When I started, with the paper-over-wood targets, the pellets at everything less than 20 yards would shape into flat discs on impact.
On impact, on the 30+ yard targets, and in my real targets, the expansion was more of the peeled-back shape that I’d expected.
Typical pellets require relatively good precision to get an effective kill-shot that will eliminate the vermin quickly. The Red Fire’s expanding design increased immediate stopping power.
I want to eliminate a pest as humanly as possible. Being able to put the rabbits down quickly is so much simpler thanks to GAMO’s smart design.
Are the GAMO Red Fire pellets worth it?
Yes! For taking care of the rabbits in my garden, I will never use anything other than these pellets again.
The higher speed, consistency in pellets, and effective stopping power are all perfect for Operation Defend-The-Veggies at my house.
I’m so incredibly impressed with these pellets. I’ll be bunny-free in no time thanks to the GAMO Red Fire Pellets. Yes!!
Now It’s Your Turn
I hope you enjoyed my best 177 pellets for huntingguide.
So as a recap:
If you’re looking for the best overall 177 pellets, I highly recommend the Crosman DS177 Destroyer.
Or if you are looking for accuracy, get the H&N Terminator Hollow Points.
If you’re on a budget, then the Crosman Premier Super Points is for you. It is affordable, consistent and precise.
Lastly, if you are into hunting rabbits, then the GAMO Red Fire is what you are looking for.
Now I want to turn it over to you:
Which hunting pellets will you pick?
Let me know by leaving a quick comment down below.
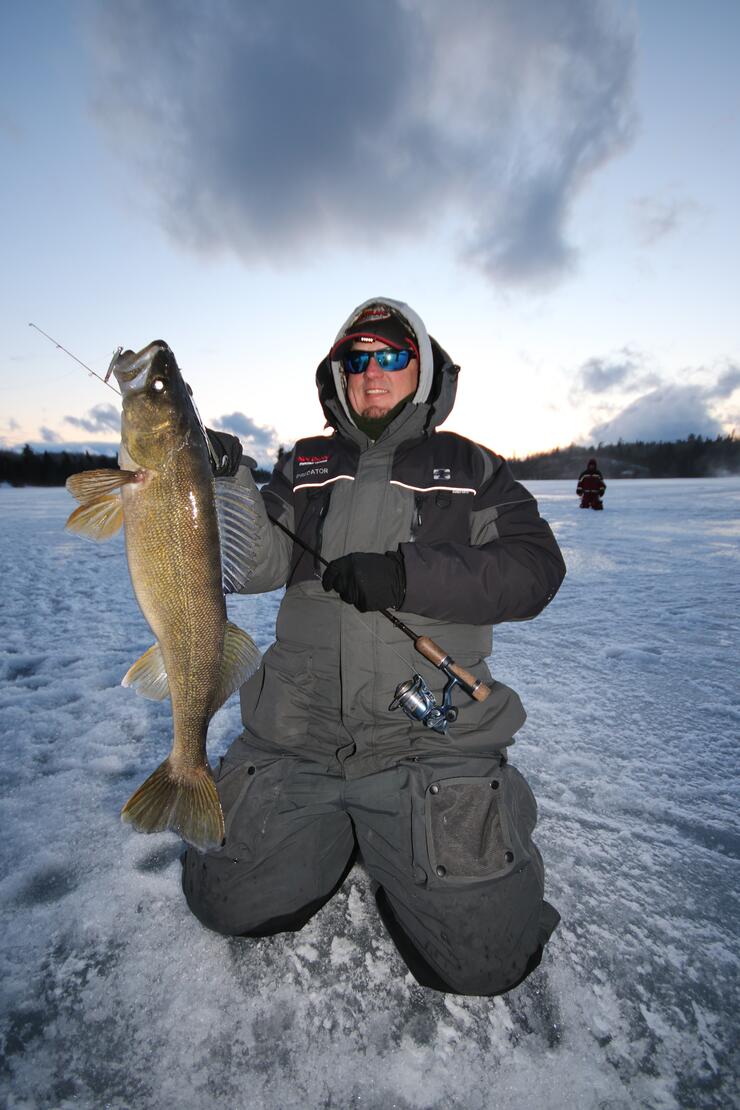
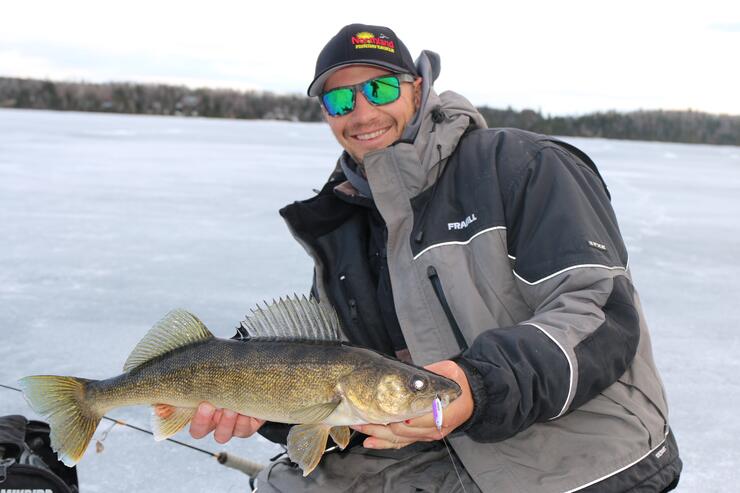
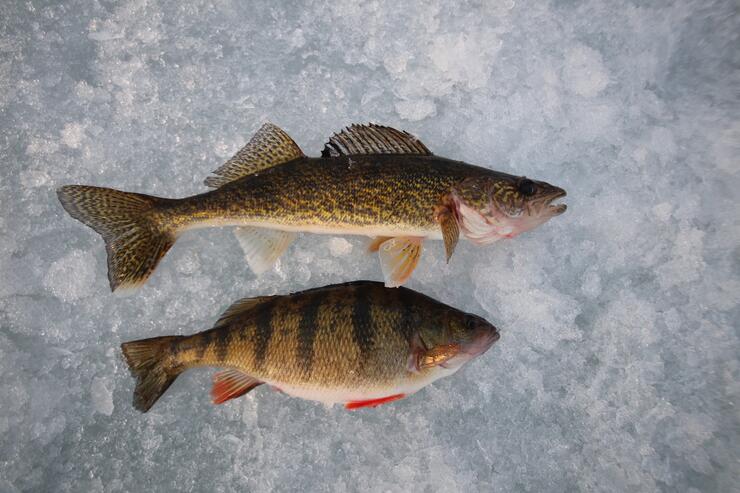
That is how I describe where I live to people I cross paths with when I’m traveling. Growing up in the Kenora area, around Lake of the Woods, I’ve been spoiled with fantastic walleye fishing my whole life. Since I was a little kid, walleye have been my favourite species to catch through the ice because the action is always reliable, they are the best fish we have to eat and we catch plenty of big ones.
Nearly all of the resorts that stay open through the winter across the Sunset Country Region will be able to put you on some top-notch walleye fishing. Here are a few of my top tips.
Where to catch walleyes through the ice
Across Northwest Ontario, we have a variety of different types of lakes that hold excellent populations of walleyes. Some are shallow and tannic-colored waters, and others are clear, deep-water lakes, with a variety of waters in between. Excellent walleye fishing exists across the region so how do you choose the best place for your ice-fishing adventure?
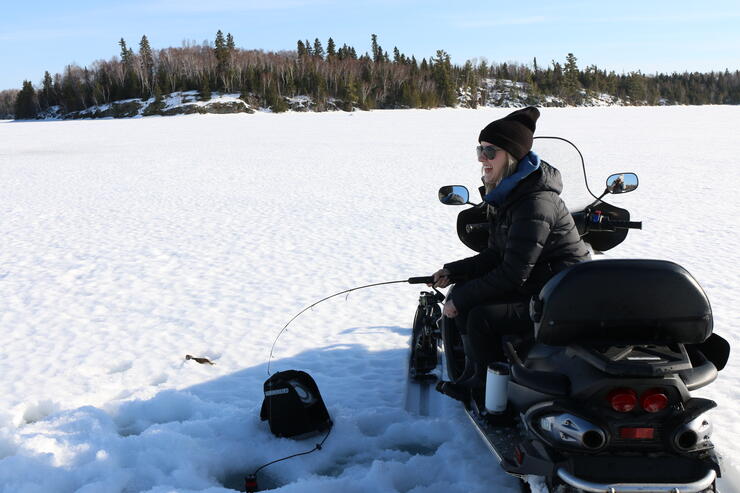
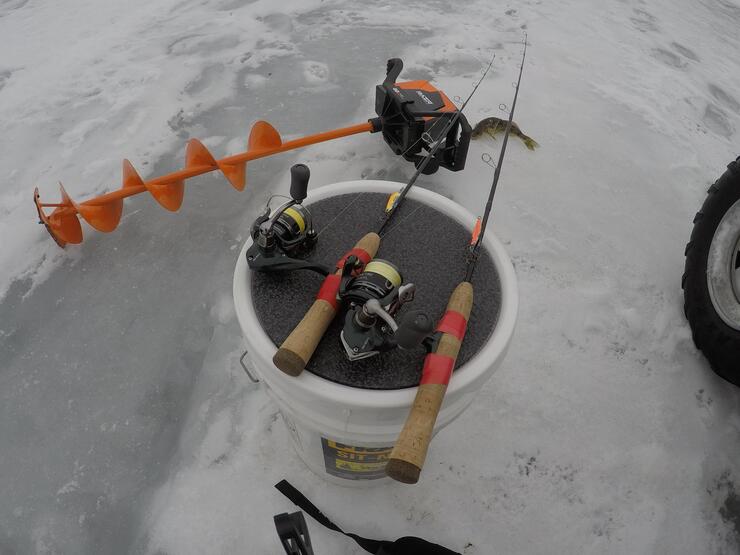
If you have visited us here in the open water season, does your favourite resort offer ice fishing? They could be a good place to start. The next consideration might be your transportation options. Snowmobiles or ATVs offer access to remote locations so you can find your own hot spots.
Drive-to-vehicle access is available on some waters, where ice roads allow you to drive right to your fishing spot. The availability of ice roads could be a discussion with whoever you book your trip with. Some resorts will rent snowmobiles, which might be a good way to go if you don’t own one. They are fun to drive and can really open up the doors for fishing opportunities.
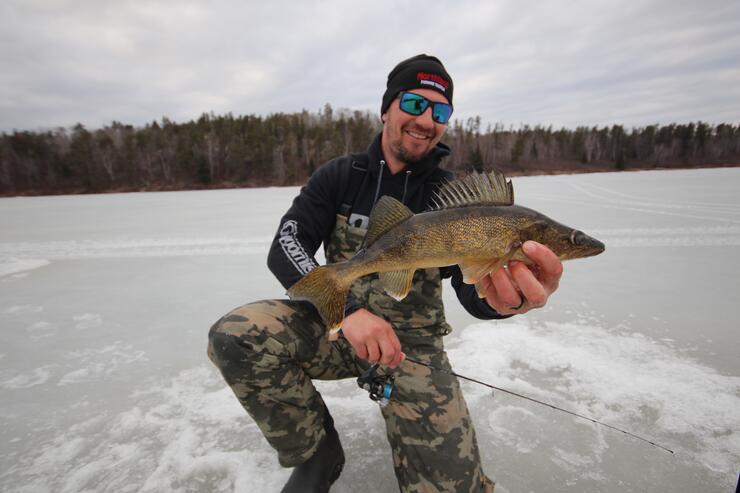
The season is open from freeze-up until April 15. Some years we’re able to stay on the ice right up to the 15th, other years the ice is done by the end of March. Like with some of the other species, my favourite times to be on the ice are early and late in the season. Early on, it’s easy to get around without a lot of snow on the ice, and getting the first crack at some of the humps and points that are good year after year results in some great fishing.
Walleye spawn shortly after ice-out around creek mouths or in shallow bays and predictably, they show up in front of these areas in March every year for the last few weeks of the ice season. I like to focus my efforts on structures like humps and points in front of these areas and if they don’t exist, walleyes can be caught on flats just out from the first good drop into deeper water. In some of the shallow walleye lakes, particularly some of the remote lakes, we’ll catch walleyes extremely shallow late in the season, sometimes as shallow as three to five feet. When you set the hook, they’ll just come flying up the hole.
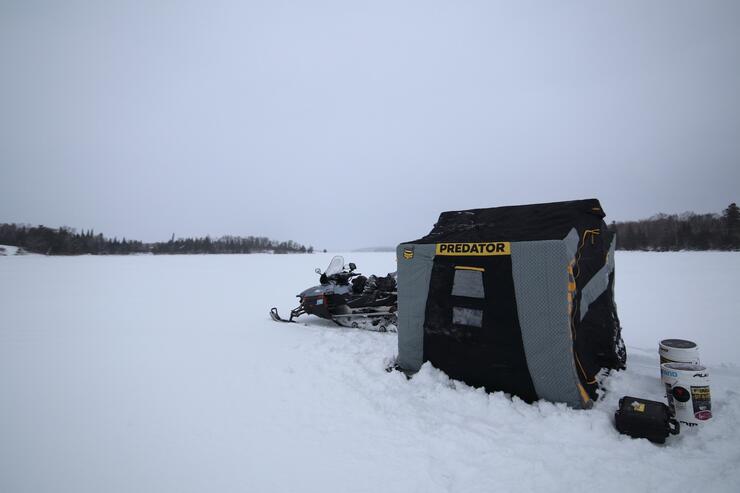
Earlier in the season, focus on main-lake humps, points, and flats. A lot of the same spots that are good in the summer are also good in the winter, you might just have to drop out and fish a little bit deeper. Because our walleye fishing is so good across the region, I have a five-minute rule for the holes that I fish. Of course, there are days when you can set up shop in a shelter and wait for the fish to come to you. That can be relaxing, you can share some good fellowship with your buddies and hey, we get real winter so some days you have to hide out inside because it’s so cold.
When I go for fun, I pick the nicer weather days and hole hop outside. If I jig in a hole for five minutes and don’t at least mark a fish, I’m moving to the next hole. Sometimes small adjustments in depth can make a big difference. Sometimes you’ll get a hole where you’re right over the top of a ledge or sharp drop and those are never as good. It’s good to be close to the edge, but a flat bottom is always the best for walleyes, where they can creep along and find your bait. The flats also allow the fish to congregate together as well.
How to catch walleyes through the ice
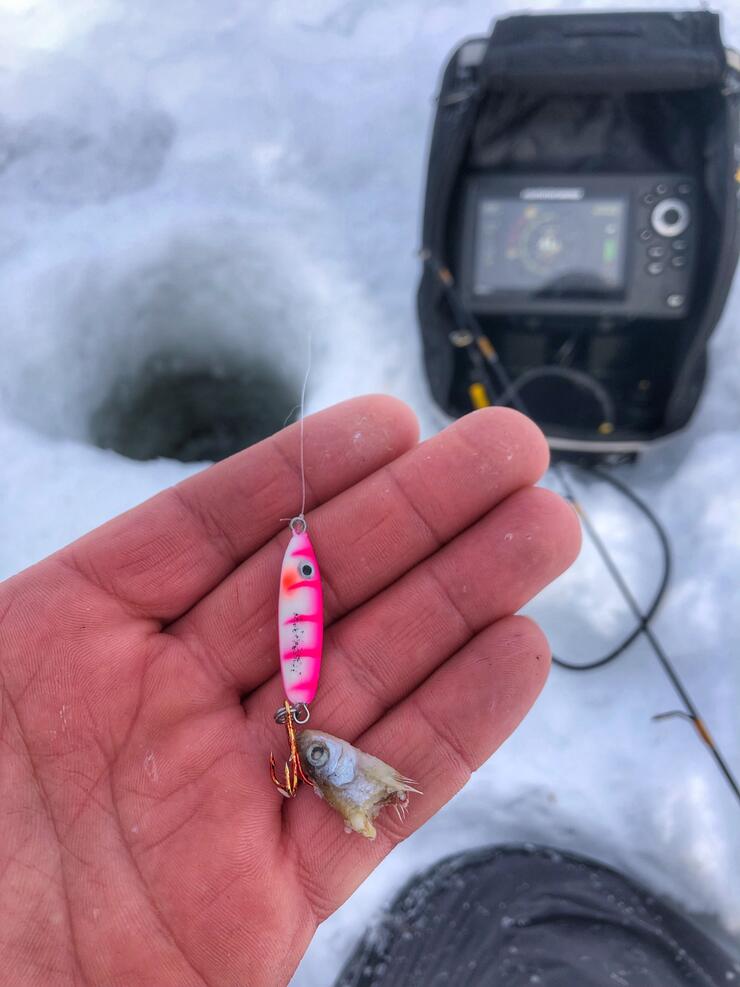
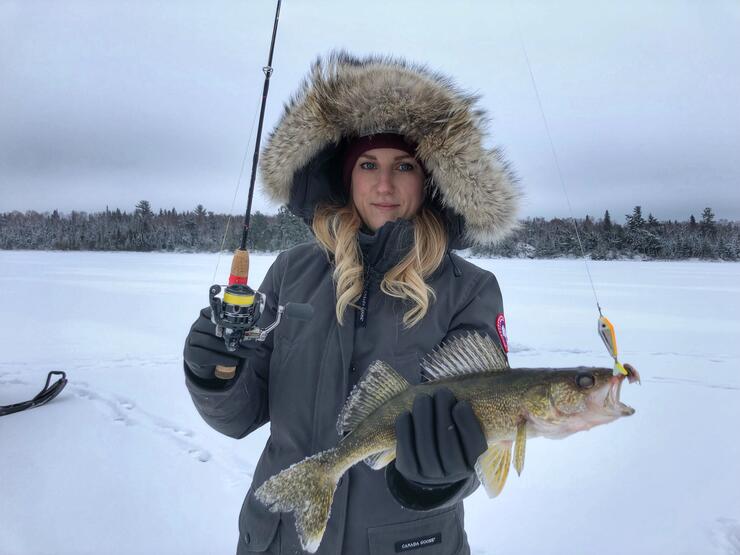
For the past twenty years, I’ve seldom used anything but a spoon for fishing walleyes through the ice. My go-to has always been a Northland Buck-Shot Spoon, popular with walleye anglers across the ice belt. I’ll always tip my spoon with a frozen minnow head and it never lets me down.
The traditional jig tipped with a minnow still works fine, I just think it’s more fun watching a spoon on my sonar unit and figuring out how to trick walleyes into biting it when they come in for a look. Some days, aggressive jigging gets bites, other days, you need to shake your spoon in a subtle manner. Figuring out how to trigger them to bite is the fun part. On some of the shallower, inland lakes, a jig tipped with a live minnow, hooked through the tail can be the best presentation. Something to consider if you fish in one of those types of lakes.
On the bigger waters, however, jigging with spoons or swimming jigs is tough to beat. Most of the time walleyes are going to be found near the bottom so electronics are not mandatory to catch fish but they will always help you put a few more on the ice. It’s good to know when walleyes are moving around beneath your hole and every once in a while, you’re going to see fish pass by that are slightly above the bottom so you can bring your bait up a bit so they can see it. More often than not, these suspended walleyes are aggressive and bite immediately.
If you are coming to visit us for a fishing trip you should also know that the “prime-time” bite is exceptional on most waters. We call that last hour of daylight “prime-time” because the walleyes almost always bite a lot better than they do the rest of the day. In fact, on some of the clear water walleye fisheries, it’s tough to catch fish during the day, then they go nuts just before dark. If you are coming for a trip, don’t be afraid to stay out there late and catch that “prime-time” bite.
Some waters in Sunset Country have special regulations for walleye fishing, including size restrictions, no-fishing areas, and bait restrictions so it’s always good to consult the Ontario Sport Fishing Regulations before you hit the ice. If you stay with a resort, they will be able to direct you on specific regulations on their waters.
We look forward to seeing you on the ice in Sunset Country this winter.
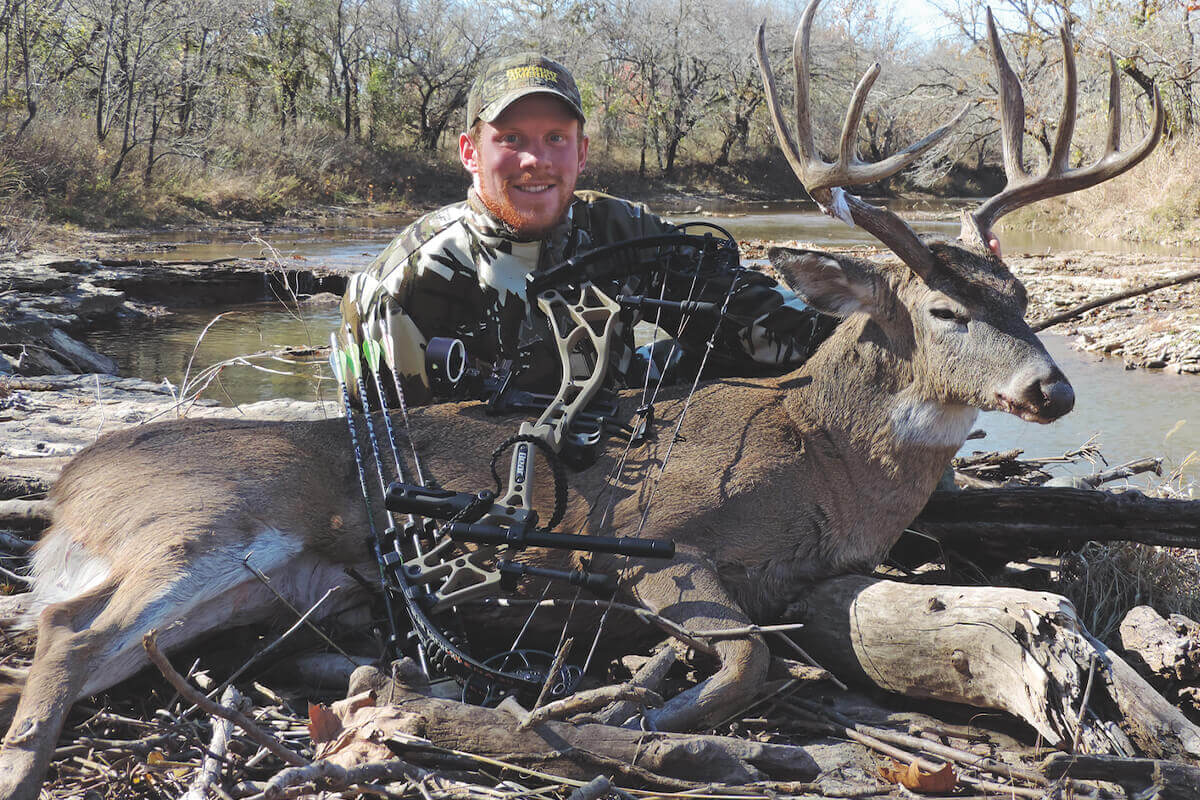
The author did his research and hunted a WMA to bag a long-tined tallgrass trophy. (Photo by Darron McDougal)
This article was featured in the November issue of Game & Fish Magazine (South edition). Click to subscribe
With temperatures reaching 93 degrees, conditions inside the ground blind were sauna-like. Despite the heat, my guide assured me that it’d be a great evening. So, as sweat beads trickled down my back and forehead, I monitored the wide-open food plot in front of me, hoping one of the surrounding draws would manufacture a mature buck.
As darkness slowly swallowed the daylight, I knew I’d be picked up soon and my evening hunt would be over. Suddenly, a big, mature 8-pointer and another buck appeared on the skyline 150 yards away. I felt a wash of adrenaline coarse through my veins as they beelined for the feeder. Suddenly, there he stood, quartering toward me at just 30 paces.
Two minutes of legal shooting light remained when he finally turned. In that instant I released my arrow, sure it would be a winner. To this day I’m not sure what went wrong. When we found the arrow there was next to no blood on it and no blood trail to be found. We spent hours looking everywhere for that deer to no avail. Needless to say, I was sick. Since I’d made contact, my hunt was over. But I’d be back in Oklahoma in November for another chance.
For the next month, I researched Oklahoma wildlife management areas for my next Sooner State hunt. The one I chose was some 200 miles from where my October hunt had unfolded. Three days in, I arrowed my then-best whitetail, a 150-inch-plus beauty. He is a tremendous trophy, especially since I took him the first time I hunted that particular WMA.
Oklahoma’s geographic location—sandwiched between whitetail meccas Kansas and Texas—is well-appointed to offer excellent deer hunting. According to QDMA’s 2020 Annual Report, 66 percent of bucks harvested in Oklahoma in 2017 and 2018 were 3 1/2 years old or older. This means that many bucks reach the age class that sees peak antler potential.
Some 4.6 percent of Oklahoma is public land. While that may not sound like a lot, in addition to sprawling national forests and grasslands, the Oklahoma Department of Wildlife Conservation manages more than 80 WMAs across the state. So, when visiting Oklahoma, you won’t struggle to find places to hunt. And, if a do-it-yourself hunt isn’t your thing, the Sooner State has many outfitters who offer a quality hunting experience.
From mountains to prairies, Oklahoma is a venerable ecological cornucopia with enormous biodiversity. Here are six of the best ecoregions in Oklahoma to hunt.
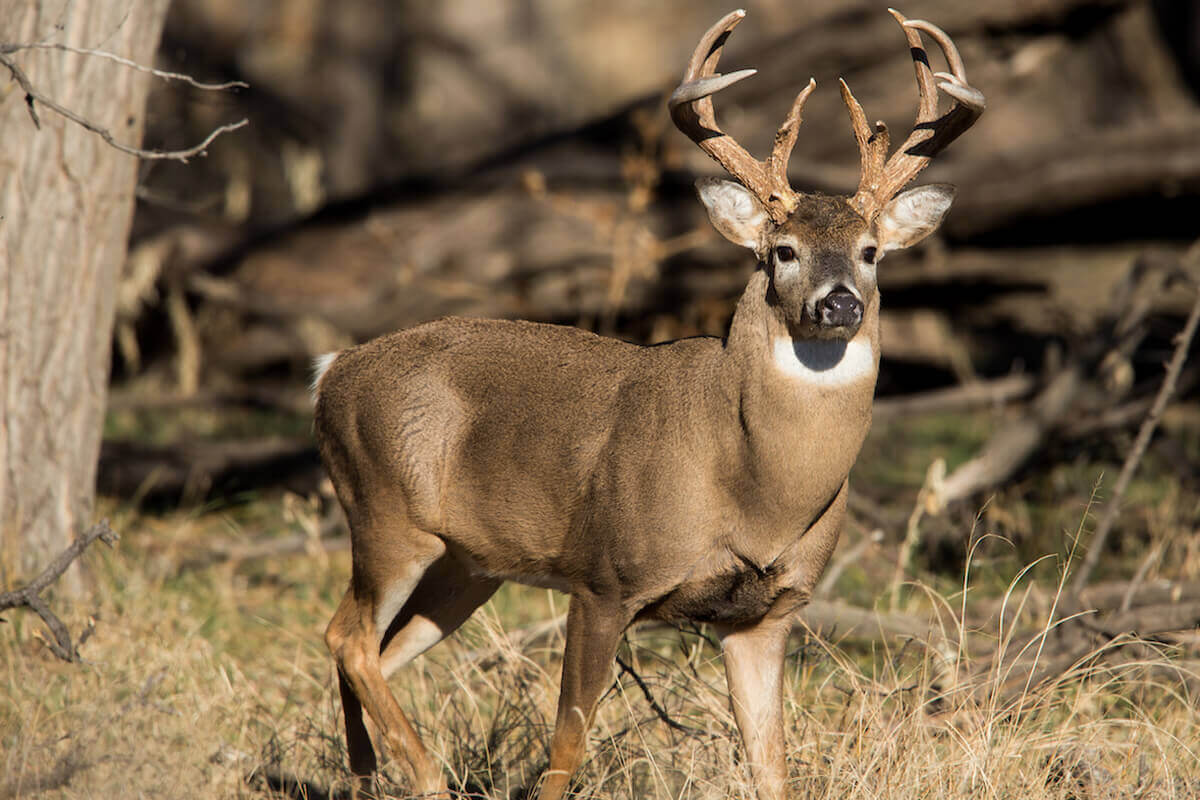
Pictured: Oklahoma Panhandle white-tailed buck. Oklahoma is an oft-overlooked whitetail destination that receives minimal hunting pressure compared to many states in the South. As such, bucks here regularly achieve their maximum antler potential. (Photo by William T Smith/Shutterstock.com)
In Oklahoma’s Panhandle lies a sea of prairie habitat surrounded by an agricultural checkerboard. Far from population centers, hunting pressure during archery season is minimal, and a bit busier during firearms season. Folks from the eastern part of the South will find the Panhandle completely different from the deer habitat back home. If you’re a treestand hunter, most of the scouting is already done—just find some trees in the wide-open habitat and park your backside there daily.
Public-hunting options in the Panhandle include the Rita Blanca National Grasslands, Optima WMA and Beaver River WMA. Native forages include ragweed and sunflower; additionally, the state cultivates small food plots on these areas. Windmills and guzzlers have also been installed to provide hydration for wildlife in this arid habitat.
Lodging options can be found in Guymon, Boise City and Beaver. Primitive camping is available at Optima WMA and Beaver River WMA, and RV hookups can be had at Beaver Dunes State Park.
MIXED-GRASS PRAIRIE
Just east of the Panhandle is a large area that stretches more than 100 miles wide (east to west) and from the northcentral border with Kansas to the southwest border with Texas. Due to size and scope, it offers great habitat diversity and varying whitetail genetics.
The 30,710-acre Black Kettle National Grasslands in Roger Mills County offers ample opportunities to stretch your legs and find your own slice of whitetail heaven. Like the panhandle, native forages are ragweed and sunflower. While the Black Kettle is scattered into nearly 100 units, wildlife plantings and water are available on most units. Primitive camping is allowed on the entire area, and three developed camping facilities exist.
If you’re looking for a large, contiguous tract, the nearby Packsaddle WMA in Ellis County encompasses 19,659 acres of rolling upland habitat consisting of buffalo grass, sagebrush, sand plum, shinnery oak and occasional mesquite. Cottonwood, elm and hackberry line the Canadian River bottoms on the Packsaddle’s southern fringe. Vehicle access is minimal to limit impact on wildlife and improve hunting.
SOUTHERN TALLGRASS PRAIRIE
Split into two sectors, the tallgrass prairie includes Kay, Osage, Pawnee, Wagoner, Mayes and Rogers counties, among others in Oklahoma’s northern and northeastern sections. Expect an ideal mixture of prairies, agriculture, brushy thickets and riparian habitat. In this region, WMAs like the 16,254-acre Kaw and 21,798-acre Fort Gibson offer solid hunting opportunities with rich soils teeming with wheat, milo, corn and soybeans, to name a few of the plantings the state implements on these WMAs.
Oaks here are abundant. During a bumper acorn crop, focus on hunting the timber, as deer will move less since food is available in or near bedding areas. Many other hunters will hunt field edges, especially those planted in soybeans. While they may be full of deer sign, most activity in the fields will be at night, so getting deep into the timber puts you in the heart of deer activity and gets you away from pressure.
Primitive camping is available on the Kaw WMA at dedicated areas, while camping near the Fort Gibson WMA can be found on U.S. Army Corps of Engineers campgrounds. If motel lodging better suits you, check out Ponca City and Newkirk near the Kaw or Wagoner near Fort Gibson.
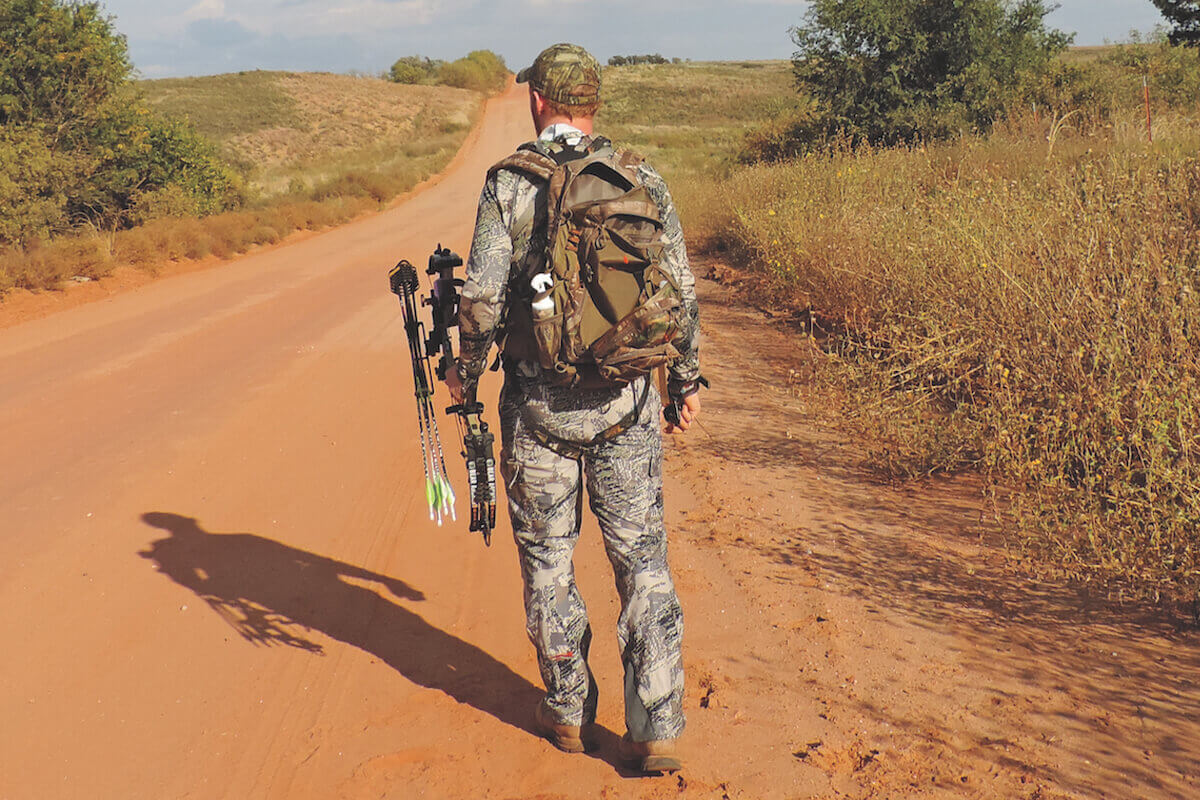
Western Oklahoma’s mixed-grass prairie teems with whitetails and includes plenty of public land on which to chase them. (Photo by Darron McDougal)
OZARKS
Next door to Arkansas is Oklahoma’s own small Ozark region, which covers Adair, Delaware and Cherokee counties. It also touches parts of a few other adjoining counties. Vastly different from the areas we’ve covered so far, expect heavily timbered habitat with oaks and hickory amidst rolling to rocky, steep terrain. Acorns are a primary food source, while native grasses provide valuable forage and thickets provide additional cover. The area sees 40-plus inches of rainfall annually, rendering it far more fertile than the ecoregions found in the western part of the state.
Worthwhile public hunting parcels are the Cherokee and Cookson WMAs. The Cherokee WMA encompasses 31,360 acres, 16,000 of which are open year-round to legal hunting with several controlled hunts made throughout the year. Between 200 and 300 acres are planted in food plots.
SOONER STATE GIANT: 3-Year Quest Ends with Huge Typical Whitetail
The Cookson WMA has 14,725 acres, with more than 100 acres planted in food plots, providing vital and attractive forages. Both of these WMAs have ponds throughout, some stocked with fish like bass and catfish. Elk roam this country, too, so keep your eyes peeled.
Limited camping options are available in the two WMAs and on surrounding U.S. Army Corps of Engineers campgrounds. Modern accommodations are available in Tahlequah and Muskogee. If you like hunting in the timber, you’ll love this area.
CROSSTIMBERS
The Crosstimbers region cuts a narrow swath through the tallgrass prairie region up north, then widens out around Tulsa and runs south clear to the Red River on the Texas border. Essentially, it covers most of central Oklahoma. Plentiful stands of oaks and eastern red cedar cover this region’s rolling hills and draws. There are also numerous cattle ranches, farmlands and river bottoms throughout it.
At the Love Valley WMA in southcentral Oklahoma, you’ll find good deer numbers on 7,746 acres of mixed upland habitat, with post oak-blackjack timber and riparian habitat featuring hardwoods along the Red River. To the northeast, in Pittsburg and Latimer counties, sits the sprawling 21,353-acre James Collins WMA in the Sans Bois Mountains. It features diverse habitat, including pine forests, oak and hickory timber, not to mention uplands and native grasslands.
If hunting at Love Valley WMA, lodge in Ardmore or camp primitively at the WMA. If hunting at James Collins WMA, camp at the WMA entrance or lodge at McAlester.
OUACHITA MOUNTAINS/ARKANSAS RIVER VALLEY
In southeastern Oklahoma you’ll find dense deer populations. Big pine forests intermixed with oaks in varied terrain ranging from gentle to rugged provide ample places for big bucks to hide and mature.
Want some room to roam? The gigantic 216,503-acre Three Rivers WMA in McCurtain and Pushmataha counties delivers. Nonresidents must purchase an $85 access permit, which reciprocates for access to the nearby 91,721-acre Honobia Creek WMA, too. Both WMAs features pine plantations and hardwoods. Terrain funnels are common, and if you’re willing to hike, hunting pressure can be evaded without much trouble.
MUST READ: Hunter’s Red-Dirt Redemption in Pursuit of ‘Ghost’ Buck
While no designated camping areas exist on either of the aforementioned WMAs, primitive camping is acceptable anywhere on both. If hunting at Honobia Creek, consider modern lodging in the town of Clayton. If hunting at Three Rivers, lodge in Hochatown or in Broken Bow.
The Ecoregions of Oklahoma
RED DIRT OUTFITTERS
These operations are ready, willing and able to provide an unforgettable whitetail adventure.
Mixed-Grass Prairie Region
Todd Rogers owns and operates Rut-N-Strut Guide Service in Elk City, offering hunts on approximately 31,000 acres of prime deer habitat with food plots, protein and mineral sites. Rolling red hills drop into creeks and river bottoms where clients hunt from ladder stands, pop-up ground blinds and box blinds. A quality mature buck at Rut-N-Strut typically measures 130 to 150 inches, with some considerably larger. Lodging is in a two-bedroom, two-bathroom house with a kitchen, washer, dryer and satellite TV. (580-799-1920; rutnstrutguideservice.com)
Central/Southern Shortgrass Prairie Region
James Burnett owns and operates Cimarron Valley Outfitters, which is based in Elkhart, Kan., but runs whitetail hunts in the Sooner State. Cimarron Valley’s Oklahoma hunts occur from the Colorado border in the panhandle all the way to northcentral Oklahoma against the Kansas border. Quality bucks typically range from 125 to 170 inches. The muzzleloader season can be outstanding while deer are still on feeding patterns, with late muzzleloader having some good pre-rut action. (620-360-4735; cvohunts.com)
Southern Tallgrass Prairie Region
The Stuart Ranch has been family-owned and -operated since 1868, and it encompasses some 46,000 acres. Hunts take place on two ranch divisions, located in Waurika and Caddo, both in southern Oklahoma. Various types of terrain are hunted, including vast prairie grasses, rolling hills and dense woodlands. Package whitetail hunts include lodging, kitchen facilities and meals (as requested). Stuart Ranch provides transportation to and from the ranch, cleaning and cold storage of harvested deer. The ranch is set up to accommodate archery, muzzleloader and rifle hunters. (580-512-7004; stuartranchoutfitters.com)
Ouachita Mountains/Arkansas River Valley Region
The Choctaw Hunting Lodge is located in Pittsburg, Okla., and situated on 44,000 privately owned acres. The lodge is a full-service operation, offering both preserve (high fence) and native (free range) whitetail hunts. Choctaw Hunting Lodge offers four- and five-day hunts, which include a private room, meals, hors d’oeuvres, snacks and beverages, transportation to and from the field, and taxidermy prep. CHL can accommodate archery, muzzleloader and rifle hunters. (580-740-0040; choctawhuntinglodge.com)
“Unlock the Power and Performance: Discover the Ultimate Break Barrel Air Rifle Oil for Unparalleled Accuracy and Smooth Operation. Enhance your shooting experience with our cutting-edge formula, designed to optimize your air rifle’s performance, reduce friction, and extend its lifespan. Experience effortless cocking and consistent shot placement like never before. Elevate your marksmanship with the trusted choice of enthusiasts worldwide.”
break barrel air rifle oil
Proper maintenance and care are essential for the longevity and performance of your break barrel air rifle. One crucial aspect of this is using the right oil for lubrication. Break barrel air rifle oil is specifically formulated to provide optimal lubrication for the moving parts of your firearm, ensuring smooth operation and reducing wear and tear. This specially designed oil helps prevent rust and corrosion, extending the lifespan of your air rifle.
When it comes to break barrel air rifles, regular maintenance is key to keep them in top shape. Break barrel air rifle oil should be applied to various parts such as the piston seal, cocking lever, trigger mechanism, and other areas where metal components rub against each other. By applying this specialized oil regularly, you can ensure that your air rifle operates smoothly with minimal friction.
It is important to note that not all oils are suitable for break barrel air rifles. Using improper lubricants may lead to damage or malfunctioning of the firearm. Therefore, it is recommended to invest in a high-quality break barrel air rifle oil specifically designed for this purpose. Regularly applying this oil as part of your maintenance routine will help keep your break barrel air rifle in optimal condition for years of accurate shooting.
In conclusion, regular oiling is crucial for maintaining the performance and longevity of break barrel air rifles. Proper lubrication reduces friction, prevents rust, and ensures smooth operation. By using high-quality air rifle oil and following manufacturer guidelines, shooters can enhance accuracy and extend the lifespan of their firearms. Remember to clean the barrel before applying oil and exercise caution when handling any firearm-related products.
Using the right fishing rig is essential for catching trout successfully, and knowing which rig to use for what conditions can make the difference between catching your limit or getting skunked.
There’s a perfect trout rig for almost every situation, and that’s why it’s so important to master rigging for trout, as this will allow you to choose exactly the right fishing rig for your purposes.
In this article I’ll cover the 9 best trout rigs, and will discuss what each of them is ideally suited for.
In order to rig for trout, you need to choose one of three basic types of rigs:
Rigs that present your bait suspended underneath a bobber or float
Rigs that present your bait close to the bottom with a weight
Rigs that enable you to cast and actively retrieve an artificial lure
While these three types of fishing rigs cover almost all trout fishing applications, they come in a variety of different shapes and forms, each of which is best suited for slightly different trout fishing setups.
So if you’re a beginner, chances are that you’re confused about all the different options of rigging for trout.
However, the great thing is that you can get started with just two or three of the most versatile trout fishing rigs, and then add more specialized rigs once you know what kind or rig works best for your pond, lake or stream.
Now let’s look at each of the most important trout rigs in more detail, to help you choose the best rig for your purposes.
And in case you’re also looking for the best bait to use with your trout fishing rigs, check out our article on what is the best bait for trout?
Trout fishing rigs with bobbers
Bobber rigs are among the most effective trout fishing set ups, and work especially well when fishing in shallow ponds and streams, as well as in shallow bays of bigger lakes, or basically in any situation where trout are active close to the water surface.
Now let’s look at the two main types of bobber rigging for trout.
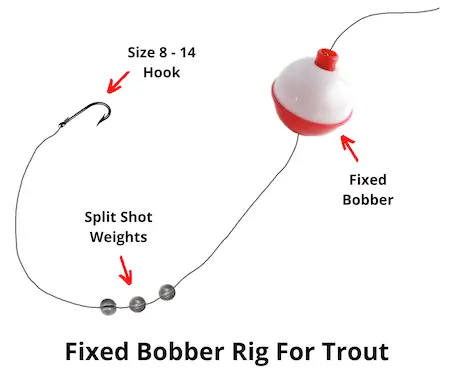
Trout rig with fixed bobber
This is one of the simplest trout rigs, and consists of a fixed bobber attached to the line, as well as a hook and sinker to weigh down the baited hook in the water.
The depth at which the bait is presented depends on the distance between the hook and the bobber.
How to tie it: Attach the bobber to the line, and then tie the end of the line to the hook. The most common type of bobber used for this fishing rig is a round red and white bobber, but you may want to choose a pencil shaped bobber instead, which offers less resistance when a trout takes the bait.
If you’re not sure how to rig a fishing line for trout, take a look at our article on what fishing line should you use for trout?
When to use it: This is a great fishing rig to use in shallow ponds and streams, as well as any situations where trout are feeding close to the surface. It’s very easy to set up and a lot of fun to fish with, which makes it an excellent choice for beginners who want to try trout fishing in a stocked pond.
But keep in mind that the maximum depth you can fish this rig corresponds to the length of your rod, since you can’t cast the fishing rig effectively if you set the bobber higher than that.
How to use it: The best way to use this fishing rig is to cast it out with a baited hook and wait for a trout to bite, which is indicated by the bobber being pulled down underwater.
When you see this, set the hook immediately, so the trout doesn’t have a chance to spit out the hook when it feels resistance on the line. This is the best setup for trout fishing in streams and rivers, where you can use it to drift your bait into the best locations that hold trout.
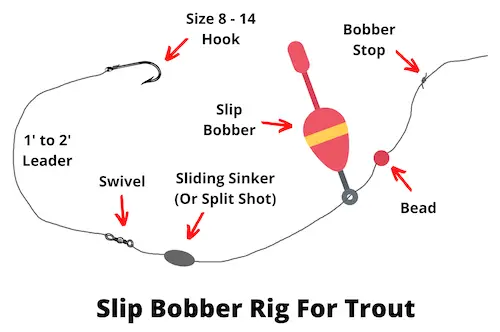
Slip bobber rig
This is another commonly used trout rig, and should be part of every trout angler’s arsenal of fishing tools.
Using a slip bobber rig (aka sliding float rig) makes the fishing rig more compact and easier to cast with than a fixed bobber rig.
How to tie it: Tie a bobber stop on to your main line, and then thread the line through your bobber and tie the line to the hook. The best hook size depends on your bait, but generally lies somewhere between size 8 and 14.
If you’re unsure about choosing the right hook size for different trout line setups, take a look at our article on the best size hook for trout.
Attach a split shot or two to the line between the bobber and the hook. This stops the bobber from sliding down onto the hook and it also weighs down your bait, helping to present it at the right depth to the trout .
Keep in mind that some baits (like powerbait) float in the water, and you may need to add extra split shots to make the baited hook sink down to the desired depth.
When to use it: The slip bobber rig is the best choice when trout are feeding in midwater, and if you can’t reach them with either a fixed bobber rig or with a bottom fishing rig.
The great thing is that you can fish practically any depth with this fishing rig, as you just need to move the bobber stop up the line to whatever depth you want to set the bobber.
How to use it: Estimate the depth of the water you’ll be fishing in, and set the bobber stop to that depth. Then bait your hook and cast out your fishing rig to the desired spot and wait for a fish to grab the bait.
Bottom fishing rigs
Bottom fishing rigs are often the best choice when trout are found in deeper water, as they tend to feed close to the bottom most of the time. There are several options available to you in this rig category, so now let’s look at the most important ones.
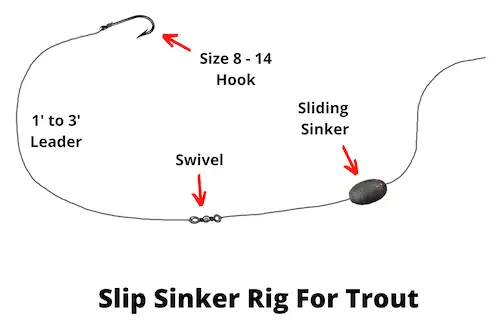
Slip sinker rig
This is the simplest bottom fishing rig around, and is the one most often taught to novice trout anglers. This rig has been in use for more than a century, and continues to perform well in many situations where trout hold close to the bottom.
How to tie it: Thread a 1/8 or 1/4 oz sliding sinker (either a bullet or egg sinker) onto your main line, and then tie the line to a barrel swivel. Attach a leader to the other end of the swivel, and tie your hook to the leader. Choose the type and size of hook depending on the type of bait you want to use.
When to use it: This rig is most commonly used in lakes where trout hold in water deeper than 5 or 10 feet. It’s a great rig to use from shore, since you can cast it relatively far, and cover a lot of water with it.
It’s important to use this fishing rig with floating bait, since you don’t want your baited hook lying on the bottom where trout won’t notice it. You can use it with either powerbait (which is designed to float), or worms injected with air to make them float.
How to use it: This is the most common bait rig used for trout fishing setups, and is usually fished passively. Most anglers cast it out to a promising fishing spot and then wait for a bite. If you do this, make sure to check your rig regularly to see if the bait is still on the hook, and also test different fishing spots.
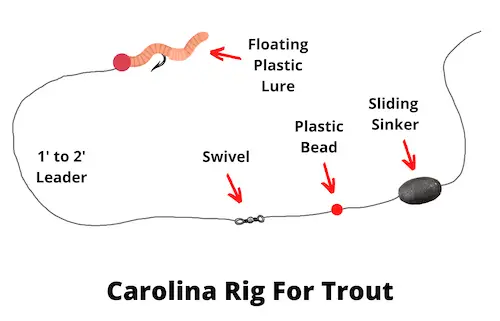
Carolina rig
This rig is very similar to the slip sinker rig, but unlike the slip sinker setup it is often fished actively with artificial lures instead of passively with bait, which is why we list the two options separately.
How to tie it: Start by threading your main line through a 1/8 to 1/4 oz sliding sinker. Next, thread the line through a plastic bead, and then tie it to a swivel or snap swivel. The bead stops the weight from banging into the swivel during retrieval, which protects the knot on the swivel from being damaged while fishing, and this is more important if you want to fish it actively.
When to use it: You can use this option anywhere where trout are feeding close to the bottom. It’s a great option to use when fishing in lakes, reservoirs and ponds, but you can also use it in rivers.
How to use it: While you can also use this fishing rig with a baited hook and fish it passively until a trout comes by and bites, the strength of the Carolina trout fishing rig lies in fishing it actively with a floating lure.
You can use a floating jig head with plastic lures such as trout magnets or power worms. After casting out, let your rig sink to the bottom, and then slowly retrieve it with a jigging movement.
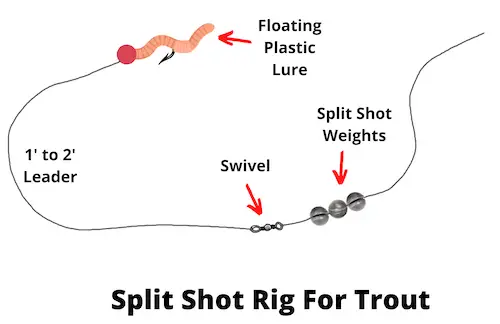
Split shot rig
This is basically a finesse version of the Carolina rig, and instead of a sliding sinker it uses one or more split shots attached to the line. Since trout can be finicky at times (especially when fishing in heavily fished waters), it’s always great to have some finesse techniques up your sleeve.
How to tie it: Tie your main line to a swivel or snap swivel, and then add one or two split shots to the line right above the swivel. Next, tie a 1 to 2 foot long fluorocarbon leader to the swivel, and then tie your hook to the other end of the leader.
Next, thread a soft plastic lure onto the hook, and your trout fishing line setup is good to go.
In most cases you’ll want to use a floating lure on this rig, which will result in presenting your lure right in the strike zone every time the split shots sink to the bottom.
When to use it: This rig is a great option if you notice that the trout are finicky. This is most often the case in heavily fished waters, and especially in clear water it can be advantageous to use a finesse rig that’s harder for the fish to spot. It’s also a great trout fishing set up for small creeks.
How to use it: Cast the rig out and let it sink to the bottom. Then slowly retrieve it with jigging movements of your rod tip. The main disadvantage of the split shot rig is that it can’t be cast as far as the Carolina rig, since it comes with less weight on the line. Because of this, it’s better to use it when fishing in smaller lakes, rivers and streams.
Drop shot rig
This is another great trout fishing rig setup for bottom fishing, and one of it’s key advantages is that it allows you to place your lure in the strike zone and keep it there for a long time. Similar to the two previous rigs, it’s most often used with soft plastic lures.
How to tie it: Start by tying your main line to a 4 or 5 foot fluorocarbon leader with a double uni knot, and then tie the end of your trout leader to a 1/8 to 1/4 drop shot weight.
Next, take a bait hook and place it facing upwards, and form a loop with the leader line about 1 foot above the drop shot weight.
Pass the loop through the eye of the hook from below, and then tie an overhand knot with the loop. Finally, pass the hook through the loop, wet the line, pull tight, and you’re ready to start fishing.
When to use it: While the drop shot rig was originally developed for vertical fishing in deep water from a boat, most bass anglers can tell you that this rig works equally well for fishing from shore, and can even be fished in very shallow water. It’s a great trout fishing setup for beginners fishing in lakes and rivers.
How to use it: Cast the rig out and slowly retrieve it by hopping the weight along the bottom, while jigging the lure up and down. If you figure out where the strike zone is, you can keep the drop shot fishing rig there, and simply wiggle the lure in place without moving the weight. That way you can keep your lure right in front of the fish for a long time, without having to retrieve it and cast again.
Lure rigs
While all of the fishing rigs discussed above can be used as trout fishing setups with either natural bait or artificial lures, some options for rigging for trout are only intended to be used with lures. Let’s take a look at the most important rigs of this type that you should know.
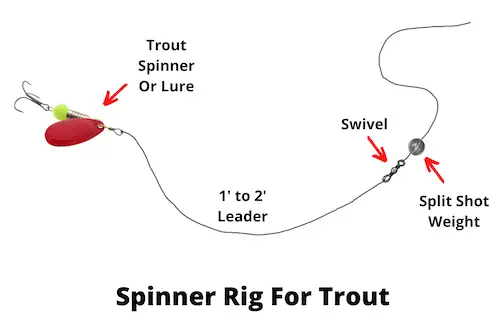
Spinner rig
The spinner rig is the most commonly used lure fishing rigs for trout. It is most often used with spinners (such as a rooster tail or panther martin), but it can also be used when fishing with any other artificial lure designed for casting and retrieving.
How to tie it: Tie your main line to a swivel or snap swivel, and add one or two split shot weights just above the swivel. Next, tie a 2 to 4 foot fluorocarbon leader to the other eye of the swivel, and then tie your lure to the other end of the leader.
Depending on the size and weight of your lure, adjust the number of split shots to achieve the right depth during retrieval. The swivel prevents line twist of your main line, but if you’re using a lure that doesn’t generate twist, you can also tie the main line directly to the leader.
When to use it: This is one of the most versatile trout set ups, and can be used in almost any setting, from small streams to deep lakes. In most cases you should try to fish this rig in the middle of the water column, but can also go deeper than that if the trout are holding close to the bottom.
How to use it: Simply cast out the fishing rig and start retrieving. Depending on how deep you want to fish it, you can adjust your retrieve speed, and you can also experiment with letting the rig sink to the bottom before you start reeling it in. However, if you’re trout fishing over weed beds, make sure to keep your lure above the weeds.
If you’re interested in fishing with trout spinners, check out our complete guide to trout fishing with spinners.
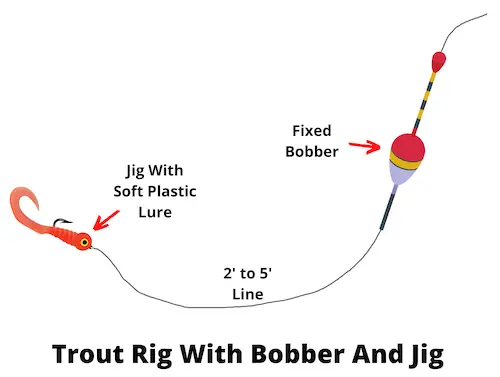
Trout fishing rig setup with bobber and jig
This is a great rainbow trout rig to use if you’re fishing over weeds, as you can fish it slowly without getting the jig snagged in the weeds.
How to tie it: Depending on the depth of the water, you can use either a fixed bobber or a slip bobber.
So start by setting up one of the two bobber rigs (as described above), and instead of tying a bait hook to the end of the line, tie a 1/16 or 1/8 oz jig head to the line. Next, you can bait the jig head with any of a wide variety of plastic lures, and you’re ready to start fishing.
When to use it: This is a great trout fishing setup for beginners when fishing over weed beds, and when want to keep your lure just above the weeds. You can achieve this by setting exactly the right depth with your bobber.
This trout rig setup is also great for drift fishing in streams and rivers, and again you should adjust the setting of your bobber to present the lure just above the bottom.
How to use it: If you’re trout fishing in a lake, cast out the fishing rig and let the jig sink as far as it can (at which point the bobber stands up straight). Then lift your rod tip to retrieve the fishing rig about 4 to 5 feet, and then pause to let the jig sink down again.
What this trout fishing setup achieves is that your jig will be slowly pulled up and then allowed to sink again. In the case of a plastic worm, this results in the worm wiggling through the water, which is highly attractive to most trout.
See also: How to rig when trolling for trout
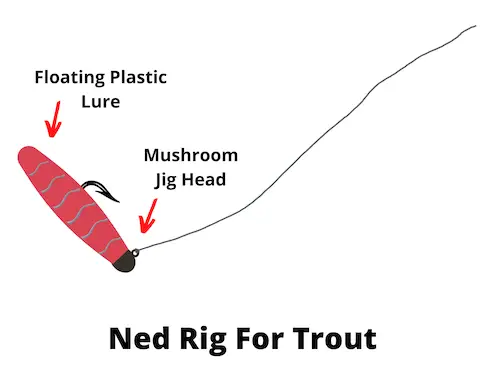
Ned rig
The ned rig is most familiar to bass anglers, but few people know that it also works really well for catching trout. The key feature of the ned rig that makes it so effective when fishing for trout is that it is usually fished with a floating plastic tail, which is ideal for catching trout.
How to tie it: This is the simplest fishing rig to tie in this collection. If you’re using fluorocarbon as your main line, you can tie that directly to the mushroom jig head of the ned rig and you’re ready to start fishing. If you’re using braided line as your main line, it’s best to use a 2 to 4 foot fluorocarbon leader, since that’s much less visible in the water.
When to use it: You can use this rig whenever trout are feeding close to the bottom, and it works equally well in lakes, rivers, and streams. The only situation when you shouldn’t use this rig is if you’re fishing in a lake with a lot of vegetation on the bottom, which is likely to get your ned rig snagged.
How to use it: Cast it out and let it sink to the bottom, then retrieve it for 3 or 4 feet with a jigging motion, and let it settle on the the bottom again. Repeat this until you get a bite.
What are the best trout rigs?
The 3 best trout rigs are:
Slip bobber rig
Slip sinker rig
Spinner rig
Between them, these three setups cover all the three main types of rigging for trout, and if you can set each of them up and fish them effectively, you’re off to a great start.
The slip sinker rig is perfect for presenting a bait close to the bottom, which is the best depth to target trout in most situations.
The slip bobber rig, on the other hand, can be used to present a bait suspended underneath a bobber, which is great when fishing for trout that are active higher in the water column.
And the spinner rig is a great basic setup for active trout fishing with lures, which is an ideal way to cover a lot of water in search of hungry trout.
If you’re currently looking for a new trout rod, check out our article on what is the best rod for trout fishing?
What are the best trout bait rigs?
The 3 best trout bait rigs are:
Slip sinker rig
Slip bobber rig
Fixed bobber rig
Each of these fishing rigs is well suited for baiting your hook with natural baits like worms, maggots, minnows, corn, salmon eggs, or scented baits like powerbait.
In addition, all of them can be used for fishing passively, by casting out your fishing rig and then waiting for a trout to pass by and take the bait.
Trout worm rigs
The best rigging for trout to use with worms is either the slip sinker rig, or the slip bobber rig. The former rig is the ideal choice if you know that trout are feeding close to the bottom, and the latter rig is better if trout are feeding higher in the water column.
When using a slip sinker with a worm as bait, it’s important to make sure that your baited hook floats in the water, as trout will not eat it if it’s lying directly on the bottom. Traditionally, this has been done by injecting air into the worm with a worm syringe (which you can get in most tackle shops).
More recently, many anglers are fishing with floating jig heads baited with worms to make their bait presentation float in the water, and another great trick is to put a small marshmallow on the tip of your hook, which also makes it buoyant.
Finally, no matter which trout worm rig you use, it’s usually best not to use a whole nightcrawler on your hook, as this is too big to fit into the mouth of a trout. Instead, cut off a 1 or 2 inch piece of the worm, and thread it onto the hook.
The best hook type to use for this rig is a baitkeeper hook, which prevents the worm from sliding down the shank of the hook.
Minnow rigs
The best trout rig to use with minnows is either the slip bobber rig, or the fixed bobber rig. Your hook size should be between size 8 and 12 (depending on the size of the minnow). The best way to hook a minnow for trout is through the upper lip.
Small fish form a large part of the diet of many trout species, which is why they can be such a good bait.
Bobber rigs are great for fishing with live minnows, since you can easily spot a trout bite when the bobber goes down, and this allows you to delay your hook set long enough to give the trout a little extra time to get the minnow fully inside its mouth.
Which one of the two bobber fishing rigs you choose depends on the depth of the water you want to fish in, and on the depth at which trout are active.
When fishing with live minnows as trout bait, it’s important to weigh them down with split shots, so they stay at the right depth.
Salmon egg rig
The best trout rig setup to use with salmon eggs is one of the following:
Slip bobber rig
Fixed bobber rig
Drop shot rig
Your hook size should be between size 8 and 14, and if you use a larger hook, you can thread several salmon eggs onto your trout hook. No matter which fishing rig you choose, you need to cast very gently in order to avoid ripping the eggs off the hook during the casting process.
If you’re trout fishing in a lake or pond, the best choice is a bobber rig, as that allows you to present the salmon eggs suspended in the water. But if you’re trout fishing in a stream or river, you can use a bobber rig to drift the salmon eggs with the current.
Alternatively, you can also use a split shot rig to drift the salmon eggs right on top of the bottom of the stream. The latter approach is better for getting it right in front of the trout, but it’s harder to detect bites with this style of fishing.
Egg rigs also work very well for steelhead fishing, and it that’s something you’re into, check out our article on how do you rig for steelhead bank fishing?
Final remarks
This concludes our article on rigging for trout, and hopefully we’ve helped you find exactly the right rig for your fishing technique.
Different trout rigs are ideally suited for different trout fishing tactics – bait fishing, lure fishing, trout fishing from shore, trout fishing from a boat, as well as fishing in diverse bodies of water, ranging from small streams to big lakes.
Now that you understand the basics of what each of these fishing rigs is designed for, this should help you to choose the best trout setups to help you to catch more fish in your local trout fishery.
When I first got my hands on some 6.5 PRC ammunition from Hornady, my initial thought was how its performance would compare with other factory cartridges of the same caliber.
A comparison of case capacities is a good starting point for finding out. When filled to the brim, gross water capacity of the 6.5 PRC averaged 67.6 grains. Moving down to smaller capacities, we have 6.5 Creedmoor and 6.5-284 cases made by Hornady at 53.4 grains and 64.3 grains respectively. Moving up to a couple with bigger capacities, we have the 6.5 Remington Magnum at 70.2 grains and the .264 Winchester Magnum at 84.1 grains. Capacities for the 26 Nosler and 6.5-300 Weatherby Magnum are 98.2 and 96.7 grains respectively.
As you can see, the 6.5 PRC holds just over 3 grains more powder than the 6.5-284 and just under 3 grains less than the 6.5 Remington Magnum.
My next step was to compare velocities of the three cartridges in rifles with 26-inch barrels. Before going there, let’s take a close look at our newest cartridge of its caliber.
The 6.5 PRC (Precision Rifle Cartridge) story begins back in 2012 when George Gardner, owner of GA Precision, who is heavily involved in PRS (Precision Rifle Series) competition, approached Hornady about developing a big brother to the 6.5 Creedmoor on the RCM (Ruger Compact Magnum) case. It would be used mainly for banging steel targets beyond 1,000 yards. But that was when the Obama administration was selling far more ammunition for Hornady than the company could produce, and the time and machinery required for developing a new long-range rifle cartridge were not available.
The 6.5 PRC is the latest 6.5mm cartridge to come on the scene. It’s based on the Hornady-developed RCM (Ruger Compact Magnum) case and is a big brother to the popular 6.5 Creedmoor.
So Gardner necked down the 7mm Remington Short Action Ultra Magnum case for 0.264-inch bullets. Remington brass eventually became difficult to find, but by then Hornady was caught up enough to begin producing what would eventually add up to thousands of 6.5mm SAUM cases, all sold through GA Precision. They are headstamped “6.5 GAP 4S,” but the cartridge is more commonly known in hunting and competition circles as the 6.5 SAUM. It is simply the 7mm SAUM case necked down.
Considering the production by Hornady of 6.5 GAP 4S cases, the next logical step appeared to be ammunition coming off the line in Grand Island, Nebraska. Instead, the Hornady-developed RCM case was used to produce the 6.5 PRC. A maximum case length of 2.030 inches makes it 0.015 inch longer than the .338 Compact Magnum case and 0.070 inch shorter than the .300 Compact Magnum. All share a 30-degree shoulder angle.
Most 6.5 GAP 4S rifles are custom jobs, and while plenty of custom rifles in 6.5 PRC are likely to be built, the availability of less-expensive factory rifles from Savage, Montana Rifle Co., Sauer, and others likely to follow makes it more affordable than the 6.5 SAUM. Other advantages are the availability of factory ammo and a reliable supply of less-expensive unprimed cases from Hornady.
Two 6.5 PRC factory loads are currently offered. Hornady Match is loaded with the 147-grain ELD Match bullet at an advertised 2,910 fps, and Precision Hunter pushes the 143-grain ELD-X along at 2,960 fps. Load data is no farther away than the Hornady and Hodgdon websites. Most who publish pressure-tested data will likely stay below the SAAMI maximum of 65,000 psi. Hodgdon stopped at 61,500 psi and 2,995 fps for a 140-grain bullet from a 24-inch pressure barrel. The Hornady data sheets I have don’t include chamber pressures, but maximum velocities listed from a 26-inch barrel are 3,150 fps for 140- and 143-grain bullets and 3,050 fps for the 147-grain ELD Match.
The 6.5 SAUM has proven capable of consistently delivering accuracy inside 1/2 MOA from accurate rifles, and to see if the 6.5 PRC is capable of equaling that, I shot it in a precision-built rifle put together by Don Fraley, owner of Advanced Weapons Technology in Russell, Kentucky. His rifles are on blueprinted Remington Model 700 actions, and since early reports described the 6.5 PRC as a short-action cartridge, we initially assumed the test rifle would be on the short version. Digging a bit deeper revealed that the new cartridge is too long for the short Remington Model 700 magazine. With an interior length of 2.840 inches, it restricts cartridge length to a maximum of 2.815 inches. SAAMI maximum for the 6.5 PRC is 2.955 inches, with the two Hornady factory loads measuring 2.950 inches.
The 6.5 PRC’s closest competitors are the 6.5-284 Norma and the 6.5 Remington Magnum. Layne put them to a head-to-head comparison. From left to right: 6.5 PRC, 6.5 Creedmoor, .260 Remington, 6.5-284 Norma, 6.5 Remington Magnum, .264 Winchester Magnum
A partial solution does exist. The interior length of Wyatt’s Outdoor magazine box for the short Model 700 action is 3.060 inches, and deducting 0.025 inch from that we arrive at a maximum useable cartridge length of 3.035 inches. Its installation requires light machine work on the receiver and modifying the boltstop, both easy tasks for a skilled gunsmith. That magazine will accept Hornady 6.5 PRC ammo, but very little wiggle room remains for chasing the rifling with handloads as chamber throat erosion requires seating high-BC bullets farther out of the case.
Everything considered, I became convinced that the long Model 700 action is the easiest way to squeeze top velocities from the 6.5 PRC while staying within SAAMI maximum chamber pressures. I tried the 6.5 PRC in the magazines of several Model 700 rifles in various calibers, and feeding was flawless in one in .300 Remington Ultra Magnum. The long Model 700 action is only 3 ounces heavier than the short action, so when heading for the hills, I will compensate by leaving a candy bar behind. Using what was originally intended to be a short cartridge in a long-action rifle is hardly new. When loaded with some of the old-school bullets, the original 6.5-284 wildcat works fine in a short action, but seat the new breed of high-BC bullets long and change its name to 6.5-284 Norma and a long action is required.
A Special Test Requires a Special Rifle
The Advanced Weapons Technology rifle I used for accuracy-testing the 6.5 PRC is the Long Bow model. It has a tactical-style bolt handle, an M16-style extractor, and a Lawton/Nosler exterior bolt release from Pacific Tool & Gauge. The HS Precision Pro-Series stock is a combination of fiberglass, Kevlar, and carbon fiber. Steel-reinforced bedding compound applied by Fraley extends from the tang of the receiver to 1.5 inches beyond the recoil lug.
The 26-inch Select Match barrel from Shilen has that company’s ratchet rifling at a 1:8 twist, and the contour is listed by Shilen as Heavy Sendero. It free-floats in the stock. Pertinent chamber dimensions are a 0.2985-inch neck diameter, a 0.2645-inch throat diameter, and a 0.2050-inch throat length. The barrel has an 11-degree crown at the muzzle, and it wears an extremely efficient and surprisingly quiet AWT eight-port brake. The barreled action has a black Cerakote finish. Measured with a Lyman digital scale, the Timney 510 trigger breaks crisply at 35 ounces with a 2-ounce variation. There is no detectable creep or overtravel. The rifle came with a 20-MOA Picatinny base installed, and for accuracy-testing, a Trijicon AccuPower 5-50X 56mm scope in Weaver 34mm tactical rings was used.
While the 6.5 PRC has been described as a short-action cartridge, it is much too long for the magazine of the Remington Model 700 short action. The long Model 700 action of the Advanced Weapons Technology test rifle is only 3 ounces heavier than the short action, and its magazine allows extremely long bullets to be seated completely out of the powder cavity of the case.
The accuracy of different loads fired in a precision-built rifle will vary a bit in accuracy, but the spreads are usually quite close compared to mass-produced factory rifles. Fraley guarantees his rifles to consistently shoot five bullets inside a half-inch at 100 yards, with precision handloads pushing accuracy in the direction of 1/4 MOA.
When good handloading practices and quality equipment and components are combined with a bit of bullet jump and powder charge juggling, it’s fairly easy to produce ammunition capable of half-minute accuracy, but shrinking group size to half that usually requires precision loading. Hornady 6.5 PRC cases were trimmed to the exact same length and their mouths chamfered and deburred. Cases were then capacity sorted and their necks outside-turned just enough to uniform neck wall thickness. Doing so reduced neck wall thickness by only 0.0005 inch, which put diameter of a loaded round at 0.291 inch compared to 0.292 inch for Hornady factory ammo. Primer pockets were uniformed, and flash holes were uniformed and deburred. Prior to being seated, all bullets went through a bullet-sorting stand from Sinclair International. Powder charges were weighed with an RCBS Model 304 scale, and RCBS Gold Medal Match dies were used in a Corbin CSP-1 bullet-swaging press converted for ammunition loading. A 0.289-inch bushing was used in the RCBS neck-sizing die.
In addition to consuming a lot of time, developing a precision load for just a single bullet-powder combination capable of equaling the accuracy of a super-accurate rifle can use up a lot of barrel accuracy life. For that reason, only four bullets were precision-loaded specifically for the test rifle. When accuracy-testing an extremely accurate big-game rifle, I usually shoot three-shot groups, but since the barrel of the Fraley rifle had a rather heavy contour with a muzzle diameter of 0.825 inch, I fired five-shot groups. To illustrate velocities possible with other bullet-powder combinations, I simply worked up to maximum in non-prepped cases.
Most who shoot the 6.5 SAUM use the Federal 215 and CCI 200 Magnum primers, so I was a bit surprised to see both Hornady and Hodgdon use standard-force primers when developing data for the 6.5 PRC. I tried Federal’s GM215M and GM210M primers, and while accuracy was about the same, velocity spread was lower with the former. It was not enough to matter at ethical game-taking distances, but it was enough to matter to those who punch paper or steel at 1,000 yards and beyond.
There is no scarcity of 6.5 PRC handloading components. Layne found accuracy to be about the same with Federal GM210M and GM215M primers, but velocity spread with some powders was lower with the GM215M primers.
Comparison Results
How does 6.5 PRC performance compare with its two closest competitors, all in 26-inch barrels? My Ruger No 1S in 6.5 Remington Magnum departed the factory in July 1965, and I purchased it new-in-box from a friend in 1978. I could never get it to shoot accurately enough to make me entirely happy until Randy Brooks introduced his Barnes X-Bullet in 1985.
Soon after adding a Cooper Model 22 in 6.5-284 Norma to my battery, it accounted for my second-best whitetail deer. My handload consisted of 53.5 grains of Reloder 19 behind the Swift 130-grain Scirocco II. The Model 22 is proof that you don’t have to have a custom rifle in order to enjoy superb accuracy.
Three different rifles might have slightly different stories to tell, but when the three cartridges are loaded to maximum with 140-grain bullets and fired in my rifles, the 6.5 PRC is about 100 fps slower than the 6.5 Rem. Mag. and about 100 fps faster than the 6.5-284 Norma. The 6.5 Rem. Mag. has long been one of my favorite cartridges, but since factory ammo and unprimed cases can be difficult to find, I have to recommend the other two cartridges over it. If, like me, you already have a rifle chambered for 6.5 Rem. Mag., by all means keep it active in the field because it is a great cartridge. But if you are shopping for a new rifle, the other two are better choices.
As it now stands, there are more sources for 6.5-284 Norma ammunition than for 6.5 PRC, although actual availability can vary due to fluctuations in production scheduling. A steady supply of ammunition gives the 6.5 PRC an edge among those who shoot factory ammo, but due to the availability of unprimed cases for both, handloaders should be equally happy with either cartridge. Those among us who cannot resist praising the new without condemning the old will point to the rebated rim of the 6.5-284 case, but decades of experience with that cartridge have not revealed a single problem with it. On the other hand, off-the-shelf factory rifles in 6.5 PRC may eventually far outnumber those in 6.5-284 Norma, and if that happens, it will have a big edge on the road to commercial success.
Many hunters each season harvest a deer and pay a processing facility to butcher the animal. One of the comments we saw a lot when we made our video on butchering a deer at home was the amount of meat that many processors waste. That’s exactly why we wanted to put this guide together.
There is a special relationship you will find knowing that you harvested your venison, dressed, skinned, and butchered the meat, and made a meal that your friends and family will talk about for years. You can butcher a deer at home and know that you wasted nothing, plus you’ll save money. Once you know the best way to butcher a deer, you can do it quickly, often finishing the major steps in less than half an hour.
A properly harvested deer begins with good shot placement and field dressing the animal quickly. We have put together guides for you to properly field dress a deer in print and on our Youtube channel.
For this process, we are going to use the Outdoor Edge RazorMax. This knife has interchangeable blades, so you can quickly switch from a 5” boning knife to a 3.5” drop point. You can purchase our favorite knives right from our website.
Begin skinning your deer by making a cut down the back of the hind legs. Be careful not to cut the Achilles tendon, as you will hang the deer from that at a later stage. After you have made the incision, you can start to pull the skin down the leg, like removing a sock. Keep the meat as clean as possible. Disposable gloves are a good idea, and you should change them when they are contaminated.
As you pull the skin down, you will find a joint. You can make an incision with your knife around and into the joint and snap the lower leg off. Continue pulling the hide down and rolling it so that the hair does not touch the meat and expose the tendon. Do this for both back legs.
You can go to the front and do the same thing as with the back legs. Simply find the joint, make an incision, and snap the lower leg off. Now you are ready to finish skinning your deer.
Hanging Your Deer
The easiest way to skin a deer is by hanging it. We are lucky to have an overhead hoist in our butcher shop. If you don’t have access to a hoist, there are a number of ways to hang a deer. You can use a chain fall and gambrel from the rafters in your garage. You can even use a sturdy tree. Placing a waterproof tarp underneath will help with cleanup.
If hanging a deer to skin is not possible, it can be done on the ground, but it is much more difficult and you should plan on making sure your carcass stays clean. Use tarps.
You will fit the gambrel through the tendons of the back legs and lift the carcass up to about chest level. This will give you good leverage to push the hide down. You’ll hardly use your knife as you skin the haunches. You can finish your cut through the groin and pull the skin back to the haunches.
When you start to work along the front of the legs, be careful not to cut the flap meat. You will find a membrane that holds the flap, and you want to make sure not to cut into it. You want the flap meat to stay on the carcass, because it will make pulling the hide off much easier.
At this point, you can pull the hide down and cut through the tail. Continue to grasp the hide and push down with your hand or fist. Be careful to avoid contaminating your deer. Change your gloves regularly. When you have gotten down to the chest area, you should raise your deer up again if possible.
Finishing the Skinning Process
The hide will be more difficult to remove in the neck, particularly with a buck. If you’re not cutting the cape for a shoulder mount, you can cut the hide down the throat to the jaw. This will make it easier to pull the hide off. Use your knife to cut through the spine at the base of the skull. Cut through the esophagus and pull the hide off the rest of the way.
Pull the esophagus through. Now you will have an opening through the neck. Your carcass should be pretty clean without any hair on it. You can rinse the cavity out to get rid of any blood. If your deer was gut shot, you should not rinse it. All you are doing is spreading contamination around. You will need to cut the contaminated parts out and discard them.
Skinning an animal is a skill that takes practice to get good at doing. When you first start out skinning, it will take you a long time to do the job, and that’s fine. You should be patient and be careful to make sure you remove the hide cleanly without damaging your meat.
A few tips that can help a lot:
Start with a Sharp Knife
This may seem obvious, but you wouldn’t believe how many times we have seen mangled, hacked up deer because someone tried to use a dull knife. You should become skilled at sharpening a knife and you should have a basic knife sharpener with you on your hunt. Regularly ensuring the blade of your hunting knife is kept sharp will speed up your skinning process. Even the best knife in the world will not hold an edge forever. One of the reasons we recommend the Outdoor Edge RazorMax is the quick-change blades. This way, you don’t have to stop halfway through the process to sharpen a blade.
Use Correct Knife Technique
A sharp knife makes it easy to cut, but you still must be cautious about the way you use your knife. Always be aware of where your hands, or a helper’s hands are when working with a knife. It’s unbelievably easy to accidentally cut someone or yourself when skinning. Make short, precise cuts away from yourself. Keep your knife handle clean. A non-slip handle is very beneficial.
Wear Gloves
Gloves will significantly help your cleanup process, but most importantly, they help prevent spreading contaminants around while you are skinning and butchering. It is particularly important to prevent spreading hair around on the meat. Changing your gloves periodically while skinning will help to keep the hair on the hide and off your dinner.
Use the Buddy System
Skinning any large animal is a chore to do by yourself. Once you have plenty of experience, it won’t be as difficult, but an extra set of hands and eyeballs can really come in handy for balancing the carcass while skinning and butchering.
With these tips and our guide, you should be able to start skinning like the professionals. Practice makes perfect, so keep at it. Offer to help others who are skinning, just so you have the opportunity to see and experience the process. The more you do it, the easier it becomes. For a visual breakdown of the process, make sure you check out or video below.
Next, we will show you how we butcher a deer so that you can learn to do it at home, save money on processing charges, and get the cuts of venison you really want. Later, we’ll show you some of our favorite ways to prepare venison and share some family favorite recipes and techniques.
So you field dressed and skinned your deer, but what’s next? In this article, we’re going to explain the process and techniques we use at home to butcher a deer and prepare the meat for final cuts. A lot of the information here can also be found on our Youtube channel if you would like to see the process we use.
It’s key to make sure your deer is completely clean and free of hair and dirt before butchering. Cleanliness is essential. You do not want to accidentally ruin your venison because of carelessness.
Butcher a Deer
We are going to go through and show you how to break the carcass down into the different muscle groups, then we will come back and show you how to further process those parts. We are using the Outdoor Edge Butcher’s Knife Kit. It comes with all of the essential tools you need. We’re going to use the bone saw, the boning knife, and a larger butcher blade that is similar to a Bowie knife. This is a great set of tools to pick up, we highly recommend them for your at home butchering. Let’s get started!
Tenderloins or Fish Tenders
The first thing you will do is reach inside the carcass and find the tenderloins. We call them fish tenders because, well, they are about the size of a fish fillet. Once you get them started, they pull out easily. A lot of people miss these or cut into them when field dressing their deer, which is really a waste of one of the best parts.
Rear Quartering
We are going to use the Outdoor Edge bone saw to quickly remove the hind quarters. This just makes the next steps easier. First, trim the flap meat, then cut through above the hip joints.
Switching back to the boning knife, you will use some downward pressure to separate the hip joints and slice the haunch off. You can use the edge of the table as you cut to get leverage. This will help separate the joint. Set the rear haunches aside for now. Later, we will break those down into the sirloin, top, bottom, and eye of round roasts and tell you how to make some jerky.
Front Quartering
Most of the time as you are butchering an animal, you will see visual cues where to cut. As you work along the front legs, you will find a membrane between the muscles. Just follow that with your knife, and the shoulder will come apart easily. Use short strokes with your knife and apply pressure with your other hand. The muscle groups will usually come apart. Set the shoulders aside. Later, we will clean these up and describe how to cut a venison flat iron steak.
Ribs and Backstrap
Use your knife and make an incision down the spine. Cut along the carcass to the rib, and work the knife back toward your first cut. Like filleting a fish, if you make these cuts right, your backstrap will come right off. The backstrap is one of the most prized parts of a deer. You will make these cuts on both sides to remove the backstraps. Later, we will tell you how to finish processing these and make them into chops.
This is where the heavier bladed butcher knife comes in handy. You will need to cut through the sternum to separate the ribs. There is a piece of cartilage that makes cutting easier. You can also use the bone saw to quickly hack through the sternum.
Use the heavier knife and a sawing motion to cut the ribs from the spine and remove them. These are great on the smoker as is, but if they are too big, you can cut the bottom portion off. Find the cartilage and cut through it to remove. You can process that part later to add to ground venison. Now, you have St. Louis style ribs.
Use the bone saw to remove the remainder of the ribs. An extra set of hands comes in very handy on this step. A pro tip is to use your knife to cut through the muscle to the bone before starting to cut with the saw. This way, you are not wasting energy cutting muscle with the saw.
Waste Not, Want Not
Carefully go over the remaining spine and neck portion to remove any usable bits of muscle. These can be ground up with other trimmings and make amazing sausage. Most of the bones can be boiled down and used to make stock. Venison bone stock makes out-of-this-world gravy, and is an excellent natural immune system booster. The only bones you should not use are the skull, brain, and spinal cord. Some animals can carry diseases that may be transferable to humans and can withstand industrial heat sanitation temperatures. It’s just not safe to use these parts.
Many people have very strong opinions on using deer fat, and there are some serious things you should consider before embarking on rendering your fat.
Probably the most important thing to consider is the diet of the animal you harvested. Deer feeding on grasses, grains, or acorns are likely to have fat similar to that of grass-fed beef and will be pleasant. Deer eating scrub brush and such should be avoided. These deer are likely to have little fat, and what they do have will not taste good.
Fat you find inside the carcass and surrounding the liver is called suet. This is used to make tallow for candles and can be saved, but is usually discarded when field dressing a deer. If you want to embark on a candle-making adventure, or if you know someone who is interested in buying suet to make tallow, you can save these parts.
If you do render deer fat for cooking, remember a little goes a long way. Too much, and it will coat your mouth in an unpleasant way. Deer fat does not keep and will go rancid within three to four months even in the freezer.
Getting Ready for the Next Step
Your deer has been broken down into the major groups now, so it is time to move on to the types of cuts you can get from your deer. We have videos on our Youtube channel that show the best way how to skin and butcher the deer you have harvested.
In Part Three, we will discuss how to get the best cuts and share with you some of our favorite ways to make venison at home using The Bearded Butcher Blend spices and seasonings.
Once you have finished the basic butchering steps outlined in part two of this guide to butchering at home, it is time to process your quarters into proper cuts of meat.
As we go along here, we will explain the different cuts and give you some tips about the way we like to prepare and season venison using our Bearded Butcher Blend Spices. We are going to continue using the Outdoor Edge Butchering Kit. The knives in this set are excellent for making great cuts of venison at home.
Back to the Venison Backstrap
The first thing you want to do when trimming your backstrap is to find the seam in the muscle. You can open this up by hand, and then give it just a little help with the knife to expose the edge. Trim the long edge off and save it for trimmings.
Next, find the thick spinal sinew that runs all the way down the backstrap and cut that out. This is often used to make traditional bowstrings. Now, we need to remove the silver skin.
Use the fish fillet method by starting at the thick end of the backstrap and cutting down to, but not through the silver skin. Then carefully press the knife away from you while gently pulling the edge of the silver skin and the silver skin will come off. If some parts are missed, you can flip the backstrap over and angle your knife blade against the skin and gently cut away from yourself. This way, you can catch the skin and lift it off without destroying the backstrap.
With the silver skin and sinews removed, you can cut the backstrap into 1 ¼” slices for chops. These are some of the most desirable cuts of venison.
Dressing up a Deer Backstrap
A way to cut and prepare a backstrap that is sure to impress is to butterfly the backstrap. To do this, you will cut the backstrap into thirds. Using the thickest portions, place your hand on top of the backstrap and use your knife to cut as close to the table as possible without cutting through the backstrap. Using your other hand, gently unroll the backstrap as you cut. You can continue to cut and unroll the backstrap until you have one uniform, thin layer.
You can season this with Bearded Butchers Spices. The Original is a personal favorite on a backstrap like this. Next, you will layer whatever filling you would like. Feta cheese, spinach, and onions is a good choice. So is cream cheese and jalapenos for a creamy spicy kick. All you have to do is roll the butterflied backstrap up and tie it off. Smoker, grill, or the oven, this is a great way to make a backstrap.
Breaking Down the Deer Hind Quarter
Next, we are going to separate the hind quarters. These parts can be used for many great dishes. The major portions are the round steaks. These are the ideal cuts for jerky. We are also going to detail how to get a great sirloin roast from a hind quarter.
Get started by applying a little downward force with your knife at the knee joint. When you are in the right spot, you will cut the shank off cleanly. Alternatively, you can use the bone saw to cut through the joint, but be sure to start with your knife. Bone saws don’t work well on muscle.
Using your boning knife, follow the femur bone down until it is separated from the meat. Cut around the bone and lift it out of the muscle. Now you will have a 100 percent boneless piece of venison.
There are four muscle groups we are going to deal with in the haunch. The first is the round point. The round point, also called a sirloin when it is properly dressed, has a membrane that holds it in place. You can start working it free by hand and use your knife sparingly to trim it out. This is the best piece to make roast venison, but you can also cut it up into cubes for stew meat. If you remove the connective tissue, you can also slice this into jerky.
From here, you are going to separate the other three muscle groups. These muscles will pull apart pretty easy when you find the seam in the membrane. This will take experience to learn to do quickly. A trick is
"Air Rifle Scope vs Rifle Scope: Unveiling the Ultimate Precision Optics. Discover the essential differences and benefits of these two optical devices, empowering shooters...
")
")
")
")
")


 Review – The Best Name In The Air Rifle Game")


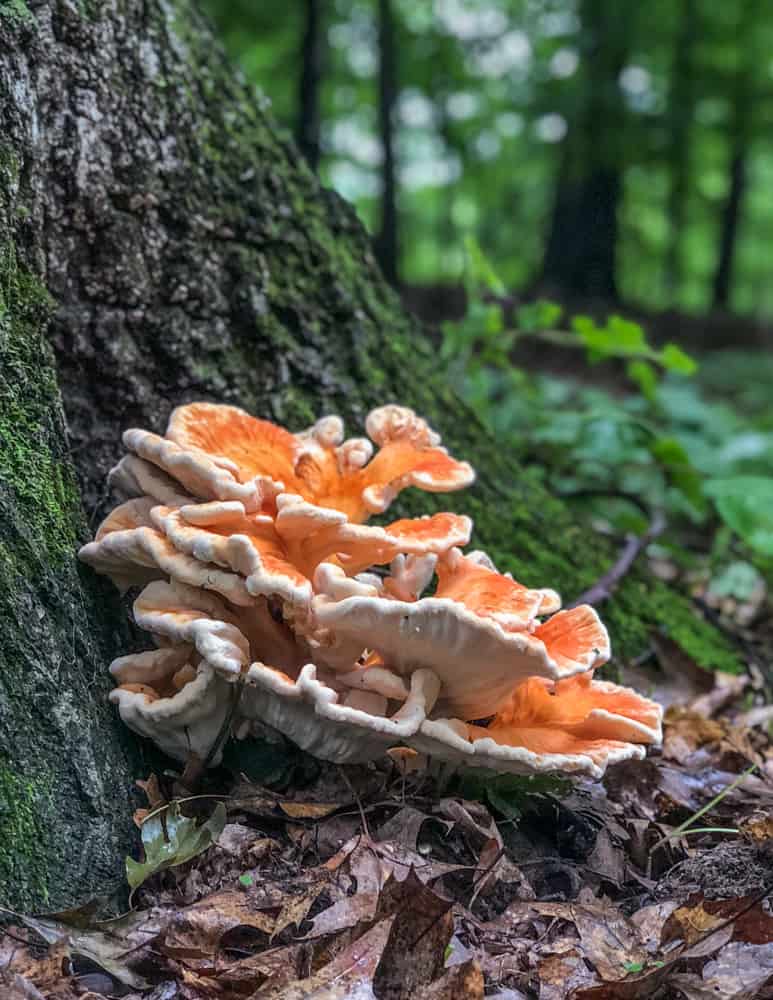


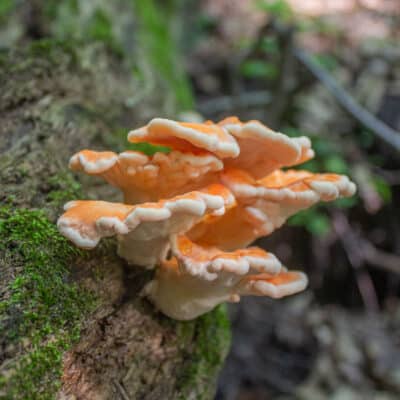


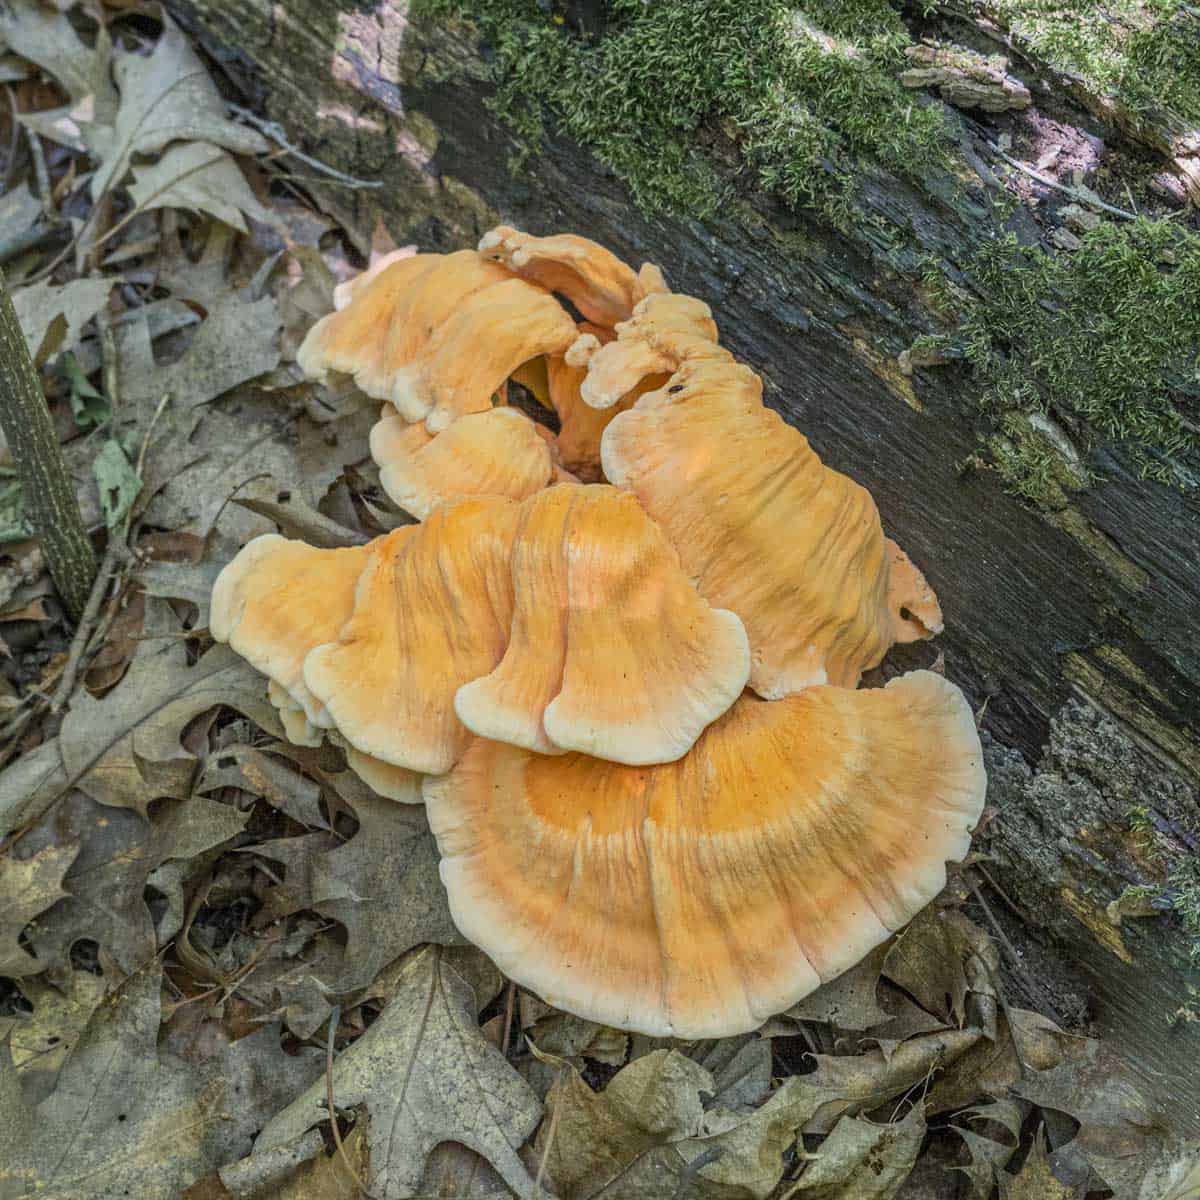


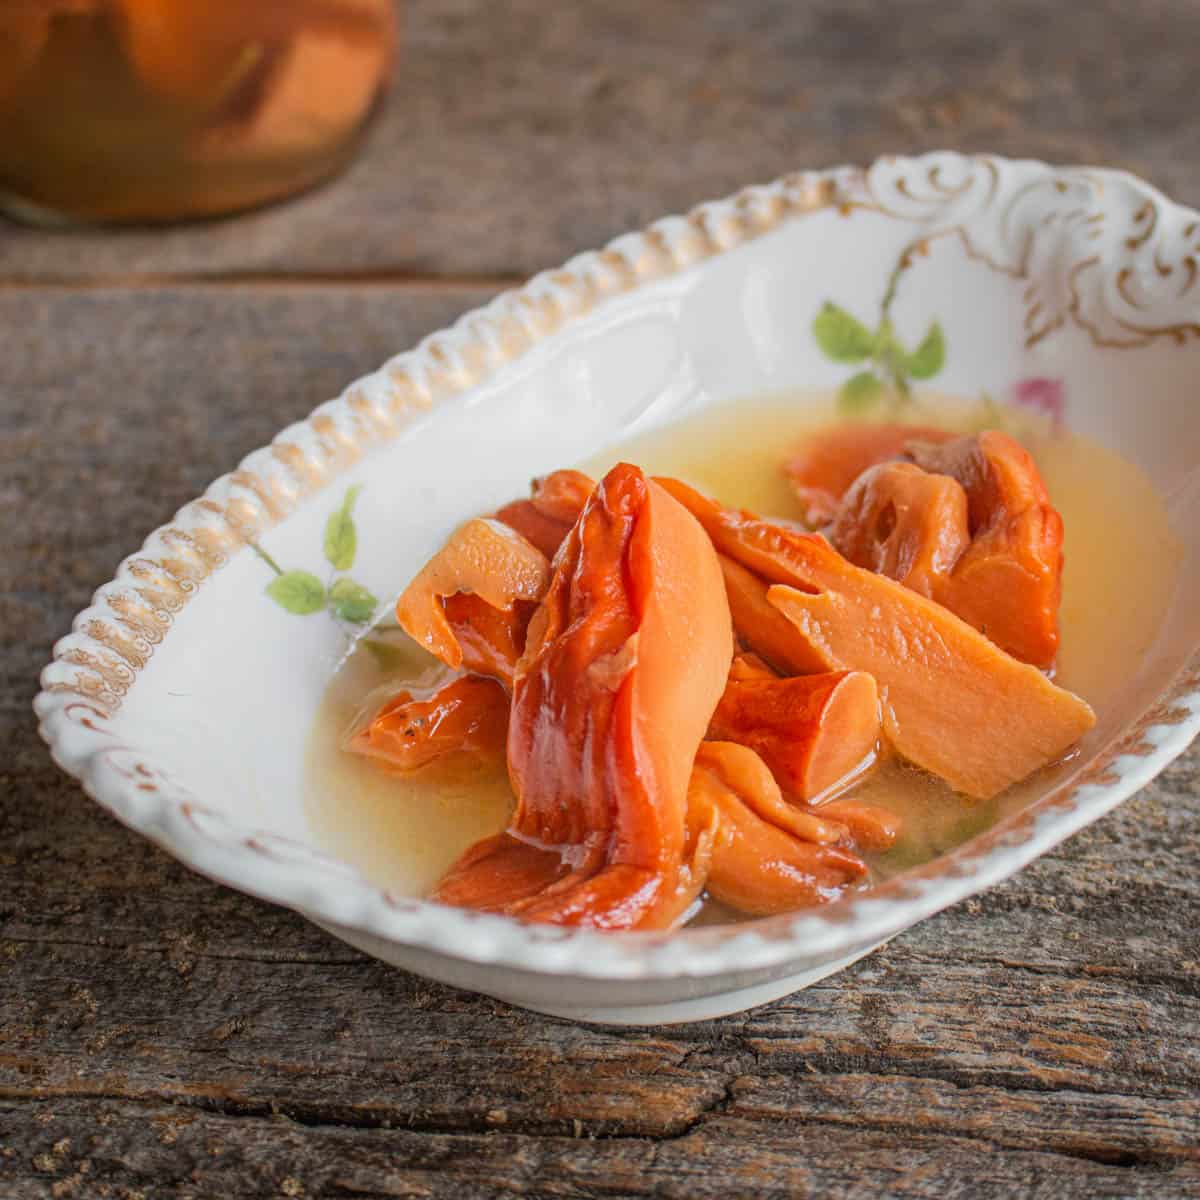


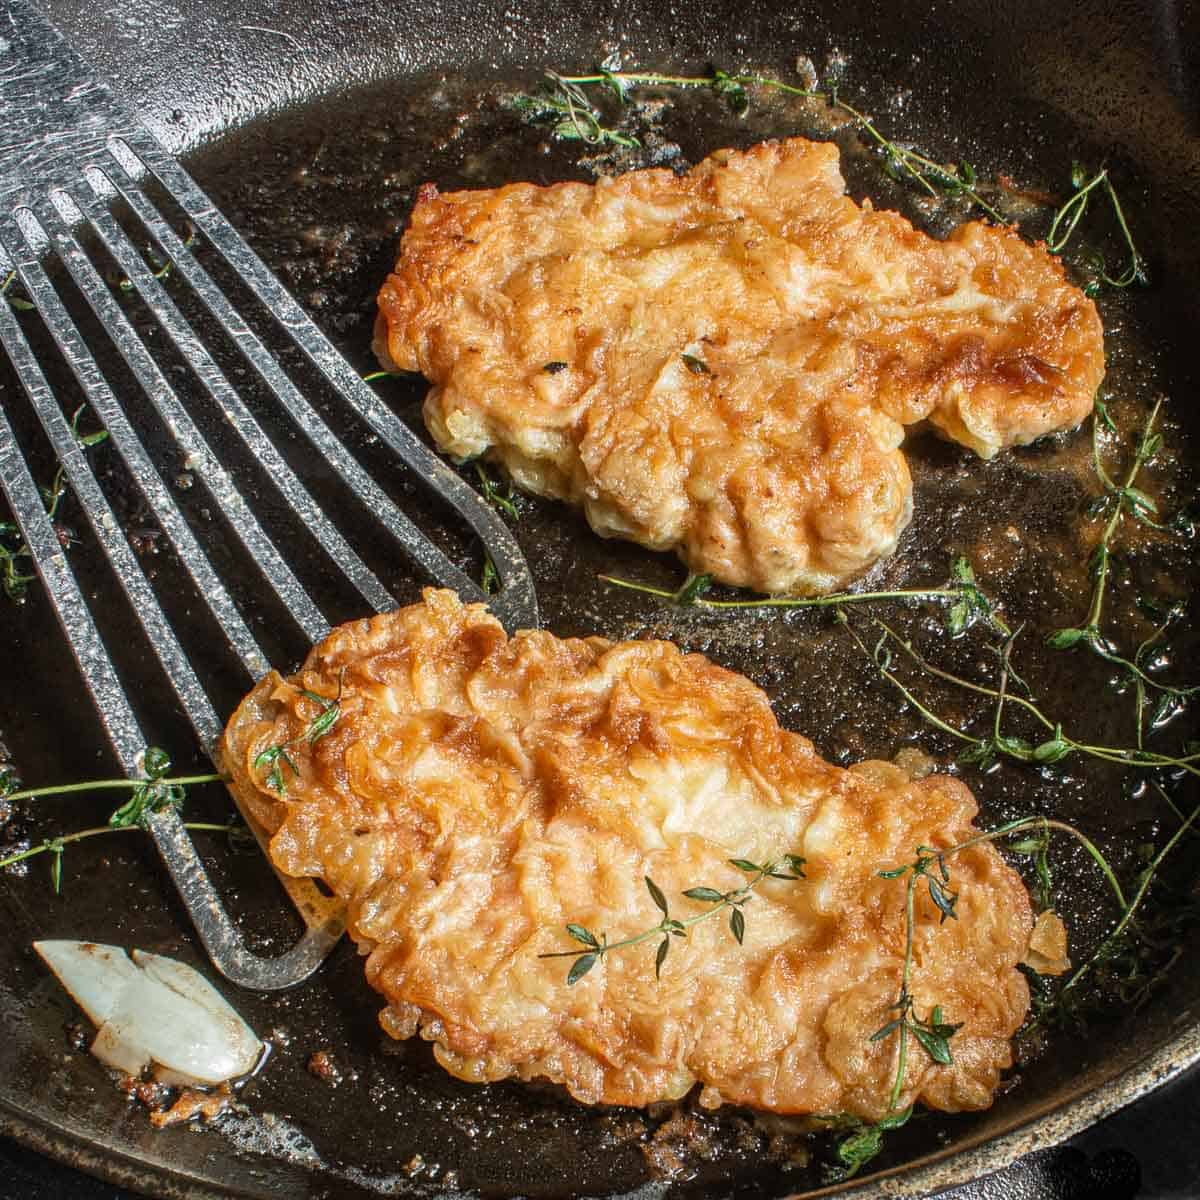


 My Chance
 Conclusions
 Materials for this task are encouragingly minimal. A worthy backpack is required, so choose your pack for the day carefully. A good, sharp knife is necessary to get through all the skinning, separating of joints, etc. Meat bags round out the list, and the one from Koola Buck I used was great. It is rated for elk-sized needs, and just one could accommodate an entire whitetail (not that mine was light enough). Splitting the load into at least two meat bags is customary, so be sure to obtain an appropriate number of bags for your task.
 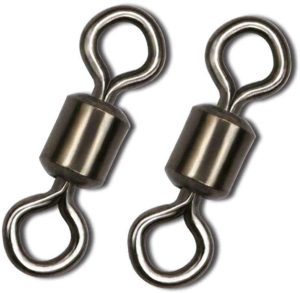 The barrel swivel is the original fishing swivel, and simply consists of a pivoting joint with two rings attached to either end. The joint in the middle is usually round, or sometimes a small barrel.
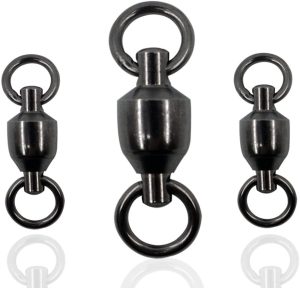 A ball-bearing swivel is an improved version of the barrel swivel, and comes with a ball bearing inside the pivoting joint. Due to this ball bearing, the rings of the swivel rotate much more freely than those of a standard barrel swivel, and thus prevent line twist more effectively.
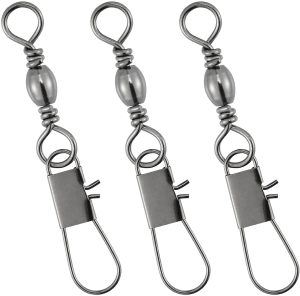 A snap swivel is an improved version of the barrel swivel that comes with a snap attached to one end, instead of the regular ring. The most common way to use a snap swivel is to tie your main fishing line to the ring of the swivel, and then use the snap to attach to the ring of a lure.
 The finesse swivel is a relatively new swivel type that’s used for fishing with a drop shot rig. It consists of a hook that is directly attached to the swivel, and can rotate around the axis of the swivel.