In this cartridge comparison of the 7mm Rem Mag vs .300 Win Mag, we are dealing with two cartridges that each carry loyal users and often find themselves the subject of heated debate on numerous firearm forums and within hunting lodges. Both cartridges were released to the public hardly a year apart and further adds to the rivalry that has been raging. Regardless of where your allegiances are situated in this topic, hopefully you are coming into this with an open mind, because both of these magnum rounds are tremendous cartridges and their popularity and longevity in such a cutthroat field speaks in volumes to their performance.
For two cartridges that overlap in so many applications, it is easy to get on the path of trying to determine which cartridge is better. We are not here to lobby for one cartridge over the other. Instead, we want to present the numbers and discuss any strengths and weakness of both cartridges. By doing this, you as a reader has a better resource and source of knowledge to make your own decision.
We will look at several ballistic categories as well as other performance specs throughout the article, and we hope that in the end, you come away with information for a more educated decision based on your hunting and shooting needs.
A Brief History
While some of you might have no interest in the history of either of these rounds, we not only think it is interesting, but we think that if you have an idea of why these cartridges were designed and produced gives you a better understanding of their intended uses. Below you can find some very, very brief histories of these two cartridges.
7mm Remington Magnum
The 7mm Rem Mag has become over recent years, one of the most popular magnum rounds on the market for hunting purposes. It was released to the civilian market in 1962 and quickly gained popularity in the hunting world. This cartridge was able to match and even excel in several ballistic categories compared to the .30-06, one of the most popular long range, big game cartridges at the time, but the 7mm rem came with much more tolerable recoil when compared to other magnum cartridges on the market.
The 7mm Rem Mag is a flat shooting round that is available in a good selection of bullet weights, though maybe not as many as the .300 Win Mag. The majority of bullet weights used for the 7mm rem mag rounds for hunting purposes fall between 150 and 180gr though there are outliers of lighter and heavier bullets.
300 Winchester Magnum
The .300 Win Mag came into production by Winchester in 1963. When comparing to other popular hunting rounds, including other 30-cal bullets the .300 Win Mag is a newcomer. If you look around the internet long, you will find that there are circles of devout followers and also unbelievers in the .300 Win Mag for various reasons. In our opinion, it can’t be denied that this cartridge can fill several hunting needs and is the reason for its continued existence and in our opinion, one of the best magnum rounds of its caliber class.
This cartridge can be packed with large amounts of powder giving it a huge advantage in velocity and the ability to carry a large amount of energy over a greater distance. The cartridge is also able to be to take a variety of bullet weights. Most weights are within the 150-200 grain range, but there are several lighter and heavier rounds available. It is also available in a wide array of bullet styles which gives it a lot of versatility
This is an extremely popular caliber for long-range shooters including those chasing big game. The .300 Win Mag is not only a hunting caliber but is also favored by long range competitive shooters. While this cartridge has been and is still used in sharp shooting corners of the military, the majority of its action is found in the hunting world.
Specs
7mm Rem Mag300 Win Mag Parent Case.375 H&H Magnum.375 H&H Magnum Bullet Diameter.284â.308â Neck Diameter.315â.339â Base Diameter.532â.532â Case Length2.5â2.62â Overall Length3.29â3.34â Case Capacity82gr93.8gr Max Pressure (SAAMI)61,000psi64,000psi
Both the 7mm Rem Mag and the .300 Win Mag were designed from the same parent casing, but their final dimensions do have some very significant differences. We first notice that the caliber of bullets that the casings will accept are different. As the names imply, the .300 Win Mag takes a 30-cal (.308″) bullet, while the 7mm Rem Mag takes a smaller caliber (.284″) bullet. The case and overall length of the .300 Win Mag are slightly longer than the 7mm RM, and its overall case capacity has a larger volume.
While the .300 Win Mag has a higher case capacity and can take higher pressures, it also must send heavier grain bullets down range while maintaining necessary terminal ballistics. The 7mm Rem Mag, on the other hand, is using lighter bullets. Because of this, it will be interesting to see how these two cartridges stack up in various performance categories.
To do this, we have selected five popular rounds from each cartridge that include several different bullet weights and intended applications. For the sake of clarity and brevity, we decided on only five selections each. If your favorite round is not on the list, it’s not because we don’t think it’s a round worthy to take in the field. We have to cut it off somewhere. Below we have listed our ten selections to be used in this article.
Because a lot of the discussion is going to revolve around these ten rounds, and because we are very aware of the possible issues when trying to use a small sample size to extrapolate performance to a much larger field, we have compiled extra rounds for each cartridge. While we will not be graphing all of these rounds (that would be a nightmare for your eyes) we have calculated averages for both and will present those at the end of each section. This way, you can have more data at your disposal if you are looking to make a decision, and it will also check our small sample group and help us confirm that the results we are seeing is accurate for the cartridges as a whole.
These are factory loads, and the performance data we are looking at comes from the manufacturer’s website and well trusted and accurate ballistic performance calculators. While this is fine for comparing specific rounds, it doesn’t mean that the numbers are set in stone. It also means that if you look around at handloading website, you are going to see numbers that sometimes vastly outperform the rounds we will be looking at in this article. While hand loading and the art of balancing the various components that go into a cartridge is a topic worth discussing, it is beyond the scope of this article.
It is also not uncommon to see slightly different performance firing these rounds from your rifle compared to computer generated data. You might see slower velocities as well as changes in bullet energy and trajectory. This is common, and most are not even aware that this occurs and when it does, it is usually not a noticeable difference. What we are saying is that the differences in performance shown here will translate to differences in performance for you when using the same firearms chambered for each cartridge, so the comparisons made here are still valid.
Recoil
While most experienced hunters or competitive shooters are not too concerned with the amount of recoil, others still might be, and those with less experience definitely are concerned about recoil. And recoil does play a role in choosing a cartridge, especially if you are dealing with a decision on cartridges that can be used for similar applications. In our opinion, you can become accustomed to any recoil within reason it still stands that certain amounts can cause you to flinch or close your eyes before a shot.
We used a ballistics calculator to generate the recoil energy (ft.lb) generated from firing each of the ten rounds that we have chosen for comparison. It is important to make clear that we are looking at recoil energy and not the actual kick or felt recoil, though increased recoil energy for one round over another will often translate to increased felt recoil of the same round.
Quite a few factors can influence the recoil such as bullet weight, the amount of powder, as well as the firearm weight. We have kept some of these variables as constants to better compare the two cartridges. We kept both of these cartridges with being fired with a 9lb firearm, and the powder loads were selected from load data. Because we are looking at factory loads, we were very conservative with the amount of powder as factory loads are often loaded with grain in far less amount than the max capacity.
So as you can see, these numbers are pretty fluid and can fluctuate depending on a variety of factors. As long as you keep those variables constant from round to round, the trends we see are going to remain the same.
So, letâs take a look at the recoil energy of the ten rounds now (Graph 1).
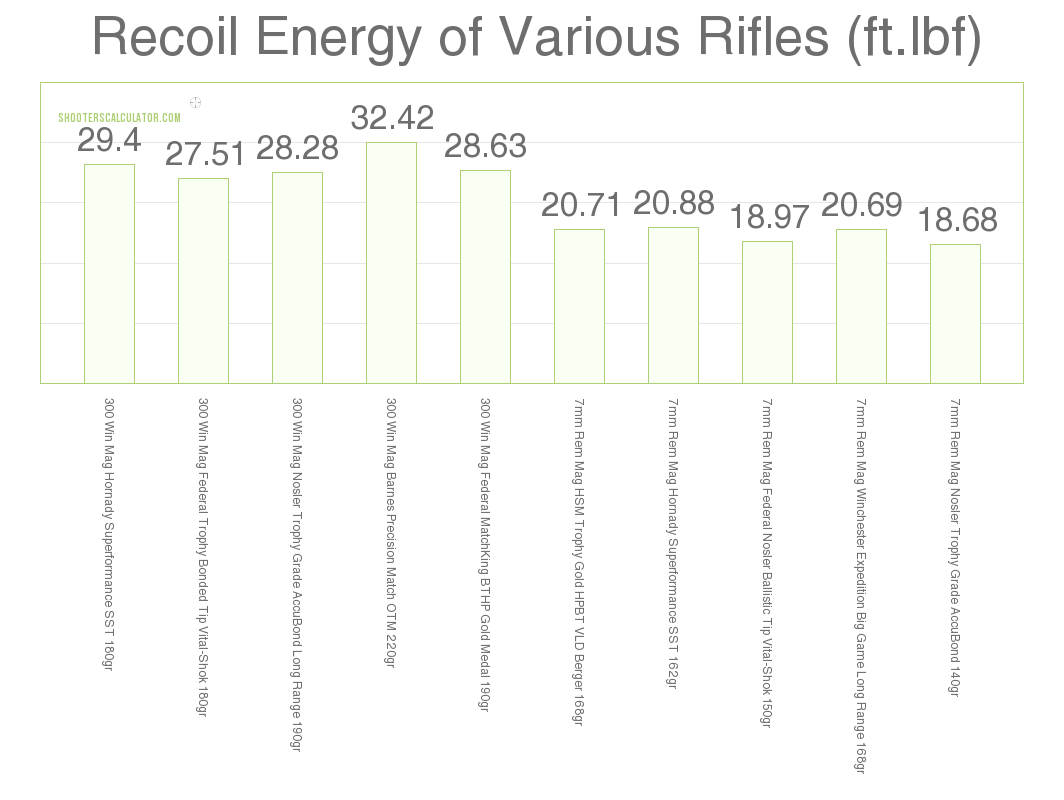
When we look at this graph, we see a clear and distinct difference in recoil energies produced from these two cartridges. All five of the .300 Win Mag rounds produced between 27 and 32ft.lb of energy, between 7 and 14 more ft.lb of recoil energy than the 7mm Rem Mag rounds.
A rule of thumb that a lot of shooters go by is that 20ft.lb of recoil energy can influence the shot and even be uncomfortable for some shooters. Again, this is all relative and depends on who is holding the gun. If we do go by this rule, the 7mm Rem Mag rounds still could be troublesome for some hunters and marksmen though still a good bit lighter than the .300 Win Mag rounds.
When you have two cartridges that overlap in a lot of shooting situations each category deserves some consideration. For such a difference in recoil, it usually means there is a performance spec out there that the recoil energy is resultant from. Let’s continue and see what we find.
Letâs take a look at the how the recoil energy between these two cartridges compare when we work with a larger data set. You will find these tables at the end of each section throughout the article.
Average Recoil (ft.lb)
.300 Winchester Magnum7mm Remington Magnum 27.322.1
The recoil energy for these rounds was generated as we described earlier and used the same variables. With the larger sample size, we see the same trend that we saw above. The .300 Win Mag, on average, is generating around five ft.lb more recoil energy than the 7mm RM rounds and if you look at the individual rounds (not shown) they tend to group pretty tightly by cartridge type though there are some outliers for both cartridges as is often the case.
Ballistics
If you’re looking at a cartridge comparison, you are going to end up looking at the ballistic categories. If you’re a hunter, competitor, or just enjoy shooting, understanding how your cartridge of choice behaves in flight and understanding its limitations is critical to your level of success
In this section, we will take a look at several ballistic categories including the velocity, the ballistic coefficient, as well as the short and long range trajectory of the 7mm Rem Mag vs .300 Win Mag. After we have examined these sections, we should have a much clearer understanding of where these cartridges excel and where they fall short and will let us begin teasing apart applications one cartridge might be favored over the other. Of course, it might also tell us that both are more than capable of doing the same thing efficiently and effectively.
Velocity
The velocity is an interesting and critical performance spec for any cartridge comparison. While we will examine it as a standalone performance category, velocity has its hand in just about all other performance specs of a cartridge. It influences recoil, trajectory, and it even influences stopping power of the bullet in several different ways.
While you need a certain amount of velocity to get the proper terminal ballistics, there is a fine line between too little and too much velocity. It is a common mistake to think that the maximal velocity you can get out of a round means a better overall performance. If you load a round too hot it can lead to extreme pressures that become very dangerous for the shooter. If the round is not paired with the correct twist rate of the barrel, the bullet can be highly unstable in flight and become highly inaccurate.
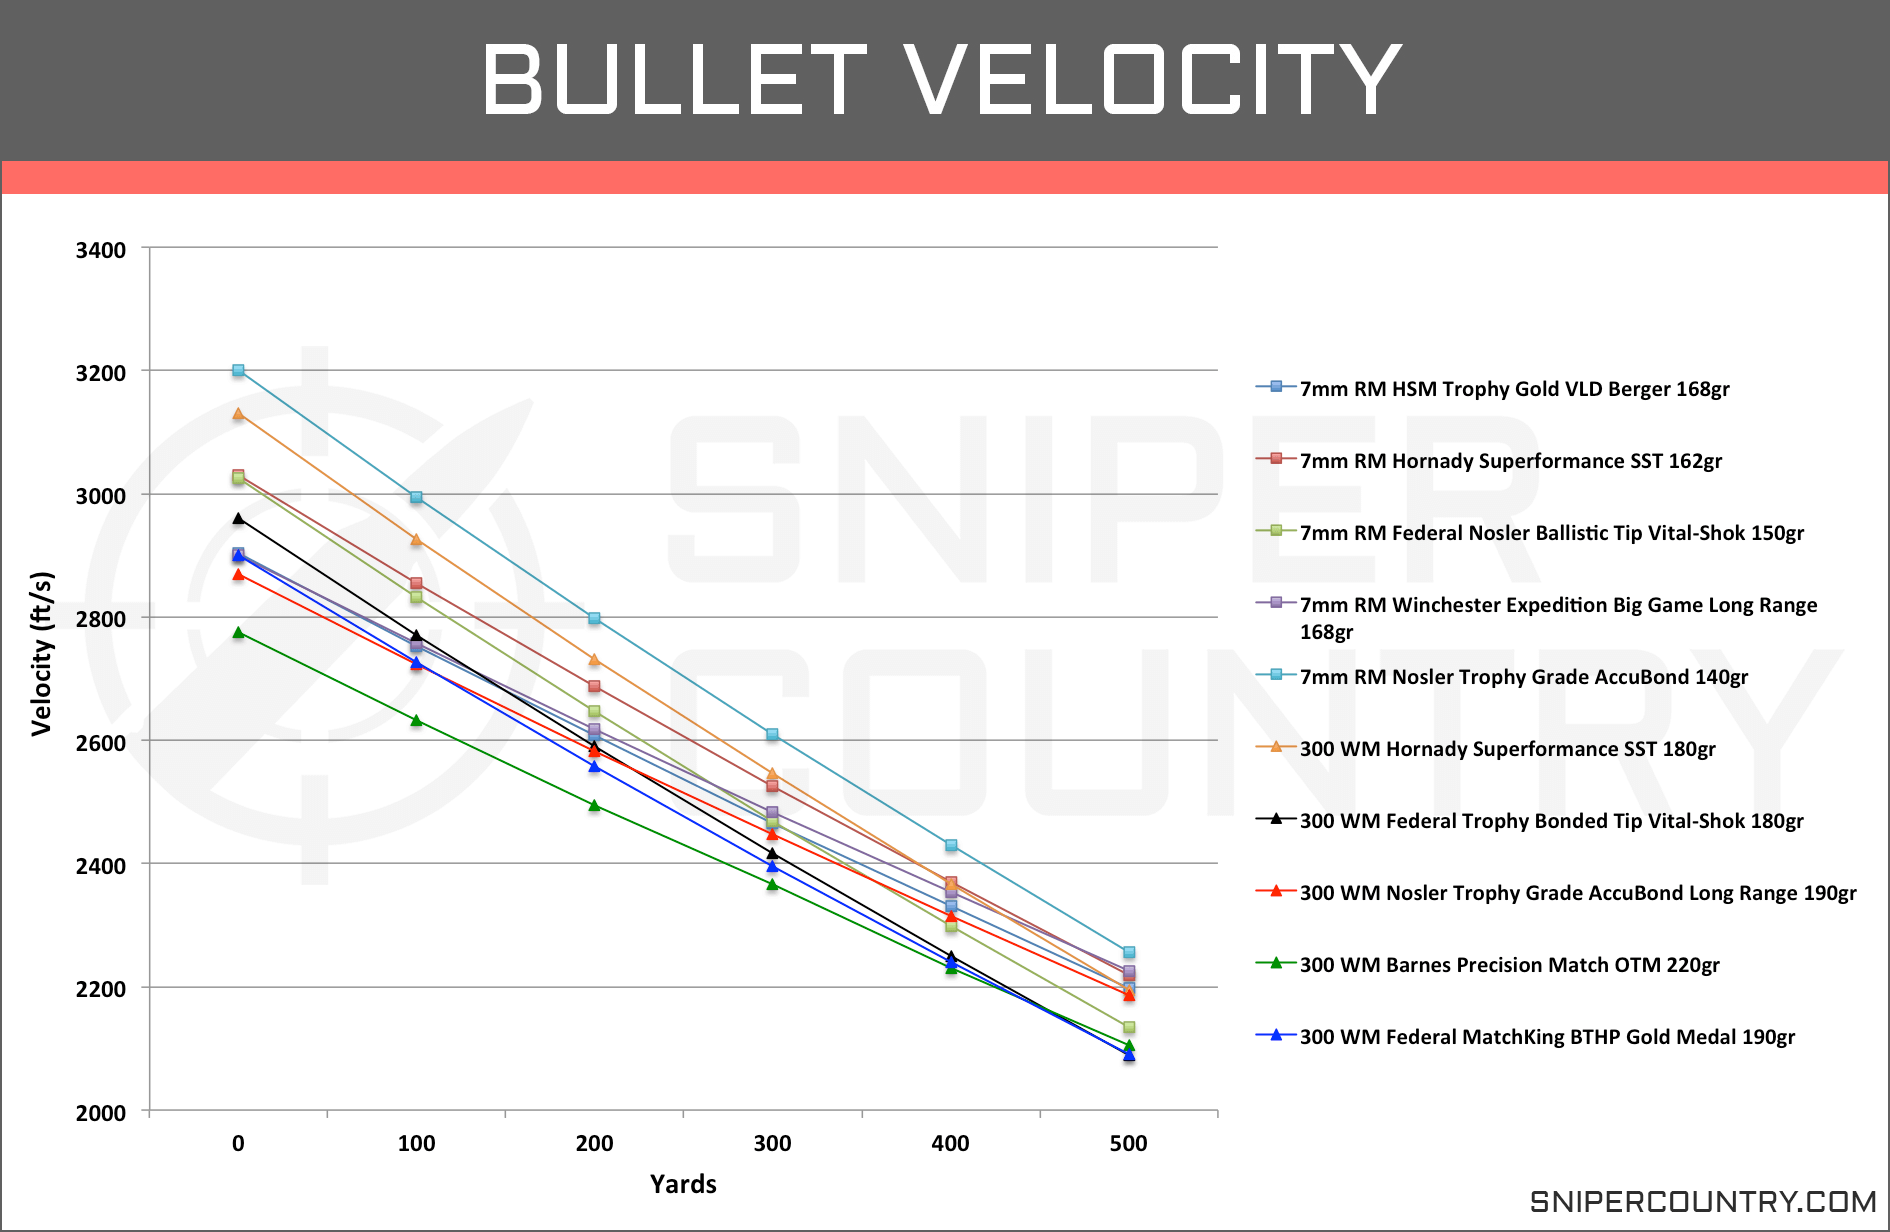
We have compiled the velocities of the ten selected rounds from the manufacturer’s websites and have listed them here. We are looking at the ft/s of each bullet as it moves from the muzzle out to 500 yards (Graph 2).

The first thing that jumped out at us as we looked at this data is that unlike the recoil, there is not a cartridge that has an overall greater amount of velocity. Both the .300 Win Mag and 7mm Rem Mag have specific rounds that show a much higher velocity and also rounds that fall lower on the graph.
If we were to take averages of all the rounds, then there would be a slight advantage to for the 7mm Rem Mag rounds at each yard marker and each time the difference is less than 100fps. Now, 100fps for some might be a bigger deal than others, but keep in mind itâs only an average. There are 7mm Rm rounds that outperform some .300 Win Mag and vice versa.
Both cartridges maintain supersonic speeds over a 500-yard range and will maintain that rating over several hundred more yards. This is more than enough velocity to get proper terminal ballistics for these rounds but keep in mind some of these are not intended for hunting purposes.
From what we are looking at from these factory loads, velocity is definitely a wash between the 7mm Rem Mag vs .300 Win Mag, but that might not be the case when we bring in more data. Below you will find the velocity averages for the two cartridges.
Average Velocity (ft/s)
Yards.300 WM7mm RM Muzzle2976.43031.5 1002773.32828 20025902634 30023902442.7 4002236.42267 5002055.82098.2
When we look at more rounds for each cartridge, we still see that the 7mm RM has higher velocities than the .300 WM rounds at each marker through the bulletâs range. And, like the smaller sample set that we just looked at in our graph, the difference between the two cartridgeâs average is less than 100fps at each yard marker.
With two cartridges that have the potential and the reputation for long range shooting, we wanted to also look at how long these cartridges can stay in supersonic flight. We have listed the average cutoff for supersonic flight in the table below.
Average Supersonic Limit (Yards)
7mm Remington Magnum.300 Winchester Magnum 1292.11258.75
We are interested in how long these rounds can maintain supersonic flight because it influences the calculations you will have to make to be accurate with long range shots. When a bullet falls below this speed barrier, its slight is less stable than it initially was and environmental factors begin to have more noticeable influence on the round. When you know when these effects start occurring, you can adjust accordingly or go with a round that might give you more flight time at these speeds.
With these two cartridges, we see fairly similar limits for supersonic flight though the 7mm RM rounds have, on average, 36 more yards of supersonic speed. In the grand scheme of things, we donât know if that is enough to sway you towards one cartridge or the other without taking into consideration other performance specs. We do know what there is a lot of range in the limits for both cartridges.
Ballistic Coefficient
The ballistic coefficient is derived from an equation that includes input variables from specific cartridge specifications including bullet dimensions and velocity. The physics and math behind the ballistic coefficient and its implications, while interesting, is not something we are going to attempt to convey in this article, but we do urge you to check it out.
In the simplest explanation possible, the ballistic coefficient gives you an idea of how well a bullet is streamlined and how well it can overcome air resistance. The higher the BC, the better the bullet can cut through the wind, meaning it resists drag and wind drift much more efficiently than a bullet with a lower BC. As you can imagine, this makes the BC a relevant piece of information for both long range competition shooters and hunters alike.
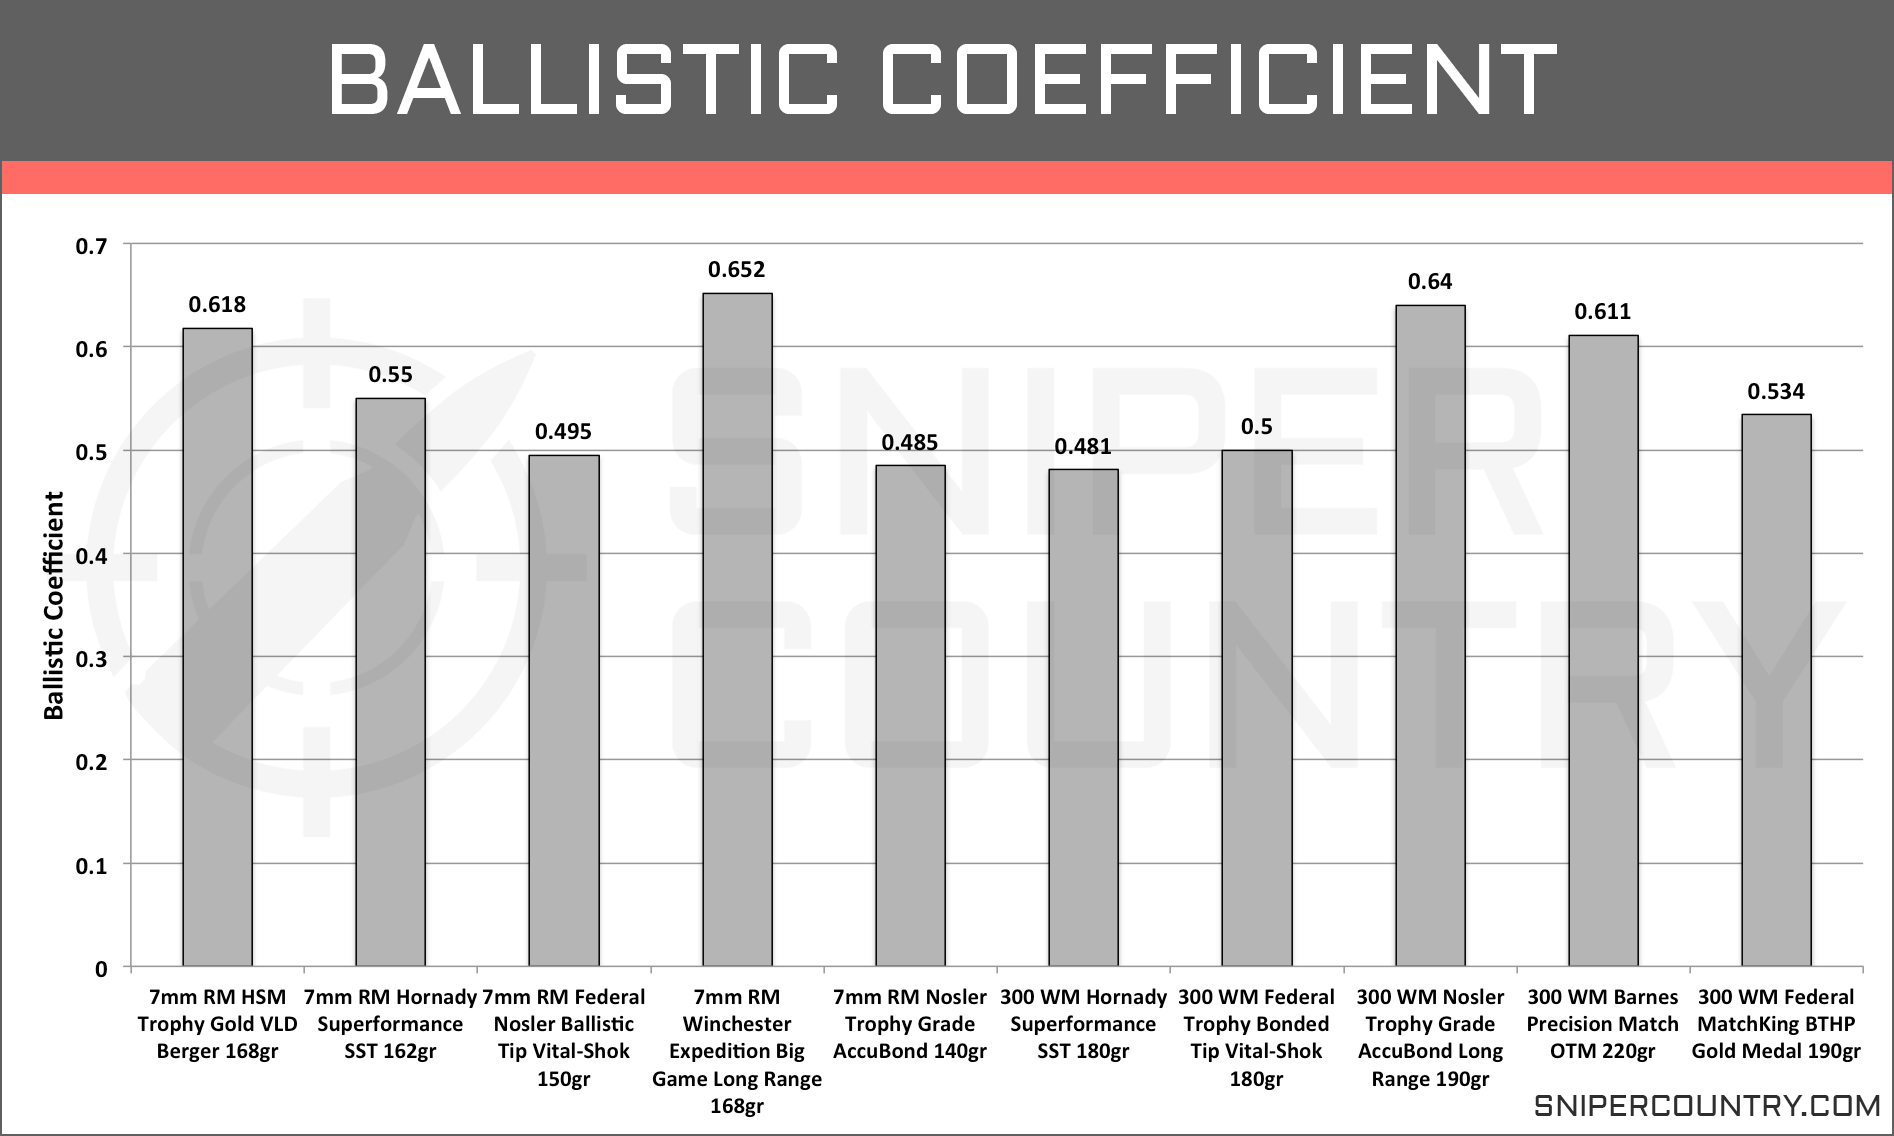
We have compiled the G1(for comparison of all bullet types) ballistic coefficients for each of the ten rounds and listed them here (Graph 3).
As with the velocity, we see a lot of variation in BCs throughout all ten selected rounds and within each cartridge class. Both of these cartridges sports rounds with ballistic coefficients well over .45 and each have rounds with BCs above the .6 mark.
If youâre interested in the averages, the 7mm Rem Mag has an average BC of .56 while the .300 Win Mag has an average BC of .553. Though there is a slight difference in the averages, we donât think it is a fair way to decide which of the cartridges have the better ballistic coefficients. If you need a round thatâs going to resist wind deflection and drag, both the 7mm RM and the .300 WM have options to get the job done.
BCs are also important in the trajectories of bullets. Higher BC rounds tend to have flatter trajectories. Since these two cartridges were nearly identical in their BC’s, let’s see if the same trend continues when you look at the short and long range trajectories. Before we move on to the trajectories of these two cartridges, take a look at the average BCs of the larger sample size. It is important to remember when looking at these averages, that they are just averages and youâre not shooting averages out the barrel. It does give you a better idea of which cartridge has more options for higher performance numbers for each specific category.
Average Ballistic Coefficient
.300 Winchester Magnum7mm Remington Magnum 0.4890.483
When we looked at averages of the smaller set, the 7mm RM had a .01 difference in the averages of the rounds. In the larger data set, the .300 Win Mag had a .006 advantage over the 7mm RM rounds. Obviously, there is no real difference in the BCs of these two cartridges. If you are wanting a BC in the .05+ range, there are options for that with both of these cartridges.
Trajectory
Look on any forum discussing shooting and the ballistics of a certain cartridge, and you are bound to see the topic of trajectories pop up. We’re don’t mean to insult anyone’s intelligence, and we are probably speaking to the choir here, but a bullet’s flight path is not a straight line but rather a parabolic shape. A bullet’s design, their BC, and the muzzle velocity all influence the trajectories.
So why exactly is trajectory important, more specific, why is how flat a trajectory is so important? Even with todayâs rifle optics, you can ask anyone whether adjusting for a 45″ drop or a 65″ drop is easier and 45″ will be the answer every time. Not only are you taking into account elevation but wind as well. And for hunters, where you might not have all the time in the world to take a shot, the fewer variables you have to account for the better.
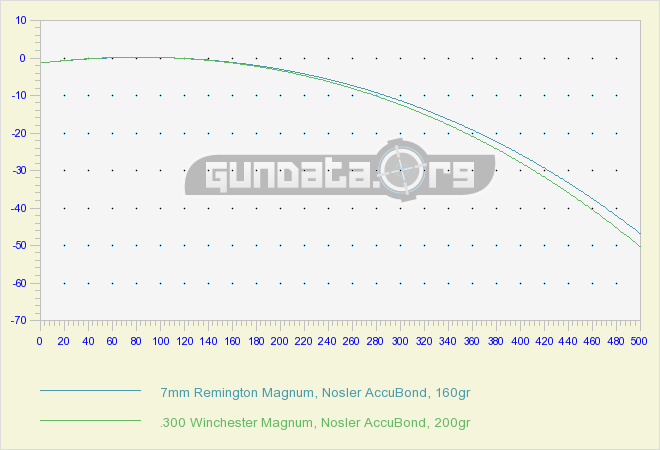
Before we launch into the short and long range trajectories, we wanted to step back and show the trajectory of two similar rounds, one for each cartridge, that uses the same bullet design and similar weights, as these cartridges allow, that come from the same manufacturer. With just two rounds, it might be easier to get an overall view of how these two cartridges stack up before we throw eight other rounds into the mix. (Graph 4).

From this graph, it is easy to see that these two cartridges show very similar trajectories out to 500 yards. In this case, the 7mm Rem Mag shows slightly less bullet drop than the .300 Win Mag round and even at their most distinguishable range, we are only looking at around 5â difference. And we canât rule out the fact that we could change the bullet weights of these two rounds and close or widen the gap. With that in mind, letâs bring in a more diverse selection of rounds for each cartridge and see if we still see similar trajectories.
Short Range Trajectory
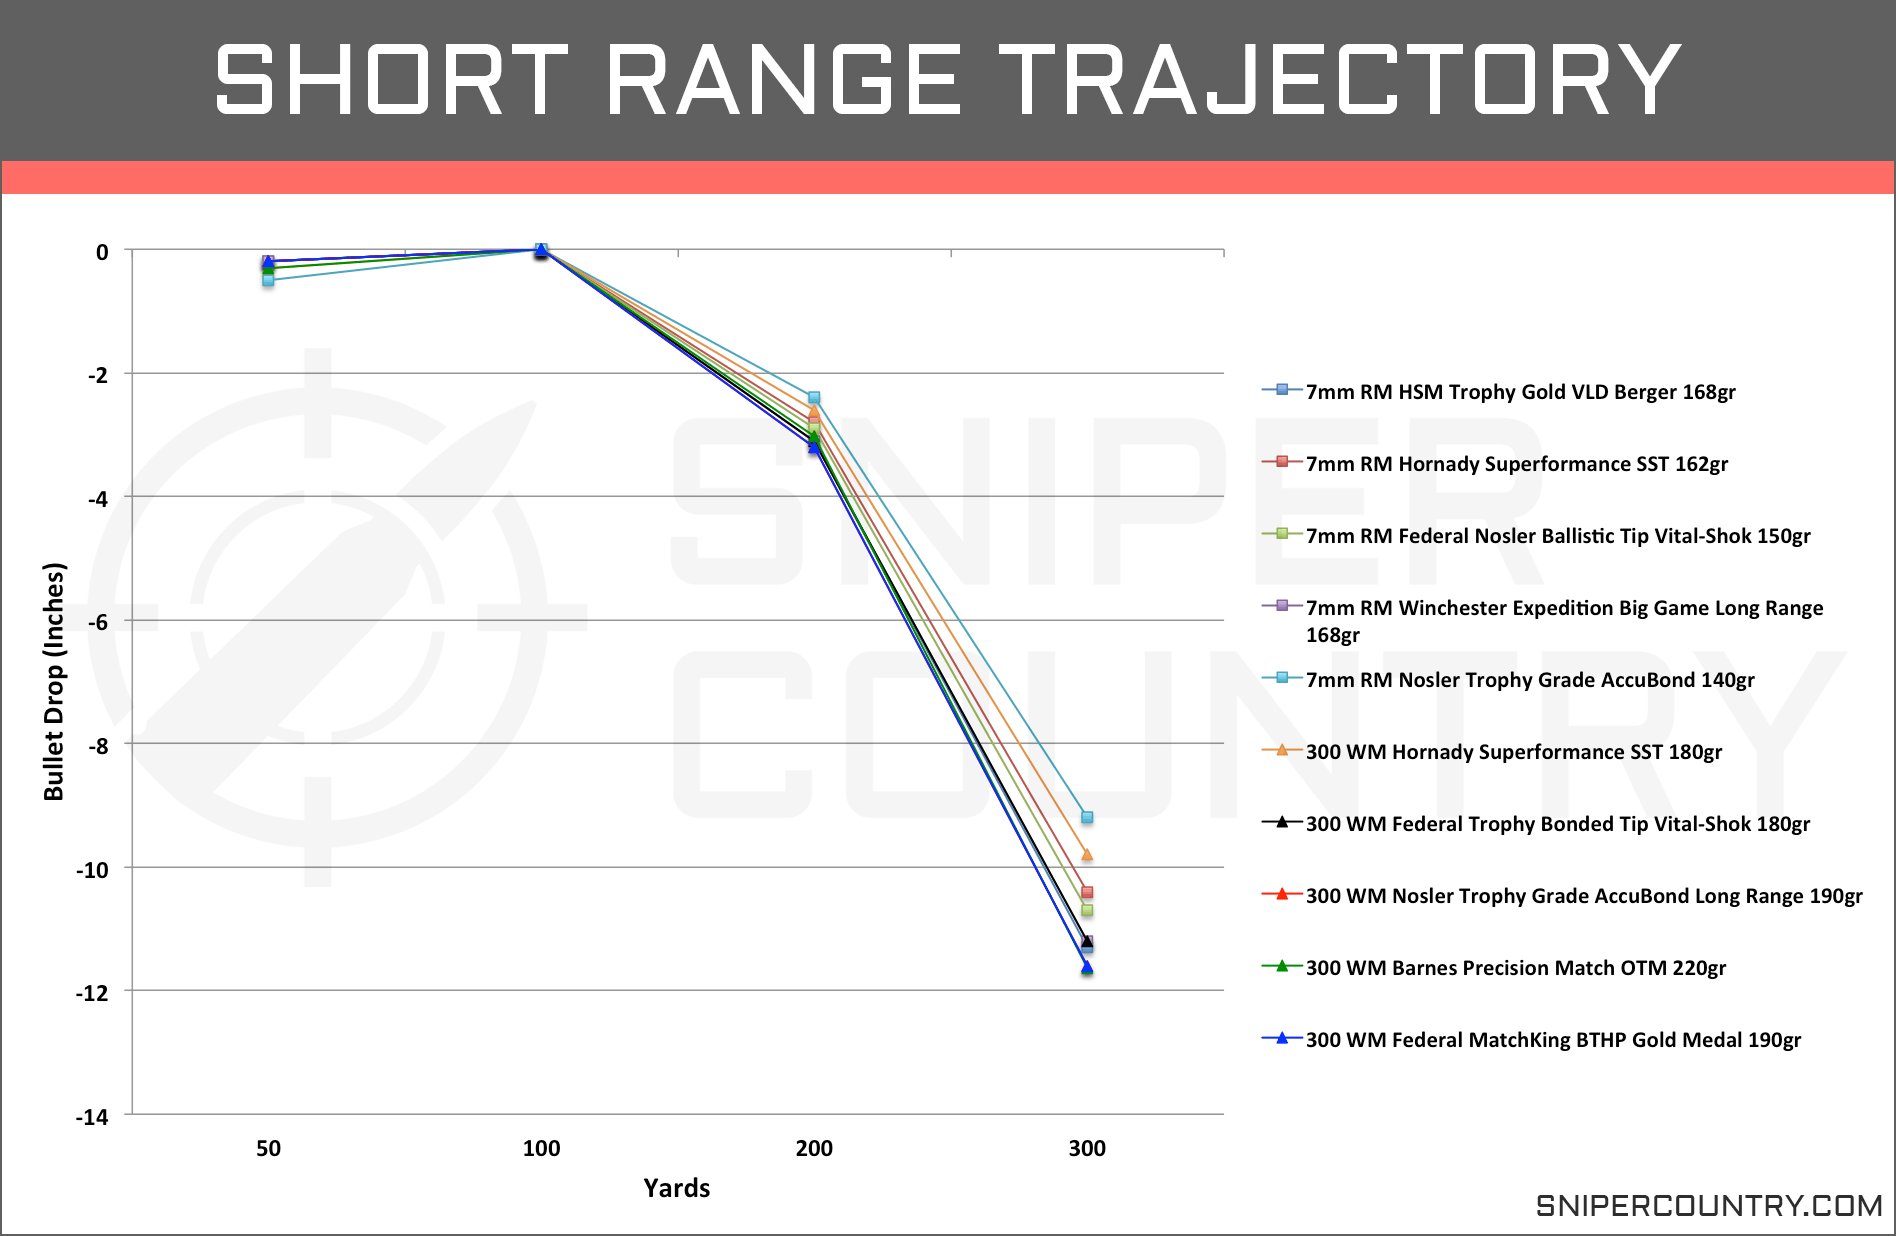
While both of these cartridges were designed with longer range capabilities in mind, they are both also hunting rounds, and with hunting, you are going to come across as much or more shots at targets within 300 yards depending on the terrain and the game. With that, we feel it’s important to look at the short range trajectories (Graph 5).
We are looking at the bullet drop (inches) from the 50 to 300 yards with the firearm zeroed in at 100 yards.
At the 200 yard mark, all ten of these rounds are clustered very tightly with a difference of only .7â between the flattest and steepest round. We also do not see any trend towards one cartridge having a flatter trajectory than the other. In fact, the flattest shooting and steepest dropping round are both 7mm Rem Mag rounds.
As we move out the 300-yard mark, there is a little more spread between the rounds but still no clear cut advantage for one cartridge over the other. And when we say spread out we are still looking at a range of less than 2.5â. The top two performing rounds are a 7mm Rem Mag and a .300 Win Mag option, and they only have a difference of .6″.
We are again seeing that both of these cartridges are performing very similarly. If you want a flat shooting round for short hunting situations, both the 7mm RM and the .300 WM are going to get the job done.
Below, you will find the numbers for the larger data set. We have also included an additional 400 yard marker as there are certain hunting situations where this range can be a normal shooting distance.
Average Bullet Drop (Inches) at Short Range
Yards7mm RM.300 WM 50-0.23-0.193 10000 200-2.8-2.9 300-10.7-11 400-24.5-25.6
Just as with the smaller set of rounds we just looked at, these two cartridges are nearly identical in their trajectories. The 7mm RM has a flatter trajectory throughout the bulletâs range, but the largest difference seen between the two cartridges is only 0.9 inches at the 400 yard mark. With that type of similarity, itâs hard to even say itâs an advantage. At these normal hunting ranges, you are not going to get an advantage by going with one cartridge over the other. Instead, your advantage is going to be achieved by selecting from individual rounds and both the .300 WM and the 7mm RM have rounds with phenomenal trajectories.
Long Range Trajectory
Let’s step out and take a look at the trajectories of the 7mm Rem Mag vs .300 Win Mag at increased distances (Graph 6).

We are again looking at the bullet drop (inches) of the ten rounds, but now we are following them out to 700 yards with the firearm zeroed in at 200 yards.
At the 300 yard mark, we are looking at insignificant differences between the two cartridges. The averages of the rounds for each cartridge have a difference of less than .4â.
As we move out to more distant markers, we start to see more of an advantage for the 7mm RM though it is still fairly close, and there are several .300 Win Mag rounds that shoot as flat or flatter than several 7mm RM rounds. Before we list some these differences between the averages of the two cartridges, it’s important to keep in mind the applications you plan to use one or both cartridges for. For hunting purposes, shots out past 500 yards get pretty dicey so the 600 and 700-yard data points are not going to be as important to you as the .300 and 400 points.
Here are the differences in averages of the 7mm Rem Mag vs .300 Win Mag; 300yds (.34â), 400yds (1.32â), 500yds (2.62â), 600yds (3.08â), and 700yds (6.96â). To some these numbers arenât going have any sway in their decision. For others, the trend of the 7mm RM losing altitude at a slower rate than the .300 Win Mag as you increase the distance is very important.
Though the averages give a slight advantage to the 7mm Rem Mag in flat trajectories, especially as it moves out to the 600 and 700 yards range, the two top performing rounds at each yardage marker was a 7mm RM and a .300 WM. You might have more options for flat shooting rounds for the 7mm RM but be aware that there are .300 WM rounds that can easily compete for flat trajectory.
In the table below, we have listed the average bullet drop for the two cartridges below. We have also added an additional 1,000 yard marker for those who like to push their limits.
Average Bullet Drop (Inches) at Long Range
Yards.300 WM7mm RM 1001.51.4 20000 300-6.7-6.4 400-19.5-18.8 500-39.5-37.9 700-104-101 1000-295.6-286.8
Like the smaller sample set and like the averages we saw when examining the short range trajectory, there is not a whole lot of difference between these cartridges. The 7mm Rem Mag rounds have a slightly flatter trajectory, on average, and this is most pronounced at 700+ yards, but when looking at individual rounds, there is a mixture of both cartridges from the high end of the bullet drop range to the flattest shooting rounds.
Stopping Power
In this next section, we are going to look at several sub-categories of stopping power. Stopping or knockdown power as some like to call it is going to be more important to those looking to utilize these cartridges for hunting purposes.
Stopping power is extremely important in a hunterâs decision for a cartridge. For us and the majority of hunters we know, putting down an animal quickly and humanely is of utmost importance. Not only is it because we donât want the animal to get away and we donât want to have to track it for miles, but we also respect the animals a great deal and letting one get away wounded is the last thing we want.
Unfortunately, there is no single measurement that is going to convey to us a cartridge’s stopping power, but there are several factors that influence stopping power such as bullet energy, penetration, and bullet expansion. The two former factors are something we can work with for comparing the 7mm Rem Mag vs .300 Win Mag with computer generated data. For penetration, we will actually look at two different metrics, the sectional density and the bullet momentum.
And while we do think understanding these components of stopping power is important, it is all worthless if you canât put the right bullet where it needs to go. A small lack of force can be made up for with an accurate shot in the vitals.
Energy
When the powder in the casing is ignited, and the bullet is forced down the barrel and down range, that energy created from the burning powder is carried by the bullet. That kinetic energy is only one factor of a rounds stopping power, but it is an important one. We know from basic physics that if the cartridge can be fitted with larger and heavier bullets and sent downrange at increased speeds (more powder) than they should carry extra force with them. Because of this, we can easily compare two cartridges rather than having to look at the individual bullet types used.
When the bullet impacts the target, this kinetic energy is transferred to the surrounding tissue and organs causing massive damage. This transfer is also affected by how the bullet reacts on impact, such as how the bullet expands. More expansion causes a larger wound and also transfers the energy carried by the bullet more efficiently. Velocity is also a key component in a bullet’s ability to expand, but for now, we are just going to stick with comparing the energies of the rounds involved.
The amount of energy that is required to bring down game varies from animal to animal. While there are general rules of thumb for what is required, nothing is set in stone, and as we just mentioned, there is more involved than just bullet energies. Still, it is accepted that 1,000ft.lb of energy is a good mark for deer while 1,500ft.lb is more suitable for elk. As the species increase in size so does the amount of energy. And like we have mentioned before, using a proper bullet and putting it in the right spot can make up for lack of energy.
Letâs take a look at the bullet energies (ft.lb) of the ten selected rounds from the muzzle out to 500 yards (Graph 7).
Unlike the last couple of performance categories we have looked at, here we see a distinct difference between the two cartridges more so than just between different rounds. From the muzzle out to 300 yards, all of the .300 Win Mag rounds show higher bullet energy than the 7mm Rem Mag rounds. Right from the muzzle, the lowest .300 Win Mag round is carrying 3,474ft.lb of force while the highest 7mm Rem Mag round is carrying 3,303ft.lb of force. The difference between the highest .300 Win Mag and the lowest 7mm Rem Mag round is even more drastic with a difference of 615ft.lb of force.
What is interesting is that as these rounds move downrange, the gap between the two cartridges begins to close. While the three .300 Win Mag rounds maintain their lead; the other two are tightly clustered with several 7mm Rem Mag rounds.
If we look at the averages of the two cartridges at the muzzle and 500 yards, we can see how much this gap closes. At the muzzle, the .300 Win Mag rounds have an average bullet energy of 3,640ft.lb while the 7mm Rem Mag rounds have an energy of 3,162ft.lbs. Thatâs a difference of 478ft.lb. By the time they reach the 500-yard mark, that difference is nearly cut in half to 224.4ft.lb of difference.
While the .300 Win Mag overall has higher bullet energy, the differences are not too extreme. You can cherry pick a round from each and see quite a bit of difference as we did earlier, but there are a lot that carries very similar energies, and we saw that as they travel downrange they even out even more. And for hunting purposes, we are not sure that an extra .300 ft.lb of force is going to make much of a difference. IF you put either of them in the vital zone, they are both going drop the animal.
Letâs see if the trends continue in the same direction when we look at more rounds for both cartridges.
Average Bullet Kinetic Energy (ft.lbs)
Yards7mm RM.300 WM 03140.83479 1002733.83029 2002372.52658.4 3002051.72290 40017661988.3 5001513.31741.3
When we bring in the extra rounds, we still observe the greater kinetic energy with the .300 Win Mag rounds at each yard marker along the bulletâs flight. And like earlier, as the rounds move downrange, the gap between the two did shrink. While this category was a little more clear cut when thinking about the difference between the cartridges as a whole, there are still instances where some of the 7mm Rem rounds produced KE around or above the average of the .300 WM rounds.
And what shouldnât be lost, is that while the .300 Win Mag does seem to have more KE, the amount that the 7mm RM rounds generate are not insignificant. Both of these rounds produce enough KE to create a lot of damage on the largest North American game at all ranges most hunting shots are taken.
Penetration (Sectional Density)
Penetration is another component to a bullet’s stopping power that we want to address in this article. For a bullet to quickly kill an animal, it must reach the vital organs. When thinking about how much penetration is necessary, you also have to think about the type of game you are hunting. A mature bull moose is going to require more penetration than a whitetail deer.
There are several factors that influence the amount of penetration that is going to occur, other than the type of animal. Some of these factors include the velocity, the caliber of the bullet, the weight of the bullet, and the bulletâs design. In this section, we are going to look at the sectional density (SD), which is a number calculated from the caliber of the bullet, as well as its weight.
The sectional density correlates with the amount of penetration a bullet will have on the target, and since we are not looking at bullet types and designs in this article, we think the SD is a good means of comparison for two cartridges. And though it is fine for looking at now, when making your final decision on a specific round, it is important that you take into account all of the factors. Understanding your bullet design, how it expands, and the velocity needed for proper expansion and penetration is a huge can be the difference between a clean kill or an injured animal you have to track through the night.
So when you look at the SDs of various cartridges and specific rounds, higher SDs correlate to deeper penetrating bullets. As an example, letâs take two rounds, both are 100gr, but one has a diameter of .100″ and the second has a diameter of .200″. The .100″ bullet is going to have a larger SD than the .200″ bullet and theoretically, deeper penetration. This is because the force behind the bullet is localized to a smaller area and can drive the bullet deeper.
We can do the same exercise, but instead look how the weight of the bullet affects the SD. With two bullets, each with a .300â diameter with one weighing 100gr and the second 150gr, the 150gr is going to have a higher sectional density and deeper penetration.
We have calculated the sectional densities for all ten of the selected rounds have compiled them here (Graph 8).

Like most ballistic and other performance specs we have looked at between the 7mm Rem Mag vs .300 Win Mag, there is not a whole lot of difference between the two cartridges. On average, the 7mm Rem Mag rounds have a SD of .279 while the .300 Win Mag rounds have an average SD of .289, a hundredth of a difference. Both cartridges have their rounds with heavier bullets and subsequent higher SDs.
Though the 7mm Rem Mag rounds are a smaller caliber than the .300 Win Mag rounds, they also have lighter bullets. This difference between the two leads us to rounds that have very similar SDs.
Average Sectional Density
.300 Winchester Magnum7mm Remington Magnum 0.2840.273
Again, with the larger set of rounds, we see the sameresults from earlier. The .300 Win Mag rounds show a slightly higher sectional density than the 7mm Rem Mag rounds.
Penetration (Momentum)
The second metric that we will use to get an idea of how these two cartridges compare in potential penetration is the momentum of the bullets. Moment is simply how well an object in motion will stay in motion. Meaning, how well can the object, a bullet in this case, overcome resistance and keep moving forward. The higher the momentum, the more the bullet can penetrate after encountering resistance. And, this is of course omitting the type of bullet that is being fired which in the field, is going to have to be taken into consideration. Though, for hunting purposes, just about all of the rounds for these two cartridges are going to be designed to hold together well and over controlled expansion.
It is also important to keep the sectional density in mind when looking at momentum. The higher the sectional density, the less resistance the bullet encounters because of the smaller area that is interacting with the target.
We have graphed the bullet momentum of our ten rounds and graphed them below (Graph 9).
From this graph, we can see that the rounds do appear to group with rounds of their respective cartridge type. The averages definitely lean towards the .300 WM rounds for higher momentum. We do see that advantage begin to shrink as the rounds move downrange with an average difference of 12lb/ft.s at the muzzle and 9lb/ft.s at the 500 yard marker.
We do see that the Barnes .300 WM round is a big boost to the averages and without it, the average performance between these cartridges would be much similar. Letâs take a look at the larger sample set and see how the two compare. Even without the highest performing round, we still see the rounds from each cartridge grouping together pretty tightly. For the .300 Win Mag rounds, all of the them leave the muzzle with over 75lb/ft.s of momentum while all of the 7mm RM rounds are below the 70lb/ft.s mark. We also do not see any overlap between rounds of different cartridges until the 500 yard mark, and even then, it is only the highest performing 7mm RM round that matches the lowest performing .300 WM round. And when we say highest or lowest performing, we mean that in regards to only the momentum numbers.
Letâs take a look at the averages of the full data sets.
Average Bullet Momentum (lb/ft.s)
Yards.300 WM7mm RM Muzzle75.466.6 10070.762.2 20064.957.9 3006153.7 40057.249.5 50052.646
When we add in more rounds, we are still seeing the same trends as before. The .300 WM rounds are generating more momentum from the muzzle out to 500 yards. We do see the difference shrink by a few lbs/ft.s but overall, the .300 Win Mag seems to have the advantage if you are wanting more momentum.
These results shouldnât be too surprising. Given that the mass and velocity make up bullet momentum and since there was very little difference in velocity between the cartridges and the .300 WM rounds have heavier bullets, it makes sense that they generate more momentum.
Accuracy
Trying to determine which cartridge is more accurate is always a task that makes us feel a little dirty. The best method of doing this is through hundreds of rounds through several days of shooting and measuring groupings. Even then, two peopleâs results can be drastically different. Heck, one person’s results can be different from day to day. And we’re not discounting that method, it can be very valuable, but you just have to be cautious of who you are getting that information from. We think which cartridge has the better accuracy comes down to the person pulling the trigger and their level of experience shooting said cartridge.
If we look at some of the ballistics data such as the ballistic coefficients and the trajectories, there is not a whole lot of difference between the two cartridges in either category. The 7mm Rem Mag had on average slightly higher BCs and slightly flatter trajectories out past 500 yards than the .300 WM rounds, but as we stated during those discussions, there are rounds for both that perform better than others. And if you need some extra power at short range the differences are nowhere enough to make you decide against the .300 Win Mag. In fact, we don’t think there is a big enough difference in these categories to make you lean one way or the other regarding accuracy from the data we have looked at here.
And you canât discount the role recoil can play in accuracy. We think that most of you here reading this article would easily adjust to the increased recoil of the .300 Win Mag, but there might be some who could easily be thrown off by the kick. And if youâre a person who enjoys burning through a box or two at the range, that extra 10ft.lb of recoil can be fatiguing and lead to a decrease in accuracy over time.
It’s all nitpicking to us. We did feel the need to mention it, but both the 7mm Rem Mag and the .300 Win Mag cartridges can drive nails with some practice on your end, and they can do it from a distance.
Price & Availability
When we look at the price of the 7mm Rem Mag vs .300 Win Mag, it can vary from round to round. Just between cartridges, we don’t think there is enough of a difference to choose one over the other based on price. Each cartridge has cheaper boxes of ammunition and each has more expensive boxes. You can definitely save a few cents per round by looking into handloading for both of these cartridges.
As far as availability goes, just about every major ammunition company are loading .300 Win Mag and 7mm RM cartridges and most of them carry several different models of each. We donât think there is any difference in availability between the two, though there is less compared to other popular hunting rounds. And with the internet at your disposal, finding exactly what you need has never been easier.
AmmunitionPrice (20 Rounds) 7mm RM HSM Trophy Gold VLD Berger 168gr$47.99 7mm RM Hornady Superformance SST 162gr$32.29 7mm RM Federal Nosler Ballistic Tip Vital-Shok 150gr$36.79 7mm RM Winchester Expedition Big Game Long Range 168gr$43.99 7mm RM Nosler Trophy Grade AccuBond 140gr$58.00 300 WM Hornady Superformance SST 180gr$30.99 300 WM Federal Trophy Bonded Tip Vital-Shok 180gr$46.99 300 WM Nosler Trophy Grade AccuBond Long Range 190gr$48.99 300 WM Barnes Precision Match OTM 220gr$48.99 300 WM Federal MatchKing BTHP Gold Medal 190gr$52.99
Applications
As we start top close out this comparison, letâs try to take the results we have found and start teasing apart certain applications of these cartridges might be better suited or maybe applications where you canât go wrong with either.
We have also provided the average tables throughout the article below to make it a little easier for you as we move through this section.
For long range precision shooting, both of these rounds have options to get the job done. The 7mm Rem Mag rounds have more options for higher muzzle velocities, flatter trajectories, and better BCs which helps performance greatly downrange. That is not to say that there aren’t .300 Win Mag options that can give you very similar performances, but most would rather not deal with the increased recoil for dozens of shots within a short time frame.
While both of these rounds can function in long range precision shooting, the majority of users are going to be using them in a hunting capacity. Both the 7mm Rem Mag and the .300 Win Mag can be used for medium sized game such as deer, hogs, antelope, and sheep at just about any realistic hunting range. We really like the lighter 7mm Rem Mag rounds for these game animals. Overall, both rounds are really overkill for these game animals stopping power wise, but that extra range can be a game changer.
Both cartridges also have heavy enough bullets and the terminal ballistics to be used for larger game such as elk, moose, and more exotic game and still have a wide effective range. For bigger and more dangerous game, you might like the kinetic energy and larger bullets of the .300 Win Mag but as we discussed in the previous sections, we would be comfortable with either cartridge in these hunting scenarios.
We did see slightly higher sectional density numbers, on average for the .300 Win Mag and pretty significant differences in the momentum data with the edge going to the .300 Win Mag as well. Both of these combined, barring bullet design, indicate that the .300 Win Mag should have better penetration potential. And that is not to say that the 7mm RM rounds are not going to penetrate well. Given that the cartridge is still around tells you that it is able to bring down large game efficiently. If you were of the mind to get as much penetration as possible, the numbers say the .300 WM is better suited. Even so, itâs really more about picking the correct round rather than the correct cartridge.
Best Rounds
Before we wrap up this article, we want to take the ten rounds we have been looking at and pick a couple that we think fits certain applications well.
Top Hunting Round
For the 7mm Rem Mag rounds, we are big fans of the HSM Trophy Gold VLD Berger 168gr round. We think the 168gr bullet is a great weight for hunting purposes as it has a manageable recoil. It has one the best muzzle velocities and BCs of all the rounds we looked at so you have excellent downrange ballistics, including a flat trajectory. It doesnât have the highest amount of energy associated with it, but with the excellent Berger VLD bullet and velocity, you get more than enough penetration and expansion to take medium to large game at common hunting ranges.
For the .300 Win Mag, our choice goes to the Nosler Trophy Grade AccuBond Long Range 190gr. Some of our reasons for selecting this round is the terminal ballistics and the stopping power. This round maintains over 2,000fps throughout a 500-yard flight, which is more than enough to cause proper expansion of the ballistic tip bullet. This speed along with the sectional density is going to be more than enough to penetrate to and through vital organs of big bull elk and moose at long ranges. It might be a bit of overkill for medium sized game and you might get a bit more damaged meat, but there is little doubt that it will put them down.
Conclusion
Both of these magnum rounds have been in circulation for just about the same amount of time. More than enough to have a good feel for their strengths and their weaknesses. The fact that both are still used and still a topic of debate should give you an idea that both can be highly effective rounds in the right hands and the right situations.
We hope that this cartridge comparison of the 7mm Rem Mag vs .300 Win Mag has given you an unbiased look at some of the ballistic and other performance properties of these two rounds. We also hope that you have come to the same conclusion as we have after researching these two cartridges. With practice, either one can easily become your go to round.
Ammunition List