It’s a common practice for firearm manufacturers to create an item with mass appeal first, and then follow up with line extensions. Such is the case with SIG Sauer’s wildly successful Tread series, which debuted in 2018. And while 5.56 NATO-chambered AR-15-type firearms have the broadest appeal, there’s a segment of the AR community that desires—or needs—the upscaled performance delivered by the larger 7.62 NATO round. As such, for 2020, the company added the .30-cal. 716i to the Tread lineup.
Like its .223-cal. counterparts, the 716i is a semi-automatic rifle that operates using direct gas impingement. Paired with the carbine-length gas system is an H2 buffer. The combination results in reliable functioning, minimal muzzle rise and tolerable recoil.
Immediately catching the eye are cutouts in the 716i’s bolt carrier. Circumventing the rear are six, evenly spaced recesses measuring 1″ by 1/4″. Not only will these nooks reduce weight, but they could capture debris, too.
Larger cutouts are found on the front right and the front left. The latter is 3″ in length and 7/16″ wide, saving meaningful weight. Still, according to an AWS Postal Scale, the BCG weighs right at one pound, and it’s a major contributor to the carbine’s 8-lb., 2-oz. overall weight. Other features of the carrier group include a staked bolt key, eight-lug bolt (with an M16-style extractor) and dual, plunger-type ejectors. The latter launched spent cases well to the right and rear of the shooter in a relatively small radius, making cleanup of the valuable brass fast and easy.
During testing, the direct-impingement SIG 716i Tread’s dual, plunger-type ejectors (l.) launched empty cases into a nice, neat little pile to the right and rear of the shooter. Bilateral controls include (r.) 90-degree safety levers and magazine-release buttons.
Chambered in 7.62 NATO (.308 Win.), the 716i features a compact, 16″ ferritic nitrocarburizing (FNC) steel barrel with 1:10″-twist rifling. This twist rate will adequately stabilize all but the very heaviest, most streamlined bullets. As for the barrel’s abbreviated length, while a boon for maneuverability and portability, shooters should expect velocities to fall short of published numbers, which are typically generated with 24″ barrels. The hearty tube’s muzzle is threaded in the common 5/8×24 TPI pattern, and it ends with a three-prong flash hider.
There are several other noteworthy features of the aluminum alloy upper receiver. First, there’s the practical ejection port cover, shell deflector and forward assist—essentials for self-defense and hunting. Affixed to the front of the receiver is a 15″ free-floating handguard, also crafted from aluminum. Since the 716i is devoid of sights, the 22½” of uninterrupted Picatinny rail atop the upper provides space for attaching an optic. The CNC-machined handguard has cutouts to facilitate cooling and improve aesthetics, as well as five sets of seven M-Lok mounting points for adding accessories.
Like the upper receiver, the lower is made from aluminum, and there is minimal play between the sections thanks to a rubber tensioning insert and quality machining. The magazine well is beveled to facilitate faster changes of the AR-10-style magazines; one black Magpul PMAG 20 LR/SR Gen M3 magazine accompanies the rifle. There are bilateral attachment points on the lower for a single-point sling.
To the rear of the lower is a polymer pistol grip with ribs on the frontstrap and backstrap to increase purchase. This is enhanced by aggressive texturing on the sides. At the bottom there’s a removable cap, which grants access to storage space for spare batteries, ammunition, tools, etc. In an effort to cater to all shooters, the 716i’s fire controls include bilateral magazine-release buttons and two-position safeties, however, there is only a left-side bolt catch.
The carbine has a polished, hard-coated, single-stage trigger. According to a Lyman Digital Trigger Pull Gauge, the test rifle’s trigger broke at an average of 6 lbs., 2 ozs. Despite its relatively heavy pull weight, creep and overtravel were virtually nonexistent, and the reset was quite short.
Rounding out the 716i’s attributes is a six-position, telescoping Magpul SL-K buttstock. In its extended position, the overall length of the rifle is 371/2″, and the length of pull is 147⁄8″. When collapsed, those numbers are 343⁄8″ and 113/4, respectively. Given that range, the carbine can fit most shooters, even with changes in apparel and/or protective gear.
To test the 716i, we topped our sample with a Leupold VX-3i 4.5-14X 40 mm scope and assembled a variety of .308 Win. loads to evaluate accuracy and proper functioning. The rifle fared very well: SIG’s 168-grain open-tip match load grouped best, producing a five-shot, five-group average of 1.24″ at 100 yards, contributing to an excellent three-load average extreme spread of only 1.39″. Still, there’s little doubt to the evaluators that accuracy could be further improved through a lighter trigger pull and/or experimentation with a range of bullet weights and types. During all testing, there were no failures to feed, fire, extract or eject.
In the process of firing nearly 200 rounds, recoil wasn’t an issue, and that’s not due to the hard rubber pad on the buttstock; instead, it’s the result of a well-balanced operating system and the gun’s heft, which is its foremost complaint in reviews by actual owners. In actuality, a lightweight .308 Win. quickly becomes unpleasant to shoot, and we think SIG got it just right. Given its impressive performance relative to its reasonable price, those shooters interested in stepping up to an AR-10 will find the SIG Sauer 716i Tread to be a top choice for doing so.
What is the best distance to sight in your bow? You’ll find various answers here and there according to the preferences of the person providing the advice. We’ll lead you straight as the best distances for you will depend on a few things:
Draw weight/bow speed
Type of bow hunting
Personal preference for maximum shooting distances
All these factors will be addressed as we discuss the most commonly used sight marks for many bow shooters.
Top Pin Setting
The most common top pin setting for both timber and the open fields is 20 yards.
These days, most compound bows are fast enough to see very little difference in arrow trajectory between 10-20 yards. When this is the case, the first pin is usually set at 20 yards that also serves as a pin for 10-25 yard distances. You may be a few inches high when using the 20-yard pin for a 10-yard shot, and you may be a few inches low for a 25-yard shot.
To enable accurate and precise shots using your 20-yard pin this way, you’ll have to know how your bow, arrows, and sight setup will perform. Get to shooting off some arrows!
Do you have a 5-inch difference or more? Do you need to start with a 10-yard pin instead? If you’re shooting from a tree stand, you just might. You must also know the positions and kill-zone sizes of your game if you’re a hunter.
Low poundage bows that includes 40lb draw weights will require a top pin that should be set for 10 or 15 yards. It’s about shot placement that includes getting close enough to your target with it in a position to take an ethical shot.
Factors to think about:
How fast is your bow?
Where and what are you shooting?
Become proficient with setup to predict how it performs between 10-25 yards.
See instructions for your bow sight if there is a recommended top pin distance.
5-Yard Distance Increments
You may see some shooters with sight marks in 5-yard increments. An example includes: 15, 20, 25, 30, 35, and 40 and other similar variations. Again, personal preference is the rule here.
Consistent 5-yard increments are usually seen on sights that have 5 to 7 or more pins, and there are both pros and cons to this pin setup.
Advantages include less gap shooting, pin for every reasonable distance, and smaller yardage increments for confident shooting.
However, the disadvantages can outweigh the benefits. When increments are small, and you have a generally fast bow, the pins will be stacked very close together. It’s likely you will choose the wrong pin to shoot with.
Pins too close together can also block out a significant amount of the target. The more pins you have, the more it clutters your field of view.
10-Yard Distance Increments
Even 10-yard distances are the most common and versatile setup for hunters for many types of prey in the field. It may start with a 20-yard pin and continue from there, or it may start with a 15 or 25-yard pin and follow suit.
10-yard increments allow enough space between the pins to adequately see the target and to appropriately shoot the gaps when necessary. However, difficulty in achieving accuracy and precision at ranges further than 50 yards increases especially when you gap shoot. When you extend your pins out to longer distances, arrow drop, user error, and form issues are magnified.
Holding over or holding under isn’t so easy to do when you’re cold, hungry, tired, or you’re pumping with adrenaline due to the 10-point buck that just came into view 30 or so odd yards away. It may now be helpful to split the distance in 5-yard increments for the bottom pins such as 20, 30, 40, 45, and 50 or 20, 30, 35, 40, and 45. Find the variation that works for your bow setup and your shooting style.
Think about:
How many pins should be in your 10-yard increment setup?
What maximum distance are you comfortable and skilled enough at to make an ethical shot?
The more pins you have, the further you can shoot out in practice whether you realistically take shots out this far in the field. Practicing at 60 and 70 yards can make your 20-40 yard groupings tighter and easier to make. However, it does clutter your sight picture and it may encourage you to take shots you shouldn’t in the field.
Where is the Middle Ground?
The middle ground is more about having the right number of pins for your setup. There’s no need to clutter your sight picture with more pins than you realistically use in the field.
A general rule of thumb is 3 pins for many hunting applications, and 5 pins for Western or long shot hunting. Of course, there are hunters that do very well with a single pin bow sight to eliminate the process of gap shooting altogether. Where do you sit in the single vs multi-pin debate?
If you’re one of those hunters who push your bottom pins down as far as they can go to get them out of the way, but you keep them for the “just in case” moment, a fixed pin with a floater bow sight would serve you better.
Many times, the bow sight manufacturer will recommend in the setup and sighting-in instructions what distance the first pin should be set with and the distance increments for the following pins.
While 10-yard increments are certainly the standard and is a versatile setup, the goal is to find what setup works best for you. You won’t know it until you get out there and start practicing.
How to Sight-In a Bow
General Preparation Instructions for Sighting In
Mount your sight to your bow.
Be prepared to spread out sighting-in process over a course of several days due to fatigue that can compromise everything from correct form to accuracy.
Have necessary gear and equipment ready i.e. targets, arrows, appropriate laser rangefinder, etc.
Safety first: ensure you have the appropriate backstops and area clearance to shoot.
Start close to the target: 10 yards to get on paper and to reduce adjustment issues later.
Adjust in small increments at a time.
Have Allen wrenches or required tools to make adjustments to sight.
We like the “one axis at a time” method of sighting in. This process may incorporate use of leveled tape in the shape of a sideways “T”, as a cross, or any target that helps to focus the eye to aim in straight lines.
How to Sight In With a Fixed Pin Bow Sight
Stand approximately 10 yards away from your T target. Starting with the windage axis (left/right), you will want to aim for the vertical part of the target. Let off 3-5 arrows in a line.
Examine the arrows position in relation to the vertical line of the T. Being this close to the target, you want to make sure you’re as dead-on the center of the line as possible. Margins of error will be magnified when you step back to fine-tune your adjustments at longer distances.
To make adjustments, follow the arrow. If your arrows are left of the T, make an adjustment to move the entire sight housing If your arrows are right of the T, make an adjustment to move right.
Repeat this process until your arrows are dead-on center on the vertical line.
Stand approximately 10 yards away from your T target. If necessary, move the top pin high up towards the top of the housing to leave enough adjustment room for the remaining pins on sights with 5-7 pins. Let off 3-5 arrows in a line using your top pin as an aiming point for the horizontal part of the target to begin adjustments for the elevation axis (up/down).
Examine the arrows position in relation to the horizontal line of the T. You don’t have to be so precise with this at 10 yards. If the arrows are further than 6 inches of the line, follow the arrow to make adjustments by moving the entire sight housing. If your arrows are above the line, make an adjustment to move the sight up. If your arrows are below the line, make an adjustment to move the sight down.
Repeat this process until your arrows are within 6 inches of the horizontal line.
Step back to the distance you want to set your first pin for which is likely 20 yards. The top pin is the only pin you can set by moving the entire sight housing at this point in the process. Let off 3-5 arrows aiming with your top pin to hit dead-on the center of the horizontal line as possible. Now is the time to be precise with your adjustments by moving the entire sight housing up or down.
Once you’re hitting dead-on with your 20-yard pin, it’s time to sight-in the remaining pins which will all be adjusted individually. Typically, the next pins will be set for 30, 40, and 50 yards, if applicable. Stand at the distance you want to set your next pin for, let off 3-5 arrows using the appropriate pin to aim with and shoot for the horizontal line of the target.
Examine the arrows in relation to the horizontal line of the T. Be precise in making individual adjustments for the appropriate pin. Again, follow the arrow. When you’re successfully hitting the center of the line, it’s time to move to the next pin until all remaining pins are set for their distance.
Go back to 30 yards and let off 3-5 arrows for the vertical line to fine-tune your windage (left/right) axis with any adjustments if needed. You might notice you may be slightly off at 30 yards since variations in accuracy are magnified at longer distances.
Fine-tune any adjustments by double checking you’re consistently hitting the lines at your set pin distances. If you need to make any fine-tuning adjustments to your 20-yard pin at this point, do it by adjusting the individual pin, not by moving the entire sight housing.
How to Sight In a Bow Sight With 1 Pin
Each manufacturer and model of single-pin sights will have slightly different sighting-in instructions and sight tapes provided. It’s important to follow the setup recommended by the manufacturer to achieve maximum potential and accuracy from your sight.
A well-accepted method is the 20/60 setup which we’ll explain below.
Stand approximately 10 yards away from your T target. Starting with the windage axis (left/right), you will want to aim for the vertical part of the target. Let off 3-5 arrows in a line.
Examine the arrows position in relation to the vertical line of the T. Being this close to the target, you want to make sure you’re as dead-on the center of the line as possible since margins of error will be magnified when you step back to fine-tune your adjustments at longer distances.
To make adjustments, follow the arrow. If your arrows are left of the T, make an adjustment to move the entire sight housing If your arrows are right of the T, make an adjustment to move right.
Repeat this process until your arrows are dead-on center on the vertical line.
If you’re using calibration tape provided by the manufacturer, go ahead and stick it on your wheel or bar now. Turn the wheel or knob all the way to the top until it stops. Stand 20 yards away from your T target. Let off 3-5 arrows in a line using your pin as an aiming point for the horizontal part of the target to begin adjustments.
Follow the arrow. If you’re low, turn the wheel/knob down in small increments at a time. Repeat this process until your arrows are dead-on center on the horizontal line.
If using calibration tape, note the reference number the indicator is lined up with as this is your 20-yard mark. If not, use a pencil or marker to mark where your 20-yard mark is.
Step back in 10 yards at a time to sight-in for 30, 40, and 50 yards. Dial down the wheel/knob each time you move back.
Finally, get sighted-in at 60 yards and make the adjustments necessary by following the arrow. Take note of the reference number the indicator is lined up with or mark this spot as this is your 60-yard mark. Additionally, fine-tune your windage (left/right) axis now to ensure consistent shots.
Match the correct sight tape for your markings or number references provided by the manufacturer and apply it to the wheel or bar. Use the sight-tape to double-check you’re hitting consistently at the matched distances.
Put it to the Test!
Once you’re done sighting-in, it’s time to pull out the 3D and 10-ring targets and put your skills to the test. You may be surprised to find your groups are tighter than ever. But, is this the only way to sight in a bow?
Everyone may use a slightly different sighting-in method, the same way they may use different distances to sight in their pins. Some may adjust for both left/right at the same time as they’re adjusting for up/down shots. It happens to be the mainstream way of adjusting especially when using traditional 10-ring targets.
Use the system you’re most familiar with. Get to know what distances or sight-in method you like best by getting out there and nocking some rounds. Sight in and shoot sharp!
Further Reading
How to Measure Scope Ring Height (With Pics & Calculations)
How to Adjust a Rifle Scope: 6 Scope Adjustments Explained!
How to Level a Scope on a Rifle [Step-by-Step With Pics]
What is a Rifle Scope Ruler (Mildot Master) & How to Use It?
The rule of hunting is getting to understand your prey. Expert hunters know this, and sometimes they get particular when choosing their weapons depending on what you are hunting. If you are a novice hunter, it is easy to make the mistakes I did when starting. I used heavy-caliber rounds for all my hunting experiences. Though suitable for taking down big game it literally destroyed small game.
When you are hunting small game like squirrels, it is unnecessary to use heavy gunfire. You will need to have the best air rifles for squirrel hunting. Hunting any game is not easy, especially small games like raccoons and squirrels.
In this article, all my focus is on exploring the best air rifles in the market and the different features they all have that make them ideal for squirrel hunting.
Using an air gun will improve any hunter’s marksmanship and shooting skills while using any rifle. It is the first form of practice you need before challenging yourself with big game hunting. Spring-powered air guns have adverse recoil as well, and this will let you handle the full recoil of a rimfire or bore rifles as well.
When going out for target practice, it is cheaper to do it with an air rifle than with a full bore rifle. The logic is that the costs of an air gun are more affordable, yet it offers a similar hunting experience. When you get better aim using the air gun rifles, the same will reflect when hunting big game using a rimfire or center rifle.
When hunting for small pesky rodents like vermin rats and squirrels on your farmyard, air guns are safer and will not destroy farm machinery when you miss your target. Besides using it for pest control, air guns can be for entertainment as well. Not many states have dire ramifications for possessing and owning an air rifle gun. Therefore you can use it to shoot at targets with your friends when they come over.
Why I Like Them?
Air rifles are a silent killer when you fix it with a moderator that takes away the noise when you fire. Because of this, you can hunt as many squirrels and vermin rats on the go before realizing they are being picked out one by one.
Unlike using a rifle or shotguns, air guns will not need regular cleaning each time you fire. It is because they never use chemicals as fuels; therefore, they are not complicated to handle.
Also, because air rifles have little recoil compared to rimfire and center rifles, they will not stress your body each time you fire. It makes them the preferred choice for people with disabilities and the aged who require little resistance and complications.
Headshots are very effective for taking down even big game animals. The advantage is it preserves the meat if you plan to eat it. Because air rifles have limited power and chemicals, the meat stays free from peppered pellets you would have if you used a shotgun instead.
Review of the Ten Best Air Rifles You Can Find in the Market Today
Gamo Magnum Air Rifle .22 Cal
I will start with the first air rifle that I tried during my squirrel-hunting quest—the Gamo Magnum Air Rifle .22 Cal. The first thing I noticed when I handled it for the first time is how sturdy it is. It also feels lightweight, which is a bonus if you want to use it for longer hours. There is also so much control when locking into targets, especially fast-moving targets.
The good thing about the Gamo Magnum air rifle is that it gives a clean but lethal shot. I realized that the squirrel I hunted was not battered to a pulp, and the meat was preserved. Another advantage is how much power it has yet subtle and causes only slight vibrations you can handle after you fire it. Few vibrations mean a firm hand and can easily get the second shot accurately if you need more than one shot to kill a squirrel.
The Gamo Magnum air rifle comes fitted with a rear sight and front scope for improved accuracy. The front scope is fixed, but you can make adjustments on the rear sight. One thing that favored my quest when using the Gamo Magnum air rifle is the excellent optics. The field of view is clear and reliable, which makes you hit targets accurately.
I had the advantage of speed, as the .22 Cal used on the Gamo Magnum air rifles has a fast velocity. They move at 1300 feet per second. It is safe to use as it has a recoil pad that reduces the recoil to a paltry 74%. It is also waterproof since I used it in the rain, without any hiccups.
Pros
It has minimal vibration
The Gamo Magnum air rifle has a high velocity .22 Cal
Adjustable trigger
Reduces the felt recoil by up to 74%
It offers the hunter powerful shots
It comes inclusive with useful accessories
Cons
I found it to be more loud compared to other air rifles under review here.
Hatsan 95 Air Rifle Combo
It is one of the best air rifles for squirrels as it has two features that other models do not have. The first thing I loved about this rifle is that it has a high-quality and two-stage trigger that makes it easy to engage. The second aspect is that the trigger pressure is ideal, and it let me take shots at the precise moment I wanted.
The Hatsan 95 Air Rifle Combo is a gun that is also aesthetically appealing. The steel barrel looks nice, yet it manages to fire accurately with minimal effort.
With this particular air rifle, you can have three versions: .22, .25, and .177 — and each will give you exceptional performances. The .22 has a maximum velocity of only 1 000 FPS, which is decent as it builds on accuracy. On the other hand, the .177 caliber is the best for all long-range shooting as it offers a velocity of up to 1,300 FPS. The .25 is the least in terms of velocity as it only has a maximum velocity of 650 FPS.
The Hatsan 95 Air Rifle Combo comes with open sights that I found the best for taking clear shots. Because it is the best for both mid and short-range shooting, I rank it as one of the best air rifles for squirrel hunting.
The Hatsan 95 Air rifle has a beautiful design of walnut wood. It will give you superior accuracy and is a rifle with superior features than most.
Pros
Accurate
Anti-beartrap mechanism
Sturdy gun
Clean shots
Lightweight
Cons
Some people may find it difficult gun to cock
The grouping is sometimes spread in a few of the rifles made.
Gamo Varmint Air Rifle .177 Cal
Hunting pesky tree rats and squirrels can be a fun sport if you have the Gamo Varmint air rifle. Sometimes after having a bad day, all I need is to feel better, and hunting squirrels offers more resolve than the rigorous process of hunting deer, hogs, or ducks.
The Gamo Varmint air rifle is a .177 Cal designed to remove the stress pests bring to your life. It is a simple air rifle that fires a caliber up to 1250 feet per second. With such firepower, it is enough to fall a squirrel from a tree minimizing the rare chance of missing your target.
The Gamo Varmint Air Rifle is also an all-weather gun with excellent stability, which combines well with quality to give you maximum performance. It is lightweight and synthetic stock that is also easy to carry everywhere you go.
It uses match-grade polymer steel, and the jacketed barrel is somewhat fluted, which adds speed and spin to your ammunition. The Gamo Varmint air rifle uses a two-stage and adjustable trigger that gives the feeling of a comfortable and customized fit. The thick butt-pad will absorb most of the recoil, and this ensures a smooth shooting experience for all hunters.
Pros
Sturdy gun
Clean shots
Lightweight
Accurate
Cons
Is somewhat louder than other air rifles
Gamo Whisper Silent Cat Air Rifle
Another best air rifle that I tested is the Gamo Whisper Silent Cat Air rifle because it has decent speed and accuracy. It has a maximum velocity of 1200 FPS, which is fast enough for hunting squirrels from mid to short-range distances.
The Gamo Whisper Silent Cat Air Rifle operates using a single cocking system, which is ideal for smooth shooting. It also uses automatic cocking to make it faster to shoot and easy to operate. The most crucial feature I loved about this air rifle is that it has a first and second stage of trigger adjustments that make it precise and comfortable.
The barrel is of the Gamo Whisper Silent Cat Air Rifle is fluted and has a polymer jacketed steel. The air rifle is also dead silent as it has a noise dampener that makes it undetectable to the squirrel population. It means that you cannot disrupt the squirrels because the gun makes no noise when your fire. The dampener has the potential to reduce the noise from air rifles by almost half.
You would not disrupt the squirrels since this air rifle comes with a noise dampener that is not detachable. The noise dampener can minimize the noise produced by air rifles by almost half, which allows you to attract more squirrels.
The design comes with a rubber pad for the butt of your air rifle. It takes away the recoil and makes for comfortable shooting as well. It comes with the best optics, which makes you shoot accurately at your targets. The sights are both waterproof and fog proof, which makes it a durable all-season air rifle.
Pros
Powerful shots
Reliable optic sight
Durable
Quiet operation
Cons
The scope is sometimes wobbly
Benjamin Trail NP XL Magnum
The Benjamin Trail NP XL Magnum is among the best air guns for novice hunters. It has a total length of 4.25 inches and is considered among the full rifles available under this review. The aesthetic wood stock design makes it a lightweight air rifle at only 9.7 pounds.
It has a thumbhole stock that feels comfortable for all hands and coupled-up with a good grip that adds to your pinpoint accuracy shots.
The Benjamin Trail NP XL Magnum uses Benjamin’s Nitro Piston Technology and is also a single hot air gun. The manufacturer replaced the steel spring as the source of power with this new technology as its main aim is to reduce the feel of recoil when you fire.
Through the use of Nitro Piston technology, you can have improved accuracy as you have a faster locker time. It can fire pellets at 1100 feet per second, making it a lethal rifle for hunting small game like squirrels and rabbits.
It has a quiet but simple break barrel as its action. Because it reduces noise, you can take a second shot if you happen to miss your first one. The trigger is also smooth and is only a brisk 3.5 pounds. The weight of the trigger is not adjustable, which is a downside, but if you are a straight shooter, you will have no qualms with this design.
Most novice hunters will enjoy using this air rifle for target practice as the skills can easily be transferred to the full gun when hunting for a big game. Every shot you fire will carry a 30-foot-pound of downrange muzzle energy. The Benjamin Trail NP XL Magnum, therefore, is among the most hard-hitting air rifles that take down small game with a single shot. The hard punch is a welcome feature as I like to consider the humane side of killing prey; it should be a quick and painless death.
Pros
Powerful shots
Reliable optic sight
Durable
Quiet operation
Cons
The weight of the trigger is not adjustable
Seneca Dragon Claw
Under this review, this is the most potent air gun rifle in the market. The Seneca Dragon Claw is for situations where you need one shot, and it must be the killer shot. When I was using the Seneca Dragon Claw air rifle, I preferred the .50 Cal.
One thing I admire most about this rifle is the pre-charged pneumatic design. It makes this beast gun able to fire .50 Cal up to 679 feet per second and a 230 ft.-lbs muzzle energy. With this kind of firepower, it is no surprise that you can hunt and successfully kill both small and medium-sized game like small hogs, foxes, coyotes, and possums.
The outstanding feature of the Seneca Dragon Claw air rifle is that it uses dual tanks of 500cc air capacity. The dual tanks are under your air rifles barrels that give it balance when handling it. It also comes with the best adjustable sights accompanied by a dovetail rail to mount the optics on your rifle’s barrel. It has an appealing aesthetics as the wooden stock finish on the fore-end is quite attractive.
Pros
Sturdy gun
Clean shots
Accurate and powerful
Cons
The dual tank feels cumbersome and makes the rifle heavy
Benjamin Vaporizer SBD Air Rifle
The Crosman Benjamin Rogue SBD is an improved version of the original Benjamin SBD. The acronym SBD stands for Silencing Barrel Device. As a result, this reduces the noise when you fire the rifle and is up to three times more silent than other air rifles in the market.
It is also a powerful rifle as it fires the .177 caliber design pellet up to 1,400 feet per second. If you are looking for a silent killer’s true definition, then you must try the Benjamin Vaporizer SBD. When hunting for small prey like rabbits and pesky pests like squirrels, it is a brutal rifle that kills on impact. It, therefore, offers the prey a humane, quick, and painless death.
The Silencing barrel device is odd-looking, but I love how it functions well and is also out of the way, so it doesn’t block the adjustable scopes. Another essential feature worth mentioning is the two-stage trigger that gives a smooth squeeze.
Pros
Accurate
Sturdy gun
Clean shots
Lightweight
The most silent air rifle because of the SBD
Cons
Appears complicated and not for the novice hunter
Beeman R7 Air Rifle
The Beeman R7 is one of the smallest and compact air rifles in the market today. Yet, despite the size, it is still powerful enough to fall small pre like squirrels. It is also not lacking in the accuracy department as it has excellent balance and control. When I was using it, I discovered that it is remarkable at hitting fast-moving objects as it also has high speed and velocity. It can fire a .177 pellet up to 700 feet per second.
It is a model that takes after the popular Beeman R1 air rifle. The idea behind the same design was to create a shorter, lighter, and comfortable to shoot weapon. An excellent feature that complements the design is the use of a double joint cocking lever, which reduces the effort when cocking.
The barrel design is a spring-piston that can propel a .177 Cal accurately and at faster speeds. The trigger is also adjustable and breaks at 1.25 lbs.
The Beeman’s reduced effort cocking device makes it unique and an overall excellent break barrel design. The fact that it is 5 inches shorter and 2.5 pounds lighter than the Beeman R1 makes it the clear winner.
The Beeman R7 is among my favored air rifles because it comes with adjustable scopes and mounts for all your optical needs.
Pros
Lightweight
Sturdy
Adjustable trigger
Cons
Some people feel like it lacks enough killer power
Benjamin Fortitude Gen2 PCP Air Rifle
When you want a simple design, then the Benjamin Fortitude is among the top air rifles. It is also easy to use and affordable. The Benjamin Fortitude has all the features you need to hunt and kill small game like rabbits and squirrels. The pellets come in two sizes you can choose from, either the .117 or—22 caliber pellet rifles. For the .117Cal, you will have a 950 FPS, and the .22 offers up to 800 FPS.
It is a bolt action and a single-shot air rifle that has a 10-round rotary magazine. The Benjamin Fortitude weighs a paltry 5.3 pounds and is an all-weather type of design. It is lethal at distances under 100 yards, and this is why I love it for all my hunting experience. The single-stage trigger design allows a constant pull that makes it accurate.
Pros
Easy to use
Lightweight
Accurate
Lethal at distances under 100 yards
Cons
None worth mentioning
Air Arms TX200 Hunter Carbine
It is an elegant and refined air rifle design. It has a sleek appearance, and it does back it up with more firepower. The Air Arms TX200 Hunter Carbine is a compact and lightweight .177 rifle known to be the best for target shooting and hunting of small game. This gun has excellent accuracy and can send a pellet downrange up to 930 FPS. It comes with an underlying under lever of 34 pounds cocking effort.
The Air Arms TX200 Hunter carbine is the best for hunting small game as it is lethal for prey like rabbits and squirrels. It is exceptionally lightweight and has a beautiful wooden stock finish that makes it aesthetically appealing. It has decent handling, and it is easy to use and the best for the novice hunter.
The most impressive feature is the two-stage adjustable trigger that is coupled-up with a barrel from Lothar Walther to give it precision and accuracy.
Pros
Easy to use
Lightweight
Accurate
Sleek design and a two-stage adjustable trigger
Cons
Expensive is not a con as you cannot drive a Ferrari that you cannot afford.
What is the difference between a regulated PCP and an unregged one?
by Nigel Allen
Precharged pneumatic (PCP) air rifles are powered by compressed air contained in either an integral air cylinder or buddy-bottle. Although the PCP is the serious airgun shooter’s choice, its concept is inherently simple: a hammer strikes a valve which releases some air to thrust the pellet out of the barrel. The hammer always strikes with the same force, so the amount of air released by the opening valve changes as the rifle’s on-board air pressure behind it drops. This affects the velocity (power) output of the rifle as it progresses through its air charge, resulting in what’s known as a power curve.
The specific shape of the power curve varies according to the rifle’s design. Generally, an unregulated PCP’s power output will rise to a peak before dropping off to the point it needs recharging. A power output that’s dependent on the air rifle’s pressure is not ideal because the pellet’s downrange point of impact (POI) will alter accordingly. Because of this, many airgunmakers incorporate an air regulator into their guns. In a regulated PCP, the power output stays consistent throughout its entire air charge.
Comparison of typical power outputs from a regulated and non-regulated precharged pneumatic air rifle
So, which to choose? Although a regulated PCP may seem the ideal, unregged PCPs have been around for many years and are still popular. Indeed, much R&D has been undertaken in the PCP world, so the simple ‘knock-open’ valve of old is a far cry from what we see on today’s airgun hardware. The Slingshot hammer/valve set-up used in the unregulated Daystate PCPs is one such example of how far unregged PCP design has evolved. Nevertheless, characteristics of unregged and regged systems are an important consideration when choosing a PCP for your specific shooting needs.
UNREGULATED PCP
Between the first and last shots of an unregged PCP’s charge of air – its ‘usable’ range – the output will follow a power curve, peaking somewhere around the mid-point of the curve. While the duration of the peak depends solely on the rifle’s inherent design, this part of the curve is referred to as the ‘sweet spot’. It’s where the shot-to-shot consistency – and so the rifle’s accuracy – will be at its best. The longer the sweet spot, the better. Ideally, that is where you want to be doing most of your shooting (and where you should zero your scope).
Of course, you can shoot either side of the sweet spot, but you may well see a slight change in the pellets’ POI. At relatively close ranges this probably isn’t a problem, but it may shift your pellets outside acceptable limits for hunting or competitive target shooting at longer distances. Therefore, with any unregulated PCP, it pays to familiarise yourself with the characteristics of its power curve so that you can compensate for POI shift if required.
Although an unregged PCP lets you shoot throughout its usable pressure range (200 down to 100 BAR in this example), the best consistency, power and accuracy will be obtained by shooting in its ‘sweet spot’ (165 down to 120 BAR in this example)
For example, your rifle may fill to 200 BAR and then, 150 shots later, need a refill at 100 BAR. Let’s assume its sweet spot spans 65 of those 150 shots. Then it would be worth noting on the rifle’s manometer what pressure range relates to that 65-shot section – perhaps between 165 and 120 BAR. If the number of shots you get per charge of air doesn’t bother you, you could choose to fill the rifle only to 165 BAR each time, and always refill it at 120 BAR. Yes, the trade-off is that you’d be reducing the rifle’s shot-count, but in return you’d be getting an output performance on a par with a regged PCP. Plus, by starting at lower pressures, charging the rifle from a manual pump will be less effort, and you’ll get longer periods between scuba tank fill-ups.
REGULATED PCP
Where an air regulator is fitted to a PCP, air release is far more controlled for the entirety of the rifle’s charge and there is therefore no power curve. Effectively, a regulateded PCP offers a sweet spot that extends from the first to the last shots of the usable shot range. In some cases, because a regulator deals with air delivery more efficiently, the rifle also returns more shots between fill-ups.
Generally, a regulator system incorporates a secondary air chamber (the plenum chamber) which is designed to operate at a constant pressure. This means that as the rifle’s air pressure drops, the main firing valve always delivers an exactly-metered volume/pressure of air. The benefit of this is that the rifle’s power output is the same, no matter where it is within its charge cycle.
That said, it is important not to let the pressure in the rifle’s main air reservoir drop below that of the regulator’s operating pressure, else the regulator effectively becomes redundant in the air flow chain. Many gunmakers now incorporate an additional gauge on their regged PCPs to specifically indicate the regulator status, like on the Brocock Commander PCP.
The regulated Brocock Commander has two manometers – one for its HUMA regulator’s fixed pressure (top) and one to show the pressure status of the rifle’s main air reservoir
While ‘managing’ the power curve of an unregged PCP isn’t exactly a headache for most shooters, there’s no denying that the fill-and-forget operation of a regulated PCP is more straightforward. However, regulated PCPs cost more than their unregged counterparts, so you have to weigh up their worth in your particular scenario.
FT, HFT and benchrest competition shooters, who seek ultimate precision in every aspect of their sport, may be able to justify the outlay for a regged PCP, but for everyday shooting/hunting assignments, a good quality, unregged PCP is equally as good if you have a full understanding of its power curve.
Yet never dismiss the addition of a PCP regulator as ‘just another thing to go wrong’. That may have been the case when airgunsmiths were experimenting with them many decades ago. But just like knock-open systems have evolved, the PCP regulator has also graduated. Specialist regulator manufacturers have risen to the forefront of the airgun industry, with many gunmakers incorporating their proven designs in their regulated PCP. Daystate, for instance, have partnered with the world renowned HUMA to develop a metering system in the new regulated HR Huntsman Regal, Renegade HR and Wolverine R air rifles.
There’s nothing quite like hunting whitetails during the rut. Georgia deer hunters are fortunate in that with a little travel, we can hunt the rut from mid-October through the end of the year — that’s two and a half months of rut hunting action!
To give you an idea of the 2024 rut dates, I’ve included a map below that breaks the peak of breeding into two week intervals. If you’d like more specific dates, check out the table below that narrows it down even further to the best week for each county.
The map and table were created based on research done by the University of Georgia (UGA) and Georgia DNR wildlife biologists that found a strong correlation between deer-vehicle collisions and rutting activity. By looking at deer-vehicle collision reports across the state, UGA and the Georgia DNR were able to pin down the peak of rutting activity for each county.
Keep in mind, these are just guidelines for Georgia’s peak breeding dates. There will always be does that come into estrus early or late, which can result in a flurry of buck activity outside of these “typical” rut dates. More on that below.
2024 Rut Dates by County
October 13-19
Ben Hill, Camden, Candler, Glynn, Jenkins, McIntosh, and Telfair counties.
Baker, Banks, Calhoun, Dougherty, Habersham, Irwin, Lumpkin, Mitchell, Rabun, Stephens, Terrell, Thomas, Webster, and White counties.
December 1-7
Quitman
December 8-14
Decatur and Grady counties
December 15-21
Early and Miller counties
December 22-28
Seminole County
What About Weather or the Moon Phase?
You may wonder how we know that these dates will apply to the 2024-2024 Georgia deer season. We know because the whitetail rut occurs the same time every year for any given location. It doesn’t change based on weather factors, moon phase, or anything else. That has been documented in study after study over the years.
What can change from year to year is how much rutting activity you witness where you hunt. Keep in mind that while the dates listed on this page are peak rut activity, there are always outliers that fall outside of that peak. Some does may come into estrus a little earlier and some will come in later.
When you see rutting activity where you hunt will be determined by the timing of does coming into estrus in that specific area. And since there appears to be a genetic aspect to a doe’s estrus timing, you may see that pattern repeated year after year. If the rut dates listed above don’t correlate with when you typically see rut activity, it’s probably because you have a doe or two that are going into estrus outside of the typical date range.
How to Hunt the Georgia Rut
In my mind, there are two keys to taking advantage of the whitetail rut. The first one is to spend as much time in the stand as possible during the peak dates. Bucks are on the feet and moving more than ever during this time, so you never know when a great buck you’ve never seen before may walk into your shooting lane.
The second key is knowing where the does are and using that information when developing a strategy to catch a cruising buck looking for a receptive doe. If you can find some type of funnel on the downwind side of a doe bedding area, then it’s only a matter of time before you get a shot opportunity.
Final Thoughts
There’s no better time to be in a treestand than during the rut, and we have over two months to chase it here in Georgia. I hope you’re taking advantage of that opportunity! Hopefully the Georgia rut map above, along with the table of 2022 Georgia rut dates by county will help you schedule your hunts this year so you can extend the rut-hunting action.
If you disagree with any of the dates listed in this article, we’d love to hear about it. Let us know what county you hunt, and what dates you think best fit the county based on your observations.
The health benefits of fish are numerous, as fish are rich in healthy omega-3 fatty acids. But those looking for a luxurious fish dinner experience might want to skip the cod and canned tuna and opt for a high-quality, tasty fish.
The most expensive fish to eat is bluefin tuna, especially specimens caught off the coast of Japan. A single bluefin tuna can sell for more than $2 million! If you’re looking for a domestic fish to chow down on, you’ll want to choose an American glass eel, as these cost upwards of $2,000 per pound.
Let’s take a gander at the most expensive edible fish so that you can choose a luxury-quality filet for your next fish dinner.
A standard can of tuna often costs less than $2, but it’s bound to pale in comparison to the tastiest (and most expensive) fish in the world. So for the most refined palate-pleasing experience, you’ll need to pay far more.
Still, you might find yourself wondering, “What qualities make some tasty fish so expensive?” Typically, the three factors that contribute to a dinner-friendly fish’s cost include:
Rarity
High demand
Legal restrictions
Let’s take a quick moment to explore why these aspects influence cost.
Rarity
Rare fish are often the most expensive type of seafood, as diners are willing to pay a high price to enjoy something that few ever get to enjoy. But a rare and tasty fish is even costlier, as it tastes far better than the standard fish filet and is nearly impossible to obtain.
But scarcity alone doesn’t make an edible fish expensive. High demand is just as crucial to a fish’s price.
High Demand
What do the most expensive steak cuts and fish have in common? The tastier they are, the more people want to try a bite!
The most costly types of fish have unique flavors and melt-in-your-mouth textures that make them culinary delights. Unlike a fried cod filet, these tasty fish are often served lightly cooked or raw to ensure diners get an unspoiled experience.
Legal Restrictions
For better or worse, some of the world’s priciest fish are endangered or close to reaching endangerment. After all, the more scarce and delicious a fish is, the more demand there is!
Some regions have strict regulations about specific fish species, limiting the number of certain types of fish that anglers are allowed to catch each year. Unfortunately, these legal restrictions only make these delectable fish more valuable and desirable. An estimated 20% of wild-caught fish imported to the United States are illegal in some way.
Still, if you’re determined to try the priciest fish in the sea, be sure that you’re choosing specimens that are legally obtained. Otherwise, you could be looking at some hefty fines that outdo the initial cost of the fish.
Most Expensive Fish to Eat: Summary List
Bluefin Tuna
American Glass Eel
Pufferfish
Alaskan Wild King Salmon
Swordfish
Yellowfin Tuna
Chinook Salmon
Halibut
Dover Sole
Sockeye Salmon
10. Sockeye Salmon
Salmon is one of the priciest fish species in the world, though some types are more expensive than others. Sockeye salmon tends to fall on the lower spectrum in terms of price, though it’s one of the tastiest types of fish you can add to your shopping list.
Notably, this type of salmon is hard to forget, especially if ordered whole. It has bright red scales across most of its body but a distinctly green head. Overall, this fish is considered the most flavorful salmon, though it’s often smoked to accentuate its natural taste.
At $20 per pound, sockeye salmon isn’t the priciest type of salmon, but it will cost you more than cod, tilapia, or mackerel.
Why It’s Expensive
Wild-caught sockeye salmon tend to command the highest prices, as they’re often much larger than farm-bred fish. Larger fish means heftier portions, so heavier specimens always cost more than smaller ones. Still, high demand and transportation costs have helped make this fish comparatively expensive.
9. Dover Sole
The Dover sole might look like the most appetizing fish. It has a muddy brown body that’s far flatter than a fresh-caught, round-bellied tuna. But it has a uniquely sweet flavor that’s often compared to spiced chicken or beef.
This flavor profile is unusual, as the Dover sole are saltwater fish. Still, they’re the least “fishy” type of fish you can enjoy, making them an ideal choice for those that tend to avoid seafood.
And with a price tag of about $29 per pound, these flatfish are far costlier than other species of edible fish. Naturally, wild-caught specimens are more expensive than farmed options.
Why It’s Expensive
The primary reason Dover sole fish are expensive is that they’re so tasty. This species is also easy to prepare, with most professional chefs and at-home cooks baking them whole. Because they have a mild flavor profile, they’re a favorite among diners that enjoy the benefits of eating fish but don’t enjoy the taste of seafood.
8. Halibut
Halibut is also a type of flatfish, but they can grow to jaw-dropping sizes, making full-grown Dover sole fish look like babies. For example, Pacific halibut can weigh more than 400lbs, and their Atlantic cousins often weigh in at more than 300lbs.
This species is also notable for its low fat content and sweet taste. Many people compare the taste of halibut to tilapia, but milder and thicker. As a result, halibut filets are ideal for fish burgers or filling fish dinners.
However, wild-caught halibut isn’t as common as it once was, making it one of the pricier types of edible fish. Generally, you can expect to spend about $30 per pound to enjoy this saltwater fish.
Why It’s Expensive
Halibut is one of the tastiest and most filling types of fish, and as a result, it’s become one of the most popular types of fish around the world. However, this high demand has boosted the price of halibut filets and made wild specimens scarce. These factors make it pricier than similarly flavored species like tilapia.
7. Chinook Salmon
Unlike sockeye salmon, Chinook salmon tend to have greenish-white bodies with small brushstrokes of red along their abdomens. However, they can be almost as enormous as their bright ride relatives, making them easy to slice into hefty portions ideal for meals.
Native to the Pacific Ocean, these fish are prized for their savory, buttery flavor and soft texture. But this mouthwatering taste has also made Chinook salmon endangered in some areas and rare in others.
You’ll likely spend about $30 per pound on farmed Chinook salmon.
Why It’s Expensive
There are two reasons why Chinook salmon is one of the most expensive types of edible fish. Firstly, they’re well-known for being one of the most delicious types of salmon, with a rich flavor that’s rarely found in other species.
However, Chinook salmon are also threatened by overfishing, making them increasingly scarce. This rarity and superior flavor profile make it pricier than other anadromous (living in saltwater and freshwater environments) fish.
6. Yellowfin Tuna
Yellowfin tuna (ahi) are gorgeous edible fish with glittering silver bellies and colorful blue-green spines. Native to tropical waters, particularly those off the coastlines of Hawaii, these fish tend to grow into enormous creatures. It’s not uncommon to see anglers catching 300lb or 400lb yellowfin tuna.
Because these fish can grow to impressive sizes, they’re often used for a variety of meals, including sushi and fish patties. But their mild taste and significant portions also make them a popular choice. Ahi typically costs about $30 per pound, but prices may be higher for those living far from tropical regions or coastal areas.
Still, once you’ve tried yellowfin tuna for yourself, you might never be able to go back to albacore! Adding a small handful of some of the world’s most expensive mushrooms to your tuna dinner can make things even better.
Why It’s Expensive
Yellowfin tuna is pricier than other types of fish because it’s gigantic, tasty, and in high demand. Additionally, some diners may pay more for this fish due to high transport costs.
5. Swordfish
The swordfish gets its name from the long, blade-like protrusion sticking out from its head. It’s been a treasured catch among anglers for centuries, but it’s also prized for its meaty filets and mild flavor.
Like other costly fish from around the world, swordfish can grow to jaw-dropping sizes. While it might not be quite as hefty as some tuna or salmon, the average swordfish can weigh about 200lbs. Consequently, a single swordfish can feed quite a few people!
At about $60 per pound, this tasty fish is also one of the most expensive types of seafood.
Why It’s Expensive
It’s impossible to raise swordfish on standard fish farms, as these fish require plenty of space and saltwater to thrive. But marine fisheries are far more costly to maintain than terrestrial fish farms. Additionally, wild-caught swordfish are becoming a rare sight to the high demand for this delicately flavored fish.
4. Alaskan Wild King Salmon
Technically, Alaskan Wild King salmon and Chinook salmon are the same species. However, Chinook salmon is the more generic term and often refers to fish bred on fish farms or wild-caught throughout the continental United States.
On the other hand, Alaskan Wild King salmon is almost always a wild-caught Chinook originating from Alaska’s pristine rivers and coastlines. Because these fish have more unspoiled areas to explore and thrive in, they can grow larger than their continental cousins.
Diners may prefer Alaskan Wild King salmon over farm-bred Chinook due to the cleaner Alaskan environment. But the higher demand for Alaskan-caught Chinook salmon results in a noticeable price difference of over $30. For example, Alaskan Wild King salmon often costs $70 or more per pound.
Why It’s Expensive
A cleaner and more expansive environment can result in better-tasting and larger fish. Of course, the same is true of any other commonly eaten animal, including chickens and cows. So you can think of Alaskan Wild King salmon as free-range or grass-fed beef.
It’s higher quality than standard Chinook salmon, which means that folks are often willing to pay a higher price for it. And because it’s caught in Alaska (almost 3,000 miles away from the continental United States), transportation costs are high.
3. Pufferfish
The pufferfish (also called fugu) is one of the most expensive seafood items on the planet. Unfortunately, it also happens to be one of the most dangerous, as pufferfish contain a combination of potentially lethal toxins.
If prepared incorrectly, pufferfish toxin can kill you in just four hours! And while you might think that this dangerous quality makes pufferfish one of the least-desired fish in the world, it only increases demand.
The most skillful chefs in the world know how to prepare pufferfish in a way that makes it entirely safe to consume. As such, many daredevil diners are more than willing to give this fish a try.
Still, you’ll need to be willing to invest some money to give this fish a try. A single fugu sushi dish can cost $60, and this fish is known to cost $200 or more per pound.
Why It’s Expensive
Pufferfish has a taste that’s challenging to describe, with most diners describing it as absolutely unforgettable. But it can also prove deadly if poorly prepared.
This combination of unique flavor and high risk makes it fugu an attractive experience for many. Still, the primary reason it’s expensive is the skillful preparation needed to make it safe to eat.
2. American Glass Eel
The American glass eel (sometimes called the bay eel) is native to northeast coastlines in North America. However, it’s not nearly as common as it used to be. As a result, anglers in Maine can now charge outrageous prices for a single pound of fresh-caught eel.
In 2009, the per-pound price for Maine glass eels was about $100. But in 2019, that price tag stood at a hefty $3,000 per pound!
Still, eel typically isn’t the first dish people imagine an exquisite and expensive fish dinner. So, why is the price of American glass eels so high?
Why It’s Expensive
The glass eel is often compared to chicken and catfish in terms of taste, and it’s not beloved due to its flavor profile. That said, this slim snake-like fish is one of the most expensive because it’s become scarce.
Poaching and illegal catching are significant problems, leading to substantial catching restrictions that have inflated the price of these fish. The American glass eel can also grow to an astounding length, occasionally reaching up to six feet long.
This quality makes them ideal specimens for sushi, and the most expensive sushi platters often include at least one cut of glass eel.
1. Bluefin Tuna
Bluefin tuna is the most expensive edible fish on the planet. In 2019, a whopping 600-pound bluefin tuna sold for ¥333.6 million (that’s about $3 million). That’s nearly $5,000 per pound!
This type of tuna is native to the North Atlantic Ocean and the Meditteranean Sea. But the costliest specimens are often found in the Pacific Ocean, off the coast of Japan.
While many types of tuna fish grow to enormous sizes, bluefin tuna is one of the largest types of tasty fish. It’s also considered a delicacy due to its increasing rarity and distinct flavor. Still, these aren’t the only reasons bluefin tuna are so expensive.
Why It’s Expensive
Bluefin tuna is one of the most prized sushi ingredients. It’s also constantly in high demand due to its international reputation for being the best-tasting type of tuna.
But this massive and tasty fish isn’t plentiful, primarily due to overfishing and enormous demand. In addition, larger specimens have become increasingly rare over the last several decades, making the heaviest catches incredibly expensive.
Try These Tasty Fish
The most expensive fish to eat is Japanese bluefin tuna. That’s because these fish are massive, rare, and in high demand. That said, bluefin tuna isn’t the only tasty fish that costs a pretty penny.
If you’re feeling in the mood to treat yourself, be sure to consider any of the above options. Though your wallet might be lighter, your belly is bound to feel a little fuller!
Are you hungry for more of the world’s most expensive foods, experiences, and items? If so, be sure to check out our blog now!
Lighter Score Weight When Filled Fuel Pre-filled? Top Pick: BIC Mini Lighter 0.39 oz Butane Yes Runner-Up: Clipper Mini Lighter 0.39 oz Butane Yes Best for Adverse Weather: UCO Stormproof Torch 3.21 oz Butane No UST Wayfinder Lighter 1.27 oz Butane No Zippo Matte Lighter 2.15 oz Zippo Lighter Fluid No
We bought 5 of the best backpacking lighters available and set about testing their water-resistance by soaking them in water, their wind-resistance by trying to blow them out, and their reliability by striking them until we got blisters. Our tests confirmed what backpackers have long known: the BIC Mini Lighter (commonly called the “Mini BIC”) is the best lighter for backpacking.
It is ultralight, reliable, decently water-resistant, and a great bang for your buck.
The Mini BIC’s only downside is it’s not wind-resistant. A simple windscreen can usually solve this problem though.
If you need a lighter for backpacking in extremely wet or windy conditions, we recommend the UCO Stormproof Torch. It was the most wind- and water-resistant lighter we tested.
Also, it’s important to point out the Mini BIC earned the top score in our tests by the slimmest of margins. The Clipper Mini Lighter is an excellent alternative. It isn’t as easy to find in the US, however — you’ll likely have to pick one up online or at a head shop.
Supremely affordable and available everywhere, the Mini BIC earned our Top Pick award because of its reliability, value, and ultralight weight.
When I struck the BIC 200 times, it lit a perfect 200. BIC has perfected lighting consistency.
The Mini BIC is also decently water-resistant. After performing 3 “Soak Tests” with it — submerging the lighter in water, shaking it out, and then trying to light it in 1-minute intervals — it took an average of 2 minutes before it started lighting again consistently.
(To dry it out quicker you can also run it up and down a piece of wood or your pants leg for 30 seconds.)
The BIC’s main drawback is how poorly it holds up in windy conditions. The flame is difficult to light in even a slight breeze.
Without some sort of windscreen, a BIC is hard to light in even a slight breeze. The wind was blowing a few miles per hour at the time of this photo.
It’s an easy problem to overcome though — I usually have luck with using my hand or windscreen to block the wind long enough to light my backpacking stove.
If you’re worried that you need something beefier to take into the backcountry, don’t be.
BIC lighters have been put through the ringer countless times by backpackers of all varieties. Every year plenty of AT and PCT thru-hikers complete their hikes having used only Mini BICs. And adventurer Andrew Skurka uses a BIC in his Cadillac Stove System.
Runner-Up: Clipper Mini Lighter
The Mini Clipper is another excellent backpacking lighter.
While not nearly as ubiquitous as the Mini BIC, it performed actually better in our tests.
For starters, like the Mini BIC it lit a perfect 200/200 times.
It is also slightly more wind- and water-resistant than the Mini BIC.
Where it took the BIC 2 minutes on average to start lighting consistently after having been submerged in water, it took the Clipper 1 minute. I was also able to light the Clipper more easily in a slight breeze.
You might be wondering at this point…
“If it performed better in your tests, why didn’t it get a higher score?”
Based on reports I read of backpackers who had used a Clipper for a long time, the general consensus was that a Clipper’s flint wore out quicker than a BIC’s. As such I docked it some points for being less reliable over the long-term.
In my view you still can’t go wrong if you take a Clipper on your next backpacking trip. Let price and availability be your guides if you’re undecided between the two.
Mini Clippers ship pre-filled but unlike BIC lighters they are refillable with butane. You can also purchase replacement flints and replace a used-up one yourself.
Best for Adverse Weather: UCO Stormproof Torch
Most backpackers — whether you’re a beginner or seasoned thru-hiker — don’t need this lighter.
It’s heavy, bulky, and costly relative to BICs and Clippers.
Its flame is impressive but unnecessary for all but the most adverse weather conditions.
But should you truly need a weather-resistant lighter, the UCO Stormproof Torch is your best option.
While neither truly windproof nor waterproof like UCO’s incredible stormproof matches, this lighter was the most wind- and water-resistant that we tested.
When submerged with the cap on, the inside of the lighter remained completely dry and lit immediately after shaking off the excess water. As marketed, the case is waterproof.
When submerged without the cap, it took just one minute of drying in my pants pocket before the lighter started lighting again consistently.
Its wind-resistance isn’t anything to write home about — it was pretty easy to blow out — but it was the best lighter we tested in this regard, just edging out the competition.
I do have some long-term reliability concerns with this lighter however. The more I struck it the more the flame started to sputter. If you do go with the Torch, take a back-up ignition source with you just in case.
There are two versions of this lighter: one comes with a bottle opener, the other with duct tape. I tested the duct tape version.
UST Wayfinder Lighter
The Wayfinder Lighter from UST, like the UCO Torch, is a butane lighter with piezo-electric ignition.
UST says it “performs without fail in the most adverse conditions.”
I found it to be reliably unreliable.
When I struck it 200 times, it lit just 87, the least of any lighter by far. It is marketed as “windproof” and is apparently able to withstand winds of up to 80 mph. I didn’t test it in those conditions, but I was able to blow it out by blowing air at a moderate rate.
The Wayfinder’s performance was heavily affected by being submerged in water. The inside of the lighter got wet even when the cap was on. Also, air bubbles came out of the fuel refill port, which made me wonder if water was entering the fuel chamber.
It took an average of 9 minutes of drying the lighter in my pants pocket before it lit again, and over 20 minutes before it started lighting consistently.
One of my main gripes with the Wayfinder is that there’s no way to know how much fuel is left. On backpacking trips, especially long ones, this in an important thing to know.
Overall I wasn’t impressed. The unreliability and high price point make this lighter a less than ideal choice for your next backpacking trip.
Zippo Matte Lighter
The Zippo is a classic, but it makes for a bad backpacking lighter.
The biggest drawback of this lighter is its unreliability.
Now, I don’t mean this lighter doesn’t light consistently. It does. The Zippo was the third most reliable lighter in that regard, lighting 175 out of 200 times.
In this case, I mean it’s unreliable because of the issues that stem from its fuel.
First, I had an issue with the fuel leaking. After soaking the lighter in water to test its water-resistance, the fuel started leaking on my hands, in my pants pocket, and on the outside of the lighter.
This poses two threats when out in the backcountry:
It increases your chances of running out of fuel
It poses a fire hazard should you light the lighter without realizing it’s been leaking
What’s more, the fuel evaporates slowly out of the lighter. There are numerous accounts online of people complaining about this and trying to come up with their own fixes to the problem.
This even happened to me when I took these lighters with me on an overnight backpacking trip. The Zippo had fuel in it when I left. When I returned just a day later, despite lighting it only a handful of times, it was empty.
The last thing you want on a backpacking trip is for the fuel in your lighter to leak or evaporate. As such, we don’t recommend the Zippo.
And that’s good news actually — the Zippo has the highest retail price of any of the lighters we tested, you need to buy fuel for it and refill it yourself, and it’s heavier than a backpacking lighter needs to be.
Save yourself a couple ounces and a handful of dollars: pick up a Mini BIC or Mini Clipper and be done with it.
Summary
Here are the best backpacking lighters:
BIC Mini Lighter
Clipper Mini Lighter
UCO Stormproof Torch
UST Wayfinder Lighter
Zippo Matte Lighter
Alternative Ways to Light Your Backpacking Stove or Start a Campfire
In my experience, lighters are the most popular way backpackers light stoves and start campfires.
There are other ways, though, which we’ve also written about. Consider these other products if you’d like an alternative to lighters (click on the link to see our reviews of the top options):
Fire starters
Stormproof matches
Waterproof matches
Even if you do go with a lighter, you might want to take a back-up ignition source just in case. Most backpackers I know who do this will carry one in the form of a ferro rod, magnesium fire starter, or pack of waterproof or stormproof matches.
How to Choose the Right Backpacking Lighter for Your Needs
Weight
When it comes to backpacking gear, lighter is always preferable.
The lighters we tested ranged from 0.39-3.21 oz. That isn’t terribly heavy in the grand scheme of things, but relatively speaking the heaviest lighter weighs over 8 times as much as the lightest.
Unless you want to go with our top option for adverse weather, the UCO Stormproof Torch, a lighter shouldn’t cost you more than an ounce in pack weight.
If you’ll be backpacking for an extended amount of time you might want to consider bringing a back-up lighter or, if your lighter is refillable, extra fuel.
Flint vs. Piezo-Electric Ignition
Flint lighters — like the BIC, Clipper, and Zippo — use a flint to generate sparks.
Piezo-electric lighters — like the UCO and UST — use a spring-loaded hammer to hit a piezo-electric crystal and create an electrical charge.
I found the flint lighters to be much more reliable over the long-term than the piezo-electric lighters.
Unless you need a highly weather-resistant lighter such as the UCO Stormproof Torch, I’d recommend you go with a flint lighter.
There are also battery-powered electric lighters (aka plasma lighters). These are not water-resistant and thus are less than ideal for taking into the backcountry.
Weather-Resistance
There is no perfectly windproof or waterproof backpacking lighter. However, all the lighters we tested sported some degree of weather-resistance.
Although, just because you expect to encounter adverse weather on your trip doesn’t mean that you need to bring along a highly weather-resistant lighter.
While I would generally recommend you go with a Mini BIC or Mini Clipper for the weight and cost savings, there are some situations where a highly weather-resistant lighter might be preferable — such as emergency or survival scenarios. Also, if you aren’t concerned with the extra weight and bulk it’s hard to put a price on peace of mind.
Pre-Filled vs. Empty
BICs and Clippers come pre-filled. The other three lighters we tested come empty and you must fill them with the appropriate fuel, which you also must buy.
Pre-filled lighters are less hassle and cheaper upfront. You don’t have to buy fuel or fill the lighter yourself.
Empty lighters you must buy fuel for and fill yourself. They are refillable and thus may work out to be cheaper in the long-run. The two types of fuel we used were butane for the UCO Stormproof Torch and UST Wayfinder Lighter and Zippo lighter fluid for the Zippo Matte Lighter. (The Mini Clipper can also be refilled with butane.)
Type of Fuel: Butane vs. Lighter Fluid
Backpacking lighters are generally butane lighters. The fuel they use is premium butane.
We also tested the Zippo Matte Lighter which uses Zippo Lighter Fluid.
The two types of fuel used by the lighters we tested
After testing these lighters side-by-side, I personally would never take anything other than a butane lighter on the trail.
The reason?
The Zippo started leaking fuel after being submerged in water. The fuel got on my hands, on the outside of the lighter, and on my pants pocket where I had placed the lighter to dry.
How We Tested
Soak Test
For each lighter I did the following 3 times and averaged the results:
Submerged it in water for 5 seconds
Shook off excess water for 10 seconds
Tried to light it
If it didn’t light, I stuck it in my pants pocket to dry and took it out and tried to light it in 1-minute intervals, recording how long it took before each lighter started lighting consistently again
Submerging a lighter in water for the Soak Test
Results:
Mini BIC: 2 minutes
Mini Clipper: 1 minute
UCO Stormproof Torch: immediately when submerged with cap on; 1 minute when submerged with cap off
UST Wayfinder Lighter: 9 minutes when submerged with cap on; didn’t bother testing with cap off
Zippo Matte Lighter: 20+ minutes when submerged with lid closed; didn’t bother testing with lid open
(H/T to this reddit thread for giving me the idea for this test, as well as the idea to test a Clipper lighter in the first place.)
Reliability Test
This was a straightforward test: I struck each lighter 200 times and recorded how many times each one lit.
Results:
Mini BIC: 200/200
Mini Clipper: 200/200
UCO Stormproof Torch: 200/200
UST Wayfinder Lighter: 87/200
Zippo Matte Lighter: 175/200
Lesson learned — strike a flint lighter enough times and you’ll get blisters!
Since I didn’t have time to test long-term durability, I then read reports of backpackers who had used these lighters for extended periods of time. If other hikers consistently reported that a lighter was unreliable over the long-term, I incorporated that into my final reliability rating.
Note: I removed the metal safety band from my Mini BIC prior to testing.
“Wind” Test
I don’t have a fan or leaf blower, but I do have lungs.
I lit each lighter and then tried to blow it out, starting by blowing lightly and getting progressively more forceful. It was an admittedly crude test.
Overall, I was disappointed in the wind-resistance of these lighters. If you’d like something that is truly windproof (and waterproof), read our reviews of the best stormproof matches. Otherwise, just be sure to bring along a windscreen to block the breeze.
Crappie readily bite for nearly everyone in the spring, but these panfish become more of a challenge to catch in the heat of summer.When the summertime sun raises water temperatures above the 80-degree mark, crappie seek deeper water and heavier cover. The fish still remain active though as they feed on schools of shad passing through the crappie’s hot-weather haunts.
On my home waters of Lake of the Ozarks, summertime crappie fishing poses two problems: heavy recreational boat traffic and a lack of visible cover. I solve the first problem by fishing early and late in the day to avoid traffic. Crappie tend to burrow into the middle of brush when recreational boaters churn up the water and it becomes difficult to position my boat in the rolling waves and properly present my lure through the brush.
Some fish can also be caught in the clear water early and late in the day, but mid-day action is slow as the crappie suspend over deep water. In the stained water areas of a lake, the fish stay shallower and are easier to catch throughout the day.
Minnows are the most popular summertime bait for anglers fishing a tight line off docks or spider rigging in boats. Since a crappie’s appetite is voracious during the summer, I select larger minnows (sometimes bigger than 3 inches) for my bait. I prefer using 2/0 and 3/0 hooks because the bigger hook is easier to remove from a crappie and the fish don’t swallow it as much as they do a smaller hook.
Jigs are also productive for summertime crappie. I use either a single 1/16-ounce jig for shooting docks or a double rig for vertically jigging above brush piles. The double rig consists of a 1/16-ounce jig spaced 18 inches above a 1/8-ounce jig at the end of my line.
While my home lake lacks visible cover, Truman Lake is another one of my favorite summertime crappie fisheries that has plenty of it. Lots of standing timber was left in Truman when the Army Corps of Engineers filled the lake.The lowland lake has more turbid water so crappie can be caught in both shallow and deep water in the summertime. A shallow-water pattern produces best when a summertime shad hatch occurs, but for most of the summer you need to fish deeper water.
How To Fish For Crappie In Deep Water
The shallow pattern consists of dipping minnows with a long pole and slip-bobber system in timber along fence rows and tree lines on the main lake or creek channel. You can catch these fish less than 10 feet deep and sometimes even as shallow as 2 feet. The slip-bobber system allows you to adjust your bobber up or down to find the magic depth in which the crappie are holding. Use number 2 or 4 hooks and pinch on a couple of number 5 split shots about 2 to 3 inches above the hook. Keeping the weight close to the minnow will restrict its movement to prevent hang-ups in the heavy cover.
Summertime Crappie Fishing: Deep Water
The deep-water pattern works best in timber along main lake bluffs and channel swings during the hottest part of summer. The fish will vary in depth from 15 to 25 feet depending on the lake’s thermocline. The same slip-bobber rig used for catching shallow crappie also works in the deeper water because the fish will be suspended in the timber. If it’s too windy the bobber will bounce too much in the waves and make your presentation look unnatural. Remove the slip bobber rig then and present your minnow vertically on a tight line next to the timber to trigger a bite.Try these patterns for crappie action as hot as the summertime weather.
The Benjamin Marauder PCP pistol has earned its place as one of the most versatile and well-regarded pre-charged pneumatic airguns on the market. This American-made air pistol, which transforms into a carbine with its included shoulder stock, offers shooters an impressive combination of power, accuracy, and value. In this comprehensive review, we’ll examine every aspect of this popular airgun to help potential buyers make an informed decision.
The Marauder pistol showcases Benjamin’s commitment to quality manufacturing. Built in the USA, it features a solid aluminum breech, a 12-inch choked barrel with an integral shroud, and a robust bolt action system that can be configured for either right or left-handed operation. The overall length is 18 inches in pistol configuration and extends to 29.75 inches with the shoulder stock attached.
One of the most notable features is its convertible design – the ability to transform from a substantial air pistol into a compact carbine. While some users report minor issues with stock wobble, this is typically resolved with simple modifications such as shims or tape. The fit and finish are generally excellent, reflecting professional-grade manufacturing standards. Currently, it’s one of the best air pistols on the market.
Power Plant and Performance
At the heart of the Marauder is its 65cc reservoir, which operates on a maximum fill pressure of 2900 PSI. It’s important to note that while the gun can accept 3000 PSI, the manufacturer specifically recommends staying at or below 2900 PSI to avoid valve lock and optimize performance. The power plant delivers impressive velocities up to 700 fps in .22 caliber, generating approximately 15-16 ft-lbs of energy – more than adequate for small game hunting and pest control.
The gun typically provides 32-40 consistent shots per fill, with the sweet spot for performance lying between 1500-2500 PSI. This shot count is quite respectable given the compact reservoir size, and the built-in pressure gauge allows easy monitoring of remaining air pressure. That’s why the Benjamin Marauder Air pistol is one of the best air rifles for pest control.
Chrony tests:
Calibers
Pellets
FPS
FPE
.22
Crosman Premier Hollow Point Pellets 14.3 Gr
800
20.33
.22
JSB Match Diabolo Exact Jumbo Heavy 18.13gr
745
22.35
.22
JSB Diabolo Exact Jumbo 15.89 Gr
622
13.65
.22
H&N Hunter 18.2 gr
710
20.38
.22
Beeman Kodiak Extra Heavy 21.14 gr
568
15.15
.22
Crosman Premier Hollow Point Pellets 14.3 Gr
643
13.13
.22
Predator Polymag 16.0 Gr
611
13.27
.22
RWS Superdome 14.5 Gr
615
12.18
.22
H&N Sniper Light 14 gr
665
13.75
.22
Beeman Kodiak Copper Plated 21.12 gr
620
18.09
Accuracy and Precision
The Marauder pistol truly shines in the accuracy department. Users consistently report impressive groups, with many achieving sub-inch clusters at 25-30 yards and maintaining reasonable accuracy out to 50 yards. The 12-inch choked barrel, combined with the two-stage adjustable match trigger, provides the foundation for this exceptional accuracy.
The trigger itself deserves special mention. With a factory pull weight of 1.53 pounds and built from heat-treated metal components, it offers a crisp break and clean release that rivals much more expensive European airguns. The trigger is fully adjustable, allowing users to fine-tune both stages to their preferences.
The 8-round rotary magazine is well-designed but comes with some considerations. It’s important to note that these magazines are specific to the pistol and are not interchangeable with Marauder rifle magazines. The auto-indexing feature works reliably, and the raised breech design facilitates easy loading.
However, there are occasional issues with magazine assembly and certain pellet types. The system works best with quality pellets like JSB and Crosman Premiers, and most users recommend purchasing additional magazines for convenient shooting sessions.
Noise Level and Backyard Friendliness
One of the Marauder pistol’s strongest selling points is its quiet operation. The integral shroud effectively reduces muzzle report, making it suitable for backyard shooting in urban and suburban environments. While it’s somewhat louder than its rifle counterpart, it’s still notably quiet compared to unshrouded PCPs. For those seeking maximum silence, aftermarket moderators can further reduce noise levels.
Sighting Options and Mounting
The Marauder pistol comes without open sights but includes an 11mm dovetail rail for mounting optics. This creates both opportunities and challenges. While the lack of iron sights necessitates additional investment in optics, it allows users to optimize their setup for their intended use. The relatively high magazine placement requires careful consideration of scope mounting height.
Popular optic choices include compact scopes like the UTG Bug Buster series and various red dot sights. The mounting system supports both pistol scopes for pure handgun use and full-size rifle scopes when using the carbine configuration.
Practical Applications
The Marauder pistol excels in several roles. Its power and accuracy make it ideal for pest control and small game hunting out to about 35 yards. The quiet operation and moderate power are perfect for backyard target practice. As a carbine, it offers a lightweight and maneuverable platform for plinking or informal target shooting.
The gun’s versatility extends to its use as a training tool. The relatively low operating costs compared to firearms, combined with the ability to shoot safely in more locations, make it an excellent platform for developing marksmanship skills.
Air Supply and Operation
One of the Marauder pistol’s advantages is its compatibility with various filling methods. The smaller reservoir makes it particularly suitable for hand pump operation – most users report needing only 30-50 pumps for a full fill. It’s equally at home with scuba tanks or PCP compressors, thanks to its standard Foster fitting.
The operating pressure range provides good flexibility, though best performance typically occurs between 1500-2500 PSI. This working pressure range helps extend the useful shot count while maintaining consistent velocity.
Maintenance and Reliability
Crosman’s customer service and warranty support receive positive reviews, and parts availability is excellent. Regular maintenance requirements are minimal, primarily focusing on proper lubrication and occasional O-ring replacement.
Customization and Upgrades The Marauder pistol benefits from extensive aftermarket support. Popular modifications include:
AR-style stocks for improved ergonomics
Custom shrouds and sound moderators
Various scope mounting solutions
Regulators for improved shot-to-shot consistency
Power adjustment modifications
Custom triggers and bolt handles
This modifiability makes the platform highly adaptable to individual preferences and requirements.
Price
With a typical base price around $400, the Marauder pistol represents good value, though the total investment needs to account for necessary accessories. A typical setup including scope, air source, and extra magazines often approaches $1000. However, operating costs remain low, with only pellets as an ongoing expense if using a hand pump for filling.
The investment compares favorably to higher-end European PCPs while offering similar performance in many areas. The gun’s durability and manufacturer support help justify the initial cost.
Features
Benjamin Marauder pistol
Precharged pneumatic (PCP)
Bolt-action
8-rd circular mag with auto-indexing
11mm dovetail
Integral shroud makes this a VERY quiet gun
12″ choked barrel delivers superior accuracy
Raised aluminum breech for easier loading of the clip
2-stage adjustable match trigger…and the trigger is heat-treated metal!
1.53 lbs. trigger-pull
29.75″ overall length with stock
18″ overall length without stock
15.75″ length of pull
Uses 2,900 psi compressed air
Built-in pressure gauge
Air tank has a quick-disconnect male Foster fitting
65cc (4 cu in) reservoir
Reversible bolt — switch from right to left side (with our special service)
Ideal for hunting small quarry up to 33 yds away
No open sights, so you’ll need a scope or dot sight
Marauder pistol clips are not interchangeable with the Marauder rifle clips…and vice versa
Includes one mag and shoulder stock extension
Recommended uses
Target shooting/plinking
Pest control/small game hunting: squirrels, possums, gophers, pythons.
Pros and Cons
Pros
Cons
Made in the USA
Compact and lightweight
Can change from a pistol to a rifle
Quiet and extremely accurate
Easy to carry and store
Fun to shoot
Large shot count
Nicely priced
Best muzzle velocity to hunt possums and gophers
Picatinny rail instead of a dovetail would be nice
The Marauder pistol appeals to a broad range of users. It’s particularly popular with:
Urban/suburban shooters needing a quiet, powerful air gun
Newcomers to PCP airguns seeking a quality entry point
Experienced airgunners wanting a versatile platform
Pest control users requiring precision and power
Shooters interested in customization and modifications
Conclusion
The Benjamin Marauder pistol occupies a unique niche in the airgun market. It successfully bridges the gap between pistols and rifles while offering impressive performance in either configuration. Despite some minor issues with quality control and the need for careful setup, it delivers exceptional value for its price point.
The combination of accuracy, power, and quietness makes it an excellent choice for backyard shooting and pest control. The extensive customization options and strong manufacturer support ensure it can grow with the user’s needs and preferences. While the initial investment including accessories is substantial, the long-term value proposition remains strong.
How long do squirrels live? What is the average lifespan of a squirrel? Do different types of squirrels have different life expectancies? In this blog post, we will answer all of these questions and more. So, if you’re curious about how long squirrels typically live, keep reading!
The average lifespan of a squirrel is around two to five years. However, some have been known to live for up to twelve years. When it comes to captivity, their lifespans are often extended. In fact, some squirrels have been known to live for up to twenty years in captivity!
Life Expectancy of Squirrels Across Species
Red squirrels: Red squirrels can live up to 5 years in the wild. Their mortality rate is quite high and only 25 percent of these squirrels live longer than a year. They mature at 2 to 4 years old. The longest recorded lifespan of a red squirrel in the wild has been 10 years. The male squirrels tend to live longer than female ones. For most squirrel species, it is the opposite.
Eastern fox squirrels: have an average lifespan of 8 to 18 years in the wild. Most squirrels die before maturity. Female squirrels have been known to live up to 13 years of age, on average, whereas male squirrels are known to live for 8 years, on average.
Southern flying squirrels: Southern flying squirrels live up to three to five years in the wild. Compared to their non-flying relatives, southern flying squirrels have a shorter lifespan in the wild. They tend to live longer in captivity and have an average lifespan of 10 years.
Eastern grey squirrels live up to 12 years in the wild. Their lifespan increases in captivity and their maximum age has been recorded to be 20 years.
Ground squirrels like the Richardson ground squirrel have short life spans of 2-4 years in the wild. Most males only live two years while the females sometimes live for four years in the wild. Similar lifespans have been reported for California ground squirrels.
Now that we know how long squirrels live, let’s take a look at what contributes to their longevity. Below are some of the main factors:
Diet: One of the main contributing factors to a squirrel’s longevity is their diet. Squirrels are mostly herbivores and their diet consists mainly of nuts, fruits, and seeds. This diet is rich in antioxidants which help to protect against disease and aging. In addition, nuts and seeds are a good source of protein and essential nutrients which help to keep squirrels healthy and strong.
Exercise: Another factor that contributes to a squirrel’s longevity is exercise. These creatures are very active and they spend most of their time running, jumping, and climbing. This helps to keep their heart and muscles healthy, as well as their bones.
Low-stress levels: Squirrels also tend to have low-stress levels. This is likely due to their simple lifestyle and their natural habitats. They are not exposed to the same type of stressors that humans are, such as working long hours, commuting, and dealing with family and relationship drama. As a result, they experience less wear and tear on their bodies and age at a slower rate.
While diet, exercise, and low-stress levels are all contributing factors to a squirrel’s longevity, there are also some factors that can shorten their life span. Below are some of the main ones:
Predators: One of the biggest dangers to squirrels is predators. These creatures are often targeted by birds of prey, such as hawks and eagles, as well as snakes and other mammals. As a result, many squirrels do not live to see their second year.
Disease: Another factor that can impact a squirrel’s lifespan is disease. Unfortunately, these creatures are susceptible to a number of different diseases, such as rabies, distemper, and mange. If they contract one of these diseases, it is often fatal.
The Average Squirrel Life Cycle:
Newborns: Most squirrel species give birth to litters of 2-5 young. The newborns are blind and hairless. They weigh about 1/2 ounce (15 grams) at birth and are about 3 inches (8 cm) long.
Weaning: At around 6-8 weeks of age, the young squirrels start to wean from their mother’s milk. During this time, they begin to eat solid food and learn how to forage for themselves.
Adolescence: At around 3-4 months of age, the young squirrels reach adolescence. They become sexually mature and begin to disperse from their natal territory.
Adulthood: Once they reach adulthood, squirrels live an average of 2-5 years in the wild. However, some species have been known to live much longer.
FAQs
How Does Their Lifespan Compare to Rats?
Rats have an average lifespan of 2-3 years in the wild. This is shorter than most squirrel species, which have an average lifespan of 4-5 years. However, there are some exceptions, such as the eastern grey squirrel which can live up to 12 years in the wild.
Do They Live Longer in Captivity?
Yes, squirrels tend to live longer in captivity than they do in the wild. This is due to the fact that they are not exposed to predators and diseases and they have a more consistent diet. In addition, they usually have access to exercise equipment and toys which help to keep them active and healthy. The oldest recorded age for a captive squirrel is 20 years.
Best way to get rid of a squirrel in your house:
If you have a squirrel in your house, one of the best ways to get rid of it is to call a professional wildlife control company. These companies are equipped with the tools and knowledge necessary to safely and humanely remove the squirrel from your home. Once the squirrel has been removed, they will seal up any entry points to prevent the animal from returning. Or you can get an air gun and take care of it by yourself.
")
")
")
")
")


 Review – The Best Name In The Air Rifle Game")


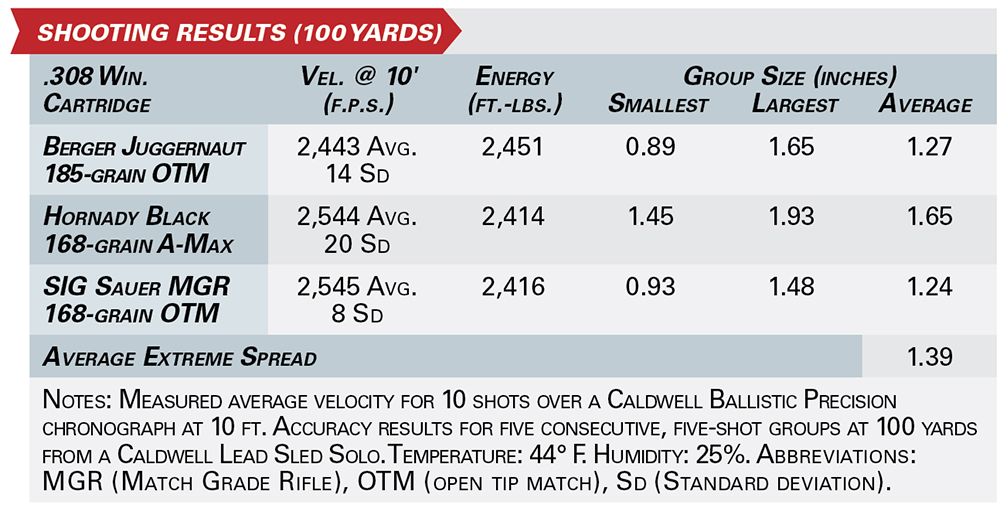
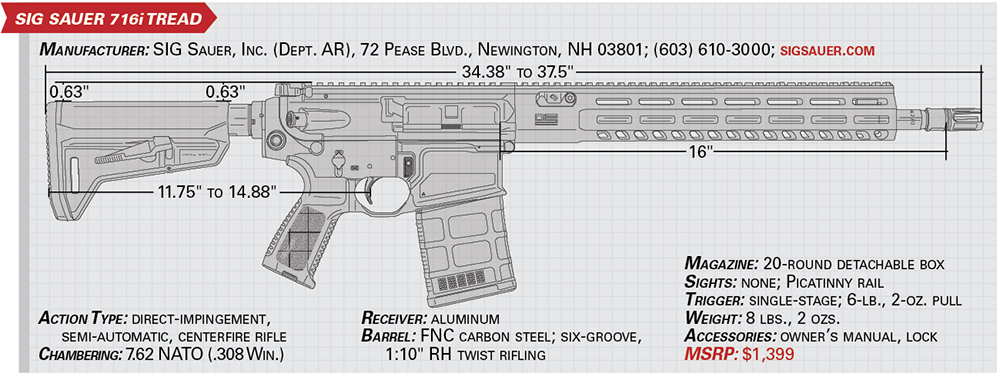
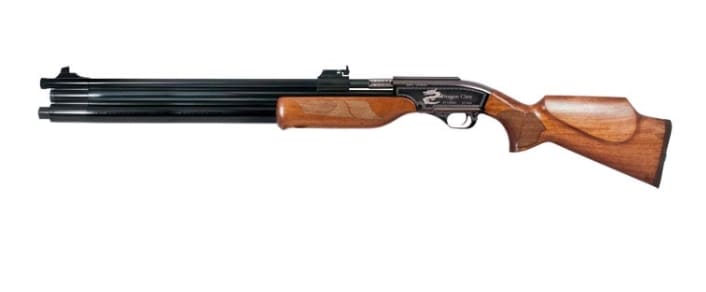
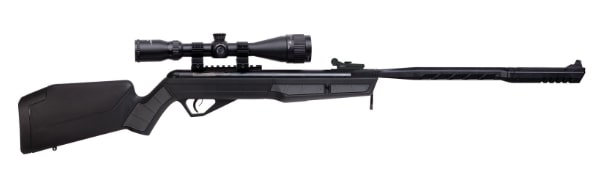
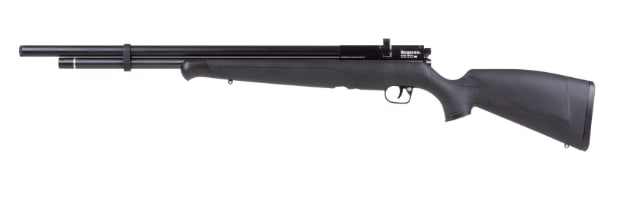
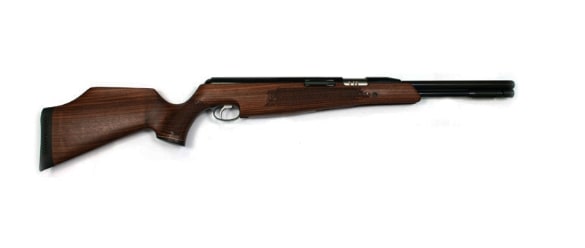
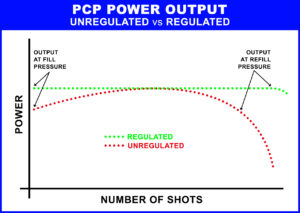
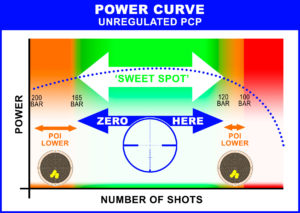


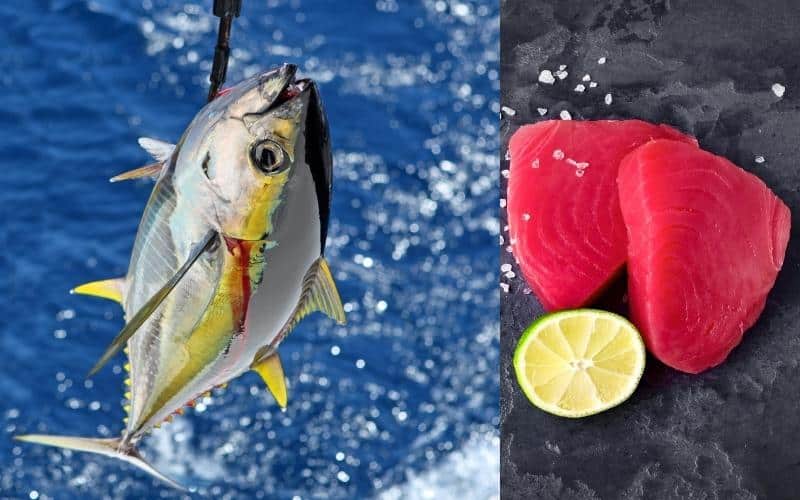


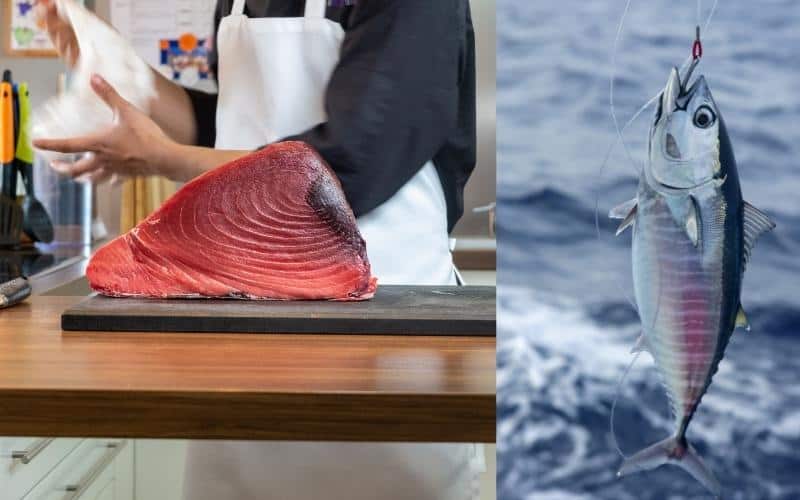

 Supremely affordable and available everywhere, the Mini BIC earned our Top Pick award because of its reliability, value, and ultralight weight.
 The Mini Clipper is another excellent backpacking lighter.
 Most backpackers — whether you’re a beginner or seasoned thru-hiker — don’t need this lighter.
 The Wayfinder Lighter from UST, like the UCO Torch, is a butane lighter with piezo-electric ignition.
 The Zippo is a classic, but it makes for a bad backpacking lighter.


 (1)")


