So you’re going on a safari to see the open plains and incredible wildlife of Africa? One of the most important details to check, before booking your trip, is what types of African safari vehicles, overlanding trucks, and other forms of transportation are used.
The range of safari vehicles is enormous. From walking safaris with enclosed transfer vehicles to pop-top 4X4 safari vehicles, and from 4-seater to 44-seater overland trucks. You can go bare-bones or air-conditioned high-luxury, local dugout mokoro, horseback, or air safaris for a bird’s eye view. The important thing is to choose the type of African safari vehicle or overlanding truck, and other means of exploring (or combination) that suits you, for the ultimate African safari experience.
We’ll start with the biggest African safari vehicles and end with the ‘on foot’ transportation mode.
Safari Vehicles, Overland Trucks & Ways to Explore Africa – Quick Links
- Overlanding Vehicles (Overland Trucks)
- Minibus or Microbus Safari Vehicles
- Land Rover & Cruiser Safari Vehicles
- Open Game Viewing Safari Vehicles
- Flying African Safaris
- Hot Air Balloon Trips
- Shark Cage Diving Boats
- Rubber Ducks
- Dhow Sailing Boats
- Game Viewing Boat Cruises
- Mokoro Dug-out Canoes
- Kayak & Canoe Safaris
- Horseback & Camel Safaris
- Walking Safaris (on foot & by vehicle)
1. Africa Overlanding Vehicles (Overland Trucks)
 Africa Overland Truck
These expedition trucks are specially built to deal with the rough roads of Africa, where potholes, deep ruts, and river crossings are pretty ‘every day.’ They are normally used for longer and larger (12 to 44 people) overland Africa tours, so need to be able to carry a fair amount of equipment while still offering the budget traveler a relatively comfortable trip and good views of the passing scenery and wildlife.
African tour operators choose the best overland truck for each trip, according to the area being visited and the anticipated terrain that will be covered.
Overland Vehicle Seating Arrangements
Overland trucks may differ in their seating formation and size. Some have all forward-facing seats, while others may have some backward- or side-facing seats. The seats are generally raised, allowing for good views over the African landscapes, especially in grassy areas, where you want to be able to spot animals in the grass. Ask your tour operator about seating formation and how many are seated in a row – some overland trucks seat up to three per row, which makes seeing out a bit more difficult if you’re in the middle – before booking your overland tour.
 Luxury Overland Truck
Windows, Pop-up Roofs, and Taking Photos on Overland Trucks
The overland trucks generally have large windows, some which open vertically, others horizontally – allowing for good views. Many of them also have a pop-up roof. This allows you to stand up and get 360-degree views and photos.
Luggage Space on Overlanding Trucks
All overland trucks are equipped with storage space (some lockable) for luggage and equipment – some under the seating section, others at the back of the truck, and some with a detachable trailer. Obviously, space is at a premium, so be sure to pack only the absolute essentials. Also, when packing, use soft luggage rather than hard (e.g. samsonite), as it is much easier to fit into lockers and overhead compartments.
Most overland trucks have a safe onboard for the storage of valuables.
Mobile Kitchen & Diner
Many meals while on safari are prepared and eaten out in the bush, far from civilization. The overland trucks are fully equipped for this. Most safari trucks have a ‘kitchen’ section (often fold-out, beneath the seating area) with a stove and hand dish-washing area. They also have a fridge/freezer/cooler boxes to keep supplies and drinks fresh in the African heat. Africa Overland Tours are thirsty work!
Safety First on Safari!
Safety is non-negotiable. Check with your tour operator that there is a fully-stocked First Aid kit onboard, safety belts on all seats, and some means of communication (radio, etc.), in case of emergencies while on safari. All legitimate tour operators have their client’s safety first in mind and ensure that their overland trucks are kept in a good condition and are reliable for long trips – larger fuel and water tanks, spare tires, knowledgeable and well-trained drivers, etc.
Overland Truck Gadgets
Modern Overlanding trucks come fully equipped with the modern gadgets that we’ve all got used to. With iPod/MP3 points, you can listen to your own soundtrack as you watch the African landscape slide by. They also have onboard charging facilities so ensure that your camera remains fully charged and you don’t lose that once-in-a-lifetime shot of a lion hunting his prey!
 Luxury safari truck for small group overland tours
Some smaller tours use smaller overland trucks – seven to nine-seaters – which provide window seats only, so nobody has to be in a middle seat.
Luxury Overlanding Trucks
These are state-of-the-art 4×4 overland vehicles used on small-group overland tours. A custom-built luxury overland truck comfortably accommodates up to 12 guests. They are specially designed to provide extra space and amenities. This is the overland vehicle of choice for a more luxurious Overlanding Africa experience with all the adventure in added style and comfort.
Features include an onboard toilet and a water filtration system for purified drinking water on the road. The luxury overland trucks have reclining leather seats that rotate 180 degrees and lock into your preferred position (for example, window or front-facing).
 Luxury Safari Truck for Overlanding Africa
Each seat has overhead air-conditioning vents that can be independently operated for individual control of airflow and temperature. Every seat also features a USB port panel for charging your electronic devices and there is a reading light above each seat. Each seat has a safety deposit unit with individual key code access, for storing your passports, phones, and smaller valuables.
Recommended Africa Overland Tours
-
20-Day East African Overland Tour – South or 20-Day Cape Town to Victoria Falls Overland Tour – Camping Safari
-
Best of Namibia Safari Adventure – Overland Camping Tour
-
Small Group Tours in Luxury Overland Trucks: South Africa Safari Adventure, Delta & Chobe Safari Adventure & Explore Namibia Safari Adventure
-
More Overland Africa Tours
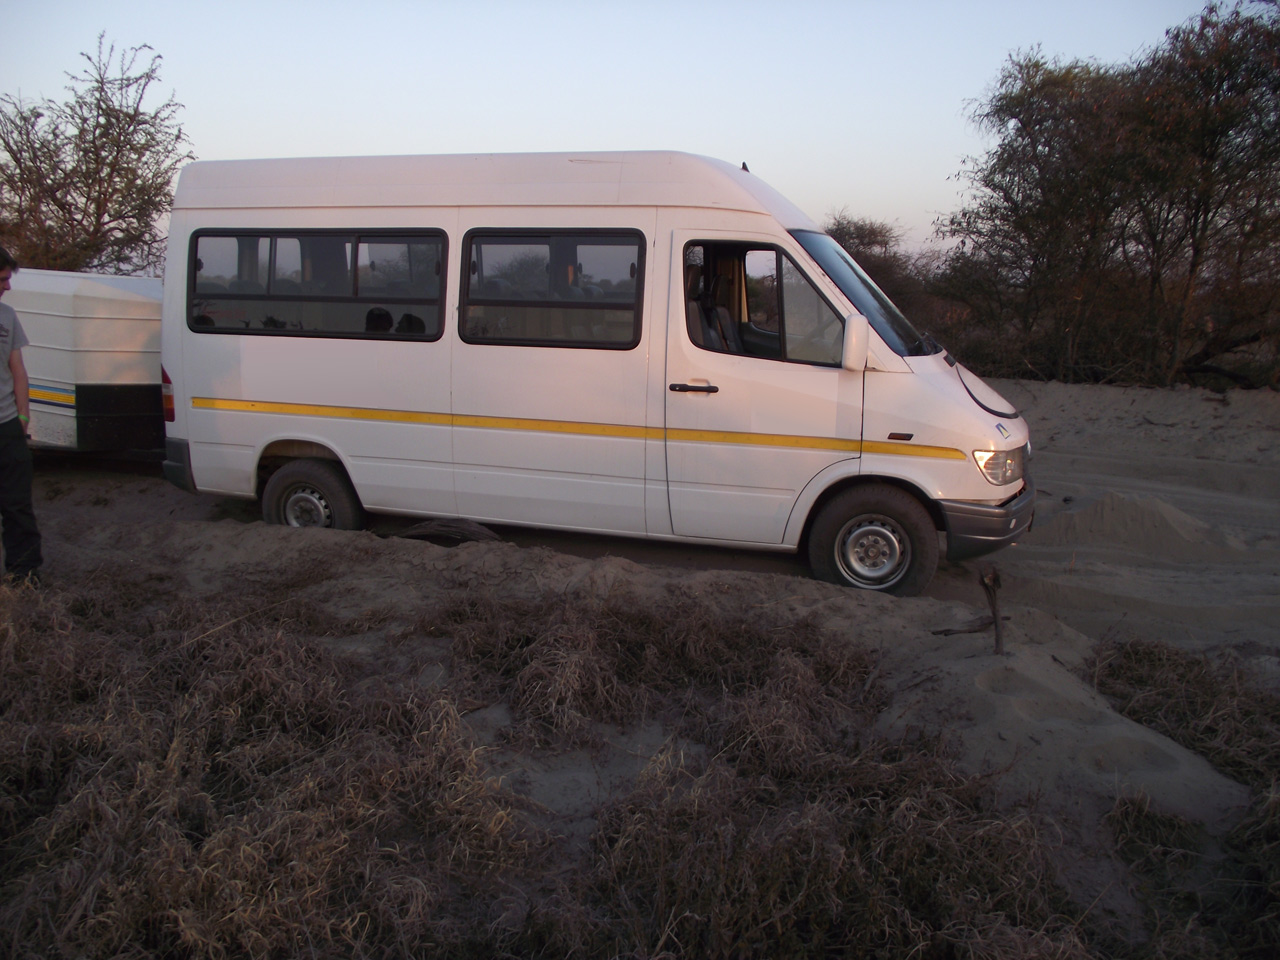
2. Minibus or Microbus Safari Vehicles
For smaller safari groups and shorter tours that don’t go through hugely rugged areas, adapted microbuses (or minibusses) are used. As safari vehicles, Toyota Quantums and Mercedes Sprinters are most commonly used. The optimal number in most of these safari vehicles is six to ten people, forward-facing.
 Sprinter Safari Minibus
When booking a safari, find out from the tour operator which safari vehicle is used, and how many window seats there are, to ensure that everybody gets a window seat and has a good view of the spectacular scenery and amazing animals of Africa.
These safari microbuses are specially adapted for safari travel and are generally equipped with GPS tracking, sliding windows, cooler boxes, fire extinguishers, and First Aid kits. They generally have a softer suspension than other safari vehicles, giving a slightly more comfortable trip. Many of them – especially on Kenya Safaris – also feature pop-up tops, allowing travelers to stand and view/photograph the countryside and animals from the minibus.
Some minibusses are fitted with air-conditioning. This is a welcome relief from the sweltering African heat but may detract from the whole experience of Africa, as the windows will be closed, blocking out the sounds of the bush.
Recommended small group trips using minibus safari vehicles
3. Land Cruising Safari Vehicles
 Pop-top 4×4 safari vehicle by William Warby
Land Cruisers and Land Rovers are used on many safari tours. They range from ‘bare-bones’ models i.e. no added ‘mod-cons’, to highly specialized vehicles that may include air-conditioning, MP3 players, and slightly tinted windows for protection from the sun. Some of the newer safari vehicle models also have pop-up roofs, for added viewing potential, especially in Tanzania.
Safari Vehicle Seating Arrangements
These safari vehicles, in general, can carry four to six (extended version) passengers, all forward-facing. Check the seating configuration with your tour operator before booking. While extended safari vehicles can carry more people, they tend to be slightly more difficult to handle on the road. Most of the Land Cruisers are 4X4s, allowing travel over the rough terrain that Africa is known for… Have a look at images of the road into the Ngorongoro Crater if you want an idea!
While self-hire safari vehicle options are available, tour operators all have experienced drivers who, more often than not have extensive knowledge not only of handling the rough terrain but of the areas through which we travel.
Safety First on Safaris!
Most Land Cruisers are equipped with all possible safety features – fire extinguishers, First Aid kits, seat belts and many have airbags. They have specially designed fuel tanks to allow the economical use of diesel during long journeys and snorkels for travel through rivers.
Luggage Space & How to Pack (light)
In general, luggage is taken either in a trailer or packed on the roof, to keep the safari vehicle as uncluttered as possible inside, for your comfort. Remember to pack lightly!
Recommended 4×4 Trips in Land Cruiser Safari Vehicles
-
Tanzania Lodge Safari to Serengeti, Ngorongoro & Tarangire
-
Masai Mara, Samburu, Nakuru 4×4 Kenya Lodge Safari
-
4×4 Ethiopia Tour – Danakil Depression & Awash National Park
4. Open Game-Viewing Safari Vehicles
 Open African safari vehicle on game drive
Within many of the game parks, smaller, open-sided, or completely open safari vehicles are used for game drives. While these are not suitable for long distances – wind, dust, sun, and Africa’s elements can be harsh! – they are great for game drives as they allow you to get up close and personal with the sights, sounds, and smells of the African bush.
These safari vehicles are most often adapted Land Cruisers which seat between six and nine passengers. Some are designed with tiered seating so that nobody’s view is blocked by the person in front of them’s head!
 Open African safari vehicle
Protection from The Elements
Due to their being open to the elements, it is vital to protect yourself against the African sun. Hats, scarves, and windbreakers are all excellent shields from fiery hot UV rays. Many of these open safari vehicles do have canvas/plastic canopies that can be closed if the weather becomes uncooperative. Thunderstorms in Africa can be wild, and come on within minutes!
Safari Drivers & Trackers
Most often when going on game drives, there will be a driver and a tracker (often sits on the front of the car, allowing him to track spoor and dung.) The trackers are highly experienced, and allow one to see the best Africa has to offer in wildlife.
Recommended trips with open game-viewing
-
Chobe, Moremi & Delta Botswana Camping Safari
-
6-Day Kruger Park & Private Game Reserves Safari (Lodge)
5. Bird’s-Eye View Flying Safaris
 Plane view of the Okavango Delta by Justin Hall
‘Air safaris’ are offered at various places in Africa, like Victoria Falls and the Okavango Delta. A flight over the delta in a small plane gives you an idea of the vastness of the area. A helicopter flight over Victoria Falls will make you feel like an eagle soaring above this spectacular area!
Helicopters on Safari
The ‘vehicles’ used differ from operator to operator. The helicopters used at Victoria Falls are generally 4- or 6-seaters and many have bubble windows, allowing for good viewing. Do remember that, in the 6-seater, you may land up in the middle seat, making seeing out slightly more difficult.
Light Planes on Safari
In the Okavango Delta, many of the lodges are only reachable by air, especially during the wet season. Many small plane charters are available both as a means to get to the lodges and for a birds-eye view of the delta and spectacular photographic opportunities – a once-in-a-lifetime experience.
 Small plane flights on safari
Recommended safaris with flying components
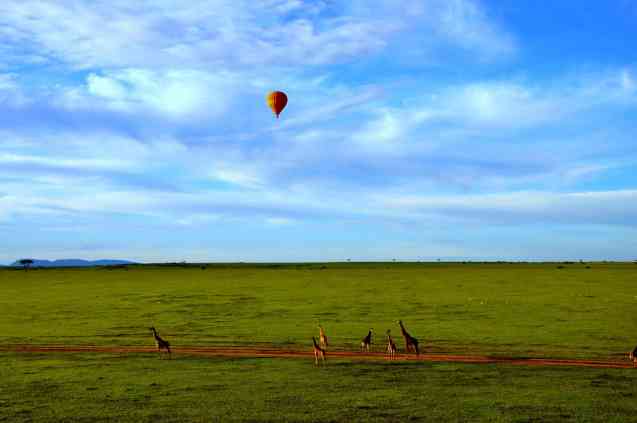
6. Hot Air Balloon Rides
 Hot air ballooning over Serengeti Park by Wajahat Mahmood
What could be better than watching the sun rise over the Serengeti while floating gently above its vast plains in a hot air balloon? Nothing, really. Hot air balloon rides are offered at various places in Africa (like Masai Mara and Serengeti) and provide an incredible, thrilling, bird’s-eye view of the vastness of Africa, dotted with wildlife.
Recommended trips with balloon safaris
-
4-Day Masai Mara Luxury Camping Safari – optional hot-air balloon trip over Masai Mara, Kenya
-
12-Day Kenya & Tanzania Budget Lodge Safari – optional hot-air balloon trip over Serengeti, Tanzania
7. Boat to the Great White Sharks
 Shark diving safari by Kim Nowacki
The boat used for our Great White Shark Cage Diving trips in South Africa is a custom-built catamaran. Combining comfort, stability, speed, and safety, this boat ensures not only a good trip for you but also promises minimal interference in the shark’s natural habitat.
The custom-built shark cage diving boat is typically a 46-foot (14m) long catamaran with a spacious upper deck for surface views of the sharks and other marine animals and platforms for the bait and decoy handlers to ensure the best possible shark viewing. It is a lightweight aluminum vessel powered by four big four-stroke 300-hp outboard engines and is equipped with the most advanced electronic navigation equipment.
 Great white shark cage diving boat
Staying dry and comfortable
Featuring a spacious indoor cabin, as well as separate wet and dry outdoor decks, the design ensures that when you’re wet, you’re wet, but once you’re out and want to be dry and comfortable, you can be. The boat usually features a central dining area, storage facilities for personal items, and both male and female toilets.
Gadgets
Electronically, the boat is fully equipped with a tracking device, radios, GPS, radar and navigation equipment, depth finder and echo sounder, and even a 12V charging facility for cameras, cell phones, and laptops.
Safety – yours and the shark’s
Safety is of utmost importance and there are life vests for all passengers, fire extinguishers, a life raft, and capsize bottles on the boat. In case of medical emergencies, there are two onboard First Aid kits, oxygen cylinders, and fluid replacement.
Not only is your safety cared for, but that of the sharks too. The cage has no sharp points or edges that could hurt the animals. The cage itself is specially constructed of reinforced steel and can take five people comfortably. It is lowered and winched back up using a winch from a sturdy gantry. Oxygen is supplied from the boat to divers via a ‘hookah’ system with hoses running into the cage.
This, too, is a once-in-a-lifetime experience. There’s not much more exhilarating than coming face-to-face with a Great White in its own habitat!
Recommended shark diving tours
8. Rubber-Ducking the Gorges
 Rafting the Zambezi on safari by Martijn Munneke
Jinja, in Uganda – where the longest river in Africa, The Nile, begins at its source, Lake Victoria – is one of the top whitewater rafting destinations in the world. Add in Victoria Falls, the Fish River Canyon, and the Orange (Gariep) River, where various boat options are offered, from boogie-boarding the rapids through canoeing to rubber ducking both flat water and white water, and it’s an adrenaline junkie’s dream. Your trip choice depends completely on your adrenaline requirements/limits!
Whichever you choose, be sure to check that the tour operator follows all safety regulations, ensuring that you have a safe, enjoyable trip through the gorge. Life jackets and helmets are non-negotiable, these waters can get wild, and a knowledgeable, trained guide will ensure you get the most out of your trip.
Recommended trips with rubber ducking
9. East African Dhows (sailing boats)
 East African Dhow sailing boat by Cesar Gonzalez Palomo
There is nothing quite so beautiful as seeing a traditional dhow gliding through the warm, azure waters of the Indian Ocean. Originally used for trading, these long, narrow boats with triangular sails, expertly sailed by locals, are used along the east coast of Africa.
So whether you’re heading off to the Bazaruto Archipelago or exploring the coastline of Zanzibar, do yourself a favor and catch a ride on one of these graceful sailing vessels.
Recommended trips with dhow safaris
-
22-Day Zambia, Malawi, Mozambique & Kruger Safari
-
5-Day Zanzibar Holiday Package – Adventure Tour
10. Game Viewing Boat Cruises
One of the best ways to watch wildlife and birds on safari in Africa is without a doubt by boat. It’s hard to compete with a laid-back sunset cruise. Exceptional wildlife and bird sightings along the rivers and estuaries in top game reserves of Africa. Stunning scenery. Chilled sundowners and snacks or dinner onboard. Easy-paced, yet exciting and novel.
The boats used on boat cruises vary but they are typically open-sided motorboats. The larger boats offer standing and sitting room and are sometimes double-deckers.
 Chobe boat cruise in Botswana
Chobe National Park in Botswana is one of the best places for boat-based game viewing in Africa. Another favorite spot for scenic boat cruises is the Zambezi River near Victoria Falls. There are plenty of other great destinations for game-viewing boat cruises, from Uganda to South Africa.
Recommended Safaris with Game-Viewing Boat Cruises
- Botswana: 5-Day Chobe & Okavango Delta Lodge Tour or Botswana Exclusive Camping Safari to Chobe & Okavango – include Chobe River boat cruises (as with most Chobe Safaris)
- Uganda: Gorilla Trekking & Queen Elizabeth Park Safari – includes boat cruises on Kazinga Channel (Queen Elizabeth Park) & in Murchison Falls National Park
11. Winding Through the Waterways in Mekoro
 Mokoro in Okavango Delta, Botswana
If your safari includes a trip into the Okavango Delta, you will more-than-likely experience the gentle pleasure of a trip in a mokoro canoe. Check with your tour operator that this is included as part of the package, or offered as an optional activity. You don’t want to miss out on this opportunity to get up close and personal with the prolific birds and wildlife – including elephants, hippos, and crocs – of the Okavango Delta.
Mokoro History
These traditional dug-out canoes are made of wood and guided by a ‘poler’, who stands at the helm. While originally made from indigenous trees, such as the Kingella or ‘Sausage Tree’, they are increasingly made of fiberglass these days. While not as ‘authentic’, this is preserving the indigenous trees of the area and provides just-as-good a means of transport through the spectacular waterways of the delta.
Experienced polers
Many people are afraid of hippos overturning a mokoro. While this is not an impossibility – this is Africa, after all, and you’re in their habitat – the polers are experienced in the area and are very aware that hippos are territorial creatures. They are sure to avoid dangerous situations.
A trip on a mokoro allows you to get as close to the sights and sounds of Africa as is physically possible. Don’t miss out on this once-in-a-lifetime experience.
Recommended safaris with Mokoro canoe trips
12. Kayak & Canoe Safaris
If you’re a kayaking or canoeing enthusiast this is the ultimate game-viewing safari vehicle for you. Watch the wilderness glide by as you paddle quietly along the rivers and waterways of Africa. A canoeing or kayaking safari gives you more independence than a mokoro trip where a guide poles you along.
The canoes and kayaks used on safaris vary widely, ranging from inflatable canoes to rugged old-school kayaks.
 Zambezi canoeing in Zambia
Some canoe safaris offer game viewing opportunities along the riverbanks and even in the waters whilst most are more about taking in the wild scenery and spotting birds.
Recommended safaris with canoe or kayak trips
13. Explore the African Bush on Horseback or Camelback
An incredible way to experience the bush up close! Horseback safaris are allowed in certain game reserves so if you want to experience the bush on horseback you’ll need to pick your destinations accordingly. Two of the most popular African safari destinations that offer horseback safaris are Victoria Falls (Zambia or Zimbabwe) and Big 5 game reserves near Cape Town in South Africa.
 Horseback safaris Cape Town
For a whole new experience, you can explore Africa by camel. An entirely unique and exotic mode of transport indeed. Camelback safaris are far rarer than horseback safaris. You can only embark on a camelback adventure in a few places, including parts of East Africa.
Recommended trips with optional horseback safaris & camelback safaris
- Experience Southern Africa Exclusive Budget Safari & Zimbabwe & Botswana Safari (Lodge Tour) – optional horseback safaris at Victoria Falls
-
3 Day Big 5 Cape Town Safari & 2 Day Big 5 Cape Town Safari – optional horseback safaris at Aquila Game Reserve
-
Lake Turkana & Northern Kenya Camping Safari – includes an overnight camelback safari in Tuum (Samburu District of Kenya)
14. Walking Safaris in Africa
 Walking safaris in Africa
This is (obviously) only an option once you are in the game reserve. Depending on the safety i.e. the presence of dangerous predators, many game reserves offer guided walking tours. This is the ideal way to get a true, African, wildlife experience. By walking through the bush all your senses experience Africa – sight, smell, sounds, touch – unadulterated by the sound of motors and really off the beaten track.
Guides and trackers
Most reserves have highly experienced guides who are a fountain of knowledge regarding the fauna and flora of the area and are excellent trackers. This allows you to not only experience the bush but also learn all sorts of fascinating facts while seeing the birds, insects, and animals that call Africa ‘home.’
 Walking safari guide in Kenya
If you have the opportunity, do not miss out on a walking safari. You can’t get closer to nature than this.
Recommended walking safari trips
-
4-Day Kruger Park Walking Safari or 5-Day Kruger Safari – Hiking Tour
-
South Africa Walking Safari to Kruger & Zululand
-
7-Day South Luangwa Tented Camps Walking Safari
Talk to an Africa travel expert to find the ideal types of safari vehicles and other transport modes for your trip to Africa.
 African safari vehicle in Kruger
[Updated in 2022: originally posted in 2014]
")
")
")
")
")


 Review – The Best Name In The Air Rifle Game")