 Hunters and shooters across North America love their 30-caliber cartridges. With the popularization of the 30-06 Springfield, the .308” diameter bullet became synonymous with stopping power and long range precision.
However, hunters and shooters wanted more power, muzzle velocity, and a flatter trajectory – and so, the magnum craze began.
Two extremely popular 30-caliber magnum cartridges are the 300 Win Mag and the 300 PRC (Precision Rifle Cartridge). The 300 PRC is a relatively new cartridge as it was released in 2018 while the 300 Win Mag was released in 1962. Both are capable of sub-MOA level accuracy at extreme long range and can take down elk and moose at well over 500 yards.
Although the 300 PRC has been optimized for use with heavier bullets with a high ballistic coefficient, the 300 Win Mag will be more than sufficient for most shooters.
Is it worth it to get a new rifle in 300 PRC? What advantages does it bring to the table?
In this article, we will examine both rifle cartridges to help you determine which will best fit your shooting needs.
What’s the Difference Between 300 PRC vs 300 Win Mag?
The 300 Winchester Magnum was developed in 1962 using a 375 H&H Magnum belted case necked down to accept a 30-caliber bullet. It was designed to fit inside a long action rifle and maintain supersonic flight well past 1,000 yards. At the time, the use of long, aerodynamic, heavier 30-caliber bullets was not something shooters were looking for, as most hunters didn’t really care about ballistic coefficient and were more concerned with penetration and stopping power.
In 2018, the ballistics team at Hornady looked to create a highly optimized 30-caliber magnum cartridge that could utilize longer bullets that were ideal for extreme long range (ELR) shooting. Hornady built the 300 PRC from the ground up, creating the ideal precision rifle cartridge to compete with the 338 Lapua Magnum with considerably lower recoil.
Both the 300 Win Mag and the 300 PRC can shoot past 1,000 yards and maintain accuracy. However, the 300 PRC will be better suited for shooting out past 1,500 yards and out to 2,000. This caught the eye of the Department of Defense (DoD) in 2019 and they ordered an undisclosed number of Barret MRAD rifles chambered in 300 PRC for their Advanced Sniper Rifle course.
The ELR accuracy that the 300 PRC offers are only matched by the 300 Norma Magnum, 30 Nosler, and 338 Lapua at this point. Does that mean you need to run out and get a new rifle or rebarrel your 300 Win Mag for 300 PRC?
Probably not.
For most target shooters or hunters, the 300 Win Mag will be more than sufficient to fell any game or punch out the 10-ring that dare enter their crosshairs.
However, if you shoot F-Class and/or T-Class competitions, the 300 PRC might give you an edge over some of your competition using a 338 Lapua or a different 30-caliber magnum cartridge.
In the following sections, we will break down the advantages and disadvantages of the 300 PRC and the 300 Winchester Magnum so you can understand the benefits and limits of each precision rifle cartridge.
Cartridge Specs
When evaluating a precision rifle cartridge, it’s a good idea to analyze the cartridge specs to gain more knowledge of each.
The first thing to notice is that both rifle cartridges have the same base diameter, 0.532”. This means that they both utilize a magnum bolt face. So, if you ever wanted to do a conversion, a simple barrel swap is all that would be required.
The next similarity to notice is the case length and the cartridge capacity, as both the 300 PRC and 300 Win Mag are virtually identical in these two categories.
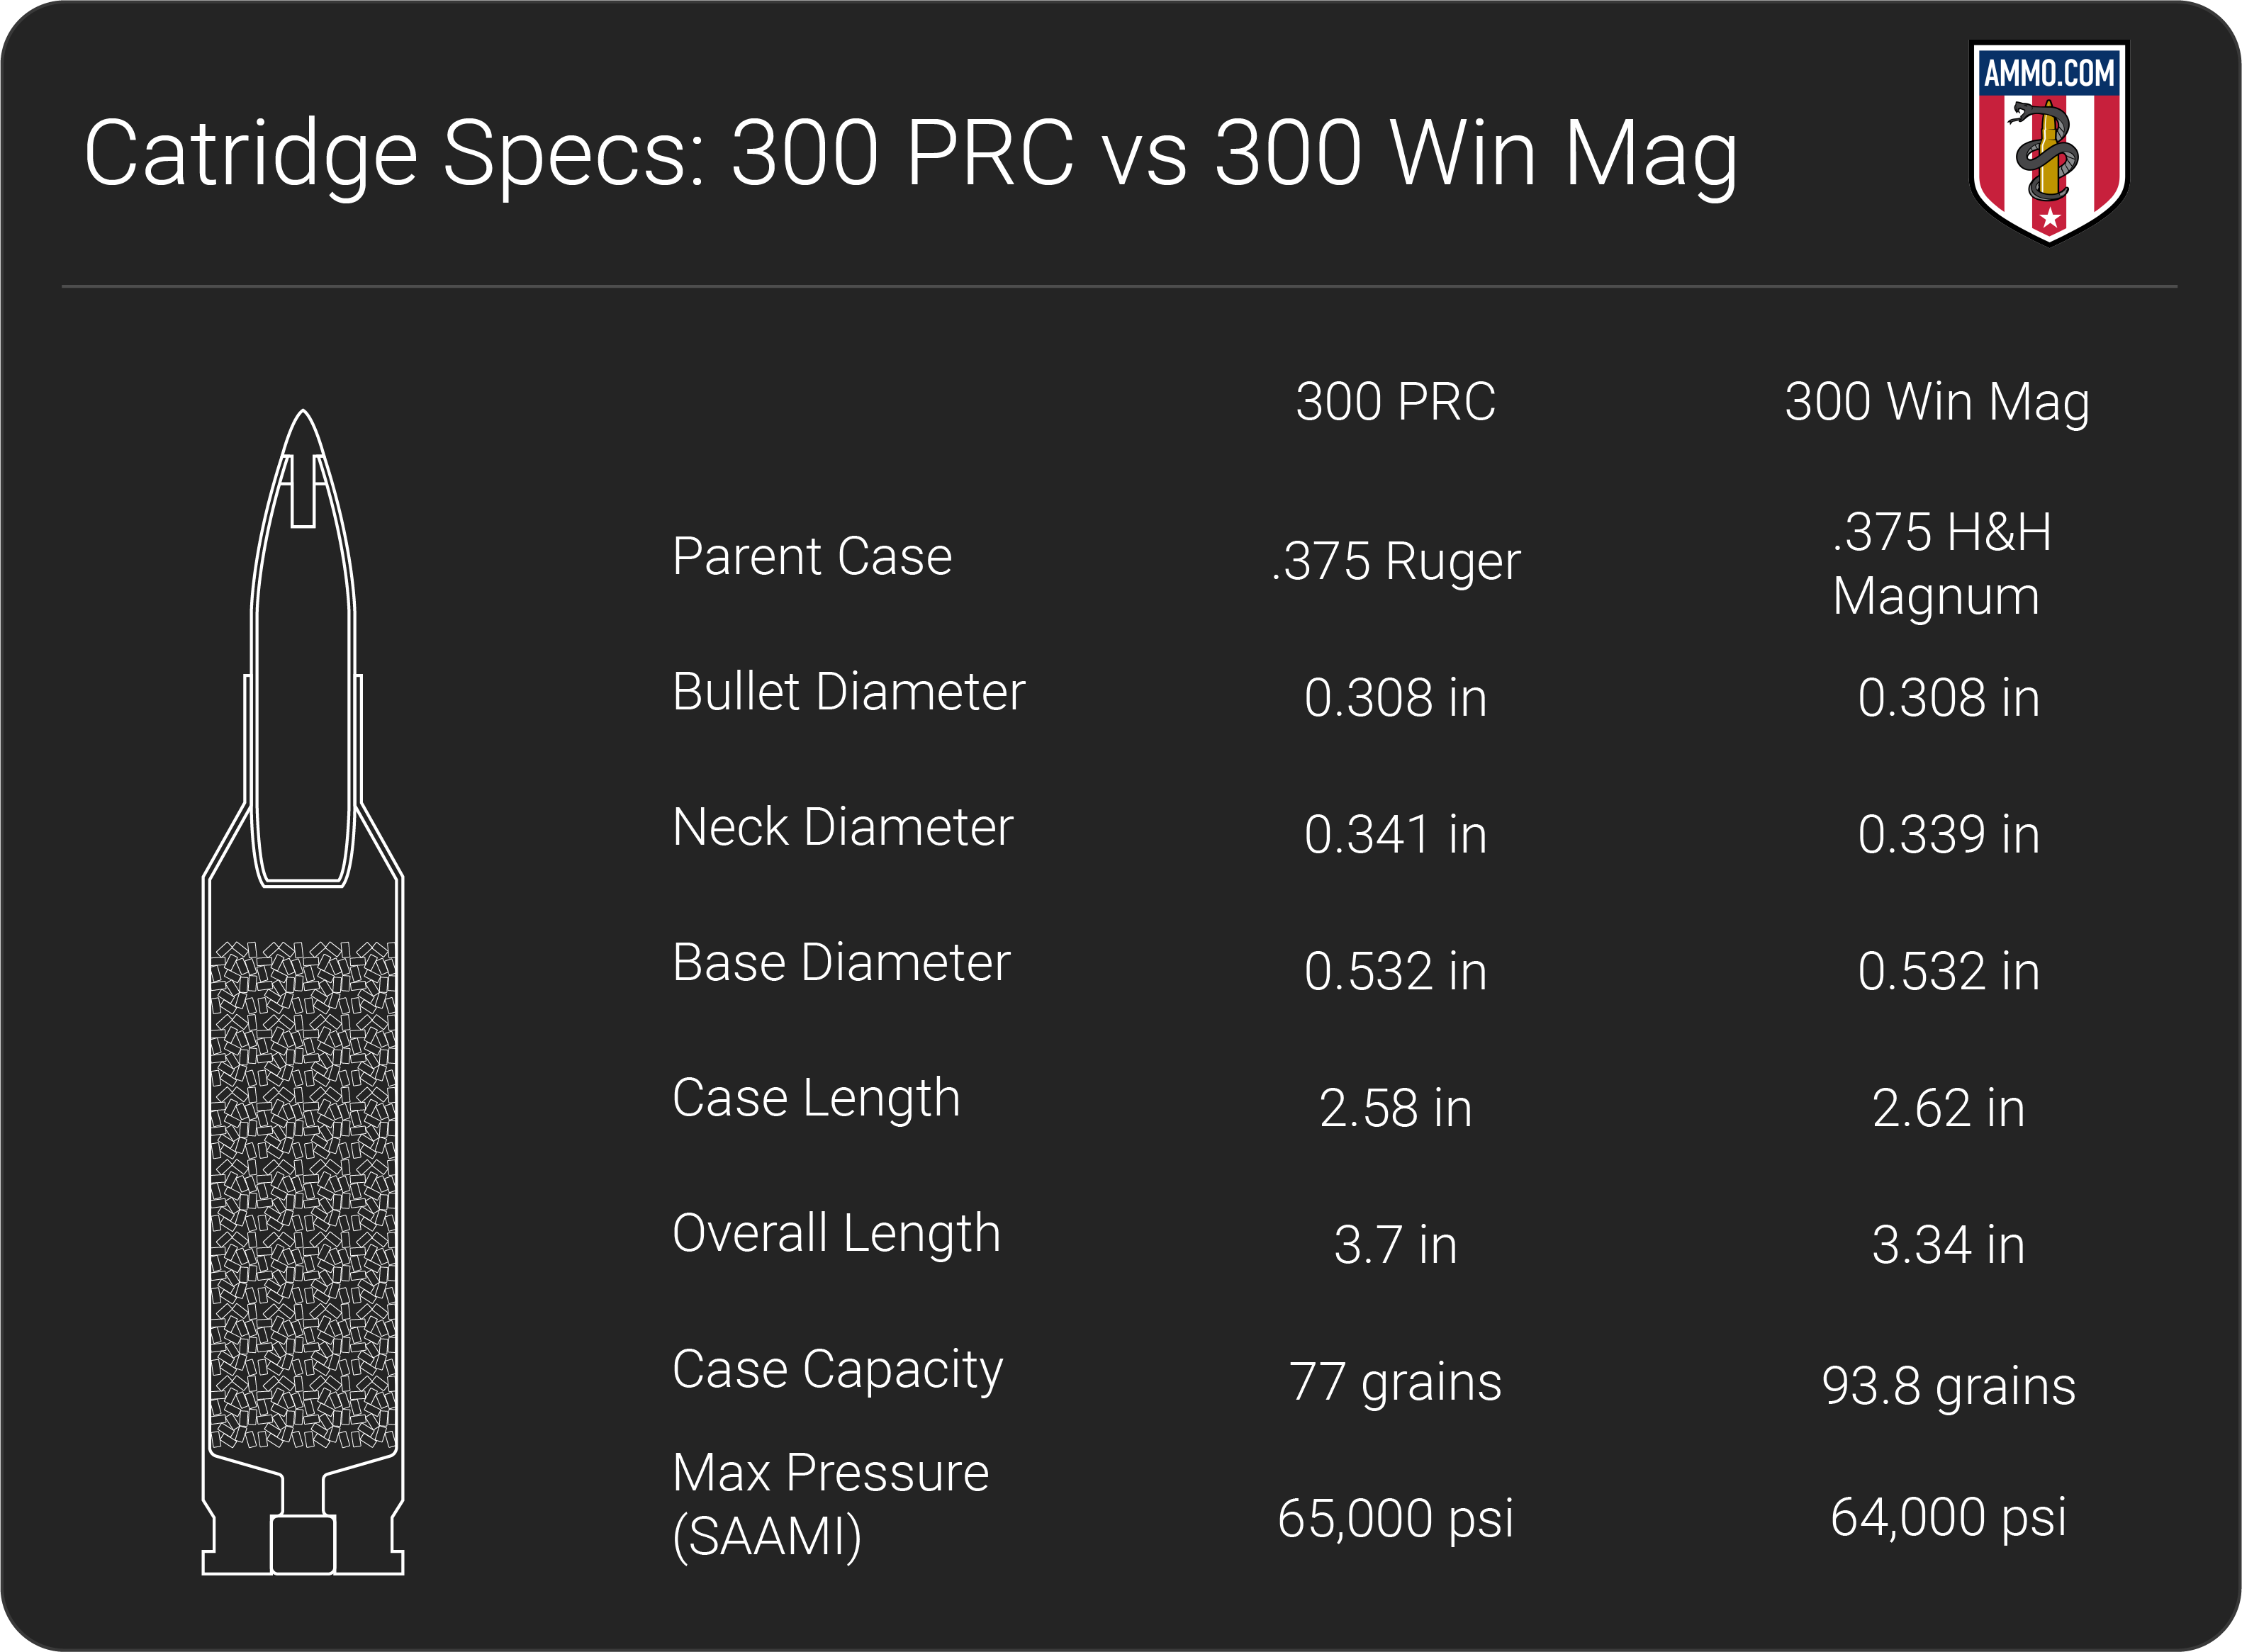
However, the main difference that you’ll note is the massive difference in overall length. The 3.34” overall length for the 300 Win Mag allows it to be loaded in a long action rifle, whereas the 3.7” overall length of the 300 PRC requires a magnum action rifle.
Hornady specifically designed the 300 PRC for the magnum action as they wanted their cartridge to have as long a “head height” as possible. Head height is simply the overall length minus the case length. A longer head height allows for longer, more aerodynamic projectiles with a higher ballistic coefficient (BC) to be used. A high BC is preferred when shooting long range and the 1.12” head height of the 300 PRC allows for this. In contrast, the 300 Win Mag has a head height of 0.72”.
The additional head height for the 300 PRC translates to more room outside the case for longer bullets than the 300 Win Mag can accommodate. Furthermore, the 300 PRC can fire these longer, slender, higher BC bullets without disrupting the powder column inside the cartridge case. In contrast, similar bullets fired in a 300 Win Mag would intrude on the powder column or contact the rifling upon chambering the round.
But does having an unobstructed powder column inside the case really matter? For long range precision shooting, yes it does.
An unobstructed powder column will have an extremely consistent burn, whereas a compressed powder charge or having a bullet seated in the middle of it will change the dynamics of the powder burn. For precision shooters, consistency is the key to accuracy.
With so many variables going into shots over 1,000 yards, shooters need to eliminate as many variables as possible. A consistent powder burn will mean a smooth pressure curve and low standard deviation in muzzle velocity. A compressed powder column or one that is obstructed by a bullet adds new variables into the equation, and inconsistencies can be seen in the point of impact downrange for these loads.
This difference showcases the disparity in design concept between the 300 PRC and 300 Win Mag. The 300 PRC was designed form the ground up to be a highly precise and consistent long range shooting cartridge. On the other hand, the 300 Win Mag was designed first as a big game hunting cartridge and was adopted as a long range competitor later in its life.
Although the 300 PRC has clearly been optimized for long range efficiency, those benefits come at the cost of added recoil.
Recoil
Recoil is the energy directed towards the shooter when a cartridge is fired from a firearm. It is dependent on several factors, but firearm weight, powder charge, and bullet weight are three of the primary factors that affect felt recoil.
Many competitive shooters and big game hunters will not be concerned with recoil as any shooter can adapt to it with proper training and a concrete focus on the fundamentals of marksmanship.
However, for most shooters recoil will be a serious issue that they need to consider, as developing recoil anticipation is extremely detrimental to downrange accuracy.
For the purpose of this example, we will consider the Weatherby Vanguard hunting rifle weighting in at 7.5 lbs.
The chosen bullets and loadings will be the 300 Win Mag 200 gr Hornady ELD-X bullet being fired at 2850 FPS and the Hornady Precision Hunter 212-grain ELD-X traveling at 2875 FPS for the 300 PRC. This is about as close to an apples-to-apples comparison for both rifle cartridges. With these parameters, the felt recoil for 300 PRC will be 42 ft-lbs compared to 37 ft-lbs for 300 Win Mag. This translates to about a 13% difference.
The 300 Win Mag is already considered to have rather stout recoil, so this increase is something to consider when looking to add a 300 PRC to your collection. Although we are not in shoulder bruising 338 Lapua territory, neither cartridge is a slouch when it comes to recoil.
Barrel Life
For precision shooters who demand the pinnacle of accuracy and consistency from their rifles, barrel life is something these marksmen will track meticulously. The largest factor that affects barrel life is the powder charge of the ammo being fired.
A higher powder charge will typically reduce barrel life.
Cartridges like the 300 Norma Magnum or the 300 Remington Ultra Magnum are often referred to as “barrel burners” as their 95+ grain powder charges are notorious for being hard on barrels. These heavy powder charges will quickly erode the rifling at the throat of the barrel, reducing downrange accuracy.
Hornady had this in mind when the developed the 300 PRC, as they did not want the cartridge burning out barrels quickly.
The general rule for the 300 Win Mag is that a barrel will maintain peak accuracy for somewhere between 2500 to 2000 rounds.
Barrel life data on the 300 PRC is a more difficult to come by as it is a newer cartridge, however 2000 rounds seem to be the current consensus in the long range shooting community.
Trajectory
Trajectory is how we quantify a bullet’s flight path as it travels downrange measured in inches of bullet drop.
Both the 300 Win Mag and 300 PRC have very flat trajectories, which makes them ideal for long range shooting.
For this example, we will consider shots taken at 1,500 yards with a 195 gr Hornady ELD-M 300 Win Mag and a 225 gr ELD-M for the 300 PRC.
At 1,500 yards, the 300 Win Mag will have experienced -885” of bullet drop while the 300 PRC will have dropped -776”. Clearly the 300 PRC has the flatter trajectory at longer distances.
However, I also wanted to compare the mid-range trajectory as this is more important for hunters. At 600 yards, the 300 Win Mag has dropped -74” while the 300 PRC has dropped -73”. Essentially, they are identical at intermediate ranges.
Accuracy
Usually for caliber comparisons, there is little difference in accuracy between two cartridges. However, the 300 PRC has several advantages over the 300 Win Mag that will help the PRC perform better at long range.
The first benefit is that the 300 PRC is a beltless design whereas the 300 Win Mag has a belted case.
At the time of development, the group think was that a magnum cartridge needed the belt to aid in case rigidity. This has been proven to be a false presumption, however upon chambering in the rifle, headspacing occurs off the belt. This can cause for as much as 0.009” of room for error when pushing the bullet into the chamber.
This might not sound like much, but all that added slop can have the bullet entering the chamber off center. That fraction of a degree may cause the bullet to enter the rifling off axis, and at 1,500 yards can have a massive effect on point of impact.
By comparison, headspacing for the 300 PRC occurs off the 30-degree shoulders Hornady designed for the cartridge. This aids in chamber alignment when the cartridge is loaded into the chamber, meaning that the bullet will be more consistently aligned on axis with the barrel rifling. The 300 PRC also has a longer case neck, which helps hold longer projectiles securely and concentrically, which also aids in consistency and accuracy.
Finally, the 300 PRC was designed with a shorter freebore diameter than the 300 Win Mag. Freebore is the smooth portion of the chamber closes to the cartridge. A tighter freebore space means there is less opportunity for a bullet to yaw when entering the rifling, also increasing consistency and accuracy.
Although the accuracy of a cartridge is most often a reflection of the ability of the shooter and their shooting platform, most long range precision shooters will find that the 300 PRC is more accurate and consistent with ELR shots than the 300 Win Mag.
Ballistic Coefficient
Ballistic coefficient (BC) is a measure of how well a bullet resists wind and air resistance. Put another way, it’s a numeric representation of how aerodynamic a bullet is. A high BC is preferred as this means the bullet will buck the wind easier.
Generally, a heavier bullet will have a higher BC as it takes more force to disrupt the flight of a heavier bullet than a lighter one.
The 300 PRC was specifically designed to fire heavier bullets, so it should come as no surprised that the 300 Win Mag falls behind the 300 PRC in terms BC.
The two primary factory loads for 300 PRC are the 212-grain ELD-X and the 225 gr ELD match, which have a BC of 0.663 and 0.777, respectively.
The 300 Win Mag just cannot compete with the heavier bullets fired by the 300 PRC. The heaviest projectiles the 300 Win Mag can reliably fire would be 200 gr bullets, as the slower twist rate of the barrel cannot stabilize heavier bullets reliably. For example, a 200 gr Berger Hybrid Target will have a BC of 0.64.
The ballistic coefficient for both cartridges is extremely good, but the 300 PRC is just better as it can fire heavier bullets.
Sectional Density
Sectional Density (SD) is the measure of how well a bullet penetrates a target. This is extremely important when hunting big game, as you need a bullet that can punch through thick hide, bone, and sinew.
Sectional density is calculated by comparing the bullet weight and the bullet diameter. The higher the SD the deeper the bullet will penetrate into the target.
As both rifle cartridges fire the same diameter bullet, they will have very similar sectional densities with a very slight advantage towards the 300 PRC as it fires heavier bullets.
Hunting
When hunting, shot placement is always the most important factor between an ethical kill and wounding the animal. Therefore, you might assume that you want the most accurate cartridge possible when hunting.
However, I contest that the 300 Win Mag is the superior option for hunting.
Don’t get me wrong, those 212-grain ELD-X 300 PRC cartridges will do a number on an elk or whitetail. However, at ethical hunting distances (500 yards for most hunters), there is little difference between the 300 Win Mag and the 300 PRC.
However, the one major difference between the two is recoil. Lower recoil will often translate into greater precision and accuracy downrange. Therefore, the 300 Win Mag will be easier to handle at shorter ranges and result in better shot placement.
Furthermore, 300 Win Mag factory ammo is easy to find, cheaper, and comes in more varieties than 300 PRC.
As it is unlikely that a moose or elk will be able to detect any fractional differences in internal ballistics between the two rounds, it’s clear that the 300 Win Mag is the better choice for hunting.
Rifle and Ammo Cost/Availability
This is another category where the 300 Win Mag reigns supreme as it has been on the market for over 50 years.
The 300 Win Mag is considered the gold standard when it comes to hunting big game. Therefore, virtually every firearm manufacturer has a rifle chambered in the cartridge. Entry models are also available such as the Savage Axis or the Ruger American for under $700.
As the 300 PRC is the new kid on the block, there are fewer rifle options available. Rifles from Savage, Bergara, Ruger, Barrett, and other custom manufacturers will start at nothing short of a grand and go up from there. In terms of ammo for 300 PRC, there are fewer varieties available…And they are not cheap! The least expensive PRC ammo I could find ran around $3/round while match ammo ran around $6-7/round.
To complicate matters, there are not many bullet weights available for 300 PRC at this time. The 212 gr ELD-X line from Hornady are the most popular factory loads for hunting while the 225 grain ELD Match is their match-grade round. And that’s about all that’s available at the time of writing!
On the other hand, 300 Win Mag ammo can run as low as $2/round for cheap FMJ practice ammo and about $5/round for the high-quality hunting varieties.
The 300 Win Mag is easier to find in your local firearms shop or hunting outlet store, whereas 300 PRC is a lot less common to see in these stores.
Reloading
Reloading or handloading is the process of recycling fired brass and to be fired again. This not only offers a wide range of ammo customization, but it also reduces your overall cost per round. Reloading is one way to bring the cost per round of 300 PRC back into the realm of practicality. However, the heavier bullets that it fires are not often compatible with other 30-caliber cartridges except for the likes of the 300 Norma Magnum.
In contrast, the lighter bullets fired by the 300 Win Mag can be loaded into 30-06 Springfield, 308 Winchester, and 300 WSM and allows you to purchase in bulk if you reload for these cartridges as well.
Powder selection you’ll want to prioritize slower burning, temperature stable powders such as Retumbo, Reloader 26, Reloader 23, H4831, and H1000.
All major bullet manufacturers like Berger, Barnes, Nosler, and Hornady make 30-caliber bullets that will mate beautiful with both cartridges.
300 Win Mag Ballistics
A Brief History of 300 PRC
The Hornady 300 Precision Rifle Cartridge (PRC) was specifically designed with long range precision shooting in mind. Hornady developed the cartridge to fire long, aerodynamic, and high BC 30-caliber bullets to be everything long range shooters want but haven’t heard about yet.
The 300 PRC began when the ballisticians at Hornady wanted to bridge the gap between the 300 Winchester Magnum and 338 Lapua Magnum for extreme long range (ELR) shooters who wanted to air it out past 1,500 yards but not have to endure the shoulder punishing recoil of the 338.
Other cartridges had attempted this but fell slightly short of the mark, namely the 30 Nosler and 300 Norma Magnum. Barrel life for these cartridges is painfully short, and Hornady wanted to provide shooters with a cartridge that could fire 200+ grain 0.308” diameter bullet while maintaining an acceptable lifespan of the barrel.
Using the 375 Ruger as a parent case, Hornady necked down the cartridge to accept a 30-caliber bullet and set the shoulder angle at 30 degrees, and thusly the 300 PRC was born.
Hornady specifically built the 300 PRC to be a magnum cartridge and did not constrain themselves by using a long action like what happened with the 300 Winchester Magnum.
Instead, they build the rifle around the cartridge, and what they got was an extremely accurate long range cartridge that can easily compete with the 338 Lapua in terms of trajectory.
The 300 PRC embodies everything amazing about the 6.5 Creedmoor and adapts it to 30 caliber. Hornady rolled out their new cartridge at 2019 SHOT Show and received SAAMI approval in August of 2018.
The initial design for the 300 PRC fires a 212 gr bullet at 2860 fps and 3850 ft-lbs of energy at the muzzle. Hornady also offers factory loads with 220, 225, and 250 grain bullets.
Although the 300 PRC is still somewhat of an obscure chambering, it is quickly becoming more popular in the long range competition circuit and is also garnering some attention from US SOCOM for military application.
A Brief History of 300 Win Mag
In 1963, Winchester introduced the 300 Win Mag in its long-action Winchester Model 70 bolt action rifle.
Remington quickly followed suit, introducing a 300 Win Mag offering in its popular Rem 700 bolt action rife. Since then, the 300 Winchester Magnum has quickly become one of the most successful magnum rifle cartridges on the market today.
The 300 Winchester Magnum was developed from the belted 375 H&H Magnum cartridge and sports a whopping case capacity of 91.5 gr of water and a max pressure of 64,000 psi based on SAAMI specifications.
This voluminous case capacity allows the 300 Win Mag to pack in the powder and push the .308” diameter bullet to its limits.
At the muzzle, a 150-grain bullet is screaming down range at about 3300 fps with a back-breaking 3600 ft-lbs of energy. That is some serious power! Standard loadings for the 300 Win Mag range between bullet weights of 150 and 220 gr.
Many shooters believe that the belted case is required to contain the “case-splitting” pressure that the 300 Win Mag must exude. However, this is a common misconception.
Based on the case design, the belted cartridge is superfluous. However, Winchester retained the designed as a marketing strategy to link the cartridge to its heavy hitting predecessor, the 375 H&H Magnum.
The strategy was wildly successful as the 300 Winchester Magnum has become one of the most popular magnum cartridges on the market, surpassing the 300 WSM, 7mm Rem Mag, and 270 Weatherby Magnum.
Final Shots: 300 Win Mag vs 300 PRC
The ballisticians at Hornady did an exceptional job designing the 300 PRC, focusing on optimizing the cartridge design and then building the rifle around it. Although many have criticized the 300 PRC for being another boutique cartridge that offers only marginal improvements over current designs, US SOCOM seems to disagree with their purchase of an unknown quantity of Barrett MRAD rifles in 300 PRC.
It’s hard to say if the 300 PRC will gain mainstream acceptance and adoption by other ammo and rifle manufacturers, however Hornady has changed many perspectives in the past like they did with the 6.5 Creedmoor.
The benefits that the 300 PRC offers cannot be ignored, as it is truly a precision rifle cartridge in every sense of the word.
The 300 Winchester Magnum is big game hunting mainstay and has taken every animal on North America. It is powerful, accurate, and has a trajectory that military snipers, sportsmen, and target shooters have grown to love.
However, the 300 Win Mag cannot accommodate heaver .308” bullets with higher ballistic coefficients like the 300 PRC was designed for. The 300 Win Mag also has less recoil than the 300 PRC, which can make a difference if follow-up shots are needed.
For most shooters, the 300 Win Mag will be more than enough to handle all their shooting needs. However, for long range F-Class and T-Class competitions, the 300 PRC is clearly the ideal choice.
As the 300 PRC and 300 Win Mag have almost identical ballistic properties at hunting ranges, there is not a compelling argument for using the more expensive 300 PRC at these ranges when the 300 Win Mag can do the same thing at lower cost and recoil.
But if you just love the idea of having the most accurized 30-caliber magnum cartridge out there, then go get yourself a 300 PRC and enjoy that sub-MOA accuracy that the cartridge offers!
")
")
")
")
")