My thoughts on venomous snakes are well known among my hunting buddies. I think they have just as much right to be in the woods as I do. As a rule, I leave them alone and let them go about their snake lives while I go about mine. Growing up in an area with more than a few rattlesnakes and as dense a population of copperheads as anywhere I have ever traveled, I learned to watch for them at an early age.
That said, I’m a realist, and I know a lot of people don’t want them around their property, especially if children, livestock, or pets are in the area. So, any time I find out someone might be prone to killing a rattlesnake around their property, I always ask them to put them on ice and give me a call. Why, you might ask? Because rattlesnakes are delicious.
We’ve talked about frying them before here. But they are pretty good slow-smoked on the Traeger grill as well.
(Don’t miss: Deep-Fried Spicy Rattlesnake Recipe)
We’ve also talked about safety. Most people who get bitten by a venomous snake do so because they are messing with it. Don’t do that. Also, freshly killed rattlesnakes can still bite and can still inject venom. If you do kill one, use an ax, a shovel, or a machete to remove the head from a safe distance if the snake is freshly dead. If the snake has been frozen or on ice for a while, you are a little safer, but I still don’t like handling the business end of one. I don’t like to leave the heads where curious children or my dogs can pick it up, so I usually lop it off with a shovel, then dig a hole and use that same shovel to pick up the head and drop it into the hole and bury it.
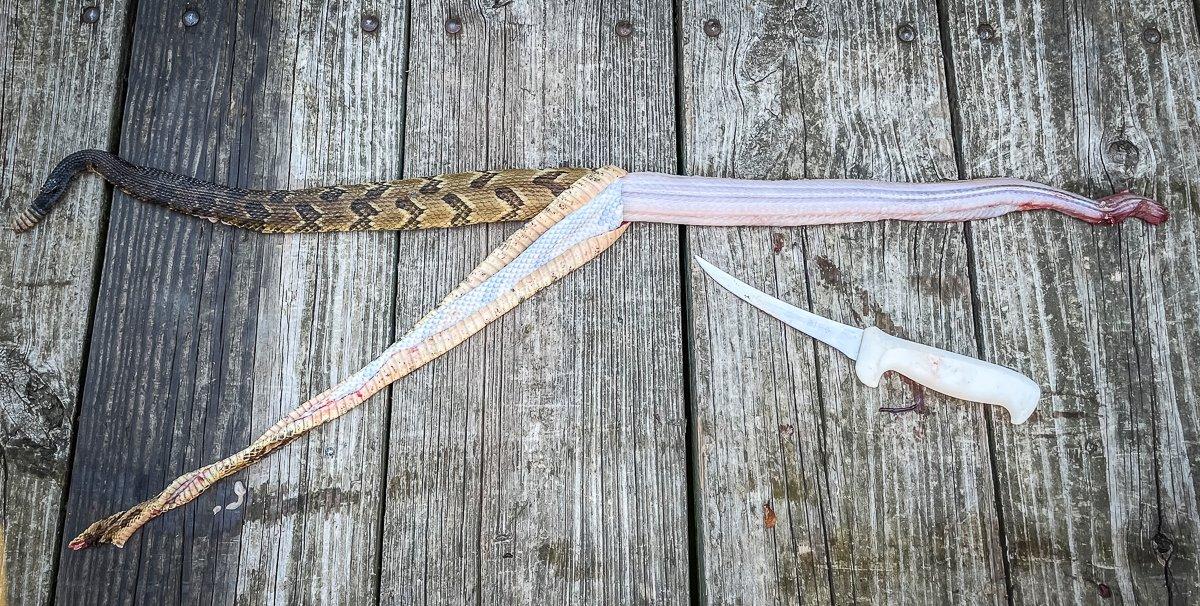
If you’ve never skinned a rattlesnake, you can see the steps involved here. Once you get the snake skinned, vacuum seal and freeze it for storage, or go ahead and cook it right away. Rattlesnakes have a pretty short shelf life, even refrigerated.
(Don’t miss: How to Skin and Prepare a Rattlesnake for the Table)
Another concern with snakes is that they often carry salmonella. I wear disposable gloves while cleaning the snake, wash knives and cutting boards well with hot, soapy water afterward, and always cook to at least 160 degrees Fahrenheit internal temperature.
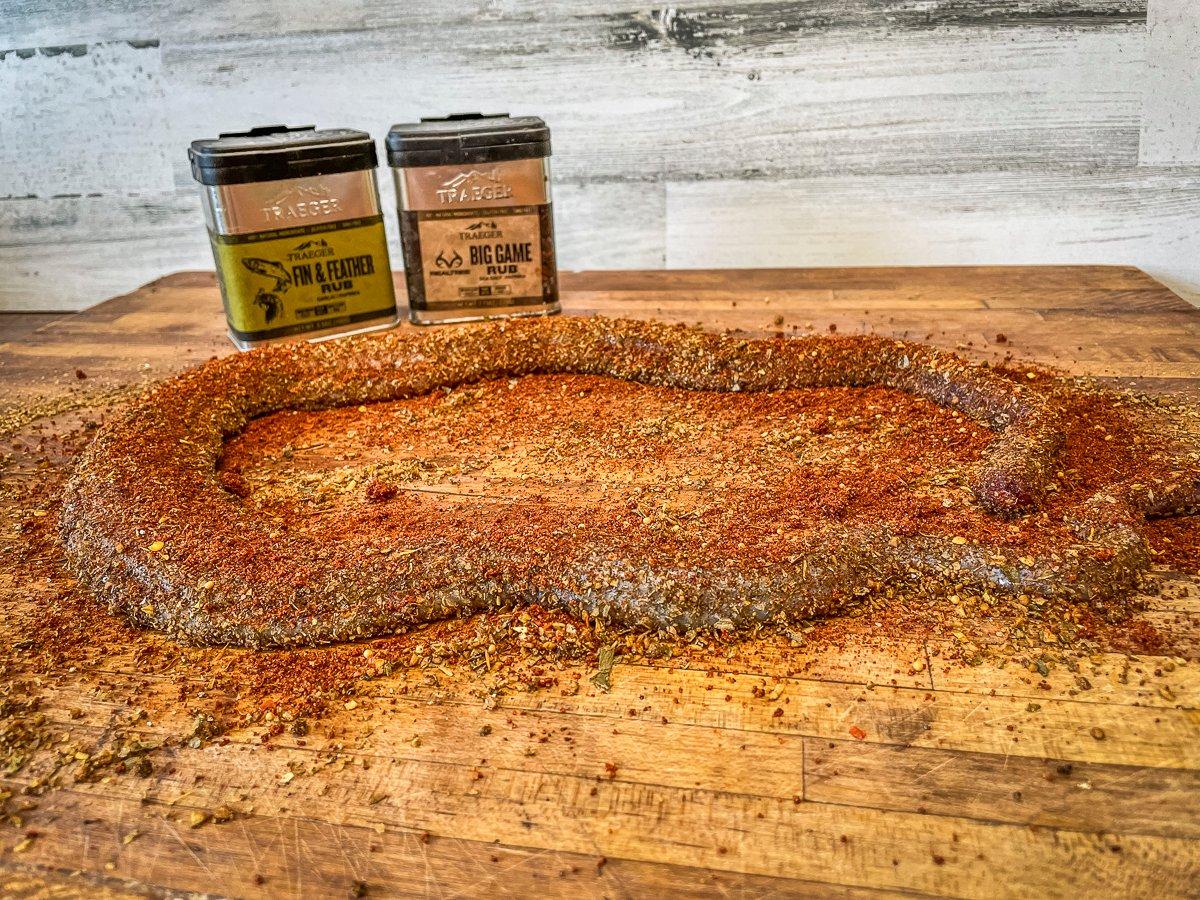
As far as the actual process of barbecuing a snake goes, there isn’t much to it. Skin the snake, remove the entrails, and rinse it well. Coat all surfaces of the snake well with your favorite BBQ rub. I used a combination of Traeger Big Game Rub and Traeger Fin & Feather.
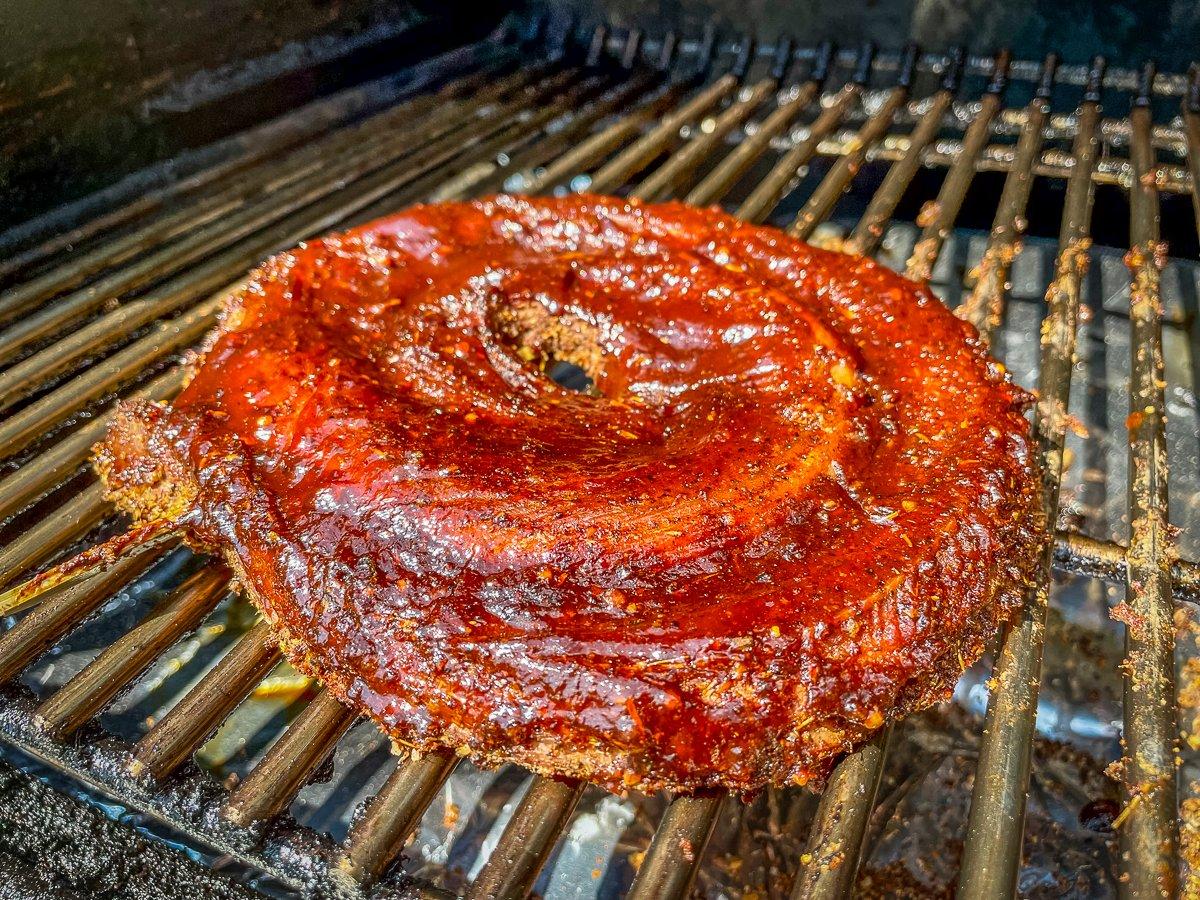
Since snakes are shaped like, well, snakes, they can dry out pretty quickly at longer cooking times. To help combat this, I like to roll the snake up in concentric circles, and pin it together with a wooden skewer. Start from the tail section and roll the snake around itself, ending with head end on the outside. Run a wooden skewer in from the side to pin the rings together.
Move the rolled snake to a preheated Traeger grill with the temperature set at 225 degrees. Turn the SuperSmoke function on for more smoky flavor. About an hour into the cook, brush the snake with your favorite BBQ sauce. I used Traeger Texas Spicy for this one because it seemed like a perfect fit. Repeat the sauce every 15 minutes for the remainder of the cook.
Smoke the snake for 2 to 3 hours, or until a meat thermometer inserted into the thickest part of the meat reads 160 degrees. Rest the snake, loosely tented with foil, for 10 minutes or so before serving.
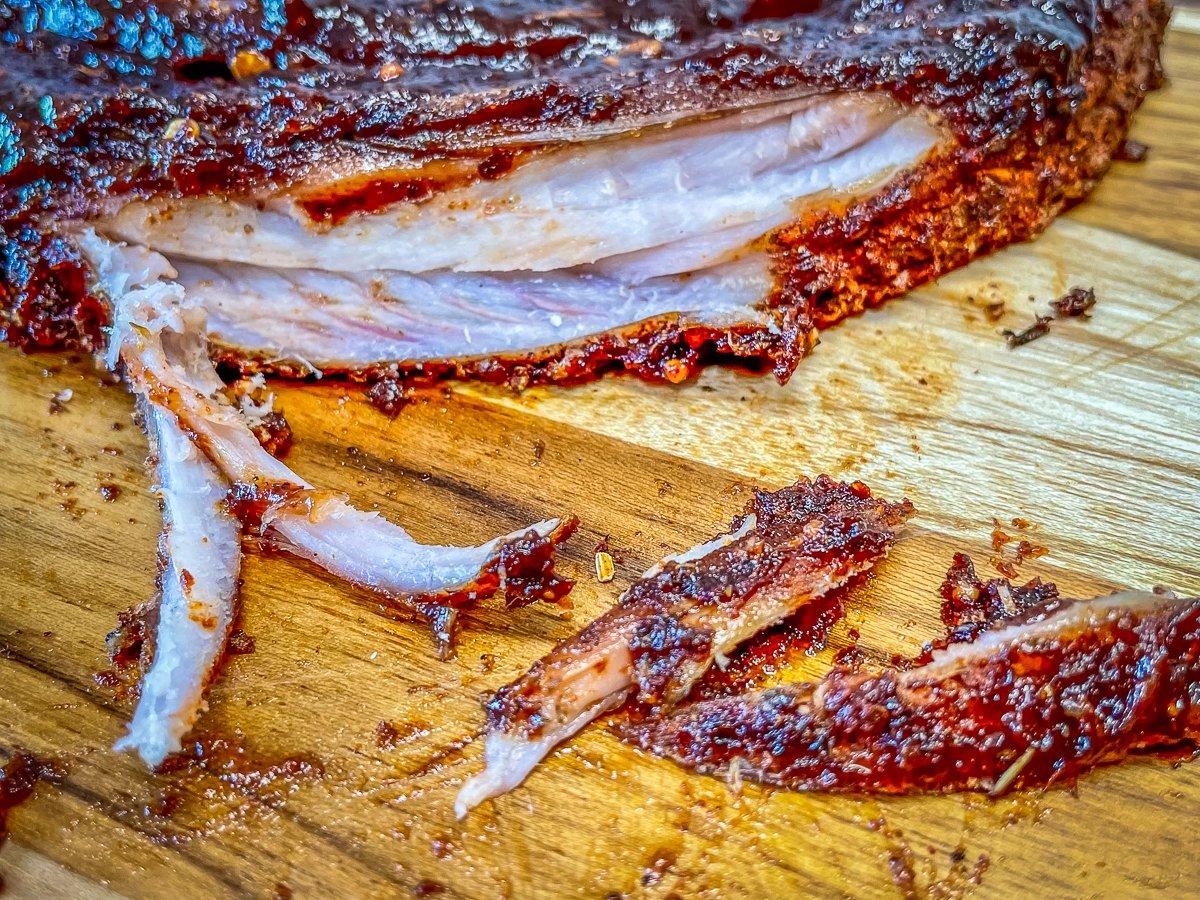
To serve, remove the wooden skewer and cut the snake into individual 4- to 5-inch sections, or just serve the snake on a cutting board or platter and let your guests pick the meat from the bones. Most of the meat will lie along the backbone, kind of a backstrap, so to speak, but you can also get meat from around the rib bones and along the belly.
We like to serve it with a cold beer for an appetizer.
(Hunt in any weather: Men’s Insulated Max-5 Waterproof Parka)
You’ve heard great things about the range, accuracy, and knockdown power of 6.5 Grendel rounds out of an AR-15, and now you want to try it. We completely understand. Fortunately, modifying your AR-15 to load and fire 6.5 Grendel rounds is easy – all you have to do is replace the barrel, bolt, and magazine with 6.5 Grendel compatible ones.
Getting the right 6.5 Grendel barrel is especially important because it will determine the handling and accuracy of your gun. Keep reading to discover the best barrel length for 6.5 Grendel.
The Best 6.5 Grendel Barrel Length Depends on Your Needs
Understanding your shooting needs is the first step toward picking the best 6.5 Grendel barrel length. For instance, if you plan to hunt, you will need a long barrel that delivers enough velocity and stopping power to take down your preferred prey.
Long-range shooters also need a long barrel that delivers enough velocity to hit far-away targets. However, your barrel can’t be overly long. A too-long barrel will make your gun bulky and clumsy, leading to trouble wielding and aiming your gun.
What about home protection, self-defense, or combat training? For such scenarios, you don’t need a barrel that delivers maximum range. Instead, go for a gun you can easily and quickly pull, aim, and shoot. Short barrels are best for this because you can easily move the gun within the closed spaces of your home or during close to mid-range combat.
What Are the Most Popular Lengths for 6.5 Grendel Barrels?
What counts as a long or short barrel will depend on your ammo type. For instance, unlike 9mm barrels that can be as short as 4.5 inches, the shortest 6.5 Grendel barrel you can get is 12 inches. Why? Since 6.5 Grendel is a mid to long-range ammo, it requires a barrel that can support that range.
Below are the most popular 6.5 Grendel barrel lengths:
12.5 inches: A 12.5-inch 6.5 Grendel barrel is ideal if you want to keep your gun as compact and light as possible for easy wielding.
16 inches: A 16-inch 6.5 Grendel barrel is a mid-length barrel that offers better muzzle velocity than 12 inches without overly compromising maneuverability.
18 inches: The 18-inch 6.5 Grendel barrel is popular among shooters who want to hit far-off targets.
20 inches: If you want maximum velocity and range, a 20-inch Grendel barrel is the way to go.
6.5 Grendel Barrels for Long Range Shooting
You can hit targets up to 800 yards away with 6.5 Grendel ammo, but only if you have the right barrel length. A 20-inch barrel is long enough for complete gunpowder burning to generate maximum bullet velocity. The velocity generated by the long barrel will help your long-range precision shooting by making a round fly further on a flat trajectory before gravity pulls it off course.
While longer barrels are available, tests show that the velocity generated by a 22-inch barrel is close to that of a 20-inch barrel. Since the velocity gains from going 22 inches or higher are negligible, you are better off sticking with a 20-inch barrel. Also, getting a 22-inch barrel or higher may make your gun uncomfortably heavy and long.
Optimal Barrel Lengths for 6.5 Grendel Hunting Rifles
Among many hunters, 18 inches is considered the best barrel length for 6.5 Grendel. Since the barrel isn’t overly long, you don’t have to worry about your gun getting caught in bushes while hunting for prey. Also, the barrel’s length will not get in the way of pulling and shouldering your gun to take aim or make follow-up shots quickly.
Even better, an 18-inch barrel combined with a 6.5 Grendel round can generate enough power to take down most deer-sized targets at 500 yards. Also, an 18-inch 6.5 Grendel barrel offers enough stability and velocity to help rounds maintain course and remain accurate, increasing your chances of hitting prey in a kill zone.
The Most Versatile Barrel Lengths for Multipurpose 6.5 Grendel Rifles
Do you want an AR-15 that can multitask? If so, fit it with a 12.5 or 16-inch 6.5 Grendel barrel. These mid-length barrels offer the best of both worlds, keeping your gun easy to wield and offering impressive velocity and accuracy.
Barrel Length FAQs
Here are answers to common questions about the best barrel length for 6.5 Grendel:
How far can you accurately shoot a 6.5 Grendel?
The distance you can accurately shoot 6.5 Grendel rounds will depend on various factors, such as wind, barrel length, skill level, and bullet weight. In standard conditions, a 6.5 Grendel round can travel 200 yards without experiencing a drop. That means you get the most accuracy at 200 yards. However, a skilled shooter can compensate for drop and accurately hit targets at 800 yards.
What does a 6.5 Grendel compare to?
The ammo most similar to the 6.5 Grendel is the .308 Winchester. They are both long-range rounds, but the .308 Winchester has a slightly larger diameter. The bigger size of the .308 gives it a bit more knockdown power than the 6.5 Grendel. However, the 6.5 Grendel takes the prize for accuracy because of its lower recoil and superior wind resistance.
Is it better to have a longer or shorter barrel for 6.5 Grendel?
Whether you should get a longer or shorter barrel for 6.5 Grendel will depend on your shooting plans. Go for a longer barrel if you want maximum accuracy and bullet velocity. However, if you want a gun that stays easy to carry and wield, you are better off with a shorter barrel. While a shorter 6.5 Grendel barrel has less range and power, it’s more than enough to take down targets at 200 yards.
How much does a 6.5 Grendel drop at 500 yards?
The drop of a 6.5 Grendel round at 500 yards will depend on your barrel and bullet weight. According to data from AmmunitionToGo.com, 6.5 Grendel ammo fired from a 24-inch barrel will drop 50 to 60 inches at 500 yards, depending on the specific 6.5 Grendel ammo you use. Hornady Match 123 Gr. ELD drops 51.3 inches at 500 yards, while Federal Gold Medal 130 Gr. OTM drops 59.48 inches.
Need a 6.5 Grendel Barrel?
Now that you have the scoop on the best barrel length for 6.5 Grendel, which one do you plan on getting? Don’t forget that the right barrel length for your AR-15 is one that fits how you intend to use your gun. Visit the Ballistics Advantage store today to browse and order your preferred 6.5 Grendel barrel and the other components you need to upgrade your AR-15 to take 6.5 Grendel rounds.
Muzzleloaders are single-shot firearms that differ from modern weapons in that you have to load each round manually through the barrel. There are no rounds or casings, but you do use primers, powder, a slug, and wadding. The challenge of hunting with a muzzleloader is that you only have one shot, and you best have the skills, accuracy, and tenacity to make that one shot count.
Many states have muzzleloader seasons and those who love the thrill of the muzzleloader hunt. You can target birds, waterfowl, deer – white-tailed deer, antlerless deer, antlered deer, and even a black bear. You are pretty much talking accuracy at less than 100 yards and that means that a muzzleloader deer hunter is going to have to be fairly skilled at getting close to deer. You can check your state’s game agency to see if a muzzleloading hunting season exists for you.
Why Hunt with a Muzzleloader?
Why not? There is a great challenge in hunting with a muzzleloader. For deer season, you have got to know the target – from antlered bucks to antlerless deer – you will need to get close, and that means growing as a hunter to understand the terrain. You’ll also need to understand the species of deer and improve your ability to stay unrecognized in the natural world. Plus, there is the challenge of being able to make a single shot count. It takes great skill to get close enough to deer to take them down without a modern weapon. Hunting with a muzzleloader includes:
The Traditional and challenging method of hunting – you’ve got to be accurate because you have only one shot. That means you have to know your prey, and the environment where you hunt, and have the skills to make your one shot pay off.They are Quieter and less expensive than modern firearms – Expect most muzzleloaders to fire in the 160-decibel range, which can be quieter than a modern rifle.Early deer hunting season for most states – the muzzleloader season generally starts earlier making it less crowded and the targets are not as aware. Some states, such as California, offer muzzleloader hunters events, and some have seasons where the events are mixed with archery. You still need a hunting license but leave the centerfire rifle at home.Do People Still Hunt with Muzzleloaders?
Muzzleloader hunting is an elite sport. It is a natural progression – in a backward fashion – and a spot for folks who are good at hunting to end up. It is one thing to take down deer or bears with a modern weapon. You can, after all, plink a few rounds off quickly even if you are not toting a semi-automatic. But the thrill of muzzleloading is not in just reaching your bag limit on a single afternoon. It is the challenge of being good enough at hunting to come home with game that you had to work at to get.
Muzzleloader Hunting vs Other Methods
Archery is perhaps the method of hunting that comes closest to muzzleloader hunting. That is purely because you have to be good enough at hunting to get close to your target. It is also a slower reload than other options.
Hunting with a modern rifle or handgun is much easier than hunting with a muzzleloader, simply because the second shot is much faster than with a muzzleloader. Modern rifles also have a longer and more accurate range, meaning that your hunting skills can be subpar, and you will still likely get a shot in even if it is a longer distance.
Make no mistake, skill is required for all of these options, but tracking, setting up stands, and stalking prey are a lot more difficult if you have to get within 100 yards of your target – and truthfully, more like 50-75 yards.
Regulations and Restrictions
Regulations vary by state. Many states offer muzzleloader events or seasons for hunters, especially those hunting deer and elk. Some events are populated drawings, and states like California often have better odds. It is important to check with your local hunting bureau to understand the regulations where you hunt and where you plan to hunt. Regulations also exist based on state and local laws, such as in California where you cannot hunt with lead bullets.
Muzzleloader Accuracy and Range
The distance that a muzzleloader can shoot accurately is a variable. Suffice it to say that with an old version of a muzzleloader, and all the stars aligned, you might hit a target 100 yards away. That’s a big “might.” Some modern inline muzzleloaders extend that range to 200 yards. Still, there is a lot between what can and what will happen.
Factors That Affect Muzzleloader Accuracy
Aiming – Don’t be surprised if part of your local regulations for muzzleloader hunting involves, or rather, restricts the use of modern sights such as scopes. Aiming the muzzleloader is one of the biggest issues with accuracy. You will need to dial in the type of sights (iron sights) on the muzzleloader.
Loads – Being able to pour a consistent load is important. Whether you are using black powder or smokeless powder, getting a consistent load will improve your accuracy. Too much powder, too little powder, not tamping down the bullet accurately, and other factors impact how well the bullet leaves the barrel. Flintlock or percussion cap muzzleloaders – sometimes called percussion cap rifles – will both have improved accuracy when you produce uniform loads and clean the fouling from the barrel.
Fouling – There is a lot of residue left around after you fire a bullet from a muzzleloader. Junior hunters can improve their accuracy by learning how to keep the barrel clean.
Barrel Length – Muzzleloaders come with a variety of lengths for barrels. Keep a consistent barrel length as this is one of the critical factors in rifles of all makes and models.
How to Improve Muzzleloader Accuracy
1. Shoot the gun as often as possible. Understanding its nature is one of the best ways of correcting accuracy issues that involve stress, fear, and other common shooting issues.
2. Practice loading the gun so that each load is as close to even as possible. Hunting with a muzzleloader is not the same as being in a war with one. Accurate loads mean the gun is less likely to foul and drop accuracy. This also means that you can reload faster without loading errors.
3. Cleaning the barrel – Make sure you can quickly and accurately clean the barrel. Being good at field cleaning the gun is essential because a clean barrel means you are back in the hunt.
Shot Placement and Effectiveness
You might be wondering where to aim when shooting a deer with a muzzleloader. When hit behind the front shoulder, your bullet travels across the shoulders, the heart, and the lungs. The angle of that shot will change based on your angle to the deer. Visualize that path and take your aim so that the bullet travels across the heart and lungs.
The best spot to shoot a deer with a muzzleloader is the heart. That is a deadly shot, and it is fairly instant.
How long do you wait after shooting a deer with a muzzleloader before going after it? The general rule of thumb is about half an hour. If you know that you have not mortally wounded the deer, then wait a few minutes. What you want to avoid is dealing with an injured animal that has the fight part of the flight or fight in place.
What are the 3 Types of Muzzleloaders?
Flintlock – A physical flint and steel powder ignition – the flint strikes the frizzen which causes damage to the frizzen and the spark ignites the powder.Percussion Cap – The cap sits over a nipple. When the hammer hits the cap, it causes the mercury-based “powder” to ignite.Inline Modern – the hammer hits either a cap or primer which then ignites the powder in the barrel.
Muzzleloader Maintenance and Safety
Make sure the muzzleloader is unloaded before you begin to clean the gun.
1. Cleaning the barrel is the biggest chore and one that everyone should be able to handle in the field.
2. Home cleaning can be more detailed including cleaning the breach plate or conduit from where the hammer hits and the ignition begins.
3. Use an approved muzzleloader solvent to clean the inside of the barrel. On inline muzzleloaders, you often shoot a copper-jacketed bullet with plastic sabots – those can be tricky to clean because the copper and plastic will cling.
Not all muzzleloaders have a safety. When they do make sure the safety works and then activate the safety before you begin to clean. Keeping your gun clean is one of the best ways to keep accuracy high.
Muzzleloader Bullets from Berry’s
To recap the benefits of hunting with a muzzleloader remember that hunting skills are repaid when every shot matters. Take the time to learn as hunting with a muzzleloader not only gives you more options for special hunts such as those for thinning button bucks, antlerless deer, hunting on public land or private hunting areas, and a field that has fewer hunters.
In the modern world, hunting successfully with a muzzleloader is a rite of passage. It means that you have to pair hunting skills, accuracy, and patience, plus your knowledge of the target, environment, and changing conditions.
Berry’s offers Blue Diamond 50 caliber 250-grain muzzleloader bullets with a polycarbonate tip and proprietary sabot. Expect a tight fit and improved accuracy with the Blue Diamond 50 Caliber, a 250-grain bullet designed for black powder muzzleloaders. The bullet is appropriate for loads designed for deer, and smaller game, such as feral pigs, and even larger game such as a black bear.
How To Find Arrowheads In The Woods: The Ultimate Arrowhead Hunting Guide
Since I started hunting arrowheads a few years ago, I’ve had a lot of people ask where the best places to hunt for arrowheads are. And if you’re an arrowhead hunter yourself, you know that a single perfect answer to that question just doesn’t exist.
But since many of the friends that ask me this question enjoy spending a lot of time out in the woods, I thought I would focus on that. And explain to them how they can take part in the fun I was having in hunting for arrowheads, even in the woods!
For information on learning the value of your arrowheads, check out my post, The True Value Of Arrowheads: What Are They Worth To You?
For tips on hunting arrowheads, keep reading!
Introduction
I created a list of tips for these folks to help answer their question…as well as to share with you, fellow arrowhead hunters. So keep reading, and I hope you find some tips that are useful on your next arrowhead hunting trip.
Once you begin finding arrowheads, the next fun part is identifying them! If you need help identifying Indian arrowheads, you might find my post, American Indian Arrowhead Identification: A Resource Guide helpful for that phase of arrowhead collecting.
Once you find your arrowheads, you’ll want to display them with pride! Check out my post of some of the Best Arrowhead Display Cases.
Recommended Reading
How To Find Arrowheads In The Woods
Like I mentioned earlier, the answer isn’t necessarily all that straight forward. I promise that you’re not going to be successful at hunting arrowheads if all you do is randomly walk into the woods and start looking at the ground. You might get lucky, but chances are you won’t find a single arrowhead point.
Get To Know The People And How They Lived
The first thing about hunting arrowheads anywhere, whether it’s in the woods, in a creek or in a field, is knowing what to look for. You want to really get to know where the ancient people who left the arrowheads behind would have spent time or gathered together. Get to know where and how these people lived, hunted and traveled, and you’ll be a thousand miles ahead of most arrowhead hunters.
Remember The Ever Changing Landscape
The other thing to remember is that the landscape 500, 1000 or even 5000 years ago was significantly different than it is now. The pond, lake or creek you see today very well could have been a dry meadow or seasonal creek 1000 years ago. And areas that are now dry, could have easily been shallow ponds, marshes or even the bottom of a massive lake.
So as you walk out into the woods to look for arrowheads, keep these following tips and suggestions in mind:
Look For Evidence of Indian Camps
Whether you’re walking in the deepest part of the woods or simply following a well used trail, keep your eyes open for evidence of old Indian camps. How do you find Indian Camps? Think about areas that you would be useful to you if you were to set up a camp today. Things that would be important for a camp are natural shelter, like bluff overhangs, sources of water such as springs could be a great indications of a possible Indian camps being near by.
Many Indian camps will be located near a water source, such as a creek, river or spring. Just like modern civilizations, ancient peoples relied heavily upon water. They would have almost always camped very close to a source of fresh water. Their survival depended on it.
Indian camps would have been close to water, but they wouldn’t have necessarily been right on the water. Look for high areas that are away from the water a bit, but more importantly, are up out of the floodplain, such as a bluff or a knoll.
Hunting Arrowheads In Creeks, Rivers and Streams
When thinking about tips on how to hunt arrowheads in the woods, one of the best tips I can give you is to find a creek or river and start your search there. For me, it all starts with a water source. Even the fields I hunt for arrowheads in must always be near some type of water source, such as a creek, stream or river.
Remember that not all streams, creeks and rivers were flowing the same way 1000 or more years ago. Always keep that in mind. But if you’re certain you’ve found a creek or river that was present in ancient times, it should prove to be an excellent place to begin your hunt for arrowheads.
Creek Walking For Arrowheads: What Time Of Year Is Best?
Time your arrowhead hunting trip during the part of year when water levels are at their lowest. This is typically during the summer months. Creeks and rivers with low water levels will expose much more of the gravel bars and creek beds, which is where the arrowheads can be found. Also look in the eroded sides of the creeks that would normally be covered with water.
Arrowheads are made out of stone, so they tend to move along the bottom of the river just like other rocks and gravel. Spend time looking for arrowheads in the gravel bars and other rocky areas. Look along the water line as well as just inside the water line. Moving water will wash away the silt and other debris making it easier to see the arrowheads.
Arrowheads tend to get caught between other rocks of the same size or larger as they are pushed along by the water, pinning it in place.
Hunting Arrowheads Where Two or More Rivers or Creeks Join
If you’re just starting hunting for arrowheads in the woods, one of the best tips you could ever receive is to look for areas where 2 or more creeks, rivers or streams come together. Creek walking for arrowheads is one of the best ways to find arrowheads, and this type of scenario is my absolute favorite location to hunt for arrowheads.
Not only are these areas a hot spot for Indian camps, but they were popular locations for other ancient hunting activities. This is where you can find many other artifacts in addition to arrowheads.
If you’re able to locate where two or more larger sized rivers come together, then you’ll probably find evidence of Indian camps nearby. In ancient times, these areas were teaming with activity. People would not have only camped in these areas, but they would have lived in these locations for long periods of time. Because of this, these areas are not only excellent for hunting arrowheads, but are also where to find ancient stone and pottery artifacts.
If you find where two or more smaller creeks or streams come together, you’ll probably also find a lot of evidence of high animal traffic. Today, these areas are excellent for finding deer and other wild game to hunt. The same would also hold true in ancient times.
Many arrows and spears were shot or thrown at deer and other game while they approached the water. Many of these arrows and spears missed their target, only to be lost in the creek or tall grass. Spend time looking for these lost arrowheads in the eroded sides of the creek as well as on the bottom creek bed and gravel bars.
Tips For Hunting Arrowheads In The Woods
Below are some tips you can use to be more successful at finding arrowheads on your next trip out.
How To Find Arrowheads in Creeks and Streams
Like I mentioned, creek walking for arrowheads is a great way to find them, and gravel bars can be great places to spend your time searching. Here are a few things to keep in mind when hunting arrowheads on gravel bars in streams, creeks and rivers and what your levels of success might be. These are not concrete rules, but rules of thumb.
Sandy Bottom: very rare to find arrowheads. Artifacts you may find are pottery shards and possibly flint.
Pea Gravel: Higher rate for finding small arrowheads/ birdpoints.
Small gravel: Higher chance of finding small arrowheads/ birdpoints and other arrowheads that are about the same size as the gravel.
Medium to Large Gravel: Any size arrowhead can be found in this kind of creek or river bottom.
How To Find Ancient Creeks
Use Google maps to your advantage. Google maps can play a very helpful role when researching good areas for looking for arrowheads in the woods.
Use the topographical option on Google maps to investigate where rivers and streams may have traveled through in the past. You may find that two streams converged in a much different location than where they currently join.
Do your research before you head out and you will find arrowheads and other artifacts!
Now that you know how to find arrowheads in the woods, get out there and start looking! Leave a comment below and share any other tips you might have.
Final Thoughts
If you’ve taken the information in this post and are still unable to find the elusive arrowhead. I’ve located a few places online that sell authentic Indian arrowheads. You can find these items on my post, Where To Find Indian Arrowheads For Sale. However, the best thing you can do is continue to educate yourself on arrowhead hunting.
Expert Knowlege!
The experts have given us everything we need to know to successfully find arrowheads! All that knowledge and experience is written inside the pages of this book! Take advantage of it! And go find those relics!
If you are heading to the lake for a long day of fishing or even a multi-day trip. You are going to need a lot of bait. Bait can get expensive if you are buying it all the time. It’s much more cost effective to catch your own. Let’s figure out what a great cast net is for you.
What better way to do this than getting a great cast net. However, finding the right cast net can be overwhelming. There are so many to choose from. What’s the right size for me? What size netting do I need; for the fish I’m trying to catch?
We’re here to help you out with that. We scoured the web and found all the good, the bad, and the ugly of cast nets. We tried out a few. Picking only the top 5 that we liked and hope that you will too.
What Makes a Good Cast Net?
I’m going to try and make this as easy as possible with tables instead of 1000’s of words. Keep this one short and to the point.
Want to skip to the Top Picks Click Here
When looking for a cast net you want the material to be made of soft, hand-tied mesh netting. The hand line should be a braided polypropylene rope. All the weights should all be securely attached. The brail lines should run from the handline to the weights and be a quality heavy-duty monofilament. In other words, this thing should be as tough as it can possibly be.
You would ideally want something that is not going to mark up the boat deck. So a coating over any metal areas, the horn. A heavy duty swivel at the neck, and aerodynamic so it flies through the air and you get that beautiful perfect circle.
Diagram of a Cast Net
Cast nets do come in various sizes, styles, and shapes, making them ideal for all types of bait fishing scenarios. I highly recommend checking with state and local Department of Natural Resources about rules and regulations before just throwing a line out.
Here is a link for ODNR (Ohio Department of Natural Resources) fishing regulations.
If you want to learn more about cast nets see my previous post
Cast Nets: The Ultimate Guide to Becoming an Expert at Fishing with a Net
How to Find the Right Size Cast Net
Net Size & Mesh Size
Measurements are approximate
Weight
Weight (lbs/ft)Descend RateWater Depth*Bait Type* recommended water depth
Material
I know I said I was going to just have tables, but this one needs some more explination.
Monofilament
As the name implies, the monofilament is made up of a single thread. Typically made with nylon. This is a more transparent netting, making it harder for the fish to spot as it sinks into the water. However, it is not as strong as the rest of the materials, making it susceptible to tearing and stretching. The material is not as easy on your hand when emptying your catch.
Multifilament
The Multifilament netting or nylon multifilament is made up of several stands of monofilament. It is either twisted or braided together. Making it stronger than monofilament. This material is still very light and flexible. It has a higher visability in clear water, but can be dyed any color. The mateiral typically does not float, making it more prone to picking up debris (grass, sticks, leaves).
Polyethylene
Polyethylene is a super soft plastic material. It is more flexible than most nettings, holds up in cold weather, and more resistant to cracking than other netting materials. This material is one of the most widely used plastics on the planet (2024). It floats and is very resistant to UV-rays.
Braided Dyneema
This is considered to be one of the strongest materials in the world today (2024). Manufactured exclusively at a Netherlands based company. On a molecular level it is stronger than steel. It’s a super light, an ultra strong fiber, that can also float on water. Making ideal for a heavy duty fishing net in deep water, for hauling in large species.
Types
TypeUsesBait
Disclaimer: These are affiliate links. Meaning I get a kickback if you click the link and purchase the item. This does not add any additional cost to you. This is a service that we provide, with researching and trying out different types of cast nets.
Okay… now that is out of the way.
5 Best Rated Cast Nets
Our Picks for Best Cast Nets and Why
Best Overall Cast Net:Bait Buster Professional Grade Cast Net
Features:
Patented Dragon Head swivel makes it easy to replace brail lines
Weight: 1.5 pounds per foot
Dimensions: 3/8 inch mesh – available in 5ft, 6ft, 7ft, 8ft, 9ft, 10ft, 12ft
Material: 0.28mm 100 pound test green monofilament
Comes with it’s own bucket for easy storage
Pros:
Great for cast in shallow water
Durable for monofilament
Easy hand line retrieval
Good for beginners and pro’s
Sinks fast
Green color doesn’t spook fish
Comes with a bucket
Weights are crimped in the line to prevent sliding
Dragon Head swivel
Cons:
Doesn’t always open fully
More expensive than other alternatives
Weights are barrel shaped, not round as advertised
Best Small Bait Cast Net: Betts Old Salt Premium Cast Net
Features:
Weight: 1 pound per foot
Dimensions: 3/8 inch mesh, comes in 3.5 foot to 10 foot
Material: Monofilament
Pros
Great for begginers
Has the ideal 1 pound per foot weight ratio
Weights are crimped into the line
Oval weights
Ideal for shallow water
Long retrieval line
Comes with a utility box
Cons
No hand loop
Retrieval line is slippery
Not ideal for deep water
Catches debris
Rip and pull easily
Best Variety Cast Net: Goture American Cast Net
Features
Weight: 3/4lb per foot
Dimensions: 3/8 inch or 1/2 inch mesh, available in 4ft, 8ft, 10ft, or 12ft
Material: Copolymer monofilament
30ft braided hand line
Handle and wrist loop for retrieval
Pros
Lots of variety in mesh size and net size
Good for beginners and pros
Long durable hand line
Easy to grip handle
Environmentally friendly sinkers
Durable monofilament
Good for any size bait
Cons
No brail lines
Easily tangles
Loose perimeter lines
Horn can easily come apart
Bucket not included
Best Beginner Cast Net: Ahi USA 50 Monofilament Cast Net
Features
Weight: 3/4 pounds per foot
Dimensions: 3/8 inch mesh, available in sizes from 3 feet to 0 feet
Material: UBE monofilament, 80 pound test brail lines
24 foot handline
Handline swivel
Pros
Good for shallow to medium water (3-6 feet)
Works for beginners and experienced throwers
High size variety
Chip resistant weights
Strong brail lines
Comes with a bucket
Hard for fish to see
Cons
Slow sinking
Hand line gets slippery
Catches debris easily
No ideal for deep water
Best Budget Cast Net: FiTech Super Spreader Cast Net
Features
Weight: 3/4lb per foot
Dimension: 1/4 inch or 3/8 inch mesh, comes in a variety of sizes 3ft to 12ft
Material: 80lb test brail lines, clear monofilament
Komfort Kuff
Pros
Great for any level caster
Size variety
20ft braided poly hand line
Triple-tied lead line
Velcro Komfort Kuff wrist strap
Ideal for shallow water
Comes with a utility box
Cons
Slow sinking
Hand line gets slippery
Easily tangles
Picks up a lot of debris
Final Thoughts
The bottom line is there are a ton of cast nets on the market. While all of these nets, if used properly, will catch fish. There are significant difference in every net on the market today. You do need to pay attention to the size of the net, the size of the mesh, the weight per foot, and how deep are you trying to catch bait fish in. Choose a design that meets your needs and your budget.
The excellent quality makes every shooter who has touched it know that they have found the best partner!
And if you don’t know about this gun yet, read this full review and decide if you want to be the first among your friends to own a world-class air rifle you have longed for.
Hatsan 95 – Guntype
This is a spring-piston air rifle.
Spring guns are cheap, accurate, simple to use, and easy to service.
Hatsan 95 also brings you SAS (Shockwave Absorber System).
It significantly reduces felt recoil and extends the life cycle of guns, optics, and accessories.
In addition, Hatsan makes this stock an ambidextrous design so left-handed shooters can share the same fun as the right-handed shooters.
Also, it has nice checkering in the grip and forearm to add friction to your arm when shooting, prevent slippage from the shooter’s sweat, and enhance accuracy.
Ammo
Since it has 3 types of calibers, Hatsan 95 has 3 types of ammo for each caliber: .177 cal uses .177 pelts, .22 uses .22 rounds and .25 uses .25 pellets.
.177 pellets are lightweight, popular and very cheap so it’s cost-effective for target shooting and plinking.
.22 is heavier than .177, more stable on its trajectory (the path the bullet travels toward its target), and delivers more knockdown power so .22 is a favorite caliber of field hunters and pest eliminators.
Although the full-function fiber optic sight is more than enough to achieve the desired accuracy, Hatsan carefully put the 3-9×32 Optima scope in it to lend more accuracy for every shot.
32 is the diameter of the front lens and 3-9 is the magnification of the scope:
It means that you can adjust the scope to magnify the picture 3 to 9 times than the image you see without it .
This variable power scope gives you and more dead-on accuracy and more confidence in long-range shooting.
Cocking effort and loading
Cocking the gun:
Hold the pistol grip with one hand, place the stock on your hip, and break the barrel all the way down to its limit
Loading the pellet:
With the breech opened after you cock the gun, put a pellet into the chamber (with the pellet’s nose lying forward),
Pull the gun up to its original position and you are ready to shoot.
Loudness
This gun produces very little noise:
It has hundreds of customer reviews without a single complaint about the noise.
You can definitely shoot it in the urban area and not worry about drawing attention to yourself
Shooting ability
The effective shooting range for the Hatsan 95 is up to 50 yards.
You can use this gun for target shooting, plinking, pest control, and small game hunting.
Maitenance
Hatsan 95 requires hardly any care for it:
Just remember to oil your gun every 250 shots and clean the barrel with a cleaning rod every 500 shots to make your rifle as good as new.
Trigger
The trigger is Hatsan’s unique features:
It’s the Quattro trigger which is an advanced gold-plated two-stage match trigger only available from Hatsan.
The remarkable thing about it is you can adjust the “trigger travel” and “trigger pull” to fit your custom needs.
No more worry or disappointment over the traditional factory trigger like other guns in the market.
Safety: a drop safety interlock device has been incorporated to eliminate the possibility of the air gun accidentally firing if it’s dropped (whether or not the safety is on)
So you can give this gun to your son knowing that the maximum level of safety is guaranteed.
Trigger Safety: Every time you cock the rifle, the safety will be engaged, you push it forward to fire.
It’s very intuitive once you cock it, you come back to aim, take your thumb and push it into place. Another plus point for this rifle.
Velocity, accuracy and power
The advertised velocity of Hatsan 95 is 1000 FPS, 800 FPS, and 650 FPS with .177, .22, and .25 calibers respectively.
Even though FPS rates may look the same from brand to brand, they may not always be the case.
Unlike most competitors who use lightweight alloy pellets to flatter the velocity, Hatsan tends to be conservative with their velocity figures.
They use lead pellets for all their velocity tests so your air rifle will deliver more takedown power than an alloy-tested air gun with the same FPS rating.
Chrony tests have given us the results as follows:
Pellets (.177 – .22 – .25)
FPS
FPE
7 gr Hobby pellet (.177)
995
15.4
14.3 gr lead pellet (.22)
806
20.63
14.3 Crosman Premiere Hollow Point (.22)
807
20.68
Crosman Premiere (.22)
734
17.11
RWS Hobby (.22)
801
16.96
Beeman Kodiak Dome (.22)
646
20.02
H&N Field Target Trophy 14.66 gr (.22)
782.6
19.94
26 gr Predator Polymag (.25)
604
21.07
JSB Exact 25 gr (.25)
605
20.32
Gamo Rocket 20.8 gr (.25)
696
22.38
JSB Exact King 25.4 gr (.25)
570
18.33
Benjamin dome 28 gr (.25)
538
18
Generally speaking, the velocity is so close to the advertised numbers, some velocities even surpass Hatsan’s stated figures- that’s how lead-tested air gun performs.
Hunting for whitetail shed antlers dominates the antler scene, but like dreaming about a western elk hunt, shed antler fanatics consider hunting for elk and mule deer shed antlers a bucket-list adventure. Hunting for elk and mule deer sheds is a surefire way to enjoy western scenery in a personal manner, and possibly pick up more bone than you ever imagined. Even so, elk and mule deer country can be harsh and testing so plan accordingly. Start your planning by scheduling for the right time of year.
When Do Elk and Mule Deer Drop Their Antlers?
Like whitetail deer, elk and mule deer shed their antlers via a combination of factors. Genetics drives antler shedding to a specific date, but a male’s use of testosterone also factors into the equation. The more testosterone a male uses during the rut, the more likely it is to drop earlier. Stress, particularly from winter and predation, influences animals to drop their antlers earlier than normal, especially under severe conditions.
The two species shed their antlers in a different time frame. Mule deer shed their antlers from January into March. Elk, on the other hand, begin shedding their antlers in March through April, although it can occur as early as mid-February.
It’s really up to Mother Nature when the antler drop occurs, but if you’re lucky occasionally both antlers drop near one another, deer and elk. With large bull elk the phenomena seems more commonplace. It’s possibly due to the heavier weight of an elk antler and the lopsided feeling that comes from carrying just one antler. If you do find a single, large elk or mule deer antler, spend a few extra minutes gridding the area. The other side is likely close.
Shortcuts for Western Shed Hunters
Despite a shedding time frame that doesn’t overlap, you can still slate a trip later in spring and look for antlers from both species. Depending on the area you target, oftentimes you’ll find mule deer antlers one level below where you’ll find elk antlers. It’s possible they’ll winter up to 1,000 feet lower in elevation depending on the winter range.
Don’t let the elevation factor scare you away. Although elk and mule deer definitely look for elevated hideouts when seeking winter refuge, they also gravitate toward large mesas, and sagebrush basins. Research regions characterized by minimal snow and feeding areas for the animals. State game and fish agencies even manage these areas realizing that the ungulates visit them annually. Many of these areas have been allotted refuge status with no human access until spring arrives. Most have a posted opening date that attracts local and visiting shed hunters alike. It’s the chance at a grand Easter egg hunt in antler style when the opening date arrives. State game managers are also helpful in pointing out other winter preferences for elk and mule deer if you wish to avoid a Boston Marathon shed antler hunt.
The best advice for any Western shed antler hunter is to spend wisely on good optics. It’s amazing how many antlers you can discover simply by looking down slopes or across canyons. Focus on white objects and partial tips protruding from brush or grass. My favorite optic to carry is the Nikon Monarch HG10x42 with enough power to pick apart the landscape when looking for antlers.
Next, make sure you’re in shape. My average day is a 12-mile round trip hike. Half is straight up and most is side-slope navigation. Sturdy, leather hiking boots and a hiking staff is a must. I trust my Cabela’s Meindl Perfekt boots to get me in and out. You also need to outfit yourself with a durable and comfortable pack. It needs enough room for water, lunch, rain gear, survival gear and first aid. It should also have ample areas to lash antlers.
To speed up your antler discoveries begin by following big game trails. Both elk and deer use trails to navigate to winter forage. Although either species has no aversion to pioneering a new route, the path of least resistance does have appeal and trails are carved into mountain sides from eons of use.
These trails undoubtedly lead to open areas for feed, but don’t overlook where the trail disappears into timber. Elk and mule deer spend more time on south-facing slopes, but they have to traverse north-facing slopes to get to any new, windswept, south-facing food stash. North-facing slopes vary from dark timber to juniper-jammed terrain. In most northern latitudes, north-facing slopes are always defined by deep snow. Again, follow the path of least resistance and look for any antlers dropped along the route.
As you negotiate winter range, you’ll obviously encounter geographic features such as steep canyons and gorges. Avoid them if the ascent looks dangerous, but steep topography and ravines cause jarring and jolting, both of which can make an animal drop an antler in an abyss. Lace up, slide down and cover more ground for a look if you deem it safe.
Lastly, you may need to put your binoculars aside and snoop like on whitetail properties for shed antlers thick vegetation. Sagebrush, mountain mahogany, scrub oak, thick junipers and even stands of cholla cactus could hide elk and mule deer antlers. They create micro environments to shield from winter winds, plus supply food sources.
Sell Your Shed Antlers
Finding antlers can pay off. Antler prices have risen in recent years. The antler market fluctuates like the Dow Jones Industrials, but artisans, dog-chew companies, collectors and others purchase antlers on a regular basis. Deer antler prices have been fluctuating between $8 and $12 per pound in recent years. Elk antlers could fetch you anywhere from $12 to $15 per pound. That’s appealing since a big elk antler may weigh nine pounds netting you more than $120 for just one antler.
Even with the possibility of a paycheck at the end of a shed antler hunt, the reward for a western adventure far outweighs cash. Picking up a shiny, six-point elk antler while you overlook a scene from the opening of a John Wayne movie is the true reward.
Filleting fish is a delicate process, and having the right knife makes all the difference. If you have ever experienced a dull fillet knife, you know how frustrating it can be. Not only does it make the filleting process take longer, but it can also be dangerous.
A sharp fillet knife will easily glide through the fish, making for a much safer and quicker experience. Picking the best fillet knife for saltwater fish is critical. Use this guide to sift through the noise and pick one that will last you a long time!
7 Best Fillet Knife for Saltwater Fish Reviewed
Gerber Controller
KastKing Fillet Knife
Rapala Saltwater Fillet Knife
Rapala Lithium Ion Cordless Fillet Knife Combo
Morakniv Fishing Comfort Fillet Knife
Dexter P94812 Fillet Knife
Bubba Blade
1. Gerber Controller
Key Features:
Finger choil
Lanyard hole
Sheath system with built-in sharpener, pocket, vents, and clip
Corrosion-resistant blade
Hydro Tread grip
A glass-reinforced polypropylene handle
Optimize to withstand harsh conditions
The Gerber is a newer knife on the market, and they’ve done their homework when it comes to the design. They reached out to anglers from all over to get their input on what they’d want in a fillet knife and sheath and implemented those recommendations.
The first thing they did was pick a corrosion-resistant yet sturdy steel that would hold an edge in a saltwater environment. They went with a 9Cr stainless steel that allows for flex to get every piece of meat off the fish while staying sharp.
The next best thing they did was design a grip that gives you plenty of force to cut the fish without slipping. The over-molded grip around the knife’s full tang and the different rubber pieces maximize your grip. Couple that with a hard yet easy-to-clean fishing fillet knife sheath, and you’ve got a winner.
2. KastKing Fillet Knife
Key Features:
A protective knife sheath
Non-slip super polymer grip
Razor-sharp stainless blade
It is thicker and stiffer than others
The KastKing Fillet Knife is a great option for those looking for a quality fillet knife that won’t break the bank. This knife features a razor-sharp stainless-steel blade thicker and stiffer than other knives in its class, making it ideal for larger fish.
The non-slip super polymer grip ensures that your hand won’t slip when wet, and the protective knife sheath ensures that your knife stays sharp and ready for use. Its bright color makes it easy to spot in the boat or tackle box.
3. Rapala Saltwater Fillet Knife
Key Features:
Super sharp stainless blade
Flexible tip
Easy clean sheath
It has a comfortable grip
If you are looking for a knife to fillet saltwater fish, then the Rapala Saltwater Fillet Knife is a great option. The blade is made from super sharp stainless steel and has a flexible tip that makes it easy to maneuver.
The knife also has an easy clean sheath to keep it in top condition. The comfortable grip ensures that you can use the knife with ease.
4. Rapala Lithium Ion Cordless Fillet Knife Combo
Key Features:
Extra length to limit wrist and hand fatigue
Laminated and polished for a sanitary build
Incredibly razor-sharp
Outstanding craftsmanship
Expertly handcrafted to handle both small and large animals
The DALSTRONG fillet knife is one of the top-rated filleting knives on Amazon for a reason. It’s a great all-around knife that will tackle any fish you put in front of it.
This knife has a blade that’s 6 inches long and extra thin to make slicing through fish a breeze. The blade is also laminated and polished for a sanitary build that resists rust and corrosion.
The handle on this knife is slip-resistant and comfortable to grip, even when your hands are wet. Plus, the knife’s extra length will help limit wrist and hand fatigue.
Also, check out our guide on some of the Top Electric Fish Fillet Knives.
5. Morakniv Fishing Comfort Fillet Knife
Key Features:
Excellent corrosion resistance
Exceptional toughness
High friction handle
Easy to clean
Available in 3.5 and 6.1 inch
If you’re looking for a beautiful stainless-steel blade that comes in both 3.5 and 6.1 inches in length, you should consider the Morakniv Fishing Comfort Fillet Knife.
They use a 12C27 stainless steel blade which comes razor sharp, holds an edge, and fights against saltwater corrosion. We like the TPE rubber soft grip, which keeps the blade firmly in your hand and prevents dangerous slipping.
Even though this knife holds an edge, it doesn’t mean it shouldn’t be sharpened if you’re going through multiple fish in a row. Depending on the fish you’re cutting, the blade will benefit from a quick tune-up.
6. Dexter P94812 Fillet Knife
Key Features:
High carbon steel blade
Durable and slip-resistant polypropylene handles
High quality
Hollow-ground blades
Dexter has been making a stainless-steel fish filleting knife that everyone, from anglers to chefs, has been using for a long time. We first heard about Dexter from Anthony Bourdain, who said he used them in his kitchen to fillet fish before cooking them for his guests.
We’ve cut a bunch of fish with this knife without sharpening it often. It’s nice to have a knife that can hold an edge for a long time. The handle is barebones textured plastic, and it doesn’t come with a sheath like some of those more expensive fillet knives.
Its durability and simple design make the Dexter P94812 one of the best fillet knives for the money.
7. Bubba Blade
Key Features:
Non-slip grip handle
Durable
Rust resistant
An extra sharp tip
Sheath with a belt loop
Reliable
Bubba Blade has been making high-end fillet knives for some time. The distinct red handle and the titanium-nitride-coated black blade are a staple in the fishing community. You’ll need to consider this one if you’ve got some money to leverage and want a bold fishing filleting knife.
The soft grip is also non-slip, and you have a place to attach a lanyard so that you don’t lose this knife overboard. We like the trigger grip, which makes it easy to maneuver the blade to wherever you need it. The full tang design and the high carbon stainless steel blade mean it’ll last you a long time.
Everything You Should Consider Before Buying a Saltwater Fillet Knife
A quality fillet knife is a necessity for anyone who regularly cooks fish, whether they get their catch from fresh or salt water. While many types and brands of fillet knives are on the market, some considerations should be made before purchasing one to ensure it will suit your individual needs.
The following guide outlines everything you should think about before buying a saltwater fillet knife, from the blade material to the handle style.
Saltwater Fillet Knife Features
A fillet knife is part of the boning knife family and is used to make quick work of removing meat from the skeleton of a fish and the skin from the meat.
Blade Material
One of the most important things to consider when choosing a fillet knife is the blade type. The two most common materials used for fillet knife blades are stainless steel and high-carbon steel.
Stainless steel is less likely to rust than high-carbon steel, making it a good choice for those who do a lot of saltwater fishing. However, it is also more difficult to sharpen and not as strong as high-carbon steel.
High-carbon steel fillet knives are sharper and easier to sharpen than their stainless-steel counterparts, but they are also more susceptible to rusting. If you opt for a high-carbon steel knife, keep it well-oiled and clean it thoroughly after each use.
Handle Style
If you’re doing a lot of filleting, it’s essential to choose a knife with a comfortable handle. Some of fillet knives’ most popular handle styles are rubber, wood, and plastic.
Rubber handles are slip-resistant, making them a good choice for those with sweaty hands or using the knife in wet conditions. Wood handles look nicer than plastic or rubber but can become slippery when wet.
Plastic handles are lightweight and inexpensive but not as durable as rubber or wood. Also, there are two types of handles the trigger grip and the standard grip.
The trigger grip is easier to maneuver the blade with because you can place your index finger on the trigger. The standard grip is the more traditional way to hold a fillet knife.
Blade Length
You also need to consider the length of the blade when choosing a fillet knife. A longer blade will give you more leverage, making it easier to fillet larger fish. However, a shorter blade is much easier to control, making it a better choice for smaller fish or those with less experience filleting.
The thickness of the blade is also something to take into account. A thinner blade will flex more, making it easier to maneuver around the bones of a fish. However, a thicker blade will be more durable and less likely to break.
Flexibility
When you’re looking at fillet knives, you’ll notice that some are more flexible than others. A more flexible blade is better for filleting smaller fish because it can easily contort to fit around the bones. A less flexible blade is better for larger fish, as it will be less likely to bend under pressure.
Sheath
A sheath is not strictly necessary, but it is a good way to protect your knife and keep it from rusting when not in use.
Fillet knives with sheaths often have a belt loop, making them easy to carry with you when you’re out on the water. If you opt for a knife without a sheath, keep it oiled and stored in a dry place when not in use.
How to Maintain Your Fillet Knife
Once you’ve found the perfect fillet knife, it’s essential to take care of it to last for years to come. Here are a few tips on how to maintain your fillet knife:
Clean the knife after each use. Saltwater is incredibly corrosive, so be sure to rinse the knife off in fresh water and dry it thoroughly after each use.
Apply a light coat of oil to the blade after each cleaning. This will help to prevent rust and keep the blade in good condition.
If the knife becomes rusty, you can remove the rust by scrubbing it with a stiff brush and some white vinegar.
If you have a high-end knife, check if it’s dishwasher safe. Some of the more advanced grips can’t handle the dishwasher’s abuse.
Keep your harsh detergents away from your knife. Follow your manufacturer’s recommendations.
Sharpen your knife often with a quality sharpener or block. A sharp knife is a safe knife.
Keep your cutting surface soft. Don’t cut on marble countertops or items that could dull or chip your blade edge.
Frequently Asked Questions
Insider Advice
Saltwater fillet knives are a great investment for any fisherman or woman. They provide the perfect tool for filleting your catch and, with proper care, will last for many years.
Be sure to consider the factors we’ve discussed before making your purchase, and you’ll be sure to find the perfect knife for your needs.
Lightfield slugs, also known as “ammo-less” or “non-toxic” slugs, are a type of shotgun slug that uses compressed air to propel itself. They were designed as an alternative to traditional lead and copper shotgun slugs, which are considered environmentally harmful.
Lightfield slugs have been shown to be just as effective as traditional lead and copper shotgun slugs, but they are significantly less expensive to produce. However, lightfield slug production has been discontinued and the company that manufactured them has gone out of business.
Lightfield slugs were once a common sight in the fields and gardens of North America. But these days, they are hard to find. What happened to them? There are a few theories about what might have happened to lightfield slugs. One is that they were simply victims of changing environmental conditions. As the climate has become drier and warmer, their natural habitat has shrunk and they have been unable to adapt. Another possibility is that they were preyed upon by introduced predators such as rats or snakes. These non-native animals may have found lightfield slugs an easy target, causing their numbers to decline sharply. Whatever the cause, it’s clear that lightfield slugs are in trouble. And that’s a shame, because these creatures play an important role in the ecosystem by breaking down organic matter and recycling nutrients back into the soil. Let’s hope we can figure out what happened to them and help them make a comeback.
Why SlugGuns Shoot High
Can You Still Buy Lightfield Slugs?
As of 2021, Lightfield slugs are no longer being manufactured. The company that made them, Lightfield Ammunition, went out of business in 2019. While there may be some retailers who still have old inventory for sale, it is getting increasingly difficult to find these slugs on the market. Lightfield slugs were known for their accuracy and power. They were popular among hunters and target shooters alike. While there are other slug brands available, Lightfield was one of the first companies to produce high-quality slugs for shotguns. If you’re looking for an alternative to Lightfield slugs, try checking out some of the other options on the market. There are a variety of different manufacturers that make quality slug products. Do your research and find the right option for you and your shotgun.
Who Makes Sabot Shotgun Slugs?
Sabot shotgun slugs are made by a variety of manufacturers, but the most popular brand is Federal. Other brands include Winchester, Remington, and Hornady. Sabot shotgun slugs are designed for use in shotguns with rifled barrels. They are made from lead or copper and have a plastic or metal sabot (a type of sleeve) that surrounds the slug. The sabot helps to stabilize the slug in flight and allows it to spin, which increases accuracy.
What is the Best 20 Gauge Sabot Slug?
If you’re in the market for a 20 gauge sabot slug, there are a few things you’ll want to keep in mind. First, what is your intended use for the slug? Hunting or target shooting? Second, what is your budget? Third, what is the range you plan to shoot at? With those factors in mind, let’s take a look at some of the best 20 gauge sabot slugs on the market: 1. Hornady SST Sabot Slug: The Hornady SST Sabot Slug is one of the most popular choices for hunting and target shooting. It’s accurate and has good penetration. It’s also relatively affordable. 2. Winchester PDX1 Defender Sabot Slug: The Winchester PDX1 Defender is another good option for hunting and target shooting. It has excellent penetration and is very accurate. However, it’s more expensive than the Hornady SST. 3. Federal Premium TruBall Rifled Slug: The Federal Premium TruBall Rifled Slug is an excellent choice for long range shooting. It’s extremely accurate and has great penetration. However, it’s quite expensive.
Are Lightfield Slugs Rifled?
No, Lightfield slugs are not rifled. Rifled slugs are designed for use in smooth bore barrels, and Lightfield makes both types of slug. Their Hybred EXP line is a good example of a rifled slug, while the Commander Slug has a saboted design that’s better suited for use in a rifled barrel.
Lightfield Slugs Auction
Welcome to our lightfield slug auction! Here you will find some of the finest slugs in the world. We have a wide variety of slugs for sale, so there is sure to be something that interests you. Our lightfield slugs are known for their beauty and rarity, and we are proud to offer them to the public. This auction is your chance to own one of these amazing creatures. We have a wide variety of slugs for sale, so take your time and browse through our selection. You are sure to find something that catches your eye. Thanks for visiting our auction, and good luck!
Lightfield Slugs 12 Gauge 2 3/4
5 oz. If you’re looking for a powerful and effective slug for your 12 gauge shotgun, then you should definitely check out the Lightfield Slugs 12 Gauge 2 3/4 .5 oz. These slugs are designed to provide maximum stopping power and accuracy, and they definitely deliver on both fronts. The Lightfield Slugs 12 Gauge 2 3/4 .5 oz are made with a patented saboted design that provides unbeatable accuracy at long range. The slug itself is made of high quality lead and is surrounded by a tough plastic sabot that helps it retain its shape during flight. This ensures that the slug will hit its target with lethal force, making it ideal for hunting or self-defense situations. The Lightfield Slugs 12 Gauge 2 3/4 .5 oz also have an impressive muzzle velocity of 1600 fps, making them some of the fastest slugs on the market. This high velocity gives them excellent penetration power, which is perfect for taking down large game animals. The Lightfield Slugs 12 Gauge 2 3/4 .5 oz are also incredibly durable and reliable, so you can count on them to perform when you need them most.
Who Carries Lightfield Slugs
Lightfield slugs are a type of shotgun ammunition that are designed to be used for hunting. They are typically made from a solid brass or copper material and have a hollow point design. The Lightfield slug was created by George Kollitides, who is also the founder of KA-BAR Knives, Inc. The Lightfield slug was designed with several features that make it ideal for hunting. One of these features is its aerodynamic design, which makes it more stable in flight and less likely to tumble when it hits its target. Additionally, the light weight of the slug makes it easier for hunters to carry more rounds with them without adding too much weight to their pack. And finally, the hollow point design ensures that the slug will expand upon impact, causing maximum damage to the animal being hunted. If you’re looking for a high-quality, reliable shotgun slug for hunting purposes, then you should definitely consider using Lightfield slugs.
Lightfield Sabot Slugs Reviews
Lightfield Sabot Slugs Reviews If you are looking for a high-powered slug for your shotgun, the Lightfield Sabot Slug may be just what you need. These slugs are designed for maximum stopping power and accuracy, and they have been proven in law enforcement and military applications. Here is a closer look at the Lightfield Sabot Slug and what it can do for you. The Lightfield Sabot Slug was developed by Dr. John Buford, who is a leading authority on firearms technology. He has over 30 years of experience in law enforcement and the military, and he has written several books on firearms technology. The Lightfield Sabot Slug is based on his research into how to create the most effective slug possible. The Lightfield Sabot Slug is made from a solid piece of copper that is precision machined to create a hollow point bullet. The slug also has grooves cut into it that help to stabilize it in flight and ensure that it spins correctly when fired from a rifled barrel. This design makes the Lightfield Sabot Slug one of the most accurate slugs available. The light weight of the slug also allows it to reach higher velocities than other types of slugs, which results in more penetration power. The sabot design also helps to protect your barrel from wear and tear since there is no metal-on-metal contact between the slug and barrel walls. So if you are looking for a high-powered slug that can deliver accuracy and stopping power, the Lightfield Sabot Slug may be just what you need.
Lightfield Slugs 20 Gauge
75″ 3/4 oz. Super-X Lightfield Slugs 20 Gauge .75″ 3/4 oz. Super-X are a great choice for those looking for a high performance slug at an affordable price. These slugs offer outstanding accuracy and terminal performance in a variety of scenarios. The Lightfield Slugs 20 Gauge .75″ 3/4 oz. Super-X are designed to expand rapidly upon impact, creating a large wound channel that is highly effective at taking down game animals quickly and humanely.
Lightfield Sabot Slugs 12 Ga
Lightfield Sabot Slugs 12 Ga are a type of shotgun ammunition that is designed for hunting large game. The slug itself is made of lead and is surrounded by a plastic sabot, or shell. The sabot helps to stabilize the slug in flight and also increases the accuracy of the shot. These slugs are typically used in shotguns with rifled barrels, as the rifling helps to spin the slug and improve its accuracy. Lightfield Sabot Slugs 12 Ga can be effective at ranges up to 100 yards, making them a good choice for hunters who want to take down big game animals such as deer or hogs.
The Lightfield Slug Mold
Lightfield slug mold is a type of mold that is used to create slugs for use in airsoft guns. This mold is made from a light-weight material that allows for the easy creation of perfect pellets every time. The pellets produced by this mold are very precise and have little to no imperfections, making them ideal for use in airsoft guns. This mold is also very easy to use and clean, making it a great choice for those who want to make their own slugs.
Lightfield 20 Gauge Sabot Slugs Ballistics
Lightfield’s 20 gauge sabot slugs are some of the most accurate and powerful slugs on the market. With a muzzle velocity of 2000 fps, these slugs can take down even the biggest game animals. And, thanks to their precision construction, they’re also extremely accurate at long range. If you’re looking for a high-powered slug for your 20 gauge shotgun, Lightfield’s sabot slugs are definitely worth a look.
One of the most frequent questions I am asked when visiting anglers are planning their fishing trip to Montana is “when is the best time to come out”. That question is impossible to answer so I generally try to feel out what is most important to someone: nice weather, lots of action, dry fly fishing, big trout, etc. If your top priority is catching big brown trout the answer is easier: October. There is no better time to fish Montana for large trout than October (and even November). Brown trout which tend to make up the majority of the trophy size trout that we see each year spawn in November and early December. Browns are notorious for becoming more aggressive prior to the spawn.
The aggressive nature of browns in the fall combined with the fact that they are on the move running up river and sometimes into tributaries can produce some heart stopping action for lucky and persistent anglers. Late fall fishing isn’t just about targeting huge trout, there can also be some great dry fly fishing over the baetis hatch. For most of our guides, however, we get caught up in chasing really big fish in the autumn months. Hunting huge browns in the fall isn’t for everyone and if you are going to play the game there are a few important guidelines worth considering.
Dress for Success October and November in the Northern Rockies can be notoriously unpredictable. Days can be warm and sunny or the snow can be blowing sideways. Make sure you prepare for any kind of weather from hot and sunny to cold and wet. If you are travelling all the way to Montana to chase big October browns you don’t want to be shut out just because some bad weather blows in. Although October and November are dry months, there will always be some early winter storms that move through and these often produce great conditions for browns that love low light conditions. I still wear gore tex waders but I also have long underwear and fleece pants to layer underneath as well as plenty of layers on top. Don’t forget the gloves and winter hat either.
Arrive at Peak Times Although big browns begin moving in late September, the best fall run fishing isn’t until after the middle of October and sometimes as late as mid November. The peak fishing on the Madison run above Hebgen in Yellowstone is usually the third week of October while monster browns on the Missouri usually don’t start showing up until November.
Throw Giant Streamers Most anglers know that big browns are predators and that fishing streamers is a great way to target them. If you are going to throw streamers in the fall don’t underestimate how big of a fly a huge brown will eat. I have seen big browns regularly eat relatively big trout in the 15” range – they often can’t swallow them all at once and spend a day with a big tail sticking out of their mouth. If you want to move fish over 24” make sure you are stripping the biggest streamers that you can find. I usually have to tie my own tandem hook streamers that are around 10” long. These massive flies are best fished on a seven or eight weight. They won’t put you into many small trout but if you throw them long enough you are sure to see some huge fish at some point.
Try Egg Patterns Whitefish, brown trout and brook trout are all fall spawners which means there are a lot of eggs bouncing around the rivers in October and November. Although huge browns tend to prefer a big meal, eggs are so packed with nutrients that even the largest browns will still eat them. There are days when fishing egg patterns under an indicator will outfish every other method for big browns.
Target Spawning Runs Although any large river that holds big browns can produce a monster in the fall, targeting fisheries that receive a spawning run of browns from a lake or larger river downstream is a good option in late October and November. Most of these fall run fisheries are no secret. Expect to see some other anglers if you are chasing browns on these fisheries that include the Madison in Yellowstone Park, The Lewis Channel in Yellowstone and the Missouri between the lakes. There are other locations that aren’t as well known that also produce a great run of fall browns if you do some legwork and experimenting. Even on the famous fall run fisheries like the Madison in the park there is always plenty of room and on a weekday with a bit of fall weather you will often see very few other anglers. November fishing is also extremely productive and the fishing pressure dramatically drops off with very few visiting anglers in the state and most of the locals out hunting.