We will be looking at rifle cartridges that have a velocity of over 3,500 feet per second. There are not many of these out there. That’s because rifle cartridges aren’t the most effective mechanisms for creating high projectile speed.
If you really want to see fast projectile speed, there are a few examples. A depleted-uranium penetrator rod fired from a 120mm smoothbore main gun on the M-1 Abrams tank can go as fast as 6,000 fps. Then there’s the Navy’s Rail Gun, which uses electric current to accelerate projectiles up to 8,000 fps.
Keep in mind that velocity also produces a lot of recoils and also puts a strain on the projectile itself. There needs to be a balance between the force behind the shot to the durability of the brass cartridge as well as your shoulders. Then, there’s also the barrel durability to consider. If your ordinary rifle cartridge goes up to 8,000 fps, then it would either break apart the moment it leaves the barrel, breaks the barrel, or dislocates your shoulders from the recoil.
With that in mind, it’s already a significant achievement for rifle cartridges to breach that goes faster than 3,500 or even 4,000 feet per second while still being safe for the shooter. We’ve pretty much achieved peak velocity in 1935 when the .220 Swift reached 4,110 fps with a 48-grain bullet.
Nowadays, you can get a Swift that can top 4,300 fps without blowing itself up. Other than that, only a few cartridges can go up to 4,500 fps. To this day, no rifle cartridges managed to breach 5,000 fps. I suspect that it wouldn’t happen unless we’ve developed new bullet or gunpowder technology, or that we use something else other than gunpowder and bullets.
Consider subscribing to our channel if you haven’t already for more content like this. Without further ado, let’s get into it.
Winchester came up with the .220 Swift by trimming down the neck of the 6mm Lee Navy. Not many people know of this cartridge since it only served briefly in the U.S. Navy and Marine Corps with its straight-pull M 1895 rifle. Neither the gun nor its cartridge found success and they were ditched in favor of the .30/40 Krag-Jorgensen, which u nfortunately did not remain in service for long either.
The case is definitely large for a .22 centerfire and it is also semi-rimmed. To produce the Swift, Winchester had to design bullets that can withstand extreme speed, which is harder than you may think. I’ve seen the lead cores of some Swifts melting into liquid moments before hitting the target. Sometimes, the bullets would vaporize soon after leaving the barrel. That’s the kind of stress bullets are subjected to at such extreme speeds.
In addition, the speed also causes significant wear on the barrel itself. To fix this problem, Winchester turned to stainless, but then found out that it’s not possible to blue stainless steel. So they opted to iron-plate the tubes first, then blue them.
Unfortunately, the Swift was not well-received. You can thank certain gun writers for that since they labeled it as unnatural, creepy, and even dangerous. They went on to talk nonsense about it. Despite the tarnished reputation by the media, the Swift managed to survive for the simple fact that it is very accurate, fun to shoot, and does not have any more problems than other cartridges.
A 50-grain bullet can reach 3,900 fps. A 40-grain might be able to reach 4,300. If you want to down a big game in a shot without feeling much in the way of recoil, I believe 60-70-grain bullets will suffice.
2. The .257 Weatherby Magnum
This cartridge is also an ancient round, similar to the Swift. Despite its age, it has been holding up pretty well. It was designed by Roy Weatherby in 1944 and was put up for sale just a year later. Among the entire line from Roy, this one is his favorite. When people called upon to cite the virtues of hypervelocity, Roy pointed to this cartridge.
The .257 Weatherby Magnum is based on the H&H Super 30 and it is normal for all Weatherby Magnums to have very little body taper, a sharp and radiused shoulder, and plenty of powder capacity. This cartridge definitely packs a punch. Back then, Weatherby rifles used to have 24-inch barrels and with 87-grain Hornady bullets, you can expect the velocity around 3,750 fps.
If you’re thinking that this is too much for varmints, then you would be right. This would pulverize small critters. So, the .257 is best used on big game at long range where this cartridge excels. I have the best experience using 115- and 120-grain Nosler Partitions, which have a velocity in the neighborhood of 3,400 fps. Despite the velocity, the recoil is surprisingly light, especially when you think how much powder is in there. That said, the noise would be severe and the barrel life would be quite short.
3. The .30/378 Weatherby
So far, I’ve been discussing cartridges that fire only light bullets. This one deals in slugs that are 180-200 grains or more. The start of its career is quite strange as well. It all started in 1959 when the Army asked Roy Weatherby to put together a single rifle/cartridge combination so they could test the effect of hyper-velocity metal fragments on armor to mimic exploded artillery rounds.
Weatherby came up with a smoothbore rifle and he necked down his .378 round to .30 caliber. With these, he managed to achieve 5,000 fps. Of course, words of this terrifying firepower got out and the .30/378 immediately became popular. In 1996, Weatherby made it a production cartridge and it is one of his most popular rounds to date. He loads a wide variety of ammo for it. The 165-grain Barnes copper bullet can reach the velocity of 3,450 fps and the 220-grain Hornady ELD-X could reach up to 3,050 fps.
Of course, this amount of firepower is only suitable for the big game at extreme distances. Prudent hunters would choose to go with the heaviest slug possible since it would retain the most velocity over the distance. Weatherby puts a 26-inch barrel to its rifles in this caliber, so you can’t go any shorter than that. Also, you must use a brake.
Also, only use this cartridge when your target is at least 400 yards away. The further the better. Any closer than that and the damage would be horrendous. Ear protection is a must, even when hunting. The barrel life is also short, with some shooters reporting that theirs lasted as little as 600 rounds.
4. The .224 Clark
If you look at pure performance, this cartridge shouldn’t be on this list since its velocity is only 3,550 fps. However, I feel it wouldn’t do it justice considering that the Clark was designed in the early 60s. It managed to achieve that velocity with 80-grain bullets, so this is a cartridge that is at least five decades ahead of modern long-range loads such as the .224 Valkyrie. The Valkyrie achieved the same speed with 90-grainers.
The .224 Clark was the masterpiece made by a gunsmith named Kenneth Clark from Moderna, California. He figured out that initial velocity isn’t everything, but rather the retained speed downrange. He knew this half a century before everyone else. So now, you have .223 shooters who are required to use 77-grain bullets for mid-range targets at around 600 yards.
Clark then selected the .257 Roberts case, blew it out, and gave it a 30-degree shoulder. He then designed his own 80- and 82-grain bullets. The best rate of twist was 1-9, which is incredibly fast. Understandably, this puts a lot of stress on the slugs. To fix this problem, Clark built them strong and came up with a double jacket for heavier slugs, because he knew that people would use this for the big game.
The .224 Clark worked well, but it never became that popular and it eats through barrels quickly as well. Nonetheless, it is definitely a cartridge that is way ahead of its time and is worth mentioning in this list.
5. The .22 Eargesplitten Loudenboomer
If you want to go hard, then this is the best option for you. The .22 EL was created in the 1960s by a gunsmith named P.O. Ackley. His goal was to create a cartridge that can achieve 5,000 fps. It was the apocalyptic .378 Weatherby Magnum necked down to .224, with pretty much no other changes made.
Then, Ackley shipped the .22 EL rifle off to Bob Hutton who operated Hutton’s Rifle Range in Topanga, California. He did all the rifle testing for Guns & Ammo magazine in the 60s. Bob’s range was located in a box canyon, so he could make as much noise as he wanted. He would definitely be called in for questioning nowadays if someone hears the ruckus he was causing. With 50-grain bullets, Bob managed to hit 4,600 fps, but could not quite breach that 5,000 fps barrier. It is possible that we could make it using ultra-slow powders today.
When entering the world of fly fishing, there are certain aspects of it that become overwhelming. Learning the rod weights and correlating numbers takes time. Having a full understanding of these numbers will help you fish your waters in a much more efficient way. It took me several months to understand what weight rod I needed and when I needed it, but the extra research has paid off in the long run.
The list of numbers include weight, length, number of sections, action as well as the necessary size of the fly line. The higher the number, the larger the flies and line and the smaller the number, the smaller the flies and line.
Numbers on a Fly Rod
Which Fly Rod Weight Should I Get?
Choosing the proper weight of a fly rod is going to allow you to better target the fish and do so in an efficient way. You can make the proper distanced casts and have enough power to fight fish.
2-3 Weight Fly Rods
These fly rods are a blast to use. They’re a bit limited in where they can be fished, but they create wonderful experiences. 2-3 weight rods are ideal for casting delicate flies at small trout in skinny water. At some points, you’re reaching out with the fly, dropping it a bit upstream and letting it drift down in front of the fish.
Learn 👉 How to fly fish for brook trout
If you know you’re going to spend time on skinny water, do yourself a favor and pick up a finesse rod and enjoy all that it has to offer. They’ll allow you to really test your skills with presentation and casting.
You’re not going to throw 40-foot casts with these rods. Your max distance is going to be around 25 or 30 feet.
4-6 Weight Fly Rods
The 4-6 weight rods are the most common rods in a trout angler’s arsenal. These are perfect for small to large rivers. If you’re fishing out west in Montana, a 5 or 6-weight rod is perfect. You can get enough power to cast, but still delicately present flies if needed.
Casting a 9 foot 5 Weight Fly Rod
Many anglers choose to purchase a 4 to 6-weight rod for their first rig. It’s versatile and will fight the majority of freshwater fish that you find. If you know you’re interested in getting into the sport, but are unsure of what rod, then go with the 4-6 weight. You can throw streamers, dries and nymphs without having to worry about switching rods.
Guide Tip: I absolutely love 4 weight fly rods. Read what to use them for in this article 👉 What is a 4 Weight Fly Rod Good For
You’ll be able to throw 50 to 60-foot casts on a good day with some quality fly line. These rods are great to fish in rivers as well as still water. The versatility is ideal.
7-8 Weight Fly Rods
Your 7-8 weight fly rods are ideal for those larger freshwater fish as well as some saltwater fish. If you’re on your way to Alaska or Canada, a 7 or 8-weight will help in your attempts to catch steelhead. Also, these are great rods for pike, bass and muskie! Some would consider these to be a bit light, but depending on where you are, they’ll work just fine.
You can throw large streamers and poppers with these rods. They’re not great for finesse fishing due to the extra power that you receive with them. If you’re fishing flats or after other smaller saltwater fish, then the 7 or 8-weight would work well.
You can easily get 60 to-70-foot casts through strong current as well as larger lakes. At times, the extra power is necessary to help you get to the fish as well as fight them. While this is a bit more of a specialty rod, if you know you’re primarily after big fish, it’s well worth the investment.
Guide Pro Tip: Do you want a “general purpose fly rod” read this article for my recommendation 👉 What is the Best All Around Fly Rod
9-10 Weight Rods
Most anglers would say a 9 or 10-weight is perfect if you’re targeting salmon, striped bass, snook as well as other saltwater fish. You’ll see spey rods come in this weight as well! Again, they’re a specialty rod, but if you live in an area with these large fish or often travel to remote areas with large fish, then a 9 or 10-weight would work for you.
King Salmon Fly Fishing
You can make extremely long casts with these rods and fight double digit fish with no problem! Streamers are going to be the primary flies you throw with a 9 or 10-weight rod. Get after those big fish and put it to the test. You won’t regret it! There are few things that are more fun than a salmon on a 9-weight rod. You have to give it your all.
10 and Higher
Any rod over a 10-weight is created to be used in saltwater. Targeting tarpon, Giant Trevally, Sailfish and other large saltwater fish is going to require as much power as you can muster. Saltwater fish fight much harder than freshwater fish and will fight to their death. You need to be prepared to throw a heavy fly, heavy leader and fight monstrous fish.
Saltwater fly fishing excursions are wonderful. If you’ve never tried it, give yourself an opportunity to do so. Hiring a guide will help you learn a lifetime of useful information. These rods tend to be a bit more expensive due to their specific use, but if saltwater is your primary water, then it’s well worth the investment.
Fly Rod Selection Chart
To help fellow fly flingers choose a rod, I’ve put together a chart and a download – FREE. Look it over and download a copy to your phone.
Fly Rod WeightWhat Kind of Fish
Click on the below picture to get the a 3 page download that talks all about fly rod definitions. The best part – It’s FREE
Fly Rod Action
After you have chosen the necessary weight of your rod, the next step is choosing the proper action. The right action is heavily dependent on your experience, skill level and the type of fishing you’re doing.
Fast Action
A fast action rod is great for experienced and strong casters. They have the least amount of flex of any action and that allows for a strong fight as well as power to cast through the wind. In order to succeed with this rod, your technique and timing needs to be in line.
Medium-Fast Action
A medium or moderate fast action is quite versatile. You’ll find many 4 to 6-weight rods are moderate-fast action. You can throw dries, nymphs and streamers with ease. You’ll find that these rods have a bit more bend in the blank and not quite as much power.
You won’t be able to cut through the wind as well as you would with a fast action rod, but it does the job. If you’re new to the world of fly fishing, go ahead and give a moderate or medium-fast action a try. Bringing one rod to the river is much easier than several! Many expert anglers still use a moderate-fast action rod because of the sensitivity it provides.
Medium Action
A medium action rod is a solid choice for new fly anglers. It’s even more forgiving than a moderate-fast action rod, but it’s not nearly as powerful. You have to be careful with the size of fish you target when using a medium-action rod. Since it has a bit more bend, you won’t have the power to fight a larger fish.
Many affordable rod options are made with a medium action. You’ll find lighter weight rods with this action because you can nicely lay down small dry flies with the more rod bend. You’ll see about half of the rod bending as you cast.
Slow Action
Many classic fly rods are slow action. They’re a perfect option for the anglers looking to fish small streams and gently lay down small dry flies. Nearly the entire rod bends as you cast. If you’re new to fly fishing and are spending time on small streams, a slow action rod is a great choice.
The rod won’t make you feel as if you’re losing control of your line as you cast. Beware of using a slow action rod in windy conditions! It’s not ideal and you won’t make much progress if you’re looking to make casts over 20 feet.
Fly Rod Length
Fly rods often vary in length, but there are a few standard lengths that you must have. Try to equate the length of the rod to the control you’ll have over the fly line. Often being able to reach out just a bit farther can make the difference.
large open loop fly casting
9-Foot Rods
9-foot fly rods are common in 5 and 6-weights. These are long enough for you to throw dry flies, but also launch streamers quite a distance. A 5’ 9-weight rod is a great versatile option that you can use in almost any scenario that you would like.
8’ 6” Rod
8’ 6” rods are also another common length for 5 and 6-weights. They aren’t going to present dries as nicely, but they can work well with streamers and nymphs. The 8’ 6” length is the most versatile length that you’ll find on the market.
Rods Less than 8 Feet
Rods shorter than 8 feet are best used on small rivers and streams. They allow you to cast in tighter areas and do so accurately. If you know that you’ll be spending the majority of your time in skinny water, then a rod under 8-feet is going to be your best friend. Depending on your skill level, you can choose a different action.
Rods Longer than 9 Feet
Rods longer than 9 feet are often used for euro nymphing. These are ultra-finesse rigs and excel in tight conditions. Longer rods can be a challenge to cast and will get tangled in trees on the banks. However, they allow for a longer reach onto the water and extremely realistic fly presentations.
Number of Sections in a Fly Rod and Why
Most fly rods are either two or four pieces. When fly rods were first created, they were made in two pieces. As technology has developed, they are made primarily in four pieces.
As far as travel is concerned, a four-piece rod is ideal. You don’t have to pay to check your four-piece travel rod tube. If you travel with a two-piece rod, you’ll find that the majority of airlines are going to make you pay for it.
7-Piece Fly Rod, Great for traveling
You’ll even find fly rods that break down to seven pieces. These will fit on a personal item in your backpack! If you can’t take much on the plane, but still want to fish, then the 7-piece rod is perfect.
What’s a Great All-Around Fly Rod?
A great all-around fly rod is an 8’6” 5-weight fly rod. You can use these on small rivers, lakes as well as large rivers. If you choose a rod with this weight and length, make sure you have a moderate-action.
This provides you with the sensitivity to lay down dry flies, but still gives you enough length to make those longer casts with streamers. An 8’6” 5-weight fly rod is one that you can always use no matter where you’re fishing. It’s not a bad idea to own a couple of these rods depending on how much fishing you do.
Fly Rod Selection Guide
What Does a 5/6 Weight Mean?
A 5/6 weight rod is not uncommon to see. Essentially this means that the rod can hold both 5 and 6-weight line. If you do purchase one of these rods, it’s best if you go with a 6-weight line. It’ll give you a bit extra weight so you can make longer casts and get a true feel for the fly rod.
Do You Need More Than One Fly Rod?
The answer to this question depends on how much fly fishing you do. If you fly fish in large rivers, small streams and lakes, you’re going to want more than one fly rod. You won’t be able to fish all of these waters well with only one rod.
However, if you fish similar sized water and fish all the time, one fly rod will work great for you. If you’re like most fly anglers, you’ll quickly fall into the addiction of buying new fly rods.
Last Cast with the Perfect Weight Fly Rod
For beginners, choosing the right size rod can be intimidating. The numbers are confusing at first, but with a bit of research they all begin to make sense. If you match the rod, reel and line numbers, you should be in good shape. An improperly weighted rod is frustrating to use so make sure you put in the time to create a well-balanced setup.
Holosun HS507K-X2 – Best budget alternative of trijicon
Holosun 507C X2 – Best for tactical shooting
Holosun EPS Carry – Best compact red dot
Shield RMSc – Best for durability
Swampfox Sentinel – Best for wide viewing window
SIG Romeo Zero Elite – Best value for money
Hex Wasp – Best user-friendly
1. Trijicon RMRcc – Best for custom-milled slides
A game-changing red dot sight specifically designed for concealed carry that’s durable, versatile, and easy to use.
Designed for Concealed Carry: One of the standout features of the Trijicon RMRcc is its design geared towards concealed carry. This thing is slim, I mean, really slim. It nestles beautifully on my Glock 43X MOS, creating an almost seamless look.
If you’re someone who values discretion and a low-profile carry, then this is your red dot. It’s got a design that ensures reduced risk of snags during your draw.
Outstanding Durability: Let’s talk about this sight’s ruggedness. The patented housing shape diverts the force of any impact away from the lens. That makes this little piece of hardware incredibly resilient.
During my field tests, I went through the usual bumps and knocks, and guess what? Not a single crack or distortion in the lens. The quality is military-grade; it’s constructed to withstand harsh conditions without losing zero.
Complete User-Control Illumination Settings: This red dot sight gives you ultimate control over brightness settings.
With eight different modes, you can easily adjust to your environment. What does that mean practically? Well, you’ve got two night vision modes for twilight or nighttime shooting.
And when you’re out in broad daylight, the super bright mode ensures the dot is visible and crisp. The flexibility allows you to tailor the sight according to your needs, whether you’re indoors or outdoors.
Easily Adjustable Windage/Elevation: Do you know how some sights need a special adjustment tool? Not this one.
With 3 MOA per tick, making windage and elevation adjustments is a cinch. The knobs are easy to maneuver, even with gloved hands.
This becomes super handy in dynamic shooting scenarios where quick adjustments are essential. You’ll have your sight zeroed in no time, and it holds that zero exceptionally well.
Crisp 3.25 MOA Dot: The 3.25 MOA dot is another remarkable feature. It’s the ideal size for both-eyes-open shooting, which is fantastic for situational awareness.
The dot is crystal-clear, and the quality of the lens enhances the visibility, even under extreme lighting conditions. I found this particularly helpful when I had to switch targets rapidly.
Why I Love It: What’s not to love? The RMRcc blends flawlessly with my Glock 43X MOS, it’s robust, versatile, and incredibly easy to use. It’s like the sight was made for this gun.
My Experience
I felt an immediate difference When I mounted this on my Glock. The sight was easy to attach and felt like an integral part of the firearm.
The drawing was smooth, and the targeting was accurate, improving my shooting experience significantly.
Pros
Slim and compact design
High durability
Flexible illumination settings
Easy windage/elevation adjustments
Crisp 3.25 MOA dot
Cons
Bottom battery access can be tricky
Slightly on the expensive side
2. Holosun HS507K-X2 – Best budget alternative of trijicon
A high-performance open reflex sight with a compact profile designed to fit perfectly on subcompact firearms like the Glock 43X MOS.
Red Super LED: The Holosun 507K X2’s Red Super LED is a game-changer. When you’re zeroing in on a target, the crispness and clarity of the dot can make a significant difference in your accuracy.
The LED technology used here offers a fine, well-defined 2 MOA red dot that doesn’t blur or distort, even under rapid movement or recoil.
What really steals the show is the whopping 50,000-hour battery life, which is a godsend for those extended field trips. No worries about the sight dying on you midway through your shooting session.
Multi-Reticle System (MRS): One size doesn’t fit all, and that’s especially true when it comes to reticles. The Multi-Reticle System (MRS) on this sight gives you the best of both worlds.
You get a fast sight picture for those quick reflex shots, thanks to the larger 32 MOA circle. Meanwhile, the inner 2 MOA dot offers the precision required for longer distances.
The genius is in its flexibility; the reticle system allows you to switch between these options seamlessly.
Shake Awake Technology: You know how frustrating it is when you forget to turn off the sight and come back to a dead battery? Shake Awake Technology solves that. The LED deactivates when it senses a lack of movement, extending the battery life.
The moment you pick up your Glock 43X MOS, the sight immediately springs back to life. The timeout settings are customizable, providing further convenience for every type of shooter out there.
Easy Battery Access with Side Tray: Fumbling with screws and mounts just to change a battery can sour the shooting experience.
The Holosun 507K X2 comes with a side-mounted battery tray, making the whole ordeal as easy as sliding out the old CR1632 battery and slotting in a new one.
There is no need to disassemble your setup, saving you time and preserving your zero.
Durable Housing: Durability often gets sacrificed for the sake of compactness in many optics. Not in this case. The 7075 T6 Aluminum housing is the same grade of material used in aerospace engineering.
This material provides an excellent balance of strength to weight, ensuring that your sight won’t fall apart or get damaged even under challenging conditions.
Why I love it: The Holosun 507K X2 is a fantastic little package that brings together thoughtful design with robust performance. It’s everything you’d want in a compact red dot sight.
My Experience
After field-testing this sight on my Glock, I can honestly say it enhances the whole shooting experience.
The reticle options are versatile enough for any shooting scenario, the Shake Awake feature is a nice touch for battery conservation, and the durability ensures that it’s a long-term investment.
Pros
Exceptional battery life due to high-performance LED and Shake Awake technology
Customizable reticle options via the Multi-Reticle System
Side tray for convenient battery replacement
Built from tough 7075 T6 Aluminum
Fits the Glock 43X MOS perfectly without overhanging the slide
Cons
Battery access, although improved by the side tray, could be further enhanced if it were not on the bottom.
See detailed Review of HOLOSUN HS507K.
3. Holosun 507C X2 – Best for tactical shooting
An open reflex sight with high performance, durability, and versatile features designed for tactical shooting.
Green Super LED: When it comes to sights, the LED quality is the real backbone. Holosun 507C X2 nails it with its Green Super LED.
This isn’t just a brighter dot; it’s an element that affects everything from battery life to how well you can acquire your target. The LED has a stunning 50,000-hour battery life. So, yes, you can pretty much forget about running out of juice anytime soon.
But why Green LED, you ask? Green is easier to see in more lighting conditions than red, making it an excellent choice for both daytime and nighttime use.
Multi-Reticle System (MRS): Alright, let’s talk versatility. The Multi-Reticle System (MRS) is truly one of the most fantastic features. It offers a 2 MOA dot and a 32 MOA circle, and you can switch between these two easily.
It’s like having multiple sights in one. In tactical shooting, your needs can change within seconds. Sometimes, you’re going for precision; other times, speed is the name of the game.
With the MRS, I was able to get quick target acquisition when I needed to fire rapidly, thanks to the larger circle.
When I needed pinpoint accuracy, the 2 MOA dot was perfect. Plus, the green color shines in both reticle options, making it easier to engage targets at any distance.
Solar Failsafe: Even if your battery does run out, which, let’s face it, is unlikely, the sight comes with Solar Failsafe. This feature is a lifesaver. It draws power from any available light source, natural or artificial.
The Solar Failsafe kicks in automatically in Auto Mode and adjusts the reticle’s brightness according to the light conditions. When I was out shooting in broad daylight, the reticle was crisp and bright.
When clouds rolled in, it dimmed down to optimal visibility. This feature reassures you that your sight will always be operational, no matter what the circumstances are.
Durability & Housing: Don’t let the sight’s lightweight design fool you; this thing is tough. Built from 7075 T6 Aluminum, the same stuff used in aerospace, it can withstand the rough and tumble of tactical shooting.
I’ve put this sight through the wringer, and it’s come out unscathed every time. From rainy days to dusty conditions, it’s lived up to the test. The anodized finish further protects against corrosion and abrasion.
Given its resilience, you won’t hesitate to take it with you in any field conditions.
Battery Accessibility: Many sights make the simple task of changing a battery an ordeal. But the Holosun 507C X2 has a side-mounted tray that houses the CR1632 battery.
It was incredibly straightforward to swap out the battery without dismantling the whole sight. The tray is secured tightly but is easy to open when needed, even in the field.
This feature is a game-changer, keeping you focused on shooting rather than fumbling with small screws and possibly losing your zero.
Why I love it: I love this sight for its innovation, reliability, and versatility. The Green Super LED, MRS, and Solar Failsafe features work together harmoniously, making the Holosun 507C X2 a robust choice for tactical shooting.
My Experience
This sight has genuinely revolutionized how I engage targets, be it during practice or in more adrenaline-pumping situations.
The easy battery replacement, combined with the Shake Awake Technology and Solar Failsafe, means I’ve never had to worry about my sight failing me. Plus, its sturdy build can withstand anything I throw at it.
Pros
Exceptional Green Super LED technology
Versatile Multi-Reticle System
Shake Awake Technology for extended battery life
Solar Failsafe for a continuous power supply
7075 T6 Aluminum for robust durability
Convenient battery accessibility
Cons
Slightly wider profile compared to the Glock 43X MOS slide
4. Holosun EPS Carry – Best compact red dot
A rugged, fully weatherproof sight designed for optimal performance on the Glock 43X MOS.
Closed Emitter: The closed emitter is the first feature that grabs your attention. You’re looking at a sight that’s fully weatherproof against dirt, water, and other debris.
That means you can take your Glock 43X MOS through rain, mud, or even desert storms, and your sight will come out unscathed. For practical applications like concealed carry or duty use, this is a huge plus.
You can’t predict the weather, but with a closed emitter, you don’t have to worry about it either.
Side Battery Access: The side battery access is another practical feature that spares you the headache of sight removal during battery replacement.
The convenience can’t be overstated; swap out the battery without losing your zero. For those of us who’ve been through the hassle of re-zeroing, this is a significant time-saver and stress-reducer.
Six Reticle Systems: The Holosun EPS Carry offers six reticle systems: 2 MOA, 6 MOA, and a multi-reticle system with a 32 MOA ring.
The versatility here is immense. Whether you’re shooting up close or at a distance, you can toggle through the reticle options and find what’s most comfortable for your shooting style.
No Lens Distortion: The sight boasts a refined glass window that eliminates edge distortion. This is particularly helpful during dynamic shooting, where you need to make quick target transitions.
Your sight picture remains crisp and clear, which is precisely what you need in those high-stress scenarios.
Rugged Construction: Made of 7075 T6 aluminum and IPX8 rated, this sight is built like a tank. Drop it, bump it, or even submerge it, and it’ll keep ticking.
For a daily carry or duty weapon, this durability is more than just a selling point; it’s a necessity.
Battery Life: The sight uses a 1620 battery, providing an incredible 50,000-hour battery life. That translates to less time worrying about a dimming sight and more time focusing on your target.
Why I Love It: It’s the small things that make the Holosun EPS Carry exceptional. From the closed emitter to the side battery access, each feature is designed with the end-user in mind. Practical, rugged, and efficient, it’s everything you’d want in a sight.
My Experience
Mounting it was straightforward, thanks to the compatibility with the RMSc plate. During range time, the sight was reliable, offering crisp reticles and holding its zero exceptionally well.
Switching between reticle systems felt intuitive, and I particularly enjoyed the absence of lens distortion.
Pros
Extremely durable and fully weatherproof
Convenient side battery access
Versatile reticle options
No lens distortion
Long battery life
Cons
Requires a turret tool for MOA adjustments
5. Shield RMSc – Best for durability
A compact red dot sight that perfectly complements the Glock 43X MOS with its strength and
adaptability.
Aircraft Aluminum Construction: This sight is made of aircraft aluminum, giving it a robustness you can count on. It might not be as rugged as some other options, but it’s more than durable enough for everyday concealed carry.
Those distinctive support rails on both sides? They aren’t just for looks; they add essential rigidity and strength to the optic.
LED 4 MOA Dot: The 4 MOA dot is an excellent feature, offering just the right balance between visibility and precision. For me, a 4 MOA dot is the sweet spot; it’s large enough to acquire quickly but small enough to allow for accurate shots at a distance.
Glass & Parallax-Free 1X Lens: You can choose between a polymer and a glass lens, depending on what you’re looking for.
The glass lens option provides a clear and crisp sight picture, and it’s parallax-free at 1X magnification, allowing for more accurate aiming.
Auto-Adjusting Brightness: Being a ‘permanently on’ optic, the RMSc automatically adjusts to ambient lighting conditions.
Whether you’re in broad daylight or a dimly lit room, the sight adapts so you don’t have to fiddle around with manual settings.
Why I Love It: The Shield RMSc checks a lot of boxes for me. It’s compact, durable, and features an auto-adjusting reticle that’s a real timesaver. Plus, the 4 MOA dot is just right for my needs.
My Experience
Installation was a breeze, fitting perfectly on my Glock 43X MOS. During my range sessions, the sight held its own, offering a consistently clear sight picture.
The auto-adjusting brightness was spot-on, and I found the 4 MOA dot to be exceptionally user-friendly.
Pros
Durable aircraft aluminum construction
Auto-adjusting brightness
Clear, parallax-free lens
Seamless fit with Glock 43X MOS
Versatile 4 MOA dot
Cons
Not as rugged as some other options
6. Swampfox Sentinel – Best for wide viewing window
Compact yet powerful, Swampfox Sentinel fits like a glove on your Glock 43X MOS.
Auto Brightness Model: The Swampfox Sentinel really shines, no pun intended, with its auto-brightness feature. Located on the left side of the body, a photosensitive sensor adjusts the brightness of the dot relative to ambient light conditions.
In practical terms, you don’t have to fiddle with buttons when transitioning from bright sunlight to low-light environments. It’s like having a sight with intuition; it knows just how bright to be when you need it the most.
Compact Unobstructive Fit: Compact might as well be this sight’s middle name. With a 16mm x 16mm window, this sight offers a field of view that is just the right size: large enough for quick target acquisition but small enough not to mess with concealment.
It’s like a perfect compromise between visibility and portability, a feature you’ll truly appreciate when you’re in action.
Duty Grade: If you’re worried about durability, don’t be. This thing is made from 7075 aluminum that’s hard-coat oxidized.
You could literally drop this from shoulder height or use it in the rain, and it’ll still perform like nothing happened.
Double the Life: Battery life is often the Achilles heel of electronic gadgets. Not here. The CR2032 battery gives you about two years of real-world battery life.
Yep, you read that right: two years. It’s a low-maintenance relationship that you and your Glock will certainly appreciate.
Large Field of View: While the compact design gives you an unobtrusive fit, the large field of view ensures that you can acquire your target with ease.
Unlike other red dot sights where you might struggle to find your target, here, it almost feels like the sight does half the work for you.
Manual and Automatic Brightness: Flexibility is key, and this sight offers both manual and automatic brightness settings.
Whether you’re someone who prefers to set and forget or someone who likes to have control, there’s an option here for you.
Why I love it: Why do I love the Swampfox Sentinel? It’s simple, really. This sight offers a robust set of features without complicating the shooting experience.
It’s like having a personal assistant that knows exactly what you need and delivers without being asked.
My Experience
Let me tell you, this sight didn’t disappoint. From the moment I installed it, everything just clicked. Quick target acquisition, robust construction, and the battery life, oh the battery life! Two years without a change is a game-changer.
Pros
High-quality 7075-T6 aluminum construction
Intuitive auto-brightness setting
Long-lasting CR2032 battery
Large field of view
Manual and auto brightness options
Perfect fit for Glock 43X MOS
Cons
Battery replacement can be a tad annoying due to small screws
7. SIG Romeo Zero Elite – Best value for money
A budget-friendly sight with top-notch features, optimized for Glock 43X MOS.
Scratch-Resistant Glass Aspherical Lens: Alright, let’s dive into the good stuff! The Romeo Zero Elite comes equipped with a scratch-resistant glass aspherical lens.
What this means for you is a crystal-clear view and, more importantly, a distortion-free sight picture. The lens is made of high-quality glass that maintains its clarity over time, so you don’t have to worry about minor scuffs or scratches affecting your accuracy.
Durable Carbon-Infused Polymer Housing: Durability is a huge plus for this sight. It comes encased in a carbon-infused polymer housing with a reinforced lens area.
So, if you’re someone who’s a little rough on their gear, this sight has got you covered. As a bonus, it even comes with a hardened steel protective shroud, providing an extra layer of protection.
Visibility and Anti-Reflection: Visibility? Check. The rear surfaces of the housing include anti-reflection grooves, and there’s a backup rear sight notch marked with Grade A Swiss SuperLuminova pigment.
You’ll appreciate this feature when you find yourself in low-light environments. With the 8 illumination settings, you can adjust the brightness according to the situation you’re in.
Touch-Activated Programming: Let’s not overlook the T.A.P technology. A simple tap on the optic allows you to change brightness and reticle options.
No more fiddling with hard-to-reach buttons, folks! It’s user-friendly and super convenient.
Why I Love It: So, why do I love this sight? It’s simple: great features at an affordable price point. As someone who enjoys both casual shooting and competition, the Romeo Zero Elite delivers exactly what I need without breaking the bank.
My Experience
The sight fits perfectly on my Glock 43X MOS and performs exceptionally well in the field. Its quick target acquisition has helped me improve my accuracy noticeably.
The T.A.P feature makes it really easy to adjust settings on the fly, which has been a game-changer for me.
Pros
Excellent visibility features for low-light conditions
Long battery life
User-friendly Touch-Activated Programming
Lightweight and compact, ideal for Glock 43X MOS
Cons
Not as durable as some other pricier options
8. Hex Wasp – Best user-friendly
A versatile and rugged red dot sight, perfect for Glock 43X MOS users who favor ease-of-use and automatic adjustments.
6061-T6 Aluminum Housing with Anodized Finish: First off, let’s talk about build quality. The Hex Wasp is made from 6061-T6 Aluminum and features an anodized finish.
That combination gives you a robust, long-lasting sight that can withstand moisture and the elements. Being out in the field, I found it to hold up quite well under various weather conditions. No rust, no degradation, and certainly no feeling that it’s going to let me down when I need it the most.
Clarity and Lens Quality: Nothing’s worse than a blurry or hazy sight picture, right? Fortunately, the Hex Wasp comes with a crystal-clear lens that allows for a vivid view.
This has been particularly useful for me during fast target acquisition. The sharp image ensures you don’t miss your mark, and I found it made a world of difference when switching between targets.
Automatic Brightness Adjustment: Now, I know some folks prefer manual adjustments for reticle brightness, but hear me out. The Hex Wasp’s automatic brightness adjustment is actually pretty slick. I’ve found it to be accurate and quick in adapting to changing light conditions.
Whether I was in broad daylight or in a dimly lit environment, the sight adjusted itself flawlessly. It’s a great hands-off feature for those who like to focus on the shot.
3.5 MOA Dot Reticle: The 3.5 MOA dot is what I consider to be the “Goldilocks” of reticle sizes; it’s just right. It’s large enough to easily find but not so large that it obscures the target.
I found this size to be especially useful for mid-range shots where pinpoint accuracy is needed.
Long Battery Life: Battery life is a crucial aspect of any electronic sight. The Hex Wasp offers around 2 years of battery life, which is pretty fantastic.
I haven’t had to worry about my sight going dark in the middle of a shooting session, and that peace of mind is invaluable.
Why I Love It: So why do I find the Hex Wasp to be a keeper? Its exceptional build quality and user-friendly features make it an all-around reliable option.
And I can’t stress enough how helpful the automatic brightness adjustment has been for me.
My Experience
I’ve put the Hex Wasp through its paces on my Glock 43X MOS, and let me tell you, it’s been a great ride. From the easy installation to the reliable performance, it’s been everything I wanted in a sight.
Pros
Rugged 6061-T6 Aluminum construction with an anodized finish
Crystal-clear lens for exceptional clarity
Automatic brightness adjustment works well in various lighting conditions
Long-lasting battery life
Versatile 3.5 MOA red dot reticle
Cons
Placement on the gun can be finicky; requires occasional readjustment
Best Mounting Plates for Glock 43X MOS
Before installing a red dot sight on your Glock 43x, you need to get a mounting plate. Here are my top picks for the best mounting plates for Glock 43x MOS.
chpws adapter plate
Outerimpact Micro Red Dot Adapter Compatible with Glock Except MOS
DPP Titanium Adapter Plate for Glock 43X/48 MOS
Final Verdict
Alright, folks, we’ve explored the cream of red dot sights for your Glock 43X MOS, from the game-changing Trijicon RMRcc to the budget-friendly SIG Romeo Zero Elite.
The best sight for you depends on your individual needs and preferences. Some of you might prioritize durability, while others may be looking for something budget-friendly.
At the end of the day, it’s all about what best suits your shooting style. So go ahead, make your choice, and may your aim be ever true!
FAQ’s
What is the best dot for the 43X MOS?
The best dot for the 43X MOS is the Trijicon RMRcc, based on my extensive testing.
What red dots mount to Glock MOS?
Red dots like Trijicon RMRcc, Holosun 507K X2, and SIG Romeo Zero Elite can mount to Glock MOS.
How accurate is the Glock 43X MOS?
The Glock 43X MOS is highly accurate, thanks to its improved trigger, ergonomic grip, and longer sight radius.
Is it worth putting a red dot on a Glock?
Yes, adding a red dot can improve accuracy, especially at longer distances.
Is the G43X MOS worth it?
Yes, the G43X MOS is a reliable and affordable carry gun with great features.
What does Glock 43X MOS stand for?
MOS stands for Modular Optics System, a feature designed to accommodate various red dot optics.
What generation is Glock 43x MOS?
The Glock 43X MOS is part of the Gen5 series, featuring the match-grade GLOCK Marksman Barrel.
[activecampaign form=1]The most expensive mushrooms in the world are rare and hard to cultivate. So no, you aren’t getting them at any local grocery stores. They are sensitive and not easy to mass-produce, driving consumer prices up to exorbitant amounts.
You might recognize some of the fungi listed if you’re a mushroom lover. If not, the good news is that they’re highly nutritious, delicious, and a part of haute cuisine. They are also a growing business opportunity for artisanal farmers and entrepreneurs worldwide.
Mushrooms grow wild in habitats across the globe, can be cultivated by individuals, and are produced by enterprising mushroom farmers in urban warehouses, isolated basements, caves, and under trees on a forested acreage. Maybe you’ll get lucky and find some of these under the most expensive bonsai trees in the world! The demand for “designer” mushrooms is, well, mushrooming! And some of them fetch very high prices.
Mushrooms are the “fruit” of fungi that thrive under certain conditions. They are fast-growing and adaptable and have been used by diverse cultures throughout history. Tens of thousands of varieties of fungi have been identified. But a relatively small number of edible mushrooms exist. In some ways, they are a “super” food, and modern science quickly points out their benefits.
Mushrooms are loaded with antioxidants, minerals, and healthy vitamins. Some have significant amounts of potassium, iron, manganese, Vitamin D, B2, and B6. They are also low in calories and fat and high in fiber and protein.
In a sense, mushrooms are the ultimate organic foods, in the scientific definition of “living organisms” interacting in the environment with other organisms. Certain mushrooms play an essential role in the natural world because fungi and bacteria recycle the nutrients of dead or decaying matter. They “feed” on wood, leaves, and occasionally insects, speeding the decomposition process.
It’s a complicated, multi-phase process that requires the interaction of a host of variables. Others enhance plant growth by producing the spores that help perpetuate the fungus that nourishes the soil and promotes plant growth. Light and moisture, temperature, oxygen and nitrogen levels, and other physical conditions must be just right for fungi to do their work.
Fungi exist in diverse forms and can live in water, soil, air, or on plant material. What we call mushrooms are just one step in the fungal lifecycle. Although most people consider mushrooms part of the plant world, scientists believe fungi are closely related to animals. In addition to their vital role in the environment, they “behave” differently based on where they exist.
Health Benefits and Medicinal Qualities
There is validity to the claim that mushrooms have health-giving benefits and medicinal value, including alleviating chronic pain and lowering cholesterol. Researchers continue to explore their uses. Controlled studies confirm that some mushrooms can reduce some symptoms and may impact the treatment and prevention of certain diseases.
Mushroom allergies are relatively rare, but anyone sensitive to mold is advised to approach mushrooms with caution. Symptoms can occur not only from ingestion but also from simple skin contact or by inhaling airborne spores of the fungus. Wild mushrooms have other hazards. Some are highly toxic to humans.
Others contain a substance that produces hallucinogenic or psychotropic effects. Certain strains have been used in religious ceremonies since ancient times. Foraging mushrooms in the wild is not recommended for anyone who is not thoroughly trained.
Mushrooms are adaptable, readily available, and may be prepared in various ways. They add flavor and enhance the taste and appearance of other foods. Some have a pungent odor; others taste nutty, fruity, woody, or spicy. Most can be consumed raw, steamed, sauteed, fried, baked, stuffed, or grilled. Mushrooms are available commercially in many forms — fresh, dried, canned, frozen, and sometimes preserved in oil.
Choosing the Best Mushrooms
Mushrooms are not the “perfect food,” but they are good — and they’re good for you! An appreciation for mushrooms transcends cultures and borders, but not all mushrooms are equally prized across the globe.
The first commercial mushrooms were introduced in Paris restaurants in the mid-1600s, but it was not until later that actual mushroom cultivation began. It took until the early 20th century before Dutch growers developed highly effective cultivation methods. Mushroom popularity grew followed, both in Europe and in the United States.
The classic white button mushroom, still known as the “Champignon,” or forest mushroom, is the favorite for gravy and sauces and stir-fry dishes and casseroles.
Even though they go by different names, the three most common varieties are identical. The only difference between the well-known White Button and Cremini Mushrooms is the age. Think of the little white ones as babies that turn a darker tan or light brown as they age and grow larger. They are sometimes also called Baby Bellas.
When Cremini Mushrooms are fully grown -they can grow to have a cap five inches or more in diameter — they are known as Portabella Mushrooms. These big ones are typically dark brown with a smooth cap and dark gills on the underside. All have a firm texture, and the older Cremini have a hearty, meaty flavor.
Rare and expensive mushrooms are distinctive. There are some unique varieties and some that are widely known.
Are Truffles Different From Mushrooms?
Truffles and mushrooms are both fungi’. The biggest difference is truffles are scarcer when compared to mushrooms. You’ll be able to find mushrooms at your local market, but you’ll have a hard time finding truffles.
Truffles grow in very specific conditions, making them harder to cultivate. Due to their rarity, truffles are much more expensive, which you’ll see after reading through this list.
Here are the world’s 12 most expensive mushrooms
Let’s take a look at the most expensive mushrooms and how they are produced around the world. We’ve included truffles in the list as they are mostly the same, the main differences being the size and where they grow. So whether you’re interested in growing mushrooms for profit or just curious, let’s explore these pricey pieces of fungi.
12. Kalahari Truffles
Grown in the Kalahari Desert in Namibia, and known locally as African potatoes, these are pretty cheap, but they still have some of the mystique of their higher-priced “cousins.”
Price: About $4 for a pound
These truffles are lighter brown and have a milder scent and taste than black or white truffles. In addition, they flourish in the sandy landscape and are quickly discovered just by looking for cracks in the sand. There’s no need for pigs or dogs, just a stick to pry them out of the ground in the vicinity of Camelthorn trees. They can be eaten raw, boiled with spices as a side dish, or used in creative ways to flavor meats and vegetables.
During the season, they are widely available at roadside stands, open markets, and on restaurant menus. Truffle butter is full of distinctive flavor, and one restaurant in the country’s capital city features Kalahari Truffle ice cream!
11. Oyster Mushrooms
Typically large, pale grey or pearl white, Oyster Mushrooms are also called Abalone Mushrooms. They have fluted gills and a firm, relatively short stem on the underside. Also available in blue, pink, elm, and gold, they have an oddly alien look.
Price: Retail prices range from about $5 to $15 a pound
Oyster Mushrooms have been sprouting up at Farmer’s Markets throughout the nation and are used in recipes by innovative chefs, particularly in their exotic colors. They are best used almost immediately after harvesting but will last several days if quickly dried. Easy to cultivate, they are one of the best mushroom varieties for novices, and kits for home sprouting are available in large cities or through mail-order companies.
Oyster Mushrooms have a delicate, if alien appearance, with a meaty texture and exciting flavor. Traditional in Japanese, Chinese, and Korean cooking, they are native to forest habitats in Siberian Asia, Northern Europe, and much of the United States.
10. Shiitake Mushrooms
Considered a specialty variety, these are a staple of Asian cooking, but their popularity has now spread to Western countries. They are tan or brown, with caps that are typically from two to four inches in size.
Price: From $12 to about $24 per pound, depending on location.
There are several different varieties of Shiitake, and each has a slightly different texture and taste. The Shiitake is sometimes considered a medicinal mushroom, and it is used both fresh and dried in traditional Japanese and Chinese cuisine and throughout East Asia. Touted for antimicrobial, anti-inflammatory, and anticarcinogenic properties,
Shiitake Mushrooms have a meaty, chewy texture and a pleasing taste that goes well with other ingredients. It is a staple of traditional Japanese cuisine. It is available fresh or dried in many parts of the world.
9. Lion’s Mane
Although it has a sprawling, undefined shape with no cap and no stem, Lion’s Mane looks like a round balloon with long, shaggy “hair” or spines. It is sometimes known as a pompon or Bearded Tooth Mushroom.
Price: Varies widely, from about $8 to $36 a pound.
One of the most other-worldly edible mushrooms, the Lion’s Mane, Hericium erinaceusm, has characteristic shaggy spines that give it a furry appearance. It’s found in North America, Europe, and Asia from late summer to early fall on dead or dying logs. It also is cultivated fairly quickly in controlled environments. It is white when young but can age to a yellow or tan hue.
Lion’s mane was known for its medicinal qualities before being identified as a fascinating edible mushroom. The antioxidant content is exceptionally high and is currently studied for its possible ability to regenerate nerve tissue. The flavor and texture are compared to crab or lobster.
8. Porcini Mushrooms
The highly prized Boletus Edulis, or “King Bolete,” is found in hardwood forests, typically on the ground among hemlock, spruce chestnut, and pine trees. The Italian word for them translates to “piglets.”
Price: Between $55 and $70 a pound, sliced and dried.
Porcini are not easily cultivated and don’t live everywhere, so they are sometimes difficult to find. Known for their oversized caps, sometimes up to 10 inches in diameter, they also have sturdy, fat stems and look heavy. When mature, they can weigh up to a few pounds.
They also have a distinctive hearty, nutty flavor that can be used in many different dishes. Famously found in Italy, they grow in other parts of Europe, North America, and some other countries.
7. Enoki Mushrooms
With long stems and tiny caps, these little clumps of fungi “fruit” are among the most interesting edible mushrooms. They are fun to use in many dishes and have a mild flavor reminiscent of fresh white grape or mild radish.
Price: $108.00 a pound or 25-pound packages for $388.75 by mail order.
One of the more distinctive varieties, Enoki Mushrooms, calls to mind visions of miniature cauliflower or glossy bean sprouts with little white button ends. They have significant nutritional content, with high percentages of niacin and folate, as well as thiamin, potassium, pantothenic acid, phosphorus, and riboflavin.
Enoki is easy to use in stir-fry dishes and soups; the attached ends should be cut off to separate individual strands. Common in Asian cooking, they typically retain their crunch, even when cooked.
6. Chanterelles
A golden Chanterelle almost looks flower-like when spotted on a mossy forest floor. They grow in clusters during hot, humid days following heavy rainfall. Unlike other mushrooms, they can make people sick if not fully cooked.
Price: About $225 a pound, dried.
Chanterelles are easy to identify, with smooth caps and ridges that run down each stem. They are typically found in central Europe and Ukraine, where beech trees coexist with pines. Chanterelles have a light, fruity scent with an almost spicy flavor. The golden variety is highly sought, but other colors are equally tasty. They range from orange and yellow to white.
They appear in late spring but only develop under sauna-like conditions, so they are available only until early autumn.
5. Morels
These expensive mushrooms are like little trolls standing at attention on a forest floor. With a sturdy stem and a ruffled, conical “head,” they also can look slightly comical, even when cooked and served with other foods.
Price: $254 a pound dried; between $30 and 90 a pound fresh.
Dried Morels fetch more per pound than they command when fresh. The dried ones are much lighter. The ruffled cone-shaped head of the Morel is spongy. The mushroom is found in the wild only from March through May. With a nutty flavor similar to Shiitake Mushrooms, they have a more intense, unique taste. Because they are typically small, they are served as a garnish or with an accompanying sauce.
Fresh Morels are not easily cultivated and are not readily available fresh. They can easily be foraged because of their distinctive appearance, but a better alternative is to buy dried Morels for home use.
4. Black Truffles
Because they are highly prized in Europe and challenging to harvest, a “black market” for truffles continues to exist in some areas. Trained dogs have primarily replaced the female pigs traditionally used to root out truffles. It seems the pigs devoured too many pricey mushrooms when digging them up!
Price: Wholesale prices vary from $800 to $900 a pound.
The French Black Perigord, tuber melanosporum, is still primarily a European product, harvested traditionally with the help of trained animals. However, commercial cultivation has been initiated in Australia and the United States because of high demand and long shipping delays.
Tennessee, Kentucky, California, and Oregon producers have met with some success, but it is a costly business. In 2017, more than 425 tons of fresh, dried, and canned truffles were imported into the United States, an increase of 75% from just seven years earlier, according to USDA statistics.
The primary market is for chefs and restaurants. Still, truffles are occasionally available at local markets in the states where they are harvested, just as they are in Europe during the season. New hot markets include Slovenia and Croatia, where truffles and truffle products are highly popular.
3. Matsutake Mushrooms
The Japanese Matsutake is an easily-recognizable little, pale mushroom with a well-formed cap and short stem. It has distinctive gills on the underside of the cap, and it’s appreciated for its spicy, slightly fruity flavor and aroma.
Price: $1,000 to $2,000 per pound
The Matsutake Mushroom has a spicy, somewhat fruity flavor and aroma. Typically it grows under red pine trees in the Tamba region of Japan, near Kyoto. It has traditionally been associated with the beginning of autumn and is considered a Japanese delicacy. However, its habitat is shrinking because red pine forests have been devastated by insects. Cultivation methods have not proved successful for this mushroom. Currently, it is considered to be an endangered species. Because of its rarity, the price is exceptionally high.
2. European White Truffle
Truffles grow underground, usually near the base of oak trees, and are relatively commonplace throughout Europe. Still, they are challenging to harvest, even with the help of truffle-sniffing female pigs or trained truffle dogs. The animals can detect the pungent odor of the ripe mushroom.
Price: Around $3,600 per pound, depending on the harvest and the market.
Truffles are one of the most treasures and rarest food products on Earth. The white truffle has so far resisted cultivation efforts, which is why the price is consistently high.
Interestingly, though, prices for all truffles are lower than two years ago, partially because other European countries are harvesting them more significantly.
Additionally, more locations have begun cultivating the black truffle, which makes it more readily available to chefs and mushroom lovers around the world.
The Italian white Alba, or tuber magnatum pico, still holds the crown as the most expensive truffle.
1. Yartsa Gunbu
The story behind these mushrooms is not very appetizing, but Tibetan men believe ancient texts identify the fungus as an aphrodisiac. NPR has described it as the viagra of the Himalayas Being able to afford it and to eat it even in minimal amounts, is considered a status symbol.
The Yartsa Mushroom Price is $2000 an ounce!
This parasitic fungus infects the bodies of caterpillars with tiny air-borne spores. Once the fungus is inside the caterpillar, it begins eating it alive from the inside. Gross.
The caterpillar dies in a mummified state, in an upright position, at the earth’s surface. In early spring, the fungus will begin growing up, emerging from the caterpillar carcass, to pop up out of the soil
You can harvest the long, thin-looking mushrooms between 3,000-5,000 meters above sea level in the Himalayas and the Tibetan Plateau.
Would you try these mushrooms? Let us know in the comments down below!
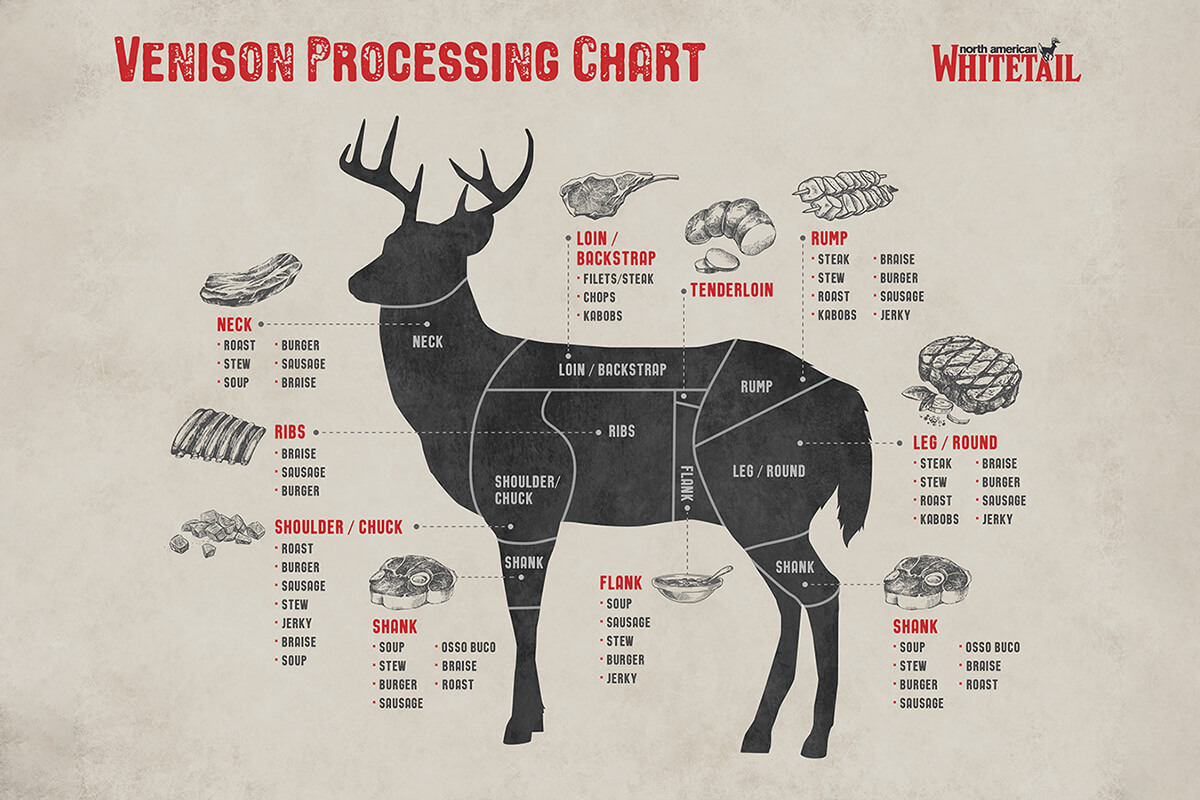
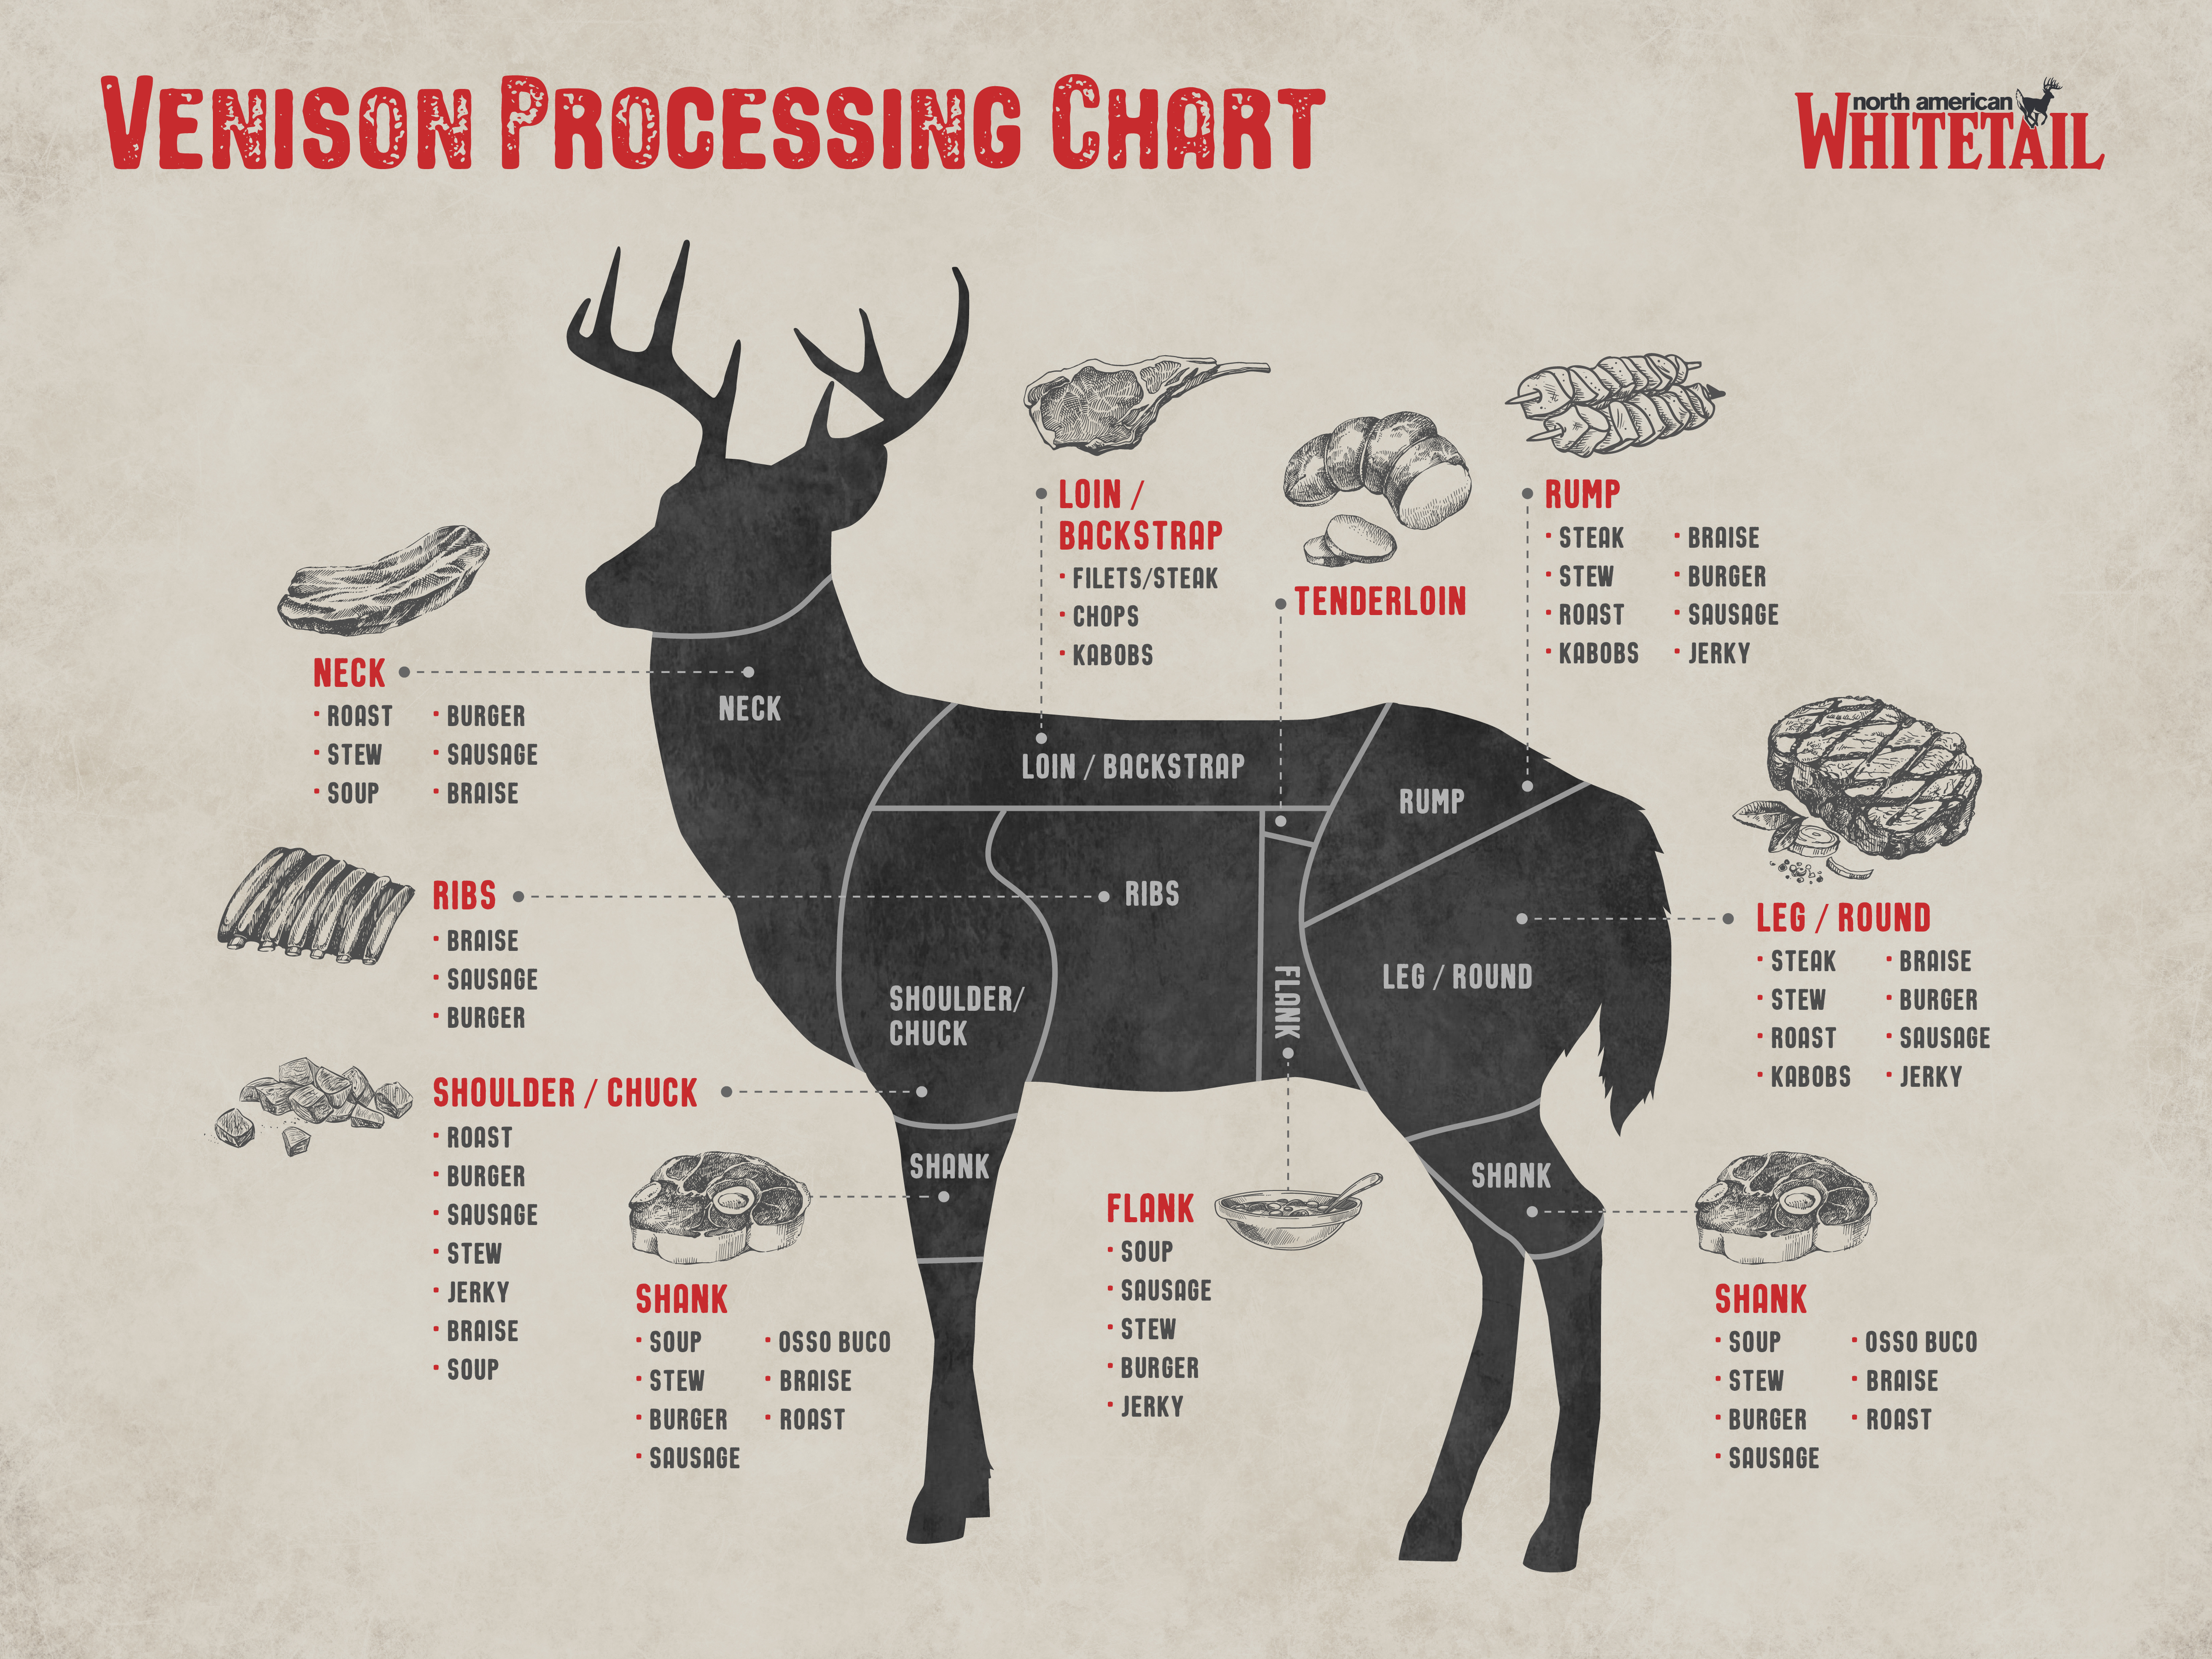
Ohio deer hunting continues to top the list of trophy whitetail destinations due in large part to an excellent deer management program. Ohio’s deer management program is designed to control the state’s deer herd by harvesting does, while maintaining a very conservative buck harvest. Deer hunters are allowed to harvest one antlered deer in Ohio per year. This allows for a balanced population while maintaining the necessary conditions to produce world class deer like the ones below.
Ohio is home to some of the biggest whitetail bucks in the world, including the #2 non-typical of all time.The “Hole in the Horn” buck. This unbelievable buck is not the biggest buck ever killed in Ohio because it was found dead in Portage county in 1940 and scored an incredible 328 2/8 inches! An amazing Ohio record whitetail.
Ohio’s Beatty Buck
Another huge whitetail buck exceeding 300 inches.Yes, I said 300 inches! The Beaty buck is the biggest buck ever killed in Ohio and was harvested in Greene county on November 8th 2000. The Beatty buck was 4 1/2 years old which was confirmed through laboratory testing in which a tooth is cross sectioned and studied under a microscope, similar to aging a tree. 4 1/2 years old! How is that for genetics! Another incredible Ohio record whitetail.
Ohio’s Jerman Buck
On November 10th 2004 in Warren county, a giant typical buck fell to a well placed shot from Brad Jermans crossbow and became the new Ohio record typical with a score of 201 1/8…Unbelievable Ohio record whitetail!
Ohio’s Mike Rex Buck
In 2005, on opening day of archery season, Mike Rex of Athens, Ohio killed this buck that had 17 points, 15 inch brow tines and scored 218 6/8. What a beautiful Animal!
Ohio’s Amish Buck
Another record buck was harvested on opening day of archery season in 2006. The Ohio Amish buck. Jonathon Schmucker of Seaman Ohio, located in Adams, county downed the 36 point buck on the first afternoon of the 2006 season. The buck scored an incredible 291-2/8, making it the number two whitetail in the state and the biggest buck ever killed in Ohio with a crossbow.
The Amish buck was reportedly fed Lucky Buck deer attractant prior to being killed.
This combination of incredible genetics, proper herd management, and an abundance of agriculture and cover makes Ohio one of our top choices for bagging a trophy whitetail!
Top Areas For Ohio Deer Hunting
While trophy bucks can be found in every corner of the Buckeye State, Coshocton, Licking, and Muskingum counties in east-central Ohio top the list of most deer harvested. These counties consistently produce massive bucks and offer some great opportunities for public land deer hunting.
For harvesting trophy bucks, three Ohio public deer hunting areas come to mind in this part of the state, Dillon Wildlife Area, Woodbury Wildlife area, and the Conesville Coal Lands.
We personally hunted the Dillon Wildlife Area during the first week of November in 2007, and we can tell you that, while receiving a fair amount of pressure, if you look closely, you can find unpressured deer. Study the maps and look for places that other deer hunters will overlook. We did exactly that and had a 150 inch 10 pointer at 40 yards chasing a doe recklessly through the woodlot. There was not another hunter around and we were within 100 yards of a main road!
The Woodbury Wildlife Area comprises almost 20,000 acres of prime whitetail habitat in east central Ohio. There is good public access along state routes 16, 36, 60 and 541, as well as numerous county and township roads. Again, the key to finding a trophy buck is to study maps of the area and find small spots that other hunters will overlook. These spots do not have to be miles into the timber. They can be right under everybody’s noses!
The Conesville Coal Lands are another great place to hunt deer in Ohio and it consists of about 12,000 acres of prime whitetail habitat in Coshocton and Muskingum counties. Hunting here requires a free permit available at local bait shops or by contacting American Electric Power at www.aep.com/. Click here for tips on hunting AEP Land.
Perhaps the best way to bag a trophy buck, is to gain access to private land, and the way to do that is to hire an outfitter. There are many to choose from, but we have hunted with Matt Hopkins and Jim Woodward from Wolf Creek Whitetails and we have been very impressed. These guys provide you with quality, unpressured, private land to hunt with treestands already hung and plenty of food plots. You can also bring your best climbing tree stand if you prefer. They have access to some of the best land in Morgan County. Check out their Ohio trail camera pictures!
Another Ohio outfitter that we have heard good things about is Joe Miller from Woodbury Outfitters. They offer unguided and semi guided hunts for antlered deer. Whichever outfitter that you choose to hunt deer in Ohio, be sure to book early in order to get the dates that you want, good rut weeks fill up fast.
In addition to the east central part of the state, southwestern Ohio is rapidly gaining fame as a trophy buck hotspot, thanks in part to the Amish Buck and the Metzner Buck both taken in Adams county.
Ohio’s Metzner Buck
Taken in Adams county in 2006 on land bordering Brush Creek State Forest. Justin Metzner’s buck scores and incredible 196-6/8, making it the second biggest buck ever killed in Ohio by a bowhunter!
Top Ohio Public Deer Hunting Areas In Southwest Part of the State
RELATED: How Many Hunters In The US
Brush Creek State Forest
Brush Creek consists of over 13,000 acres of steep hillsides, deep hollows, and narrow ridge tops. Prime hardwood forests with supplemental feed for the whitetails on the private farms bordering the forest. This is where the Metzner buck was taken in 2006. Look for more huge Ohio bucks from this area in the future!
Tranquility Wildlife Area
Tranquility consists of over 4000 acres, about 400 of which are dedicated to food plots. Approximately half of this area is mature hardwoods and there are plenty of places for big bucks to hide, as evidenced by a 165 inch buck taken during the December muzzleloader season! Don’t overlook this Adams county gem for antlered deer.
Shawnee State Forest
Consisting of over 60,000 acres, Shawnee is the largest state forest in Ohio. Ongoing logging operations make access easier along the many logging roads. This is extremely rugged country…So be prepared. There is a lot of 5 to 6 year old new growth which provides prime habitat for big Ohio bucks to grow old. Look for some monsters to come out of here in the next few years!
If you are looking for access to private land…Our choice for Ohio outfitters in this part of the state is David Lusk at Southern Ohio Outfitters. David has over 6,500 acres of prime whitetail habitat, including food plots, that has been managed to produce some of the biggest bucks Ohio can offer. Again, be sure to book early, good rut weeks go fast!
Here is our summary of why you should try your hand at Ohio deer hunting
Ohio has the right terrain, habitat, crops, food plots and genetics that consistently produce big bucks.
Ohio has a short gun season, held after the rut and only allows shotguns and straight walled cartridge rifles.
Ohio sells Non Resident hunting licenses and deer tags over the counter for only $149.
Ohio has a one-buck per year limit and can be taken with any weapon, any county or in any zone on the same deer permit.
The Ohio deer hunting season runs from September until February, making it a four month season.
Ohio Department of Natural Resources has very consistent regulations with a great website www.dnr.state.oh.us/
Another option for hunting deer in the Buckeye state is to get an Ohio deer hunting lease of your own.
Ohio Deer Hunting Season
Ohio deer hunting season is one of the most liberal in the United States. The archery season season begins on September 27 and goes all the way to February 1st, with Sunday hunting allowed, that means a possible 127 days afield. That is a lot of time in the woods and reason enough to take up bowhunting. Keep in mind that crossbows are allowed in Ohio during archery season.
The deer gun season in Ohio is for shotgun and straight walled cartridge rifles, and is typically held after the rut.
The state also has a youth deer gun season that is held before the regular deer gun season.
There is also a muzzleloader season in January. This can be a great time to hunt big deer in Ohio, as they try to fatten up after the rigors of the rut.
If you are serious about harvesting a mature buck in Ohio, then you must hunt during archery season in order to take advantage of the rut.
Click on the link to visit the Ohio Department of Natural Resources website complete regulations regarding the Ohio season dates.
The best time to harvest a mature buck in Ohio is during archery season and the November rut!
Ohio Trail Camera Pictures
Check out these trail camera pictures submitted by Ohio deer hunting outfitters Wolf Creek Whitetails
Holy Ohio big bucks.com batman!
Click here for more Ohio trail cam pics.
Planning Your Ohio Deer Hunting Trip
It doesn’t matter if you are hunting public land or with one of the top Ohio deer hunting outfitters, you need to be prepared.
So we have put together a checklist of some of the commonly forgotten items that you need for your deer hunting trip.
Hunting License – You’d be surprised how many people forget this!
Boots and Socks – Click here for the best hunting socks you can buy.
Bow or Crossbow – You’d be surprised how many hunters have to turn around after they’ve started their trip because they forgot their weapon. Here is our guide to the best beginner compound bow.
Broadheads – Here is our guide to the best broadheads for deer.
Flashlight or headlight
Rain Gear – Some of the best deer hunting in Ohio that I have had was in the rain. Don’t forget your hunting rain gear and your best tree stand umbrella.
Hand Warmers
Thermos – Very handy for all day hunts.
Knife – Check out our guide to choosing the Best Deer Hunting Knife.
Target – Always good to take some shots when you get to Ohio. Here is a guide to the best archery target for broadheads and field points.
Calls – I like to bring a grunt call, bleat call and a set of rattling antlers.
Tree Stand – Here is our guide to the best tree stand. Even if you are hunting with an outfitter, consider bringing a climbing tree stand. It will give you the ability to move on your own, if you see a pattern to the deer movement.
Safety Harness and Rope or strap – Bring the best hunting safety harness that you can afford.
Binoculars – Here’s our guide to the best hunting binoculars.
Rangefinder – I actually bring two of these. Here is our guide to the best rangefinder for bow hunting.
Cooler – For getting your meat home.
Those are just a few of the more common items that deer hunters forget to bring when they travel to hunt deer in ohio.
Leave your comments below. We would love to hear about your experiences or just leave us an Ohio deer hunting report.
A Self-Professed ‘Fly Snob’ Shares His Guilty Pleasure of Bait Fishing for Colorado’s Largest Sport Fish
A lake trout (Mackinaw) taken on a sucker minnow. Photo by Jerry Neal/CPW.
At 7 a.m. on a sunny May morning, the fun begins: “Clang!” The empty Dr. Pepper can supporting my fluorocarbon line topples and crashes down the rocky bank toward the water. The clatter of the makeshift strike indicator disturbs the tranquil Lake Granby shoreline and rouses me from my early morning stupor.
I jump from my folding chair, spilling my coffee and hurry across the bank to rescue my spinning rod from its metal, v-shaped holder. Line races from the reel’s open bail, and my anticipation soars — the first “run” of the morning is always the most exciting.
With rod in hand, I allow the fish to swim freely a few more seconds. Then, with a subtle “click,” I close the bail, put the reel in gear and stop the fugitive before it strips me of both line and bait. The fish hits the tight line like a dog reaching the end of its leash, bending my rod into a deep arch. The resistance pushes the circle hook through the fish’s jaw, and the battle begins. Three minutes later, I land a fat 5-pound “Mack” — not huge, but a terrific way to kick off this outing.
Karen Krueger proudly displays her first Lake Granby lake trout. Photo by Jerry Neal/CPW.
During the next four hours, pop cans fall like targets in a shooting gallery. My friend Karen Krueger and I land eight fish in the 2- to 7-pound range and miss half as many more. By noon the action is over and we are enjoying a relaxing lunch on the beach. Krueger, who just experienced her first “Mack”-fishing trip, is grinning ear to ear. “That was a blast,” she says with childlike enthusiasm. I nod in agreement, while biting into my turkey sandwich and doing my best to ignore the foul stench of sucker meat on my fingers. We spend the rest of the afternoon basking in the warm sun. And although I’ve experienced days just like this one countless times throughout the years, I’m reminded again of how much I enjoy bait fishing for one of Colorado’s supreme sport fish — lake trout.
The author with his catch. Photo by Karen Krueger.
Okay, I admit it: I enjoy bait fishing for lake trout. As a self-proclaimed “fly snob,” it’s not easy confessing my fondness for bait fishing to my fly-fishing peers, particularly when that style of bait fishing involves soda cans and sucker meat. But a few times every year, I happily leave the fly rod at home and load my bait-fishing tackle into the Jeep — never once feeling an ounce of embarrassment about the cooler of sucker meat that’s sitting on my back seat. (Well…maybe just a little.)
Like most anglers, I began my fishing career drowning worms and salmon eggs for brook trout, rainbows and the occasional suburban-pond sunfish. But nothing captured my youthful imagination like bait fishing for lake trout. The nearly magical combination of catching large — sometimes enormous — fish and the almost methodical setup involved made fishing for “lakers” the ultimate boyhood adventure.
As I grew older, however, my angling interests transformed completely when I received my first fly rod — a transformation that soon became a life-long passion. And for the last 25 years or so, I’ve joined that haughty fraternity of anglers who fish almost exclusively with artificial flies. But as much devotion and love as I have for fly fishing and all its highbrow qualities, I occasionally feel the need to return to my bait-fishing roots.
Angler Katie Knoll caught her first lake trout on sucker meat while fishing at Lake Granby on May 31, 2011. Photo by Jerry Neal/CPW.
In addition to being just plain fun, there’s a nostalgic quality that draws me to this simple, unpretentious style of angling. Bait fishing takes me back to those Huck Finn days of my youth, when I wasn’t concerned about the intricacies of fly casting, tippet weights or “matching the hatch” — only catching fish on minimal tackle and sharing those prized moments with family and friends. Isn’t that really what fishing is all about? As an adult, I find there’s also something intrinsically relaxing about fishing with bait. It’s a chance to give your casting arm a rest while idly enjoying the mountain scenery and a cold drink from the comfort of a lawn chair. I can’t think of a better way to spend a spring or fall day in Colorado.
According to surveys conducted by Colorado Parks and Wildlife (CPW), nearly half of the state’s anglers fish with bait. So, in addition to divulging my “guilty angling pleasure” to the masses, I penned this article to present all those “worm dunkers” out there with a new challenge. And to challenge my fellow lure-and fly-fishing brethren to rediscover how much fun you can have with a spinning rod, bait hooks and dirty hands — and I do mean DIRTY hands.
Sucker meat, the primary bait for lake trout, permeates your skin with a fishy odor that no amount of same-day hand scrubbing removes. My hands, cell phone, fishing gear — even the steering wheel on my Jeep — smells of sucker meat for a couple of days after a successful lake trout fishing trip. Wearing rubber or latex gloves while baiting the hook solves this problem, but the only thing worse than getting caught handling sucker meat by one of your fly-fishing buddies is to be sporting a pair of rubber dishwashing gloves while you’re doing it. Dirty hands are just part of the bait-fishing experience — a rite of passage, so to speak, for every aspiring angler who has enough courage to bait his or her own hook. If nothing else, fishing with sucker meat will get you to stop biting your fingernails faster than any other remedy. And the possibility of catching a heart-stopping lake trout is definitely worth all of the stinky side effects.
There’s likely no other freshwater fish possessing more names than lake trout; the fish has more aliases than Jesse James. In Colorado, anglers often refer to them as lakers, Mackinaw or Macks. In the Great Lakes, Alaska and Canada, where lake trout are native, fishermen call them grey trout, lake char, paperbellies, leans, siscowet and salmon trout. But perhaps the most appropriate and descriptive moniker is found in the fish’s Latin name: Salvenlinus namaycush. Namaycush, a Native American term, is said to mean “tyrant of the lakes” or “dweller of the deep.” Either translation is apropos to anglers, as lake trout are Colorado’s largest predatory sport fish, inhabiting some of the state’s coldest and deepest waters.
Characterizing lake trout as “tyrants” is fitting. They are voracious predators that feed almost exclusively upon other fish. They also get big — really big. Unlike most trout species that rarely surpass the 15-pound mark, lake trout can grow to mammoth proportions. Mackinaw in the 20- to 40-pound range are fairly common in Colorado, with anglers landing monster specimens exceeding the 40-pound mark annually. The state-record lake trout, taken from Blue Mesa Reservoir in 2007, tipped the scale at a whopping 50.35 pounds — now that’s a fish worthy of being called a tyrant! Although most lake trout caught from shore typically range in size from 2 to 20 pounds, the possibility of catching a leviathan is always present. And it’s the excitement and uncertainty of never knowing what’s lurking on the other end of your line that makes lake trout fishing so addictive.
In addition to their tyrannous ways, lake trout are truly deep-water dwellers, spending most of the year at depths of between 60 and 200 feet — that’s uncharted territory for most other freshwater fish. And it’s this preference for deep, cold water that keeps lake trout safe from the lines of most fishermen. Only anglers fishing through winter ice, or those fishing from boats equipped with sonar and downriggers, are able to get lures and jigs deep enough to reach lake trout during the summer and winter.
But during the spring and fall months, the tyrant briefly abandons its deepwater haunts and moves within reach of shore fisherman. In early spring at “ice-off,” lake trout move into the shallows to feed and remain there until water temperatures exceed 50 degrees, usually occurring around the second or third week of June at most high-mountain reservoirs. As summer progresses and water temperatures warm, the fish return to deep water and remain off limits to shore anglers until late October, when they come back to the shallows to spawn. Although the window of opportunity is narrow, early spring and late fall is when bait fisherman should fish hard and fish often.
Gearing Up
One of the best things about bait fishing is that it doesn’t require a lot of expensive or sophisticated equipment, and fishing for lake trout is no exception. Chances are, if you are nothing more than a weekend-warrior angler, you already have the necessary rods and reels in your garage to pull off a successful outing.
For lake trout, I prefer medium- to heavy-weight spinning rods. A fairly stiff, 6- to 7-foot rod is ideal to ensure effective hook-setting and to provide enough backbone to land larger fish. Some Mackinaw fishermen prefer huge saltwater surf rods, which allow them to zing bait long distances off shore. Either setup works fine, but I prefer the fun and finesse of using lighter-weight equipment. Medium-size rods cast well and can handle lake trout of all sizes, and playing fish on lighter rods is immensely more enjoyable.
Match the rod to a medium-capacity, open-faced spinning reel spooled with 6- to 12-pound test line. I prefer “clear” fluorocarbon lines, but standard monofilament or braided line like Spiderwire are fine options. Braided line works best when tipped with a 3- to 4-foot monofilament/fluorocarbon leader above the bait hook. The added leader helps conceal the more visible braided line from wary fish.
Regardless of line selection, drag adjustment is critical. The reel’s drag should be set loose enough to allow large fish to strip line from the reel without snapping it. A properly set drag can mean the difference between landing and losing the fish of a lifetime.
Sucker Soaking 101
Because lake trout are predators with a voracious appetite for other fish, one of the most effective baits is whole, dead suckers or sucker meat. Frozen suckers, sold at most bait dealers and sporting goods stores, are convenient and are generally available in a variety of sizes.
When I can find them, I prefer small, 4- to 6-inch minnows or chubs. My favorite technique is to fish these whole, threading a size 5/0 or 6/0 snelled saltwater circle hook through the minnow’s body from head to tail (see photo slideshow below). Once the hook is threaded, I attach the snell (loop end) of the hook to the main line with a snap swivel. The benefit of fishing with whole minnows is that they cast well and sink to the bottom without adding lead weight to the line. This allows the minnow to move naturally in the current, closely mimicking a dead baitfish.
The key to fishing with whole minnows is to keep the bail open on the reel after casting. Most often, lake trout will grab the dead minnow and continue swimming without stopping. Fishing with an open bail allows fish to continue moving without resistance from the rod, line or reel. Here’s how to set this up: Cast the minnow and allow it to sink to the bottom. Once it settles, reel in some of the excess line and remove most of the slack. Then, reopen the bail so the line peels freely from the spool.
Soda Can Strike Indicator
An empty soda can makes an ideal strike indicator when fishing with an open bail. Place a small stone on top of the can to prevent false alarms on windy days.
To detect strikes with an open bail, run the loose line around the lip of an empty soda can. The can serves as a strike indicator and topples when a lake trout takes the bait and swims away. To prevent false alarms on a windy day, set a small stone on top of the can to add a small amount of weight. Once a fish grabs the bait, I usually allow it to run for approximately 20 seconds before closing the bail and “setting” the hook. This allows enough time for the lake trout to take hold of the minnow, increasing successful hook-ups, but does not give the fish enough time to completely swallow the bait. On rare occasions, fish may drop the bait before the time has elapsed. If this happens, reel in the line, check the bait and recast. As they say, you win some and lose some.
‘Cutbait’ Night Crawler Rig
A standard bait-rig consisting of a sliding sinker, snap swivel and snelled circle-hook is effective when fishing with pieces of sucker meat.
If sucker minnows are not available, the second-best option is to fish with meat or “cutbait” from larger suckers. When using cutbait, I prefer a traditional night crawler bait rig, equipped with a sliding sinker, snap swivel and larger-size snelled circle hook. It’s important to cut sucker meat into bite-size strips or chunks. Baiting the hook too heavily or with excessively large pieces of meat may obscure the hook point and prevent a clean hook-set. With cutbait, keep the reel’s bail closed and set the hook when a strike is first detected. To spice things up a bit, try adding a night crawler and a salmon egg to sucker meat. I dub this smelly combination “triple delight.” It works great when cutbait by itself isn’t enough to tempt finicky “lakers.”There are some caveats when fishing with sucker meat: Make sure to store suckers in a cooler of ice until you are ready to use them. Once sucker meat gets warm, it turns mushy and falls apart, which makes it nearly impossible to keep on a hook when casting. If frozen, make sure the meat has thawed completely before use. Thawed meat produces a stronger scent, making it more likely to attract fish and it also sinks to the bottom more effectively than bait that’s still partially frozen.
Final Tips
Similar to most other angling or hunting pursuits, lake trout fishing is an early morning endeavor. In both the spring and fall, lake trout are most active in the early morning from sunrise until 12 p.m. Fish continue feeding throughout the day, but generally, fishing past noon is spotty at best.
Before heading to your favorite fishing destination, pay a visit to the area’s sporting goods store. Local shops are a great place to purchase bait and other last-minute supplies. Most importantly, shop owners can provide information to help make your fishing trip more successful. When fishing from shore, it’s helpful to know which areas of a reservoir are most productive. This is particularly important when fishing exceptionally large waters like Granby or Blue Mesa. Shop owners know all the particulars of local waters and are usually more than happy to share “inside” information with their customers.
Even if bait fishing is just not your thing, or it’s been years since you’ve “drowned a worm,” I encourage you to give lake-trout fishing a try. You’ll never have more fun watching a soda can topple and line race from your fishing reel. And who knows? You just might end up catching the fish of a lifetime. Or better yet, you may rediscover those simple, childhood- angling pleasures that got you “hooked” on fishing in the first place.
NOTE: Colorado fishing regulations prohibit the use of live fish as bait east of the Continental Divide above 7,000 feet, and west of the Continental Divide, excluding Navajo Reservoir. Therefore, anglers fishing for lake trout must use previously frozen or packaged baits to ensure compliance with regulations. Colorado Parks and Wildlife encourages anglers to keep smaller-sized lake trout. Check the fishing regulations for bag and possession limits.
Mark Farmer, 36, of Lakewood, caught this trophy lake trout while fishing at Lake Granby on May 14, 2011. The monster fish measured 39 1/4 inches in length. Fishery biologists estimate the fish weighed nearly 30 pounds and was approximately 20 years old. The trophy-sized “Mack” was safely released back to the reservoir. Farmer plans on getting a synthetic mount based on photos and the fish’s measurements. Photo by Jerry Neal/CPW.
First introduced by Marlin Firearms in 1948, the Marlin 336 is one of the most popular centerfire lever rifles still in production. If you asked ten different deer hunters to name their idea of the most iconic deer rifle, I’m betting that more than half would say a lever action 30-30 Marlin 336. The first deer rifle I ever fired and carried into the woods as a teenager was a Marlin 336 chambered in 30-30.
Having grown up in North Carolina, the lever action 30-30 was the most popular deer rifle during my youth and the gun of choice for deer hunting in heavy cover where the average shot on a deer was 100 yards or less.
The shorter barrel (compared to most bolt rifles of that era) made it easy to handle in cover, the lever action was more than fast enough for rapid follow-up shots, and the 30-30 caliber was more than sufficient for ethically taking deer at 100 yards or less. While more popular as a deer cartridge, the 30-30 is also used for hunting Black Bears as well.
Even today, the Marlin 336 is still a popular option for deer hunting with new and experienced hunters alike. The timeless lever-action design still appeals to hunters and shooters as a lever action rifle was the traditional weapon of the cowboys and frontiersmen of the past. Even today, one of the questions I’m routinely asked at my day job is: what’s the best scope for 30-30 Marlin 336 lever action rifle?
Each scope that I’ve suggested as a possible option for a 30 30 lever action rifle has both pros and cons. Let’s get into why I think each of the rifle scope models below is a good option for a Marlin 336 30-30, and then I’ll go over what to look for in a Marlin 30-30 scope in a buyer’s guide down below.
Vortex Crossfire II 2-7×32
When discussing Marlin 336 scope options, the smaller and lower-powered scope models should always be part of the conversation.
Built on a 1-inch tube, the Vortex 2-7×32 offers a compact and lightweight scope option for the Marlin 336. Given that most shots with a 336 take place under 100 yards, it’s not necessary to outfit one with a higher magnification scope.
The 2-7 power range offers more than enough magnification for shots out to 75 yards or longer. The 32mm objective is small enough so the scope can be mounted closer to the bore, yet offers enough light transmission for a bright, clear picture.
With an overall length of 10.71 inches and a weight of 14.3 ounces, this Crossfire II scope is small and light enough not to slow down or interfere with the maneuverability of the lever-action 336 in dense brush.
This scope is available with either a Vortex V-Plex reticle or the Dead-Hold BDC reticle. I’m a fan of the Dead-hold BDC reticle as it offers a serious amount of versatility.
ProsCons Outstanding 3.9 inches of eye relief
A very wide field of view of 42-12.6/100 yards
The Dead-Hold BDC can be used to extend the range of the rifle
Great Warranty
Built like a tank, but it also means that this scope weighs more than most models with the same dimensions.
A fixed 100-yard parallax (Not a deal-breaker, but I prefer an adjustable parallax if possible)
Here are the best prices and deals I could find for the Crossfire II 2-7×32 models:
Simmons 8 Point 3-9×40
When you start shopping for a Marlin 30 30 scope, you’re most likely going to see a number of suggestions for scopes in the 3-9 power range. This is due to the overall popularity of that specific scope magnification range.
If you want a decent 3-9 optics for your 3030, then the Simmons 8 Point 3-9×40 might be worth checking out. It’s a no-frills 3-9 scope that offers better than average optical quality and features at a price that won’t break your budget.
This scope offers an optical quality that exceeds the price, coupled with 3.75 inches of eye relief, and Simmons patented TrueZero windage and elevation system.
The 8 Point scope offers a good value at a good price.
ProsCons The price point is a big plus
Surprisingly, decent glass for the $
Very lightweight for a 3-9 scope
Compact 40mm objective lens
A non-adjustable 100-yard parallax
The power adjustment ring can be hard to turn at first, but it loosens up with use
Here are some of the best deals I could find on the Simmons 8 Point 3-9×40 scope:
Burris Fullfield E1 3-9×50
The Burris Fullfield E1 series of scopes is the workhorse scope series within the Burris scope line. The E1 offers good quality optics and features at a very reasonable price. Is it the cheapest 3-9 scope model in this list? No, but it’s a quality scope that will last a lifetime with proper care.
This scope comes with the Burris E1 reticle that functions as a standard duplex when needed but also features BDC functionality for bullet drop compensation. I like this reticle option as it’s very flexible.
This scope model features better than average glass that is crisp and clear, even in low light conditions. As an added bonus, it’s covered by the Burris Forever warranty program.
Even though the 30-30 is a light recoiling rifle, this scope has a history of durability and will hold up to a lifetime of recoil on a lever-action 30-30.
ProsCons Excellent low light optics for this price range
The E1 reticle can also extend your shooting distances if you learn the reticle
Great Warranty
Like many 3-9 scopes in this price range, it has a fixed 100-yard parallax setting. (Not a deal-breaker though)
While the eye relief is listed at 3.1 to 3.4 inches and seems fine to me, some people have complained about the eye relief being “too short.”
Here are the best deals I could find on the Burris E1 Fullfield 3-9×50:
Leupold FX-3 6×42
A fixed power scope has always been a good choice for a Marlin 336 lever gun as they are simple to operate, very light, and very compact. The first Marlin 30-30 rifle I ever shot was equipped with a 4X fixed power scope, and it was a highly effective combination.
The Leupold FX-3 6×42 is a fixed 6X power scope that is built on a 1-inch tube. This scope model offers outstanding optical quality, but it comes at a higher price point than most of the other scopes on this list. This model also offers excellent low-light visibility via Leupold’s patented Twilight Management system.
The FX-6 comes with a standard parallax setting of 50 yards, but Leupold can also adjust the parallax point to another distance if you prefer. The FX-3 weighs 13.6 ounces so it’s a lightweight option for most any lever action 30-30.
ProsCons Excellent optical quality glass
Excellent low light scope option
Comes with a fabulous warranty
Pricey but worth the cost if you prefer a fixed power scope
Not a heavy scope but not the lightest fixed power scope on the market
Here are the best prices I could find on the Leupold VX-3 6×42:
Vortex Crossfire II 3-12×56
While some people may look at the 3-12 power range on this Vortex scope as being too much, I’m a huge fan of this power range for a lever rifle. This power range offers more magnification range than a standard 3-9 scope, without having to move up to a higher-powered and heavier 4-12 or 4-16 scope.
Now, this scope does have a 56mm adjustable objective which is on the larger side as most of the other scopes on this list feature either a 40mm objective or a 42mm objective. The 56mm objective means that you’ll need either a set of higher rings or maybe see-thru rings. Another potential downside is the larger objective also adds overall weight to the scope.
However, the larger objective also pulls in quite a bit of light during low light conditions, and this scope features an illuminated reticle. These two features make this scope a good option for hunting in areas with a heavy leaf canopy or where a specific low light scope is needed.
Vortex advertises this scope as a “hog hunter” model but I’ve had customers at my day job who love this specific scope on a lever-action rifle. This model is built on a 30mm tube and features an adjustable parallax that will focus all the way down to 10 yards.
If you’re looking for an illuminated scope for a 30-30, then this scope might be worth checking out.
ProsCons The 3-12 power range can be a big plus if a 3-9 is on the smaller side for you
Illuminated reticle
Adjustable parallax that focuses down to 10 yards
The larger 56mm objective lens will require scope rings that are higher than usual or see-thru rings (which I like as well)
All the extra features come at a price, and it’s the weight. This scope weighs nearly 22 ounces, which is much more substantial than most of the other scopes on this list.
Here are the best prices I could find on the Vortex Optics 3-12X56 IR:
Leupold VX-Freedom 4-12×40
As you shop for the best scope for a Marlin 30 30, you are bound to come across some recommendations for the Leupold brand of scopes, and I would agree with those suggestions.
The Leupold VX Freedom scope series is designed as a more budget-friendly mid-range scope within the Leupold line that offered very good optics at a reasonable price. While the VX-Freedom scopes are not the least expensive scope series on this list, they do offer a very good value for the cost.
Built on a 1-inch tube, the Freedom 4-12×40 model offers enough magnification to handle a shot from almost any distance. As with most all Leupold scopes, this 4-12 Freedom scope performs very well during low light situations and offers excellent light transmission.
The 4-12 model is compact enough to fit nicely on a lever-action brush gun yet offers enough scope for most any hunting scenario.
ProsCons Impressive low light performance
At 11 ounces, it’s very light for a 4-12 scope
Backed by Leupold’s outstanding warranty
Comes with a fixed 100-yard parallax
Only available with the Tri-MOA reticle (which I like but some don’t)
Here are the best deals I could locate for the Leupold VX-Freedom 4-12×40:
Vortex Diamondback 3.5-10×50
The Vortex Diamondback scope models are a step up above the Vortex Crossfire II scope that I mentioned previously. The entire Diamondback line is really geared for hunting and is built like a tank to stand up to a lifetime of recoil.
The 3.5×10 configuration may be the ideal power magnification for most hunting situations as the 3.5 power is low enough for short-range shots and the 10X power offers enough magnification to push a 30-30 or .35 Remington round out past 100 yards if needed.
The optical quality on the Diamondback series is slightly better than the Crossfire II scopes and offers a crisp, clear image.
This model is built on a 1-inch tube and comes in weighing 16.2 ounces.
ProsCons Excellent magnification range for any lever action rifle
Offers a good weight to the magnification ratio
Offered with two very effective reticle options
Fixed 100-yard parallax
The eye relief is 3.3” inches, which is a bit on the shorter side. It’s fine for a 30-30, but I wouldn’t suggest it for a heavier recoiling caliber
Here are the best deals I could locate for the Vortex Diamondback 3.5-10×50 scope:
Leupold VX-3i 3.5-10×40
The 3.5-10 power range has been one of Leupold’s most popular power ranges for several years. The VX-3i series is a step above the VX-Freedom series in terms of glass quality, and that is reflected in the price.
This scope is built on a 1-inch tube, weighs in at 12.6 ounces, and the 40mm objective pulls in plenty of light.
Like most of the Leupold scope models, the VX-3i series also uses Leupold’s Twilight Management system for premium low-light performance.
While this scope model usually costs more than the Leupold VX-Freedom series I mentioned above, it’s still not a terribly expensive Marlin 30 30 scope option.
ProsCons Clear optics with excellent low light performance
Covered by Leupold’s second to none warranty program
Manufactured in America
One of the more expensive options on this list
Comes with a fixed 100-yard parallax setting (This isn’t a deal-breaker, but I prefer an adjustable parallax if possible)
Here are the best scope offers I found for the Leupold VX-3i 3-10×40 scope:
Simmons AETEC 2.8-10×44 Illuminated
If you’re in the market for a budget-friendly scope with an illuminated reticle, then this Aetec 2.8-10×44 with an illuminated reticle might be worth checking out.
While this scope model is equipped with a power range that is a bit out of the ordinary, the 2.8-10 range is an excellent all-around range for a 3030 lever rifle. The 10X magnification offers more than enough power for longer shots, and the 2.8 magnification works well for close-in shots in thick cover.
Built on a 1-inch tube, this Simmons Aetec scope weighs in at a hefty 16 ounces and is 13.4 inches long. While this scope seems to perform well in low light dawn and dusk situations, the low performance is not as good as the Leupold scopes I highlighted above. However, that’s to be expected as this Aetec scope costs less than half as much as a Leupold.
ProsCons Optical quality is average, which is about what you would expect for the cost
The illuminated reticle is a deal at this price point
Much heavier than expected for a 1-inch tube in this power range
The illuminated reticle does not have an auto-shutoff feature
The eye relief is advertised as 3.5″, which is right on the edge of being a bit short.
If you are shopping for a Simmons Aetec 2.8-10×44, here are the best prices I was able to locate:
Like this Venison Processing Chart? Download a large, printable version (for personal use) here: JPG version | PDF version (North American Whitetail / Outdoor Sportsman Group Illustration)
Print Recipe
There’s more to venison than just backstrap, tenderloin and hamburger. Venison is versatile, but it would be a mistake to expect the same results from every part of a deer. Each cut is special in its own right. The cooking suggestions below will help you get the most out of your deer.
Venison neck is laced with silver skin and oftentimes fat. It’s one of my favorite cuts for slow cooking. All that collagen breaks down with slow, low heat, and takes on an amazing texture that rivals that of pork shoulder.
However, because of its odd shape, I like to use the neck for dishes that call for shredded meat, dishes such as tamales, tacos, burritos, enchiladas, stew, soup and sandwiches. Or try the pulled meat on top of pizza, in pasta sauces or in hand pies. You can also cut off the entire neck, bone-in, and braise it to make pot roast over mashed potatoes.
The most ideal cut of meat for slow cooking requires connective tissue – venison neck provides that.
Recipes for Venison Neck:
Cajun Smoked Venison Neck
Japanese-Style Venison and Pork Belly
Japanese-Style Venison and Pork Belly (Jenny Nguyen-Wheatley photo)
Venison Ribs
Depending on the size of the deer, you may not get more than a few scraps of meat here. We cut off strips between the rib bones and save it for grinding or filler meat for stew and chili.
If you shoot a larger deer, the ribs could be worth sawing off and braising. Do not cook venison ribs like you would pork or beef ribs; they will dry out quickly. Slow cook the ribs first until tender – covered and fully submerged in liquid – and then finish on the smoker or grill for color and flavor.
During the winter, our Nebraska deer can get quite fat. This fat may or may not taste good, and will determine whether you choose to keep the rib meat. If it tastes okay, a little fat is fine, but when there’s a lot of it, keep in mind that deer fat can have a waxy texture that is not so pleasant on the tongue.
Recipes for Venison Ribs:
Amazing Venison Ribs
Wild Game Stock (or Broth)
Venison Shoulder/Chuck
The shoulder is full of great meat for stew, soup, braising and grinding for burgers, chili and sausage. Aside from the “mock” tenders, most of the muscles on this part of a typical white-tailed deer are too small for decent steaks.
Leave the silver skin on for slow cooking – it will turn into gelatin and provide a juicy texture to the meat. If grinding, try to remove as much silver skin as possible. Too much silver skin in a grind will prevent proper binding in your burgers.
Larger muscles can also be shaved thinly for stir fry, fajitas and cheesesteak sandwiches. Also, you can slice the meat thinly to make jerky. Remember to remove as much silver skin as possible for these treatments.
Recipes for Venison Shoulder/Chuck:
Venison Stew
Venison Pot Pie
Ultimate Square Venison Burger
Ultimate Square Venison Burger (Photo courtesy of GameandFishMag.com)
Venison Loin/Backstrap
The coveted venison backstrap needs no introduction. The only rule for this cut is to not overcook it. Medium-rare is best: between 130- and 135-degrees Fahrenheit.
To cook the loin for stunning medallions, remove as much silver skin as possible. Tuck in the tapered ends – if any – and tie the entire piece with kitchen twine, which helps the loin cook evenly and keep its round shape. Allow the meat to rest before slicing to allow the juices to redistribute.
For a more impressive presentation, keep the meat attached to the ribs and saw off for racks of venison chops. For a simpler preparation, butterflied steaks are my go-to. The backstrap can also be sliced, seasoned and marinated to make the most tender kebabs on the grill.
I also enjoy making venison steak tartare with the loin, which is a raw dish.
Recipes for Venison Loin/Backstrap:
Roasted Venison Loin with Scotch Whisky Sauce
Bourbon BBQ Venison Backstrap
Venison Steak Diane
Bourbon BBQ Venison Backstrap (Photo courtesy of North American Whitetail Magazine)
Venison Tenderloin
The tenderloin is the first cut that is usually taken off a deer. This cut is so tender that it should be treated simply – salt and pepper is all it needs, with a quick hot sear with butter on the grill or in a pan.
Do not keep the tenderloins on the deer while hanging and aging. They will dry out quickly.
Recipes for Venison Tenderloin:
Smoked Venison Tenderloin
Venison Tenderloin Oscar
Venison Tenderloin Mini Wellingtons
Smoked Venison Tenderloin (Allie Doran photo)
Venison Rump
The rump offers a small piece of muscle, best for pot roast and stew meat. It can also be ground for burger, chili and sausage. The size and quality of the cut will also depend on how careful you were when cutting the hindquarters from the deer.
Recipes for Venison Rump:
Venison Fennelise Italian Sausage
Easy Venison Taco Dip
Grilled Venison Quesadilla Burger with Guacamole
Grilled Venison Quesadilla Burger with Guacamole (Jessyca Sortillon photo)
Venison Hindquarter/Round
The hindquarter is my favorite part of the deer. It’s large and variable, with cuts that are suitable for steak, jerky, braising, stew, kebabs and grinding. The major muscles in the hindquarter are the top round, bottom round, eye of round and sirloin.
The top and bottom rounds are large pieces of whole muscle, great for steaks in young deer or aged deer. The bottom round is usually more tender, especially in the tri-tip area toward the bottom of the muscle. If you find these cuts a bit tough, marinate them first. The rounds also make delicious kebabs and stir fry when sliced thinly. When I’m out of loin, I use the rounds to make steak tartare.
The eye of round looks a lot like a piece of tenderloin. On young deer, this can be a very tender cut. For older deer, marinate it or use it for jerky or for stir fry and fajitas.
The sirloin is a large knuckle of muscles, with a little bit of silver skin throughout. On young deer or aged deer, the sirloin may be sliced for steaks – eat around the silver skin. For not-so-tender deer, this cut is suitable for braising whole, making jerky, as stew meat or ground meat.
Recipes for Venison Hindquarter/Round:
Southern-Style Honey Barbecue Venison Jerky
Pineapple and Jalapeño Venison Jerky
Venison Kabobs
Grilled Korean Bulgogi Venison Kebabs
Grilled Korean Bulgogi Venison Kebabs (Jenny Nguyen-Wheatley photo)
Shanks
These long bones look like clubs of meat and are full of silver skin and ligaments near the joints. They’re a massive pain to debone and clean – the muscles are tiny, cradled by an extensive network of connective tissue.
While shanks are not suitable in some treatments, they are absolutely amazing in the slow cooker. Remember the collagen discussed in the neck section? The shanks have even more of it, and when braised, they turn into gelatin, making it the most unctuous cut of meat that exists on a deer. This is where venison osso buco comes from. Savor all four of them.
Recipes for Venison Shanks:
Venison Osso Buco
Braised Venison Shanks
Venison Osso Buco (Jenny Nguyen-Wheatley photo)
Flank
The flanks are thin pieces of meat that stretch between the ribs and hindquarters on both sides of a deer. You can add them to the grind pile or slice for jerky.
The Air Arms TX200 MKIII stands as a testament to precision engineering in the world of spring-piston air rifles. Since its introduction in the mid-1980s, this British-made masterpiece has earned its reputation as “The Spring-piston rifle to which all are compared.” This comprehensive review explores why the TX200 continues to dominate the field target competition scene and remains a coveted choice for serious airgunners worldwide.
The TX200 MKIII embodies a philosophy of achieving quality through simplicity. Rather than pursuing complexity, Air Arms has refined the traditional spring-piston design to near perfection. The underlever cocking mechanism, requiring approximately 27-34 pounds of force, operates with remarkable smoothness and incorporates an essential anti-bear trap safety device introduced in the MKII iteration.
The heart of the rifle features a precision-machined compression chamber housing a high-grade spring steel powerplant. This system is optimized for consistency rather than maximum velocity, delivering an ideal balance of power and accuracy that serious shooters demand.
Premium Materials and Finish
The rifle’s exterior showcases Air Arms’ commitment to quality. The metal surfaces feature what many consider the finest bluing in the airgun industry, with a glossy black finish that literally reflects the company’s attention to detail. Available in both walnut and beech stocks, each version offers distinct advantages:
Walnut: Lighter weight, superior aesthetics, traditional appeal
Beech: Greater durability, increased stability, more affordable option
Both stock variants feature exquisitely carved fish scale checkering patterns on the forearm and grip, providing both functional grip enhancement and aesthetic beauty. The stock design includes a tall Monte Carlo cheek piece optimized for scope use and a flat spot on the forearm that proves invaluable for off-hand shooting.
Perhaps the TX200’s most celebrated feature is its trigger mechanism, a refined version of the famous Rekord design. Air Arms has enhanced the original concept with several notable improvements:
Riveted steel construction replacing bent sheet metal
Addition of bearing-supported pivot points
Adjustable first-stage pre-travel
Exceptionally consistent pull weight (varying only ±4 oz)
Out of the box, the trigger typically breaks at around 1.65 pounds, with a clear distinction between stages and a glass-like break. While adjustable, most users find the factory setting nearly perfect for both competition and field use.
Competition and Field Use
Field Target Optimization
The TX200’s design clearly reflects its competition heritage:
Weight distribution aids stability in various shooting positions
Stock geometry accommodates both seated and standing shots
Precision trigger control enables fine shot placement
Consistent point of impact across temperature ranges
At approximately 11 pounds with scope mounted, the rifle is decidedly heavy. However, this mass contributes to stability and helps manage recoil, making it easier to maintain accuracy during extended shooting sessions.
Maintenance
Maintenance requirements are minimal but important:
Periodic stock screw checking, particularly the rear trigger guard screw
Annual spring lubrication with appropriate products
Basic cleaning after extensive use
Regular scope mount verification
Noise and Neighbor Considerations
The MKIII’s barrel shroud effectively manages sound levels, producing approximately 71 dB at the muzzle. This places it firmly in the “backyard friendly” category, though shooters should note that the powerplant’s operation will be more noticeable to the shooter than to others downrange.
Areas for Improvement
Despite its excellence, the TX200 MKIII has a few minor issues:
Difficult underlever release mechanism
Tendency for the rear stock screw to loosen
Fragile rubber bumper on the barrel (easily resolved with O-ring mod)
Weight may be excessive for extended field carry
Target Market and Value Proposition
The TX200 MKIII clearly targets serious airgunners:
Competition shooters
Precision hunting enthusiasts
Collectors valuing quality
Dedicated target shooters
While the price point exceeds many spring-piston rifles, the combination of accuracy, quality, and longevity provides excellent value for the dedicated shooter.
Features
Spring-piston
Underlever
Single-shot
Sliding breech cover exposes loading port during cocking cycle
2-stage adjustable match trigger
Lothar Walther barrel
11mm optics dovetail grooves
No open sights
Beech Monte Carlo stock
Raised right-hand cheekpiece
Checkered forearm and pistol grip
Ventilated rubber recoil pad
Shrouded barrel
Recommended uses:
Target shooting/Plinking
Pest Control/ Small game hunting: Armadillos, Chipmunks, Grey Foxs, Possums, Porcupines, Prairie Dogs, Crows, Pigeons, Raccoons, Rabbits, Rats, Skunks, Squirrels, and Turkeys.
Pros and Cons
Pros
Cons
Underlever design and fixed barrel for accuracy and consistency
For shooters seeking the finest in spring-piston powerplant, who value precision engineering and are willing to invest in quality, the TX200 MKIII offers an unmatched shooting experience. Its continued success in field target competition and enduring popularity among serious airgunners testify to its exceptional design and execution. The TX200 MKIII isn’t just an air rifle; it’s a precision instrument that rewards proper technique with outstanding performance.
Beretta M9A1 vs Beretta 92A1: Is One Better? Is There Even A Difference?
If you’re looking for a big double-stack but won’t have a darn thing to do with tactical Tupperware, two guns you might wind up considering are the Beretta 92A1 vs. M9A1. You might further ponder just what the heck the difference actually is…and if it’s worth paying for.
There are some differences, but they’re subtle; there’s nothing overwhelmingly different about one compared to the other. However, the differences that are there might add up for some people.
Beretta 92A1 Is Actually A Detuned 96
What you don’t know from looking at the two pistols is that the Beretta 92A1 is not an upgraded trim level of the Beretta 92FS, Beretta’s classic Wonder Nine. It’s actually a toned-down Beretta 96.
The Beretta 96 is a Beretta 92 that’s been overbuilt a bit in order to accommodate the .40 S&W round instead of 9mm Parabellum, the typical chambering. If you were to look at the internals of the slide, you’d see a buffer in the frame (it’ll run +P without issue) and a thicker nose in the 92A1 compared to the 92FS or the M9 family. Essentially, a Beretta 96A1 converted to 9mm.
Another difference from the standard 92FS is the 92A1 is railed, with a Picatinny rail machined into the dust cover. It has a fully rounded trigger guard in lieu of the classic Beretta trigger guard shape and comes with white 3-dot sights as standard, though you can swap them for night sights or fiber optics as both front and rear sights are dovetailed. The recoil spring, for those who get hung up on this aspect, is fully captured.
As for the measurements, you get 4.9 inches of falling-block barrel. The gun stands 5.4 inches tall, 8.5 inches long and 1.5 inches wide, weighing 33.3 ounces unloaded…but then again you knew this thing was a brick. One of the party pieces is that it accepts 17-round magazines, two more than the standard 92.
So…it’s big, it’s bulky, but it capacity is substantial, the gun is if anything overbuilt. This is a gun you can count on to save your bacon, anywhere and everywhere, all day every day, with a bit of care. MSRP is $775, which isn’t terrible considering this gun will probably last the rest of your life.
Beretta M9A1: Marine Corps Cooked Up A Classic
The Beretta M9A1 is an upgraded Beretta M9. The upgrade came about after the US Marine Corps found a number of shortcomings with the standard issue M9 and told Beretta what they’d like changed.
First was adding a mil-standard Picatinny rail, with a longitudinal channel cut through the middle of the rail. The magazine well is beveled, for more reliable reloads. The frontstrap and backstrap of the grips are checkered, for a better grip, and a thinner trigger guard for easier one-handed operation.
Sights are three dot, and the controls are ambidextrous decocking safety levers. The standard magazines are coated with physical vapor deposits (PVD) for more reliable operation in desert environments, though the M9A1 ships with 15-round boxes rather than 17. The M9A3, however, does come with the 17-round magazines. The recoil spring is not, however, fully captured.
The tale of the tape? The only differences are the M9A1 weighs 33.9 ounces, and lists for $750 MSRP. Otherwise, everything else is the same.
Beretta 92A1 vs M9A1: Do The Differences Matter That Much?
There are only a few differences between the Beretta 92A1 vs M9A1. First, the 92A1 is built a little thicker in places. The 92A1 has a rounded trigger guard, almost reminiscent of the 1911. The M9A1 has the classic Beretta trigger guard, albeit a touch thinner.
The rail on the 92A1 is different, in that it doesn’t have the longitudinal channel through the middle of the rail. The 92A1 lacks the beveled magazine well and ships with 17-round magazines. The M9A1, however, has more aggressive grip texturing. You can upgrade front and rear sights on the 92A1, but only the rear sights on the M9A1 without needing a machine shop.
Thing about the 92 platform is that it isn’t the best carry gun compared to most other popular pistols for that purpose like, say, a Glock 19 or M&P Shield. You can, of course, and some do…but most people wouldn’t. Really, a person gets a 92-platform pistol as a home defense gun, truck gun or something like that. Either gun will excel. They are accurate, they are reliable and plenty of people have and currently do bet their lives on them.
That said, the 92A1 has a bit more in terms of features. If you’re the sort that upgrades sights as a matter of course…it’s the gun for you, but carry holsters will be a little rarer because of the rounded trigger guard. Either way…you get an absolute hoss of a gun.
Have you shot these firearms? What did you like, and what didn’t you?Let us know in the comments below!
An air rifle's effective shooting range depends on various factors, including the type of rifle, the caliber, and the power source. Generally speaking, most...
")
")
")
")
")